Transcripts
1. Hello & Welcome Back: The desert offered invokes
images of a vast expanse, a timeless piece of beauty,
wander and longing. That desert is such an
environment that is often overlooked and it's true
beauty is not realized. If you are looking to witness
the beauty of desert, you must definitely
wants experienced the colorful sunsets and the
Magical nights and deserts. Hey guys, I'm Neil, I'm Ryan artist and an art educator based
out of Bangalore, India. In case you're joining me for the first time and don't
know much about me. I go by the name at the rate, Neil's artsy underscore
Cove on Instagram, where you could discover my
passion to paint nature. You could also find
me on Pinterest, YouTube and Facebook,
the link to which is given on my
Skillshare profile. When it comes to illustrating landscapes that they encounter. Watercolor is my go-to medium, and I have been sharing my knowledge about
the medium through various online and
offline workshops for the past couple of
years because I truly believed that
anyone can paint. Painting landscapes
has the power to teleport you to places
that it depicts. And each landscape I strongly believe narrates its own story. Deserts have always
intrigued me because of its vivid sharp
contrasting colors, but I was always very scared
to try out this subject until recently with several
field experiments and trials, I learned to paint
them in my own style. And I'm so glad
to share with you the detailed process
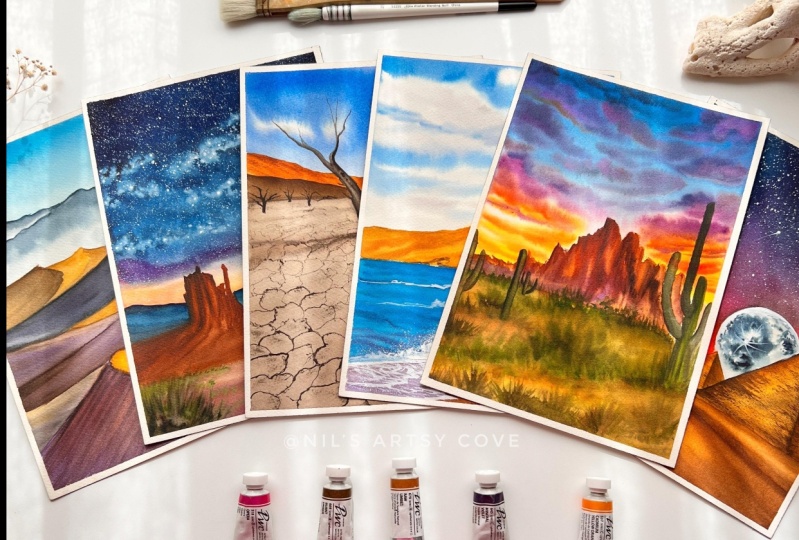
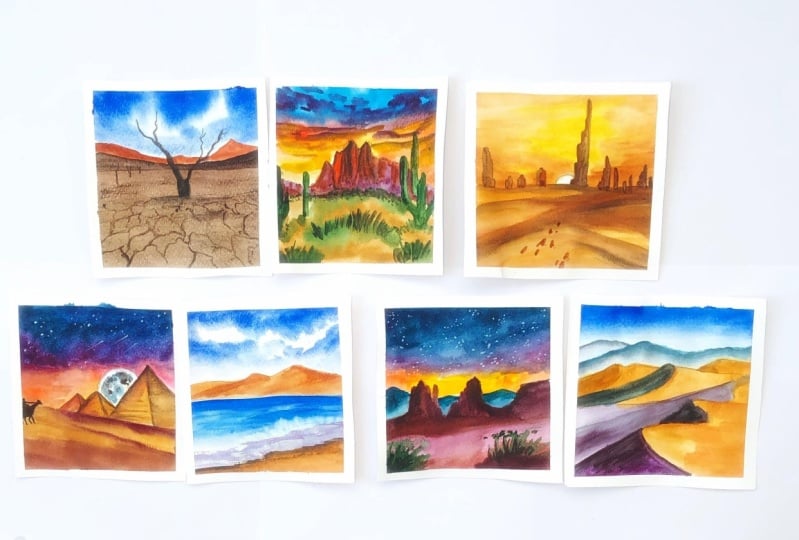
through this class. This class is going to
run for seven days. Each day we are going to paint a famous desert
around the world, capturing its own
characteristic essence. The class is structured for
all watercolor enthusiast. So even if you are someone who has just started
with watercolors, do not worry, I have
got you covered. I will be walking
you through with all the essential supplies needed to paint for
the next seven days, including setting up
your own color palette. Show you why it is important to know about paint to water ratio and exercise water control when it comes to
painting wet-on-wet. Also, before we begin
with the class projects, I have given you an overview
on how to proceed with the projects applying different watercolor
techniques each day. So that by the end
of this class, you will be able to paint
any desert reference with ease by applying the techniques
learned from this class. If you are someone who was looking forward to
ping this escapes then joined right away
and let's embark on our desert Safari around
the world in seven days.
2. Supplies Needed: Let's talk about the
materials that we are going to need for creating
our class projects. First and foremost supply
that we are going to need for our watercolor
painting is our paper. So let's talk about what
kind of watercolor paper do we generally go for when it comes to a
watercolor painting? I will be explaining
all about it. Now the watercolor
paper that I'm using here is from Saunders, Waterford send cupboard,
Mills watercolor paper. Now, this watercolor paper is a 100% cotton mold made
acid free archival, and 300 GSM is the
thickness of the people. You are. Thickness of
the paper will matter a lot when it comes to how long your paper is able to absorb and with all the
moisture content in it. So whenever you are choosing
your watercolor paper, make sure that you are going for 100% cotton watercolor
paper and which is of at least 300 GSM as the thickness of the paper when you are going for heavy washes. For lighter washes, you
can afford a lesser GSM. Now, this one here is a cold
press watercolor paper, and it is fine grain. Okay? Now when it comes to cold
press, watercolor paper, there are three different kinds of cold press watercolor paper. There is this fine
grain which has really finer tooth on the paper. And now there are medium grain paper and
then rough grain paper, which is extremely to the. So let me show you the
difference between this rough grainy texture
and this fine-grain texture. So this one is your
from Fabriano, artistic or paper, and
this one is a 100% cotton, 300 GSM is the thickness. And look at the texture here. It is the rough grainy texture. So how to turn the
paper fields right now, I'll compare it with my
Fabriano fine-grain paper. Let me show it to you. I will get it up close
so that you can really understand the
difference between the textures of these papers. Here. Can you see the
difference between the texture between
these two papers? The fine grain is so smooth, whereas this rough one is so much grooved and to the right. Now, each one of us has a particular preference
when it comes to going for our own
particular paper. So I, as an artists prefer to go with finer
green paper because I feel when I create landscapes in this
kind of find people, I get the best
between border walls. For example, when I
want to create skies, I get the smoother blends
and when I want to create rough grain textures
or dry brush strokes, I create them perfectly in this cold press fine-grained
people. Most people. Now let's talk about
the surface on which you must be
taping down your paper. I'll be using this
acrylic sheet board to tape down my paper. Whenever you are selecting your surface to tape
down your paper, always remember to select it as a non-absorbing surface here this acrylic sheet
is like glass leg, so it is not going
to absorb any water. Now next let's talk about paint. The paint that I'm using here
is from Shanahan Art brand, which is from their
premium watercolor range, that is the PWC. This is unprofessional learn
artist grade paints supply. But if you do not have this artist grade
paints, do not worry. You can go ahead and use
something like this pallets. Now these pallets are
from Art Philosophy go, but it has all the basic colors, like the primaries, along with the secondary and tertiary
colors included in them. I will show you another
one that I have out here. Just for an example, look at this palette. Here you can see, right, it has all the basic
primaries along with their secondary and
tertiary colors included in the palette. Now this palette is from
Art Philosophy co-brand. This is their ODC palate. If you have either of
this kind of pallets, you are good to go
for this class, but not necessarily that you need to stick by these brands. You feel free to use
whatever paints that you have got with you to
join in this class. But makes sure that
at least you have primaries included
in your pallets. Always. If you're feeling confused as to what colors I will be
using for the class. Do not worry, I have
got you covered. I will be discussing
in detail about all the colors before each
and every class project. Now that we have discussed about paint people, what comes next? The very most important tool, that is our brushes. So here is my silver
at ealier hake brush. Now, this brush is made up of
gold hair fiber and hence, it is very soft and it's suitable for
watercolor paintings. The size of this brushes ten. Now, in case if you do not have this kind of
Hake brush with you, you can substitute it with a broad flat brush that you can use for laying flat
wash on your people. Now, another alternative that
I can suggest you is to use the square wash three
by four inch brush from Princeton Neptune series. And you can see how
soft this brushes are. So these are tailor-made for watercolor paintings and hence the soft
bristles of the brush. Now, if you do not have this
kind of software brushes, you could also make use of your synthetic soft
hair brushes too. Next, we will be needing
some round brushes. The round brushes
that I'm going to use here is from silver
black velvet brush. Now this brush is
size number 12 from silver black velvet,
300 as series. And look at the
sharp pointy tip. It has got the
rounded belly which holds lot of moisture
and paint as well, and forms that
beautiful sharp tip. I love using this brush. Now, another brush from the same brand is the
size number eight brush. This brush, a smaller
brush is necessary to accompany your bigger brush. That when you want to
fill out certain areas in your painting where
your bigger brush, you do not have enough control
to go with overdose areas, small areas, you need
smaller sized brushes. Hence, I always prefer to
have 1282 size brushes. Now next comes our square head, smallest size brush, which
isn't a half an inch brush. Now, along with this
soft hair brushes, you must also use some
synthetic brushes to have enough control with the amount of water and paint that
you want in your painting. So I always prefer to have this size number four brush
from Princeton velvet series. This is a synthetic brush and this rigger liner brush from
Princeton heritage as well. That was nice. Number two, now you must be thinking, what would you do if you
do not have silver black velvet brushes are panicking
what you must be doing. Do not worry. I'm
here showing you another alternative to this
round soft hair brushes, which is this small brush. This is also made from goat hair and it's very
soft and flexible. This one is from the
brand brush stroke. This is size 0 brush. But look at how
broader the bellies. That's the beauty
of the mop brushes. It has a rounded belly
and when you wet it out, it forms a nice tip
in case if you are looking for some
economical alternatives. Now this brush set comes
in a set of four brushes. You can go try them out. Now let's take a look at the
basic sketching supplies. Are basic. Getting supplies
include our pencil, which isn't a normal HB
pencil that I'm using here. And I will be using
an eraser as well. So instead of this eraser, you could also go ahead and use kneading eraser if you have. Next is our ruler. Now we would be
needing a ruler just to have a straight horizon line. If in case you are
somebody who is not very confident about going with freehand
for straight lines, then ruler will
come in real handy. So the next supply
that I'm going to talk about is our palette. Now, in case if you
are using paint tubes, you would need a place to
squeeze out to your paint. So in that case, we would be using this
plastic palette, which is 42. Well, it has this
respective wells for me to squeeze out
individual colors in its respective wells becomes
really handy when I want to create my own palette and carry around for travel or
anywhere that I go. Next supply would be
our masking tape. Now this one is known
as carpenters steep. It's very normal. Carpenter tapes,
which is available in all hardware shops
and stationery shops. Now, this comes in three
different sizes, 0.512 inch. The other one that I have
in my hand is washi tape. This is also a
very smaller size. I think this is 0.5 or six MM. I'm not really sure
about the size. Next would be our tissue double. These are very handy, especially when it comes
to watercolor painting. They are my absolute
best friends, so I keep them
always by my side. Next will be our water jars. Now, I always have two
separate jars for water. One is for rinsing
my brushes and the other is freshwater supply. Always have this fresh
source of water readily available by your side when you are starting with
watercolor painting. Now, another way that you can have in handy is a
geometric supply. Yes, you can have a
compass and eBay you to draw some circles or have some circular objects
like this to go and paint some moons
in your landscape. We are going to paint a moonscape
in one of our projects. So we need something smaller, circular and say
it's not too small, but the mediums or gluten says, if you have a compass
or a master circle, you are good to go.
3. Setting Up Color Palette: Okay, so before we begin to
set up our color palette, first and foremost,
we should know the basics of color theory. The color wheel, especially this split complementary
color wheel, comes in very handy when we know what exactly
are the cool colors, warm colors and water is
split complementary colors. Now, always bear in mind that
your primaries will always have a cooler and warmer variant to the
respective color or hue. So when you mix its
respective complimentary, that is your primary
complementaries. With it, warmer or
cooler variance, you get bright and
vibrant colors. For example, warm yellows
and warm reds will give you brighter, beautiful,
vibrant oranges. Similarly, when you mix
cool red with warm blue, they will give you a brighter
mixes of purple, violets. Similarly, cool yellow with cool blue will give you brighter and vibrant
greens, right? So this is how you are going to create your secondaries
and tertiary is by mixing your
complimentary primaries together are mixing one
primary along with it. Secondary colors. Okay? So keeping this
knowledge in mind, we will be able to pick
out colors which may be visually contrasting and we
want it in that painting. So accordingly, we will be setting up our
palette and we will use this basic knowledge of our color wheel to
fill up the palate. So in my color palette, I would like to have my primaries with their
warm and cooler variance, just in case I want to create
some bright and vibrant, beautiful secondary
or tertiary colors. Now apart from your primaries, which can give you the
first complimentary colors, it is wiser to have in your
palette certain brands, the browns and the
yellow occurs are typically categorized
as the earth pigments. And in my previous class on evocative Golden,
our landscapes, I have discussed in
great detail about the earth pigments and what some paint
manufacturers are now, replacing the naturally
occurring earth pigments with more stable sources of synthetically
manufactured compounds to give more stable and
bright and vibrant colors, you know, which would be seemed towards
natural counterpart. So once you know
your properties of the colors and their background or history of this pigments. It is easier for you to choose your colors and set
your own color palette. And this basics of your color wheel and
color theory will, of course help you a lot
in developing your own, are customizing your
own color palette. So come now, let's
arrange the colors in our color palette using the basic color wheel
or the color theory, I'll be starting
with my first red, which is cadmium red deep
now this is a warm red. It is made up of pigment PR 108. I'm going to squeeze out
my color in the well. Next is my cool red, which is spiral red here with PR to 54 as the
pigment information. Now instead of this, you can
also go ahead and choose your Alizarin crimson
or rose matter. These are all your cool reds. Next LV filling up with my warm and cool yellows here I'm going with
the cool yellow first, which is my lemon yellow BY A21, followed by my warm yellow, which is from Daniel Smith, Quinacridone yellow,
which is p by 150. Now instead of that, you could always go ahead
and use your permanent deep, which is PY 83. Similarly, I had filled in
with my warm and cool blues. I'm going with sap green, followed by some
purples and pinks. The pink that I'm using here
is dropping, which is VR1. Now instead of this opera pink, this is sometimes
fugitive colors. So instead of this you can offer bright rose, rose, madder lake. Now, here is the purple. This is mineral valid p V3. Next is my yellow ocher BY 42, followed by my burnt sienna. Now next LV filling in
my blacks or Greece. Apart from this basic colors, I also like to have certain other colors such as my turquoise blue
and cobalt green, along with some other
shades of brown, which are known as light
red and brown reds. I will be describing all the pigment information
here on the screen. So you could take a note of all these other colors that
I'm adding in my palette. And here it is my own
personal customized palette, which we are going to
use for seven days. In case if you do not own
watercolor tubes, do not worry. If you have a very basic
watercolor pan set, which consist of 12 primaries, you are very well good
to go for this class.
4. Water Control- An Important Aspect In Watercolors: Water Control is a
crucial technique that all water colorist must learn in order to paint skillfully
and effectively. And it is the very same thing that all the beginners
struggle to understand. Now, in order to learn how to control paint to water ratio, first, you must identify where the water is
exactly coming from. So in this section, I'm going to demonstrate three ways that the
water can come from. First is no
wet-on-wet technique, which we do by applying a
coat of water on your paper. Now, when going for a
flat wash of water, as the first court
on your paper, make sure that your
paper does not have any bead or pool
of water that you have. Here. You can see it's
a pool of water. And you see what
happened when I touch my intense pigmented
color into this pool, it automatically
bleeds into it, right? That's the beauty
of watercolors. It flows onto the
wet background. So the proper way is to go
with your brush uniform lead to and fro motion on the area where you
want to wet it out. In doing so, you
realize that your paper has now and even glossy sheen, unlike here where
you have a pool or puddle of paint separating out and flowing into
the water, right? So this is what exactly is how much water you
should have on your paper. So this is the right amount. So when you have a proper uniform layer of
water voted on your paper, there should not be
any pools, puddles. If there is, you
should soak it up using a tissue paper
or tissue tablet. Now next is water on paint. This is really very important. So we often ask the question, right, how much water do
I mix with watercolors? So here is just a demonstration of how much water that
you should be adding. Your, I'm going with my brush
fully loaded with water, and I go and create
this pool of very thin, watery mix of paint right? Now. This, suppose this
is wet on dry. Now suppose you want
to use this kind of watery mix on paper which
is already pre-vet. So what would be the result? The colors will start flowing into the paper
uncontrollably rate. And you will not be able
to control the amount of paint and water that you have because it is already too watery and the paper itself
is loaded with water. So this can be very chaotic. So in order to have the
right balance of water, what I could suggest you is to practice your value
scales of paint. This I have shown you
in my previous class, evocative Golden,
our landscapes. So please do go and
check the section where I have talked about
values of the paint. When I'm trying to create some clouds with
very watery Payne's. So this is the result
that I'm getting. This will slowly start
spreading around the areas and there will be no particular shape of the cloud that you
will be attaining. This. We will come back to it
when the layer dries off. Now, the correct way I'm
trying to demonstrate here. Now, this water on
paint is subject to different conditions when
you would want to have pain. Northern lights where
you need the colors to flow and create
beautiful smooth blends. That time you would want
to use some watery paints. But unlike the other, where do you want to paint? Loose, fluffy
clouds, for example. In that case, you need to
understand what exactly should be your paint
to water ratio in order to have your
correct shapes of your clouds or the fluffiness of the clouds to come out
beautifully on your paper. Now try and observe
closely the amount of water that I have on my brush. Here. I dip my brush in water and my brushes fully
loaded with water. I have extra water on the brush. What do I do? I grabbed my tissue
paper and dab the brush on this tissue paper to soak up the extra water. Now I will be
reactivating the paint. When I'm reactivating it, there is optimum
amount of dampness in my brush to pull the colors. So here I'm loading my
brush with the color and the result is
I have this PR, intense pigment color
loaded in my brush, okay, minus the
watery part, right? So when I go and try
to create clouds, right now on this
wet background, I will get beautiful,
intense pigment. It colors for the clouds because there is
very much water. I have exercised water
control over here, right? So I will be able to
create as much clouds, as much fluffy clouds as I want without having to
worry that these are going to flow or blend into the background and losers
total shape, none. The next very crucial one is the amount of water that
you have on your brush. Now as one who is just
starting out with watercolors, you need to know
that painting with good brushes make
the painting process much easier for you. Okay? And as an extension
to this, what I am seeing, water control will be much easier to achieve
if you are painting with brushes that hold a lot of water and
pigment together, okay, For this reason, I always
recommend to go for or choose a brush which has
at least soft animal hair, or a brush which is a blend of real and synthetic bristles
like the one here. Silver black velvet is for
demonstration purpose. Here I went in with
wet on dry technique, and here I have
created an outline. Now with the other brush
where I had too much of water and I created too much
of water pool out here. You can see that I have this
water pool running inside. This is the case where you should be a little
wary about when you have too much of water in
your brush and as a result, you will have to
watery paint mix. Okay. There might be a
possibility that there's too much of water into the area that you are
painting might come out of this confined areas and spoil
your painting altogether. Okay, So that's why whenever you load your brush with water, makes sure to have a proper control on the amount of water
that you're using. Always dab your
brush onto tissue, tissue paper so that it absorbs the extra
amount of water. Here I'll show you
another example. So here I want to paint a cactus and I want
to outline it. So if my brushes having
too much of water, the outline shape that I'll
get will be to take, okay. And I'll not be able to get the very nice sharp
lines that I'm using using my two watery brush. So I'll show you in a while
what I'm trying to say. Suppose this is, we are going with
wet-on-dry technique and right now we have this
area not too wet, but it is still wet
because we have applied our wet paint over the dry
surface, that is a paper. Okay, Now I want to create
some stripes on this cactus. And to do that, I'll be needing my brush. Smaller size brush preferably to go ahead and do the stripes. Okay, so in this case, I will be needing
little water control or here when I'm trying to create this flower on this cactus, if it is too watery, I'll create a blob
on top of it and it will start spreading into the
wet areas as well, right? That is what we want to avoid. Here. See the amount of water that I have in the tip of this brush. Okay? So if I start with
layering this, you can see rate
what is happening. I'm not creating any
lines over here. It's getting all blended
into the background, creating a very untidy
mix over urine, creating a mess sort
of thing, right? So I'll fix it back, I'll login, blend it out into a smooth one. Now see, the amount
of water that I have. It is almost I'm picking up
only the intense pigment. There is just the brushes damp. And here you can see I'm
getting this dry brush strokes. This, when I do it on wet paper, this will give me
the smooth lines or the strokes that I wanted
to have for this cactus, getting a feel for the
right amount of paint and water will obviously t time. So experiment, do not be afraid to make mistakes
because from your mistakes, you will be able to learn
the right way to do it. Now if you're someone who are
very new to watercolors and not have much idea about the techniques in watercolor
such as wet on wet, wet on dry dry brush technique. Then I would recommend you
to go check out my class, watercolor sunset
cityscapes, where all this basic
watercolor techniques have been explained
in great detail. I hope this lesson
was useful to you. And if you were someone
who were making some of the mistakes that I have
just demonstrated here. I hope you have understood
that and you will be able to practice more efficiently
water control in your paint, paper and your brush.
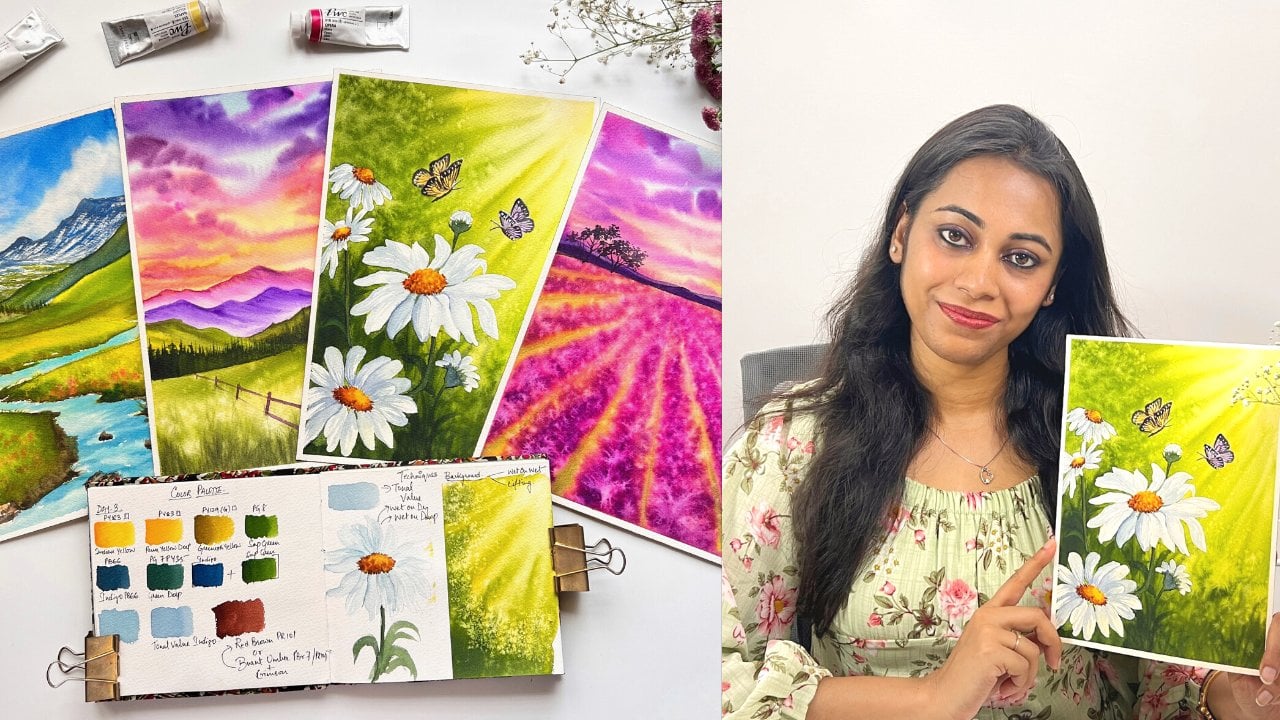
5. Day 1: Color Palette : Let's quickly take a look
at the colors that we are going to require
for day one project. I will be swatching out
all the colors that we will be requiring for
our project one-by-one. And along with that
on the screen, I have mentioned the name of the colors along with
their pigment information. So please pause the screen wherever you feel like and take a note of all the colors that
we are going to use. Here. I'm going to show
you how you can mix your own sepia by mixing your basic
colors in your palette. Here I have taken some of that. Golden yellow, that is
Indian yellow pea way 150 and mixed little bit
of mineral violet into it, along with some blue. When you use more of
blue into the yellow, you obviously know
it will turn green. So when you use
more violet again, you turn into this brown, which is when Jackie Brown
use more of violet into it, you will turn it
into Colin Brown. So these are the colors
that we are going to require for the one project. So pause the screen out here and take a note of all the colors, names along with the
pigment information, and get your color
palette ready.
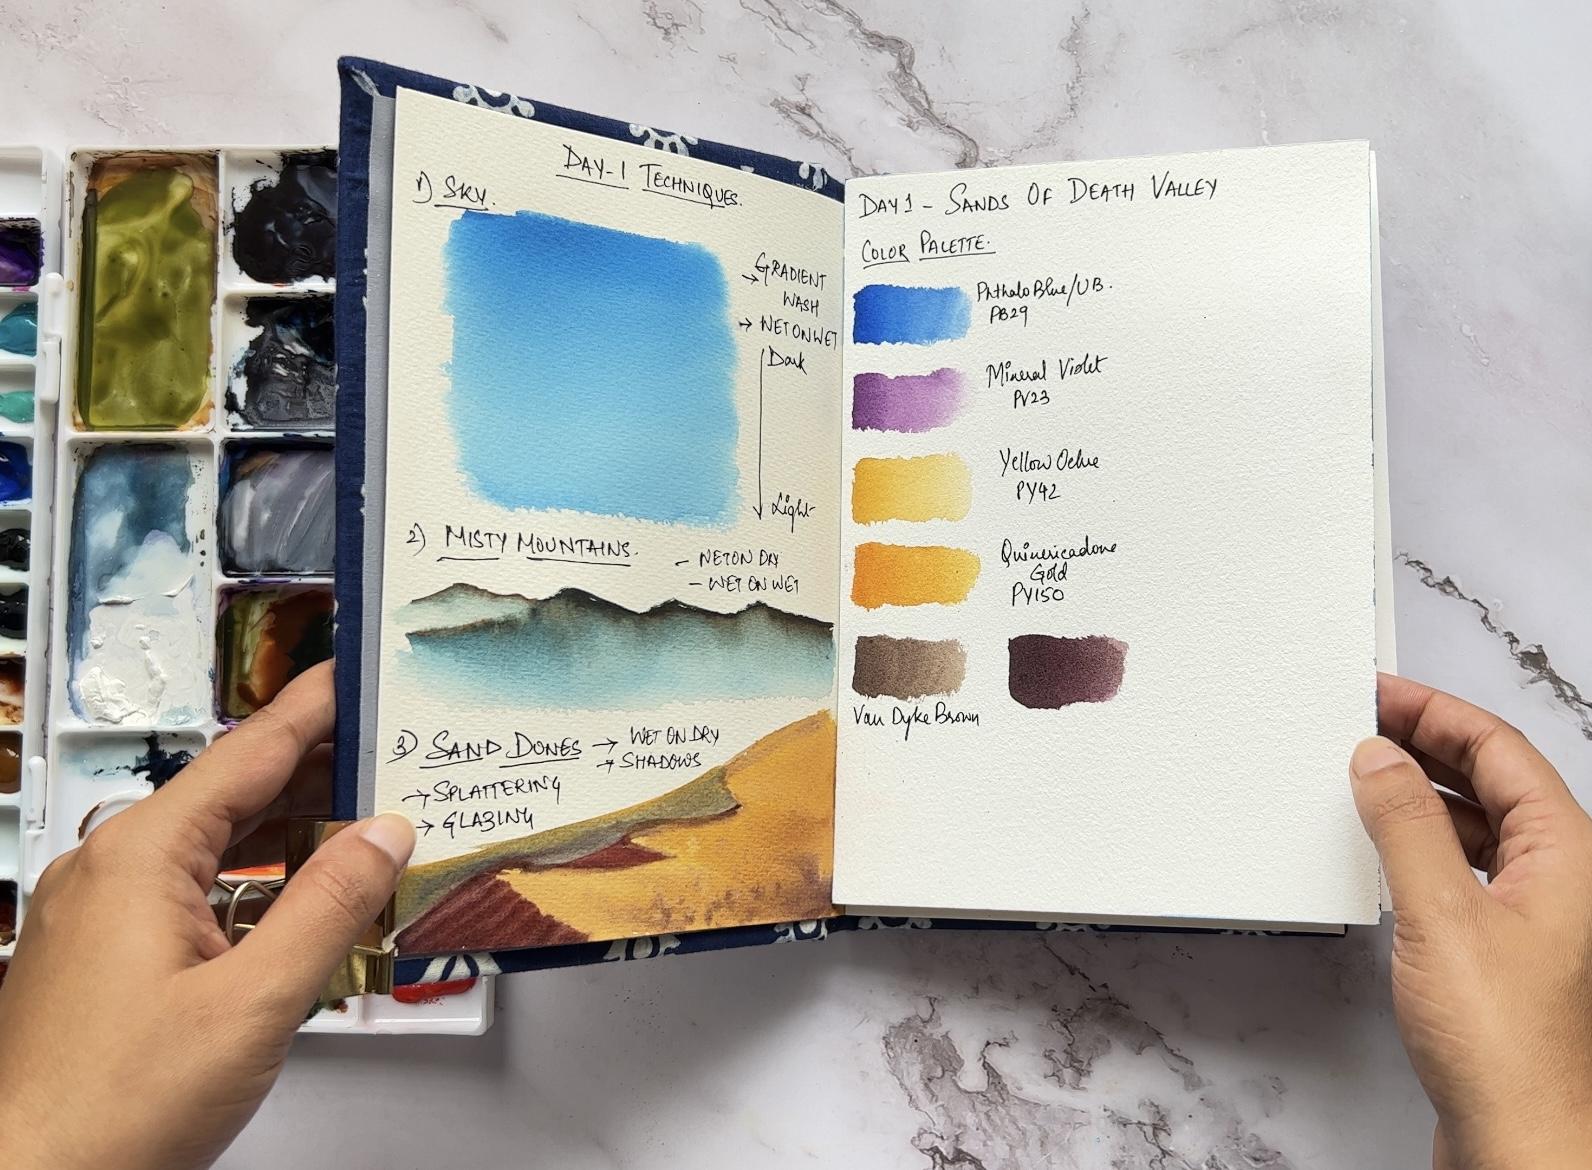
6. Day 1: Techniques : Hello, welcome back. Thank you for joining in. In day one. Your, I'll be showing
you the overview of the techniques that
we are going to use for our main project. Now here in this project, I have three elements. Though sky is a background, misty mountains is
the midground and our sand dunes is the main
focus element of our project. Let's begin with our techniques. The first will be our
background, which is a sky. Sky. I'm going to go with
wet-on-wet technique, which means applying
wet paint over surface. Here, I'm layering my paper with an even clean coat of water and making sure
there are no pools, are puddles formed when I'm
doing applying this step. So whenever you are
layering your water, make sure that your brush is not loaded with too much of water and there is no pools are
puddles formed on your paper. This is because if
there are pools are puddles standing on the paper, when you touch your wet
paint on this surface, it will start blending
uncontrollably on the paper. This is something
which you do not want, where you want yours
colors to be perfect. Right here, I'm going
with the gradient wash. So for gradient wash
means I start with a darker color and then
transition into lighter colors. Next, coming to our misty
mountains for this, I'll go with both wet on dry
and wet on wet technique. I'll tell you why our misty
mountain will be somewhere connected between our foreground as well as a background
which is this guy. Now, in order to have very sharp outline of the
mountains where I need the shape of the
mountains to be distinct yet very blended and faded out. I'm going to go
initially with wet on dry technique to create
just the outline of the mountains and
fill in some of the areas at the top with those same
wet-on-dry technique. Now, I'm going to start the misty effect at the
base of the mountains. For that, I'm going to invert my sketchbook over here
and with my flat brush, I'm trying to lead and
even coat of water. It's okay if you display
some of the colors, that's totally fine
because we are going to eventually let little bit of the
colors flow down to create that foggy or
the misty effect. And this Mountains,
at this point, the base of my mountains is wet, so I will get in some
of that blue here. I'm using medium
tonal value of blue. And with the damp, watery brush, I'm going to go and
bring the colors down. Can you see that the
colors are flowing down from the top to the
base of the mountains. Here at the base, I
want more faded look. So what I'll do is at the base, I left out some of the
colors using one stroke with the damp brush for the
background, misty mountain, I'm trying to blend
in those browns along with the blues that
I have loaded in my brush, makes sure that
you are exercising little water control and use just the tip of your brush
to blend in the colors. And at the base, it should look faded out owing to
the fog effect. And that's all about
the misty mountains. Now for the sand dunes, I'm going to go with
wet-on-dry technique because these are the main focus
elements of a subject. Hence, we needed to have sharp outline features
indicating the ridges. The lines are the
ripples in the sand, along with some shadows of the
sand reflecting the light. Okay. Some darker areas will be there so far,
the darker areas, I'm going to go and use a burnt sienna mixed with a
little bit of burnt umber. On-screen here is a reference of a sand dune observers
lighter and the darker areas and also the
technical terms used to describe each
part of the sand dune. Now we are going to paint the crest and the flank
of the sand dune. Here. I'll be using my
mineral valid mixed with little bit of my burnt
sienna or burnt umber. I will use this mix to create all the darker parts in
this Christian plank. Okay, here too, I'm going with wet-on-dry
technique, but here, when you go with
wet-on-dry technique, you are layering your dry
paper with wet paint, right? So that gives you a
little bit of time to work on the wet areas where
you have just let the paint. Using that to our advantage, we are going to use are lifting and the
layering technique on this particular areas
where we have just created this darker
parts of the sand dune. So here at this point
my paper is still wet enough for me to create
some textures on the sand. And to create those textures, I'll be going ahead and using
splattering technique and the water bloom method to create the beautiful texture of
sand grains on this dunes. Using just the tip of my damp
brush on this wet surface, I'm creating a larger particles and now just dipping the tip of my brush in water and going to create some blooms over here. Now, I'll leave it to dry and then we will
come back to it later. Now with my angle shader brush, I lead the flank
of the dune with some darker mix of violet mixed with little
bit of burnt sienna. You can see how bright that
color is looking, right? So instead of an
angle shader brush, you can use a very short head. Flat brush of this size
number is one by eight, so you can use a smaller size, flat brush size
number two or three. And you can create this kind of lines which will be the
ripples and the sand dunes. For those sand dunes which
are there in the background, I'm going to go and coated with the first layer of yellow ocher, which is my light color. And then towards the base, I'm going to go and coated
with some darker shade here, I'll be using a mix of muddy, burnt umber mixed with data, a little bit of Payne's gray. You can, instead of that, you could go and mix a little
bit of darker shade of violet with a little tinge of blue and blend the
colors smoothly. So this is how we are going to proceed with the final project. I hope you are clear
with all the techniques. Advice you to see through this lessons and tally
and then practice these techniques in
a separate sheet of paper before you start
on with your project.
7. Day 1: Sands of Death Valley Part 1: Our day one begins
with a trip to Nevada, that valid desert. So let's begin by first
steeping down a paper with our masking tape onto
this non-absorbing board. I have taped down my paper on all four sides using
the masking tape. Now I will ensure that
there is no gaps present between the shaping of
the paper and the board. Okay. Because that's the point where the paint might seep into. So ensure that your
paper is firmly fixed onto the board and
there is no gaps present. So run your fingers along the side margins of the masking
tape to ensure the same. Now let's begin with
our pencil sketch. So I have roughly drawn some misty mountains
in the midground. And I'm going ahead and
drawing sand dunes, which is the main focal
element of our painting. During this process, I might be erasing and 3D
sketching the areas, certain areas lot
many more times. So I would request you guys to go through the entire video, see how final sketch looks, then pause the screen over there and start your pencil sketch. I'm creating some shadow lines with the help of my pencil just to make sure that these areas will be
darker when painting. So this is how our
final sketch looks. So you could pause the
screen out here and then take this as a reference
and start your own sketch. I will try to upload
the reference of all the class projects and the projects and
resources section. So if you will, you can go check them
out over there too. If you wouldn't have taken my other classes on Skillshare, you would know that in
any landscape painting, I first always
begin with my sky. So here too, I'll
be beginning with my sky using my hake brush. I'm going to wet my paper. This is known as layering
your paper with water, which is important part when you are going with
wet on wet technique. On this pre wet surface, you will be layering
your wet paint. So that's why it's known
as wet-on-wet technique. If you would have observed closely the sketched
mountain area, I'm leaving them dry and making sure that
I'm going around those mountain ranges and be wetting the paper just
alone the sky portion. While doing so, make
sure that there is no lumps or puddles of water
standing on the paper. So go as many times
as you want with your brush to make sure that
there is no extra water. And if there is extra water, always grab a tissue
paper or tissue towel and rub it off from the sides
of your masking tape to ensure that this
water will not cause any bloom effect if they
run into the painted areas. Using my size number 12 brush, I'm loading the brush with peacock blue
color for the sky. Here. Observe the paint to water
ratio that I had used. It's not too watery. It's just the optimum
amount of water so that there is
no excess water on this wet paper around this horizon line of the sky where it is
meeting the mountains. I'm going to go and
make them the lightest. Use. Just your **** tip
of your brush. Now, your brush should
not have excess water. If you feel your brushes
having excess water, dab it on tissue paper or tissue towel to soak up
the extra water there. Do you see that? Paint mix l soak it up
using my tissue paper. And this is very important
because you do not want this to cause any
blooms in yard. Perfect Skype. Now we will let the sky area to
get dried completely. Now, I'll be starting with
my foreground sand dunes. For that, I'm using my medium tonal value
of yellow ocher. Here. I'm going with wet-on-dry
technique because I want to have control over the
wetness of my paper, which will allow me to work
in the ways that I want. Like going with dry brushing techniques
are lifting techniques. I do not want to
go with wet-on-wet because when you go with
complete wet-on-wet technique, it takes some time for
the paper to dry up. In that time, you
will not be able to. Go ahead and start layering
with other colors. It might bleed and blot and
smudgy areas might appear. Here we need our lines
to be crisp and sharp. Okay, so that's where we are going with wet on dry technique. Now observe the
brushstrokes I'm going with for filling the
colors in the dune. Here, I'm going with slanted
or inclined brushstrokes. This will give a
kind of elevation sought to the dune and
does when we start layering it with darker
shadows this June will represent are have
a very realistic effect. If you would have observed
generally the shadows are formed near the edges
or the corners. So you're too with
my burnt sienna. I'll be going ahead and creating some of
this darker shadows. And I'll mix now a little bit of my burnt umber into
this mix of violet and brown and create this darker sheets here when you are going with
this darker brown. So make sure that your
paper is still wet because you need to have the
shadows really look soft. It should not form a stiff
hard edge or a hard outline. Therefore, if you feel that
your paper has dried out, go over those areas
again with a layer of little watery paint to
mix of yellow ocher and then go with this
shading of Brown's. Continue to create
this darker shadows using this slanted
inclined strokes. When doing so, do it
very lightly or gently. You do not want to scrape out the underneath layer
of yellow ocher. That's why you need to go
with very soft tanned. Just use the damp
tip of your brush to create this darker
shadowy areas. Now, what I'll do is I'll
create some sand texture. So using a little diluted paint, I'll go with the
splattering technique. I'll splattered this shade of burnt umber mixed with a
little bit of blue and purple and create this darker shade of Brown's splatters onto
this part of the dune. Now in-between this
tiny splatters, if you want, with just the wet, damp tip of your brush, you can go ahead and create some bigger dots like
shapes over there, just in certain areas. And that's all. Now with the same paint mix
with which we had splattered. I have gone and created this
darker outlines over there. Okay, now I'll create
the splatters one more time because those have
got blended into it. Now, I'll be using your permanent violet
in your mineral valid. You can mix a little bit of blue to get your violet shade. I'm going with a
medium tonal value of permanent violet and it's little watery if
you also observe. This is because I
need to work on this area a couple of times
with lettering techniques. So I need this area to be wet, but not too wet. That's why we are not going with complete wet
on wet technique. Now observe the brushstrokes. I'm going along the
shape of this deal. Now, it's time to add some
darker tones on to this area. So here I have used the same
Berlin brown mix that we had created using our
purpose and our brown. Now with just the tip of my round brush of
size number eight, I'm going to go and create this inclined slanted lines which will represent the
ripples along the dunes. But the help of my
size two brush, which has a very
sharp pointed tip, I'm going to go and create some ripple leg structures
at this edge of this dunes. Okay, so from there
we're going to bring down the rippled stripes
much more prominently. Oops, I made a
mistake over there. So I fix it by using
my flat brush. This will be easier
when you do using your flat brush because
it has a flat head. So when you bring
down the stripes, it will be long and
slanted and straight. Because we have gone with
wet-on-dry technique, the idea has dried out
and it has faded out. Did you observe that? Hints, I'm going with a
second coat of paint, this time with a darker shade. This is known as the
layering technique. So I waited for the first
layer to dry up and then I'm going with the
second coat of paint. Here. I have used purple mixed with my burnt sienna
to create this color. Now using smaller sized
angle shader brush. If you do not have an
angle shader brush, use a short head
flat brush of size two or four and
create this stripes. So load your brush with
the darker mix and just go on and create this long
horizontal slanted stripes. So that's all we will
be doing for this part. I will meet you again in the
next part of the lesson.
8. Day 1: Sands of Death Valley Part 2: Welcome back. We'll
be starting with the background sand dunes. I'm going with a very light wash of yellow ocher at the top part. And for the bottom part, I'm going to go with
a little dark color. That is for our shadow. So I'll be creating a
very muddy mix of brown, preferably mixing browns with your blues to create this kind of darker shade of brownish
black you could call, okay, So here it is rough, so do not worry about the
dark edges that we have got using are just a damp brush. We are going to fix it
back and create very soft, smooth transition
between the colors. Always make sure that every time you rinse
your brush in water, makes sure to dab your brush on tissue paper or
tissue towel to soak up the extra water and then go back and blend this areas out. Too much of water will cause blooms to appear on the
paper which you do not want. Now starting with the crest of the background dune over there. So I'll be going with a medium tonal value of yellow
ocher there at the site, fringes of that crest, it will be darker and
as they come inside, it will get lighter. Okay. So this is how we
are going to go about it. It's time to start layering
with the darker shade, just like how we did it for
the front crest of the dune. And here to try to
create brushstrokes and follow along the shape of the crest that you
have outlined. Now, we will be switching to
our same angle shader brush. Your switch to your, any short head flat brush and
start creating those lines, those inclined sloping lines
on this crest of the dune. Make sure you are using a
synthetic angle shader brush or a flat brush so that you have better control on the amount of water that is present
in your brush. With similar technique, we're going to go ahead and create the crest flanks of
the other dunes. Here. I'm using my mineral violet mixed with little bit
of my burnt sienna. Here the dominance is
more towards violet. As you can see. I'm going with medium or
the lightest tonal value, but having control on the amount of water that
I have in the paint. Now on top of this, I'm going to go with a very
dark shade of burnt umber. Okay? The bottom and
the top corner of this flank will be darker and the center radius
will be lighter. But here you can see that we are having sharp, distinct, dark, and lighter areas, but do not vary with the help
of a **** brush, we are going to
blend them together. So I rinse my brush and so the extra water up in the
tissue towel or tissue paper. And now just with the
light brush movement, I am going to blend
this out together. Okay, just gently
do not drag too much of brown's into
the center area. Leave the area to be little lighter than
the other two corners. With the help of my
size number two, silver black velvet brush, I'm going to go and reflect
some of the areas where the tasks much doubt to create a distinct outline of
this darker dunes. And let me share with you an interesting fact about
this Death Valley Sand Dunes. Did you know that at the
top of the sand dunes, one can experience strangest
phenomena of the desert, which is known as
singing of the sand. Sounds interesting and
intriguing, right? So it appears that when the sand slides down
this Steve phases of high dunes are sound
like the bass note of pipe organ or the distant drawn off an
airplane can be heard. So the reason. Behind this phenomena is still not very clear
to scientists, but it is the most
likely assumed that it is caused due to the friction
between the sand grains. Sounds very
mysterious, straight. If you want to know
more interesting stuffs about that valley, then Google it out. You will be in all and would surely love to visit
this mysterious place. And for those of us who
cannot visit this place, let's just enjoy the beautiful mysterious
place by just painting them so that we can get virtually teleported
to this mystical, mysterious desert
cure to I'm going to create the same steps as we have done for
the previous dunes. Okay? Now remember
that if you have a softer watercolor brush or brushes like
silver black velvet, it will become easier for you to blend the
colors smoothly. Or if you have Princeton
Neptune series but brushes or any watercolor brush
made above goat hair, which are soft hair, you will be in a better place to blend these colors smoothly. Right now, it looks
like there's too much of purple in there. So I use just the **** brush tip and liftoff, the dose areas. Because underneath the purple, we had the base coat
of yellow ocher. Under painting is a very beautiful technique
where, you know, the base coat is maybe a
lighter or darker colored, and you top it with the
darker or lighter color, so it goes vice versa. And though effect that it
produces is very beautiful. Just like how we seamlessly
created transition between both the yellow and purple color using just
the lifting technique. Finally, here comes
our last large dune. Okay, So I'll quickly
fill it up the left side with the darker shade
because as you can see, all our darker shadows
are present on her left. It is very important
that you remember this. Okay. So all the dunes, when it is in the same
orientation or landscaping, we'll have the shadows
fall and at the same site. This is because the
sun over it would be casting a shadow on that
particular side of the dunes. So do not go with one side of the painting
as the lighter one, the other as a darker
and haphazardly mixing all these sides in the respective lighter
and darker shadows. And that way it will
look very messy. Here. I'm going with little
bit of ultramarine mixed into the darker mix to
create this darker shadow. Because I'm going to go after some time with my damp
brush and liftoff certain areas of this side of the shadow and bring out the
lighter portions as well. I'll do it shortly. Even if you are lifting out
the colors from this areas, just remember to go along the direction of this
crest of the dune, okay? It is very important
to remember and just light handedly
blend the colors out. To the right side. I'll
fill using my yellow ocher. I'm going as poor though
direction of the dune. Okay, it is very important
to remember to always paint in the direction
or whenever if we are filling the
color or likewise, because that is what gives the object its
proper 3D dimension. Okay, now, around
the top corners, I'm going and filling
out the areas with some darker shade and
at the bottom as well. Do not worry. I'm going
to blend these ideas out with another
bet, damp brush. Now, remember that your
brush should not be too watery because you know what is going
to happen, right? I have been repeating
it quite many times. So yes, just blend it out
like I have done out here. And that's it. You are good to go. Now to create a little bit
more of a realistic effect, I'm going to add that
little foot marks or any marks left from
walking over those dunes. Okay, so use just the tip of your brush and use
intense tones of your burnt umber and create
this random strokes over there with some dots and
blotches and that's it. Similarly, I'm going
to go and create or fill out the colors in this
background dunes as well. So keep observing. I have fast forwarded
this areas because it is the same exact repetitive
steps which we have seen earlier while painting the sand dunes out in the forefront. If you wish to slow
down this process and paint at a normal pace, then I would request
you to decrease the speed to 0.5 weeks in
your Skillshare browser. And you could watch
them in a normal speed. And with this dune, we're almost completely done with painting the dunes
and I'm already loving it. Next is, we are going to paint the misty mountains in the background in
the next lessons. So join me over there.
9. Day 1: Sands of Death Valley Part 3: Coming to the last and
final part of the painting, that is painting the
misty mountains as we had already seen and discussed
in the technique section. We will be creating the misty mountain effect
using wet on wet technique, but I'm not going
to completely wet the entire empty space that
you see for the mountains. Okay. I'm going very
cautiously and carefully around the areas where the outlines of the
sand dunes are. But I'm not touching the
outlines of the mountains there. I'm going to go with
wet-on-dry technique to create this distinct outlines of the mountains in the background. Okay, just like this. So use your brush tip and
create those outlines here. Try to go with
medium tonal value, soak up the extra water
in from the paintbrush and then go ahead and
create this outlines. Okay? Now, using the belly
of your brush, try to move around. The colors are liftoff the colors from the
base of the mountains. So in that way, you will be getting the
misty mountain effect. For this misty mountains, I'm going with a medium
tonal value of indigo. You could see here I
have mixed with my blue, my peacock blue little
tinge of my burnt sienna. Just a little tinge
and you would get a darker shade
of blue already, which will resemble very
close to your indigo. Okay, So this is
how I'm going to go ahead and create the
misty mountain effect. And as you can see, as soon as though
wet paint touches the wet areas around the
base of that mountains, the colors will slowly start
to float downwards. Okay. To facilitate the process, I just went again
one more time with my wet damp brush
at the base layer. And now I'm quoting
the top layer of the mountains again
with a darker value, a little watery value of
my indigo mix and creating these strokes wherein I try to blend and make them float
downward direction. Okay? So this is how we are doing it. So this will create the
misty mountain effect. The last standing mountain
left we are going to paint it out using the same technique
that we have just seen. Being the top first
with the dark tone. And then at the base, use the damp brush to spread out the colors
and that's it. So yard painting is done. And I'm really loving
how it looks right now. We will let the painting
get dried completely. Our painting has dried
completely. Now. We will be peeling off the
tapes from all the four sides. Though, painting process was little tedious when
it came to painting. The Sand Dunes, right? You must be feeling, but when you have
the overall result, you will be really pleased with all the efforts that has
gone behind painting this. Now, if in case you are
feeling that you're painting has not turned out
to be like mine do not vary. Every one of us has our
own individual style. So be happy with
the result that you have guard and yes,
practice and practice. Practice always
makes a man perfect. And that's all for day one.
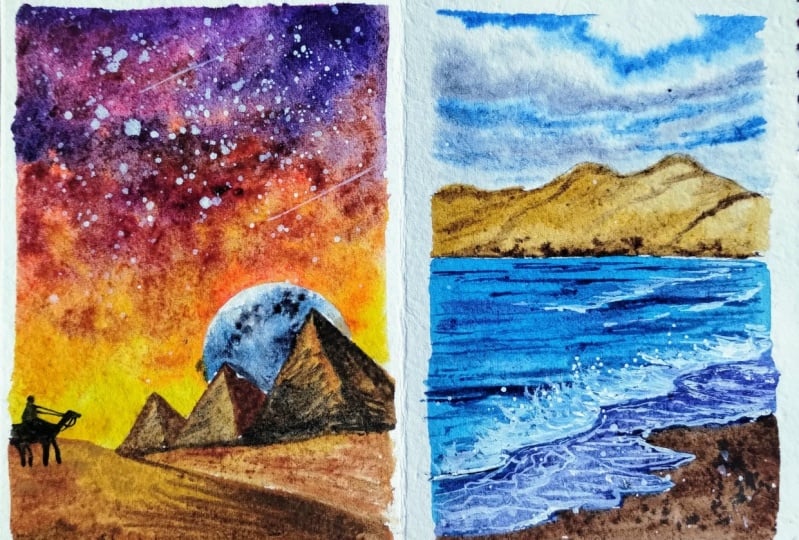
10. Day 2: Color Palette : Welcome back to day two. And today we are going to paint this beautiful Milky Way galaxy, starry night under
the OTA desert. So let's quickly take a
look at the colors that we are going to need for
creating our project. Here the main focus
is the Milky Way. So for this guy, we are going to go
with different colors, especially our blues,
which is tailored blue. And then indigo. If you do not have indigo, mixing a little bit of Payne's gray into your Taylor
blue and you can turn it into indigo or
mixing red into your Taylor blue and you can turn
it into Indigo as well. Now next will be peacock blue. Instead of peacock blue, you can add force cerulean
blue or your cobalt blue. Next is lemon yellow. Apart from lemon yellow, I'm going to also
use a warm yellow, which is my cadmium yellow deep. And I will be using both of these colors to paint
my sunset horizon. Next would be my opera pink. Now, if you do not have Oprah pink in your
palette, not very used. Any bright rose, rose, madder lake, or crimson lake, that's totally up to you. Swatching my mineral
violet as my next color, which is P V3. Next is light red. Now if you do not have
this color, do not worry, use yard burnt sienna mixed
with a little bit of red. And when you have more
of red into your browns, you get this brown red color. Using my purple and my
brown red, light red, I will be making my
own Perlin violet, which is also known as
Martin Brown, other brands. So use yard mineral Violet and you're burnt
umber, if you like. If you want to go
for a darker shade, use your bond number. So you would get
something like this. It will happen under hue of violet is my sap
green, which is P G7. When you mix lemon,
yellow and green, namely viridian green, you
get this shade of sap green. Last but not least, we would need some white
gouache to add stats.
11. Day 2: Techniques: Let's start with the
techniques for our D2 project. So first we will be starting
with our Milky Way sky. For this guy, I'm going to go
with wet-on-wet technique. Now, you would have
taken my other classes. You would already know what
is wet on wet technique. It means applying
your wet paint over wet paper surface here I am pre wetting my dry
paper surface. And on top of this I'm going
to let my wet paint. Okay. First we will be starting
with our sunset colors, which will be closer
to the horizon line. So I'll be starting
with my yellows and pinks and little
bit of oranges. So I'm grabbing my yellow. So rulers generally,
what I generally prefer to do is I grab
some of my warm yellow, mix it with little bit of
red and some lemon yellow at the center to create that glowing part
of the sunset sky. And the darker, warmer colors will be towards
the site corners. There. This is how
I'm going to go. Oh, I'll be grabbing
some of my opera pink and letting it on
top of the yellows. Always make sure that you go with medium consistency
of your paint mix. For this step, do not use too watery mix or
else you will cause unnecessarily blooms
to spread across the yellows and you will
get very smudgy clouds. You do not want that. So try to go with proper
water control in your brush. Now once you are
satisfied with that, it's time to switch to a bigger brush or
using the same brush, you can now grab
your blues here. I'm using my tailor blue
in that Taylor blue, I'm going to mix my Payne's gray to turn it into a
darker shade of indigo. Now, I'll start from
the topmost section. As you can see, for this tape, your paper needs to be absolutely wet or
else you will not be able to move around the
colors with the damp brush, the transition metal
area where the blue is meeting your yellows and
pinks, go with yards, soft mop brush and try to
lift out our smoothing the edges of the blue
transitioning into the opera pink. Here are my people
feels pretty wet. That's why I want to have some control in the amount of water that I
have in my brush. Hence, I have switched
to my size number for synthetic brush to create this softer clouds in-between those areas where the blue was transitioning to open it up. In those areas, we did not get a proper transition
between the colors, right, in order to hide that, we're going to go and paint some fluffy clouds with some darker colors there I
have used my purple mix. Okay, So here, this
is how you can go and create this dramatic
effect in the sky. Now, I'm going to go and create some more darker
parts of the sky, especially at the
topmost part of the sky. I'm going to go with my intense tone of the indigo
mix that I've created. So just go with any
random strokes is not necessarily to go by the
strokes that I'm having. It should just, the color should be
blending with each other. Your paper should be wet. Now, in this wet paper, I'm going to go with
the white quash. Can you see I have white
gouache loaded on my brush. So this is how you are
going to go and approach this section and try to
create some more whiter, much more whiter patches in-between the other areas
which are blending and fading out into the blue and
try to work around those bleeding areas with
just the tip of your brush. Here, I'm going to drop in
some of that darker shade of Payne's gray just in
between those whiter areas. This is because if
you have noticed Milky Way pictures closely, you would see that in-between
those white patches there are some darker colors which are the clusters
of this starts, right? So I'm going to go
ahead and do the same. And once you are
done, using here, are dropping your darker
shades go and drop in some more of that white gouache
to make the areas, the light areas much more
brighter and glowing. Okay, So this is how we are going to create our Milky Way. It already looks so
beautiful, right? So just with the tip of the
brush dropping some dots. Basically the stars,
the glowing starts over there with my
soft mop brush. I'm trying to blend in
the hard edges that were formed while when we
started layering our blues. I'm going over my damp mop brush and very gently
wetting around the entire area because we
do not want any hard edges. I will be going over
those areas again and creating some more
clouds and splattering. This starts now Penn new splattered stars
in the wet background, you get bigger bloom
of stars, okay? That actually is what we would need in a
cluster of stars. And then once your paper
starts drying out, go and tap it with
medium consistency, consistency of white gouache, and start tapping it to create the smallest stars in
and around the sky, but more towards where
the cluster of the star. So that is our Milky Way. Once you are satisfied
with the number of stars that you
have in your sky, you must stop the process and
move on to the next part. Our next element is going to be the rocky formations
of Monument Valley, which are referred to
as messages are built. If you Google the images
of Monument Valley, you would get the number of rocky formations at
this plateau area. Okay, some of the
famous is known as a tort hymns are built. Here. I'm going to go and
create the builds in general. So this sandstone
rock formations are generally with the red color, which is due to the iron oxide. That is the reason I'm going and using my light red color, you can mix in your burnt
sienna little bit of red, and you can get a
similar looking shade. Now for the darker or
the shadowy areas, I'm going and using my little bit of Payne's
gray into my brown. And that's how we are going to go and create this
Butte leg structures. Now in-between this
darker radius, I'll be going with lifting
technique to lightly lift out certain areas exposing
the lighter bars. Moving on to our next element, which is the ground area
of this Monument Valley. So here for the Valley Today, I'm going to create the ground
area with my light red. So you can mix a little bit of burnt sienna and
yellow ocher as well, and to create the darker
shadows in the ground areas. Mixing a little bit of burnt
umber along the sides. Okay. Leave though, the center part of the areas to be lighter and
all along the other parts, the sides will be darker. So once you are done
with the ground, the next element will be the vegetation that is found
in this Monument Valley. The ground would be covered with some vegetation or
grassland structures. So for that, I'm
going to drop in my greens into that
Brown's, okay, when the background is still wet to so it will create that lose effect of having some vegetation on
the ground right. Now, I'm going to go ahead with some splattering
technique to indicate the soil or any debris
is on the ground. So you could also do that. And if you want, you can add
in some of that cactuses. Cactuses are really
easy to paint, right? So for this bloom technique, you can use either
water or your salt as well to create these
textures on the ground. Things, some bushy grasses, just by using my
rigger liner brush out here and just creating
some long elongated strokes. I'm going to go ahead
and paint some cactus, but this is totally
optional if you want to include it
in your landscape. You could include,
but I have not included this cactus
in the final painting. Apart from the sky, if you would have noticed, we have painted all the
other elements using our wet-on-dry
technique because we wanted some distinct
outlines and shapes as well as control over how the paint was spreading
on a paper, right? So this is why we went on
wet-on-dry technique to create this other
elements of our painting. Now with just the finger, I'm freeing the tip of
my brush and I will go and drop in some of the paint loaded on the tip to indicate some rock pebbles scattered
around the ground.
12. Day 2: Stargazing at Nevada Part 1: Hey guys. So let's begin at dA2 with
taping down on paper. And this is what we are
going to paint today as starry night sky under
the desert of FUTA. Once you are done taping
down your paper firmly, now it's time to do our
preliminary pencil sketch. It's very basic and easy. First, the three-fourths of
the paper will be a sky. I'm creating Jaron horizon line. There would be some
background distant mountains. So your horizon line
will just form of preliminary basic idea for you to create the mountains
just above that line. And here I'm creating
this builds. So if you have known or
googled Monument Valley, and you would see
this beautiful, gorgeous sandstone rock
structures over there. Now that we're done with
the sketching part, Let's start with the sky. We are going with wet-on-wet
technique because that is my most favorite and preferred technique to paint a skies pure. I'm going to lay gentle
and uniform coat of water all across the paper
until my horizon line. It's okay if you are going
over the huge structures, you need not worry because
we're going to paint this builds with colors
like red brown, so that's okay, but makes
sure that you are doing this step very carefully
and uniformly. There should not be any pools, puddles of water standing. Once your paper is glistening and you
have coated uniformly, it's time to get
on with our paint. I will be starting here with my sunset colors just
above the horizon line. For the sunset colors, I'm going to use a mixture
of my warm yellow, lemon yellow so you can mix it in the ratio
of two is to one. Makes more of the
lemon yellow and little tinge of
that warm yellow. Lemon yellow because I want the center part of the
sky to be glowing. The other areas to be warm
and bright and beautiful. Whenever you want to paint
a glowing centered sky, always try to go for
lemon yellow as a color. Now, around your left
and right corners, I'll be using some more of that intense warmer
tones of my warm yellow, which is my cadmium yellow. I do not bring too much of the warmer shades right
there at the center. I just leave the center to
be with the lemon yellow. Now, I'm going again with
my damp brush just to make sure that when I start painting the topmost
part of the sky, my paper remains still wet. So you could do this
step before you begin with your top
part of the sky. So now I will be
loading my brush with that of o para
instead of o para, you could also ask
for bright rose in case if you do not have
a pyrene with you. This is obeyed wrapping
from Han art. Okay? Now when you mix a
little bit of red into this opera along with
some of that warm yellow, you get a very beautiful
coral pinkish color. And this is the
shade that I'm going to go for while creating and mixing with my yellows to create soft yet vibrant sunset
shades of this guy. Can you see the
bleeds over there? So I'll switch to my
size number eight, silver black velvet brush. And with this damp brush, I'm going to lift some of those bleeds and try to
smooth those areas out. Switching back to my size
number 12 and charting that I have gotten rid of all that
excess moisture over there. So with that Oprah pink
loaded on my brush, I'm going and created the
slanted motion with my brush. Observe the brush strokes here. Whenever you are
painting sensors with different array of colors, always remember
to make sure that your lighter colors
are not fully covered with your
darker tones. Okay. You're my yellows are
still visible underneath those pinks and now I'm layering it with some
of that purple hue. Now it's time to go for our
topmost part of the sky, wherein our dark shades
will come and play. Mixing my blue with
my Payne's gray here, the blue that I'm
using is Taylor blue. And I have mixed it with
little bit of Payne's gray. So go with any random strokes of the brush you and
did not feel pressured. The strokes that you are having, remember that the
topmost part should be the most darkest areas and
even at the site corners, that is your right and left
corner should also be dark. Now as you start approaching the center part of the paper, makes sure that you are
going with lighter strokes and also ensuring that wherever you are approaching
the areas where you have lead your Skype
with pinks and yellows, you go with lighter
tones of blue. The way our sky is looking is just perfect
for us sunset sky, but here we are going to
paint the night sky view with this answered this toddlers still existing in the horizon. Okay. That's why we need to
go and use some more of the darker tones at the
topmost part of the sky here, I have fast forwarded
the process because it's kind of repetitive. If you want to slow it down
and see it in actual face, you could change the speed
on the Skillshare browser to 0.5 weeks and watch the same
cure at the center part, we will be creating the
Milky Way or the galaxy sky. So for that, I'm going
to use my white gouache. So this is a modern
watercolor techniques. If we were to go by the
traditional method, we would have left
some of the whites of people exposed while painting around them, the darker areas. Okay. Or else use the lifting
technique to lift off some of those pins from the areas where we want the
Milky Way to be. So instead of that, we are going to go and use this diluted gouache to create a transition between our
blues and the white. One important thing to remember
out here is you could do all the steps only when your paper is still wet
enough for you to blend. The colors are, move around the colors creating
soft, beautiful blends. Once your people
starts drying out, do not try and do this
blending of colors because you will be having
a really hard time. And as you can see, I have, my paper has already
started to dry out. You can see the colors are not really blending or
flowing across the paper. But I think I will
be able to manage this layer because some parts are still sufficiently wet enough for me to create
this smoother blends. Google out some
Milky Way pictures, and you would see
that right in-between where the whitish areas
of the Milky Way Galaxy, there would be some
darker areas as well. So try to go with some darker tones in-between those whiter parts
that you have left. That would give the
exact same effect that you are trying to
go for your Milky Way. Adding in the darker
tones in and around those whiter areas that we have just created
using our white quash. I think I'll have to go
one more time with some of their diluted white
cars so that it spreads more beautifully
on this wet paper. Here. I'll be going
ahead with some more of that white quash
loaded on my brush. And I'm going to go with some
little watery consistency, but makes sure it is not
do fully watery or rails, that paint will start to spread unevenly onto the
areas which is wet. And maybe if your
paper is drying, you will get some uneven
blooms over there. You do not want that. One way to fix that is load your brush with
some darker tones and go and blend those
bloom areas in and around. While we were doing the
top part, the paints, we're traveling down towards the horizon because the paper
is little inclined, right? And watercolor always
flows down the gravity. So you can see I have created
some of that hard edges because this bottom part of the paper has started
to dry out completely. To refinance those hard edges, use your soft tip of your silver black
velvet brush or any soft tip of your brush and try to blend those colors out. Okay. So that's the way
that you would be able to still salvage the hard edges. Whenever you are
going with this kind of areas where your
paper has dried out, always make sure not
to have too much of water in your
brush, just the dam, IP and little bit of your color
to blend and mix it well, I'll go and drop in some
of my darker shade, just like how we have seen in the technique
section in-between. White gouache. Oops, my paper has dried
out here completely or no. So here I think I'll have to rework on this area all over again because
you can see rate, my paper has started drying out and the colors
and not really spreading. I'll try to make
some more clouds here at the horizon level where the shades of
sunsets are because this area is drying out to be a lot lighter than I expected. And here to my
paper is drying up and the colors are not blending with the
background colors. I think I'll have to redo
the sky all over again. So anyways, I'll show
you how you can do that. I'll try to fix it. So let's open prevent that. We're fixing it back
because it's off lately, very windy and weird
kind of weather. Sometimes watercolors
is dependent on lots of environmental
factors as well, such as the weather. If your weather is
really dry, windy, without any moisture in it, your paper will likely
to get dry up very fast. So here in this project
you will see how I try to salvage this painting using the
re-weighting technique. So let's get into it. In this point where your
paper is semi dry here, if you do not exercise water
control and your brush, you will see what
happened there. Did you see the line
that my brush created because it was a little
bit of too much water. So I'll try to blend
these areas back. Something like this going
to and fro motion because at least the bottom part
of the paper is still wet for me to blend
the colors out. The top part, we will get to it. So here at this point, I want to create
some darker clouds. So I will mix in a little bit of Payne's gray into my Oprah and mineral violet mix
and create a darker mix. You're, there should not be
any water in your brush. Dab it on a tissue paper and
it should travel with just dabbing motion of the
brush in this wet areas, try to create the smaller, shorter strokes, creating
this cloud-like shapes. Now let's get to the top part. I have inverted the paper and using my damp brush
with size number 12, I'm going to let it
with another coat of my Caleb blue and
peacock blue mix. And observe how I'm trying
to blend in the colors. Moving the board
upright down so that the colors flow
downwards to the top, right, because that's where
we want to blend the colors. Now here, I'm trying to
salvage these areas so that it is still wet for me
to blend the colors out. So I'm creating those
clouds, inverted my paper. And here I'm going
with size number 12, brush loaded with
intense tone of my indigo makes sure
that you are not using too watery paint because then it will turn
into a lot lighter shade. Try to go with the
intense mix out here. Now here is another trick
is to use your misting or the spring button to create the dampness that you
would want in the paper, but makes sure that
you do not disturb the bottom layers where you
have painted the sunset. This guy is looking much, much better now, okay, so I'll go one more time with those pinks
and yellows with my another's brush that is a size number eight brush
once I'm done with here. So I'm going over
these areas again because we need the
transitions to be smooth. Now I will switch to yellow and create glowing part of the sky.
13. Day 2: Rewetting The Sky Part 2: Continuing with this guy here, I'm going and lifting out
some of that darker shades of blue because you're I want
to use my white gouache. And my white gouache
needs to have certain areas of white in
order to come out beautifully, which will give the
glowing clusters of stars. Okay, That's why
we're lifting out certain areas using
my damp brush. Use your software flat
brush for this step. I'm struggling so
much with my sky because the paper is
drying out way too soon. I don't know if there was some problem in the
sheet of paper, but it does sometimes happen. But do not worry, do not give up on
the painting yet. If you do face similar
situations like this, try to use your
watercolor knowledge and the techniques of watercolor to try to salvage the painting. Sometimes you solve it,
sometimes you feel, but at least you got to try right before you
decide on to quit. So here is my take on that. Now, if you would have observed, I diluted my white gouache, did not make it too watery thin. I'm just using the tip of my silver black velvet
size number eight brush. And because some of the
areas of data still wet, my paint will spread and bleed beautifully
into the darker areas. Okay, but here you can see
some areas and not blending. The white quash is
not spreading around. So I will go in there, use some damp brush and try to get my white gouache in there
so that it spreads out. Now I'm adding in some of that white gouache with just the tip of my brush
going and adding in over there so that I get This bright and
beautiful glowing center in the Milky Way. Now because I have used little
watery tip of the brush. Did you see the water
started coming down onto the purples and
pinks over there. So I will use my flat brush
and using some clean water, I will very lightly and
gently re-wet this areas all over again so that with the help of my
damped round brush, I can go create those darker layer of
clouds one more time. Here. I have lost though
center part of that glowing skies using midas
soft Princeton Neptune, flat brush, one by full-size. I'm very lightly going and lifting some of the colors from the center part because
that's where we want our sky to be
glowing right. Now. Did you notice the
water droplet that fell at the top part of the sky? I need to go and re-read
those areas all over again so that I can blend it and this
bloom can be rectified. I am going with
my soft mop brush and just trying to reward
those areas very lightly, I have inverted the pace
so that all the colors flow downwards as I
have tilted the paper, can you see here, go with yard intense tone of indigo one more time
using your brush. Now I'm trying to re-read
the other areas as well, just trying to move
around the color. Do not use two
water-filled brush over there because you will get those ugly blooms one more time. So just with very soft handedly, drain off the excess
water from the brush and just keep
blending the colors. Now using a synthetic
brush of size number four, I'm going to go and splatter
some stars over there. I'm doing this on
wet-on-wet background because I want the
stars to look glowing. They will look faded out once
the paper has dried out. And on top of that, we are going to splatter
the stars one more time, again later when these areas
have dried out completely. So this is the
problem that you will face when you re wet your paper. Some of the areas, the glowing areas of the sky will be lost during
this process, I have to go here again, lift out some of the
colors from the center to create that glowing effect of the sky here you may go with, again, a tinge of
lemon yellow here and spread it out uniformly across these areas
to make it glowing. Now with my size four, brush from Princeton
velvet does series. I'm just going and creating
some dots like shape. Over the areas where we had
splattered the white quash, they have left, you know, faded background which will indicate the glowing
areas around the star. Okay, So just go
and add these dots using the tip of your
brush. You are done. It's time to add in some
darker areas in between that white center of
the Milky Way you would have seen in the
pictures of Milky Way, right? There would be some
darker areas as well passing through the galaxy. So this is what we are
trying to replicate out. You use intense tone of your colors and try
to do this step. When your paper is
still somewhat wet, the paper has dried, it will not blend
into the white quash. Okay, So this is how I'm
going to create the clusters. Now can you see this
area where you have this sharp two distinct blair of my sunset colors and the
night sky, the darker tones. That's why I went and re-wet those areas one
more time so that I can use my violet and with the help of the
tip of my mop brush, I'm going and creating
the shape of the clouds. The reason why I'm
going with this kind of reweighting technique and not using my missing
or spray bottle. Because I if I use the
missing or the spray bottle, all the blues from the top, we'll start flowing down to these areas of
orange and yellow, which rarely will lead to
a kiosk in the sky, right? So this is the reason why
I'm using my brush and going with very soft candidly
re-wetting the areas, creating layers with my
synthetic brush going with my white gouache all over again around those darker gray areas. Now with the help of my
**** tip of the mop brush, I'm going and trying to
spread out those hard edges, softening those hard edges with the help of my flat brush, going and lifting
out those areas again from the center
of the sunset sky. Now, with my size number
for synthetic brush, I'm going to use the tip
and create some dots in-between those white areas to create those starts glowing. And if you want to blot out any areas to create
the glowing effect, you can use your
fingertip as well. Now it's time to
splatter the stars. When you as flattering the star, remember to use not
too watery gouache mix because that will give
you some bigger blooms. For tiny stars. Remember to use a
thick consistency of gouache and use the tip of your brush directed
towards the paper and tap it with another
brush or your finger, that's totally up to you and skip splattering.
This starts. The sky is looking beautiful. Remember the time when
that water droplet had fallen on that top part
of the papers there, I had reweighted
those areas using my mop brush with a
watery mop brush, that is where, you know, I might have unknowingly removed some of the
colors from those areas. That's where you can see those lifted out portions and some darker portions
in there, right? I will have to go back again and do reweighting
technique for this. So make sure whenever you have some accidental
spillage over there, you go and add some darker tones also when you
reweight those areas so that it does not get
faded out like that. Look at the difference
of this guy. After I read it, the areas with my darker tones of indigo mix with Payne's gray. This is the trick, how you can fix your
paintings, right? So that's where I told whenever you do reweighting
technique makes sure that we you do not leave
the area as such because you wouldn't have removed some amount of paint from there. Hence, go and layer those areas again
with a fresh coat of your intense pigment at pains to give you this
beautiful bright result. Now I'm working with the
background mountain. This is the same technique which we had done for our
day one project. I first went with
wet-on-dry technique, creating the darker
areas of the mountain. And then used my watery brush and drag the colors down towards the base of the
mountains and that's it. Now we will soon be starting
out with the foreground, especially working on those Rocky Mountains
or the beauty. So I'll see you in the
next part of the lesson.
14. Day 2: Foreground Rocky Mountains Part 3: Kick starting with a foreground
where we will be painting our formations of this
totems or builds. So for that, I'm
mixing in my browns. I have used light red mixed with a little bit of brown
red and burnt umber. Instead of burnt umber, you can also add little
bit of purple into this mix and start
filling in the areas where we have sketched
out those totems or the beauty just along the foothills of that
background mountain. I'm going to go and create
another darker mountain to fill in the gap between this builds and the
background mountain. Now filling in those builds with my same reddish brown mix
that I have got Y reddish brown because this
sandstone structures are filled with iron oxides. Hence, the color of this builds are this reddish
brown in nature. Now keep observing
my brushstrokes and the colors that I'm filling
those mountains here, there will be some
darker tones of red browns as well as
darker shades of brown. While I move to the right side
of the bills, I my colors, we'll start getting little lighter than that
of the left side. Whenever you are going and creating the shape
of the builds, make sure that you use just
the tip of your brush there. The paint mix should
not be too watery. As you approach the
base of this builds, you can use little watery
paint mix so that you are able to cover larger
surface area with ease. Using the same technique
that we had applied for the one rocky formation
in the foreground. The other background builds to, we will be filling
in similar way. Here. Only difference will
be for the background once we will be using a darker
mix of our Brown's, preferably make CRC same shade of brown with little bit of purple to give them the Perlin violet to
brownish undertone look. Now, along the side
edges of this builds, I will go in with just the tip of my brush and start
filling in with some darker shades to indicate the stripes are the rugged
features of this builds Okay? To create the darker
areas of the mountains, use a darker shade. You can mix in a little bit, just a tiny bit of Payne's
gray or mixing yard, permanent violet on
mineral violet into your brown to get the
darker mix as well. Okay, Now we will be creating
some more darker shades on this right side and
we'll stretch it along to the left side
of the bigger Butte. Keep observing my brushstrokes, how I'm creating the
ruggedness and the lines are the raw features on this builds using just
the darker colors. For the ruggedness I'm using my synthetic brush
and I will just go and create some darker
vertical lines over there. Really led this area's
dry up a little. And then I'm starting
with the rounded built, which is the last viewed
of our landscape. Here at the right-hand corner, I'm going with the darkest
mix of brown that I have. So mix more of your
purple or violet into your brown and get
obtained this darker mix. Now, just the top will be dark, and then when you come
down towards the bottom, it will become with the same
brownish mix that you have. The second view, the color
has faded out a little. So I'm going again and
layering this with little bit of burnt
umber at certain places, only your top areas. Now with a little watery mix, I'm going to blend this area's
out so that it looks even. Now to create this lighter
parts of the Butte, a little bit more prominent, I will do is I will go with my lifting technique
with a damp dry brush, and I will just vertically
live the colors off from certain areas in between the darker strokes that
we have just applied. Now coming to the
foreground area, which will be our land. So here I'll be going
with my yellow ocher, but I have first pre wetted the area so that
I can spread out my yellows beautifully on the areas and allow them to blend with the
layering of Brown. Taller Butte is looking
little bit more darker, so I will lift out some
of the areas along those darker strokes
that we have created. The paper is still wet so
I was able to lift off. Now here I'll be creating
an heap light structure over here with the light
red mix that I have got. Now on top of this, I'm going to let it with
some purples over here, purple or violet, you
could use either of it. Now, the remaining colors
that I have on my brush, I'm going to blend it
out into the background, mixing the yellows with
the purples like that, creating some random
irregular strokes. Now it's time to
create some vegetation like growths on this
land surface. Okay. Your I'm just dropping
in my sap green using just the tip of my brush
onto this wet background. So it will seem like
there is some kind of smaller bushy shrubs which are
growing on this land area. You can mix in a little
bit of purple or brown in your greens as well to turn
them into a darker shade, this will create a depth
into your painting. Creating the same here too, with just the tip of the
brush dropping in the greens. I'll switch to my liner brush and create some vertical
grass like shapes over there at the left
corner and smaller ones you're at the right
hand side as well. Now it's time to
create some textures. You own the land area. So here I'll be going with
the splattering technique. I'm splattering little water you may have solved nearby you, you could also add
in some salt to create this kind of
beautiful bloom effect. Here I'm happy with
water and it is easier for the water
to be on this wet, on dry technique
because it will create very controlled and
beautiful blooms and dab in some darker shades in between those platters
to create a depth and also to create some grassy
like structures out here. Some prickly grassy structures. I'm using my liner
brush to do so. Here I have frayed the
tip of my liner brush. As you can see now
with this flip tape, I'm going to go and create some grass like
structures, very small, short strokes there to indicate some glass-like patterns over
growing on that land area. And that's all that we're
going to do for this. We will let the area
or the paper dry completely and then we will
be filling out her tapes. As you can see, our paper has
completely dried out flat. Now it's time to take off our masking tapes from
all the foresight, this is the most
satisfying part. Post painting rate billing
of the tapes gives you such a great
satisfaction feeling, a feeling of
accomplishment, right? So here we are with
all the four sides, perfectly neat and crisp. And here we have
the final painting. Hope you have enjoyed
painting along with me and learn the inside. So reweighting the people. Join me back tomorrow
for we are going to paint this beautiful
Namibia Desert. I'll see you tomorrow. Bye.
15. Day 3: Color Palette: Hello, Hello, welcome back. We are on day three
today and we will be heading for a safari to
the desert of Namibia. So come, let's get started. So we are going to be painting this beautiful desert
cracked lands of Namibia. So let's take a look at the
color palette that we are going to require for
completing our project. Let's get started with
the color palette. We are going to start
with our beautiful brown, which is our burnt sienna, are very beautiful,
orangeish brown. It is known by the
pigment number PR 101, or PVR seven, followed
by yellow ocher, which is known with the
pigment number BY 42. Now, different brands will have different shades
of yellow ocher. Some label it as light or deep. Swatch out your color
and then get started. Now next is brown red, which is again PR 101. Now, brown red is optional. You could make sense
some of the red within your burnt sienna and
they've loved this brown, red or light red. Here next is burnt umber, which is the bundy
version of your Romberg, which is PVR seven. Now mixing two colors, we will give rise
to the mud color, which is the cracked land color. Okay, So we're going to mix burnt umber plus
Payne's gray and a little bit of white
gouache to result into one of these
following shapes. I'll show you here. Here. I'll be mixing the
colors and swatching it out. Mixing my burnt amber with little bit of white
gouache and little bit of Payne's gray to
form this kind of very opaque and
clay kind of color, which is, which you can see
on screen out here, right? So this is the shape that
we are going to use now, when you add little bit more
white quash and do the same, you will get the
lighter variation. So we will be using
both of these shades. You paint the dried
out, cracked land. Okay. So I hope this is
clear to you guys. Mix your colors,
swatch them out, and then we will get
started with our project.
16. Day 3: Techniques: Thank you for joining in. Let's get started with the
techniques for our day 3. First and foremost, we will be going with the sky. For sky. This is going to be
very simple sky with the bright blue sky with
white fluffy clouds. I'm going to go here with
wet-on-wet technique. There, I have just reactivated my settle in blue or
the cobalt blue colors. You could use either of that
color to paint your sky. I've started first layering
the paper with an even wash of water till the portion
where I want the sky to be. Then I have started
with my wet paint, leaving around some white gaps for our white fluffy clouds. When a paper is still wet, you could lift out
certain areas from the other areas where you
want your fluffy clouds to be or enlarging
areas that you have left the white spaces and to
create your fluffy cloud. Every time you lift the colors, make sure that you dab your
brush on the tissue paper or tissue travel or dip
it in water and then soak it up in tissue
paper or tissue travel. Moving on to our next element, which will be the sand dunes. Here we will be
painting the sand dunes along with the shadows casted
by the opposite sand dunes. Okay. So you're going with a mixture of my yellow ocher
mixed with burnt sienna. So you get this result in shade. Once I'm done with this
part of the sand dune, I will be switching
to PR burnt sienna and going over
layering the color on certain areas of the sand dune will be switching to my
burnt sienna very soon. Sorry, not burnt
sienna, burnt umber. And I'll be going over
certain areas just along the slopes of that sand dune
that we have just painted. Your observed the brush strokes that I'm
creating out here. This is two, create
the texture of the ripples that the sun has
created on the sand dunes. Okay. Now going with
the darkest tone of my burnt umber mixed with
little bit of Payne's gray and creating the shadow of the sand dunes which are being tested from the sand dunes, which may be in
the opposite side. Okay, So this is how we
are going to go about it. Moving on to our next element, which is our dead tree. So for the dead tree, switch to a brush which has a sharp pointy tip
for you to create some thin strokes for the branches emerging
out from the tree. Now remember that the beauty
of this dead tree will be its sharp pointy branches
jotting out, right? So make sure that
you are exercising brush control and water
control in the amount of paint that you are
using to create this tree. So when you are going for
thin lines for the branches, if you're using a liner brush, use dry out the
paint consistency on a separate piece of paper, and then start creating those sharp pointy
branches of the tree. Now with my damp brush, I'm going to lift
out certain areas from the branch of
that dead tree. Okay. So this is to indicate the light and shadow portion of that tree where the light is
not striking the tree there, it will be darker as compared to the rest
of the other tree, which maybe the sunlight
is hitting the tree. Okay, So that is what I
have done over there. Now moving on to
the last element, which will be our focus
element in this landscape, which is our cracked ground. For the cracked ground, remember the mix
that we had created, the clay kind of color mix using our burnt umber Payne's
gray and white course. So I am going with that mix and creating this kind of strokes
to indicate the ground. So the picture here, which I use for reference, has this kind of perspective where the picture is taken from a very low angle perspective, giving the hi to the ground
as well as to the tree. Okay, so I'll share
the picture out here. You could see here how, what exactly I'm trying to say. So to replicate it, I am going to go with this
slanted strokes of the brush, observe my brush
movement and create the same realism of the ground. Now I have switched
to my liner brush. And with my liner
brush I'm creating this cracked patterns
for the land. Okay, so here the trick is
go with very thin lines and use your darker mix for creating this cracked
effect in the land. Now, if you saw
observing the reference, you would see that this
crack patterns are running, are converging towards
the base of that tree. And where it is converging
towards the base of the tree there the patterns
are going to get thinner and thinner variables, the ones which are prominently
visible on the foreground. There, I'm going with some darker strokes
using the same mix. Just hear what you
have to do is you have to create some darker, thicker strokes out
there to indicate the deep cracks that it has,
indicating the shadows. Right. So this is
what I'm going to do. Now to indicate that
dirt on the land, I'm going to go ahead and create some dry brush strokes
using the same brush. This last step is very important as this would give the texture, the realistic texture
to this crack lands. And wherever the
cracks are, there, just go and create some
thinner like cracks from there to indicate
more realism into it. Now, I'm just going around with this synthetic size number
four brush creating more dry brush strokes to create the textures on
the land. And that's it.
17. Day 3: Aridness of Namibia Desert- Part 1: You guys ready to jump
start our class project. Let's join together and paint this beautiful
Namibia desert. Like always, I have
taped down my paper onto this vote with the
help of my masking tape, running my fingers
along to ensure that the paper is stuck
to the board firmly. Now, it's time to begin
with a pencil sketching. Here is the reference for our D3 project and this is what I'm going to sketch it out. We are going to
divide the paper in such a way that 1 fourth of the paper is our sky
and the rest is a land. And in-between the
land and the sky, there will be this
background sand dunes. And just around the
center of the paper, we are going to draw or
sketch out this dead tree. So I'm going to do the
same on are this paper, the final project paper? The paper that I'm using is a 100% cotton from
Saunders Waterford. Now around 1 fourth I have separated the sky from the
land with the horizon line. And just around like around three or four
centimeters above. I'm going to draw, sketch out the sand dunes. The sketches really
very easy and simple. You could pause the screen where the reference picture
on the screen is displayed and use that as your reference
and sketch it out. Or use my sketched out the outline for your
reference and start with it. Now you're just around
the center of the paper. I am going to start with
the sketching out the tree. Makes sure that your tree is positioned right
in-between the center, positioning it exactly in
between those sand dunes. Okay, So this is what is the main focal
element along with the cracked ground
of this landscape. So this is a final
outline and I have sketched out some
background trees just below the sand dune. This as the reference. And let's start with the sky. I'll be going with wet on wet technique using
a flat hake brush. I'm going to share just
the portion of the sky. Makes sure that you do not
go wet around the mountains. I do not want the water to go into the mountains
are because I want to paint the
mountains with Brown's. Okay. So if the blue
touches the mountains, then the brown that you mix
is going to turn really dark. And also we'll be
using yellow ocher. So chances are there that you're mountains will
start turning green, which you do not want that. So make sure that
you are layering the water only
around the sky area, going around those sketched
outline of the mountain. Loaded my paint onto my brush. And I'm directly starting with this random
strokes for the sky. Here, I'm using cobalt blue and look at the paint
mixture that I have got. It's not too watery. You want a little
bit thick paint mix, intense ones so
that post drying, your sky doesn't
look too faded out. And in-between, I'm
leaving some shapes for those white fluffy
clouds in-between. Now, instead of cobalt
blue, cerulean blue, you can also opt to go
for ultramarine blue. That's totally up to
choice here I have used some cooler shares
instead of warm shades. I hope you're observing what I'm doing like all the
other projects, the sky at the top is darker and while I'm coming down
towards the horizon line, my sky has become lighter. We have transitioned our
sky from dark to light. Now using lifting technique, I'm going to lift
out those edges from the whitespaces
for the clouds. I'm just want to make those
shapes little more rounded. So every time you
lift off the color, wash it off or debit in our
tissue paper or tissue towel. Now, I'm going to use a
very diluted mix of my Payne's gray mixed with brown using just the tip of my brush, I'm just going to layer
something like this. It's too dark. I'm going to lighten
it using another of my **** brush size
number four damp brush. And I'm going to simply
spread it around those white patches
of the clouds, okay? But makes sure that you are not going and touching the corners. Done with the sky. Now we will let
this guy dry out. In the meantime, we are going
to start with the land. Once a sky has dried out, we'll go and do our sand dunes. So for the land, I'm going to use the clay mix that we have seen in the
color palette section. I'm going to mix my colors
altogether and keep it ready because we are going
to definitely cover a larger surface of
the paper, right? So mix out your color beforehand and swatch
it out before you try it on the paper and see if your color is almost
same as mine. And then start with the land. I'm going to go and use
this lighter section first as the first
coat for my land. I have loaded my brush
with the same polemics, going to go carefully
around this area with just the tip and slowly
start spreading the colors. Make sure you just use
the tip of your brush and go around your main
focal element, that is your tree. And here I'm going to use
wet on dry technique and simply favoured this entire
ground with the same color. But here, there
is a trick to it. In order to give that
perspective to the ground, we're going to use certain
slanted brush strokes. Please keep observing
how I do this. While doing this step, make sure that you use
little watery paint that will enable you to cover
larger surface quickly, but makes sure
that it is not too watery that you are going all over these areas and your trees are also getting
covered with those. You should be able to control it with the tip of your brush and use your full body
of the brush here. When I say body of the brush, I mean the bristles
of the brush. Okay, the head of the brush. So try to use the full length of the bristles when you are trying to spread out the colors. Now when you start reaching
the base of the tree, this is from where you
are going to create some diverging strokes
from the base of the tree to the outer
side of the paper. Okay, you are flanking it. I would say it can
you see the strokes? But if you start from
the bottom of the paper, that would mean you
will have to go with converging strokes which will meet at the base of the tree. And those would be slanted
converging strokes. So watch the entire process to know what exactly
I mean by this. Here, I am lifting some of
the darker shades because this ground will be far
from your view bond. Hence, this areas will be lighter than the
rest of the ground using just light pressure with your brush gently and
liftoff the colors. When I meant by
converging strokes, this is what I meant. See the brush movement
that I'm doing here. I just, I'm just
showing you with the help of little
water and also because I don't want the layers to form any
hard edges over there. That's why I
reactivated those areas with little water
with those strokes. Now with the paint mix, I'm going and creating those same converging strokes
like I had said earlier. Keep observing the brushstrokes, that angle at which I am
creating the strokes. And while we're at it, let me tell you a fun fact or something really
very interesting. If you had not known
about Namibia desert, is that now maybe a desert is by far the world's
most oldest desert. And it has really some
interesting facts about it. I will share it later
in this lesson. Now I will go on
using my brush and letting the color with the same strokes that
I discussed earlier. Okay? So this, I'm doing again
and again because this is the idea that I want to be wet since we went with
wet-on-dry technique, layering your wet paint over
the dry surface again and again will ensure
that your paper is wet for a longer
period of time, enough time to allow you to work and have some advantage
over your paper. If you have noticed, I went with n number
of times with some watery paint mix and
also some damp brush. And as a result of which, my ground had become
much lighter color. So if you also experienced the same go with another code using the same diverging or converging brushstrokes wherever you are
starting the strokes from. Depending on that, okay. And then your ground
colors should match. This almost looks
like a coffee color, I would say. So. It should be
something like this. Okay. Now to create that arch kind of shape
or V kind of shape, anything that you
may want to call. I used my burnt umber mixed
and now with the damp brush, I'm slowly trying to spread it around the sides of that tree. Now here along the side
bays of this tree, I'm going to go and create
some dotted line patterns. Some dots to represent some rocks or pebbles
lying around this area. Here I'm using my burnt umber, intense pure burnt umber, but just the damp brush and
just loading it like that. And at the sides I'm trying
to blend in a little bit. Creating some more dots and patterns over there with
just the tip of the brush, just lightly gliding
around the Brush. Oops, I removed some of
the paint from the base. So I went with one more
coating or layer of the same burnt umber plus payne's gray plus
white mix over there. And I'm doing the same, trying to re-read
the areas again, doing all over the place again. So makes sure that when
you are doing that step, do not keep your palm of
the hand or somewhere when still the paper is wet because in that way you
will live the colors. I think I have covered
most of the part. Hey, would say almost reweighted
the entire ground area. Okay, Now, I think I am now satisfied and I'll
be extra careful in how not to go and
touch any part of that surface here with just the tip of my
size four brush, I'm going and leaving
some lines or marks over there just to
indicate the textures. Here, the textures
need not to be so much defined because it is
far in the background. Okay, now it's time to paint the sand dunes because
this guy has dried. Later on, we will start our ground work once
the ground has draped. So I'll see you again
in the next lesson.
18. Day 3: Arid Cracks- Part 2: Let's get started first
time swatching out the colors that I'm going to
use for my sand dune here. I have watched out both of my burnt sienna
and yellow ocher. You are, you can see so intense and vote lighter
wash tone over here. Now, I will be mixing my
burnt sienna along with my yellow ocher and we'll
get the result in shade. So this is the color
that I'm going to go for layering the base
coat of my sand dune. Okay. So here I have my
brush size number eight from silver black velvet loaded
with the same mixture of my yellow ocher and
burnt sienna mix. And I'm going to go very carefully around the areas
where it meets the sky. I'm outlining the mountains
first and the tree as well. So intense tone at
the top portion of the mountain and then I
leave the bottom area, MT. This is the area where
with a damp brush, I'm just going to
lighten the color out. Okay? So this is how
we are going to create this beautiful gradation
of those sand dune. Continuing the same process at the other side of the
sand dune here too, I'm going with wet-on-dry
technique because you're I want to control the amount of
paint to water ratio, Hence this wet-on-dry technique. Now at the rightmost corner I'll be going in and
adding a little bit of burnt umber on top of it and blend the
colors together. Now for the base
of the sand dune, using your damp brush lift
out just a little bit of colors because those areas
had gotten little intense. We want your lighter tones. Remember just like how
we painted the left. Do. So just make this a little
lighter and with the tip of your brush dry blending the colors covering
all the empty areas. Now when you are
filling our blending in the colors for
the sand dunes, remember to go
with the direction at which the sand dunes
are running along. Okay. Now with little bit of burnt sienna just with
the tip of your brush, try to blend in the colors. Now I'm going to create
the same kind of structures for the
left June to use just your damp brush
and little bit of your burnt umber mixed in
with the burnt sienna. And very light handedly
go along the slope of the dune in this manner to create
some textures over there. Okay, just don't overdo
it or leave it like that. Now it's time to
paint the shadows of the sand dunes costed from
the opposite sand dunes. Okay, So for that here I'm using my burnt umber mixed in a little bit of
Payne's gray into it. But if you have darker shades of brown such as Van
**** brown or CPR, you could use the same. Now here to add the base. I'm going little lighter. At the top, I have used the
intense tone of the mix, repeating the same process
for the one at the right two. So once you are done
with this part, it's time to move on the ground. So my ground has already dried and here I'm going
with my liner brush. I'm going to go and create this irregular shaped
shapes over here. It's not so cool, It's not oval, it's somewhere in-between
circle and oval-shaped. So just with the help of a
sharp pointed tip of a brush, create this irregular shapes. Make sure that your stroke
lines are really pins. They're only at certain areas
of this irregular shapes. We will be going with a thicker strokes indicating
the deeper cracks. I'm not just going
to go randomly with this cracked textures. I'm going to follow with
the strokes that are left behind from the wars that we have created
the background with. Following the same strokes, I'm going to create this
patches of dry land. Now when you are
creating the shapes, make sure that you are going
with some irregular shapes. I mean, some will be larger
and some will be smaller. Okay, so here for
the shapes alone, it needs to be irregular
and in a random pattern. And somewhere in-between
the adjoining are the connecting cracks. Go ahead and use some
darker tones in there. Now, this is how
I'm going to fill the entire land
with this kind of irregular shapes once
we start closing in or we start moving
in towards that dream, the shapes, we'll start
getting slanted in that converging direction and it will be smaller and smaller. Now here, I always wanted to use the
cling wrap technique. Remember if you have taken my watercolor textures
and frozen lake class, you would know how
much I loved creating textures of the cracks
using that method. So I wanted to go with that, but in that cling
wrap technique, I wouldn't have got, you know, this kind of overland
circular shapes. That is the reason I have not gone with the
cling wrap technique. But if you are looking for
those street or slanted lines, you can obviously go with
the cling wrap technique. Now observe as I'm closing
in towards the tree, my shapes are getting
smaller and smaller. Did you observe that? And these are also
thinner as compared to the ones which we have towards the bottom
of the paper, right? One more way of
doing this is I'll just show you in a while
from the base of the tree, start creating slanted
curvy, groovy lines. And just like that, and the line should be thinner. And as you come here, the line should get broader. It will be like
diverging, right? That's what I meant. When you are starting from
the bottom, it is converging. When you are starting from
the base of the tree, it will be diverging. Now, I'm going to create
some darker areas in this cracks just using a
little thicker stroke, I will be repeating
this step until I have covered the entire
area of this land. Now, as I'm closing in
towards the base of the tree, now my strokes are going to get much thinner and lighter shade. And just like that, I'm not going in and creating the full shapes here with
the help of my dry brush, I'm just creating some
dry brush strokes using the same mix. So when you are doing
this dry brush technique, makes sure that your brushes
absolutely dry and try you're using a synthetic brush because it holds less water. So I will keep doing this dry brush technique
in random places over there until I'm really satisfied with the look of
this cracked land. Let me share with you an interesting fact
about this Namib desert. One of the many marvels
saves are one of the most intriguing features is the phenomenon known
as fairy circles, also known as fairy rings, which are barren patches
of land and so called by a single species of grass which are found
throughout the desert. And the most interesting
thing is this fairy rings disappear once though they're yours
of drought and they reappeared again once
it has started raining. Interesting, right.
19. Day 3: Final Details Part 3: We are almost towards
the end of a painting. Here we are going to add few more background
trees over there. For the background trees, I'm going to go with
wet-on-dry technique. Here I'm using my liner brush loaded with an intense mix of burnt umber in case
if you're burnt umber is not as close to this shade. You can mix in a little
bit of neutral tint or your paints black to your
mixture and create this. Or if you have Van
**** brown or CPR, you are very well good
to go and use those. I have started painting
the background trees in the meantime,
my entire paper, especially those sand
dunes shadow part as well as my ground
as totally dried up. Hence, it's, it will be easier for us to create these trees without having the fear of lifting off any
paint from anywhere. Starting with our main tree. For the main tree, before we start here, I observed that I had left a little white patch over there, so I'm filling in with that clay shade that
we had created. Now, I'm going to fill in the tree with my
burnt umber mixed. Here. There will be a time where I will be using
lifting technique just to indicate the darker and the lighter
radius of the tree. I have switched to my
size number four brush to create or fill in the
color for this tree. Here, try to use the full
head Brazil of your brush. In that way he will be able to cover larger areas
together at once. And when required when you want to go and create
those sharp tips, use just the point that if your round brush is not
having a sharp pointy tip, I would ask you guys to
switch to our brush, which is having a
sharp pointy tip and keep and other round brush where you can fill in the colors at the broader
base of the tree. The little mindful about
the water that you add to your paint to not
use too watery mix. Too watery mix will result into fatter or thicker strokes. Here I'm going with two
mixes of my burnt umber. One to the right, I'm using a very light
mix of burnt umber. And for the darker ones, I'm going with PR, intense tone of burnt umber. Now here, the main beauty of this landscape is
this dead tree. So take your time, Have some patients and use
just the pointed tip of your brush to create those
thinner branches of the tree. I'm quite happy with how
this painting has shaped up. And with this tree it is adding so much of that
beauty, isn't it? I hope you are
following along with me at every step of the process in case if you feel that you are getting
stuck at any process, please do not hesitate to
reach me out on my mail id or on Skillshare under
the discussion tab, you could post your queries or anything that you want to
ask or have any doubts, feel free to reach
me out over there. Now here with my damp brush, I'm going to very
softly lift out certain areas from
that tree branch. And on the other side, I'm going to let it again
with the darker tone of my burnt umber and
blend it out like this. So I think we're pretty
much done with our tree. I'm not going to overdo here, I'm just trying to create some dry brush
strokes over there. And yes, we are pretty
much done. If you want. This step is totally optional with synthetic brush, dry brush, I would say grab some
of your white quash and go near to the
bark of the tree, just set the base, try to create some dry
brush patterns here. This would mean the solid
deposits due to the added temperatures that has
deposited on this dead tree. When you're using this
dry brush technique, tried to go from the base
to upwards. Like that. How I'm creating the dry
brush pattern over here. And that's all with
just the tip of my **** brush loaded with
little bit of burnt umber. I went and added some dots over there and that's
all I'm going to do. I'll let the paper
dry out completely. Then we will be
peeling off our tapes. Our paper has dried completely. Now I'm taking off the tapes
from all the four sides. Always do it at an angle. Also makes sure that your paper
has dried out completely. When your paper is
dry out completely, your paper will be
flat like this, okay? So don't be in a
hurry to peel out your masking tapes patiently wet enough for the paper
to dry out evenly. With that, we wrap
up our D3 tomorrow. I will see you again in Namibia with a very beautiful
Skeleton Coast. So until then, bye.
20. Day 4: Color Palette: Hey guys, welcome
back to day four. And today we are going to paint something
very interesting. We are going to paint today a landscape where
desert meets the sea. Okay, so let's get started
with the color palette. First. I will be starting
out with our sky. So for this guy, I'm going to use my cobalt blue or you could
use your cerulean blue. These are your cool blues. Now, if you want to go
for some warmer blues, ultramarine blue
or yellow, blue, you can go ahead and use
them to four-year sky. Here I'm swatching out
my cobalt blue color. The alternatives that
you can use instead of cobalt blue are on screen. Now the next color
would be our gray. So I'm going to mix
and form my gray using that of burnt sienna and
little bit of my cobalt blue. So this is the sheet
that I'll go for. Next would be our yellow ocher. So as you have already seen, yellow ocher is the
common color that we have been using throughout our
class projects so far. Have that along with
my burnt sienna, followed by our burnt umber. Now burnt umber we will
be using for the coast of the sea as well as for some of the darker parts for
the sand dunes also. Okay. Next I'll be swatching
out the sea color for the C I'm going to use
here my cool blue, which is the peacock blue color. Now, instead of peacock blue, you could offer other
cooler options of blues are just Prussian
blue and indigo. Indigo is for creating though wave or the ripples
which will be darker in color. So that is all for the
colors that we are going to use for this project. So I have categorized the colors based on the elements that
we are going to create. So I hope to see you
in the next lesson.
21. Day 4: Techniques: Thank you for joining in. Let's quickly dive into our techniques section
and learn to paint each and every element for
our skeleton coastal Namibia. But we'll be starting with
the sky as usual for the sky, I'm going on
wet-on-wet technique. The only difference here in this project for
this guy will be here we are going to paint largest stretch off
cloudy areas of the sky. So far that I ensured that I went ahead and laid my paper. The area where I'm going
to paint the sky with an even coat of water with
the help of my cobalt blue, I'm going to go and create some patches of that
bright blue sky. So here we are just
doing the alternative of creating the patches with our bright blue instead
leaving them white. It's just that difference right? Now at this point, what you can do is if you want to fix those bleeding areas, you can use just the tip of your brush and
smoothing it out. Or you could also lift out
some of the areas from the blue where you would want your bigger cloud chunks to be, just lift out the
colors over there. Now I'm preparing
the gray mix using my burnt sienna mixed with
little bit of my blue. So you're is it and
I'm going to drop it just along the bottom edges
or maybe at the center. And then with the help of
my another **** brush, I'm going to just use the tip of that damp
brush and blend it out. Now next will be a sand dunes, I think by now, all of you must have mastered the technique of
creating sand dunes with different textures and
shadows and depth into it. So here's what I'm going with freehand sketch
of the sand dunes for awhile and just using slanted strokes to
get the colors down. So here I am going with
wet-on-dry technique. I think by now you'd
know it very well. What kind of technique
I am going ahead. So it means applying your wet
paint on your dry surface, which was our people. Now here I'll be going ahead
with the layering technique, also known as glazing. I'll be going with some
darker shades of brown, preferably my burnt umber. And just go along those strokes. What we have just created,
those slanted strokes, just in few ideas to create the shape of this sand
dunes or the textures, how the sand has
deposited over time. Now here I'm going
to grab little bit of my Payne's gray mix
it with my burnt umber. And just with the tip
of my damp brush, I'm going to go and create some dots and irregular
patterns over there just to indicate some lying rocks or pebbles
across the sand dunes. Okay, So we're moving
on to our next element, which is a C. Here. For the C, you can go with
wet-on-wet or wet-on-dry. That's totally up to
you for this project. I'm not going with wet-on-wet
technique because it would take time for us to
get up paper dried. And also we want to create
this ripples for which we need our people to be
almost in a semi dry state, not fully wet, because
we want the ripples to hold their shapes as well as to blend into the background. That is the reason I
will be going with wet on dry technique
and not wet on wet. Now, in case if
you want to learn more in details
about how to paint, see and it's repulse. You could check out my class
seven days of vitamin C. I have explained
it all out there. Don't worry, I'll be
explaining the process all over again when we go
into our main project. Now, let's move on
to the next element, which is short for the shore. I'm going to use
my burnt sienna. And also I will be
going ahead and using some of those
splattering technique to create the textures on the sand. Now, I'm going to go with the little bit of
layering technique to create the shadows
for this sand area. Now, I'll be grabbing in some of that yellow card and just go over the center area and blend the other colors
together on top of this. Now with the help
of pen liner brush, I'm going and
splattering my water. So it's just the plain water. You could also create some mix of your Brown's
darker browns and splatter it as well to indicate the grainy textures of the sand. Now another important
part is the beach face. That is the wet area
of the beach or the shore here for the for
that beach face area. I'm going to use a little
bit of my purples out here. So mix your blue along with the mineral violet to get the
similar blue violet tone. And just do it the use of your damp brush go and let
the colors in that direction. How you have painted
the line of the shore. So if it is slanted, go with the slanted
strokes like this. Now coming to the
last finishing part, which is R for me part of the C. As you can see,
those forms I have created using my white gouache. So instead of white gouache, you could also use your white
watercolor paint to create this sea waves with little
bit of foam over there. Okay. So I've switched to mini
detailer brush here. But instead of mini
detailer brush, you could use any round brush
which has a sharp pointed, rounded tip and create this
retreating area of the waves. Your goal with smaller strokes to create these lines now go with some slanted
exact lines. So create some
interlocking patterns in between these waves. More of this is there
in my another class, seven days of vitamin C there
in one of the projects, I have shown you in
detail how you can create this interlocking
patterns for DOC waves. Here with some of that blue, I have created this, you know, crashing waves or bulge which is going to crash into
the shore area. Now using mine,
another round brush, I'm going to use dabbing
motion of the brush to create this splashy part or the
foamy part of the wave. Here, go ahead and use your dry brush
technique for the same. Use, thick consistency of
white gouache and keep dabbing in across the area where you have painted
the shoreline, especially this crashing
wave and keep dabbing until you are satisfied with
the fact that you have got, I hope you are confident with
the techniques now practice these techniques if you're not confident on a separate
piece of paper. And then we will get
started with our project.
22. Day 4: Skeleton Coast- Where the Sea meets Desert: Part 1: Let's get started with our
project first and foremost, I'll be taping down on paper with the help
of this masking. The paper is taped
down on our board, and now it's time to do the
basic pencil sketching. 3 fourth of the paper
will be the sky. The horizon line will be
separating the sky and the C. Okay? Now here just above
the horizon line, I'm going to go and sketch
out the areas of sand dunes. And below the horizon line, I'm sketching out the C part. Like every other class project, I would suggest you to first
go through or watch through the entire sketching process
or the entire video first, and then pause the screen
and create your own outline. I was not really happy with
the waveform over there, so I'm going to create
it all over again. Here. I'm creating the
crashing wave line, okay? So the one in front will
be the retreating wave and the one behind will be
the next incoming wave. Here is our final
pencil sketching. So you could pause
the screen out here and then sketch it out. Let's get started with this guy. For this guy, I'm going to go
with wet-on-wet technique. So by now you would have
done that for this guy. I always prefer to go with wet
on wet technique because I love those mood flawless
transitions in the sky. And the smooth sky always
gives me a happy feeling. So whenever I want to paint sky, I always prefer to go by, but don't read method. Now, I'll be preparing
my paint mix. The paint mix that I'm creating
here is my cobalt blue. Makes sure that you are not creating too watery
paint mix out here. I'm going to use little intense
tone of my cobalt blue. Okay, so this is how I'm going. Observed my
brushstrokes out tier, I'm going and creating little slanted strokes
out here and using just the tip of my
brush to go and create some of the blue lines
are patches in the sky. Now can you see what has
happened over there? My color is all flowing
down and you can see right there is a pool
of water over there. So I'm going to use my
flat brush and grab my tissue travel and all the excess water that
is there on the paper. I'll be trying and
removing them. So I'll tilt my board in such
a way that all the excess of water that is there in
my paper is drained out. And with the help
of tissue paper, I'll be just soaking it all up. All that extra water is
now off from people. Now, with the help of my damp brush loaded
with cobalt blue, I'm going to go over those
areas one more time because the initial layer had
faded out because of too much presence of
water on the paper. I'm going to go ahead and use
the tip to create a light, airy strokes to create those fluffy blue
presence of cloud. Next step is to
prepare the gray mix. It is advisable that you prepare your gray
mix well ahead. As soon as you I plan to start
your painting because you already know I had already briefed you about in
the technique section, what are we going to do? So once you have your
reference planned out, always go ahead and
mix your colors. Prepare your colors well
ahead and keep it in your palette so that
in-between your painting, you do not have to go and
mix your colors, right? So that will save your time. By this, you would also
have an advantage to work quickly with your
wet paper because mixing your colors
and then coming back and going ahead and layering it might take some time and your paper
might start drying up. So in order to avoid that, always mix your colors
well beforehand. With the help of my
**** dry flat brush, I'm just going
ahead and layering my gray mixes over
this white patches. Okay, now, do this, they're very likely
and gently do not use too intense gray areas. If you feel that the blue
areas that you had been tuned has started to
fade out a little bit. You can go with another layer of your light cobalt blue mix
and created one more time. But do this step only when you feel your paper is wet
enough for you too. Blend and spread the colors
smoothly and evenly. If your paper has
started to dry out, avoid or skipped this
step totally cure. I just feel like going ahead and creating some
more blue patches. But if you feel
that you are happy with how your sky is
looking right now, you might avoid this
step altogether. There is no hard and fast
rule had the way I am going with this layers of blues
in-between my whites. You will have to also
exactly copy the same. It's never like that. So you do whatever you feel
that you are happy about. I am now going and
cleaning of this bleeds that I have got because
the paper is wet, right. I do not like this kind of
bleeds in my cloudy sky. So I just use the dam tip of my brush and lift
off those areas. Now VT0 for this guy to dry out a little bit and then
start out with your dunes. For the dunes, I'm going
with my yellow ocher here. Observe I'm going with
wet on dry technique. And the reason why I told to wait out for this
guy to dry out. There, I was getting
some bleeds, the yellows where bleeding
into the blues of this guy. So wait for your
sky to dry out and then only start
with the dune part. Okay. Now, just like how we
had seen for our D3 project, the base of the dunes, we will go with a lighter shade. The top areas of the dunes
will be your darker shade. Okay. So using just your ****
little watery brush blend of the colors towards the base, making it a transition
from dark to light. Be mindful of the
paint to water ratio. I cannot stress
about this enough. I have been repeating
the same in each and every
class project rate. It is very important
that you try to understand how much
water is needed in your paint mix when
you are going and creating textures like this are creating elements
where you need to know how much water control you should have in
your paint mix right? Now here, I went with some of that burnt sienna to create some darker parts
of the sand dune. Observe the strokes. All my strokes are aligned towards the direction
of the sand dune. Okay. So my sand dune is sloping from top to bottom and left
and curvy direction. So am I following the same direction even with the darker, burnt sienna tones? I will be blending that out with the help of the dam
tip of my brush, make sure that you blend
out the strokes evenly. There should not be very
prominent hard edges. It will really not give a good feel and look
to your sand dunes. It is important that you learn the technique of
using wet-on-wet and wet-on-dry and to how you can create smooth
and softer blends. Do you know why the Skeleton
Coast has got its name? So this is because this part
of the desert is named for the bones and the hundreds of broken chips that
litter its beaches. And of the main reasons
for so many shipwrecks is the stretchers,
Gail wind forces, and the crosscurrents that blow from the sand
dunes to the sea, creating our dense fog, due to which visibility becomes absolutely 0 and the ships almost bang into the jagged
reefs along the coastline. That is why it is known as the most dangerous
coastline in the world. Okay, So now coming
back to our painting, I'm going ahead with my damp
brush and trying to gently smoothing out the Dark Ages by blending and softly
into the background. So I'm going to create these
textures and the illusion of many sand dunes forming
on top of each other. Okay, like, you know, kind of range of smaller
mountains, you could say, by adding in some
distinct boundaries are layers using
my burnt sienna. Just keep observing. Now that I'm satisfied with the dunes now it's
time to create some smaller debris ease with my
intense tone of my bond. Umber, you can make a little
bit of Payne's gray into your burnt sienna and create
your burnt umber as well. Okay. And create this along the foothills of
those sand dunes. Okay, Just like that here, try to go with some
intense tones of your burnt umber mixed with
a little bit of black. Do not use too watery
paint because if you use too watery paint that would create blue into the sand dunes, you do not want that. You want little dots like dabbing strokes
from your brush. And that's all. Let's start
with a C. So for the C, I'm going to use a peacock blue. You can see from the right, I have gone ahead with
an intense tone of peacock blue and towards
my left eye diluted the same peacock blue and
created this lighter shade right here is the transition from dark to light,
as you can see. Now, I'm going with
wet-on-dry technique. And in certain areas of the sea there will be varying
depths, right? So with lighter and darker
transition of colors, you are going to
depict the same. Now here, do not try to use too watery paint mix out yours. You need to have control
on the water where Ts, when you use a little bit of intense watery mix of
your peacock blue, you would be able to
cover larger radius altogether and keeping
your paper wet for a longer period of time. And also whenever you are going with the C tried to create this depths with varying tones of color and your brushstrokes. Try to create some ripples
using the tip of your brush, like the manner I'm doing.
23. Day 4: Skeleton Sea & Coast Part 2: Let's continue with us. See here observed the
strokes that I'm using, I'm going and using
the same paint mix, which is not too
diluted with water, as well as it is not to
take it somewhere in between the medium
consistency of water and paint so that I get that
vibrancy of the sea as well as have the paint flow and
covered larger surface area. Also. When you are
approaching your coastline, makes sure that you go
with the same direction of your brushstrokes as the
pencil outlines, sketches. Once you are done with the C, I'm going to go and create the wet part of
the shoulder area, which is also known
as the beach face. So I'm going to use my purple mixed with little
bit of my cool blue, that is my peacock blue. And I will just go and create this slanted strokes
towards the see, okay, from the shore. So this is how I'm
going to do it, it, this step is very necessary because yard outlines, sketches. The sketch or the boundary
of the sea that you have created is leg
towards slanted rate. It is not very straightforward, or the straight cut
one, it is slanted. So always go, try to go with the same kind of direction with your
brushstrokes as well. To give you the perfect
realism into it. Here, I'm starting with the
shoreline or the coast area. For that, I'm using my burnt sienna mixed with
little bit of burnt umber. Here. Try to be
observant with the brush strokes that I'm
going and creating. And when you are
near to the areas of that beach face
curves and the grooves, use just the tip
of your brush to go and create those
smooth outlines. Now from the bottom right
corner of the paper, I'm going to fill in using some horizontal strokes
using my yellow ocher. Now here I'll be trying
to blend those areas of my burnt sienna mix along with those yellow shade to create
the shore kind of effect. And towards that
beach face area, I will go and darken
the areas a bit more using my burnt umber mixed, try to blend the
legs out together. And now here I'm using
my dry synthetic brush, size them before and creating this outward strokes from the
beach face, radiating out. Okay, this is like the
convergence strokes to go with convergent and
divergent strokes as well. Once you are done with that, you can start with those
flattering technique. Oops, I have splattered too
big of those water droplets. I need to use just the tip of the brush and blend those
wet areas out again. And here I have to go
with another layer of that burnt sienna mix one more time because those
droplets were too big. Now in this step, my lighter parts of yellow
ochre, red almost hidden. So I will just use my
damp brush and lift out certain shades from there
and expose my yellow ocher. Now I'm covering up the part, the sky part and the C part. And now here I'm starting to splatter those mics
off my browns. Now to create more interesting
texture on that sand, use the splattering
technique to width water, makes sure that your brush
is not too loaded with water because you
need to have smaller, tiny droplets are blooms. My Sea area has almost dried
up because we had gone with wet-on-dry technique
with the help of my size number 12 brush, I have reloaded the brush with the little watery
mix off my peacock blue and I'm going over
those areas all over again. Okay, so creating
some darker shades as well as some
light two sheets. Now using my size four brush or you could
use size number two brush, anything which you
are comfortable with. Make sure that your
brush has a pointed tip. Try to create this
smaller waves or ripples. Smaller waves or ripples will be towards the horizon line
just below the sand dunes, okay, because this is
the farthest point. And as you are closer
towards the shore, the repulse will be
little bigger in size. Now here I'm going and
creating this crashing waves. So just create this bulges. Sharp bulges of the waves. Once you are happy with this, crashing waves, start
with their background. See there you want
to create some more of those waves and
ripples in the C using the same mix of
your peacock blue and mix a little bit of Payne's gray into it to
get a darker mix. Or if you have indigo
available with you, you can directly go
ahead with indigo. Now, make sure that whenever you are using this paint mixture, not make it watery. Watery paint mix will totally
ruin your C because your, your paper is almost
in a semi dry, semi wet kind of situation. So any extra water will cause the pain to move around
and shift causing blooms. I'm going to repeat
the same steps to create this background waves. And also I'll darken some of the ideas there on the
crashing waves as well. Time to create some
sand texture in this beach face area
or the wet sand area. So the signed area, if it is wet, needs to have
certain tinge of brown. Right. So I'm layering this purple beach face with little bit of my burnt
sienna, burnt umber mixed. Just a very light wash of burnt sienna mix and
blend it with that popup. Now remember the white part that we had left for
the crashing wave. So just beneath that go
with some darker tones of brownish purple mix and
create a darker tone of it. Because underneath the waves, you need to make
those areas dark for your waves to be
prominently seen on the paper because
underneath the waves is the shadow part or the shadow area and
hence the darker color. Once we're done with this, we will start with our little waves in the
background of the sea. So here I'm using my liner brush and with the thick
consistency of white quash, I'm going and creating this wavelike ripple
forms over there. Okay, so it need not be a
perfectly straight line. Waves are never symmetrically
straight raid it, it has some calls and forward
areas, backward areas rate. So use those kind of goals and grooves to create your waves
in this background, areas. In the background see, these waves will
be very smaller as compared to the one
crashing on the beach. Right? Now, I'll be switching
to my size four brush. After I'm done with this, I'll just go and redo the wave, the wave ripple of this particular wave that
we have just created over there using my
little intense tone of my peacock blue, just bulgy curvy line out there. And that's all. So go and darken the areas underneath
those smaller waves also. Now it's time to create the foamy part of
that crashing waves. So for that, I'm trying
to use my liner brush, but since the point
is to elongated, I'm not able to have a
proper grip over there. So I've switched to my
favorite round brush, which is extremely round. It has very sharp
pointy tip at towards the tip or the FX rate and the entire brushes
very much rounded. So use this brush to create
this splashing effect. So I'm just dabbing the brush, make sure the brush out
here is totally dry. I'm just lifting up
those white quash, the thick consistency of white gouache and just
dabbing my brush and this motion just along the curves of the wave
that we have painted. And that's how we have
got our very foamy wave. Now, with the help of
another brush here, I'm using my brush
size number two. I'm going ahead with
its tip loaded with the thick consistency
of white gouache and creating my lines
of the waveform. Now loading my liner
brush with the help of this thick consistency
of white gouache. I'll be going and
creating the strokes. Going over the strokes all
over again with white gouache. To create the take quite
for me part of the wave. This wave is the crashing wave. So I'm just going underneath
that white part and creating the outline or
the shape of this wave. So here, once I'm satisfied, I'm going to go ahead
and start creating the interlocking waveform or the patterns of the
retreating wave just after the crashing wave. Okay, so I'm going to go with the zigzag pattern
with the help of my liner brush loaded
with my consistency. Of course here the quash
consistency should be medium, it should not be too watery, it should not be too thick. And here I will be
going ahead and switching to my fine
mini liner brush. If you're comfortable doing this interlocking patterns
with their liner brush, please feel free and go ahead and do it
with the same brush. I have more control
on this brush, which is my mini liner brush, because it has a very
sharp pointy tip and I get precise control
on the amount of thickness or thinness of the interlocking wave patterns
that I'm creating here. Now, I'm going to repeat
the exact same steps, but here the stretch
will be a bit longer. First I start with my outlining the areas
of that beat form. You're used thick consistency
of white gouache and make sure that these do
not become too thick. You need some thin, very crispy lines over here. So switch to our brush where you have more
control like I have more control on this
fine liner brush instead of my liner brush. Here. This is how I'm going and creating strokes to
slanted strokes. I have filled in those areas with little bit
of white gouache. I'm going to go and do little
dry brush patterns over here at the right corner and fan it along to the
left side as well. With a pointy tip of the brush, I just go and create this curvy top sea lanes for
the waves, retreating waves. So you're trying to go and form interlocking
wave-like patterns. This interlocking
wave-like patterns I have explained elaborately. Skillshare class seven
days of vitamin C, where all these aspects of painting C has been
explained elaborately. Now, I will go and create some more foamy part in the background of
the sea over there. The colors, the white quash
had faded out a little. So I'm just going
to go add a little bit more using my
mini liner brush. Almost done. Now comes the exciting part of
splattering this white gouache. To depict the white for
me, splatters or Farsi. That's all for this painting. We will let the paper
dry out completely. Then we will be dealing
off the masking tape, peeling of the tapes
from all four sides. Now, doing it at
an angle and only after our paper has
dried thoroughly. I'm totally loving how this
painting has come out to be. I hope you had fun painting
this along with me. I'm eagerly waiting
to see you upload your projects in the projects
and gallery section. I'll see you again
tomorrow with day five.
24. Day 5: Color Palette: Hey guys, Welcome back. So let's quickly get on with
our day five color palette, E5 color palette
is pretty simple. It will consist of all your
warm color tones here. First I go with Naples yellow. Now instead of Naples yellow, you could mix and create
your own Naples yellow, which will be discussed
in the main project, then followed by a light red, yellow ocher, burnt umber. Now instead of burnt umber, you could also offer
any darker shade of brown and last but not
the least, Payne's gray. Payne's gray and burnt umber will be used to
create the shadows. And that's all I'll see you again in the next lesson where we are going to go over the techniques which will
be required for a project.
25. Day 5: Techniques: Let's get started with
the techniques first, beginning with this
guy here we will be going with wet on wet
variegated wash. Now, what is variegated wash? When you use two or more colors and go for a gradient wash, that is the
transitioning your sky from light to dark
colors are dark to light that is known as
variegated wash. Now I have lead my paper within
thin even coat of water. Now using my lemon yellow and
a mix of my cadmium yellow, I'm going to prepare this mix, and this is the mix
that I'm going to use for the glowing part of the sky. I'll start from the center. Now with just the tip of your brush to blend
in the colors, move around the colors on the
either side of the paper. Now I will wash my brush, and here we will be creating just with
the tip of my brush, the outline of the setting sun. Now I'll be using little
bit of my light red color, mix it with my yellow to create this brownish orange shape. Now with just the
tip of the brush, I'm going to go and
create an arc or a semicircle to create the
shape of the setting sun. The idea was dry where we have went ahead and
created the outline. That's why the colors did
not really bleed into it. And other adjoining areas. I'm just going to let
the colors that is there in my brush
just from the sites. Now I will grab bit more of that lemon yellow and
I will start blending the colors where they wear those distinct cell sharp lines from the reddish
orange color, right? So I'm just going to blend with the help
of my damp brush. The center area should
be your glowing area. So try to retain those areas
with the lemon yellow. Now coming to the next element, which is a sand dunes. Now, by now I think you all
know how to go ahead and create your sand dunes here the sand dunes will
not be as high. It will be closer to
the ground levels, so there will be little high res sand dunes
in the background. Now with a darker mix of brown, I'm going to go and
create the shape of the sand dunes just
with the tip of my brush and trying
to blend in in here, the main important point
is my paper is still wet, so the moment the paper
starts drying out, it becomes a little
difficult to blend these areas with the
background color and create this
softer looking edges. Okay? So always make
sure that you do this step with
loose watery paint. Paint your background
with loose watery paint, and then go over those
areas with the darker tones so that you can easily
blend out these ideas. Now that is all for the sand
dunes here we're going to outline those skyscrapers of Dubai and the famous
boots Kaleeba. So that is one of the most tallest building
in the world, right? So that's what we're going
to sketch it out over here. It's just a rough
outline sketch. The details will be in
the project section. So we are going to sketch out some of these high
res skyscrapers. My outline is done and now we
are going to start filling this shape of the
buildings with our colors. Okay, so here I'm going
to use two shapes. One is our burnt umber mixed with a little
bit of Payne's gray, which is for the shadowy
parts of the building. And the other one will be the lighter color which
will be burnt sienna. Now here we might be
sometimes going from the intense tonal value of a particular shape to
its lightest pigments, such as here, I had
first coated it with the burnt umber at the top, which is the darkest, and then feed it out, right? That was the lightest tone
with just the damp brush. Now here I'm going again and I have lead it with another
coat of burnt sienna. So that is how we
are going to create the shadow and depth
of the buildings, exposing the lighter as
well as the darker colors. So this is how we are
going to go about it. And you're am going and filling in some
more darker shades. And that's all. This is the same
thing that we are going to repeat
on the left also. So let's jump start our project.
26. Day 5 Desert Sunset At Dubai Part 1: Hey guys, welcome to day five. And like always, I have
taped down my paper on all four sides using
my masking tape. I have tilted my
paper a little bit by using a smaller
masking tape there. If I project is very simple and hence the sketching
is also very easy. I just went and created a horizon line around
three-fourths of the paper. And then I'm going and
sketching out the sand dunes. Dunes, okay. Now here I just went and created some more bulges
indicating others sand dunes. Subject is sunset view from the desert overlooking
the Dubai skyline. So for the setting sun, I'm using a coin over here. So you could use any round
object or a campus event to go and create this color half
semicircle of the setting sun. And now I'm going to create the tallest skyscraper
in the world. That is, they are Burj Khalifa. We are going to go
and create just as elaborate of these buildings
from the setting sun. Hence, there will not be
any detailing required. Okay, so just the outline
of this building would do. Now adjacent to it, I'm going to go and create all the other skyscrapers
surrounding this main building. Okay, so just a basic
pencil sketching would do, as I always say, if you want to get
the final outlook of this sketch and then go and
start your pencil sketch. I would request you to fast-forward this areas
or go along with me, watch the full video and then start your
pencil sketching by pausing the screen
out there where you find the final outcome
of the pencil sketch. We are almost done. Here is the final sketch. You could pause the screen out here and then start your sketch. For this project, I'm going to first start
with a foreground, which is our sand dunes. Okay, So I'm going
and starting it with medium tonal value
of my yellow ocher. And just around the horizon, I'm using just the tip
of my brush going there very sharp and precisely here I'm going with
wet-on-dry technique because at certain areas I want my papers not to be wet for
a longer period of time. And hence, I have chosen
to go with this technique. He owed at the base or
bottom of the papers, use your little diluted form of your yellow ocher and start
layering are covering it up. Here. I'm trying to blend
out those hard edges, trying to evenly
spread out the paint. And now with another brush, I'm going to go and create
some darker tones for our sand dunes using
our burnt sienna mix. At this point,
I'll be going with little bit more darker shade
because you can see red, It's quite blending well
with that yellow ocher. Here. Observe the change in the direction of
my brushstrokes. This is the same way
that you can create the dimension that you
want in your painting, especially the direction of how the sand dune
has been formed. Now at this left corner, I'm going to go with
some intense tone of burnt umber and create this
diagonal slanted strokes. Now I'll go and use the tip
of my brush to create this darker tones onto those upper or the topmost part
of the sand dunes also. Here we are going with
layering technique, but on a red background. Why? Because we want
these areas to be smooth and softly blended
with that of the background. And hence, that is
the reason we are going with wet on wet layering. Now at the bottom
of the paper I'm going to go with
yellow ocher mix and we'll cover this entire
whitespace with the same mix. Now switching to my size two brush from
silver black velvet. And I'm just trying to spread
around the darker areas, layering it again with some
darker areas just to create the valleys are the grooves
that the sand dunes firms. Now towards the
bottom of the paper, I'm going to go with my burnt umber mixed with a little bit of Payne's gray and create some marks on
the sand of this dunes, just like this, using the tip of your brush and creating some marks and
patterns over here. Adding in some darker tones
over there in this mux. Okay, now, towards the right
corner I'm going to go and create some
more loose strokes with my burnt amber mix. We're done with the
sand dunes now it's time to start our sky. But before that, I'm
mixing my colors. Well ahead here I'm creating
a mix of Naples yellow. You could say it
has Naples orange. By mixing lemon yellow with
that of my scarlet red, it's time to code the sky area with an
even wash of water, makes sure your water
should not be in excess. It should not be forming pools, puddles because if in case there is an excess amount
of water in the sky, it will all start
running down towards the sand dunes that
you have already painted and you
wouldn't want that. Here? I went around the sun. I did not wet the sun. Okay. So make sure that
you do not wear your son because I want the center
of the sun to be white. As I've already mentioned
in the earlier projects, always use your lemon yellow to create the sunset
glow in your sky. Now I'm spreading this lemon yellow at the center
of the paper, leaving some white gaps as well. I'm going to blend
it out with some of that cadmium
yellow now around the sides and at the base of
that lemon yellow as well. Now, as you go or approach towards the
base of a horizon line, we're not going to
paint it with orange. We are going to mix
a little bit of burnt sienna with a
little bit of red, and then we are
going to paint it. So this would give you a very sober and beautiful
color of the sunset. Now towards the right
side of the sun, I'm going to use my
orange mix as we had already prepared it well beforehand and around the sun, I'm going to go with
just the tip of my brush and create the outline. Now towards the right, I'm going to just
blending the colors, this orange and
brown shade mix with that of the yellow that
we had lead in the sky. Now it's all about the blending
that we're going to do. Now as we move to the
top of the paper, are colors will get lighter. Okay, so that is what
you should remember and use of a brush which
holds more water. And use the medium or the lightest tonal value
of your color and try to blend in together with data of yellow just with soft,
light, gentle strokes. Now here, going over
with that **** tip of the brush and just
trying to blend in the colors very
light and softly. The more softly you
will do this step, you will be creating very smooth and soft
transitions in the sky. So that's all for this guy. I will see you again in the
next part of the lesson where we will be going ahead and
creating this elaborate.
27. Day 5: Painting Building Silhouettes Part 2: Continuing with our desert. Here you can clearly
notice, right? Or desert has faded
out completely. That's where I'm going and
reweighting these areas very light and smoothly with the help of my size
number 12 brush, making sure that I do
not lift up any colors. Now with little intense
tone of my burnt umber, I will go and let it
using my tip of my brush. Okay. If you feel that you
have led to much of color, wash your brush and just try to blend in because we have just reweighted this background areas observed my
brushstrokes over here. I'm not really completely going with flat and straight strokes. I'm going and creating some bulges which will
represent the dune, the bulged or the heaps
of the sand dunes. Okay. I'm going to go and continue with the same steps until I'm satisfied with this other
shadows of the sand dunes. Okay, so here I'm continuing with just
the tip of my brush and creating some
slanted strokes to indicate the other
part of the sand dune. Adding some darker strokes from the right-hand
corner as well. And here I'm not going
with a straight line. I just created a bulge
over there now with the help of my size
number two brush, I'm going to go and create those marks on the
sand all over again. Okay, so just random shape and create this kind
of marks over here. And that's all. At this point, we will let the sky, as well as the land area dry out completely before we begin
with the building silhouette zoomed in a little about the
space so that you can have a better view here with the help of just the tip of my brush, I'm using my darker
mix on my palette. So here you can see rate that's burnt umber mixed with
little bit of Payne's gray. Now I've switched to my size number four brush switch here to a smaller size brush so that
you have a better control. The paint mix out here
is little watery because we don't want a very
dark tone out here, but we want certain
dark areas as well as certain light
areas right there. I have created a mix
of my burnt sienna as well as this darker
mix of my burnt amber. Again, a droplet of water
has fallen and yes, I have lifted up the paint, so I need to prefix this
area all over again. I don't know what's
wrong with me. Second day project was ruined because of just
the drop of water. So please be very mindful
of this drop of water. Whenever you are
washing your brush, do not wash to
vigorously that you splattered the water droplets
all around your painting. Now with the help of this
size number two brush, I'm going to go and create the others elaborate
of the buildings. It's just the filling
of the colors. Remember, one particular site, go for the lighter tones and then one side go for
the darker tones. So that would indicate
the depth or the shadow cast by the other buildings on the particular
building, right? Where the light is falling
will be the lightest color and where the light
isn't falling upon, that would be the darkest tone. From here, I have
phosphorylated the process. This is because it's the rep, step of just filling
in the colors of lighter and darker shades
and blending them together. This is how we are
going to fill in colors for rest
of the buildings. T5 is a very simple project, and I have chosen this project. This is because here we
already have applied all the techniques that
we have learned so far in the class from
day one to day four. So it looks very simple, but the outcome is
really very beautiful, especially with the
soft glowing Skype. Make sure when you
are going with this main building
of Burj Khalifa, one of the biggest
landmarks of the way. Make sure your paint
is not too watery. You need here, your tip of your brush to be very
sharp and pointy with the smooth flow of your paint so that you are able to paint the curves very
sharp and smoothly. Do not go with two watery
mix because that would totally ruin the sharp
corners of this building. Try starting at the top part. Oops, can you see the paint is bleeding onto
that area because that's the area where
my water droplet had fallen and I had
reweighted that area, laid over the paint again. Wait for this area to get dried in case if
you do have spilled some water droplets
and you went over those areas or your sky has
not dried out completely. I would suggest you
wait for your sky to completely dry out and then
start with this, love it. I will let that area get right. In the meantime,
I will start with the left side of the syllabus. Okay, So here too, I'm going to use little
darker shade than that we have used for the right. It is because our
sun is setting and the left-side buildings will be almost towards the shadow side. My lighter shade, I went and use little bit of burnt sienna
mixed with little bit of red, that is the red brown, and then mixed it
with little bit of that dark tone of burnt
umber towards the left side. Okay, So this is how you are going to paint the
buildings at your left. So just relax and keep painting this lovers using your brush. This painting's
main objective was to make you feel
relaxed when you paint. Because all throughout
day one to day four, we have created lot, many complicated
elements and subjects. So this painting is merely very, very simple rate as
compared to the others. So take your time, relax. And D6 will again be
a little rigorous because we're going
to paint beautiful, dramatic sunset sky with
that desert backdrop. Now from here, I'm going to
be extra careful because my building or the epics part of the building is
going narrower and narrower. I need to be very careful of the amount of watery paint
that I'm having on the brush. So make sure that you soak
up the extra water from the base of the bristles from the brush and then go and start painting not from the tip. I repaid only from
the base of fear. Bristles, right,
the ferrule where the valueless starting and holding all the Brazils soak up the extra water with the
help of tissue paper from that area and go
and do this top part. Finally, we are done. Okay, I'm pretty much happy and satisfied with how this
is looking. Overall. I'm going to fix a little
bit of those paint which had gotten into that white of
portions of the sun, right? I'll just go with the help of white gouache using my size
number two brush and I'll just try to lead the
white gouache over this ADS trying to
cover those patches. Okay, and that's all if
you want, you can paint, give the Sun a little
bit of orangeish tone also to it by going with a light reddish
brown color into it. It's totally up to you. I'm choosing not to go with it. I like it better in this way. So I'll just retain like this. I'll wait for the paper to get dried completely
and then I'll be peeling off the tapes
has dried completely. So I'll be going and removing all the masking tapes from
all four sides of the paper. Make sure that your paper has completely dried out
or else there might be a chance that you will rip off your painted part along
with your peeling tape. So make sure you do it at an angle and have
little patience. And that's all I'm in love with, that sky and the
desert and all the colors that have
blended harmoniously. I'll see you again
tomorrow with D6, where we are going to paint a colorful sunset from
the desert of Arizona.
28. Day 6: Color Palette: Hey guys, welcome back. Today we are going to paint a beautiful sunset sky
from the Arizona desert. So let's quickly take a look
at the colors required. The colors with all its
pigment information is given on the screen. So make a note of
all these colors. Get your color palette ready. And then we will be
going and checking out the technique
section for the Desert. We're going to use
our yellow ochres and little bit of sap green mixed with a little bit
of burnt umber. Now, instead of burnt umber, I have here used round red. And when you make sap
green and brown, red, you get that greenish brown, which we are going to
use for our mountains. So get your color
palette ready and let's jump into the
technique section.
29. Day 6 Techniques: Thank you for joining
in and this technique section for our
D6 class project, we are going to paint this
beautiful sunset view from the desert of Sonoran. So the very first
element that we are going to create is the sky. And here we are going to
paint a dramatic sunset sky. First, I will go
wet-on-wet for this guy, meaning I will be
applying wet and paint over my wet paper surface. First, I'm going to start by applying an even
coat of my yellow. The yellow that I'm
using here isn't warm, yellow, permanent yellow deep, and going across the paper from either sides with
horizontal strokes. Next, I'm going to coat it
with some orange layers. Now, when you are applying
this layers of orange and yellow makes sure
that you are leaving out some white
spaces in between. Now here, I'm starting with the topmost part of
the sky wearing, I'm wearing my cobalt blue
and peacock blue mix. Instead of This makes you could directly go ahead and
use your cobalt blue, cerulean blue, any lighter shade of blue, preferably cooler one. Okay. Then I will be now going with some of
that mineral violet. So mineral violet and blue
really blend well together. They are harmonious combination, but be little careful
when you try to mix mineral violet with your
yellows and orange. So you can notice, I'm going and mixing
my mineral violet, blending it into the blues, but I'm not doing the
same for my yellows. Instead, I have those certain white
gaps in-between right? Now they're, the
oranges faded out. So I'm going to go and create some more brighter
shades of orange, letting it just beneath
those violet clouds. Here, the mixes not
looking proper, so I'll switch to
my size four brush. And with the damp
tip of the brush, I'm trying to gently blend
out the colors over there. You can blend out these
colors so smooth and softly only when
your paper is wet. So make sure when doing this
step that your paper is wet. Moving on to our next
supporting element, which will be our
Rocky Mountain. This is almost similar
to that Rocky Mountain or the Buttes which we had
painted in our day to project, we are going to apply the same
techniques over here too. Just the difference
will be here. We are going to add a little
different color combination. So observe my
brushstrokes over there. I do not have any
outline, pencil sketch. I'm just going with the tip
of my brush and created those vertical strokes over there first with
the yellow ocher. Now, topping it up with my
unit reddish brown mix. Now we will be creating some darker parts
of this mountain. For that, I'll be
using my burnt umber, go with an intense tone of burnt umber and use just the tip of your brush and create along this lines are
vertical stroke. If you want, you can
mix a little bit of violet and use yard. The side belly of
your brush to drag the colors down along
the vertical strokes. Here. It's looking too dark, so I'll go with the
damp brush and lift out using vertical
stroke as well. It very gently lift out certain areas in-between
those darker areas. Okay. And again, lead with a darker area in-between
those lifted out areas. And here you are. You create so easily this kind of rocky terrain of a mountain. We are going to create our
third supporting element, which will be the ground, where we are going
to paint vegetation, along with the famous
characteristic of this desert, which is the the cat taste, especially the Saguaro Cactus. I'm going and creating the
ground using my sap green, which is mixed with a
little bit of burnt sienna. Mixed little, just a little
tinge of burnt sienna into your subroutine
and you would get a shade similar to this. Now with very watery mix, I went ahead and
created the ground, which is kind of
in-between that mountain, mountain and your
foreground right there. I have created a mix
using burnt sienna, as well as this greenish
brown, gold color. Now with a darker green mix, I'm going to paint
vegetation over there using just the tip
of your round brush, you can create this strokes, vertical strokes
which will indicate some prickly grasses over there. And now with just the
dabbing motion of the brush, you can go create that shrub. I'm in-between those greens, you can go and add
in a little bit of your mixture of burnt umber mixed with a little
bit of purple. So that would
create that look of a dried parts of the
grasses or the bush. Similarly, I'm going to create some dried out grasses here
at the right-hand corner too. I'm going to go create this
prickly kind of grasses here, closer to our foreground. Here I'm using just the tip
of my brush and creating this vertical strokes swaying left to right or right to left. So go with any
direction and blend this base of the grasses
into the background. Loading my size four brush
with this sap green mix. And I'm going to go and
create this tree-like cactus, which is the main
characteristics speciality of this Sonoran Desert. So it's very simple. Go with and intense tone of sap green first at the left corner, and then use a
diluted paint mix to drag the colors lighter
to the other side. Okay, So similarly, I'm
going to go and create another stem from this cactus, repeating the same steps. Now to fade out the
color to the right, I'm going to use the
lifting technique out here and use the full body of
the brush just like that. So I lifted out two months. So this is how we are
going to paint the cactus. It's easy and simple. Painting another stem towards
the apex of the cactus. And yes, that's all. So it's very simple. These are the main
elements of our landscape. And together we are going
to be painting this in the form of our sixth project
are the basics project. So come, let's get started and deep dive
into our project.
30. Day 6: Sunset View from Sonoran Desert- The Sky Part 1: Let's get started with the
basics first and foremost, I have taped down my paper on all four sides with the
help of my masking it. Once you are done taping
down your paper and making sure that there are no gaps
or leakages in between. Now it's time to start sky. So like always, I will be going with three-fourths of
the paper for my sky. Then will come the mid ground, which will be the mountain, and then the foreground which
will be there, desert land. Okay. Let's begin by going with the basic pencil sketch here I'm sketching out the horizon line. Now, this line is
totally optional. I'm just using it to have a reference how much height
I want for my mountain, so that I can scale my mountain accordingly in aspect
ratio to my sky. Okay, So this is how you
can have a clear idea of how much you should be
scaling up your elements. Now with the help of my pencil, I'm going to go and shade out the areas where there will
be some darker tones. I'm going to go and
create the cactus, which will be the main
element in the foreground. So the cactus is
simple and easy. There is no too much of
competency involved is just creating the stems of
the cactus. And that's all. Here is our final pencil sketch. Now, mark the other positions where I want the
other cactuses to be. Now let's be for this guy, I'm going to go with
wet-on-wet technique. Now here makes
sure that your sky is the paper where you are
going and creating the sky. It should be
thoroughly coated with an uniform layer of water. Because we are going to
paint a dramatic sunset sky. If in-between your
paper dries out, it will be a little
bit problematic to go and create the dramatic sky. So makes sure you do this
step little, patiently. Coat your paper, but makes
sure there is no excess water. If there is excess water running out from the masking
tapes like that. Use a tissue paper or
tissue towel to soak up all the extra water along
the side margins like this. Now by doing so, if you feel that you
have exited mentally scraped off the
water on the paper, then go again with a damp brush and layers though
water one more time, but makes sure
there should not be any running pools of
water on your paper. Time to create the dramatic sky. Here, I'm going to use slight
tinge of lemon yellow, mix it with my warm yellow, that is the cadmium yellow. You by now know right, this is my favorite
mixed to create that bright and
glowing sunset sky. So this is what I'll do and I'll squeeze out some
of that white gouache. You're I'm trying to make
the Naples yellow mix, okay, so that it does not react too much with our blues
when mixed together. Now load your brush with this
paint mix, but remember, there should not be too much
of water into your pain. Start from the corners of this mountain range and go and create this
horizontal strokes. Now in-between these strokes, always make sure to
leave certain wide gaps there you could go and fill
out others streaks of color. Now make CR, warm
yellow and tinge of your warm red to mix a
bright and beautiful orange, almost like a fiery sunset. Orange. This orange we will be using to layer in-between
these white gaps, which we have left
in-between yellows. And we are going
to go and create this horizontal
streaks like this. I'm using my size
number four brush from silver black velvet. These is a soft brush
and I'm going to go and layered this
orange one more time in-between those areas because the colors are fading out a
bit when mixed with yellow. So I want these colors to be very vibrant and
striking in the sky. Hence, I went with another code. Now using my purple mixed
with a little bit of brown, I'm going and creating this darker mix of
clouds in there. Now I'll switch to my size number 12 brush from same
silver black velvet. I love using this brush, especially when I need to
cover larger surface area. And I start with the top
portion of this guy here, I'm going to go with
a gradient wash, meaning dark to light
transmission of a single color. Okay? So this is what I'm going to do. I'm going to go over those
areas all over again and create this side
horizontal strokes. Now, if you observe, I did not go there and touch the yellows and the red
brown purple mix over there. I just left the
whitespace in between. Don't worry, we are
going to create some dramatic clouds in there and cover up the space later on. What I can do is I can tell the board like this and
since the paper is wet, I can use the dam
tip of my brush and helped the colors to
float down like this. Not exactly into the yellows, but just to fill in
that whitespaces. You're creating my mix of mineral violet to create
some darker shades. The transition color
is in-between. I will go and create this dramatic intense clouds with the help of mineral Violet, when we are very close
to that of orange. Orangeish red are the
fiery orange color. It just in-between
go and use the tip of your brush and
create these strokes. Just have a look in my palette. The paint mix that
I'm using is just with optimum paint
to water ratio. There is the
painters little pig. You can see using just
the tip of my **** brush, I'm going and creating
these strokes to create the dramatic clouds if you use too watery
paint mix out here, as stated earlier and also before we started on
with our projects, I had included water
control lesson in there. I have showed what really
happens when you use too much water in your paint mix if you're a big note and you would have skipped that lesson, I will suggest you to go back and check that section
because it is very important to understand
the importance of water to paint ratio. Sky is already looking so
vibrant and colorful, dried. I'm going to go ahead and use just the tip of my
brush and glide them lightly across the paper to create some more
shapes of the cloud. Remember to use very soft
and light hand strokes to indicate this fluffy clouds. Every time you go clean
up your brush in water, makes sure you dab
it on a tissue and tissue paper and then go and load your brush again
with an intense tone of color and put it
across on your people. I'm now going with an intense
tone of Payne's gray on top of that purple mix clouds to
denote the darker clouds. Keep observing the brush
movements are pure and also the position where
I have held the brush. I have held the brush almost towards the edge of
the handle, right? This allows me to create very loose and wispy strokes are here with the help of
the dam drives the hip. I'm going to go and clean out certain bleeds because
our paper is inclined. We had inclined the papers. All the colors are flowing down towards the
horizon line rate. You're trying to clean out. On lift out this bleeds, make sure that you do not
put too much of pressure applied just the tip of your brush and try
to create very soft, gentle strokes and
liftoff the colors. If in case you have
lifted off the colors, go with an intense
tone of any color, your Payne's gray
or your purple, even your orange
would do and create some darker clouds in there
just to fill up the space. Now going and
dropping in some of that indigo shade
you would call. So here I have mixed a little
bit of my blue and pains create together to create
this darker shade of indigo. And I'm going and
creating just lose kind of wispy clouds with just
the tip of my brush. Make sure you do this step only when your
paper is still wet. If your paper has
started drying up, please do not do this step. This step completely. So that's all for the sky
and we will let it to get dried and then start on with
our land and the mountains. The center area
had become faded. Those clouds. That's why I'm layering it with again and intense tone of Payne's gray mixed with a
little bit of purple in there. And using very light
gentle strokes, I tried to create some wispy
clouds and I'll stop there. That is all. I do not want the
colors to float down. So what I'll do is I'll
fill the board other side. You can see rate
all the colors are moving down towards
the horizon, right? Right. So if you do not like
this kind of bleeds, what you can do is using
just the tip of your brush, you can just lightly
remove or clean up those bleeds like this
using the lifting technique. Now that's all I will
not try to move out or lift the colors too much because the paper has already
started to dry. I let the paper dry, inclined like this, and then we'll start on with our ground.
31. Day 6: Sonoran Desert Foreground - Part 2: Let's get started
with our ground. In the meantime, our sky will be dried out completely
for the ground. I'm going ahead
with a mixture of yellow ocher and a little bit of my lemon yellow over there. So I'm going and creating this lighter background ways
for our ground on top of it, I'm going to go and fill in with some of that burnt sienna. Now observe the
brushstrokes out here. I'm not using too watery, burnt sienna over dead. Now I'm mixing my
yellow and a little bit of burnt umber or
burnt sienna in there, go and fill out the empty spaces of the
ground using this watery mix. Now, with the help of the brush, go and create a drop
in some more of that red brown color over there just to indicate certain
foliage or grassland growth. And similarly, I'm
going ahead and doing it with my sap green. Now I'll use just little
watery tip of the brush and try to create this
random brushstrokes. Just like how you would
create foliage on the tree. I'm going ahead and creating
with the brush chips similar kind of
foliage and adding in some browns and darker
shades of brown just to give some depth
into this grasslands. Now just below that
bushy vegetation, I'm going to go and reward
those areas so that I'm able to blend the base
of that into the background. Now using my mix of
green and brown, I'm going to create here some spiky grasses just at the bottom of the
paper using the damp tip, make sure your paint
here is not to dilute d. I'm going to go dropping the colors over there where
the background is still wet. And then with the help
of my liner brush, I'll go and try to create
some vertical strokes indicating some spiky
grass like shapes. To create grasses
with much more ease, you can use a fan brush, synthetic fan brush
and create this. Tall spiky grasses are just frayed ends or the tip of your synthetic brush
and create this grassland shapes by just lifting the colors in a vertical stroke where the background
is still wet, just like this out here. We're going to create some
more grassland patterns here, near to the base of
the paper, okay? So use varying tones
of greens and browns. If you want to create a
darker mix of green or brown, you can either use
purple or you can use your cool blue and create a darker mix just in-between go and create some darker
strokes like that. Now here in this ground, you can go ahead and do
your splattering technique. You must platter here using the little water or using some
greens and browns as well. So it will give a very
loose effect to the ground. Now it's time to
paint a mountain. Our sky has dried completely. Here. I'm going ahead
with my mixture of red brown mixed with a little bit of
my mineral Violet. There you can see right in
the mix that I have guard, it is almost towards Berlin. Berlin brown violet and add more of the
violet over there. And with the help of the tip of my ties
number eight brush, I'm going and
creating the outline of the mountain
first and then I'm going to start layering it with this paint for the
mountains here. I'm going to go with the long vertical strokes with
the help of my brush tip. Just like that, drag the
colors down and use a little diluted or just use the damp brush and try
to blend in the colors, creating some darker and
lighter stroke like that. Filling up the rest of the mountain using my
burnt sienna mixed. But here we are going to apply
the technique of day one, where we had created the base of the mountain to
when Misty here too, I'm going to go and create
something like that, but it will not be missed. It will just be the area where the mountains are receiving plenty of light and
there are no shadow. So this area will
be the lightest. So when you paint
mountains and this way, you'll create a
beautiful textures on your mountains and give
some water 3D realist view. So this is the most
easiest way that you can beam to such rocky features. I'm going to do the
same until I have covered the other part
of the mountain as well. Okay. So you're I hope you are well aware of what kind
of technique I'm using. I'm here using
wet-on-dry technique. This part is little tricky. I'm going to go around that cactus stem and
paint the other half of the mountain in case
you find it little difficult and are afraid to smudge the colors
into the characters. What I would suggest
you is to use a masking fluid to
mask out the areas. This negative painting method is the only way that you can go around your whitespaces
and paint with darker colors. Remember those dark
mark that we had made with a pencil during
our preliminary sketch? So I'm going to use
my darker shade of violet and brown mix and
create the darker areas. Now in-between
these darker areas, go and use a synthetic brush and lift out certain
areas as well. Just to give them a bit
more realistic highlight. Over the help of my synthetic
brush size number four, I'm going to go and create some darker edges from
the top of the mountain. Use a mix of long and short vertical
strokes when doing so. Just like how I'm
doing out here. Just around that base of the mountain where it
is lighter in color. I'm going to go and use
this synthetic brush. Lay very light coat of burnt sienna mixed with a
little bit of yellow ocher. And then I'm going to drag out those darker areas that we have just painted into these areas because these areas are wet, it will easily blend into it. Observed my brushstrokes,
how I create this very realistic effect at
the base of the mountains. I'm pretty satisfied how
the mountain is looking are the rocky feature of this
dessert is looking right? So this is how I'm going to go and do not overdo
the mountain ADS. That is not the main focal
element of this desert, but an important
part I would say. Now here I'm trying to
reactivate the layer of yellow ocher for the ground and create with the tip
of this brush very small, tiny new vertical strokes which will eventually blend
into the background. Okay, so this would indicate the vegetation growth happening
on the surface of this. So I li or rocky areas. I'm really not happy
with how the grass is looking right
now on this land. Okay, so I'll blend it
out again with the mix of my burnt sienna and the existing background of the yellow ocher along
with some of these greens. Okay. So just blend it out and using just the tip of
your **** dry brush, try to create the
dry brush strokes again with the brush
to denote the grass. Now I've created a
similar shape of this grass over here
and onto my right to, I will go and create some
more spiky grass like shapes in-between those
grass leaf blades am going and adding in some darker tones of
green there I have mixed in a little bit of purple into my green to grade
this darker mix. But you can go ahead and add in a little bit of Payne's
gray or indigo to it. And this is how I'm going to go and create some more grasses. The grasses which
we had created in the foreground at
almost faded out rate. So we are going to go and
create those leaflets one more time using my
greenish brown mix. I'm creating out here
more grass like patterns, but I feel that the background
had faded out already. So I went over those
areas One more time with my yellow ocher. In this way, I also blend
it out the greens that I had in the field already here. Now I'm going to create
my cactus for that. I have already prepared
my darker mix of green. Here. I have mixed sap green
with a little bit of brown, that is one sienna
and little bit of Payne's gray to create
this darker mix of green. And here I'm going ahead and
creating the cacti tree. Layering the cacti with
this green here and making sure that one
part of the cacti will be darker and the other part will be little lighter so forth that I just drag the colors
with the help of the Brazil. And yes, that's the lifting technique
that I have done over there. And for the base, I'm trying to blend
in the colors and use certain strokes from the tip of the brush to denote
this grassy pattern. Now it's time to paint our main characters,
the bigger ones. So for that I have mixed
my yellow ocher sap green to create this kind of
muddy kind of green, I would say pay silly green and using just the size
number four brush, I'm going to go and create
the shape of the cactus. Now when I reach the
base of the cactus, I use a little diluted paint and go over those areas once again to create
some lighter mix. And surrounding the
base of the cactus, I use some darker green mix to create the grass
blade like leaves. Now using my darker
mix of green, I will go again
from the left side, the areas and create
this darker shade. Now, I am going ahead
with my darkest green. If you mix a little
bit of Prussian blue or any blue
into your sap green, you would get a
color which is very close to this darkest
form of green. This is also known
as when tacky green. In many other brands. Using the same mix, I'm going to go and paint
this other branch also here. I'm going with little
irregular lines, not a very smooth one. Painting the stem of
the cacti tree as well. And did you know that
this Sonoran Desert is very famous for the types
of cacti that grows here, especially the Saguaro Cactus, which only grows
here in this region. This tree like cactus can
grow up to 40 feet tall. Can you just imagine? Now here in this desert land, I have not added any
kind of Florida's, but if you do want, you can include some
of the tiny florals, including your water
blooms platters, or just by splattering any colorful paint mix such
as lemon yellow or so. The main broad stem of
the cactus has dried up. So I'm going to go and use my darker green to create
some stripes in there. I'm going to go and create some more cactuses in
the background over there and one more taller one
near to this shorter one. Yes, pose this we will be
done with our painting. I will not overdo. And here near the
base of the cafe, I'll just go and create some shorter grasses.
And that's it. Now with the help of
my damp dry brush, I'm going to go and lift out certain areas from that cacti. And yes, our painting is done. We'll let it to
dry out completely and then we will start
filling out the tapes. Here comes the most
satisfying part that is peeling our tapes. That's it. We're done with D6. Tomorrow is the last day
of our desert Safari. I'll meet you tomorrow.
32. Day 7: Color Palette: Hey guys, welcome
back to day seven. Let's quickly take a look at the color palette for
creating our project. For this class project, you have two variations. You can see rate one here is with the contrast of this
just yellows, pinks, and blues the other year with the contrast of little
orange, pink and blue. For this class project, I'll be going with
this orange contrast. But if you want to go
ahead with the other one, you can also go ahead and do so. So come now, let's
quickly take a look at the colors that
we would be using. The swatches of all the
colors would be there on the screen and also the
pigment information. So you could pause
the screen out here or go through
the entire video, pause the screen
and take a note of all the colors that I will be using for
this class project. Here. For this guy, I will be going
with overlapping. Now instead of opera pink, you could go and use
your bright rose. Now when you mix
yellow cadmium red and cadmium yellow, cadmium orange. Last but not the least, we would be using some
white gouache to create craters on the Moon and
some starts and theories. One trick for this
guy to achieve the smooth transition of
colors, mixing and blending. Have a spray bottle
handy with you, and that's all for the colors that we are going to use
for the color palette. I will see you in
the next section, which is the techniques.
33. Day 7: Techniques: Thank you for joining in. Now, let's get started with
the technique section. First, we are going
to go with the sky. And as always, I will be going
with wet-on-wet technique. If you are joining in
for this particular day, wet on wet technique is
nothing but applying wet paint over your
wet paper surface. Okay. That's what is the
literal meaning of wet-on-wet technique
in watercolors. I have lead my paper with an even uniform
coat of water here. Now I'm mixing my lemon yellow
mixed with a little bit of my cadmium yellow to give me this bright and
beautiful yellow. This, I'm starting
from the base of the sky where they
would be horizon line. Now here I'm layering
some red with yellow. Red and yellow, which
are warm colors, will form of beautiful,
vibrant orange, right? That is what even we have
seen in my other class. If you would have taken my
class on irrigated Golden, our landscape, you
would all know water, warm and cool shades. If you notice out here, I am transitioning
this guy from lighter to darker shades versus started from the lightest
color that is yellow. And then I'm transitioning
it to orange, pinks, and then purple's. Okay. So this is how we are moving
for a sky if you want, you can start first with the darker colors and then transition into
lighter colors. That is totally up to you, but the transition between light and dark colors
should be maintained. Since here I have my little watery paint for
each of these bands of color, you can see the colors
are all flowing down. Now is the time when we are
going to tilt the paper. And we are going to control
how the colors will flow. The trick to achieve a smooth blend of colors
in a galaxy sky is two. You know who your watery Payne's when your paper
background is still wet but do not go ahead and use to liquid or watery
Payne's that time, you will have little
difficulty in controlling how your paint
will flow in the paper. So try to use moderate
amount of paint to water ratio and work
when your background is still wet enough for the
colors to flow smoothly. I am now going to tilt my paper and let
those watery Payne's flow in the direction that I want them to flow by
tilting the paper. When I tell them downward, they will all move downwards. When you tell them sideways, they will flow side
versus this is how you can tilt your paper and
let the colors flow. Now here, my background
is still wet. If I go and splattered, this starts like this
with my thick wash paint, even if it is take but my
background is still wet, right? This we have seen in our
day to project two there, we wanted certain white stars, which are faded because we wanted to paint a milky
way over there, right? So if you do this step, this is what will happen. Your colors will start. The stars will move
with Along the colors. So if you want to paint
something like this, you can go ahead with
it or else you let your ideas to get dried a little and then go and
splatter the stars. Here. I have started with creating the shape
of the pyramid. You could Google out or browse out some shapes of the pyramid. And then you create this
triangle shapes like this. Once you are done with
sketching out your pyramids, now it's time to go and fill
the pyramids with colors. First, I will be going
with wet-on-dry technique, which means applying
your wet paint over your dry paper
surface here, I'm using yellow ocher as the base coat
of these pyramids. Here. We will be going with wet-on-dry technique
for glazing as well. We are in day seven today, so I think by now you all would know what I mean by
glazing technique. Glazing or layering
essentially means applying multiple layers of paint
on top of each other. So each layer of paint
is left to dry a little, then applying the
next one because this adds depth and richness
of the color and also it transforms any
flat shapes into visually, you're not 3D shapes. So notice here, I am not really working full-on dry on dry
technique for this glazing, I am mixing it with little bit of wet-on-wet
technique as well. Because I want this
darker and lighter shades too little blend as well, because that will
give the pyramid its own characteristic colors. Though darker shades. I have gone and filled it
along the side fringes. Okay. Now, I will let
those areas dry out. I'm going with the sand dunes, the low-rise sand
dunes here also I am going and using the
wet-on-dry technique. The main trick out here is to make the wetness of the paint wet your paper and work with the darker shades as well so
that it creates this smooth, beautiful blends of color giving the exact dark or
the depth that you want in your dunes are the
texture in there sand. Now we will start
with the dry on dry, which is a dry brush technique. And observe your my brush
bristles are absolutely dry. I go and pick some of my concentrated paint
over there and I scrape it along the
sides of this pyramid so you can see the dry brush
strokes which I'm obtaining. So this is how I'm going to do the sides of the
pyramid indicating the ruggedness and the frontier of the pyramid across the edges. Here I have shown you very
briefly about how to go with this dry brush strokes to create this ruggedness of
the pyramids, right? But in our final project, we will see in
much more details, the next element in our
landscape is the moon. So use any circular object
to create your moon. Here I'm using my masking tape, but this is not the
exact shape or size of the moon that we are going
to go for creating a moon. I'm going to go with
wet-on-wet technique. I will first code to the circle shape with
little bit of water here. The water should
not be too runny. And top it up with
some lunar blue here. The lunar blue that I'm
using is from Daniel Smith. This is a very
granulating color. And if you do not
have this color, you could go ahead and
use a little bit of your Taylor blue and mix it
with little bit of indigo. Use the medium tonal value, and then let it with the
darkest tone of integrals. Just like this, in certain
areas only the lighter colors should we still visible now with the help of
some white gouache, I'm blending the right
side of the moon to show the glowing part here for the astral
projection in the moon. I'm going ahead and
using my liner brush and thick gouache
consistency to create that astral projection
just like this. Now it's time to move
on to the next element, which is our camel and the
man sitting on the camel. So this is the last element. So keep observing how I create the pencil outline of
this camel and the man. Once you are done
with the outline of the camel and
you are satisfied, now it's time to fill up
the Campbell's elaborate. So for the silhouette, I'm going to use
my Payne's gray. If you do not have Payne's
Grey, do not worry, you can substitute it with ivory black or lamp black
and the black that you have got when filling
out the camel BCR to use a very thin liner brush
or else you might get some fat, thick outlines. Or bestest to use a brush liner pen to
create this allowed. That's all for this
technique section. I will see you in
the next lesson.
34. Day 7: Sky- The Land of Mummies Part 1: Hey guys, welcome to
the last and the final day for our Sephardi
to the desert. And as always, I have
taped down my paper on all the four sites
using my masking tape, make sure that your
paper is firmly adhered to the board
with the help of the masking tape
and that there are no gaps from where the
paint can see true? Once you are done with
fixing your paper, Let's start with our preliminary
basic pencil sketch. Three-fourths will be our sky. I have created a
horizon line over there using a ruler or you
can go freehand, totally up to you. Okay? Now, using this
horizon line as a reference, I'm going to create this
sand dunes structures. In total, there will
be two sand dunes. One in the foreground
will be the most bigger, covering a larger surface area, and the other one will
be little smaller. There are other smaller one is the main sand dune from where the pyramid structures
are going to raise. Okay? So you need not have this horizon
line again with you, so you can erase that off. And now you can create your pyramid structures
using your ruler or a scale. The shape of these pyramids
will be triangular in shape. It's going to be
two other pyramids, but this will be smaller in size behind this bigger pyramid. So keep observing. I will suggest you like I had already suggested in
all the other projects, go through this entire video or the sketching part and then
sketch out your pyramids. I'm going to darken this outline of the
pyramids a little bit more so that once we start with our watercolors,
these are visible. Now I'm going to create
the outline of a wound. So for the moon, I'm going to
use the base of my candle, which is in circular
shape to create the moon. So this is the size that I'm going to go
for, for the moon. It is kind of in proportion
with the pyramids. It is not too big,
not too small. Just that. Use a compass or any circular
object of this size. Now, here I'll show
you one trick. You can mask this
area of the moon because we are going to
paint the moon invite, okay. So you can cut the outline of this moon with the help
of this masking tape. And then you can stick it and
start the painting process. Or you can use your
masking fluid. Now sketching out
the next element, which is a camel and the man, you could use vector
images which are available on Pinterest
as your reference and try and sketch out this
camel and the man writing your LB sketching out the man will just sitting
on top of the camel. But if you want, you can also go ahead and use your
own reference, our yard imagination of a man walking along
with the cameras. So either offers, so
it's totally up to you. Once I'm done with the sketch, I will be reactivating all of my sky colors with the
help of the spray bottle. This is the easiest technique and also this will help you to have some water control on the amount of water that
you have in your paint. Now, let's start with the sky. I'll be going ahead with creating a flat
wash on my papers, especially the sky area. So if you have any
thread-like hair coming out from the brush, always make sure that
you remove because that will form a bloom or pattern when you
start layering with your paints once
it dries up, okay. So make sure you remove any of those thread or hair
from your brushes. Another tip is to shake off the brush quite nicely with
the help of your fingertips before you start going and applying a flat wash of water with the
help of your brush. Once you are done with layering the paper with an
even coat of water, you would see your people listen when you hold it against the
light, something like this. Okay, So in this way you will
be able to notice that if all the ideas that you
want to cover it with water has been watered
down perfectly. Another tip, I have couple
of brushes handy by you, so that once you start the sky, you'd need not go
fetch your brushes. I have prepared a mix
of cadmium yellow and lemon yellow and started
with the base here. Observe I'm going around
the pyramids because I have not maxed out
my pyramids over here. Make sure that these colors
do not enter the pyramid, because pyramids are going to go with the yellow
ocher and brown. So be a little careful of that. Go around. So this is known as the negative painting
that I'm doing. So I'm going around the
whitespaces that I want to retain and filling
the other areas with my color of interests. Take a look at my palette
and observe that I do not have too much of
water in the paint mix. So here it is very
important that you do not go with two watery paint because it will be little difficult
to control the amount of the pain spreading
on your wet background. Now, I'll be layering with
a very bright orange. I have created this
orange by mixing my warm yellow with cadmium red, which is also a warm red. So I have made enough so that did not come back and
prepare this mix again. Now, before I start
applying the orange, I'm going to use my spray bottle and spray some of the
water over there so that I have this kind of water
flowing over on my paper. Okay, This is very important
because from now on, it is just about all the colors blending
with one another, creating a complimentary
and a tertiary colors. Okay, so this is how
we are going to do it. Mix it thoroughly with the
help of your of your brush. So over there I kind of created a transition
of yellow, orange. And now I'm going to go with
much more darker orange. I went with solid red over here. Now, I'll be using my damp brush and mixing these
colors altogether. So keep observing now. Now I'll be switching
to my size number 12, brush dipping it Justin some water and loading my
brush with lemon yellow. Here, I'm trying to create a transition between
the yellows and the oranges over here
because it should not look like two distinct
bands of color, right? That's why I went and created
this mix using your brush. Since my paper has lot of water, you can see the colors moving. So you can tell
the board and make the colors flow as
per yard direction. Now I'll be starting
with my Oprah pink. I have mixed a little
bit of Prussian blue in there to create a mix of violet. So I have created a mix of
permanent valid out here. Now I'm loading my brush with a little bit
of oprah pink and that violet mix and going
ahead and applying this pain, spreading it across the sky. Something like this. Do not have to worry about the
strokes that your brush is creating because the paper
is with little water. So this will help all the colors to flow
and blend together. Now I'll be switching
to my bigger brush that is size number 12 brush
because I need to cover larger surface
area and this will help me to spread the
paint much more evenly. So I'll tilt my board
like this and try to code the paper
with the blue at the topmost part of the sky used little bit darker blue
here I have added that little bit of Payne's
gray with my blue to create this dark
tones of colors. As you come and touch down to the yellows and reds go
rinse your brush in water, dab it in a little bit of
tissue paper and come back and grab your indigo
or Payne's gray, whatever you have or you
can mix yard Payne's gray with your approach
in blue and create this darker mix some blue, you need to work a
little faster over here, because if your paper
starts drying out, the colors won't bleed
and mix into each other. Okay. If you feel that your paper is drying
out, go ahead, grab your spray bottle and spray a little bit of water into those dry or dry doubt areas
are the areas that you want to colors to flow
and mix beautifully. Use the spray judiciously, not leverage with too
much of water so that everything goes and ruins our
moon and the pyramid. Okay. Around the moon,
I have went ahead and created a layer
of oprah pink, because opera pink and
orange and yellow forms really beautiful
coral orange color, which is really a beautiful
contrasting color to your orange and yellows. And it will be
harmonies together with the colors that are there at the top most part
of the sky as well. Now, if you observe, you would notice
that all the colors are flowing down, right? So as a result, some
of the colors might start coming to this dry
area such as the moon. So you can go and
fix those areas by using just the tip
of your brush and your tissue paper to
lift out those areas. Something like this. Go and lift out gently from the side. If it is not coming
out, do not worry. We will go later on and
fix this with gouache. You can see how the colors are flowing down due to the gravity. So you need to keep the board and such direction
that the colors are flowing to the topmost part of the sky and not coming down
too much to the bottom. Now, here is a very
important thing. Always a cough or rub your
tissue paper against. Lose extra paint mixes
that are flowing out of the masking tape because in
case it runs into your sky, it will form loose bleeds. Okay. So you want to avoid
that into your pretty sky? At this point, my sky
has somewhat dried out, so I have used my synthetic
size number four brush and grab the little bit of my pick consistency of gouache
and started splattering. This starts when splattering the stars covered
the bottom parts so that the starves platters with the gouache does not
settle down over there. Okay. Now keeps flattering. You need some smaller as well as some bigger drops
for the smaller drops used very thick
consistency of gouache and keep tapping it with a
brush or your finger. Okay, something like this. And point the brush tip at the direction that you
want the splatters to be. Keeps flattering until
you are satisfied with the amount of stars that
you have gotten your sky. Now, I'll be using
this liner brush. This is size number two brush from Princeton Heritage Series. And I'll be going ahead and
creating some shooting stars. Okay? So I'll be creating
this bigger dot like this, white and tap it with my finger. Just that it represents the
glowing area around the star. Okay. And then I will go over that area with this thick
consistency of gouache. And now I'll be going with one stroke for the tail
of the shooting star. And this is how I'm
going to create some more of the shooting stars. At this point, this part of the paper has
completely dried, so I'll go use the size
number two, brush, dip it in water and create this wet background for this star so that
the paint spreads, giving that glowing
effect around the star. Okay? So this is how you
can do it and go and create the dot over there
and gently strike it down. So this is how you create
the shooting star. Next, we will be working
with our pyramid. So I'll see you in
the next lesson.
35. Day 7: Pyramids & Dunes- Part 2 : Let's continue with painting our pyramids
and Jones for that, I'm preparing a mix
of my yellow ocher. I'm preparing and quite
a good amount and keeping it ready that I need not go and prepare
this mix again and again with the same brush
that I had prepared the mix, I'm going to go and create the outline for this
foreground sand dunes. I am here using
size number eight, brush from silver black velvet. This is a medium-size
brush which has quite a good tip and holds
lot of paint and water. So it would help me to spread
out the colors smoothly. Observe that I'm just
dipping the tip of my brush and little water and I'm going and spreading
around the pain. This will ensure
that the base of the dune is having lighter
shades of yellow ocher. Now, I'm going to
prepare a mix of my burnt umber by using
burnt sienna and my purple. Along the right-hand
upper corner. I'm going with slanted
strokes and I'm going to build it out at
the left-hand corner. Also. The strokes are
kind of converging right? So it's going inside the dunes, leaving the center
area of the dunes to be with yellow ocher now
with just a damp brush, I'm spreading around the
paint and blending them. So this is how you can play around with paint
to water ratio once you have learned how to control the amount of water in
your brush and your paint. And you can go around, play around with watercolor
techniques and use them to your advantage at
this point with slide gentle strokes
of my damp brush, I'm going and lifting out certain dark colors and
exposing go yellow Copart. This darker shades of brown that you are observing
right now is going to go a shade lighter since that's
the rule of watercolors. When it dries, it
dries a shade lighter. So I'm going to go with
another layer of this brown that is my burnt umber
and go from the sides, blend it out with the same strokes that
we had done earlier. Now I'm going to use the same technique and
create those sand dune, which is just beneath
that pyramid. So the base code will be with medium tonal
value of yellow ocher. I'm going with
wet-on-dry technique. And as you come towards
the base of it, try to go with the lighter
base coat of yellow ocher, because later on we
will be darkening it with some of that burnt
sienna and burnt umber. So let's start with
a pyramid right now. For pyramids tool, I'm
going to work with a base coat first with the
yellow ocher here too. I'm using my medium tonal
value of yellow ocher. You could make it
a little bit of your tinge of Indian yellow into your yellow ocher to create this golden yellow ocher mix. And then you could start letting it with some darker tones of burnt sienna and
burnt umber to give this pyramid its
shape and depth. The right side of this
phase of the pyramid, it's going to be darker than the left side because
here the light is not reaching and hence the other side will be
casting a shadow over here. So here in this case go with little darker tone
of yellow ocher. And then we will be sharing it with some darker
tones of burnt umber. Go with the darkest tone of burnt umber or mixed
little bit more of Payne's gray into your burnt umber mixed
to achieve that shade, I have now switch to my size number two brush
because I'm going to go and outline darker
areas of this pyramid. So I need something which is
really pointy and sharp to give me this thin
straight line over here. Hence, I have switched
to size number two, but feel free to do the step with any
brush which are sharp, pointy tip and which
you have control over. Now, observe how I'm going
to play around using wet-on-dry technique
and altering the paint to water ratio. I had lead that darker tone
of burnt sienna and now using little watery dilute
mix of the same mixture, I'm going and creating this transition of darker
to lighter shades. Are you able to follow here? Observed my
brushstrokes out here. I'm going with slanted strokes right from the base
of the pyramid to up. I'm going to go
and lay this over that base of the pyramid
to create that shadow. And you're, I'm going with some slanted altering strokes at the front of the pyramid. Here, I'll be switching to my synthetic round brush of size number four from
Princeton velvet. That's the reason
why synthetic brush, because I want to control the amount of water that
I have in my brush. Hence, I have switched to
my synthetic brush and now observe my brush movements. When I start working in
this pyramid from the top, I start with the intense
blackish tone of brown, and then I go with
some shades of my darkest burnt umber and then fade it out with the help
of my damp, watery brush. See how light or color is
looking right now, right? So I will start again from the top with long slanted
strokes like this way. With my synthetic brush. Here I'm using the mix of my bond tamper with
little bit of blue. And hence I will get this
kind of dark brown shade. I'm going to repeat
the same process, but right now I'm going to go
from the bottom to the top, observed the brush
movement out here. I'm flicking the brush from the base to leaving it upwards. You can see rate, that
line is not so smooth. So I will lift out certain
areas where there had been a bulge because my brush
went outside the boundary. Now with the help of
my size four brush, I'm going to go and lightly
to control my stroke, creating this straight line. With the same brush, I'm going to just blend out
the other darker tones, which I just lead
trying to fix this area because here I felt the area
was looking to bed dark. So I just use my damp brush and lifted some of
the darker areas. This area has completely
dried off now as you can see. So I'm going to layer one more time with my
yellow ocher here. Try to observe that whenever
I go and wash my brush, a rinse my brush, I always tap it on
my tissue paper or tissue travel so that all the excess water from
the brushes absorbed. Repeating the same process
for our smaller dunes here, I'm mixing my burnt
sienna yellow ocher and starting with wet on dry technique for
the smaller dunes which are just behind
the larger one. It's the same drill. The PR concentrated
mix of paint is always towards the
edge of the pyramid, right where it is more darker than the rest of
the body of the pyramid. And when you go to
the darkest portion, which is the right
portion of the pyramid, use darker mix of colors such as your burnt umber
mixed with the burnt sienna, and start layering
it with wet-on-dry process using your brush. Now, the selection of
brushes totally up to you, if you would like to have a better grip and
better control, I would recommend
you to switch to a brush of smaller sizes, preferably of size number four or two based on your comfort. Repeating the same exact process for this smaller
pyramid as well. I have started leading
burnt sienna first on the left corner of this pyramid and toning
it down with little damp, watery brush so that the
color is lighter at the base. Adding some darker shadows using burnt umber starting from the top and gradually blending
it into that wet paint. Adding in the darker tones on the right side
of the pyramid, which is the shadows spot. So you're being a
little careful. You do not want to use
too watery paint mixed. Use your brush sizes number four or two and then
go and create that going over the base
of the pyramid one more time with my brush loaded with burnt sienna mixed
with a little bit of yellow ocher that
is all over here. I will not try to
overdo this area. Next, we'll be
moving to the moon.
36. Day 7: The Moon & Final Details- Part 3: Continuing with our
pyramid here I'm going with the lifting technique and
using just the damp brush. I'm going and lifting certain areas of
those darker shades that we had just led, just to expose some of
that lighter base coat. Now I'm going to start working at the base
of this pyramid because the initial base code has dried out to
be a lot lighter. Here I'm going with
a damp brush using my wet paint and trying to
blend in the colors smoothly. Use little tones
are burnt sienna or use your purple
mixed with your bonds here not to create
more darker use of your browns and go and
create this darker shade. The purpose of using
this light and dark shades is to represent
the depth in your painting. This also has an important
role in how the light and the shadow behaves
a particular shape or an object that
you are painting. Hence, we are using some darker, warmer tones to create the same. Here, since my bottom part of the dune has already dried out, I go with my damp
brush very gently and start coding it with
water all over again. This is the re-weighting
technique so that when I start blending
the darker tones, it does not form any hard edges. Here at this corner, it feels too dark
and sell lift out some paint of the darker
tones and go in and add another coat of my yellow ocher onto it and
just blend the colors evenly. And that's it. Now,
I'll be squeezing out some of that white gouache because we will be
starting with a moon. I'm going to spray
a little water and make it a little
watery consistency, but to take one so that
it's not very diluted. And I'm going to first write
out the areas of the moon. While doing so, do not flood the areas of the moon
because if you do so, all the waters will
start going out of the boundaries of
the moon and into the sky which you
do not want, right? So go with the damp brush and just try to spread
out the water evenly. Now, host you are
done with that. Go load your tip of your brush with this diluted
white gouache and go around the radius or the circumference of the moon to create the white outline. Here, makes sure that
your hands steady when you are creating
this circle outline. Because if there is
some curves and bulges, your moon will not have a
proper round shape, right? So B steady tried
to practice it. And also, if you want, you can take the support
of your little finger, steady down on the paper and then go and create
this a confidence. Now, I have switched to my size number four
brush because it has a sharp pointy tip and also quiet volume or
body of the Brazil's. Hence, it will be easier
for me and I will be having much more better
control when I'm going with this smaller brush
to create the outline. Now once you are done with that, I'm going to blend in with the help of my size
number 12 brush. It is just the damp brush. I have not used much
of water in there. Now is the time. Then I will go and drop in
some of that white gouache because I can still see the lead of the
other colors, right? So you just need to cover those areas so that it is not so prominently visible
once we start layering with our lunar blue, which is a granulating
blue and a Payne's gray. So here comes a lunar blue. Instead of lunar blue, you could also go and use
your darker shade of blue. If you have any
granulating blue, that would be fine. If not, you just use any
of your blues and use some darker and lighter
tones to create the effect of the
craters on the Moon. The reason why I went with wet-on-wet
technique for the moon so that when I start
layering my lunar blue, which is a granulating blue, my colors will start
forming beautiful bleeds and blooms onto this wet
surface of the moon, which will give rise to
the shape of the craters. And it will be easily done. I just need to go and add in some darker tones of
indigo Payne's gray to give the effect of depth into the Craters of the
Moon or the shadows. And that's it. This is the reason why
I went with wet-on-wet technique for a moon or
near to the topmost part, I'm just going to lightly blend out the colors over there. When I had used some of
the darker pigments, this would give a beautiful
effect, or the glowing. Light of the moon,
as well as the shadows that the creators
have custard, right? So this is how I'm
going to proceed on. Add some darker tones in-between using just
the tip of your brush. And that's how your
moon will come to life. Now, with the help
of my liner brush, I have used thick consistency
of gouache, loaded it, and I've just went
and used a so-called or a dot placed in
just kind of center, you would call over there. And I'm going around it, lettering with some
darker tones so that this astral projection is vividly seen on
the moon, right? So I'm going to use this liner
brush loaded with gouache. And I'm going to create
this Astrium prediction. Very thin lines. It will be in the
form of a star. So keep observing. When going with this
astral prediction tried to create long strokes, one stroke using
your liner brush or any fine liner brush. And that's it. Let's move on to our last element
of our landscape, which is the Campbell and the
man riding on the Campbell. Here, I've switched to
my size number two brush from silver black velvet because it is very sharp, pointy tip. And to create the
outline of this camels, you would need a brush which
has a sharp pointed tip. So you can use your
size number to one or any mini detailing
brushes to feel, feel you have better
control over your brush. Go ahead and use your brush to fill out an
outline the camel, or else you could use a sharp pointed tip Sharpie
or your brush pens also. Now here I'm just
going to fill out this allowed of the camel
using my Payne's gray. So keep observing, this
is nothing complicated. You just need to
fill out the color. So you could also use your
black micron brush pen or any fine liner pen and fill out the shape of the
camel and the man. Switching to my liner brush
to create this thin lines which indicate the harness that the man has
for the cabinet. And that's it. Since the
camel is on the sand dune. So it would leave some
marks on this Dunes, right? So for that, I have loaded the tip of my brush
with little bit of yellow ocher mixed
with a little of burnt sienna and then faded
it out. So that's all. And I will let the ideas
dry out completely. To start with my dry
brush technique. Use just your dry
bristles of your brush loaded with the darker
shades of yard Payne's gray mixed with a little bit of your red brown or your
burnt sienna and create this kind of dry
brush strokes around the edges of your
pyramid structures. I'm going to do the same, repeat the same process, even for the smaller pyramids at the back of this bigger one. Okay. So I'm just
going to scrape this dry brush over these areas and you would
get this dry brush marks, but makes sure that your
Brazil's of a brush and really dry in order to give you
this dry brush patterns. So this is the dry
on dry technique. Why this dry brush strokes? Because this would
indicate some of the textures which are
there in the pyramid and also give the vintage
of the wear and tear of these structures
over time, right? I'm going to continue creating this dry brush patterns
onto this larger pyramid, which is like almost
the main subject you could call for a landscape. The smaller ones are not
that required because they are really small and are really
at the background, right? So makes sure that
you go and create this dry brush patterns
onto the bigger one. So that is quite
prominently visible. I'm satisfied with how my
pyramid is looking right now. So high would stop this
dry brush techniques and loaded my brush with
little bit of Payne's gray using just the tip of
my size number two brush I'm going and creating certain
drops and things on the moon. That's it. Those were the final
details and now my paper has dried
out completely. It's time to peel off
our masking tape. But all the four sides. I hope you have enjoyed this seven days safari
to the deserts. We have painted deserts
all across the world. Some of the very famous desert. I hope you have
enjoyed the class totally peeling of
the last steep. I hope it's fine. Yes, it's perfect. And here comes the final reveal
of a painting. I love it. The sky is looking
so beautiful, right? Even the pyramid and the dunes. I hope you have enjoyed me in the next lesson where
I'm going to give you certain tips and tricks
and also concluding are the seven days
journey to the deserts.
37. It's A Wrap: With this, we come to an end of our seven days Sephardi
to the desserts. I hope you have enjoyed
this class thoroughly. Each day we have painted
seven beautiful deserts across the world applying
various watercolor techniques, understanding why
it is important to have proper water
to paint ratio. Now, here comes an
important thing that I want to share with you. Wherever you pick up
references for your paintings, always try and remember
to go buy a plan. What I mean to say is, before zeroing down
on your references, always try to pick one
or two or more than that references and try to see the color combinations that
you would want to go for. For your painting. It maybe the color combinations, or you can combine
one or more of these reference pictures
and combine them by picking elemental
compositions from each of these references and
make it as your own. I hope this helps you in all your future
paintings are artworks. Now, if you are interested in painting and practicing
more of deserts, I have my Pinterest account where you could find the link on my Skillshare profile and access all the references that I
had saved for the deserts. If you are someone who
has loved this class, I would love to hear
your thoughts about it. Do consider leaving a review. It would help my class a lot. Also keep uploading
your projects in the projects and
galleries section. I would love to see them. I will see you soon
in my next class.
 Nilam Roy, Art Instructor