Transcripts
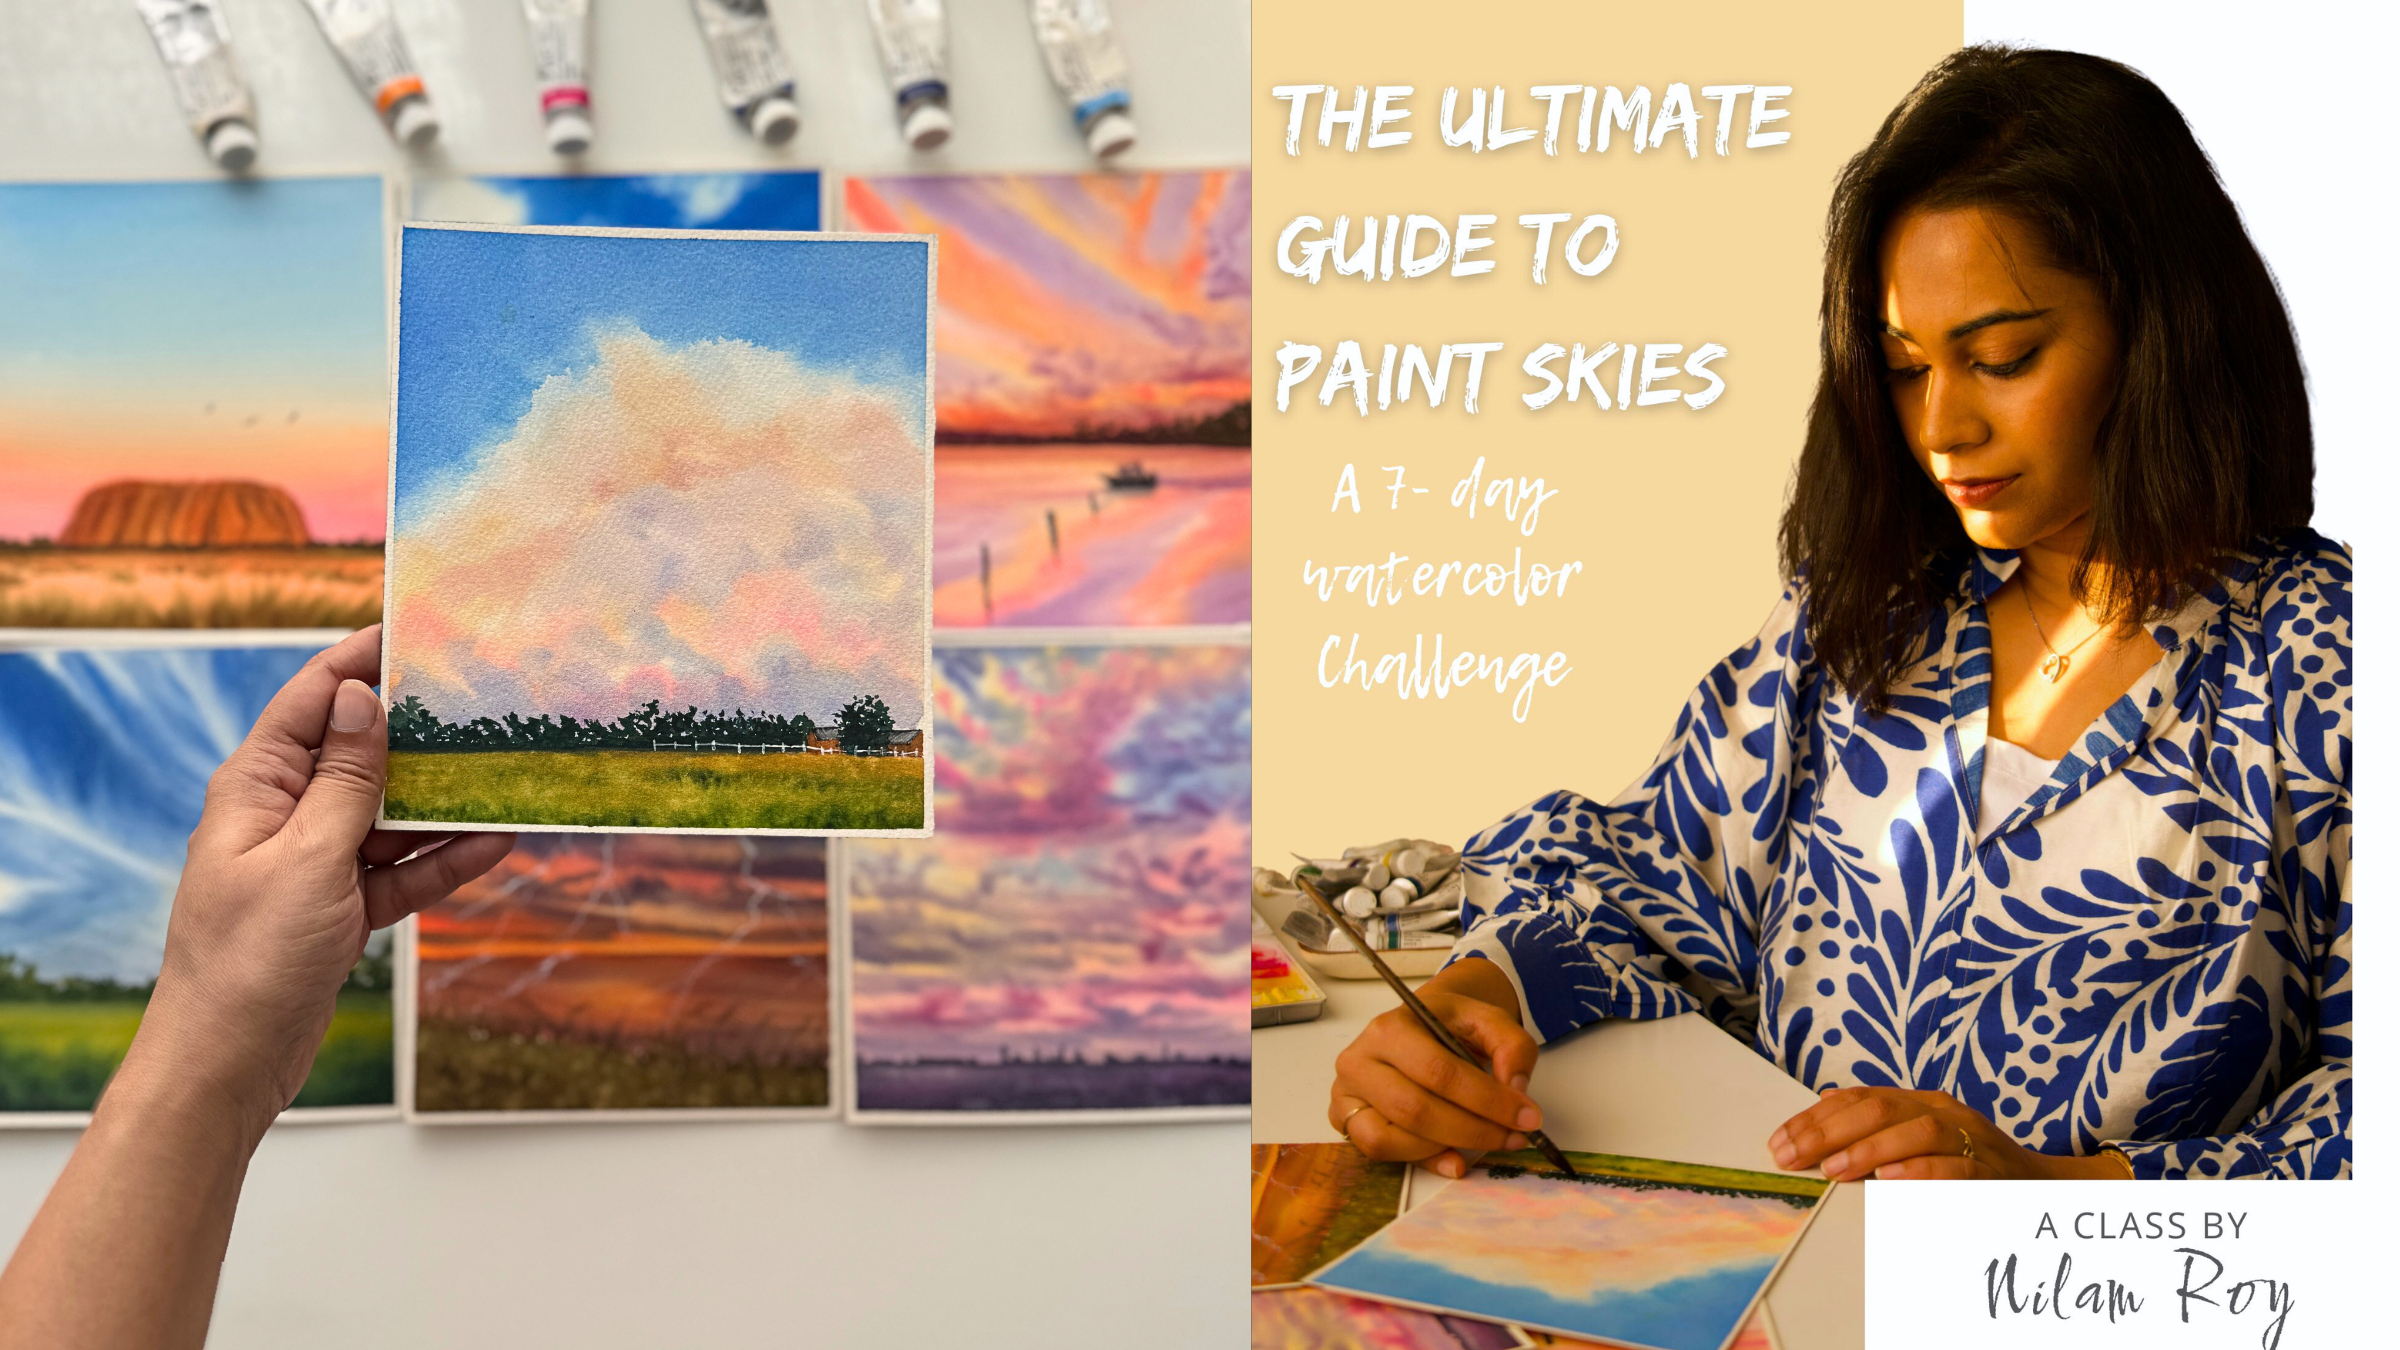
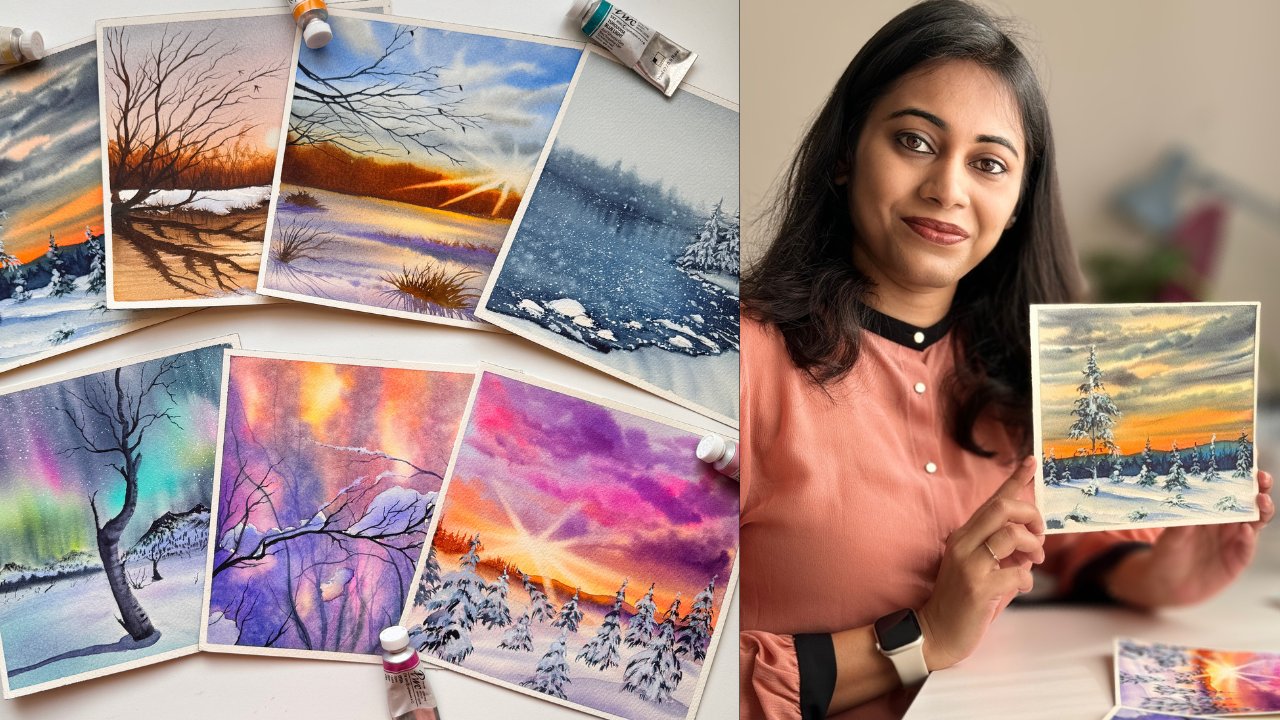
1. Introduction: About the Class: Have you ever tried
painting a sky with watercolors only to end
up with harsh edges, muddy colors or clouds that
just don't feel right? I know I have been there, too. When I first started, I too struggled creating those soft luminous blends
that make sky feel alive. No matter how much I practiced, my clouds look stiff, my transitions felt
patchy and my skies lack that effortless glow I admired in professional
paintings. But over the years, I
have refined my approach. From choosing the right supplies to mastering water control, brush techniques
and color harmony, I was able to bring depth
and movement to my skies. Now, I want to help
you do the same. Hi, I'm Nelm Roy, a watercolor artist
and a brand ambassador to a South Korean paint
brand named Shinhan Art. With over four years of
experience painting landscapes, I have developed a
deep passion for capturing the beauty
and mood of skies, whether it's a golden
warmth of a sunrise, the stormy depth of
gathering clouds or the soft tranquility
of twilight. Through my in person workshops, I have helped students
break free from the frustration of muddy
washes and overworked clouds. And in this class, I'm bringing
that experience to you. Skies are more than
just a backdrop. They are the soul
of a landscape. A well painted sky can transform an ordinary scene into an
evocative masterpiece, but achieving that perfect
balance of softness, movement, and color harmony takes more than just
copying a reference. It requires an understanding
of paint consistency, water control, and
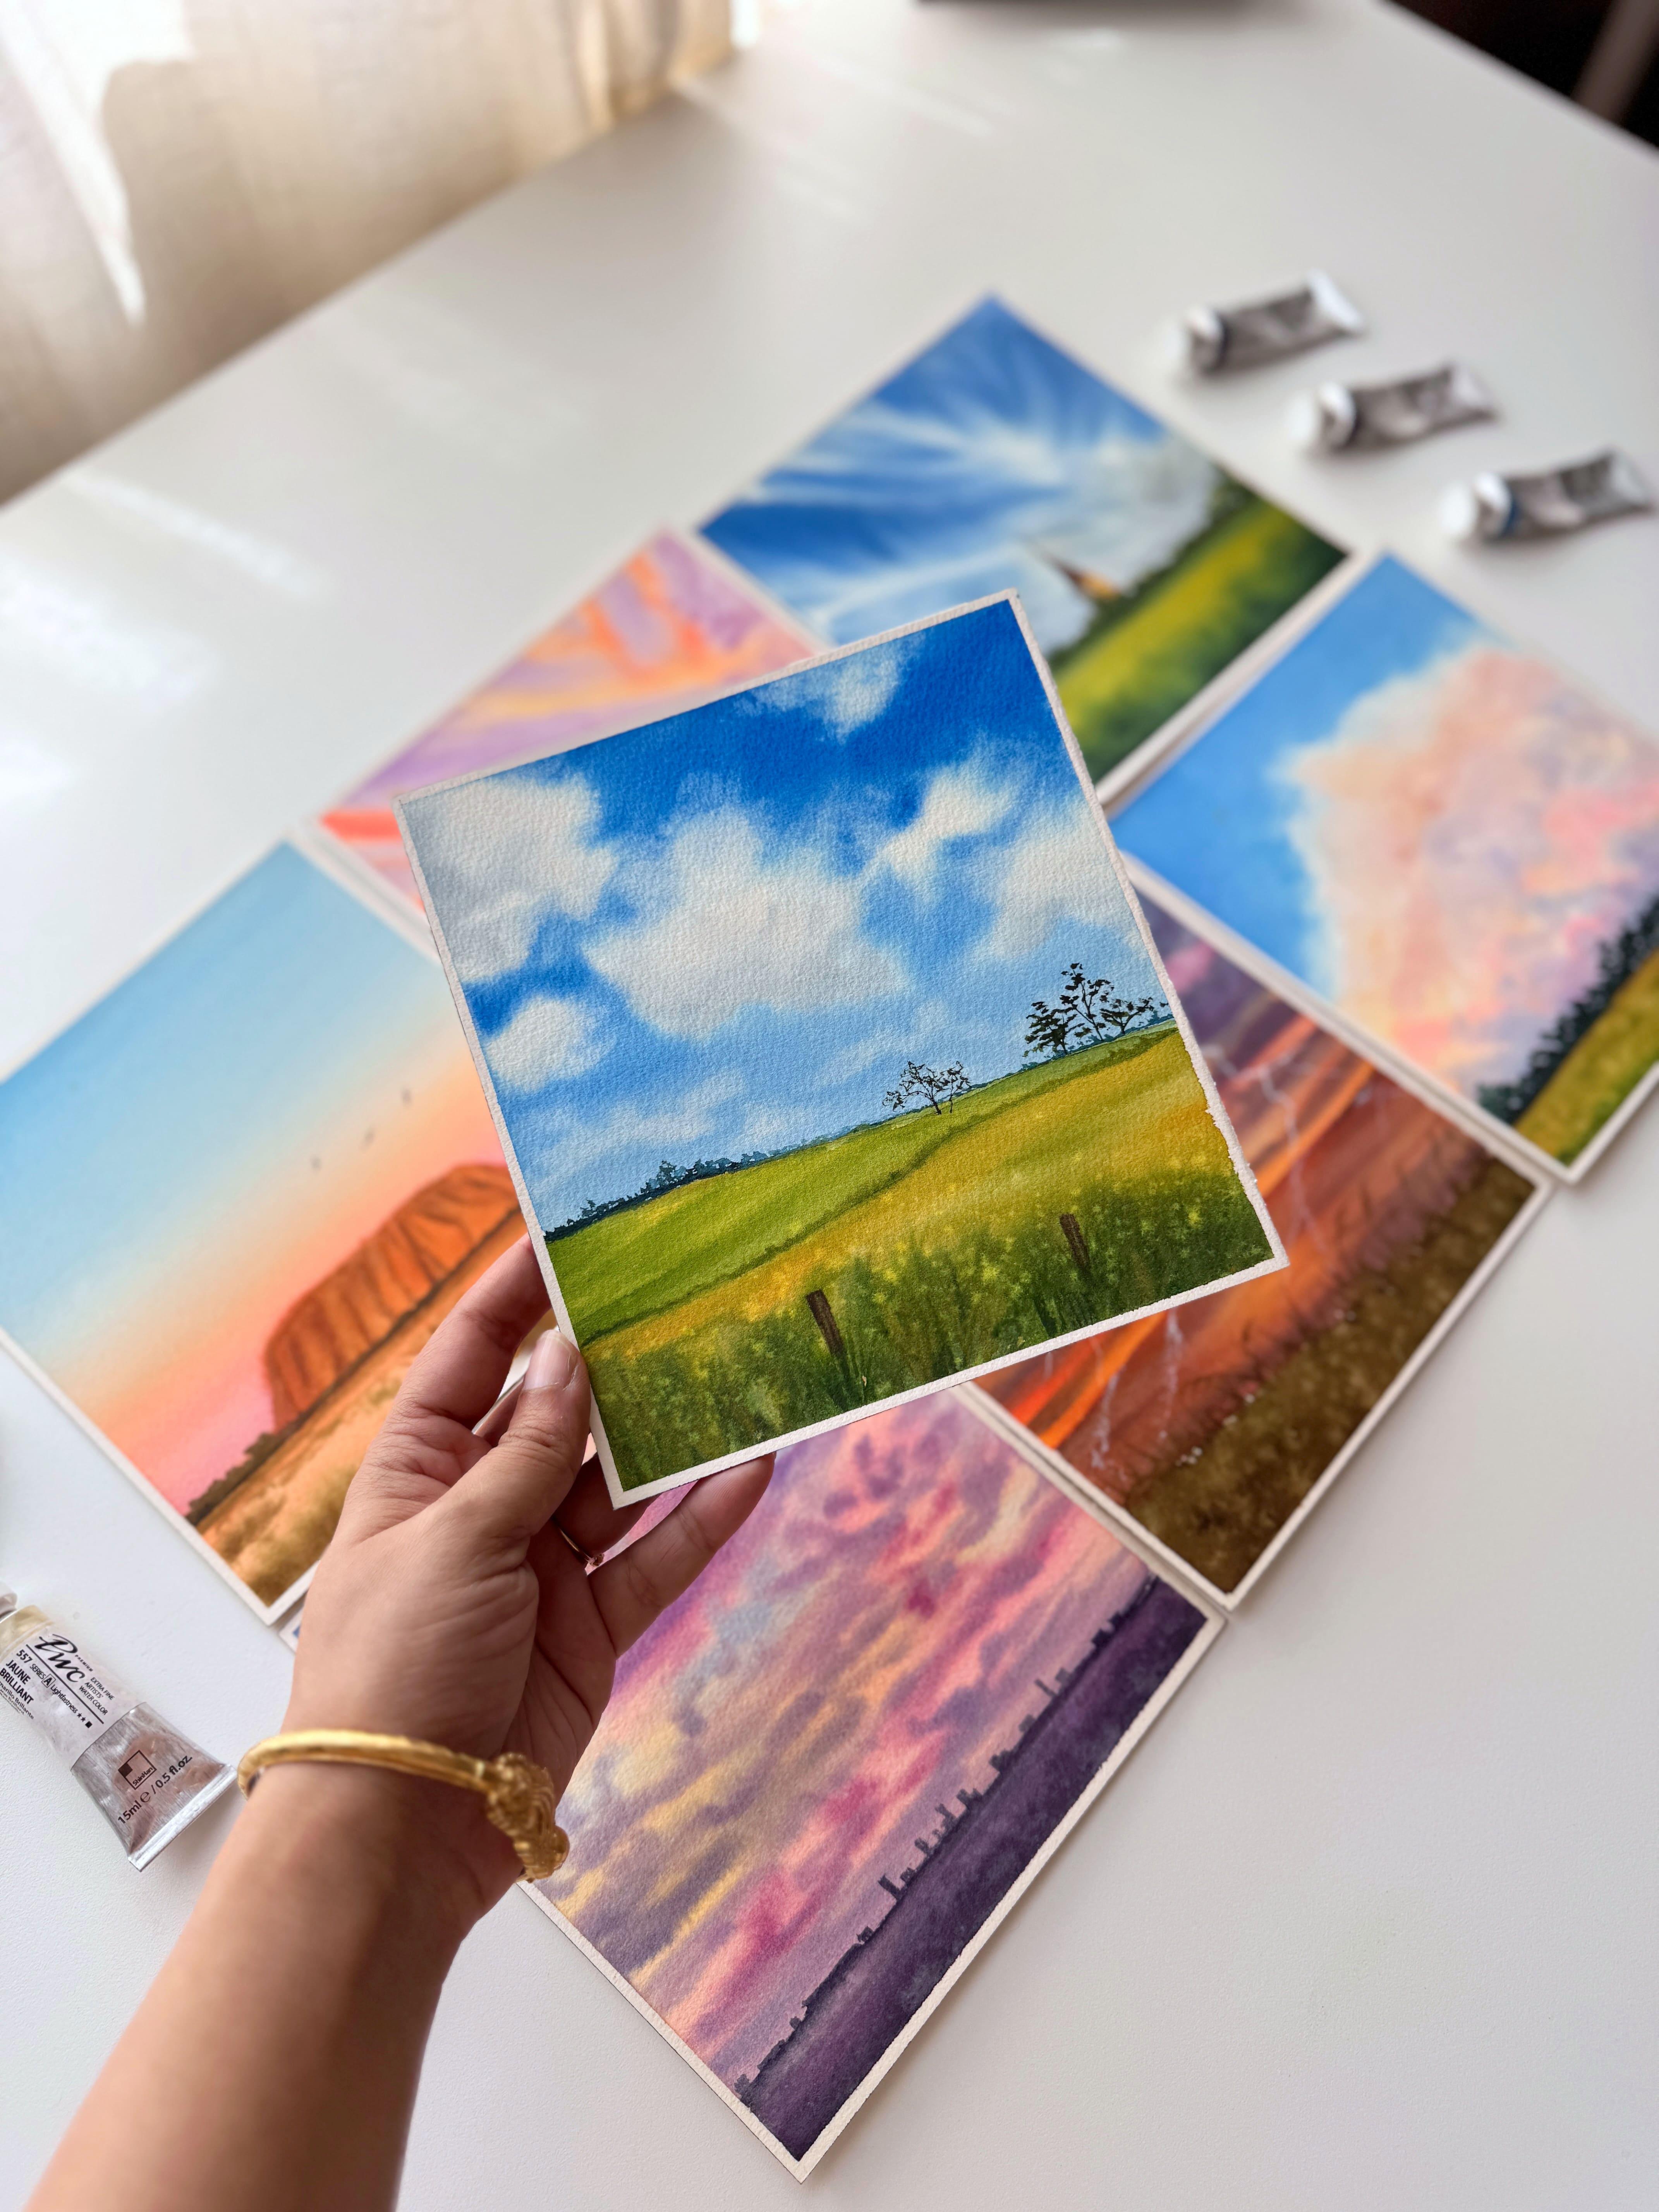
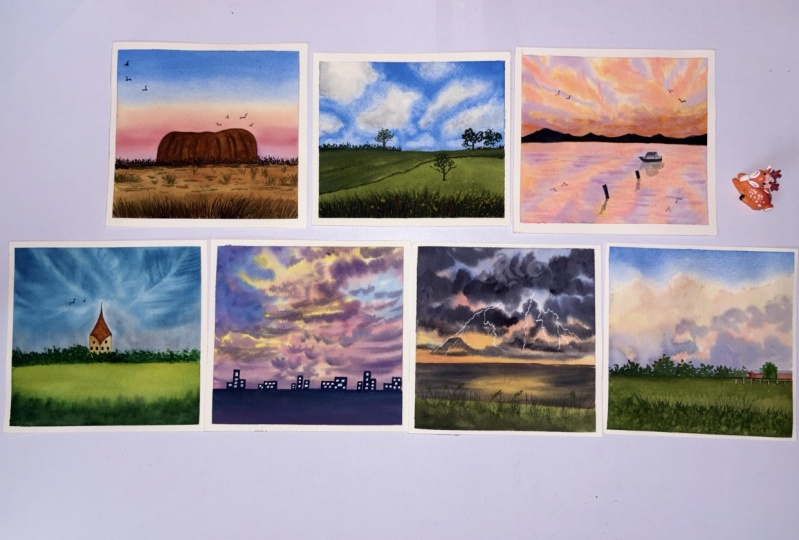
brush techniques. This seven day structured watercolor challenge is designed to help you master the art of painting skies methodically. Each lesson builds on the last, taking you step by step through color theory
and palette selection, mastering water to paint ratio, and brush strokes
and techniques. We will reinforce
these techniques through seven stunning
sky compositions, starting with simple
gradient washes and gradually progressing to more
complex atmospheric skies. Each lesson is broken down
into clear achievable steps, making this class ideal
for both beginners and intermediate artists looking to refine their watercolor skills. By the end of this challenge, you won't just have a collection of seven bread taking skies, but you will also have a strong foundation
in water control, brush work, and
blending techniques that you can apply to
any watercolor painting. More than that, you will cultivate a consistent
painting habit, allowing you to break free from daily stress and finding
joy in creative expression. Are you ready to transform
your watercolor skies? If you're nodding along,
then join me in this class, and let's get started.
2. Supplies Required: Okay, so let's quickly
go through the list of supplies that we are going
to need for this class. So let's talk about the
most important material which we are going to need for our class. That is our paper. For this class, I'm going to use the paper from
Saunders Waterford, watercolor or equireal
Series paper. It's a cold pressed
grain fine paper, which is denoted by the
letter CIP and not. The color of the paper is
white, black, natural, and the size of the paper is
ten inch into seven inch. But here, for this class, I have not used this
same full size paper. Instead, I have cut my
paper into square size of 18 centimeter
into 16 centimeter. It is not a perfect square, but it is almost a square. But you could choose to go
for any size of the paper. If you will to, you can go
for a perfect square of 16 centimeter or 18
centimeter or more. That is totally up to you. Along with this,
I would recommend you to keep some
scrap piece of paper handy with you for
color swatches or practicing some
quick techniques. Now let's focus on the
most crucial aspect of your watercolor paper. That is to always check
the label of your paper to ensure that it states
the word 100% cotton. Now, this detail is often
overlooked by the beginners, and it is one of the biggest mistake that
the beginners commit. This paper that I'm using
here is an artist grade, which is also an archival grade, acid free and tumble
rolled paper, making it my absolute favorite for painting
watercolor landscape. No, it is not necessary to use this same particular brand of
paper that I'm using here. Feel free to explore
other high quality, 100% cotton watercolor papers that are available
in the market. Moving on to our next
essential supply, that is our watercolor
paints for this class, and as always, I will
be using Shinhan arts, PWC Extra fine watercolors. Now, these are
professional grade paints. When you choose
professional grade paints, the properties of each color
such as light fastness, transparency and their
pigment information will be mentioned on the
labels of your tubes or pants. When choosing colors, always refer to the pigment
information on the tubes or pans rather than relying on
their generic color. At this class, I will be
using watercolor tubes, but if you have pans, instead, feel free to use those. To squeeze out my colors, I will be using
this polycarbonate palette from Shinhan art. You can already see the colors
laid out on my palette, but I have included an additional lesson on how to properly set
up your palette. I have explained the
process in detail while keeping it comprehensive
and easy to follow. Don't worry about
the specific colors used throughout the class. Before each class project, I will walk you through
the exact colors needed. For the most part, I have kept the color palette
consistently similar across all projects with just a few colors
additional where necessary. Next, you will need
a spraying bottle, absolute lifesaver
during the summer months when the paper is
drying up too quickly, I absolutely keep
this handy with me. Now we will also need a non absorbent
acrylic sheet board or any other non absorbent
surface to tape down your paper on fo sites if you are using
loose sheets like me. However, if you're working with glued paper blocks
or sketchbooks, this non absorbent surface
will not be necessary. Now to tape down the paper, you will need masking tape. I am here using half
an inch masking tape, but feel free to use whatever size you have
available with you. Next, we will need two
jars of clean water, one as a constant
source of clean water, and the other for
rinsing your brushes. Lastly, we will also need some basic sketching
supplies, a pencil. The pencil that I'm using
here is a mechanical pencil. Feel free to use
whatever you have got a ruler and an eraser. Now let's talk
about another most important supply
that is our brush. Throughout the class, you
will see me primarily using the four natural hair
brushes to create a skies. The most commonly used ones are my silver Atalia series mop
round and hake brushes. This hake brush is made
from goat hair bristles, and I love using it for
laying down flat washes. I will also be using
the two round brushes. One is a synthetic
ultra round brush with an elongated tip, and the other is a silver black velvet round brush
of size number six. Both the brushes are of
size number six brush. In addition to this, I will
also use liner brushes. One is a Princeton heritage
synthetic soft brush, and the other is a mini
liner brush from Hi Mia. For special effects,
you will also see me using this
specialty brush, the Princeton velvet
at series comb brush, which is great for
creating grassy meadows. An alternative to this would be a fan brush which would
give you similar results. Last but not the least, you will need some
tissue paper or a paper towel to dab your
brushes, dry or clean. And with that, we have wrapped
up our supply section. So gather your materials and
join me in the next lesson.
3. Color Theory: Revisiting Basics: In this lesson, let's
dive into color theory. I have my three
primary colors, red, yellow, and blue, and I
have created a color wheel. I'll arrange these primaries on the wheel in a way
that forms a triad. The first color that I'm placing on the color wheel
is the color red. This particular red is
made from pigment PR 209, which is transparent and
leans towards the warm side. Now, let me briefly explain the concept of temperature bias. Reds that lean towards orange
are considered warm reds, while those that lean towards
purple are cool reds. Example, cool reds
include quina CridonRd, crimson lake, et cetera. However, these
names are generic, and the actual
temperature of a color depends on the
specific pigment used. Determining whether a color is warm or cool is a
relative process, and it can vary depending on the context or the colors
that are next to each other. Time to place our
next primary color, which is our yellow. Now, the same concept
applies to yellows as well. The yellow which I will be
using here is Indian yellow, made from pigment PY 189, which is a warm yellow. It leans towards orange, giving rich glowing warmth. Think of the color of the
sun radiating warmth. This exactly feels
the same, isn't it? On the other hand,
a yellow that leans towards green is considered
to be a cool yellow. As mentioned at the
beginning of this lesson, color temperature is
really very relative and I will discuss this in more detail later
in this lesson. Now let's move on to
the next segment, mixing our primaries to
create secondary colors. Here, I'm mixing my
red and yellow in equal proportions to
form my secondary color, which is orange, which I will place right in between red and
yellow on the color wheel. Here, I'm mixing my reds and
yellows to create orange, but I notice that I have too much red on the tip of my brush. To balance it out,
I'll have to add more yellow to achieve that
perfect brilliant orange. Getting the right mix
is all about adjusting the proportions to reach
the desired vibrancy. I next, I will mix this secondary color, which is our orange with our red to create
a reddish orange, a red orange, which
is a tertiary color. When you mix a primary
with a secondary, always remember you
form a tertiary color, and in this case, our red
orange is a tertiary color. Similarly, when you mix your
orange with your yellow, you form yellow orange,
which is, again, a tertiary color that sits right between your
orange and yellow. At this point, we have created our secondary and
tertiary colors which are all quite warm. However, the brightness and warmth of your
orange will totally depend on the temperature of the red and yellow that you use. If one of these primaries
is a cool color, then the resulting orange
will be more muted rather than being a very
bright and vibrant orange. Okay, so I have
filled my color veil with all the remaining
secondary and tertiary colors. Now let me quickly explain
the process to you. When you mix yellow and blue, you get green, which
is a secondary color. Mixing green with yellow
creates yellow green, while mixing green with
blue results in blue green. Now, when you mix blue and red, you form purple, but
here is a slight catch. Both blue and red that
I have used here are warm blue biased towards purple and red bias
towards orange. As a result, the secondary color that is produced
is a muted purple. Now, here is an
interesting fact. If the blue is biased
towards purple, meaning it's a warm
blue and the red, which is biased towards purple, which is a cool red, you
form the brightest purple. Because both your primaries
are biased towards purple. Now, when you mix
purple with blue, you get a blue violet, a tertiary color that
tends to be quite dull because a purple
itself is dull. Similarly, when mixing
purple with red, it gives you a red violet, which is another tertiary color, and this color will also
be very dull color. Now here's something
to remember. On the color wheel, the three
primary colors, red, blue, and yellow will always form
a treadic relationship, meaning they are evenly
spaced around the wheel. Let me show you through the guided lines with
the help of this pen. So whenever you are placing your primaries in
the color wheel, always remember that they will form this exact
triadic relationship, and everything else
will fall into place. If you so notice, even
your secondary colors, that is your orange, green and purple also maintains a
triadic relationship. Now if you're wondering why your primaries are in a
triadic relationship, it is because in a color viel, they are spaced equally apart, and this even spacing ensures
that each primary color is balanced and distinct without sharing any direct
hues with the others. Similarly, your secondary
colors such as your purple, orange and green form a triadic relationship
because they are created by mixing
primaries and are equally spaced from each
other on the color. Okay, now that you have
a clear understanding of how primary colors
are positioned on the color wheel,
their relationships, and how secondary and
tertiary colors are formed, let's move on to another
key concept that is complimentary colors
and their interactions. Now, what are
complimentary colors? Complementary colors are
those colors which are positioned opposite to each other directly on
the color wheel. For example, red and green
and orange and blue. When mixed together, they
neutralize each other, resulting in muted earthy
tones such as grays, browns, or even near blacks. For example, primary blue and secondary orange
are complimentary, but by mixing them
in varying amounts, we can create different
shades of brown or gray. To illustrate this better, let me quickly show
you the color mixes. For example, if we take red, its complimentary
color is green, which sits opposite to
red on the color wheel. When mixed together, they create a desaturated color resulting in burnt sienna or burnt timber, depending on the ratio
of red to green. Now to demonstrate this, I will first
reactivate my yellow. I'll do it nicely
and thoroughly and then add in blue to
create my green mix. I will speed up the
process of mixing my yellows and blues
to form my green. Keep adjusting the
ratios of yellows and blues until you have
your appropriate green. Once my green is ready, I will now rinse my
brush and add in my red. As soon as I introduce red
with just a tinge of green, you will notice how the red loses its brightness and
becomes more desaturated. Now, when you keep
increasing the amount of greens into your
desaturated red, you get a mixture which shifts completely towards
your burnt umber tone. You see how that
redness of the red has changed into the
completely brown tones, right? So this is the
beauty of using or mixing your complimentary colors to form desaturated colors. And by varying the proportions, you can get a wide range of your neutral tones or
your desaturated colors. Similarly, when you mix your
violet and your yellow, you create neutral
tones of grays and blacks depending on the
proportions you mix. This principle applies to each and every color
on the color wheel. When mixed with this
complimentary colored, it results in a
desaturated color. Another important concept
to remember here is that when you mix all your
three primary colors, that is your red, yellow, and your blue, it
produces black or gray. Now, depending on the amount or the proportions that you are using to form your
black or gray, it can produce a wide range. Now, I have already
red on my palette, so I'll mix in
some of that blue. Next, I'll rinse in my
brush and add in yellow. Now, when you mix in
yellow into this mixture, if blue is dominant, mixing it with yellow
will first create green. Then when you add more red, you can adjust the balance to reach a stage of
your reddish brown, and then keep adding in more blues to reach
a neutral gray. Now you can try adding in
a little bit of yellow and then balance it out again with a little bit of blue to
reach your jet black. Or if you want to make it more towards aligning
towards Paine's gray, then you mix just tinge of blue, and you have your Pain's
gray like mixture. With this, I conclude
the color theory lesson. I hope it has given
you some clarity on the importance of understanding
and mixing colors. There is so much more to
explore in color theory, but I have kept this lesson within the scope of this class, providing you with a broad
overview to get started. Key takeaway is to
keep experimenting. The more you mix
and observe colors, the better you will understand
their interactions. In the next lesson, we will take this understanding
a step further by exploring analogous
split complementary and harmonious color palette through a series of exercises.
4. Analogous Color Palette : All right. In this lesson, we will explore the
differences between analogous, split complementary
and harmonious color palettes through examples. Let's start by breaking
down analogous colors. As discussed in the
earlier lesson, analogous colors consist of three to five colors that sit directly next to each
other on the color wheel. This combination creates a soft, blended and cohesive
with minimal contrast. It is often used to evoke
feelings of calm serenity, making it perfect
for misty forests, dreamy sunsets, or
monochrome landscapes. Now, this was an example of a warm analogous color palette to create a cool,
analogous palette. You can use the
colors between yellow and blue to create that cooling effect or between
blue and red offering more tranquil and
soothing feeling. So any colors which are directly next to each
other will give you this calm and soothing feeling or which are visually
pleasing to your eyes. By understanding the placement of the colors on
the color wheel, you can layer them effectively
in your landscapes, ensuring that the
final composition is always harmonious and
visually pleasing. Okay, now let's jump into
our class exercise and see how we can create a
warm analogous color sky. Will be using three colors, red, orange and yellow. However, since you already know that mixing red and
yellow creates orange, you can choose to work with just red and yellow
omitting orange altogether. I'm starting by
squeezing out yellow, specifically a
transparent yellow made from pigment PY 83. Next would be my orange, but as mentioned earlier, you don't necessarily need
to have an orange paint, since you can mix red and yellow to create for this exercise, I won't be using a
premixed orange. Instead, I will create it
directly on the paper. Since we are working
on a smaller surface, this approach works well. However, if you're painting
on a larger surface, you may want to premix a
uniform pool of orange beforehand or simply use a ready made orange
for your convenience. Now I will squeeze out
red onto my palette. By mixing red and yellow, I can create various shades
of orange by adjusting the intensity by varying the
proportions of each color. Let's get started. For the sky, I will be using the
wet on wet technique, which involves first wetting the paper before
applying the colors. To begin, first, I'll create a rough outline of
the setting sun, a simple semi arc at the center. Then using my soft
goat hair mob brush, I'll evenly spread
clean water across the entire paper surface,
ensuring uniform coverage. Make sure to do this step a good number of times to ensure that your paper surface remains wet for a
longer period of time. This method allows
the colors to flow, blend smoothly and create
a soft transition. As I layer clean water to
pre wet the paper surface, I will carefully
wet around the sun, ensuring that no
paint bleeds into the area where I want to preserve the
whites of the paper. This approach is known as negative painting
a technique where you paint around a subject rather than directly
painting it, allowing the untouched areas
to stand out naturally. Here is an important tip. For covering our
current paper size, this size number 20
more brush is ideal. However, if you use a smaller round brush
like a size six, which has a smaller belly, it won't hold enough
paint and water. This means you will spend more
time filling the surface, and by the time you reach
the center halfway through, your paper may start
drying out too soon. This is one of the most common mistakes every beginners make. Never use an
undersized brush for creating larger
washes for your skis. This is one of the
biggest mistake that every beginner make. To avoid this, always choose your brush size according to the size of the paper
that you are using. For painting skis, I highly recommend using
a mop brush with a rounded belly and a sharp
preferably size number 20, or alternatively medium sized, half an inch or 1 " flat brush. Theise brushes allow you to layer colors quickly
and uniformly, ensuring a smooth
and seamless blend. With the help of my wet brush, I'm preparing my red mixture, but you can see that there is too much of red at
the tip of my brush, making the color overly intense. Utilize a high tinting red, I'll mix in some yellow to achieve a more balanced
reddish orange. I begin by applying this reddish orange mix at
the bottom half of the sky, carefully painting around the
sun to preserve its glow. While applying the color, I'm using just the tip and the toe of my brush
holding it at the center. This grip allows me to
have some control over my strokes while still keeping
my pressure very light, ensuring a soft and
effortless blend. Using a clean, damp brush, I will now layer yellow in
the mid section of the sky. This will allow it to blend seamlessly with the red while
the paper is still wet, creating a bright, beautiful yellow orange
transition in between. Notice how I use
light gentle strokes, holding the brush at
the mid section and gliding it effortlessly
across the paper. Applying too much pressure at this stage can lift the
underlying red layer, disrupting the smooth
transition and making it difficult to achieve the
desired yellow orange gradient. Keeping a light touch ensures
a seamless natural blend. I if you now observe my blend between
the yellows oranges, and the red isn't as smooth
as I would like to fix this, I'll create a slightly
diluted mixture of yellow and use a gentle to and
fro motion with my brush, starting from the
top of the paper and gradually working my way
down towards the bottom. Notice that I'm using
unidirectional strokes, ensuring that I don't
lift my brush in between. Instead, I'm making complete
edge to edge strokes, which helps in achieving
a seamless even blend without creating
unwanted streaks or patches. If you notice unwanted streaks
or patchy transitions, you can always incorporate
darker clouds to subtly blend and cover the imperfection while the paper is still wet. Watch how I use light gentle
strokes with just the tip of my brush to create these wispy clouds in
the transitioning areas. This helps in softening the blend while adding depth
and movement to the sky. Remember, the success of these steps depends entirely on the wetness of your paper. If your paper has
started to dry up, brush won't glide
as smoothly as it does when the surface
is still optimally wet. Timing here is the key to achieve soft natural
looking clouds. If your reds accidentally bleed into the white areas of
the sun, do not worry. I have an easy fix for this. Simply take the damp tip
of your brush loaded with thick white wash
and carefully cover any unwanted stains or
blotches in the white areas. Quash is opaque, so it
works really well for correcting mistakes and
restoring the sun's bright glow. This quick fix helps
maintain the crisp, luminous effect of
the sun without affecting the overall
harmony of the painting. This class exercise was a classic example of a warm
analogous color palette. But if you wanted to explore cooler tones like
blues and greens? Yes, that's also
absolutely possible. When painting ocean
scapes or seascapes, you can use any
combination of blue, blue, green, green and yellow. When let correctly, following their natural placement
on the color wheel, these colors will create a harmonious and visually pleasing representation
of water. This is why understanding color theory and
knowing how colors interact based on
their position on the color wheel is
so very important. In the next lesson,
we will dive deeper into the split complementary
color palette.
5. Split Complementary Color Palette: In this lesson, we are going to explore the split
complimentary color palette. This palette consists
of one base color and two colors adjacent to its complimentary color
on the color wheel. Now, why do we use this
color combination? This is because using
this color combination, it creates a contrast
without being too harsh, balancing the warm
and cool colors. For example, if I consider yellow orange in my color
wheel as the base color, the exact complimentary color is blue violet in
the color wheel. But instead of choosing
this complimentary color, we choose two colors adjacent
to the complimentary color, forming a triadic relationship. Now you can either choose the direct adjacent colors
of the complimentary hue or experiment with the
neighboring shades within the same color family for a
slightly different effect. Here, instead of selecting
purple as my adjacent color, I chose red violet
along with blue. This subtle shift
adds variety while maintaining harmony within the split complimentary
color scheme. This gives us the
contrast without really creating any muddy mixtures and giving us the bright
colors as we need. So let's understand this
better by painting this sky. I'll begin by outlining our setting sun just
above the horizon line. To create that perfect
semicircle or an arc, I'm using my washtape
role as a guide. It's a very quick and
effective trick to get that perfect
setting sun outline. Once the outline is ready, we will now move on to
the wet on wet technique. As explained earlier,
this technique involves applying wet paint onto
our wet paper surface. Key here is to choose our
reds and blues wisely to create that perfect contrast while minimizing muddy colors. Instead of using a warm red, I'm switching to
alizarin crimson, a cool red, which is
biased towards purple. Understanding the bias
of colors is crucial. We know that mixing a
cool red with a warm blue creates a vibrant purple because both are
biased towards purple. However, in this case, I'm using a cool blue, which will result in a
desaturated secondary colors rather than a bright mix. This is an important
concept to grasp. Choosing colors with
incompatible biases can lead to dull or muddy
results. But do not worry. I'll show you how to work around this challenge
and still create a visually appealing sky without compromising
the composition. I'm squeezing my colors out
straight from the tube. I have already squeezed
out my Azarin crimson. Now I'm adding my cool blue, that is my peacock
blue onto my palette. You can try doing
this exercise using both your cool blue
and warm blue colors separately to compare the
differences in the results. Before we begin
wetting our paper, let's first prepare
our yellow orange mix. If you have a ready made
yellow orange in your palette, that is whether in your
pants or tube watercolor, feel free to use it. Otherwise, you can easily
create the mix by combining a warm red with a warm yellow
like how I am doing here. I am here trying to
adjust the proportions of my reds and yellows to get
that yellow orange mix. Once you have obtained the color similar to your yellow orange, we are now ready to get started with the
wet on wet process. So for the wet on wet, I'm going to switch to my silver black velvet
size number 12 brush. Now using the same round brush, I'm going to wet the paper with back and forth
horizontal strokes, ensuring the surface is evenly
covered with clean water. The key here is
to avoid puddles. We don't want any pools of
water standing on a paper. Want it nice and
uniform and consistent. For more efficient flat wash, you can use one in soft natural hair flat brush for making it easier to spread
the water smoothly. Time to layer are yellow orange starting from the base
of the horizon line. Hold the brush at a
top angled position and use light pressure, even as you press down slightly
to engage the tip toe, and belly of the brush. Notice how I have
gripped the brush. I have held the brush at the center of the handle
for better control. Move in gentle back and
forth horizontal motion, allowing the paint to spread smoothly onto this
wet paper surface. Now using just the tip
of my clean damp brush, I'll dip it in water and begin lightening the yellow
orange as I move upwards. With gentle sweeping
back and forth motions, I'll bring some of that
softened colour downward. The brush should
glide smoothly over the paper surface without
disturbing the underlying wash. Here, you must be cautious not to have
too much of water in your paint brush
or else it's all going to become too watery
and difficult to control. Next, I load the tip of my mop
brush with serine crimson. Here it is important to mind the tonal values using a medium to light tonal value in transitioning layers
helps avoid muddiness. However, I think I went a little overboard with the tonal
strength of my alzarin crimson. To fix this, I'll use the clean damp tip of
my mop brush to lift up some of the excess pigment and softly blend the remaining
color into the sky. Here at this stage, pay attention to the water
content in your brush. Too much of water will make the transitions messy and
difficult to control. A slightly damp
brush helps achieve a smooth blend without
unwanted blooms and not to forget the amount of
pressure that you are exerting on the
tip of your brush will depend if you are
lifting the colors or you are putting on the
colors on the paper. While my paper is still wet, I'll add in my blue
directly above my Allison Crimson and stop midway around here and blend
the colors to and fro. The tip of my brush
has too much of blue, so I'm going to rinse it off, damp it dry, and reload it with a light tonal value
of my cool blue mix. Now, using this lighter
tonal value of blue mix, I'm going to blend the
purple transitioning from midway to upwards, making sure not to
bring the blues down into the yellow,
orange transition layer. This would help us to
avoid that muddy layers. To create a seamless
transition between the blues, purples, and yellow orange, od a light tonal value of
Alyzarin crimson and begin blending from purple
transitioning area moving upward and
stopping midway. Then I'll pick up
another litnal value of Alizarin crimson and carefully blend it into the
yellow, orange layer. While blending upwards, I'll
keep my strokes confined within the purple
transitioning zone and not extend into the blue, as pulling the colors downward would create unwanted
muddy mixtures, which is the main
objective of this project. Now, if you would like
to add clouds similar to how we have done in
our analogous project, we will use purple
for a subtle effect. Here I'm going to mix my blue and my lyserin
crimson to create my purple. Switching to a smaller
sized round soft brush, I'm going to create light strokes using just the
tip and toe of the brush. The brush that I'm using
here is silver black velvet, size number six brush. Remember to keep your
strokes soft and delicate, allowing the brush to glide
smoothly over the paper. Avoid using excess water as
overly wet brush strokes can cause the paint to spread uncontrollably leading
unwanted blooms on the paper. This, we have
successfully completed our split complimentary
color palette lesson. Through this
exercise, you can see how important it is
to choose colors strategically based
on color theory and their affinity towards
the underlying hues. By making smart color choices, we avoided muddy
mixtures while still achieving high contrast in
the sky using our cool blue, cool red and yellow orange. I highly recommend repeating this exercise using our
warm blue, cool red, and a yellow orange or experimenting with
a different set of split complimentary colors practicing this will greatly
enhance your understanding of color selection for skies
and help you create vibrant, yet harmonious compositions
with confidence.
6. Harmonious Color Palette: Now, let's talk about
harmonious color palette. A harmonious color palette
is any combination of colors that feels visually
balanced and pleasing. This can include
analogous, complimentary, triadic or split
complimentary color schemes. As long as the colors
work well together, it will create a visually
balanced painting. Understand this better,
let's do an exercise. I'll paint the same sky, but this time using a
harmonious color palette, and before that,
I'm going to change the water in my water jars. I'm starting with yellow
orange as my base color, working wet on dry. Personally, I don't
prefer wet on dry for skies because the paper
dries too quickly. This means you constantly
have to come back and rework watery layers to
keep the surface wet, which can be quite troublesome, especially on larger papers. You can see how time
consuming this process is by going over these
areas again and again, keeping the paper wet. To counter this, I will
quickly wet the top section of the g going wet on wet and blend it to my base
layer of yellow orange. Near the bottom
edge of the paper, I will now add med
tonal values of orange using to and fro
horizontal motion with my brush. As I move upwards, the values will gradually
become lighter while still maintaining the vibrant
orange base of the sky. Next, I will now begin mixing my cool reds with blue
to create a purple. To start, I will apply a medium tonal value of purple rather than
an intense tone. This allows for better control
over the depth of the sky. I needed, we can always deepen the purple later in the process by layering
more intense tones. Now I'm going to add some
slanted strokes of purple using very light pressure to create sense of
movement in the sky. I'll keep the strokes
asymmetrical and avoid taking them too far
into the yellow areas. This is because purple and yellow are complimentary
colors and can create muddy mixes if there isn't a transitioning
color in between. Next, I will introduce
light tonal values of blue, layering them directly
over my purples. Since my paper is
starting to dry, I'll use a slightly watery mix to help the colors
blend smoothly. You will notice
that this layering creates the effect of
a stormy sunset sky. Now, I will be adding a transitioning color
that is my opera pink, a cool pink that
mixes beautifully to create bright purples
and coral oranges. Now, I will start adding
my transitioning color. That is my opera pink, a cool pink that
mixes beautifully to create bright purples
and coral oranges. Now, if you do not have
opera pink, do not worry. You can always search your watercolor kitty for other cool pinks
with a red pigment, like quinacrdon Magenda
or bright rose. However, Avoid pinks or reds
that contain violet pigments as they can result in muddy mixes when layered
with yellows or oranges. This is an important
tip to keep in mind. Always choose your
transitioning colors based on the affinity of the colors
you have already selected. Thoughtful color selection will ensure that your sky remains harmonious and vibrant instead
of becoming dull or muddy. Here you can see
that the bottom part of the sky has started to dry, which is preventing the layers
from blending smoothly. To fix this, I'll go
over the bottom area again with a light
tonal value of orange, blending the layers uniformly. Now, if you want the sky to
have a seamless gradient, mix in some opera pink and use quick light
horizontal strokes. Start at the center,
move upwards, and then bring your brush all
the way down to the bottom. This technique will help you achieve a smooth
gradient wash. Now, if you want to
introduce a contrast, then start at the top and apply a medium tonal
value of blue. Stop right here at the center, rinse your brush and
load it with opera pink, and then again, begin layering opera pink from the
center of the transition, moving upwards and
stopping midway again. Reload the opera pink
and repeat the process, start at the center where you left off and move downwards, and then back again upwards, maintaining a smooth gradient. Throughout this process, use
consistent light pressure, ensuring that you don't
pause in between. The key is to use straight
horizontal strokes covering the width of the
paper in one smooth motion. The movement of the
sky feels lost, we can bring it back by adding
some directional clouds. And for that, I'm going to use my blues and mix it
with my opera pink. I'm going to squeeze out some
of my opera pink and mix it with my blue to create a beautiful, bright
pinkish purple. I will give it a good mix, and using just the tip
and toe of my brush, I will start adding
some horizontal clouds with a mix of short and
long broken strokes. Observe how lightly
I have held my brush and I'm keeping the strokes
very light and loose. Here at this point,
I'll introduce a large diagonal cloud
starting from the left, moving invers towards the right. Notice how lightly
I'm doing this step. My brush is gliding smoothly on the paper with that creamy mix. This is a critical point. If you start with a paint
mix that is too watery, you may introduce
blooms in the sky, and blooms can be
quite tricky to fix, especially when working with multiple colors in
a sky like this. Towards the right side, we will use swirling
inverted C strokes, keeping the movement light and free to add variation
to the clouds. And that's all for this lesson. I hope you were able to
follow along closely and understood the importance
of these techniques. Practice is the key. Make sure you try
out the exercises yourself because
only when you paint, you will get a crystal
clear understanding of the critical points
we just covered. If you weren't satisfied with your first attempt, don't worry. Redo these exercises as
many times as needed. The more you practice,
the better control you will develop over
your brush work, water control, and
paper wetness, all essential skills for painting expressive
and atmospheric ski. With this, we have covered all the essential
color theory basics. You need to create your
own stunning skyscapes. Now let's jump into
our next lesson.
7. Brush Type & Water Control: For this exercise, grab your most frequently
used brushes. Here I'm using
couple of brushes, a tissue paper, and a
jar of clean water. From this collection of brushes, I mostly work with
silver atelia series. So I'll be picking my silver atelier squirrel
blend mob brush of size 00. This is a hybrid brush
made up of squirrel and soft synthetic fibers
that mimic natural hair. Now I'll dip the brush in water. Notice how the bristles swell up and the tip fills with water. It's extremely watery. When I lay it down on dry paper, it forms a blob of
water. Can you see that? As I drag it down, you can see a watery
line forming. This is a classic example
of a watery brush. Imagine if your brush was
loaded with this kind of thin, watery paint mix
while painting skies. If this is something
you have been doing, what I'm about to show you
next will be eye opening. Let me demonstrate. Here I am forming a watery
paint puddle. Just observe it's very dilute. You can see here how watery
that paint mixture is formed. If I apply this on dry
100% cotton paper, it will still work to some extent because the paper absorbs the excess moisture. But let's see what happens in a wet on wet technique with
the same watery paint mix. First, I will wet my paper laying down a
uniform coat of water. Now using this to
and fro motion, I'm going to spread the water uniformly on the paper surface. Then I dip my brush in water, directly load it with the paint, and then we'll be dropping it onto the wet
surface directly. Do you notice how the paint bleeds and spreads
uncontrollably? It feels like you are moving
too much of paint and water. This is one of the most common mistakes every beginners make. Look at the amount of watery
paint your brush is holding. This lack of control
over your brushes, water and paint
holding capacity can lead to tricky situations in
your watercolor paintings. Now let me demonstrate the
correct water to paint ratio your brush should have when painting clouds or skies. Now, I'll give my
brush a good rinse. Then I'll load it
with clean water and lay it onto my
paper to make it wet. I'll do this step evenly. Observe how I'm
applying the water. I'm using the full
body of the brush, the tip, toe, and the belly
all at the same time. Notice the pressure
I am exerting. I'm holding the brush near
the edge of the handle, which gives me more room and freedom for expressive
brush strokes. This allows me to cover
a larger area smooth. Now, I'll let the paper rest for a moment to absorb
some of that moisture. In the meantime, I'll
prepare my paint mix. Since my paint is
already watery, I'll grab a tissue towel and dab my brush to soak off
all that excess water. This tape is important. It ensures that when I reload my brush with
a watery paint, it absorbs the mixture properly without becoming
oversaturated and swelling. Now I'll start
layering the paint using a horizontal
to and fro motion, applying the color
with the tip toe and the mid belly of the brush while using very light pressure. Observe how I hold the brush. I'm gripping it at the edge of the handle rather
than at the center. Holding it at the center would restrict
expressive movement because you would
naturally exert more pressure leading to
a heavier application. Let me show you this
process once again. This time, I'm loading only the tip and toe of
the brush with paint. Then using just the tip and toe, I'm reapplying the color
over the previous layer. This ensures that
I'm not lifting off the paint from
the underneath layer. The brush should glide
effortlessly over the paper. You shouldn't feel
any resistance when using a natural hair brush. If you do, it means there is too much pressure and not enough moisture
in the bristles. Now let's repeat
the same exercise using a synthetic brush
and compare the results. For this, I will be using this synthetic brush from Brostro Aqua stroke
size number 12. It is marketed as a
watercolor brush, but I find the bristles quite stiff and have
a strong spring back. Let's see how it performs. I'll start by dipping
the brush in water, giving it a nice rinse, and then I will
load it with water and start applying on my paper. I'm trying to use
the full body of the bristles to lay
down the water, but I can feel some spring back and resistance
from the paper. Since this is a synthetic brush, its water holding
capacity is quite low compared to a natural or a
blended natural hair brush. This means I have to go over the same area multiple times
to lay the water evenly. As mentioned earlier, synthetic brushes don't
hold as much water. So instead of
completely drying it, I'll just lightly dab
it on a tissue paper. Now, I load the
brush with paint. Here, I notice that the
paint is too thick, and if applied with
a synthetic brush, it won't glide smoothly. So I'll add a drop of water
with the tip of my brush, mix it well, and turn it
into a creamy consistency. Here, I realized I forgot
to hit the record button, silly me, so I'm going to
repeat the process once again. I'll clean my brush, dab it lightly on
a tissue paper to remove any residues that
is left from that red. Then I dip it back into water
and lightly dab again to absorb excuse moisture before loading the velvety paint mix. Now, using just the tip and
the belly of the brush, I start applying the paint. Can you observe how
the brush is leaving behind streaks or
visible brush strokes? This happens because it is
a pure synthetic brush, and synthetic brushes
are usually very stiff and run out of paint
and water very quickly. That's why in a
single application, you don't get a clean
uniform gradient blend. The brush strokes are clearly visible because even
with slight pressure, the brush lays down and
lifts off color abruptly. So if you're using
a synthetic brush, make an informed choice. Look for a soft
synthetic brush that is designed exclusively
for watercolor, one that feels smooth
and holds moisture well. Otherwise, you are likely to face these issues
while painting. Now let's compare
another synthetic brush this time from Princeton
Heritage Series size number ten. The bristles of this
brush feels feather soft, almost like natural hair, and it is not as stiff as the
previous synthetic brush. There is a slight spring
bag, but interestingly, it takes a bit of time
to return to a shape, quite different from the
usual synthetic stiffness. Did you see that?
It has slightly bent out of its shape and
it has not spring back, so let's perform this
exercise using this brush. Let's get started
with the exercise. Now, before soaking
the brush in water, I want to test it
spring back on paper. Wow, this feels really
soft when I press it down, and it stays in place for a moment instead of
instantly snapping back. Now, let's begin by
dipping the brush in water and laying down a
flat wash on the paper. Since it is still
a synthetic brush, I still have to go back a couple of times to layer
the water evenly. But compared to the
previous brush, this one feels much more softer and distributes
water more smoothly. Let's load the brush with the creamy paint mix and
see how it performs. With just the tip dipped
in a little water, I mix the paint further to create a creamier
velvety consistency. Now, very soon, I'll start spreading it or
applying it on paper. My brush is loaded
up with the paint. Let's begin to apply
it on a paper. And, oh, wow. I can instantly feel the difference between the
two synthetic brushes. This brush is so
much more softer and glides effortlessly on the
paper without much resistance. You can still see some streaks, but compared to a
previous synthetic brush, the result is so much
more smoother, right? Even as I demonstrate
this exercise, I can feel the
difference firsthand, and that is why I highly
recommend you to test out the stiffness and softness of
all your brushes yourself. Most good brands make synthetic brushes at
an affordable rate, and it is always helpful
to have a few of the synthetic watercolor brushes alongside with your natural or blended watercolor brushes. Practical implementation
of this exercise will help you choose the right brushes for your next
watercolor painting.
8. Brush Control & Stroke Techniques: Before we begin
with brush control, let's take a moment to
understand the parts of a round or a mop brush and how the influence
are painting. I have here my size and about 20 mop brush,
a natural hairbrush. When your mop brush is damp, you will notice the pointed end of the bristles.
This is the tip. Just below the tip
would be the toe. Now here in this mop brush. When you bend it, it will retain its shape. This is the toe part of the brush because it's
a natural hair brush. Now, just below the toe, you have a rounded
portion near the ferrule, which is the belly of the brush. This belly is where
the mop brushes hold a large amount
of water and paint, making them ideal for
broad fluid strokes. Below the belly is the heel, and then the ferrule, and then comes the handle which provides grip and control. Now, that was all
about our mop brush. Now let's take a look at our ultra round brush
from silver silk series. You will notice
that this brush has an elongated tip and
a more defined toe. However, unlike the mop brush, its belly is not rounded, meaning it won't hold as
much as water or paint. Instead, this brush is more designed for precise
and control strokes. Making it idle for fine details. It also has a ferrule and a
short handle which allows for better maneuverability while working on integrit areas. Understanding the
structure and function of your brushes will help you
use them more effectively, allowing you to
create a variety of strokes and textures in
your watercolor paintings. Now let's move on to the
holding positions of the brush and how the
effect art strokes. Holding the brush closer to
the fiule gives more control, and holding the brush
at the center or at the edge of the handle
results in more looser, more expressive strokes, allowing for a freer
flow of paint. Let's practice this by wearing pressure and grip position
while using just the tip toe, or the full body of the brush. When I hold the brush
close to the fiule, I apply firm pressure and
create control strokes. Here, I'm pressing down
the tip very lightly, and you can see how the marks are varying from thick to thin. Now, when I press
it down a little harder and create a more
controlled pressure, you see the uniformity
in the stroke. Now I'll change the
position of the brush and hold it upright at the
center of the handle. Now using just the tip, I'll try to make a straight line and see how I differ
the pressure. When you use just the tip of the brush and apply very
light pressure on it, you will see that the brush is literally dancing or
gliding on the paper. Now when you exert a little bit more pressure with using the tip and the toe, you see you get much more
controlled and thicker stroke. Now I will hold the
brush closer to the edge of the handle and repeat
the same exercise. I will be using the full
tip and toe while creating this line and now using the
full belly of the brush. You can see the stroke
difference, right? When painting skies especially for gradenblends or clouds, I prefer to create loose
expressive strokes by holding the brush closer
to the edge of the handle. This allows me great
freedom and flexibility, making it easier to move colors
fluidly across the paper. By varying the pressure, I can control the way the colors blend and flow, achieving
soft transitions. Similarly, when painting
skies with slanting strokes, holding the brush at
the edge of the handle keeps my wrist and
fingers more flexible, helping me to create bold
broad strokes with ease. Now let's explore the
different strokes used to create the clouds. Using the tip and
toe of the brush, press it down and
lightly release the pressure to create
soft organic shapes. Varying the pressure allows for thicker and thinner strokes, helping shape the
cloud naturally. To form a cloud, start with thicker strokes at the top and gradually lighten
the pressure as you create smaller strokes
towards the bottom. Next, repeat the same
stroke in reverse, holding the brush at
different positions. Near the ferrule, you
will exert more pressure, which can lift off the color when working on a
wet background. At the edge of the handle, it allows for lighter
and more fluid strokes. Now let's apply the strokes
on a wet background. First, I will wet
down the paper and lay our gradient wash
or purple as the sky. This lesson is only going to be helpful when you
practice it yourself. Collect references of your sky, observe the shapes of the
clouds and try to mimic the exact same shape of the clouds using
varying pressure and. Because there is no
better way to learn than through experimentation
and practice. By doing so, you will not
only master the techniques, but will also begin to develop
your own unique style. That's exactly how
I learn to paint my skies through
continuous practice, observation, and exploration. So embrace this process, experiment fearlessly and let your style evolve naturally. Let's get back to the
point where we left. I have already created this gradient wash of my
sky using my purple mix. You could go ahead and create any background wash for your sky that is
totally up to you. Here, this is just for a reference purpose that
I have used this color. Now I'm going to dab my
brush on the tissue paper. But you can observe that
my brush is still wet. It still has moisture
in it, right? You can see those
droplets of water. You brush this very wet and you load it with a
creamy paint mix. Notice what happens when you apply it on your
wet sky background. The colors start to blend and the clouds lose their shape. Can you notice in here how
the shape of the clouds is blending in that wet background and not holding his shape? When I dab the brush on my tissue paper to remove
that excess water, and I will reload it
back with my paint mix, you will now see
that the strokes of the clouds hold their shape
on this wet background, creating a soft yet
defined cloud shape. This exercise helps
you to understand the water holding capacity
of your brush and teaches you how to quickly
adjust it during the painting process to achieve the desired effect that
you are looking for. Here, I'll create
and demonstrate some more shapes of the clouds on a dry background so that you can practice this by varying your brush pressure before applying the techniques
in our class projects. First, to create
the cumulus clouds, I'll hold the brush upright and use the tip and toe to paint the sky while preserving the negative space for
white fluffy clouds. Next, for the floating clouds, I'll use the ski strokes
which we practiced earlier. Adding darker tones at the
bottom will create depth. But since we will be working
on a wet background, the colors will
blend automatically. You need not go and
blend it yourself. For the next cloud, I will use the full belly of the brush applying varying pressure to create the direction and
movement of the cloud. Observe my brush
strokes out here. We are going to use this kind of clouds for our
project number five. So practice this shape of
the cloud by yourself. The next shape of
the cloud that I'm creating is by swirling motion using just
the tip and toe of the brush and wearing
the pressure lightly. You can also paint an inverted C shaped cloud
for a different effect. Lastly, I'll be using some
slanting broken strokes to create a directional cloud for more dynamic compositions. So the cloud shapes may keep
changing and may varying. So practice them according to the references that you
collect and study the shape.
9. Type of Washes: In this lesson, we will explore the three different types of
washes used in watercolors. First, let's take a
look at the flat wash, what it is and how
to achieve it. To proceed with this technique, first step is to
prepare our paint mix. We'll have to mix a
generous amount of water with our paint to create a
smooth, uniform mixture. While I'm preparing
this pool of paint, let's first understand
what exactly is a flat wash. Flat wash is a technique where
you apply a smooth, even layer of color across a surface without
visible brush strokes, streaks, or tonal variations. The goal is to create a
uniform wash of color. And hence, because
of this reason, we need to have our uniform
pool of paint mix ready before we go into creating
our flat wash. Once a smooth, even consistent
paint mix is ready, the next step is to
choose a medium to large sized brush according to the size of your paper and
start working wet on wet. To start working wet on wet, we will first apply a thin
even layer of clean water to the paper before adding color to help the
wash spread smoothly. I would recommend you to take your time and wet your paper
because you do not want your paper to start
drying in between your wash. Now I will be loading my brush
with the smooth, consistent paint mix and
then start working on it. When applying the paint, we will first begin at the top and use broad
horizontal strokes, keeping our brush in
contact with the paper. Observe how I'm utilizing
the full body of the brush. I'm engaging the tip, belly, and toe to distribute the color evenly throughout
the paper surface. As you work, ensure
that there is wet bead of paint at the
bottom edge of each stroke. This helps maintain a smooth transition
and prevent streaks. Work quickly and slightly overlap each stroke to
keep the wash even. Once the entire area is covered, allow it to dry completely without going over drying areas, as this can cause unwanted
streaks or patches. By following the steps, you could achieve a
flawless flat wash with no tonal variation. Now moving on next to our gradient wash. Now
what is a gradient wash? A gradient wash
in watercolors is a technique where
color gradually transitions from
dark to light or smoothly blends from
one color to another. Unlike a flat wash, which maintains a uniform tone, a gradient wash creates a natural shift in
color intensity, adding depth and
dimension to a painting. You must be thinking,
why is it necessary to know all these techniques
before you paint the skies? Because they are essential
for painting realistic skies as they help capture the natural variation in
light and atmosphere. Most skies aren't a single
flat color, are they? They shift from a deeper blue at the top to a lighter
tone near the horizon, or maybe they blend in warm and cool tones during
sunrise and sunset. This technique allows
you to create a soft, seamless transition that mimics the way the light
interacts with the sky, adding depth and realism
to your landscape. Now I will load
my wet brush with a slightly watery paint mix and begin applying
color from the top, using the full body of
the brush to spread the paint evenly across
the wet paper surface. As I reach the
center of the paper, I will gradually release
the pressure from the belly of the brush and engage
only with the tip and toe, gently moving the
colour downward. Maintaining moisture in
your brush is crucial here as it helps to create a smooth tonal transition
from dark to light. There is another way to
achieve this effect. Start with the same process
applying color from the top. But when you reach halfway
down the paper, pause, rinse your brush and
dilute your paint mix with a drop of water to create
a lighter tonal value. Then resume painting
from where you left off, allowing the diluted mix to blend seamlessly into
the previous layer. This method makes it
easier to achieve a smooth transition,
especially for beginners. If you don't get it right at the very first time,
keep practicing. Gradual control over water and
paint comes with practice. Can you see the
beautiful transition of color we have achieved from dark to light blue just by varying the total value of
a paint mix and pressure? This smooth blend creates
a natural gradient. Now let's move on
to the next part of our gradient wash where we are going to do
the same process, but with three different colors. As already said before, a variegated gradient wash in watercolors is a
technique where we use two or more colors
gradually blend into each other while also
transitioning in tonal values. Unlike a simple gradient which transitions from dark to
light in a single color, a variegated wash allows multiple colors
to flow together, creating soft organic blends. In this exercise, we will use ultramarine blue for the top
and yellow for the base, and I'll show you how
to avoid creating a greenish mix in the transition layer when
blending these two colors. Since blue and yellow
naturally mix to form green, we need to ensure that the
transition between them remains smooth without
unwanted color mixing. The key is to create
a buffer layer by allowing a soft
fade of blue before introducing yellow
or introducing an intermediate color in
between yellow and blue. So that it does not form
that greenish color. To do this, I will first apply
my yellow at the bottom, gradually lightening
it as I move upwards. Before reaching the area
where the blue begins, I'll introduce a thin band of clean water or a
light neutral wash, allowing the space
for the colors to blend without fully merging. Now I will start applying my ultramarine blue using
a size 00 mop brush. This is a natural
hair mop brush, but notice how the brush is dry, creating streaky
strokes on the paper. The brush feels a little too small to cover the
surface. To fix this. I'll add a drop of
water to my paint mix, creating a more
fluid consistency so the brush can glide
smoothly over the paper. Let's try this again. This time, I noticed
that the top part of the paper has started
to dry already. To prevent harsh edges
or streaky strokes, I will switch to a larger size, about 20 more brush which is more suitable for
this paper size. I will begin with a light
tonal value of blue in the area where I left off
and blend it upwards, ensuring a smooth transition. This larger brush allows better control and
even coverage, helping me to move the
color without streaks. As I move downwards, I stop just before
transitioning into the yellow then using a rinsed brush loaded with light
tonal value of yellow, I gently work upwards, applying light
pressure and using horizontal back and
forth strokes to blend the yellow into the
transition area without the overpowering blue. Next, I load the tip
of my brush with a little watery mix
of lavender and blue and start from
the midway point, blending it into
the transition area where yellow meets the blue. Using the belly of my brush, I gently push the
colors back upwards at the same time towards the top while maintaining light
blending strokes. Throughout this process,
I'll make sure to keep the brush in contact with the
paper without lifting it, ensuring the transition
remains soft and seamless. The key here is to apply very light pressure so that the transitional
area stays delicate, it does not create
any harsh edges. Now, to avoid that
greenish mixture, I have added a little bit of lavender into my blue so that the transitioning area
becomes gray when mixed with yellow because lavender
is a form of purple, and when mixed with your yellow, purple and yellow will
form a grayish mix. You can either follow the
previous method or introduce a third color to create a smoother transition
between blue and yellow. If you observe sunrise
or sunset skies, you will often notice
a soft warm transition between the cooler
and warmer tones. And to replicate this effect, I'll introduce a light tonal
value of Alyzuen crimson halfway between the yellow and blend it upwards into the blue. The crimson acts
as a buffer color, preventing direct mixing
of yellow and blue, which would otherwise
create green. To refine the transition, I will use a light tonal wash of naples yellow and blend it
into the crimson layer, allowing the colors
to merge softly. Once are paper rise, you can see the beautiful, soft and smooth transition
of colors we have achieved in the variegated gradient
wash. Blending is seamless, creating a natural shift between hues without any harsh edges. You can repeat this
exercise using your cool and warm purples this time without introducing
a third color in between. The challenge is to
transition from purple to yellow while avoiding
any muddy mixes. The key to achieving
this is to always use light tonal washes at
the transitioning layers, allowing the colors to mud gently without
overpowering each other. I hope you practice this
technique and master it, keep experimenting with
different color combinations to build confidence in
creating smooth, harmonious gradients.
10. Setting Up Palette: Before we dive into
our class projects, I want to take a moment to address one of the
most requested topics, how I set my palette. Many of my students have
always asked me about this, and I couldn't miss
this opportunity to share the thought
process behind it. I am using a palette
with 37 wells, but you can apply
the same principle to set up your own palette, no matter how many wells it has. It doesn't have to be the
exact palette that I'm using. I generally use a
35 well palette from my favorite branch in an arts polycarbonate palette I also have an eight
in well insert for it, but I won't be using that
many colors for this class. Instead, I'll set up
my palette in a way that allows me to paint
any subject I wish. Do you remember our lesson on color theory and
the color wheel? We have learned that with
just the primary colors, we can create an endless
variety of mixes. However, there is a catch. Each primary color has a temperature bias like we have already gone
through over it, meaning it leans either
towards warm or cool. This bias directly affects
the vibrancy of color mixes. For example, if we mix a
warm red with a cool yellow, each biased towards
different underlying hues, the resulting mix can
turn muddy or saturated. This is where the split complimentary color
veal comes in handy. It helps addresses this
issue by ensuring that we both have warm and cool
versions of the primary. He may split
complementary color veal, where you can see that
each primary color is divided into its respective
warm and cool hues. Let's take a closer look. Red is split into two hues, one warm and one cool,
followed by yellow, which is also divided into one, warm and cool version, and blue also follows the same principle with a
warm and a cool variation. Now the reason behind
this setup is simple. It allows us to create the most brightest and
most vibrant color mixes by pairing primaries that share the same temperature bias. For example, a cool red bias towards purple when
mixed with a warm blue, which is also biased
towards purple will result in a bright
and vivid purple. A warm red bias towards orange
mixed with a warm yellow, also bias towards orange
will give the bright orange. Similarly, a cool yellow bias towards green mixed
with a cool blue will also create brilliant green because both are
biased towards green. This exact concept is what we will apply when setting
up our color palette. Now, in my palette,
if you observe, I have included both the warm
and cool versions of reds, yellows, and my blues, which are my core
primary colors. In addition to that, I have also included some
warm and cool greens, a few pastel blues, warm and cool purples, and then browns and
blacks for added. Now for your own palette, you don't need to include
all these extra colors. You can just start
with six primaries, one warm and cool
version of each primary and build from there based
on your preferences. I have created a swatch
palette for your reference, which you can find in projects
and resources section. There you will see the
exact warm and cool colors I have selected for this class. Let me walk you
through my palette. First, I have my warm red, which is permanent red, cool red, Allison crimson, followed by opera, a
color I use frequently. Many consider it neutral, but I personally feel
it leans towards warm. Next, I have my warm yellows and oranges, along
with the pale, warm variations, naples yellow, and Jean Brilliant number two, followed by a cool lemon yellow. Moving on to my greens, I have a warm greenish yellow, warm sub green, warm, hocus green, and
finally, a cool green. Next, I have my warm
ultramarine blue, which is granulating, along with another warm blue that
is not granulating. Then I have my
cool peacock blue, followed by a dark, warm indigo. I have also included
a cool pastel blue, which is one of my favorites. Moving on to my purples, I have a cool purple
and a warm violet, along with pastel
hue of lavender. I have included few
other pastel colors that I love using for floas. These are personal favorites and not essential to have
in your palette. However, we will be using
lilac in our class projects. For earth tones, I have
my muted yellow ocher, followed by burnt sienna, which is a very bright
and beautiful warm brown, cooler, burned tumber, then followed by brown red, which is a very bright and
beautiful reddish brown color. This is an optional color. Then next, I have my blacks. I have my neutral tint, which is warm and paint
screen, which is cool. Still have a few empty wells, which I may fill later based on the needs
of my composition. Now that you understand
how I set up my palette, you can see that it is
all about starting with a basic limited
palette and gradually adding colors that suit your
personal painting style. Over time, you'll develop your own preferences and build a palette that
truly works for you. Now I'm going to quickly
grab my spray bottle and reactivate my paints so that they are ready for
our class projects.
11. Day 1: Color Palette: Before we get started
with our Day one project, let's quickly take a
look at the colors that we are going to need while
creating this project. The first color that I'll be watching out is my blue gray. Now, based on the brands
that you are using, the name may vary. But overall, this is a very
pretty cool sky blue color. And you can easily
mix this and form your own sky blue by using
your cool blue shade. Here it is PB 15 is 23
and the pigment PW six, which is nothing but
essentially your white pigment. So when you mix your
cool blue shade, along with your whiteqh, you get this color. The next color that I'm going to swatch out is my
opera pink color. It is a very bright neon pink which I love using for my skies, and it has a pigment of BR one. Now, this is a pigment which is present in this opera
from Shinhan art, but if you do not have
this opera pink color, you can go ahead and use
any other cool reds, which has red pigment in it. And when mixed with yellow, it gives a bright color. Now, you need to test it out. For example, I know for sure because I have been
using this color that when I mix my naples yellow and little bit of yellow orange
along with my opera pink, it results into a very
bright coral orange and coral pink based on the wearing
proportions that I use. So I know this for sure, but you need to test it
out for yourself with the colors that you have if
you are getting this color. Mostly if the pinks have
a violet pigment in the resultant color
when you mix with your yellow will definitely
not be this color, but will be a very muted color. The next color that I am
swatching out is my lilac. Now, you can easily mix your lilac by mixing
your mineral violet, which has a pigment of
PV 23 or likewise here, you need a violet pigment in it, and when you mix
it with whiteqh, you can get this same color. Now, based on the brands
that you're using, it might vary slightly. But you can go ahead
and give it a try. The next color is my burnt
umber or burnt sienna. You can either use
any one of these. I have used your burnt
sienna because when you add in a little bit of neutral tint or ivory black or
paints gray into it, you can easily turn it into
a darker shade of brown. Oh, yes, another color that
we would need is sap green. Now sap green is easy to form. Take any of your green and mix a little bit
of yellow in it, you would get your sap green. So these are the
final colors that you would be needing for
our day one project. So get your colors ready, and let's jump into our project.
12. Day 1: A Gradient Morning Sunrise: Let's begin our first project. I will be using a
square paper cutout, measuring 18 centimeter
into 16 centimeter. It's just two centimeter away from being a
perfect square, but feel free to use any size that you are
comfortable with. The next step is to tape down the paper on
all four sides. You can choose to create
thin or thick borders. I personally prefer
thin and clean edges, so I'll be taping down the
paper on all four sides. Once that's done, we will move
on to the sketching part. When I tape down my paper, I always make sure that
I run down my fingers once I tape it down to ensure that there are
no gaps in between. Since the primary focus
of this class is the sky, about two thirds of the paper
will be dedicated to it, while the remaining third
will serve as a foreground. I'll keep the foreground
elements minimal to ensure the focus
stays on the sky. So now let's begin
our sketching part. To start with it, Alphas draw a
straight horizon line and mark the midpoint. Once I look at the midpoint
at the center of the paper, I'll just use a dot
to mark it out. Next, I'll outline the hillock. Now to outline the hillock, I'll position it 3.5
centimeter away from the midpoint on the left and maintain the same
distance on the right. Then I'll sketch the
rock formations lightly. I will also add few pencil lines on the rock to indicate
those shadow areas. Sketching them lightly
will help us guide later when we contour
them with darker colors. Once you are done with this, we will be done with sketching. A Okay, now it's time to move on to
the wet on wet technique. I'll start applying the
water onto my paper surface, but I think it will
be wiser to switch to my broader hake brush to evenly and smoothly apply
water across the surface. This will also speed up
the process compared to repeatedly laying water with
that smaller mop brush. Choosing the right brush size
is essential when working with watercolors as it directly relates to
your paper size. A brush that's too broad
can flood the paper, while one that's
too small may cause the surface to dry too quickly
leading to frustration. Take your time to
wet your paper, applying two or
three even layers to ensure that every corner
is thoroughly covered. Be mindful not to create
any pools or puddles. There shouldn't be excess
water standing on the surface. Once the paper is evenly damp, I'll let it rest
for a few seconds. Meanwhile, I'll start
mixing my colors. I'm picking up my naples yellow, adding a drop of opera. Observe the mixture
on my palette. It's not too watery, but has a creamy consistency. I'll begin with a light
tonal value using just the tip of my brush
and with gentle pressure. Holding the brush near its edge, I'll glide smoothly across the paper to create
soft transitions. Now carefully using just
the tip of my brush, I'll pull the colors down
along the sides of the rock, making sure not to let
the paint flow into it. I'm retaining the white
space near the horizon, for now with the
same light strokes, I'll spread the color gently stopping about halfway
down the paper. Next, I'll mix a
light tonal value of opera pink and layer it
over the naples yellow. I'll start at the top
of the rock using very light sweeping
strokes while making sure not to
completely cover the yellow. I Now, I'll introduce a little lilac to the bottom third of the paper and blend it
into the opera pink. Look at the amount of lilac that I have loaded
my brush with. I have just used the tip of
my brush to load the opera, and I'm directly applying
it on the paper. I'm going halfway through
it because after this, I'll be blending it with
my mixture of opera. The mix is a very light
tonal value of opera. I'm just going to give it a nice blend using sweeping
to and fro motion. Layering with the
light watery values here will ensure that the surface stays wet
for a longer time. Before proceeding with
the top part of the sky, I will re wet the area down
to the halfway mark because it's quite hot and my paper
is drying up at the top. At the center, since our
yellows have faded out, I'll go back in with a medium
value of naples yellow. Mixed with a little bit of opera and gently blend it
into the pink layer using very light
pressure and using just the tip and toe
movement of the brush. Notice how I am working with just the tip and toe of my
brush for a soft transition. To refine the blending further, I'll take a damp tip of my silver atelier squirrel mop and lighten the transition area. Now I'm quickly mixing my blue gray or sky blue color
to a medium tonal value. Let me show you here.
Observe the mixture. It's creamy, neither too
thick nor too watery. Adding in some more of that pigment to make it
to medium tonal value. Tip and release it
as I move downward, ensuring an even and
gentle application. I'll continue with smooth
strokes without lifting my brush from the paper,
maintaining uniform coverage. As I approach the yellow layer, I'll lighten my
pressure working with just the tip and toe to
softly pull the color down, keeping that area light. Now, with my brush
tip loaded with a light tonal value
of my yellow, I start to move upwards
in one continuous motion, blending seamlessly
into the blue. Can you see how smooth and perfect the transition
is turning out to be? Now I feel I can go a
tone darker for the blue. I'll begin at the top with the same medium
tonal value of blue, applying pressure at first
and gradually lightening it as I move downwards to
create a natural gradient. As I approach the
transitioning yellow, I'll use just the tip
of my brush and move the color downward with very light strokes,
as you can see here. The paper is wet, the colors
will seamlessly blend, creating a soft and
natural transition. Look at that
beautiful variegated gradient wash we have created. We have our blues, yellows, pinks seamlessly
blending without any unwanted green tones. The key was using very light tonal values as we approach the
transitioning areas. Additionally, the mixture
of opera and naples yellow, when blended with a light
tonal value of blue, created a subtle
gray in between, giving the sky a more
natural and harmonious look. Now we will let the
sky dry completely. In the meantime, we'll begin working on the
bottom foreground. For the foreground,
I'll start with a light underlayer using naples yellow mixed with
a touch of opera pink, applying it with a
light, watery wash. Since our paper is dry, we are working with
wet on dry technique, but I'm keeping the mix slightly watery
for a smooth base. We are avoiding a wet on wet approach here because
the sky is still drying. If we were to introduce
too much moisture now, it could seep into the
drying sky causing unwanted feathering
and blooms as the wet net spreads into
those semi dry areas. We will work quickly while
the foreground is still wet. I'm mixing a medium tonal value of burnt sienna and
applying it near the horizon in a single stroke using my size number
00 mop brush. I leave a small gap and
then start applying the color again from the bottom
using horizontal strokes. I'm letting the
underlayers remain visible because burnt sienna
is naturally transparent, and when used in a
light tonal value, it allows the previous
layers to subtly show through adding depth and
warmth to the foreground. Now to enhance the depth at
the bottom edge of the paper, I'll mix a darker green
tone using my burnt umber with sap green and apply it
in a fanned out direction. Observe my brush strokes over here using just the
tip and the toe of the brush and pushing the colors inwards
from outwards. To create a more
pronounced effect of this grassy texture, I'll soak up all that
excess moisture and fan out the tip of my brush to create those delicate
grass strokes. If you have a fan
brush or a comb brush, you can use it for this step
to achieve a similar effect. Observe how I'm
spreading out the tip of my damp dry brush on my palette. Since it's a natural hair brush, I can shape the bristles
to my preference. Using this freed out tip, I'll now add smaller broken dabs around this area to
indicate grass growth. Now I'll deepen the foreground by adding some more darker tones of grass near the bottom edge of the paper,
enhancing the depth. Here, the paper is still wet
enough for me to do this, so the grass will look
very soft and blended. Next, near the base of the rock, I'll use just the
tip of my brush to paint a fine
horizontal green line. From here, I'll
start building up foliage patterns on both
the sides of the rock. I the grasses are looking
a little faded out, so I'll add in some more
darker tones of my brown using a very controlled wet on dry technique using the
damp tip of my brush. Here, my paper is still wet enough for me to do this step, and the grass will
still look blended. If your paper has
dried out completely, do not do this step right here. Next, it's time to
paint the rock. I'm going to use the same
mixture of my naples yellow mixed with opera pink to do the underlayer
of the rock first. I'm going ahead with wet
on dry technique with very light tonal value of
this yellow and pink mixture. Now, I'll quickly switch to my size six ultra round
synthetic brush and mix a rich medium tonal
value of burnt sienna. Oh, oops. My brush
is too watery. I'll squeeze out
the excess moisture from the belly of the brush, making it just damp. Next, I'll go and fix any bleeds outlining the entire area with
this light mix of sienna. I'm not reloading my
brush with more paint, just using what's already there for a subtle
controlled application. Now I'll introduce
some darker tones using burned tamber and
start layering from the top. This part where I
lay darker tones or burnt tumber wasn't recorded. I simply use the deeper
browns to highlight the shadow areas now using
the damp tip of my brush, lightly loaded
with burnt sienna, I'm gently pulling the colors
downwards to blend them while ensuring the lighter yellow underlayers are visible. To add even more depth, I'll introduce darker
tones of brown, almost looking similar
to that of Cipia. Mix in a little bit
more of neutral tint into your burnt sienna and
you would get a similar mix. I'm using the pointed
tip of my brush, creating these fine lines and subtle marks running across
this surface of the rock. Copy the steps just
I'm doing here, and we would be done creating
this rock structure. I just noticed that
the background foliage near to the horizon
has faded out a bit. To enhance it, I'll go in with a medium tonal value of sap green mixed with
my burnt sienna. For better control,
observe how I'm gripping the brush
closer to its ferrule. Now with dabbing strokes, from the tip of my brush, I'll create foliage
in varying shapes and sizes to add more natural
and realistic feel. I will continue using these
dabbing strokes until I have completed the foliage patterns along the entire horizon line. This will ensure a balanced
and cohesive look, adding depth and texture
to the background. I With this, we are officially done
with our painting, but I'm not really
very happy with these two splatters that
I have got over here, and I'm thinking of covering it up using few birds in flight. So it will not only
hide the splatters, but will also bring a sense of movement and direction
to the painting. I'll switch to my
detailing liner brush and load it with
this neutral tint. Carefully paint
small bird silvitts with it using just the tip, as you can observe here. I think I'll be adding one
more small bird out here, something like this,
and I'm not going to go overboard adding
too many birds over here. I'll just leave it at that. Now I will wait for my painting
to dry out completely, then we will be peeling
off our masking tapes. My paper is almost completely dry as I had left it
overnight to dry. Now I'll be peeling
off my masking tapes. Do it at an angle of 45
degrees so that you do not risk the chance of ripping
off the painted edges. I'm loving those clean, crisp edges that we have
got for our painting. Now the final one. I hope we have gotten a
clean edge over here, yes, and that's it. I'm really very happy with how this project
has turned out. We have achieved a very
beautiful gradient sky with smooth transitions. I hope you give it a try. I'll see you again tomorrow with another exciting
project until then bye.
13. Take A Moment To Practice: Now before moving on to Day two, take a moment to visit the projects and resources
section of the class. Scroll to the end and you will find an additional
reference for day one. This extra exercises will help you refine your
blending skills, practice gradient washers
with more colors, and build confidence before
tackling Tday's lesson. Give it a try and
you will notice a big difference in your
control and transition. I have also included some reference images
here on the screen. Feel free to hit
the pause button and practice whichever
speaks to you. Remember, practice is the key. The more you experiment with
blending and gradnt washes, the more confident and effortless
your skies will become. So take your time, enjoy the
process, and keep painting.
14. Day 2: Color Palette: Welcome to day two, and
today's color palette is going to be inspired
from Australian spring. First, I'll watch
out the sky color. I'll be using here
my thalo blue, a warm blue, which is a
non granulating blue. The thalo blue that I'm
using here is a warm blue, but instead of this thalo blue, you could also go ahead and
use your ultramarine blue, which will have the
same pigment PB 29. Next, I'll watch out
my yellow ochre, which has a pigment PY 42. It is a muted warm yellow
that is commonly found in a basic 12 color palette perfect for adding
warm and earthy tones. Along with that, I will be
using a cool lemon yellow with pigment PY 81 to
bring brightness and contrast and to create those
florals in the meadows. For the greens, I'll
be using sap green, which can be easily
mixed by using a cool blue with a cool yellow in the ratio of one is to two, giving us this rich,
perfect green. Moving on to the
fence, I'll use burnt umber with the
pigment PBR seven. To create those
warm early browns. For darker details, I'll
be using neutral tint, or you could also go ahead and use your paints gray
or ivory black. Okay, now that we have our colors watched
and sorted already, let's dive into our
second project. On the screen, you will see a quick color recap
for your convenience. This will help you double check your palette before
we start painting.
15. Day 2 : Australian Spring - The Sky: Hello, hello.
Welcome to Day two. Before we begin painting, I'll quickly tape down my paper with masking
tape to secure it. Now let's move on to sketching. I'll start lightly by sketching the horizon line and
the rolling meadows. Since the sky is our
main focal point, we'll allocate two thirds
of the paper to it. As always, I highly
recommend watching the entire lesson first
before painting along. This will help you to get a clear understanding of
the steps ahead of you. I'll also sketch out the
fence to mark its position, ensuring we have a guide
when we paint later. Once you're done with
this basic sketch, we will move on to
painting a sky. For the sky, I'll be using
wet on wet technique, which means applying wet
paint over weight paper. I'll first load my silver
atelier mop size brush number eight with clean water and apply an even coat over
the entire sky area. I recommend doing this
step two to three times, allowing the paper to absorb
the moisture gradually. Next, I'll wipe down any excess water pulling on my masking tape
with the tissue. This step prevents back flows when we start
applying our paint. I'll go over my paper once again with smooth
horizontal strokes with clean water to ensure that my paper stays wet for a
longer period of time. I will repeat the
process of wiping down the excess water pulling on my masking tape
with the tissue. Now, let's get started
with our painting. I have switched to my
size 00 mop brush. This brush I'm using from
silver atelar series, and I lightly wiped it down on my tissue paper to
remove excess moisture. I'm loading my brush
with allow blue, which is a warm blue, and it is also non granulating. Observe how I'm holding my brush close to the
edge of the handle, allowing for a free
fluid application. Notice how I leave areas of white paper untouched while painting the blue around them. This is called
negative painting, and this will help define
our clouds naturally. Observe how I'm wearing
the pressure on the brush, sometimes using the tip for finer strokes and the belly
for broader applications. Now, with the same brush
loaded with my thalo blue, I'll paint a few horizontal
strokes across the sky. Then I'll rinse my brush, dab it on a tissue, damp it dry, and begin fading the blue as
I approach the horizon line, creating a smooth
gradient blend. Next, I'll come back and
repeat the step this time, using a damp brush to move the paint that's
already on the paper. With gentle back
and forth strokes, I'll blend the
transition seamlessly. Now, I'll clean my brush
and use the toe of the brush to lift off some of the blue paint in
random pattern. This will help define
the cloud shapes. Here you can observe that with
the damp tip of my brush, I'm gently pushing
the paint away with the belly of the brush to
create the soft cloud edges. Now, once the white spaces for the clouds are established, I'll use my damp brush to
lightly wet those areas. This helps keep the
edges soft and airy. In between, I'll load just the
tip of my brush with a bit of blue paint to refine the
cloud's edges where needed, adding depth and movement. With the same tip, I'll blend near the
horizon line again, ensuring a seamless
gradient transition. To create a small chunk of
the cloud here at the top, I'll use my damp brush tip to lift some more
paint from the sky. Each time that I lift, I'll clean my brush on a tissue. To avoid re
depositing the color, you can also use a dry
tissue to gently dab the area to create a fluffy and airy looking
shape of the cloud. Now let's add depth
to our clouds by introducing some
subtle shadows there. I'll create a light tonal
mix using my paints gray or neutral tint and then swatch it on this
scrap paper first. The mix should be very light, almost a transparent wash. Before applying, I'll dab off the excess paint from my
brush onto a tissue paper. Now using the tip
and toe of my brush, I'll gently lay down
soft strokes at the bottom of the clouds
where shadows naturally form. Notice how light and
airy my strokes are. I'm not covering
the entire cloud. I'm just enhancing its volume
by creating this depth. I will repeat this process
for the other clouds, making sure to start
at the bottom and then fade the pigment as per the
direction of the cloud, leaving some areas
for the natural glow. To ensure a smooth transition, I'll use a damp brush
and softly drag away the paint away from
the shadowed areas. This will blend the
tone seamlessly creating soft billowy
cloud formation. I will fix this cloud
by gently blending it upwards and creating
this soft Bilawy cloud. Here, I felt the shadows are too much onto
the white area, so I'll just dab the brush clean and damp it
and then take out some of those areas using the same shape and creating
the same brush strokes. I will soften the
top small chunk of the cloud by going
over the white areas using my damp brush
and pushing the blues away and then dabbing
it on my tissue paper, I'll gently create that
pattern of fluffy airy cloud. Now, using the lifting
technique with the damp tip and
belly of my brush, I'll gently lift colors near the approaching horizon to create smaller floating clouds. This step will work only if
your paper is still wet, allowing for smooth
and soft edges. If your paper has dried, it is best to avoid this step to prevent harsh and
unwanted marks. This is the reason
why you should wet your paper thoroughly
before you begin painting. A well prepared surface
stays wet for a longer time, giving you more time to
work on soft blends, seamless gradients, and
delicate cloud formations. Since my paper is still wet, I'll use a damp tissue
paper to create the fluffy edges of
the clouds here again. Using just dabbing motion
of my tissue paper, I'll go ahead and
create these soft, airy marks or directions
of the clouds. Here, I was not happy with
the shape of the cloud. So using a little
damp tissue paper, I'll dab it lightly, and you can see that it has
created that weird mark. So using a damp brush, I'll go over the
area and then gently dab the tissue again
slightly over here. Now, since the paper is
still a little wet enough, it will create a smooth
edge after it dries. I can feel that my paper
has started to dry, so I'll stop overworking the clouds and leave
it to dry completely. We will then move on
to our foreground.
16. Day 2: Australian Spring- The Foreground: Now that our sky has
dried out completely, let's move on to the
foreground near the horizon. First, I'll prepare
a colour mix of lemon yellow and yellow ochre to create this very natural warm
base using my wet brush. Now remember, here the brush
should not be soaking wet. It should just be
wet so that you can lay the colors
on your dry paper. I'll start applying
the color now. Pay close attention to
my brush stroke here. I'll start here, but
I'll drag the colors down so that all the
watery paint is here at the base so that I do not
run the risk of running these colors into my sky
where it starts seeping in. I'll use directional
angled brush strokes to give the field a sense
of depth and movement. This creates a more dynamic
and natural looking landscape rather than a flat
and uniform wash. If you observe closely, we are already creating that beautiful contrast between the cool yellow of our
foreground and the sky. Now using just the
tip of my brush, I'm smoothing out the colors to keep the transition
soft and natural. Using the damp tip of my brush, I will now mix a little of my sap green with a little lemon yellow and start layering angled strokes into
this wet area. The surface is still damp, this will create a
soft diffused effect perfect for a natural
and organic look. Notice how I'm leaving
certain gaps of that yellow in
between the field and not covering it up
entirely with my green. But a key thing to
remember out here is keep your brush
damp and not too wet. Using just the tip of the brush, I'll apply diagonal strokes, some shorter and some longer to mimic the texture
of a grassy field. To my right along
the outlined slope, I will use just the tip and toe of my brush and load it with the medium tonal value of my sap green lemon
yellow mixture. This will help create a
natural transition in the landscape while maintaining
depth and variation. Using a light pressure, I'll allow the strokes
to blend softly, keeping the area rich but
not overly saturated. Now let's move on to the
main foreground section using the wet on wet technique. First, I'm loading my brush with clean water and evenly
spreading it across the area. As I approach the previously
painted sections, I'll use just the tip of my brush to lightly
cover the edges, ensuring that the
water does not seep into those areas and
causing unwanted bleed. Now, I'll load my brush
with a mixture of yellow cre and lemon
yellow and start applying. But before that, you
must keep this in mind that my brush should
be damp and not too watery. Towards the right, I will
use longer converging strokes helping to guide the viewer's eye and add
a sense of movement. This technique enhances
the feeling of a swaying, grass field or the natural growth patterns
in the landscape. Now, I'll load my brush
with a creamy mix of sap green and gently apply
the same converging strokes, making sure to leave some of that yellow underlay visible
between the strokes. This will help create depth and natural variation in
the grassy field. At this point, because we
are working wet on wet, please ensure that you are exercising water
control in your brush, as well as in your
paint mix to give you this kind of
soft blended defect. Next, using just the
tip of my brush, I'll load with some more
of that green and start adding slanted vertical strokes to suggest taller grasses. Here, my brush is
damp but not too wet, and I'm working with
a fanned out tip of my natural hair brush to create organic flowing
grassy textures. To add even more depth, I'll mix in a little bit of my ultramarine blue or
thalo blue into the green and create a darker
shade and gently repeat the same strokes over the
previous layer of grass. Wearing the stroke
direction will help mimic the natural growth
patterns of the wild grass. Be mindful of the pressure
that you are exerting on the tip of your brush because
if you press it too hard, you are going to
lift the underlays. Finally, I'll use my
special comb brush to enhance this effect further. Now, if you do not
have comb brush with you, that's
absolutely fine. You can go ahead and use your
fan brush or flatten out the tip of your natural
hair brush and create this brush pattern just
like how we did it earlier. Since the background
is still wet, it will allow us to
create the soft, subtle grass patterns
beautifully. But we need to speeden up this process because if the
background starts drying out, we will not get the soft
edges of the grass. Now I'm adding in some
darker green strokes to enhance the depth and
dimension of the field. Now, if you feel
that your meadow has started to dry out quickly, here is a simple
trick to remoistion the surface without disturbing
your previous layers. Cover the entire painting, except for the foreground
area that you are working on using a thick sheet
or a boat to protect it. Then take a spray
bottle and lightly miss the area two to three
times from a distance. Be mindful not to
spray too close, as too much water can cause unwanted blooms or disrupt
the existing layer. The miss settle down for a few seconds and then
start to paint again. Now I'm switching to a size
two synthetic liner brush and loading it with a
darker green mix to paint the tall grasses. Using long slanted strokes with a slight curve at the top, I'll create a natural
flowing grass pattern. Keep your strokes swift and confident to maintain
an organic feel. Now here, you must
work quickly because you need to keep this
on the wet background. If your paper starts drying, all these strokes will
start standing out. Now we will start with the
splattering technique. I'll quickly cover the sky
with a sheet of paper and load my liner brush with a slight
watery mix of lemon yellow. Now I will start to
splatter gently to create the effect of wildflowers scattered throughout the meadow. Important tip here is this technique will work best
only when the background is still wet as a
splatter will bloom softly and blend naturally
into the grassy field. If your background has
dried already, don't worry. Use the misting technique, as we discussed earlier to lightly revet the area and then add the splattering
yellow blooms to ensure that they
blend seamlessly. Splatter the wild blooms until you are happy
with the effect, but be mindful not to overdo it. A well balanced
composition is key. Too many splatters can make
the meadow look cluttered and lose its natural knowing
when to stop is crucial. Step back, observe
your painting, and if it feels lively, yet harmonious, it's
time to move on. With the tip of my brush
loaded with lemon yellow, I'll add a few delicate dots to enhance the
wildflower effect, but we'll stop here and
avoid overworking it. Now, with the tip of my
brush loaded with sap green, I'll begin adding foliage at the intersections of the meadow using light dabbing strokes. This will help create depth and natural variation in
the grassy texture. Here, importantly, make sure the brush
dip is not too watery, as too much liquid can cause unwanted plumes or
overly soft edges. Now, I'll start painting
the fence in the foreground using my mix of burnt
timber and neutral tint. I'll make the fence
in such a way, making sure to position
it so that it appears partially covered by the tall
grasses growing beneath it. This will help it
blend naturally into the scene rather than
looking like it's floating. Next, with my line of
brush loaded with green, I'll quickly add some grassy
patterns around and below the fence reinforcing
the idea that the fence is nestled
within the meadow. To add atmospheric perspective, I'll mix in a touch of
blue into my green, creating a soft teal green tone, and I'll be using
this mix to paint foliage at the furthest
distance near the horizon, ensuring that the
tones are lighter and cooler to give a sense
of depth and distance. I'll also keep the foliage
patterns small and more delicate as distant elements appear less detailed
in perspective. Now if you want to
deep diper into atmospheric perspective
and understand how it enhances
depth in landscapes, consider watching my Skillshare class atmospheric
spring landscapes. In that class, I have broken
down how colors, values, and detail shift
with distance help you create more immersive
and realistic landscapes. I have also explained
these concepts in detail with step
by step exercises. So be sure to check it out if you would like to
refine your understanding. Here, I have switched to a detailing liner brush to
create thin, delicate shrub. Since this shrub requires
fine lines and precision, using a thinner brush dip helps maintain better control
over my strokes. I'll carefully build
up the shape with light and wispy
stropes ensuring that the shrub looks natural and blends seamlessly
into the landscape. Keeping a steady hand and using gentle
pressure is the key, so go ahead and use the dabbing strokes to
create foliage on the shrub. Once the foreground fence
has completely dried, I'll use neutral tint to add a few thin lines that replicate the natural
wood grain texture. I will now use the lifting
technique with the damp tip of size two brush to create this natural
texture on the fence. Using just the damp tip, you can lift off the
colors that is wet now. I will wait for the
entire painting to dry, and then we will
peel off our tapes. Now it's time to peel
off the masking tape, gently remove it at an angle of 45 degrees to avoid
tearing the paper, peeling slowly and
carefully ensures clean, crisp edges and prevents
any damage to your artwork. And with that, we have successfully completed
our day to project. I can't wait to see
your creations. I'll see you again tomorrow.
17. Take A Moment To Practice : Here are some reference images for you to practice for day two. Focus solely on painting
the fluffy glomus clouds, ignoring the foreground
elements for now. You can find these images under the projects and resources
section of the class. Feel free to download and
use them as your preference.
18. Day 3: Color Palette: Hello, hello. Welcome
to Day three. Let's quickly go over the colors and swatch them for
our class project. Today we will be working with
a harmonious color palette. The first color that
we are going to swatch out is our naples yellow. If you don't have it, you can
create your own by mixing white wash or white watercolor with a touch of yellow pigment, which is PY 35 to achieve
similar looking color. Next, we will swatch
out our opera. If you don't have those
bright neon pink, you can alternatively use any
other warmer pinks instead. Look for alternatives
like pinacrdon magenta, bright rose, crimson
lake or et cetera. Now, when your opera
is mixed with yellow, it should be able to create coral oranges or coral pinks
which are vibrant in nature. So make sure to check
the label of your pinks. It should not consist of a violet pigment because it
won't mix well with yellow. Instead of it, it should have a red base pigment to achieve those bright coral
oranges or pinks. Watch as I mix nipples yellow with a drop of yellow
deep and opera. This creates such a
beautiful coral orange, and just by adjusting the ratio and adding
more of that opera, the mix shifts towards
more of pinker hue. We will be using these
shades to paint our clouds. The next color that
I'm going to swatch out is a pastel shade of lilac. Now, if you do not have this
color, you can create one. But for this project,
I'm going to use medium tonal values of lilac. Now you can mix it by
using your mineral violet, which is a cool violet, along with a little bit of
opera and your whiteqah. Mix and vary the
proportions and see if you can get a
similar looking lilac. Next color that I'm going to
swatch out is my lavender. Now you can mix a cool blue with a warm violet and add white guash to achieve
this soft hue of lavender. We will be using both of
these colors to paint a sky. The next color
that I'm swatching out is my mineral violet. It is a cool violet.
The next color that I'm going to swatch
out is my sap green. We have already
discussed how to mix this color in day two in
case if you don't have it. It's a beautiful warm green that will add depth
to our painting, especially towards the
midground near the horizon. The last color that I'm swatching
out is my neutral tint, which I will use to
create darker mixes and for painting the board's
reflection in the water. You can use any other black, but make sure it is transparent to maintain the vibrancy
of your layers. Hope you have your colors ready. Now let's dive into our project.
19. Day 3: Serene Sunset by the Lake- Part 1: I before we deep
dive into a project, I'm taking a moment
and cleaning up my palette to avoid
any muddy mixtures. This is very crucial
whenever you are painting skies to allow your skies to
feel luminous and glowing. As for the next step, I'll tape down my paper on all four sides
using masking tape. Now instead of masking tape, you could also use
your washi tapes. Now, since the emphasis
of this painting is on the sky and its
reflection in the water, I will sketch out
the horizon line placing it not at
the perfect center, but instead I'll position it
about 2 centimeters below the center to allow both the sky and its reflection
to take the spotlight. Now, I will also sketch
out a small boat towards the right side of my paper rather than placing
it in the center. Now, you need not go ahead and sketch out the same
element that is a boat. You could also go ahead and add a swan into the background. That's totally up to
you. Now, remember the rules are perspective. The size of the boat or any other moving object that you decide to create here should be smaller in proportion
as compared to the other foreground
elements because this will help create a
sense of depth and distance, making it clear that the boat is further away from
the viewer's eye. And with that lock like object standing in the water as
sketching is complete, now it's time to start painting the sky using a wet on wet wash. I'll repeat this because
it is important. Take your time to
evenly wet your paper, go over the surface with a
wet brush two or three times, ensuring the water is uniformly applied with no puddles forming. This will help keep your
paper wet for a longer, giving you more control
over your washes. Observe how I'm using the
full body of the brush, pressing it down upright to evenly spread the water
across the surface. Make sure to cover
the entire paper until you notice
a uniform sheen. This indicates that the paper is evenly wet and ready
for the next step. That is your paint application. Here is one hot
tip for you guys. Now, if you are in a region where it is hot and
dry and burning, consider using a humidifier
near your workstation. This will help keep
the paper moist and allow you more time to
blend your color smoothly. Keeping your paper wet is an added advantage when
you are painting skies. Now I'll quickly use a
tissue paper to wipe off any excess water from
the masking tape to prevent backflow. Next, I'm switching
to my mop brush 00 from the silver
atelio series. My mop brush is a
natural hair mop brush, and I'm reactivating naples yellow mixing in a
drop of yellow orange. Then I'll test the intensity
on a scrap piece of paper. If I'm not happy with it, I'll adjust the
intensity by mixing more of my naples yellow along
with my yellow orange. Once I'm happy with how the intensity or the
tonal value is looking, I'll test it on a
scrap piece of paper, and if I'm happy with
the tonal value, I'll start at the
base of the horizon, using the full
body of the brush, lightly pressing down
to spread the paint. Then I'll adjust my grip holding the brush
closer to the edge of the handle and start
layering the color upwards to create
a smooth blend. Observe how I'm
using the tip and toe of the brush to
softly blend the colors, gradually feeding the tonal
values as I move upwards. Now I'll add a touch
of warm or orange at the base of the horizon to enhance the glow of
the setting sun. As I move upwards, I'll lightly blend it into the previous layers ensuring
a smooth transition. At this stage, I'm working with just the tip of the brush, gently fading the colors to
create a soft seamless blend. I'm doing this step
quickly because it is incredibly hot today
around 37 degrees Celsius, and my paper is already
starting to dry out. I have used this spraying bottle to mist my paper on the top, and using this little
damp wet brush, I'm going to go over those areas once again so that
my paper is wet. I'm switching to a
smaller sized mop brush to blend the areas
near the horizon line, ensuring a smooth and uniform transition post
misting the paper. Now, using the damp
tip of my brush, I'm going to load it with
my opera pink mixed in a little bit of my
Allison and crimson here. But if you do not have Allison
and crimson, that's fine. You could mix in a little
bit of your reds in here. To create a blushing
bright orange, I'll mix in a little bit
more of my yellow orange and prepared the color mixed
to a creamy consistency. Now I'll load the brush and I notice that my brush tip is
holding too much of water, so I'll dab off the excess
water using my tissue paper, pressing just the belly, I'll load back the tip of my
brush and start to create the thin broken
horizontal strokes to form smaller floating
clouds near the horizon. This smaller delicate
strokes will help add depth and
softness to the sky. Now it's time to switch to a smaller soft synthetic
brush of size number four. I'll prepare a paint mix
for the clouds using lilac, copira pink, and a little
bit of mineral violet. I'm mixing the
colors here and I'll adjust the intensity
according to my preference. Once I'm happy with the intensity and the
look of the color, I'll now load the tip of
my brush with the paint, holding the brush at the center and engaging only the tip. I'm going to create
soft delicate strokes to create these little
cloud formations over here. These purple tones
will be laid over the orange clouds to
add depth and contrast. Observe how with light pressure near the transitioning areas, I'm forming smaller
organic cloud shapes, allowing them to blend
softly into the sky. Now I'm feeling my
paper is drying up. So before layering
the top with paint, I'll rewet the area using
my size 00 mop brush, but only up to the
transition area. Now, I don't want to risk my bottom part of the
sky to start drying, so I'll miss the entire sky area using my spray bottle and
spraying it from a distance. Now using my synthetic
size number four brush, I'll load the tip with my opera pink and
yellow orange mixture. The brush should be here damp dry as the paper is already wet. We want to control
the water content in both the brush
and the paint mix. I'll use the tip of
the brush to refine the smaller floating clouds as we previously painted in orange. And then with a
clean damp brush, I'll load my purple mix
and repeat the process of layering purple clouds
over the orange ones while allowing the orange
clouds to show through. Now, I'll load the tip of my size 00 mop brush with a mix of naples,
yellow, yellow, orange, and opera pink and creating a medium tonal value of
coral pink orange paint mix. I'll adjust the ratio
of pinks and yellows until I achieve that
perfect coral pink blend. Once I'm happy with the mix, I'll begin painting slanted
directional strokes starting from the left
edge of the paper. I'm here using just
the tip of my brush, and I'll engage the toe
with light pressure where needed to create
subtle variations in the shape and
texture of the clouds. Now I'll add these
directional clouds in few other spots in the
top part of the sky, ensuring that balance and
direction in the composition. Now I'm going to layer the codal pink orange with a slightly
deeper coral pink mix, placing it over
the orange clouds using just the tip of my brush. This will add more dimension
and depth to the sky. Since some of that
yellows got covered, I'll bring back that
glowing effect by adding a touch of more naples
yellow to the clouds. To do this, I'll squeeze
out the excess water from the belly of my brush and
then use just the tip to softly blend the
nipples yellow into the pink layers of the
earlier layers of the clouds, ensuring a smooth transition
and a luminous effect. Now I'm preparing a paint
mix of lilac and lavender. The mix feels a
little too watery, so I'll add in more
paint to achieve that thick creamy consistency while maintaining a
medium tonal value. Here, I want to go with soft and dreamy effect and will not overpower the sky
with two dark tones. Before layering, I'll soak off all that excess water
from the belly of my brush to ensure that the
glide smoothly on the paper. Controlling water
through the belly of the brush is the key to
achieving soft blends. Observe my brush strokes. I'm following the direction
of the previous clouds, gently filling in
the white caps using very light pressure and soft movements to maintain
that delicate feel of the sky. To avoid muddy mixtures where lavender and yellow might mix, I'll introduce my coral
pink mix in those areas. This will help
maintain harmony in the colour transitions while preserving the soft
glow of the sky. This is an important tip
that you must remember. For the top part of the sky, I'll gently fill in the
white caps with a bit of lavender and blend it smoothly to create a seamless
airy effect. Here, near the horizon, my purple clouds have
blended in too much. To bring them back, I'll load my brush with a
lavender lilac mix, dab off the excess
paint on a tissue, and then start layering
the clouds back in, but the tones feel
a bit too soft, so I'll add in a touch
of mineral violet to the same mix to create a
slightly more intense tone. After mixing it well, I'll
dab my brush on tissue again to remove the
excess moisture and then using very
light pressure, I'll build up soft
looking clouds keeping them airy
and natural looking. I'm happy with how the sky
has been turning out so far, so I'll stop here and let it dry completely before moving
on to the next step.
20. Day 3: Serene Sunset by the lake Part 2: All right, let's move on
to the reflection part. I will be using the wet on wet technique just like
how we did it for the sky. I'll start by wetting the
paper, but be mindful. Avoid taking a soaking wet brush too close to the horizon line. If too much of water is there
in the tip of the brush, the water will start seeping
into the drying sky area, and this is going to ruin the sky which you want to avoid. So take your time
with this step and ensure smooth and controlled
application of water. With my slightly damp tip, I'm going to glide over
the yellow edge and then run my brush over to
the bottom of the paper. Now, here, at this point, I'm measuring the reflection of the directional
cloud in the water. Before diving in with the paint, I like to practice my strokes roughly getting a feel for
the movement and placement. Now using my same size
number 00 mob brush from Silvertlo series, I'm remixing my sky colors, adjusting them to
match the clouds that we painted
in the sky above. Since it's reflection, we
are going to be working with riply horizontal
strokes to indicate that reflection of the clouds in Notice how I'm using just
the tip and toe of my brush, applying medium
to light pressure to create those subtle ripples. Watch my brush
strokes carefully. It's all about the gentle
controlled movements to capture the natural flow
of reflections in the water. So over here, I have started
layering opera pink over that coral orange to add depth and contrast
in the clouds, carefully mimicking the
colors of the begin with a few gentle horizontal
strokes before moving back to those directional clouds in the reflection. Next, I'll load the tip of my damp brush with
that naples yellow and use slight delicate strokes to softly blend it into the pinks. It is the same step by step process we
followed for the sky, maintaining the harmony between the sky and its reflection. As I paint, I can already feel a sense of calm and
serenity washing over me. I think that's the magic of a well balanced color palette. It creates an effortless flow, making the painting process as peaceful as a scene itself. For the rest of the reflection, I'll softly blend
the yellow spinks and a touch of
orange when needed, keeping my strokes
very gentle and fluid. Then I'll introduce
diagonal strokes of my lavender lilac mix, starting with broader
strokes at the bottom and gradually releasing the
pressure as I move upwards. This creates those
beautiful slanted strokes that follow the
direction of the clouds, enhancing the perspective and
realism of the reflection. I can feel the bottom edge
of the paper drying up, so I need to work quickly to blend the lilac lavender mixture into the pinks while
there is still enough moisture for
a smooth transition. I'm using a medium tonal
value of lavender mix to ensure that when it blends with the
yellows or oranges, it does not create a muddy mix. Keeping the colors vibrant
and harmonious is key here, so I'm being mindful of how much pigment I'm adding
and adjusting as needed. As I get closer to the horizon, I'm making sure my brush
is loaded with pinks to avoid muddy mixtures when the lilac is mixing with yellow. Here is a mistake I made
that you should avoid. I thought my sky
was still wet here, so I attempted to adjust
it near the horizon, but it formed an odd
patch over here, creating that very
muddy mix over there. To fix this, I'll let it dry completely and shift
my focus to painting a few gentle ripples
in the water using the tip of my size
for synthetic brush. Next, with a light
tonal value of my mineral violet,
not too watery, I'll carefully paint short
and long horizontal strokes to suggest movement
in the water. Then I'll add some
darker tones of my mineral violet to indicate the boat's back
flow in the water. The tip this size number four
brush is not very pointy, and as a result, this backflow, which I'm creating has created very thick and
blurred smudgy lines, which I'm not liking it. So please go ahead
and ensure that you are using a finer
point tip brush, preferably a smaller size brush of size number one or two. Next, I switch to a mini
tiling liner brush loaded with paints gray or neutraltin to paint this log
standing in water, but my brush tip is
a bit too watery, so I'll dab off the
excess paint and then use the dry brush tip to gently
refine those feathered edges. That's it. My log has
turned out to be too thick, so this tip is best done
either once the paper is fully dry or by carefully controlling the water
content in the brush. I think I'm really not
happy with how the sky has turned out near
the horizon due to that muddy patch
that has formed. It's ugly. I don't like it. So I think I'm going
to cover it up. I'll paint a distant
mountain range with foliage at the intersection of the sky and the water body. And for that, I created
this mix of my warm violet. So using this I number six synthetic brush and
with this pointed tip, I'm just going to outline the horizon line and paint
this distant mountain. The technique that I'm
using here to create this distinct
background mountain is wet on dry technique, meaning I'm laying wet paint
over this dry paper surface. I'm just going to quickly blend in that range
of mountain with the tip of my brush
and make sure that the base of the mountain
is going to be lighter. So just confine your
medium tonal values of your purples into the
top part of the mountain. I am now going to load just
the tip of my brush with the paint mix and start shaping the mountain
on the right, also. Then using just the
belly of the brush, I am going to blend the
colors near the horizon, ensuring a lighter tonal value as it fades into the distance. This helps create a sense of depth and atmospheric
perspective into our painting. Next, I'll mix my sap green into my violet mix to create a muted green perfect for
this distant foliage. Using my size number six
silver black velvet brush, I'll be carefully adding foliage near the patchy area
to just cover it up. If you don't have this
patchy area in your sky, feel free to skip this step and add just the distant
mountain range. But if you would like
to add this foliage, go ahead and add it. I'll be here using
dabbing strokes with just the tip of my brush
to build up that foliage, keeping the strokes
all light and natural. Going to vary the
size of the foliage, keeping some tall and other short to mimic the
natural growth pattern. This variation adds realism
and depth to the scene. Now, instead of running the foliage along the entire
length of the horizon, I'll let it gradually taper off towards the left
near the horizon. This ensures that
both the mountain and the foliage remain distinct, allowing each element to serve its purpose without
overwhelming the composition. I have here sped up the
process since it's repetitive. The key here is to
maintain variation in size and shape while keeping the strokes loose and organic. Now it's time to paint our
boat and its reflection. I'm mixing a medium tonal value of neutral tint for this tip. But here, I chose the
wrong brush size, which made this final stage more difficult than
it needed to be. To avoid this, I would
highly recommend using a size number two or
three round brush with a fine pointed tip. This will give you
better control over the details and
the water content, ensuring clean and
precise strokes. Now, I'm going to use the damp
dry and spread out tip of my round brush to create some vertical strokes over
the existing boat reflection. Observe here the brush tip was
not loaded with any paint. It was just the damp
dry brush using which we are just softly
blending the reflection. I'll add some shorter
horizontal lines to subtly suggest
movement in the water. No need to stress here. This isn't the main focal point. We are just adding
our suggestions of movement and depth rather
than overdfining it. I'll add those four thin lines using the pointed
tip of my brush. Here, exercise water control. You do not need too much
watery brush content or switch to a smaller
size synthetic brush to do this final detailing. Here, I have switched to a small mini
detailing liner brush to create small human like figurines for hint
of life and scale. However, if you prefer
a simpler look, you can skip the details and
leave the boat as it is. Either way it works depending on the mood
you want to convey. When I was rinsing my brush, I accidentally splattered
a drop of water on the port's reflection,
and I messed it up. And to fix this, I had dabbed off the paint using
a tissue paper. And now to cover up that spot, I'm going to add few
more poles in the water, keeping linear
perspective in mind. I'll paint shorter poles near the boat where that
spot appeared to be gradually make them longer as they approach the
bottom edge of the paper. This not only fixes up
the mistake but also enhances the depth and
composition of this painting. Sometimes small accidents lead to better creative
decisions, isn't it? I'm creating these additional
poles, and along with it, I'm also creating the
reflection of the poles in the water using just the
zigzag motion of my brush. With that, our painting
is finally complete, even though there
were quite a few unexpected accidents
along the way, but I'm really happy with how it all came
together in the end. Once your paper has
dried out completely, it's time to peel off
the masking tapes, the most satisfying part
of the painting process. And with that, we
have successfully completed our day three project. I hope you enjoyed the process
even with its challenges.
21. Day 4: Color Palette: Hello, and welcome to day four. To begin with color swatching. I'll start by mixing my ultramarine with my
thal blue for my sky. You can choose any warm, non staining blue
for this project. I will be working with
a medium tonal value of this blue for our sky. Next with my rinsed brush, I'm going to swatch out
a light tonal value of a mixture of neutral
tint and indigo. This same mixture we
are going to use to create those darker
clouds near the horizon, as you can see in
that final painting. So this is the light
tonal value mixture. Next, I'll be watching out my yellow ochre with
the pigment PY 42, which is a muted
and eddy yellow. We will be using this
color for our meadows. Now, following that
is yellowish green, a beautiful granulating
warm yellow green from Shinhan art again. In case if you do not have this color available
with you, do not worry. You can easily prepare this similar color by
mixing your warm yellows with your greens and
wedding the proportions of yellow and greens like
two is to one ratio, more of yellows
and less of green, you would get a color similar
to this greenish yellow. Next color that I'm going to
swatch out is my sap green. Now, you should already
know mixing this color because we have commonly used this color in our
previous projects. Now we will make a darker
shade of green by mixing my sap green with either ultramarine blue or
your neutral tint or indigo. When you mix these darker
tones with your green, you would get a darker
shade of green, which we will be using to create the grasses
in the foreground. And then last color
that I'm going to swatch out is
my burnt sienna. It's a very bright
and warm brown that I'm going to use to paint
the roof of that monument. Here is a quick colour recap
for you on the screen. Hope you have your colors ready. Now, let's dive
into our project.
22. Day 4: Delicate Cirrus Clouds Part 1: All right, time to get
started with our day four. First things first,
let's tap down a paper on all four sites
using masking tape. Now that our paper is secured, let's move on to
creating a basic sketch. We will leave two
thirds of the paper for the sky and draw our
horizon line first. Next, I'll use a
ruler and sketch the building structure right
at the center of the paper. Since it will be further
into the background, be mindful about its size to maintain the
proper perspective. As always, I would
recommend watching the entire lesson first
before painting along. This way, you will have
a clear idea of what's coming next and be better
prepared as you paint along. Watch along as I
create this sketch. I might make a few adjustments here and there until I'm
happy with the final look. So observe the sketching
process first, then pause the screen on the completed version before
starting your own sketch. Okay, now that our sketch is
ready, let's begin painting. First, we will
start with the sky. To ensure the paper stays wet for a longer
period of time, I'm going to thoroughly
wet the surface. Today we will be painting a delicate sky with
streaky, serious clouds. I absolutely fell in
love with these clouds when I spotted them during
my vacation to Australia, and I have always
wanted to paint them. This class felt like
the perfect opportunity to finally bring
that vision to life. You can see that I'm wetting
the paper two to three times to ensure it stays wet
for a longer period of time, allowing me to work
smoothly with wet on wet take your time while
applying water to your paper. There is no need to rush. Observe how I'm carefully wetting the paper only
around the building. If you're a beginner,
you might find it helpful to mask the building
before starting out, applying masking fluid or cut the masking tape to fit along
the building's outline, preserving the negative space. For the sky, I'm going to be using two of my
favorite mop brushes. One is size zero, zero, and the other is size 20, both are natural hair brushes. Now I'm loading the damp tip of my size number 20 mop brush with a mixture of my
ultramarine blue. I'll be working with
a medium tonal value creating a creamy consistency
for smooth application. Preparing your paint mixture, test it out on a scrap
piece of paper to check the tonal value before
applying it to your painting. This will help you
ensure that the color is just right for the effect
you want to achieve. Next, I'll be taking my damp size number 80 mop brush and reapplying the water
over the sky area. This ensures that the
paper is fully saturated, allowing the paint to
blend and flow smoothly, creating a soft seamless sky. Here I'll adjust the intensity
of my paint mixture by adding two to three drops of indigo into my
ultramarine blue mix, and then I'm going
to load up my brush and start applying
slanted strokes. Oops, there's a bit
too much of water. I'll squeeze the
belly of the brush on a tissue to remove
that excess water, and using the tip
and toe of my brush, and with control pressure, I'm going to create
the slanted strokes, making sure to leave
some wide spaces in between for natural airy effect of the clouds that
we are going for. Now, I'm using my
clean damp brush, and I'm going to lift off
some of that paint to create wavy patterns in the white
areas we left earlier. This helps enhance the softness
of the serious clouds. I'll also use this
technique to refine any feathering edges
for more seamless look. Observe my brush strokes here. Observe how I'm using the
damp dry tip of my brush to lift the color from the areas where I notice
the feathering effect. This helps soften
any harsh edges and maintains the delicate wispy
look of the cdrus clouds. Next, I'll switch to my
size 00 mop brush and reapply the intense tones of my Indigo plus
ultramarine blue mix, adding depth and contrast
to the sky wherever needed. Not to add depth to the
sky near the horizon, I'm going to go
ahead and prepare a light tonal value mix of
burnt timber plus indigo. Once the mix is prepared, I'll begin painting
the darker clouds with horizontal strokes and then gently stroke it upwards following the natural
direction of the clouds. Here at the horizon. Now I'm going to rinse my brush, remove all that excess paint, and then reload the tip with light tonal value
of this gray mix. I'll start applying
it near the base of the horizon line using
light gentle strokes, making sure to leave some wide
spaces in between them for a natural airy now
observe how I'm feeding out the gray mix
using a damp dry brush, gently stroking it
upwards to follow the natural rhythm of
the streaky clouds. This helps create a
seamless transition and keeps the clouds looking soft and airy while
adding depth and contrast. Now I'll rinse my brush and dab it dry on
my tissue paper. Using soft gentle
strokes facing upwards, I'm going to blend the
grays into the blues, creating a smooth, streaky
transition in the sky. Now, with a clean,
damp dry brush, I'm going to spread
out the bristles and start at the white areas gently lifting of the paint to create white
streaks in the sky. Each time that I lift the blues, I'll clean the tip of my brush on the tissue towel to
prevent mudding the colours. I'll repeat this
process until I have built enough direction
and movement in the sky, capturing the delicate wispy
nature of the cirrus clouds. At this point, I'm
going to add a touch of purple towards the
base of the horizon, but this is experimental. You do not need to do
this in your painting. Avoid this step if your sky has already started to
dry out as adding new colors on a semi
dry surface may create unwanted edges
instead of smooth blends, and you will see
that I'm going to suffer in the next few
minutes because of this. But I think I'm not liking that purple near
the horizon line, so I decided to cover it up with a soft layer
of my gray mix, shaping into horizontal clouds. And I'll quickly blend
it into the drying sky using a damp dry frayed
tip of the brush, making sure to only blend
and not lift any paint. Too much pressure
at this stage could unintentionally lift
the underlying layers. So I'm keeping my brushw very light and soft
and controlled. But my sky has started
to dry already, and my paint would
start from here.
23. Day 4: Delicate Cirrus Clouds Part 2: Okay, time to move on to
the meadow foreground. For that, I'm preparing a medium tonal value of
greenish yellow for this area. With my wet brush, I'll first apply clean water at the bottom part of the paper, making sure not to wet the area close to
the horizon to avoid disturbing the sky as it is
the sky is partially ruined. Now I'll start applying the greenish yellow mix
from the dry area near the horizon and
gradually blend it downward into the
wet bottom section for a smooth transition. Now, I'll start mixing my greens into the
remaining greenish yellow on my palette and add a bit of my blue mix to create a
darker shade of green. Using the tip of my brush, I'll start dropping this darker green vertically at the
bottom of the paper. Since the bottom is already wet, the paint will start
spreading naturally, and we will blend it
using our comb brush, driving the strokes upwards to create the grass
like patterns. Now I have mixed a
little of my indigo into my green mix to create
more intense green tone, and then I'll start layering this deeper shade at the
very base of the meadow, creating depth and
dimension to the field. This would help create
a natural sense of the grounding and contrast
in the landscape. With the tip of my comb brush, I'll now create light
horizontal strokes just below the horizon line, allowing the underlayer of greenish yellow to
subtly show through. This will add texture
and depth to the meadow. Now let's address the
elephant in the room. Those dry bleads in
the sky need fixing. I'll try to use
the fluffy tip of my dry hag brush to see if
I can smoothen them out, but the issue here is that
the paper is drying unevenly, so I'll switch to
my damp dry tip of my mop brush and try to
lightly blend the edges, but this too is
creating more patches, making the problem
worse than fixing. Now you can see what's
happening here. Time for plan C. I'll grab
my size 80 mop brush, dampen it enough just to have tiny wet feeling on the tip, then spread out the
bristles and load it with light tonal
value of my blue mix. Now I'll gently start applying slanting strokes
over the dry leaves, being very gentle to avoid disturbing the
layers too much. This should help unify the sky while maintaining
its softness. It's looking better, but I'm still not completely
happy with it. Using the same tip of my brush, I'll now take a very
light tonal value of my gray mix and start applying
the same slanting strokes, but even more lightly this time. To refine it further, I'll add a bit more of that dark gray mix
where needed and use the dam tip of my
size 00 brush to smoothly blend the edges on both the right
and the left side. This should work and help
us to cover that sky. Now, if you're wondering why I just didn't miss the paper, here is why misting would have reactivated the entire sky, making it easier to
fix the bottom area. But it would also mean redoing the top
portion of the sky, including the delicate
streaks of the cirrus clouds. This could have
ended up being much more messier than what we
are dealing with right now, so it is best to
work selectively rather than risking
overworking the entire sky. I hope your sky didn't turn
out this way and that you watch the entire lesson first to know what to avoid
in the first place. Fixing a sky like
this depends a lot on the delicate brushstrokes
you apply and the understanding of the
wetness of your paper, which comes only
with experience. For a big nerd, this might
feel a little tricky, but now you know how
to approach Remember, it's not impossible to fix a sky that didn't go as planned. With patience and with
the right techniques, you can still bring
it back to life. Time to fix my meadow. I'm a little apprehensive about missing it because my paper is behaving unpredictably in terms of retaining
moisture and drying. So instead, I'll use a slightly damp tip to fix the bleeds near
the horizon first. We will wet the bottom
part later, but for now, let's focus on building
the background foliage, using my greenish yellow mix, and then I'll add in
some darker tones of greens at the base to bring
in the shadows and depth, making the meadow look more
natural and dimensional. I'm now preparing a mix of my greenish yellow with
a medium tonal value, and using my size
number six round brush, I'm first going to lay a thick band of green
along the horizon line. Next, I'll start adding the
foliage by using dabbing brush strokes at
the top to create a natural and organic here, we are working on wet
on dry technique, so make sure your sky is completely dry before
starting this step. Otherwise, the colours could
bleed into the sky and fixing that would become so much more harder
and impossible. I'm going to repeat the
same process of creating our foliage along the left
side of the horizon line. Now, I'll add darker green
tones at the base of the foliage to create depth and contrast along the
entire horizon line. While doing this, I'll
make sure to live bits of that underlayer of
green speaking through, which helps maintain
the dimension and the depth and prevents the
foliage from looking flat. This layering
technique will enhance the natural feel
of the landscape. Time to rewet the foreground, we have here two options either carefully miss the
foreground while covering the sky and horizon
to avoid reactivating those areas or use
a damp brush to gently layer a flat wash
of water starting from the bottom and working midway below the horizon
like I am doing here, making sure this will not disturb the foliage
layers we just painted. With my damp mob
brush of size 00, I'll load a light tonal
value of greenish yellow and lightly spread
it over the wet foreground. Since the base is still wet, this will reactivate
the darker green, so be careful not to go into the lighter areas after
covering the darker one. Ing some darker green tones, keeping them confined
around the bottom of the meadow to enhance
the depth and contrast. This is the same
repetition of the process we used at the start
of this lesson to create the grassy pattern using
light upward strokes with just the tip of my brush to mimic the natural
texture of the grass. This layering will help
bring the foreground to life while keeping it visually connected to the rest
of the landscape. Now with my comb brush, I'll push the darker tones upwards with light strokes from the tip of the brush just like how we did at the
start of the lesson. I'll cover the sky and
the horizon and use my round brush to splatter drops of
water over the meadow. This will create a
beautiful texture with soft blooms adding
a very natural feel to the grassy effect. If you want to experiment,
you could also sprinkle some salt
on the wet surface. Next, we'll start
painting the building with a light tonal
wash of yellow ochre, keeping the tones soft to match the atmospheric
perspective of the scene. Make sure your brush
tip isn't too watery to prevent the paint from
leaking into the sky. Dab off the excess
water from the belly of the brush and just paint
using the tip of the brush. If there is too much of water, the paint might spread
uncontrollably, especially near the
edges of the building. Keeping the brush damp
and not dripping will give you better control
over the shape and edges. On the left side
of the building, I'll use a very
light tonal value of neutral tint to add shadows, creating the depth that we need. And also, I'll start applying the shadow from the left
and then use a clean, damp brush dip to softly blend
it into the yellow ochre, ensuring a smooth transition between the light and shadow. Now, I'll start painting
the roof using a mix of burnt sienna and
a little crimson to give it a warm deton. Make sure to exercise
water control here. Too much of water can cause
the paint to bleed into unwanted areas while too little might create
streaky uneven washes, work with a medium consistency to achieve a smooth and
controlled application. Wait for the roof to
dry out completely, then start adding the
windows like we sketched, either by using the
fine pointed tip of your brush loaded
with neutral tint or use a waterproof
micron fine liner pen for crisp precise lines. If your paper has
dried out completely, carefully peel off
the masking tapes at an angle to reveal those
clean, crisp edges. And with that, our
day four is complete. I hope you have learned
something valuable from this exercise and
enjoyed the process, as well. I'll see you again tomorrow
for the next lesson.
24. Day 5: Color Palette: Okay, let's quickly go over the colors we will need
for our Day five project. For this dramatic sky, I'll primarily be using five key colors to
create depth and mood. Let's watch them out first
to get a clear idea of how they interact with each other before we begin painting. The first color
that I'm going to swatch out is naples yellow, a soft warm tone that sets
the base for a glowing sky. Next will be my opera pink. But if you do not have opera, you can swatch out a warm
magenda or any vibrant pink, but make sure that it
is on the warmer side. When opera pink and naples
yellow are combined together, they create a beautiful,
soft orange hue. Following that, we
will swatch out pastel cool lilac or lavender. If you're unsure how
to mix this color, refer back to D
three color palette, where we already learned
how to create it. Next, we will soften
mineral violet by mixing it with lilac to tone down
its intense color saturation, creating a more muted and
harmonous shade for our sky. Next comes my warm
permanent violet, which we will use
quite a bit to add richness and depth to both
the sky and the foreground. So keep this color
handy with you. We will also need a
pastel sky blue to capture the soft fading light
of a day coming to an end. If you do not have
this color with you, refer back to day
one color palette, where we discussed
how to mix it. Lastly, we will also need
neutral tint or our paints gray to create desaturated mixes or to add contrast
wherever needed. So go ahead and spotch out the colors you
have available and find the closest that matches to the ones that I
have demonstrated. Once you have your colors ready, let's begin at day five.
25. Day 5 : A Dramatic Sunset With City Silhoutte Part 1: Welcome to Day five. Let's
begin by taping down our paper on all four sides
using my masking tape. Now that our paper is secured, we will start by drawing
the horizon line. Most of the composition will
be dedicated to the sky, while the area along the horizon line will
feature a city silhouette. For this day five project, I didn't follow a
specific reference. Instead, this piece is
inspired by my observations and the beautiful sunsets I get to witness daily
from my studio. Once our horizon
line is sketched, we will dive straight
into painting the sky using the wet
on wet technique. As with the previous days, I will make sure my paper is evenly coated with a
uniform layer of water. I'll repeat this process
two to three times to ensure the paper stays wet
for a longer period of time, allowing for smoother and
seamless colour transitions. Now, I'll grab a tissue
paper and gently wipe off any excess water
on the masking tape. This prevents any
backflow of water onto a painting once we start
adding color to the sky. You might notice that the
paper is now absorbing the moisture causing it to
swell lightly in few areas. This is completely normal
and it indicates that the surface is well prepared for the wet on wet technique. Now let's begin to
start painting. Using my damp mop
brush of size 00, I'll start preparing a mix of Naples yellow and Jean
Brilliant number two. And with this pastel
yellow blend, I'll start painting the sky
using a variety of strokes. I'll first start from the
left corner of the paper, observe how my brush
glides across the paper and how I'm working with just the tip and
toe of the brush, creating soft transitions
as I vary the pressure. Here, observe how I'm using both the belly
and tip of the brush to shape the clouds by wearing my strokes and gradually
building their form, extending and refining
their shapes naturally. This technique not only helps in creating soft organic clouds but also establishes a sense of directional
movement in the sky, making the composition feel
more dynamic and alive. Observe how I'm layering a
medium tonal value of naples yellow over the previous wash repeating the same
pattern of strokes. I have intentionally left
some white spaces in the sky. These are crucial for creating
depth and contrast later. As you layer the yellow, be mindful not to
cover the entire sky. Now starting from the
right, I'll begin adding a medium tonal value of opera pink mixed with
a bit of yellow. I'm layering it in a way that allows the yellows to
peek through the pinks, creating a soft glowing effect. Notice how I'm using staggered
half horizontal strokes. This technique helps blend
the colors seamlessly while maintaining a natural and
atmospheric feel in the sky. Now I'll add some
medium tonal values or mineral violet
using a damp brush, layering it at the end of the
directional yellow cloud. I'll gently dry my
brush on a tissue, then load the tip
with the same mix. Using this, I'll start to spread the color following the
direction of the cloud, but not almost
covering the yellow. I'm working quickly
here because we can't afford to delay when
layering this darker. The paper starts drying, vetting the sky at this
stage can be tricky, especially since we
are working with complimentary colors
like yellow and violet. So keep observing my brush
movements, and if possible, watch this entire
is in first to get a clear idea of what's
coming next and paint along. Using just the tip
of my damp brush, I'm now painting some
horizontal clouds above and along the horizon line
with my mineral violet mix. Exercise water
control at this step. Next, I'll clean my brush and prepare a blue
gray lavender mix. Now, at this stage,
I'm preparing a medium tonal
value of this mix. Ensure that you always test
out your color mixes on a scrap piece of paper before you start to paint the clouds. I'll begin adding this mix to the white spaces left on
the right side of the sky. At this stage, I'm
making sure not to let the blue touch
the purple just yet. I'll start applying
this blue lavender mix to the top left corner
of the sky, as well. Notice that I'm using a
light tonal value here to prevent any unwanted green issue when layering over the yellow. Observe my brush
strokes here carefully. I'm engaging the entire
brush by varying the pressure to create
soft natural transitions. At this step, controlling the water content in your paint, as well as in your
brush is crucial. If your brush is too watery or your paint mix is too watery, you will get unwanted
bleeds when you start layering or creating
these horizontal clouds. And if it is too dry, the paint won't glide
smoothly across the surface. I'll now create a paint
mix consisting of my permanent violet with a drop of indigo to
create a darker. Make sure you are not
going here too strong, use medium tonal values
of this color and start applying this mix
at the top left of the sky using inward strokes. But unfortunately, my camera ran out of battery so I
couldn't film this part. Here I have dabbed off the excess water from my
brush and I'm slightly going over the purples using just the tip to bring
the intensity down. Here, I'll load my brush with
lavender mix with a drop of indigo and begin creating
smaller wispy clouds, ensuring that the yellows
are still visible. Now, just below the warm, purple and indigo mix. I'll start laying my
cool mineral violet and opera mix while carefully
controlling the water content. Now using the same brush
loaded with my pinks, I'll pick up the
violet indigo mix and begin forming clouds
on the right side. Notice how this technique
creates a dual tone in clouds, adding depth and variation. At this stage, it is all about carefully building up
the depth and movement in the sky with
darker tones while ensuring they don't
overpower the composition. The key is to let those
lighter colors shine through, creating a luminous
glowing effect that enhances the
drama of the sunset. Now, I'll start to add some horizontal clouds
here at the horizon. Fortunately, my
paper is still wet, so I'll go ahead and add
some horizontal streaks of clouds just above the horizon
underneath the purples. Next, I'll return to the larger floating
cloud at the top and deepen the tones beneath the purples to add more
dimension and depth. I can do this seamlessly
because my paper is still wet, allowing the colors
to blend naturally. But if you notice that your
paper has started to dry out, you can either skip this
step or incorporate these darker tones
earlier in the process to avoid any unwanted
harsh edges. And with that, we have
completed our sky. Now I'll let it dry
completely before moving on to the cityscape
Slout at our foreground. While waiting, I'll
prepare a mix of warm violet with a lighter
tonal value of neutral tint. Now that my sky is
completely dry, I'll begin applying
this paint mix to the foreground section using
the wet on dry technique. I'll start by painting a flat wash over
the entire section, ensuring smooth
and even coverage. Once that's done, we will continue from here
in the next part.
26. Day 5: A Dramatic Sunset City Silhoutte Part 2: Okay, now that our foreground
is ready with a base color, it's time to start adding
buildings in the background. Using my size six
ultra round brush, I'll paint a mix of tall and short buildings along the horizon to depict
the city skyline. I'll gently squeeze out
the belly of my brush to control the water flow and
start adding the buildings. At this stage, maintaining
proper water control is crucial to prevent any
unwanted paint bleeds. We want the background buildings to appear sleek
and well defined. So ensuring the right
paint consistency will help achieve that
clean, crisp effect. The buildings in the background, I'm starting with a light
tonal value of our paint mix, while for those slightly
below the horizon, I will go ahead and use little darker tones
to create depth. At this point, I wasn't
entirely sure how I wanted my city skyline to look since I was working without
any fixed reference. I debated between painting
multiple layers of buildings with shimmering lights or keeping it just simple. Eventually, I felt a strong urge to go with a single line of buildings along the horizon and separate them from the
foreground with a water body. In the next step, I will
add that water body, so keep observing
the process closely. Now, instead of using a round brush to paint
these buildings, you could also use a
smaller sized flat brush or an angle hitter brush. The square tip of
the brushes makes it easier to create clean
rectangular shapes, helping you to achieve sharp and well defined
buildings with minimal effort. At this stage, I think it
will be easier to switch to a mop brush to start applying the paint mix
for the water body. The mop brush will
help achieve a smooth even wash while allowing
for subtle blending, creating a natural reflective
effect in the water. Now I have loaded
my mop brush with a light tonal mix of neutral
tint and my warm violet, and I'm filling
the lower section below the horizon line with it. To suggest a water body reflecting the opera
hues of the sky, I'll add a touch of opera
pink into this area. Then for the
abstract foreground, I'll use a medium tonal value of neutral tint mixed
with my violet, similar to how we painted the meadow in our
earlier projects. Next, I'll cover the
sky with a sheet of paper and add some water
splatters to create texture, giving this painting
a unique look. Now, instead of water splatters, you could also try adding
in some salt crystals or rock salt into this area
and create the texture. And with that, our painting
is finally complete. Now we will let it dry
completely before peeling off the masking tape to reveal those crisp, clean
white borders. I'm absolutely loving how
this piece has turned out. Do give it a try and applaud your work under the projects
and resources section. I would love to see
your take on it. I'll see you again for day six.
27. Day 6: Color Palette: Welcome to Day six.
Let's quickly go over the colors we will need
for art today's project. The first color that I'm
watching is naples yellow. My naples yellow is
from Shinhan art and is made from PY 35 a
cool yellow pigment, and PW six, which
is a white pigment. If you do not have
this exact color, you can easily
create it by mixing a cool yellow with a
touch of white quash. Next is yellow orange, a beautiful warm,
yellow orange color. You can easily mix a warm
red with a warm yellow to achieve this color in case if you do not have this
available with you. The next color
that I am going to swatch out is my opera pink. Now opera pink is a very
bright and beautiful warm red. When mixed with naples
yellow or yellow orange, it gives a very beautiful
coral orange color. The next color that I'm going to spatch out is my blue gray, which is, again, a very
beautiful mellow pestle color. Now the next color is
my mineral violet, and the next is sap green, followed by burn timber
and neutral tint. Most of these colors have already been used in
previous projects, and I have also discussed
how to mix them in case if you do not have the exact
colors available with. Now, in case if you do not
have your neutral tint, you can always go ahead
and use your paints gray or ivory black to
substitute this color. Now using our neutral tint
and a little touch of indigo, along with mineral
violet and blue gray, we will create a rich dark mix perfect for our stormy clouds. That's all for the colors. You can see a recap
on the screen, so get your colors ready, and let's jump into
our final project.
28. Day 6: A Stormy Day Part 1: All right, let's
begin our day six. As always, I'm
starting by taping down my paper to keep
it flat and secure. Now for today's painting, I have combined two references. You can see them on the screen. For the first image that
is on the top left, I'll be using the horizon line to establish the composition. However, for the color scheme, I'll be following the
second reference, which is at the bottom left. Now, let's begin with
wet on wet technique. I'll start by applying an even layer of water
to the sky area. Be sure to layer the
water gradually, allowing the paper to
absorb moisture slowly. This ensures a smooth
and even wet surface. Avoid flooding the paper with excess water as we don't
want pools forming. Before moving on,
I'm taking a tissue to gently wipe the edges
of the masking tape. This prevents backflow and
keeps our edges crisp. I'm slightly tilting
my boat to make sure the water is evenly
distributed across the paper. You can check this by
observing the sheen. It should be uniform without any dry spots or excess pulling. Now that the surface is prepped, I'll mix my naples yellow
with yellow orange and begin applying it at the
base of the horizon line. This blend will create a soft glowing
foundation for our sky, setting the stage for a
warm atmospheric sunset. While laying the yellow, I leave a small white
space on the right. This will help create
the soft glowing effect we want to achieve in our sky. If I notice my colors
drifting into that area, I'll use the damp dry
tip of my brush to gently lift the paint and
keep the glow intact. Now, using the damp
tip of my brush, I have mixed opera pink into
my yellow orange blend. Holding my brush upright, I'll carefully
apply the pink mix with light controlled pressure. Pay close attention to how
I use the tip of my brush. This will help maintain a delicate transition
between the colors. Here I notice my paints are drifting into
the white space, so I'll use the damp tip of my brush to gently
lift them off, keeping that soft glow intact. Now, I'll mix my opera
pink with naples yellow. My mixture is slightly
watery here because the top of my paper is
already starting to dry. This extra moisture
will help keep the surface workable
as I continue laying. Observe my brush strokes here. I'm using a mix of long and
short diagonal strokes, keeping them slightly slanted. I'm also leaving white
caps in between, which are movement and
radiation to the sky. Now I'll prepare a mix
of my lavender and blue gray adjusting it
to a medium tonal value. The consistency is creamy, allowing for smooth application. I'll start layering
its mix at the top of the sky using the same
directional strokes as before. As I apply it over the pinks, I'm being mindful not to
completely cover them, letting those warm tones
subtly show through. I have also made sure to retain some white
spaces on the right, which enhances the
glow in the sky. I'm really loving how
this is coming together. It's creating such a beautiful
and luminous effect. My paper is drying up
like biscuits today. It's extremely hot and dry, which is making it challenging
to keep the surface moist. To counter this, I'll use
my spray bottle to lightly miss the areas before applying my darker mixes for
the stormy clouds. When spraying, I'm holding the bottle at a distance
to ensure the mist evenly distributes
across the paper rather than concentrating
it in a single. Now, I'll let the paper rest for a moment while I prepare
my darker cloud mix. For this, I'll combine my neutral tint with
a touch of indigo for depth and tone it down with a little bit of
pastel blue gray. Now, if you do not
have pastel blue gray, you can achieve similar effect by adding a tiny drop of white. Once my darker mix is ready, I'll use the tip and toe of my brush to start layering
the stormy clouds. Here I'm using a combination
of C shaped and inverted C shaped strokes at the top of the sky to create natural
cloud formations. Notice that my paint mix is
not too watery, it is creamy. At this stage, a watery mix would lead
uncontrollable bleeds, making it harder to achieve well defined cloud shapes before you start practicing
these cloud shapes or begin this project, I would highly recommend practicing these cloud
shapes beforehand. If you need a refresher, refer back to the
lesson brush control and stroke techniques where I have already
demonstrated a variety of strokes to help
you master this step. Observe how I'm layering
the darker clouds. I'm not covering the entire sky. Instead, I'm leaving some
lighter areas in between allowing the sky to breathe
and create that contrast. Later, we will introduce
some purple tones in these lighter areas to suggest
the origin of the thunder, adding drama and this
technique not only enhances the stormy atmosphere
but also helps create a beautiful glow
within the clouds, making them feel more
alive and dynamic. Now, I'll mix a little bit of opera into the
darker mix to create a purple and begin layering this underneath
the darker clouds. This adds depth and
subtle color variation to make the clouds
look more dynamic. I'm not following the
reference exactly, but rather painting
it in my own style, letting intuition guide the cloud shapes
and the movement. To the cloud areas just
above the horizon, I'm adding a creamy mixture of opera pink just beneath
the darker clouds. This helps create
a subtle warmth and contrast in the
lower part of the sky. Now, at the top of the sky, where we left a lighter space, I'm dabbing the
tip of my brush to softly add touches
of opera pink. As I continue laying the same opera underneath
the darker clouds, I notice the top part of
the sky has started to dry. Can you see that
harsh edge forming? We will fix that by using
a spray bottle lightly misting both the top
and bottom parts of the sky from a distance. This will gently
reactivate the paint, allowing us to
retouch the top area smoothly without disrupting
the existing layers. We. Just above the horizon line, I'm just going to retouch with my coral orange and my naples yellow to brighten that areas because we have just misted it. So you can just go ahead
and lay these colors in between the areas where you feel the colors
have lightened out, just like how I'm doing here. The next few minutes are all about adding depth
and drama to a sky. So keep a close watch on how my brush is moving
across the paper. Watch the direction pressure, and the strokes I'm using to
build up that atmosphere. At this stage,
when you are going over those darker clouds, make sure that your
brush is damp and not too wet with
watery paint mixture. Maintaining proper
water control in both your paint and
brush is crucial. Too much of water can
cause unwanted bleeds, while too little can cause
harsh, unblendable edges. This step is critical
to achieving the right balance of softness and definition in
the stormy clouds. So take your time and be mindful of how much moisture
is in your brush. But the damp dry
tip of my brush, I'll gently smooth out
any unwanted bleeds or lift off the exist paint to reveal the soft glow of the sky. Be gentle with this step, too much pressure can
create harsh streaks while a light touch will
seamlessly blend the colors for a
natural glowing effect. Here at the lightest
area at the top, I'm adding a touch
of mineral valet, making sure to leave
the center white. This will serve as a origin
point of the thunder, so it's important
to keep the center lighter as compared to
the peripheral areas. Observe my brush is damp
dry and not too damp. This ensures
controlled application without unnecessarily bleeding. Now I'll prepare a creamy mix of my white wash and using
my fine liner brush, I'll begin painting the thunder originating from the
center of this area. With a pointed tip.
I'll carefully create thin zigzag lines to capture the natural
movement of the lightning. Next, using the dam
tip of my mob brush, I'll softly blend in
the white wash at the starting point into
the center white area. This will create a
beautiful glow effect, making the lightning appear
more natural and ensuring it does not look like it's
just emerged out of nowhere. To create the glow of the
thunder as it emerges, I'll use the damp dry tip of my brush to dap softly
over the zigzag lines, slightly blurring the edges. This subtle diffusion helps enhance the glowing
effect of the lightning, making it feel more
natural and atmospheric. Once a softened
glow is in place, I'll go back with
my fine liner brush to redefine the thunder, ensuring it remains striking and well balanced
within the stormy sky. Once you are satisfied
with thunder, it's time to take a short break before moving onto
the foreground. In the meantime, our sky
will also get dried up.
29. Day 6: A Stormy Day Part 2: Okay, let's get started with the reflection of the
sky on the water body. I'll be using a controlled wet on wet technique beginning with a slightly watery mix of my naples yellow
and yellow orange. I'll start at the center
of the horizon and then carefully extend the wash
below the horizon line. This will ensure that
the watery paint does not seep into the sky, even if the sky is still dry. Here at the base of
the horizon line, I have introduced some brighter
tones of coral orange and pink while keeping the center of the water body in yellow. This has created the
effect of glowing water now using the
damp tip of my brush, I have just blended in, and I'll just go ahead and start layering with
my naples yellow, all over again, blending the
edges very nice and neatly. Now I'll load the tip of
my brush with a touch of opera mixed with
indigo and neutral tint. Using horizontal strokes, I'll start layering
this darker mix at the corners while keeping the center glow intact,
as you can see here. Notice how my brush
is just damp, allowing me to create
soft light strokes that blend seamlessly into
the surrounding colors. I realized that the darker
tones had faded out, so I'll go ahead and deepen them by adding more
pigment near the left and the right corners of the water body while
keeping the center glowing. Observe how my brush
is damp dry and not overly loaded with
watery paint mix. If you notice here, I'm using the toe and half belly
of the brush to lay broader horizontal strokes to blend the colors effectively. I'm happy with how
the water body looks, so let's move on
to the foreground. I'll start with a mix of burnt ambo at a
medium tonal value, applying the color using
vertical dabbing strokes. We will be using a control
wet on wet approach, starting with wet on dry first and then
gradually switching to a watery paint mix to keep the paper moist for
seamless blending. I'll start adding some sap green to the bottom
edge of the foreground, gradually feeding it out as
we approach the water body. I'll now switch to a liner
or rigor synthetic brush of size number two and start creating varying sizes
of grass shapes. You will need to
work quickly here to ensure that your strokes blend beautifully into
the grassy meadows for a natural and organic look. Mm hm. Next, I'll cover the sky with a paper
or a boat to protect it and begin the splattering process to create some texture
defects in the foreground. This will add sense of depth and spontaneity to the scene. Now, here I'm splattering
some water droplets. If you want, you could go
ahead and splatter some of your lemon yellow blooms into the foreground.
That's totally up to you. Here my foreground
has completely dried. I'll go ahead and add a
fresh watery layer of saprene using short and long
vertical dabbing strokes. H then I'll repeat the process with my
line of brush gently pulling the colors from
the wet foreground to create natural grass shapes. To add depth at the
bottom part of the field, I'll adjust by adding
medium tonal values of burnt timber and quickly introducing more
grass like textures. Be sure to work
fast or quick here. You don't want the foreground
to dry completely. Then we will be going ahead and splattering some
water to create fun texture defect
that resembles spontaneous wild blooms
in the foreground. With just a tip of
my liner brush, I'll add a few tall feather like grasses resembling
Kansas grasses, wearing their sizes
for a natural look. Be sure to this step only
after the water body has dried completely to avoid any
unwanted bleeding or smudging. I'll repeat this process of adding tall grasses
on both sides of the foreground to create balance and more natural look
to the foreground. Now, just above the horizon, the thunder lines that we had created had
almost faded out, so I'm just going ahead
with a creamy wash mix loaded onto the tip of my fine liner brush and
refining them again. He Once the thunder is defined, I'll begin adding its
reflection on the water body, ensuring it appears soft and slightly diffused for a
more realistic effect. I'm going to here exert a
very light pressure when I'm creating this reflection of the thunder on
the water body. To create a more realistic
effect of the thunder, I'm going to use the
dry brush technique. This involves lightly grazing the damp dry tip of my paint loaded brush over the dry paper surface
and horizontal strokes. The key here is to keep the stroke subtle
and delicate so that the reflection blends naturally into the water without
overpowering the scene. With that, our painting
is finally complete. I'll let the paper dry flat completely before
peeling of the tapes, always the most satisfying
part of the painting process. Now our paper is fully dry. It's time to remove
the tapes from all the four sides and reveal
those crisp, clean borders. I hope you enjoyed
this process of creating this
dramatic stormy day. Don't hesitate to share your projects and
feedback about the class. I would love to see your
work and hear from you.
30. Day 7: Color Palette: I can't believe we have
reached the final day of our seven day challenge before we deep dive
into painting. Let's quickly go
over the colors we will need for our
day seven project. The first color
that I'm going to swatch out is a bright blue. I have prepared this
color by mixing my blue gray with a little
bit of my halo blue. We will be using this mix to
paint the top part of a sky. Once we are into the project, I'll demonstrate to you
how I have prepared this color by mixing my blue
gray with my halo blue. The next color that I'm going to need is my naples yellow, which is a very
pastel, cool yellow, followed by my Jean
Brilliant number two. When you mix naples yellow, along with Jean
Brilliant number two, you get a very beautiful
pastel orange shade. We will be using
this pastelnaples orange mixed with a touch of little opera to create those soft fluffy
clouds that you can see in the final project. Combination adds a
warm glowing effect, making the clouds appear more
vibrant and atmospheric. The next color that I'm going to swatch out is my lavender. Now in the earlier projects, we have already seen
how you can create this lavender mix in case
if you do not have one. The next color that I'm
swatching is mineral violet. Now by combining
my mineral violet with lavender and blue mix, we'll create a
soft pastel purple for adding depth and
dimension to our clouds. For the foreground
and midground, we will use sap green
and yellow ochre. Additionally, when you
mix sap green with a darker blue like
indigo or thalo blue, you will get a dark green mix, which we will use to add
depth to our landscape. Now, here you can
see a color recap on the screen for reference, so get your colors ready, and let's begin our final
painting for Day seven.
31. Day 7: Cotton Candy Clouds Part 1: I Hello, hello. Today marks the final day
of our seven day challenge. As always, let's begin by taping down a paper
on all sides. I'll start by sketching
the horizon line, placing it slightly above the
lower third of the paper, leaving about two thirds
of the space for the sky. You will see the
reference images displayed on the screen. I'll be using the first
reference for sketching. I'll sketch in some distant
bands along the horizon, along with a bit of foliage to add depth and interest
to the composition. Once the sketch is ready, we will then move on to painting the sky using the wet
on wet technique. Our sketch is now ready, we will move on to painting the sky using the wet
on wet technique. As we have practiced
in previous projects, we will start by
laying down a smooth, even wash of clean water, ensuring that there are no puddles or standing
water on our paper. I'm here using my soft
bristle hairbrush from silver atelia series to evenly and thoroughly
wet the paper. Ensure the surface stays
wet for a longer period, repeat this process
two to three times. If you're working in a
warm or dry environment, consider wetting your paper three to four times before
applying the paint. This will give you more time for creating smoother blends
and working wet on wet. Next, I'll take a
tissue paper and gently wipe along the
edges of the masking tape. This tape is
essential to prevent back flows when we
start painting, ensuring clean and
controlled washes. Now we are ready to begin. For the sky, I'll be keeping three of my favorite
brushes handy. I'll start with my
size 00 mop brush from silver atelier
squirrel blend series. First, I'll wet the brush, dab it lightly on a tissue, and then start preparing a yellow color mix using my nipples yellow and Jean
Brilliant number two. Before applying it
to the painting, I'll swatch the mix
on a scrap piece of paper to check
the tonal value. This helps ensure
the color is just right and I can
adjust it if needed. Now that I'm happy with
the mix, I'll begin. Notice that my brush
isn't too watery, neither is my paint.
It's just damp. I'll use the toe and
tip of my brush to create soft inverted
C shaped strokes. Pay close attention to
my brush movements here and follow along as I
create these cloud shapes. Since I'm working with a
natural soft hair brush, I can easily manipulate the
bristles to my advantage, allowing me to create those s shaped strokes effortlessly. The flexibility of this
brush helps in forming those soft organic cloud
shapes with minimal effort. Here I'm applying light pressure to create those
cauliflower shaped clouds. Notice how I'm carefully
spacing out the yellow areas, ensuring that they don't overlap
too much on one another. This allows the whites of the paper to show through adding natural highlights and keeping the clouds airy and luminous. Next, I'll rinse my brush, dab it lightly on a tissue and start preparing my pink mix by combining opera pink with the previously used yellow mix. This will ensure that the
pinks remain soft and mellow, blending harmoniously
with the base layer rather than appearing too
bright or overparing. Notice how I have held my brush and the tip
is not too watery, using the same
inverted sea strokes, I'll begin layering the pinks, partially overlapping
the yellow areas. To keep the transition seamless, I'll use the damp dry tip of my brush to soften the
edges of the pink clouds. Then I'll continue with the same gentle sea
strokes to create lighter, more delicate clouds towards
the left side of the sky. Notice how I'm leaving some space between the
yellow and pink overlaps. This is the key to
creating a glowing effect, making the clouds look
naturally soft and puffy. Now, I'll prepare a medium tonal value mix using lavender, blue gray, and a touch of lilac. And to adjust the
intensity of the blue, I'll add a pinch of talo blue, and for a richer purple tone, I'll add a mix of little opera. Now, this is going to be a little experimental colour mix that I'm preparing out here. This beautiful pastel blue, purple mix that we have created will add depth to a
sky when we start layering it near
to the horizon and at the base of the
yellow pink clouds. I realize that the top
part has begun to dry, so before applying the mix, I'll lightly miss the
top part of the paper from a distance and give
one spray at the bottom. Now I'll load my size 00 mob, gently squeeze out the
excess water from its belly, and start applying
this pastel blue, purple mix underneath
the pink cloud layers, making sure the pink shapes
remain distinctly visible. Observe my strokes
carefully and follow along. As I approach the top edges of the yellow and
the pink clouds, I'll flatten out the
tip of my brush and gently overlap the mix
with soft pressure. This will help blend
the colors smoothly, creating soft and
glowing transitions in between the clouds. Now, if you so observe closely, I'm using just the tip
and toe of my brush to create sea strokes in
between the color lays. This helps maintain
a soft air effect while ensuring a natural
transition between the colours. Now with my rinsed
damp dry brush tip, I'll gently blend
out the edges of those different color layers to smoothen out the
transitions further. This tip helps soften
any harsh edges and ensures that the clouds flow naturally into each other. Now I'm going to add few more yellow clouds
on the left side. And for this, I have mixed
my Jean brilliant number two with yellow orange creating
this medium tonal value. At this stage, I'm almost shaping the mounts
of the clouds using full circle C strokes to give
them more form and volume. If applied color feels too
intense or overpowering, I'll dab off the excess paint
onto a tissue and then use the tip of my brush to gently
soften and blend it in. This keeps the
transition smooth while maintaining that natural
glowing effect in the sky. I'll load the tip
of my brush with this pink and blue mix
that we prepared earlier, and I'll gently apply this color at the base of the
yellow fluffy clouds using very light
delicate strokes to build depth while keeping
the transition soft. If you notice here, my
brush is loaded more with pink purple mix rather than blue since we are working on clouds
at the base of the yellow. This is important because adding too much of blue at
this stage could result in an
undesirable gray mix when blended with yellow. Now, I'll start adding that light purple mix to
the center of the sky, covering up some of
the white spaces while making sure not to
cover them up completely. These subtle touches
help balance the clouds while preserving
the natural glow. When retouching the bottom near the horizon,
be extra careful. It is best to load your
brush with more of the blue purple mix rather than the lighter pinkish purple. This ensures a smooth transition into the atmospheric
depth near the horizon. However, do this step
only when your paper is still wet over here to
avoid creating hard edges. Now using the flattened and
damp dry tip of my brush, I'm just going to smoothen
out those cloud shapes. Before moving on to the
topmost part of the sky, I'll first go over the area with a wet brush to
reintroduce the moisture. But here I'm being extra
mindful about the water. I'm using a smaller
mob brush to avoid excess water from seeping
into painted cloud areas, which could cause unwanted
blooms or back flows. Now I'll prepare a pastel
yet intense blue mix by combining a
little of halo blue, blue gray, and a
drop of lavender. I'll keep this slightly
watery so that the top part of the paper
stays wet for longer, allowing us more time to
work with smooth blend. Now that my brush is loaded, I'll start applying
the paint mix, carefully defining the shape of the clouds using the
negative painting method. This technique helps carve out the bright cloud forms
by painting around them, adding contrast and
depth to the sky. Now I'll rinse my brush,
dab it on a tissue, and start lifting
out those feathering edges to create
soft airy effect. Notice a slight bluish tinge
left behind after lifting. That's because thalo blue
is a staining pigment, and I intentionally used
it in this mix with blue gray to achieve this subtle glowing
effect in the sky. Now here with my flattened
dam dry tip of the brush, I'll gently lift off some of the blue and then quickly wipe off the excess paint onto
a tissue to keep my brush clean and ready
for the next step. I'll add a light pink mix into the lifted a ensuring that
I add depth to the sky. While doing this, I make sure to preserve a little of that
white edge around the cloud, which helps maintain the natural glow and
depth in the sky. Using the slightly damp
end of a soft tissue, I'll gently dab over the wet blue paint to create this fluffy airy
edge for the clouds. This technique helps soften the transitions and
enhances the natural glow, but make sure to do
this very gently. Pressing too hard can create hard edges instead of
soft feathered edges. Also, each time you
lift the paint, switch to a clean part
of the tissue to avoid re depositing the pigment
back into the lifted areas. This ensures the lifted sections remain light and luminous. Here at the top part of the sky, my paper is still wet, so I'll add another
layer of blue to debate its intensity and bring
more contrast to the scene. By doing so, I can also
enhance the cloud shapes, making their edges appear
lighter and more defined. Once that's applied, I'll take a clean end of a soft tissue and dab lightly lift the paint of
creating white wispy edges. I'll repeat this process
from left to right, carefully shaping the clouds and adding beautiful
airy effect. After this, we will
let the sky dry completely before moving
onto the foreground. Here at the very top, I also went in and lifted out some blue to shape
the clouds further. This gives the illusion of those Bilowy cumulus clouds and even cumullimbus clouds making the sky feel more
organic and natural. Now we will let our sky dry completely before moving
onto the foreground.
32. Day 7: The Foreground Part 2: Our sky is completely dry, let's begin with the foreground. Here, for our foreground, I'll go with wet
on dry technique using a slightly watery
mix of yellow ochre. Make sure it is just little
watery, not too watery. I'll begin at the center
of the foreground and then gradually blend it downward towards the bottom of the paper. Now, with a damp tip, I'll softly blend
the yellow ochre below the horizon line, ensuring a smooth
transition. Be careful here. Make sure your brush is not
too watery with the paint, because if your brush
tip is too watery, the paint might
start bleeding into the sky which we want
to avoid at all cost. Now, I'll start preparing
a greenish yellow mix by combining sap green with
little of burnt sienna, creating a shade similar
to that of olive green. This di tone will help bring a natural organic field
to the grassy meadow. Now I'll load just the tip of my brush and
flatten it out and begin applying
vertical strokes to replicate the grassy
texture in the foreground. Theise strokes will add movement
and depth to the scene, and then I'll switch to
horizontal strokes to blend the greens towards the
bottom half of the paper, creating a smooth transition. Next, I'll cover the sky to be extra cautious while
working with greens, ensuring that no unwanted
splatters end up in the sky. Next, I'll repeat the
same process to create grassy texture using the
flattened tip of my brush, but this time with sap
green for more vibrancy. Next, I'll switch to
my comb brush to add more refined grassy details using darker values
of sap green. I'll create longer
vertical strokes at the bottom and keep them
shorter towards the center, reinforcing perspective and
depth in the landscape. Using my comb brush,
I'll now splatter water droplets to introduce
a loose organic texture, but I can notice that my
paper has started to dry out, so I'll blend those
water droplets back into the foreground using
the tip of my comb brush. Here I'll use a little of
yellow ochre while blending. To enhance the texture further, I'll quickly splatter some
more water droplets achieving the soft natural effect that I wanted for the
grassy foreground. Now I'll create a
darker green mix to add foliage near the
base of the horizon. For this, I'm mixing
my sap green with a little bit of my indigo
or ultramarine mix, which deepens the sap green and adds richness
to the landscape. I'll be using my size six silver black velvet
brush for this step. Here, I'm trying to create a creamy paint consistency
and not too watery. Once the brush tip is loaded, I'll carefully lay down a light horizontal line of dark green at the
base of the horizon. This will act as a foundation
line for the foliage. Then once I'm done
with adding this line, I'll start adding dabbing strokes of dark green
gradually building up the texture of the trees and bushes here at the
base of the horizon. The dabbing motion helps create a soft organic feel mimicing the natural shape of
the distant foliage. Now, I'll vary the height and shape of the
foliage to create a more natural organic feel in the landscape using
the tip of my brush, I'll dab and tap to build up
taller and shorter foliage, ensuring that the trees and bushes don't look all uniform. This variation adds
depth and realism, making the scene
feel more dynamic. Now, I'll repeat the
same exact steps to create this foliage in
between these two barns. Now I'll switch to size to synthetic round brush to start adding details
to the barn. I'll begin by filling
in the first burn with a darker mix
of burned timber, ensuring the left side is in deeper tone to create a
sense of light and shadow. As I move towards the right, I'll gradually fade the
color to a lighter tone, achieving a natural
gradual transition that suggests light
falling from one side. I'll repeat the same exact
process for the next barn, maintaining consistency in the lighting direction
while ensuring each barn has a
slightly distinct tone and texture to enhance
the depth of the scene. Time to paint the roof. First I'll outline
the roofs used in neutral tint defining
their shape and structure. I will now add few lines of neutral tint along the roof to suggest texture
and dimension. Then using the damp tip
of my rinsed brush, I'll soften and lighten
some of the areas, creating a subtle
gradient that makes the roof appear more
natural and weathered. This technique helps to
add depth and variation, preventing the roof
from looking too flat while maintaining
its structural form. Here, just below the barn, I unintentionally
left a white patch while painting the meadow, so I'll have to redo the entire meadow repeating
the same layering process. This is a good reminder
to always ensure the foreground is fully painted below the horizon
from the beginning. That way you can avoid having to go over it again
like I have to now. So I'll go back and rebuild
the midow step by step, starting with a little watery yellow ochre wash
blending it smoothly. Then I'll lay the green tones using sabran mixed
with burn sienna, followed by texturing
with vertical strokes and cobra splatters to restore
the natural grassy look. Now, I'll remove the
paper covering the sky and move on to adjusting the
shrub between the barns, making it broader and thicker, using the same dark green mix. This step is simple, just like how we painted the
previous foliage, using dabbing strokes to
build up depth and volume. Once the horizontal baseline of the dark greens has dried, I'll take my opaque
white marker from Shinhan art and add a white fence to enhance
the composition. If you don't have a marker, you can use a white elpin or even white quash
for this step. Once we are done with fencing, I'll let the entire
painting dry, then carefully peel off the tapes for crisp,
clean edge reveal. And with this, we
have successfully completed the seven
day sky challenge. I hope you found this class
valuable and insightful. It has been an amazing
journey exploring different sky compositions
and techniques together. I'm looking forward to
seeing your projects.
33. Outro : The End Of The Class!: Congratulations on
completing this class. I'm so proud of you for taking this journey into painting
atmospheric skies. Throughout the duration
of this class, we explored color theory
and palor selection, mastered water to paint
ratio for smooth blends, practiced brush
control to create soft wispy clouds and painted seven stunning
sky compositions, each helping you
build confidence and control in your
watercolor journey. But remember, learning
does not stop here. The key to mastering watercolor skies is
consistent practice. To help you continue
your journey, I have added extra
reference pictures in the projects and
resources section. Feel free to use them for additional practice and experimentation and
gain confidence. If you have enjoyed this class, I would love to
hear your feedback. Your reviews not only
help me as an instructor, but will also help
this class reach a wider audience allowing more artists to benefit from it. And if you have found
value in this course, feel free to share it
with your family and friends who might enjoy
learning watercolor skies. Lastly, don't forget to upload your class projects in the create project
section of the class. I can't wait to see your
beautiful projects. I would also love to know your thoughts and suggestions
for my next class. Drop them in the
discussion section. I always enjoy hearing from you. And if you have any
questions or doubts, don't hesitate to reach
out there, as well. I'll be happy to answer
at the earliest. That's all for this class. Thank you for joining
me and happy painting.
 Nilam Roy, Art Instructor