Transcripts
1. About This Class: Hi everyone. My name is Carrie Sanders
and I'm an artist, a teacher at a creative
here in St. George, Utah. I'm just outside of beautiful
science National Park. And I feel so fortunate
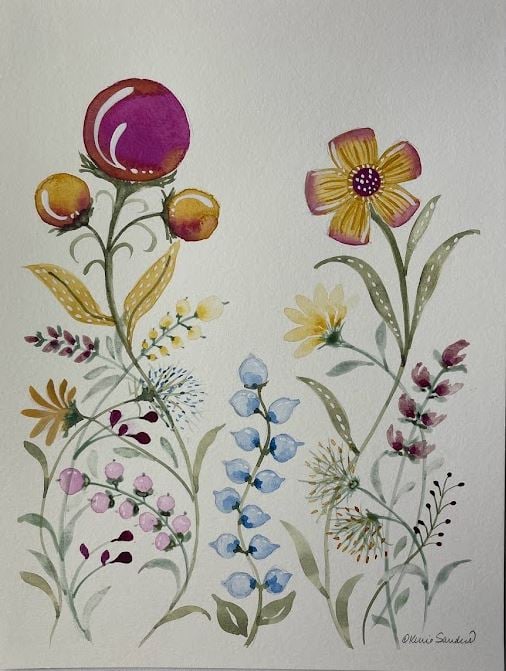
to live here because I'm so inspired by nature. And today we're going to do this wonderful botanical piece. But the beauty of it is
we're going to learn modern watercolor
techniques as we go along. What I have found as I've
taught students over the years, is they have a fear
of watercolor. They feel like they
don't have control. Much like they have
control in acrylics. Whales. And I understand that because I love all
of those PDFs as well. So I wanted to design this class to help people understand that once you learn basic
techniques and practice those, It's not that you gained
control over watercolor per se, but you learn how to
anticipate what squint to do. You've learned how to understand
how it interacts with the water and the
paint and the paper. And so in that regard, you do gain control of
watercolor is an amazing medium. It's my favorite media. I can grab and go, and I can go to urban
sketching in this city, or I can take it
with me on a hike. I can take it with
me on vacation to capture a scene
forever in my mind, there are so many things
you can do with watercolor and I want to help you
gain that love for it. Today, we're going to
learn in a unique style. What I've found is students
learn best by doing and not necessarily by just listening and observing
and then going to do so. I want you to do as
we go along today. So in other words, what
we're going to do is let's say that we're doing a wet
on wet technique here. We'll do this practice
in a sketchbook. And then immediately I'm
going to come over to our art piece and do that portion of our art
piece that's wet on wet. And then we'll come over
here and we'll practice more same we're doing
binds or pedal stroke. And then we'll come over
to our art piece and we'll add in the blinds
or the pedal stroke. And so we'll go back
and forth so that your hands-on throughout
the entire lesson. By the end, you're
going to end up with a really beautiful
botanical piece using modern
watercolor techniques. So you're gaining knowledge
along the way and having fun. I hope that you will
join me with this. I've had the pleasure of
having pattern packets and a painting book published and send across the nation and many, many people over the years. I hope that you will
join me and let me have the pleasure of sharing this information with
you and lighting a spark and a love
for watercolor. If this sounds like
something you would enjoy and grab your supplies. And let's head back to my studio and get started together.
2. Supplies and Color Swatching: Hi everyone. Before we get
started with any project, the first thing you
wanna do is take a moment to color swatch your pallet because you want to see how it interacts
with the water, the color values that
you can get from each of your colors
that you've chosen. You also want to see how it interacts with the paper
that you have selected. I'm using 140 pound paper
for the project today, I always choose 140
pound or better. But some papers have
different coatings on them, or they've been
created more rough or more smooth depending
on the finish. I'm either hot press
or cold press. And so you'll want to
see how that interacts. I just usually take a, just a scrap of paper, but it's the same type
that I'll be using for my project so that I
can see how that works. So before we get started, let me show you the
brushes that I've chosen for the project today. I'll just be using
a variety of rounds from pretty largest as a 12
and a couple of mediums. And you'll definitely want a
nice spine scripting brush. This is a number one. Then you'll need a nice pencil to do a little bit of sketching. Not much sketching, but just
a little indication here. I always use a black wing. This is a palomino is my very favorite type of
pencil that I always use. And today we'll be doing
some awesome techniques. We'll be learning some
different ways to do backgrounds and put some
texture into your pieces. And so we'll be using
some table salt. You certainly do not
need this much salt, but I just always
keep a little dish in my painting studio
and so you'll need some just regular
table salt is fine. It doesn't have to
be anything fancy. And then of course, my favorite tool always
is my handy-dandy tissue. We will be using
this a lot today. So grab some tissue
and then of course, some clean water and
a shop towel handy in case you have a
little bigger spill or something that you need. So let's talk about
paints for just a moment. We'll be using yellow
ocher, quinacridone, gold, Naples, yellow,
buff, terre verte day. And we'll be using forest
green, quinacridone, violet, Potter pink,
and violet cobalt. And this is Winsor violet, cerulean blue, and
the yellow blue. And of course, I
always say you can switch out for whatever
you have handy. We want you to be
really comfortable with the supplies that you have. I don't want you to
feel like you have to go out and buy something. So let's start with our yellow ocher and start
with a full strength. Dip in your water. So you have a clean brush
with just water on it. Pull that down so you can see the lightest value that
you can bring that to. Then you can see how it's interacting with
your paper as well. So let's pull some
quinacridone, gold. I love this color. It's transparent, but it
really packs a punch. And when you put a glaze of this color on top
of something else, it just makes it
pop if you're doing sunflowers or I use it
on cliffs and rocks. It is beautiful. Okay. This one is Naples yellow. I can tell you that
I use this color in probably 99% of every project
I do has this color in it. It is so versatile, It's a great base color, is a great mixing color. And it's wonderful. Same with this color is buff. And same thing. I use this in probably
99% of my projects. And same thing, It's great
for mixing with other colors, is great for basing rock, stones, walls, and
so many things. Plants. Alright, we are going to
go over to terre verte. This is a nice translucent color and it's kind of a blue green. So I live in the South. I do lots of blue-green
plants and I love this color. And this one is forest green. This is going to have a
little more punch to it. But it's a deeper greens, so it's not that
blue-green, it's warmer. And so we'll be using
this one as well. Let's pull it down
with some water. Beautiful. This one, I don't use a lot. It's gonna be really
fun to use this today. This quinacridone violet,
you can see, is very strong. This is a great bow color. And let's pick up some
water and bring that down. It's beautiful. And same with this potters pink. This is a great beau ** color. It's kind of a brownish
pink and translucent. And we're gonna do some really delicate flowers
with this today. Well, it's gonna be
really pretty and pull that down. Okay. Our next one is violet, cobalt. Love this color. It's not too pink,
not too in your face. Pink. Oops, I forgot
to pick up water. Let's bring that down. There you go. Now, it doesn't have
to be Windsor violet. But just make sure it's
a deep rich violet. There's not all Violets
are created the same. Some go really pink
and I want you to have a nice rich violet that
stays in that purple tone. There we go. Civilian blue. I can tell you I use this
in 99% of my paintings, whether it's for sky, water, plants, shadows, all
kinds of things. It's a great mixing color. Our last one today, fellow blue. This is a very strong color. And again, I use it
for sky and water, putting deep shadows
in beautiful. So here we go. Here's our palette today. Use what you have at home, but go ahead and
gather your supplies, and I'll see you in the next video and
we will get started.
3. Using Salt and Water: Okay guys, let's start with
our first technique which is putting salt on wet paint. And what that does is pulls the pigment off
wherever the salt is. So I'm going to use, well, let's do a
little snow scene. Because I do this a lot for winter scenes and
Christmas cards, loved the hand pink
Christmas cards. I'm going to use
some of this indigo blue but dark for my liking. So I'm going to add some
civilian like that. Okay? So when you're using salt, you need to have a nice wet
piece for it to drop into it. You don't want it so wet
that you have cauliflower. Just a nice moist background
for it to have enough to absorb that paint and water. Darkening it a little
bit at the top. That's what I like in my sky. I'm gonna do a
little snow scene. Demonstrates for you. Awesome. I'm going
to leave that. And then we'll just pick up
a little bit of table salt. It doesn't take much, just the tiniest pinch and you're just going
to lightly sprinkle it. Not very much. I'll bring this up to the
camera in just a moment. With this, you have to
let it dry on its own. It takes a little bit of time. You have to be patient. Sometimes I'll do this and leave it overnight and just let it do its thing overnight. You can't speed up the
process with a hairdryer. I'm going to bring this
up to the camera a little bit and you can see where it's already
starting to absorb some of the paint
wherever that salt lands, it's going to absorb that
paint and the water. And that's where you end up with a light background and they did. Okay. So while that is drying, I'm going to set
the cell to sign, flip the board and we're
gonna do a little bow, whole floral piece,
which will be fun. And let's go ahead and start by just throwing
some brown out here. I'm just going to
throw some engineer abstract the background. You'll have to worry
about brushstrokes. There's enough water in there, then it's going to smear out. Okay. Now, with this, we
are going to flip water on there just like you do when your splattering
with paint. But before we can do that, it needs to dry
just a little bit. So we'll let that sit. It's something that you have to just practice
enough times that you understand how the
waterworks with the paper. If you do it too soon, you're just going to end up with little cauliflower
ears and it won't have the look that
you're hoping for. And if you do it too late, then it's not going to
lift off the paint. So practice, practice, which is true with just about everything. I'm just checking out
the sheen on the paper. Okay. We're almost there. So it's not super shiny anymore. It's between a shine
and a matte finish. We don't want it to Matt,
we don't want it to DO. That means the water
will not lift off. So let's pick up
some clean water. I'm using a number four, so a smaller brush than what
I use to apply the paint. And we'll just
start splattering. I'm going to stop and wait
for a minute with water. It grows. We're putting wet onto wet, so it's going to flow out. I'm going to bring
this up with a camera. You can see it's
already working, it's already lifting
off that pigment. You're getting all these spots. And it just leaves a
nice texture looking background is going to bring some real interest
to your piece. We're going to paint
flowers on top of it. And so they'll fade
into the background and it'll give it some
depth and some interests. And I use both of these methods. A lot for landscapes. You can use it for
rocks and cliffs. And sand and beaches. But I also use it for
abstract things like this, where we put flowers
on top of it and snow scenes that
we're going to do here. And so this is very versatile. It's super great to know
these things in practice. These things just do a
little vignettes like this. And practice, and
practice and practice until you're
comfortable with what the water and the salt
does and how it interacts with the paint and your paper. So let's go ahead
and let this dry. Both of these have to dry completely and
naturally on their own, you cannot use the hairdryer. So I'll see you in just
a moment after those have dried through
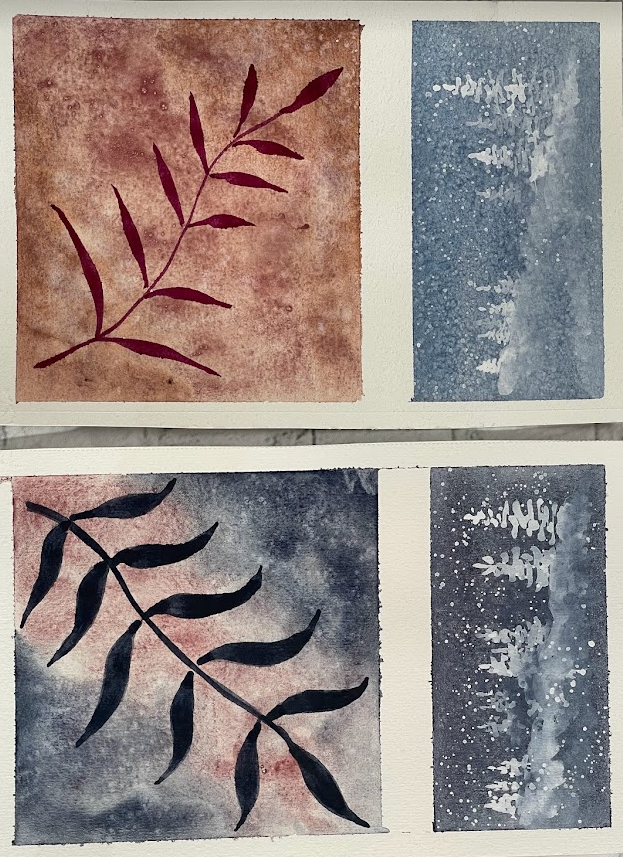
the magic of video. Everything is completely dry. We can take, I'm gonna bring
this closer to the camera. We can take a closer
look at how things went. This is the side that we used, table salt and you
can see you get a very fine granular look where it has lifted
off the pigment. And this is the side where
we splattered with water. And that water spreads as it continues to dry and
pull off the pigments. So you can see how
you get a little bit bigger depending on how
big splatters you put on, you get bigger areas of white. It just depends on the
look that you want. If you are going
for a winter scene, something snowing and refined, or a really fine sandy
beach, something like that. I would go with the salt. If you're doing something
more broad like cliffs and mountains or
something further away, something like the water
splatter is great. We're gonna do a little
vignette with both of them. You can try that out
and see what you like. And so let me set that up
and I'll be right back. Welcome to follow along with me. If you're going to do
a little snow scene, then I've just pulled
out some white gouache and I'm going to use a
script liner as well. And let's just have some
snow trailing down. There. We have a really fast vignette. Just a quick little snow scene. You could use this
for Christmas card, or I've done these for, well, pieces are gifts. But anyway, you see the
beautiful depth that this gives you when you splatter the snow on top
with your gouache. And you've got that texture behind it so it
makes it look deep. And so when you put some of these trees that
are a little more faded out and then some
stronger ones in the front. You've got a beautiful
piece. What did that take us like 3 min. It's such a great technique. Alright, let's
flip the board and let's do our vignette
on the other side. Okay, before I start this, I'm just gonna do a
vine with some leaves. And I wanted to review with you this pedal
stroke that I'm gonna be using so that you can use this on any leaves in
our final piece. All I'm using is a medium round. This is number four
round and you'll notice that take it and I twirl it between my two fingers
that as I lift and that brings my
brush to a fine tip. The brush will do the
work for you guys if you just learn to trust it. And so as you touch, I'm planting my
finger down to steady my hand and I'm just
going to lightly touch. So I get a fine tip and then press and then bring
it up to a tip again. And that could be a pedal on a daisy or some
type of flower, or it could be a leaf on a vine. And so for this piece is
going to be a leaf on a vine. Let's do it again. And you can do with them
curved, Of course. So there's all different
ways that you can use this stroke is really valuable. And when I first
started painting, I just did pages of strokes just over and
over and over again, just in different colors,
having fun with it. And with all my
different size brushes. All of these brushes
will do that, not just this brushed. And so you need to
become comfortable with that so that you can
utilize that to your advantage. Alright, I'm gonna go ahead
and speed up the camera and take a look and
follow along with me. Now, because of the background, you can keep something
very simple like this, or you could still
add more to it. For our final piece today, we will be adding quite a bit, but we're going to
stop here for this one because we were
really just learning and focusing on how we can enhance the background by
doing different textures. Let's go ahead and get
ready for our next steps. I'll see you in
the next video and we'll get started on our
final piece together.
4. Wet on Wet: Alright, the next
technique we're going to learn is a wet on wet technique. And it's great for blending. And we're going to do it in
kind of a fun way today. So I'm going to
pick up some paint and work that into my brush. I would say about 50%
water if 50% paint ratio. Let's just do a circle. I just wrote out
my sketchbook here because we're just going
to practice for a minute. Breaks down your
brush real goods so you don't contaminate. The next color that
we've picked up. I'm going to pick up
some yellow ocher. Now. I'm just going to
touch this now you can see already how that water
just just blends. And you have to just take a deep breath and trust that
it's going to work out okay? And try not to control it. Now, you can have a
little bit of control. If you wanted to. By tilting your paper, I can force it to go down
or I can force it to come back and have the pink
go into the yellow. So you do have a little bit
of control, but not a lot. And it's really fun and it looks beautiful on
certain things. Let's do a different color. So why don't we pick
up some Naples yellow. Now I'm wanting to throw in a little bit
of cerulean blue. Make sure it has
about a 50, 50 min. And then we're going
to touch that. And away it goes.
Just start to go. With this method, wet on wet. You just have to be patient. You can't rush the process. So this is another thing that you have to just
practice that so that you kind of know what to anticipate and it will help you visualize
things down the road. So let's do just the opposite. Now let's pick up more
civilian blue, 50, 50 mix. Clean our brush real goods
so we don't contaminate. And what's pick up some yellow. It's great to always
play with it here, much like doing our swatches that we did before
we started painting. Because then you'll know what blends that you like before
you start your piece. Let's do just the
opposite here as well. Let's start with yellow ocher. Let's pick up some about Violet. Actually, we're going
to pick up some of the Queen violet. That's powerful. Look
at that. Very fun. Now if you want something
that's a little more subtle, blue on blue, That's
what I'm going to do. Now. My brush, I'm going to
pick up some phthalo blue and tap that in. If any of you who took my
Christmas ornament in class, you saw me use this combination. And I did this
technique as well. Beautiful on
Christmas ornaments. Alright, so go ahead
and play with that until you have the color
combination that you would like. And then we are going to
come over to our design. This will be our
final piece here. And as we learn techniques
here and play with it, we're then going to use that technique on our final piece. And when we're
finished learning, we will end up with a
finished piece here as well. So go ahead and play with
that for just a moment and bring your final piece over and we'll add
that to our piece. Okay, let's use the wet on
wet technique that we learned here and apply it to our piece
here to get this started, won't take it a certain step. We'll only do these
items here that we practiced here and then we'll stop and learn
something new. And I'm going to go ahead
and use this lighter pink. Okay? Now we're gonna do the same
technique for this flower. We're going to start
with our yellow ocher. When you do a wet
on wet paint will only flow where
it's already wet. So if we avoid that
center than we aren't going to have a problem with
it going into the center. And I'm just going
to a little bit off with a dryer brush center. Good. Now let's pick
up some of that peak. That is so pretty. Hey, now I'm going out
your brush really well. Let's finish out the flower. Let's let that dry.
5. Lifting Highlights and Petal Strokes: Another technique
that is used very frequently in highlighting
is lifting off. It's where you put some
paint on and you lift off the center in order
to pull a highlight. And we're going to
be doing that with some of the flowers
that we're doing today. So let's just practice. Got the Sketchpad back out. I've got about a 50, 50 ratio on some blue here. And let's just practice
on a circle again. Let's say that that is a pedal. So we've got a pedal
and it's coming down to a vine, so to speak. And you paint that on
and then gently tap it off and it leaves a
shadow of what it was. And then you can come back
and touch the bottom, deepen where a stem would be. So it gives the illusion. Let's your eye fill in
anything that's missing. And there's various ways to
lift off in doing highlights. So let's just practice
this a little bit. And then also you can lift
it off using your brush. If you have a large area, see how you can
just lift that off or if you want it to be. A lot of times I'll do
it. If I want it to look curved or something
and not flat, then I can use my
brush and follow the contour of whatever
it is I'm painting. So you can see that there's
different methods to it. But lifting off is
a great way to do highlighting in all different
ways on your painting. So we are going to
use this today. And you can also use it in, I'm doing some flowers. Let me show you a
different flower that you can use this for the petals. You want to make
sure that you have clean tissue when you
do this because you don't want anything transferring
to your other petals. But let's say that you are doing a really delicate flower. And so usually you would use a variety of colors
for those petals. Let's just start. Maybe over here. Whenever you need to dip into the water to clean your brush. So that would be
the first layer. I'm just going to try and stick with the palette that I have. So I would use a soft pink, one more layer with the flu. Then this would be the stem coming down. You get the idea. So you can build on that
using different colors or all one color and just make
each layer darker or lighter. And they can be quite beautiful. Let's go to our piece and we're
going to do some flowers. Okay, guys, we are going to add this vine of beautiful
little blue flowers. I don't have names for any of these because I
just made them up. So let's pick up some of
our blues really in blue. Go back to that 5050 ratio. So pretty watered down. I'm eating it using a
medium size around, I think it's probably an eight. And I'm just going to
take some of that water out. Lay this in. Actually lay a couple in. Before you lift off on these. A secret to sketching these
in is to just start with a little circle and then just make a little
pointy tip on them. Then we will connect the
vine a little bit later. Don't want to get
ahead of ourselves. So look how beautiful that is. Alright, now while
it's still wet, we're going to use that
wet on wet technique, but we're just going to
pick up some of that civilian blue that we just laid in and just put a teeny bit where it will connect
with the vine. And that just gives a little
impression of a shadow or some Vine or whatever your mind puts in
when you look at it. I'm going to speed up
the video here and finish placing those in. Alright, How did you do? I went ahead and
filled the center of that flowering so
it can be drying. And we should have all of our little flowers
here down the middle going and our pieces starting to come
together. This is great. Alright, Let's learn
another technique. And this is using that same pedal stroke
that we have been using. And we're just going
to do a flower bud. And let me just draw
it for you real fast. So if this is your stem and you've got a little bit there. So it would be as if you were doing part of a
flower like that. And we're going to use
the same pedal stroke that we did before. Let me do it dark
so you can see it. And you're just going
to touch, press, lift. Press lift. And you notice I'm
curving the pedal. The center ones pretty much
going to come straight down and then we're going to
curve the other direction. Okay, let's practice it using a couple of
different colors so that you're comfortable. Let's pick up our yellow. I think I'm actually going
to do it in Naples yellow. Now. It is still wet. You can take a little bit
of color if you want, and drop it in
towards the bottom. Ten, let it start
to seep upwards. And keep in mind, let me just throw this in
here so you catch the visual. We are going to be doing a
little stem here, right? So or maybe you don't want blue when you want a little bit of pink instead, you could, you know, Pink
would have worked too. So you can play with that. Or maybe you would like gold. I'm just putting it
on top of the blue, but I'm just showing
you different ideas. This is why it's
great to practice, figure out what you want
on your final piece. And that's what we will do. Now, let's say that you have a stem that is just some buds. So you're going to
have some leaves. And you'll just have
a little bud or even something that's
partially budding. It's gonna be the same stroke. So let me do it dark. So you're just going to touch
and lift, touch and left. I'll look it looks like a heart. And then we'll come
in with the green. We do the other side
with a different color. And let's just do the yellow. So let's say it's
just a bud that hasn't even started to open yet. And we're gonna do
a bunch of these two and just fill
that in quite easily. Alright? And if you want,
you can lift off the tips and leave it
darker on the bottom. Or you can lift off the
tip like we did and come back in with the gold and
touch while it's still wet, little wet on wet and
let that seep upwards. There's all different kinds
of things that you can do. Sky's the Limit, play with this and decide what you'd like. And we're going to
come over to our piece and add a couple
of flower buds in. Okay, I've just done
a little indicator here on where my
flower is going to go. I'm going to use this Naples
yellow and row in my petals. This will just be a half flower. So literally just
the bud portion. Beautiful. Now I am going to take a
little bit of this goal. Not going to go and touch just the bottom left
that work its way up a little bit. Alright. This branch, I'm just
going to do an extension. Not there, not very big. And I'm going to do
It's more circles. Now, do these have to
be perfect circles? No, this is just the
beginning of our bouquet. And so trust me, when I say
it's not going to matter. Just lifting off for
some shear minus k. Let's let that dry. While we have our
Naples yellow out. I've added a new stem. And I'm just going to add some more pods that are
similar to this blue.
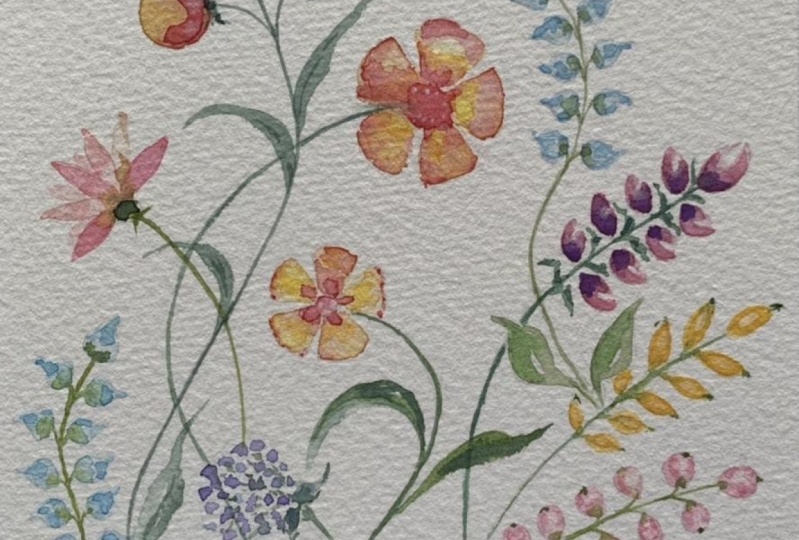
6. Vines and Flowers: At this point, it's time
for us to put in some of our vines because it's going to be not only a guide for us, for our future flowers, but also you want to
have some that look in the distance as well as
some in the foreground. And so that's why we have two
different colored greens, some one strong and when light. And so you're going to
use your scripting brush. And I'm just going to give
a quick example here. Then I'm going to
fast-forward the camera, but I have found you have a better result
if you just go for it. Just go for it
without hesitation. If you go really slow,
you'll end up being shaky. So I'm gonna go ahead and
fast-forward the camera. Just take note that I'll be
using both the light and the dark green in different
areas and have fun with it. Just do what you wanna do. Alright, that was fun. How did you do guys? I hope it went well for you. It doesn't matter if it's
thicker and thinner. And you notice that I just came right on top
of whatever was in the path because we're going to fill in with leaves
and more flowers. And you want that dynamic. You don't want everything to
be exactly this fine line. This is art. Art is not perfect and it needs
to be interesting. Okay, I'm going to go
ahead and just add another stem to that stem. I'm going to just throw
in some little bugs. I'm going to come back now and add these
little leaves around them. Alright, I want to take this same green and I'm just going to add some filler leaves
in the background. So this is the terre verte. Really quiet see-through
fade into the background. Okay, I've added a stem here and we're going to
use that lifting off method along with wet on wet
to add some little flowers. I'm going to actually do
these in hotter pink. I just love this color, this brownish pink, that's
really translucent. But we are going to add
some of the darker too. Attach the stem. So we're going to do a larger
side to more of a point. And then kind of a smaller, it's like almost
like a lobster claw. So put that on. And then let's pull it off and then pick up some of this darker
touch the bottom. Mine was to dry. Let's add some water. There we go and let
that work its way up. Okay. I'm going to fast forward and put some of those
buds down that stem. When that's dry, we'll come and put some leaves around those and maybe they can
look tucked in nicely. I've added a stem here
that I'm going to put some buds on and
some stems here. At this point, I'll probably
just fast forward the camera and you can follow along with the way that
I start filling in. All of this is going to be using the techniques that
we've learned today. And then I will slow it down when we start to do
some more detail work, this flower needs
to be finished up. And there's a few
things that we need to talk about with
our final highlights. We're almost finished, guys. I think I'm going to
add some more detail here and a few more leaves
to fill in here and there. And then we'll stop the fast forward or
chat for a minute.
7. Final Highlights with Gouache: I hope you've had fun playing
with yours and filling in and trying all these
new techniques that we've used and learn today. We're on our final step, which is just adding
some fun highlights. We're going to be using our white gouache and
number one scripter. Of course, you could use a gel pen or
something like that. But today's lesson is all
about learning new techniques with a paintbrush and using salts and all
those kinds of things. And so we want to
stick to that plan and use our brush today. So I'm going to be adding
some highlights and some fun things just to
make it a little more fun. So I'm gonna go ahead
and fast-forward the film and you can follow
along with me there. Well guys, I think this one is a wrap and you know
what that means? It's time for us
to sign our name. Always be proud of your work. Always sign your
name and claim it. It's a beautiful piece of art. It's unique to you. And I'm so proud of
you for learning all these new techniques and throwing them into
one piece of art. Thank you so much for
joining me on this project, and I'll see you in the
next video to wrap up.
8. Class Project: Your class project
is to complete one botanical piece by utilizing the modern watercolor
techniques I showed you by phone or video step-by-step
and completing your piece. If you wouldn't
mind just snapping a pig and sharing your
finished piece with us. That would be so awesome. We would love to see
what you've finished and it would allow us to
communicate together there. You can just look for the big green button that
says Create Project. And that will allow you to
upload a picture real fast. And that would be great.
Also if you wouldn't mind taking just a moment and
leaving a review for me, I would so appreciate
that it helps me learn. I can improve, and it also helps my ratings with
the Skillshare folks. Thanks again for
taking this class and I will see you
in the final video. And we'll wrap up there.
9. Thanks and Congratulations!: Well, congratulations
on finishing your class and ending up
with a beautiful art piece. I hope you enjoyed it
and learned a lot of great modern
watercolor techniques that you can put
in your toolbox. If you feel like this was
beneficial to you and you know, someone else that
would benefit from it or that would
enjoy this class. You can just click on
the Share button and both you and your friend will benefit financially
from Skillshare, which is pretty cool. Also, if you could
take just a moment and snap a picture of your artwork and upload it in our gallery by looking for
the Create Project button. I would love to be able to see your work and it allows us to
communicate there together. And everyone can see what
the other person has done, which is always fun
as the students. Additionally, if
you would like to see what's going on here
at clumped Cottage studio. You can find me at Kerry
centers aren't dot com. You can also see part
of my portfolio there. And just take a look at
beautiful St. George, Utah. And we'd love to
have you join us here in studio at some point. Well, that's all for now, guys. I hope you'll take
a look at some of my other classes in Skillshare. And I'll see you
in the next class.
 Kerrie Sanders, Artist, Teacher, Creator.