Transcripts
1. Welcome! : Well, hi everyone. My name is Carrie Sanders and
I'm an artist, a teacher, and a creative here
in St. George, Utah, just outside of
Zion National Park. It's so beautiful here that
you can't help but want to go outside and do some
plein air painting, some urban sketching. Or we do also do special
workshops here in studio. So when you come visit
our neck of the woods, I hope you'll look me
up at carries Sanders art.com and see what workshops we have going while you're
here and come join us. I absolutely love
teaching and painting. I've been doing it
for many, many years. I have published patterns and a book that have gone
across the nation. And I love to share
how to paint and draw. And today I'm going to be
sharing with you how to do a beautiful
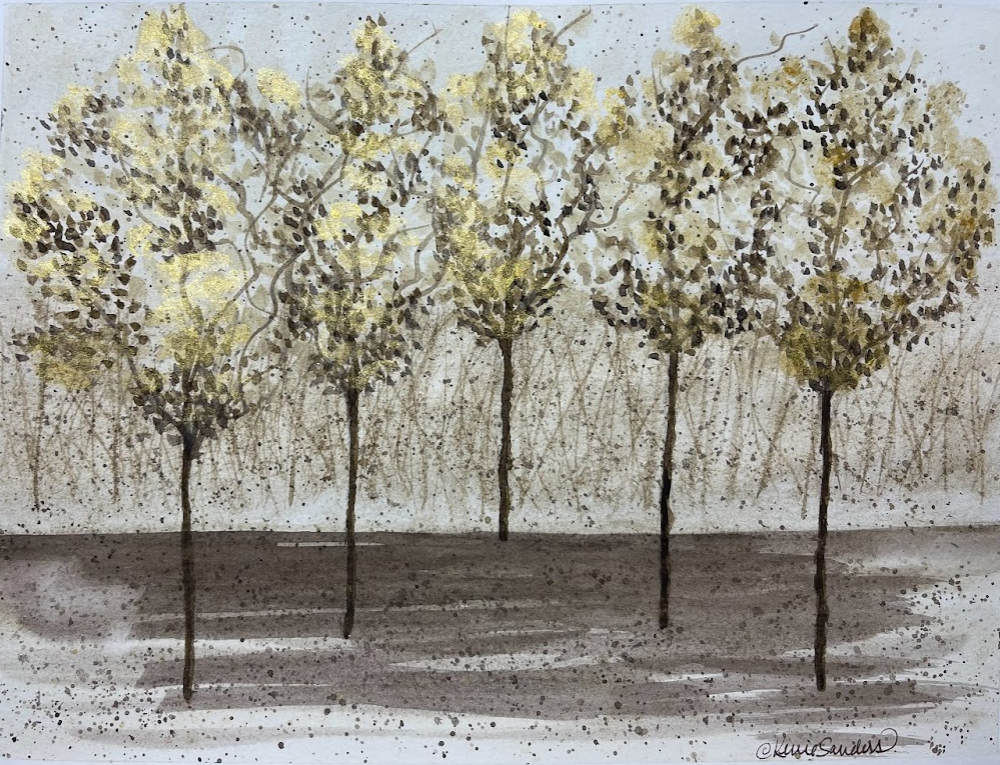
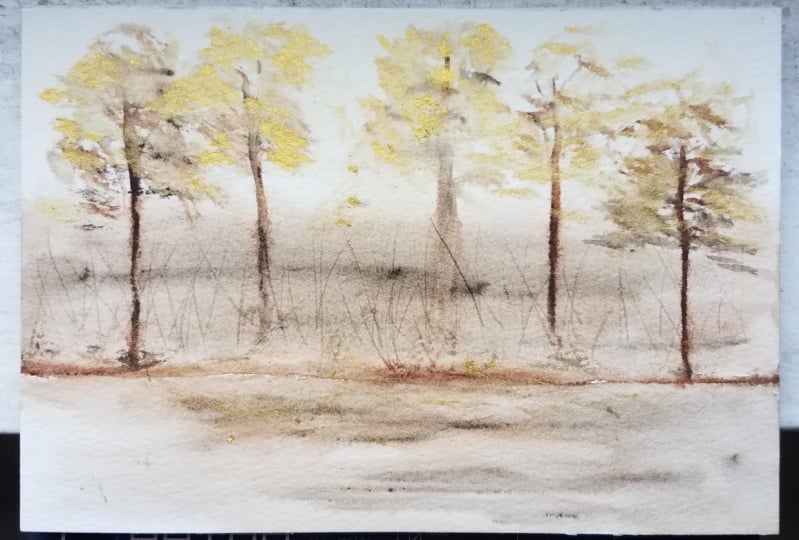
monochromatic grove of trees that are highlighted
with leaves in gold. This is a great piece for people with all abilities in painting. And I'll be taking you
through videos every step of the way on how to do
things like wet on wet, doing some washes, doing
some layering and glazing. And how to do some
special techniques in the background by scratching off and letting
those dark colors CPN for some tree branches, then adding that gold highlight and not letting it
get away from you. This is an awesome
fun, relaxing project. And if that sounds like
something you'd like to join me with and why don't
you grab your paints. Let's head back to my studio and let's get started together.
2. Supplies Review: As I'm sure you've noticed, this piece is very monochromatic and that's
part of the beauty of it. So our palette is very
limited for this piece, which makes it very
simple to prepare for. We are simply going to be
using three different paints, will be using Buff Titanium, we'll be using sepia
and raw amber, and then we'll be doing some
highlighting with gold. And you're welcome to use any of the gold metallics
that you have. I'm going to be using
brush oh, gold, which if you haven't
used this before, we'll introduce you to it today. It's a powder and
I like to use this when I'm going for a
texture with my goals, I want it to be a little
bit of a race texture. So if you feel like trying this, you're welcome to do it with me. Or if you want to just use
what you have, That's great. Then use some of your gold here. And then the brushes
that I'll be using today are very limited as well. This is really awesome. You don't need very much
to paint this piece. You'll be meeting. Let me give this for a background
so you can see the tip. You'll be needing
a large brush that will hold a lot of water to
be doing your background in. I'll be using this number 12, but you could use
anything that you have on hand, of course. And then you'll be
needing something to paint all of the
small leaves in. And my favorite brush for
that is a number four. We'll also be using
this to do all of our splattering width. Then you're going to be needing a nice fine tip
script liner so that we can be doing
those fine branches and tree trunks and whatnot that are going to
be needed for this piece. And then lastly, setting
using the brush tip, I like to keep a script liner
that has at the bottom. And then I have put into a pencil sharpener so that I have a nice
sharp tip on the end. And I use that to
scratch into my board. And then the paint seeps
into those scratches. Now you've probably done this
technique before also using a cut credit card and use the
corner of that credit card. Whatever you use is fine. I prefer to use this
just because it's handy and I can use either end
of the paintbrush equally. And I don't have to carry
a credit card with me, so but this is what
I'll be using. And of course my
handy-dandy favorite tool, the tissue we will be using
plenty of this today. Trust me, you're going to want your handy-dandy row and
you will need a pencil. We'll be doing a little bit of sketching in just to
make sure that we have our tree trunks in
the right place and our horizon line
where we'd like it to be. And I always suggests my
very favorite pencil, which is the black wing. This is the mat. I
often use the palomino. I don't get paid
anything to say. This is just absolutely
a top-notch pencil. And if you've never
tried before, then once in awhile it's worth
the money to try something that's really top
of the line and this is something I recommend. But you will need a pencil. Any pencil will do, of course. And as far as paper goals, this is where I do say, spend a little extra
money if you can, and get a nice paper because you will have a
much better result and be very happy with your efforts that you put into a
beautiful painting. I always recommend using cotton paper that is
140 pound or better. I don't care if it's hot
press or cold press, but those are the
two qualifications that I promise you you will never regret putting out
the money for if you can. So this is what I'm
using today and I've just taped it onto a piece of core boards so that I can easily manipulated on
camera for you today. So 140 pound watercolor
paper would be great. Why don't you go ahead
and gather your supplies? And we will get started
in the next video. And it's gonna be a lot of fun. I'm excited to get
started with you.
3. Background & Foreground: Are you ready to jump
in and get started? I know I am. So the first thing that
we're going to do is lay in our horizon line. And for those of you
that like to measure, you can absolutely measure. I'm more of a go with
the flow artistic girl. So I'll show you a little trick that
has not failed me yet. And maybe you already
know the trick, but if you take your middle finger and
plant it right next to either the edge of your board or the
edge of your paper. And then hold your
pencil real still. Then you can get a
pretty straight line if you keep it steady. So I just kind of
eyeball where I, I've made a little
mark where about as high as I want my
horizon line to go. And I am going to, I'm going to go
along the edge of my paper because it's not, if I go along the
edge of my board, it will be crooked. I didn't tape it
on exactly square. So, but my paper is square. So I'll just hold
this real tight, snug here and keep my finger along the
edge of my paper there. And as I pull down, I'll get a nice
even horizon line. Okay? So there's our horizon line. So gather your supplies together and let's
get started painting. I've placed our three
colors on the palette. And the first thing that
we're going to do is take our large brush and just get some water going on the background of her
watercolor paper. Kind of get that
cotton nice and moist. We do not want any
puddles of water. We just want a bit of moisture. So let's just put a
nice life film there. I'm staying above the
horizon line for now. Okay, That feels pretty good. Let's take a look in the light. Great. Alright, so let's just pick
up some buff with this water. And as we apply this, we don't want to have smooth
even strokes like this. This is going to
be the background, the forest, where the trees are. And so we don't want it
something smooth for this. We want it to look
a little texture. I want it to be quite light down here by the horizon line. So I'm pushing the paint
upward a little bit. And then I want it
to be fairly light. Up at the top. I'm going to
push it down a little bit. Great. And I'm just going to actually dive here and
there a little good. Just gives it a little
extra texture there. Okay, We're going to take
some of our raw umber, That's the medium brown. And go ahead and
place some of that in this section where
our tree trunks will be coming through. Stay away from the top band, that's where our leaves will be. And you notice I've stayed
above the horizon line. So where this
horizon line now is, I'm just taking water
and blending that. My tissue block a little bit. Stomach where? Glen that a tag. This is just water. Okay. Great. It's probably still too early, but let me just check. We'd have to keep our
eye on the dryness of this section because we're going to add some
scratches in here. And that brown will seep into the scratches and
look like trees. Bushes in the background. So it's not quite ready yet. Let me add a little
more brown and see what happens. It's almost there. Testing that little
section there, you can see how
it starts to seep into the scratches
that I need here, which is exactly what
we want it to do. I think we could
go ahead and add our scratches all the
way across so they're coming from the
horizon line just passed this Brown's section
that we have put in. Now, if you don't
want to sharpen the bottom end of your
brush, that's okay. If you have an old
credit card that you can cut up and
use a sharp edge there or something
else that's not going to actually pierce
your watercolor paper, but will scratch or
engrave a line on it. That's what you want to use. So we are slightly damaging, I guess, for lack
of a better word, your actual watercolor paper. But we don't want
to go too deep. We are gonna be painting
things over it, so alright, I've put
quite a bit on there, and now I'm going to come
back and pick up some of this raw umber and just place it on so it can seep into those scratches
a little deeper. And then we'll come
and block some of it off because we don't
want it to be this dark. So you can see I had to
move fairly quickly. That might be a good
idea to practice this on some scrap paper if you
haven't done it before. Now I'm just using clean water
to soften that top edge. Okay, Well, that's getting
a little more dry. Let's come below the horizon
line now and add some water. Waste was yeah, we'll go ahead and start
by adding some buff. Going to wash that in, just like we did above this
time. You can stroke it. It's okay. Just a side-by-side
stroke is fine. Great. And then we're going
to pick up some of this raw umber coming
back to our horizon line. Be a little bit careful here. For now, crossed. Now here is the beauty
of watercolor paper. And watercolor is the water is going to blend
that in the paper, is going to absorb it and
give us a nice soft edge. So we don't have a hard
edge on that horizon line, which is just what we want. Now I'm bringing this
down a little bit. I didn't pick up anymore paint. I just worked it down. It's called the bead line. You're going to bring
that bead line down. But I am going to leave it quite light at the very front
of my foreground. And now I'm going to pick
up some of the dark sepia. It's a very rich, beautiful,
heavily pigmented color. It's quite granular. Use more of the tip of my brush, even though I work,
look at the palate, I work at all the
way into the brush. I press down. You want
those bristles to pick up all the paint and the water
and let it do its job. But when I get over
here to my paper, I'm using more of the
tip so that I have control of staying on that horizon line
for a minute here. Great. Now, I am just going to bring it down here and they're
not everywhere. Just using the tip. And because that
paper is still wet, it's going to
continue to just grow and spread a little bit. Just like we want it to do. And we'll come back
and add to that. But we have a good solid
foundation here for our piece. Let's let this dry
and I'll see you in the next video to place our trunks and get
started on our tree.
4. Tree Trunks & Branches: Welcome back. Alright, we are going to throw in just a few
background tree trunks. And then we'll get started
with our foreground. So I'm just taking some raw umber and I'm
thinning it down quite a bit. And I am using my scrolling
brush, my liner brush. And I'm just going to stay
in this section here. My paper is almost dry. It's still slightly damp,
which is just right. I'm actually hoping that this
will spread a little bit. I'm just going to
add, yes, perfect. I'm just adding a few trunks that are just gonna be
basically like that. They aren't all going
to be straight up, but they're just gonna
be a little more substantial than the ones
that we scratched in, if that makes sense. So again, what we're doing
is building depth and dimension so that
you feel like you're looking back into this forest. So obviously some are
gonna be closer and farther away and that will make them thicker, thinner,
lighter, darker. So you can see the
difference between this section and this section. More dimension and
depth and more to come. But you need to do this while your paper is still
slightly damp. Okay. This one's a little strong. I'm just going to touch it. That one there. Alright, I like that a lot. Let's let this dry. And then we'll come
in with a pencil and outline where our tree
trunks are going to be. Before we lay in
our tree trunks, we are going to do some
splattering for our background. And I like to use my
number four round and you're going to water
down your raw umber paint. It's going to be
quite thin for this. And there are a
number of ways to splatter and probably
no right or wrong. But I feel like you
have the most control. If you hold your brush between your middle
finger and your thumb, flip it over and then you tap
it with your index finger. And for this piece we're
going to want some control. And so that's the way I'm
going to be splattering. And I like to use the number four because it gives
me a nice small dots. If you want larger
dots, that's fine. You'll need to use
a larger brush. And I often will tap
with a tissue while it's still wet because it flattens out the splatter
and lightens them up. We're going to do two
layers of splatter. And I want you to enjoy it and just do what you like to do. Now, I don't know if
you noticed or not, but I did heavier here and here and then much lighter
laddering up here. And now we're going to come
in with our darker when the CPI you still dean at light and watery that
you can see the depth, It's going to add. Alright, now let's
step back and make sure it's just how you want
it before we let that dry. Okay. We're all trying
now and I've gone ahead and placed in the
first three of my trees. I pretty much just start
at the center point of my paper on the horizon line and just bring a
straight line up. And then I just kinda eyeballed, but I would say these are 2 " or one and
three-quarter inches apart. And we want one on
the horizon line, one down a little further, and then one down a little
bit further in the front. And I'm actually going to flip my board to do the other three. You can do them with
me. And I've already placed just I just kinda eyeballed where I
want those to go. And so I'm just going to go ahead and now I'm just going to bring that across and say, okay, that's about
where I want to start and bring
that straight up. And then same with this one. Just about there. Again. I'm not one for exactness, guys. This is art and art is
not exact in my eyes. Not for a piece
like this anyway. So just do what feels good if you would
like to measure it, because that's what
feels good to you, then go for it. That's great. So here we go. Here's our tree trunk. And what I have found
with this piece is it's easy to get sidetracked
by all of the branches. And so I like to just
kinda start with my Y, meaning y, and then
the one at the middle. Or maybe that's a
V in your eyes. And then we will
wing it from there. But it's really helpful to have those first few in place with
a pencil for a guideline, and then we can go from there. So take it that far
with your pencil. And we will come back together
and get started painting. Let's go ahead and get
started with our tree trunks. Now, we're going to take
our scripting brush and our raw umber and
thin that down. And we're just gonna go ahead
and lightly placed that in. I like to just start
with my first line. Now, obviously we don't want tree trunks to be
perfectly straight, but it just helps to
give me a little guide. I'm going to come in
and just kinda wiggle a little a little
too wiggly there. Okay. This one in the back
is going to stop at the horizon line basically. And I'm going to branch off. Now, for branches
on these trees, there is a little bit
of a trick to this. You need to flick your
brush a little bit. So once you start coming up, you're just going to start
wiggling and kind of just flick, flick like that. So there is a little bit of
a trick to doing branches. You've got your trunk that
comes up and your y or your V, and then you don't want
them to look straight. You have to flick your brush
a little bit of wiggle and flick like that so that they
look a little more natural. I would say practice a bit on paper before you go
to your big piece. But if you make
mistake, just quickly, get some water on my brush
and it'll come right off. You can plot that right out. So I'm going to start
out fairly sparse. I'm gonna come over
to my second tree, actually bring up that trunk. Because the sooner I
can have these placed, then the more I can gauge
how many branches to put in. Okay. I'm going to fast-forward the cameras so you
can watch me put the branches in and you can follow along
on your own piece.
5. Tree Leaves: We have all of our branches in. The next thing that we're
going to do is take some of this buff titanium and lay in the foundation
of our leaves. I'm using the number four and we're going to use
a basic pedal stroke. Although I'll be honest and say, once you start putting in
a whole bunch of these, you, you're not going
to be as exact. But a pedal stroke is a
touch press and lift. And let me do one that's darker so you
can actually see it. It's touch, press and lift. And when you have a good brush, it has a nice tip on it. It does the work for you. It gives you a nice
pointy tip on that leaf. And as you lift up it, it ends out the bottom of the leaf for you,
which is great. So we're going to
do this with buff. You're going to want
them to be going in all different directions and kinda fill in that
background of our tree. And I am going to go ahead and fast-forward the camera
for you while I do this. But before I do, I just want to point out that we have a
straight edge across the top and the sides
and we don't want our leaves to be
straight and straight. So let's not lose
sight of the roundness and the shape of our trees as we're
putting in our lives now. Alright, I'm going to stop
the camera and fast-forward it for you and go ahead
and put in our news. Okay, Awesome. How did you do with that? Before we move on to putting
in some darker leaves, I just want to point out
again that we want to make sure we're maintaining
the shape of our tree. So if you look at these, I've got a definite
shape to these trees. And so if you've
lost that shape, it's not too late because these leaves are really going
to fade to the background. It's the next two sets
of leaves that we put in that are really going
to develop that shape. So be aware of it at this
point if you lost your shape. Alright, so we are going
to do the same thing, but we're going to
pick up some raw umber and it's going to be
fairly watered down. So it's not super dark because we are going
to come in after that with our next darker color. And we just wanted to put in to the areas that are shaded. We don't want to do an all over look like we just
did with our buff. We just want it to come in in certain areas just to
kind of emphasize. And so I'm going to be a
little bit more careful and very intentional with what
areas I'm putting them, I'm kind of clustering them. But do you remember
that it's going to dry one value lighter
than it goes on. So don't let that frighten you if for some reason it goes
on dark and you're like, oh no, then just touch
it with your tissue. And you can see that it
lightens it right up. And you can go back in, you know, it wherever you want. So you're in control. It's okay. You'll be fine. So let's
go ahead and do that. I am going to go ahead and
speed up the camera again. And you can follow along with me for this darker
area with raw amber. Okay, Now we're going
to emphasize some of the some of these
areas using our CPL, which is the darker brown. And we're gonna go pretty
sparingly with this. We don't want too much. I tend to use more of
it down here around the tree trunks just because that's usually
more of a shadow area. And again, if it goes on a
little darker than you like, go ahead and touch it with
your tissue and start over. It's perfectly fine to do that. I'm gonna go ahead and speed up the camera now and just add in those shaded areas. And I'll see you
in just a moment. While we let those leaves dry, we're going to use our liner brush and
we're going to pick up this darker sepia and just add some dimension
to our tree trunks. We don't want them too dark, but they look pretty flat right now because all we did
was based them in. Great. Now we've not going to darken any of our
branches, just the trunk. And we are still
going to come in and we're going to darken
some of the foreground, but now we need to wait
until our trunks have dried. So while that's drying, let's get our gold
out and get that reconstituting so that it's workable and we'll get
started on our gold. Alright, For those of you
that are going to be using a metallic gold that
comes in a pan like this. You'll need to put some drops of water or spray some water in and let that
reconstitutes so that it's malleable and
you can use it. It's pretty solid surface and you'll want that nice
and soft to use. For those of you that are
going to be using a brush with me if you've never used it before and let me just
show it to you real quick. It doesn't come with a hook. I put that hook in
it because I like to just punch a hole in the top because it's called sprinkle it because
you actually do sprinkle it. But I'm not going to
sprinkle it today. But typically you would just sprinkle this on your piece
and then spray it with some water and it reconstitutes beautiful
random sprinkling way. Or you can sprinkle it and spray some water and then manipulate it
with your brush. But it comes in a
powder form like this. And I don't like taking the whole lid off
because I'm clumsy. I'm going to spell it. If it can be spilled, you can count on me to do that. So I like to punch a little hole in it and then I just keep
this little hook in it. Or you can put some text in
it and then you're safe. So I'm just going to sprinkle
some of this powder here, and then I'm going to reconstitute
that with some water. Now, why am I doing that? Is because I can control the
consistency of the paint. I, for this piece wanted
to have a texture of gold. You're welcome to
do a smooth goal. That's totally fine. This is your piece
and I want you to enjoy it and love
every bit of it. So do what you want. For me. I want to have a texture. You can even do gold leafing if you would like
for this portion of it. But for today I'm going
to use the sprinkle it and you can see how how thick and texturing and
granular you can keep it. You can also keep adding more and more and more
water and it becomes quite smooth like it was here.
I used it the other day. And so it's whatever
you want it to be. And that's that's the way I'm going to be using it
today and I wanted to introduce that to you
if you haven't had the opportunity to
use this product yet, because it's really fun, it's super fun to work with. And by the way, sprinkle it comes in
all different colors and some really beautiful
iridescent colors. I'm gonna be doing some
dragonflies later this year. And we'll be using some
really funky fun colors. And I don't get paid anything
to say that I dislike to pass along some products that I feel are worth
trying out and using because I'm a teacher and how do you learn if
someone doesn't say, hey, have you ever tried
this product before? So anyway, okay,
reconstitute your gold. And let's go ahead
and get started with our gold addition to the leaves. I can tell you from
experience that the gold will really
get away from you and you end up with this shiny
piece of art and you lose track of what the actual pieces
if you add too much gold. So what I have found the
most success with is to kind of stay in line with the main vertical line
of your tree trunk. And I'm not trying to put individual little
leaves with this. I'm using a side stroke
to just slather on. I guess the, the
term is scrambled to stumble on some of this gold. And then from there, I am going to put a little more delicately here and there on the outer edge and
bring it in a little bit. I'm not going to
bring it all the way down just a little bit. And maybe a little here. It adds a little
bit of shape and definition to the outer
edge of your tree. I'm going to wiggle this
to see if it helps you see better where the shine is. But that's about all the gold. Do you want to add to one tree? I don't know if
you have noticed, but even though I'm following the vertical
line of the trunk, I'm still kind of doing a
zigzag motion with my brush. Alright, kinda stop. Step back. Look at it. The light uniform. I'm going to add a
little bit right there. Alright, let's let that
dry for just a moment.
6. Shadows & Gold Splatter: Well, I hope you enjoyed
working with that gold. It's just the highlight
of this piece and I just have so much fun
every time I do that. We're now going to emphasize
some of the shadow areas of our foreground by
using our large brush again and using some of the CBS. So let's go ahead and pull that brush out water
down some of this. Now, this is dry, so it's gonna go on darker than one way first laid it on
and it was all wet on wet. So keep that in mind. The last thing we're going
to do is we're going to do a touch of splatter
with some gold. If you want. You don't have to
do that, of course. But I do enjoy just a little bit since we have this
beautiful shine up here, I want a touch of that as if some of the
leaves have fallen. But I do want to be
careful to not put any splatter in
this center area. So I'm going to cover
that up with some tissue and just do a tiny bit of splatter down at
the bottom here. Alright, I'm gonna
take my handy tissue. And I'm going to cover the top, the middle of the piece, down to the horizon
line, right there. And I have thin
down my gold paint. Well that wonderful. Alright, I'm going to remove the tape and then we're
going to assign our piece. That is the most
satisfying, isn't it? When you can pull the
tape off, It's so fun. I'm going to fast forward. I hope you took a moment to
go ahead and sign your name. Be really proud of
your work guys, and don't be critical
of yourself. Everything is a
learning process. And just be really excited
about the things that you're producing and
enjoy the journey. Thank you so much for joining
me in doing this project. And I will see you
in the next video. We'll be wrapping up
our project together.
7. Class Project: Your class project is to
complete one painting, this beautiful grove of
trees with gold highlights, and then snap a picture of it
and add it to our gallery. I'll show you the button
that looks like this. That way it will allow me to
make comments on your piece. We can communicate
freely back and forth and even more fun. The students can all
share and comment on each other's pieces
and we can learn and grow and encourage
one another there. If you could please also take just a moment to leave
a review for me, I would really be grateful. It helps me be a better
teacher for you, and it also helps my ratings in the algorithm with
Skillshare folks. I will see you in the next
video for our final wrap-up. But thanks again for
taking this class with me. I really do appreciate it.
8. Congratulations and Bloopers: Well, you did it. Congratulations, you've
completed your project. I am really proud of you and I hope that you're proud of
what you have accomplished. If you could take
just a moment to snap a quick picture and upload that into our student
gallery so that we can all share in the
joy of your piece. I would really be
grateful for that. Find the button that
looks like this, click on that and then
it's really easy to just upload that
picture real quick. Also, if you
wouldn't mind taking just a moment to leave
me a quick review, that would really
helped me a lot and I would appreciate you
doing that for me. In addition to that, if you enjoy being on Instagram, I would love to be part of
your art journey there. I'm it carries Sanders art and we can communicate
there as well. If you know someone that would
enjoy taking this class, then you could click on
the button that looks like this and share that with them, would take them to this class. And did you know that both
you and your friend would benefit financially
from Skillshare. That's pretty cool. Alright, lastly, if you wouldn't mind taking
a look at my website, carry centers aren't dot com. Not only if you're
going to be in town, but if you're curious
about some of my work, what we do here, I would really love
to have you there. And if you would like
to follow me here on Skillshare, that
would be awesome. Then you'll be aware of
what classes I'm teaching. I come out with a
class every couple of weeks and I would love to
have you continue to join me. I so appreciate you being with
me and we will see you in the next Skillshare class
that I guess for now that means it's time for bloopers. Today, we're going
to be working on this monochromatic grove of trees with I have no lights on. And joy success with this piece, you are going to
learn some things like splattering and
wet on wet washes, doing plein air painting as well as indoors
doing a variety of different workshops and doing a variety through good start.
 Kerrie Sanders, Artist, Teacher, Creator.