Transcripts
1. About This Class: Well, hey everyone. Today I have for you the
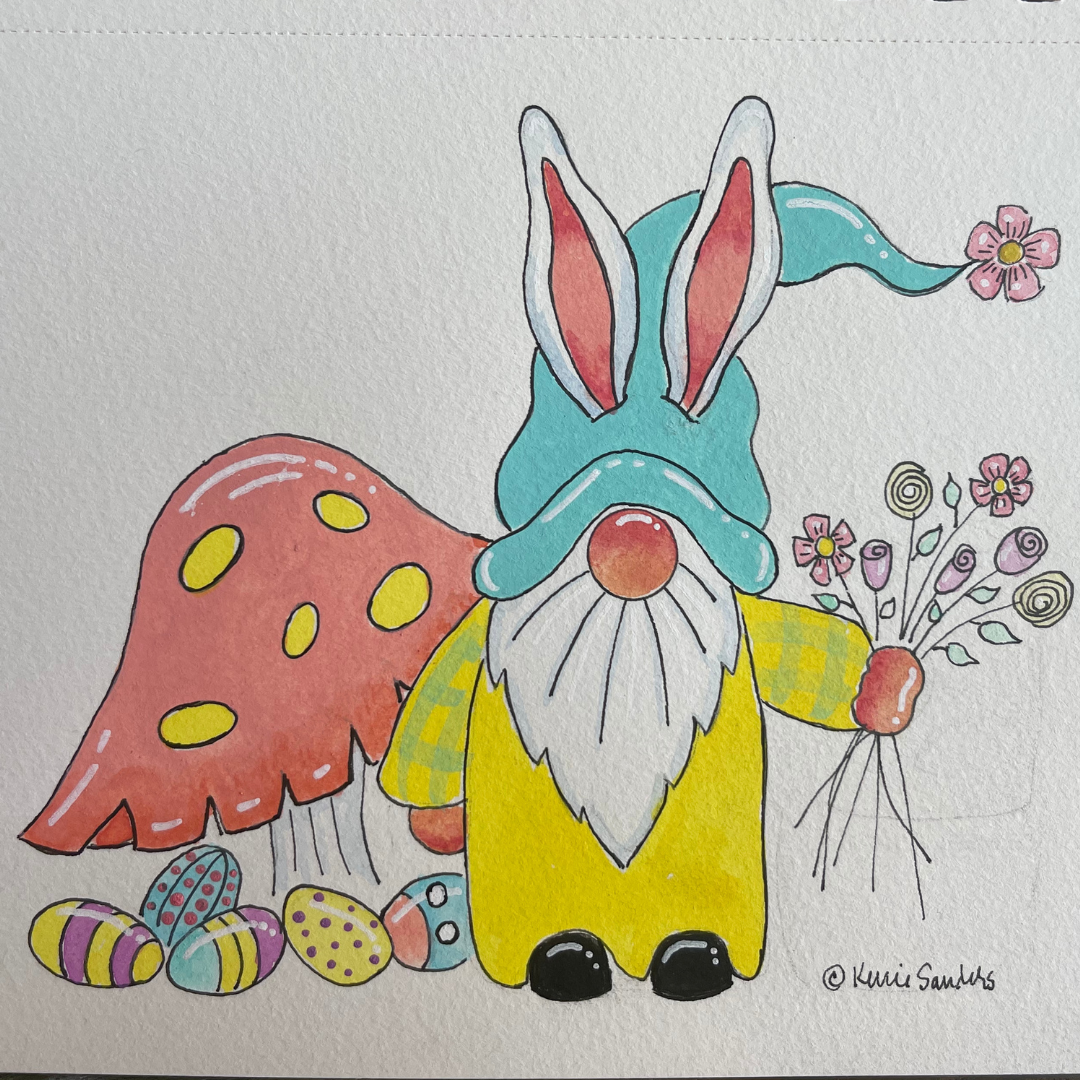
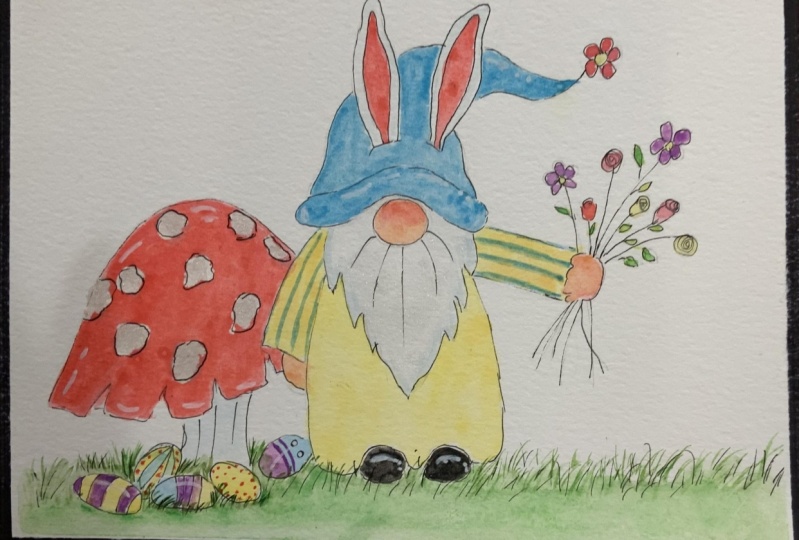
cutest little Easter gnome. He is adorable with his little bunny ears
and a big mushroom. I just wanted to
create something that was fun and relaxing and easy to tackle for someone
of every ability to enjoy. If you've never painted before, you will still have a
great result with this. Just follow my step-by-step
videos and I'll walk you through all the
way beginning to end. You can start and stop
the videos as needed. And for those of
you that are more experienced, he's a cake. You're gonna whiz right
through this one. Wrap your friends, your family, your daughter, your grandmother, and have a pink
project together. This is the perfect piece. I love to share holiday
painting with others. I've had a painting holiday book that was published
across the nation, as well as some
painting packets that were in a big box store
across the nation. It's just my passion and my love of painting that I
want to share with others. And so I would love
to have you join me today on this cute
little known project. If you would like
to join me today, then grab your
supplies and let's head back to my studio
and get started together.
2. Supplies: Thank you so much for joining me on this fun easter
project today. I'm so excited to get started
on this cute little bunny. But first I wanted to give
a quick review of supplies. And really it's very loose. Whatever you want to use at your home is great,
it will work. First, let's talk about paper. I'm going to be using
this Artesia sketch book. It's 140 pound watercolor paper. I always recommend using
140 pound or better because it interacts well with your paint, with the water. And if you're going
to put the effort into a watercolor piece, you want to have a nice outcome. So I highly recommend
that 140 pound or better. I've provided for you on this
page a PDF of the patterns. So if you want to go ahead
and download that and then trace that out on
some tracing paper. And then you can apply that
to your watercolor paper. Oftentimes, I'll just
use a little piece of graphite and you just lay that down on your
watercolor paper. Put your vellum on top
of it and then you can trace the lines
with a pencil. Or I usually use a stylus. It has a round ball tip and it will apply that pattern without
ruining your velum. So you can reuse this pattern, or you could use a
light box as well. So go ahead and apply your pattern to your
watercolor paper. And then as far as
our brushes go today, just use what you have handy. I'm going to be
using a variety of rounds and a liner
brush and a small flat. So just use whatever
you have handy. And of course you're
going to need some handy-dandy
tissue that's a must in every video you deal with me and shop towel
and some water. We are going to
be using a Posca, white fine tip for
our fine detailing. You can also use a
gel pen, of course, or some white gouache, but this will be the
one I'm using today. And then for our paints, I'm going to be
using the series, it's called a pastel
dreams series. I just picked up on
Amazon and I love it has all these beautiful
pastel colors and just a few of my own
as well, and that's okay. But today I'm going to definitely be using
these pastels here. And so this lemon
yellow I added. So feel free to float your boat. Do whenever is fun for you, whatever colors that you like. There's no right or wrong here. It's just a really relaxed piece that we're going to enjoy
doing together today. So go ahead and apply your pattern to your
watercolor paper. And in the next video,
we'll get started.
3. Inking: So now that you've
applied your pattern, I want you to go
ahead and ink that. Let's talk briefly about
inks because you're going to need a fine tip and not all fine tips
are created equally. So you'll need to test that out and see what size you want. This is one of my favorites. It's a Muji, MU J. It's a gel pen. This is also one
of my favorites, it's unit ball and all of
these are called fine tip, but you can see that one is definitely thicker
than another. And so you'll just want to
see what you like best. This is a micron, It's an O3. Also one of my favorites. Guys. The most important
thing is to make sure that it is permanent ink, that it is waterproof. And I'm going to show you why. So this one is not waterproof
and I want you to take a spare piece of paper
and test up before we get started on this piece
because I would hate to see you
have to start over. There were an issue once you have your watercolor
or excuse me, once you have your
inking picked out, then test it out. If you're not a
seasoned painter, test it out and
see what happens. So as you can see, nothing's happening on all
those permanent ones, but get over to my fountain pen. And it's not permanent ink and you can see what would
happen to your patterns. So please make sure that you
are using waterproof ink, permanent ink because
we are going to be inking our piece first and
then painting on top of it. So this is a really
critical step that you test and makes
sure you're good to go. So go ahead and
just go over your, go over your pattern
lines that you applied with whatever tool
you decide to use. And I'll see you
in the next video and we'll start painting.
4. Let's Paint: I'm so excited to get started on this piece is
going to be so cute. Alright, I'm going to take some light pink and get
started on this mushroom. Hi. Alright, we're going
to let that dry. It might need a second coat. We'll see how it looks. But basically that's just
called base coating. And when we just
lay it right in, I don't plan to do any
shading on this piece. And so we can just
move on to the next. I'm still using this number
four and I'm going to pick up some of this minty
bluish greenish. And I'm going to
fill in the hat. Okay. Now you notice that I
went over the line on this brand is hard to avoid that and it's
okay to go over it. When it dries, the line
will show through darker. And if the line is not
dark enough in the end, we can go over it
again with a marker, so don't stress over it. No stressing with this piece
if it's gonna be just fine. Alright, I'm going to do
his gown in lemon yellow. It's a nice creamy
light, yellow. Cad yellow light
would also work. Even though this
is a larger space. I still like using this number four because it has
that sharp tip, and that's what's
allowing me to get into these small spaces. Q. Okay. I'm gonna take some of
the same pink and put it into the center of his ears. Once your piece is dry, take a look at it and see if it has all the same value across. You can see I can, I can see
some brush strokes here. So I'm gonna go ahead and put a second wash on top of this. If yours needs a second wash, go ahead and do that as well. And I'll probably fast-forward the tape so you don't have
to watch me do it again. I'll see you when I have
finished this mushroom. While I have my pink out, I'm gonna go ahead and add a
second coat inside the ears. So if you need that
second coat as well, go ahead and take care of that. And my second coat is always much lighter than
the first meeting. I have a lot more water mixed in with the
paint and on my brush, It's more of a glaze, just a light coat to
even out the values. And I'm gonna go ahead and
do the same for his hat. I'm going to go ahead
and speed up the video. Okay. We need to make something for his nose and his hands. And I don't really
have a skin tone. Maybe you have one. Hello, this is Naples yellow. But by itself, it's too yellow. It's not a great flesh
color by itself. And Lula, this pink to it. That's pretty good.
I want him to have really rosy skin and
we're going to actually come in with some of this cad red light and really
rosy him up a little bit. So let's just go
ahead and put him in. Great. Okay. Let's let that dry
so we don't risk smearing it into
the white beard. Okay guys, we're
gonna put a touch of wash. And when I say wash, I mean a true wash this
time where It's very, very light, 80%
water, 20% paint. I'm using cerulean blue for this because we don't want
this too overpowering anyway. So have your handy-dandy
tissue ready. Because if we need
to dab it off for being too dark, then we will. So I'm just going to put a
little bit up in the top of his ears and that
feels a little dark, so I'll just touch it and then at least a little
residue which is just right. We just want a hint
of a shadow up there. And I'm just going to come down the outer rim of that
year on the bottom. I'm going to leave
that. And then while we have this watered down value of surrealism
blue, test that out. We're going to add some
character to his beard. I'm just going to add
some little stripy trees. I'll probably come in and go over these with the
marker at the end, but I didn't wanna do it first. And maybe this attached along
the outside of that beard. And we're going to stick with this cerulean blue
watered-down value and come under our mushroom cap. And let's add a little shadow here and a couple of stripes. So I did on the sides, underneath and down then
a couple of stripes and I think that's it
for our civilian blue. Okay, so our flesh
should be totally dry. Let's go ahead and
pick up a little bit. You can either do cad
red light or you could do a darker pink,
whatever you have. I'm going to mix it
with a lot of water. So super watered down and pick up a little of that flesh tone, but you can still see a
difference the tone I'm using my paper as well. And we're going to just lightly tap in and I'm
literally tapping up and down. I'm not stroking. I'm not stroking side to side. We're just going to
put a little bit of a give me a little
red nose on top. Now, if you end up with a hard
line for some reason here, you can just rinse your
brush off and lightly tap that bottom edge and it will blend, the
water will blend. That's the beauty of
watercolor and water really works in your
favorites. So nice. I'm gonna do the same
thing up in the ears. Okay? Now while we have this, I'm going to use a
little bit more with this pink that we
used on our mushroom. Do this dark little triangle. This is the underside. That mushroom. Then I'm just going to have a little bit from the
bottom edge here. Okay, Let's fill in
our mushroom cap. I'm going to use some yellow. Let's get started on some of our Easter eggs.
Have fun with it. Just do what ever you want. Okay, we'll let those dry
and put the dots in after.
5. Finish Up Painting: All right, We're
going to take some black and go ahead and put in our shoes. Okay. You'll notice that I
bring this to the camera that I didn't go all the way to the inking
with the black. First of all, it's going
to need a second coat. And secondly, I wanted
to make sure I didn't go into the yellow at
all because you can't really lift
black off of yellow. You won't have a good result. You can always go back
in and add more paint, or you can go in with your marker and fill
in any whitespaces. Cautionary step there to
not go into your yellow. You won't be happy
with the result of trying to lift that off. Okay, let's start to move
over here to the bouquet. I'm going to pick
up a little bit of this darker pink and water
it down. Pretty good. Softening with some water. Great. Alright,
now these flowers, I'm going to do as a true wash, meaning as we did with the
blue, this brilliant blue, it's going to be way
more water than paint. And let's use this
pink for an example, because I'm going to use
this on some flowers. You can see the value. Now if I were just to use paint, it would be dark. But I'm going to use
a wash lots of water. The reason I'm doing
that is because it's a small space and
there is a lot of ink. And so I don't want to have
to try to go back in and ink those lines or I don't want
those lines covered up. So when you come in, if it's too dark, I'm going to show you
a couple of tricks. So first I'm gonna
get it in there. If you need to, you can take You have to
have clean tissue. Let me get something tissue. You can take some clean tissue
and very gently touch it. You can't smell it,
you can't wipe it, you have to just touch it. I want it a little
bit darker than that. So I'm going to come back in. I was just demonstrating a
different method you can do. Let me put this in is to let
your brush be your tool. So you come in with a clean brush and
kinda the same thing, you just touch it, but it leaves a little
more paint on there. And I liked that value
a little bit more, so it's a little more pinky, but it's very see-through. I'm gonna do a
yellow center there. So let's do another one. Alright, let's come put our
second coat of black in. Now, could you do the shoes
entirely with marker? But you would have
a different look. Marker has a sheen to
it and you're pink, comes in with a matte finish. So I wouldn't recommend
it unless you're just super uncomfortable
painting black. All right, Good job. Let's let that dry so we don't take a risk
in smearing it. Okay guys, if your shoes are
dry and everything is dry, then let's go ahead
and pick up some of the minty greenish bluish
that we did for the hat. And for this, I'm going to
use the, the small flat. We're going to add some
plaid to his sleeves. And we're going to do
what's called dry brushing. So you pick up some paint and then basically
you wipe most of it off until it's pretty dry and it just leaves a hint of paint. So this isn't solid washing in or glazing like
we did before. It's dry. But at least it really fun. Look, you're gonna wanna
do a few strokes on your paper to start
getting that dry look. And then we're just
going to bring over. Now notice I'm also curving
knees slightly always follow the contour of whatever
it is you're painting. Good job. Let's let that dry.
6. Details and Highlights: I'm so excited, we
are almost finished. You guys. I hope this has been fun
and relaxing for you. We are going to just take
our marker or your pen, whatever it is that you
inked him in width. And if you have any
areas like I need to do this hat brim that have been
overrun with the paint, then this is a great
time to go over that. And to strengthen your lines. Don't go over the whole piece. There's no need to do that. I'm going to speed up the
video so you can follow along and go ahead and
eat your piece as well. I've got my white Posca here, and we're going to do
our white highlights. Then at the end, we'll go ahead and add
the dots on our eggs and make sure that we've
finished up everything that way. Anytime you add dots, it takes longer to dry. So I wanted to do
those very last. I'm just going to be adding some white highlights
here and there. I'm just going to test this
out and make sure that we're I'm just going to add
little highlights. I'm not gonna get
too carried away, but just kinda do them. Now. The mood strikes, it just
adds a little sparkle. I think. I think I'm done with the white. Just go wherever you want
to go with your weight. I'm gonna be using the
stylus to make my dots. You can also use the
sharp end of your brush. It's the same thing. I'm just going to
dip in and touch. Alright, Let's let
that dry and dots take a long time to dry. They'll dry on the surface, but because they're deep, you can smear them easily. So be very careful with your
dots for a few minutes here. Alrighty guys, I think
we're finished here. B string that you take the
time to sign your name. Every art work that you do is unique and wonderful to you. And you should always be
proud of what you do. I'm very proud of you, and I really
appreciate you taking the time to do this fun
little piece with me. I always recommend that you step back 6 ft and take a look at it. Just kinda prop it up
and take a look at it. See if you missed any spots, anything that you
needed to go back in and tweak before you finish and then
signed her name and enjoy your Easter peace. I will see you in the next
video for our wrap-up. And thanks again for joining me. I hope you had fun with this.
7. Class Project : Your class project
is to complete one cute little Eastern home by following all the
videos step-by-step. And I will take you through
it from beginning to end. And after you've finished, if you could snap a
picture and upload it into our class gallery
for all of us to share. That would be really awesome. You and I could
communicate there, I can take a peek and
give me some critique and mostly give you kudos
and tell you, thank you. If you could look for the green button that
says Create Project, it's easy to click on that and that will let you
upload your photo.
8. Thanks and Congratulations: Congratulations on finishing your cute
little Easter Bunny. I hope you've had a
great time doing it. And if you know someone
else that you would like to invite to share
this project with, all you have to do is
click the Share button and both you and your friend would benefit financially
from Skillshare, which is pretty cool. Also, if you would like to
communicate freely with me, we can find each other on Instagram at carries
standard art. Or you could upload
your pick here on our gallery and I can
communicate with you there. All you have to do is click on the green Create Project button. And that will allow us
to talk freely there. If you'd like to
see what's going on in my world here in St. George, or see some
of my profile. You can find me at Terry
centers aren't dot com and that will take
you to my website. And I'd love to have you take the work and more importantly, love to have you come to St. George some time
and work with this. Also, if you wouldn't mind, take the moment to just leave
me a quick review. I would be so
appreciative of bad. It really helps with
the Skillshare folks. It helps me know how I
can be a better teacher. And I hope you'll
take a moment to look at some of the other
classes that I have. This is the one I most recently published, it's
watercolor techniques. But we learn as we go. So as you learn a technique, you've placed it here
on your art piece. And by the end of the class, you have this beautiful
floral design and you've learned some wonderful
watercolor techniques. Alright guys. Until next time. See you later.
 Kerrie Sanders, Artist, Teacher, Creator.