Transcripts
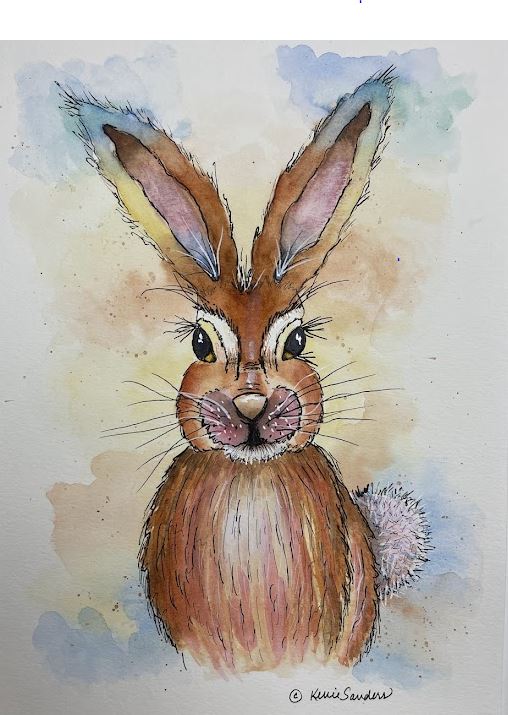
1. Welcome: Hi everyone. My name is Carrie Sanders
and I'm an artist, a teacher in a creative. And if you've taken
any of my classes, you may have noticed
that I love to teach. I really love
teaching beginners. I take you through my
videos step-by-step, explaining everything
clearly and concisely. And the videos are close up and you have the ability
to stop and start them as you need to review
them over and over as you clarify and absorb and learn the steps
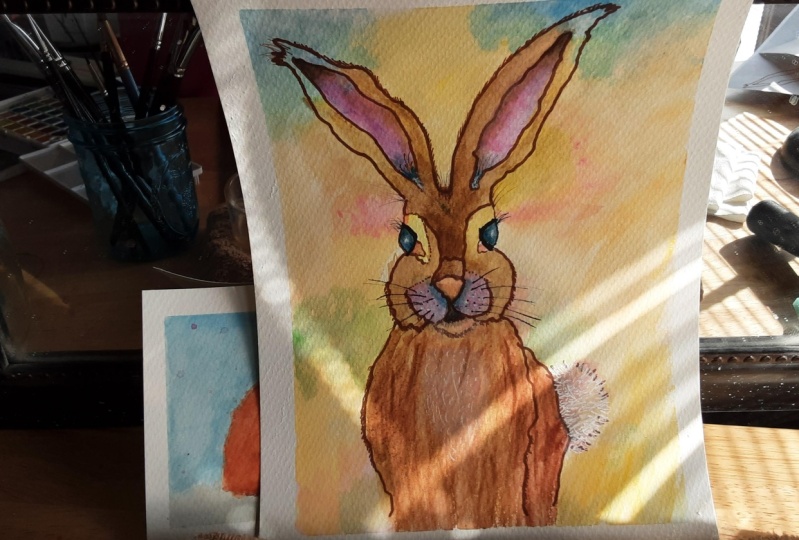
that we're viewing. Today's project is
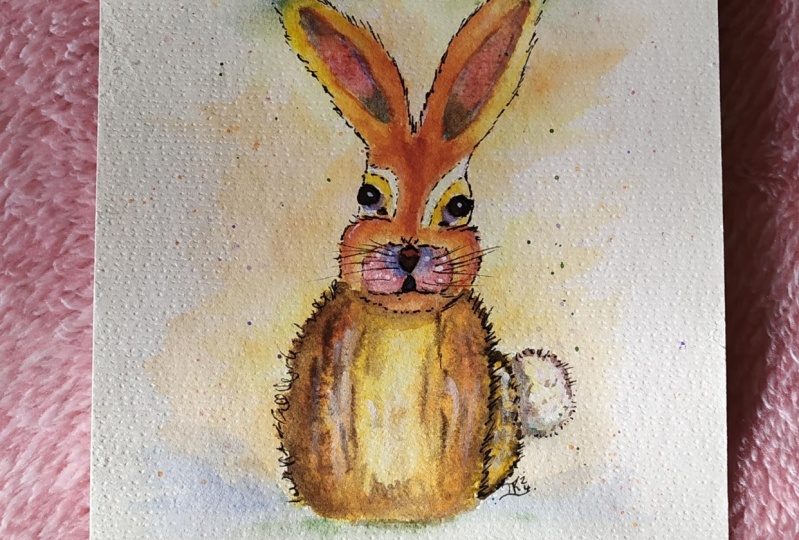
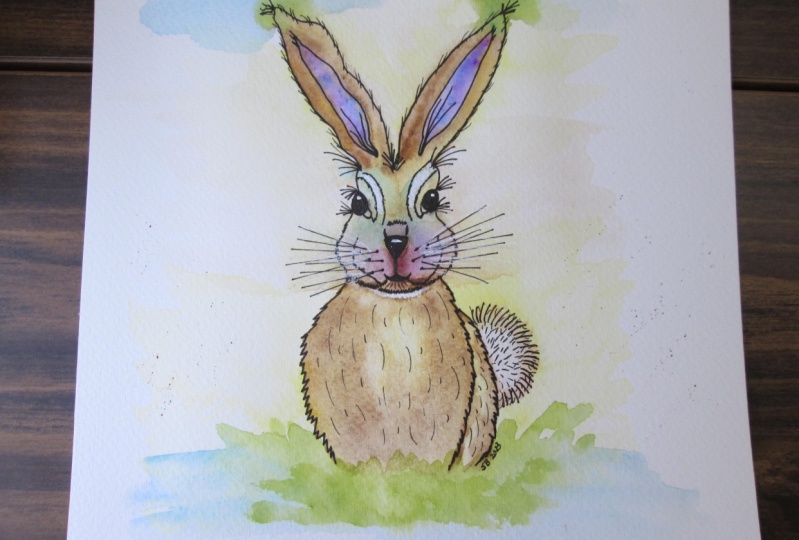
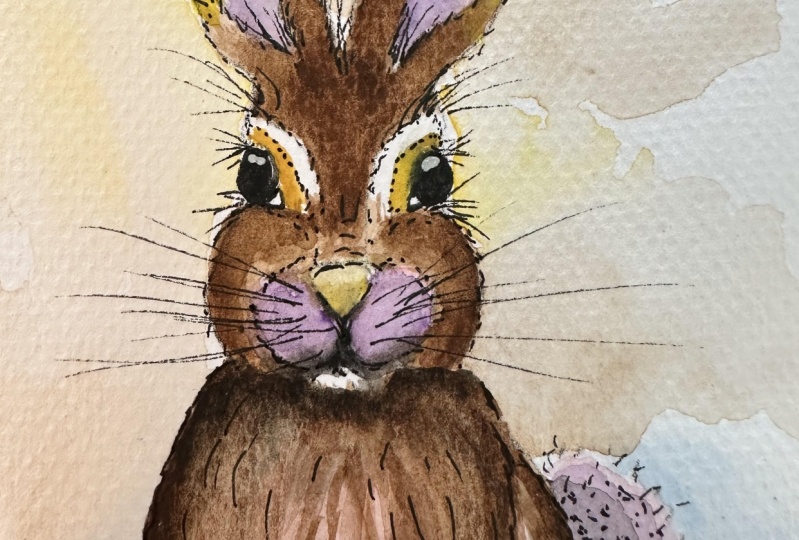
an adorable, funny, because every time I look out my window or I step outside, there are multiple rabbits
in my art all the time. And I think they are
so fun to watch. But it was a great
opportunity to teach wet on wet technique. The entire project is done
with wet on wet technique, along with some inky
for definition. It's a great project to help us understand how
to work with water and paint and paper and which
brush to use is a big one. Is it a little teeny
ones to noodle width? And once you learn
this technique, you realize that
although you don't have control over watercolor, what you have control over
is the ability to anticipate what's going to happen because you experienced it enough
times you've learned it. And so this class is
going to teach you how to work with the wet
on wet technique. Have a beautiful outcome and something fun and Florida
like this cute little bunny, but they're always
hopping around my yard. I have done some baby animals that have gone in my
grandchildren's nurseries. And this is a perfect
addition to that collection. I rent a studio here
in St. George, Utah. And we do outdoor workshops, urban sketching,
plein air painting. And I would love
for you to check us out at Kerry centers
aren't dot com. And if you're ever
in our neck of the woods, come and join us. I've had the privilege of having a painting
book, published, incentive customization, as
well as painting packets. Always love to teach and
enjoy sharing with others. So if this looks fun for you, if you feel like
you could benefit from learning wet
on wet technique, then grab your paints and
let's get started together.
2. Class Project: Well, hey everyone. Your class project today is to calculate one
cute little bunny. And all you need to do is follow the videos I've provided
for you step-by-step. I'll take you through
it from beginning to end and you have the
ability to stop and start as often as you need to review certain techniques
or certain processes, as you need to go along the way. If you wouldn't mind once
you've finished that, just snap a picture with your cell phone and then
look for this button. It's on the page. Create project. And that will
show you real quickly how to upload a picture of your completed
project in the gallery. And we still fun for us
to see what you're doing. And it's also a great place for us to communicate
back and forth. You can ask me questions and I can comment on your
beautiful piece of art. So thanks again for
taking this class with me and I look forward to seeing
your completed projects.
3. Supplies: Hi everyone. I know we're anxious to get
painting, but before we do, let's do a quick review of our supplies and gather them together so that once
you start painting, you have everything you need
right at your fingertips. So today, I have provided for
you the PDF of the pattern and you can just print
that off and copy it onto some vellum or
some tracing paper. And if you have some
graphite paper, then you just slide that underneath and you can
apply that pattern. I'll show you how to do it. My next chapter. I always apply using
a stylus rather than a pencil so that my pattern is preserved and I can use it
over and over if I want to. But you can go ahead
and just use a pencil. If you don't have a stylus, just know that it's
going to put obviously a pencil line on your pattern and that's
okay, that's fine too. So I'm going to be using some good-quality
watercolor paper today. I always use 140
pound or better, and I highly recommend if
you can splurge in one area, watercolor paper is always
the best place to do that. It's going to interact
well with your water, your paints, your brushes, and do what it's supposed
to do with expanding and contracting and
absorbing that water. And you will get the
best results if you have a good watercolor paper. As far as brushes go today, I'm going to be using
a variety of rounds. I'm actually not going to
be using any slats today. So I would say pick
up a variety of your favorites and have
those handy to use. I have large ones as
well as small ones. You will be using a
liner brush for sure. And then some of these bigger
ones for the background. I always recommend
my favorite tool, a handy-dandy role of tissue will be using this a lot today. We'll be doing this whole
piece is wet on wet, so we will need a lot of tissue. Obviously, we're going
to need some water and some towels
and whatnot handy. So let's review our palate. Since we look at the
palate and these colors are a little bit deceiving
when they're dry. So I went ahead and
painted a palette for you. We're going to be using gamboge, but just the tiniest
bit for his eyes. So you can definitely substitute this for something
else if you want. We're going to be
using Naples, yellow, burnt sienna, burnt
umber, CPR, forest green, civilian blue, cobalt blue, and violet, cobalt,
Alizarin crimson. And I loved this potters pink, It's kind of a brownish
pink and it's gonna go really well with his firm. Now, I went through
these really fast. And obviously I have these
listed on the supplies, sheep, that's another PDF
that's on this page you can download and referred to. And again, you can go ahead and substitute these colors
for what you have. If you take a look
at the piece here, it's it's a blend because
we're doing the wet on wet. It's a blend of a lot
of different colors. So there's a lot of flexibility
here for you to be free. I would say just makes sure that you test out your substitutions on some test watercolor paper so that you make sure that
they work well together. And as a side note, I always use strips of paper that are made
up of boo-boos. So if I start something, you can see this is a
rabbit that I actually started and I didn't like that. I just take that paper
rather than ruin it, rather than just toss it away. I slice it up and those
become my test strips. And so I make good
use of that paper. Alright. We will also be needing
some bleed proof white or some whitewash. And for inking today, I'm going to be using both
the uni-ball fine tip, which puts out a line
about this line here. I'll be using the
micron double up five, which is a much finer line. Let me bring these
up to the camera. I'm gonna be using this thicker
line in areas like it's eyelashes and some of the hairs is whiskers that I want
to be darker and thicker. And I'll be using this finer tip for some of the lighter areas. So I'll be using both of those. So go ahead and gather
all your supplies, guys. And in the next video, we'll get started
painting together.
4. Wash Part 1: All right, Before we get
started on our bunny, for those of you
that are beginners. And even if you are really
familiar with wet on wet, there's always different types of wet on wet, so to speak. So we are going to be getting our paper wet first,
but not saturated. Meaning we don't
want it pedaling, we don't want cauliflower or
blooms forming on our bunny. Those are great for landscapes or oceans and skies and
different types of things. But for this piece, we
just want a dull shine. And once you, let's say
you get it too wet, you can blot it off with
your tissue or you can wait for the paper to
absorb that extra moisture. And then you're going
to pick up some paint and you're going to either dotted in or you're
going to stroke it in. And then the important thing, and probably the hardest
thing guys, is to wait. You have to allow
time to pass for the watercolor to do its thing with the water and the paper. And it will continue to blossom out for an amount of time, which is what you want it to do. You don't want to rush that process because we will be adding
other colors to it. Let's say we want
to blend some blue on top of that violet cobalt. And again, you have to
let that blue sit and blend and melt into your violet. And that's the beauty of
wet on wet as you get these gorgeous soft blends. So this is more of a
stroke on top of another. This is more of dabbing in and we're gonna
do some of both. And so I would
recommend that you just test it out again on your
scrap of water paper, watercolor paper, and
get comfortable with it. But this is a great exercise
for us to learn and grow and develop our skills and talents with wet
on wet technique. And so let's go ahead and
get started with our piece. Always with watercolor, we
start light and go dark. And so I'm going to pick up
some of this gorgeous Naples yellow and just work
it into my brush. This is a nice wash. Probably 60, 40, 60%
water, 40% paint. And I'm going to do wet
on dry for just a moment. I wanted to just get a feel. Just going to do the
outer edge of this year. That feels pretty good. I'm
gonna go ahead and just take a wet brush and go over that. And yes, I'm going
to pull that out, kinda shake my hand a little
bit and pull that out. Now, if you got a hard edge, I didn't, but I'll
show you anyway. You can either soften it with
just water on your brush or you can take your handy-dandy tissue
and soften it that way. So let's go ahead and
again on the other side. Take some water on your brush
it out. Is that a word? Great. Okay. So I'm going to go ahead and just do
different areas on the body and you
can follow along Let's let that dry. Okay, it's pretty dry
up around the ears this time we are gonna
do a true wet on wet. I'm just going to
get the inner ear. Wet. Paint is going to travel
wherever the water is. So if I don't go on the
outer edge of the ear, the paint won't go there either. I'm going to add just a
touch of this cobalt violet. Little goes a long
way on this one. So I like to have this little
pink on the inner ear. Alright, How are
you doing there? While that's drying? This is pretty dry now, so I'm gonna go ahead and
just a little bit of water. Just water right here. While that's still wet
because of this burnt sienna. Just a moment. Let the water do. Nice. Wow, that's blend nicely. Okay, so let's finish the
outer portion of these ears. This is just water on my brush. I'm just bringing that burnt
sienna up a little bit. At the top. This darker blue. Yes, I love cobalt blue,
such a pretty color. We aren't using a lot
of it in this piece, but just a little, little zip, zip, zip it out. It's scary. I now
just go for it. And then I'm just going to soften those
edges with my tissue. And while it's still wet, I'm going to pick up some
of this forest green. You could use it fallow green. You just want a nice blue-green and I'm just going to touch it. Watch that go. Just
on the very tip. Then if you want,
you can blend some out into the background. We're doing guys as we paint
along and we pull it out. When we pull it out is we're
forming the background to our piece in a very
natural smooth way. Love it, love it, love it. I'm going to add a
little burnt sienna. Careful when you
touch your browns and your blues together because
what does brown and blue together make gray. So be very careful if you just let it naturally
collide with the water. It takes care of that
process for you. Alright, I'm going to strengthen
my Naples yellow here. Because this is a
highlighted area. I feel anyway, I like that outside edge of his ear
to be a little bit lighter. I am going to bring up just a little of the sienna
on the bottom. And you can see it
just touched it. It just blends in by itself. Let's get a really watery mix. 70, 30, 70 water. I kinda bring some out. Be careful with it. That's a strong one. Go gently. Take a deep breath. We have finished an
ear that looks great. If we want to after it's dry, we can come and strengthen the inner ear with
a little more peak, which I probably will do. It's feeling a little soft. Let's let that dry and we'll
move over to the other ear.
5. Wash Part 2: Okay, Now this ear doesn't
have to just match guys, but, but I tried to do
something fairly similar. So first I'm just getting
the outer ear wet. I'm going to come
in with some of this beautiful burnt umber. Reddish brown, isn't it? That's why it works so
well with burnt sienna. I'm just pointing it
out a little bit. Oh, I like that. Alright. And I'm going to add just a
touch of the forest green. I'm the very tip. This
is going to literally drop it in on just touch
it and let that blend. But I am going to use
some out down here. Let's bring up some
of our browns. And then I'm going to bring out some burnt sienna
into our background. Big deep breath. All right, good job everyone. Hey, before we leave the ear, we need to put a little
background in here. So I'm just going to bring out a little bit of this umber, but it's gonna be
very watered down. Okay, Let's let that
dry for a moment. Okay. So I'm just going to wet his muzzle a little
bit and I'm going to be pretty careful to
not go into his nose or into his cheeks. That blend for just a minute. Right. And while that's still wet, now that it's kind of blended
out where we want it to go, I'm going to add some of this
darker blue, cobalt blue. Touch closer to the inside edge. A little shadow
underneath the nose. Giving that a minute. Blend. I'm going to soften these edges. This is going to be
blackened by our marker. And I'm okay with the way. Actually I'm going to add
maybe just a hint of brown. This is dry his bottom lip. You buddies up what? I'm going to add just a hint. Naples yellow area
just above the eye. But I am going to leave
this part white for now. But I'm gonna come in
and darken this here. Well, it's what we're
working on the head. I'm going to pick up a
little of this member, maybe more of a 5050. And since it's dry, it's
going to go on darker. Don't be worried. Water on my brush. Alright, I've basically got to start over with
this shadow because it lifted off instead
of putting it online because I rushed it. So if yours is fine, leave it. If you're like me
and need to repair. That's okay. I'm
actually glad it happened because that shows
you that you can fix things. I'm just going to pick up
some of this cobalt blue. Back in This town. I'll be patient.
Let it sit here. Alright. And I'm going to put in some of this dark sepia just right here. So let me get an idea of this mouth is going to
be closed in with ink. Don't go up into
your blue already. Great. Same thing with I pick
up this dark sepia. I'm going to make some
cobalt blue with my son. The blue brown
sepia can go quite flat and granular punch to it
6. Wash Part 3 : I'm going to switch to a larger, this is a ten round. It does have a pretty
sharp tip on it though. And some water down. Alright, I'm gonna start with some foreign aid. All right. I wanted to have just more
of a light chest right here, so I pull some out. But go ahead and just add
those streaks of burnt umber. Soften the edge. Alright, and then let's put
in a little bit of red dirt. And here's where I'm making
shorter strokes more. What do you indicate for pretty much leaving
that center part alone. Blend it with some water. My nose is dry. How about yours? If it is, let's go ahead and I'm going to come
back to a smaller brush. I'm going to use
my number for now. I'm just going to noodle it
a little. I like to say. So that's why I'm
using a small brush so that I have a
little more control. I'm going to let that
dry and then we'll come in with that Alizarin
crimson again. While that's drying, let's come back to the rest of our bunny. You some water. We're going
to keep it off the tail guys. Give that a minute. Alright. Yeah. Moodle that a little bit. While this is drying, I'm going to come
back up here and grab a little bit of
that Alizarin crimson. I'm going to take some
more of this burnt sienna. Let's kind of an
extension from here down. Just gives a little curvature
to his cute little mouse. While we're up here, Let's
go ahead and do the eye. I'm using gamboge. Switch to a medium-size
with a fine tip. This is a six. And I'm coming to the tail now. And I'm going to add just the slightest
amount of this pink. Don't go crazy. This is probably a
9010, 90% water. Test it out first. Let it dry a little bit. I'm going to pick up some
of this Potter pink, brownish pink and put
it closer to the body. Notice I bounced. I don't put a straight line still going to bleed
because it's wet on wet. But I don't want
a straight line. I want I want it to look bushy. Now. We can add just a
touch of the amber. Again, this is probably
9010, 90% water. Let's let that dry
7. Wash Part 4: Okay. I've switched again. This has a number eight, has a tip on it. Because it's time to, I highly recommend
that you step back 6 ft. Take a look at your bunny and see where you need to add depth and dimension. And so this is where
I'm going to go from the tip of his ears down
to his missing feet. And I'm going to
see where I need to add more to deepen the
shadows of his fur. And of course we
need to still add pink and we need to
finish his muzzle. And a lot of this is just
going to be wet on dry. And then I will soften the edges because I don't want to do a total wet
on wet again at this point. Okay. I am going to pick
up a little bit of this burnt umber now. Very lightly. And I'm just going
to soften this. Don't overwork it. Nice. Now the body is dry, so it's a good time for us
to come in and just pick up a little bit of
this cobalt violet. Again, very watery. Test it out. Just
a little spice, you know, just add a
little bit of color. It's going to tie in
the tail and the ears. Muzzle. Looking pretty good. I am going to put just a touch of blue, something with a more fine too. I'm just going to indicate little hairs go in all
different directions. They are going to dry super light and fade
into the background. But you know what, it adds depth and dimension and will be an important part to the success of that
fluffy little tail. We'll take a look from 6 ft. Stepping back, I can
see that I need to put that second coat
on his eyeballs. So I'm just going to pick up the sepia mixed with a
tiny amount of blue. Alright, and getting
out some white gouache. There are a couple of
places that I want to do a light wash of the gouache. And that means I'm
going to water it down. We'll just gouache
dries lighter, just like watercolor does. So I would say this
is probably a 60, 40 water to paint ratio. Test it out. I was
testing it out, going over another color
so I can actually see it. And I'm going to
just a teeny bit on the chest and then I'm just
going to soften the edge. I don't want to
work with my brush. I'm just going to soften
the edge with my tissue. I'm going to water it down
a little bit again and put the smallest amount on the
outer edge of his muzzle. And it's kinda scary at
first because you're like, Oh my gosh, what just happened? And then maybe, maybe just a smidge insight
right on the pink. Where you want it to look.
That's soft, fuzzy pink here. If for some reason you
overdid it with your blue, you can put some on the tail. I'm okay. So I'm going
to leave it alone. But if you needed to just put a little wash with
the gouache over it, and that'll be totally fine. Alright, this is drying now and I'm liking
what I'm seeing. We're going to put some white
for over the top of that. And this is great. Okay,
we're looking good. Let's let this dry. While it's drying. We can go ahead and put in
some more of our background. And then we will income
will be finished
8. Wash Part 5: Okay. I've switched to a
pretty large round. This is a that's worn off. So it's probably a ten. But instead of a pointy top, it has kind of a roundish top, which I'm going to use
for this background here. So I'm just gonna go ahead and lay in a little bit of water to make it easy for movement. And then guys, you can use
whatever colors you want. I'm going to lay in a
little bit of blue because we've got so much
blue in this tail. Well, I'm not going to blend the two because the gray spot, I'm just putting a
little bit of blue down here to anchor it. So we've got our
blues top and bottom. Okay, make sure you're
stepping back and looking at it from a distance. I stepped back 6 ft and took a good look and finished
out the background, making it a little
stronger here and there and balancing and out. So you do the same. And also looking at the penny, I made it the way
that I wanted to just added a little deeper shading
in the ears with you. I did add a little bit
more white gouache. This is still wet right here on the outer edge of his muzzle. I just wanted it a
little bit lighter on the very far edge. And now what we're going to do is a little bit of splatter and not much, but just a little. And then we'll do
our inking together. I'm going to use, well probably this number four. And I'm going to use burnt umber and will water
this down quite a bit. Alright, so we're
just going to do a few splatters,
not a whole lot. And I don't really want
them on the bunny too much. If you smear something
that you don't like, just touch it with water. When you press the
splattering like that, it lightens it up obviously, and it flattens those dots out so that they're
not so strong. I like to do that
sometimes when I want it to be quite subtle. I think that's enough
splattering for me. You can do as much or as little as you want you can
get with the brown, you can get with the blue, whatever colors that you want. So now I think we
are ready to go ahead and do our black inking, followed by our white details.
9. Final Ink and Details: Once your splattering
is completely dry, then we're good to go. I'm going to start
with the unit ball, which is the thicker line, as you can see there. And I'm going to
speed up the camera. And basically I'm going to do a lot of
detail on his face. We're going to be
the eyelashes and eyebrows and the
muzzle, the whiskers. And maybe a little stronger here and there on the
ears and the body. And then we'll come
in with the micron, the double lot five and
add in some fine hairs. So let's go ahead and get started with that.
This is exciting. This is where it really
comes together, guys. I stepped back and took
a close look one more time and never hurts to do it one more time, one more time. And a couple of things that
I wanted you to know I did and I'm still
doing is first of all, I reshaped the eyes just a little bit because one
was bigger than the other. So just did that with my ink. And then I took some of the
darker blue and I just added a little bit right in the hollow of the ears right there,
that cobalt blue. And now I'm just
taking a little bit of the sepia and maybe just mixing in a little
bit of that burnt umber. Just touching the hollow of
the ears on the very tip. I'm just trying to sync
those in a little bit. I want it to look like
they go back a little, so just touching it with some water here
to soften the edge. I don't wanna go too
far into the pink. I think I'll leave it
right there actually. Okay. So I think I am good to go here. I'm going to let that dry. And then I'm going to pull
out my bleed proof white. This is Dr. Phil Martin, Dr. Ph Martin's
bleed proof white. And I'm going to use a fine script liner
and the white details, and then we'll be finished. I actually went ahead and put that sepia up here in
the tips of his ears. And then I also added
just a little bit of stroking here
underneath his neck. And maybe here and there
just to let you know. Again, make it how
you want it to be. It's your peace and be
happy and free with it. Alright. I'm going to go ahead and pick up
some of this white. Now, you'll notice
I'm rolling it between my thumb and
my index finger. And as I do that, I lift it to a fine tip. That just gives me
a nice fine tip on my brush and it feels
a little thick. So I'm going to turn
that down just a tad. Now, I'm using this instead of gouache because it is stronger, so be careful with it. If you're using this. Gouache will dry a shade
lighter and this will not. Making this a little bit like I'm just kinda going
up and down a little. Now, don't do as many
white ones as we did black or just highlighting it says if there are still black but the light is catching them. Let's bring in some little hairs down beyond the ink line. Then definitely want
to add some white for especially in
this highlighted area that we left kind of light. And then the tail
definitely we want to do. Now. You're going
to want to pull out not in because
where you touch it, it's going to be thicker. And you want it to be nice and thin where it pulls
out away from the body or out
away from the tail. Go all different directions. Keep them short. Alright, I'm going to
step back and look at it from 6 ft back and see if there's anywhere else
I need to highlight. I don't feel like I need
to highlight anywhere, but I just want to add a few more hairs for I don't know what
you want to call it. Wait. Aren't rabbits
called hairs? Anyway? I just felt like it
was a little sparse. Alright, step back, guys and see how you feel about yours. Is there anywhere
else that you want to emphasize with your ink
or you're highlighting. This is a great time to do that. I'm just going to females
down a little bit. Once you feel good about it, go ahead and sign your name. That's so important with any piece of artwork
that you do. I'm so proud of you for finishing this piece
and I hope that you enjoyed it and learned something about wet
on wet technique. And this is such a
fun little piece that would go great in any child's bedroom, a nursery. Or if you just plain
love bunnies that have fun with this piece and put it anywhere that you want. Thank you for taking
this class with me. I really do appreciate it and I will see you in the
next chapter to wrap up
10. Congrats and Bloopers: Hey, congratulations, you
have finished your rabbit. You have worked with
wet on wet technique for all of these
chapters now and I hope that you feel accomplished and that you've learned
something and can now anticipate what that water and paint are going
to do together. And the more you
practice this technique, more comfortable you'll be
with it and it's going to benefit you in all of
your future art projects. If you feel like this has been a beneficial class
for you and you know, someone else that
would enjoy taking it, then would you mind
sharing it with them? All you need to do is
click on this button, which is found on this page. And then actually both you and your friend will benefit
financially from Skillshare. Where does a pretty cool thing. Also, if you wouldn't
mind leaving a review. And that will help other
potential students understand what this
class is about. Who will also help
me as a teacher understand how I can improve. And I would really
appreciate you taking a moment just to do that. If you would like to
communicate with me, I would love that. And the best way to do that
is through our class gallery, which is below on this page. All you need to do is click on this button, Create Project. Snap a picture of
your project and upload that it doesn't
take much time. And then New and I can
communicate easily. There is a great place. Also, if you're interested in learning what we do
here in St. George, Utah, so beautiful and we'd
love to have you join us. Or if you're just interested
in taking a peek at more of my portfolio and what I do
here in studio on my own. You can take a look at my
website, very Sanders art.com. Also on instead
Gary Sanders part. I posted behind me several of my most
recent classes because I just finished up a three-part aquatic
series for this summer. If you're interested in taking the ocean wave or tropical fish, are doing some urban sketching
with this lighthouse. For these flowers are great for beginners
because they teach a lot of the techniques you need to do is
type in my name, in Skillshare and
all my classes will populate there and
I would love to have you join me
for more classes. Okay, guys, I'm going
to lead to go for now. I guess that means it's
time for Wilbur's. Don't hold it against
me. Bye for now. Take care to do is look for this Create button
that I'm showing you here. I'm dropping this. I'm
not saying it right. A nice home in your house or your grandkids house or
your daughter's house, whoever whoever wherever
it is thrown by the home. And I'm so blessed every
time I walk outside, I am surrounded by wildlife. There are bunnies and rabbits. Is that the same thing? Buddies and rabbits? Oh yeah. It's good thing I
can laugh at myself.
 Kerrie Sanders, Artist, Teacher, Creator.