Transcripts
1. Welcome: Well, hi, everyone. My
name is Carrie Sanders, and I'm an artist, a teacher, and a creative here in Utah. I'm coming to you from my new
studio up in Northern Utah. I just moved to be closer to my grandes so that I can have
some fun time with them. And today, I'm excited to share with you
this new piece that I've created of some cute
sheep. It's springtime. It's starting to feel warm
and wonderful outside, and what better time to do something that's really
creative and colorful. We are going to learn how
to play with colors today. We're also going to learn how
to do wet on wet technique and splattering both with
water and with paint. And they do two completely
opposite things. We're going to learn textures. We're going to learn
how to do inking. We'll do a little bit of
contour line drawing. There's something in
here. For everyone. And it's a piece that you
can just relax and enjoy, as you learn, have
a great experience because you really
can't go wrong. I've had a wonderful
life of teaching art. I've been teaching
since I was 19. That was a long time ago. And I had the wonderful
experience of having a book published a painting book published that went
across the nation, along with pattern packets that went out across the nation. I've had award winning art, and I've just really enjoyed the experience along the way of sharing the love
of art with others. That truly brings me joy. And so I'm so happy that
you're here with me today. Let's grab your paints
and let's get started on this piece and give you some fun ideas and techniques and get your creativity flowing. And this is something
that you can take with you and build on through your art path throughout the
rest of your life. I hope that you will
take a moment to click that follow button
and follow me so that you can be notified when
I have a new class and we can continue to take
this art journey together. I truly do appreciate
your time spent with me, let's go ahead and grab your
supplies and get started.
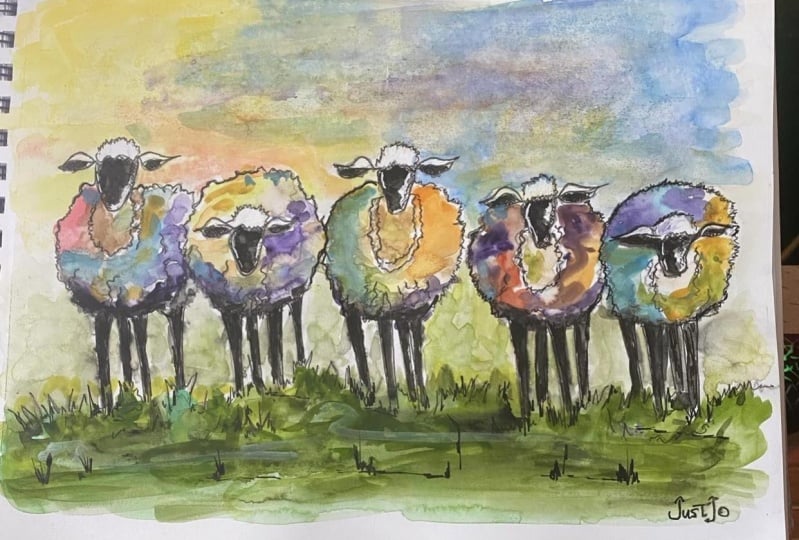
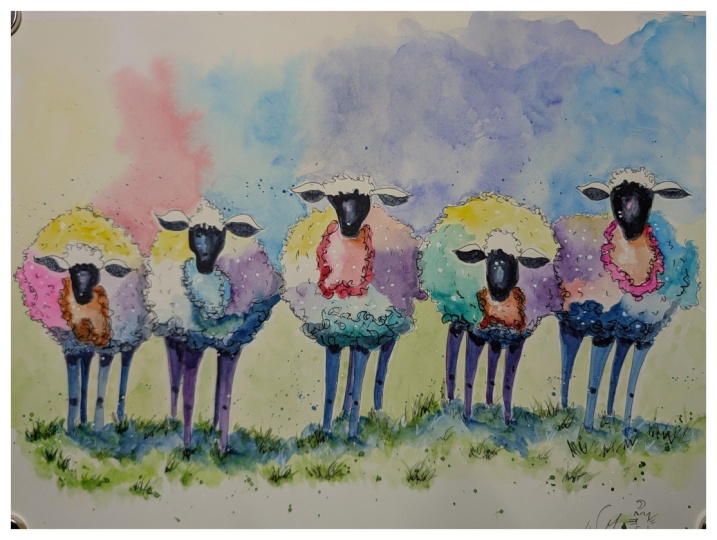
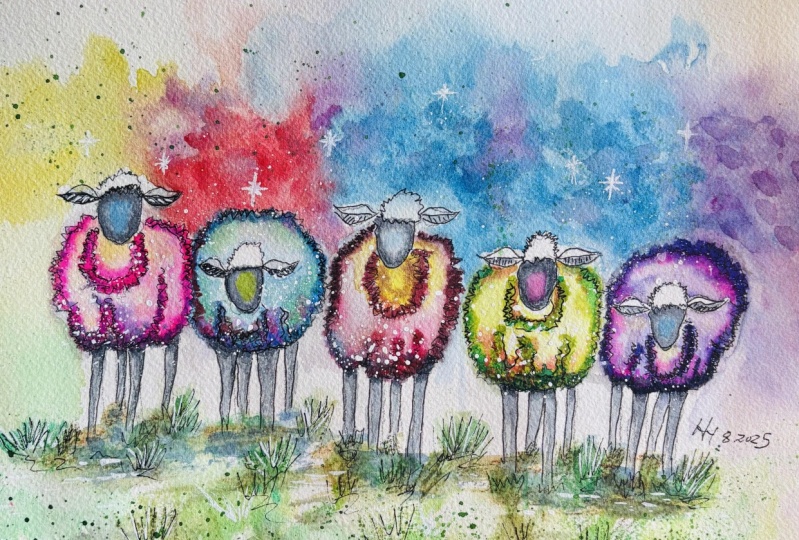
2. Project: Okay, fellow artists. You class project is to complete one painting
of a flock of sheep. But more importantly,
as you're doing it, as you are experiencing this, I want you to be creative and feel creative and
think things through. I want you to make choices, and I will help you through that process all along the way. I'll say you have this choice
or this choice or make it your own by doing this
or this because yes, it's okay to follow
me step by step. Absolutely, and that's why I provide the instructions
as a teacher. But I want you to develop your own sense of who
you are as an artist. I want you to develop
what you'd like to do as an artist so that when I'm not there by
your side, you'll know. And this is such an awesome
piece to play with color. That's why I had so
much fun doing it. You'll know how yellow
works with red or how red interacts with blue or the two different
blues in the sky, you'll know how to make
that into a sunset, if you want, or a sunrise. This is such a fun piece for even experienced painters to
be able to play with color, to play with
techniques that create that lumpy bumpy grass or
that wool on the sheet. I want you to be able
to learn and grow and develop as you create
your class project. And once you're done, take a
moment and snap a pick and upload that in our
gallery so that we can all support one another. Nothing but love
here. No judgments. I would love to be able to make comments and point out the
things that we've done right in your piece
and other people can like and click on
that little heart. It's so fun to be able to see
what each other has done. I look at it. It's
like a recipe. We can all have the
same cake recipe, but everybody's cake turns out just a little bit
different in the end. And that's how art should be. It should be unique to you. Snap a pick, upload that
in our gallery below, and let us share
the love with one another on how you did
with your art piece. Again, if you wouldn't mind
clicking that follow button, I would love to be able to share another class with
you at some point. Thanks for spending the
time and I'll see you in the next video. Okay.
3. Supplies: Before we start painting, guys, let's go a quick review over
our supplies needed today. When I was developing
this piece, I was just using my sketchbook, and this is 140
pound paper here. It's a cold press paper, which worked out just great. But for today, I'm going to
be using a hot press paper. And if you've never
used hot press, the difference between
cold press and hot press, is a very smooth
surface on hot press. It's used for different
types of art. And because we're
inking, I thought, Well, I'm going to try it
on some hot press today, but you can definitely just go ahead and use your sketchbook or use your regular pad
of cold press paper. I think the important thing that is always true for every
piece that you've ever done with me is that it is 140 pound watercolor
paper or better. You're going to have a much
more excellent outcome, and if you're putting your
heart and soul into something, why not have the best
outcome possible, if you can squeeze a few extra pennies out for
some good watercolor paper, this is the place
to do it not in paint or brushes,
but with your paper. So that's what I'm
going to be using. I have provided for you on
the main page of Skillshare, PDF, that is the pattern, and I wanted to point
this out to you. I am going to demonstrate
for your very beginners, how to apply the pattern, and this is what you will print out. But when you go to
apply the pattern, don't put every detail. Don't put all the
squiggly lines and all the grass blades and all those things. We're
going to free hand that. It will be very simple. You just want to
put an indicator of the shape of the sheep
and the shape of the face, and that will get us
through what we need. I wanted to point that
out. You're going to print this out and you're going to use a
pad of tracing paper, pull a sheet out,
set it over that. Trace just the basic lines and you'll need a piece
of graphite paper, and I will show you how to
do this in the next video, if you've never done it before. And then you're just
going to want to position it on your paper. I have taped down my
watercolor paper onto a stiff board so that it's not it's going to bend
and buckle as we paint, and it absorbs that water. And then it flattens out again. But it will help your experience painting if you go ahead
and tape that down. So, along with that,
my favorite tool always is my handy dandy tissue. We're going to use a lot
of that. We'll be doing a lot of wet on wet
technique today. You'll need something to
keep your paints wet, and I'll be using two
jars of water today, which I don't always do, but we'll be definitely doing some splattering with
clean clear water. So you need a jar that you
keep clear water with. And then for brushes. Oh, guys, it's going to be so simple today with these brushes. Just need some type
of liner brush. This is a number one out. And then a couple of
different size rounds. This is my very
favorite brush, always. It is a number four.
I love this so much. This one is done by Princeton. It's fairly inexpensive and it holds up and it's my
favorite brush ever. And this is going
to be a number six, or you could use a number eight. Then I am going to be using
my squirrel hair brush. It's kind of a
smaller mop brush. I'm going to be using that on the sky because it
holds a lot of water. And for our inking today, the most important thing, guys, is to make sure that you are doing something that
is water proof. I want you to actually
test it out on a piece of watercolor paper and let it dry and then paint over the top of it and make sure
it doesn't smear, make sure that it doesn't bleed out and that it stays nice and clean line before
you begin your piece. But if you're using the Nibal
you're going to be just fine and also a Muji pen Uji, that would work just fine, but I like the
width of this tip. It's called a fine
tip, but it's on the thicker side of a
fine tip, so to speak. Then for our paints today, we're going to be using
here's our palette. We're going to be using
pines gray, violet, Prussian blue, cobalt blue, ciilian blue, and
cobalt turquoise. Also burnt sienna, CD red light, C yellow medium, light green, undersea green, rose permanent and emerald blue and
then some white quash. And always I suggest
that you look at my palette here and then see what you have
that's close to it. Don't feel like you have to
go out and buy something, especially for a fun piece
like this where we're going for an experience with
lots of different colors. We're trying to learn
the wet on wet technique and how things blend and
how to work with the water, and that's more
important than having the exact colors
that I am using. Use what you have within reason, and let's have some
fun with this. Go ahead and gather all your supplies and
in the next video, we'll go ahead and apply the
pattern and get started.
4. Let's Apply the Pattern: For you beginners who've never
applied a pattern before. I've gone ahead and I
printed out the pattern. I traced the bare minimum onto
a piece of tracing paper. I have positioned it onto my watercolor paper
where I'd like to be, secured it with a piece of tape, and now I'm going to slide my graphite
paper underneath it. There are two sides to your
graphite, test it out, make sure that you have the side down that's
going to leave a mark. I'm going to use a pen today, but only because my style is
packed in a box somewhere. I move my studio, and I haven't
unpacked everything. I'm going to go ah and just
start with a couple of marks. After I've done a
couple of marks, then I just check it to make sure that I have
the right side of my graphite sheet down
and once I'm going to go. Just go ahead and
finish that out. I'm going to go
ahead and speed up the camera and
apply this pattern. You do the same thing, and I'll catch you on the flip side.
5. Inking : We're going to go ahead and ink our piece in. First thing. This is a nib fine tip pen, black, and I've used it
many times for inking, so I know it is completely waterproof and I don't have to worry about
painting on top of it. This is where we're going
to go ahead and put in those details and make it how
you really want it to be. The only con lining
that I'm going to do really is inside
of the ears and then of the outside
of our sheep and we're just going to do we
want it to look lumpy bumpy. That's a technical term. We want it to look
like fluffy wool, take your time doing this if
you need to stop and rest your hands for a
minute or if it starts to feel a little bit
tiresome or tedious, get up and take a little walk, get some fresh air,
that kind of thing to refresh yourself and then come
back and get going again. So where we didn't put much
detail in on the pattern. This is where all the
detail is going to come, and then we'll float in
the color afterwards. This is an important
part of our piece. Here's our neck that's
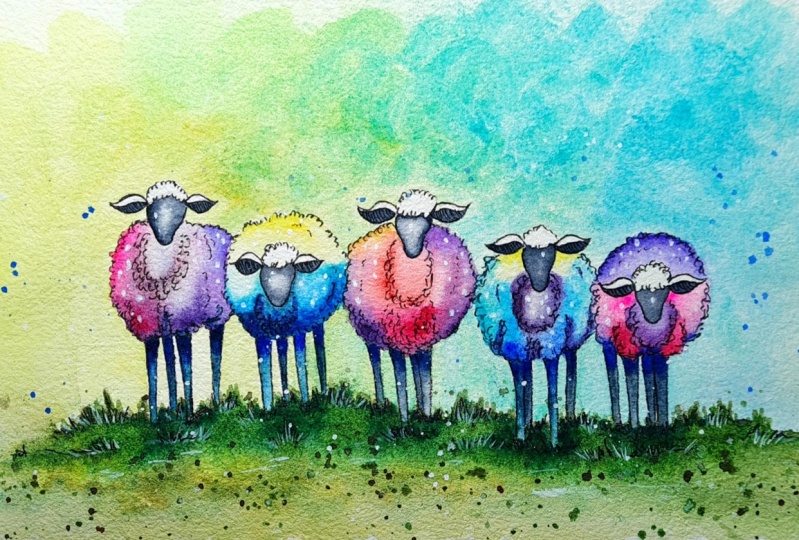
going to connect down. I'm going to show you a picture of the actual sheep that I took this from sheep are so fun. They're so darn cute. If you've ever been to Ireland, they're just everywhere
over there on the beautiful green
lush fields and grasses and I just
absolutely love them. But also, I was in Vermont. I live in Utah, so I was
in Vermont last fall, if you've taken my
mushroom classes, you're aware of that. Then we were up in
the mountains where the VonrapFamily I don't know if you call it a cabin
or what, but it's huge. But anyway, up in the
mountains there and they have the most amazing,
beautiful sheep. I'll show you some of
the pictures there. I've just ever since then, I've wanted to paint some sheep. And so I'm so excited to be
doing this piece with you, we're finally getting a hint of spring here in Northern Utah and it's so exciting to want
to be having some warm, springy colors and the
tulips are popping and baby chicks are out all the fun things
that come with spring. So this is going to be a
really fun piece to do. Now, as you do the legs,
It's really important. If you didn't do it
on your pattern, make sure that the hind legs are shorter than the front legs. And that kind of keeps things in perspective for you as
you are laying this out, both painting and inking. That's just a little tip there. And I'm ready to move
on to my next one. So if you're ever looking for a picture to
paint some ideas, and you don't want to pull from vacation photos or whatever, just get online and
look at some of that. There's a lot of free
photos that you can use. That's what I just type
in is free photos, free stock photos, and then and then you can
type in your topic. And then there's just literally thousands that you
can choose from. Okay. And get a lot
of great inspiration. And that's what I did to find. Even though I had lots of sheep, I didn't have sheep
that were standing in a line looking at
me the way these are, and these are literally
looking at us just perfectly as
if they were posed. And I couldn't wait
to use this picture. So Now, mine is going on quite
easily because I'm using this hot press
paper that's very smooth. But I've painted this several
times before this class, just getting in preparation, using different colors and
whatnot, which I always do. I was just using
regular co press paper, which is much more And so the pen went on a little
bit more lumpy bumpy, which just added to the
personality of the sheep, the wool and what
we're trying to get this texture look.
Don't worry about that. If you start to feel
frustrated with it, if your pen is skipping
a little, that's okay. We're going to remember
that we're going to paint over it
and give it lots of personality and depth and dimension with the things that we're going
to be doing there. With our paint,
and it's going to be just fine, don't
stress over it. You can always come
back in at the end if you want and add more. Add more ink. It's okay. But we'll probably touch up
a little bit with our ink. That's going to be
fine. You're going to find me to be quite
relaxed as a teacher. I don't get up
tight over things. There's nothing you can do
that we can't fix generally speaking. This is for practice. Then when you're competent, you want to do a
piece that you want to hang up or give
away to a friend. Great. You'll be
ready to do that. Guess what? We can't be
perfect in all things. But practice helps us feel more confident and practice
is how we get better, and we understand what's going
on with our pen and how it interacts with
different surfaces of paper and different types
of watercolor paper. So this is really
important for us to do. This one starts with a back leg, and then we do the front legs. Make sure those front
legs come down further. Here we go. Great, how are you doing. Typically, in my classes, I speed up this
process on camera. I had a student
reach out and say, I really like to do it with you, so I don't care for
it when you speed up. I thought, you know, if I've got some very beginners
in this class, and this is the type
of class that I might, I'll just keep it
on regular speed and you have the ability as a student to increase the
speed as you watch it. Did you know that? On the
main screen of the video on the bottom left hand corner,
You can change the speed. You can make it
faster or slower. You can also stop
it and start it. You're in control,
and I'm just going to let this one
go regular speed, regular pace as I paint along, as I ink along, and hopefully that will be a
good situation for you. Oh, my gosh, they're so cute. Are they just so cute? I like a lot of extra fluff where the legs come
up towards the body, and it's also the
base of the neck, so it's kind of a
good fluffy place. If your fingers are getting
tired, relax your hand. There's no need to
hold the pen so tight. Just tell yourself to relax. For set it down, shake
out your fingers. The main thing is
we're trying to stay consistent with our loop de loops,
our little wiggies. Bringing these front legs
down a little bit lower. And I made these ears curly. That was a little
accident, but that's okay. As Bob Ross would say,
accidents, right? They just bring their own
personality, and that's okay. Okay. Now, let's throw in
an indicator of our grass, and we're not going
to do much right now. We'll come back in
with some paint. But this is going to help us
know where to end our legs. We don't get lost. Sometimes
we get lost in our paint. Yeah, I'm just going to put
a few mounds here and there. I don't want to
come down too far. There. And like I say, we'll come back in after, but I think that's a
pretty good indicator this far out, this far down. All right. We are
ready to paint. Make sure that give your ink a minute to dry so you
don't want to smear it, and I'll see you in the next
video. We'll start painting.
6. Background Wet on Wet Technique: Okay, we're going to
dive right in with our sky and I'm going to start with my
squirrel hair brush. This is a small
mop, so to speak. I'm just going to
pick up some water, quite a bit of water, actually, and just start wetting. I'm not going to get
any on the sheep. In fact, I'm going to
be quite careful to go around the ears and the head
and not get on the sheet. We'll start letting that
water absorb into our paper. Now, we're going to go over to our second sheet
right now. All right. A little bit into the third, I guess, close to that year. Now, also, I don't
know if you can see the she on my paper, but I'm kind of
making little loops. In other words, I'm not going straight down straight across. If I wanted that, I
could just stick with what my tape laying is,
and I don't want that. So I'm going to start with
some calf yellow, very little. This is probably 5%
paint, 95% water. And I'm just going to touch that on lightly and let that start blending with the water
that's on our paper. And this is where
with wet on wet, you just have to be
patient and give the paint time to interact with the water and the paper
and let it do its thing. And you don't want to push it, you don't want to
overwork your paint. Good. Now, let's go ahead and add in the
tiniest amount tab red. Had red has a lot
of pigment in it. It's a wonderful color,
but it will take over. You don't keep it in check. I want that to blend
nicely with our yellow. I some clean water here and where those
two touch together, in softening that a little bit. And then let's extend our water over We're around
the sheep again. We don't want this to
go onto our sheep head. We want to keep those
heads nice and white. Let's go ahead and pick
up some of our Let's do Ceran blue light blue first. F. Let's see what that does
with the red for a minute. Okay, I'm going to come
back to my yellow, just a little bit more
in this upper portion. Now, you may not need to. So you gauge what you like, the amount of
pigment you like on your paper and determine if
you want to add more or not. I'm going to pick up
a touch of this red. A little stronger right here. I'm going to soften this
edge where the yellow stops. I'm going to come and add in some green a little bit later. So I'm just basically
bringing it down with water. All right. So back to our blue, looks like it's done about
all it's going to do. So let's go ahead and add some of this cobalt. Can. And we don't want
to touch our sheet. Simply going around. And then for our last area, a little bit. And I'm going to stick with the cobalt. I'm just going to make it. Love. Now, this is going to continue to blend that you can see how our bubbly edges to make it look clouded by not
blending like this, and there's a time to do
that, for this piece. I'm just kind and lots of water gives it that clouded
effect. Loving that. Now, I don't want
yellow, red, blue. I want to very carefully just screen over a little
bit of the yellow. And we want to be
really cautious because we all know what
yellow and blue make, right? You don't want to end
up with a green sky. However, we need a little bit of blending over here as well. Over a touch right on top of
the red and on top of blue, and I'm not going
to fiddle with it. I just let that place down. Let the water take care of the rest. And I
think we're good. I might add a red. Remember, guys that water
color dries one value lighter. And so you have to think ahead. I just wanted a little
bit darker right behind the sheet as if
there were a little bit of sun setting going on here. Because it makes it
more interesting. Yeah, I'm going to let
that blend into my yellow. And I don't like that dark spot. I'm going to touch it with
my fish very lightly. Love it. Okay,
let's let that dry, and then we'll start
with our sheep.
7. Color Play Sheep #1: Okay, let's go ahead
and get started. I'm going to use my
number four round. I'm picking up just
some plain water. I'm going to start over
here and just get this wet. I'm going to pick up a little
bit of this permanent rose. You could also use Opera Pink. There's all different
colors of beautiful pinks and you can just choose
whatever you like. I use these four floral designs. I use them in rocks. And there's all
different uses for pink. It's just a beautiful color. I'm going to strengthen
this just on the outside. Do you notice I'm following
the ripples of my inking. I'm not doing a smooth
painted line because I have a lumpy bumpy for
lack of better words. Ink line. We want
to follow that. There we go. Because it's wet, it's going to soften
and do it something. Now, let's just move along. Water on my brush, to go
across the top of those legs. And I'm going to pick up a
little bit of Prussian blue. And just touch that down here. Let the water take it up. About a minute to
see where it goes. And while that's going up, let's move on. And we go. I picked up some of that
pressure. I didn't want to. So now I'm going to add in just some water where I
want this lavender to go. I'm going around the
second sheet but this would be kind of a
shadowed area shaded area. Man, I'm just going to touch it. Let that start to do its
thing with the water. See how I don't have to paint it all in right off the bat. Rinsing my brush. Now, I'm going to encourage
this prussian blue, and I'm going to
soften this top edge. This is just water on my brush. I'm going to let that blend a little bit more with the pink. So pretty. Love it. Right. And purple now. Bring it out a little bit. I'm not going into that
second sheep over there. Kind of letting it. Now, I'm
going to soften this edge. Just water on my brush. And I like the way it looks like little tufts of wool
because when we apply it, we kind of did this
up and down motion. All right. Around the neck, I think I'm going to go
with some bird sienna. Brownish red. Just putting this on the
neck line, so to speak, and then I didn't put water on first because it's got water surrounding it
on the outer edge. I want to see how much
water is still on there and kind of starting to
spread a little bit. Let's see how that does for
just a moment. All right. Now I have water on my brush, and I'm just going to
soften that inner edge. I'm going to soften
this pink edge right here, too, with water. Bring out some of
that fur sienna. Oh, I'm loving
that. Loving that. All right, so let's
leave that body alone for a minute and
come to the legs. Let's pick up some pretty
dark prussian blue. Just fill in these legs. Remember that our back legs are always going to be shorter
than the front legs. So that needs to be corrected
while you're painting. This is a good time to do that. Great. Okay. Now,
I'm going to just emphasize I pick up
the right color. First, I make sure I
pick up the right color, and then I emphasize. So picking up some
strong pression, I'm just going to dab that on. I'm going to do it pretty
strong on the back legs. But on the front, I'm
going to dab that on up towards the top where
it meets the body. I'm going to go ahead
and let that float up into what we already put on and pretty much to
the whole back leg. That brings the front legs forward and yet it
connects them to the body. So they don't just look like
the legs are stuck on there. And it pushes those
back legs back. Now, I would like to add a
little bit of this purple. Just to give us some interest. I'm not filling it in. I'm just making a few strokes
through there. Great. We're going to leave the face for now because we don't want to take a chance of it
blending the body. Now, we're going to pick up
some of our clean water. We have this clean
water over here, and we're just going to splatter on a little bit of water. What that's going to do is
lift off some of the paint. It's just going to give us more of a texture to work with. We are ready to move
on to our next sheep.
8. Color Play Sheep #2: Okay guys, you can do
whatever colors you want. This sheep. Again, I'll
show you the picture of the actual live sheep
that this was based on. I got it from a free stock
photo on the Internet. But anyway, this sheep is obviously leaning forward
with his head down, which gives us a nice view
of its back and he's over here where the sun is
setting and glowing. I want to put some yellow
back here. So pretty. I'm going to leave
a white edge just because it's in stark contrast to the purple next door here. And down here. When I'm leaving
something white, I don't put water on it. Remember that your paint
flows where the water goes. So if we don't want any
paint flowing over there, let's not put any
water over there. All right. I just picked up
some of our cobalt blue. I'm going to put some
of that over here. And now I'm picking up water. Bringing up a little bit of
this pression blue in darker. We're coming over to a shadowed
area where he's tucked up next to this other
little buddy next door. And I'm going to have
a lot of water there. Okay. Now I'm going to pick
up a little bit of lavender. I'm going to softly
help that blend with our yellow great
complimentary colors there. So beautiful. I'm just going to bring this blue up
a little bit under the neck. I think I'm going to
come in with some pans gray at the end and
shade it there. It going to leave that for now. Same with this, this is just water on my brush,
softening that edge. Remember we left that white. Now, I'm going to pick
up some clean water. And little splatter. Great. You can see
how it's lifting off already. That's great. And I didn't do the legs first. So let's make sure
our legs are dry. And let's go ahead
and put the legs in. This time, I think we'll
start with purple. The guy next door has blue. I'm going to let up into
the body a little bit. Back legs. Yeah, I'm gonna
pick up some of this pression. I hit it here and there. Great. Bringing some of that purple in right
in front where the legs attach to the body but staying
underneath the neck line. Great. I am so sorry if you
can hear pounding. I've got some carpet
layers downstairs. I keep testing the mic to
see if you can hear it, and I can't hear it, but it feels really loud. Oh, there. I like that a lot. Okay. Let's let that try and we'll move on
to our next sheep.
9. Color Play Sheep #3: I think I'm going to
start because this one's still kind of
in the sun over here. I'm going to start with
a little bit of yellow. Now, obviously, you can do
whatever colors you want. You've got the hang
of it by now, right? It's our third sheep. You can do whatever color
combinations you would like. Okay. This one, I just did
a big splash of water. That's okay. I
take it off there. All right. This time, I think I'm going
to do emerald blue. Emerald blue, if you haven't
used that color before, not one that we use super often, but I love it so much
for flowers and water. And apparently for sheep. But it's got a purple to
purple underton to it, so it's really a fun
color to work with. As far as the blue family
goes, it's very light, a grayish purpishlight
blue. All right. I would like to pair
that up with Turquoise. This cobalt turquoise is so great if you're doing
an ocean piece. Isn't that beautiful? Be. I've done a couple
of classes I've done an ocean wave and a lighthouse with the
ocean in front of it. I've had requests from students to do another ocean piece, and I've done a couple
of tropical fish pieces. I really enjoy this color
in doing the ocean. It's beautiful. I think I'll be doing some more. But I also I am coming out with a series of birds right
after this class. And one of them has this
teal color in it as well. A couple of them have a lot
of blue, which is really fun. All right, I'm going
to put some lavender here next to our teal. I'm going to help that blend
a little bit right there. Now, make sure you're
bringing this out to the edge of your
little wiggly lines. And I'm even going to darker. Yes. The water's
going to carry it up. I'm going to let
that I'm going to give that a minute to see
where the water takes it. Now, I would like to do a
little bit of red right here. Great complimentary color
for purple's so pretty. Now I don't want it to
look like a stripe, so you notice I stopped short so that I can just
add water brush. Add a bit of go. Add a bit of shaping to it. Sorry. I lost my thought
there for a minute. All right. I'm
going to encourage this purple up a little bit. A little further in. Red. Yeah. Now, I want a little
darker teal bottom ch. Purple. Okay, that looks cute now. I think around the neck. I'm going to add
a touch of pink. Ends nicely with all
of these colors. Yeah, I'm going to bring
it up a little bit. This is just water on
my brush, bring it in. Face there. I can have
a mind of its own. Now, I'm going to just light touch over on the yellow
side very carefully. And I'm going to lift off a little highlight in
the middle there, just water on my brush, and then I'm touching my tissue. You can see that
comes right off. And I end up with a
lighter piece right there. Great. And I'm going
to do hi blue. Eggs. A little bit of purple. All right. I'm going to add just a little hint
of this cobalt blue. Not the pression but cobalt. Russion would be really
dark on this teal. Just a teeny bit of the cobalt, bring those legs
up into the teal. And this is just
water on my brush. Cute. Okay, now picking
up clear water. Tiny splatter. A.
10. Color Play Sheep #4: Already. I tend to do some teal the one
next door had it. I just water and my brushed
that yellow and teal. And down here, I'm going
to do cobalt blue. I most often use cobalt for seascapes back on the horizon line
where it's far away, so you want a
little darker blue, and also up in the sky, like we did here where I want it dark up in the
right hand corner. It's a great blue. We have versatility to make it dark or add more water
and lighten it out, but it's real true blue. Yo blue feel to it. I'm going to bring some of
that teal over actually. Here. When that a little bit.
All right. Coming up. I'm going to go into
the lavender over here. I was careful not to get water
on that sheep next to it. Laughing a little bit
darker right here, bouncing up and
down a little bit. Get that cotton woolly impact. Picking up clean water
softening the edge. A more. Great. And I think here
on the net Padding water. And I'm going to come in
with some of the brana. And I touch a red here next to the blues and
purples. Oh, that's pretty. Okay, I just touched it. I want to see where it goes, so I'm not going
to mess with it. I'm going to watch
that for a minute. Now, let's put these legs. I'm going to go with lavender. That's not lavender.
Let's try again. No. No, we'll pick up that fresh. Great. Where we can
go to our last one. We got to pick up some
clean water. Later. Texture.
11. Color Play Sheep #5: Okay. And this one, I think I'm going to
start with lavender up here because we have all
this lavender right here. Tie in. I'm not going to go too strong
because it's on top. Okay. And actually a little bit of red. That looks. Okay off the neck. I'm going to make
it a little bit stronger towards the outer edge. That red will take
over if you let it so. Softened quite a bit
on this lower edge. It just went down too far.
I don't like it that far. Actually touch it there. That way, I can bring in blue. Let me go. Is there. Little more pressing. I'm going to just use water on my brush. I can get these to
blend a touch better. Bring down the purple a little. It was just a little
too much red for me. I didn't want it to
take over that much. And I'm going to
soften this edge now. Two strongly pigmented
colors there. Okay. And I'm just going to use a little water to soften right here
around the neck. I want to come in while
it's still fairly wet some pink let
that blend out. It'll look good with the red, look good with the Prussian it needs to do it
while it's wet. T. All right. And then
coming up the side, I think I'm going to
switch gears and go from all these strong colors to
something more soft and use this emerald blue right into the pink. I'm just going to keep
blending this now with water. I'm going to keep
it fairly light. Yeah. I like that. Okay, almost Sage. And I think I'm going to
do some cerlian blue. A lot of blue on this last guy. But it's because we used
the red and the pink, so I didn't want to
throw in yellow. Oburnena as well. I wanted to keep
it at more blue. Can we need the purple. All right. I'm gonna
do presion blue legs. And I'm going to add. You know what I'm going to add because we've been doing it all bit of purple at the top. All the way down on the
back legs. Here and there. Great. Good job, guys. Now, let's just take
some clean water. Little splatter.
Let's let that dry, and then we can come
in and do our faces. See you in just a minute.
12. Washing in Sheep Faces : Now that the bodies
are completely dry, the legs are dry,
everything is dry. Let's come in with some
of our pains gray, and this is our darkest dark. We want to come in gently. We can always make it darker. This is probably
a 90 ten mixture, and we're just going
to start by doing the outside edge of their phase. I'm going to leave
that center area white for just a moment. We'll probably add some color to it and we'll float it in. But I want this
pains gray to start soaking into our paper
on that outside edge. While that's soaking in, I'm just going to float
in a little bit on the inner ear where we did
that contour line drawing. And I'm going to
put a little bit at the top of the leg
just to deepen that. And maybe here and
there on the hind legs. Great. Okay, let's come
back up to the face. This is just water on my brush. And I'm going to bring that in. I want to keep a
highlight on the face. I'm going to coup under
the hair on the top. Good. Now, I think I'm going to choose one of these
colors, probably lavender. I'm going to keep
it pretty subtle. Just put a drop in the
bottom middle portion. Just to give it a little paz. Choose one of your colors or you can keep it that
white if you want. I lost some of my darkness over here, so I'm
going to add it back. The water will carry
it over for us. Okay. I'm going to let
that sit for a minute. And move on to the next. You guys get the idea now. We're going to keep doing this. I am not wetting the paper f. I want to have a
little more control. You notice how close
to the brush tips, I'm holding my brush. So when I want to
really control things, that's where I'm holding
it almost like a pencil. Come over and do the Now, the reason I'm not doing
the inside of the ear, acute color like
pink or something is because we already have so
much going on with the body. And so I don't
want to overdo it. I want the head
and the ears to be distinctive and to stand out. It's going to deepen. I love paints gray. It's so great for doing storm clouds or adding depth
to any kind of shadows, if you want to use
it for shadows, rocks, cliffs, the ocean. Pains gray is one of
those versatile neutral, if you want it in
the blue tones. Great. All right. I'm going to
add just a little bit of this cobalt blue to this one. Yeah, like that. And this one, I think, would add a touch of the pink because we've got
so much pink going on. Just a little bit
towards the top. Okay. I think I didn't add any down
on this guy Bing up just a little That's better. All right. Darken this bit. I think I'm going to go blue on this, little Prussian blue. Mm hm. And this is a
soften that just to touch. You notice, guys, even
though I'm onto the next, I'm always looking back, and the reason why is because it's still wet because it's wet, rumor paint flows
where the water goes, it's still wet and so that paint is still working
with the water and the paper. I'm always keeping an eye on it so that I know
where it's going and I can make adjustments if I'm not
happy with the outcome, while it's still wet,
it's much easier to manipulate if you
need to or want to. It's a good habit
to develop early. I'm going to just
fill in this one. This one I did so dark
compared to the others. And so I'm just going to fill
this one all the way in, and then I'll lift out
a little highlight. I must have felt a little
sassy doing this one. This one is the one I
ended up doing curly ears. I don't know what got
into me. All right. This is just clear water. Yes. I'll just pull out
a little highlight. All right. I'm going to add
just a touch more down here. There we go. Awesome.
Okay. Let's get started on our grass while
the faces and legs dry.
13. Creating Grass: Okay. All right. Our grass is
going to move quickly, much like our sky did. So I have already created a
little well of light green, and I'm going to water
that down a lot. This is probably
a 90 ten mixture, maybe even a 9055 mixture. I'm using my larger round. This is an eight
or a six would do, even a ten would be fine. And go ahead and we're
going to start by well, let's make sure our legs
are dry. I live in Utah. Mine dries really fast, to make sure your legs are dry before you do this portion. So I'm just going to wash in some I'm going to start by
putting a little on there, and then I'm lightly
going to bring that up to meet the sky. And we want this to
be really subtle. So I'm going to tap tap that
it came on a little strong. And I didn't touch
the sheep with my brush just being very
careful about that. It's not the end of the
world if you do, it's okay. Now, the reason I'm touching
is both to lighten it, but also it gives it a
little texture look, and this is background grass. We're going to add
a lot of texture this grass actually in the foreground but we don't want it to look bare
in the background, so very careful here. Right. And on this edge, I'm
going to go really light. I'm going to add more water. And bring that up
to meet the blue. And again, I don't
want to straight edge. I can it out. I'm actually going to tap tap. Stopping that. Yes.
I like that. Okay. How did you do? If you were holding your breath,
take a deep breath. Okay. Now, remember
how we made our marks here to remind us that
we don't want to go clear down to the
bottom of our page, and we kind of want
tufts of grass. Okay? So we're going to
start by laying in some of this light green and we'll
come in with two other colors. So let's go ahead
and get started with our first base. All right. So I'm going to just keep using the same wash and I'm
just going to dabble it in And I come up with water and just kind
of model it a little bit. Meaning, I want it to
be and here and there. In other words,
I'm not going like this with smooth brush strokes. I don't think we've
done any smooth brushtrokes on this whole piece. It's a little bit unusual, but that's the nature
of this piece. The water here, dark for me. Awesome. And you know I'm trying not to go straight across the bottom. I'm going to come in and
make that even uneven. Just to make it more
interesting here that trail. I have this trail over here. Yes. A bit. Good. I like that.
So you can see the bottom edge down,
down, up, down. And that just makes it a little more interesting. All right. While this is still wet, let's pick up some of
our Undersea green. And same thing, it's going
to be very water down, a 90 ten mixture or
even a 95. It's fine. And I'm really going
to hit where we have inked in some
of that grass. And I'm going to use notice my hand has gone to
the tip of my brush now. And I'm going to pull up
some grass, very lightly. And because it's still wet from what's underneath it,
it's going to soften. You can see it's already
starting to soften by itself. And that's what we
want at this point. I almost feel like
you're scribbling. Drops here and there. And then I'm gonna touch it with my tissue to give it
that nice texture. Can you see the texture
that comes in with that? And I'm going to leave
some white spots, too. I don't want to
fill everything in. We're still going to come
in with one more color. So on the end is a great place
to have some of that grass trailing because it goes into the white
edge of the paper. Just a few little indicators. Awesome. That looks
great. The leg over here. All right, as that
drive step back. Take a look, see if
you want to make any adjustments to the
faces or to the grass, but let's let that drive
for just a moment.
14. Dimension through Shading: All right. I'm mixing up a
little well of the pins gray. It's a 90 ten mixture, maybe even a 9055 mixture. And I'm going to float in some more shading on
some of the faces, but also a little
bit on the sheep. I'm using my number four round. And I'm just going to
touch this down on the nose and a little on the outer edge. I
like that better. It makes a statement. Now, only do this if you feel your piece needs it. You
don't have to do it. If you don't want to or
just because I'm doing it. He's gonna come in with
some clean water here, and I just suck in this. Okay. Great. All right. Now, if you would like. You can come in ever so gently, I'm going to use a larger round again let me mix
up a little more. Coming back with our pains
gray still very lightly. And you can add just
a touch of shading. Yeah, that darkens that up just where the legs meet
the underbelly. If you want to. You notice that I try to give you
choices all along. You can certainly
follow what I do, but I want you to think
about your piece, try to make decisions on what
you like as an artist and a creator and make choices. There. See how that
just adds dimension. It makes that look more round when you have that
under belly darker, and that's why I like the top
of the legs dark as well. That feels great. I have mixed up some prussian
blue over here, and this again, is very thin. It's 9055 maybe in 90 ten
sticking with my larger round. What we're going to
do is just add a hint of a shadow
underneath our sheep. And we certainly don't want to try and shape it like a sheep, but in keeping with
the rest of our piece, just keep it kind of
modeled in lumpy bumpy. And I'm just kind bouncing
that in so it doesn't look smooth and I don't
want to really disturb what we did
with our grass. But I am going to
kind connect them because they're standing so close together that it
would probably connect. Remember it's going
to dry one value lighter and it is going to mix with some
of the green underneath, so it's going to soften
up a little bit. Nice. It just adds that one more dimension to our grass
and our overall keys. Great. Okay. Let's give it a minute. Everything is very wet. The face is wet, the body's wet.
15. Creating Highlights: Okay. Now that everything
is completely dry, we're going to do
some splattering, and just a little
tip for you guys, and maybe you already know this. Let me see if I can
show this to you. When I do splattering, I pull out my little
silicone sheet. You can buy these big sheets. They're really thin and pliable on Amazon for really
inexpensively, but it protects your
your work area, and certainly the table cloth that I have
underneath this. Anyway, let's go ahead and a
well of our undersea green. I'm going to be using
my larger round. And probably a 90 ten mixture. For this, I don't really want it to go on my sheep or in the sky. I'm going to use a shop towel
here and just cover them, lay that on top and go ahead
and start splattering. Now, I'm using my larger round
so that I get bigger dots. If you want smaller dots, go with your number
four, which I will do for other portions. If you get some splots
where you don't want them just touch them real
quick with your tissue. Or if you want a mixture
of light and dark spots, which frequently I like to do. Then I'll just touch
a few here and there, and I'll have a nice mixture. You can see the pigment will
still stain your paper, but it gives you this
nice again, dimensions. You have light and dark.
Now, I'm going to go ahead and pick up with my number four, the smaller just some
of the same mixture. Just to give us a little more. You can see it makes a lot smaller Great. And same thing. I'm just going
to touch here and there. Okay. Let's see how we did. Nice. Okay. Great. We're going to start from the
bottom and go up. We have a lot of
splattering to do, so I hope you like to
splatter as much as I do. I love to splatter. It's one of my
favorite things to do. But I think it just adds a little zip zip
to your painting, and it's fun and it's easy. So now, I like to
splatter a little bit of around the sheep and actually into the
sky a little bit. So but not hugely. I'm going to probably cover
part of it. That much. And I'm going to
use my number four, so I'm going to stay
small and I'm going to mix a well of the Prussian blue. Now, I recommend
that you switch to a clean tissue.
Throw that one out. That's why I have
them handy here, because if your tissue is
wet and you go to dab it, then now you've got a
green spot on top of your blue where you
didn't want it. Now I'm going to
be pretty careful. I don't want a lot on my sheet, so I'm just going
to start gingerly. That's about all I want. And now I don't mind
having a few on my sheet, but I just didn't want to get carried away right off the bat. Sometimes, you got
to warm up a little, you know. There we go. This is a little strong. Touch those. Great.
How do you do? Now, just kind of observe, see if you want to
lighten any up. Or if you need to add any more
on. I got one on the face. I don't like. Good. Now you can see how they just we've
got them here, they're going. And then as we get up towards the sky because I
covered part of that, it's just a very few dots. It just diminishes into
nothing, which is great. That's just what we
wanted. All right. The last thing
you're going to do now is we're going
to let this dry and we're going to
bring out our white and do some highlights,
and we'll be finished. All right. I'm going
to be using guash, and we're going to be
using two brushes today. So I'm starting
out with my number four round and then I'll be switching to a liner brush for some finer
details in the grass. So the stronger highlights. I'm actually just going to
dip right into the tube, and I'm just making sure I don't have any
more pressure blue. Let me dip into my clear water. Make sure you have a
really clean brush because you don't want to
contaminate your tube. If you're worried
about that at all, you can just put some
out on your palette. That's fine. But you want
your gah to be really strong. So we want a nice strong white Okay. So we're just going to do a few highlights here
and there on our sheep. You notice that I'm
wiping it off on the rim. I still want to find tip on my brush and I'm
just going to put some little highlights here and there as if the sun were
catching little tufts of wool. I'm going to be careful down here where we did a nice shadow. We don't want to get
carried away there. D. Okay. Now, I'll give
you a little hint. If there's anywhere that you
want to try and cover up. Like, for example, I
have a little spot here where the blue bled
down into my ear. I can just gently
cover that with the white and no one will ever know. There you go. All right.
That's good for that. Let's switch to our other
brush now. All right. For this portion, I'm
using my number one liner, and I have put some guash on my palette because we are going to add a
little bit of water. And this is very little water. So the opposite of
everything else we did, I didn't even water
this down and mix it. I just put water on my
brush and dipped in. And as I dip in,
watch my fingers. I am rolling it. I'm pulling up and what this does brings a nice fine
tip on your liner brush. The reason we want to do this, and I'm going to hold
my brush back on the end here is we're
going to flip up some little blades of
grass that are catching the sun and so it's giving it a little bit of a highlight. You need that looseness in order to be able to have
that movement. Make sure you're
putting them going all different directions, and this allows you to
have a really light touch. We don't want very many,
don't want it to take over. Just a few here and there. And I don't know if
I mentioned this, but when you do this, always go from the
bottom up because you naturally start harder
when you're pressing harder, which is going to give
you a thicker line. And as you pull up, it gets lighter and a thin line, and that's how we want
our grass to look th at the root at the top. And this gouache is going
to dry lighter as well, so keep that in mind. Great. I'm going to
add just a little bit of some lines now that
are more intentional. I'm going to pick
it up in thicker. It's going to die
right in there. I'm just going to put
lines here and there. I don't know how
to describe them. So kind not a straight line, kind a bumpy line like
it's going around a rock or a little
bump in the ground, but that horizontal feeling
of the ground here and there. Just catching some light. And this is something
you would also do if you were doing a seascape, if you're doing the beach,
ocean waves, cliffs. Always remember that
sun is very strong, and it reflects
off of everything. Great. All right. Let's do just a little
bit of splattering. All right. I am going
to cover my sky. I don't want it to look
like it's snowing. But I am going to let it come up on the sheep a little bit. Let's not get carried
away with this. In one of the versions
that I did, as you know, I paint my lessons, I paint them like
three or four times before I do the final one. But anyway, I got carried away
with my white splattering, and it definitely looked
like it was snowing. So Just a little bit there and just a tiny
amount on our sheep. Good. Now, I'm going to lift off real quick
where it went on the face. It's touching with wet brush. All right. Can you see what
I'm doing. I had some dots go on this face
here and this one here, I'm just lifting it off.
All right. How did you do? Now, if you have a
smear like this, I'm glad this happened
so I can show you. All you need to
do is rub it with water and gab and it fades
right into the background. No harm no fowl. All right. Let's let all of
our splattering dry and we'll get our ink back
out for just a moment. A
16. Final Inking: Okay. Now that
everything is 100% dry. I'm coming back to the Ni ball, and I just want to see
how we've lost some of the inking for the grass. And we anticipated that knew
it was going to happen. Remember at the
beginning, I said it was going to be kind
of a guideline, now's the time to come
in and just add a little bit more to emphasize Notice how fast I'm going, and that's intentional because
it helps me stay loose and not think too much
about each blade of grass. And now, step back and
look at your sheep. Is there anywhere that you want to add emphasis to or repair? Did a splatter cover a piece of the inking that
you don't like? Or I can see right here
my ear is detached. I a floating ear. He. So I'm going to go ahead
and just detach that ear. Soha and kind of
examine your piece. And tweak it. This is the time. Now,
I've lost some of the inking here because
I did such dark colors, which is totally fine, but now I'm going
to come in with my pen and just reemphasize
the bottom of that tic. What's fun about this is we're actually adding
yet another layer, another dimension by having
lighter and pking in our p. I got a few too many dots. I'm just going to
ink right over him. Get rid of those white
dots down there. Same here. I've got
too many white dots. I'm just going to ink right
over here on this leg. And this one. Better. Other What's with my floating ears today. So cute. All right. Step back, six feet.
Take a good final look. I think it's time for
us to sign our name, always claim your
art piece, guys. I know sometimes you feel like, Oh, smoke good
enough or whatever. We're always hard on ourselves, and I want you to feel great
about what you're doing, you're learning and growing. I'm still learning and growing. I take a lot of classes
here on Skillshare myself, and I travel around taking classes from experts
all over because we're never going to reach our potential if we don't
keep learning, right? And remember that you have a skill and a talent that
most people don't have. I am so proud of
you. I really am. I'm genuinely happy that
you took this class. Thank you for spending
your time with me today. I hope that you
learned something. I hope you had fun, and
I hope you're walking away with an adorable
little spring sheet piece. Let's go ahead and sign
our name and claim our art piece. Wonderful. All right. I will see you in the next video and
we'll wrap up together.
17. Congrats and Bloopers: Okay. Well, you did it, guys. You completed your project. I'm so proud of you. Thank you for spending
your time with me, and I'm so pleased that you were able to complete a project, and I hope you feel
good about it. I hope you had fun
along the way and you learned some things
that are going to help you with your art journey. If you would like to
take more of my classes, all you need to do is type by name in on the search bar above, Carrie Sanders, and all the classes that I have here of Skillshare
will populate, and I hope you will join me
in some of my other classes. Also, if you click
that follow button, you'll receive notice whenever
I release a new class. And it would be so fun
to have you join me. If you feel like this class was beneficial to you and you know someone else that
would benefit from it, then all you need
to do is look for this link on this
page of Skillshare and send that to your
friend and both of you will benefit financially
from Skillshare, which is a pretty cool thing. Also, if you would like to check out what's happening in
my neck of the woods, you can find me at
are sandersrt.com. You can also find me on
Insta at Carrie Sanders Art. And I would love to be
able to make comments on your pieces and
interact with you freely. The best place to do that is
right here on skill share, both in the discussion box
or in the class gallery, when you post your picture
and we can talk freely. I promise I'll get back to you because I really want
to encourage you. It's my job as an instructor and a teacher to instill a
love of art with you. That is one of the
most important things that I hold dear to my heart. And also give you valuable tips and instructions along the way. So feel free to stop and start these videos
as often as you need to. You have the ability to speed
them up, slow them down, do whatever you need
to make this suit your needs and be a good
experience for you. Also, and lastly, if you have any suggestions on classes
that you would like, I'm open. I've had students suggest some things that I'm
going to be doing soon. And also, I had a
student who asked me to just leave the film in real time so they could
paint along with me. And so that's what
I've done here today. So please leave me your ideas, your
thoughts, suggestions. I love hearing from you. All right, guys,
until the next time. Take care. Bye bye. All things and
creating new life. And so this is a great time to I'm not saying
this very well. Yeah. Take 20. Here we go. Okay. I've been wanting to paint for a long
time because I've had because I can't think
of what I want to say, get it together, girl.
 Kerrie Sanders, Artist, Teacher, Creator.