Transcripts
1. Welcome: Well, hi everyone and
welcome on into my studio. I'm Kerry Sanders,
and this is part three of an aquatic series
that we've been working on. The first one we did
was an ocean wave. And the second one was beautiful tropical
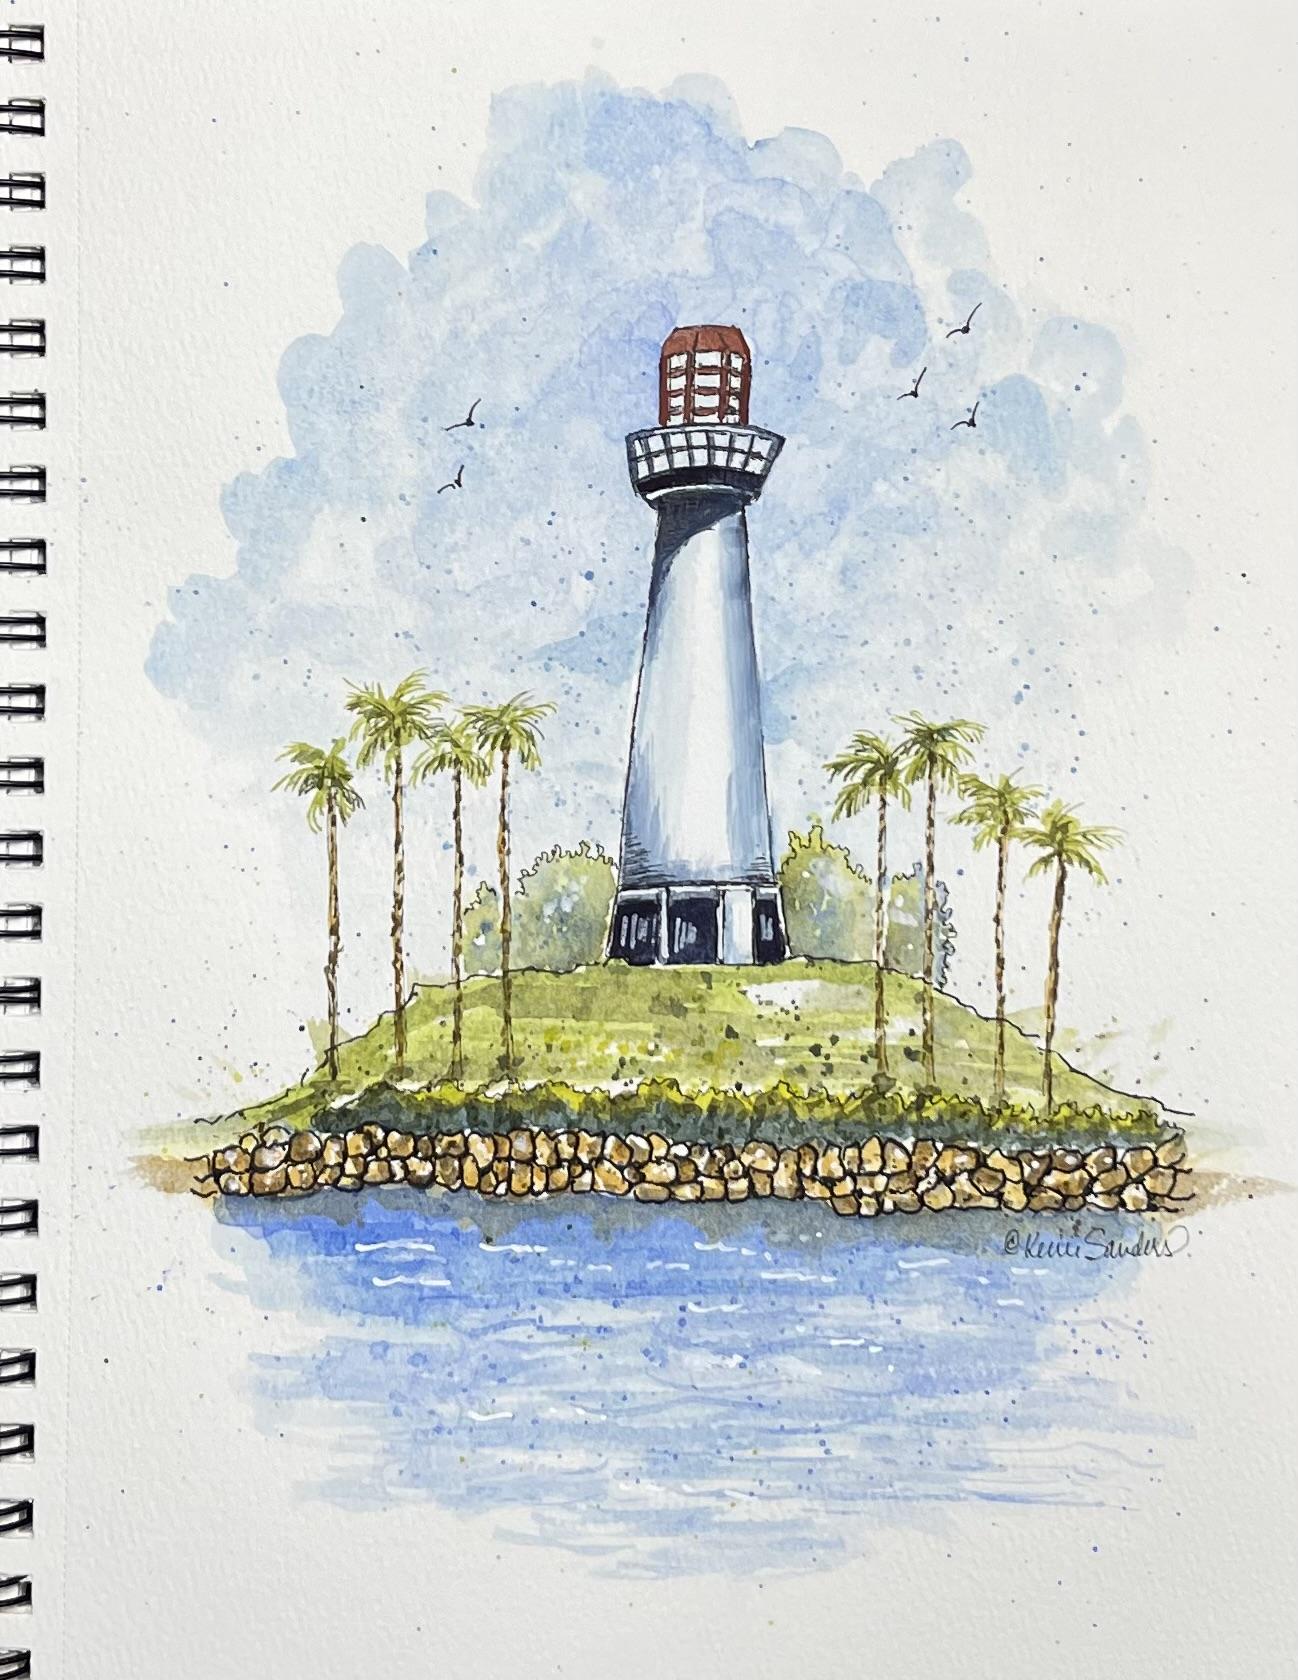
fish and sea horse. And then the third one that
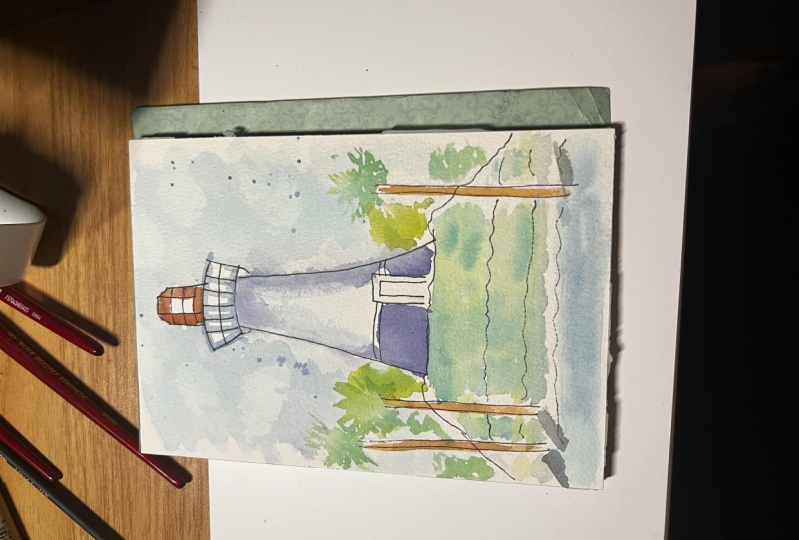
we're going to be doing today is this great
urban sketch of a lighthouse is going to be a different
style because this is truly going to
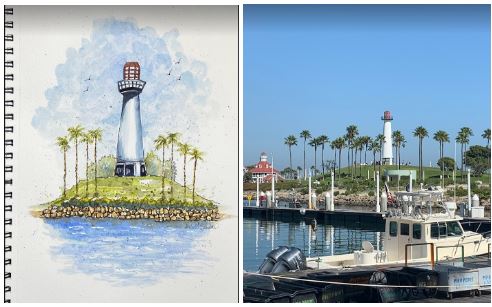
be an urban sketch taken from a photograph. Or you can use these same
techniques and just pull the car over honey and do some sketching right
on the side of the road. We're going to be using a
mixture of pen and ink, meaning markers as
well as a ballpoint pen literally, and watercolor. And we'll be using photographs to work from
for our reference here. But it was literally taken from a vacation that I went on. I mentioned that because
I want you to be able to transfer this
to your own life. If you go on vacation, you take some amazing pictures. You don't have time to stop
and paint for an hour. That's okay. Bring those photos
home, sketch them up, put them in a beautiful journal, and you've got some great
memories captured for ever. My name is Carrie Sanders. I'm in St. George, Utah, just outside of
Zion National Park and it's so beautiful here we do a lot of plein air painting. We do urban sketching. It's warm year round and so who wouldn't want to be outside? I'm very fortunate that I was picked up by a big box store who published my pattern
book to over 10,000 people, as well as some pattern packets that were sent to
stores across the nation. In other words, I just
love to paint and share that joy and
instill that in others. I hope you'll join me today. And if you like to
take this class, then grab your paints and
let's get started together.
2. Project: Hi everyone. Your class project
is to complete one lighthouse by following all the videos step-by-step
from beginning to end. I'll take you through
every step of the way and teach you some fun tips
on how to do urban sketching from photographs taken while you're on vacation or
while you're out and about. Or you can also use these same techniques while
you're sitting there and doing the fresh air
and the breeze on your face and wanting to
sketch something that you see. I hope you enjoyed this
project and I'm really excited to see your completed pieces
in our student gallery.
3. Supplies: Hi everyone. I know we're anxious
to get started on this lighthouse,
but before we do, let's just give a
quick review of our supplies and then
we'll be all set to go. For those of you that
want to apply a pattern. I have provided that for you. On this page is a PDF
that you can download. And all you need to
do is print that out, trace it onto some
tracing paper. Then you can use some
graphite paper to apply that. Or you could use a light box to apply it to your
watercolor paper. You're also welcome to just sketch it onto
your watercolor paper. This is going to be an
urban sketch type piece. So it doesn't want, we don't
really want it to be exact. You can be more free
and loose with it, so feel free to just sketch it. I'm going to be using 140
pound watercolor paper. It has a bit of a tooth to it. And I always recommend
that you use 140 pound watercolor
paper or better, because that's going to give you a great result with your work. And so it's always worth
a little bit extra money into your watercolor paper is going to interact
well with your water, with your paint brushes. With the paint, it does its job. It absorbs, it stretches, it does all the things
that it's supposed to do. And you'll be really happy
with the outcome there. So I'm going to be doing this
in one of my sketchbooks. And you're welcome to do it on anything that you like as well. I would say for brushes, just go ahead and get something that
you're comfortable with. Just a variety of rounds
and a couple of flats. Keep them on the smaller
side for this piece today. And always, always. My favorite tool, our handy-dandy tissue paper will be using some of
this for sure today. And some clean water and shop towels and then for tools today. So for, again, this is an
urban sketching piece, will be doing some
inking both before we paint and after we paint. So make sure that you test and that your ink is waterproof. I would really hate for you
to start a piece and then put some watercolor over it
and it smears everywhere. So please test it first. These are three of my favorites. I'll probably use two or 32 or all three of
these in today's piece. I do love the micron series. I'll be using
something really fine, a double up five. And this is a unit ball pen, It's a medium, well
it's a fine tip, but it comes on
more as a medium, but it's a real smooth gel
and it is also waterproof. And then this is a Muji
pen, a ballpoint pen. It is also permanent ink and I loved the way all three of these interact and work well
with your watercolor. And of course, you'll be needing probably a pencil to do a
little bit of sketching with. My favorite is the
black wings series. This is a palomino. I just really loved
the way these work. You can make them light and
dark and they erase well. And for erasing, I always recommend using
the white rubber eraser. And then I, I apply my pattern. If you're going to be
using the graphite, I do apply my pattern
using a stylus rather than a pencil so that I
can reuse my pattern over and over and it won't
destroy your pattern. And then lastly, let's talk
about our palette over here. We're going to be using a
number of colors today, but just use what you have, substitute what you've got. I'm sure it will be fine. So for our greens, we'll be using a darker green, which is an undersea green
or something similar. And then we'll be mixing
our lighter green. So I pulled out a
cad yellow medium. You can use a lemon yellow. Just pull out a light medium
that we can mix with one of our blues to
get a light green. And then we'll have our
Leitner dark green. And for our rocks will be using yellow ocher and Naples
yellow and some raw umber. And we'll actually be using some white gouache on
top of that as well. Then for our sky and for shading the lighthouse and for our ocean will be
using cerulean blue, ultramarine blue, and some indigo blue or
something similar. So pull out what you've
got and let's go ahead and get started by
applying our pattern. I'm going to speed up the tape so that you can
watch me ink my name. And you can do it
right alongside me. And then we'll be ready to start washing in some watercolor.
4. Sketch, Ink, and Wash Sky: Let's go ahead and get started
by applying our pattern. I'm going to speed up the tape so that you can
watch me ink my name. And you can do it
right alongside me. And then we'll be ready to start washing in some watercolor. We're going to start
by putting our sky in and I want it to look
kind of wispy and cloudy. So I've got some of my
handy-dandy tissue ready, and I'm going to use one
of my larger rounds. This is number eight. I guess it's more of
a medium-size round. Anyway. I'm just going
to put a little bit of water to get the paper
going, activate the paper. I'm not gonna go over
the light house, but I'm not being super
careful about it. You notice I'm not going
to the outer edges. In urban sketching. You can go to the outer edges, but it's rare because
it's not like a piece of artwork that you
put in a frame. So just start around. Notice I'm using
circular strokes. She is plain to see the kind of wispy looking fresh, getting lighter as I
come down to the island. Now, while that's still wet, I'm going to follow
up my tissue and just gently lift here in there. Get a nice Let's do the other side. I'm going to regenerate
this paper a little bit. Those of you that have
taken my classes before, you've heard me
mentioned that I live in St. George, Utah. It's just outside those lines. National Park, which is
really amazing and beautiful, but we are cactus country. It's very fact today it's
just under 100 degrees, which I showed this with you only because my paper
dries really fast. And so you'll see me rewetting
my paper frequently. And if you live in a
more humid climate, last week I was in Florida
and when I was painting, I found I did not need to regenerate my paper
nearly as often. So you do you and I'll do me and it's all going
to work out this great. Now this is just going
to be my first coat on when to come in and
glaze a little bit more. Love it. Now, I do like to
have a little bit darker around the top edge. I'm going to pick
up a little bit of this ultramarine blue, which is, as you can see here, it's a different blue. I always have a scrap of watercolor paper handy
so I can test out the value and see
if it's where I want it to be before I
place it on my art work. So our wire called
paper's still wet. And I'm going to actually
soften the edge. Just wanted to add a
little more interests in depth right around
the lighthouse. Keeping that circular motion. Dabbing a little bit. Don't you love it? Alright, That's
gonna do for now. I'm going to let this dry. And then if I need to come
in and add more, I will.
5. Wash Ocean & Greens, Glaze Sky: Alright, well this is drying. Let's just come and
Washington a little bit on our oceans. So this is going
to be, we've got our greenery or rocks and
then we have the ocean here. And we're not going to try and do anything
in particular right now, but I just wanted to
put a little glaze in there just to start
laying it in. Again, this is the
urban sketch style, so I'm not bringing it down, I'm not making it square. I'm just going to throw in a
little bit of color for now and we'll add to it. Well, that's still wet.
I'm going to pick up some ultra marine and
darkness rocks with me. Remember the watercolor
when drying or one value per cent lighter. That's good. Canal. Let's let this all dry. Okay. I'm all dry now. But I want to come in. I'm going to add a little bit
more civilian blue to this and just mess up the
edge a little bit. It's a little too
advanced for me. And so I'm just going to
noodle it a little bit. It's not a technical
term, noodle it. But I just want to play with it. I'm just hearing there. If you want your lights to look lighter at this fleet and dark. So that's what I'm doing here
is I want some lighter PC, how that has a lot more
depth than this side now. I like it, guys is to make
sure you have enough water. I would say this is a
5050 mix water and paint. Yeah, I like that better. Okay. So what we have some
fresh blue Let's go ahead and mix
some of our green. Okay, guys, I move the
camera closer because we're getting into the
more detailed portion. Although with urban sketching, you don't do a ton of detail. I mean, you can, but really you're
trying to do something fast while you're
on-site or from a photo even you want
to just try to capture the moment and you don't want
to go into lots of detail. So I'm just taking some of my yellow and some of
my civilian blue. And I'm going to mix up
a little bit of green. I'm going to keep
it on the yellow. This is gonna be obviously
for our light yellow. And just kind of a first
wash of the grass, leaving some white spots. And we're also going to use the same mix for a little
bit of heart attack. I'm going to make it
a little more yellow for the tops of
this little hedge. While that's still wet. Let's go with some of
our darker and darker blue or this point you can pick up some
of that darker green. I'm going to add a
little bit of water. You can see that it
is blending a bit. But here again, I'm in such a dry climate and
it's so hot today. I'm drying so fast. I'm going to use some
of this undersea green. And actually I'm going to
switch to a smaller brush, the number four round. And it can be a pretty
thin wash, about 50, 50. And I liked the screen
when I'm doing a mix, it has a nice yellow undertone. While that's still wet, I'm going to add some
variation here and there. And you can see on the anterior, I just keep adding water and
pushing it out to nowhere. Can keep it loose. An abstract and just let it be. Don't overwork it. While we have this
color out though, we are going to put some
shading on our graph. So let's go ahead and
just add a little while that's on our brush.
Let's go ahead and do a little bit of
splatter lettering. So we're going to have
quite a bit of water on our brush. At this point. I don't want the green on
the lighthouse tissue. I don't really care if
it gets in the ocean. I don't care if it
gets in the sky. Urban sketching is fun
and messy. That's okay. Just wanted to add
that yellow as well. So fun, isn't it? Also
with urban sketching, you'll frequently see people just take it from an edge
and just push it fast. Do it lists and don't
think about it. Give us some loose edge. Great.
6. Trees and Rocks: Okay, well, we're
still working with our green in the photo and I'll post it here
so you can see it. It has trees that are over here. And I'm going to
take the liberty as an artist to
move them up here. Because we don't have
room on the outer side, but I think they add
some great interests. So I'm going to start with some of this yellow
mixture that we have. And I'm just going
to be super abstract and make them nice and
bright on the top. Then while that's wet, pick up some of our green. Alright, I'm gonna do the
same thing on the other side. Let's let that dry. And looking at the photo, one area that I
forgot to have us do was put a little bit of the sky because you can see through the glass at
the top of the lighthouse. So I'm just going to put a
touch of the cerulean blue. It's not going to make
a huge difference. I'm using a lot of water. 50, 50 probably. I'm just gonna go right
over the top of it here. And then we're going
to let that dry so that we can go in and finish it off. Great. So let's let that dry
while that's drying. Let's come down here
and do on Iraq's. I'm going to use my number four. I'm gonna stick with that. I'm going to pull
out some brown, so let me set up my palette. I'll be right back. I've gone ahead and
set up the palette. I have yellow, ocher, Naples, yellow and some raw
umber over here. And I'm using a number
four brush and probably do about 50, 50 ratio. I'm going to start with our
lightest and will go dark. So we'll start with this
beautiful Naples yellow. I use this color a lot for basing in rocks and
stucco and brick, and cliffs and
hillsides and meadows. And it's probably one
of my most used colors. And the way I like to do
this type of rock is, you can see I've got
this strip here. We're gonna do three
layers of rocks, but we're not going to try and fill in what they
look like right now. So I'm just bouncing my brush. Let me get the camera a little upbringing.
It's up to the camera. Just bouncing the
brush and I'm leaving plenty of whites because we have these other
colors to put in. And we still want to
leave some white. You just kinda have
to go with it. Again, this is abstract right
now where urban sketching, where it's not going
to be super detailed. Great. Alright, now it doesn't
matter if that's wet or dry. We're going to pick up some of this beautiful yellow ocher. This is another
great basic color. But it can go on a
little strong for this, I don't want it super-strong. So again, I'm gonna go 5050. Let's test that. Still living in lots of white as you can see. Okay, what's that dry? Let's let that dry just a
little bit before we come in with our Ember
because we don't want that to totally bleed, but it doesn't need to be
completely dry either. For me, that's going
to happen really quickly for you,
wherever you are. You gauge the time. So I would say, you know, just kind of almost
dry to the touch, but your paper is still there, still moisture in your paper. This is going to feel kind
of strong, but that's okay. What we're going to do
is come in and ink this afterwards and make
it into rock sheets. So trust me, when I say
this is all going to work out and you will have
a beautiful rock while I would like to do a little splattering
with our raw umber. Why did that down quite a bit. I don't want a bunch
to go into my ocean. And I don't want any to go
on my lighthouse right now. Cover those up. I don't mind if a little goes
on the grass them. Okay. Good. Alright. Let's let that dry. And then we'll come back up to the top. What's
initially lighthouse.
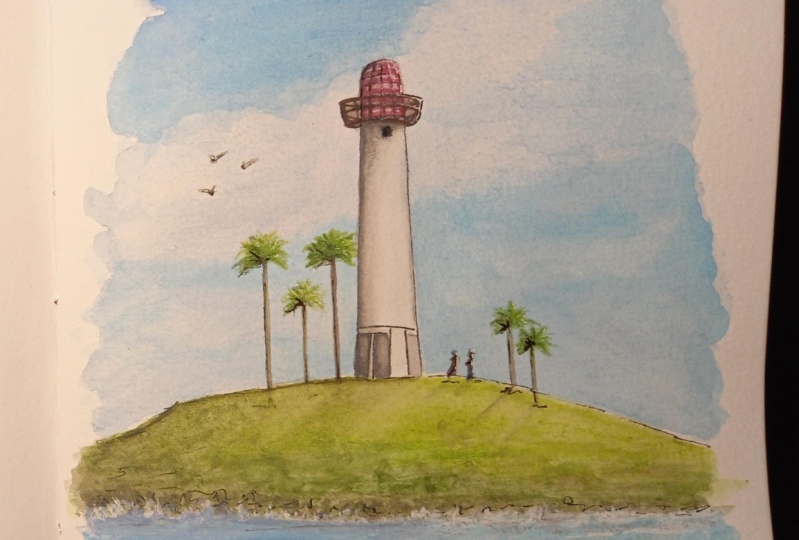
7. Lighthouse and Palm Trees: Okay, everything is dry. We can start with
our lighthouse. I forgot to add this to
our supplies earlier. So if you have this
is Indian red. If you have like a rusty colored red that would work Burnt
Sienna if you add a little too, it would be fine. But we're going to
just add a wash to the top of this lighthouse
using some Indian red. So we're just going
to kind of go basically thicken are lines
that we've already added. Like that. We can still see through it. And actually this would be a good time to add some indigo. Now again, we're
just doing a wash. Okay. It's time for us to
pull out a couple of flat and we're going to
use some white gouache. This is a white lighthouse. So we're basically going to
do white with some shadowing. And I'm going to start
by just picking out some gouache with some water. Gouache is quite
thick compared to watercolor if you
haven't used it before. Okay, so I've just
put down a wash of the white gouache
and I'm going to switch to smaller flat. And I'm going to pick up
some of the cerulean blue. Just going to start laying in a little bit of shadow
down each side. Slip that dry. And while that's drying, we can go ahead and base
in this darker area here. You can use black. I didn't pull it out. I don't like using black. It looks very flat to me. I am going to use
this indigo blue. Not dry it. Let's let that dry and come back
in just a moment. Be dry now. And we're going to take out just a little bit
of this indigo. And some water washed down
and just deepen the shadow underneath the whatever that
top piece is called, a cage. I don't know what it's called. I apologize for some of you that might be experts at this, but like houses, we don't
have lighthouses in Utah, so I don't know. Anyway, I'm going to curve this. And now I'm going to pick up just a little
bit on the side, so it's just the
corner of my brush. You can see I'm just
going to sweep down extra lightly because
if you press hard, you're going to lift
up that gouache. Isn't it beautiful? It just deepens the shadow. And I'm going to add, just intend to do
the same thing. Like, you know. Alright, now we're gonna do the urban sketching thing, guys, and we're going to pick
up something that's really what's a
little bit of white. I'm just going to regenerate
this a little bit. We're going to go. There we go. We look messy and unintentional. I think I want this
to be stronger. You know what we're going to do? We are going to use the ladder
or lighthouse little bit. So I would say, let's err on the
side of lightness. Trying to find
some cerulean blue that I haven't
mixed washing too. So I'm going to go ahead and I'm not I don't want a
ton on my lighthouse. Let's let that dry so we
don't smear our dots. Okay. This is a good point guys to step back about 6
ft and take a look at your piece and see
where you need to strengthen or whatever
you wanna do. I noticed right away
that I hadn't made my shadow dark
enough underneath. So I came back with
some indigo blue and just added some strength
to that shadow. I'm also going to add some indigo blue strength to
the bottom of this basket. Now let's add a little
bit of this indigo blue. Finish off the
windows down here. And then for this door, you pick up a little
bit of that civilian mixed with the white gouache and just add a little
bit of shading. Alright, we are ready to pick up some of this yellow ocher. And let's just lay in poetry. What's also pick up
some of this rock and just add some
variation to the trunk. You can see I made these all
the same height and they need to be various sites. So I'm just kidding. I raise
this one up a little bit. That did the trick
where you are going to go ahead and put
in our palm fronds. And these are going to
be pretty abstract guys. Let's go ahead and mix
up some of our green. I want these first
ones to be the light. So it should be fast and sketchy and fun and loose and free. We're making a stroke like this. So this is the center. We're pulling out a frond
and then he leaves. I'm going to speed
up the camera. What we finished
putting this in. Okay, So we've added in our
light and then now we're going to come in
with an olive green. And you're only going to do the underside of
your palm froms. So if this is the
center, you know, just kinda come in and we're just going to add a
little bit of a shadow. I'm going to speed
up the camera now.
8. Adding Depth to Bushes and Ocean: Okay. How do you do with that guy? I think while I have some
of this olive green now, I'm just going to add a
touch shadow underneath. Just kinda anchor those in. And while I've got
this green out on a little more
interests to my question. Oh, it's really coming together as we want to put just a hint of the rocks under the water by laying in a little
bit of this occur. Notice I'm going all
chickadees. Wiggly. Great. Okay, very good. Let's let that dry. The last thing that we're
going to paint before we dive back into inking is we're just going to put a few soft waves into
the foreground here. I'll post the picture so
you can see it again. It's, it's within a base, so it's very calm. And keep in mind this
is urban sketching, so we're not going
to try and put in every little wave and make
it look super realistic. So I'm going to pick
up some more of our civilian blue and our
ultramarine blue here. It's going to be
quite watered down. And just kinda put a
little softness here. Now I'm coming into
the ultramarine. Again, lots of water. This is probably a 70,
30 min, 70% water. Can add some deepness where
the shadow is from the rocks. Imagine yourself sitting by the bay, painting this outside. You're gonna do a fast. Here. You can see I'm kinda
viewing a little bit more of an up
and down motion. Alright, Let's let that dry. I have stepped back and taking a look at my
piece from a distance which I highly
recommend that you step back 6 ft frequently. I can see that I've made, I've made kind of a triangle. That's, that's cricket. It's not even down the center. So I am going to bring a little bit of more
of the ocean out here. Then I do want to splatter just a little bit before
we move onto our inking. Step back, guys, and make sure
that it's how you want it to be before we move
into the last phase. Okay, last thing I'm gonna
do is do some splatter, and I'm actually
going to splatter in the ultramarine blue. And I'm not going to
cover anything up. I don't really care where
it goes. This point. I like that. Alright, now let's flip that dry and we'll move into
our inking stage.
9. Ink Rocks and Finishing Touches: If you're completely dry, Let's go ahead and add our finishing touches
with our inking. I like to just work from
top to bottom on this. And so I'm going to just look at the top and
see what I need to add. I'm going to pick up
my double out five and just just kind of
add some outlining on some of this red that we put in just to help
clean up my lines. Whenever there's
real skinny lines, sometimes I like
to clean them up. And same with the railing. Who's going to add a touch? It's not that we're
redoing everything, guys. We're just touching
up here in there or emphasizing some things. So on the trees It's
just a little squiggly. And you don't have to do it. But it's very typical
in urban sketching. I'm not going to do
anything on the palms or the trunks because we've already got
that pretty clear. But I am going to go along
the top of the hedge. Good. How are you doing? Guys? I am so excited to
put in the rocks with ink because it's really going
to make this piece pop. And we're so close to being
finished, It's so fun. I have just a little sample
here of what we painted earlier so that I
can demonstrate for you how to put in the rocks. For this piece, we want it
to look like rock shapes, meaning we don't want it to be symmetrical like a brick wall. We want it to be round and
rectangular and big and small, and we just make them
all fit together. I'm going to be
using my uni-ball. It's a fine tip. However, it's really
more of a medium tip. And I want it to just emphasize the darkness
around the rocks. And that's why I'm going to use this particular pen versus the double up five
that we've been doing. So finally, everywhere,
I usually just start, I'm gonna do two or three
layers of rocks probably. And I just kinda
start by going around and picking out what
looks like a rock. And I made sure that
they fit together. Big and small and
different shapes. And away we go. So let me finish this out. So something along those lines and I painted it
really sparsely here, but it's much more
filled in there. But you can always go back in and add more paint if
you're not happy with it. But keep in mind, we're
not doing fine art piece. This is an urban sketch piece
that you would do quickly. And it's just to bring back a memory capsular moment so it doesn't need to
be finely detailed. So I'm gonna go ahead
and speed up the camera and do my rocks and you
can do it along with me. Okay. How did you do? Isn't it amazing how that just transforms the whole piece? And you can see now why I
wanted to use this darker, thicker ink because it really
adds weight to the piece. And if you would like, you can still go
into little crevices between rocks and add
a little more ink, which just gives it a little
more depth and dimension. To touch here and there, which I am going to do. I'll probably speed
up the camera here and just add
a little bit more. But you can see in that
section what that does. So I'm going to
speed up the camera. Alright, that looks great. And I think one of the last
things I'm gonna do with the black ink is go ahead
and just add a few birds. Just a little line. And some weeks, maybe a couple over here
just because they're so fun to love it. Alright, then I am going
to pick up my white posca. It's just an acrylic
marker with a fine tip. And I'm just going to add a few highlights or clean up a little mess that I made here. There. I always travel with this if I want to add a strong
highlights somewhere. This is such a great pen to use. Instead of the white gouache. And a couple of my rocks
needed just a little love. Now, see if I were
doing a fine art piece, I would take my razor blade and scrape that were
out on location, or we're just trying to
do a quick sketch here. So no need to get too caught
up in fine art details. Alright, step back 6 ft
and take a final look. In stepping back, I realized
I didn't put any highlight on the frame of these windows
here, which I like to do. Let's step back again. Alright, in stepping back, I feel like my shadow here needs to be a little bit darker, but I'm not going
to get out paint. I'm just going to add a little contour lines
to it. My marker. Good. Okay, guys. I think we're ready
to sign our name. Fabulous. I'm so proud of you. Thank you so much for
taking this class with me. I hope you had a great time and learned something new
about urban sketching. And I will see you in the
next video to wrap up.
10. Congratulations and Bloopers: Hey, congratulations on
finishing this class. I am really proud of you and
I'm grateful that you spent the time to learn something
new and take a class for me, it's really my pleasure
to be here with you. If you enjoyed this class
and learn something, and you feel like this would be a benefit and fun for
someone that you know, it's really easy to share. All you have to do is look
for this button on this page. Click the Share button, and both you and
your friend would benefit financially
from Skillshare, which is kind of a fun thing. Also, if you would like
to communicate me, there are multiple ways
that you can do that. You can look for
this Create button and upload a picture
of your project, which would be super fun
for us to see what you did. But that's a quick way for us to communicate
back and forth. But you can also find me on Instagram as well
as on my website if you'd like to
see some more of my portfolio or what we're
doing here in St. George. Love to have you join
us here are take a look at my website and see
what's happening. If you wouldn't mind
leaving a review, that would be amazing. I would love to hear how I can improve and become
a better teacher. And it's also a great
reference for people who might be considering
taking one of my classes. So thank you for
that. Alright guys. Lastly, appreciate
you taking this class is actually Part three
of a three-part series. First we did the ocean
way and then second, we did our tropical fish. And then of course, this last
one being our lighthouse. So I hope that you'll take
all three classes and enjoy that piece and we'll be moving forward with
some other funds. Summer things. I
just got back from beautiful Florida was
a great vacation. And of course now I'm all
things ocean for a minute. I've got some fun ideas that
we're going to be doing so until the next class. I guess it means it's
time for one person. Okay. I'll see you soon.
Take care everyone. If you enjoyed this. And now someone else would droop be about I need a camera man. I'm sweating, It's hot. I'm misting. Women don't sweat. We missed
 Kerrie Sanders, Artist, Teacher, Creator.