Transcripts
1. About The Class: [MUSIC] Hi everyone. Welcome
to my 9th Skillshare class. My name is Lisa and I'm a watercolor artist
based in Malaysia. I've been painting for
the past six years and florals are one of my
favorite subjects to paint. In this class, you're going
to learn how to paint sunflowers and how to make
them more dimensional. We'll start with the materials that are needed in this class. Then I'll share with you
the colors and color mixes that I often use in my
sunflower paintings. Now this class is
suitable for all levels. If you're a beginner,
don't worry, because I've included some
useful and important lessons that will prepare you
for the final projects. First, you're going
to learn how to apply basic watercolor techniques
such as wet on wet, bleeding, and lifting
in your projects. Follow up by some
brushstroke practice, where I'll show you how
to create petals and leaves of varying
shapes and sizes. Next, you'll learn how to
use light and shadows to add dimension to your sunflowers
so they don't look flat. Lastly, I'll teach you how
to paint sunflowers in different perspectives
so you can create your own composition of sunflowers in your
future paintings. Once you have completed
all these lessons, you'll start working on your class projects
where you'll be painting these two lovely
sunflower compositions. You will learn how
to add depth and dimension to your paintings. By the end of this class, not only will you have two
lovely sunflower paintings, you will also be able to
apply all that you have learned in this class in
your future paintings. Grab your brushes and
let's get started.
2. Materials Needed For This Class: Let's talk about the materials that you'll need in this class. Now you don't have to use the
exact same brands as mine. Just use whatever
you have available. For papers, I'll be using this bow 100 percent
cotton paper. This is in 300 GSM. Now you can also use
a 200 GSM paper. If you don't have 100
percent cotton paper, you can try using whatever
you have available. But do keep in mind that your
results may vary from mine and some of the techniques may not produce the desired results. For brushes, we'll be
using round brushes. I'll be using this size 6 and size 8 from silver black velvet. I also have a size 2
for final details. For mixing colors, you can use
any palette that you have. I'll be using my
ceramic palettes. We need some clean water. Now, I usually have two
jars of clean water. One to rinse off colors
from the petals and another one to rinse off colors
from the stem and leaves. You need some paper towels to remove excess moisture
from our brush, especially when we're
working wet on wet. Now these are the colors
that I'll be using. If you don't have
these exact colors, you can just use any similar
colors from your palette. It's more important to
focus on the techniques in this class than having
the exact colors as mine. For example, if you don't
have permanent yellow deep, you can replace it
with any orange. For burnt umber, you can
replace it with any dark brown, so you have in your palette. Now you can replace green
Earth with any greens, and it's not necessary
to have shadow green. You can always darken your
green with any dark brown, indigo, or Payne's gray. For lavender, you can replace it with any
blues from your palette.
3. Watercolor Techniques: In this lesson, I'll show you the watercolor
techniques that we'll be using to paint
our sunflowers. The first technique is
the wet-on-dry technique. This is basically just applying
wet paint on a dry paper. Now, moving on to the next technique which is
the wet-on-wet technique. This is where we apply
wet paint on a wet paper. The paper can either
be pre-wet with a layer of clean water
or a layer of wet pain. When paint is applied
on this wet surface, the color will spray and bleed and you create some
lovely soft edges. Now, if you use a
thicker mix of paint, the color will
spread less because there's less water in
the paint mixture. The thicker the
paint consistency the less it will spread. Now I'll show you the
bleeding technique. I'm going to apply some
burnt sienna here. While this is still wet, I'll apply some yellow
right next to it. You can see some of
the burnt sienna bleeding into the yellow. Let's try this again. Now I'll apply some yellow
next to this burnt sienna. Now you can see some of the burnt sienna bleeding
into the yellow. When we have two wet colors
right next to each other, one color will bleed
into the other. Now let's move on to the next technique which
is the lifting technique. We use this technique to create highlights and also to
correct any mistakes. I'm going to rinse my brush
and them off excess moisture. Now I have a clean damp brush. I'm going to lift off the
excess paint from the paper. Each time you want to
lift up any excess color, you need to rinse
your brush and remove any excess moisture
on the paper towel. Now we can do this as long as the paint is not completely dry. Now I'm going to
show you how to use these techniques to
paint a sunflower, I'll start with
the flower center. While this is still wet, I'll paint in the petals. Right away you can see some
color bleeds from the center. This creates some
shadows in our petals. Next, I'll create
some textures in the center while the
paint is still a bit wet, I'm going to tap in
some burnt umber. Here I'm using the
wet-on-wet technique. Now I'll use a thicker
consistency of burnt umber. You can see that it
doesn't spread as much because the thicker
the paint consistency, the less it will spread. Now if you want to learn more
about paint consistencies, I highly recommend you take
a look at my previous class, nine-day watercolor
floral challenge. In that class,
you'll learn how to use the right paint consistency in your floral paintings so that you get your
desired results. Now I'll show you how to
use the lifting technique. I'm just going to drop in a
bit more burnt sienna here. I'll paint some
petals over here. You can see we have a lot of burnt sienna bleeding
into the yellow petals. In this case, we can use the lifting technique to lift
up the excess burnt sienna. You can practice these
watercolor techniques before you move on to
the class projects.
4. Brushstrokes: In this lesson, I'll show
you how to paint petals and leaves using some
simple brushstrokes. We'll start with the brushstrokes
for painting petals. I'll start with the
most basic brushstroke. We usually use this
for painting leaves. What you do is, just start with the tip of your brush,
press and lift. You can also make
downward strokes and try to paint them in
different directions. If you want a broader stroke, just press down a bit
more on your brush. I'm using a size eight brush, but you can also use a smaller
brush like a size six. Let's switch to a
size six brush. Just press and lift. You can vary the broadness of the leaves by varying the
pressure on your brush. If you want to create
a wispy stroke, just quickly lift your
brush towards the end. This creates a very pointed tip. Now you can also combine two strokes to form
a basic leaf shape. Try to paint them in
different directions. Now we can make this basic
leaf strokes slightly curve, so it's like a C stroke. Again, practice painting them
in different directions. If you want to create
some wispy strokes, just quickly lift your
brush towards the end. I'm going to switch
back to my size eight. Next we're going to
paint some thin strokes, so you can make them a
bit curved and again, paint them in
different directions. You can also paint
them quickly to create some wispy strokes. You can use this thin stroke to fill in any gaps
between the petals. Now you can also combine this thin stroke with
the other brushstrokes. Now, another way to create
wispy strokes is to add the thin stroke at the end
of your basic brushstroke. We can practice painting them
in different directions. Now I'm going to
show you how to use these brushstrokes
to paint the petals. I'll just paint a
center for sunflower, and I'll just add some
basic brushstrokes. It's okay if they
don't look the same, you can actually make some a bit longer and some a bit shorter. Now I'm going to
add a curve stroke and I can also make
a downward stroke. I can add a thin line next to the petal just to
fill in the gap. Try to vary the
shape of the petals. You can also make them curl in different direction so that your sunflower will look
a bit more natural. If you want to
create wispy petals, just quickly lift your brush. Now you can also turn
your paper to make it a bit easier when you're
painting the petals. Now if you want to create
wispy brushstrokes, you can add a thin
stroke right at the end. Practice painting
these brushstrokes before you move on to
the class projects. Now let's move on to
painting our leaves. Again, we will use the
basic brushstroke, and to make it a bit longer, just dry your brush before
you lift your brush. If you want a broader leaf just press down a bit
more on your brush. If you want a thinner leaf, just apply less pressure, or you can just use
a smaller brush. Now we can make
them a bit curved, just like what we
did with our petals. You can paint them in
different directions, and to create wispy leaves, just quickly lift your brush. Now we can combine these
brushstrokes to form a leave. Basically you can combine as many brushstrokes as you like to achieve
the desired shape. Now we can also create a broader stroke by using
the side of our brush. We can combine
other brushstrokes with this stroke
to form our leaf. Basically you can combine
all these strokes as many as you like in order to
achieve the desired shape. For example if I want to
create a heart shape leaf, I can use a side of my
brush to create a C stroke, and then I'll just add
some basic strokes until I get the desired shape. Let's paint another one
facing the other direction. I can draw in a darker shade of green while it is still wet. This will create some shadows
and highlight on the leaf. Now you can also make a sweeping
motion with the side of your brush to create a
long and wispy leaf. Then you can just add a stem. Just practice all
these brushstrokes. You can experiment with
different brushes and of different sizes and see what brushstrokes you can
create with your brush. Then you can combine these brushstrokes to
get your desired shape. Now for thinner leaves, you can just use
a smaller brush, so here I'm using
a size two brush. You can practice all
these brushstrokes before moving on to
the class project.
5. Color Palette: In this video I'll show you the colors that you use
to paint our sunflowers. The first color is lemon yellow, and then we have
permanent yellow deep. Now I find this lemon
yellow a bit too light, and this is a bit too dark, so I'm going to mix
these two colors to create a medium
shade of yellow. I'm going to use this
to paint the petals. Now the next color for the
petals is yellow ocher. We are going to use these two
colors to paint our petals. Next we have burnt sienna. We're going to use burnt sienna
to paint some shadows on the petals and also to paint
the center of our Sunflower. The next color is burnt umber. I'll use this to create
some textures in the flower center and also to darken some parts of the center. Now moving onto the
leaves and stems, I'll be using two greens. The first is green earth, and the second one
is shadow green. Now feel free to use any
greens from a palette. Now for the lightest
green I'm going to mix green earth with
a bit of yellow. If I want a lighter
shade of green, I can add a bit more yellow. I can create a
range of colors by varying the amount of
yellow in this mixture. Now for the mid tones
I'll use green earth. I can adjust the tonal values by varying the amount of
water in the mixture. For the darkest green I'll mix green earth with shadow green. If I want it to be
a bit darker I can add a bit more shadow
green to the mixture. Now if you don't have
shadow green you can always darken your
green with sepia, indigo or Payne's gray. We have a range of greens here ranging from light to dark. We are going to use
this range of green to add depth and dimension
in our final projects.
6. How To Add Dimension To Your Sunflowers: In this video, we are going
to talk about dimension, and how to add more
dimension to our flowers. What is dimension? Dimension is how we
describe a form and shape. Here we have a basic shape, which is a circle. Now this is considered
two-dimensional because we can really measure it in
terms of length and width. This looks like a flat object. How do we add more
dimension to an object, or rather, how do we make an object look more dimensional? The easiest way to
add dimension to an object is by adding
highlights and shadows. Now, if we add a light source, and create some highlights
and shadows on this circle, we will make it look
more dimensional. Now we can measure it
in terms of length, width, and depth, and it no longer looks flat. By adding highlights
and shadows, we give it more dimension
and turn it into a sphere. Now, this sunflower painting
on the left looks flat. To make it more dimensional, I used more than one
color for the petals, and added some shadows
here and there. Now, I also varied
the size and shape of the petals because
the sunflower petals are not entirely flat. They tend to curl, bend, and also, overlap one another, so this will create some
shadows on the petals. I've also added some
dimension to the stem by painting some shadows on the
left and for the leaves, I created some highlights. The easiest way to
add dimension to our sunflower is by adding
highlights and shadows. In the next lesson, I'm going to show you how
to paint this sunflower, and how to add dimension to it.
7. Front Facing Sunflower: In this lesson, I'm going
to show you how to paint a front-facing sunflower and how to make it appear
more dimensional. The easiest way to add dimension is to add
highlights and shadows. In order to do this, we're going to use some
light and dark tones in our sunflower by varying the colors in our
petals and leaves. Let's start by mixing the
colors for our petals. The first color is a mixture of lemon yellow and
permanent yellow deep, and the second color
is yellow ocher. We'll use a bit of
burnt sienna to add some shadows in the petals. Let's start by painting
the sunflower center. We're using burnt
sienna for this center. Now, let's paint in the petals
while the center is still a bit wet so that we can
get some nice color bleeds. We're going to randomly
switch back and forth between the yellow mixture and yellow ocher when we're
painting the petals. You can start with any color. I'm going to start with
the yellow mixture. I'm using my Size 8 brush. I'll vary the size and
shape of my petals by varying the brushstrokes
which we practiced earlier. I'll add in some thin lines
to fill in some of the gaps and also make some petals
a bit more with whisperer. Now, instead of
switching back and forth between the two colors, we can also use
one color to paint several petals and then paint the remaining petals
with the second color. Here we have some nice color
bleeds from the center. Now let's add some shadows. I'm using a light
mix of burnt sienna. With my Size 2 brush, I'm just going to add random
strokes here and there. Once I'm happy with the
way the petals look, I can start working
on the center. I'm going to rewrite
it slightly with the pure burnt sienna
so that I can use the wet-on-wet technique to create some textures and
shadows in the center. Looking at the reference photo, we can see some shadows
along the edge of the flower center where
the petals are connected. I'm going to use my Size 2 brush and tap in a bit of burnt
umber along the edge. At the same time, I'm creating a bit of textures in the center. Next, we'll darken
the center with a thicker mix of burnt umber. This is a darker
spot in our flower. Once I'm happy with
my flower center, I'll move on to the stem. I'll make it a bit curved. I'll add some shadows on the left to give it a
bit more dimension. Now, I'll use a bit of
water to soften that edge. Next, I'm going to add a
heart-shaped leaf on the right and I'm going to combine several brushstrokes until
I get my desired shape. While the paint is still wet, I'm going to drop in a
bit of my shadow green. This will create the illusion
of highlights and shadows, therefore, making this leaf
look more dimensional. I'll add two more
leaves on the right, the smaller one at the top and another heart-shaped
leaf at the bottom. I'll repeat the same
process by dropping in a darker green to
give it more dimension. Now, for the final step, I'm just going to
darken the shadows on the stem bit more since they
have faded quite a bit.
8. Painting Sunflowers In Different Perspectives: Now in this lesson, I'm going to show
you how to paint two sunflowers in
different perspectives. Let's start with our
first sunflower, which is a partially
open sunflower, and the center is
facing upwards. Imagine if we're
looking from the side, we can only see the petals, the base of the
sunflower, and the stem. The center will be
completely hidden. Now I'll show you
how to paint this. I'm going to paint one facing
the upper left corner. Now imagine the base
of the sunflower is like a shallow cup
or shallow bowl. I'm just going to
lightly sketch the base, and then we'll fill in
this gap with some petals. I'm going to use my yellow
mixture and yellow ocher. Now we can also leave
some white spaces in between the petals. Then I'll add some shadows using a light mix of burnt sienna. Now I'll paint the base. Now let's add the sepals. Now, if the petals
are still wet, you can either wait for them to dry or you can use a
thicker mix of green or just remove excess paint on a tissue so that it doesn't
bleed too much on the petals. Next, I'll paint
the stem and add two smaller leaves on
both sides of the stem. All right, now let's move
on to our second sunflower. The center for this sunflower
is somewhere over here. Now, imagine if we
tilt this sunflower towards us at a 45 degree angle, the center will be
partially visible. It will look
something like this, where you have
petals in the front, which are closer to us and
some petals in the background. Now I'll show you
how to paint this, so I'm going to
start with the base. Then I'll fill in the petals
which are closer to us. Now the center will
be roughly over here so I'm just going to
outline the center. Now before you fill
in the center, just make sure that these
petals have dried completely. Otherwise you get some brown
bleeding into the petals. Now these petals here
are a bit too long. I'm going to paint
over them with some burnt sienna while I'm
filling in the flower center. Now I'll paint the petals
in the background. Then I'll add some shadows using burnt sienna to give it
a bit more dimension. Now let's pin the base. We'll add some sepals
followed by a stem. Let's practice another
one so I'll start with the base and then I'll
fill in the petals. Now let's add some shadows
using burnt sienna. Key we'll paint the outline
of the flower center. Then we'll fill in the center
with some burnt sienna. Now I'm going to paint
the petals in the back. Then I'll add some shadows
using burnt sienna. Now I'll darken the
center a bit more. Now let's paint some
sepals followed by a stem. Now I want the
center to be a bit darker so I'm going to drop
in a bit of burnt umber. Practice painting these flowers before moving on to
the class projects.
9. Sunflower Garden : Painting The Sunflowers: [MUSIC] Welcome to our
first project where we'll be painting this
sunflower garden. Now we're going to
paint now sunflowers in different perspective. To create depth in a painting, you paint the leaves in the
background a bit lighter, and the ones in the
foreground a bit darker. It also vary the size, shape, and color of our leaves to add more interests to our painting. Let's prepare our
colors before we begin. I have a mixture of lemon yellow and permanent
yellow deep here, yellow ocher and burnt
sienna in my palette. Let's start with the
sunflower center. Now, let's paint the petals, but the center is still wet, so that we can get some
nice color bleeds. For the petals, I'm just randomly switching
back-and-fourth between the yellow mixture and
yellow ocher and I'm varying the shape and size of the petals to make my sunflower
look a bit more natural. Now, if there are any gaps
in between the petals, you can add a thin stroke. I'll also add some thin
strokes on some of the petals to make them
look a bit more wispier. Next, I'm going to
tap in a bit of burnt sienna along the edge of the flower center to let
it bleed into the wet petals. Now, let's add some dimension to this flower by adding
in the shadows. I'm using my size 2
brush and I'm adding random strokes of burnt
sienna on the petals. Once you're happy with
the way your petals look, you can start working
on the flower center. I'm just going to tap
in some burnt umber along the edge of
the flower center. Then I'll darken the center
with a bit more burnt umber and additional textures
to the center. Now I'm going to add more
shadows on the petals. Feel free to skip this step if you're happy with how
your petals look. Now let's move on to
our next sunflower. We'll paint a side sunflower, where the center is
partially visible. Now feel free to
rotate the paper. I'll start with the petals
which are closer to us [MUSIC] and then I'll complete the
base by adding in some sepals. Also paint some tiny leaves followed by some
shadows on the stem. Next, I'll draw the
outline for the center, but be careful not to touch the yellow petals because
they're still wet. While waiting for
the petals to dry, let's paint in the stem
for our first sunflower. We'll add some shadow on the left to create
a bit of dimension. Next, we paint the stem
for our second sunflower, and I'll add a bit of
shadows on the left. Now that the petals
are completely dry, let's fill in the flower center. Now let's add the petals
in the background. [MUSIC] Next, I'm going to darken
the petals in the foreground with a
bit of yellow ocher. I'll darken the center
with a bit of burnt umber. I'm going to shorten
some of these petals here so that the center
will be more visible. I'm just going to paint
over them with a bit of burnt sienna and burnt umber. Now, let's move on to
our last sunflower. We'll paint a side sunflower
on the lower-left corner. We'll start with a stem and
then we add the petals. I'll start with yellow, and then I'll add in
some yellow ocher. Next, I'll paint the sepals at the base, and I'll remove excess
moisture from my brush so that the green doesn't bleed
too much on the wet petals. Now, let's paint some
leaves for our sunflowers. Since these two sunflowers
are in the foreground, I'm going to paint their leaves a bit
darker than the rest. Let's start with this
front-facing sunflower. I'll add a heart-shaped
leaf on the right, and while it's still wet, I'll drop in a darker green. I'll paint another
leaf here on the left, which is partially
hidden by the sunflower. [MUSIC] I'll do the same for
this side sunflower here. We'll have another leaf here
which is partially hidden. Let's drop in a darker green while these leaves
are still wet. Now, moving on to the
sunflower in the background, I'm going to paint two
smaller leaves here, and I'm going to make them a bit lighter than the leaves
in the foreground. This completes the first
part of our painting. In the next lesson, we are going to paint the
leaves in the background.
10. Sunflower Garden : Background Foliage: We're going to paint some
leaves in the background. Since they're in the background and further away from
the viewer's eye, we'll paint them
a bit lighter to create some depth
in the painting. I'll be using my
lightest green which is a mixture of green earth
and permanent yellow deep. I can create a range of light green colors by
varying the amount of yellow in my mixture and I'll also be using a lighter
value of green earth. Basically we're
just going to paint some leaves around and
behind our sunflowers. We'll paint leaves
of varying sizes and colors to make our composition look a bit more interesting. [MUSIC] You can also use a lighter value of your green and yellow mixture
to create a lighter green. This part in the foreground
looks a bit bare, so I'll attach a leaf to the sunflower which
is in the foreground. Let's have some stems emerging from behind
our sunflowers. Right at the top, I'll
add some smaller leaves, like filler leaves to add
interest to the composition. I'll add more stems to fill in the empty spaces and I'll make them really light to show that they are
in the background. I'll slightly darken the
leaves in the foreground. For the final step, I'll just add some smaller
and lighter leaves to fill in any empty spaces. In the next video, we're going to add the
finishing touches.
11. Sunflower Garden : Finishing Touches: Now for the finishing touches, I'm going to darken the
leaves and stems in the foreground to bring them
closer to the viewer's eye. This will add depth
to the painting. I'm going to darken the stems on our first sunflower and I also darken this leaf here. Now this sunflower is also in the foreground so the stem
should be a bit darker. I'm going to darken the
shadows a bit more. This completes our
sunflower garden. We managed to create depth in our painting by painting the elements in the
foreground a bit darker, and those in the background
which are further away, we painted them a bit lighter. Now, don't forget to
upload your projects in the project gallery so that I
can give you some feedback. I hope you enjoyed
painting this. I'll see you in the next lesson.
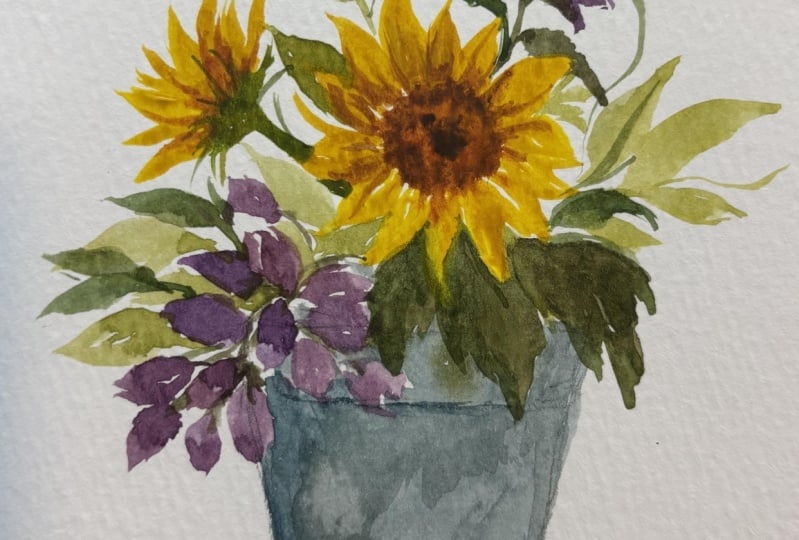
12. Sunflowers In A Pot : Painting The Sunflowers: For our second project, we are going to
paint this lovely sunflower composition
in the flower pot. Now, we are using
the same colors, so I have my yellow mixture, yellow ocher, and burnt
sienna in my palette. Now, let's start with
the flower center. While the center is still wet, I'm going to paint the petals. Right away you can see
some color bleeds, I'm just repeating the
same process where I am randomly switching
back and forth between yellow ocher
and my yellow mixture. At the same time, I'm varying
my brush strokes so that I can create petals of
different shapes and sizes. This will make our sunflower
look a bit more interesting. Now, I'm just going to
add some thin strokes to make my petals look
a bit more wispier. This step is optional. Now, you can see some
nice color bleeds coming out from the center. Next, let's add some shadows, so I'll look my size
2 brush with a bit of burnt sienna and I'll add some random strokes
here and there. Now, let's darken the center and create some textures
using burnt umber. I'm just using the tip of my brush to tap in
some burnt umber. Now, let's darken
the center with a bit more burnt umber. I'll use a thicker mix of burnt umber because I want this part to be the darkest
part in the sunflower. Now, I'm going to use a
bit of yellow to fill in these gaps here in
between the petals. I can also add a bit more
texture to cover up those gaps. Now, I'm going to place
our second sunflower on the upper left corner and
it's going to be a sunflower. I'll just draw a horizontal
line to mount the base of our sunflower and
then I'll fill in the petals with my yellow
mixture and yellow ocher. Next, I'll add
some shadows using a diluted mix of burnt sienna. Now, I'll just fill in
the base with some green. Now, because the petals
are still a bit wet, I'm just going to
let it dry first and then I'll come back
in to paint the sepals. While waiting for
the petals to dry, I'll just lightly sketch
out the flower pot. Now that the petals are dry, let's add in our sepals. We're going to paint some
complimentary flowers in our bouquet and
we're going to use the color violet because
violet and yellow are complimentary colors and
they go very well together. I'm going to use lavender. Now, if you don't
have this color, you can use any blue
from your palette. So I'll make two paddles
of lavender in my palette, and I'll add Permanent
Rose to both of them. But one paddle we will have a higher ratio of
Permanent Rose. We're going to use these
two colors to paint some simple flowers on the
left so I'm just going to make some three to
four petal flowers and I'll switch back and forth
between these two colors. Now, I'm going to add
a bit more rate to this paddle to create
a lilac shade. [MUSIC] I'm just
randomly switching back and forth between
these two colors. Now let's attach some
stems to these petals. We're going to paint
another flower on the upper right corner, this time we're going to
paint an aster flower. I'll start with the petals and
I'm using my lavender mix. Now, let's attach a
stem to this flower.
13. Sunflowers In A Pot : Painting The Leaves & Pot: You start with some
leaves here at the base, which are partially
hidden by the flowers. I'll leave a tiny
gap here between the flower and the leaf. Now I'm going to paint a
larger leaf right next to it. I'll drop in a darker green
while it's still wet. One more leaf on the right before we start working
on a flowerpot. I'm going to drop in a
bit more green here. This could be the
shadows from the flower. Now let's move on
to the flower pot. I'm just going to
create an outline. Then I'll apply some lavender on the left and gently blend out the edges
with some clean water. Next, I'll add some indigo to my lavender mix and
use it to darken the left side of
the flower pot and also to create some shadows
underneath the leaves. I also drop in a
bit on the right. I'll darken the
shadows a bit more. Next, I'll use a tissue
to gently dab off the excess paint in the midsection to create
some highlights on the pot. This will give it a
bit more dimension. Now let's move on to the
leaves in the background. We're going to make
them a bit lighter. Again, try to vary
their shape, size, and color to add more
interest to the composition. I'm just going to
paint some leaves around our flowers [MUSIC] and to add contrast, I'll paint some smaller leaves
next to the larger ones. We're going to let this
layer of leaves dry, and then we're going to add
in a layer of filler leaves. Now that the first layer is dry, I'm going to paint in
some filler leaves. I'm going to make
them a bit darker than the first layer of leaves [MUSIC] I'll attach
two smaller leaves to this as the flower. Now we can also paint
some stems sticking out. Now, I'll also vary
the colors for my filler leaves just to make the composition a
bit more interesting. Now for the finishing touches, I'll darken some of
the stems here and paint some leaves
behind the flowers. This completes our
bouquet of flowers. Now, don't forget to
upload your projects in the project gallery so that I
can give you some feedback.
14. Final Thoughts: Guys, congratulations on
completing the class. I hope you've enjoyed
painting along with me. Now, the techniques that
you have learned in this class can be applied in your other
floral paintings as well. It's very important that you
get to know your brushes, to know what kind of
strokes they can produce. Experiment with other
brushes that you have and see which
works best for you. Now, if you have any questions, do post them in the
discussion section and I'll get back to you. Do share your projects, you can upload them in the project gallery so that I
can give you some feedback. If you're sharing on Instagram, you can tag me @blue.lisart. Also, it will be
great if you could leave a review for this class. Thank you for taking this class, and I hope to see you
in my next class.
 Lisa Lam, Watercolor Artist