Transcripts
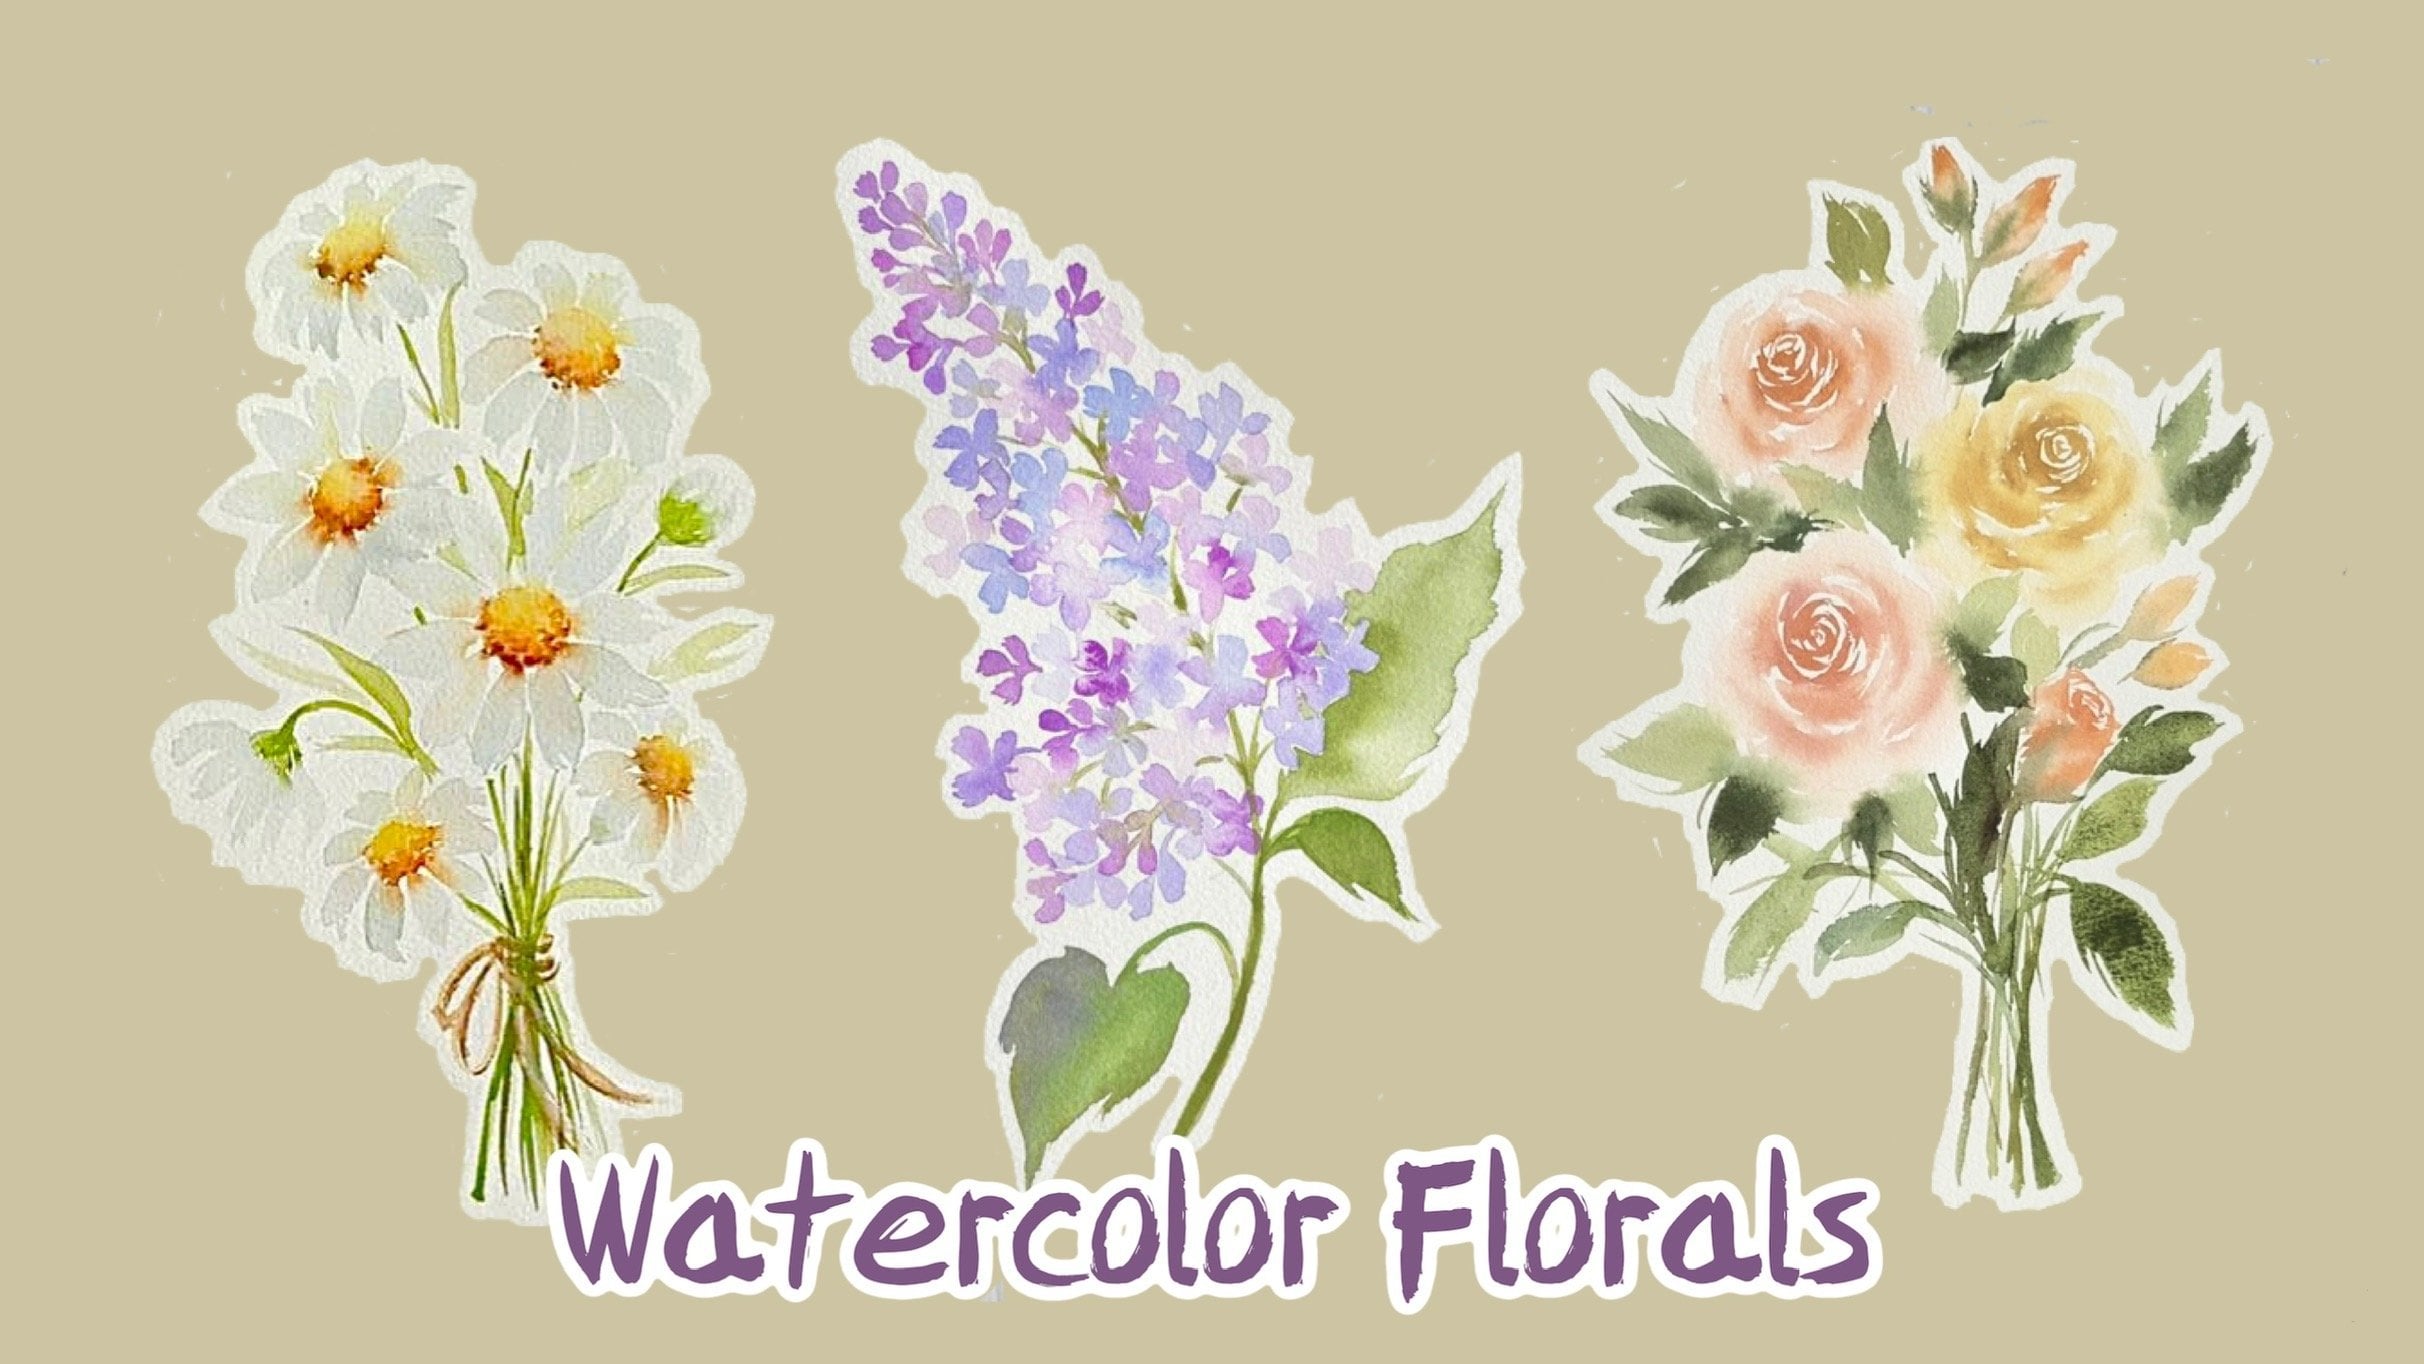
1. Introduction: Hi everyone, welcome to my class. My name is Lisa and I'm a watercolor artist space in Malaysia. You can find me on Instagram where I share my art works and some short video tutorials. In this class, I'll be teaching you how to paint loose watercolor, the nominees. This class is suitable for all levels, as I'll be guiding you step-by-step throughout the class. You will learn simple brush strokes and some basic watercolor techniques for painting loose fluorophores. Then I'll show you step by step on how to apply these brush strokes and watercolor techniques in painting. And by the end of this class, you will be able to pin this small composition of a nominees.
2. Supplies: In this video, I'll show you the supplies that I'll be using for this class. Now you don't have to use the same brands that I'm using, just use whatever brands you have. So these are the colors that are BY using royal blue, cobalt, violet, ultramarine, violet, or lift green, Sap Green, viridian, and indigo. If you don't have some of these colors, you can replace them with any similar colors in your palette. You can replace cobalt violet with any ping, our reach shades in your palate. So Afghans, alpha artists, and permanent rose from each channel. And for royal blue and you can replace for you blue with sorrow limb glue or a diluted mix of cobalt blue. Now I'll be using a 100% cotton co-presence. Other papers in 300 GSM and four brushes. I'll be using psi six round brushes. But you can use any medium-size from brushes as long as they have appointed a tip. You will also need some paper towels or any cloth to blown-up excess moisture and paints from your brushes. And lastly, you need a pellet and a clean jar of water.
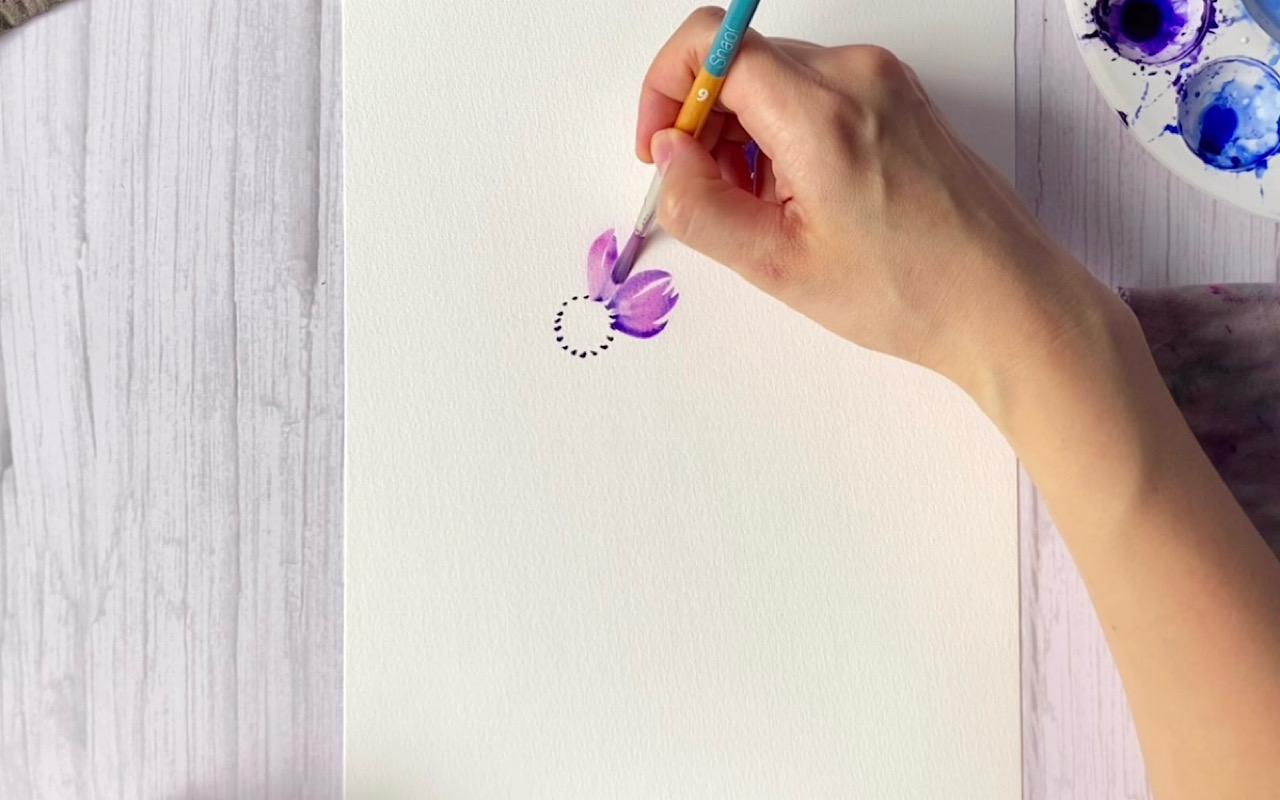
3. Brushstrokes & Watercolor Techniques: Now let me just quickly show you the brush strokes that we will be using to pin our denominator. So we can make little dots using just the tip of our brush. We can also draw fine lines with just the tip of our brush. And we can vary the thickness of these lines by varying the pressure on our brush. So to draw thicker lines, just supplies slightly more pressure on your brush. And to pin really thick strokes, apply more pressure and press down on the belly of the brush as you glide your brush across the paper. We can also draw wavy lines and we can form a leaf for our nominee by joining these lines together. The next brush stroke is for painting our paths. So I'm studying at the tip of my brush, pressing down on the belly and lifting bang up. We can create wispy strokes by and these quickly. So practice painting these in different directions and Pingdom quickly to create risky strokes. Now, the second brushstroke flower petals is to see stroke. So starting at the tip of your brush, press and curve as industrial brush. Now we can create wispy strokes by painting these quickly. So again, practice painting them in different directions and pin them quickly so you can get risky strokes like these. So once you are comfortable with painting these brush strokes, we can now form our paths by combining these see stroke with the previous brushstroke. So practice painting these brushstrokes. Before moving on to the next video, you can awesome. Men with different ROM brushes to see which works best for you. Now, I'm going to show you the basic watercolor techniques that we will be using to paint our nominees. So let's start with a wet and dry technique. Now this basically means applying web pane on the dry being gone. This technique we create Hart and defined edges. Now, the next technique is still wet on wet. And now this is when we apply Web pain on a wet paper and letting the colors spray. So I'm gonna went this area with water, making sure there are no podocytes and the water is evenly distributed. Now if I hold this up to the light, there should be a nice sheen on the paper. Then I'm gonna drop in a color and you can see the colors starting to bleed up. Now the more water you have in your brush, the more it's gonna spray. So if I draw in a diluted mix on violet, it's gonna spread more than this saturated mix of violet. And with this technique, you will not get any heart edges. I can even move color using a rinse and dry brush without creating any harsh lines. Now, the next technique is colored leading. So this is where one color will bleed into the colour which is next to it, because both colors are wet. So I'm going to ping the square with some saturated mix up Violet. Then using another color, our pain, another square next to me. And I'm going to touch the tip of my brush to the edge of this Bobo square. And you see inviolate leading into the pink square. So this is the colicky. So now I'm gonna show you how we can use these basic watercolor techniques to paint a simple flower. I'll start off by adding around center. So this is wet and dry technique. Then our main column bleeds SIP and the petals by touching the edge of the red center. Finally, using the red on red technique, how Trump some violated a wet center, like the bleed into the patterns. I can also draw a second color on the web pentose, and allowing the colors to blend together. So in the next video, we will pin an anemone using these techniques and the brushstrokes wish we practice earlier.
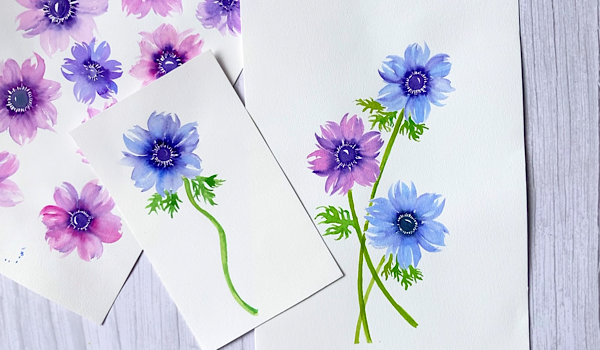
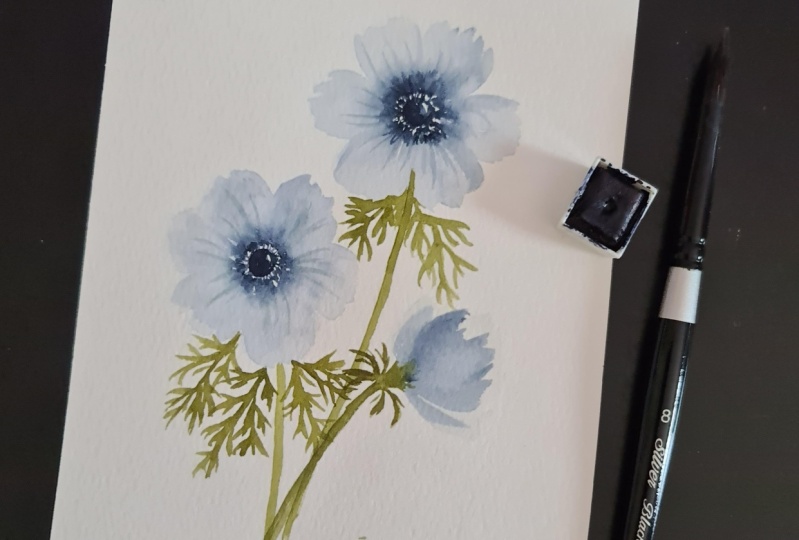
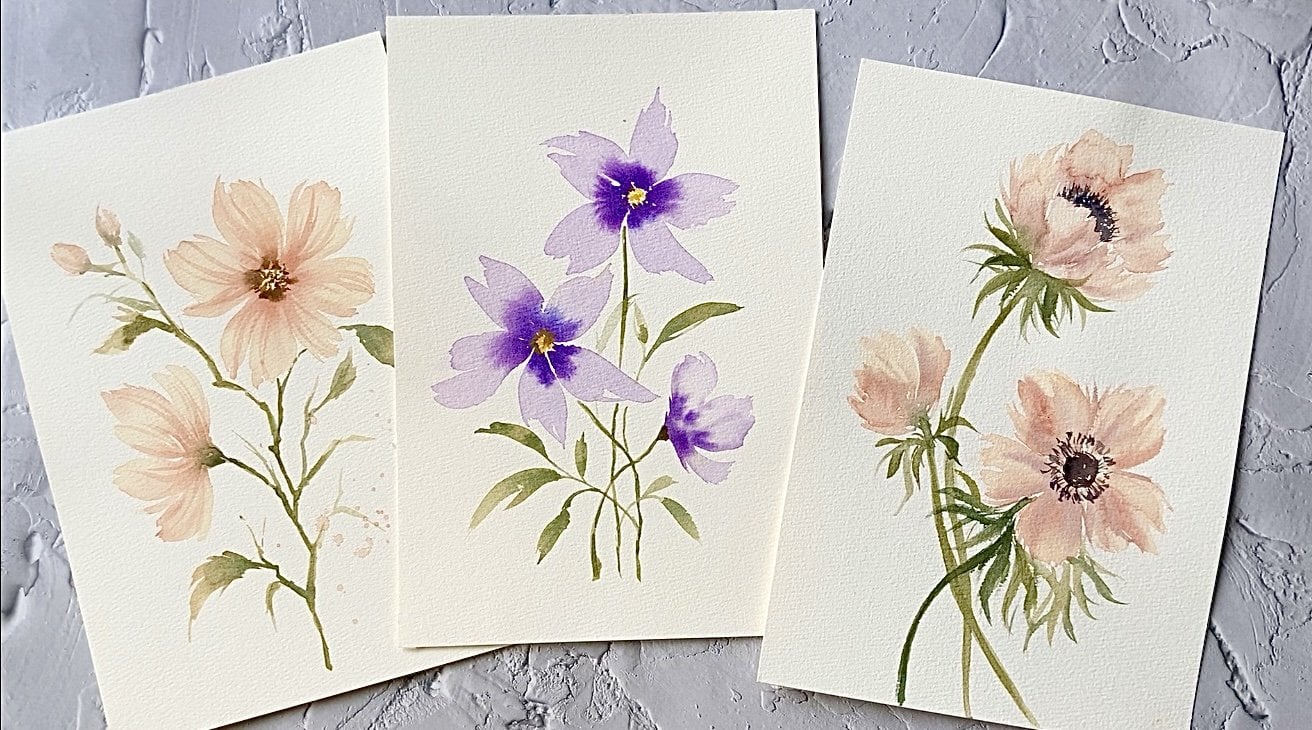
4. How to paint an anemone: In this video, I'm gonna show you step by step on how to paint in the nominee using a brush strokes and watercolor techniques which we practice earlier. So in my palette of God, some royal blue, ultra Marine and a saturated mixture of violet. So let's start by loading our brush with some violet and will make little dots to form around center for our flower. Now we went these dots to stay wet. Sudan do bleed when he painted pentose. So to make sure they stay where we can go over them with a bit more paved. Then loading our brush with some royal blue will start adding The Cantos by using a brush strokes which we practiced earlier. So make sure to touch some of these dots to a locally bleeds into the petals. So try varying the shape of each petal s. This will give your flower alone nature. We look. And if you find that your pet, Those are starting to dry. You can slightly random with a little bit of Froyo blue, but make sure to leave the whitespaces. So while the petals are still wet, we can apply the wet on wet technique by tapping in some ultra marine onto the center of our flour and letting the color blue. And then using a rinse and dry brush, our pull out some of this color to create some color variation in the patterns. Next, bloat your brushes, Sam Violet, and start drawing fine lines coming out from the center and letting them play into the web potatoes. And finally, we'll add our proposed centre, leaving a little bit of highlight. So the greens that I'll be using for the stem and leaves, olive green, Sap Green and VV due by you can use any greens in your palate. So load your brush with any green and add a curvy stem. Then draw some shot wavy lines to form the leaves. Now make sure that the potatoes are dry and before adding the leaves. Otherwise you might get some green splitting into the petals. So carefully paying beliefs surrounded petals to show that the leaves are behind the flour. And finally, some shadows by using a darker green. So now that you know how to paint an anemone, We are going to paint a small composition of anomalies in the next video, where you can paint along with me.
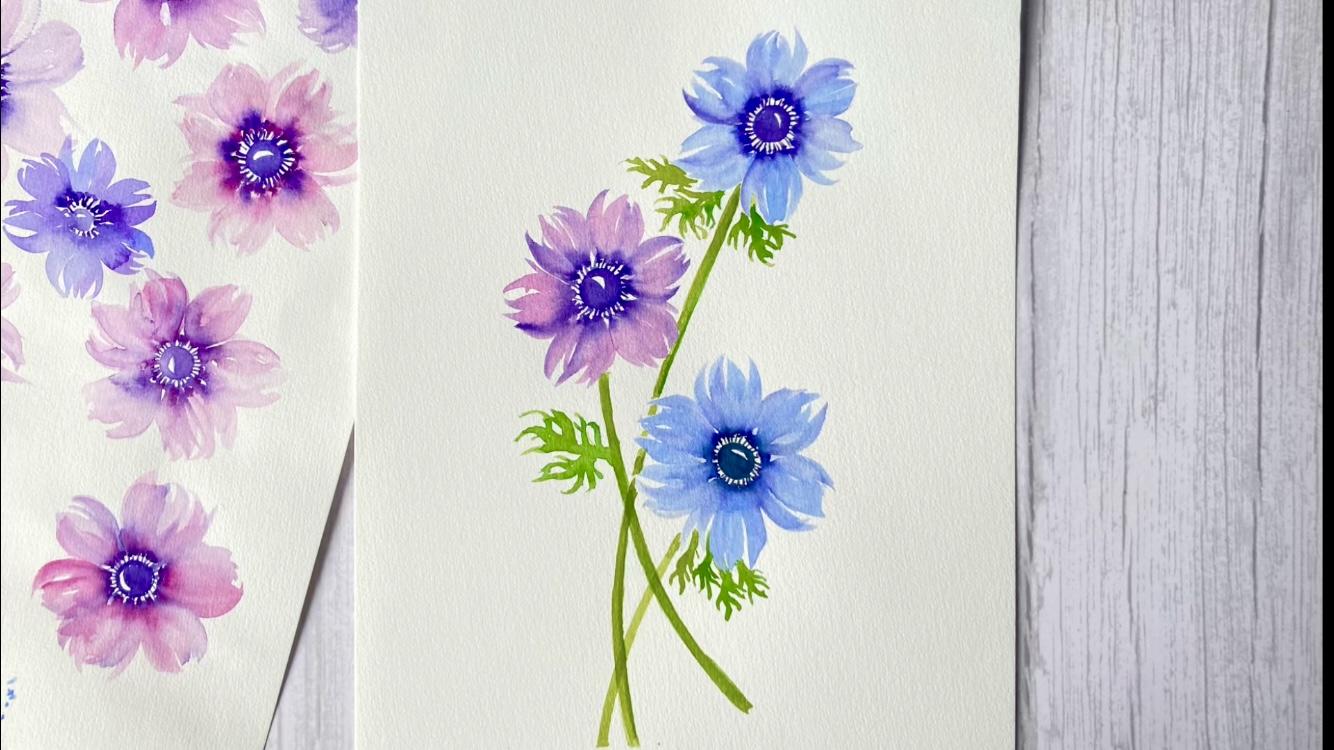
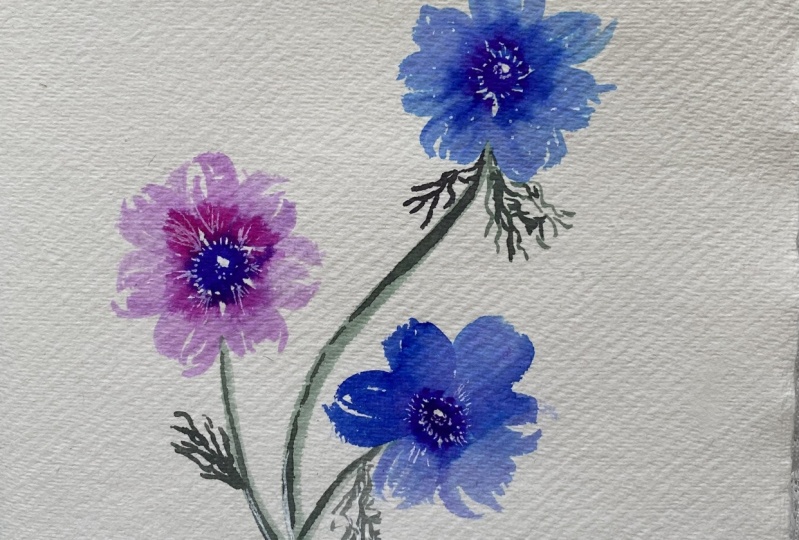
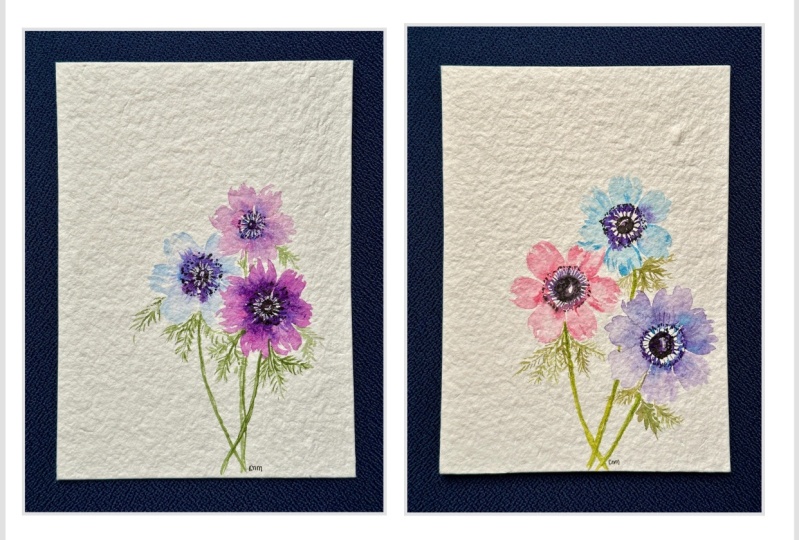
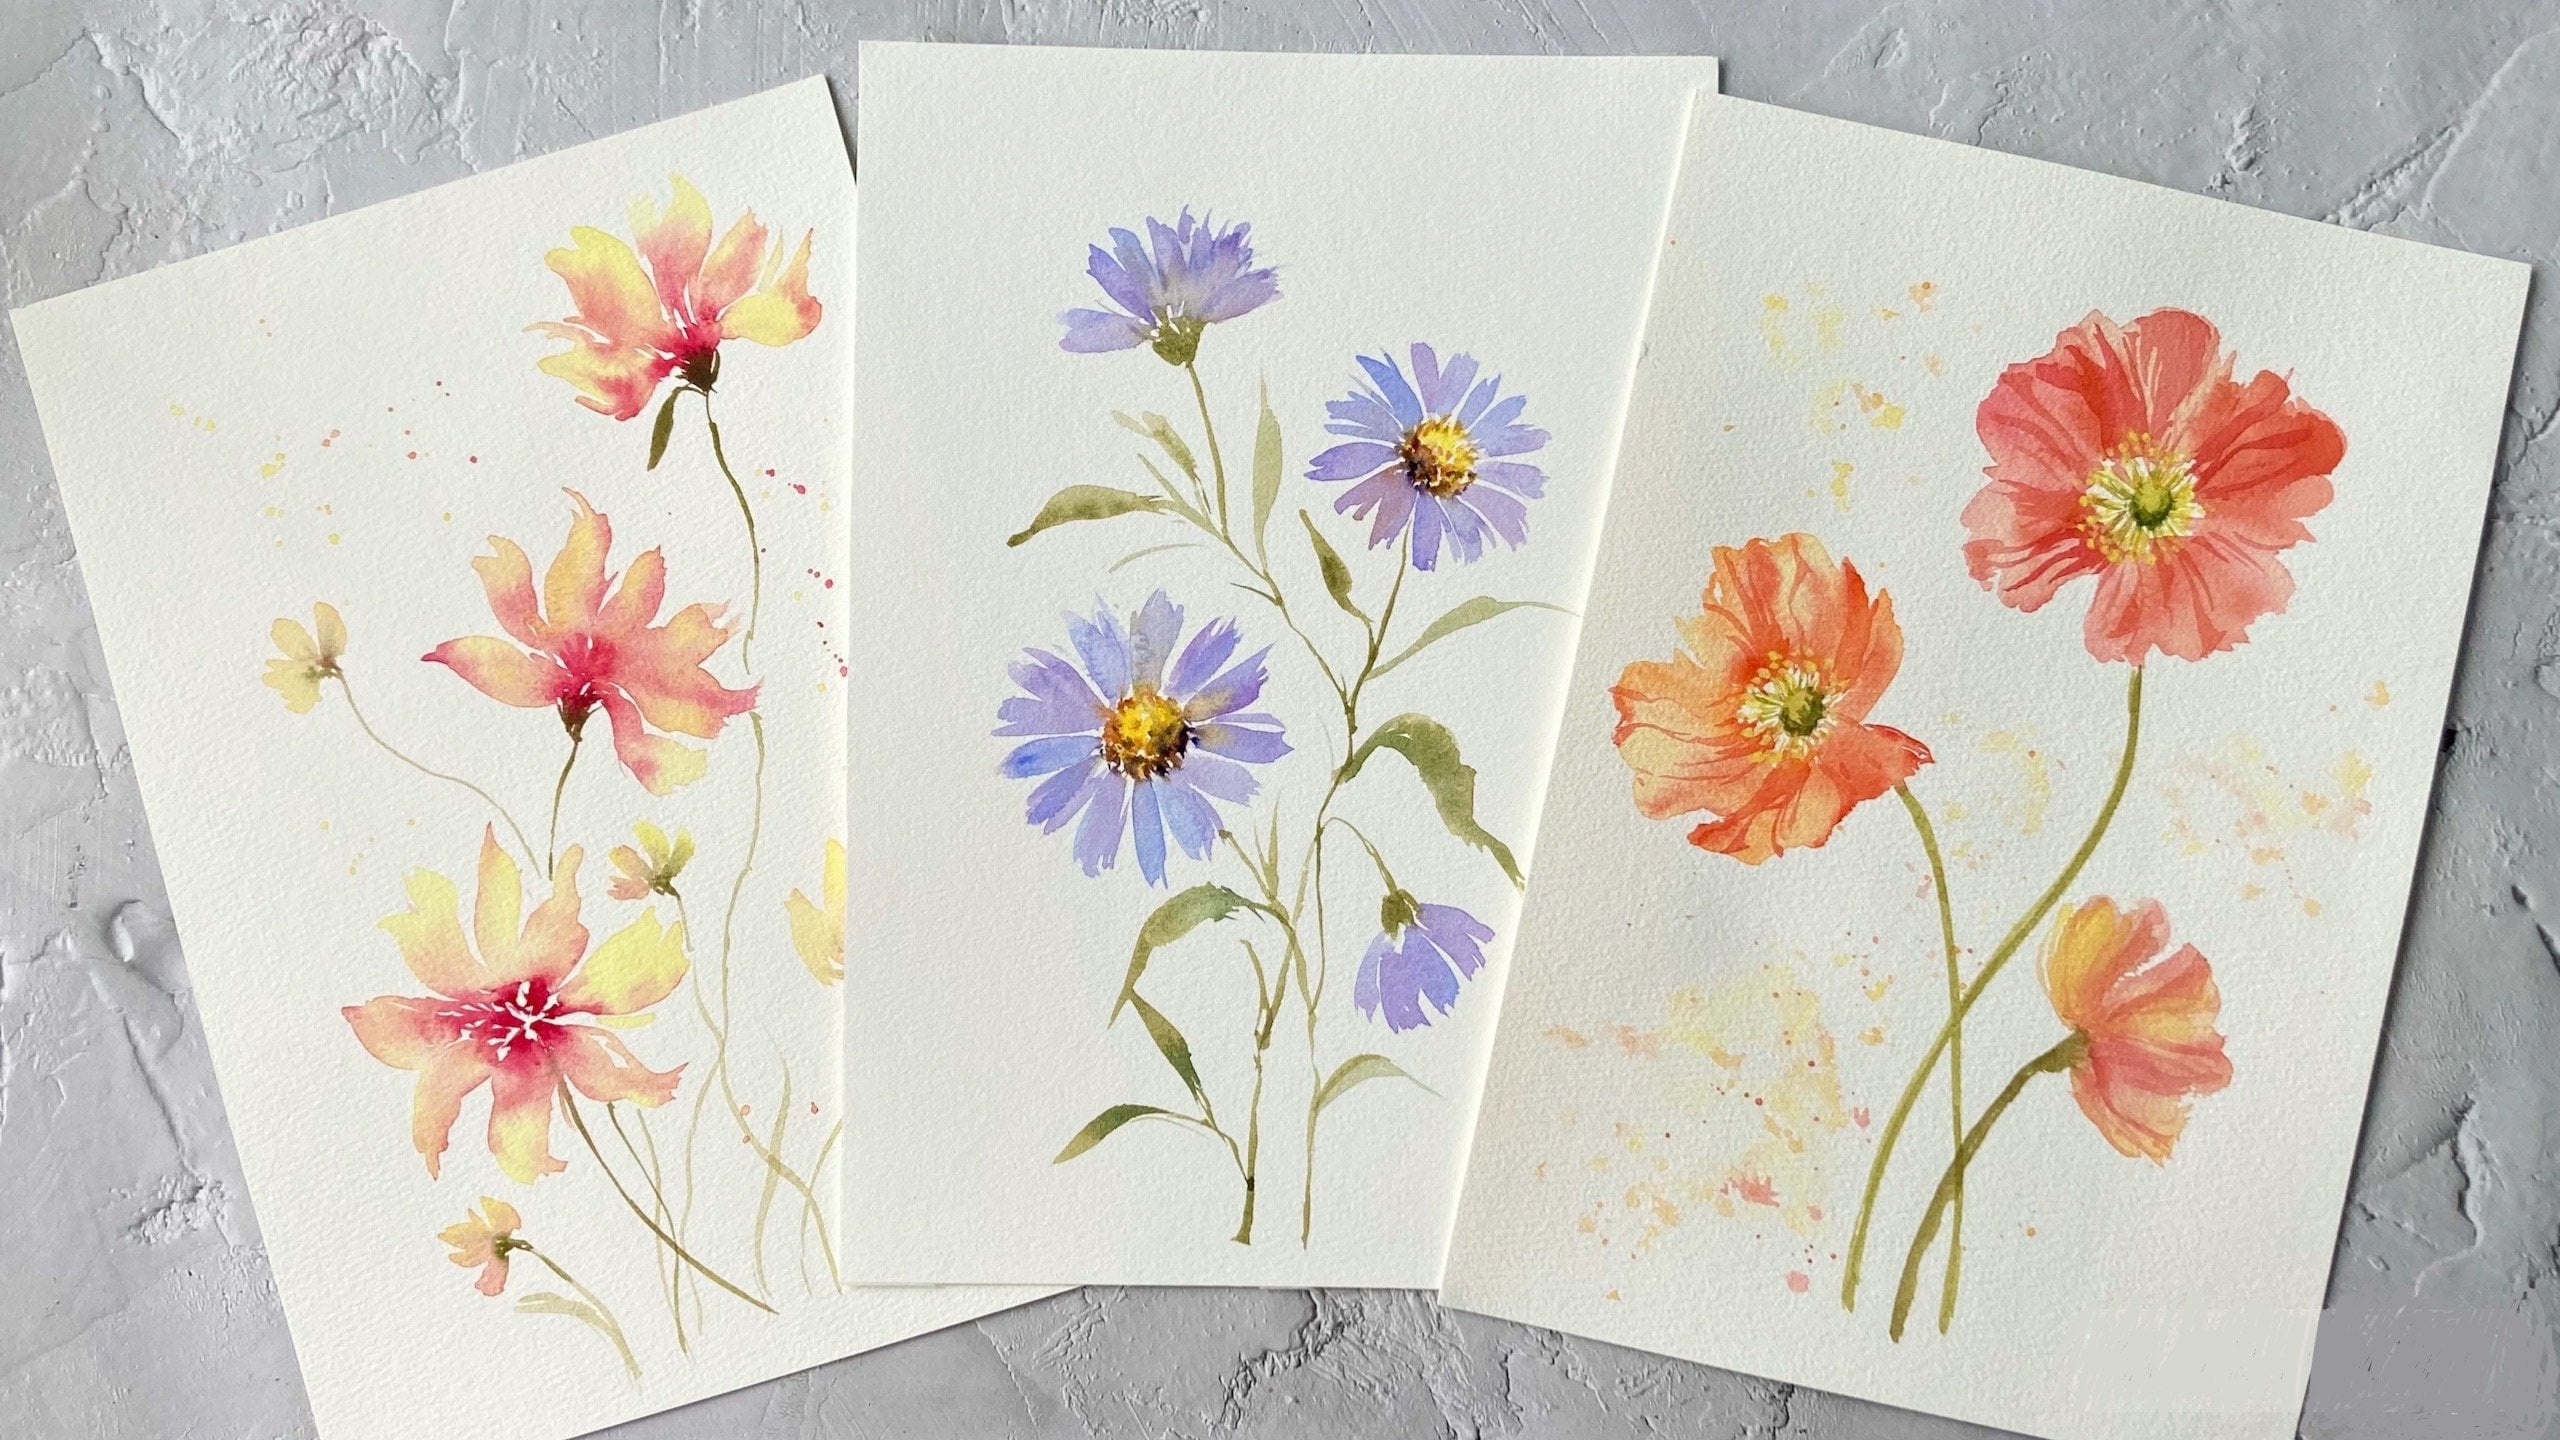
5. Class Project : Painting a small composition of anemones: For our class project, and we are going to pin a small composition of a nominees. Now feel free to use any Carlos for your flowers, but made sure to use a wet and saturated dark color for the flower's center. So let's start by painting around center of our flower. Here I'm using a century to mix off violet. Dan loading my brush with some diluted blue, I'll start adding the plateaus. Again. Make sure the touch these dots to allow color bleeds into the petals. And then while the penis still went quickly drop in some ultramarine onto the center and gently pull it into the petals. Downloading my brush would find it. I'm going to add the statements and letting them live into the WACC atoms. You can add more color variation in a pentose by pulling out some of these fire. Now for this next flour, I'm gonna place it slightly over to the left. And I'm gonna make this a pink flower. So opposite Hall, I'm quickly lifting my brush to create recipe brushstrokes. Now try to vary the shape of each petal as disruptive flour more naturally. And you can do this by varying the size and length of each brush stroke. And while the pentose ask direct quickie statements and letting the color bleed into the path lengths. Now for this last flour, I'm going to show you what happens if these dots are not wet enough and what you can do to fix it. Now because these dots are starting to dry, I'm not getting much of a candid bleed into the pentose. So the flower is looking at it. So I'm going to have to add more color variation in a pentose by first typing in some ultramarine and pulling it into the pentose. Then our tab in another color here I'm using violet. And again, I'll put some of this color into the petals and letting it blend with the other colors. So now that I'm happy with the color of the pentose, because start reading my book for both sides of the paper. And next, I'll ping some goofy standards using olive green. I'm using a live screen and sap green as the base color for my leaves. And I'll type in some very good whenever they add some shadows. So these features drawing shortly p-values and joining them together to form this image and to finish off the gaining power. And finally, over here, yeah.
6. Final Thoughts: So we've reached the end of the class. I hope you've enjoyed this class and you've learned a lot. I would love to see your class projects. So please are loaded in the project gallery. And if you're sharing them on Instagram, please tag me at blue dot this art. And I'll share your class projects in my Instagram stories. Now if you have any questions about any part of the class, just post them in the discussion section. So guys, thank you for watching and I hope to see you in my next class.
 Lisa Lam, Watercolor Artist