Transcripts
1. Class Intro: Snowflakes are a classic
winter image for artists. They pose the challenge of capturing the
individual snowflake, the nature of a single flake, as well as the color
to which varies from white to iridescent
to transparent. In today's class, watercolor snowflakes for
beginners will review the technique of
negative painting to capture the IC detail
of a single snowflake. Hello, I'm Daniela Mellen, an author and artist. Today's class is for beginner
watercolor artists will start by tracing a snowflake from the template to
make our pencil sketch. Then we'll start our painting. But instead of
painting our subject, which is the snowflake, will paint the areas around the snowflake or
the negative image. Choose your colors or blends of colors to make an
interesting background. And pretty soon you'll
see a snowflake emerge. This is a fun technique that
makes the colors really pop. So gather your supplies
and let's get started.
2. Class Supplies: So these are the
supplies that we'll use for our watercolor snowflake. We have the snowflake template
that has three images of snowflakes to help
you draw your snowflake. But if you want to
draw it freehand, feel free to do that as well. I have a six-by-six piece
of watercolor paper to create one painting of
a single snowflake. But if you use larger paper, you can create
multiple snowflakes. I have my watercolors
and I'll include a separate list of the ones
we use today in class. And then I have my brushes. I have a very fine
liner, 12 over 061. And these are the
brush sizes that I'm comfortable with
for this painting. By had a larger painting, I'd incorporate a larger
brush in there as well. I have a pencil and an eraser. In the next chapter,
we'll go over using the template to
create our sketch.
3. Using the Template: So to create my sketch, I just put my template
on a light source. Today I'm using a light pad, but you can use a light from
a window just as easily. Just put a little
piece of tape up to hold your template in place. And then put your paper,
your watercolor paper, right over your template where you want it for your image. Now if I shut out
my studio lights, you can see the background
coming through, which makes it easier to trace. So from there, once
I have it placed on my paper where I want it to
go with a very light hand. I'll just trace around my image. So from here, I've traced my image from my
template onto my paper. If I want to make any
modifications here, if I want to add
different elements to the existing snowflake
or a hole in the center. I do that now, but I'm happy
with the way that looks. So in the next chapter,
we'll start our painting.
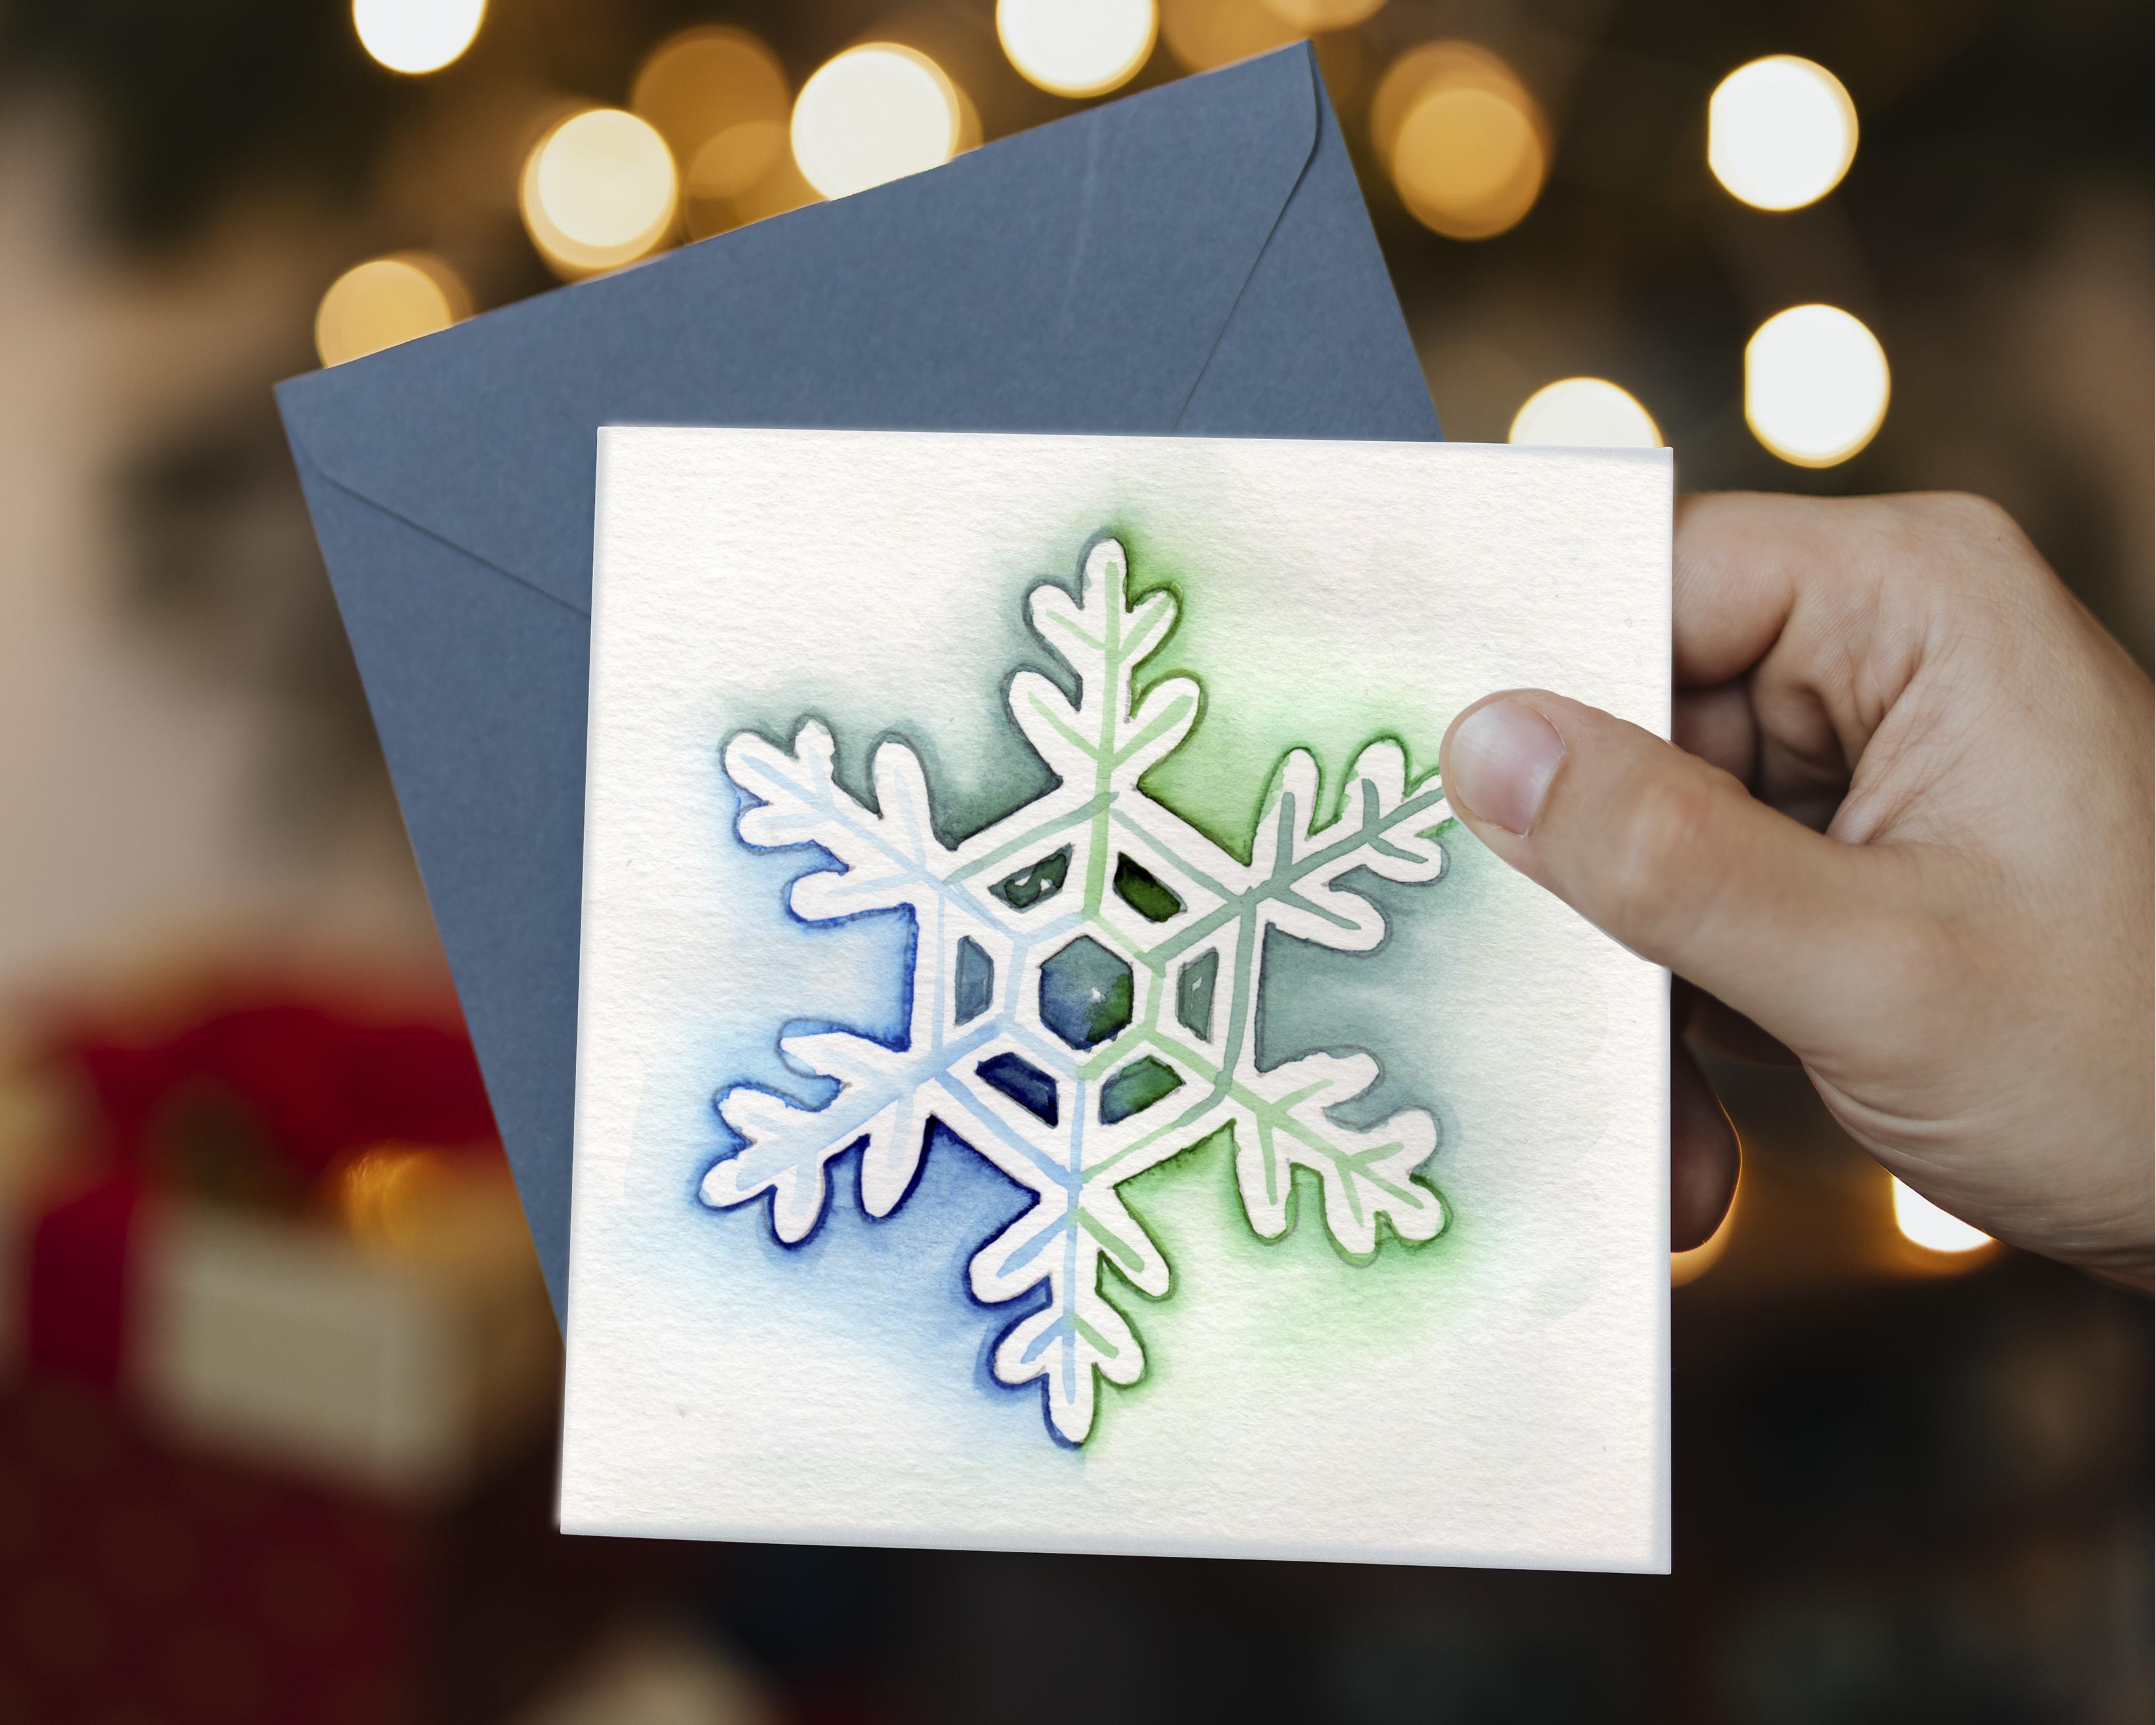
4. Painting the Background: So now to start our painting, I like to do a negative
painting mainly because I want the snowflake to really stand
out and be kind of white, I guess is a better
way to describe it. So I'm going to paint in
everything but the snowflake. So to do that, I'm going
to take my large brush and I'm going to start by
just adding a little bit of water to the areas in the center of my snowflake that
are not the snowflake. So the areas around the snowflake and
I'm just trying to wet that paper ever so slightly. And then I'm going
to choose my colors. Now for snow, I usually go with a blue highlight or a purple, maybe a pink or green. I'm going to do green,
blue, and turquoise. I like to work with three
colors sometimes too. But I get a nice result. For my first layer of color. I wanted to be very light. So I'm going to take some of
this Prussian blue and just mix it on my palette and add a little bit
of water to that. Then I'm gonna make
a second puddle. It makes a little
more Prussian blue, some water to that. And again, I want
this to be light. And then I'll make
a third puddle with whatever's
left on my brush. And I'll take some of
this already in hue. And now combine that with one of those blues that I have
to get my turquoise. And I'll mix it playing with proportions
of blue and green. Here I took a little of
this indigo blue as well. And I'll just take a
little more of that green. So I get a turquoise,
little Prussian blue. And then some water. Take a little more of
that viridian hue. Just so I have a little
more puddle to work with. And now I'm going to start, I'm going to start
with my green. I have a lot of water here. And with a very sharp
point on my brush, I'm just going to
start in the center outlining my snowflake. And I like to do one
section at a time depending on the anatomy of
that particular snowflake. Where I put the color down
closest to the center, create that shape,
that negative shape. Then I did my brush in water and Splenda out the
color from there. This helps so that the most pigment is in the
center of my snowflake. And that's just how I like it. If you want your darkest area around the snowflake to
be on the top right? You can do that as well. And I'm just pulling that color away with just introducing
more water on my brush. Each time. I'll rinse my brush
and just blend that out right at the edge. Then I'll come back in and decide if I want to
introduce a new color yet, or I still want to
work with that green. And I'll work with that green
rotating my paper around. And right now I'm just working
on carving out that shape. I want that snowflake to be pristine white from the paper. Just a little bit of
color here around it. This will dry even
lighter than it is. But it gives me a
good starting point. I can go back in there
and just deposit a little bit of
color in the center. Once my brush and just
gently blend it out. Don't want any harsh lines. I'm going to move
now to my teal, my turquoise, the
teal that we mixed. And just introduce that
around the area on the next section and really let that blend
with the existing green. I'll come back in,
rinse my brush, and blend it out, and just play around with it. I can come back in
with a little of that viridian green,
that viridian hue. Just help that to blend. Come back in. And again, dig out that shape, carve out that shape
of that snowflake. Doing the negative images, come back in dab a
little bit pigment. Just towards the center of it. Rinse my brush and blend it out. And I'll continue this, changing the colors
as I go between this turquoise teal
and that green. And then I'll introduce some of that blue that we have as well. So I think right here I'll stop halfway through
this section. Rinse my brush and get that
color to a nice blend, coming away from that snowflake. And they can come in
here with that blue. And let that blend with
that existing color. Come around and continue. And this layer takes the longest because I want to work while the paper is still wet and
while the pigments wet. So I get a nice blend. Can decide where I want to stop with that color and introduce a different color. I think I'll go all
the way over here. Maybe halfway down here. With this blue
rinse my brush with clear water so I can help get that nice soft blend
away from the snowflake. I'm going, I can come
in here with the green and let the green and the blue mixed together and milled and form a
different version of that turquoise teal. Again, I'm just
going to blend out those edges. Just like that. Now I'll take a quick peek, deposit a little more
pigment right in the center of my snowflake
using all the colors that I already introduced. Put a little more
color here and there, just to get some variation. And then I'll just make sure
that it blends out nicely. If I have to incorporate
a little more color to get a blend,
and I'll do that. And I'm just trying to work. While my paper is wet. Over here, it's going to work a little more pigment
away from the snowflake. And I know it's already
starting to dry lighter. And I like that effect. I don't want it to be very
bright blue or green. And when I'm happy, I'll let that completely dry.
5. Sharpening the Edges: So there my first
layer is dried. Now, depending on the
colors you choose to use, some colors can lift. And by that I mean, if you
take a clean brush with clear water and you want to remove maybe a mark that
shouldn't be there. Certain colors you can lift. So if you put water right
on top of them and just kinda work it with your
brush with some colors. You can just take a paper
towel and lift off that color. Some colors you can't live. They stain the paper. Usually the blues will
work themselves out, but I also don't want
to work the paper too much to dig it up and tear it. So if there's any
areas that like a big spot that you
want to correct. Now's the time to do it. For our next layer, I want
to sharpen up those edges. So I'm going to use
the same colors that I used for the background, but with a little
more intensity, but a lighter hand. So I'm going to start
on this blue here. And I'll take some
more of that blue, mix it on my palette. And then with a very
sharp point on my brush, I'm just going to
outline the area that matches that color. For the snowflake. It will dry lighter, but I also just want to
sharpen up that edge. Now the area where it starts to turn into this green over here. I'm just going to take my
color as far as I see. And I'll continue
this all the way around my snowflake with the appropriate colors
for the outline. Sometimes it's easier if I just do all the straight lines, pulling them towards me. And then I can go back in and do the lines that intersect. I just want to sharpen up
that edge of that snowflake. Now, the color is turning teal. So I'll switch to my
teal turquoise color and complete those outlines. Going all the way around. Just to really sharpen it up. Then I'll come in with this
green, the viridian hue. And I'm going to add a little
more color just to get a little more intensity
right to my palette. Continue all the way
around this snowflake. You can see how it's
sharpens up the edges and make that snowflake pop
just a little bit more. If any of the colors blended
in the background here. And you want to blend
your colors to match, you can do that as well. And by that, I mean, it's kind of a teal color over
here where that green in that blue
melded together. So I think I'll switch
on that side to that teal to outline it. And again, it's just
personal choice. If you want to just outline the entire thing in one color, you could do that as well. Once you have it outlined, you'll let this layer
completely dry.
6. Painting Highlights: So now you could stop
here if you wanted to, but I want to do a little
more work just to make the snowflake really stand out. Again, I'm going to
use the same colors that we already mixed. And I'm going to take my
sharp number one brush and I'm going to dilute
them even further. I'm going to start with
this pale blue here. And I'll dilute it with
a little more water. And with a very sharp point, I'm going to draw lines in
the center of a snowflake, a very thin line, and the shape of the Snowflake. So I'll start in the center. Just make a little
dot for reference. And I'm just going to pull
that line straight down. And then I'm going
to come out here across onto the little
hands of the snowflake. And I'll do this with
all the colors starting from the center and going out. And I'm using just
a very pale color. And I'm not really worrying
too much about it. Come here. And again, now the color changes to teal. So I'll just put a little
teal on my palette. Water it down because
I do want it lighter. Sharpen that point, and
finish that snowflake. Just making a little
highlight here, little emphasis. Come over here. Do the same thing. Good. Switch here now to green. Adding a little
water to my green. Sharpening up that point. And I've created my snowflake. I can stop here and I
like the way that looks, but I do want to add a
little something else. So I'm just going
to take a little of the pigment from my palette, the colors that
I've already used. And I'm just going to spatter little bit of this
color here and they're kind of
avoiding the snowflake. And there I have my
watercolor snowflake painted by focusing on the negative image instead of the actual subject.
The snowflake.
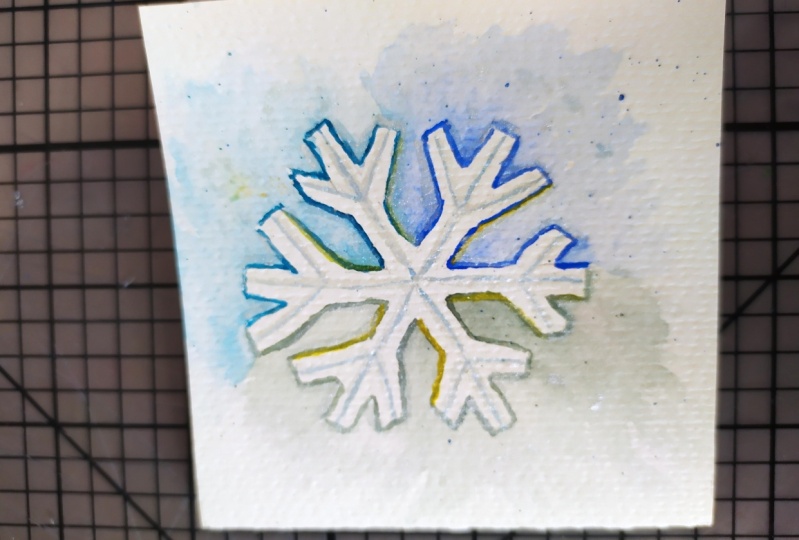
7. Class Wrap Up: So here's the snowflake that
we made in class today. Using the template. We have the spatter, we
have the different colors. And most importantly, we've
painted the negative image, leaving the white
of the subjects, the snowflake to show
with just a little bit of a highlight or a
reflection inside of it. So it's a very simple, but very beautiful effect. And you can get different
looks by varying the colors using the same techniques and using the snowflakes
from our template. Here's another snowflake from the template using
the same colors. The snowflake itself
is different, but it's the same procedure where the background
color really shows through and the white of the snowflake
makes it pop. Now for this one, I
didn't do any spatter. I just have the same
colors and that's where I stopped on this snowflake. So I also created the snowflake
using just subtle colors, a single color for
the background. Instead of working on blends
of colors or radiants. And it's a very
effective this color, so cooling and it's
very pretty. Here. I did something a little more fairy Like I have the pinks, purples, the blues, same technique, just
different colors. And lastly, I combine two snowflakes onto
one piece of paper. You can hold it
in this formation or up and down, doesn't matter. It's the same thing
with the blend, our colors in the background, not on the subject, and so it makes it pop. Now I stuck to cool colors. By cool colors, I mean
blues, purples, greens. You can also use warm colors, reds, oranges and yellows. That would be a totally
different design and effect. And really just
do what you like. Don't feel you have to
do a snowflake in blues. So I hope you'll try
these techniques painting the negative background for the snowflakes to make your
image and your painting. Try one of the snowflakes from the template and see the
result that you get. If you do complete a
painting, snap a photo, and post it in the
project section, please be sure to
follow me here on Skillshare to get notified
of future classes. Please consider leaving a
review and be sure to check out my YouTube channel where I post new videos every
Monday and Wednesday. Thanks for joining me.
 Daniela Mellen, Artist & Author