Transcripts
1. Introduction: How do you like my
Christmas decoration? It's November, but
already Christmas. We all have similar
frustrations when we're at the beginning
of our journey. I remember very well my frustrations and
they still sometimes return when I compare myself to other box successful artists, we all worry that you might never get any better
than when we started, and that we don't have
any talents that are early drawings are
a warning sign that we're wasting our time, but that's not true. It has nothing to
do with talent. Whenever we start something new, we do it badly. We struggled how
to learn to read, how to learn to ride. A new language. Or beginnings are difficult. The only way to get better is to practice and to make mistakes. And our sketchbook is the
best place to practice. So I advise to, to practice and share
what you make with others and we will
all cheer you on. That's the way practice
and learning works. Share your struggles
because we all went there. Every time you struggle, you get closer to your unique
drawing and painting style. So let's take a deep breath and just continue along with me. And tell me if you
have any questions. We will practice and
play in our sketchbook. In this class, we will
document autumn colors in a sketchbook channel and experiment with
different materials. And I take you through
my entire process, including trying to
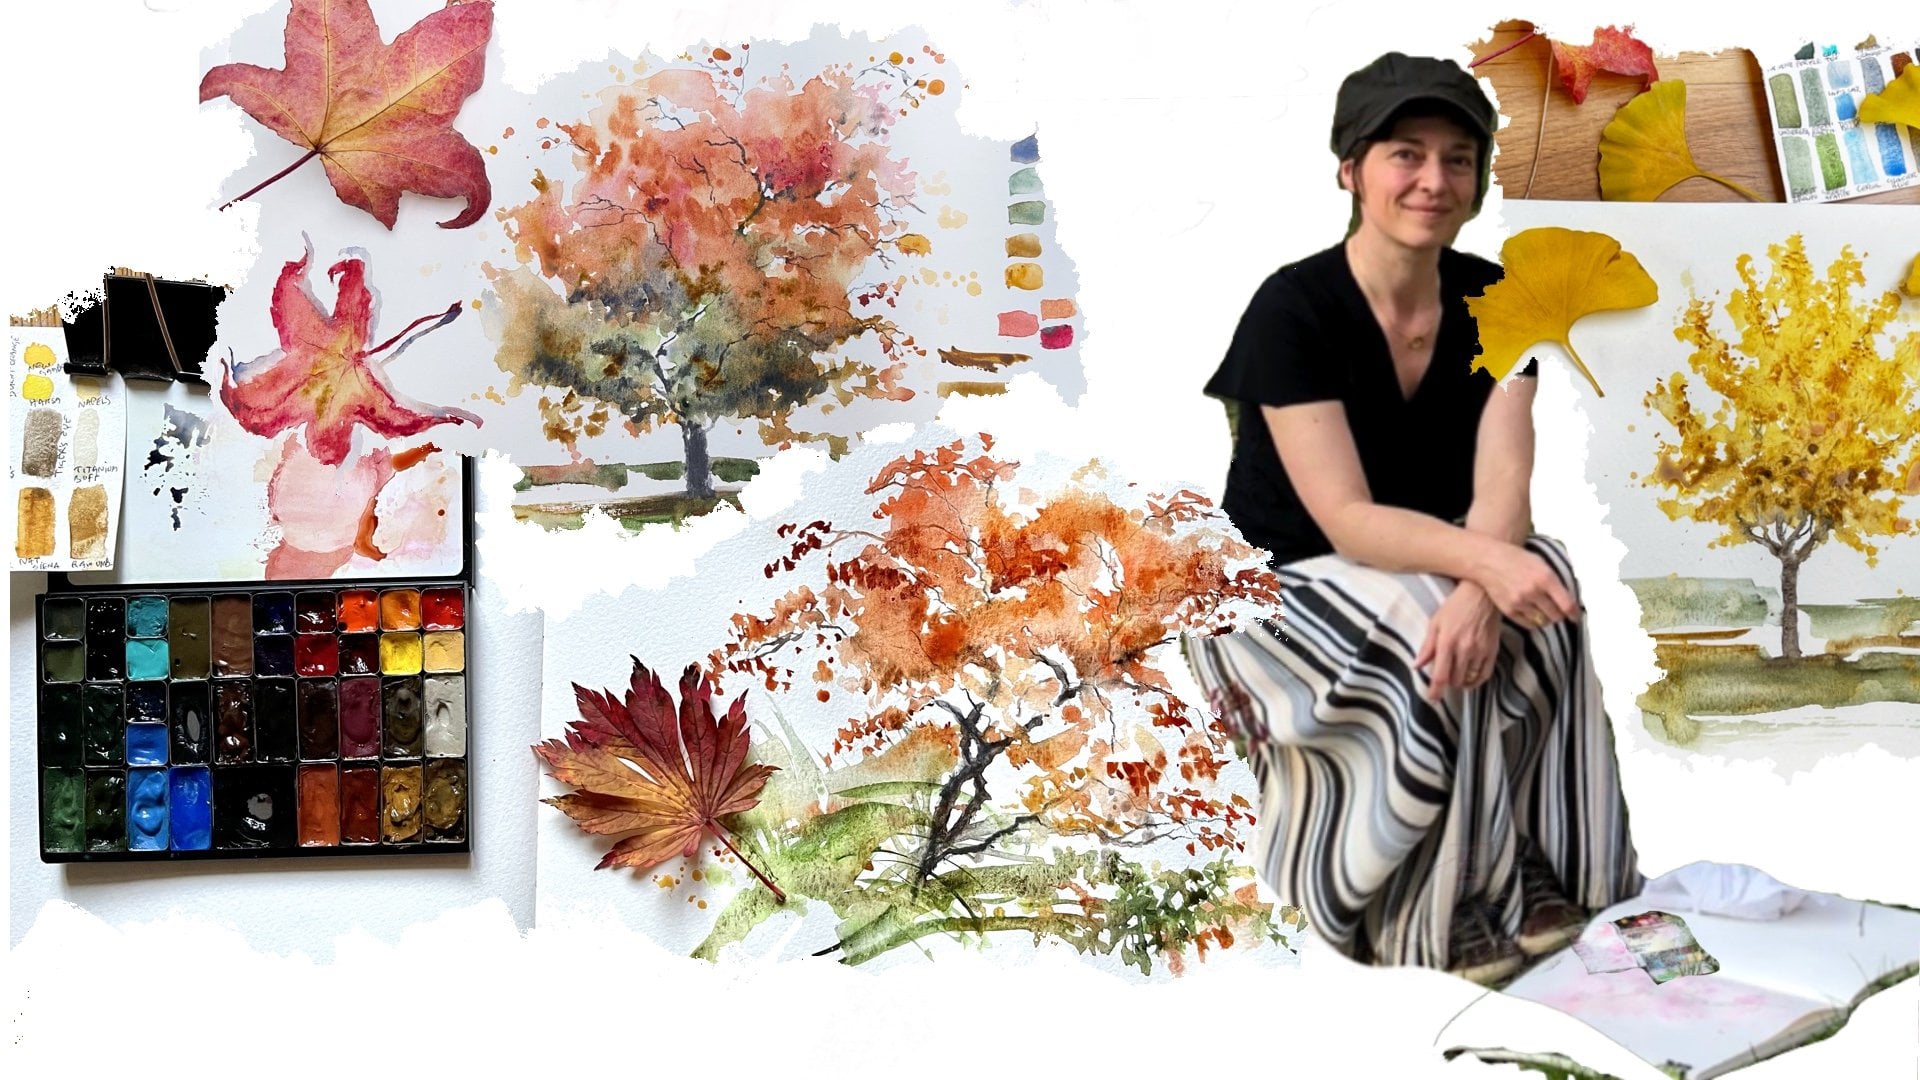
erase some mistakes. Hello, I'm Barbara. I'm an architect and artist, still working as
architects everyday, restoring monuments, as living. In my free time, I make art
drawings and paintings. I also published two books about watercolors
sketching in Japan. As I'm passionate about Japan. But most of all, I want
to commit myself to share my love of making art with
as many people as possible. I hope this class takes away your fear of making
a bad drawing, of making mistakes, and takes away the fear of not
having any talent. And I hope I will help you to your way to your unique
sketching style. My purpose is not to
make you sketch like me, but to give you tools
to sketch like you. Let's get started. In the next video, I will explain about the class project and then about the
materials we will use.
2. Class Project: As a class project, I invite you to make
several sketches in your sketch book to
illustrate your environment. I invite you to choose a scene
in your surroundings to, for you to illustrate. It's not necessary to make a
big scenery like I did here. You can also just sketch
some beautiful alternates or other small objects that will make you a beautiful
sketch book page. It's important to choose things that make you happy and
that are important to you. If you choose something
boring that you find boring, you won't have any
pleasure drawing it, and you will have
a boring drawing. Your sketchbook is
your safe place to experiment and play, and then pure ideas
and emotions. By daily sketching,
you can build in a sketchbook habits and you can look for your own drawing
and painting style. Please share your work so
everyone will level up by seeing as sharing the
experience and who knows. Maybe you'll discover
some new tips who can help everyone? In the next lesson, I will explain you about
the materials we will use.
3. Class Materials : So this is the
sketchbook I will use. Saunders Waterford paper. It's almost A4 size. Watercolor paper, quite smooth. But any other
sketchbook will do. Long queues are too small. Sketchbook A4 size
would be best. And then I will use some
watercolor pencils. So these go hand dash
watercolor pencil. These are some autumn colors. And I will use some
water-soluble graphite. This is a water-soluble
graphite paper that I put in a small container. Two, take outside sketching. And this is What's a
soluble pref right? Pan in a tin. Also via go particle. And I will test also for you
this water table graphite in a stick and some water
soluble graphite pencils. But if you don't have all that, It's really doesn't matter. You can sketch without it. I will just experiment how to create textures with watercolor. Then I will use some watercolor watercolor
palettes by our two kids. I love it because it's so light and handy
to take with you. And they are magnetic patterns that you can take
out and change. This is palette with
some autumn colors. If you go to my other
autumn color trees class, you can see more
about the colors, how I assembled my palette. I will also use smaller ballots when
I go urban sketching. And then here are some
brushes I will use. I really use some brushes. And also normal pencil to draw. I don't have it here. Normal pencil tool, the pencil to draw,
not water-soluble. Then I will use some brushes. Sable brush are also some
synthetic brushes are good. In my classical art, watercolor. For beginners, I explain
more about brushes. I will also use a synthetic
brush to erase some mistakes. They say eradicate or
by Rosemarie ankle, a very hard synthetic brush. So you can erase some
watercolor if you like. And then you will also
need a water bucket and tissue to clean up the mess. Some paints.
4. Autumn Sketchbook Part 1: Welcome to the Sonya forest. This is a great forest near my house where I
will make my sketch. When you make your drawing, just look in what direction
the lines are going. Not drawing a house or a tree, you're just drawing
a bunch of lines. In what directions
are the lines going? Are they going up or down? Are they going diagonal? How long is this line
compared to the other line? So you will have more or
less the right proportions of your object and then
everything will be fine. Don't worry about perspective. Let's start painting now
refers to wet my paints, pens to make them smooth, to dilute the paint
already a bit. I start by making the paper
wet around the house. So I make the colors of
the surroundings reflect into the lake with soft
contours and make also a sky. And the trees in the
background that will have soft contours because I
will be painting wet in wet. If you want to know
more about that, you can go to my first
two other color class. I don't wet the house because I want the
house to stay white. If I were to make
the house also wet, then the watercolor would
flow into the house as well. Please find a place
where you want to make your sketch and take a place where you have
pleasure or go away. And that has a meaning for you. You don't need to paint. Of course what I paint, my purpose is to make your paint what you paint and what you
would like to paint. So you can find your unique
painting and sketching style. Now I'm going to use
water-soluble graphite. This is a water soluble
graphite pencil. And I will use it
to add some shadows and add some branches
in the trees. And I love this benzyl when I use it on paper
that is still quite wet, it gets a bit you
did with the paint. I also use what does
soluble graphite based? This is a based of vertigo and I put it in a little container to take
it with me to paint outside. And these water soluble graphite makes great texture as to the watercolor because it's very granulating and it's
a great way to add fixtures, but it's also
a great shadow color. It's gray. And by using it's still
in the wet paint. It mixes in watercolor. So it makes the colors a bit
muted and it's dark greens, the colors quite much. You see here, I splash a lot
because I love to splash. It makes me feel
like I'm playing. And also, I think splashes of paint are an excellent
way to suggest trees. So I have splashed
some amber has to, autumn colors are
quite yellow and also green because it's
still quite green. It's the beginning of autumn. And I will also splash orange. There's not much
orange to see yet, but I love orange. And this is artist freedom. You can splash and use all the colors that you like
and that make you happy. As our architects, I used to really make myself sick
like if there was a window, me see, if it was
not totally correct. If the perspective is wrong. I used to destroy my drawings
if it wasn't correct. But now I really
tried to stopped is because it takes away
all my joy of painting. So I tried to concentrate on
what I like in my painting. And I want to make progress that way to have more fun
and joy in making art. And also, I find that's
the way to improve yourself the fastest
if you are having fun. So try to not make it too
stressful for yourself. Now I paint the reflection
of the house in the water. I have made a lot
of reflection of all the autumn colors in
the water in the lake. But I forgot to make
Also the house. So I will paint over the
roof and some windows. They don't feel like I'm erasing all the beautiful
colors I made in the lake. The house won't be reflected totally in the water
as it should be. I mean, it's not
photographically correct. So you don't see the whole house in the lake and not
all the reflections, like it should be,
but that's okay. I mean, I don't care that it's not really
photographically correct. Well, at least I
try not to care. So this is just like the painting as I
want to make it now. In the next lesson, I will make some other sketches on the page next to this
one in my sketchbook. So documents on bottom, objects and also some writing
as illustrated journaling. And I will try to make some
reflections on page layouts. I hope you'll have fun. And I look forward to
see your sketches. Tell me if you have
any questions. I will be happy. We'll discuss them with you.
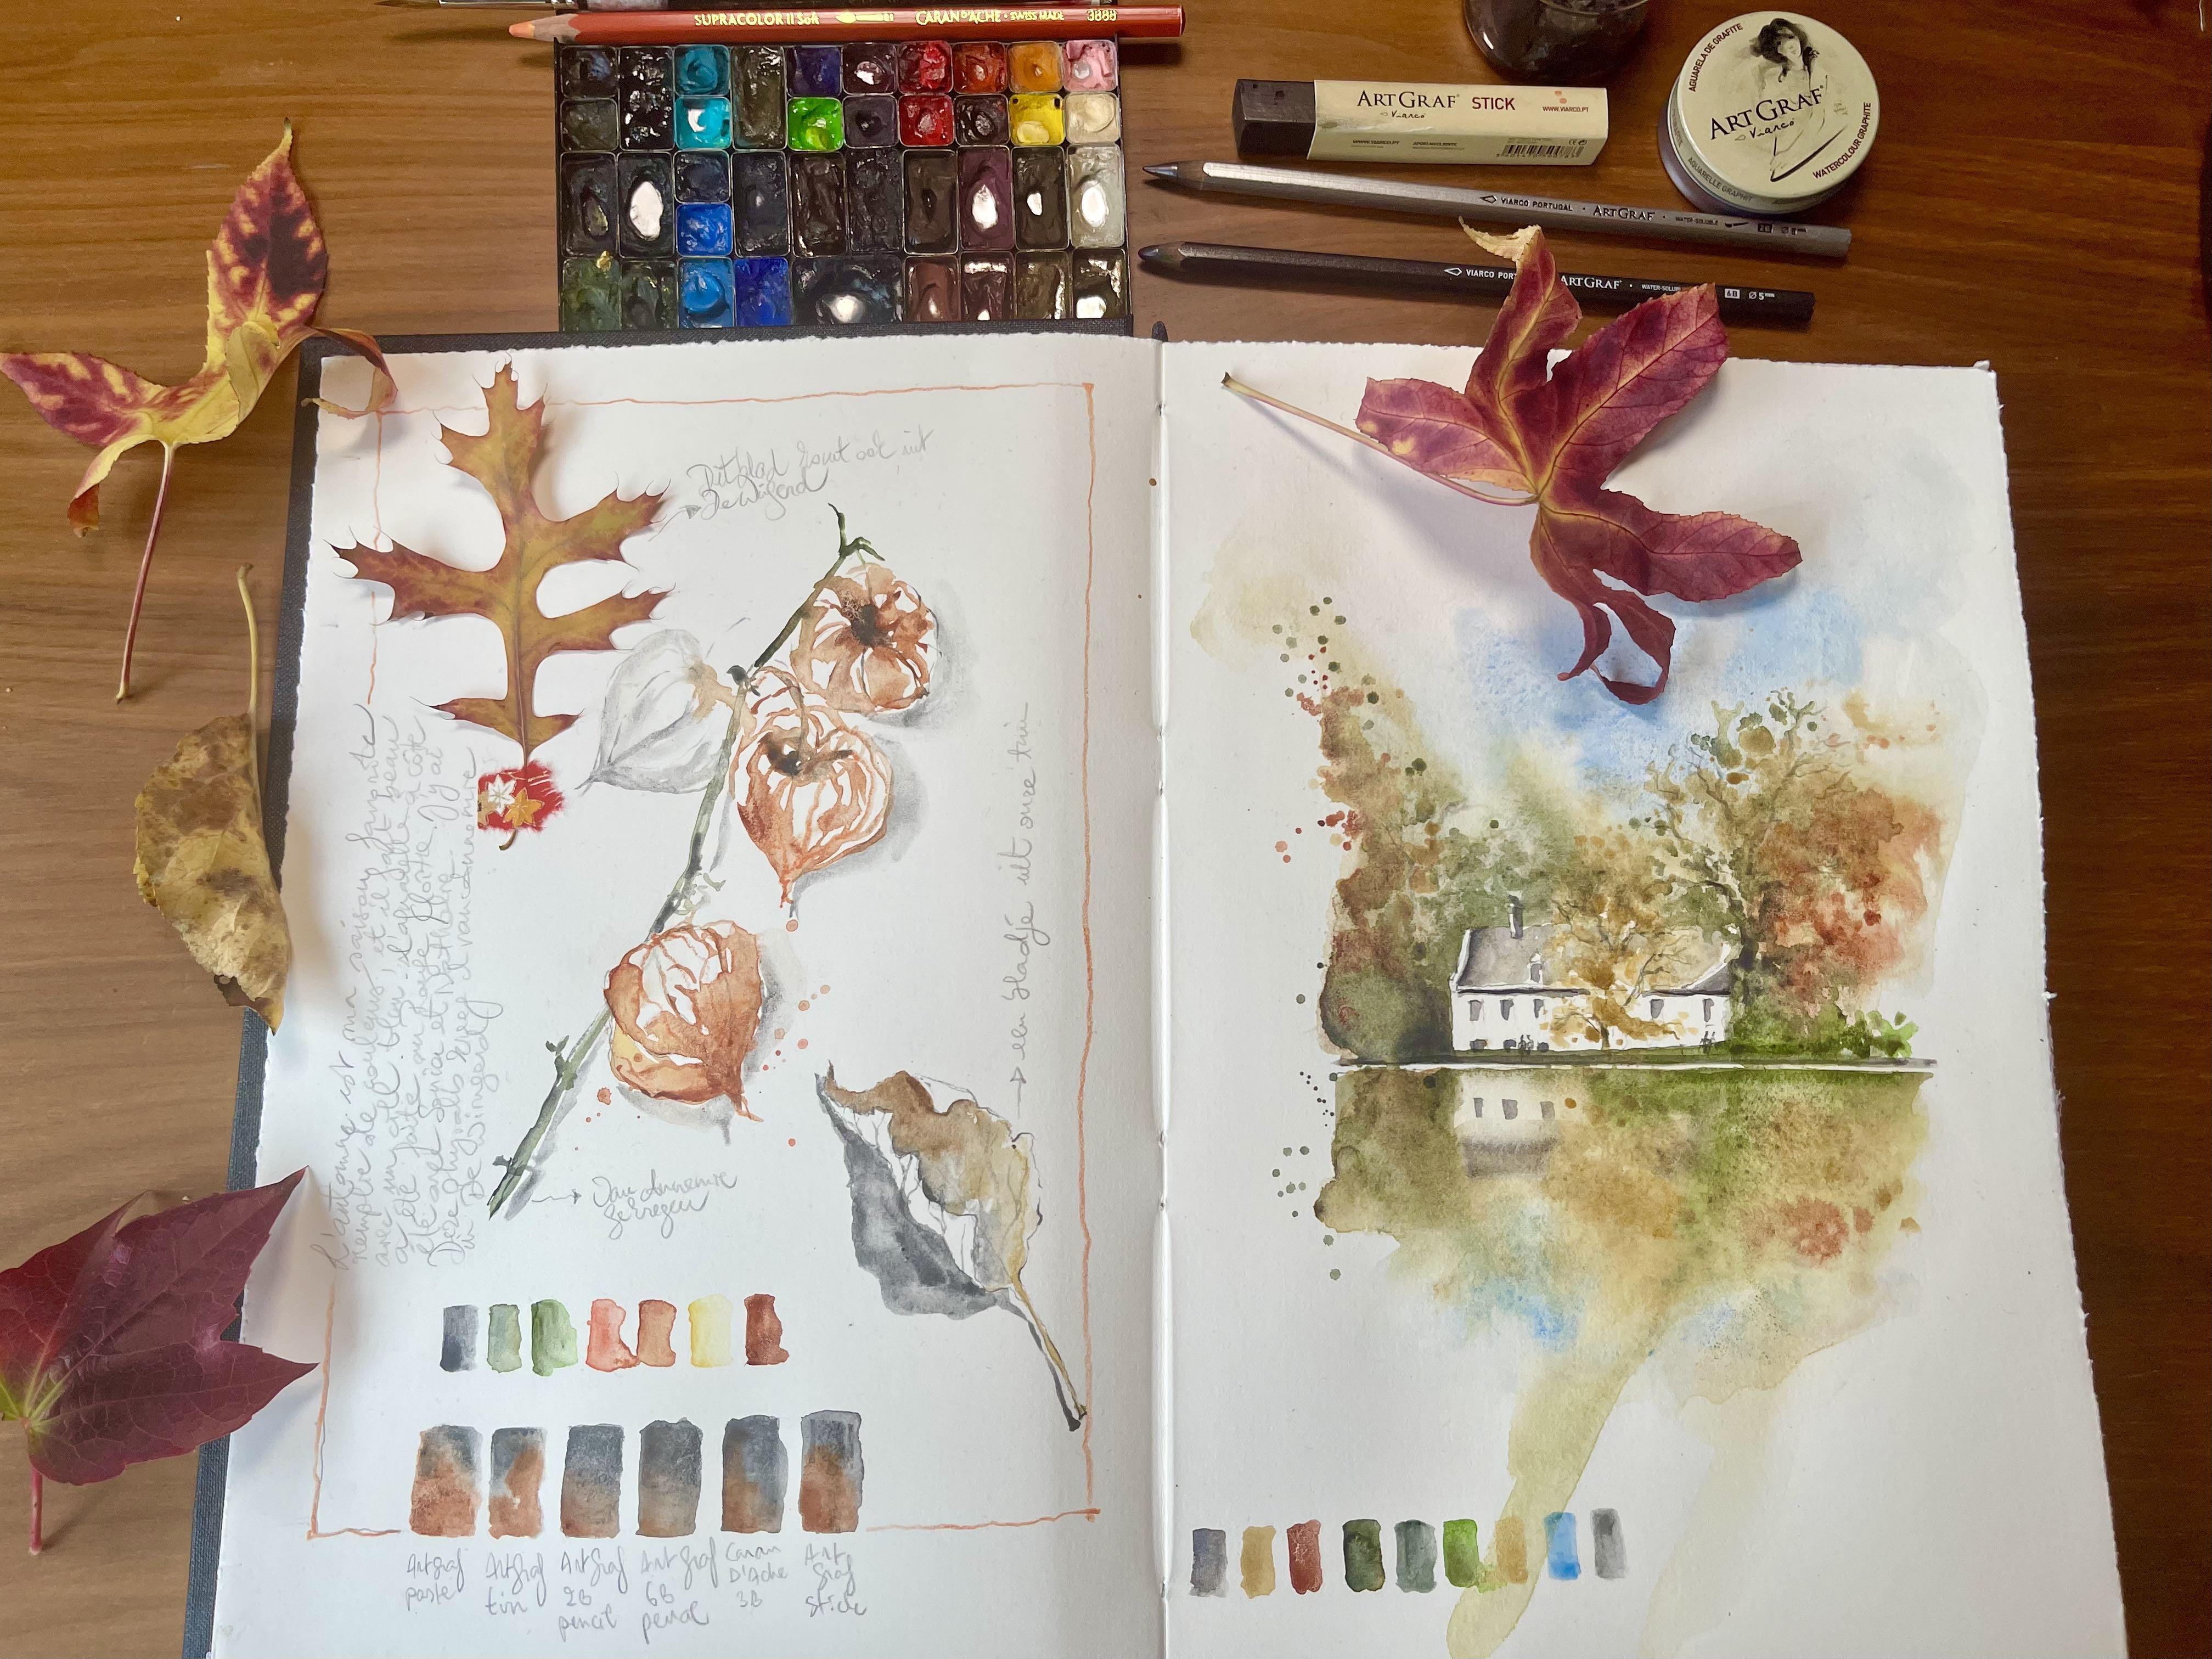
5. Autumn Sketchbook Part 2: Next on my forest water color, I wanted to document some
other autumn souvenirs. I have this Sally's. I love it because it's
so beautifully orange. Because I received it from a friend who has
it in her garden. And so I want to paint it
next to the forest page. I think it will look beautiful. I will make a free
composition of it. So it's not totally
Photographic Sketch. And I will use asked cough, it's this water soluble
graphite in tin. And afterwards I will at some other item souvenirs
and also some text and some swatches of different types of water-soluble graphite mix
tweets, watercolor paints. I paint with the arch graph,
What's soluble graphite. And while the page is still wet and wet soluble
graphite is still wet, I add watercolor in it. And so the Kraft Fight makes this sweet watercolor paints. There's something in my
sketch I don't like, I don't like how the
branch goes into the p.ball, Sally's fruit. So I will try to
rub it away with this nylon brush to eradicate or brush
from Rosemary and Co. It's a very stiff nylon
brush that allows me to erase a bit on the paper. It depends which kind
of paper you use. With some papers, it goes
easier than with others. So what I do is that I make the brush wet with
a bit clean water. I make it a bit dry on a tissue and then I wrapped
a damp brush on the paper. And I will go with
the district on the paper to take away
some excess water. If you don't want your
painting to look too flat, It's good to try to make a
variation in your values. Use some more, pigment
it some darker colors. So more saturated paint. In places where there's
some less light. You can use some highlights of stronger paint in places
you'll find more important. You can also make a
variation in thickness of lines and darkness of washes. Also don't forget to
leave white paper. There were a lot of
lights in your objects. So I picked up Jeff is Alice to look for the parts
I like most in it. And I want to paint those. So I like this little curls of the branches of the fruits. So I'm painting these here. And then I will also little foot next to it that I
want to add to it. So just do like you wish. There are no rules and you can do anything you want
in your sketchbook. You can add colors that
all no, not really there. There will not be like a police control to see
if everything is correct. I mean, just play
around and experiment. When you're painting
a collection of similar objects
like this one, It's good to pay
attention to not paint all objects the same way, like when you paint
collection of values. I tried to orientate them in a different manner so they
don't look all the same. And like when you paint a
range of trees in a scenery, try to make the variation in distance between
the trees and to make the variation in
the shape of decrease. Now, I use the
water-soluble graphite to make the shadows. I use this in the dark
bottles of his Alice and later I will use it
to paint the shadows. And let's also add some
watercolor pencil. I like to use
watercolor pencil in sketches and to add lines
of different texture. Because you see when
the benzyl is wet makes really intense
colored lines. And also it gives variation in fixture in
some parts of the sketch. Let's add fatalities float on the other side of the branch because it's
a bit empty there. And also I find that
they all look the same. I bring them all in the same
way with the same colors. I want to make a fourth one there to
add on the other side of the branch that I will
leave it in graphite. So I want so much watercolor in it that will make a
variation in the sketch, which I think will make
it more interesting. If you want to draw fine
lines with your brush, make sure to take a quite
flexible brush with a fine tip and also to hold
the brush quite vertical. So you can have a
control over the deep. And you'll see very well how to keep off the brush
that she's the paper. So you can push it
up and down to make a variation with thicker
lines and finer lines. Again, if your sketch
is not totally correct, don't worry, it really
doesn't matter. You will see the more you do it, the better it will become. In the next video, we will add some other objects to the
page and some thanks. See you in the next video.
6. Autumn Sketchbook Part 3: To make it really illustrated watercolor sketch book
journal about my souvenirs, I will add some leaves. I wanted to add like
a real Aleve that I picked up in the garden. And I want to add a
painted autumn leaf. And so this ultimately, I first draw away tweet
water-soluble graphite pencil, quite crazy one to make
it really wrinkly. And then now I add some
watercolor paste that I put in this container to add
the shadows in the leaf, and then I will add
some water color. Now, I add color to the
still wet graphite gouache. I add row number
and burnt umber. And also here you
will see if you want to take away excess
paint and excess water, you should clean your
brush in clean water and then take out the water by pressing the
brush in a tissue. And then with the
dry brush you can go into the puddle
of paint and water. And the hairs of the
brush will suck up all the excess paint and water. They illustrate. Illustrated journal can
also be a great place to collect real souvenirs that
I can not only sketches. So you can stick
souvenirs in it. All kinds of tickets,
restaurant bills, or whatever you would
like to collect. Entrance tickets to museums
are sometimes very beautiful. And I will stick this autumn
leaf in my sketchbook. I use washi tape to stick
it in a sketch book. Finally, we come to the
last part of the class. It's also a great place
your sketch book to document your process and
experiments of art supplies. So here I will make
some swatches of all the different kinds of
water-soluble graph, right? I have, and I have fused or not. And so I will make
some swatches of the based of the graphite in the tin of the graphite
pencil and makes them with watercolor paint and
see how they mix together. You will see there
is some difference between all these kinds of
water-soluble graphite. I find to paste the water soluble graphite
in the thin makes much better with the
watercolor paints than the stick or the pencil. Of all the different water soluble graphite
tools that I used. I find this tick is
the most difficult. I already tried to paint with
it in another sketch book, and it's quite hard. So I think I didn't find
yet the way to use it well. So I prefer the paste and art graph in the tin
which are very soluble, and also the pencils
I like a lot. Finally, I'm going to connect the sketches
and the leaf and the swatches together with
a frame and with some text. So they will be
connected in a layout.
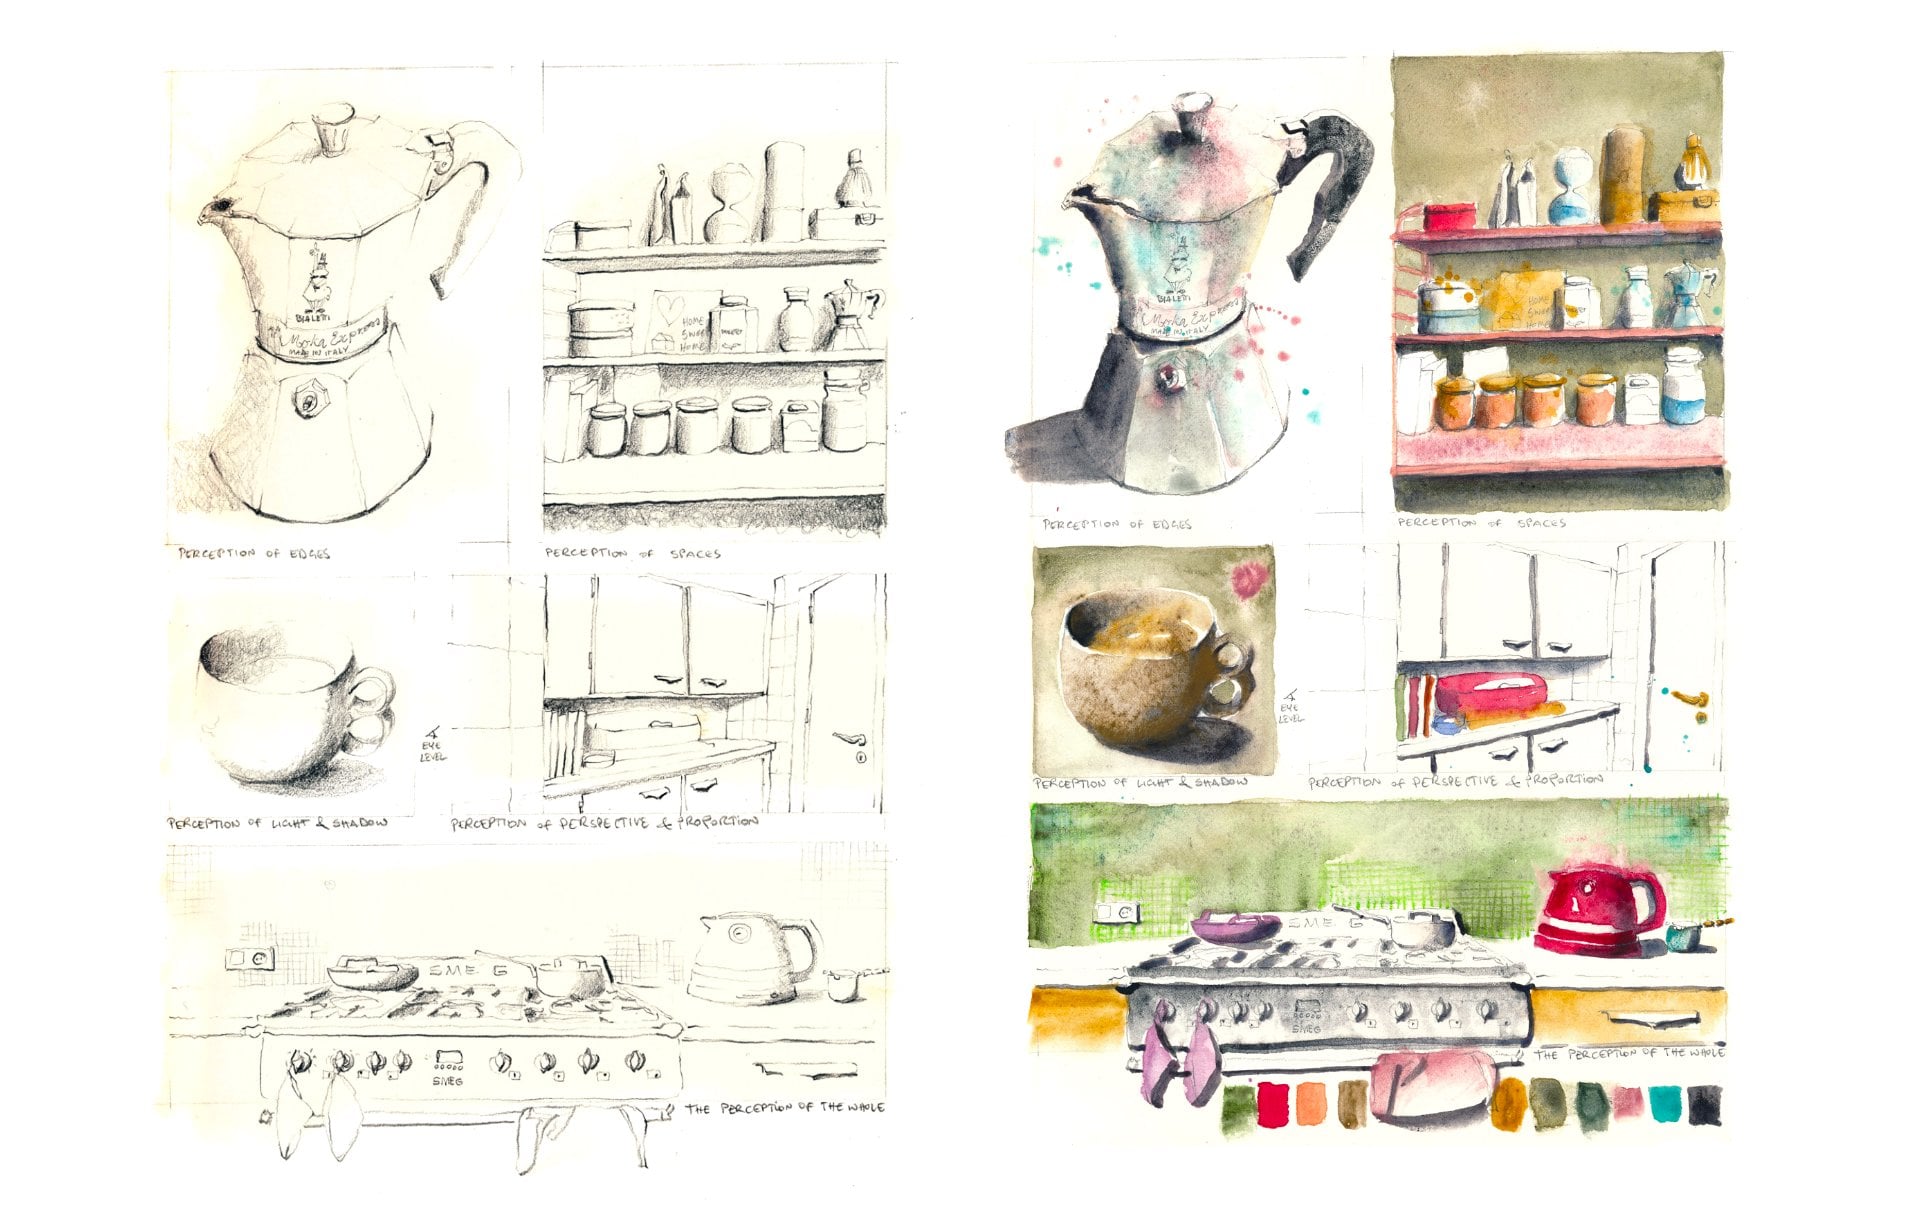
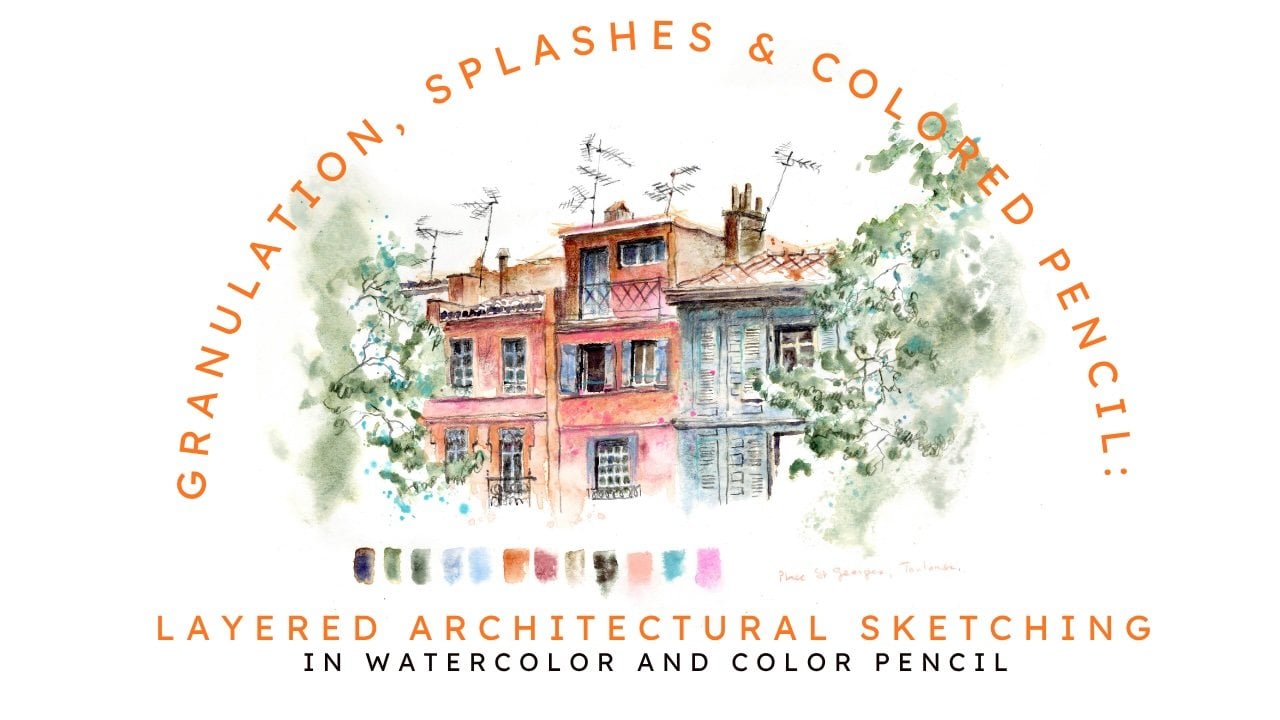
7. Autumn in Brussels Forest: Hello. So this is Barbara well. And we're in the SonanFest near Brussels and it's beautiful
autumn beginning of October, and I will be sketching
in this design. So it's paper, I folded to have some autumn themed
homemade sketchbook, just like a big
sheet, I fold it. And I'm sketching in this video this beautiful
little house in the forest. So let's start this
sketch in the forest. Like all up and
sketching outside when you sketch on a
side, it's always feeling overwhelmed because
there's so much to draw. And here in the forest, there are so many trees. There's the little house and all the leaves
and everything. So I try to focus on what's important to
choose what I want to draw. And if you saw my a class
about drawing made easy, drawing on the right
side of the brain, there are the perceptual skills for observational drawing, which are always good to
remember when you are drawing something where
there's so much to see. The first skill is the
perception of edges. S in what direction
the lines are going. So these trees have all different lines going in all different directions
like the house, it has lines going in all
different directions. And then there's the
perception of spaces. To see what's in front
of something else. And so here, I
started by drawing the trees because they're
in front of the house, and it's a good thing to
draw only what you see. So I'm not drawing what I know is behind the tree because
that's my left brain speaking. I know the house continues behind the tree
that I don't see, so I don't draw it. And then there's also the
perception of light and shadow. We will put some shadow in
some parts of the house. And there's also the light
and shadow of the forest. So there are some trees which are lighter than other trees. And then there's the
perception of proportions, and that's to see what size one line has
compared to another, and what are the
proportion of the house. And what are the
proportion of the tree? You have small,
narrow tree trunks, and then you have thicker trees. So I try to see what size one object has
compared to another. So but let's paint a bit some of these marvelous autumn colors. So I use for the yellows, I use raw sienna and raw umber. And then there's for the orange, I use burnt orange, Kina Credon, burnt
orange by Daniel Smith. And then there's
still a lot of green. There's the green grass, which is around the house. And then there's still
some green in the trees. But I focus on all
the autumn colors. You can just use, of course, all the colors that
you like most. I paint the trees
around the house, and the house is white. The side facade is a bit darker than the facade
in front of me. So I will make it a
bit grayish later. But the house shape is
painted negatively. So I mean, it stays
white of the paper, and I paint the trees around it, which makes the shape of the
house come to stand out. So. For the green, I use desert
green for the trees. It's a grayish, greenish gray. It's a greenish gray, and it's a super
granulating color. Like for the green, I use forest green by Sminel which is also
very granulating. And it's kind of muted green. Then I paint the tiles of the
house with my dagger brush, which is a flat brush, and I suggest just some tiles
in the corner of the house. I never draw all the tiles because that makes
the roof look a bit flat and boring like little soldiers standing
next to another. Which reminds me
also to tell you to be careful not to
put the trees on an equal distance
one next to the other because that is
not really very natural. So you better vary the distance between
the trees to make your painting
look more interesting. So I paint around the trees, and I leave them
white for the moment, even if I will paint
some of them later on. And I also paint behind the little pools which
are drawn in front. And I never use masking
fluid because I find it a bit too strong edges, then I prefer to just paint around what I
want to leave white. And the windows and door are made dark because
they look really dark as it's very light bright outside and inside there's
no light, so it's dark. During the day,
windows are mostly dark and I make the
autumn colors go a bit inside the door
and the window and also some green to link
them all together. And then there's the
shadow of the cornice. And on the side facade, I will make it a bit
in a shadow later on. And next to the house behind, I will make the color a bit darker to make the
house come to the front. So some trees are painted with this gray and some are left with white and to make a variation in the trees
and in the forest. I add some blue and
some pink splashes. I splash also on the roof of the house to make another
suggestion of roof tiles. And then, of course, I splash in the forest to suggest leaves. So I want also refer
to another class to create some depth in your
paintings and in your sketches. So a reminder to
create some depth. So all the colors
which are stronger and more saturated are
coming to the front. Also all the warmer colors
compared to cooler colors. So warmer colors is with
yellow, orange, red. They will come to the front
and attract attention. And also everything
which is more detailed will come to the
front and attract attention. So when you're sketching, it's good to keep that in mind and think about what I want people to watch
in the painting. And so now I will add some greasy watercolor
pencil lines on the wet paper to attract attention to
what I find important. So I add some stronger
lines to the house, and I will also add some stronger trees in
the front of the house. So this dark gray
color pencil will give another extra texture to some trees and branches
in front of the house. Okay. And then I will also add some ventana color
in the forest. I do some hatching
with the color pencil, and it's quite strong
textured paper. It's not very smooth, so the hatching doesn't
work very well, but I will suggest some
leaves on the trees just by doing some curly drawing
in between the trees. So that gives another playful
accent to the forest. And then I receive a
present from a tree. It's a autumn leaf which
falls on my sleeve. So let's add it to the page. I will do this
really quickly now because it's getting cold. And this is not my main subject, but it's a fun detail to add as a souvenir
on my autumn page. And as the colors for the leaf, I also use row amber and Ros ienaF the
shadow of the leaf, which I do very quickly. It's not very
correctly detailed. I will use my mixture of ultramarine blue and
transparent orange. So I hope you had
fun in this video, and I'm curious to see
what you sketch in your sketchbook or on a loose
sheet of paper like I did. Have fun. O.
8. Final Thoughts: Congratulations, You made
it to the end of the class. I hope you enjoyed the
class and I hope you will continue sketching and
playing in your sketchbook. And I look forward to seeing your sketches in
the class projects. I promise you that
the more you do it, the better your
drawings and paintings. Forget. It's not about
talent or gifts. It's about skills you can
learn and get better at it. When we draw, we're in
the present moment. And when I look at a drawing I made on site during a trip, all the smells, sounds, and lights of the
place come back to me. It's also a wonderful
way to travel. Some final thoughts and
tips from the class. To avoid overwhelm, try to
simplify your subjects. What story do you want to tell? Don't draw everything. It's impossible. Draw only the most
interesting part for you. Object that are your focal point in a scenery must both valid. So what's the most
important in your painting? What story do you want to tell? Make that part more
interesting in colors. Objects that are
further away are lighter and cooler colors and
objects that are closer by and I will be attracted by the more vivid colors also serve where the light
is and leave white paper. The white of your paper is
too light of your subject. Finally, use enough paint and
water to have a nice wash. Experiment with textures and vector colors flow
into each other. Don't try to control everything. Your cons make some splashes
of color on your paper. If you are afraid to dirty the paper and don't be
afraid, It's just paper. Try to adopt a playful mindset and don't worry about
so-called mistakes. So your class project is mainly to find yourself a
fun way to sketch. Enjoy sketching
without stressing over the result and
love your mistakes. They make you develop
your own hand. Drawing. By the way, I still make mistakes
every day and start over to make it
better and better. But there are mistakes. Sometimes every artist,
you as well have a unique style and taste that will develop when you
sketch regularly. Be sure to post your projects
so everyone can be inspired by your work and share
your story about it. And if you don't know what to draw or paint in
your sketch book, any subject which makes you
happy is a great subject, being subjects you like, and that make you
feel good and happy. So you will enjoy yourself
and enjoy yourself. Your painting will automatically
make you happier than if you paint something which doesn't mean anything to you. Just one thing to keep in mind. If you're a weird subject, you're drawing will
look weird as well. Last but not least, be kind to yourself. You're not making a masterpiece, you're just making a sketch. Thank you so much
for taking my class. I'm so happy to be here with you and to share
this experience with you if you'd like to see more examples so you can
follow my work on Instagram, are subscribed to my websites
to get my newsletter. And please leave a
review if you have time and tell me
what you're saying about the class so I can make it better and don't hesitate to ask questions or make suggestions of what you
would like to learn. Thank you.
 Barbara Luel, Architect, Author & Artist