Transcripts
1. Introduction: Hello, I'm Barbara Luel. I'm an architect from Brussels and I love drawing and painting watercolors. For those who already took my two previous classes about drawing watercolor, you already know more about me. In this class I suggest that we paint wonderful autumn colors. So what you will need is a sketchbook, watercolors, and pencils and brushes. And I will give you more details in the next class, we will make an autumn color palette. So I suggest that you collect some beautiful autumn colored leaves from trees around in your neighborhood because everyone has other vegetation. So we will observe which color they have and we will make a palette so that we can go sketching autumn colors. And we will also draw and paint some of those trees. I will show you how to do it. I hope you have fun. And please post your paintings in the class so I can help you. And so your classmates can see what you make as well. And we can inspire each other.
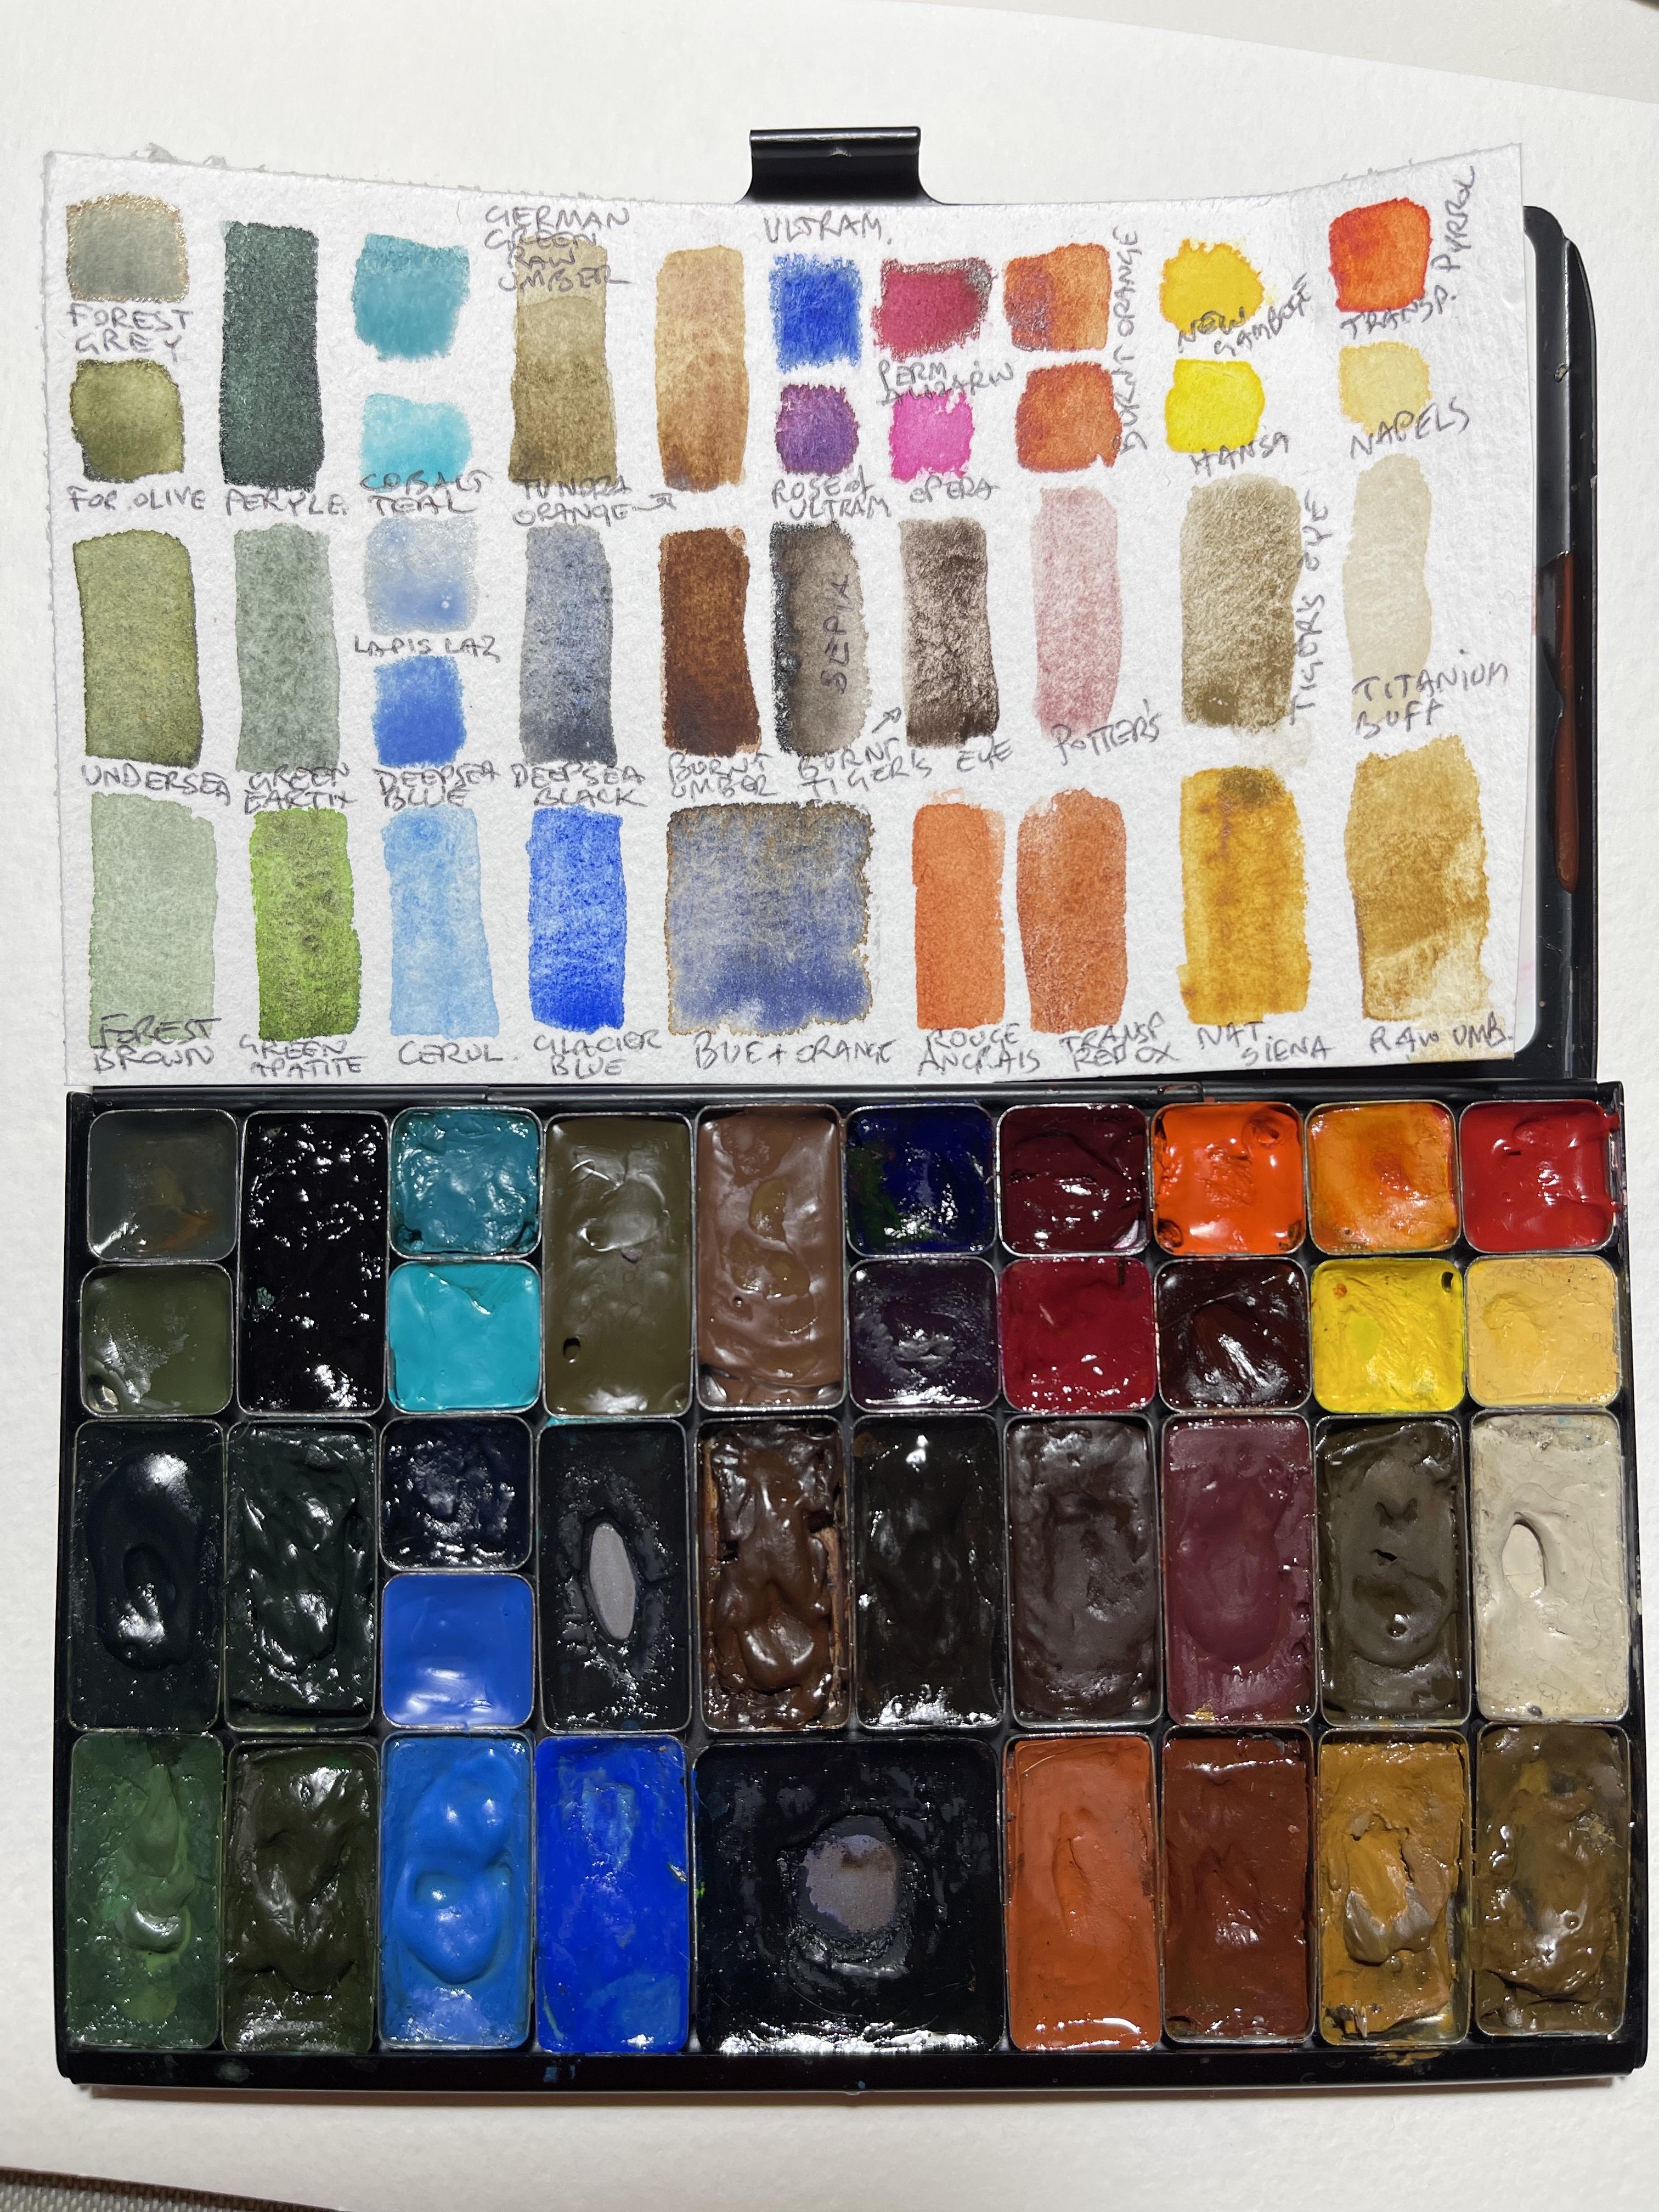
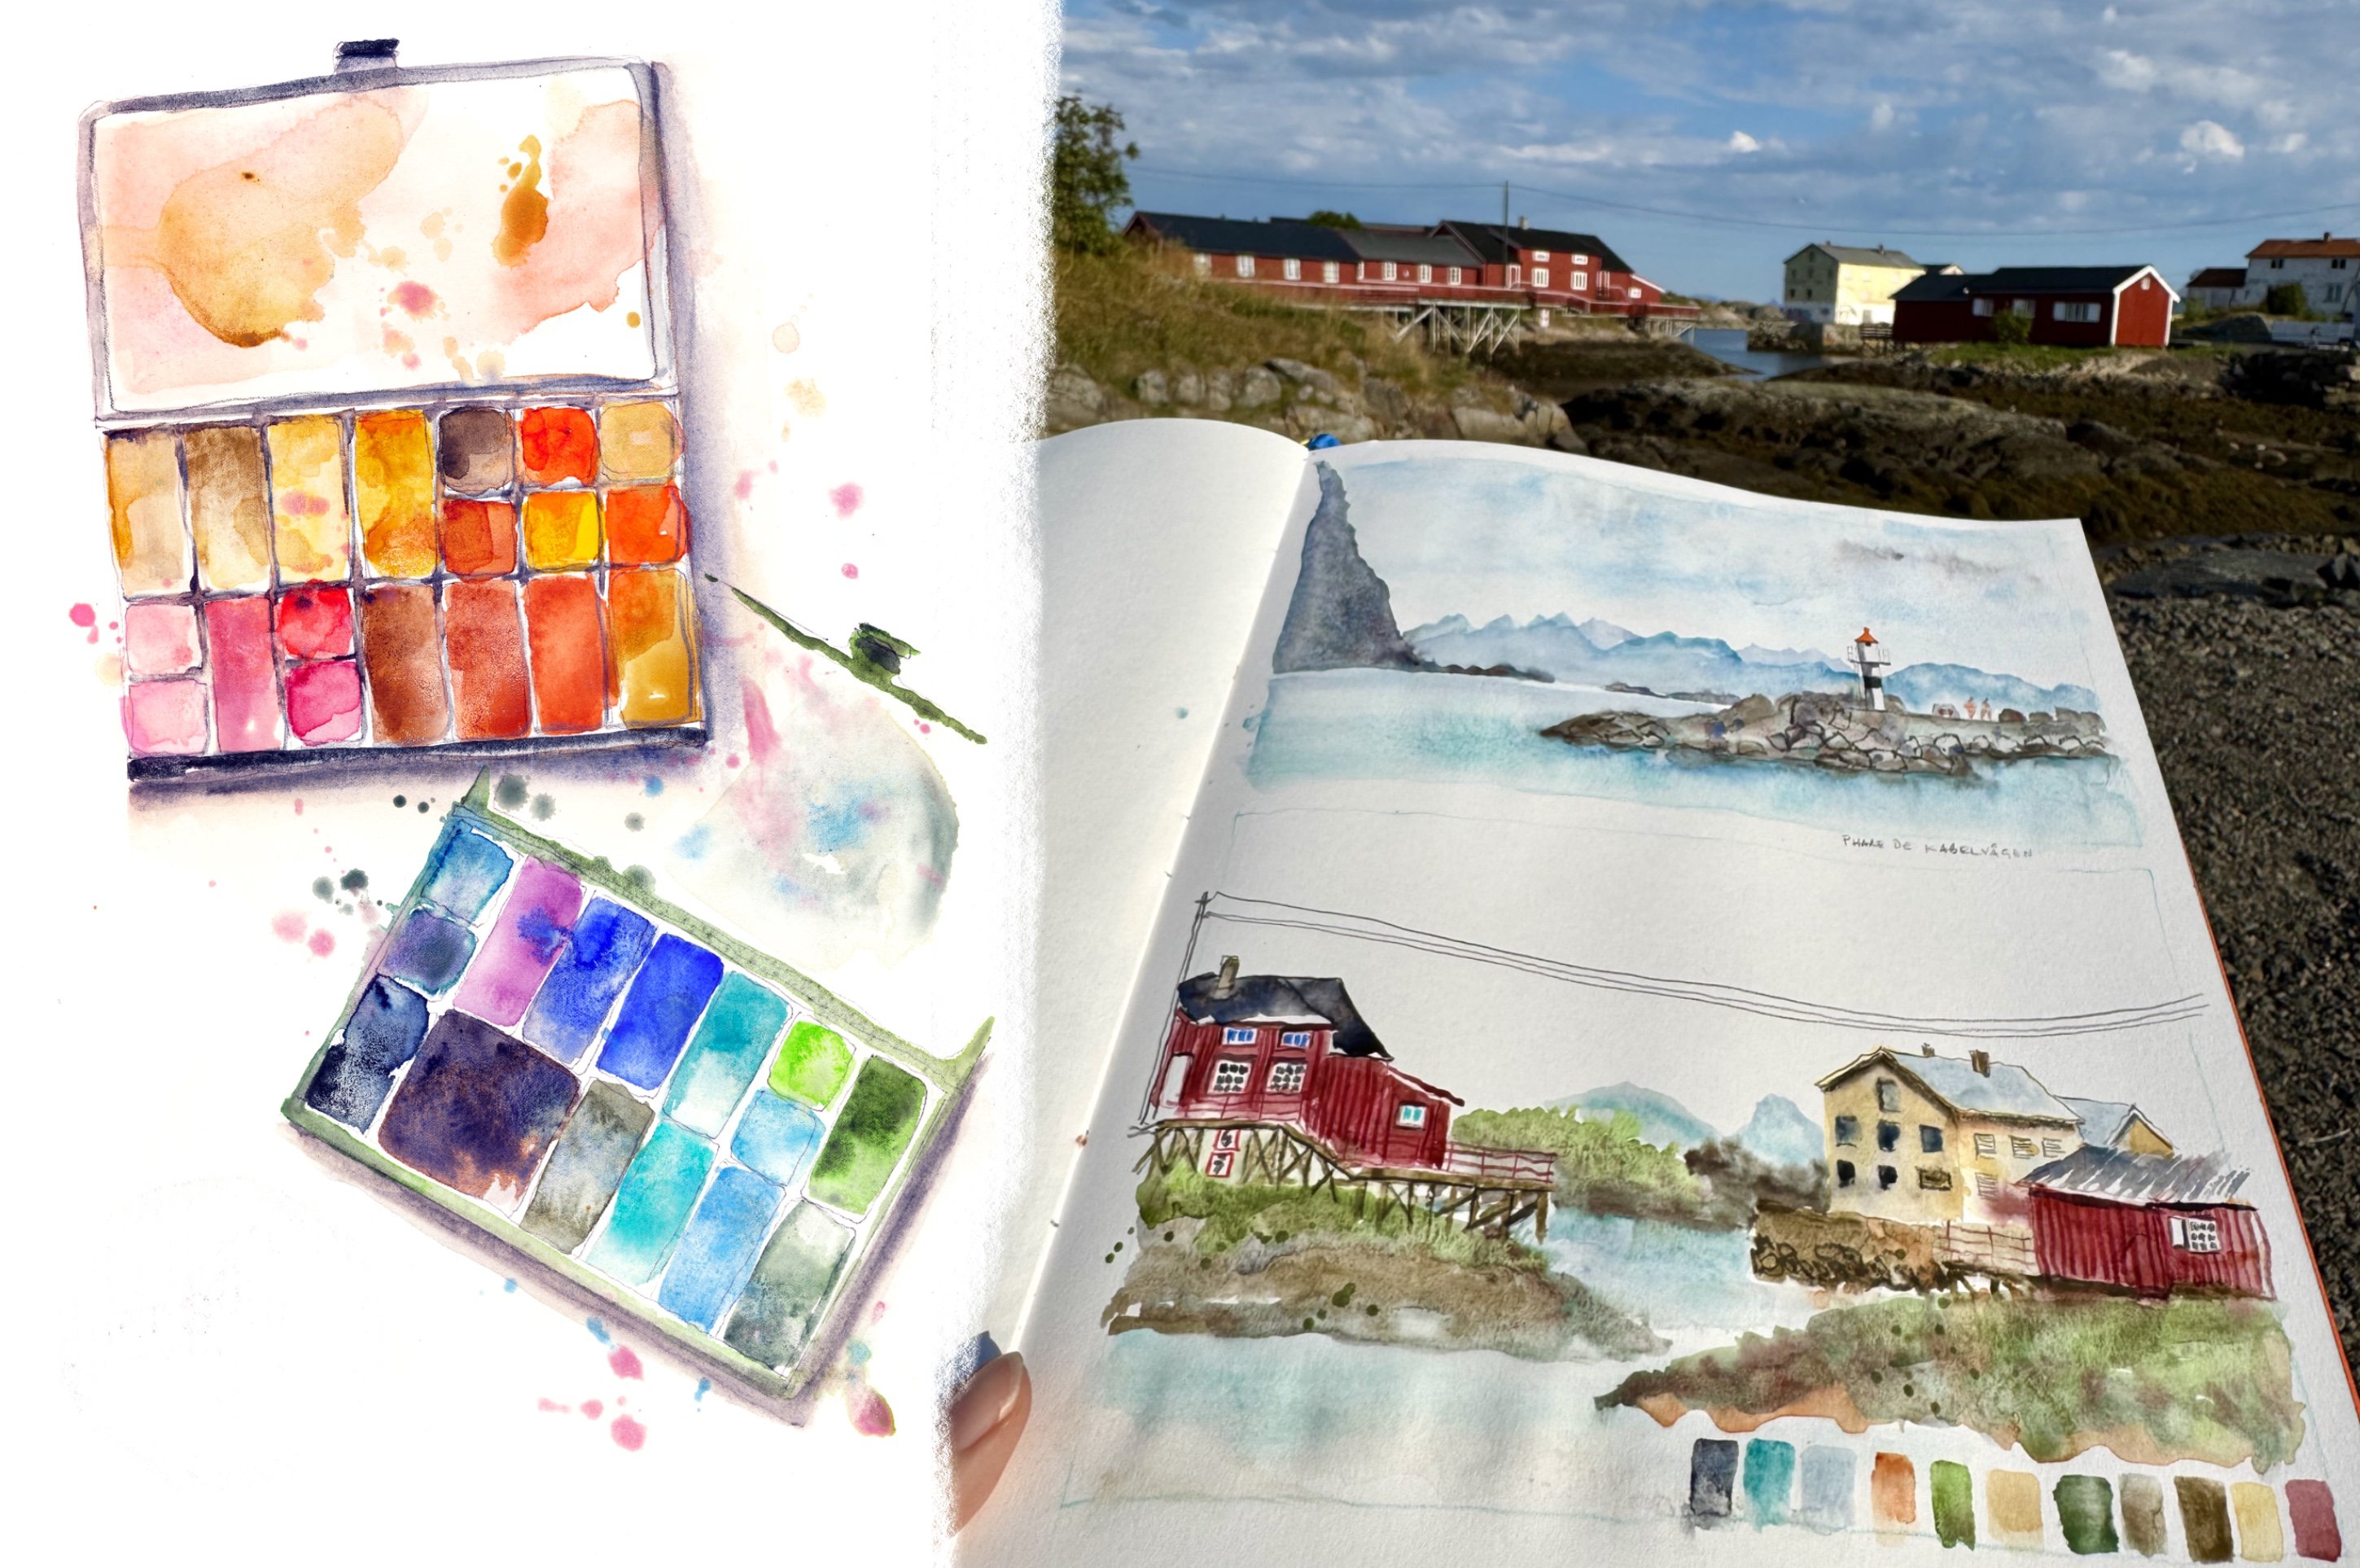
2. The Palette: Hello! So this is Barbara Luel ! We're going to make an autumn color palette. So make yourself a nice cup of coffee. And let's do this. This is the most fun part. So I collected autumn leaves. And you can collect autumn leaves from your neighborhood because we don't always have the same kind of trees. I don't know the names of all these trees, but some are red, we just talk about colors here. So yellow, this is ginkgo leaves. They have this nice yellow. So we will try to find these kinds of colors in our palette so we can go outside to paint them. So you also still have a lot of green in autumn. It's not all orange and red and brown. So what I did is I used these art toolkit palette and they have this great pocket palettes. I used to make a green and blue one and an orange and yellow one. But now Arttoolkit makes these bigger folio pallettes. So it comes with this pouch, like the pocket palette comes, with a small pouch. And this is Folio palette is kind of a bit more than two of these small ones in the big palette. So what I did is I took my palette that I made this summer I made this palette to go to the "île de la Réunion" where I was giving some sketchbook workshops. And so I looked what kind of colors they were with the flowers and everything. So I had a lot of different bright colors. And I took the pans out because they're magnetic. You can just flip them out like this and then change them. So I took the colors out I don't want for this autumn. With my color chart, I put them in a pouch so I can reuse it this summer when I go back. So I collected all kinds of autumn colors and I will put them now in the palette to see which colors I want to add. I already added some greens and blues I used now this Schmincke range, they have lovely granulating forest colors. I also added some of these granulating blues. But if you don't have them, don't worry, just take your favorite kinds of blues. So I will add extra colors. I will show you how I do it. This is the titanium buff. I already heavy it here, Naples yellow as well. It's, it's almost like this but a bit different. We can mix the colors. Natural Sienna, I have it as well. It's here. If your pan is empty, you can just add some tube color. And then we make the color chart so we see the colors well, because when the colors dry, you don't see very well which color it is I want to add some orange. I like to have a lot of beautiful oranges in these leaves. And we can mix them. This is transparent pyrrole, orange. It's very, very bright, but I love it. So I just push to tube up here and push the paint inside the pan. And if you want, you can mix it a bit with this paperclip that you unfold open and just clean it up with a tissue. And this is also a beautiful orange Quinacridone burnt orange. We can put it here. The colors that are very bright, that I don't use so much. I put them into small pan And colors I use more I make a bigger pan of it. So what else do we have? sepia ! this is the sepia and I will add some because I use it a lot in autumn. It's a very dark brown. What else can we use? Raw Umber? I love it a lot. I made here. Mixture of Raw Umber by Winsor and Newton and Raw Umber by Daniel Smith's. They're a bit different. And then we have this one, tigers Eye Genuine. It's very granulating color. And what else do we have? A transparent brown oxide that might be interesting and some red. Here is a lot of red. In autumn. I get this Permanent Alizarin crimson. It's a beautiful red. I will make the color chart for you so you see it better. And then we have, this is Tundra orange. It's very special. And then we have burnt tigers Eye Genuine. It's more brown. I'm not sure I want this tundra orange. Maybe I will take two smaller prints instead of a big one. This is a very granulating brown, I didn't bring brown leaves here. But yes, there's a lot of brown in autumn of course. And this I already have. I use this a lot. It's potters pink. And if you don't use the color a lot and you can just change it. Take the pan out, and you can buy these pans separately. You can also take away the paint out of the pan, but that's more difficult. Let's try this new color. I don't know it very well. What I also do is I try to put similar colors one next to another Sometimes they tend to mix up a bit into another, but these are very similar. So let's make the color chart So let's make our color chart.
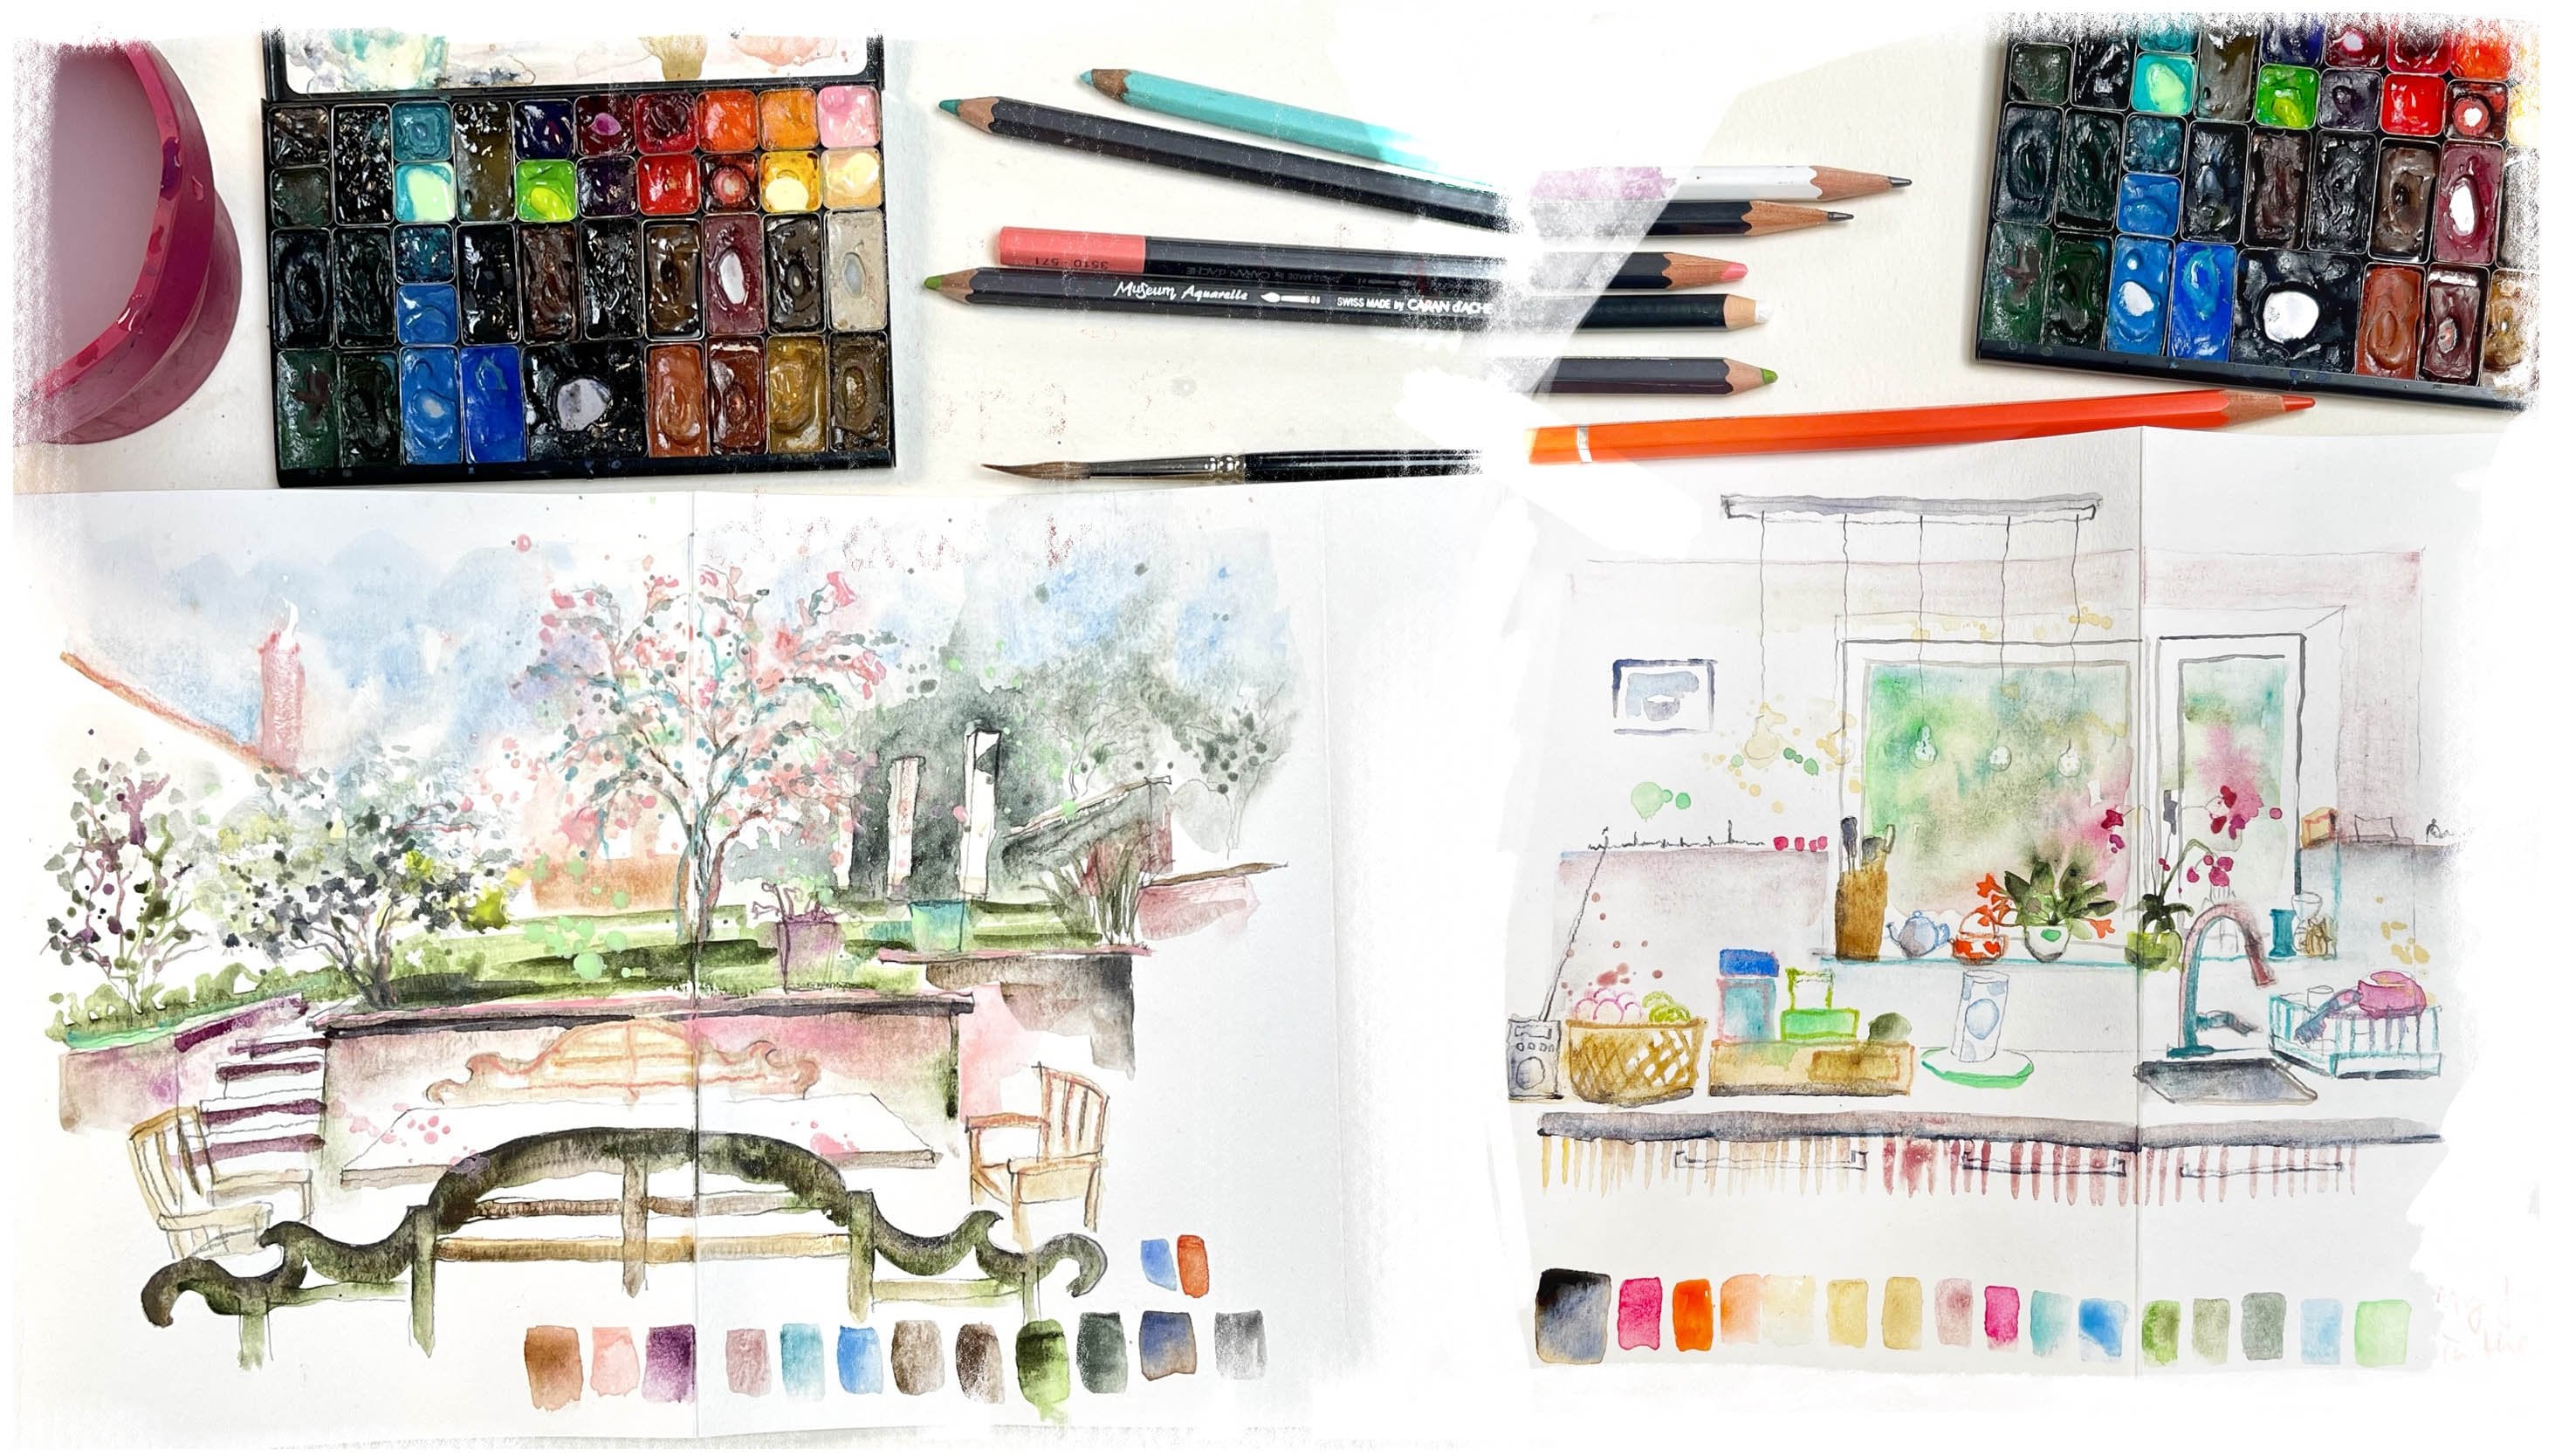
3. The Materials: Let's look at some different ways to paint trees and leaves. What do you need? You can use, you don't need all these, you can just use what you want. But I will use pencil, just a soft graphite pencil. I will use water soluble graphite pencil. This is Viarco Art Graf Water soluble graphite pencil, a very soft, very black one, and less soft ones. So like this is quite soft graphite, normal pencil, not water soluble. This is like very strong water-soluble graphite, and this is a bit less soft. So you see it's less black and less greasy. And then you can also use this. It's a water-soluble graphite stick. And then this is graphite paste, water soluble graphite, which, which you can draw with a brush. So I put it in a container. If you don't have it, it's okay. you can just use a normal pencil or just with water color. But I will show you how to use this because I like it a lot . Just put it in a container. Time then we put water on it. It's also made by Viarco Portugal. you can find it online. Just show you how I use it with water. And it becomes smooth. And see, you can draw with it. With the brush. It gives nice texture if you mix it with water color. But don't worry if you don't have it. It's okay, you can also make beautiful trees without it.
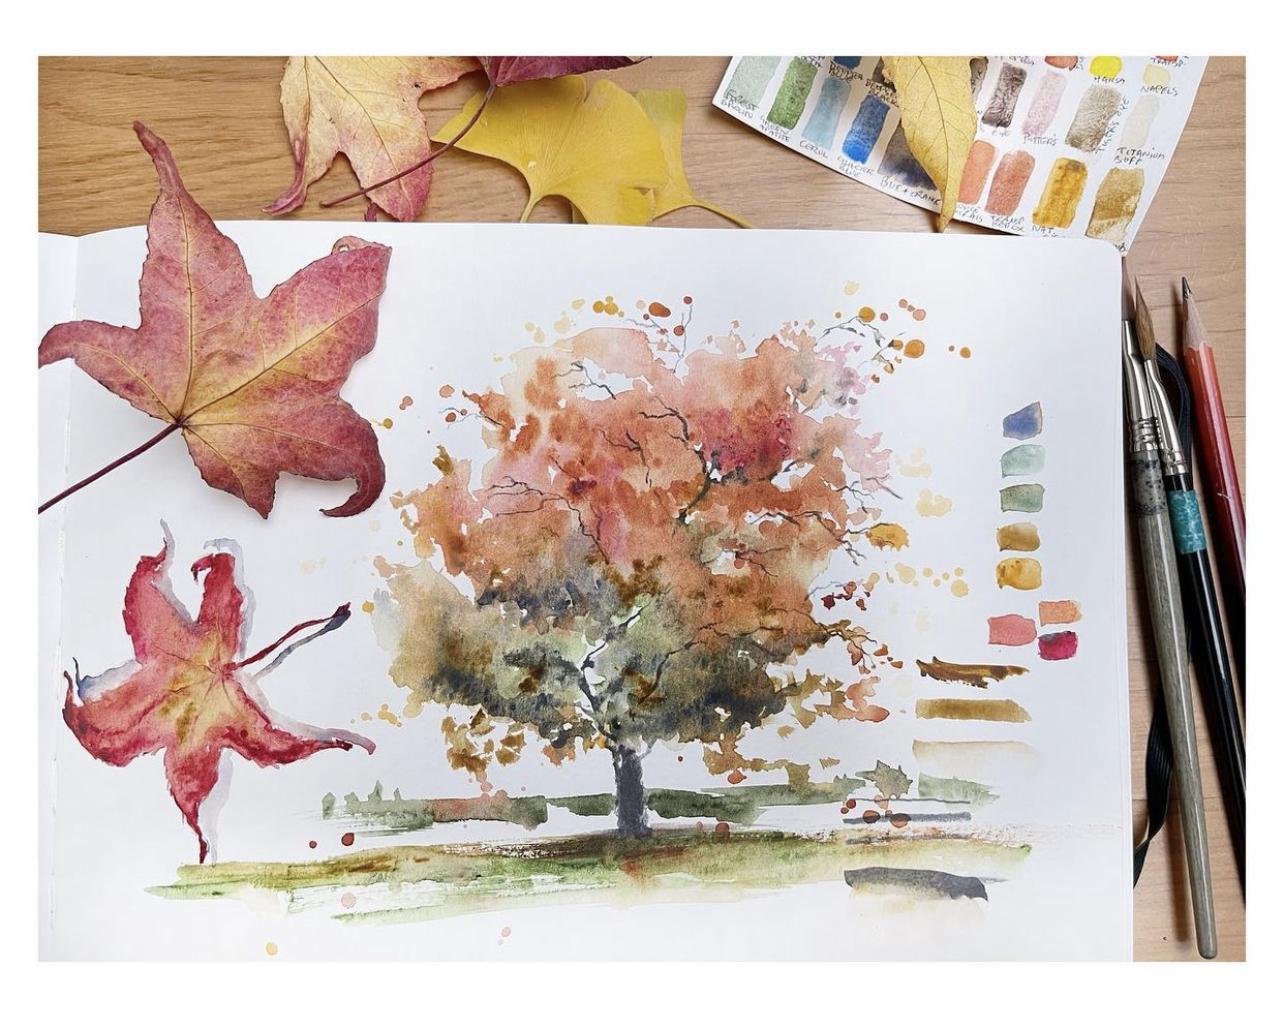
4. Wet in Wet Old Maple Tree: So let me show you how to paint in different ways to paint trees. We can do it like wet in wet where you just first wet to page and suggests the colors of the tree. We will draw the maple tree and it was this leaf. After that, we will draw a leaf. So we just wet the page and suggests the colors of the tree. So it was it's a tree that is red on top and it's like this, orange, red on top. And it' kind of yellow in the middle. And it's still a bit green in the bottom. So just look well at the shape of the tree. And you can splash also. This doesn't work always, like this. And look at the shape of the tree and then suggests the leafs with splashes and with colors. And afterwards, we will add some branches. I first start with the leaves because leaves interrupt the branches so the leaves are in front of the branches. And so if you first draw all the branches of the tree, they will look like continuous and you might forget that you don't see all the branches. So just concentrate on what is in front and what is behind. And that way, just paint what you see first and then you can add afterwards what is behind. So just add all the colors like you want. All right, of course you want to suggest the autumn colors like there's really some red and some orange. If you have too much water puddles like I have here, you just suck up the water with your brush. Dry it like this, and you see it sucks up all the excess water and excess paint. Let's see what this will give. So this is wet in wet, it's wet paint on the wet paper. And you can also paint, of course, on dry paper, you don't have to wet it. I have this brush also with a Nice tip. I will add some colors. Suggest some leaves like this. We'll dab. To suggest some leaves you can take Different colors, mix together and lengths. You can suggest some small leaves because the tree is seen from far away. So from far away you don't see the leaves very well. And in the bottom of the tree is always a bit darker because it's shadow. You can also add some grey like this the paint It's just mixed on the paper. Just some grey inside, some shadows. And it's really. Nice mixture of the Green Tree becoming autumnal colors. Try to vary the density. So you have this like "cream" paint you see. And then you have paint that is more diluted like "milky". And then you have paint that is really transparent. And if you have all these three together, you will have a nice variation in values. Here it's almost getting dry. And then we will add the branches. So look well at the shape of the tree. This is a very old maple tree. So it's really huge. And like here, I suggest leaves. So the colors of the leaves and the shape of the tree will show you which tree it is. So now we can add some branches. I like to add it in pencil and mix those together. So this is the tree trunk, like it's a very old tree, quite thick. And you have an grass underneath, standing in the grass. Make some dry brush strokes. And there's also a lot of leaves. If you want to splash, It's better to use the natural hair brush And there's a lot of leaves laying on the ground. So the ground is colored with the leaves of the tree. So beautiful. So this is water soluble graphite. You can also dilute it a bit or you can use your graphite paste Like this So this graphite paste will also make some shadows in the tree. Interrupted branches. You can do it like this, or you can do it with a normal pencil. It's okay if you don't have the graphite pencil, you can just use normal pencil. And I tried to make the the branches is a bit wobbly. And then I will add some trees leaves here. Just try to follow the shape of your tree. So you can paint the branches with a very fine tip. Or you can just draw with pencil or with your watersoluble graphite pencil. And this is not so nice. It's a bit too dark, I think. You will dilute it a bit. You can take also watercolor pencil if you prefer. And there are some branches also here. And just try to suggest the tree and like you see it. Don't forget to leave some white in the tree to bring some air in your painting. Under the tree is darker because it shadow. There's some greenery behind it with some bushes. And then when it's drying, you can add some splashes to have some special effects and some light. And then you can, we will leave the tree to dry To splash you go up and down with your brush. And when your brush is down, you tap with your finger. You have to have a lot of paint and water on it. Some days it goes better than others. Just exercise and see what kind of splashes you make like this. And now we will paint a leaf next to it to show which tree it is
5. A Maple Leaf: To show which kind of tree it is So I will try to draw the leaf approximately, So it should be quite symmetrical. There's like five fingers divisions in the leaves. it's almost dried so it's very wrinkled. Now I will paint. Yellow in the middle. I take natural sienna, and then there's a bit orange and red. a bit red. and a bit orange A bit darker orange, red You can also use this finer brush to draw. It's not always easy to find a good color. I think this is okay. And then you can paint the shadows. I do it with gray (mixture of blue and transparent orange). So here is not to a lot of shadow. Some shadow here. Just some shadow here. And you better wait until it's dry to add the shadow. Now it's the paint of the leaf is running away. So you just can take up excess paint like this. Let's wait until it dries and then we can finish it. Here is better to add some shadow as well. Because it's the bottom of the tree. you can add some of your gray or dark greens and in the middle as well. So I hope you are having fun with your trees and I look forward to seeing your paintings in the class. Don't forget to post them on the platform. So you can also see what others are doing on the platform and share your experiences. And maybe you'll also have some nice tips for your classmates. Thank you so much.
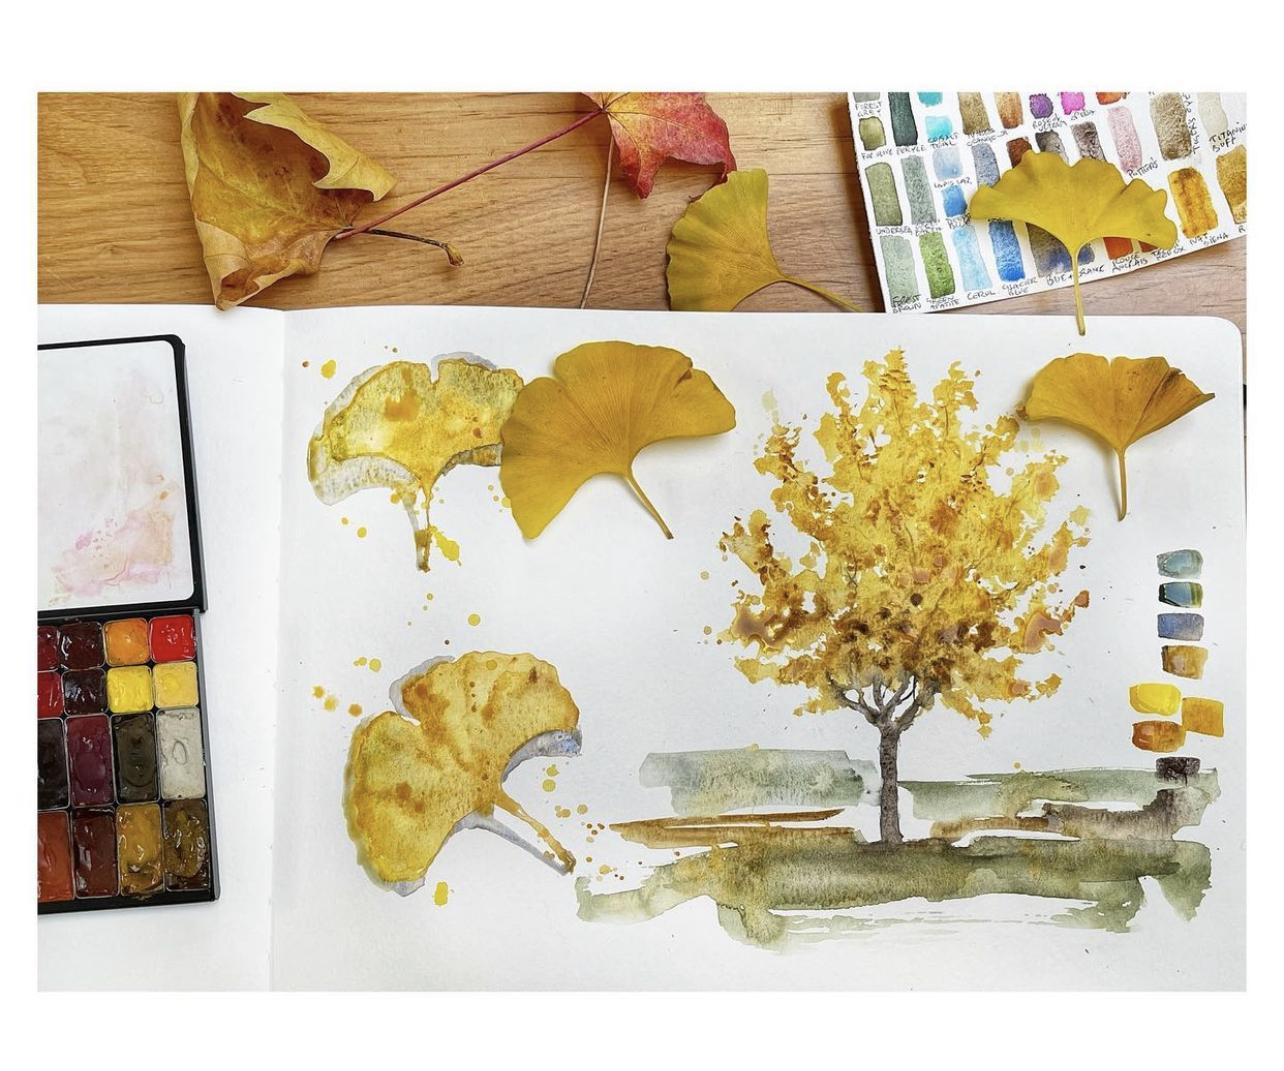
6. Gingko Leaves: Hello. Okay. Yeah. Hi. Hi.
7. A Gingko Tree: Hello. Okay. Okay. Okay. Hi. Okay. No. Okay. Right? Okay. No. Okay. Hi.
8. Painting Outside: You take care Thank you so much regions you can give. Just to give it to me.
9. Thank You !: So you did it ! this is the end of the class. I hope you had fun. Please post your paintings in the class so I can see them and help you. And your classmates can see them too. And you can inspire each other. And please leave a review for the class and let me know if there are things that I can make better next time. Thank you so much for making this happening, And for taking my class. Thank you!
 Barbara Luel, Architect, Author & Artist