Transcripts
1. Welcome to Thumbnail Magic: Do you also fear the blank page? I do, except when I make
some sales in my Art, Johnny, thumbnails
play a crucial role. So what out something
else you might ask? Thumbnails are very
small sketches, which are generally used to make a draft sketch
for a bigger painting. And thumbnails on my go-to place when I feel
creatively stuck, they're the perfect
place to try new things. Or when I'm afraid, thumbnails are very small. So it's like no one
will notice them, especially when I make mistakes. They're also my go-to
place when I'm looking for answers because they are a great way to
explore solutions. When I'm tired. Making a small thumbnail is always easier than
making a bigger sketch. I'm never too tired to
make a small thumbnail. So I always have a
thumbnail page going. And also thumbnail
pages look great. People even want to buy them. Hello, I'm Barbara. I'm an architect and artists, still working as an architect everyday restoring
monuments, as living. In my free time, I make out drawings
and paintings. And I also published two
books with paintings, but my travels in Japan. I also volunteer in an arts workshop for
people with dementia. I draw and paint with
them and give them human connection and the
way to express themselves. But most of all, I want to commit myself
to share my love of making our tweet this
many people as possible. In this class, I want to
teach you my tips and tricks with to Magic
of thumbnail sketches. I hope it will boost
your creativity and sketching skills as
much as it did for me. We're going to do with this
day by day, over ten days. I will give you a new
prompt each day and show you how I approached
them in my work. I never feel so free
and never have as much as when I make a
thumbnail composition. And after finishing the page, the results are always amazing, even when some of the thumbnails didn't
turn out as I wanted, it done so much and do over
page always looks great. So in this class, I want to
share that pleasure with you to help you boost your drawing and
observation skills, Experiments and play without
pressure and fear of ruining the page and explore
your artistic style. But ultimately, I want you to start to create from
a place of play, enjoy rather than stress
and fear for mistakes. I will show you how. Let's make some Thumbnail
Magic together.
2. Class Project: Let's make a thumbnail page together on an A4 size
paper like this one. I make ten sketches of 5 cm by 5 cm or 2 " by 2 " and also
some rectangular ones. And as a class project, I invite you to
choose a subject and your surroundings for you to sketch in the thumbnails
we will make together. Think about the story you want to show eventually
in your sketches. It can be your favorite
places of your home. Like I did holiday or
like I did lately. I made a page of
thumbnails for clients, sister who got married and with their
favorite activities, holiday places, drinks, and the place where
they got married. Any subject at inspires
you is a good subject. I'm going to draw
here the places of my home I moved into last year. You can also make thumbnails are just objects like tea
cups of your children, your old Doris, your pet food. It can be absolutely anything. I will be very curious
to see what to sketch. The purpose is to
have fun and play. If you have fun while drawing, you will make better programs. So think about what
story you want to tell. Your thumbnail page
will tell a story about you a bit
like a comic strip. Please share your work on
the platform so everyone will level up by seeing as
sharing their experiences. My husband was falling. I hope this class takes away the fear of making a bedroom, takes away the fear of not
having talent and will help you on your way to your
unique sketching style. My purpose is not to make
your sketch like me, but to make you sketch like you. Let's get started
and don't forget to subscribe to my skill share. To my skill share. Let's get started. Don't forget to subscribe to my Skillshare channel by
clicking follow here above. So I can contact you if I have an announcement and tag me in your posts on Instagram with your class projects so I can show you odds with
the whole world. In the next video, I will tell you what art
supplies I will use. But of course, you can use any parts of that I
still have at home. You don't need to buy
anything special. Thank you.
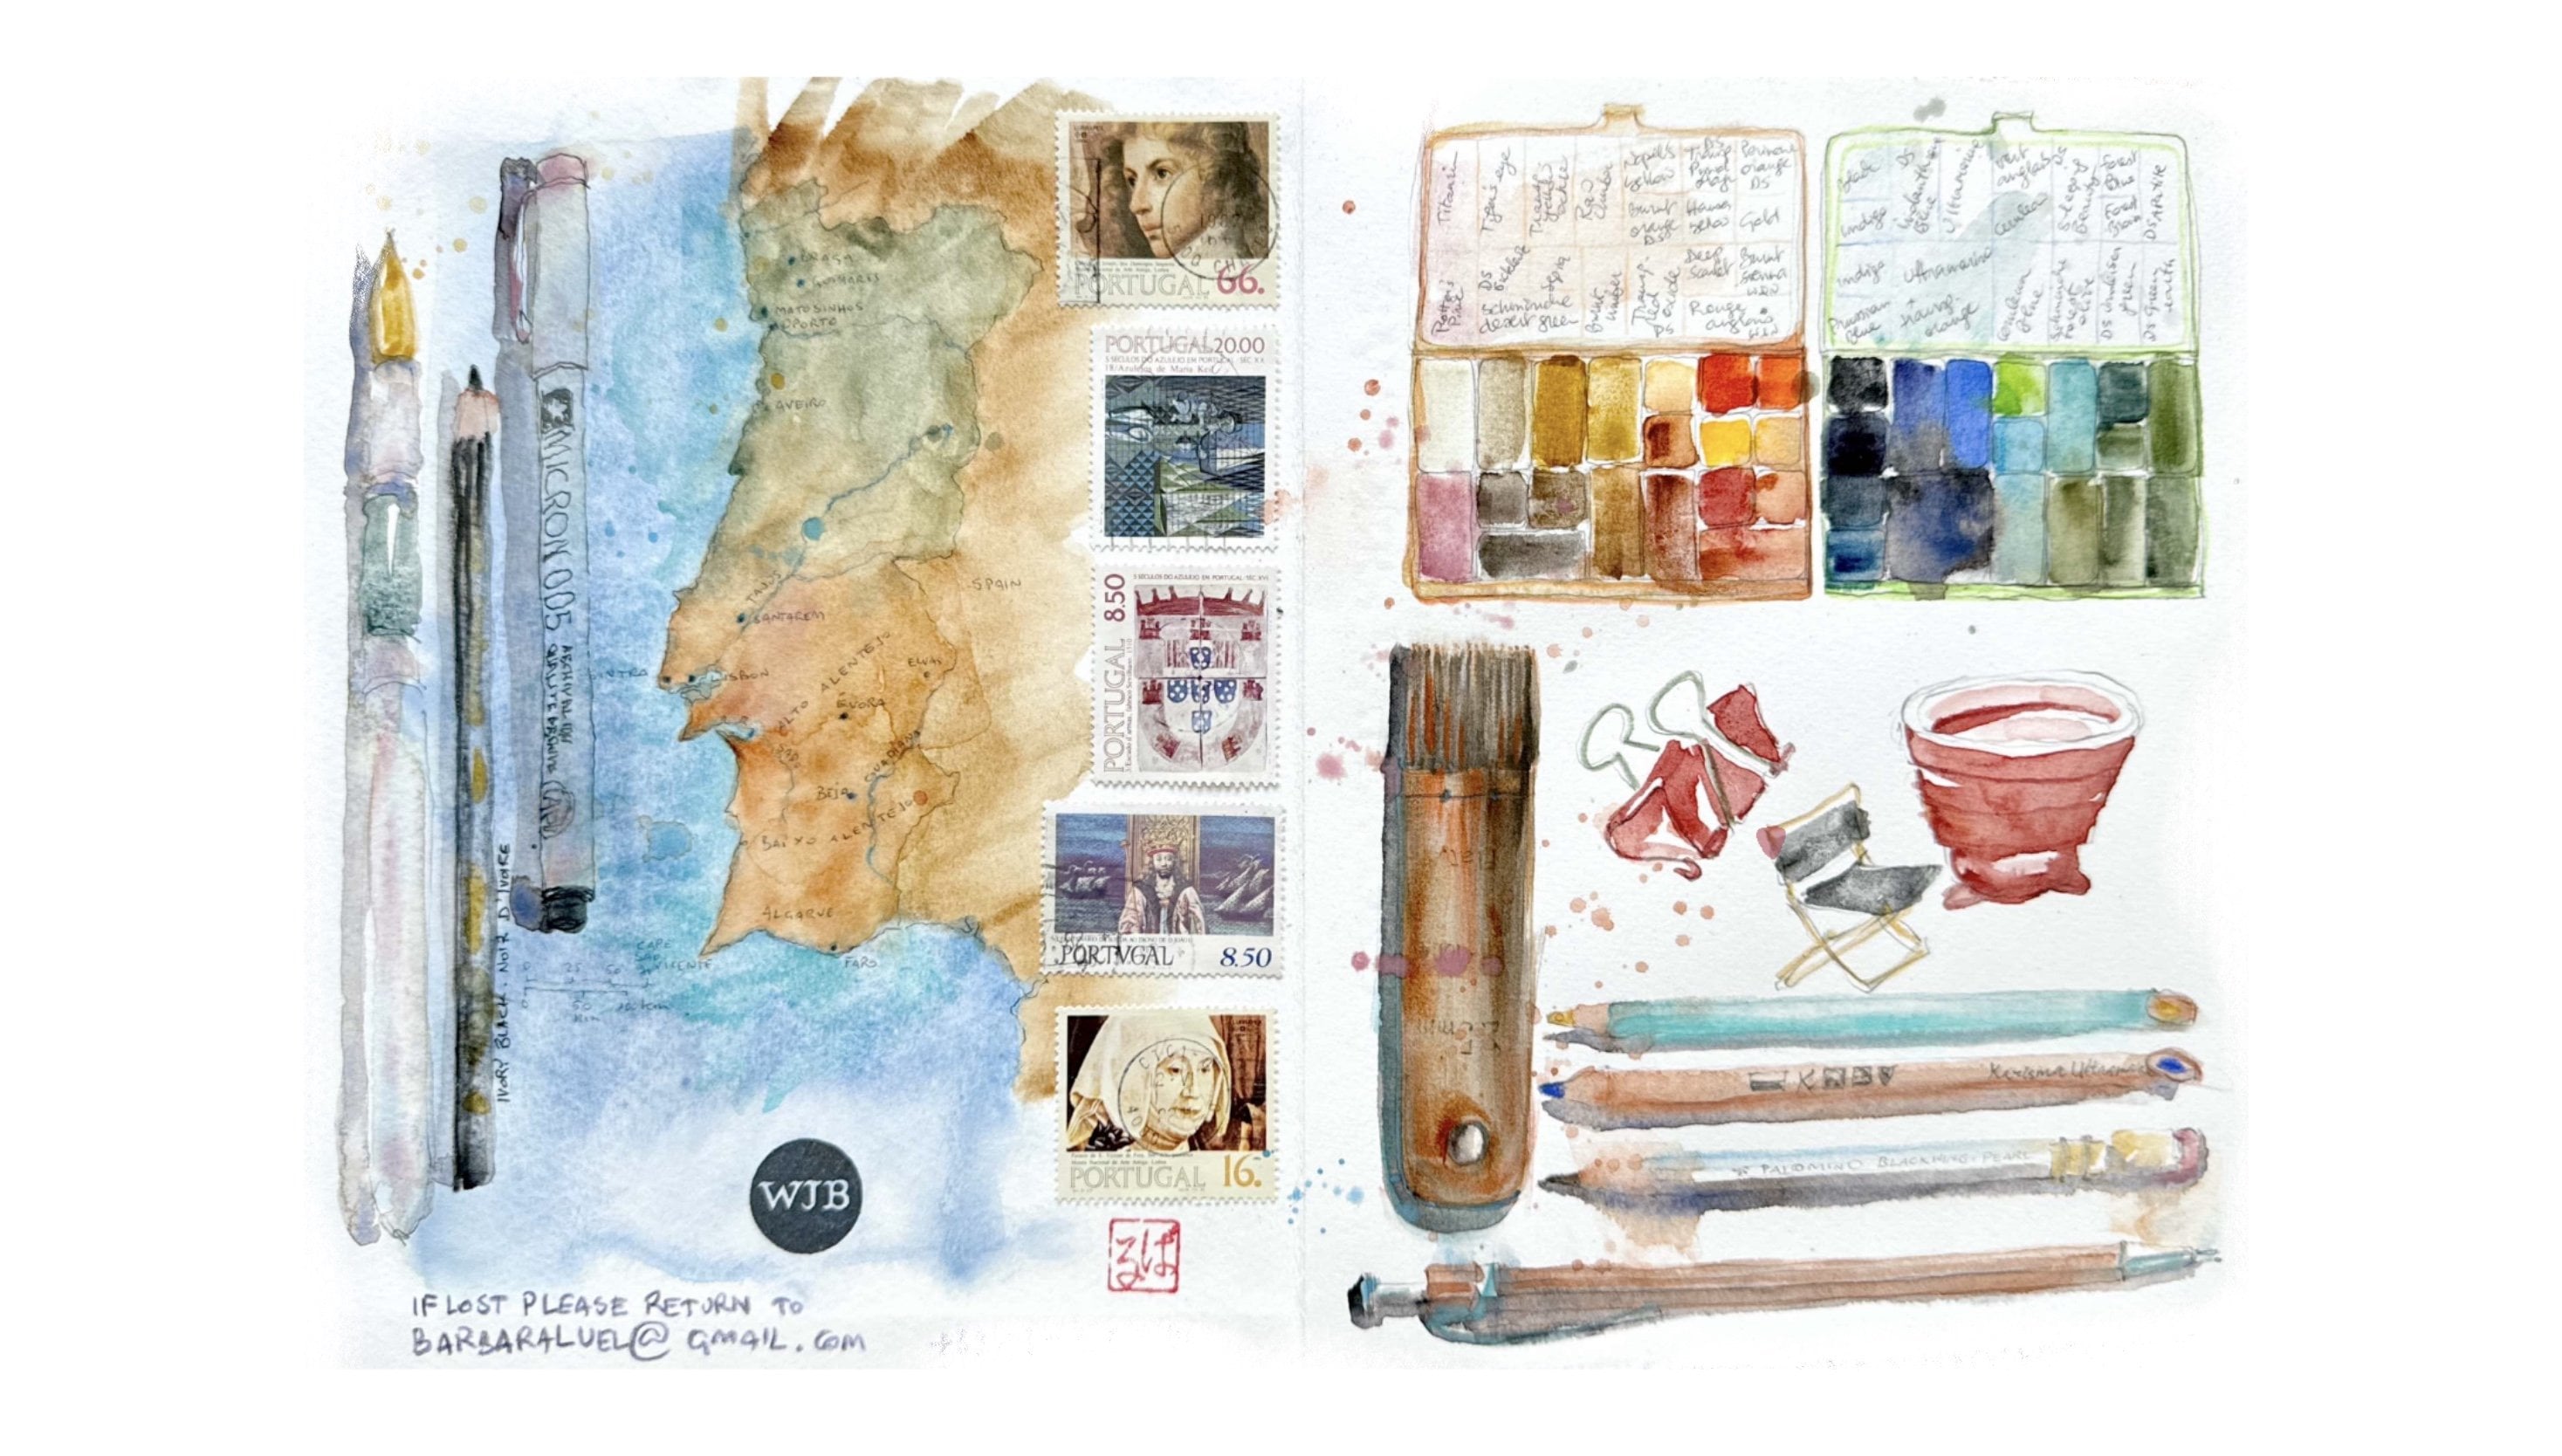
3. Art Materials: Welcome to the materials video. I will now explain the materials I will use for this class. So I will use a4
size sketchbook. You can also use of constant
smallest sketchbook and adapt the thumbnail
sizes to your sketch book. But this sketchbook
is about a4 size and thumbnails are
about five by 5 cm. To draw the grid, I use this triangle. I show it in the next video. I find it easy to make
parallel lines with his triangle and you can
measure in both directions. You're going, of course also
make the grid just tweet tape and not to make
it so straight. But this is the way
how I will do it. Then next, you'll need a pencil. This is a very soft
graphite pencil, like two or three be. And when you press on it, it makes really nice dark lines. I like this soft graphite. Use this kind of eraser because it doesn't
damage the paper. It's a kneaded eraser. You can also use
another type of eraser, but if you will use Watercolour, you might want to use this so you don't damage the
paper when you erase. Then I will make a thumbnail
with a ballpoint pen. This is ballpoint pen, very fine ballpoint pen. And it's waterproof. So when you want to Watercolour, you'll need waterproof ink. So you might want to test
your ballpoint pen on a separate paper to see
if the ink is waterproof. Then I will use fine brushes. These are sable brushes, these two, and this is a
synthetic imitation sable brush. And this is a synthetic
brush by a Skoda. I will put a list of my
materials in the Resources tab, and then I will use
watercolor pencils. These are watercolour pencils. And then I will also
use normal pencils. But you can use whatever pencils you have
and it will be fine. And you can also use
other materials. Of course, you don't have
to use the same as I do. And I will use some
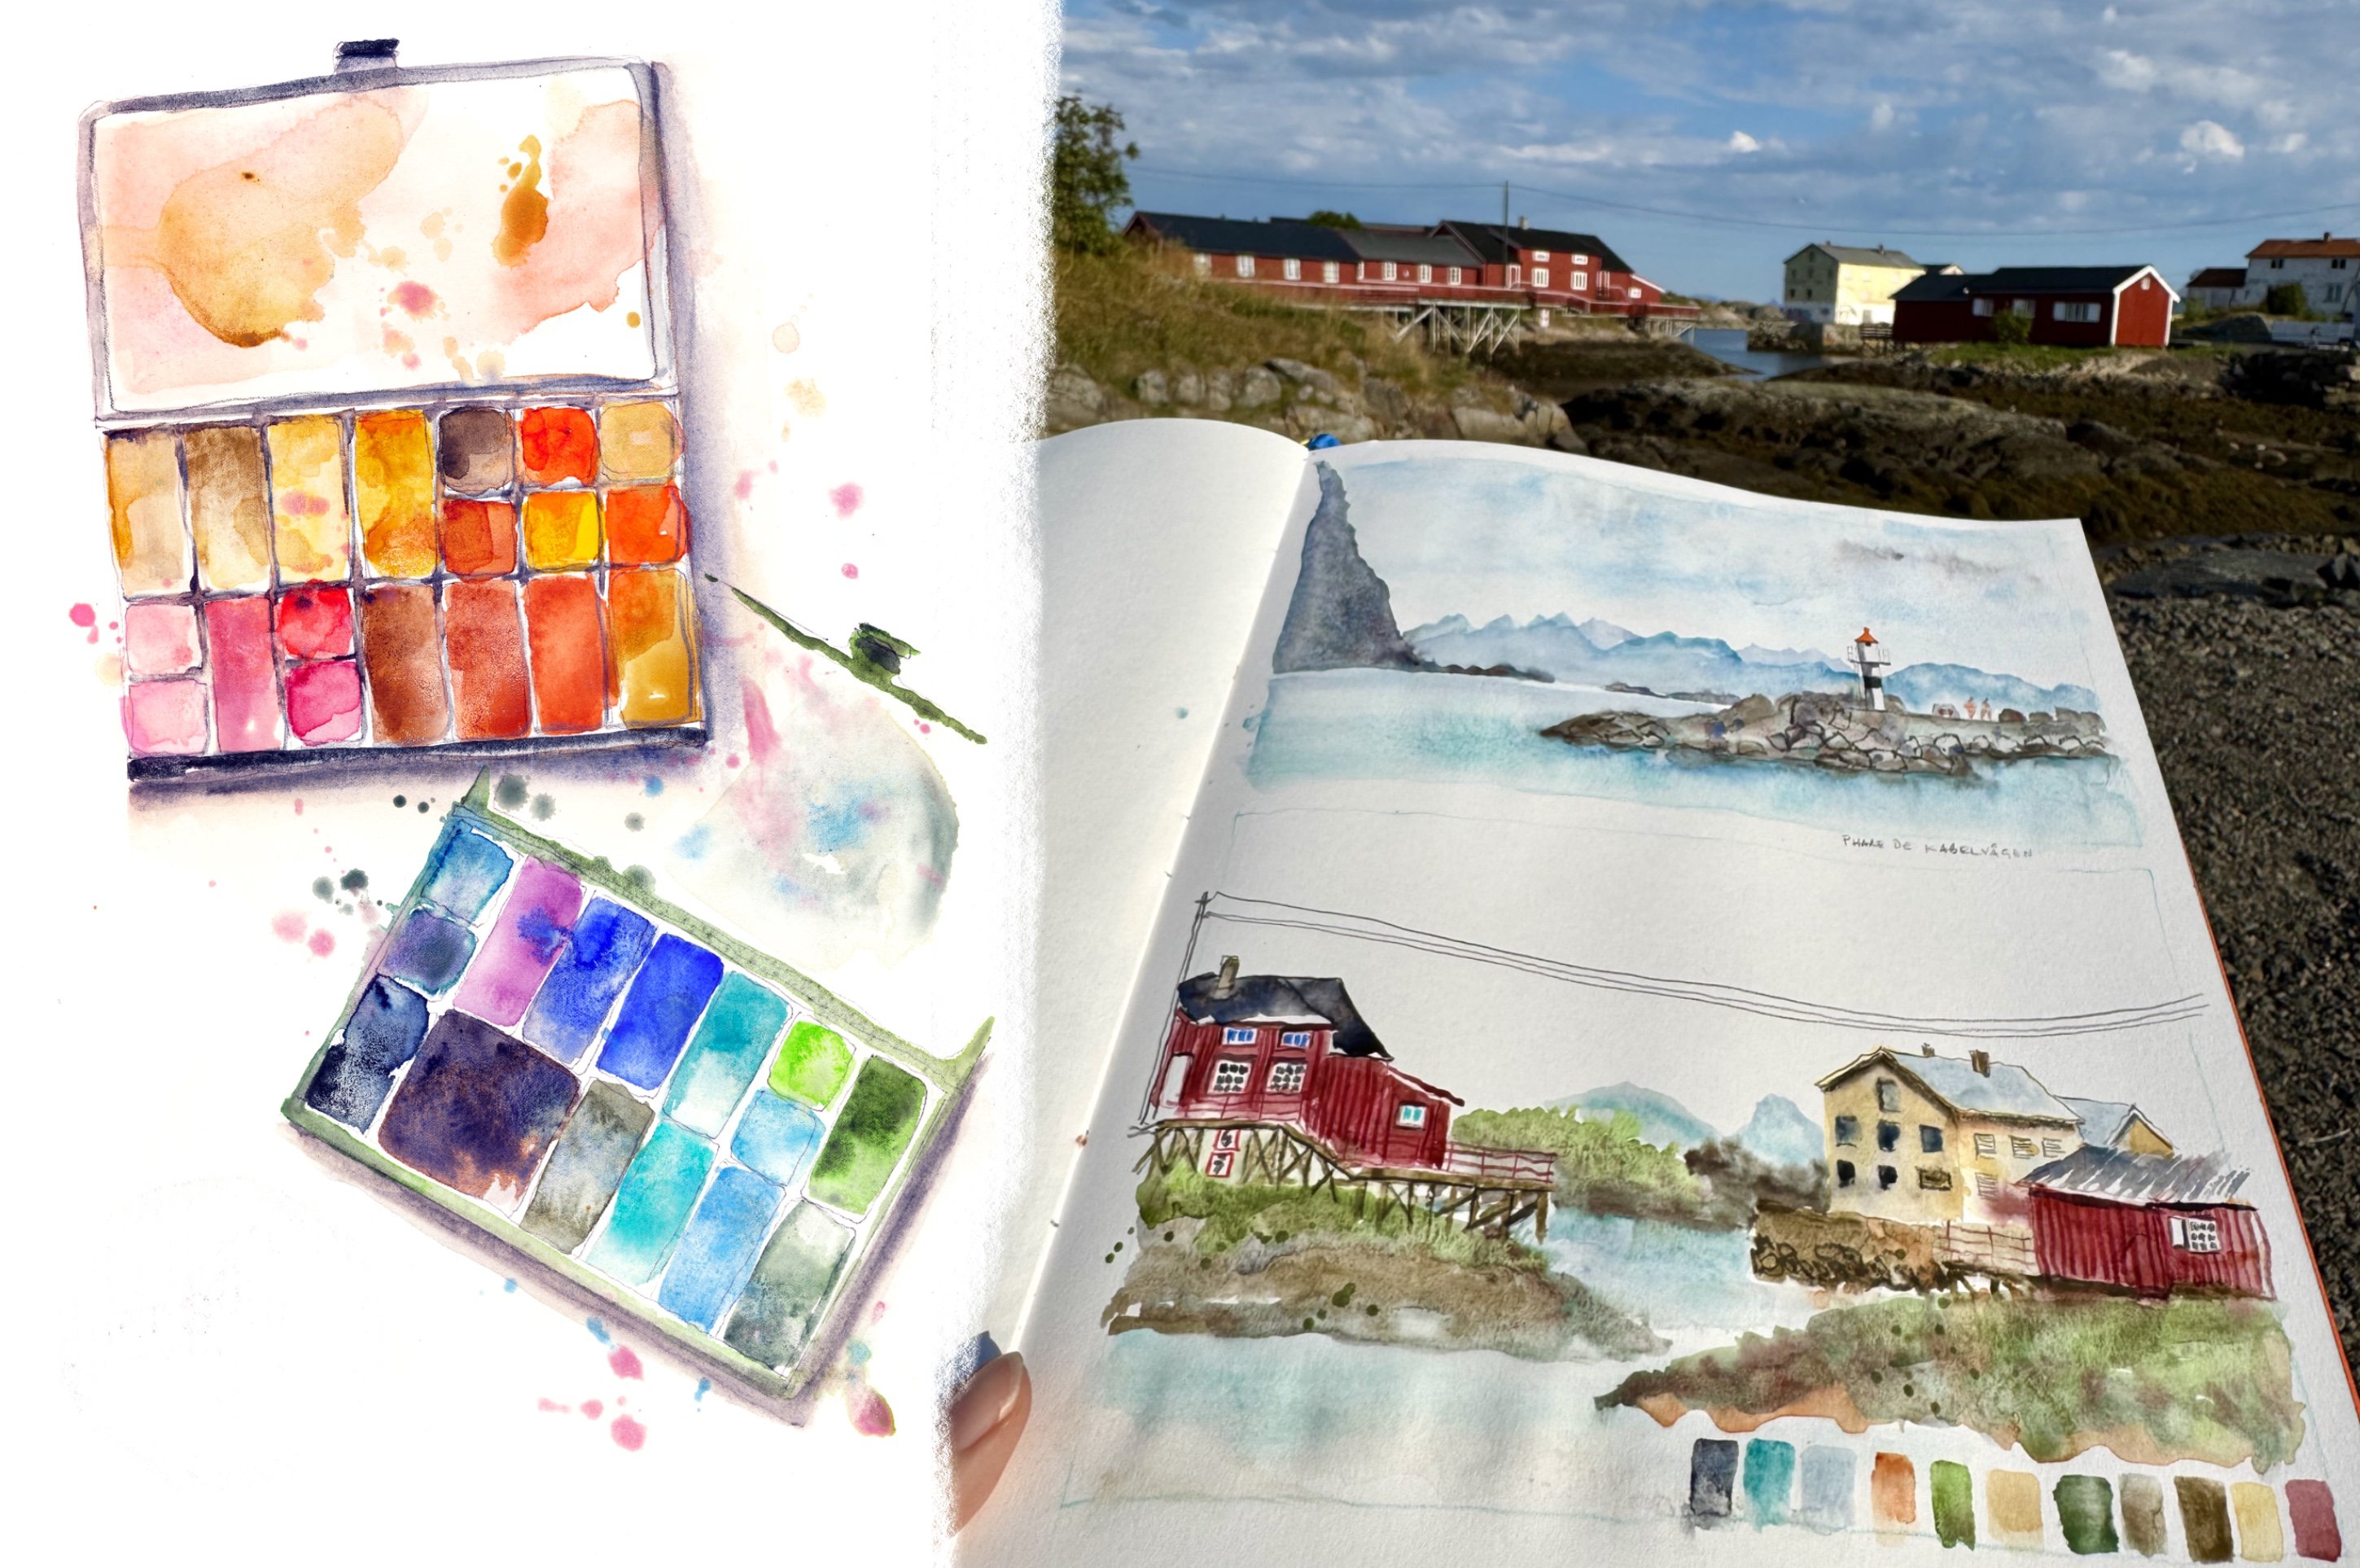
colors of this, but I will only use 12 colors. And you can find them also
in the Resources tab. Of course, you can also use
just a smaller palette. And this is just my palette
I use for the moment. I will select only some colors
to go into the thumbnails. And then you'll need a
water buckets if you want to, Watercolour, of course. But anyway, you can also
use other materials like color markers or just do
we think Color pencils, everything you want
to do will be fine. We're here to play
4. Drawing the Grid: Welcome. In this video where I show
you how I drove the grid, I use a pencil and a triangle. I use my graphite pencil. It's about 2B soft graphite. And I make squares
five centimeter by five centimeter for
Europeans in inches, that would be about 1.96 ". So let's take 2 "
by 2 " squares. And as I have an a4
size sketchbook, I will have a page
of 12 squares here. But from these 12 squares, I will make two rectangles to make a variation in the grid. And in total, I will
have ten paintings. And so I also try
rectangular thumbnails, which will make the
page more interesting. I think. You can also make a variation in square
sizes like I did here. On another page. On this page I have a
bigger term nail in my page where I
connected Foursquare's. So that would be
approximately 10 cm by 10 cm, so 4 " by 4 ". And to connect the squares, I erase the connections
in Pencil I made. To erase the connections, I use this kneaded eraser because it doesn't
damage the paper. I also erase a bit of the grid because I don't want the
pencil lines to be to present. And once you put
Watercolour on the pencil, you can't erase it anymore
because the Arabic gum off the Watercolour will fix
the pencils to the paper. If you don't want to make
a grid with pencil lines, you can use masking tape, but be careful
that you don't use masking tape which
damages the paper. If it sticks too
much to the paper, you might take some paper away when you remove
the masking tape. Of course, feel free to make some bigger thumbnails if this is really too
small for you. For example, if you don't
have such small brushes, or if you have a
vision impairment, or if you want to use
PESTEL with bigger strokes, Feel free to use any other dimension of thumbnails
which fits you better. My purpose is however, to keep it as smallest possible, to keep it sketchy
and short and sweet, like five, like 15
min sketch habits. The purpose is to
make this a habit. And if you have a busy work life or family
life to make it short and sweet thumbnails might be important to keep the
habit on a long-term. And they've to thumbnails
become too big. We will have tendency to
make too detailed sketches. And now choose the story you want to tell and your subject. Maybe you want to document
the summer with flowers, or maybe you want
to document travel, a holiday you made, and animals are food. Any subject is a good subject as long as you like it, Let's start
5. Day 1: Focus on Fine Line Work - Sketch a Welcoming Place: Hello, welcome to day one. Let's start. We will
draw the first square. You have to choose now
the story you want to tell on your first page. As you start the
first thumbnail, I will illustrate my new home in which I moved into last year. And I will start with
my front door in this square in Tumi. We will pay special attention
to the fine line work. As the thumbnails
are very small, it's very important to
have very fine lines. I think the topic to remember here, our focus point
is the line work. I start with the
vertical thumbnail, top left corner,
but you can start with any tumpnail you like
according to your subject. Did you choose your
subject you want to illustrate on
your Tumpnail page? It can be flowers, your holiday, anything is good. Look carefully in what
direction the lines are going. The thumbnails are very small. Pay special attention to your line work during
the whole class. Draw with a fine line, either a well
sharpened pencil or a waterproof fine liner or
waterproof ballpoint pen. Otherwise your thumbnail will quickly look very full of lines. You can add any time some
colored pencil if you like. You are here to play and to
have fun and try new things. I don't know if you noticed, but before I started, there were already some colored
lines in this thumbnail. It's just that I was starting pencil line work and
I started too low, so my page layout wouldn't
have looked good, so I erased it. You're here to experiments. The line work is very
personal to each artist. And it's not a
question about talent, it's just a muscle to train, like you train
yourself how to write. You train yourself how to make beautiful drawing
lines that you like. Like you found your
signature handwriting. With a lot of drawing time, you will find your signature
hand drawing by drawing regularly and a thumbnail
a day keeps the Dr. away. It's like meditation,
it empties your head. Let's go through
some line work that can make your
drawing come alive. Now I started to paint. You just can choose all the colors you like to
use in your dumpnail page. I chose a limited palette that I will use
all over the page, so that all the dumpnails are connected together
with the colors. Now I started to put color, I'll put watercolor
and color pencil. In each thump nail, I put the water color all the different
colors and I just continue painting while
everything is still very wet. Because I like when the
colors flow into each other, I put the watercolor
pencil into the wet paint. The color of the pencil
flows into the watercolor. Try to choose your
colors that you want to use all over the page. And repeat these colors from one thumbnail to another
to make them fit together. The temp nails will
actually be linked and connected together in a page
layout by three things. First is your subject and
the story you want to tell. Second is your line work. And third will be
your colors and also the repetition of
materials that you use. If you make a mistake, if you put too much color
or water on your page, you can clean your brush in the water and then the
brush in the tissue. And with a clean brush, you can absorb excess
water and paint.
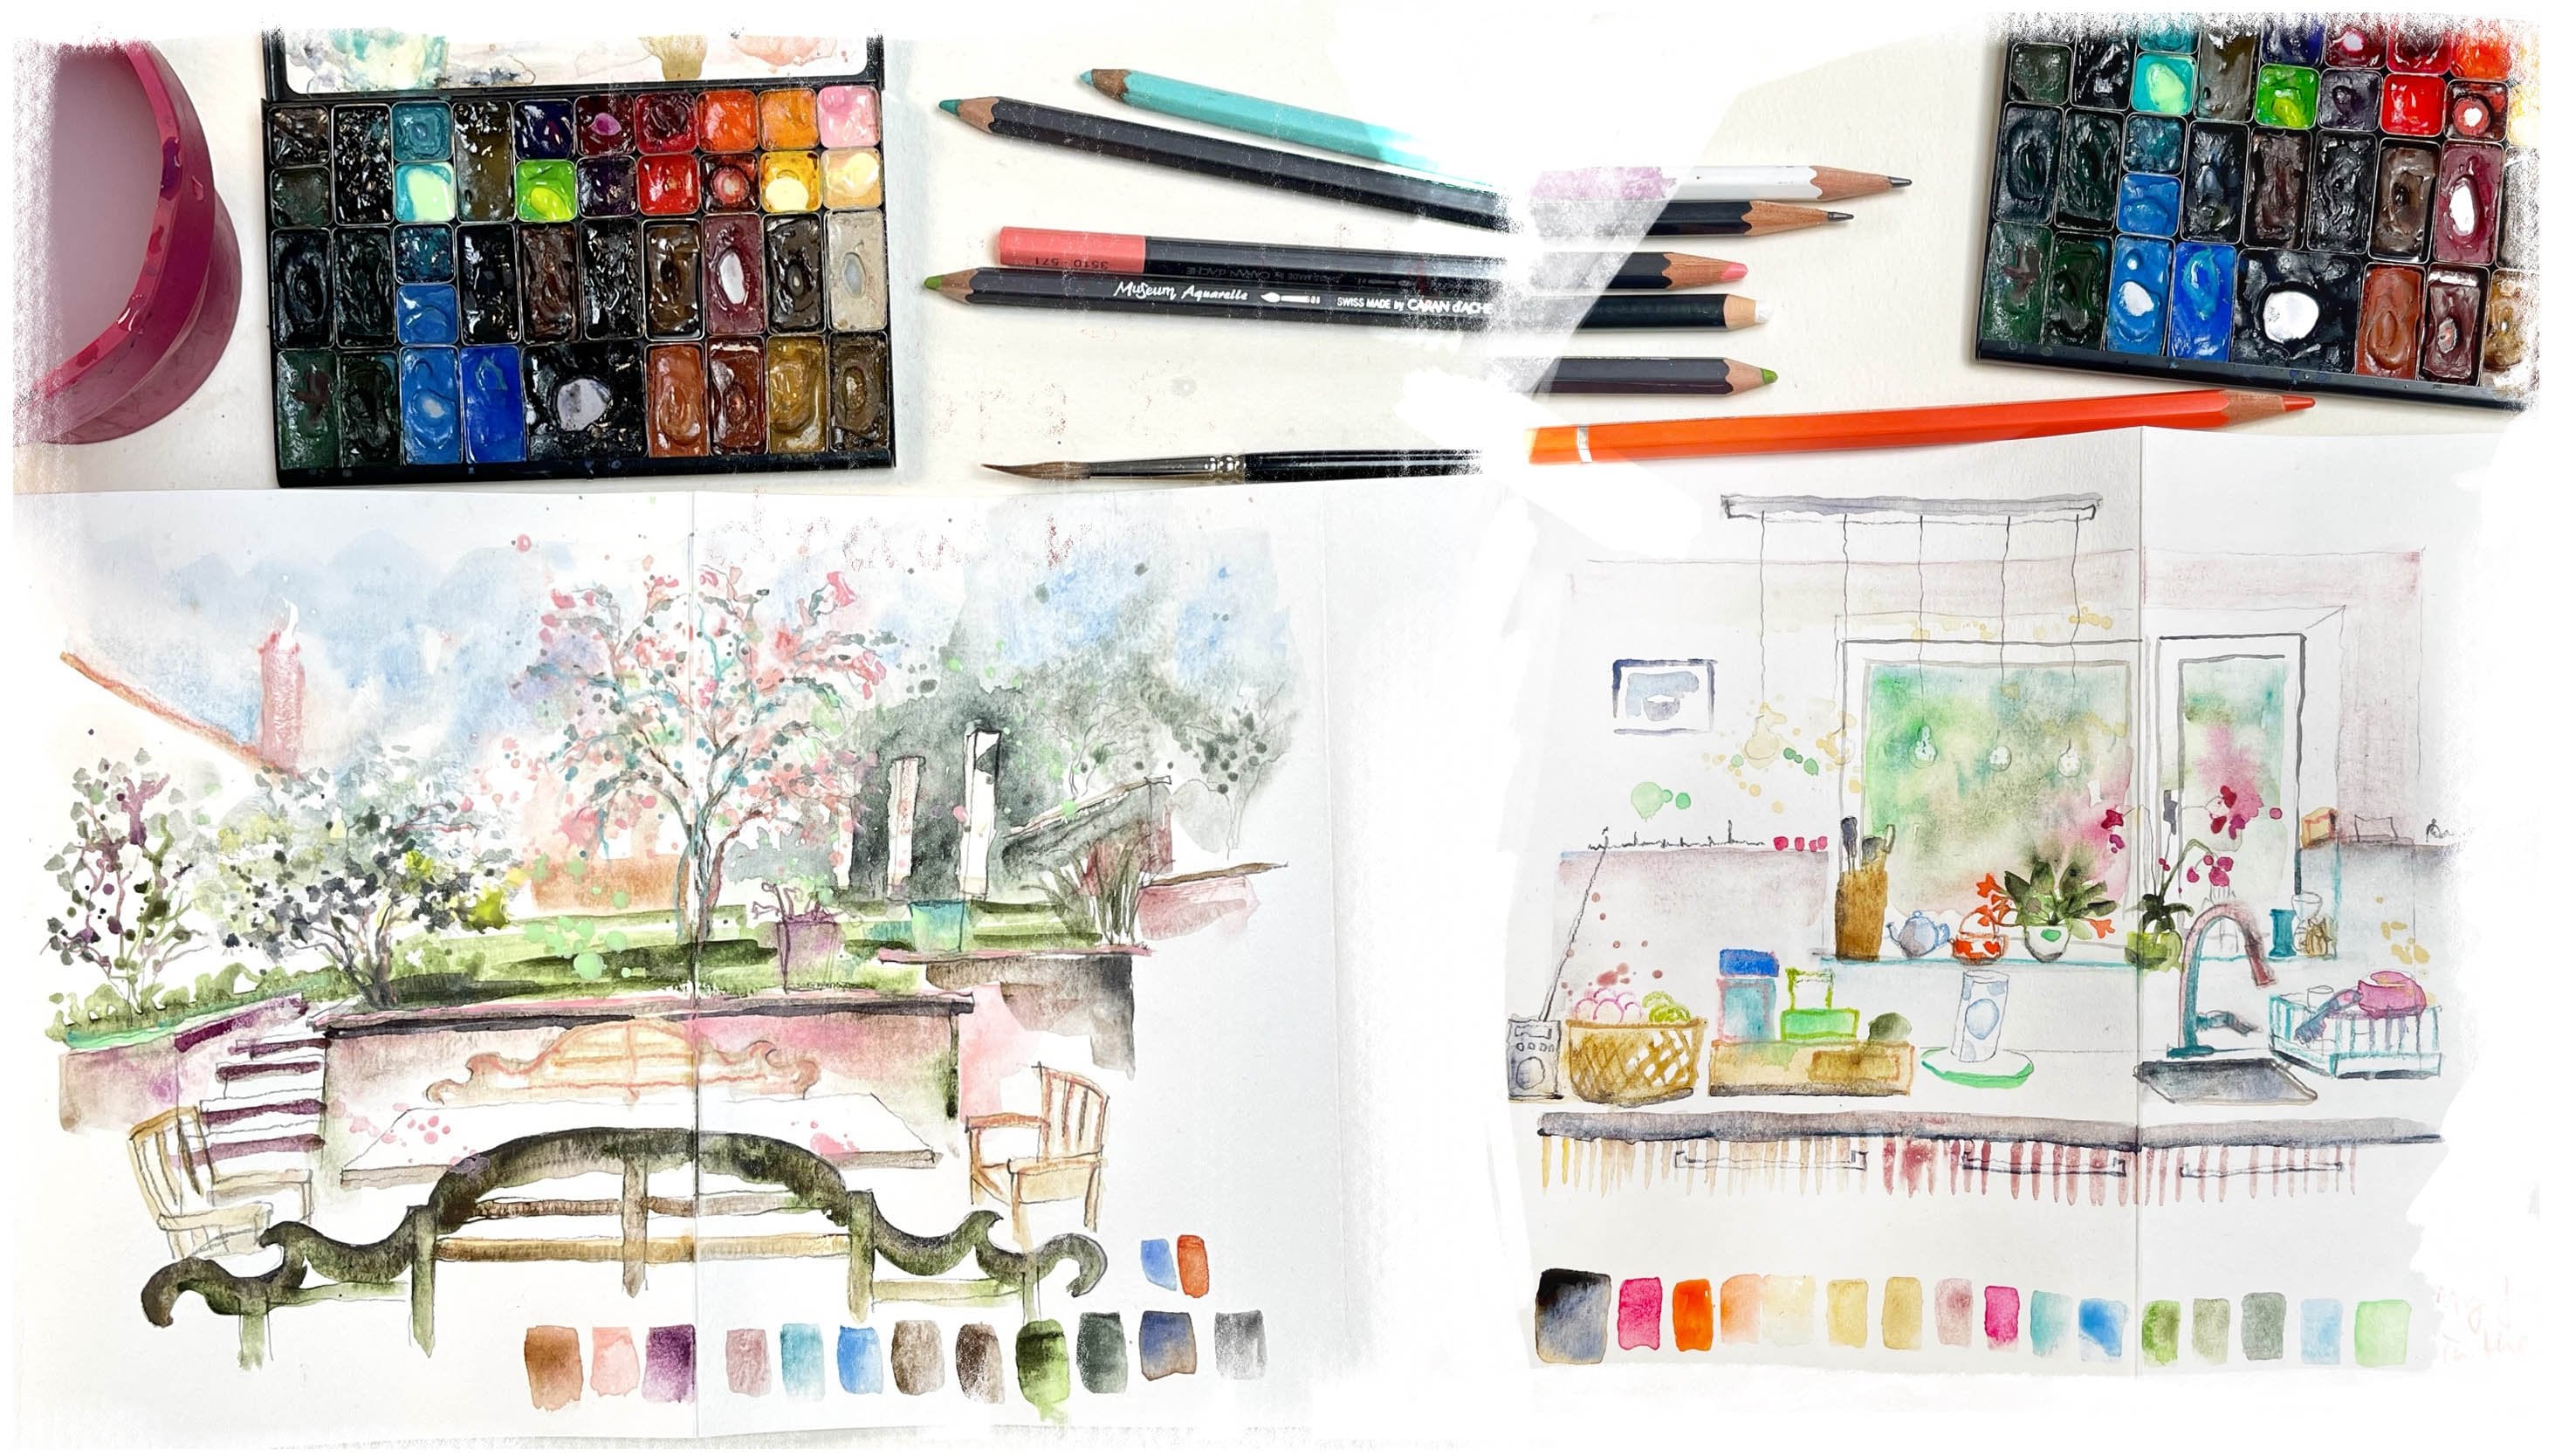
6. Day 2: Focus on Light & Shadow: Welcome to day two. I hope you had fine with
your first thumbnail. So let's make the second one. So in this second square, I will sketch these two teapots. And I suggest that we focus
today on Light and Shadow. It's not because we are
making a small sketch that we don't have to pay attention
to what we are sketching. So make sure to pay attention. Be mindful in the
present moment. And that's the magic about
sketching and painting. It's a bit like meditation. Let's do this. So I make a quick sketch and I immediately pay attention to where is the light and
where are the shadows. I will press harder on the
pencil where the shadow is. So the pencil line will be
thicker and more black. Where is Shadow? And where I see a lot of light. I will press lightly
on the pencil. So the line will be
very skinny and lights. And that way, I
immediately forced myself to look Where
are the shadows? When you draw a round shape, like a round object, you will want to draw an
ellipse because you see the shape from the site and you're not looking
from above it. So you will have an ellipse
shape on top of the teapot and the same parallel ellipse shape on the
bottom of the teapot. Like when you draw a cap, you will have bottom, which is an ellipse
shaped bottom. And the top of the
cup will also be an ellipse and will be parallel
to the bottom of the cup. Now, I erase a bit pencil
lines before I start painting. Because once you put the
paint on top of the sketch, you will not be able
to erase anymore. And I start with
painting the shadow. And as a shadow gray, I use a mixture of ultramarine blue and
transparent orange. I prefer this kind
of gray because it gives a gray which
is like a bit alive. Because you have the
blue and orange pigments which separate a bit
when they try out. And when you take
an industrial grade from a tube of from a pen, it will be a more
flat uniform gray. When I paint the shadows, I pay attention to make a variation in values
in the shadows. Try to observe what you see. Some parts of the shadows
are darker than others. And when you will
make a variation in values from dark to
light in the shadows, you will make a
better suggestion of the roundness of the
shape of your teapot. So in the bottom is much less slides then on
the side of the teapot. So the bottom of the
Shadow and of the lead, or darker than the
top of the Shadow. And when you paint, cast shadow on the table. So here on the window sill, the Shadow of the teapot on the surface must be
attached to the objects. So I paint everything
in one goal. The surface of the window sill and the shadow in
it, the same gray. And for the Windows, I use green earth and some
light turquoise splashes. And the screen suggests
the vegetation which is seen outside to Window. But it's not important, so it's far away. So I use the green earth
because it's very cool green. And when you use a warmer green, it will come to the front. And I don't want the
window to come to the front because my main
object is the tea pots. I will add some of
these drawings on these teapot because
they're so special. I sorry, I went to
page first and then I go in it with watercolor
brands civil. And I will just suggest
some, some drawings. Not at all realistic. So this temp nail
is quite finished. Now, I hope to see you
in the next video, we will paint some
new number three
7. Day 3: Draw A Place Where To Sit & Rest: Hello, Welcome to day three. I hope you're having FUN
with the thumbnails. I suggest for these thumbnail to pay extra attention
to line work. And to do so, I will use this ballpoint pen. It's a very fine
waterproof ballpoint pen. If you want to use Watercolour, don't forget to use a
waterproof ballpoint pen. So I will sketch this window. I just did these teapots. Now I will sketch the window of my kitchen because
I like it so much. So let's start the kitchen. Draw when. And as I told you, I will use this very
fine ballpoint pen. So this is not
possible to be erased. It will be a bit more stressful to draw
because I can't erase. But actually I noticed that
it makes me more mindful. My kitchen table. Just look in what
direction lines are going. Draw what you see, not what you think you see. Look in what direction
the lines are going. And that way, I don't want
to think about perspective. This is thumbnail page. The purpose is to
make Greek sketches. I don't want to make
very detailed sketches. I just want to have the
impression of my kitchen window. So of course there
are my tea pots again and lovely
little old Windows. Here is open window
with mosquito netting. It want to suggest
the mosquito on it. And the, the line goes
in the wrong direction. It doesn't matter. Just continue. The Art. Police won't come to check
if your drawing is correct. And most of the time, I'm the only one moves sees
that my drawing is not correct and the other ones will think it is
a lovely drawing. So just continue. And at the end, most of the time the
drawing ends up just fine. So let's put some
color on it now. I will start with the
shadows of the heating. If you have this
sort like Brush, you can just make
some tips like this. So when you start painting, pay attention to
light and shadow. I don't paint the top of the table because there's
lots of light on it. And when I choose my colors, I think about the color
palette I chose in, when starting this
thumbnail page. I use the similar colors. Then in the previous
stem thumbnails, I put some green and
turquoise on the windows and also some orange to suggest the houses of
the neighbors roofs, they are orange colors
and detail the inside of the windows because it sets suggestion from what's
happening outside. I don't want to attract all
the attention to the Windows. Tried to make all the
windows a bit different. So it suggests that something
is happening outside. Again, you don't have to
paint in a realistic way. You can just use all
the colors you like. Use enough paint
and water to have nice washes and let the
colors flow into each other. So you can also experiment with some textures and some
columns splashes. I make some color splashes to connect all the
temp nails together. Awesome times I make color
splashes too dirty my page. Add some thing. Like I have been here. I can make something here. I think Pink is a happy color. The teapot is not paint at all. It's black, but I like pink. So I can add some pink here and rigid or is white. But I like pink. Remember, who can do whatever
you want in your drawing? And the Art police won't come to check if your
drawing is correct. Just play around and see
what you would like to test. What you like to use. Essence your favorite colors. Let's move on to
the next thumbnail.
8. Day 4: Draw A Place Where You Spend a Lot of Time: Today, I will finish this
kitchen, kitchen drawing. I will bring the coffee
machine and sing and lovely green was a ink. And I will paint and
draw at the same time. So again, sees for
experimenting. And I like to do this sometimes because it's different
from what I do usually. And so I will be more in focus. And also it makes FUN effects when you
draw in the wet paint, you have lovely coloured lines. So I hope you'll join
me in this Experiments. And I will be courteous
to see your sketches. Let's start. I will put this thing
here. One-third. It's always a good layout. It's to work with ferrets. Upwork dirt is green. So this is watercolour pencils. I suggest Watercolour
friends to. It's almost like squares. I Draw a watercolor
pencil in the wet paint, and I suggest the mosaic
tiles by hatching a bit. I don't do it on
the whole surface, otherwise it will
look a bit flat. But I had with the watercolor
pencil in wet paints. So the green, the color
of the watercolor pencil, dissolves a bit in the
watercolor paints. So when you're
tired of painting, you can draw with it.
That's what I do. And it keeps me super
Focus to draw or light that's Paint First and
then Draw With bit. And it's really
like ballet between the drawing pencil
and the paint. When you draw with the graphite
pencil in the wet paint, you hold Watercolor pigments, which you with the pencil. And so you'll get
any way some colored lines also with the
graphite pencil. It's quite funny and it
gives some nice effects. And it makes the Watercolour
sketch look very loose. So don't forget also when
the paint is still wet. You can also solve
a bit of paint with clean brush up your brush in clean water and then in the tissue and you press the hair of the Brush
with the tissue. And then you'll go into
the paint and try it. Hairs of the Brush will absorb
excess water and veins. I also use all the Color pencils I was using in the
previous thumbnails. So a bit of pink and
turquoise for the tab, which is not at all pink
and turquoise in reality, but it doesn't matter. If you notice a mistake
when paint is dry. You can try to erase it
with a synthetic brush, like synthetic hair
brush that is stronger. You can rub the paper a bit and don't do this
picture sable brush because then you will
damage your brush. Also be careful not to
damage the paper when you rub the paper trying to
erase on Watercolour. Maybe it's best to what I do, just ignore the mistake and continue sketching
and painting over it. And usually it will come out fine when the
painting is finished. You will not notice it anymore. And also most of the time, mistake doesn't seem a
mistake for other people. It's just you who
think it's a mistake. But in the overall sketches and in the overall thumbnail page, you really won't notice
your mistake anymore, so don't get stressed out of it and just
continue painting. Now I will start
this coffee machine. And the coffee machine is like a big black monster on
the kitchen furniture, but it's makes good coffee, so I want to sketch it. And it's quite scary because I want to
use some black, um, there's a lot of
black in the house, in the doors and in
the declaration, and in the furniture. So use these black I
have from Daniel Smith. It's lunar black and it gives some really lovely granulation. You already see lovely strong black pigment
in the Watercolour. So I like that a lot. It gives a lovely textures. So when you have such a big a dark colored
objects in your sketch, try to make it not like
uniform, the same intensity, but give it some shadows, like some, like I did with
seeing some dark shadows. And then the rest of the object would look a
bit lighter in veins. So you'll have some
life in your sketch. So I hope you have FUN
trying this method Light. First put some Watercolour
on your page and then do some sketching
and painting again. And then again some sketching. I'm just switch from
one to another. And it will give you a whole
new energy in your sketch. More like experimenting
and play. When you start
liking your sketch. When it's like almost finished, you really have
to pay attention, I think, not to
overdo the sketch. When I start liking my sketch. Like now, I really
consider stopping. Because once you
overdo the Sketch, it's difficult to get it back. Like sometimes I
just do too much. 19 thumbnail tree. And then at a certain moment
sketches that because I put too much lines and too strong lines and
too strong paint on it. So I think I should stop now. Just some splashes because
I splashed a whole page and my green and being splashes. And some to class, we'll connect these thumbnail to the other term thumbnails. I hope you're having FUN and see you in thumbnail day five
9. Day 5: Paint First & Draw Next : Welcome to the five. She's really feeling
out quite nicely. Please post your sketches. The platform so I can see
them all pages evolving. And now in this tariff, now coming temp, now, I will sketch this lethal
window with the plant. Here. It's the little window where my cat goes in and
out of the house. So we will focus on painting. And we will first
paint and then sketch. I never do that
because it's quite stressful because you can
click small difficultly. But let's try it out and
experiment and play. A lot of artists start painting immediately without
preliminary sketch. I always find that fascinating
and very interesting. I almost never do that. But let's try with
this thumbnail. I will Draw With the Brush. So take a brush with a fine tip. This is Swartz shaped Brush by a Skoda is a synthetic
brush, quite cheap actually. And it has a wonderful fine tip. And because it has the
shape of a sports, you can also make
larger brushstrokes. If you hold it quite
parallel to the paper. And if you want to draw, you have to hold it quite
vertical to the paper. So of course, I like to do this because it makes me focused more and be more
mindful because it's difficult to correct
your drawings and you'll have less
control over it. Then over a pencil, of course, where you
can easily erase. But anyway, if you
make a mistake, just clean your brush and absorb the excess
paint with a brush, dry it in a tissue. When you do that immediately. Mistake is the excess paint
will be quite easily removed. So I'm drawing here With the Brush and with
different colors. And I don't wait until
the paint dries because I want that colors flow
into each other. So the shapes are connected to each other when the colors
flow into each other. And you any way will easily recognize the
shapes and the Drawing. Thumbnails are the
perfect way to try new techniques
and play around. If drawing With the Brush
is your usual technique, please try something else so
you can challenge yourself. So I start here with the main shapes of the
sketch and my focus point. And it's my favorite colors. And then afterwards, I will
add some pencil lines. If you want to add some ink, you will really
of course need to wait until the paint dries. And here I Draw With the
pencil in the wet paint. And that way, the pencil
will drag the paint pigments Alone and you will have some colored lines
in your sketch. And anyway, just like with Pencil Drawing or with a
ballpoint ink drawing, just look in what
direction the lines are going to line going tilted, or is it going straight
up or horizontal? In what direction
are the lines going? And just draw what you see. When I want some
nicely crazy lines. I take a watercolor pencil. This is a watercolour pencil. And when you draw
with it in wet paint, the pencil color dissolves in the wet paint and mingle
with the Watercolor. It's really juicy. And of course, I will
end with some splashes. If you want some
bigger splashes, you will need to take a
brush with natural hair. Brush with natural hair makes
nicer and bigger splashes. Now, I go back a
bit in the tree. They tree is definitely
not my favorite sketch. And I find it quite week next to the one they to, and they five. So I add some stronger
molars to make the thumbnail connect better to the other new word thumbnail. So this is the grid of the mosquito door net
to go to the garden. And I suggest the mosquito
net grid with the benzyl. Benzyl, I drag the
fresh Watercolour. Let's go to day six. Please post your sketches on the platform in
the class projects
10. Day 6: Draw With the Brush A Place You Feel Creative: Hello, Welcome to
the basics already. I hope you're page is
evolving like your wish. For these day. I suggest that we will Draw With the Brush. And I think that's also great exercise to
have maximum Focus. And so you better choose one of your findings
brushes with a fine tip. And we will do everything
drawing With the Brush. And for today, I vote
from Drawing table. I almost forgot. Don't forget to post your
sketches on the platform. Class projects. I will be very
happy to see them. Thank you. To have control over
the tip of your brush. Better keep it, hold
it quite vertical. And just look in what
direction the lines are going. So again, the thumbnails are the perfect place to
try new techniques. So I like to try this
drawing With the Brush. It takes me out of
my comfort zone. So it makes me more
focused and more mindful. Because of course, I'm always afraid to row in the Sketch, especially while
you're watching. So I started with the main
shape of my drawing table, which is a big drawing tables. We takes a lot of room. And then of course I
add some splashes to make the dump Neil connect
to the other thumbnails. So some tips. Take a flexible brush
with a fine tip. Hold the brush quite
vertical when you want to make fine
lines and Rest with your little finger
on the paper to have control over the pressure
of the brush tip. In case you make a mistake while you draw with watercolor, you can clean it up immediately
with a clean brush. I mean, fresh clean water. And you clean your brush
in the clean water and you can dissolve the
freshwater color. You can dip your brush
afterwards in the tissue to make it dry and then absorb
excess paint and water. Then you can start painting again when you're
beach has dried. So I don't draw all
the stuff on my table. Of course. I just suggest some paper and some Art
Supplies on the table, but I try not to overload it. Then afterwards, of
course, if you want, you can add some pencil lines to give some different
structure to the drawing. Because sometimes when
you're Draw With the Brush, the Brush drawing
might seem a bit weak. So if you want, you can
some pencil lines in the fresh paint and still
will drag the paint pigments. We did. And so the
graphite lines will be a bit color it according to the colors you used
week the paint. I think it's quite finished. Let's go two days, seven, Try some
New Art Supplies.
11. Day 7: Try New Art Supplies: Welcome to day seven. Now, for today, I will
sketch, scan mean. I will Try New Art Supplies. I will try to add
some colored pencils. So now the page is
getting really full. I hope you're having firm the your Sketches
in the class projects. I will make a pencil sketch. I haven't sketched in
Color pencils since ages, since I was small. So I made this selection of colors which fits more or
less with the other colors. And I will try to make it
fit with the other sketches. I start with my favorite lamp. New Art Supplies. I don't mean you have to
buy New Art Supplies. I already had these
Color pencils, but I say New Art
Supplies because I never Sketching Color pencils anymore
since I was a teenager. I felt like trying this Color
pencils again since size. So the great Sketchbook classes of Marie Noelle
warm on Skillshare. They have made me want to
use Color pencils again. You can check out her class. I put two reference in
the class resources step. In this thumbnail, I will try some colored
pencil rendering. I use this fabric Estelle
Polish almost Color pencils. And I like them a lot. And the other Color pencils
I used, watercolor pencils. I often use watercolor
pencils in my Watercolours to add some extra crazy
lines in the Watercolour. But these are just normal,
non-soluble Color pencils. I tried to do some hatching. And for the hatching, I make lines in all directions. So at the end you have kind of surface that these color it in lines in different
directions. But of course you can do some more regular
hatching if you want. Just try out and see what
you'll find beautiful. So again, I chose
some colors here that fits the Watercolours I chose for the rest
of the thumbnails. So they would be some connection with these different thumbnail. This thumbnail is bit different because
it's Color pencils, but it has similar colors than the other term thumbnails
so they will fit together, I think afterwards
you can of course, also add some watercolor
splashes on it. So if you're used to
work in colored pencil, why don't you try out
some other Art Supplies. You are not used
to, like gouache. I think they're awesome, great gouache classes
also on skill share, also by Marina will warm
or by other features. The purpose is to
test and play and try new techniques and get
out of your comfort zone. So some tips for Color pencils. You can make a
variation in values and intensity in your lines. Just like I do with graphite
pencil and with watercolor, I press harder on the
benzyl where the shadow is. So I have some
depth in my sketch. So when there's shadow on
the bottom of the couch, which is away from the window. That will be darker and more intense than the
rest of the couch. Here in the Windows, I use similar colors than I used in the
rest of my windows. We'll add some green to it so the windows in color
pencil will fit. The Watercolour Windows. Try some lines going in different directions also
when you color surface. Unless you really like this color pencil lines going
all in the same direction. That also can be wonderful. Rendering, of
course, about paper. Your paper is very rough. Maybe it's best to stick
with paints, watercolor, and gouache, because
Color pencils are hard to use on rough paper. You won't have an easy way
of coloring the surface. If the paper is very rough, It's best to use a
smooth paper if you want to make a Color
pencils sketch. So I'm curious to
see what you make in this challenging thumbnail of trying New Art Supplies
You are not used to. And maybe you can post your thumbnail in
the class projects. And I will be very happy
to see what you make. And if you try other
kinds of Art Supplies, I will be happy to see it. Also. It can give
some new ideas. Also two other classmates. So please post your
projects in the class. Projects, like every day
you make a thumbnail so we can see the evolution
of your thumbnail page. Here. I add some color
pencil also to day tree. The tree. I don't know if you noticed, but they tree is really
difficult for me. Now I add some color
plant cell to repeat some colors of these
Color pencils, thumbnail. But I'm not sure it was a
good it because it makes my thumbnail looking
even more heavy. I think it's better that
I don't touch it anymore. But anyway, I wanted
to show it to you because some thumbnails are more difficult than other ones. So have fund and see
you in the eight
12. Day 8: Try a Combination of Art Supplies You Never Used: Welcome to they age. So we did this, for
instance, sketch, and I think it smells
quite nicely because I used the same colors as
the other thumbnails. But I will continue now a bit in colored pencil and maybe I
add some watercolor to it. They wouldn't be just
one color pencil sketch, like to make some other ones. Now, we Color pencils and
maybe add some watercolor. So I will sketch this view
still from next thumbnail. Then we go back downstairs. Day eight. So again, for Color pencils, just light from a
normal graphite pencil. You look carefully
in what direction the lines ongoing and how long one line is
compared to another line. So you have the
proportions, correct? And then also, I tried
to pay attention not to make the line of the same
intensity all along. So it would be more alive. Like when there's some Shadow. I will press harder
on the pencil to have a stronger line
then when their slides. I hope you're having FUN
with this term thumbnail. We are approaching the end. It's already the eight
and I think page looks really nice now with
all these thumbnails. And I hope you like
what you made until now and how your
pitch starts to look. And I look forward to see
it in the class projects. So I decided to make
again this color pencil. So I wouldn't have just one Color pencils
thumbnail on my page, but I will have no color
pencil thumbnails on my page. And I quite like
how it turned out. Actually, I want to
continue playing with it. I think I will make
some drawings as well. These thumbnails are the
ideal way to test out some sketches to make
a larger drawing. Afterwards. I tried also in this sketch to pay
attention to the layouts and divide my
thumbnail in thirds. Now I'm drawing this
handwriting from the staircase. It's really 60s design. And when I first saw the house, I really fell in love with it. So I made these view
because I have the chair, I have the chimney, and I have this handwriting
and the window behind it. So I think it gives some
nice layout to a sketch. And it assembles all the
things I love in this place. And for the windows, I repeat the colors of the windows in the
thumbnail next to it. So again, look to make thumbnails fit together
by repeating the colors, by repeating some Art Supplies. And so you have a
repetition of colors. And I also, we'll
add some watercolor to this one to link it to
the neighboring thumbnails.
13. Day 9 : Draw A Place Where You Feel Relaxed: Welcome to day nine, sell day before the last day. And it's some water color
to the pencil as you so and some splashes to unite
thumbnails together. The same color splashes. And that way, when there's a repetition of
colors and techniques, you can unite all the
thumbnails together. So today I have no sight. Oxide view. People as still style here. In the previous days as well. I didn't draw everything because it's so
small and anyway, it's interesting to
draw everything. You can just draw
what you find more beautiful to simplify sketch. I did here, for example,
of migrating normal. I left out all oldest stuff that I've beautiful. Sketch it. Like it to be weakness stuff. So feel free to leave out things that you'll do
whatever you want. And don't forget to First you Sketches in
the class project. So when you have
a complex scene, it's a challenge sometimes
to know what Q1 to show in your sketch and to
see what you want to draw and not draw what
you want to leave out. The sketch wouldn't be too full. It can cause some overwhelm me. In this case, what's
important is the umbrella. Of course, I love this romantic umbrella and
the table to sit outside. And then also show
that it's a garden. So I will use some green to
suggest vegetation. For that. Of course, I will
use the same green as I did in the sketch above, with the entrance door, with the same green
watercolour and the same green watercolor
pencil in the Watercolor. So what I also liked about
these terrorists are the wonky floor
tiles on the crowd. And so I will suggest
them as well. I started painting first and
now I add some pencil lines. And these pencil lines, or to finish the umbrella
while the paint is still wet. Because I like when
the benzyl foils, the wet watercolor
pigment on the page. I have small colored
pencil lines, although it's plain
graphite pencil. Again, as a gray, I use my mixture of ultramarine blue and
transparent orange. I will suggest the table. And I try not to go into much detail because it's
just a thumbnail sketch. When my attention
is fading away, I do something to
challenge myself. So I will paint with watercolor
without drawing first, because then I feel I have
to concentrate better. So you can question yourself, what do you need to reestablish
your focus and to be present in the current moment when you're painting
and drawing. To be mindful, actually, I have chosen my
terrorists to sketch. If you don't have it there is. Maybe you can sketch another
place in your home where you would like to relax and Where
You feel like on holiday. Or if you chose to make
thumbnails about your holidays, maybe you can sketch the
place where you were on holiday and where you felt the most Relaxed drawing
your travel. So some tips. If you make a mistake, don't worry, and don't beat yourself up, just
continue painting. For example, here, I don't like at all the way I have drawn the feet of the table because they're complicated,
feed on stable. I've tried to draw
with the way it is, but it's really quite wonky. But I just continue. And I think the mistake eventually fades away when
we continue Sketching. And most of the time we
learned from our mistakes. And also most of the time, others don't see
them as mistakes. So I hope you have
FUN with this Sketch and let's go to day
ten, our last day. Please post your Sketches in the class projects so
everyone can see them. And so you'll have yourself
a record of your progress.
14. Day 10: Draw a Place Where You feel Safe Alone: Welcome to day ten. So this is our last day. I in my bedroom and get the window with a
view to the forest, to the neighbors and the
lamb and the ceiling, which is bit complicated
because of the roof. Lines are going in
all directions. So again, like the
other drawing you make, just look in what directions lungs are going and
trust what you see. Draw what you see and
not let you think you'll see and you'll be good. So I will know this Watercolour
just drawing the week, the fresh because
that's like outside of my comfort zone. Two, Focus. When I drove with the pencil. Weeks the last sketch, again. Try to repeat colors you
used somewhere else. Even if they're not really, they're just use
the colors I like. I am curious to see all your sketches in
the class project. See you soon and don't forget to reach out if
you have any questions, I will be happy to answer them in the discussions are
in your class project. Thank you. So again, I repeat this because I find it very
useful to repeat for myself. Just look in WIP directions. Lines are going,
especially if you have some really complex shapes like I have here with the
ceiling of this room. Also pay attention to light
and shadow from the start. And leave white paper
with Light is strongest. And the other parts
which are in shadow will receive wash like this gray wash mixture of ultramarine blue and
transparent orange. So just look in what
directions the lines are going and try to look in an abstract
way to watch our drawing. You're not drawing a ceiling, a window or whatever. You're just drawing
a bunch of lines. And that's a way to get in
the right side of your brain. Now, I have drawn the lamp just in the middle of when
I was drawing the ceiling. And that's because the
lamp is hanging in front of some lines of the ceiling. So that's also a trick
to look immediately what's in front
and what's behind something and Draw
first what's in France. As far the view from the window, I will just make light green
wash of these green earth. I love very much. It's a grayish green. And it suggests that
outside are a lot of trees. Because I'm not interested
in drawing what's outside. Of course. My purpose is
to render my bedroom. So this thumbnail looks quite different from
the other thumbnails. So now I will take
some colors which are in other thumbnails
to put in this thumbnail. Even if it's just
a white ceiling, my room is not so
Color Theme reality. But they use these
colors anyway to make this thumbnail fit to
the other thumbnails. And you can just
take the freedom of the artist and use
whatever colors you like. Use your favorite colors, even if they're not there. In reality. If you want something
like in reality, you just take a picture. So just use your favorite colors because they will
determine your style. So this is our last day. I hope you had Fun with
all your thumbnails and maybe you will find time
to make one term, Neil day. Even if it's not very long, sketch sketching
every day really makes a huge difference
to your skills. Please post pictures of your thumbnails in
the class projects. So everyone in share
the progress and share that takeaways which tape
ways it you find interesting. He's just something you would
like to know more about. I can make even extra videos. And what did you
love of the class? And I will just be so happy
to see your thumbnails.
15. How to Correct Watercolor: In this video, I want
to show you how I tried to erase a
bit of watercolor, which I find too strong. For example, in that thumbnail. Number three, I don't
like the windows. There are much too strong. I think they don't
fit to the rest of the thumbnails and also they
come too much to the front. If you use a warm color, like a warm green with
a lot of yellow in it. It will come to the front. And if you use a
cooler green light, green earth are used
in other thumbnails. The window goes to the background and that way
you can create some depth. So what I'm doing
here is that I use synthetic brush
from Rose memories and it's called the eradicate. The eradicates or Brush, is just a simple synthetic
brush with hair, which is quite stiff. And that way I rub the paper and I clean the brush and
rub the paper again. And then the excess
water with tissue. You will have to be
careful when you do this. You have to be careful
not to damage the paper. So you better make
some tests before rubbing and the interrupt too hard and too long
on the same spots. Otherwise you might the image, the fibers of your paper. Some papers don't take
this treatment very well. Then I add some green
earth would windows and some turquoise
because that's what I used in the other
thumbnail windows. So now they tree seems much nicer to me with windows
which are a bit lighter. And I go a bit the edges
of the last day, they ten. And I just want to soften
these edges a bit and make it gray a bit lighter to make the thumbnail
also a bit softer. And then finally,
thumbnail number eight, I will wrap the hand
railing a bit because I think I put too much of this burnt sienna
Watercolour on it. So I rub the sides of the hand railing and
I tried to make it also a bit less presence because I think the main
subject also is the chair. And the hand railing
became a bit too thick. And actually I regret a bit have put some
watercolor on it. I think it would have
been nicer in Pencil. But as you see, it's not possible to remove
all the Watercolour. It's possible to take
some Watercolour away and to soften
edges and everything, but you can't take
everything away. It's the main purpose
of Watercolour. And also, it depends
of the paper, what kind of paper
that you used. On some papers,
it's more easy to take the Watercolour away
than on other papers. It depends on the glue that
was used in the paper. And if it's button
or cellulose paper. Now, I will add
some pencil lines to make the drawing
a bit stronger. And finally, these gray in the chimney is
disturbing me a lot. So I'm making it softer and lighter because
I really don't like it. So clean your brush. Synthetic brush. Otherwise, with
natural hair brush, it's not possible
and you will damage your brush and it's
not strong enough. You clean your brush and you rub the paper back and forth. And then you have some of the
water away with this shoe. And repeat to action. And always verify if you
don't damage the paper
16. Final Thoughts: Congratulations, I'm so
happy that they could share this experience with you as a promise that
the more you sketch, the better your
sketches will look. It's not about talent. It's about skills
that you can learn. I hope you enjoyed this class. I hope that these exercises give you a different
point of view on Sketching and
everything that you can do and play and let
go of perfection. Let go of perfectionism
and talk. A habit of thumbnail
sketches can boost your skills and
fuel your creativity. Maybe one of these
thumbnails is even also bigger painting project
you could Work Comp. I promised that
the more you do is the vector your drawings
and paintings will get. So be sure to post
your stitches in the class projects so everyone
can be inspired by your. And so I can see what to make and maybe give you
some extra tips. And don't be afraid
to ask questions in the discussions that thank you
again for taking my class. I'm happy to be
here with you and I could experience with you if you would like to
see more examples. You can also follow my
work on Instagram and if you want to get from time to time some free tutorials
in your mailbox. You can subscribe to my website. Thank you again for
taking my class and please leave a review to
tell me what you think. And leaving a review, it's really the best
thing you can do for a teacher to help
a teacher to get better and to help your
fellow students to find a class that day like and don't hesitate to reach out if
you have any questions. Thank you.
 Barbara Luel, Architect, Author & Artist