Transcripts
1. Intro: Hi, I'm Anna and welcome
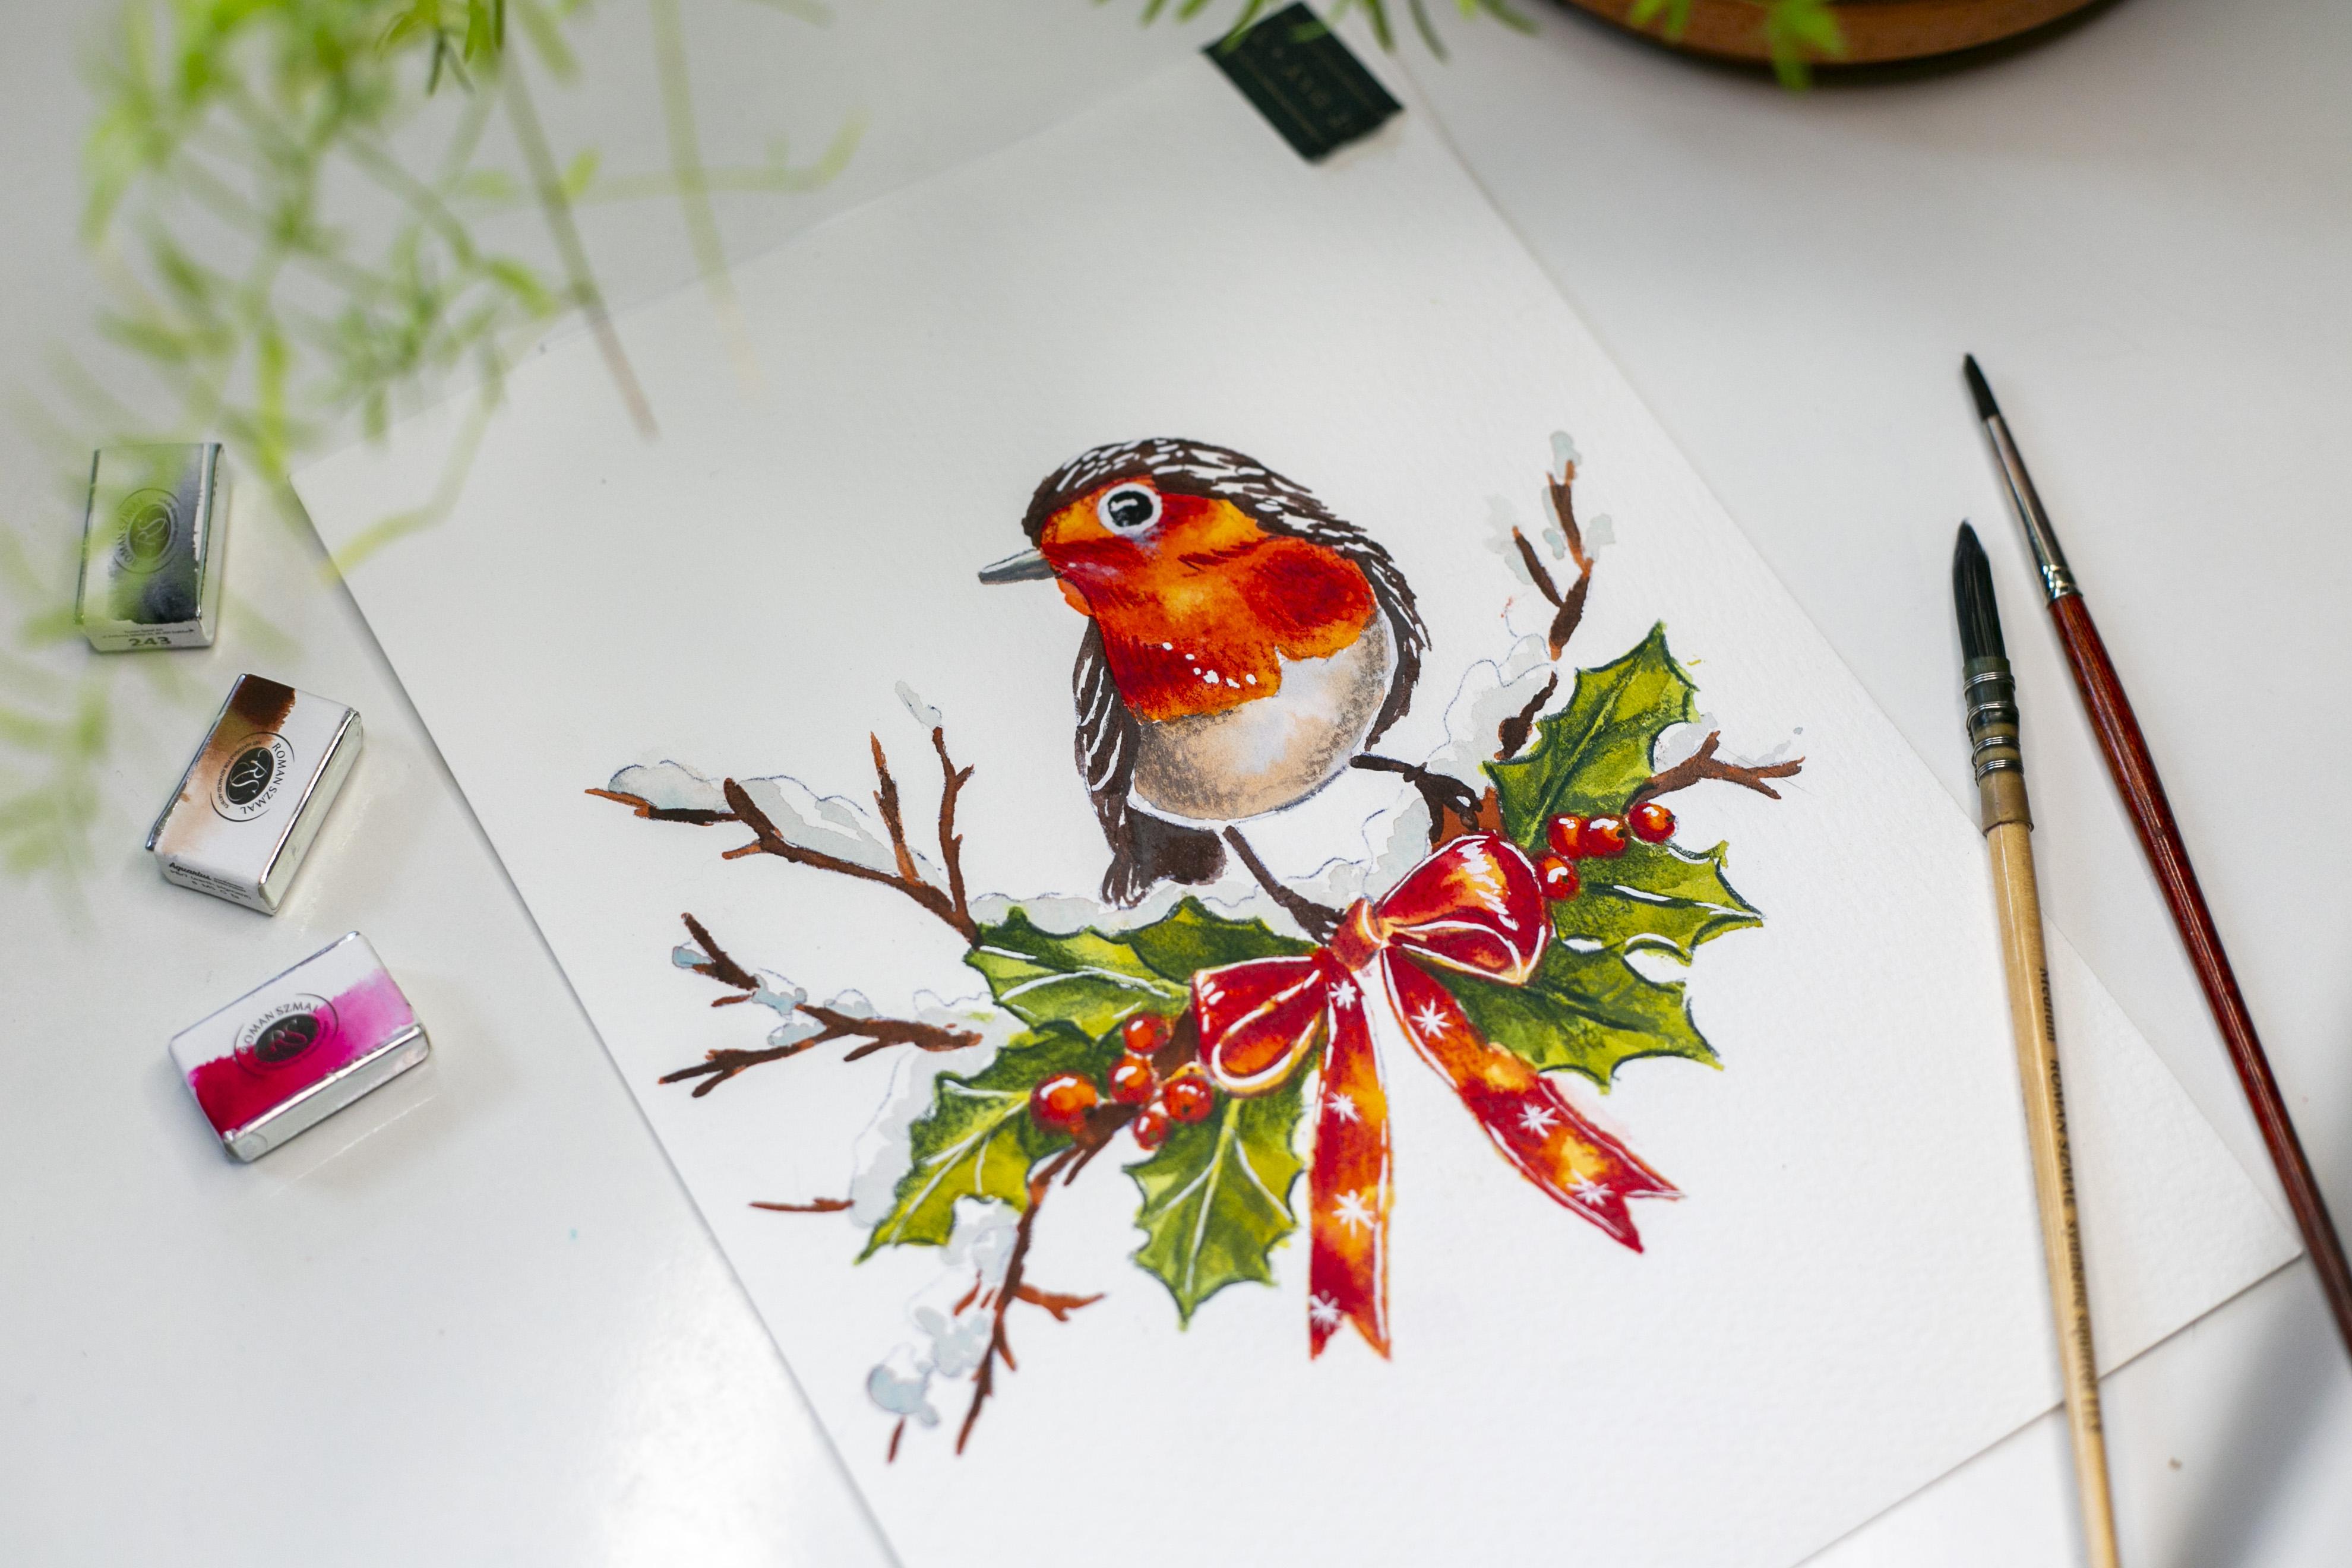
to this watercolor class. In this lesson, we will paint a European robin in a
soft wintery composition, surrounded by branches, leaves, and a simple decorative bowl. This class is all about
gentle layers, warm reds, and building character with simple shapes without
overworking the painting. I'll show you my
full process from my way for
transferring sketch to watercolor paper
through color mixing to small details that
bring the bird to life. This class is suitable for
beginners and anyone who wants to slow down and enjoy
a calm watercolor session. Take your paper, prepare
a warm red palette, and let's paint this
little robin together.
2. How to transfer the sketch to papier: This class will start with
the ready made sketch. I often get the
question from you, how can you or do I do it? How do I transfer the sketch into watercolor
Watercolor paper. I usually transfer it through I think it's called
purple carbon paper. This is the way I do it
because I don't mind the very harsh and visible
trace on watercolor paper. So I usually do it like
I have watercolor paper. I'll place my carbon
purple carbon paper on it, and the sketch, I usually check, especially when the size
of the paper is smaller, where it ends if the sketch is placed on
the center of the paper, and then I'll use a Tig my micron usually all two or one or all three to trace it. I just drew on top of my sketch. But you need to be cautious not to move
your sketch around. Still, I can check if I have
everything from this side of drawing and then move
on to this left side. Okay, let's see. If
I traced everything. I see that I didn't
finish this leave, so I will trace these inclines. Let's check once again. I suppose I have all. I'll just remove my sketch
and remove the carbon paper, and I have my sketch ready
on watercolor paper. I know that you cannot raise it with
eraser, but I don't mind. I just like the even
darker sketches sometimes. I like even to trace them with
my fine liner at the end. That's why it doesn't
really bother me that this is quite visible. Is that you can't raise.
3. First layer - reds: We will start to paint our holiday robin like usual
in my previous classes, perhaps you will notice it
in my previous classes, we will paint it step by step. Just like always, I will show you first the colors
for each layer, and then we will paint
together the layer. First, we will paint
this belly of the bird. We need to prepare some colors. I will spray my palette, and we mix these colors
in I call it 50 50 ratio. It's not very watery and
not very translucent. First color is naples yellow. We have our naples yellow. The second color will
be cadmium orange. I have cadmium orange
from white knights, so it looks like this. I know that from
different brands, this color may vary because when I started
painting watercolors, I use Winston and Newton. For example, cadium orange from Winson and Newton was a bit
different than this one. So this is my second color. The first color will be rose. This is rose. The last one is Alizarin. This is Alizarin, dark red. Let's make it in here. I will take my I call
it medium brush. It's number four from Princeton. I like it because
it's a soft brush. Let's start from
the lightest shade, from the apples yellow, and let's paint almost almost all belly except
this area around the eye. If you paint on it,
don't worry because we can make it white again
with wash later on. But if you can try
to avoid this area, we have maples yellow. Okay. Let's clean our brush. I painted on the ice,
but don't worry, like I said before, we can
make it white again later on. Let's pick Cad orange and add some here and here
under the eye. We want to create
this shadow effect, it will blend with each
other and we want that. Perhaps I'll switch
to smaller brush for the darker shades and I will pick number
two from Princeton. Let's take rose. Once again, we
added in the places where we want more
color transitions. With a smaller brush, I have better precision. I will add in here my rose. The same with Alizarin. I will clean my brush, make it dry on paper towel, and I will take my Alizarin. I will add it in here over here. In this area. And here. I see that I have
a lot of water in this area because I'm
still adding on color. Okay. Perhaps I will
add some rose here. Let's leave it that way. While we have our reds ready, let's paint the berries. We have two shades of
red and orange so we can with these colors
paint the berries. I'll simply pick mostly
rose and Alizarin. A if color bleeds
between berries, it's not us and it's
not something bad. While we will be painting
berries and bow, the belly of the bird will dry. So let's move on to the
bow and let's start from kople Cello I will paint painted with yellow
in the beginning, and this area
because I'm painting this all element at the
same time because I want them to try a little
between stages. I will pick my rose color. I won't be using
orange this time, I will pick my rose and
add it in here and in here the same I will avoid some areas. I don't want to paint
everything with my colors. I want to leave some
lighter areas on this bow. For example, like that. I see that this is quite wet. I will move on for now
to the second bowl. Once again, let's start with
the yellow koples yellow. Here here let's
place noples yellow. I Let's do similar trick just like before so
pick Rose added in here in this area. In this way, we have
the center quite light and here we have a shadow from the leaves and from
the upper part of the bone and have some
shadow at the end of this but and leave it this way and let's go
back to this area. It's dries a little. I will take my darkest
color so Alizarin and add it to this part. This is still wet, so it will bleed, but not as much as it would, if it still be very wet. The same with this
dark color red, I will add I will add details in here. Let's do the same trick
on the second bow. I will add a bit touch. I just touched this area to
make this color flow in here, and here I will add my
darker red, so Alizarin. The same issue. Now we need to move on to
these areas and I will start with the apple yellow
and I will paint it, but be aware that the
upper part is still wet and the colour may bleed and we don't want
that in this area. But if that happens,
don't worry much. Okay. And I will pick my rose
and add it in here. I will perhaps leave it like that because I know that if I add more dark red
sarin in the center, it will bleed on the yellow
part and I don't want that. Still, at the end in
one of the last layers, we will add colored
pencils layers. I will simulate the
darkness in here. We will simulate
it with pencils. Let's do the same on this side, noble Clo and a touch of rose in the center. This is all for this stage. In the next step, we will paint the leaves. This all will dry and we will paint the
snow and the leaves.
4. Leaves: For the leaves, we will mix
two shades of green and one is my favorite of all times. So it's autumn green from Roman Schmal it's
my favorite green. I just love this green. It's granulating color,
so it always creates this very interesting
effect just like before, we mix our color in 50
50 ratio and I will mix some more because I know that I usually mix not enough. This is first. The second is green gold
also from Roman Schmo. If you don't have green gold, you can mix yellow or cadmium yellow with
some kind of green with a touch of green if you have because it's green
with a lot of yellow in it. This is green gold. Let's paint our leaves. I will choose between
these two colors. I don't think much which one
will I take in this part. Perhaps I will swap swap the smaller brush at
the moment in a moment. I will switch to smaller
brush because it's easier. Here, I will add some
water to my color on paper and I will pick this green gold to
create this transition between two colors secondly, for example, I will start from gold and we can, for example, paint the
whole leaf with this gold. For example, we have gold. And let's add the
screen in this way. In this manner, it's also fine. Let's, for example,
move on to the leaf. I want this to to dry a little, so I will paint this one. I will start from
autumn green at water on the paper and
switch to the screen gold. We want to achieve the effect that not two leaves
are the same, so they don't have
the same color. I will add this
green at the end. Again, I will start
with autumn green Perhaps this one will be painted only with autumn
green and perhaps at the end, I will add just a touch of this green gold and we
will see the effect. Let's add a touches
of green gold. This area is dry enough
to paint it Okay. Okay. And we have one leaf left. Perhaps I see that leaves
are lighter than this one, perhaps I will start
with green gold. We have all. In the next step, we will paint the snow.
5. Snow: For the snow, we will use one of my favorite
colors once again. Perhaps, if you
watch my classes, you see that I use
it almost every time when I need some
kind of light gray. It's misty morning from Roman Schmal and it's
also granulating colors. I call it pigeon gray and
it's very, very beautiful. And I will mix it with water to mix with a lot of water to achieve
very light color, very light. Still, if you don't
have misty morning, you can create your own gray. You can add just a
touch, for example, paints gray to water to create this very translucent gray. We only need something which is two tons
darker than white. We have our gray color. And for that stage, we need smaller brush
definitely because we will only add details in some
parts of snowy areas. Still, I need to be aware because the belly of
my birth is still wet. Perhaps let's start from this part and let's
paint the snow. We don't paint the
whole area of the snow. We only add the shadow. The real thing which
we are painting at that moment is the
shadow on the snow. A I forgot to draw the snow on my
sketch on the branches, but still we can't
paint them this way. So still we can do it. For example, it looks like
that and we have here shadow on the snow the same goes in here. I will paint my snow
just like that. Okay. Let's add an I in
the stage Iris. To do that, we need
something which is black. I usually use for that
paints gray and I won't mix it on my palette because
we need very thick paint, and I will take my smaller
brush number three from restaurant house because
it's not very soft brush. The Princeton is very soft, but I don't want soft brush. I want brush which is rather thick because I will
have more control on it. I will take my paints gray, add just a touch of the water to it because I want
it to be thick. I will check on my
piece of paper. Okay, let's paint the iris. Still, you need to be aware
that this is still wet. This is the step where
everything comes to life because the eye is the most
important part of this bird. When you add I, it just
goes live this bird. This is all for this step. In the next step, we will go back to the belly of the bird because we need to put a second layer to
darken some areas once again the same with the bowl, see you in the next step.
6. Reds - second layer: It's time to add more color to this area of
the bird and to our bowl. So we will use the same
two colors we used before, so we'll use rose and Alizarin. I need to mix them once
again on my palette. So once again and this time, I need this color
to be rather thick, it's like 50 50 ratio or
even more paint, less water. Let's check in a minute. The transparency of our colors. Mix them in a 50 50 ratio. Perhaps it will be easier. This is my rows. And here will be my Azaren. We have our Alizarin ready. Let's start from bird belly and I will take a smaller brush because it will be
easier to place the colors on the areas
where we need them. I will take a smaller brush
and it's a soft brush, I will take number two. Let's start from Rose let's add this color in
here around the Okay. The eye and under the beak. We can still blend them
with the dump brush, we can blend the edges. Let's do the same trick in here, so I will add my rose
color and perhaps I won't even be blending
this color in here. Only perhaps I will
add more rose to this side and this edge will blend Let's pick Alizarin at a touch. I just touch a few
times to make it bleed. I think I will do the
same tripping here, just to touch and we want
this area to be the darkest. I will place here my
Alizarin, clean my brush, make it dry a little
on paper towel, and blend the edges. I want soft blends in here. Perhaps I will blend also this. Let's do the same trick
on the other side. Let's lace the Alizarin, the darker red. Like that. Clean brush, make
it dry a little. With a damp brush, we
just blend the edges. I think we also need to add just a touch of this dark
red in here and here. I will pick my dark red
and slowly add it here. Once again, clean my brush, make it dry on paper towel
and with a damp brush. Blend the edges. We have the belly writing. Let's move on to the bow. Also, to the bow and
berries because we can still add some
shadow on the berries, so we can choose to pick
one of these two colors. For example, let's
choose a rose. And add some shadow, we will be adding shadow also with the
colored pencils later on. But to make work
more interesting, we can add this shadow also
right now with the paints. With my rose color, I added shadow and
we need to make some contrast on the bow
because right now it's even. Except these areas where we have this yellow shining
through this red. The bow is event tone and we want to make
it more contrast. We will do it with Alizarin, so I will pick my Alizarin color and let's
start with the middle. Of the bow and with
the donut brush, I will blend the
edges and here we will darken the side of the bow and lend the edges. With my brush, I see that I
don't have enough Aizarin. That's why I will make
it fast on my palette. Let's add some shadow in here, so I will only draw online. Clean my brush, make it dry, and blend the edges. Let's add some color
red dark in here. We don't have to exactly blend the edges in this
area where we place the last dark layer because it will create the effect of the
creases on the ball. But I only add more paint to the center of this ball so
let's move on to this bowl, the second one, the right
one, and just like before, here I will just paint
only one shade this area. Here once again, we
recreate the same effect. Let's start from the
center at our dark red. Perhaps we will blend the edges and let's
add do this edge. Darker blend the edges
with the done brush. Here we do the same. I will place my color. Here we have a shadow the
bird is casting shadow on a bow and I will
blend the edges here, I want the bottom part of the bow and decide to be darker, and let's plant the edges. Fine. I think I will also add more. I want the center here
to be the darkest, so I will add some more and I won't even
be blending the edges. You can of course blend it, but you can leave it
also because we will add the pencils on top
of that and it will cover Here let's
add the shadow, I will place more color. And blend. Edges. Once again,
I need to make more Aizarin I will
add added here. And blended. That's not all with our red still with
the same two colors, but mostly with the Alizarin, I'm going to add some details
on a bird and on a bow. But for that, I need
a smaller brush, so I will take number
three from rest house, but this one is differ. I said it many times that
Princeton is more soft brush. Restaurant house is more
stiff and right now, I need more stiff
brush if I want to add details and I need the
paint to be more thick. I will add just a
bit of water because I need more of this
paint and more paint. I need this paint
to be more thick. And I need this
paint to be morphic. I will check on my scrap
paper if I can paint lines and we will be painting lines indicating
the feathers on the bird, but we don't paint
striight lines. We will always be
painting rounded shapes. If I see that my paint is thick enough and my layer on
a bird is already dry, I will add details in here, we will paint some feathers. And here near the eye. Also in here, here we have also some and in the area
which is the darkest. Remember, the lines
should be rounded. Let's move on to the bow and I will place my color in the center to make
it even more darker. I will outline I outline the bow. We can still do it with
the pencil later on. Don't worry if you
don't have vary. If it's too hard for you, you can wait and do
it with the pencils. Okay. The same in here, outline. This is all when
it comes to reds. In the next step, we will move on to the
branches. See you then.
7. The feathers and the branch: Okay, so right now
we need to mix colors for our branches, and we need two colors. So we need a light
brown and a dark brown. So as a light brown, I usually use I
usually use red her. So this is my red Oh. Okay. And I will mix it
in 50 50 ratio. So in the medium, like, um the same amount
of water and paint. The other color, I
usually use October 2023, but it was limited color
and I have used it to the end and I cannot
count by it anywhere. That's why I have new color, new shade, and
this is raw amber. I will use raw amber to this. For this step. But still, if you
have some dark brown, other brand or because
this color is from Roman Schmal but if you
have other dark brown, you can also use it. So these are two colors
which I will use right now. This time, I will take
my smaller brush. This time, I will take
the smaller brush but the softest one. I will use Princeton number two. For this stage, just we mix
between these two colors. For example, I will
use I will use my light brown at the start, then I will switch to this darker Here, I will clean my brush, make it dry on paper
towel, and again, take the lighter one because I want these colors
to bleed on paper. That's why I'm switching them
while they are still wet. Once again, clean my
brush, make it dry, and take the darker shade. And I will paint this
way all the branches. Okay. And we also will paint right now
the legs of the bird. So I will take this
darker color so Amber and I will
just paint them. I don't like painting birds. I love painting birds, but the legs are
the worst part of the bird for me to paint,
something like that. I will mix my brown, once again, dark brown because I
don't have enough. So 1 second. Because right now
we will be painting the wings and here
the head of the bird. So we need our dark brown
and a touch of light brown. We need light brown to
paint the beak of our bird. So with the light brown, I will paint the upper part. And I will clean my brush, make it dry on paper
towel and I will take this dark brown and paint
the lower part of the beak. Yes, the beak is
also after the legs, the beak is the worst
part to paint in a bird. But we can do that.
With the dark brown, let's start to paint our wings and let's start
with the left part, especially when you
are right handed, because if we start from
this side, we can smudge it. It's easier to start
with the left part. We will paint wings also with the rounded shapes and you can leave the
white areas unpainted. It will create the illusion of light reflecting on the wings, and it doesn't
look quite good if the whole area is
painted in one color. In one color, we can only paint this sail only because
it is in shadow, it's the darkest
part of the bird. But for the wings,
we will paint. That's why I'm still
using soft small brush. Still, if you paint these areas, we will um we will paint the whites with the
gouache, it doesn't matter. Don't worry if you did paint the whole thing or
just in my case, it looks strange because
it's too event for me. Perhaps I will do
something like that. While this is still wet, I will add more brown. To make it even more darker. This painting, just
like I said before, I painted with
October 2023 and it's more dark more dark color. We'll see how it looks when the brown is a bit lighter
than in this case. It also be interesting for me. Here I will paint here you can even paint the
whole section area. You can leave white or not because we will add this
white with gouache later on. If you see that it's easier for you to
paint the whole area. With the brown, just do that. With this color, it looks quite, perhaps I will love more this effect with
this dark brown. I will add while
this is still wet, I will add more of this brown because I want
it to be a bit darker. That's why I'm adding the
second layer while this is wet. That's all for now.
That's all for now. In the next step, we will move on to the bottom because it is
the only thing we didn't paint so far and perhaps we will add the second layer to our lips to make them
more interesting. After that, we will switch
to pencil colored pencil, see you in the next step.
8. Leaves second layer: Okay. So while
this is still wet, I don't want to paint
the belly of my bird. And well, I see that I
didn't paint this area, so I will paint it. Because it was a
mistake on my sketch, and I won't be painting the belly at the moment
because the wings are wet, so I'm worried that if I will
start to paint this area, the brown will bleed
and I don't want that. That's why we will move on
to the leaves right now. Once again, we will go back to the same colors
which we used before, but for now, I will
only mix one color. It's just like medium green. I usually use autumn
green for medium green, and this is this color. It's like a grass
green, I will call it. I will mix it in 50 50 ratio. Once again, this is my color. I think I will start with the number four, but soft brush. I'm thinking if
this will be right because this area
aren't too big. That's why I always think which brush will
be more suitable. The smaller one or the medium. Let's start with the medium
and we'll see how it goes. I will take my color
and add shadow in here. And there is no rule
to paint these leaves. We just paint them in the areas where we
definitely have shadow. For example, in here,
and we can blend this. We can if we like, if you don't like
the hard edges. But still, we can leave them
just like they are in here. Because when you look at leaves, they are not evenly. So for example, we will
paint them this way. I will only for sure add the green to the areas where I know for sure
that there is a shadow. And for the rest of my so there is definitely
shadow under the snow. And still be aware that this
is not a real illustration, perhaps I meant it is
a real illustration, but not realistic one, so you can paint the shadow just like
you like if you feel, perhaps in this way,
something like that. And perhaps I will add
more to this area. I will pick colors straight from my pen because I
want it to be darker. That's quite nice, very nice. In the next step, we will paint the belly,
paint some details. But it will be, I suppose, just one line on
the big and then we will move on to the colored
pencils. See you then.
9. Watercolor details: Okay, like I said before, this will be the last
step with watercolors. So we need two colors
for our belly. And one of them will be the
same as we have in here. So you need a light some
kind of light gray. But for that, I will
use my favorite color. So it is misty morning from Roman Schmal I usually
call it pigeon gray. This is color which
is granulating. We need this color and the other one should
be our light brown. In my case, it is red ocher. I suppose I had it in here and this light brown should
be should be very light. With a lot of water, we
only need a glimpse of it, very light shade in
this area, very light. That's why I mix it
with a lot of water. Okay. Just like I told you
in the previous step, we also need a dark
brown for our beak. I will take my stiff
and smaller brush with the stiff and
not the soft one, but the stiffer one. It's number three
from restore house. I will take my brown
straight from the pun. Because I want it to
be dark and I want to paint very thin line. I need less water on my
brush and I will draw this line on a beck and I will add this line indicating
the shadow on the beck. Well, clean my brush, make it dry a little on
paper towel because I don't want to have much
water on my brush. Just with the tip,
I'm trying to blend this dark brown into the area. Okay, so I think this is all for now for the
big because we will add a glimpse of gouache later
on in the very last step, and we will be
painting this belly, and we will be
painting wet on wet. I choose my number four
round from Princeton. It's very soft brush, and I will cover the
whole area with water. Let's pick our gray and add it Adi in here. Once again, I'm starting from the sides because the
sides will be in shadow. That's why they are
at the darkest. This is still wet. I'm
cleaning my brush, make it dry on paper
towel and I will pick my light brown
and add it in here. Something like that. This is all for watercolors. We need to leave it to
dry and in the next step, we will move on to colored
pencils. See you then.
10. Red colored pencils: Okay. My first color
will be luminance 589. This is Izarin crimson
and it looks like that. It's the same color, the same hue which we
used with watercolors, but we have it in pencil
and it's a bit darker. With my crayon, will I will
define all my berries. So I will outline them. And without pressing hard, and with a bit of
sight of this crayon, I will create
shadow on my belly. On one side and on
the other side. Sometimes it is just easier
to do it with pencils. We can also add some strokes here on a
bird in the areas which are very dark and we don't see exactly the texture
made with the paint. For example, we can add
some here bit in here. We can with the side of the
seal create more depth. I will add some strokes and more depth on the
side of this pens. Let's move on to the bow. First, well, I will make
more shadowing here. Here, I will also make
a shadow inside of this bow and the same
on the other side, we have a strong shadow here, we also have some shadow
in here and in the center here on the wall we are doing it. We do this shadow
on both sides of the boll also we need to make. I'm still painting
with the side of my pencil because it's easier to control how
much the color we have on our illustration. If you want this
shadow to be lighter, we just don't press too hard our crayon and make less
layers with the crayon. If we want to have
this shadow darker, then we just press harder
and make a few more layers. Also, the other side here let's add and want this to be the darkest in
the top part of this. Here I will just make a little
darker and at the bottom. In this stage, if you haven't done this outlines with the
watercolor of the ball, you can do it with the crayon. It's easier because
you can sharpen it to the sharp end and you just
just draw these lines easier. This is also the
way you can do it. In the next step, we will move on to the
branches and leaves. In a little bit on a belly. Only two steps left.
11. Green colored pencils: Okay. So for the
leaves for the leaves, I picked two colors
from Luminus Carendahm. I usually use this too. Forever when you watched
my previous classes, it's always the same
shades of green. So one is the most
green two to five. So it comprehends
the autumn green. It's one shade darker
than my paint, and the other one
is dark sub green 739 and it's very beautiful
and deep green color. With these two greens, perhaps I will start with my dark green and
I will outline, but not every just like you see, not every outline is connected. Sometimes I just don't
connect them with each other. I drew something like that
in the center part also. These lines looks rough and I left a white spot in
here and I don't want that. That's why I will
painted with pencil. I Okay. And perhaps it will be
easier to switch to the most green color right now and we start adding shadow. We add shadow and
drew some lines. Perhaps I will
sharpen my crayon. We also add shadow under the snow and under
the berries. Yes. Perhaps I will make this on the center of the lines this time because I didn't
do it in my first work. This will be a bit different. Once again, I will
switch to darker shade. I will drop this stems. You can also do it with
the lighter shade. With my dark green, I also add more shadow in the areas where I think
it should be a bit darker. I'm also do it with the side of my pencil and here under the
snow perhaps more shadow. A you can even go beyond the shadow and make
some shades on the leaves. It also looks interesting. I think this is all for
the greens and we now go back to our belly for belly, I picked two colors. One is a very dark gray
and it's number 71 from Mondus this is like this and the other one
is nine oh six Sepia, 50% from luminance arandsa. This is more brownish. Let's start from this
gray and very slowly. Also with the side of my pencil, I'm building a shadow in here. So very slowly
because then you have more control of how
this turns out. This is my shadow. And now I'm switching to sepia and I will
add more shadow to the sides and more color
to the sides and in here where I know that I
didn't do it in my first work, but I think it will
look much better or I will try and see if I add it here and we have our belly almost done. Perhaps here, I will add more of this color because this will
be in the darkest. Okay. And something which I
didn't do in this work was also details
with this sepia. Perhaps it was before it was because my brown in here was much darker than
the one I used in here. So in this situation, I need to darken my wing because it is too
bright, too light. So I will darken it, perhaps darken a little legs
and add details on my legs. I think we can try to also add some details on wings. And I will also
darken this a bit. This is all for crayons
and in the very last step, we will add black dots on
our berries and white. It's not all I suppose, still with the sepia picked, I will darken my
branches under the snow. Thank you. So this is
something I didn't do in my first work and it's once again because I have
different brown used here. I don't have it now because it was limited color and it's not
available to buy it again. That's why I need to darken
my branches some other ways. I will simulate the shadow with my crayon in the areas where
it meets with the snow. This is all for a
colored pencil stage. In the next step, we will move on to
the white quash, and we will also add black dots to our
berries. See you then.
12. Guache: Let's start with the black dots. I will pick my black
straight from my pan. I have only wet brush and
I'll pick number three, it's a small brush and
the one which is stiffer. And I will pick my black
straight from the pen. If you don't have
black, for example, you have pains gray, you can choose pains gray. It doesn't really matter. If you don't have any paints gray and any
black on your palette, you can draw it with the
black pencil or fine liner, it also will be fine. Let's add this black dots. Just like you see, the small details
makes the difference. Okay, so we have
done with black, and let's move on
to the white quash. I have it squeezed in here, so I only add water to it. I want very thick
paint on my brush. I test on my scrap
paper if I can draw some dots, lines, thick lines. I don't have small brush. That's why I'm using
this number three. Let's start from a bird. Let's define this white
outline around the eye. We can add some details on
belly just like I did here, but it's up to you if
you want them or not. We will add some thick lines
in here indicating that here we have some light which creates a shine effect on the feathers and once again, we have some shine
on the upper part of the beak here and
with the short lines, and I'm trying to
make them very thin. But here, you see
that they are thin and here you see that
they are not so fin, sometimes it just not working. These two effects
are quite here. The same on this side. I see that I have a dry brush. That's why I will add
more water to my white. Once again, I will test
it on the scrap paper and let's add some details just like the dots
on the berries. This could be only some dots. It don't have to be much. Let's add some details
on our leaves. This could be the simple lines, short strop short strokes does not very connect
with each other even look better and here and we also have the ball. We have some light
shines in here. We have the reflected
light in here, so we will draw it and the
same on the other side. I'm trying to paint
this fin line. We have some light
shines in here. And the same on the other side. I will once again pick my white paint some
stars on board. In the Sia and in the seria. Let's add some stars in here. And the same on the other side. Okay. And this is all. We made it to the
very last step. I hope you enjoyed
painting what mean. So see you in the wrap up video.
13. Outro: Thank you so much for
painting with me. I hope this robin brought
you a bit of calm and joy. Every version will
look different and that's exactly
how it should be. Please don't forget to upload your project to
the class gallery. I truly love seeing your
birds and color choices. If you enjoy this class, a short review would
mean a lot and help other students
discover it too. You can also follow me here on Skillshare for more
watercolor birds, sketchbook studies, and
slow painting sessions. Thank you again and see
you in the next class.
 Anna Krupa, web developer & graphic designer, mix media artist