Transcripts
1. Intro : Siberian Husky in Watercolors: M Hello, and welcome. My name is Emily, and I am the artist behind Emily
Marie Watercolors. Welcome to my home studio
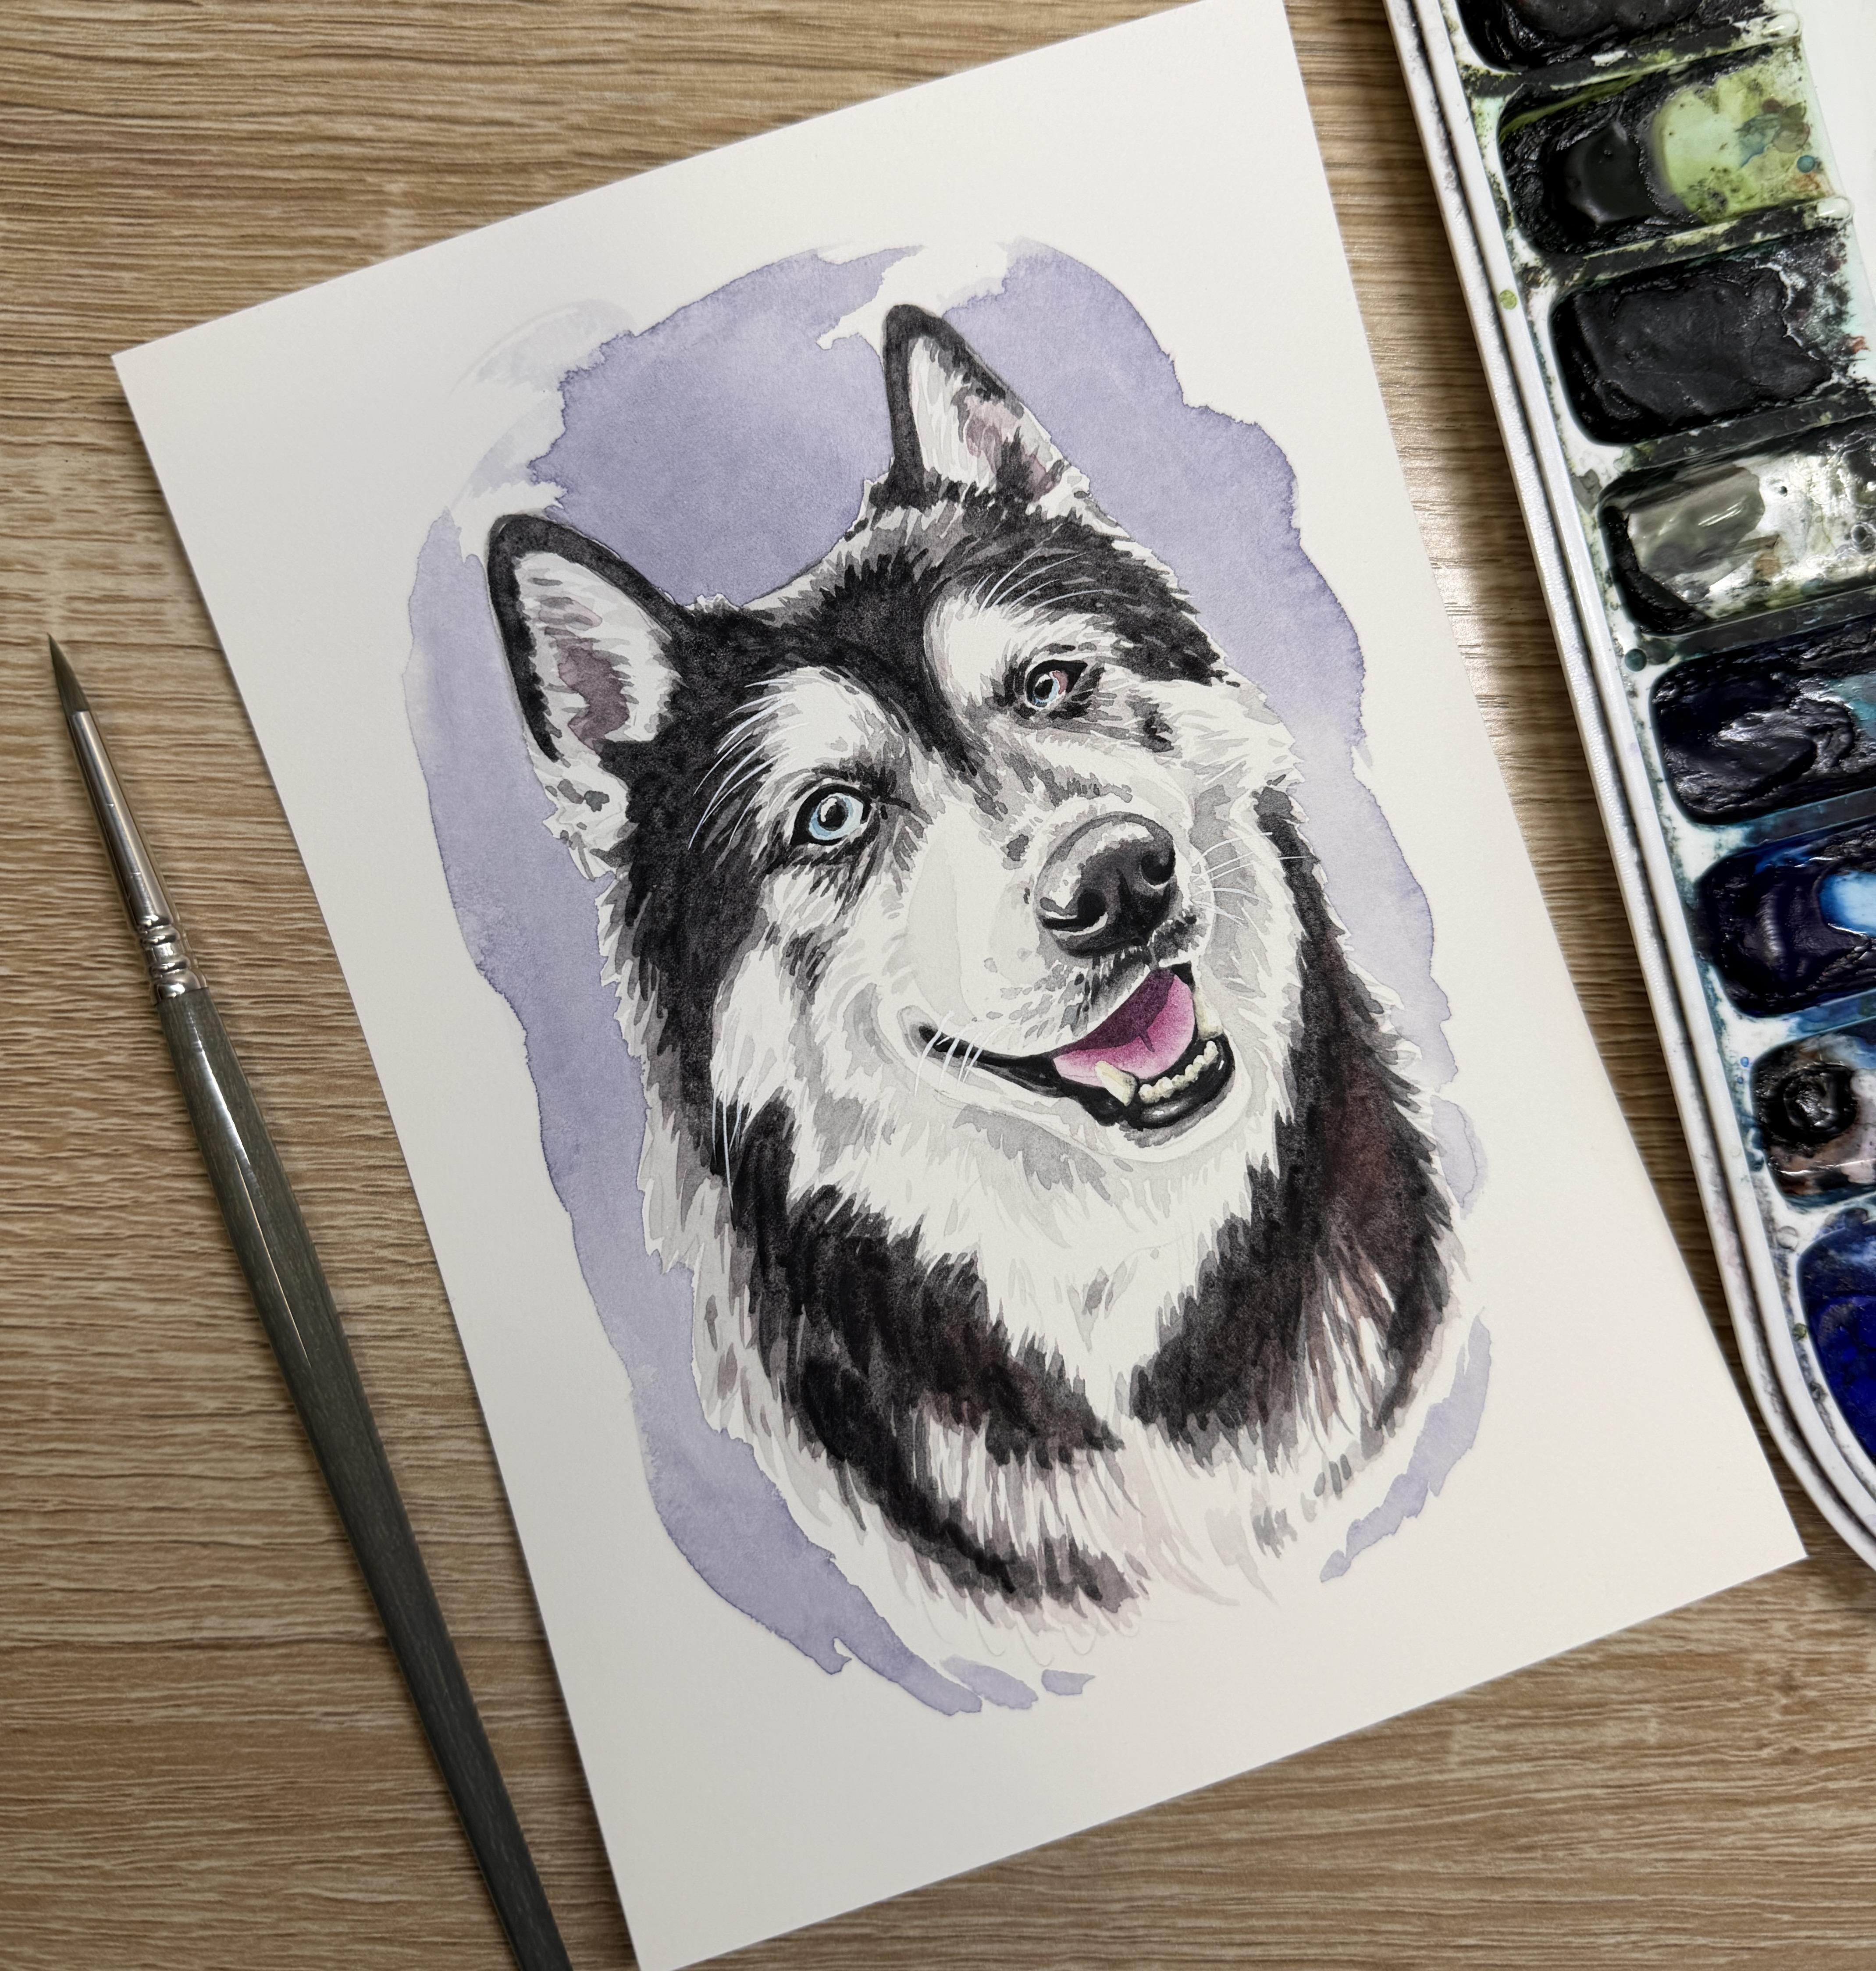
here in Madison, Wisconsin. In this Skillshare tutorial, you'll learn how to paint James, the Siberian Husky
using Watercolors. As a watercolor artist, I have found a passion for
painting pet portraits. If you already know the
basics of watercolor, painting pet portraits can
be a great way to turn your hobby into a part time
or even full time career. My style is characterized by adding details to
the mouth, nose, and eyes, but not
getting caught up in painting every
single hair or curl. In the Resources tab, you can find a traceable
template for tracing James, the Siberian Husky onto
your watercolor paper, as well as color
reference photos and supply guides to use
during this tutorial. Or sketch out your
own Siberian Husky and use what you learned
to paint your own dog. We'll first look at how to gradually build up
layers of gray and to paint hairs following
the natural curves of a dog's eyes and mouth. We'll then take a peek at
how to paint white fur, as well as how to keep your pets facial features from
disappearing in all that hair. We'll talk about how
to add a layer of black paint so that your
fur doesn't look flat, and then move on to adding a colorful splash
in the background. For some final details, I'll also introduce
using white gouache to add some fine white hairs
above the eyes and mouth. As an added bonus, I've even included a quick
guide with step by step pictures so that
you have an easy way to see how all these
layers come together. So grab your supplies, and let's get ready to paint. Don't forget to upload any
questions that you have, and I'll try my best to answer them along the way.
Let's get started.
2. Supplies and Painting Prep: Alright, so let's
talk supplies for painting James, the
Siberian Husky. So starting with paper choice, I am choosing to paint on arches hot press paper
that's 140 pound paper. I like to get the ten by 14
inch blocks or sorry, pads. And then I will cut
one of those ten by 14 into 45 by sevens. Now, the client ordered this
portrait on five by seven. However, if you
would like to paint this on an eight by ten,
you're more than welcome. You can also paint this on
cold press paper versus hot press paper if you prefer cold press
over hot pressed. So the next thing
that we can take a peek at is our brushes. So you can use a variety of different sized round
brushes for this tutorial. Since I'm painting on a five by seven inch
sheet of paper, I'll be using some
smaller round brushes. So I have a silver
limited round size four. I also have some escota brushes. These are from their Perla line. So I've got a size zero, a size two, and a
size four round. For watercolor paints, you can use whatever colors that
you would like at home. I am using Daniel Smith colors. You can find a link to all of the colors that I use
for my classes and tutorials in the PDF
attached to this tutorial. For the purpose of
painting James, though, we'll be using a
lot of grays and blacks. My favorite gray to be using for pet portraits is Daniel
Smith's shadow violet. It is a granulating color. It leans a little warmer. I'll also be using a bright blue for the
eyes, athalo blue, a quinocraumgenta
for the tongue, and I'll be using lunar black, which is another granulating
color for the black fur. Around the color splash, I'm going to use a mixture of purple and blue for
the color splash. And as we start painting, I might use a few
other little colors as well that I will talk
about during the tutorial. You will need two cups of water. I like to have two so that
I can switch them out. I did tape my tracing down, so I traced this out already on my five by seven
sheet of paper. I taped it onto a plastic corrugated board that I found at Michael's
and cut into size. And I'm using kiwi hub tape, but any painter's
tape will work. And I already masked the teeth and the
highlights of the eyes. This is the only section of my painting that
I like to mask. I don't like to mask any of the white whiskers
for my dog portraits. I'm actually going to be
using a white gouache in the very end to add some little white
whiskers and white hairs. But I did use some Windsor
and Newton masking fluid and a calligraphy pen to mask the teeth and to mask a
little highlight in each eye. You can either mask
those as well, or you can use your
bleedproof white at the end. You'll also need a
paper towel or a cloth and the reference photos for painting James,
the Siberian Husky. Alright, let's get started.
3. First Layer: Iris, Tongue, and Nose: Alright, so the pose
that I chose for James is this really
nice, smiling pose. However, it was taken outside. It looks like it was a
slightly cloudy day. So the fur itself
looks slightly gray. And so I have a second
reference photo that I'm also working from
to make sure that these sections of
the white fur are truly white or are
they actually gray? So it's looking like
it is truly white. And so I am going to start. Like, I start all of
my pet portraits by painting the iris of the eye. So that's the color part
of the eye and any pinks. So the color of the iris is this really nice
light light blue. And so I am going to do the first layer of
this light light blue. I can go over the masking fluid, and I can also go over the pupil here because with watercolors, of course, I'm going to
layer the second layer. Now, I did notice with a
second reference photo for James that there is a bit of a red coloring on
the outside of the eye. It looks like it was
some sort of, like, birth mark or some
sort of eye condition. And it's in multiple photos. So I'm not actually gonna
extend that blue all the way. Now, I'm lifting the blue slightly so that
it's not so wet. And then I'm just gonna
drop in a little bit of palo blue directly from my
pan into the very center. I'll wash my brush
and dry it and use a dry brush to soak
up that dark blue. I want to have this kind of, like, ring of light blue, but in the center, have it very, very dark blue, so you can get that really nice
blue eye effect. Now here I can also drop
in additional water to push that darkest blue
pigment to the center. So I'm just going to kind of
do a combo of lifting and dropping in water until I get
that blue where I want it. Alright, now, still using
my size two round brush, I'm going to paint the
pink of the tongue. So I'm using a
quinocrodone magenta. I've already massed
out the teeth here, and so I'm just going
to do one full layer of quinacredon magenta. Now, if you have time
before it dries, you can always drop
in a little darker of magenta to the
center of the tongue. And then, same thing, dry
wash your brush, dry it off, and use your dry brush just like a sponge to lift up if it
kind of went all over on you. Alright, the next step that
I always like to do when starting pet portraits is
the first layer of the nose. I like to let that start to dry so that I can start
working on the second layer. For this, I'm mixing water
with a shadow violet, and I'm gonna be painting
the nose section. I'm going to start around
the outer edge because I am noticing quite a big highlight here and the top of the nose. So I'm going to fill in
this whole bottom of the nose using a shadow violet, leaving that top
section just for now. And then I'll dab my paper towel so that I don't have quite as
much liquid on it. And now I'm just going to use a little bit of a
stippling technique. So I'll do a combo of tapping my brush if it has
too much liquid. I want a mostly dry brush
for this stippling because I do want to still
leave that highlight. But I want to come
along this hard edge, and I also want to come
along this little center here and add a few dots. Before it dries, I can
also dry my brush. And if I notice some sections under the nostrils
that have highlights, I can always pull
those highlights. If you don't have time to
pull those highlights, it's usually not a big
deal because it's gonna be a little we're doing our first layer lighter
for that reason.
4. First Layer of Black Fur (Gray): Alright, now I'm gonna switch
to a slightly larger brush. I'm just going to switch
to my size four brush. And now I'm going to look at the first layer of black fur. To do the first layer of
black fur for my huskies, you can still notice at least
around the outer edge of my huskies that they still
have kind of some lighter fur. And so we're going to want to go over wherever it's black. But then we also want to do some negative painting so that we can show some of
those little tiny hairs. So here in the ear, I
came around with my ear, and I'm going to pull
in some lines inward. So I'm looking at where
is the gray in the ear. And I'm wanting to make sure
that I keep this section of the ear open since it's
very white and light, and grab a little bit more. I'll come down. I'll pull some of that down. And then it also looks
like it's a little bit of white tuft towards
the base here. So I'll just add a little
bit in the center. Now, the same thing
at the bottom, I can pull a little
bit up and out. Because we don't want this
edge where the black is. We don't want that to be a
really hard, harsh edge. Kind of went over the
pencil line on the ear. That's okay. I don't really need to worry
about that all too much. Alright. Now I'm going to continue on with the
rest of the face, and I'm going to keep going
where this is wet here. And when I get to
the outer edge, I do want to be pulling some of these little fine
hairs out of the edge. And when I get to
the white sections, I do want to make sure
that I am pulling some white or I'm pulling some little fine hairs
into these white sections. Now, I need to work sort
of quickly because, of course, this edge is going to dry fairly quickly on me. I am working kind of
section by section. I already have my sketch that's showing where these
white edges are. I'm trying to just
follow the curves here. I'm going to pause
in the center. I can always do
around the eye later, but I don't want
this edge to dry. So I'm trying to kind of use
the natural stopping points, the natural kind of
boundaries for my husky here. So now that I kind of have
a natural boundary there, I'm going to work on this ear. I think I'm gonna switch to
my silver limited size four. This one has a little
bit finer of a point. So I can get a
little bit finer of these little wispies
Whereas my escota is a little bit more of a blunt
brush a blunt round brush. I can't get as many
fine wispies Alright, now, this is kind of
where my black stops. Now, you'll notice that
I didn't really do many whiskies towards
the top of the head. That is on purpose. The reason why is
because I found with past portraits
of huskies and other long haired
dogs that if I add too many hairs sticking
upwards like this, it ends up looking almost
like the dog hasn't had, like, a good grooming
session recently. So it kind of looks like
there's stuff out of place. So I would definitely
suggest if you are going to add a few
hairs at the top here, that you maybe only
think about adding a few coming out of the top, like, right close to the ear, maybe, and not necessarily
adding too many in the middle because adding
too many here in the middle, it just might look a
little bit more unkept. Alright, so let's take a peek at now I've got I still
have to work on the eyes, but let's take a peek around
this outer edge of James. So I've got my black that is continuing
down this outer edge. So I want to make
sure that I'm pulling some strands out and then
also pulling some strands up. So as I come around, I'm going to do
this in segments, so I'll pull some down. And then I'll pause because I don't want this edge to dry, and I'll pull then some
negatively in and up. So this is why it's
really helpful to have those edges kind of
already drawn out for you before you start with this section
of your painting, because we want to
make sure that we have a good sense of where
these edges are. So now it looks like
as I come down, we've got a nice black
section on the inside. There's a little section
coming on the inside here. And then it looks like
it's a little bit gray, and then it comes
down and around. And there's, like, a little
section that's pulled in. Now, this part is not white, so I can kind of go through and roughly connect some
of those edges. I don't need to worry
about that pencil line. That pencil line is
gonna be erased. Looks a little bit more
of that shadow violet. Alright, so now I've got
kind of this section here, and now this section on
the other side is where this black now is going to be
coming on this other side. And so I'm going to do
the same thing where I'm gonna pull some strands up, pause, and then pull some strands down before
moving on to the next section. I just want to make sure
that I'm correcting any of these strands before it dries. The minute that it dries, you've lost the ability to kind of change the shape
of these hairs. So it's really important that
you're doing these steps in a timely manner and
that you're making all your corrections
before you move on. So I'm going to go ahead and do this lower
section right away, so I don't have that hard edge. It is gray. So I'm gonna
connect some of them. Then I'll finish going up
on the side with the black. It looks like the black
kind of starts here
5. Darkening around the Eyes, Nose and Mouth: Oh Alright, so I do want to
take a peek at the eyes, but I am going to switch
back to my size two. Because the eyes
are so small here, I do want to add the black outline first
to make sure that I have enough room for the rest of the out like that rest of
those hairs around the eyes. So I'm going to start
on this right eye. Now, huskies have this really intense
kind of black eyeliner, and it's more intense
on the upper lid. So you'll notice this whole, little corner of the eye, and then all on the top of
the eye, it's quite thick. And it does come down and kind of flares
out just slightly. There is a little bit of a line that follows
the underside there. And then I'll go to the
center of the eye here. I don't need to connect
those two lines. I just want to give kind
of the illusion that there's there's a line that's
coming underneath the eye. Alright, now, while I'm at
this and I want to leave that line to dry fully before I go around and
add all the little hairs. And so, while I have
this nice dark darker, it's still not it's
kind of a medium to medium dark transparency
of shadow violet. I'm gonna come in and add
these pupils to the eye. Now, with a lot of huskies, the pupil tends to
be not that big. It depends on the picture
that you're working from, but make sure that you do see
quite a bit of that iris. So that's the colored part. All right. Now, as I'm
letting the eyes dry, I'm going to go in with
that darker shadow violet. And I'm going to actually
outline my nostrils. The reason I like to do this
at this stage is because I just want to make sure that
I can see those outlines. I've found that if I
add the medium layer, the medium darkness, I tend to lose the nostrils in the medium, like lose that pencil sketch. And so if I can do this
darkest shade right now, then at least I know
where they are. I can always paint them
that medium shade later. And I'll also go
in in the mouth. All right now, I still
want to go over the teeth here with this shadow violet, and I want to go
down to there is a lower lip that you
can see in the picture. But then there's also kind of some black hairs that are
coming out of the lower lips. I only want to do the
lower lip and leave that next section of black hairs until
this section dries. I do want to paint black up to the tongue
and over the teeth. And I can add a little bit of water to this shadow violet, and I can always paint on top of the tongue on that
underside of the mouth. Go to kind of belly that
shadow down slightly. No, I'm bellowing it down. I'm following the
curve of the tongue. I'm not following the
curve of the upper lip. So you'll notice that this curve mimics the curve of the tongue. And then I can pull a little tongue line
out of that shadow. Sometimes when I'm
painting tongues, I don't always follow
the reference photo. If you take a peek at the reference photo for
the tongue section here, you'll notice that
it is quite dark. You almost can't even see
the pink of the tongue. And so in order to make
it look a little cleaner, I sometimes will just paint
a solid shadow line in that center of the mouth that follows the curve of the tongue instead of following
the reference photo.
6. Painting the Gray Hairs around the Eyes, Nose, and Mouth: Alright, so now that I've added some of these darkest shadows, I'm going to switch back
to my round size four, and I'm going to lighten
up that shadow violet. I'm looking for the
shadow violet to be about the same consistency
as the black there. Maybe just slightly lighter, if you're nervous about keeping some of these hairs
light and thin. So when we look around the
eyes and nose and lower nose, we notice that there's a
lot of almost grays there, but there's a lot of white
fur shining through. So instead of painting, so under this eye, instead of just painting that whole shape and kind of outlining it and
filling it all in, we actually want to
do some little um, like talies and we're going to be making these
little lines to follow the shape of the eye so that it mimics what we're
seeing on a reference photo. So if I'm painting
this under section, we're just going to
practice it a little bit. I'm going to be doing a
very light brushstroke, and I'm doing these
little like tally marks, but I'm curving my tally marks according to what I'm seeing
on the reference photo. Some of them are going to
connect, some of them are not. And so I'm kind of having the ones where
it's a little bit darker, I might have those
connect a little bit more and where I'm seeing
it's a little bit lighter, I might have those
connect a little less. Now, right around the eye, I can make those connect a little bit more since it is
quite dark around the eye. And if I were to continue on, I would come down the nose here and I would follow the
shape of the nose, and then it looks like
it kind of splays out a little bit and almost fountains in the
center of the nose. So it kind of fountains out and then back
up the other side. So all of these
little tally marks you can practice
them if you want. So here's where
that darker section under the eye is all connected. And then where it lightens up
a little bit under the eye, I would have some tally marks
that aren't quite touching. Now, it's okay to be practicing this as many
times as you need to. And we want to make sure that we don't have a ton of
liquid on our brush. If I totally fill up my brush, my lines might be a
little bit thicker. So if your lines are too thick, you can tap your paper towel so that you have some nice,
really thin lines. Your brush choice
might also matter. So this silver limited brush has a quite nice point to it. That's why I'm still
using a size four. But my escoda size four, it still has a nice point, but I have to have a much
lighter touch with it, or otherwise, my lines
get a little too chunky. So really practice
with a variety of different brushes and see which
brush works best for you. Alright, so let's start and we will practice then
around the eye. So I'm going to start
with this lower section around the eye, following the curve
of the eye here. And it comes down into kind
of this little V almost. And then it comes out slightly. It looks like this section is almost mimicking a
smile line here. So whereas this one came down, this one is kind of curving
up a little bit more. And then when I look at the
bridge of the nose here, it looks like
there's a curve of, like, talis along
this bridge here. That's kind of talis and
curving down slightly. I'm gonna continue with the
upper part of this eye. So it looks like we've got some coming kind of
around this curve here. It's curving up like this, and then it's curving around. So I'm gonna do the
curving up first. And now I'll do the curving
around following that eye. Now, where this white patch is, I can always go around
the outer edge of this white patch and add a few little tally
marks coming in from into this around
the outside edge of this white patch
if I'm noticing that my edge got a little bit too hard of an
edge around this white. Sometimes we can just add
slight tally marks around those white patches to just
help blend that white in. Alright, I'll do the same
thing with the other eye, and then I'll take a
look at the bridge. All right, now that
I'm ready to kind of take a peek at this bridge here, I want to be really cautious
of making sure that the shape matches
what I'm seeing here. I'm actually going
to start closest to the nose because I
don't want to start up here and then all
of a sudden have it splay out too much
or out to that side. My guide to this
central nose area is actually going to
be the nose itself. I'm going to start in this
right most section here because it kind of almost
starts at the very tip top. There's a white
space in between, and then it comes around
And then from there, it's almost like it comes up. Now, on this side, it's the same where it kind of starts almost up that
corner of the nose. I'm going to add
some dash marks. It's almost like there's a
little white space in between, and then I'm going
to jump and add more dash marks up above. Lastly, I left quite a big
section of that white there, and that was on purpose
because I do notice there's just a little bit of
almost like cash marks, just a few at the
top of the nose. There's still quite a large
white section, though, so just add just a few there
just so it's not so white. All right. Let's actually
take the same shadow violet. We're going to continue
around the nose and down below the nose. I'm going to actually
now that I loaded my brush up with a little bit
more of this shadow violet, still the same transparency. But I'm going to start on the section between the
nose and the mouth. I'm still doing hash marks here. But what I'm doing for these
hash marks is I'm leaving a small line of white between the tally marks
I'm making and the lip. I want to leave a little bit
of white edge to this lip. The reason being is because if we go all the way
to the edge of that lip, then suddenly we
lose the definition of the lip and it just
blends into the mouth. So by leaving a little bit of
that white along that lip, it's going to give
you a lot more shape. Now as I come outwards here, you notice I wash my brush, I added a little bit of water, and it's coming lighter in
color as I come outward. If it gets too dark, tap your paper towel. And then I'm going to
add dude that same tally mark out starting in the center, coming out for almost three
lines of those tally marks. And then adding just a
few extra little spots wherever you're noticing some
of those whisker follicles. Now, this is where it might be a little challenging to add details that you see
when it's this small. I'm also going to
come around the nose, and I'm going to
add a little bit of shadow using that color all along the base
of that nose there. Now, if things got too dark, I will dry off my brush, and I'll use a dry brush to just zip up if any of those
dots got too dark. Now, you notice I only extended
these dots to about here. I do see some shadow here, but I'm going to wait
for that shadow. I'm going to do the rest
of my dots along the base. I'm going to do that same
thing that I did here. I'm going to start
in the center, do these tally marks where
it's going to be the darkest. Leaving that little bit of
white in the upper lip, I can always connect the top to the bottom in
this very center line, and here and there
around the base. So if I do connect
in a certain spot, which even I don't
like how that looks. So even if you see in your reference photo that it does connect in certain areas, I do feel like it
is really helpful to have that white
lip stay white. Okay, so I'm going
to add water and extend following the
curve here of this mouth. Add a little bit of
shadow at the top here. A little bit of shadow. There.
7. Painting the White Fur: A Alright, we'll let that dry. Now I want to mix a very, very light shadow violet. So I'm bringing some of
that shadow violet up top, adding it to just water. Here I'm still
using my size four. However, you can use a
smaller brush if you need to. If I check my transparency for now painting the shadows on the white for I'm noticing that that
transparency is very light. It's much lighter than what
I did for under the nose. And so now we're going to test out if it's light enough
by the smile line. So right here where
the smile comes up, I've got a little
bit of a shadow, and then I'm jumping across, and I'm adding another shadow
behind this smile line. And then from that, I can
pull a few hairs out. So there's kind of
two smile shadows. There's this smile shadow
closest to the dark black. And then that shadow can just
kind of come down slightly. And then I jump
and I pull again. Then we'll leave another
little section of white, and here we'll add
a little bit of shadow following the same curves and the same lines
that I painted. So if your hairs look different, you're going to
follow whatever you have on your paper,
whatever you painted. So I'm just wanting to add a few lines here
into the white fur. That's following the
same the same curves. And I want to make sure
that I'm not adding too much because
if I add too much, it's just going to look like that section of fur is muddy. So what I will do is I will follow for this downward
section under the mouth, I'm going to paint
using that shadow along the bottom line of the mouth so that I can really nicely
differentiate it. And then from that shadow,
while it's still wet, I'm going to pull some lines
out from that shadow line. I'll try to follow
the same curves that I notice on my
reference photo. And I'll come underneath. I'm still I'm not pulling
them so far down. You'll notice that
I'm still keeping these lines slightly small. Maybe a few of them come
a little bit longer. And now I still have this
big section here of white. Now, in my reference photo, it's showing a lot of
little shades of gray. I don't want to add that many. I might add just here or there, maybe one or two hairs
coming out up here. In this larger triangle, I'm going to add a few hairs, maybe one, two, three, four, and another triangle shape that's mimicking
this other triangle. It's a very, very light hand. This is definitely
something that you can practice ahead of time
if you would like. And now I'll move on
to this right side. So this right side, it
seems like, same thing. We still have an outline
around that chin. And it seems like we also have a little bit of shadow
along this side, too. So I'm going to
add a little line of shadow along that side of the mouth and a line of
shadow around the cheek. Seems like this is actually
darker here at the top, so I'm gonna drop
in a little bit of that darker shadow violet. And then from that darkness, now I can pull out, making sure that
I'm leaving some of that white to shine through. I don't want to pull
this shadow violet all the way to that edge. And I'm still following the curves of this outer curve here that I painted earlier. So even though on
the reference photo, it looks like the
hairs are sticking out more because I painted
them more at a curve, the shadows of the white fur also going to be
at the same curve. So here's where we're using our reference
photo as a guideline, but we're changing it according to the brush strokes
that we made on our paper. Now, as I'm noticing here, I'm going to extend
just a little bit on this section here. I almost feel like
it didn't come out far enough that first time. And I'll be adding
a second layer so I don't mind if there's
some overlap there. Alright, now let's take a peek at this section of the mouth. So right here, it looks like we've got I still have a little bit of this
shadow violet on my brush. Above this smile line, I'm just going to add a
little bit of shadow. And then this edge that's
connecting with the mouth here, it looks like it has
just some little bit of shadow coming down almost towards the
edge of the mouth. Now I'm going to wet my brush. So it's even lighter. And I'm going to do
one brush stroke using edge of my brush
along the edge here. So it's kind of this
upper smile line, and I'm coming up to the top. Now, if it gets too dark, so I use the edge of my brush. If it gets too dark,
you can lighten it up, but it's not looking
all that dark to me. I'm gonna do another swoop here from the nose
kind of inward. Now, this is so light that you might not
even be able to notice it. But as it dries, you're gonna start to
notice that shadow there. Alright. And the last
thing that I noticed is I didn't add anything
on this lower lip. Now, it looks like
there's some hairs coming out of this
little corner here. And then I'm going
to grab some of that slightly darker shadow
violet here under the lip, if you have space for it, if you don't have space
for it, don't worry. We're gonna add
some little lines coming out of the
bottom of the lip here, and it can be a
little bit darker. You do want to make
sure that you have a nice chunk of white
here under the lip. So if you extended that upper or if you extended that
lower lip too much, then maybe don't do this
section because like I said, you do want to have a
little white lip there. And the last thing
that I'm noticing for my white fur well, one I might I kind of don't
like how this stopped here, so I might add just a
few strokes here in this white section just to kind of help give it a little bit more shape
to kind of connect that. And then I also
might take a peek at the ears here and add just a few strokes in
that white of the ear. So if you section, so this section
actually looks nice. I don't want to do more there because I might lose
some of the white. This one I had too much white, and so I wanted to add just
a little bit more shadow.
8. Second layer of Gray (part 1): Alright, so now that we've
done our first layer of gray, now we're going to add
more shadow violet, and we're going to
do a second layer of slightly darker
shadow violet. This time, we're going to look at all of the
black sections. So your second layer, it's important that it's darker, but that it's not as
opaque as you can get it. So we still want to have
a layer of black on top. And so when I test
out these two, it still is watered
down. It's quite watery. It is slightly more opaque, but it's not quite as dark
as taking it from your pan. Now, I want to start in all the sections where
it is the darkest. So I'm going to start
in the ears here. I'm doing all the
same brush strokes as I did for this first layer. Alright, so now I am still the
section that I have black, I'm just filling it in. I actually don't want to add that much texture to
that black section. I want the texture to really
shine on the in between. All right, so I need
to be really careful here that I'm not adding my
black too close to the eye. Remember, I'm doing a lot
of negative painting here. And then I have my darkest
coming down and around. Now, here along the outer edge, it seems like there's
a little bit of, like, a shine on the outer edge. So I'm not going to extend this second layer all
the way to the edge. I'm going to leave
a little bit of that lighter color
to shine through. Now, I made sure that
this edge up here, it's an edge that I can leave. So it's following
the curves there. So I'm going to continue
onto the neck here. So I'm negatively painting. It seems like the darkest
of darks is close right up to to the white here. Now, another thing to remind yourself as you're painting
this second layer of black, I'm keeping my brush very, very light on the paper, and I'm keeping it more at a perpendicular angle
instead of a parallel angle. I really want that tip of the
brush to work for me here. Now, I'm not going to extend
all the way to the edge. Seems like this darkest
section kind of comes around and then down. I'm still trying my
best to leave some of that lighter gray
to shine through. On this edge here, I can always add a few
little individual of these dark So I added just a few little
individual hairs here. Once again, I'm
trying to correct all of the edges here
before it dries. So Seems like I can now pause, and now I'm going to work
on the upper forehead here. Now, the same concept where the upper forehead here is
a little bit highlighted. So I'm going to take my gray, my second layer of gray. It's the darkest in the
middle of the forehead here. Now I want to make
sure that I'm not extending this dark gray
all the way to the edge. I do want that lightest
gray to shine through. And this darkest section
is coming in the center, and it's kind of stopping around the same
height of the eyes. I can always change
it if I need to, but I don't want
this top edge to dry before I have a chance to
fan it out a little bit. I can't tell if I like that
little highlight that I left. We'll see. I'm gonna
keep coming around here. I got to be careful
with the eyes. And it seems like
this is about where the darkest of those
layers is stopping. Same thing. Kind of
the outer edge of the ears is nice and smooth. And the inner edge
is where we can pull some hairs if we wanted to. And then it's the opposite
on the inside of the ear. I'm going to add some of this darker shadow
on the inside of the ear because I have
not added that yet. Making sure to leave some of those nice highlights
in the center of that ear. Alright, and then
the second layer, we'll continue down
this right side where we notice it to be darker. Remember this is that
medium transparency. It starts about here. Remember that we're
following the same curves that we made on the first pass. Even if it's slightly different than your
reference photo, we still want to
follow the same curves along the neck line here. It's the darkest along this edge where the
white is on top. And then along the bottom edge, if you wanted to leave
some of that first layer to shine through, you can had some slightly longer lines in between here where
it's a little bit more gray versus white. And now I'm going to
take a peek if I need any darker around the eyes or
around the nose and mouth. So I am going to
add a little bit of extra darkness in certain
areas around the nose. So I'm kind of I'm seeing these, like, two triangle shapes kind of coming down
each side of the nose. So I do want to add a
little bit darker there.
9. Second layer of Gray (part 2): And then I also notice some darker around immediately
around the eyes. So I'm going to add a little bit of darker around the eyes here. And then it seems like it kind of the darkness jumps here, and then it's a
little bit darker. And this little
patch, there's, like, a little patch under each eye
that's a little bit darker. So I'm going to do the
same thing on this side. Still using these hash marks, it's the same technique as the first layer with slightly
darker pigment this time. And then we've got a little bit darker coming in this
triangle under the eye. And then it jumps, and we've got this
little like patch in the corner of the eye
that's a little darker. Out of the corner of the eye, I also notice it's a little
darker around the corner. And there's almost like
a little line, like, almost by I know it's not where the eyelid is.
Well, maybe it is. There's almost like a
little crease here. So there's a little white
section in between, and then there's a little
darker of a crease. That kind of shows
where the eyelid is. All right. And then I'm going to
take a peek and see if I need to darken up any sections down
here in the mouth, it seems like in the
corner of the mouth. Well, that actually seems okay. I might add a little
bit of water and then a slight
lighter second layer on this shadow here
under the mouth. I'm noticing that this is kind
of where it's the darkest, and I'm also noticing
that over here on the right side by the cheek is where it's the
darkest, as well. It's a little darker here. So, the second layer on the white fur is
definitely not as dark. I watered it down a little bit, but I'm just being sparing
of where this second layer, this darker layer on
the white fur is. And I will take this
second layer color. And I also want to take a
peek at the nose again. So we've got this outer line on the outside edge of the nose. And then we want to fill in. We're using this medium tone on top of the whole
bottom section. If you can leave a little bit of highlight under each
nostril, great. If you can't, that's okay, too. If you wanted to make
that line not so perfect, you can add a few dots
on top of that line. If it's not dark enough, you can always drop in some of that darker pigment
along the base, although that's seeming
pretty good to me. You notice that I went
over the other nostrils and that pigment didn't
anything. It stayed there. And that's what I
was looking for. I was looking for having
those nostrils be nice and dark so that I can add that layer
and still see it. Alright, we'll add
a second layer to the mouth using
a shadow violet.
10. Black Layer: On my layer of black, I am using lunar black. I still want to mix my
lunar black with water, even though I want a dark color. The reason being is because if you have too dark of black, then you're going
to lose a lot of this other really
pretty work that we've done so far on the fur. So I do want it to be black. However, it is quite
watered down, okay? So when it's watered
down like this, it is also really easy to
lift with your paper towel. Whereas if you have your black directly from the
pan without adding water, it still is going to lift, but you see how much
darker the stain was. So we still want to mix it with water so that if
we make a mistake, we can lift it up a
little bit better. I can always drop in more
black in the darkest sections, but it's going to be
harder to lift off. So it is genuinely I tend to paint with
slightly lighter black. Alright, so we're
going to start with our sections that are
for sure the darkest. So we're going to
start around the ears. Same rules apply as what we did for the first
layers where we'll add the same fur strokes as
we did in the beginning. This time, though, we do want to take a peek at
this dark section, and if we wanted to leave some of this
gray to shine through. So I am noticing that it's a little bit lighter
towards the eyes here. There's like a little
highlight in that black fur. So I'm going to take
this hair line here and I'm going to kind
of curve it around. And I'll stop here at the white. And now, it's seeming
like it's coming up, but then I might not
have it fully filled in. I might leave a little bit of that gray shine through
in certain sections here. Around the forehead, we're going to do the same thing,
we'll come around. And this section here in the forehead is going
to be the darkest. But I'm only going to
bring it up not super far, and I'm going to bring
it up in kind of like an arched shape. And then I will bring it down in between these eyes here and it's going
to come down, and it's going to stop about
where my eyes are here. Then I can start to curve
it around a little bit. So we've got almost like this fountain shape in the
middle of the forehead. On this right side
will fill in the ears. And then it seems like we've got our darkest pigment along the outside edge and
the inside edge. And then they might
connect in certain spots, or it might be like,
the same on this side, where we just have we can do our outside edge and
we can do our inside edge, and then we can kind
of connect the two of them together in certain
spots if we need to. Alright, now taking
a peek at where the darkest around the
eyes is going to be. I'm going to actually switch
to my size two brush. Before I do the hairs
around the eyes, I do want to add the darkest around this
eyeliner on the top. So I'm going to
use that slightly smaller brush for adding that, as well as adding the pupil. I want these darkest sections
to be really nice and neat. And then I can either stick with that two size two or I can
go back to my size four, whatever brush you feel
more comfortable with doing these little tiny
baby lines only now, these are going to
be a little bit more sparingly than our
dark gray layer, use of course, we don't have all that dark
around the eye. So I'm just adding
a little bit of that dark these dark lines around the center
of the eye here. And then a little bit
on the underside. I can always blend those out too later if I don't
like how they look. Now, I will add just a few, very brief just a few of these black lines where you're
noticing it's the darkest. But it's really sparse cause these black lines
are pretty intense. Now, around the nose, I am gonna fill in the nostrils. I can do that little
center line of the nose, and then I can do this
little almost triangle underneath is where it's
going to be the blackest. I'm not going to add anything else to the little
mustache there, but I will take a
peek at the mouth. I'm outlining this upper lip. And then I'm coming down. I'm outlining the upper line of the teeth as well as the
lower line of the teeth. And I'm leaving a little space
in between that lower lip. I'm just kind of
outlining that lower lip. So then you can see
a little bit of that dark shadow violet
in the lower lip. I actually didn't can
pull a highlight. I didn't leave a
little highlight, so I'm using a wet brush and just pulling a
little highlight in that lip on the left
hand side here. You can always do that
when it's dry, too. Alright, and now I'll switch
back to my size four. And let's finish the
black layer of the neck. Same thing. I can leave some of this lighter gray
to shine through. If I need it, even darker, I can while it's wet, I can add a little bit of that darker black where I'm
noticing it's quite dark. So there's like a
strip here that follows the curve
that's darker. H
11. Optional Color Splash in the Background: Alright, so I'm going to
clean off a section of my board here of my palette. And I'm going to mix
the color splash that is around my husky, and then I'll go
back and I'll do some color corrections after
I do the color splash. So my color splash, my client had wanted a
kind of a periwinkle, this purple mix with just
a little bit of indigo. So it was a color
that she saw on a different pet portrait
that I had painted. And so that's the
color that I'm going to mix for her for huskies, um, another great color around huskies would be that nice alo blue to kind
of highlight the eye. Now, we've got a lot
of fur going on here, and so I want to actually
start in the top of the head, so I'm going to turn
it upside down. I'm gonna wet the area that I
want the paint to go first. And I'm going to try my best because I have a long hair pet, I'm going to try my best to use a very
watered down color. I don't want this color
to be too opaque, because if it's too opaque, it's gonna go on top of
these little fine hairs, and I don't want that to happen. If anything, I want to
leave a little bit of white so that it doesn't go on top
of those little tiny hairs. I can dry my brush
and always use a dry brush to add a
little bit of texture. And now I'll come
down each side. So like I said, when I'm
doing these edges that have some lots of fur coming
out, I'm trying my best. I don't want the water to go on top of those little hairs. I want the water just
right up next to it. And if anything, maybe
a little tiny bit of paper space in between. Like I said, the last
thing that I want is for some of this color to go on top of those little tiny hairs. So I'm trying my best to
give it a little bit of shape around here to kind
of help your eye go around, but also to not keep it
a very perfect border. I don't want this blob
behind it to be perfect. You see, that went
over that gray. I I don't like what
it looks like when my outside color
goes over the fur. It tends to make that fur darker because it's
technically a second layer. And so I try my best to
avoid that at all costs. And then, usually around
long haired dogs, I'll just add a few brushstrokes using the color of the splash, and I'll kind of follow the
curves of the pet's hair.
12. Final Details (highlights, white gouache, color corrections): Alright, so I've let my
painting dry overnight, and I took it off of
the plastic board. So now I'm ready to take
off the masking fluid. You can use either a
kneaded eraser or actually make gum erasers that
are a little bit sticky, and so it helps to take the
masking fluid off that way. So either way. Now, after I
take my masking fluid off, I always like to take a peek at the teeth and back at the eyes. So I'm going to switch to my
smallest size zero brush. Now, when it comes to
painting, pet teeth, you can either use a
little bit of a gray, whatever gray or
black that you have. And then I always like to add just a little hint of yellow. The little hint of
yellow is going to help with that shadow, it's going to make it look
a little bit more like teeth enamel versus
just black and white. So I've added a little bit of it's kind of
like a tan yellow. It's not a bright sun yellow. To my gray, and it's
going to be very, very light and transparent. So it's probably
even hard for you to see over the video here. But it's just a very,
very light yellow with a little bit of gray to it. And sometimes I will
reference my reference photo. Other times, I just paint on one side of
that canine tooth. So from here, I'm doing
just one on the inside. It's kind of a line
of that yellow on the inside and then a line
along the bottom of the tooth. Now, these little ones below, I might just kind of
add here or there, like little dots almost of that yellow in
between the teeth. And then I'm going
to do the same thing on this other canine. So I've got my line of yellow along the center and along
the bottom, the base. Now, sometimes I like to then go back before it dries
and I'll drop in a little bit darker of pigment
along the base of the tooth there and just allow it to kind of almost blend into the
gums there a little bit. It's not a lot. Now, when you took your masking fluid off, if you noticed that you don't have enough
black around the teeth, you're going to
have to go in with a little tiny brush and then help add some contrast
in between the teeth. So sometimes you can start
to outline them slightly. Now, you don't want to
outline it too much. I don't even like
how that looks, so I'm gonna try
to take that away. Really, we're just
wanting to give those teeth just a
little hint of color. Um, just so they're not looking
too bright and vibrant. And then you might have noticed that I used
a wet brush kind of along the base of these little
tiny teeth to just kind of soften up that edge
along the teeth line. Alright, so now that
I'm done with that, I'm going to take a
peek at the eyes. So the first thing
I notice is that this highlight is way too big, so I'm going to grab some black. And I'm looking at
my reference photo. The highlight is definitely much more in the upper
left hand corner. So I'm going to center that
pupil a little bit more and already by centering
that pupil and giving that highlight
more of an art shape, it just really totally changes
totally changes the eye. And now I want to kind of almost make this highlight on the right side a little
bit smaller, as well. Now, at this stage, as well, you can always color
correct your eyes. So here I'm going to take a little bit of that thalo blue. Still using my
small detail brush. Now, if you extended the
pupil at all on the outside, you would want to leave that pupil to
dry just a little bit. And I'm going to add
almost just, like, a little coma of that palo blue on this left side and a little
comma on the right side. I'm just kind of almost making a little parenthesis
around the pupil. And all that's doing is it's just giving me one more layer of color just to kind of depth
as, like, added depth. And then the last
thing for James here, I am going to add
a little bit of red into that corner of the eye. So if you are painting
your own husky at home, you probably wouldn't add this, but I do notice that James
has a little bit of that must be some sort of condition where it just causes
a little bit of, like, bloodshotness,
in that right eye, and I'm going to kind of just
bleed it into that black. So it's just a hint
that it's there. It doesn't detract from
the rest of the painting. It doesn't make it
look awkward at all. Now, the last few little
things that you can do are color correcting. So if you're noticing any
sort of browns in the fur, you can always go in. So I'm noticing on a
different reference photo that some of the fur
around the chest area has, like, this kind of warm brown. So you can always
come in and glaze a little warm brown using like, this is a piamintteGenuine, and that I'm just glazing over the black and
then I might pull a few strands into that white
just so that you can see a little hint of that brown
on that right side here. Um, I think that's the only place that I
want to add that brown. I don't want to add too much. I just want to add
kind of a hint of it. This is also a great
spot to be glazing on the nose if you notice a little bit of
browning in the nose, or if you notice
any sort of browns along the neckline
or in the ears, sometimes I like to grab a little hint of
magenta and then just add just the slightest bit of pink to the
center of the ears, even if it doesn't show
in the reference photo, sometimes just adding a
little bit of extra color in the ears also helps to kind of bring the shape and
bring the painting, give it a little bit more color. If there's no
browns in the nose, you can always add
a little bit of background color into the
highlight of the nose, or you can add a little bit of blue into the
highlight of the nose. Sometimes it helps
to kind of, like, reflect the skyline and the blue of the
sky into the nose. I don't think I want to
do that in this case, just because I want
to leave that blue, that nice blue in the eyes. And then, lastly, other kind of last little details and kind
of troubleshooting here. If any of your edges got to
be too intense of edges, you can always come back
with a small detail brush, a wet, clean, small
detail brush. And you can always come in and kind of soften up
some of those edges. So here on the little
mustache here, I'm going to soften a
little bit and then use dry my brush and then soften up that
black just slightly. It almost looked a little too
dare I say Hitler Mustache. So I can reactivate that color just using a wet
brush and then dry it off. And suddenly it changes that to be just a
little less intense. You can do the same thing
around the eyes, especially. Around these edges of
the eyebrows here, if you got too close with your black and you didn't leave any of
that gray in between, you can always use a wet brush, and you can go around the
edge and lift up some of that black so that there's
a little bit more of a gradient from white to black. So there's little
things that you can do to kind of add more details. The other thing that you can
always do as well to add a little details to your pet portrait is adding
some bleed proof white. Now, you can either use a small detail brush like
this round size one, or you can use a very, very small liner brush. Because this is a five by seven, my liner brush I think
is going to be too big, so I'm going to try it
out with my small brush. But your script or
your liner brush can be nice for
your eight by tens, where you might want a
slightly bigger whisker. So when I take a peek around
the nose in my picture, I've got a lot of these little white little white
whiskers coming out. And so I'm using this bleedproof white
directly from the container, wetting it, though, and making sure that it's
really nice and watery. I mean, watery, but
also with your pigment. So your brush needs to
be completely full. And then I'm going
to test it out a little bit on a test strip. Now, when I do line work, instead of holding my brush in kind of the cup of my hand, I'll actually move it
up to my first knuckle. This gives me a little
bit more stability, and it changes the
angle of my brush so that I can have a nice angle
at the tip of my brush. Instead of here, I feel like
it has more of a side angle, and so I get a little
bit thicker of a line. Alright, so I've got
my brush loaded up. I'm going to start on this right side just in
case they don't turn out, so I'm going to add a few of these little white hairs
coming off the right. Grab a little bit more. And then I'll add
a few on the left. It looks like there's
a few coming out of this corner of the mouth kind of covering that smile line. So if you notice just by adding a few of those
little whiskers, although you can't see
it on either side, you can see it through
the smile line. Now, you could also
add a little bit of highlight here to the mouth if you weren't able to add any highlights in the lip area. You can add highlights to the nose if you needed
to or to the eyes. I really all depends on how
much detail you want to add. And then there's also a few of these smaller lines out of
the white of the eyebrows. And so I can always add a few smaller lines out of
the white of the eyebrows. And once again, I'm going to be following the curve
of the face there. And the reason why once again that I did not use
masking fluid for this is that masking fluid
just gets too thick. The lines just get way too
thick for masking fluid. And so by adding a few lines
with guash afterwards, we get a much fiiner little
line, much more hair like. Now, I do know some artists who will use much more
white gouache, and so they would add
white all along this edge. They would add it
out of the ears. I mean, you can really
go crazy with this. I'm gonna only leave
it in those few areas. That's actually all I'm gonna
do with my white gouache. I just don't want to overdo the painting since
it is so small, and there are so many
details in the fur. I don't want to I don't want
to have too much going on. So this is going to
be my final piece. Make sure to let it dry fully. And then if your painting is
a little bent and warped, you can always wet the back
after it's completely dry, wet it very, so slightly, and then place it in
between a few books. Usually, when I wet
it, I'll just use a flat brush and just add just a little bit of
water on the backside. Leave it between some books, and you're all set to go.
 Emily Marie Watercolors, Watercolor Artist and Dog Lover