Transcripts
1. Intro for Skillshare videos: Hello, and welcome.
My name is Emily, and I'm an artist and instructor based in Madison, Wisconsin. In this Skillshare tutorial, we'll start off by learning
how to paint a sky, using a really easy technique to add some white puffy clouds. We'll look at painting
our cows wet on wet and then adding a wet
on dry layer of shadows. And then we'll finish
it off by learning how to paint grasses
using a rigger brush. You'll have access to a tracing template
included in this tutorial, as well as some color
reference photos and printout instructions that will teach this
tutorial step by step. So grab your supplies, and let's get ready to paint.
2. Supplies: Alright, so for
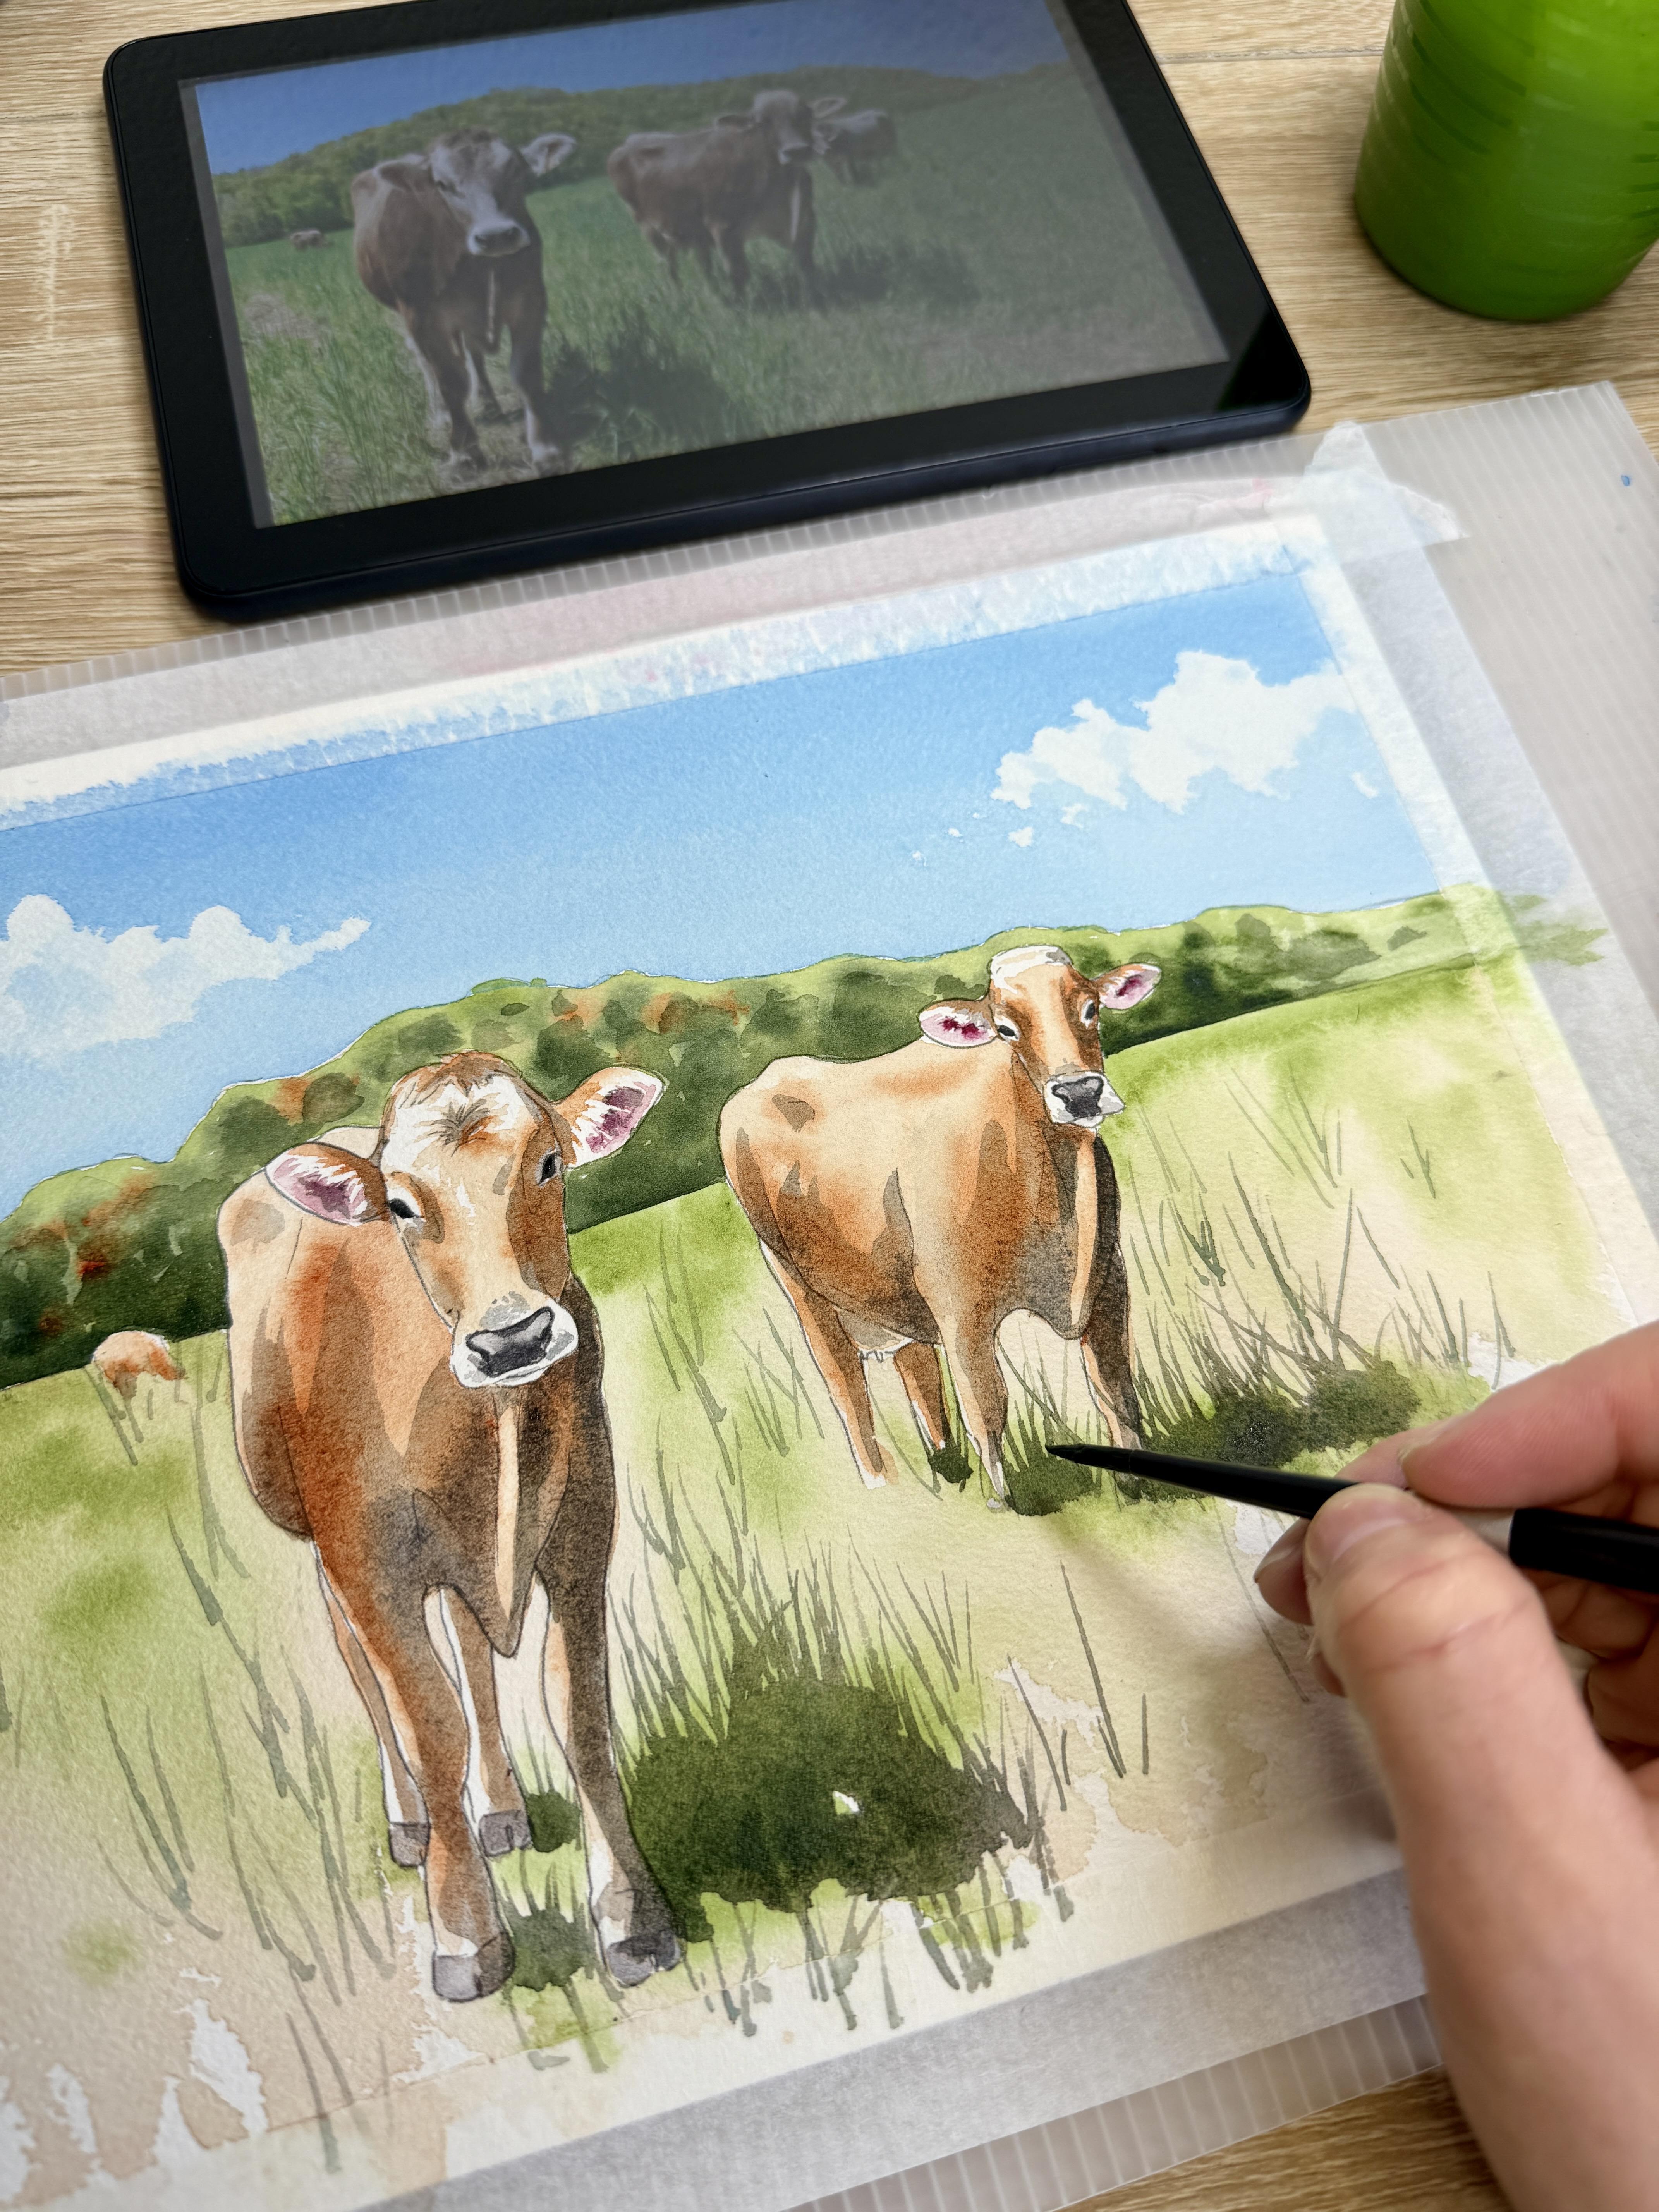
today's tertorial, we are going to paint
some Swiss cows. I have my reference
photo all set up. I have my template printed onto my eight by ten inch
cold-pressed watercolor paper. This is 100% cotton. This is a brand called Arches. I do have it taped on top of a plastic corrugated
plastic board, taped with this
is a special kind of watercolor tape
called Kiwi Hub, but you can also use
a painter's tape. I have my water colors. I have a variety of
Daniel Smith colors, a few glasses of
water, a paper towel, and then I have a variety of large and small size brushes. I have a larger quill brush. You can also use a mop
brush or a flat brush for painting wetting the sky and
for painting large swatches. You'll also need a
medium size round brush. So I've got a round number four. This is a silver limited
black velvet brush. And then specialty brushes, I do have a rigger brush. This is a size one rigger, also known as a liner
or a script brush. We're going to use
this for painting some of our tall grasses.
3. Sky and Clouds: Alright, so we are
going to get started. I'm going to start off
with my sky because I do want to paint the sky
up to the tree line, and I want that
to be able to dry before I do the
other two sections. So, I am going to add
some water to my palette. I'm using my large quill brush, and now you can use
any type of blue. If you have Cerlean
blue, you can use that. Or you can also use athaloblue
if you have Atho blue. You can do a different
color in your sky. You can either warm
the color up or cool it down by adding
some color to this. But I'm going to do just
a simple palo blue. And now we're going to
paint our sky and then use paper towel to pull some clouds. So I have my board. I picked up my board
slightly at an angle. I'm going to paint first
these horizontal lines. So now I'm going to do my best to kind of butt up
against the tree line. Can add water to this lowest
line that I'm creating if I want this line towards the horizon to be a
little bit lighter in color. And now that I have kind
of an even wash here, if I had wanted to add just a little bit darker of blue
towards the top of the sky, I can grab a little
bit of that halo blue, mix it on my plate so
that I don't I don't get some streaks on my paper and then add a little bit
extra to the top. Now, before this dries, I do want to lift some clouds. I'm going to take
my paper towel, wrap it around my finger. And then I can use that to
lift a few clouds in the sky. So I'm pressing down in
different different levels. So I'm pressing down a little bit harder towards the top if I want the tops of my clouds to be a little
lighter in color. And then I'm barely touching the paper towards
the bottom because I want the bottom to
be a little lighter. Now, every time you
do a different cloud, you are going to have
to find a new section of your paper towel. I'm trying to add a few clouds that are coming
from the sides inward. The reason I'm doing that
is because I want to kind of keep this composition. So I'll move my paper towel. Alright, and I don't want to get too complicated with this. I think I'm just gonna
leave it at that. If you do have any sort of pools of color on the
sides of your paintings, you might want to lift those up. The one thing that
will complicate a nice wash like this,
like we have in the sky, is if you have any water
that's sitting on the edge, if that water starts to
creep back onto your paper, it's going to create
a little bit of a bloom on the edge
of your paper. So, it's usually best
that we do not have any sort of puddles of
liquid on the sides here. Mmm.
4. First layer of foreground: Alright, now I'm going to take
a peek at the foreground. I know I still have my cows
here that I'm going to paint, but I want to paint
the first layer of these light
grasses in the front, 'cause I want to allow that
to dry before I add some of the grasses with
my rigger brush. So I'm gonna clean
off my palette here, and I'm going to do
the same thing where I'm going to grab some water in a new section using my
large quill or mop brush. And this time, I'm going
to use I'm gonna use a quinocratone burnt orange for this first layer of grass. Now to this, I can once I paint this quinocorn born
orange along the base, I can drop in a little
bit of green if I want, or I can keep the green to be just the grasses with
my rigger brush. But I do want to add
a little bit of color here just to kind
of get it colored. This is also going
to go quickly. So I do want just
like I did the sky, I'm not going to wet
this foreground first, but I might do a little
bit of dry brushing here. So what does that
look like? I might start on this left side, and I might work in section. So this is kind of a good
section here by my cow to do since I've got
the feet really, really close to the bottom here. So I'm going to grab my color. I'm going to go just over
that cow in the background. I'll make sure that
I have a really nice thick layer of color here. And then as I come down, I can use the edge of my
brush and pull some of that color to the front and leave a little bit of this paper to
shine through here. That is called dry brushing. Now, to this cow here, I'm going to take my
paper towel and I'll just lift a little bit from that cow. Alright, now because this
quill brush is so large, I think I'm gonna switch
to my small brush. And I do want to go in and make sure that I'm up against my cow, that I pull that color up
against my cow or otherwise, I'm going to see that hard edge. I can also take that time to add my color between
the legs of my cow. Now, since we're only doing
one section at a time, now, this is still wet. So we can if we wanted to, we can always drop in a little bit more of
that quinocidurne, burnt orange towards
the back side here. I got a little too dark. Or we can always drop in
a little bit of green. So here's a sap green. I think I'm going to see
what it's like to drop in some of this sap green here. Now, I do want this
quinocradon orange to still shine through, so I'm not going to drop in
this sap green everywhere. I'm gonna actually
try to keep it closest to the horizon here, because that's where it would be darkest is at the horizon. And then I am going to
take a peek kind of where the shadow is here on my cow. I can always add a little
bit to that shadow. But you can see
that I still have this orange still
shining through. If your green got
too dark at all, you can take your paper towel and just kind of lift it up. And now we're gonna move
on to this next section. Alright, just like before, we'll come on in with a
little bit of that sap green. Drop in a little bit
of that sop green. While it's wet. And then I'm going
to take a peek. Now, there's quite a
significant shadow right here. So I think I will
try to add a little bit darker of that green and the shadow here just to kind of place where that shadow is gonna be for me. I can do the same thing with this cow in the background here. A little bit more shadow
here in the front. And then I'm going
to continue on. Looks like that didn't.
With the rest of my grass. And then once again,
in this section where it kind of butts
up to the white paper, I can use my paper towel
and just kind of soak away a little bit of that
so it's not so intense. And now I'm going to let
that whole layer dry.
5. First layer of eyes, nose, hooves on your cows: Alright, so as we let the sky and this first layer
of ground dry, we're going to
start on our cows. Now, I'm going to start
on the faces here, especially this face, since it's not touching any
of the wet ground. So let's start off by
mixing a base color. Now, we're going to start off by painting this base color
over our entire cow. So when we look at our Brown Swiss cows, we're looking at, what's the lightest
color that we have here. And I actually think
that it's very similar to this ground
color that we painted. We've got a little bit of
orange undertone to it. And so I think we're
going to actually use the same quinacridone
burnt orange that we used for the ground, and we'll use that for the
first layer of our cows. Alright, so as we take a
peek at the face here, let me zoom in on
this cow on the left. We're gonna start by painting wherever we see
some of this brown. Now, I know there's
a lot of details, and so we're going
to kind of try to simplify those details. We can start with
the little kind of patch of hair on the head. To that, we can always add. Once we've got that first layer, you can drop in a
little bit more of that quinocrodone burnt orange
kind of in the center. So we're going to
do a combination of this first layer and then dropping in where we
see more shadows. When we move on to
the forehead here, I'm taking a peek at this
kind of patch in the center. So I'll do a little
dot of color, and then to that dot, I'm just going to pull
some outward lines kind of radiating out
from this center. Now, if you have
too much liquid, you can tap your brush
on your paper towel. You'll notice that it's
really nice and light, and then I can go in
while it's still wet, and I can always
drop in a little more of that quinacradone burnt orange in
the center there. Alright, then we'll go on. We'll move on, and we'll see
where is the darkest shadow. So I've got these shadows
all along the right side. So I'm gonna paint
a shadow around. I'm gonna still leave the
eye a little lighter. So I'll go around
the eye here and down kind of the edge of the face up to the neck here. And then I'm going
to wash my brush, tap it, and use just a little bit of water
to kind of blend that out. So blend that around the center, come around to this left side. And I'll do the same
thing on this left side, kind of paint around the eye
here and down to the nose. So so far, we've
got some highlights here and some highlights
around the eyes. Now, we will be going back and doing a whole nother layer, but remember with watercolors, we like to just get our color on our paper first so that we have an idea
of where our shadows. If any section gets too dark, you can take your
paper towel and press down to lift up where
it got too dark. Alright, now for the ears, I am going to take a little bit of this quinocodon magenta, and I'm going to paint a
little bit of the ears here. So I want to add
a little line of this quinacudon magenta along the edge of the ear,
the outside edge. And then I'm going to take
that whatever's left on my brush and I'm going to
pull some lines inward. So what we're doing here is
we're negatively painting. So when we take that color
and we pull it inward, we're left with these little white hairs that are coming out. You can always grab a little more magenta and
drop it in the center. If it gets too dark, you can dry your brush
and then just lift a little of that quinocrto
magenta from the outside edge. Now we're going to
wait for this to dry, and then we're going to
do that same idea on the inside edge
using that brown. So we'll do the other
ear first the same way. We're going to do
a little line of quinacon magenta along
the outside edge, and then pull some of that
quinacridone magenta inward. Kind of following the, some of the guidelines
that were sketched out. I can always drop a
little bit more of that quinocrado magenta
in the inside of the ear. If it got too dark, I can dry my brush and lighten
it around the edge. I think I'm going to
do the same thing on my other cow just because
I've got this color all set. And so let's do the
exact same thing here. Alright. Before we
do the whole body, I want to give this a little
bit more time to rest. So let's take a peek at the noses and we
can do the noses. So I've got a little bit of shadow violet here that I'm
going to mix with water. My opacity should be kind
of a medium opacity. This is going to be the
first layer of the nose. It'll be too dark if you can't see the lines on
your paper anymore. So with that medium opacity, I'm gonna actually just
paint the entire nose here. Now, this is where if you would like to switch to
a detail brush, you're more than welcome to
switch to a detail brush. And we will paint the
other nose, as well. Now, while I have this color, I can do two things. I can paint my hooves. Now, if this gray gets pulled
into my grass, that's okay. And then I can also use that color to paint
the dark eyes. Now, to this nose, if you notice any
sort of highlights, you can always come
back before it dries, dry your brush off and
use a dry brush to kind of lift any of those
highlights that you notice.
6. Wet on wet Layer: Cow Body: Alright, let's finish
on the first layer of the color coat of
our first Swiss cow. So I still have that
watered down color. And this time, I'm going to
do it over the whole body. Now, your greens in
the background should be dry enough at this point that you should be able to paint up next to it
without it bleeding. However, if you
start to notice it bleeding at all, take
your paper towel, soak it up, and then wait a little bit until you then
paint the rest of your cow. Now, I'm going to try to do
this in sections in segments, just so that I can
get a little bit of wet on wet details here. So I'm going to start just with the body and then the two legs. Alright. Now, before I drop in
any darker pigment, I'm going to go back
to where I started. Make sure that this
section is nice and wet. I need to make sure
that it's evenly wet in all sections
that I'm working, which is why I go back
to the beginning. Now I can take some of that quinacidone burnt
orange directly from my pan, and I can drop it in where I
see these darker sections. So I notice along the front of the cow
here, it's quite dark. A little bit on the back here. Now, you notice that as I grab when I'm grabbing more
quinarcadone burnt orange, I'm not washing my brush.
This is important. If I do wash my brush and I
grab a brush full of liquid, it's just going to dissipate with the water
that's already on my paper. And I want this color to
kind of stay where I put it. So I need to make sure
that I'm grabbing color that is not
mixed with water. All right. If any sections
of your cow got too dark, you can always dry your brush and use a dry brush to lift. Now, this is going to
be the first layer, so I know it's
looking quite orange. We're going to add a second
layer of brown on top. All right. And then we didn't add any color to the back legs. I'm going to add
just a little bit of color to these back legs. I'm gonna wait for
that back leg, though, since it's right
butted up against. All right. And then I think we will do the body of this
cow the same way. I think I am going to segment this cow similarly to
how I did the other cow. So I'm not gonna do
that back leg there. I'm going to do the body and
then the two front legs. Take a little bit of that
color directly from my pan and drop it in where I notice
the darkest of colors. And then I can dry my brush
and lift where it got a little too dark
with my dry brush. Let's take a peek at the
head of this second cow. So it's a very similar coloring, except for this
little hairpiece at the top is what's the
lightest in color. So we're gonna do
just a solid color around and down the head. And then I'm going to go
pretty close up to the eyes, but I'm still going to
leave a little bit of paper to shine through
closest to the eyes. And still same thing right along the nose here around the nose there
is still dark in color. And where I'm noticing the darkest of these
colourings is, again, the shadow
is along this edge. It seems like there's more
light coming from this side. So I'm going to drop in a
little bit of shadow around the right side of the eye and along the right
side of the face. If things got too dark, especially in the center here, I can take my brush and
lift from the center. Alright, I'm going to go back to this first cow and
take a peek at the face again because I wasn't able to drop in
any of these darker colors, so I'm actually going to go back and do kind of the
same thing that I did here, where I'll kind of
wet this section. Let's go back to this other cow. I do want to drop in
a little bit more of that burnt orange here
on the right side, but I just need to wet that
section of the face first. I still want it to
be nice, wet on wet. So basically, I've got some shadow on each
side of the face. It's gonna be a little bit
darker on this right side. Alright. Now, I did
not do the ears. And so this is where we
can do the outside of the ears us now this
magenta is dry. So I'm going to
start with my color right up next to the face. And then I'm gonna
pull a line across the back side of the ear.
And then same thing. I can pull a few little
strands outward. Now, I don't want
to pull too far out because I do want to leave a little
bit of white there. So, it's going to be the same concept that
I did for the inside. Instead of pulling in, I'm going to take my
color and pull out. I'll show that one more
time on this side. Now, I know it looks like it's really nice and
highlighted there, but I'm still gonna
do this step. I think it does
look really nice. So there are times when we can kind of ignore the
reference photo for a little bit and add color in ways that
we know will work. Now I can always make that
a little lighter towards the end by pulling up some of that color
with a dry brush. And I'm going to do
that same exact thing now on my second cow. Now, this is definitely
where you can use a a small detail brush here. Add a little line on
the top of the ear, and then pull a few
just a few strands in. A little line on the top, pull a few strands down. Alright, then we'll finish with the rest of the legs here. These legs in the back seem like they're
a little lighter, but they still have
some color on them, so we definitely don't
want to miss out. And then you can always drop in darker pigment where
it's attaching to the cow.
7. Adding details to Eyes, nose and mouth: Alright, so as the body
of our cows are drying, let's take another
peek at our eyes, nose and mouth and add some
final details to that. Now, this is where you
definitely can switch to a smaller detail brush, especially for the nose here. So I've got a size 40. You can use a size
zero, size one. I'm still gonna use
this shadow violet. This is just a nice,
dark gray color. You can always use black
if you would like. But I'm really not
going to be using a lot of black in the
rest of the painting. So I don't think I
need to use black to It just might be a
little too dark then. So I'm going to add
another layer to the eyes to make
them nice and dark. This is basically as dark of the shadow violet
gray as I can get. And then when I take
a peek at my nose, I notice that there's
a little bit of kind of an outline along
the top of the nose. So I can try to do a little bit of outline
along the top of the nose, and then along the base of the nose is where it's
going to be the darkest. So I can kind of
fill in the base. I'm going to kind of
bring that base color up. And then when I get to a section that I want
to start to blend, I'm going to clean my brush. Now, I do need to tap my brush on my paper towel
so it's not soaking wet. I want it a little bit
wet but not soaking. And then I'm going
to take the point of my brush on that
edge that I want to soften and then soften
and pull that water Okay. Now, I can also take a little
bit of water down gray, and I can add a little bit of dots of watered down gray
towards the top here, and then towards the
side of the mouth. I'm just adding these
watered down dots to just kind of give a little
bit of shadow and texture. And then I'm going to do the
same thing for my other cow. Now, I know this is darker
or this is further away, so it's a little bit smaller, but it's going to be the
same general idea where I can if I can outline the top of the nose
using a very small, fine brush, I will. And then I'll come down
to the base of the nose. I'll fill that in about halfway. I'll stop, clean my brush, tap it on my paper towel, and then use the point of my brush and blend
out that edge. Same thing. I'll water down a little
bit of that gray color. And I'm noticing
some light gray dots along the left side
here of the mouth. So I'll add a little of that and a little bit
on the right side, a little bit under the mouth, a little bit above the nose. It's okay if you pull a
little bit of the pigment. That dark pigment, that's okay. And then I forgot to
darken up. The eyes here.
8. First layer of Tree line: Wet on wet: Now, as we let the
body dry a little bit more so that we can get a second layer of
color in the body, I'm going to do my first
layer of the tree line. Now, it seems like the sky
and the foreground are dry. I'm actually going to do
this sideways here so that I can rest my hand towards
the sky and not get it dirty. I'm going to mix a sap
green color first. And then I'm noticing on
my reference photo that it's a lot darker at the
base of the tree line. So I'm finding my
deep sap green and also my quinacadon burnt gold burnt orange because I do
see some oranges here, and I'm going to use
those two colors to.in. So I've got my sap green here. I'm using my round size
four and same thing. I'm going to chunk this
in sections so that I can drop in wet on wet
color before it dries. So I'll go around
this little cow. And I'll kind of choose
maybe this top section of the head is going to be
a natural area to stop. You might be noticing that
all of these first layers of color are all wet
on wet to begin with. And then after we finish our
first layer of wet on wet, then we add wet on dry details. All right, so this section, this little segment here is wet. And so I'm going to grab
some of this deep sap green, and I'll start by adding some deep sap green
along the tree line, the base of the tree line to
get it really nice and dark. And then I can use the
edge of my brush to add a little bit of kind of dots along
that tree line here. I'll grab a little bit of that
quinocodone burnt orange. My brush is too dirty. Grab a little bit
more. Same thing. I don't want my brush too wet, so I might tap it on my paper towel so
it's not soaking wet. And then I'm going to add just a few little highlights
of that burnt orange. If the highlights of burnt
orange get too dark, I can dry my brush, soak up a little bit of that. Alright, I'll continue
doing it in segment, so I'll do this next
segment probably up to the head of this next cow. Now, as your painting gets
towards this right end, just like with our grasses, we can always use our paper towel and just
kind of soak some of that up along this end so that it also kind of fades
out a little bit.
9. Adding shadows on the Cows, part 1: Alright. Now, while
we let that dry, let's take a second
peek at our cows. We're gonna add our
shadow layer to our cows. And so we're going
to actually use that shadow violet
as our shadow layer. And I'm mixing it here. If I get a little
bit of that quinacn burnt orange in it, that's okay. Now, I am mixing
quite an opaque. Well, I shouldn't say
it's that opaque. Let's check the opacity here. It's quite watered down. So our shadow layer does need
to be quite watered down. The reason being is
that we definitely want that shadow to not
be too opaque. If it's too opaque, it's going to look really heavy. We still want our shadows
to look nice and light. So to make it look
nice and light, we still have to add
quite a bit of water. Now I'm going to start on the darkest sections
of my shadow. So I'm going to start
on this Left cow here. Well, actually, you know
what? Let's start on this right cow because he's not going to be the main
guy that you look at. This one is going
to be the main one. So I'm going to kind of
practice on this one first. So I'm seeing right away, I've got a shadow along
this right side of the body along by where
this kind of neckline is. And then there's
also a shadow along the right side of the leg.
So I'm going to add that. Now remember, we've got our light source
from this left side. So naturally, we would have this shadow cast
on the right side. In the face, same thing
as the right side. You can see just
how watery this is. So I've got this whole
right side here. I do have a little bit on
the left side as a shadow. And then I notice there's a big old shadow
here in the body, but we do leave a section of this neck
here that's out of shadow. The shadow kind of continues through the right
side of the leg. And it kind of stops here ish. Now we have it along the
right side of this leg. I do have a little bit
of shadow running up, so I'm going to take my brush, wet it, and use a damp brush to just kind of pull a little bit
of that shadow up. Just kind of keep that edge. I want this edge hard, but the other edge doesn't
have to be quite as hard. Now, if I want to deepen any of these shadows,
while they're wet, I can take some of that
shadow violet and drop it in while it's wet and just kind of deepen those
shadows a little bit, especially on the
right side of my cows. And along kind of this
bottom belly section. All right, we'll go
back to the belly here. Now, this left side
of the leg that's gonna stay nice and bright. But the belly here
does have a shadow. So we'll add the shadow here. And then where the shadow
line is going to end, I'm going to kind of follow a little bit up this line here, and almost kind of where this line ends is where my
shadow is going to end. And then I am noticing a shadow kind of coming
up and curving here, maybe a second one
right next to it to just kind of show almost like the rib cage
starting there. I do notice a little bit of
a triangular shadow here. Now, you're already going
to be able to start seeing once these
shadows start to dry, you'll be able to see
that they're really not quite as dark as what it
looks like when it's wet. And that's important here. We've got another shadow
along the butt end here coming up at that triangle. And then once again, right side of the leg
right side of the leg. And if I need to
drop in any dark, I'm noticing it's
a little darker the back side of the
body and the back here. I forgot to add a little bit of shadow
on the utters here. Now, I like how it looks with these hard edges
for the shadows. I think if you are not a
fan of those hard edges, I think that we can kind of soften them up once it's
dried a little bit. I also notice that
in the ears here, there's a little bit
more of a shadow here on the ear and here on the ear. The whole idea of adding shadows here is
that we're adding shadows to the whole
body of our cow. We're not just adding
shadows to the body, but we're adding
shadows to the face. I added a little bit of shadow to this right
side of the head. Okay? And it's nice
and watered down. Alright. Now, let's continue on the same shadow color on
this cow to the left. So, same thing. Right side of the body is really
nice and dark. So I'm going to add
really watered down. This is nice and watered down. My brush is fully loaded. When my brush is fully loaded
and I add it to my paper, I get a very, very
nice even layer. It becomes not even when we
don't have enough liquid. When we don't have
enough liquid, then we start to see the texture on our paper shine through. So I'm adding shadow to this right side of the
leg, same as before. I can kind of come in and according to the
curves of the legs. So I came in, I left a little
curve here by the calf, came in left a little
curve by the ankle, kind of where this
foot would be bent. And before this section dries, I can go grab a little bit
more of that shadow violet, drop in a little
darker shadow violet here just around the head, around the rightmost
side of the body. Load up my brush again and start working on
the rest of the body. I have it nice and watery. It's very, very watered down. I'm kind of tracing along
the bottom of the head here, but then I'm leaving this really nice
bright shadow or bright highlight
here by the neck. So I'm going to
follow that down. And then it looks like I've got some shadow here that kind of
comes across the top here. And then this whole
bottom is in shadow. But it's kind of coming
from the end of this mouth here over to kind of
where the leg starts. Now, here I'm kind of
simplifying the shadows. Dragging my brush up and kind of stopping here, seeing
how that looks. I think I'm gonna have
it go up slightly more. And then I've got
shadow all along this right side of the leg. And I can grab a little
bit more pigment and drop in where it's dark. So it's nice and dark
here and the chest, kind of where the leg
is connecting here. It's a little bit darker on this leg and a little bit
darker on the belly here.
10. Shadows on the Cows, part 2: Alright, then back
to water down. Really fill up my brush here. Now I'm coming to the face. I'm noticing the same
thing here where I've got the shadow around the
right side of the face. Up through the nose,
it kind of comes at a point here to the
nose, a little bit down. This whole right side
is covered in shadow. And then I do have a little
bit of shadow kind of in this little teardrop
shape in the left of the eye and just a little bit
along the left of the face. Now, that looks like
it got a little too dark. Dry my brush. Use a dry brush to
lift a little bit. Looks a little bit better. So here's where I can just
kind of play around with what shadows look
like on the face. And if it doesn't work, I can take my paper
towel and lift it up. Add some shadow here
on the forehead, kind of this hair coming out and the hair on the head
to this right side. It's nice and dark
on this right side. A little bit darker on
the inside of this ear. Now, I went over that
highlight in the eye. I still think that looks okay. And now here on the
left side of the face, the ear here is what's going
to be in shadow slightly. So I've got that
inside of the ear and then where the ear connects to the head or there's a
little bit of shadow here. I can add a little bit of
shadow in that little, like, hump in the back. And now let's add a little bit of shadow
on the legs here. Now, if you're trying
this at home and your shadows are not
working as you're planned, two things might be happening. One, like I said, you might not have enough
liquid on your brush. We really do want some
very watered down shadows. Ah. Oops. That happens more often than you
think, actually. The other thing that might
be happening is that you might be blending out
your shadows too much. So, already, when we
look at this first cow, when I did not blend it out, these edges, these hard
edges look really nice. Um, if you blend out
all of your shadows, then suddenly you lose
that bright contrast. And watercolors is all about having those bright colors
and those deep dark shadows. So we do want to have a hard
edge with these shadows. Know that your color is going to dry lighter,
your shadow color. And so if it looks a little
bit intense when it's wet, have faith, let it
dry a little bit. But also make sure if it still
is looking really weird, try your shadows a second
time on a different painting, making sure that
that shadow color is really quite watery, okay? And then your shadow color
could be the culprit. Now, if you don't
have shadow violet, you can always use Payne's gray. You can mix your
own shadow color using indigo and purple. Have it be a little bit more of a purple
tone to your shadow, which would also look really
nicely with the gray. I forgot to add my little shadow of a
cow in the background. Is it that first layer? I don't need this guy
in the background to be very detailed, so I'm just gonna
add a little bit darker of that quinocradone, burnt orange on
the base. Alright.
11. Painting the Grasses: Alright, so we've done
our shadows on our cows, and now I want to look a
little bit at the grasses. Now, using the same
shadow violet, I am going to create a big old shadow here
by where the cows are, and then I'm going to
use my rigger brush, that's not my rigor
brush to pull some estrands from that shadow. So I need my shadow pool here
to be really quite liquidy. I'm going to try it
first, of course, with this cow back behind, and I'm going to do
section by section, I'm going to start
with this shadow to the right of the body. Once again, it's
completely loaded up. This is something that
you can always try first before you do this
on your final paper. I'm going to add a few little
clumps of shadow here. Make sure it's nice and watery. I can add a little bit of that dark deep sap green
to that shadow color. I can also add more of
that shadow violet. So it's nice and dark. And then before that dries, I'll use my rigger brush here. I'm going to kind of
pull it to the side, and I'll use whatever liquid
is left in this puddle, and I'll use my rigger brush to kind of pull some grasses up. Now, when I'm pulling grasses
using this rigger brush, I'm making these grasses go in different
different directions, and I'm also having some
longer than the others. I can add some off
towards the end here. So I have some crossing
over to the left, some crossing over to the right. I can have some crossing
over the body, actually. So I'm going to grab a little
bit darker green here. And now, while this is wet, I added some of this green
to the shadow color, and I'm really loading up my
rigger brush here as well. And I'm going to
add a few extra. It's too dark. Of these darker grasses kind
of towards the base here, pulling into this shadow. I don't want too many, though, so and if they get too dark, you know, I don't
know if I really even like that, to be honest. I think I kind of just like
it in wherever the shadow is. So I'll add a little
bit more shadow I'm noticing more shadow here and a little tiny
bit in the back here. Same thing. Well, it's wet. Use whatever's left in that puddle and
pull using my rigger brush. If I need to soften up this lower edge of
the shadow here, I can take my paper towel, kind of soften up the
outer edges of the shadow. Then I'm going to make
a really water down. I go add a few little extra. I think the reason why I'm
not really liking this yet is because I don't have
any grasses anywhere else. So I'm going to kind of
add some more grasses to this section here. Keeping not too many grasses
towards this right side. And I can kind of
do these grasses almost in, like, little clumps. Now, you can either pull
up or you can turn yours upside down and you can add some grasses upside down here. The majority of these grasses we want towards these
shadows here, okay? And then just a few little
extras outside of the shadows. Alright, now, I'm going
to do the same thing in the shadows of my
other cow here. So I'm gonna mix more
of my shadow color. That's that shadow violet. And then I'll add
a big old pool of shadow violet to the
right of my cow. Now, this pool, the
lower line here, the lower edge of the pool, I'm gonna see what it looks
like to not have it be an even edge here
'cause I think I did this edge a little
bit too even of an edge. Maybe that's what I
didn't like about it. Add a little bit more liquid, add a little bit of that deep
sap green. Drop that in. And now use my rigger brush, and I'll pull some grasses
up out of the shadow here. Now, if your grasses out of
the shadow here are looking a little weird, add more grasses. Sometimes if we only have
a few grasses coming out, that can make it look a little bit more
awkward, if you will. And then we can also add a few grasses coming
from the bottom in. We can take a little bit of a
jump here from that and add a few little extra grasses outside of that big old shadow. And then add a little bit of shadow to the right of these legs because we know that there's some
shadow there as well. And now, any of the
grasses to this left side, I do want to add some grasses. I don't want to leave
this totally down, but I am adding quite
a lot of liquid to this shadow color and adding some of my grasses
to this right side, sticking kind of
close to my cows. Now, if this is your
first time doing these grasses and you're
not really a fan of it, um, keep at it. Don't have this be your last
time trying this technique. The more that you do it, the more confident you get, and then the better that
it looks when you're done. Now, if the shadow here on the ground is too
dark and you wanted to add a little bit more shadow on the right side of
your cows to kind of deepen this shadow to kind of
have it match that shadow. You can also do that and add
another layer of shadow so that it's not so that it feels a little bit
more connected, I should say.
12. Second layer on treeline and final details: Alright. And now
that we've added some texture to the foreground, we can go in and add
if there's time, you can go in and add a
second layer of color and texture to these
trees in the background. You can either do that by using the edge of a round brush and starting for sure at
the Horizon line. And then like I said, it's still very watered down. It's not crazy dark of a color. So this brown is the same
shadow color that I used for the shadows here with this shadow violet mixed with
a little deep sap green. And I will paint kind of along the bottom edge
of the tree line. And then as I come
upward with my trees, I'm going to add, like, little almost blobs using
the edge of my brush. So these blobs are going
to be a little bit larger in color or sorry, a little bit larger in size. You can't be larger in color. And now, these blobs
are going to get smaller the further up you go. So I'm not going to really add that many blobs to the
very top of my tree line. I just want to kind
of give the illusion that there's some harder
edge shadows there. So I'm just painting
along the edge of my cows here and then adding a few
blobs towards the top. Same thing. This layer, we want to keep as a hard edge. So we don't want to blend
out the edge and all. If it starts looking
weird to you, it could be because your color
is a little bit too dark. So it's still quite
nice and transparent, but it's still a hard edge. If you're not liking
how that's looking, you can always go in and lift a little bit with
your paper towel, especially towards the top of the little tree
shrubs so that you can lift up and have a
little bit less color there. All right. If you had needed
two final details, if you had needed
an extra little p of darkness in the eyes, you can add a little extra
darkness in the eyes there. You could always add a little highlight
using some whiteqah. However, I don't think
it's super necessary. We'll let this dry, and then
we'll take the tape off, and we'll have a
finished painting.
 Emily Marie Watercolors, Watercolor Artist and Dog Lover