Transcripts
1. Introduction to Creating A crashing Wave in Watercolor: Going to show you
today how to create a very simple way with
very basic steps. It's actually easier
than you think. You're sitting at the beach with your family or maybe under an umbrella or
swimming in the ocean and it just brings back all
of those fields for you. This class is perfect for beginners and for those
that are looking to loosen up their paintings
or maybe you just love to paint coastal
scenes like I do. Seascapes, landscapes,
coastal scenes, waves, beach, they are all in my wheelhouse, absolutely love painting them. Simple, we're going
to keep this beginner friendly and I'm going to walk you through
it step by step. I'm going to show
you how to sketch the wave and the different
parts of the wave, but I will also have a
PDF printable for you. If you want to print
it out, you can just trace it and follow
along that way. You will learn some
techniques such as lifting. We'll be using a tissue to lift the clouds to create those
little puffs and you will learn to layer your colors over the top of one another to
create a little bit more depth. We're going to be using quite
a few values in this one. That's going to
create some movement and depth in your watercolor. I'm going to show you how you
can actually use white in watercolor rather
than just the white of the paper or
using masking fluid. We're going to be using
some paint for this one, and I'm going to show you
how to create that foamy or that texture from a
crashing or rolling wave. I'm going to break
down the wave into very doable steps for you and we're going to add
some texture and contrast to make things look
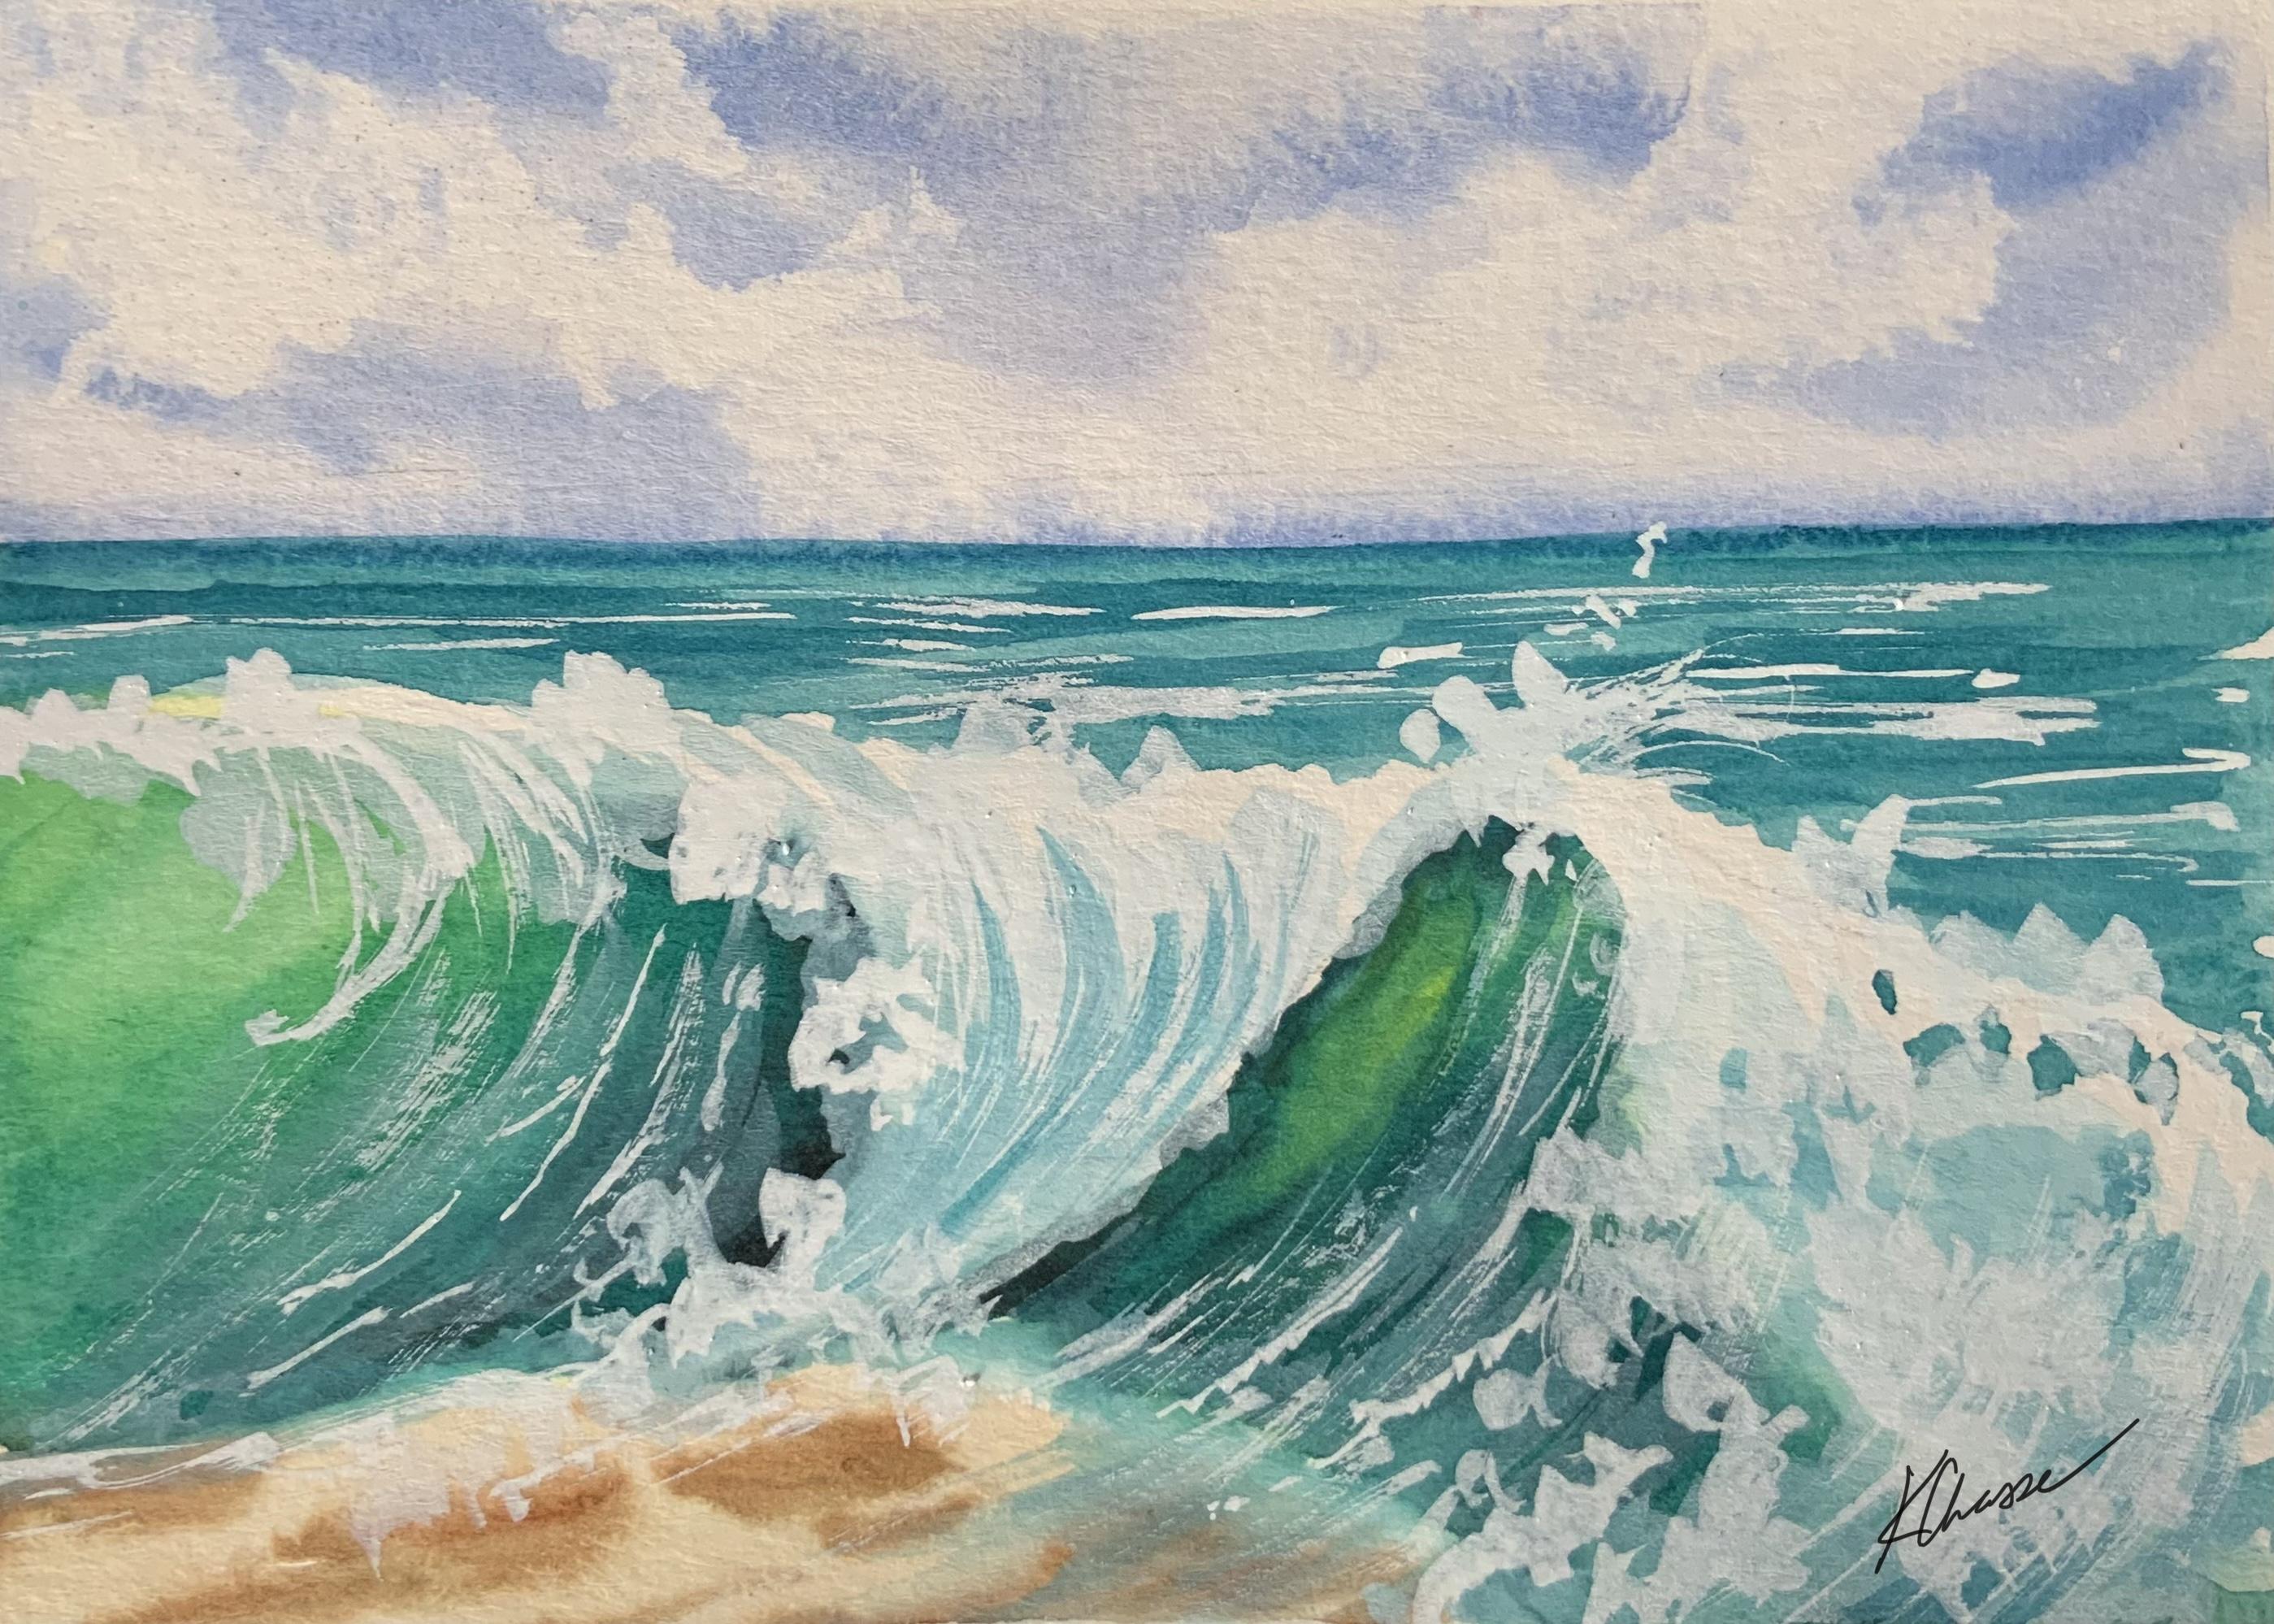
a little bit more real. By the end of this course, you will have your own
beautiful crashing wave that you can hang
up on your wall. It will be full of movement.
It will be full of light. We're going to capture
that luminescence, that light that comes through the waves
that you can see in that beautiful teal shade
that sometimes you'll have. It's going to give you that
beautiful coastal beach vibe. Let's get started. Grab
your watercolors and your supplies and bring a little bit of ocean
inspiration with you. In the next lesson, we'll talk about the materials
that you'll need.
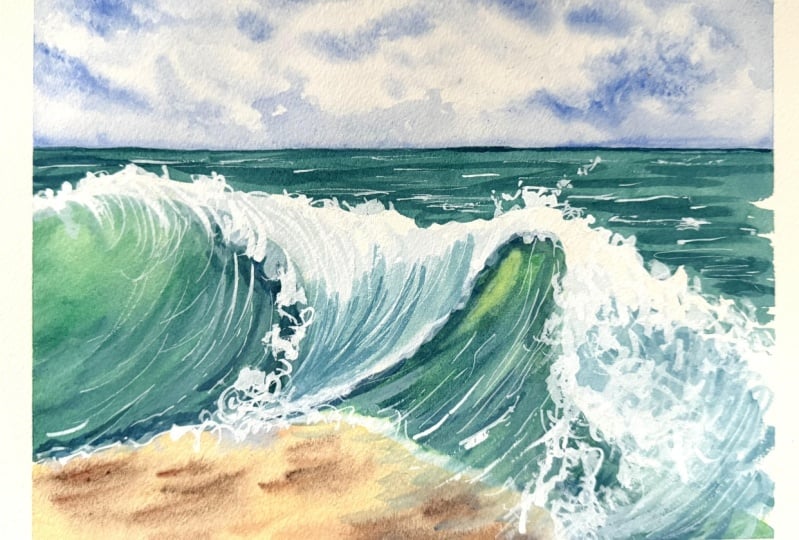
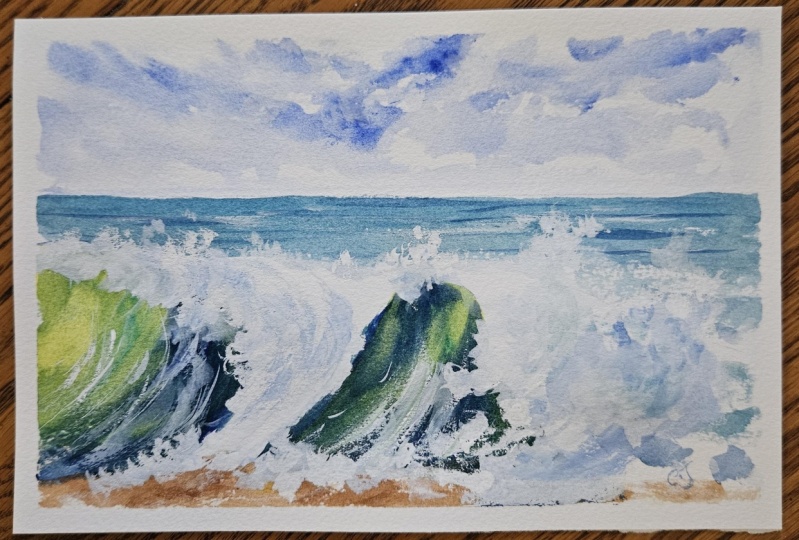
2. Class Project : Before we jump into
all of the details, let's talk about your project. For this course, you
will be painting your own watercolor wave
complete with crashing, foam, that movement,
and some sand. Plus those beautiful teals and blues that we're
going to be creating. I'm going to walk you through
this step by step from the sketch to the painting and all the details in between. And what I don't want you
to do is to be perfect. This is all about
enjoying your process. I want you to explore the
watercolors, have fun with it, test out different colors to see which colors are best
for you if you happen to love that the Bahama look or
that beautiful green blue ocean or maybe Maine where the ocean is a
little bit darker blue. Once you have finished
your painting, I would love for
you to upload it to the project section and feel free to share what
you enjoyed about this. Don't forget that sharing
your work is going to help you keep track
of your progress. Plus, it also inspires others to jump into the class and
share their projects too. But
3. Materials Used: Crashing Wave: Hey, everyone. We
are going to paint this beautiful wave today
and we're going to break this down into some simple steps for you. Anybody can do it. You are going to need your
watercolor paints for colors, I mostly used lemon
yellow, emerald green, and ultramarine
blue, plus you will need some either white guash or some white bleed proof
Doc Martin for the wave. Now, you can do this another
way and use masking fluid, but I like the mixed
media way approach and it just saves me some time
and I find it just more fun. So for brushes, I am using a number 12 silver
black velvet brush. This is the round, it's got a nice point on it,
which really helps. Then for the waves, I'm going to be using some of those details, my number quarter inch
dagger brush by Princeton. I love this brush. If you don't have a Princeton, just
use any size round. If you have a six
round, that will work. But if you have a fine liner
brush, that will work. So you know, something like
this one here, a zero, a one, anything that's going to
give you a nice point, and you can use it to make
circular motions with. That's what you'll
need for brushes and yep, tape it down. I have a nice little
edge on mine, so I did use a backer board, so some kind foam board or
something that you can put your paper on and tape
it down to really helps. I actually love the little edges that my masking tape does. Plus, if you get it too wet, you're not going to
get that buckling. It holds the paper
nice and flat for you. All right. If you're
ready, let's dive in. Yeah.
4. Anatomy of a Crashing Wave: Okay, before we actually
start painting, let's just break down what's happening in a crashing wave. You can see it starts
out like a smooth swell here out in that deeper water and it just rolls along
with the winds energy. As it moves towards the shore, that's where it's going to
hit the shallow water and the bottom of those waves
start to slow down, so the top keeps
going, and that's what begins to give it
that rise and that curl. Right here. This is where we
get the waste of the wave. It's often that beautiful that glassy wall
in through here, gets that light that just shines right through
right about here. That's the moment where the top that crest starts to tip forward and it's turning into
that white foam where it breaks or crashes
down right here. It's almost like a little heart. That moment is full of movement, that splash, the
spray, and the power. After breaks is where you get that wave it becomes
more white water, tumbles forward like
it is right here, and you get that rush where it fades into that bubbly
foam across the shore. When you're painting this, you want to think about
the contrast, the soft curves here versus that very sharp edge
that you get right here, right here, and then you
get that calm afterward, which you don't see
it in this one. This is the real rough, all this foam in through here. Look for where the light hits. That's where it's going to bring that wave really to life. This is the anatomy of the wave. You have the face where the rolling mound is
before it breaks. The break is
happening right here. This is where
you're going to get the biggest amount of splash it starts to curl
as that wave rises. Then the break is the moment
that wave crashes over itself and this is where you get that full foam and you
get all of that energy. The white water
is where the mist and the splash happens from that crashing crest and then you get a little
bit of the foam, which we're not going to see a whole lot in the pain that
we're going to be doing. Then this is the
swell right here. This is the whole action starts. Hits that part where
it's going to crash. This is where you
get your swell. You can also see
where all this energy is just curling around, curling, curling, curling right here where
it's going to break. Again, you can see where
most of that light is showing right at the
top here where it's going to curve around.
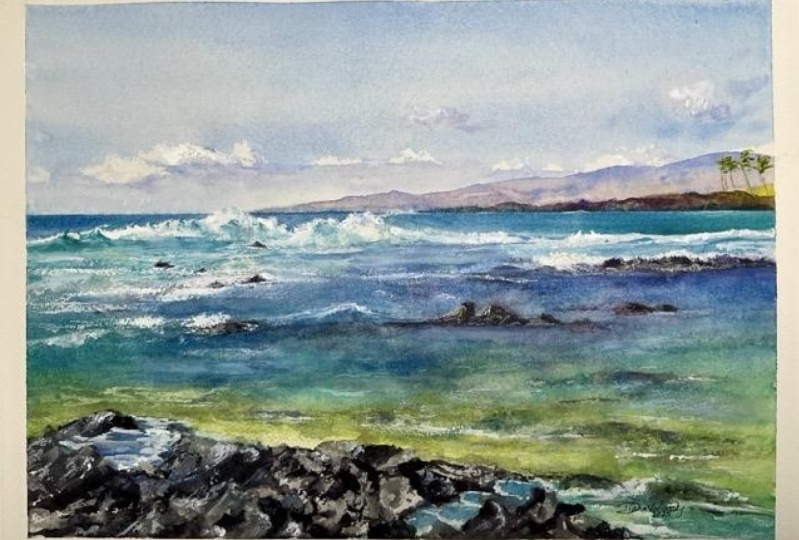
Here's another one. This one looks a little bit more like the
one that we'll be doing from the correct angle. This one does have some
rocks down the bottom here. The one we're doing
is a beach version, so there's no rocks
down in the front. Again, you can see this is where our white water is where that
crash has already happened. You can see the foam. That's
coming along in here. Then we have where it's
about ready to break right along this edge here
or where it is breaking, it's about to break here.
This is where the break is. Here you can see where
the face of that wave is or that curve or
that curl is happening. A horizon line is back here. You can always see
where it's a little darker back here
as we get closer, those waves are going to
spread out a little bit more and it's going to
be a little bit lighter. You also can see where it's
darker underneath the wave. This is where the light is not hitting in the center here, it's also a little bit darker. Depending on the photograph
that you're looking at, you can tell where the
swell is happening, where it's about ready
to crash because you can see that nice light
that's coming up here. We're getting a swell and
that's probably going to have a face on it in a
break very soon. Those are all parts of the wave. I hope this helps you
visualize it a little bit better and let's get ready to do a few practice sessions
with our watercolor.
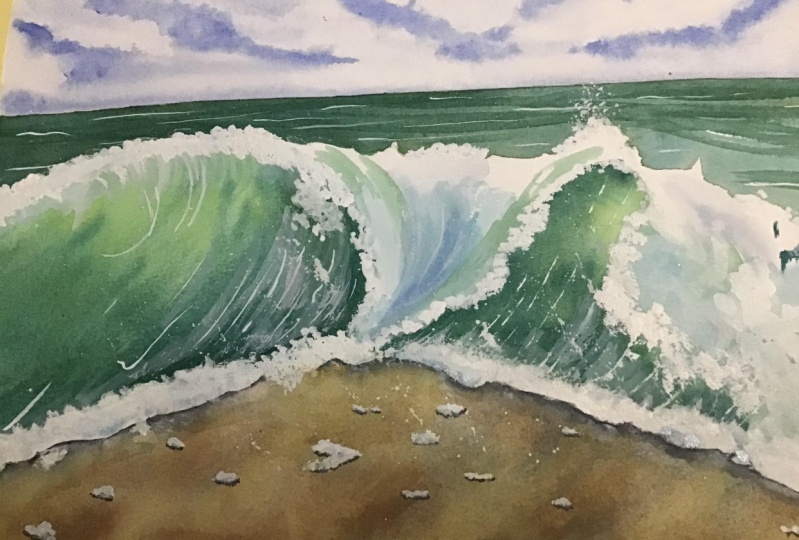
5. Practice your clouds and wave: Let's do a little
practice before we begin. Let's just start out
with a very easy way to do skies along with some cloud. You can use an ultramarine blue, you could use Calbatblue, whatever blues you
have are fine. I find that the easiest
way to do clouds, get yourself a
nice little puddle and I'm just going
to fill this in with a nice wet wash
working my way down. We've got a nice wet background. It's not super wet,
but you can see I've got some of the paint
is still moving. Now we're going to grab
ourselves a little tissue, kitchen towel, what have you. We're going to create looks
like a little ball shape, it doesn't have to
be perfectly round. Then before this dries, you do need to move fairly quickly. You're just going to tap in some nice little fluffy clouds and you can
see where that's going to lift your
paint right up. Now you can get those round little puff
balls if you want, if you push down and lift up. These don't tend to look
quite as realistic. But if you do add them together, you can grate more of
those little puffy clouds. No. I have seen clouds just
randomly out there like that. Whatever your favorite
way of doing clouds are, you can also do a dry brush,
like a sweeping motion. And come out in angles, what looks like it's lifting some of that out a little bit. That's another way
that you can do it. You can also use guash
to create your clouds. Usually, I'll let that
dry a little bit, but I think it's dry enough. We have a pretty warm day here. I'm going to grab a little
bit of this bleedproof white. I'm just going to mix
it up in my cap here. This one is getting
a little dried out. This will make it more
chalky appearance, not quite as light as what it does by
using just the paper. If you find you get a little marks that
you're not happy with, you can put a little bit
of that white in there. I like to do a little
circular motions. Now, this is a brush that has a tip on it doesn't
work quite as well. I want something that's
somewhat rounded. Maybe some wisps down here. Also grab a little bit of that blue and drag that in there to soften that if you
find it's just too bright, you could work back
and forth with that. You can even give it a little
purple on the underneath, so it looks like it's got
some darkness under there. Because sometimes
those clouds will have a little bit darkness on
the underneath of them. But we're going to keep it
pretty simple for our demo. You can even add a little purple in
here if you wanted to. You can create more drama in your sky or you can
just leave it blue, however you prefer it. Next, let's take a look
at the wave shape. Your wave it's it's crest because we're doing
a crashing way for this. Let's just draw in real quick. Most ways will come up
like this and they'll have this curl and then
it comes down. This is where your
crashes comes back up. You might get some
more of these Vs or some more of these
crashes in here. This is going to be
where your white area is where your foam you
might have some foam here. You might have some
splatters up here, some more foam coming down
here, just curl around. It almost looks
like a little bird. That is the basis of that wave. Now most waves will have a
little bit of light in there. What I like to do is I create this is where the
white is going to be and this is where your wave is going to be going to be highlighted. I'd like to use a
little yellow in here where that wave
is going to be. Usually, you have
the light coming in from one side or another. Some of this is going
to be covered with some green once we
get going here. Remember, up a little
curvy and then back up, that's pretty simple
little shape. We do need to dry this and then we'll add the green on top. The yellow has dried, now I'm going to work with some beautiful green shades or teals. Again, if you don't
have that teal shade, you can work with some blues and some greens and
you can make your own. But just get a color
that you really like. I'm going to go with more
of that Carolina Bahama looking color. Wet this area. It's got a little bit
green tint to it. Then I'm going to go in with that pre mixed
green color that I have and we're going to
add that green to this. Now we're going to have
some splashes up here so this doesn't
have to be perfect. We're going to curve. We
don't want to lose all of that beautiful highlight
that we have going on here. So we've got a nice
little highlight in here where that sun's glowing
and peeking through there. Go with a little bit
more of a green shade. You want to keep that light
right up in the corner. Now if you find you
get too much pain in there, you can
take your brush, I just cleaned it off and
you can lift some of that out to bring that
highlight back. Then wherever your
edge is going to be, I like to go a
little darker there. You could add some
brown, some purple. You could add a
little green to that. You just want a nice darker
valu tap off the excess. That's a nice color.
This is going to be right here is where your wave is going to be a little darker. You can drop that in there
while that's still wet. You might even have a
little bit more here. That's where that's
curving around your wave. It might look a little
funny right now, but you'll see once
we get going here. I'm going to go in with even
less water because I want to darken that up even more because it's wet it's still spreading
around a little bit more. I want a nice edge here. Nice dark color and we're going to curve
that wave around. You can even maybe a a
little bit here too. We've got our light, mid tone and then very dark
on the edge here. Now for the wave next to it, we're going to do
basically the same thing. I'm going to go in
with that green. This time I'm not going
to use any water. Let's just see how this goes. I that little highlight is
going to be right there. Let's just get that
green in there. I to rinse my brush off and I'm going to again lift some of that green
out right here, so I've got a nice highlight. I could have added even
more yellow to that. It's really not a
real dark yellow. Now for this one, since
the wave is crashing here, the dark values are going
to be on this side. I'm going to tap
it around there. Maybe we have it again
curving up a little bit. I'm going to lift some of that back out just to soften it. You can do that with a
little bit of water. We've got a nice color in there. I might go again, even darker. Blue and brown. Again, I want a
nice edge on here. Again, that wave
is curling around, so this is going to
curve along with it. Everything is curved here. Look at that nice and dark. I'm going to grab my white now. And we do want to dry that normally to make sure
that that's nice and dry, but I'm just going to
show you over here. We're going to start
curving again that wave. Because this is
wet, I could pick up a little bit of that color, so it doesn't need to be
bright white at this point. We're getting some of that
splash curving up over it. Then we can come down here
and do the same thing. A little bit of foam and dragging some of that
blue right up and around. Again, it's coming over here
and crashing down over. We're going to add
more white to this, but I do want to have
a little bit of that blue or that green in
there at this point. We're going to do the
same thing on this side. Now this is coming up
here, curving down in, and then again, crashing
over on this side. Nice curve curl. Let's add a little blue to that. Curving here, curving
up over here, and that wave is
just curve around. Now we're going to
dry this and then we'll come back and we'll
go with some bright white. I've got some nice
blue in there. You can also put a little bit of that green in there
if you wanted to. Now I'm going to go in with
just the bright white. We want this fairly thick. We don't want this super watery, so we're going to
dot a little bit. This is going to be
where it's crashing. You can see that bright white, makes it look a little
bit more realistic. We can bring some
of that rolling wave crashing over here. Again, we've got a little bit
of the foam down in here. We've got the same
thing on this side. Curving up brown, crashing and maybe a
little bit of foam here. This is where the splash
happens where that wave breaks. Then we can add just a tiny bit. We can dry brush this by
just tapping off the excess. We do want a little bit of this definition in the wave as it curls around, you're
going to have some of that. A little bit of foam
that comes down, maybe even a little
dry brush if we want. I'm just doing that with
the side of the brush. You don't need a whole lot. You can have some splash
up here too if we want to. Then down here might be some
more splashing or it might be some sand that's
down in here. That's how you're going to
do your crash of that wave. Always the flow of the water, your brush strokes are
going to go the same way that the water is
going to go, that curve. You just need a yellow ochre
or a light sandy color, maybe mix in with that yellow and that will be across
the bottom here. You can bring that up into the wave a little
bit if you want. That would be the
sand on the bottom. You can even get a
little bit darker value dropping it in, so it looks like it might
be wet in some areas. You get a little
shadow in there. You can tweak that
back and forth. If you need to add a
little bit more white, once that dries, you can splash a little bit more of
that bright white in there. Write down over that sand, put a little highlight
in the water or in the sand in the bottom. That's how you're
going to do your wave. Let's get ready to start
your main painting. You can go a little bit bigger. These are just sample ideas
for you and your bigger one, you can do a five by seven, eight by ten, whatever
you're comfortable with.
6. Sketching out your Wave: All right guys. We are going to do away today. This was a actual bigger
painting that I had done, so we're going to do
something very similar to this one and we are going to sketch this
one in really quickly. I will put PDF for
you, of course. It doesn't matter what
size paper you're using. This is a five by seven, but I want you to know that you can do this. It doesn't matter. If you have a big
full sheet of paper, you're just going to
break down your paper into these sections matter
what size you're doing. We've got the skyline up here, and then we have this
wave that comes here. We're going to
make this V shape. This is where it's
going to be crashing. Going to come back
up. Then we've got another little loop to do
here where it comes down. This is what we're going to
leave white right along here. This is where your
wave is splashing. We've got some splash up here. And then this is pretty much all white in
through here as well. This is the area that you're going to leave
white right in here. Now, you could use masking
fluid if you wanted to, but we're going to
to brighten this up some bleed proof white
for this portion of it, or you can use white guash, or if you have white in your
pan paints, you can use it. You just need to use
it fairly thick, so not a lot of water in
order to get that brightness because most white in your kits are opaque and a lot of
kids don't come with white. This is going to be your
area for your sand. You're erasing on
watercolor paper. Remember, watercolor
paper is very fragile. Don't use a pencil with one
of those rubber pink erasers. Get yourself one of
these little white ones. This is actually from staples and going to slightly just
very lightly erase it. You still want to
be able to see it. It's going to be hard
for you to see on here. But when I start
painting it, you'll notice where I'm going
to be putting it. How I'm going to
break this down is we're going to start
with the sky first. And then we're going to
skip this section here, we're going to come down to
your wave area and let that dry and then we will add in the water at the top and
the sand near the bottom. The reason why we don't do that altogether is because it's going to be wet and you want that nice
distinct line in there.
7. Painting in the Sky with Clouds: So again, I want to go with some ultramarine
blue, fairly light. You could do a coalbt blue. I'm going to wet my paper
first because I like that softness that it gives
me when I drop in my paint. Look at that. Nice
bloom. Nice and light. Doesn't need to be super
dark. Look at that. I'm already going down below my lines. Don't
worry about that. You go down below
because you can always add the green on top. Now I'm going to go in with
a little bit darker pigment and I'm going to drop in just
a little bit of swirl here. Make it a little
darker at the top. This is the way things
tend to grow on you. I'm trying to make
this straight now. You'll see a lot of artists, I don't do this, put
some tape down there. I don't bother with
that. Now I've got that wet sky in there. I'm going to take a tissue
and lift some of that. Just a little
kitchen paper towel. If you don't have that,
you can use toilet paper. I've got a little tiny piece. This has got texture
in it already, so I'm going to ball it up because I don't
want lines in there. You have to do this
fairly quickly if you want to
create some clouds. See that texture in there,
it looks neat though because it's clouds clouds are funny. They have weird little
shapes that they make. That's why we're always
trying to decide if that's a dog up there or Mickey mouse. Clouds can always look like
something. That's good. I might not like that
little dot right there. Again, look at all
the texture that that creates just from
lifting that up. You can play around
with that a little bit. What you don't want to do is
you don't want to push and lift because it's going to
take out all of the paint. You want to just
do a nice little tapping and you don't
want it straight across. You want to give it
some ups and downs. We come down here. You don't want to do it
all straight across. You don't want
those clouds to be perfect little puff balls, although you do see skies
like that sometimes.
8. Adding the Base Wash for your Wave Hightlight: All right. Now for the
green in the wave, we actually want to put some yellow in here and
that is going to be this really bright highlight
that you see here. We to use a bright
lemon yellow for this. I'm going to paint in
that wave area here. Now, I don't want to
paint in where this white's going to be,
want to leave that. We're going to
paint this one too. We're going to go darker
on it afterwards, we'll add to that green on top. This is all white
in around here. It's going to be more of a green that's going to be
in throughout here. You can take the yellow and
fill it in just lightly. You don't need it to be
super dark over there. Let's lift a little
bit of that out. I'm going to go a
little darker here. I want that to be nice and bright. We've got
our yellow in there. We're breaking this down into really easy steps.
This is white. This is going to be that green, I've got a little yellow
in the sky there. We want some sandy
color down here. We can add that in
right now because I'm okay with that mixing a
little bit with that yellow. Now I want a little yellow
ochre, little sand color. I should have spritz my
paints before I started because I'm having to really
work my palette over here. Let's fix those. This is key. I forget to tell you guys this, but if your watercolors
are super dry, they will dry out and it takes a lot longer for you to
constitute any colors. Before you start, I usually
will sprit my paints, 15 minutes or so before and what that's
going to do is going to get nice and juicy in there and you're going
to be able to look at that. You can mix those colors so much stronger when you don't
have the dried out pigment.
9. Added darker tones to the wave : Going to mix up a little bit
of green with this blue. I like this one. What color blue is that one? This is in my Rosa kit. That's just called blue. There we go. Blue or
ultramarine blue. Then I'm going to add a little
bit of my green to that. I have green, I
have bright green, I have emerald green, I have
all those different greens. It's not going to
matter. Use any of them. I happen to like
that teal shade. I'm going to add a
little teal to it. I think I need to add a little
bit more of that green. Let's see. That is
the emerald green. That's the color I want. Now, again, if you're in Maine, those greens are
going to be different than if you're in the
Bahamas or something. That's the color
I want for our we and the water in the background. I forgot I was going to
put in that sand color. We're going to just put some
of the sand down in here. We don't need much
while it's still wet, I'm going to go with a
deeper brown like an umber and just do a
couple little marks in here so that it looks
like maybe it's wet sand. Leave it just like that. It's going to disperse
a little bit. Rinse my brush off now.
This is still wet. This is still wet, so I'm going to dry this before I go
on to the next section. We are all dry. When you
are new to watercolor, we tend to want to
throw everything in there and get all those
details in right away. You can see when I break
these paintings down into this does not look
pretty at this point. You wouldn't think you'd
start this out and be like, Oh, what am I doing? But these are the
base layers that you really need in a painting
to really bring it to life. All of those final details,
they come at the end. They don't necessarily come in the middle at the beginning. Now, some paintings, I'll do quickly and really
throw in some paints. It's a different
way of painting. But when you're painting
more methodical or you're creating those layers, it's just a different
way of painting. It's not that loose.
This is a little bit tighter than some
other paintings. You'll notice too, I always
have a tissue in my hand because I'm always wiping
off the excess paint. You'll find a tissue in the
hand works really well. We've got those basic layers. This is how I always taught my classes was breaking
it down into steps. I learned this from my mother. Because mom would paint really, really fast and I was like, What wait, what are you doing? I don't know what
you're doing here. We need to break this down a little bit because I'm not sure what's happening because
I couldn't see it. I didn't know what was
going to be what, you know? I'm going to come up a little higher because
that's usually a nice dark line across the top. So where I went down a little
bit too far, it's okay. I left a little
white spot in there. You could do a little
dry brush if you want. I want to come down
here a little bit more because this is the
top of that wave, so I don't want
it to be perfect. We can come down
a little bit with that water to give the illusion that that
wave is up there. I should have left this
a little bit whiter right here, but that's okay. We can add some guash to that. Then we've got some splash
down here which we can create with the guash. Some of that is
tucking down in there. I may even want to tuck
a little bit in here. Again, this is where all
that wave is going to be. We'll throw in a little bit of blue in there too at the end. That is very basic. Now, I can touch this up
now. I'm going to go in. This is all dry.
Go in with more of that green and we are going
to layer those waves on top. See how bright that is. I've got some splash down here. I'm going to come up around. We'll add some more
splash to this. But you want to follow
that wave, it's curling. As you're doing this, you
want to curve that around. I need to go into
some darker pigment. I'm going to add a little
bit more blue to that. I want to keep the
highlight here, but I want it to be a
little darker here. Where that wave is
dark underneath. As it splashes, you get
that light shining through. Maybe really dark here. We've got that wave,
it's not perfect. We're going to throw some white guash up
on the top there. I do have a little
bit of wetness here where it's a
little bit of a bloom, so I'm going to
rinse my brush off, tap off the excess, and I'm
just going to soften that. I'm going to lift. I
don't need to do much. That's good. I'm not
going to overwork it. That is one way. We might add some more darker values
in there. We'll see. I'm going to do the same thing
over here for this wave. Again, our light is in here. And then we'll get darker. Again, the wave is crashing, it's pulling up here. I can put in a little
bit in here too. We're going to fill that
in with some more gash. I've got my light on this side. To go in with some
darker blue in that same teal and I'm
going to come in this time, I'm going to hit it right under here is where that darker
value is going to be. Maybe some more here. I want to keep that light right
up here at the top. Again, that wave is
curling this way. I want to continue to move
my brush in that direction. I'm going to go in even darker, maybe add a little
brown to that. Let's hit that right
along the edge here. That's where the
darkness is going to be. Be dark in here, where
that wave is crashing. Again following that shape. A little more in here maybe. That little curl, it's
all going this way. Then we're going
to let that dry. We're going to start
adding the guash. We've got those
layers in there now. Let's see what this looks
like when it's dry.
10. Adding a foamy look to our crashing wave: We have all the basics. I stuck my finger in there I was trying. That's all right. We
can cover that up. Right now, it looks like a way, but because you don't have
any other values in here, it's just bright bright white, we've got to work with that now. Same with in the
water. It looks very flat. I could take my brush. Let's go in with a little bit of darker value and create
some ripples in here. Just so it's not flat. Again, I want to leave some of that lighter
area in there. I don't want it to be
completely covered up, just a couple of little marks. We can also add a little white
guash in there if we want. Now I'm going to take
that white up here. You might need a
smaller brush for this. Depending on if you're comfortable
with it, look at that. This paint needs to be
reactivated a little bit. I want to be fairly
thick, look at that. I've got some splash going
on. That's all right. Let's take off some
of that excess. I'm going to start to
roll this a little bit. Now, I'm pulling up some
of that paint in here. I'm okay if it's not bright
white at this point. Some of this is going
to be filled in. Here's the wave we want the bright white probably to be up at the
top a little bit. Let's come in here with
this a little bit. This stuff is rolling
and it's cruising. Cruising down around. Ready
do the same thing here. You can see how I've
got a little bit of blue already in here. This is rolling up around here. Picking up some of that color. Again, we are doing
this curl and around. You can see how much
blue I have in there. This is not bright
white at this point. Then we've got some
coming this way. This is crashing over
here. This is curling. I want to leave the bright
white up at the top. We can even do some
here curling if we want a little crash of the wave. And this is where it's breaking. Now you can start to see some
things are happening here. Maybe we want a little bit
of that white in here. It doesn't need to be bright. Let's clean off our brush and soften that a little bit
just with some water. Look at that we get some
softness in there now. You start to see that curve, do the same thing over here. Look at that I've got
a little white spot in there. Let's curve up. That splash is happening. I don't want to cover all of it. Some rolling. Little circles. This is where it's crashing. I've got some color in there. We probably have some
color in here too. And down in here. Let's extend that out. See that waves coming this way. Rolling. Now we need you
to dry that and then we're going to go in with
some very bright white for the rest of this. You probably put let's do this while we're
still wet in here. We want a little bit
of this darkness in here because we want
that wave to be rolling. You're going to see a
little bit of that blue in behind where it's crashing.
That's a little too wet. See I've got some marks there. I want to lift some of that out. Let's soften that a little bit. That's it. Let's dry and we'll go back in with
some brighter white.
11. Adding the Final Details : All right. Now I'm
working in my white. I had a little bit
of you can see, there's some texture in
there where some of it's dried. I got little bits. This is probably not
the best thing to do by dipping in here because I've
got a little blue in there, but I'm trying to
clean it out now. I've got some pretty
consistent white on here. Now, another thing
I do, I've got these little jars and
sometimes I'll just put either guash or some of that bleed
proof white in here. You can see that one is colored, so I can clean it
out. This is hard. That's the difference
between guash and the bleed proof white is I don't
know what it has in it. Contains zinc sulfate,
but it's more liquefied. It's starting to dry because
I leave it open a lot, but it still reactivates
just like wash does. I've got my dagger brush now. I want to again, take
my little tissue, tap off the excess because
I don't want it to be super heavy paint and I'm going to pop in
some little ripples maybe in the water here. Doesn't have to be a lot,
could be a rough day. If you want to drybush it, you can take off
most of the paint. This might not be the
best brush to dry brush, but you can get a little
dry brush action in there. Again, some ripples. It looks like the waves
maybe are crashing back here as they get closer, they get further apart. I'm going to fill that back
up again with my paint. I want this bright white, this should be dry. Again, you want it to be dryer, otherwise it's going
to pick up some of that paint and you don't
want to go over it a bunch. I do want my bright
white splashing up here, again rolling down in using
that circular motion again. Just creating some bright
white splashes down here. We've got some water
coming down in here. We've got again texture. Let's give it some
little swirls. Curve it around, it's coming from up here and curving
around this way. This is where the
splash is going. Again, you've got
to get that um, that shape right splash a
little bit more up on top here. Curving that in. It's
coming on top and rolling. You can add a little bit of
blue to that if you need to. It's tucked in in between those. Go back to the white. We're going to come up
on this side again. We've got some big splashes
maybe happening here. We can even go
some dots up here. And then we have
this again, a curve, maybe some white popping up through here,
curving it around. This is where your
splash is happening. It could be they get
that big roll in here, rolling, little bit
of curve to it. Curve and roll because this is where your
wave is breaking, it's going to be a little
messier over here. I need to come up here again. Let's give us some
splash up here, covering up some of those
pencil marks that I saw. Again, a little curve, a little rub dub
dub, little circles. And then some final. We don't want it to be perfect, I want to have a little
bit of splash in here where that's
curving around. Messy, can be messy through here. Little dry brush. Again, I don't have
much left on my brush. I'm using that length of it to give us a little
bit of omph here. There we have our wave. Now, if you find that
you get this part too dark in here, you can lift out. I actually like that the
way it looks right now, but I just want to
show you how to do that. I've got clean water. I'm going to tap off the
excess and I'm just going to lift some of that paint just to get a little bit more
of a highlight in there. If you get it too dark, you can pull out
some of that yellow. Actually, it looked pretty good, let's just soften that. You can even put a little
yellow back in there. I just want to show
you how you can do it if you don't think
you got it right. Look at that. It
gives it that glow. Remember when it dries, it's going to dry a little lighter, so let's go ahead and dry it. Now we have it dried out nice. You can see it looks like the lights just shining
in through there. It's highlighting that wave where the lights coming through. Let's remove the tape here. I'm trying not to get a bounce. And there we have our
bright little happy wave. And there is our big one. They look pretty darn close. Hope you guys enjoyed that one. Alright. In the next section,
we're gonna talk about your final project. H
12. Outro: That's it. Congratulations.
You did it. I hope you had fun capturing
that crashing wave in the foam and I hope you learned some techniques
along the way. Don't forget to upload
your finished project in the project section and
you can also feel free to post any of your practice
sessions in there as well because I absolutely love seeing all of your
beautiful work. If you love this project,
don't forget to hit the Skillshare follow button for more courses in the future. That way, you'll get
heads up when I send out a new release for new classes or if I have updates to share. Thanks again for
being here with me. Look forward to
seeing your project and we'll see you hopefully
in the next class. Bye. P.
 Kellie Chasse, Artist + Entrepreneur + Educator