Transcripts
1. Introduction & What You’ll Learn : Hello. Welcome back. So this is Shrimai art
educator from India. I'm going to teach you with easy watercolor painting
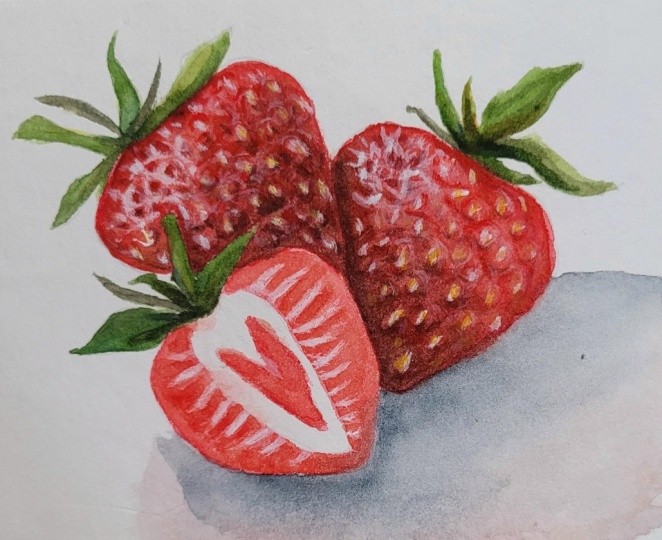
of strawberries. And in this class,
we're going to just start with a quick sketch
of the strawberries and going to learn about
a techniques using masking fluids and
layering of watercolors. So blending becomes
very realistic. And next, it's going to be with making details and
highlights with respective to the
light source and building up shadows of
the object and so many. So we're going to
learn so many things, and I hope you
enjoyed this class. And let's get started.
2. Get ready with Art supplies!!: Hello. So the art materials that you are going
to get ready with for this beautiful juice
strawberry watercolor painting is like for watercolor paper, I'm going to use the Canson brand 300
GSM watercolor paper. So from this brand, I'm just
going to choose the paper. You can just go with
any brand you have, and I have just used
with a size of a six. So this sized paper, and the horizontal
sized paper is enough. So because we're going to
draw only within this frame, a small try so we can
just go with this sheet. For watercolor paints,
I'm just going to use Himmi brand
watercolor half and set. So this is going
to be the paints, and a mob brush comes
along with this. So maturely, I'll be
using this brush. So it works very well, and next is going to be
with another spare brush. So that is for applying
masking fluid. So here and there to
hide for protection, I'm just going to
apply masking fluid, and that fluid is
from Brustro brand, and we should just
use special brush for playing the musculin
fluid because the hairs may get destroyed
after application. So I have just applied I'm just keeping a separate
brush for this fluid. And next is going to be with
tissue and masking tape. Issue, masking tape, and next is going to be
with important thing, any pencil for a
regular sketching. So only these are going
to be our materials, and excess is going to be any ceramic palettes and water
containers of two bowels. So one is going to
be like pure water, and the other bowl will
be with the washing of press the rest of the colors will be tossed off in that bowl. So we can keep two
separate water bowls. Also one spray bottle finally to activate the watercolor
paints often as it gets. So only this, yeah, gets started with the sketching and I'll be meeting you there.
3. Sketch strawberries with ease: Welcoming you all
to sketching of this beautiful juicy
strawberries with pencil. So first, I have just taped on all the four corners
to hold the paper. Now I'll just attach the reference that you're
going to use for our drawing. And first, you can just see like it's been placed in the
very center like this. It's going to be
aligned on this place. And in this alignment,
you can see, like it goes with shape,
a complete triangle. The first one that is
half sliced one goes with a half cut is going
to be placed here, and that's in exactly
triangle shape. So for this, you can just make a rough calculation like how
we can place the triangle. So I'm just going to make
it roughly like this. You can just go with
imaginary lines that is the lines should not be
that bold or very sharp, hard or done with
a hard pressure. So it will be easy for us to make the shape and
arrays out in future. That's why maintaining
a light pressure for sketching is
very much important. Now, first piece is located and second
base is going to be a, and before that, we need to
make the leaf on the top. So it goes like this with the stem is being
raised like this. And next it is going
to be with the leaves. So each leaves it goes
with a different designs. So one is in this direction. The other one is
completely flat. And still it's visible.
We can make it like this. And the other one,
it's very flat and little tilted with
the angle like this. Okay, so we are going
to build exactly same on the other
side, like this way. Our next is going to be
with little curves and sharp edge on the top
returning back like this. So the first set of leaves is done perfectly,
but not the fruit. Now, as we have stopped
with the shape here, next we can just locate all the rest free strawberries and build up the
exact shape nest. Next one is going to be on here, and it starts exactly just
behind this first leaf. And from here, we can
just draw with bulkiness, it starts like this way, and it goes to the top. Till here. Just you need to make a little depression
for the stem portion, then get back and it ends
exactly on this place. Again, it's going
to be a triangle. But here I'm just going to make it exactly with the shape. That's it. So the
second one is done. And now we can build
the first one. So it's completely
with a triangle. What simple step will
make this realistic. So it starts with a
stem potion here. Like this, it goes
a little green. And from here, you are
going to just make it with a curve like this
and build up here. Good slanting portion, facing
the top and another U bend here just goes towards the top and it
connects exactly here. So even it cuts this
portion of the strawberry, as I think we have just extended this at bid so we can erase it. This much, it's enough. Now with the eraser, I'm just going to erase all the unwanted sketches
to make very precise. So it will be clear for you
to draw it very perfectly. So I'm just erasing out. Okay. Next, it's
going to be with a leaf portion again on here. So it goes with much
mount of bunch. So we can start it exactly from this place like
this and gets back. Next, it's going to be on here. So each leaf is going to be with a different design and it varies with the
sizes, everything. It's a little hidden, and the other one is completely
flat and visible with the top side like this. And next is going to be the rear portion of the
leaf. Can draw it like this. Same way on the other two sides. And one last leaf on here. Like this. Now, very perfectly, we are completely done with
two parts of the strawberry. And the third one
it's going to be like we can focus on the
one place to here. So the starting point goes at this place and ending
point is here. So it's like this way, like a trapsiu its. And here we can just elongate with a sight line
and make a good curve. And from here, just
build like this. And you can end it
exactly like here. Next is going to be
with the leaves because the other last one
is placed here, but it's like little and very behind to
all the strawberries, all these two strawberries. So we're going to focus
it last and we can create a leaf thing here. Starting from this place, it's going to be
very up right and straight with wavy
patterns like this. And the other smaller one You can also add leaves as
you want in the middle. It's not like you should go just as it is
in the reference. So if you want one or two in
the middle for satisfaction, you can just go with
building those. And next coming to the
final part here like this. Yeah, this is enough
for the third one. And finally, the last piece is going to be with
a starting point on here and it covers with a
base on this place like this. So it's been placed this way. And the head portion goes here. Like this. So it's a bit tilted. I have just made
it a little stried and next with the
leaves as usual. So here you can try
making it on your own without just listening
to my steps, but you can try it on
your own, if possible, because we have just
learned three already. Okay, we try it on yourself. Or if you want to add, along with these four things, if you want to add something
new here or somewhere, even with the imagination,
you can just make it. So that will be more creative
and interesting for, like, with our imagination, it will be very much
interested to make the work. So finally, building up
the very last one on here. Yeah, that's it. So the strawberries
are completely done, but we are left with a seeds. Now, here in the
first sliced piece, you can see it goes
with a pale shade in the middle like
this to create that I just using a very soft shade without pressure like this way, so we can make it in
the exact center. Also from this side,
it goes like this. In the center portion, it goes with a V shape and the other completely
on the outer, it goes with a heart shape, a lengthy long tu heart. That's completely red.
Yeah, we can do this. And next is going to
be with the seeds. So for making seeds, we can just create with
little oval shapes, and it starts exactly from
the base here like this. So you can keep randomly
but of same size. Also it converges in
the same direction. So one around here,
when we paint, I'm just going to share you tips to make it
realistic, juicy. So just follow all the lessons to make it realistic
and three D. So I'm just going to simply fast forward only this session, and it can just
create with the seeds of own and just upload
in the project session. So I'll be just replying
to all your pictures done. Yeah. So this same way, we're going to fill
for these two, and I'll be catching you up in the next lesson for masking. That tip will be shared
in the next lesson, so just join in there.
4. Tips on Masking for protection: Welcome back. Here
we are just got ready with a masking fluid
in the ceramic plate, and we're just going
to make a masking on strawberries to protect it from the paints while coloring. So with a separate brush that I have only for
the masking thing, I'm with that brush using to
mask it all over required. So we need to make the
brush a little pointy. Like, you can just go on
the corners like this, roll over to make
it very pointy. And with this, I'm just going
to start from the top here. So you can see on this side, it's going with a
little highlight. So just on that highlight, I'm going to make it
slowly moving like this, leaving all the seeds. So this is going
to be till here. One did this much with
the highlights is CNF. And next, only here and there of highlights
should be like this, very slanting and around
the seed. Just two. And next over the seed, I'm just going to make it
with little tiny drops, and before that, you can just cover all the
bigger highlights. So it's going to be
around this side. Like this. Just combining
like four or five around. And also around the
seeds like this, just here and there to
make it more highlight. And this after removing
will make it very shiny. And I'm just covering
to the other side, only this slowly starting up from this place and
moving on like this And for the other
highlights here I'm just going to use
with the oval shape. So major portions are
completely covered, and next is going to be with each single seed to
paint that yellow. So I'm just going to make
it over that like this. And after layering of colors in the next
upcoming lessons, I'll be sharing you tips like
how you can just add with a realistic colors that just works with a
light and shadow. So first, I'm just covering up seeds on here
slowly like this. So I'm just going to fast
forward on the sessions, and you can also just try
masking all this on your own. Now, mostly, I have just applied masking fluid all over
in all the strawberries. And next is going to be with
applying on here to secure, I'm going all
around just leaving the heart in the center
all around this way. And on the sides,
I'm just going to extend it up to make the effect. So one this thing is okay,
and it will work out. So with this, it's going
to be on the sides, just pushing it towards
the side like this. And it should not be
so thick and bold. Just a light push towards
the outer side is enough. And after removal,
we can just make a protection with a pint.
So no worries on that. Okay, so it's completely done. Next, it's like, we need to give at least 20 minutes of
time to completely dry. So you can just pat over this and see whether it just
sticks to your finger. And if it's not, it's
completely dry and done, we can move on to the next step. So I'll be meeting you
in the next lesson after it's completely dry.
5. Selecting perfect Red's and Green's : In this lesson, we're
going to just make the selection of exact
realistic colors. We're going to
choose our reds and greens for the
strawberry painting. So I have just come up with some selection
of colors here. So with each color, I'm just going to make strokes. So first, starting with the, we'll be kneading with the red. So just red will be very
fine to make this work. So this is going to be the red. And next is going
to be with the. Yeah, I'm just going to dilute
a bit more with the water. So yeah, this is the exact
pigment of the halfpen set. And next, it's going to
be with a Pyle crimson. So I'll just dilute that
color too and swatch it. And it's even that we are
going to use for our painting. This is the pile crimson. You can see a
difference just a bit, I hope so because
maybe of the light, also the color will be
not exactly that visible. I'm making it a bit darker. This is the color
for pyrrol crimson. And next here and there on
the half sliced strawberry, we are going to use a little
bit of cadmium orange hue, so I'm just picking
up that color too. So first, we are going to pick the color selection for
one day the strawberries. And next it is going to
be bit with the white. So yeah, this may be
a little visible. So here I have painted it white. Now for the berries,
it's completely done. And next, it's going to be
with the greens for the stem. So for that, I'm
just going to pick, just missed with
one color that's like with the burn timber. So even this is going to
be for the dark area. The shadow portion of the
berry over the berry should be painted with a
mix of burnt timber. So even I have
just pick that up. So you can see
here I'm mixing up burnt timber and
on the other side, I'm just going to
take a bit of red. So from this side, I'm just going to move my red color produced will
be kind of like this. So I am just much interested to use this color for shadow
area. This works very well. And next for the stem, it's going to be with yellow
that is lemon and low. So here I'll paint for the stem. This is going to be
the lemon and low. And next, it's going to
be the yellow green here. This is yellow green, and
next is medium green. Medium green will be in the middle portion like here and there,
we'll be using it. And to the darkest
of the greens, I'm just activating
mine yellow green. Yeah, this works good. And finally, for the darkness
and shadow portions, I'm just going to use
a bit of Heinz gray. Just a lighter version
of pink spray. Only these are going to be the colors that I'm
choosing today. I'll just mention
up with the names, and you can just take out all
the colors that you have. So here are all the
colors with the names, and you can just get ready
with all the color palettes. And in case, if you
don't have any color, like if you don't
have burned tumba, you can just go
with burnt sienna or you can just go with a Sepia. So that should be a little like darker version
in the browns, not very light versions. That's much to the lighter
version of your tones. So just go with shades of burn Sienna,
that would be fine. And for Pyl crimson, you can just go with
a shade of magentha or any kind of darkeston
of berry colors. That will be like rose. Even that will be very fine. And for cadmium orange hue, you can just go vermilion. Even that will work very fine. And other colors are like, mostly available
in all the sets, and you can just have all
the colors ready with you and just get started
with a basic layering. I'll be meeting you
in the next lesson.
6. Layering Techniques - Part 1: Welcoming back to the
coloring session. So it's going to be a very basic layering
of the major colors. So after building up
with the basic layering, next on the over of it, I'm just going to make
with the details, highlights, shadows,
everything is going to be laid over up. Now, first, I'm just going
to use with a mob brush, I'm just taking up
the burn timber a bit and just applying
it all over, just on the areas
where it goes little. Without darkness.
So over that alone, I'm just going to
apply with this color, this shade, very slowly. And you have to look
after the reference to side by side and create with
the base layers like this. And you don't want to
make it so sharp defined, just go with a very light
layers. That's fine. And next, it's going
to be over here, making like this
slowly just moving up. And without disturbing
the objects sketches, we need to move very slowly towards all the directions
on here and here like this because as we just discussed in the color palette
color choosing session, it's going to be a mix of burn
tumber also with the red. So it produces kind of a dark
shade for shadow portion. One till here, I'm
just going with the burn tumber just still here. And next, it's going
to be again with the same color on this place. It's going to be a bit darker. And when moving up
towards this direction, can bring with a lighter
version with the same color. So it depends on
dilution of water like this and you can just
motil this place. And this area goes a
little uter without much hue that is like
desaturated version, it goes. Okay, so only the base
layer has been done. And on this side, I'm just going to make with the lighter potion
using this burn timber. With the tip of my brush. Do this very carefully, if not, the colors may get out. So we need to be very
careful with that. And also, again,
I'm just adding up a sharp edge with a
brighter tone on here. Like this. Okay, now you can just slowly
wash off the brush, adding a bit brown only on this place that is laying
again over the previous color. So this layering should be very, like carefully done, only that we can
build up the details, the glassy look juicy look. Everything depends with
this basic layering. Now, after completely
done with the undertone of a the first layer
using burn tumber. Next, I'm just going
to dilute my red. And before that, as we
did for this color, secondly, it's going to be
with the pyrrol crimson. And with little of Pyl crimson, I'm just going to apply
it only on this area like this just a bit as we did
with the previous color. Only a little. Yeah.
This is very fine. And again with the same color, I'm just going to
make it over on here. Also a mix of bit
of cadmium orange. So everything goes with
a lighter tone value. And the other side
on this cherry, it's going to be used on this place. Like this. Then on here, it's
going to be used. So keep your brush
when painting very upright because when
a place is necessary, if you keep your brush slanting just flat towards the paper, what will happen is
it will produce kind of greater larger strokes, and you cannot just retain
back the shape you need. So it's very important to hold the brush up straight like this. Mostly places wherever
necessary is being colored with the Pyle crimson as
a base layer and blending with the
previous color like this. Next step is going to be worth adding off the second layer, and it's going to be
in the next lesson, and let's catch it there.
7. Layering techniques - Part 2: Now on the second layer, I'm just going to use
my bread, so it well. Now, you can slowly
start applying it all over the cherry like this. And never mind about the mask
area goes slowly all over, and we need to keep on blending
with the previous color. So the beneath it
is going to be with a dark portion of burnt tumber. So over this, I'm
just going to slowly aplay with the red like this. And this is even going to
be the first layer of red. I'm just using the same red to spread the color
over like this. And even this area, it's going to be with a
little amount of brown. So I'm just going to add a little amount of
brown alone here. Very bit amount of brown again. It's good to work after
it's completely dried up. Laying after drying up is like working great to bring
out the realisticness. We need little patients to
maintain all the dryness and bring out the
efficient color that we require for bringing
out the realism. So also, you can just
keep on practicing with the color theory because when we keep on practicing
with the color theory, we can just learn more on
the contrast colors and, like, which color can be
mixed up to get what? And so we can just keep on learning more things
about the color, and that improves our
drawing very well. So I just recommend keeping up with the update
always with the color. So whenever it goes with, like, bodom or whatever it may be, we can just go with
practicing of the colors. I will help improve a lot. So actually, I do that. Now, again, I'm just going to dilute my red as it
keeps on betting. Like this. So we should be very careful
working because it may damage by entering
into the other object. So we need to be very
careful on here. Now, I'm just going
to take a bit of Pyl crimson and add it on this area and a very
lighter mixture of cadmium orange hue on this area to make it lighter because the light
falls over on this place. So this area goes darker and shadow even
falls on this area. So light is from this place. So we need to make top of the berry very
lighter and brighter. Again, with the red mix, I'm just going to apply it here. So with the color palette, I keep on changing
and layering up with the colors to bring
out the result. So first one is done and
let this dry completely. And before that, I'm
just going to add a bit of burnt timber to
this side alone, only this area and blending
it to the previous color. Same way with a brown. I'm just going to use it in the very corner here like this. And on this side,
slowly like this. Okay. So mostly the colors
are done, Shading is done. And next, it's going to
be with this top one. And here for the second layer, I'm just going to
take my brown again. Now this area
completely goes with the darker portion as it goes
with the lightless area, and here goes with completely
light reflections as it falls only on the
upper side. Yeah. Now with the red, I'm just going to
make it all over the second layer
like very slowly. So done. And next, it's going to be with
a lightering version. So only here, I'm just going to lift up
the color like this. So with a wet brush
or you can just have a tissue on the side
and with a wet brush, just wet brush, I'm
lifting up the color here. To make it light, and
you can just wipe the excess color
over the tissue. So this is a tip on removing the colors
that are required. And even on this ad, I'm just going to pull off all the colors because
we are going to just add a lighter version that is cadmium orange hue in
all the remote areas. Okay, now I'm just diluting
up my orange cadmium hue with this just blending
up here this way. To bring the lighter portion. And next, it's going to
be on the other side. The other one on this side, it's going to be completely
just near the light source. And highlight even here, it's like, more
comparing this two. So I'm just going
to make it just red all over. Like this. So even this is not
the final step, and this is the other step of layering with the colors,
but with more details. And after removal of all
the masking fluid things, we'll be adding with the
highlights and shadows to depth to bring out the realisticness of
actual strawberry. So this is just with
focus only on colors. All over going with
the reds like this. Now, with a very lighter
shade of orange, cadmium orange, I'm just going
to make it on this area. Next, it's going to be
with a mixture of again, red on this side
and deeply on here. And the other side, it's
going to be on this place. It's completely
fine, painted red. And I'm going to make it
with a lighter version. So mixing up with the
cadmium orange hue. Yeah, done. And mostly just near the whites
in the center. I'm going to take a bit of cadmium orange, dilute it well. So around here, I'm just
going to go paint it outwards like this and blend it. So it will not look
that red comparing the previous Only with these Berries are
completely painted. And next, it's going to be we need to make with a leaf
crowns on here on the top. So we'll just make up
that in the next lesson.
8. Painting Leafy crown!!: In this session to
paint with a leaf, I'm just taken
with yellow green. As a base layer all over, I'm just giving up the
yellow green over for the first very slowly. Also on here, So this is going to be
the same technique applied all over on
all the berries, and hope you can just
make easily all over. I'm just going to make
this little fast forward. So you can just
simply just build up yourself without any trouble. Here, it's completely
layered with a base only yellow green. Now we are just going to make a differentiation
using darkest stones, and I'm just going to take
my medium green first. And on this area, you can see a bit darker with
the leaf portions on top. So over there, I'm just
going with the medium green. And if required
with a thalo green, even we can just go with that. And firstly, even on this area, it's going to be just
with a medium green. I'm just going with that slowly. And just taking a bit of to green and applying
it on this place. So we are not going to aplay it completely
all over the leaf, instead, just wherever
required with the darkness. I'm just going to go
paint only at that place. So here, if it's this going to be with the
darker portion on leaf, I'm going to paint only
on here with a the green. Same way, you can see
this flattened leaf, it goes a little darker
just below like this. And I'm going to there make
it a little darker here. Only this. Even this area, it's going to be
darker, the behind one. I'm making a bit darker
on here, only this. And next, it's going
to be on top here. Now, similarly, we
have to just check on, wherever it goes
darker with a place. Also if it's going to be with a tu green or just
a medium green. And firstly, I'm just going to complete all the to green areas. So I'm just going to paint
it on this place with a dark talu and on here. Like this wherever necessary. Okay. And next, it's going to be turn for the medium green. So with that, I'm going
to paint it on here. As we did for the same
technique using Telo green, I'm using it even for
the medium green. Like this So in the middle here, it's going to be half with a medium and half with a
blend of yellow green. Same way on this side. At here. With a medium
green on this place. Like this? Okay. So mostly greens with this limited
versions will be very fine because the lightest
version will bring out the color pop because already
the reds are so dark here. To make it very pop out, I'm just going to add
much of lemon ello here just near this
place and smoothen it. Next, it's going to be again on here like this and slowly
blend with the previous color. Or you can also grab with a yellow green to
make it on here. In all the remaining gifts. Again, I'm just going to
make a little speed up here, and I'm eagerly waiting for your work in the
port project area. Just summit after
it's completely done. I'm just eagerly waiting
to see out your works. Here we are done
with all the greens and reds, that is the basics. A next is going to be with
adding of details and shadows and we'll be just
making it up in the next sss.
9. Final Blending for juicy effect: Painting is completely dry. Now we can just take
any rough eraser to just peel off all
the masking floeting. So I'm just going
slowly all over like this to remove everything. So we can just add up
with a seeds coloring. And here are the highlights and details, everything
can be added. So I'm just removing
off all over. So this can be done with
any sharp edge knife or with the eraser, it's easily just peeled off. So I'm just going all around here and there
to make it happen. Now, don't just remove
all the dust just with your hands roughly because it may damage the drawing or you can just have any
separate brush. So a dense had brush
and just taken with a flat brush here to
just peel it off, or you can just blow
away everything here. Now, after our
place becomes neat, next is going to be taking up with the cadmium
mellow medium hue. So that's a little lighter
version of yellow. So I'm just taking that color. So I'm just going to update
this color for our seats. And if you don't have
cadmium melow medium hue, you can just go
with a deep yellow. Slowly just putting up with
yellows here like this. Or some places, if
you want to just add up with one la white
chicken just go there. Here, it's not with
the final step. I'm here just with the process, and we need to build
up more details again. And in some places, it goes just with the whites
as highlights. Covering up all the
whites with a yellow. So you want to worry
anything on the seeds, whether it will look good or don't think about
the result from now. So I'm just going to add
only the yellows here. And next step is going to be
creating with the details. Here, the yellow is not that proper and it's not
looking like a seed. Instead, it looks real messy. So to correct that and
bring out the exact shape, I'm just taking
again with a red, and with a tip of our brush, I'm just making that little
oval like this very slowly. So it should not be
completely watery. The pain should have a
good amount of pigments. And after making with this, we can just build up using our whites to make
the highlights. And some lighter portions one around here in the
highlights area. Or you can just previously
with the colors, you can just lift it to
make the highlights. Same way, making it
on the other area. Like this. Same way. I'm just going to
complete it all over here. In the third strawberry, I'm just going around all the
seeds slowly like this to make it a little oval and
not in any different shape. Ringing out like this. And all the highlights here
should not be completely wet just adding little
amount of the juicy effect. I just tapping it
over here and there, and with a good
amount of pigment, can brighten it up and adding little amount of yellows to
make like a seed effect. With this, it's enough all over. And next, it's going
to be completely making this white
little thin by, again, adding with
a reds on here. Like this. So you just move in all the
directions. Like this. So this should be followed
even on this area, on the other side making
it very linear and sharp. And just mixing up with a
white color here to blend. What will happen is it
will look very juicy and the realistic device
will be reflecting out. So just like this, it's fine. And a bit of red color, just a very little to make
a pale effect on this area. Or you can just grab
a little amount of yellow without leaving it white, adding all around. Like this. Now, mostly the details
are being done. And for making up with a shadow, the whites and the shadow
effects all the details, so we can just make it up in the next liston. So
thank you for now.
10. Highlights and Shadows - Tips: Now I have just come
up with the whites and the pin spray to make the
shadow and highlights. So with a white,
I'm just going to brighten up this very slowly. And around here, adding
a little amount of white like this to make it
lighter version and glossy. So this should be done with a good pigment on top of
the tip of the brush. Now, the same steps
should be followed all over on here just
wherever required. Or if there are some kind
of a gouache, paint, white gouache, or
any white gel pens, even that for making highlights
will work out very fine. So I'm here just going
with the watercolors. So that's our choice we can
do with anything we need. And over around the leaf, I'm just going slowly
with whites like this. A just like this. Now to make the shadows, I'm just taking the
gray, very light amount, and with that, just adding up the base here around like this. So with much of water, just dilute it with good amount
of water to make it with lighter version and spreading
it all around here. So also it should be just blend towards the paper like this. And this portion goes a
little dark in the very base. So only there, I'm
adding a bit of pins gray A here. Very lighter amount
on this place. That next is going to be
more diluted version, blending up around like this. So with water, you can just
smudge the paint and remove the extra colors
around so that it flows smoothly super
all around like this. Si. Only this much is very fine. If you feel you want to
add a bit of fins gray, just take just a bit and add it here to make
it a little darker. That's it. Yet I'm interested in adding
again, just a little bit. Around on here. With this just you can blend. That's it. So finally, we can just peel off here on the sides and our work
is completely done. So **** is very beginner friendly and easily
can just give a try. Hope you loved this work. And I'll be meeting you
in the wrap up session.
11. Class Project and Wrap!!!: Here in the very end, and I hope you all loved this painting very
much and tried it out, and I hope also it
turned out very well. So excitedly, I'm waiting
for all your results. You can just upload in
the project session. So you can just also
add an excess piece of a berry or a sliced piece of berry on the other
side if required. And it's mostly just with
your imaginary thing, and you can just go
with whatever you can. And I just suggest to make a compulsion of the
project assignment submission, and I'll be reviewing
you all your works and so that I can feel like I'm engaged
with the students, and I can just create up
more videos like this. So coming up with more ideas and beginner friendly
watercolor projects, also color pencil
projects, so many things, and I'm so good in making
with color pencil works, also in watercolor things. So just keep engaged and do follow so that I can make
with more videos. Thank you.
 Srimathi, Artistcastlebysri - Art Educator