Transcripts
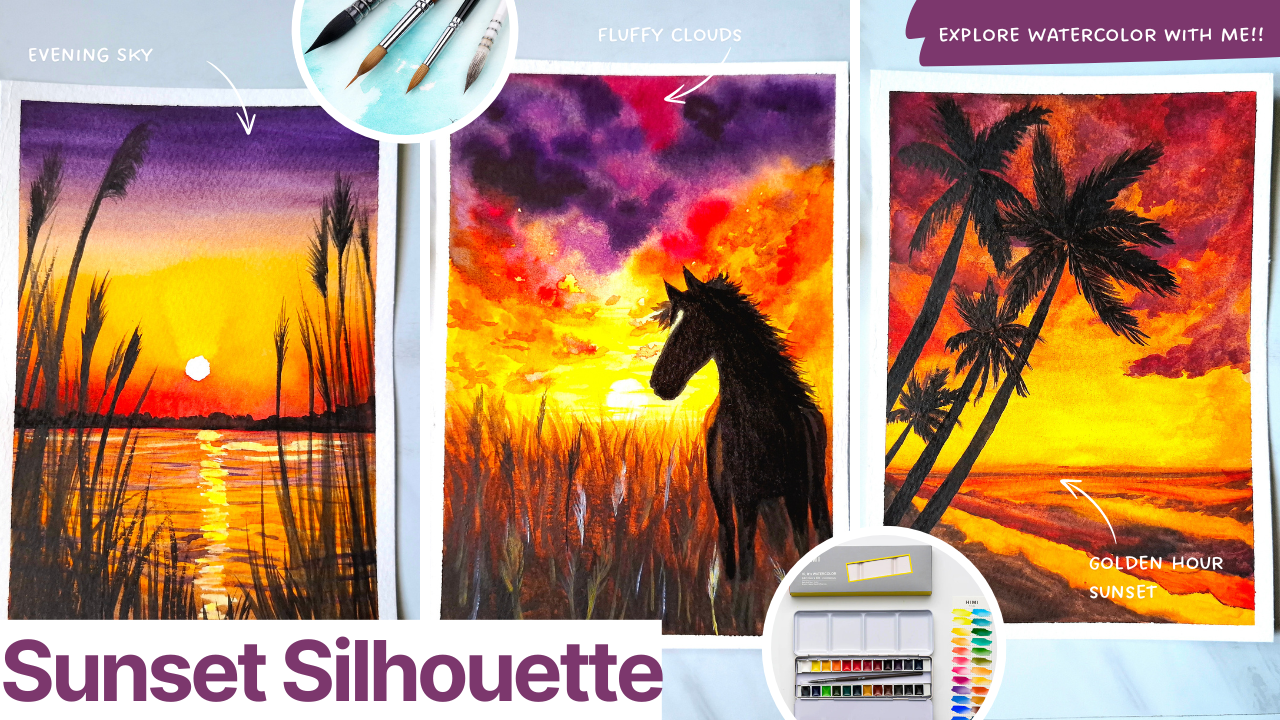
1. INTRODUCTION: Si, welcome to the
project session here. So here we are
going to make with three different paintings
of sunset silos. So I'm here just going to teach you
three different types. So first is going to be the project of using
the masking fluid. So here you can see, I'm just going to use
my masking fluid and close up the sun reflections and then using with
a different sky, I'm just going to create
this first painting. Second project is going to be using the golden
sunset hour painting. So it's going to be
with a silote of coconut trees and the
beach on the side. So the clouds will
be on the top. It's going to be kind
of fluffy clouds. So this is the other
second painting. And thirdly, it's going to
be with the harsh silo. So here we're going to again, use the fluffy clouds
and it's much colorful. And the base, it's going to
be with the grass fields. And here, I'm not going
to use any masking tape. Without using the masking tape, I'm just going to apply
the white directly and teach you all with
different paintings. So I hope you all enjoy this process and paint
along with meet together. So hope you also provide some valuable
feedbacks about this. So I'm I'm just requesting you to just follow
the watercolor session, all the three projects from
the first to the last with each single session
so that you can understand it
clearly and better. And let's get started with
art supplies. Bye bye.
2. Art material: Welcome back again
to just introduction to Odd supplies that we are
going to use for our project. That's going to be our
Sunset sellout project. And firstly, I'm just going to introduce our
watercolor paper. So this is Canson brand, and it's like 300 GSM
and A five sheet. So if we want to
just go with A five, we can just go or we can
just split it with a six, so that will be easy to work. So as a beginner,
it's your choice. You can go with either
A five or A six. So this is the
quality of the paper. You can see here, the thickness. So it absorbs very well and all the definitions
of the paper. So it's a cold pressed one. So this is going
to be the paper. And next it is going to be with a masking tape to
tape on the sides. For watercolor paints, I'm using the imi brand watercolor kit, and it has got like
24 colors in it. So this is the set.
Let me open it up. We also have, like, palate
thingingi on the side, so we can just make the blending of colors here if needed. And just comes along with
a brush, a mob brush. So yeah, this is a super
good kit. To start up. And for brush shirt,
I'm just going to use with Brostros velvet
touch brushes. So these are aqua
brushes and very good for using the applying of water and all the textures
to give textures. It goes with different
sized brushes. And this number one and number six is my favorite
that works very well. So I'm just going to
take this brushst. So yeah, and next is going to be with the
waters and tissues. Only these are our supplies
for making the art piece. So get ready with all your
watercolor art supplies, and let's get started.
3. Project 1 - Sunset Grassfield: Hello. So I have just taken
a six sized paper of Canson, 300 GSM watercolor paper. And now the task force,
we are going to just make a masking of
all the corners to make it stable and the borders will be very
good looking soif mask. And let's do that process. You can This masking tape
even is available on offline stores like
hardware shops and also available online. So it's easy to go and buy. So I'll just also provide art supplies list in
the descriptions. So here I have just peel off the tape and just taking to
the very corner of the paper. So same way, I'm
just going to make a paste all over the four sides, and next we can just move
on with the color palette. I have tapped all the sides and now it's going to be the
selection of colors. So here I have this watch cause and the names of colors written. And for the painting
that we're going to do, there's going to
be a sunset silo. And so I'm just going
to take a white, the titanium white first. And next is going to
be with a lemon ellow. So this is the shade, and next is going to be a
cadmium yellow medium hue. And next is going to
be cadmium orange hue. So next is going to be the red. And this is the magnese violet for making the top of the
sky and dioxin violet. So these two colors are the
very most beautiful ones. And this is so opaque and
the color is beautiful. Next, for the sill out
to make a dark portion. For the bushes and
the grass fields, I'm just going to add
with a burnt umber here. And next is the paints
gray and the plaque. So these are the
colors that we are going to use for our painting, and I'm so excited
that to use and teach with all the techniques and easy steps to make
you all draw that. So let's get started. So let's make a simple sketch to the painting to make it easy. And firstly, I'm just going
to make the horizon line. So it's going to be
exactly on this place, just splitting with
the sky and the water. So on just about the
line of horizon, it's going to be
with a little bushes that we can just make with a simple curves here and there. Just a rough curve is enough. And these are going to be with
a silo effect. All these. And in the front here
it's going to be with grasses, all the ferns. And now let's just make a masking of the sun to
make it like a pure white. So here I'm just going to take
my Brostro masking fluid. So even if you don't have
this fluid, it's okay. We can just go with our white paint or white
gouache, even that's fine. So I'm here applying
the masking fluid. I here have a separate brush to make the use
of masking fluid. It's essential to have a separate brush because
it may damage the hair. So yeah, I just recommend
to use a separate brush. Yeah, I've just
made a small circle here just to hide the sun. So it's going to be
completely of white, some kind of a little
pale yellow shade. So I have just masked. Also exactly on the
reflection of water here, I'm just taking my brush and going here and
there like that. So here, it's important to make it very, very thin stroke. So you can just mostly
hold your brush upright and go like
imagination of reflections. So I'll make a zoom after
the completion so you can see it clearly and
make it like perfectly. So it should be exactly
straight towards the sun. That's fine. And on the top here and there, I'm adding a little
bit of strokes, just the lengthier strokes. So here are the masking
fluid applied area. You can see I have just
added with the reflections, and this is on top of the sun. So let the fluid masking of the sun and reflections
let it dry completely. And in the next session, I will just help you make all the sky and
the water details.
4. Project 1 - Painting Sky: Welcome back. So
we're going to now paint with watercolors
of the sky. So the masking fluid
is completely dry now. With flat brrush
I'm just wetting completely the paper
with water here, only on the top. So just about the
horizontal line, applying the water like this
and making the paper wet. So the colors will
flow very smoothly. Now, I'm just going to take the dark violet that is
the dioxin violet here. So I just have a spray bottle so you can just make a little spray on all over the paints starting with a dioxine violet
on the top here. So you can add a good amount of color to make it more vibrant. And I basically allow
the vibrancy of color. So the transparency of the color will make
it look little dull. So I want to make the
color so vibrant. I'm adding it with lots of
violet here and to the base, next to this dioxin violet, I'm going to take
the Magnese violet here and just make the
blend of the color. So this color is a bit lighter
version of the violet, and we need to just make a
smooth blend of the color, as you can see here,
starting from the violet. So I'm just making all
these with a flat brush. So it's okay to go with
the round brush too. In the next colors,
I'm just going to make a mixture of blending
it with a round brush. So I have taken my mop
brush to make the blend here again with the
dioxide on the top. So this holds the
water well so well. You can see and we
can just lighten it up with a magnes violet and
blend the colors in between. So the transition should
look very gradient. And next color is going to
be with the orange shades. So the color gets saturated
in the sky, as you can see. I'm just going to make the layering process
from the bottom. So the top two is done with a bright colors,
the violet shades. And from this place,
I'm going to add a bit with the primary ranges,
the warmth of the color. So I'm just going to start
with the red next to orange and next with cadmium
low annexed with lemon low. So we're going to make
a transition like that. And before that, this area of
my paper is completely dry. So I'm just going to wet it
again with my flat brush. So with just water, you can rewet the paper. So the colors will blend
so smoothly like this. Okay, I'm just applying
good amount of water. So it's recommended to just use paper watercolor
paper of range, at least 300 GSM only because it can hold
a good amount of water. You can see I'm
adding the red shade. And next to this,
I'm adding a bit of ponso the orange shade. So this is a cadmium orange hue, so I'm just adding that color. And to the sides of the red, here it look more
like not natural, so I'm adding a bit
of burnt tumber to the sides here and make
a blend you can see, let's blend it with a red. So I'm again taking a
bit of red to make with a blend so this
should be the thing. And on the top here to blend it, I'm just taking the
orange cadmium orange and making the
colors more vibrant. So let the colors bleed to
look like a natural effect. And on the top, it's going
to be just above the sun, it's going to be with
a cadmium yellow here. So you can just apply cadmium yellow on the top here, again, adding a bit of the color
on the top. Like this. Now the task is like we
are going to just blend the color magnes
violet and yellow together to make a shade of desaturated
version of the color. You are going to, back and forth to make the colors
blend till the last. So if required, you can just add a bit of dioxine
violet on the top. Yeah. So mostly our
blending process is completely done. That's it. So now let's just give
it a little bit of time, so the colors will settle
and dry completely because it's too
watery. And yeah. Now, this top portion alone, I'm just going to add a bit
of lemon ello one on here. Just make it look more
realistic like this. Again, just making a
wash from the top. So fine. Like this. That's it. Okay. So yeah, let's give a bit of time to
make this completely dry. A next process is going
to be with adding off the water details and the sky
portion is completely over. So next is going to
be with the water. Let's see in the next session.
5. Project 1 - Painting Water & Reflections: Welcome back. So the sky portion that we painted is
completely dry now, and the rest is going to
be with a sea portion. So here I'm just going to take again with the water
in the flat brush and apply it over like this and
spread all over the area. So the colors will flow so
easily and then easily. Yes. Now, next is going to
be with making the colors. So the colors I'm
going to choose here are magneus violet, cadmium orange and lemon yellow. So annexed is going to be with
cadmium yellow medium hue. So all these four colors. Firstly, I'm taking
the cadmium orange. So let's just make a spray over the water the
colors will be wet. And with this color, I'm making it all over
spread all over like this. You can see. Next, I'm just going to add a bit more orange
shade in the base. So this is going to be the
color reflection from the sky. So here it's going to be with
more and more of orange. And as we have mask
in the middle, it's like we don't
have any restrictions, so we can just go
easily apply over that. And on the top, I'm going
to make a little mixture of the violet and orange together like this for the
seascape just below the sky. Let's just make a definition of this I'm just applying all over. Now, after the application, now the task is
going to be worth taking more amount of
just amount of the red. So with the red, I'm making with the details
here and there, just only in the corners
and blending them, adding a bit of violet
again in the base. So it will look more
of warmth, like this. Now, to this, I'm adding the magnes violet and
making details all over. So with the mob brush itself, I'm just going to use the tip of the mob brush here
and just move from this side like this
to make the details. So these are the
ripples of the water. I'm adding, like, from the small strokes to little
bigger details, you can see. So if you're not comfortable
with a mob brush, you can just take with
any of your linear brush. Number one, round brush will also be so beautiful to work. You can take any of the brush. And when the reflections, the ripples move little towards the sea that is a
little far away from us. I will become so thin and the details will not be
visible as we have done here. So this should be noted
well and practiced well, and you can just make
it with a difference. So the near ones will be a little broad and much details comparing the far away ones. So near this violet
portion in the sky, sorry, in the sea, you can just add more amount of
violet like this. And on the base, I'm going to make with
orange and violet mixture from all the sites like this. So this will give more realistic freshness of
the evening sunset feel. So you can just go with a
curse, also strip lines, but everything should be with the tip of the hairs, the brush. Okay. So if you're
just comfortable, you can just take a bit
of dioxide violet to make or give a darkest look. So I have added, like,
plenty of details. Adding a bit of
dioxin let and giving the details just near like this. So to the little faraway area, I'm adding a bit
of dioxine violet. I'm giving the dark
effect, as you can see. All that should be of a little strokes and linear
lengthy short and mixed. So in the front, I'm
adding just like this, a little rigor strokes to show the wavy form
of the water effect. So this should not be a continuous format and you can just make a break
here and there, adding wavy patterns like this. So just darkening
up here and there. And to this, I'm going
to add a pins gray. So with this color, you can just increase the darkness effect just
near the land surface. Only the near place of the land should be
added with a pins gray, and the rest can be just
gone with a dioxin violet. You can see. So to additional
adding with the details, I'm just going to
make a perfect blend. So the colors will blend
smoothly and will not very, like, defined and produce
the unique style. So I just I want to make
with a blending even or I'm just going with just water to make the blend of
all the colors here. And also here and there, I'm adding with orange,
as you can see, adding this will make
also not only adding here I'm just blending it with
the previous Mars violet. So color will look
like a pop out. Attained with the same set of strokes just here and
there from the top, adding liner one, then the
brighter ones like that. These are the final
details to be added. So you can just take
a pre amount of orange to make it
look more vibrant. Yeah, so mostly the
coloring works or done. And next is going
to be with adding of the grass fields and
removing of this one first. Then finally adding
with the grass fields. So to the base, I'm
adding a bit of magnes violet just in the base. As you can see. Also a bit of burned timber and paints gray. So this is a shadow
portion because no much reflections of the
light falls over here. So I'm just adding with a
gray shade on this place. So all the waves will
turn grayish here. Yes, mostly done. And next is going to be with the
peeling of section. Here I'm going to
use a paper knife to just remove all
the masking fluid. Here you can take the
corner of the sharp edge of knife and remove it
slowly. Remove done. Same way, you can just remove
with the masking fluid. This should be carefully done because we
should not damage the paper and choose one corner side to
remove all the fluids. So if you just take
from one side, it peels off very easily. So let me just do this
task and I'll show you. Here I have just removed
all the masking fluids now. It's going to be with
a adding section of lemon lolo to all the white highlights,
the reflection parts. So here I'm just
continuing with adding of lemon at some places. So this addition should
not be done all the places because we should be
very careful with the glitteringness
of the reflections. So I'm just carefully
adding with the yellows here and there, so you can see also on the sides should be just completed applying
with the yellows. So I'm just finishing it up
completely shading everywhere yellow like this to be the coloring section
of adding the sell outs. So mostly with the
Cescape is done. Coloring is completely done. A next is going to be with
adding of all the yellows. Yeah, C is done.
Next is going to be with a fill out
addition, adding section. So I'll be meeting you there. So just buy for now.
6. Project 1 - Reeds details: Welcome back again. So
here is going to be the second last step of adding
the bushes and the slots. So I'm just going to take my mob brush again
to add the bushes. And the colors required are the black and the burn sienna. So I have taken both the colors. Firstly, with the black color, I'm going to make with
a base line here. So just a straight, simple stretch is required
to make the straight line, the base line of the bushes. And to this, I'm
adding a good mixture. I'm taking a good
mixture of the black, and just start making the
push effects like dabbing it. Just a small dabs
over is enough, and this should be done like starting from little
like, heights. And when it reaches the center to the sun exactly
center to the sun, here we are going to make a
mixture of the burned timber. So if you don't
have burned timber, you can take your burnt sienna. Anything is fine.
Just below this, I'm adding the burned timber. And again, continuing to that, take a good amount of black and add to the
excess of the place, just making with heights. And here, it's important to
hold the brush very closer. So the detail portions
will be so good. You can make the details
very easily just by making a little
dab like this. Same way, we can just
make it under the sun, again, going back to the previous place
to add the details. Yeah, this is fine. So our second last portion of
adding the bushes is done, and final portion is
to add with a grasses. And for that, I have just taken number one brush
along with the mob brush. So this is from Rustom. This is from Hami Brand. So this is number
one round brush. So firstly with the mob brush, and here we need only
the black color. So with a black, I'm
just adding the details. So here you have to
hold it closer and hold your brush upright and make all the
details like this. So the brush little dry that
make it a little moist. So I'm just activating
it with water. Now just mixing up the
color well with water. Now, just adding the grasses, so they are so, so tall, and it crosses so easily
above the sky like this, just making with lengthy strokes
this should not be bold. Before adding the
details to the grasses, I'm just making
only the outlines as much as possible, like this. So all these wads it goes
in different direction, it grows in different direction. So you are going to paint along
the directions like this. And we should not just
go just near the sun. So we need at least
a gap of this much, and we can make it
grow like this. On the top, I'm going to add
a bit of the grass effect. So for the grasses, here you're going to
just use your more brush and make like this
soft feathery texture. Same way, you can just
add on all the sides. Okay, now, mostly on this right side with the mob brush work is completely done. Next time I'm going to jump
towards the other side, adding a little wreaths, small sized wreaths
and mostly just don't disturb this reflection part that adds beauty to the picture. So just leaving
that I'm going to add with the wreaths like this
and my brush becomes wet. So I'm just a little
bit dipped in the water to just make it moist
and work with the flow. Here again, taking
up the blacks. So the grass it grows in all the directions so as we
have to paint like this, moving in all the directions. So one will be so tall, the other will be short
and went like that. So we can make it like this. And this should not be clumsy,
and we need to make, like, a little thin strokes. Yes. So most of the details
are completely done. I'm just extending this up. Just a bit up and adding
the feathery texture. So I'm doing all this
with the mob brush. As this is a larger one, I'm doing it with the
mob brush itself. For smaller details, we can just take with a number
one round brush. As this doesn't go so dark
and it gives a gray effect, I'm taking a little
amount of black again. Yeah. This is perfect. Now, to make the small details, I'm going to take my
number one round brush. So with this, you can
add it on this place like here. Like this. Okay. So for the baby ones, you can just add a bit
smaller and softer effect. This looks perfect.
So I'll just add all the details and we'll
show you the final result. So you can add all this. So before adding, if
you feel a little hard, just take a rough piece of
paper and give it a try. That will work well and help well without making mistakes. Same way on the other side, I'm going to add
with us baby plants, which should be very
thin and feathery. Yeah, this works well.
So successfully, I think I hope you just
learned the techniques and little easier way to make the salut,
the sunset salous. So it will feel
relaxing to just watch the nature with all these
lights and shadows, the colors. So I admire it a lot
in the evenings. And with that, yeah, successfully, our painting
is completely done. So let's just peel off the
tape here, slowly removing it. So you have to peel it off holding the tape on one
side of the cornet upright, and you should peel it
outwards. So not inwards. If you peel it inwards, what will happen is the painting the corner edges may damage. So it's recommended
to peel off very, very slowly as much as possible
and with much patience. I have just peeled on all the
set. Just one is remaining. You're successfully
peeling it off. And our first painting is done. So I hope you enjoyed this
first painting session of Sunset Silhout. And I'm so excited to just share all the
techniques and making the details of the rest two watercolor
paintings of Sunset. So one is going to be
with a coconut silo, and the other one is going
to be the heart silot. So I'm so excited. Yeah, let's just move on to the next session. I'll
be meeting you there.
7. Project 2 - Coconut Tree Silhouette: Welcome back. Here I'm ready
with the second painting of painting a sunset sil out of coconut trees
and the beach side. So I have a fantastic
fantastic clouds. So to paint all these, I'm just going to
use the paints, the rose and burn tumber. And next is going to be
with the paints gray again. Next is going to
be with a black. And here is the cadmium
medium yellow hue. And next is going to be
cadmium orange, the red. Also magnese violet,
lemon yellow, and die offs and violet. So all these colors are being
used to make them painting. And the brush is again going
to be with the same set. So first is going to
be with a ma brush, and second is brown brush, and number one,
and to apla water, I'm using the flat brush. So these are the majors,
and if required, I'll be switching to the Bus
stop brush size 12 and six. So only, these are the brushes, five brushes I'm going to use. Now, firstly, I'm
just going to make a simple sketch to
just make the split up of horizontal line and the details of adding
the beach scape. So just three fourth
of the place, I'm going to make it for the sky and just one fourth with
the seascape sorry, the landside area and
the split of seascape. So both is going to be
with one by fourth side. I'm just splitting up it here. You can see so with this split, so this is a horizontal
line splitting both the land and water and next is going to be with making perspective sites like here, I'm just going to make the
wavy patterns like this. So this is for making
the waves of the sea. And next is going to
be from the same edge. You're going to make a
wave of a little wave, not that huge wave. So this is, like,
differentiating the way. And here, we'll be adding a different shadow
portion of the color. So yeah, this detailing is must. I'm just topping it
exactly on this place. So this is going to be
completely the wave, and these two are going to be
the flat portions of water. And a small detail
of the wave is being additionally added
here, just like this. Here, I'm just going to, again, wet my top portion, the three fourth portion
of the sky using the flat brush and completely moist the paper using water. So the colors will
bleed perfectly. So we can do the same. I'm just try avoiding the color should not bleed
just below the line, or accidentally mine is flown. I just lift the water
excess using the tissue. Same way you can just do it. This is a quick
tip for an error. Yeah, I'm just rereading the
water all over the paper. So it's perfectly done. Next is going to
be the activation of all the paints you can see, activating all the colors. Very well. Okay, now
with a more brush, from the top, I'm going
to add with the rose. So adding the rose
here and there. So next wherever needed, I'm just adding the rose, also a little bit of oranges. So the sky goes so
beautiful and warm effect. To bring that effect, I'm adding colors this way. Brush also should be
very wet. Like this. And in the middle,
even here and there, I'm adding a bit of
orange like this. So the colors it
bleeds so perfectly. And in the middle, we need to just add more amount of violets or just activating the color well and adding the
violets in the middle. Let the colors flow in their
own natural direction, and we don't want to
make up blend much. So if required, we can
blend. Not unnecessarily. Most portion of
the violet it goes with the backdrop of the sky. So if needed, you
can just add a bit of dioxin violet to the mix. Only on the top here and there. At the different places is
going to be with violet. So Magnes violet. So that's the lightest color, activated well with water and bringing up the
beautiful effect of sky. You can see. Next cleaning
up my brush well, and just moving along this
way so the colors will blend well bringing to the
end on this side. All these are mostly
with the violets. Now it's time to add
much of the oranges. So with the orange,
I'm going to make it flow from this side, like this. So starting from the orange, I'm going to make with a
mixing up of cadmium yellow, orange hue, like this. So the colors are just
getting down, saturated. Even here, if you
want to just lift up the color for making
the cloud effect, you can just remove the
colors to that area, I'm adding a bit
of orange to make it look fiery, so good. I'm satisfied
making this effect. Also, on the top here, it goes with so much
of black, sorry, violet and just removing that violet and
leaving up the space. You can just put the violet
excess here on the side. Again, adding with the removal. So here we are going to use
our rose an orange mix. You should keep on washing your brush because the
colors remaining in the brush may get or
the paint damage. So if you blend together, so just removing all the
colors then and there, cleaning up the brush well, picking up fresh paint, and just adding it to the. So yeah. Mostly the cloud
section, it's done. And to this, I'm just adding
more amount of white. So here, the cloud section, it has gone mostly with the
dark shade that I don't like. So I want to just
remove these colors, tarding yellow here. So the orange present already
just blended with the yellow and also the violet on the sides to produce a
different shade of the color. Yeah, this looks super good. Next is going to be again, adding with a rose
here here and there. Dropping the water. So
you can just go with the flow to whatever
direction the paint flows. It's no restriction that the color should be completely
like this and this. We can go with
whatever flow we get. So it's completely creativity. And again, applying just a
bit of orange onto the base, I'm adding a bit
of yellow to this. So the colors will blend
completely like this. So again, just taking
with this yellow. So as we get down, we are just focusing on making
the yellows on the sides. So here mostly making
the oranges to the base, painting with the
orange in the base. Just give a spright
stretch of the orange. And to the sides, I'm adding the yellow
cadmium yellow. In the middle where
the sun is present, the sunlight is present. I'm adding a bit of lemon yellow and blending
the colors well. So yeah, the blending should the color
should not stand out. Blending is much important here. We can just make the effect with a brush strokes,
adding it like this. If needed, finally, we
can just add a bit of yellows like this and
blend it with the clouds. Finally, again, taking
with the yellow mixture, so getting it little
down from the base. Okay, so mostly it's done, and let's give a little time to line for the
colors to settle. And here on the top alone, I'm just adding a bit of mixture of the dioxin
violet and the rose. Okay. So next, finally, adding the mags violet here and there to
make it realistic. Just hold your brush closer on the bristle and just keep
on the pains dropping, add it like this, again with a magnes violet. I'm dropping the paints
with this effect. Yeah, this works good. The violet should be visible. If the colors then you can add a bit of violet to that to make it dark. So that's it. I'm just adding details to the sky with the breast strokes. So mostly our painting is done. Let our sky settle, and I'll be meeting
you in the next session painting
with the sea waves.
8. Project 2 - Painting Beach: Here we are completely
done with the sky portion, and next is going to be
painting of the seascape. So to paint this, I'm mostly going to give a base layer of the orange cadmium orange as a base layer in
the bottom here. So if we give this next, we can just on the top overlay with the detailings we need. So I'm just giving the
base layer as this. On the other side opposite, I'm just going to use the burned Siena or burn
tumber whatever you have. So with this, we can just
add with the landscape, so the shore of this edge. So I'm just going to add it
with good amount of pigment, and this should not be watery
that will not look good. Here you can just go
with the sharpness, the fine details of the paint. And if done, just let it dry
completely and we can focus onto the side of making
the s. So to that part, I'm adding orange again. On the top here, just adding the orange it's very slowly because
this should not merge. And next is going to be
adding the burnt again. So you can just give a single
stroke of the burnt ocher. Here in between, you can just see it goes with a shadow
effect as the wave, it just goes folded like this because the sky
reflection mostly goes with the shades of violet
and the rose and the bottom breaks down toward the orange
and yellow mixture. So for this fold of wave, I'm adding like this Okay, so now the color has let it completely dry and
after it gets dry, I'm just going to add
with the details. So the way it is going
to be in this direction. The fold is going to
be in this direction, so we need to just go along
the breast strokes this way. And I'm just going to take my
burnt burnt umber again and add a bit of details like this over the base of
the other waveform. So this is perfect. And here, I'm going to
add a mixture of paints gray from the corner to
boost up the dark effect. And again, burnt umber, then a bit of pins gray. So with both mixtures, I'm just blending the
colors to make this sure The depth is very much important so that
we can differentiate easily. Even on this side of the corner, I'm just adding with the black. Yeah, so mostly the
way format is done. Now, mostly this color, this area of the color is
completely settled down, and we have just made a perfect finish blend
of the sea show here. And to make this, I'm going to add much details. So with the same mop brush, I'm just taking my Magnese
violet in good amount. So to that violet, I'm just making in
the center this way, so painting in this direction and blending it with
the previous color. Also, I'm just
taking a bit of burn tumber and from
the straight last, I'm just lifting
up the colors for the wave and going like this So this is how the wave format appears. And here and there, if we
need with a dark shade, we can just add with a
pains gray and a mixture of burnt sienna
or burned timber. And to the base here
I'm going to add a bit of the pains gray like shadows. And this looks very flat. To make an improvement, I'm just taking my burned
timber again and with this just making a little amount of the wave format here behind. So starting, making it broad
and slowly moving forward, I'm just making with a
simple strokes of lines, a continuous line set. This works look
like a wave format, starting from the
faraway portion. We can make it like this. And I'm just going to add
a mixture of red just a bit of red to the corners
here and lifting it all over, also from here here and there. And I'm just going
to make it with a complete blend with
the colors present. So here you can see it
goes with a blend of brown shade and the red
shade. This is fine. And I'm just going to here
make a blend till the last. Now, washing my
brush thoroughly. Next blend is going to be
simply with just empty brush. I'm just lifting the red. I'm blending that with orange. So the end, it looks
like a great reflection of the sky like this. Same way, making it to the other end of
the sea, like this. Yeah. Now again, washing. So next is going to be
with the cadmium yellow. So with that yellow, I'm adding it to the base here
and also a bit of orange. So putting down all the colors to bring out the reflections of the sea go with a single stroke of the brush
to bring out the effect. Yeah, mostly the
way format is done. So if we need to add with
some kind of yellows, we can just take a bit of
camium yellow medium hue. And here and there, I'm just
adding the yellow details. So that looks like a reflections and just wipe the excess
color with the tissue. Again, take the color back, add in the starting
portion of the seashore. I'm just continuing the same
process again and again. Also in between like this. Finally, to here. Okay. So this is
successfully done, and the next process is we need to make this
part dry completely. And final part is adding
with a coconut tree. So let me meet you in the
next session. So bye for now.
9. Project 2 - Silhouette of Trees: Welcome back. So here, it's going to be
with the last step of coloring the coconut trees. So this is going
to be the sellout. So for making that, I have just taken my number one round brush. So the paints are
going to be with a burnt umber and
the black color. So both colors are required, and dress before
painting with a black. So firstly, I'm
just going to make a bigger tree here
and a smaller one. So it's going to be
with the four trees. So starting from this
way to this way. So it's going to be three trees continuous here and one
last tree on the top. So firstly, I'm just
going to make with them. Bottom portion, the tree
trunk portion with a black. And for the leaves,
I'm just going to take my burnt umber
to make the leaves. And over that, I'm just going to add with the black
color. So let's see. Firstly, I have just
taken my black. So if you're okay, just okay to draw with the paint directly,
you can just go with that. If you feel little
hard to make it, you can take your pencil. This is the first
one. And second one is going to be a
small tiny thing. So this is the second and this is going to
be the third one, which is a little bit taller, and this is going to
be the fourth one. You can make a little bent and just grown
up over it like this. Yeah. Now, I'm just going to
make the painting process. Just dilute the paint
as much as possible. I'm mixing the color. Now I'm just going to wait it inside. And when you reach the top
portion of the re rank, it should be completely like
narrowing towards the top, so we can stop it on here. Next is going to be
the smallest one. And again, just loading paint, making it a little darker. Then on the top, I'm here adding with the
little breath, not so pointy. Again, just lifting
from the base. Can this let reach the top. Then finally, I'm adding
it on the base here. So I'll just complete
and show you this. So the base portion
is completely done, and next is going to
be with a leaf and make that I'm taking
my burn tumber. So firstly, we need to just make a split like this,
not too watery. So we can make a split, and then just making the
details of the leaves. So firstly, it should
be completely done with the burn timber. Like this. Same way. Just repeat
for all the trees. This give the realisticness. I'm adding the
same effect again. I'll show you just for
one simple tree here. And this brown should not
be completely visible because we need to overlap
it with the black color. The color gets keep on trying, and I'm just activating
again and again. This number one brush, it's not available and
if you have some kind of a triple zero sized brush
or double zero brush, even that are okay to go with. And when you just make
with the tree leaves, so this tree leaves should go in the direction of the wind. So it's grown a
little up the one I'm working, so it's grown up, so we need to make it in the upward direction and not in the bottom direction. So it's not compulsory that much of the brown
should be visible. Just the shade the
siler portion should be like realistic because
when the sun just falls, it shows off not only
the black color, also the other color in
the shades of browns. So I'm just adding
with the brown. Here you can see this
leaf is little sideway, and we need to paint it
in the same direction. So the same way as I have
painted this part of the leaf, I'm just going to make
for all the other trees so you can do the same way. Now completing after
with the blacks. So the browns, I'm just going
to make with a black paint. So on the top just over
the top like this, you can add the black
because it will give some kind of a double shade
with browns on the top, it's going to be with a black. So it will look more realistic
and we can add this style. So I'm just going to
finish with this tree first and let me just
continue with a speed up. You can just take your
own time to finish this. We need to be careful of
adding all the leaves, so this goes very
thin and not broad. So we need to keep our
breast accordingly comfortable and just paint it. Same way on this side. So we can just make
with the stem portion, the bigger vein
first of the leaf, then with the extensions
on all the sides. Yeah, this looks so beautiful. And a perfect easy sell out. So just give all
your feedbacks in the project section so that I can just make my
drawings and ideas. Like, I can just come up
with different ideas and different projects with a
suggestions and interest. So please provide your
valuable feedbacks. I'm so eager just to read everything and upgrade
our project courses. And also, if you're done
with the paintings, the first one, the
grass field one, also this coconut tree one, Alex is going to
be with a horse. So we can just complete
everything and take a picture of all these and post it in the project assignment area
so that I can see everything. Now, just one tree is being completed using
the blacks and Brown. Next is going to
be with the rest to three. So let
me complete that. So here I have done with all the four blacks
of the coconut tree. So this painting is
completely done, and let's just peel off the tape and see the final
result, how it looks. I'm just slowly peeling it off. So this is the final result. Hope you liked it.
So just try and upload all your projects
in the assignment area, and we're left with just
one painting and I'll bet in the next session in
that painting. By for now.
10. Project 3 - Horse Silhouette in Sunset: Hello. Welcome back
to the Project three. And here we're
going to just make the painting of sunset
Slot of a horse, and it's standing in
between the grassfelds. So the paints needed
for this are like, so it's going to
be with a white, and next is going
to be lemon ellow and cadmium yellow medium hue, cadmium orange
hue, and pone hue. So it's kind of a
light orange shade. And next is going to be the
red and the pyrrole crimson. So if you don't
have Pyl crimson, you can just go with
a regular crimson. That's enough. Annex is rose. So next is Magnese violet
and dioxine violet. So all these colors
are repetitives from the first two paintings. Annex is going to be
burn Siena and sepia. So if you don't have a sepia, you can take burn timber and finally with the black color. So all these are the colors
that we are going to use. And before starting,
I'm just going to make a quick sketch of a
hears standing here and so that we can
easily color on all the the clouds can
be colored all here. So I'm just grabbing
my pencil and going to make a quick sketch of the horse standing exactly on this side. So the head it ends
on this place. So starting from the base, you can just make
with a circle here, like a rectangular shape, a small rectangular
shape for the body. So this is fine. And to that, I'm
just going to add an additional layer on the side. So from this second split, so it's going to
be the first, and this is going to be
the second split. So from this split,
you're going to just build up with the neck
of the hoarse like this. So this is fine. And from here, we need to just make with
a triangle shape. So we are going to
build up easily with only the shapes. So yeah. This goes like a tropezium we are going to make the
shape just to the shape. And from here it goes with
the hairs of horse and yeah, the nose parts, the mouth. So you can build it easily,
so it's nothing hot in it. And just slightly, you should
not build up making with a sharp fine edges because the face do not
have any sharp fine edges. We need to make it
easily with the curves. Then on here, it goes
with the high end. So just molding an
extra on the side. So on this side, it goes
with the ears like this. And on here it goes
with the other ear. So mostly the head portion
is completely done. And next, the body
part ends here. So you can consider like drawing the neck portion here and here. So this is the front
side of the body, and it ends exactly
on this place. So we need to just make
a quick line like this. And next to the back portion. So here I'm going to add an
extra curve on this side. Just coming along like this. Yeah, this works very fine. And next is going to be with detailing adding the
details of the legs. So mostly half of the
hoarse is completely done, and all the shapes is not visible because
it's going to be in silo and I'm adding a
little detail here. So here we are going to
fill in with a white color. And next here all these places it goes with the hair particles. So you can just make a wavy
pattern small has like this. Yeah, this is good. So all the has should
extend till this place. So this is just for our
assumption and to make the legs, so you can just build up
from the base like this. So here and there, you can find a bit
of highlights. That is because sun
portion is here and the light from sun it's going to be fall over this
side of the horse. So so many highlights will
be visible from this side, and it's completely
dark on here. Next is going to be the
completion of legs. So we can make it like this. And here it's going to be
the base of the horse. And on this side, it's
going to be the other leg. Making exactly parallel
and a neat look. So the next leg, the behind ones are going to
be exactly near like this. So if you want to just
make the knee portion, can just make it like this and
attach it from this place. Same way on this side, it's going to be from
the extension on here and going down parallel
to the previous leg. And next, it's going
to be this way, like this and make with a
tail portion like this. Yeah, this is very fine. So mostly the detailings
of the horse are done. If you want to just increase the size of the stomach or pack, you can just increase. And I have just made a
little extensions here, so I'm just going to erase that portion alone
and correct it. So from here, just make the
leg and the knee that's it. So not all the bottom portion of the hearse will be visible. Only this much of
the hears is enough. And we're going to
just make the removal of all the pencils or here
just dabbing with eraser. So if you do't have
any normal eraser, you can just go with
our needed eraser. That works very fine. So I'm just making use of this for now. Even this is fine. Okay.
So this is a quick sketch. We are done with the sketch,
and I'll be mating you in the next session for making sky portion and the base
portion. So for now.
11. Project 3 - Painting Background: Hello. Welcome back to the painting session
of the third project. Here I have all
the colors ready. And here we are just going
to activate all the colors by spraying it over
in everything. So spraying helps in just making all the waters
loading water more. So I love spraying it instead of pouring the water and activate
every time over the pan. And again, using
with a mob brush. So before we start, I recommend to just make the
paper wet, the base wet. So I'm taking my
flat brush again, just going from the top. Or if you want to spray over
the paper, also, it's fine. You can just make spray
over the paper well and spread the water along
the paper. Like this. So I have just wet
my paper completely, and next is going to be
with applying of the brown. So here I'm going
to take the sepia. So with this shade, I'm just going to wet the
base of the paper here well. All this base is going
to be with the sepia. And on just about that, it's going to be with
a burnt tumber mix. So I feel the sepia mix is little or not
enough and not bold. So I'm adding that with
good amount in the base, you can see So adding a
bit of a little amount of pons to this mix here. Okay. So next, washing my brush
well and taking a bit of the Ponsio color and
adding it on the line, the horizontal line
and blending well. So next is going to be with
the cadmium orange hue. So with that color, I'm making on this place. So let all the
colors settle well. And now the task is like
making with clouds portion. So on this cloud portion, I'm going to take the base
layer of yellow here. I'm just going to
make slow process of adding in the base like this. So all the base portion
is going to be completely covered with the lemon
ellow here like this. So this is important. And after the color application, let's give a little time
so the colors will settle. And over this, we
can add the details. So mostly the portions are covered with a yellow
and over this, almost here and there, I'm applying with the
base layer as yellow. Like this. So this is okay. But this sudden near
after the land, this portion has
to be completely yellowish, this is recommended. And now after
applying the yellow, I'm just using my light
cadmium yellow medium hue. So with this color, I'm just going to make on
these sides all the details, just like dropping the
paints from here and there. Very slowly. So the yellowness the lemon of the sky
will never fade. So without disturbing the hops, we can just go on the sides like this and drop our paints. Take in little larger
amounts of adding the paints and the
clouds are so fluffy. We can just go with
our own creativeness. No conditions are here
to make the painting. So it should not be
like with restrictions. The cloud should be like
this and this direction. I'm moving mostly in this
direction towards up like this, taking amount of yellow again, just just putting it on the top. Like this. We can take
a bit of orange now. So all the colors all
the water is dried up. So with this, I'm
dropping a bit of orange activating with water, taking a bit of
orange and dropping here and there, like this. So it's good to be added on the top because the
sun portions here, so we can make it on
the top, like this. Yeah, this is fine.
And here it's mostly going to be
with a mixture of red. So red is going to be added on the middle portion
with little drops. Just the small drops
of reds is enough. Only with a tip of the
brush is okay to be done. So if we drop the
paints here and there, it will beautifully spread along and create some
beautiful effects. We need the patients
to make it slowly and enjoy the process like this. Yeah. This is very fine. And on the top, as the
colors dries up here, we need to add a bit of
yellow to make the strokes, take good amount of light
cadmium yellow medium hue and add the strokes like this. So also on this side of the
heart should be noted often. Yeah. So let's leave a space in the middle this
place to make the sun. And I'm just taking
my lemon ello again, dropping it here and there to
make a good yellow effect. This is fine. And
next on the top, it's going to be with a
mixture of dropping the rose. So let's just take our rose
and drop it here and there. So the place here
it's completely dry, so I'm just taking fresh water
and adding it on the top. With the rose, I'm just going to make the same cloud
patterns here and there. This is going to be
with a lighter shade of the rose if you have. And on the sides, it's going to be again
with applying like this. Then to the base of the rose, I'm taking a bit of light
orange and adding it on here. Then dioxine violet.
With that violet, I'm just putting it
over top of the rose. This is Magness violet and over that is going to be with
the dioxine violet. On the corners, it
should be completely with the dioxin violet. Just dropping the colours of dioxin violet on this place
to make the darker effect. So this is perfect for
the evening sunset sky. So let the colors settle and we don't want to
disturb anything. Even on this side,
I'm adding it. And then to the remaining space, I'm just making it with
a magnes violet again on here and a bit
of rose to this. So let all the colors
blend naturally. I'm just washing my
brush very well, taking a good amount
of magnes violet here and going to
drop it in between, like this on the top, so the colors flow on its own. And here in the middle, it's going to be with the
mixture of dioxine violet. So even that colors
flow on its own. Then as the color settles, it's becoming a little dull. So I'm just matching
it with the orange, taking a bit of orange, and dropping it, blending
with the rose here. Same way on this place. For making the sun,
I'm just taking white colour and adding it in the center as a
circle like this. So it's like our option in
the first project we saw of applying a masking fluid
and then adding the white. So we just left that
white as it is. Here in this third project, I'm just taking a bit of white paint and applying
for the sunlight. So any process is fine. And over this, we need to
just add a bit of lemon low. So the paper is completely dry, so it's easy now to
make the details. So I'm taking lemon low
and just passing it over the sunlight as the clouds
are hiding away the sun, and I'm just taking
the cadmium low and adding a little stroke
here and there, like this. Even this will be
very fine looking. So it's good to just give a beautiful background
just behind the sun, so it will pop out. And with the same yellow, I'm just moving on the
sides here like this. The clouds are
completely settled now, and next task is going
to be with adding of the orange here in this
place and smudging, just blending it to the base. So firstly, it's going to be
with orange at good amount, next with a Ponsio just next to the orange and
take the water. The color should
blend very well. And to the base, it's
going to be with a burned timber
first and the sepia. Firstly, here with
the burn timber. Next, it's going to
be with a sepia. And if you just
interested to add a bit of black just next to
the sepia, that is also fine. We can add it. Mostly, all the process
is completely done. Next is going to be
making with the horse. So we need to allow the
colors to dry completely. And here I feel a
little we can add a bit of orange scenic. So I'm just taking orange paint. I'm moving like this to the topwas covering
the background of the horse to make
a good detail of it. So we can cover it
completely with the orange. Now, to this, I'm
going to add Ponso. So this is the next arcstic
color after orange we have. I'm just going to add
little droppings like this. And you can better give
it in a diagonal way so the colors spread
properly like this. And here and there
with the paint. This is a small fluffy clouds. It can add with any
of the warm colors. So mostly our project, the background is
completely done, and next step is
going to be with adding of the sell out of horse. So I'll be meeting you
in the next session.
12. Project 3 - Horse Silhouette: Welcome back again. So
here we are going to start up creating with
the horse fill out. And for this, I have just
taken my black, white, lemon low, cadmium
yellow medium hue, and camium orange pons. Or you can just take your vermilion or scolor instead of pons if
you don't have. And next is going to
be the primary red and black and burned
thumberne sepia. So these are the colors
I have just taken. To make it, I'm just
taking my black first, so activating it with the water. I'm just giving the base as we did for the sky
using black color. So all this area it's going to be completely
with the black. So we need to just leave
only this portion white. I'm leaving that can work very slowly and carefully
to bring the same result. I'm just making it
flow downwards. This is the correct
way to be done. So we have splitted two curves. The front side is going to
be with the body part here. And this top also is
covered with black. So I'm just showing up all the places that's going
to be completely black, and here is going to be black. Next, moving downwards
in the front line. So this is the front
side of the leg, and all this is
going to be black. Just leaving it like this. And on this side, we're going to make a mixture of orange, also orange and burn timber, so we need to work
a little carefully. So little by little, adding the colors like this. Just taking up the color
from the sides of my pan. And with the point of the brush, you need to fill up
all the details. So the ears of the horse will
be so sharp and beautiful. So we need to create
the same effect. And Isil out the shadow, the effect of the details, all the parts will be clearly visible and it will
be very sharp, okay. So we need to create this same effect
that's very important. And I have just applied water before
in this place, right? So that's a little wet still. I'm just going to cover on
this place of the horse. Here, it's not that wet. So I'm just pulling up
the water downwards like this and moving to the sides. Also to this side of the horse. And the main task is like
we are going to blend the hoarse portion on the sides with the burnt
sienna and orange, so we need to keep
the colors ready, adding details of the
nose and mouth portion of hoarse, like this. So this is going to
be the hair line. So making hair should you should have a moist brush
filled with a paint, and I'm just dragging
up like this. To make the hair strokes. So all the hair
should be visible, like flying towards and every single hash strand
should be visible like this. So each hair should grow or fly in its own
direction, natural way. Everything should not be
in the same direction. So on the top, it's
moving towards the up. And some in the front, it's going to be
with a little amount of burnt sienna mix. Yeah, this is the brown. So you can take any
medium brown shapes. So the hair, it starts
from this place and moving towards the
front, like a hair. And from this place,
it's going to be like this, starting very light. And move to the other direction. So I'm just increased with the saturation of the blackness. My colors are drying up. Yeah. Now just we can paint
with black over again. So with the black,
I'm just going over this place. Again, like this. And the years too
move like this. And if needed, if you want
to make it more black, you can just add other
layer of the black on here. Or you can also use
the Guash paint to make it so mad finish. I'm just going over
with only watercolors. Not a mixed media type. And now it's time to just fill up the front
portion of the horse. Like this. Here, it's going
to be again with a little in the middle
portion with black. Also here on this side,
it's going to be. All these portions are
going to be in the black. So I'm just taking a black paint and adding
it only on these portions. So I'm adding a
bit of black here. And to this, I'm just
going to wash my breast first and taking
my burned tumber or burn sepia,
whatever you have. So to this, we need to add along the black
and make a mixture. So this will become a perfect
silo with the highlights. And I'm just taking a
little amount of black again and making
details on the sides, covering all these portions. Same way with the brown, I'm just going on this side. And the rest portion is
going to be with the orange. So it's like a beautiful
bright orange. And for that color, I'm just taking cadmium orange and applying it this place. Same way we can use here. If orange is not that visible, we can take our gase
paint and apply it on the top to produce
the orange effect. Even that will work good. So again, taking a bit of orange to make the details
highlight on this side. Yeah, so mostly the other
side is completely done. And for the top here, I'm going to add a white
color only on this place. Only on here. So I needed for highlights, you can add on this place too, when that's fine,
here and there. Next is going to be making the most highlight details because here I can
find the paper behind. So I'm taking again
with a black and just reapplying to make it a dark
textured black like this. So all this should be done completely
covered over the face. Also the years, I'm just
going it on everywhere. And finally, it should be done. In this place. So I'll just complete making
over the hair structures of the horse on back here
with a moist brush, and so you the result. Yes. Mostly it's done and just the end of the hair
strand should be very thin. You can make that effects
flying towards air. So for making this effect, the brush should
be completely dry. And instead of using more brush, we can just take with
our linear brush too. So even that works well. And here is going to
be with a horse tail. Taking amount of paint
again and adding for the tail portion in
the base like this. So mostly our horse
is completely done. Our next is going to be with
adding off the grass fields. So I'll be meeting in the
next session. By for now.
13. Project 3 - Painting Grassfield: Welcome back. So for
the last portion of this third project to make
with grass fields here, I'm just going to take the
burnt umber and burnt sepia, also white, all the
three colors together. So first with the sepia, I'm just making with the
grass strokes like this. So you can use any number
one brush of your choice, and all the strokes
should be very, very thin like this. So when it goes a little behind the details and
the coloring thing will be a little different. So here I'm just
going with the sepia, the brown shade,
the sepia shade. When it just moves
a bit on the top, you can make with
the burnt umber. So here I'm just taking my burnt tumber and
making all the details. But when it just nears
over the orange layer, you can take another
different shade the earth tone
will be very fine. For that, I'm taking the
Earth yellow from my set. Earth low will be very
fine. This is earth allow. With this color,
we can add a very behind like this just
making with thin curves. So all these details
should be done just near the sunlight,
not very front. And if you're done
completely with all these three color
mixtures of the grasses, next is going to be with adding the white
highlights of the grass. So that's important,
and we need to do that. Next again with
the burned timber. So here and there, we can
just make a little high one and add a feathery
texture on the sides. Same way with the sepia. You can just make a thin one, lengthy one on the sides and add the feathery texture on
the sides like this. Okay, so this keeps on moving. In the base just near the base, if you want to add the blacks, even that's easy, and
we can just go with a black stop to make
a bigger good sillot. Yeah, here I'm just
finishing up with the blacks and making the
bold strokes of grass. Or if you want to just make up with just simple
strokes very slowly, even that is our choice. We can do anything. Again, with the burned
thumber, the sepia. I'm making it like this. We need to completely
fill up this land area. So here you can see, I have just used the colors of plaque, starting from the base
using black and sepia, burn timber, and then finally
with the Earth ocher. So with all these
colors I have done with making the raspel and next is to produce the highlights and the shadow silos
of the same grass. I'm taking a bit of black. So with a brush, I'm just moving with the single lengthy
strokes in the center like this and making the details so this should be
done here and there. This will look realistic
and beautiful. If not interested
with a black color, we can also take our burn tumber or the darkest shades of brown
to make this same thing. That will look more realistic. So I am personally
using the black. Yeah. So here and there, the details are being added. Now, it's now time to just actually use the
white color paint to make with the details. So here just taking the white and adding the same
thing using the white color. So we can just
take it like this. Also here and there in the mid. When the color is dry, it perfectly blends the
other shade of the color. So we are applying it over here and there
over the browns. So the colors will
completely dry with a white and produce a kind
of a lighter shade. So if you wish to just
make it lighter version, you can just take a
bit of earth low. And with the earth low,
I'm just going it over like this. Even this is fine. So it's completely
our creativity. And here and there,
I'm just using the Earth low to make
the same color patterns. If the color is too thick
and paste like a thing, we can use it instead of wash. So here, the Him Earth low
it's completely opaque, and I can use it
easily over here. That's it. So if you want to add more number of grass
types here and there, even you can just go with a simple strokes of the
grass and that's fine. Instead of adding
completely with details, you can just go with a simple
curvy strokes like this. Even that looks neat,
give detailed effect. So mostly we are in the
end of our process. So next is going to be with
the peeling of the tape. I'm going to peel it off slowly. So that's it. If you're done, just post all your drawings and paintings in the project section in an assignment session. And if you feel a little hard or if you go
with any questions, you can feel free to ask me, so I can just respond. Here I feel it's
a little linear. I'm just adding the
details in the back. Here you can just go with burned tumber or the black
color itself. Like this, yeah. So let me meet you in the last session of this complete all the
projects. By for now.
14. Thankyou: So I'm just completed with all the three projects and hope you are just doing along with me and enjoying all the process. And here we have
just experienced three different types
of clouds painting, also three different types
of landforms and a seascape. So here, on the first, we just did with a masking
tape, and on the second, it was just directly with the slot of us using
different colors, and the cloud type was also
a complete fluffy type. And thirdly, it's kind of a very golden evenings
like that set. So we've just gone with three different
types of colorings. So now I just want
you to give us a feedback on all
these three projects so that I can make
different ideas. I can come up with a
different ideas and topics according
with your interest. So also I just
request you to drop all the three paintings
projects output results in the assignment
area so that I can verify everything and
provide a result of it. So I'll just make a look. I'll give you a closer
look of all the details. This is a painting that we
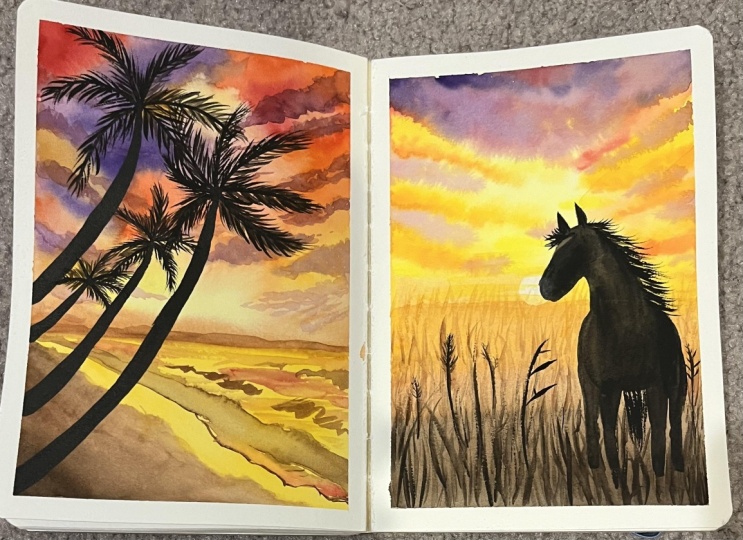
did as a second project. This is the third
project that we did. And this is the first project. So hope you enjoyed
all the process. And also, please drop your percentage like which you liked it first and
which was enjoyable, which was your first
most liked one. So that's it for
this project video. Next in the next project, I'll be sharing with some
different kind of topics. And yeah, bye bye. Thank you for attending
the class till now.
 Srimathi, Artistcastlebysri - Art Educator