Transcripts
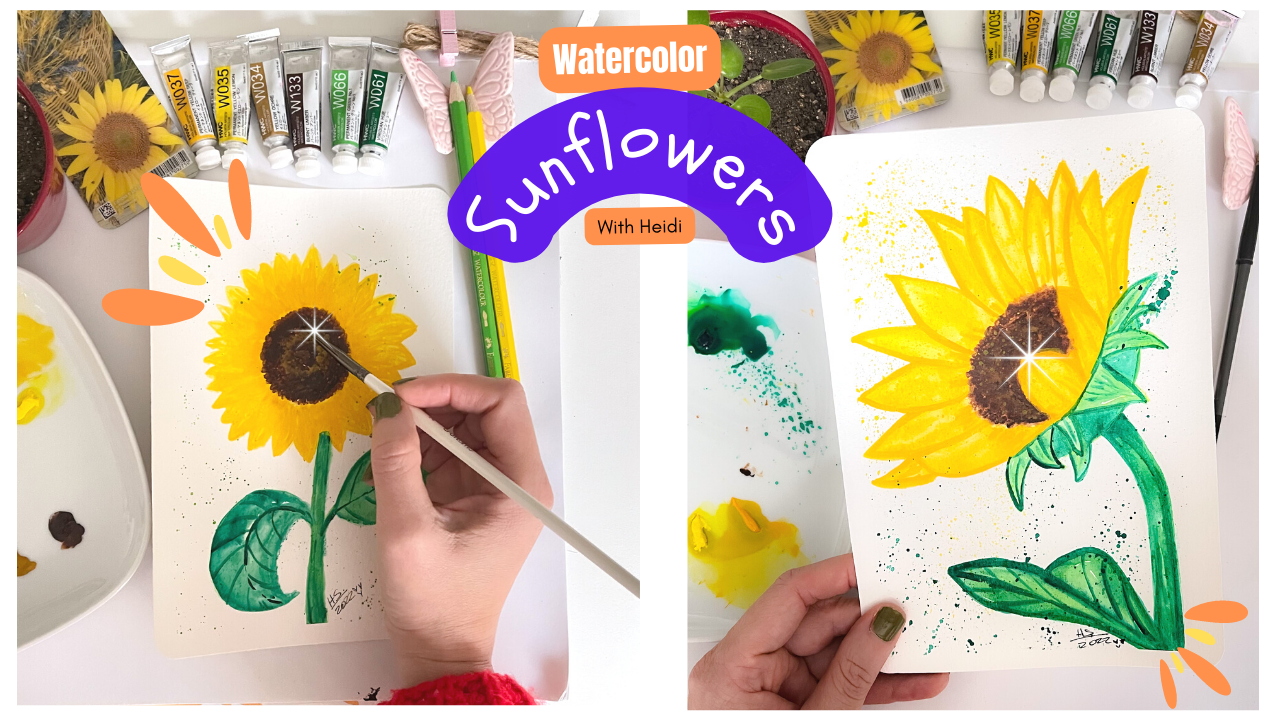
1. Welcome and Intro to the Class: Hello and welcome to this class. My name is Heidi, and in this class I will be guiding you through
the whole process of painting some flowers and we add painting them in
two different views. One is looking directly
at you front view, and the second one is
looking to the side, the side with other sunflower that is looking
for the sunshine. We're going to be
discussing about the colors we are
doing together. The sketch for the
front, sunflower. I have for you free
templates that you can download to transfer to your watercolor paper
easily and quickly. You can download those templates in the resources for this class. Easy, it is. And then you can
transfer them to do paper and start
painting with me. I went to remember
too that you can follow me here on
Skillshare so you can have access to all my
classes and you won't miss any new class update discussions
that I shared with you. I can't wait to see you
in class and let's start. I will see you in
the next video.
2. Templates: I have Purdue two templates
that you can easily download. Just colleague. Here below the video in the bar, there is a tab that says
Projects and Resources. You just click over there. And then on this side, it will be the PDF that you can easily download as I'm
showing you in this video. So downloaded templates and
we can start the class. I will see you in
the next video.
3. The Supplies to Use: These are the supplies that we need to complete this class. As always, we need
watercolor paper. I have cut this in half. Two brushes into
different sizes. Clean water, a clean towel. You will need also
to circular objects. It can be anything
ground that you have at home, a fine liner. As always, it's good to have
your watercolor palette. We are going to discuss this more when we start the class. To Q-tips, a mixing pad, a ruler, to trace your sketches. And as always, I just cancel
them, mostly Canson paper. This, this is good-quality
and the size is a four. Please download the
templates that I left you in the resources
for this class. I have, we had painting
two types of some flowers. And we're sketching this one and the other one to
have the template, to have the both templates
on the resources. And for that you
need two roller and the circular objects
into sizes as well. Please download
directory services. And we are going to be starting
now with the sketches. I will see you in
the next video.
4. Paper Preparation: The class, I will be using
my watercolor paper, but I want to make it smaller. So I have here my whole
size A5 watercolor paper. And they have a
much cutting mat, so I don't damage the
surface of my desk. And I have a ruler. I just cut in half. So my size will be
about a tree size. Smaller one. You can use any, any size you want
for your paint. I NGOs working in this
because it's more easy to work and to explain
the technique that we are going to be
working during the class, I will round the edges
of these two pieces. So I get a more cute
looking for my paper. This is a paper cut
to confine them in the supply stores or on the Internet and
shop, online shop. They are very affordable. Or you can just use scissors
if you don't have this. This is just aesthetics. Now that my pages are done, Let's proceed to prepare
or paper to work on them. Just fixing them. This is a cardboard from the
back of my watercolor paper. I just use them. I would show you this. This one is from my block
of my watercolor paper. And I always keep them
aside because I am using them to protect my
paper and my surface. I have my clean towel. Now. I will use my technique to
soften up the glue on my tape. My paper doesn't get
damage like this. I will just tape the tape on the tower and then I
will be dust it off. And now the glue on the
tape is not that strong. So when I take my paper with it, when they fix it
to my cardboard. And then when I take it off
of my paper, we stay safe. No damage. And it will be really nice. You will see, I hope you're going to use
this technique to soften off the glue on
your paper tape as well. So do paper doesn't
suffer any damage. I will do this with
all the sides, Always keeping a
rhythm or a direction. Say, I start with it on there
and then the upper side, and then the sides. When I pull it off, it is easier for me. Now my paper is fixed and
ready to be used and I will get no stains
on my surface. Hybrid seed in the next video.
5. Sketching the Front View Sunflower: Let's sketch or fears
sunflower, which is this one. You can transfer these one to do paper or you can
sketch it with me. If you prefer. For that, you need a two
sizes of circular object. I have this two things here. Then we are going to be adding the details and starting
to add the colors. Lake, you can
transfer is a fight I was telling you or you
can draw it with me. I have my paper fixed
to the surface. I am using watercolor pencils. So when I add the
watercolor slighted, they dissolve with water. If you don't have
water colored pencils, then use your pencil and an
eraser to make the lines lighter so the colors
doesn't get muddy. I want to start with the
smallest circular objects that I have IN using the jello
water colored pencil, because this is the main
color of the sunflower. And then I will place the second singular
object, the biggest one. Just aiming a central
placement on my paper. It doesn't need to be perfect. This is just a line to a guy. And then we're going to trace the lines dividing this circle. And then we're going
to be painting the petals on these lines. Did you can look at a reference picture for
sunflowers and you can see that they have this
many overlapping patterns, like these ones, as
you can see here. Coincidentally, I have
this beautiful sunflower here in this ruler. This is what we are
going to start. Looking for. The center of the sunflowers, where the seats are. We are going to let that
space MT from petals. And we'll start painting
the patents on this. On the outside of the smallest
circle, like this one. This is just trace line. This is not the real painting. We're painting this more clearly with our brushes
and watercolors. This is just to have an idea. And then in this case, we go silent using
colored pencils. These colors will dissolve with the water when I
apply the watercolor does, is why they always use
watercolor pencils. So we are having here a, an idea on how to paint
or beautiful petals. So when we start the
planning, the watercolors, it is easier for us to create the shapes at manys and
try to overlap them. The petals, as I showed you
with the reference picture. Then we can paint the stem. Not to find is this
thick a stem and leaves, which are big leaves. This self flower is
looking at the toe where it is on
front of the light, is facing, do forward. So I will see you
in the next video.
6. Adding Watercolor to the Front View Sunflower: Let's place our colors
on the mixing blade. This is Barn, Amber is a
dark brownie, toasty colon. Then I have yellow ocher. I am placing the colors together that we are going to
be using together. Yellow ocher. Then I have permanent
jello lemon. This is a very light yellow and the one that we are going to be using most for the petals. Permanent yellow, lemon. And this is a more
darker yellow deep. Then I have a lighter green, permanent getting n
The brand is Holbein. So be careful when you
choose your colors because they can differ on
the brand that you're using. The last is BDB and
some more darker green. So we're all set. And we can start
then applied in, or watercolors on our painting. We're starting in the
center of the sunflower using or Q-tips or codon stop. Codon sticks. I don't know how
to call this one. We are just going
around the center of our sunflower painting
with our Q-tips. Just touching the
paper with our cubic. So we have these
little dots that resembles the seeds of
order water or some flower. We're going to paint
the outer part of the circle or the center. Then when we're done with this first part
of the painting, we are going to use the
other tip of our Q-tips and they occur or more
lighter color like a line. So we started to have
two shades on this and that officer of our
sunflower to give more structure and contrast. And then the small
centered that we have, we can continue with
the darker color. Just touching in doing
some little dots. And it is good if you
leave some white spaces. Because we can then
interchange the two colors. Using the Q-tips gibbs, this model bluer
effect that make the center a little bit
more whimsical texture. You can see that texture. This is the fierce later. And then of course
we are going to be retouching and correcting or adding more color if we need. As the water colors
start to dry. For now, I think it is enough
and we can proceed to start painting the other elements
on our beautiful sunflower. I will see you in
the next video.
7. Painting the Petals of the Front View Sunflower: To paint the petals, we are going to be using
the deepest yellow and lemon, permanent lemon. Yellow. I will first clean water. I'm using a round brush
for this procedure and I am just adding water
to all the patterns. Most of them the fittest
that I'm starting to paint, because we are going to be using the wet-on-wet technique. The fierce ledger will be
with or lighter jello, in this case, the
permanent yellow lemon. You just need it to go through all the patents that
you have endured. Painting, following those
reference lines and adding a very light swash
with Azure jailer lemma. This is the first layer. Afterwards, we are going
to be adding more color. And of course, we
are going to be creating contrast using that
deep and yellow as well. Go through all the patterns
and corrected that shapes. If you need. And keep doing this until your petals are filled
with beautiful colors. Now, before our watercolor
to dry completely, Let's add some touches
of our deep jello. You can also use
orange, if you prefer. Does that I want on
my self flower to look like this yellow sunflowers that I see on the fields. Here. They are very
bright, a jello. But to add contrast, to need that CEJ. So I didn't use any, in this case, the journal. The petals are more pointing, pointy at the ends. But you can make it round
if you prefer as well. Just a look at the
reference picture. If you have a look at the
ones that I gave to you or on the template that you can download on the resources
for this class. As you can see, I
added a little bit of water to all the
rest of the petals. And now I am adding the
fierce ledger of the jell-o. This sunflower is
looking right back at you can see every petal and the center of the sunflower
pretty perfectly. He's smiling back at you. This is one of the flowers, iconic flowers for the summer, any sort assemble the sun. And when you see this
big sunflower fields, they are really bright. Now I can start to add in a
torturous with my deep jello. You can see IN
adding the bottom of the petals near the center. Because I want just this
part to become a little bit more infused with color. Adding water to be
able to move the color around so it doesn't
get too dark. Then just with my brush, wet with clean water, I will blend these two colors more smoothly. It is taking a really nice
contrast with this two colors. You can also use
this deeper order, darker color to
shape the petals. Going through all the
shapes of your patterns and making it more defined. So you can see them because
the jello is really light. I prefer a more loose style. But some people prefer
a more defined, perfect shape or even realistic
look on the paintings. Looking pretty nice. I really am liking these
two colors together. And it is super fast. I think the painted this flower. Some people may think
it is difficult, but in reality it's more
easier than they think. So I encourage you to take your brushes and
start painting them. Just following this
real time class. Because this is, I love to give you the feeling that
you are painting with me, not just looking at a
speed that PBL weeks, which shows you the final piece. Without telling you
how the process works. It is starting to look
a lot like a sunflower. Identically liking this one. Keeps just adding the color. So there were do need
to want at them. And I will see you
in the next video.
8. Last Details and Reveal of the Front View Sunflower: Time to paint the
stem and the leaves. And for that we have
here are colored with the permanent
green and the VDB. And we're just going
to add the colors. The first letter is the permanent
green, the lighter one. Then we are going to
be adding some touches of the ability to give
structure to the stem. Just very easy. And to make the contrast
with these two colors, then we are going to be
continuing with the leaves. You can go more specific
and more detail on the lips. If you prefer. A matter of preference. And it is super easy to do
these stem and this ellipse. Then mix the two colors and
paint the other leaves. With your brush is pretty wet. The colors around easily integer paper tried to make
it the contrast between the two colors so
the leaves get more structured and looks cohesive. This is the fierce later, then we are going to be adding
some details to this leaf. They are more dry. For now, we're just
letting these additives and proceed with
the other details. On the center of order. Safflower, going through again with Q-tips and correcting and adding color there,
what do we need? What we think we need more
color and more contrast between the colors in the
center of our sunflower. If you think you need a little bit more
lightness in the center, then this is the
moment do need to add that gives a beautiful structured to or some flour. You see the depth here. It is looking really beautiful. Now, let's add the last details on the leaves that now
that they are dry, we're using and the dark
is getting that we have. And add in the other center of the leaves with a very
light small brush. This more lines to define
the center of our lives. And we're going to do the
same on the other leaves. Keeping it very light. Line, fine. This leaf has a turn, so try to keep it that turn. So you get the real effect of this sunflower looking
at to as myelin, super-happy in a summer day. When do you add happy
with the results? Then you can leave it as it is. And then we can continue the other details to our painting, which is some splashes with
the light green background, gets a little bit more
of life and you can also paint a background if you
want to do that. Okay? And you can also
use a mixed medium. You're going to use acrylics or gouache for the background. And I think it would
be a very nice TO watch or twist to
this sunflower. Do as many splashes
I still want. You can interchange
the colors as well. Then forget to add a
duty to your painting. Even if you are
using this Azekah. Now, our beautiful
painting is done. And you can see how
beautiful and how happy. And it is not
completely dry yet, but I will show you when this to completely dry so as you
can see the beautifulness. But we're here at the end
of the road looking at or beautiful some flour and how
easy and beautiful it is. I can wait to see
what you create. The members, you can upload your class project to the
class session for this class. I will see you in
the next video.
9. Side View Sunflower : Let's paint or side
view, sunflower. This, I have transfer this
to my watercolor paper. And remember you can
download a template and transfer it to your
watercolor paper using this simple technique, adding the graph it on
the back of the page and then placing it onto
paper like a stencil methods. Once you have your template
to the watercolor paper, then fix your paper
onto a surface. For the transfer. I use the watercolor pencils
in yellow and green. You can use your
pencil if you prefer. Now we are ready to
start adding the color. And we start, we are
going to be starting in the middle and then going through all the elements of art, beautiful side view, some flour. So let's get started. I will see you in
the next video.
10. Adding the Watercolor Side View Sunflower : Throughout the
watercolors, we're using the same shades that we use for the Fernando
view sunflower. I then just activating
again the colors because they are
a little bit dry. They have the water. And I will start in the
center of our sunflower, as we did in the last painting, using the darker brown, which is Barn Amber. And start adding those
little dots with the Q-tips. This technique is really fabulous to create
this beautiful texture on the center of
our sunflower or any flower that
you want to paint. This is the best method
that you can use. On my opinion, because it gives this beautiful dots with a space in-between that create
this beautiful texture. Let me know if you have another
nice technique to paint this type of texture
on the painting, say, I will love to
try them as well. In here, alternating
with my lighter ocher. To create this effect
of the seeds on the center of our flower. You can use r-square brush, but do need to be
more precise with the deep when you start
to create those dots. But I think this is just
brilliant, a brilliant tool. Now I will start painting
the petals with mine. Lemon, yellow deep, and adding water to the petals as we did
in the previous painting. You, at this point you may have an idea on how to proceed
to add the watercolors. We are using the wet
on wet technique. The technique a
cycle it through, allow or watercolors to ground
freely on the each petal. And then the blending
becomes more beautiful. We are starting with
a lighter yellow, in this case, the lemon jello. And we are going to be
painting all the patents. And you can see this side view. Some flowers like
look into the left, looking for the sun
because the sunflowers, the name itself tells
us that this has, this add the flowers of the sun. And then they look like a sun. And they are always looking
where the light is. And I wanted to show
you how to create a piece with your sunflower
painting as well. We are adding the fierce
leg using or lighter jello. It is really a
beautiful process. And remember you can
always reach AYP, your petals with your brush. And until you are super
happy with the shapes. And even you can
add more petals if to say that you need the more
petals, interior painting. I think getting that. And
now we can start adding some contrast using Jell-O. We inhale this one. We are trying to define the petals
using, or the cello. As you can see, I didn't
go in around the line, the outer lines of petals. So it does start to become more visible that
they are petals. And this will give the
painting a more cohesive look. And because my
painting is still wet, the color lands and blend with the color
that we are ready, place it onto the petals. You can also use orange
for this process. But try to keep the
orange light intensity. Keep adding colors to all
the pattern and try to keep the petals separate. So do you have the real
shape of the side? Look sunflower. Looking for the
light coming from the left and going
to all the lines of the petals so they
become more defined. And then we're going off course, going through all of them and
blending those two shades. So the lines doesn't seems to
be too hard when it dries. Here. I am just adding
more definition to these petals as they are the ones that are in
front of our painting. And this is the good
thing with watercolors. You can always reshape them. If you see that it
needs some reshaping. Just add a little bit of water. Now we are going through
again on the center with Q-tips and adding some dots here and there to
make it this center more cohesive as well. This makes the painting black or blue because it's
like you're adding the color, but at the same time you
are picking up the colors. And that is why this
technique is so fabulous because it gives us the two
textures at the same time, adding colors and picking it up. And then you become, you have these white
spaces between the dots. Then interchange the two colors. So you have this contrast
like the real ones. Because these are
the new seats and the ones that are more
toasty by the sun. And this is why this always
look like two colors in them. Then pick up some of these
lighter color because it's mixing too much
because it was too dry. I will see you in
the next video.
11. Side View Sunflower Adding Details: Now we can add another digit of the on the center of the
sunflower using archetypes, more brown to give more
contrast on these two colors. Here under correcting and
adding in at the same time, picking up colors to
create this effect. And adding some contrast
on these two colors. Okay, now let's
start painting in the back of the sunflower. And we are using for that, the greens here
because when you look at a sunflower safflower, the bag, they have these leaves. And then the petals are
on top of those leaves, this little green leaves. And we're going to be painting these in the
template and you have all these lines and you will be able to just go through
with watercolors. But if you are more capable of painting
by yourself or drawing, drawing by yourself, and you
have a reference picture. Of course, you can do it
as do, which maybe do. Some flower is looking to the right instead of the
left, like this one. And this is totally,
perfectly okay. Remember you can always use your own style, your
own creativity. Go a little bit
further and present a different view depending on the style you are looking
at with the darker green, then we are going to be
painting in this part of the back of the sunflower to give more contrast and
structure to or painting. Then we are going to be painting in the stem
and the leaves. For this time we
are using, again, the mix of the two
greens or a stem have as well structured and
blend of these two colors. Just like this, and try to
have a little bit of water in the brush so the
color runs easily. Antigen paper. Remember
the stem of the sunflower? Big. They are not small stems because this flower can
be very, very, very big. The flower itself, so it needs
a really strong support. That is why the
stems is so thick. Now we're painting the leaves
using the same two colors. Starting with the
outlined and then adding or moving the
color into the center of the flower and keeping some white spaces to
give them a structure. In contrast, it is always
important that do pay attention of white-space
because they resemble the light and we want
them to be there. Then adding some green to create these shadows inside or stem. And then look into perfect, looking. Very, very nice. And we can go ahead and add
these little darker spots. And this is the fifth spot. We're coming back to
this to add more detail when it's more dry
or dry completely. Now we can proceed
with this that adding some details on the flower and the patterns and give
more structure to them. Using the deep agenda
or the dark is Jell-O, you have the palette. And using a fine brush,
a smaller brush, we're going through
all the petals, giving them more definition. And a structure. Having a wet on dry
situation here or technique. So we can allow the color
to stay on the paper. Go as loudly as always. And you will have a
beautiful define sunflower. Now you can see a little
bit more closer on how I am adding this defining
lines on the petals. We are doing this on
all of the petals. So we create a
more defined view. Or Luke or some flour. Okay, We have a little
more of petals to go. And we're going to
be doing the same with all or sunflower, meaning the bug of the sunflower and the
stem of the sunflower. Keep the lines as
fine as you can. And go slowly
through all of them. And adding some touches
in the middle to define the center of the petal. I'm trying to keep the harmonious
position of each petal. It may be a little
bit difficult to see where the line
starts and ends. But if you add a slow, then you can see very clearly, we are almost done here. Just a couple of petals MOD. And then we can
see if we need to add something else or the
water to the diffuse, the colors are more
lines and so on. We are with me to keep an eye on our painting and see
how it is evolving. So we can adjust and we can correct and get the results
that we really want. These two petals are
overlapping itself. And it is a little
bit difficult to see. But if you go as low as you can see that there are two petals, we are ready with the petals
definition and D. Then. Now we can proceed with the other elements
of our side view. Some flower, which is the back of the
sunflower and the stem. We're going through
this with our green, tracing some lines
to give definition. Mixing the two greens. So we have a darker but with
Who's of the lighter green. And then we can define
these little lines here, these little petals or leaves. And giving them more
depth and extraction. And a more
three-dimensional look. It is always amazing how just little lines and the
position of this lines, how it changed the
whole composition that we're creating here. It's like going with
your fine liner, but this is just
Pradesh watercolors. So it is looking really nice. I really like this. And we are almost done again with our site
abuse sunflower, and I hope you are
enjoying this process. And I really can't wait to see your class project on the class project section
for this class as well. Any suggestion or any
idea for new classes, you can always talk to me. You can create a discussion
on the underneath this class and we can
interact to each other. If you have any
questions at all. Please don't hesitate
on letting me know. I will gladly get back at two. I will see you in
the next video.
12. Side View Sunflower The Reveal: To finish the details on
the leaves, we are using, the dark green and we're
going through all the lines again and then adding the
inner lines on the leaves. So it gets more
defined and structure. The leaves from the sunflowers
are very weak as well. So we need to take
that in consideration. Then we are going to be adding some little details
here and there. On. The other elements are the stem. And we are almost done. Done. Now, let's add some splashes
using my own technique, the flat brush and
the bamboo stick, and a very light wet watercolor. So let's try how it look. Nice. Water control is
very important here, so you don't damage the
painting with big splashes. At least you want them. So we are going to
be at integrins here on the idea of the
leaves and the stem. And then we're changing
the color to add the splashes on top
of the sunflower. Mixing the two colors
together more darker. Jello and then
splashing, splashing, splashing a little
bit here and there, and on top of the sunflower to get more structured through
the center of the flower. And that's what perfection. Now we can add or six NADH two, don't forget to
always sign and your paintings and then
remove the tapes and or painting we be ready to display to give to another
one or two for the home? Does is up to you. What do you want to do with
their beautiful painting? And it is always so nice to see how crisp the
edges of our painting. After we peel off the tape. And if you use the
technique that I always used to minimize it, the glue on the tape so you
don't damage your paper. You will see how satisfied in this peeling
off the paper is. So odd painting is ready. Now you can use these
beautiful painting. As you wish. You can add a lettering,
a greetings card, or a happy birthday or
happy dance given as well. And you will put a smile on their faces of the
people that receive them. I can't wait to see
what the eighth, please make sure you do. Watch the project sample
that I always put on the class project section and
resources for this class. And I can't wait to see
and interact with you about your beautiful painting. Thank you so much and I will
see you in the next video.
13. Class Project: For your class project
is super easy. You can tell with me in the class project section
for this class here. And then it's the BVM. There is a tab that says
Projects and Resources, and you click there, and then on the side will appear getting button and click that. And then you can easily download two beautiful predicts
with me, Chad, into your class, your progress, your materials,
your final pieces. I always left to do a sample
project on the class. So you can see a half and a beautiful idea on how to
upload your class projects. Take advantage of that and have the inspiration to upload
your class project. And I can't wait to see what. Please check that with me. I will be super, super happy and making a happy dance for you. So I will see you
in the next video.
14. Congratulations & Thank You : Thank you so much for
completing the class. This is a big accomplishment for taking this class
and completing them. That is a wonderful thing. And I congratulate
you from my heart. Thank you for taking the
class, for having fun, for being willing to
learn something new. And of course, I'm super
happy to hear from you too, can leave a review for
this class telling me, what do you think about it? Or giving me they're
suggesting for new classes. Or if you have any questions, you can always good in contact with me through the
discussion is starting a conversation or
asking a question whether we do need
to let me know. And of course we can always interact in the class
project section. When you upload your
class project section, I will get in touch with you. Of course. You can
always follow me here on Skillshare with keeping contact and do don't miss any updates, any new class, any thing
that I wanted to chat with. You can also follow me
on Instagram issue, have one and we can interact
over there as well. And if you upload
your work there, I will be telling them in
my stories or in my feet. I'm super happy to have
you in class and I can't wait to see you in my
next classes get created, and I will see you
in my next classes. Bye bye.
 Artjourneywithme Heidi, ARTIST AND FACILITATOR