Transcripts
1. Introduction : Hi guys. Hello everyone. Welcome back to my class. During my today's tutorial, I will teach you how the plant lovely floral wreath in watercolor style. And I will teach you how to paint watercolor, quote, into the 40 rate. And other things that I will teach you how to change the color or the entire race. I hope you liked it. And also, I prepared for your new watercolor brushes along these watercolor paper color palette and my own sketch and my own paintings as I draw. Feel free to use them for your own projects. And guys, I hope you are ready. And I worked with very thankful if you could follow me and share your own projects in projects and sources section. And a visual up in, if you're ready, grab your iPad, Apple pencil, and let's paint together. Guys, I'm a freelance illustrator. Welcome back to my class and let's paint altogether called illustration with character and botanicals. In Procreate, we will explore digital watercolor and create a beautiful illustration with different elements. And in the end of my class, you will learn more about procreate composition, especially how to use layers, clipping mask, Alpha Lock Selection Tool can how to texture, volume and color variation to your picture. And most importantly, you will learn you painting technique. You can use the illustration you create for Poston and Instagram added to your portfolio or sell it on Etsy damn road and so on. Or just share it with someone whom you really like. I'm sure zeta will be so happy, they get an illustration that is created by you. Today. I want to show you, is it watercolor is so simple and it's a real fun. And in the end of my class, you can see it. Today. I will teach you how to create texture paper. How to use stem brushes. What is composition? Have to ban, picture, result, reference picture. How to use my default Procreate brushes for watercolor painting. How to apply my new watercolor technique? What as in you and says you need to know if you want to create a watercolor illustration, how to use Alpha Lock, clipping mask, how to add texture to your artwork. I will also show you how to add shades and highlights. I will show you my whole process from start to finish. And as a bonus, I will share with you my new textured paper. Lots of custom brushes and new watercolor brushes, color palette that I created. I will also add file of my pictures that I drew. Feel free to use it for your own art projects. This class is great for intermediate level, also can be useful for beginners. If you watched my previous classes, experienced artists, probably here, you can find an inspiration and your ways how to create botanical illustration, rescued character. Your class project will be next. Create an illustration, this character and botanicals using the tips and brushes that I gave you today. I will use Procreate for this class, please, iPad and Apple Pencil. So if you have it or some mass and drawing pets or just regular watercolor paper and veins. Please join our class, and good luck. Okay.
2. Creating Paper: Wow guys, let's get started. And first of all, we find that import all our freebies into Procreate. And the second step that we will do is given a great texture paper. And I will explain you how to use my watercolor brushes that I created for this class along his color palette. Then I will explain more what we're actually going to do today. So let's get started. And first of all, I need to tap Plus in Procreate and after setTab plastic bag. After, as you might see, idle speech from pixels into inches, Lexis. And next step, I will arrive Nian. 11 inches weighs 300 DPI resolution and a maximum layers that we might have 0s 56 because that should be enough. And after sad failure or takes a paper like that. And next step we need to export all our previous case. Once again, where can you get all my freebies? You need to open my class in browser. It's very important because if you're opens at in Skillshare app, some of my freebies might not be reasonable. So your goal open in Chrome or Safari, my class. And after that you go to Projects and sources section. And in the right corner and this headline, the resources you might get all my freebies. Okay, next step, bend the downloaded all of ribose is a might be in a folder Downloads. You need to tap action button, tap, Add and tap, insert the file. And opposite three, we'll import our watercolor paper into Procreate. Next video rotates a paper and that fit the screen. After sack field replicates layer 2 times. And in bland and modes who speech to linear burn mode and colorbar and act as a doublet case it one more time, leaner birth. And why more time colorbar and opposite merge together. So those two layers and after that logger linear burn mode till around 50 percent. Select two layers and tap group. Next, rename. Have does it create couple of new layers? Place our paper layer on the top of everything else. It's very important to paint on the nice out paper layer group. Because if you're, you will not have this authentic watercolor texture. This y. Let's just rename it. Okay guys, and now we can talk about brushes as the first one is blue flowers. A brush that I created recently as this precious perfect for creating flowers, especially peonies. It's very soft and edges and the very sharp in the middle. And this as a brush is both crops or brush that I created recently. This brush is great for leaves and in some inky lines like sad. And we also have native Procreate brushes such as miracle rubberized 6-bit pencil. There are layer brush which is cool for add in some texture along with, and you can also use it as a blender. Dry brush, very cool brush. It can help you to add. So strokes, dry effects. And we'll use it. When we got to add some texture and brush pen, we're going to write something today. So I'm going to use this brush for adding those beautiful quotes or whatever you want to sell. So now you know a lot about our Russia that we have today for our class. And we also have color palette that's called florals. As you see, we have around a variety of different shades and we're going to use it a lot of times today. And the second theme that we will do it, we need the expert texts that we're going to use today and we will use it as a base for our calligraphy paint. So says My handwriting and we're going to use it as a base. So trying to art you don't actually need to use it. But if you want, of course you can do or you would use some of the forms that you already have in Procreate. So it's all up to you guys. And first things that we're doing, we're going to create a sketch, and I'm going to use six per pencil.
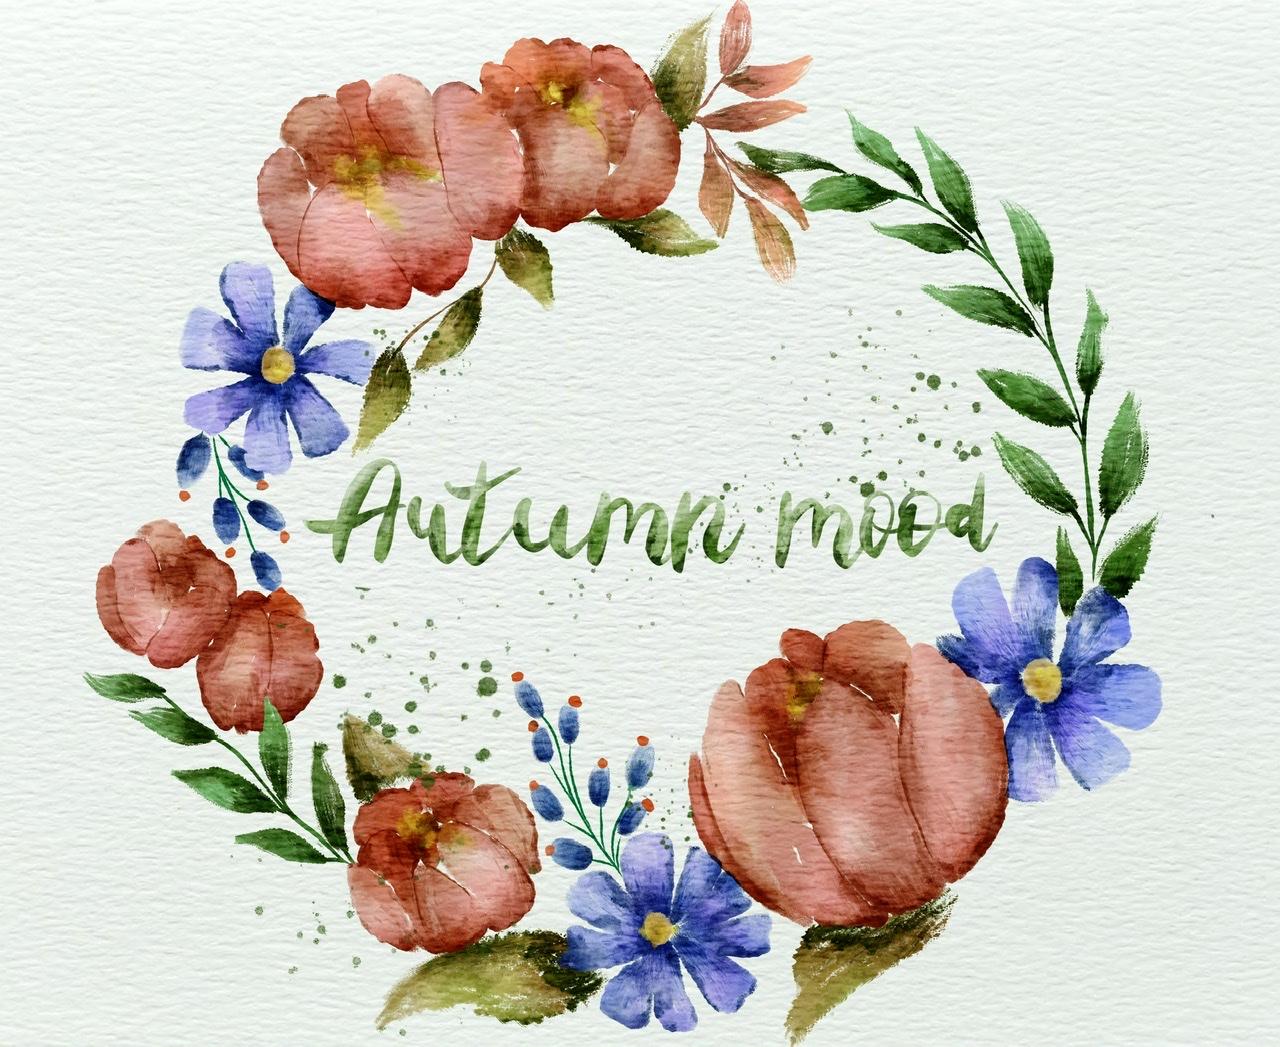
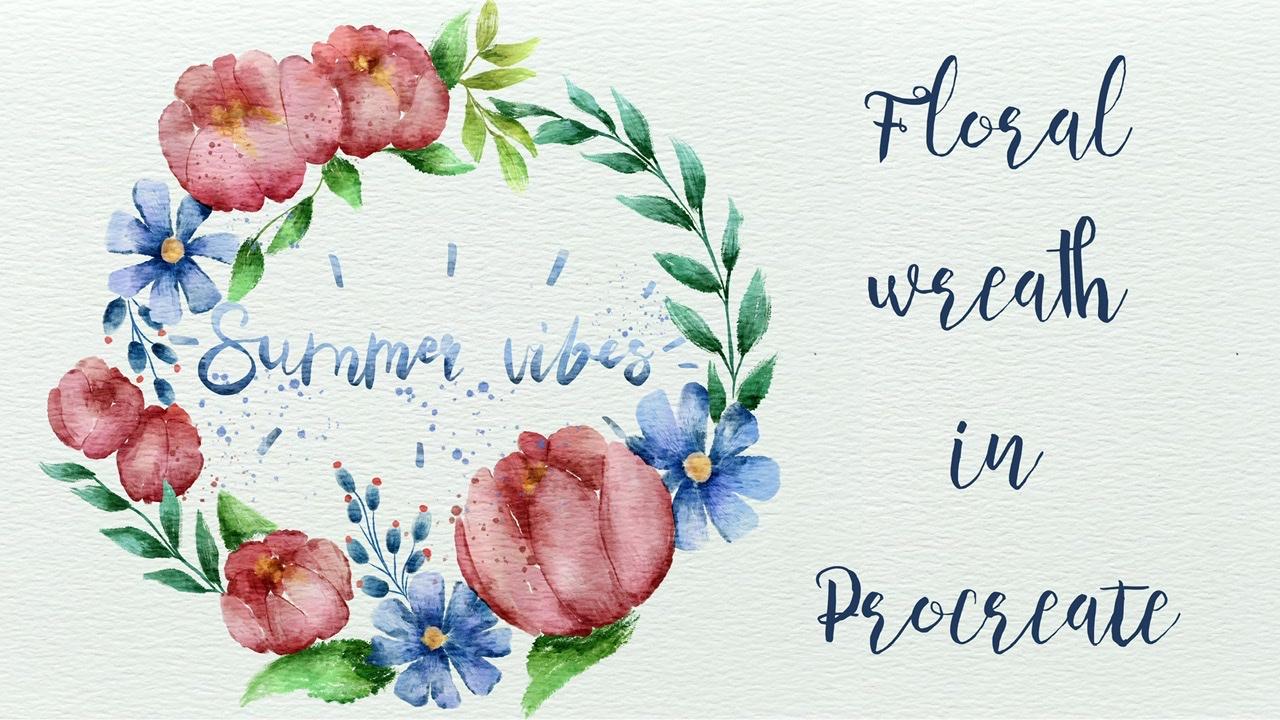
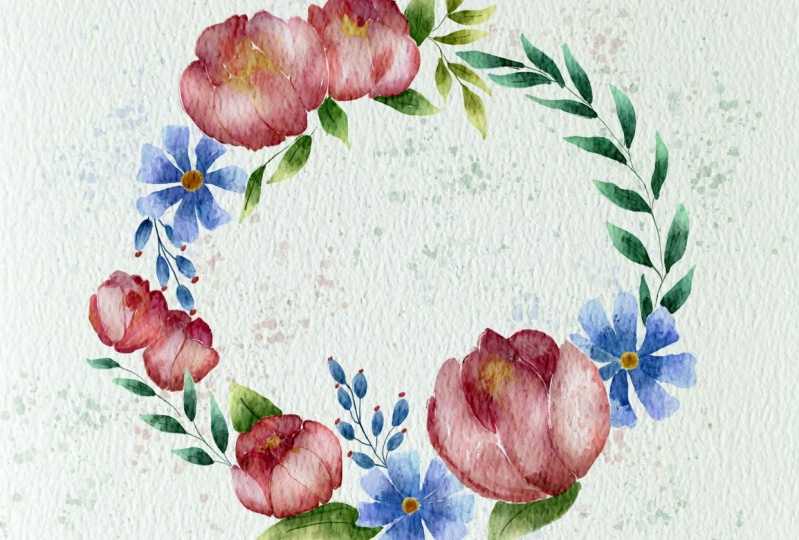
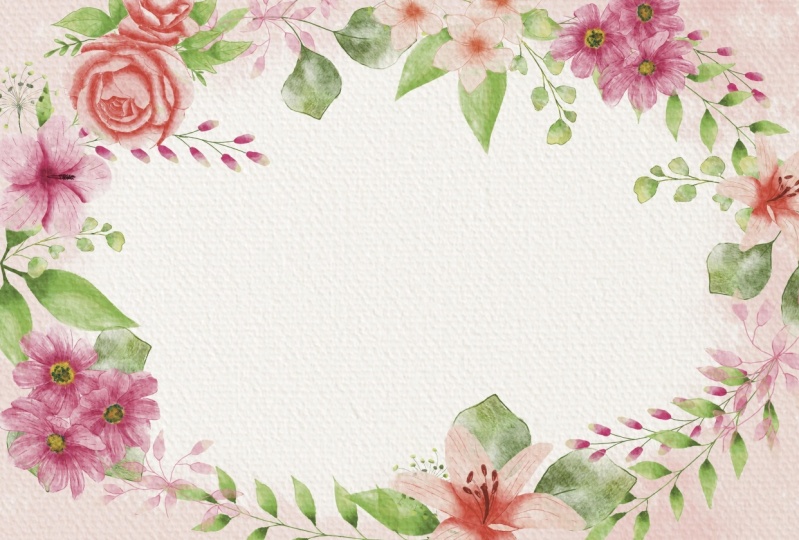
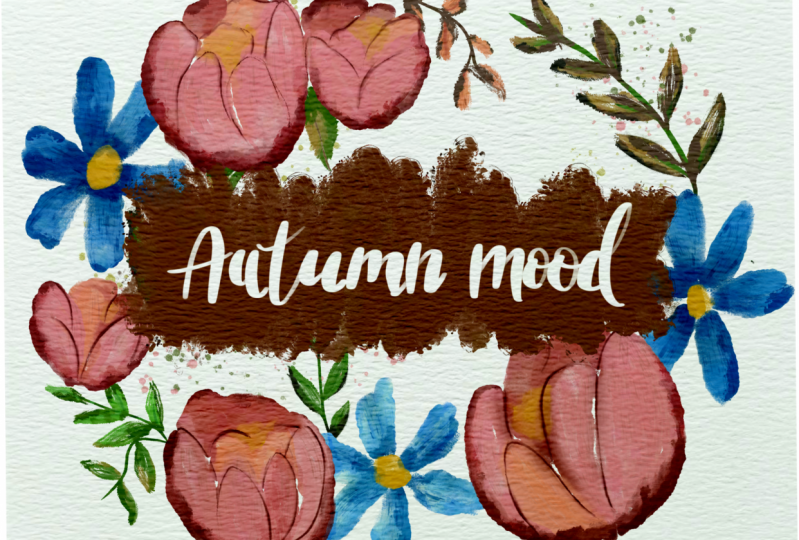
3. Creating Sketch: Guys, I have some rough sketch that I created because we need to pay in floral frame. And inside a floral frame we can write some quotes like as you see, we have summer wipes or auto mode. And dependent on a color of our leaves, we actually going to change the title. And let's just start one by one. Once again be created one more layer underneath of everything. And the 2k 6-bit pencil brush, native procreate brush. And first thing that we'll do is we need to create a circle. Tab, make it slightly weaker. Edit Shape tab ellipse. If you're ordering can be some kind of circle. Place it somewhere in the center. We're going to move it the summary here. Okay, great. Either create one more layer on the top because I don't want to pay and toward the top of our circle, and we're going to add some Paeony different kinds of flowers leaves altogether all around this circle. So I'm going to paint circle here, this here we have some flower at all alone, resist floral. So I'll just show it V sub base shapes where you're going to have some, some flowers. Flower, tiny flower in this area and here, x hat. So next tab is, it would've ended like step-by-step. And I will start off is this fluoro. And once again, remember this is peony, so it looks like grows a little bit about, of course, is slightly different. And that is if you want to know how they look like. My suggestion, if you might go open browser and go to the website and unsplash.com and check it. So next we need to tap peony. Guess why I like to use this website because here you might use pictures for personal and commercial purposes. So you might look at SAMHSA plans and you might think was it might look cool and you might use it as a reference. So what I'm gonna do right now, actually, okay, here we have an example of like very cool example of peonies, how to draw them. And I think I will use them as a reference. Yep, I can. Let's just look at Sam and just pay in complex Tempest tab like petal by petal. And let's try to imitate the same. In the same way, how to draws us beautiful florals. Once again, we're going to use watercolor like accurate than is completely normal. Like summary here. I like this floral here. So say one visit to white. And I'm going to paint one more. Something like that. Again. I want to add one more fluoro and it will be different one, I don't remember English name but not like it's kind of purple. It has purple petals and the inside is yellow. So once again, if you want to add some other florals, it's fine. Just go to unsplash.com or if you want, you might go to Pinterest, but of course don't copy anything. And I think I want to add one more floral summary in this area. And once again, you don't need to be accurate in like on a sketch. Later we're going to turn it off. So as this kitchen should have a need for adding details. But we want to keep, et cetera. Now they might add some leaves all around. And you might think where you want to add. And just tried to remember, like all leaves, flowers, they need to have the same direction. So your conscious paint randomly the leaves like in different ways, everything should be very small in liquid. And it can be slightly previa next year. So we also have some overlap. Some of these can go like on top of a flowers. And it's normal. And also interpret some predict peak leave behind this peony like this. I can now let's go to this way. I think here is this part of the slightly empty paint behind this part. So as you might see. And then we added one more planned and they're very close next to each other. This is not that beautiful, doesn't look organic. So my citation tried to find a nicer place where you can add plant, which might look like more cake. Okay, I'm a better way. So this area, I think we need to add a couple of leaves. Some leaves here. I think we might call this piece finished and actually how it looks. So I'm going to select these two layers and I will press fit to screen now it's in the center. And later valued color, we will add some quotes. So we'll turn off our circle. We don't need it anymore. And as you might see, now, our floral flame frame looks pretty good. I will still keep this reference picture as reference because I need to see how the color peony, but we have shade and so on. But I'm pretty satisfied with what we have is our frame. So the next step we'll create one more layer on the knees. And we're going to start adding some feathers.
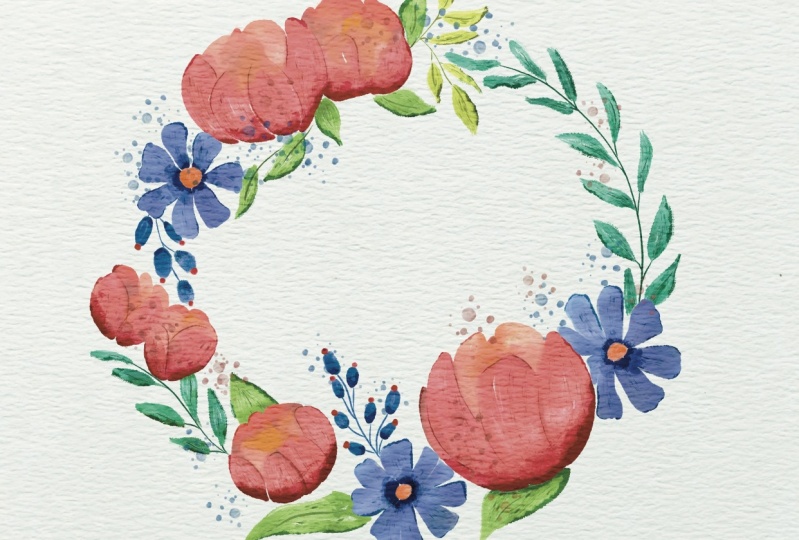
4. Adding Colors: Let's move the legs, Barth, and there's keep in mind that I need to play into our botanicals, our leaves separately prompts at flowers because later I'm going to change the color of it. So I'm going to use both crap first and I will start with plants. I'm on a new layer. Let's keep painting. My situation. Let's make this kitsch not set saturated thoughts it to be so of course I need to see what I'm painting. So 50 percent and after log our sketch layer because in case if you're afraid of paint on it like what I do, I think I can pay into this theme and I wanted to do was add. I'm going to paint it likely that means like for example, when we paint something, I'll make it bigger and our dry brush is so dry. Then after that when we are trying to paint on it, Pope didn't cover like a dozen towers, the whole area like this. Same fill in USA. Very dry effect. So our aim today is to try to imitate away how your paint something by one, you have just a little bit of water. The rest of the leaves are pretty small and I'm going to change the color. Slightly bluish. Controls as size. So it's like your have some dry FX and it's the same time and still little bit indulgent. It might leave some white gaps. It's also fine. Now let's go to this part and I'm going to change the color of safe to say sleeves little bit. I don't want to have so so pre-lab pins, slightly creation. I like this color. I forgot about one more leaf here. I'll add a little bit later and switch TO nasa. They forgot to add one more leaf. Over there. I can call up. Now guys, what we should do are we going to create one more layer, because as I told you, we need to paint florals on a different layer. And I'm going to use this. Let me things is dark blue color. I think. Blue-collar and purples us a very good combination. So it's took colors. And I'm going to use both loved flowers and as a brush. This brush is pretty big. It's pressure sensitive. So if you want to have more textured look, don't press so hard by it. If you want to have like solid look like this. I suspect you press harder. Like sad. Now let's go to orange color. And the inside part, all of source florals. But as I told you, it's yellowish. I wanted to make it more orange. And next part, I'm going to go and grab this light purple color. Here. I want to add some petals. I'm going to do it on a new layer. Ok, and I have place it underneath hue saturation and brightness. And I want to make this floral little bit lighter. So I'll just increase the brightness slightly like set. Because later I want to add some shades and original layers of trust. One should be light there. And now we're ready to move towards a plants to our peonies. And I'm going to go and perhaps a slightly pinkish color have same brush. I actually have a few ways. So this is the first way. And as Juan is like mostly for painting roses, yeah, run you, just start adding tiny lion. And after one more tiny line and painting like step-by-step. Piano ego. A little bit different. If pure colors like Sanchez. But once again, you might call a way more easier. And now if not call this a bit darker color. And later we're going to blend those colors. Cancer can now orange color. As you might see inside, we have some yellowish and slows watercolor illustration and glands, some parts one on each other. But before I start doing said, I actually want TO remoter transparency what we did before a member. And I forgot about one more thing. Yeah, go Crap, reddish color. Let's return to our planned this one. And I wanted to add this reddish color all around. Probably want to make it create new layer on a new layer. Next, I want to finish painting florals. And I'll create one more layer on top. And after, I'm going to grab as mercury brush, greenish color, I think we need to lower some of our sketch layer even more like that's really seen. The careful Lockett's don't paint on this layer. Let's check. His arrest is God. Let's go on to say is pretty bright color. Slightly darker shade. Because this flower darker. If you want, you might just finished painting some lines here. And let's go and crafts this bluish color. Next, sad, now cream color. Okay, great. So now we can turn off our sketch layer. We don't need that anymore. So my next step is I'm going to go applicator layer one more time, go to lower layer. And after adjustments, hue, saturation, brightness and tap Layer and makes a lower layer like white, completely wide. I will duplicate it two or three times and large that the cancer and merge together. Why I chose it, guys? Because in this way, bread, I merged together the layer. So I'll show you. So here, as you might see, our floral is very transparent, this layer, and we need to remove transparency. We don't want to have this overlap is, so that's why I duplicate the layers and I will merge it together. Great goes by and I drew his head. As you might see now, our florals are not transparent animal. When you've got the same with all our plans and match together. The leg, this is so bright. Velocity till 30 percent merge together before so on. Perhaps a saturated color go to lower layer. Hue saturation brightness turned to maximum, replicated couple of times and merged together. And the rest, I don't need to merge anything either need to blend and create one more layer.
5. Adding Shades and Highlights : So the next step is guys, I will go to our floral here and that'll tap Alpha Lock. So it means that now I can just paint analysis selected area. And I will grab Terrell airbrush. And I want to nicely plant like some colors one and a charge per one to make it more natural. And if you wanted to do that, so obviously some colors will blend one and another flick. What I'm going to do here, That's pretty authentic. And yellow colors summary here. Same area. Now let's go to this plant, this floral, and let's just plan on an another. And as you see, I don't go beyond the Alliance. I can't do it because an alpha lock you can just pay an on areas at, let us already like select that draw painted before axis. Okay, I like the way how it looks is producing thick. And I'll turn off our Alpha Lock mode. And next step, I will create one more layer on the top of our peonies and I will press clipping mask. So now the same procedure. But unlike Alpha Lock clipping max, we're always can turn off. And all the changes that we had were in on a new layer. And if you don't like them, we can just simply erase it. So I'm going to grab our lab brush and I want to add some shades and I will go and I tap multiply. So now this layer is a blending mode is changed. And I'm going to go in and grabs this pinkish color. Maybe slightly darker. But what I like about this brush and about this mode, because when we paint things to the multiply mode, to shades will be slightly darker. And once again, we are on a new layer and select Clipping Mask Mode and randomly paint everything that we don't go beyond two lines you see? And you're going to like it. We can just simply m. Okay? Say we can prove his eyes are flowers, least one clipping mask. This one. We're going to go and grab a slightly darker color, say my logo to multiply layer. Add some shades in this area. Some shades here, all around here. And say him, I'm going to inoculate, merged together and merge together. Same I'm going to do V's, our plans. These botanicals clipping, mask, multiply, multiply. Like said. Okay, I do lags away how it looks. Next step we're going to add some color variations and I'm going to show you how to dose it I gave you are ready to add some color variations how to dose it. We're going to go to our peonies and we're going to grab my selection tool freehand. And now I want to select some, some parts of our peonies. And I'm going to change the tolerance as part phasor around certain percent saturation brightness and tap layer. You might make it lighter or darker, darker, It's up to you. Or you might, as you might see on my change the color a little bit. So as you might say, made it a little bit lighter because I think that could be even more beautiful. And I'm going to keep it like sad. So I added some light color variations to our peonies and say look very beautiful. And if you want, you might dark and some of the areas, for example, you can go grab selection tool. And inside owes his part. I think it wouldn't be prayed to make it. Archaea make darker and darker and a little bit darker and some dark areas here. And after six professor, 12 percent TAB, Saturation, Brightness, tap layer. And I'm going to darken it. And of course I will add more saturation because I don't want, I would set dark to simulate obeyed at it has a beautiful patch, beautiful feeling. And let's combine them into a same reason as a part of our plans. Are what you're going to enjoy. So I'm gonna go to this blend, to this flower. I will grab selection tool, press freehand, and select this area and change the color elite. But as you might see here, I made it slightly purplish. Light how it looks. I can, and those same is plans. The other thing is I want to add a tiny bit of shades all around. So the shadow be here. And this area here. As our 16 percent hue saturation, brightness, lovers uprightness, increased situation. And you might play this color variation. So little paint. I want to keep it like said. Perfect. The next step is I'm going to add some texture. And terrible I brush which is a first Tuan, I will create one more layer on top press clipping mask like what I did before. Maybe Multiply. Yeah. Not all around, but in some arts areas set up next to the florals, we shouldn't make it slightly darker. And saying we're going to draw this without adults, I'll merge together, create one more time clipping mask, multiply. And in this area, because here we have two florals next to each other. So I want to make it darker. Same here, our currencies part, darker here. And here. Same wave, clipping mask multiply. And I'm going to make this part a little bit darker. Yeah, like it. So next step I will merge it together and I'm going to go and change the brush to a dry brush. Now I just wanted to add some dry strokes. Make it more white brand to saying create one more layer, press clipping, mask, and write wild-type fly. Hence I almost the end of our painting process. So you see even add some dry strokes. Looks pretty authentic. So the same set as parts of our plants. Reach Locard imputer, create 1 million bras, clipping mask, multiply layer. And I want to make it even darker because those plans, as you might have very, very saturated. And when you add some strokes, try strokes. It makes it like Oracle. Creates a feeling that it's actually try what colors it just dries on a paper. Some tries strokes here all around. Clipping mask, multiply. Slightly darker color. Unless my situation, what else we can go? I actually want to merge together. Marched. And now I'll create one more layer on the top. And i o press clipping mask. And go to multiply layer. It's just because I don't want to separate it. And those parts this time from as a pet house is time for our leaves. I want to have everything in pretty solid way. Pretty dark cave likes had a pretty quick, if you want to make it more saturated, you can duplicate a layer. And as you see, you have this authentic feeling. I have a large deal with 40 percent or 30 percent. I am satisfied once we have and I will merge together. P is our reach LA, one more layer, press clipping mask, multiply. And I'm going to go and speech too, dark green color. And I want to add some shades here, some strokes. Next. Once again, what you can do with them decayed and easy might see now it's more saturated, maybe 60 percent. And I will keep it like that, then merge them together. And great. Now you're going to go towards the last part that I'll peonies clipping mask, multiply layer. Double-check says this is multiply layer and let's give ad and shaped double-check. Now it's more saturated. Like say is Martha together. Then some areas, a few things, it's too sharp. Part then once the pit some shapes how I will post it. I'll create one more layer on the top of the peonies, press clipping mask, grab Terrell airbrush, a, a multiply layer slide with our care of. And now I want to call the lines. I tried to click to the edges. And I wanted to make some parts like very, very edge after sick blend and all same brush. And as you see when you add edges, it looks at a more realistic watercolor dries. It has this edge alliance book spherical, pretty realistic and same I'm going to do with this flower. Clipping mask. Multiply, add some edges. Edges, merge together, merge together. Plans clipping mask. Multiply. Co2 leaves the clipping mask, multiply. Green color. I'll create one more layer on a dog press clipping mask, and I want to add some details. Grab your brush tool, our peonies. And I wanted to separate leaves one from each other. And I'm going to go and grab blending tool edges and stop it. Okay. Guys. So final details, we need to blend some color swatches on each other. And we will add our quad until the end.
6. Adding Quote and Final Details: And the last part, yeah, it's alleged chests, my situation merge everything, blend everything one and another. And in this way what they shouldn't tool, I'm going to go, and I don't combine florals, this one altogether, but they will be separately from, say, leaks. That's very important. Remembers it. I've got the bookcase it together. And I'm going to keep one leg says, I'm gonna go and make it slightly brighter. I'm going to go grab she was a tradition and brightness. And pretty surprised this make it more saturated. If you went through my display around and make its life in a lighter. Maybe to give it too saturated. You can go to curse and also play around and think what you like. And want to keep it like says. Okay, so I likes us Flora florals, they look very beautiful. I'm going to keep it as a CSE lens. Slightly lighter as well. Thanks. Just tiny band. So I keep it in this way. Next, I will merge it together. So such kind of summer brief. Now we're going to just say always a nozzle one. And I'm going to change the color here. I'm going to go to our botanicals abuse attrition and brightness. And I wanted to change that color. Auxin leaves. And as you see, I made it slightly orange. Banks hat. And we're going to do same with our floral here. Less saturation. And if you like, you're going to change the colors. And I went to make it slightly yellowish, yellow EXXAT. So as you may know, there are some, there's some difference in these areas. We can turn it off any CSS reads, it's very saturated and one is slightly darker. And that will merge it together. Lighter, darker bond. So here we have a says auto mode and this is summer wipes. And as you might see here already, some reference. I'm going to keep it to like, like right, It's like summarize settled, make it slightly bigger. This is our reference and I will lower sub bass and take the next thing I crept brush pen. This is calligraphy brush. And you might grab black color, It's fine because later if you'd like color it sudden targeting, right? And it wipes. I once again guys, you have an option. You might just dry your painting skills, your calligraphy writing skills, and just imitate what I did. And I, I do like how it looks. Or is it other thing is you might just go and grab sat phones that you like most and just write it. Here. We're going to keep some or WIP summary here. And I'll do the same. Okay, yeah, this is how some arrives later. I'm going to add some color. And now we have automotive. And how auto motor will be with these brief. I'll create one more layer like this. Turn it off and just how I'll tell you what. I'll love it, sorry Here. And I will keep it like this. So as a neck thing guys, what I will talk about applicants a layer make it less transparent, go to hue saturation brightness and turn the brightness to a maximum. And I and length away how it looks. I'm going to merge it together. Sam be some arrives called the logger layer, hue saturation brightness turned brightness to maximum. Replicate. Merge together. Now guys, I go to the original layer and as you might see, this is why it right now, hue saturation and brightness and I move it to white color. Those same business layer. Saturation brightness turn brightness to maximum. Now it's also wide neck theme. So we're gonna go and grab thoroughly at brush. Grab some colors that you like Moscow, for example, if it's auto mode and it's automotive, probably isn't Keller, We'll be a greenish. And after that they need to press Select. And now, as you might see, the half hour right in its selected, grab our brush and you can start coloring. Feels all carry out basic color. If you press harder you to have more saturated colors. So remember about that. And you might play around, add more colors, make it brighter or darker to some crazy and darker, darker color. And I remember how I showed to you. It might add least hokey it. After dark shades to set edges. I came. So this is auto mode. It looks fun to fall, but I want to make it more white brand called curse. And thanks to the curves, you can make it lighter, brighter. It's apt, says it's auto mode. It looks beautiful, I like so a outlooks, you might add dry brush, make it even more texture. How good did it remember? We will create one more layer on top, press clipping mask MOOC to multiply Dr. brush, this dark green color. And if you lie, you might add more texture to your pain members. This is on a new layer, so if you don't like something, just simply raise it. I'll merge it together. And as Athena, what else you might do if you like, you might go with the spray paints, grab, flicks, and a call to lower layer and just pray little bit conflicts around. And said to my help you to heads of us, then the aquatic habitat. So Dan music first illustration, I'm going to merge it together and merge together, leave a region of paint as his one. Awesome mode illustration is ready. Now let's move to summarize, is a summer arrives illustration. We're going to have our paint and return it. And remember what it press Select. Now, I'll paint that is here and VA can see it really by 2 is to conceive. My suggestion, go and grab bluish color. And let's have Carolyn brush increases size. And here I went to make gradient. Says top of pow, PMDD in real paprika lived here. More colors and go and grab a color. Darker one. Says a bottom, we'll get very, very thin. We get our sum of wives are ready to save it, going to go to curse and to make it slightly lighter, likes his create one layer. And can crack is purplish color. Go to spray. Grandfatherly costs our summer wives paint and this also red, guys. I hope you enjoyed my taste. Now you can go to together, go to our summer vibes, floral wreath and inherited together as rapidly. And as this is the end of our class, I hope you enjoyed it and now you learn more and learn some new techniques. How to create beautiful floral wreath and how to turn your painting like from one color to another one. And now you know that it's so simple. So end of class and now you know how to bend floral wreath for summer and autumn. Now, I'm really happy to see what you're going to create a visual agnosia own art projects. And let's see you guys in your retail. And if you have some questions, suggestions, you might leave some in discussion section. Bye bye.
 Inga Yoon, Digital illustrator and teacher