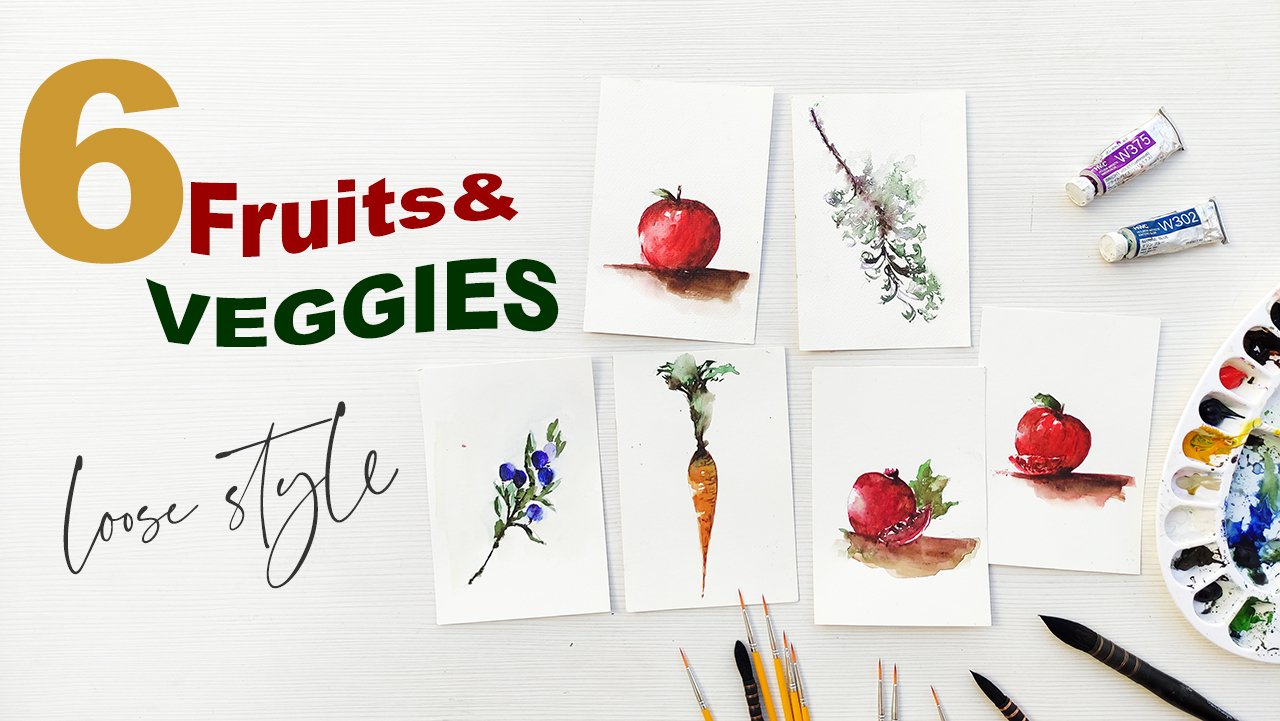
Transcripts
1. Introduction bird paintings1: There is a divine
spark within us. Miracles are supposed to happen and healing
is supposed to cure. Hello. Thank you so much for
joining me in this class. I'm really happy
to have you here. My name is Tyler. I'm a French Filipino
artist and illustrator, currently residing in Spain. And today we will be learning three cute little birds in
watercolors in loose style. My goal is to touch, and he has one sold
through my odd. As a new artist, I'm humbled that
my paintings have been apart of
private collections, exhibited and
represented by galleries all around the globe,
awarded internationally. But most of all, I'm so excited to
be able to share my passion as an art teacher
without further ado. In this class, we'll be painting three little birds in
Louis style in real-time. Well-being, learning about
the basic techniques such as wet on wet, wet on dry, dry brushing,
lifting water control, loose up straightforward
steps from me, from materials, the sketching, and how to be a better
watercolor is this class is designed for intermediate
to advanced students, although beginners, it can also give it a try and
challenge themselves. In general, this glass will
have student to loosen up their paintings and enjoy
the free flowing method. I'm really firm believer that
everyone can do watercolors and achieve their goals as low as they put their
mind and heart into it. Thank you so much for watching and I'm
really looking forward for you and I to be working
together in this project. And it's going to be amazing and it's going
to be really fun. So I hope to see you.
2. Materials: Hello, and welcome
everyone to this class, to the material
part of this class. And so happy to have year and I will be showing you all
the materials that we are going to need for this painting were in the park
and we are painting birds, so it's perfect case Saturday, so it's a nice day. So let us begin. So for this project, I will be using Canson
watercolor paper of two hundred, two hundred and eighty GSA. But for me you can use any
watercolor paper that you have as long as it is thick
enough to hold the wash. So although this is a
minimalist painting, we still need a paper at least, at least 200 or 180 GSM in order for our paper,
not tobacco lab. For a tip. I think
paper is one of the most important parts in watercolor painting because it's like make it or break it. Especially if you're a beginner, so you don't want
to be crying over. Good painting because
your paper as buckled up so you don't
have the time for that, you just have the time to learn. In my opinion, you have to have at least a quality paper
that can hold washes. This is Canson watercolor paper, but they can use any
watercolor paper that you have as low as
it's thick enough. I will be putting all the materials,
specific, specific names, and some advice and tips on a PDF file for you to be able
to see it and download it. This one is the size of A4. Now, let's continue with
our watercolor paint. For the watercolor
paints I will be using, of course, we have
the Chinese white. So we have the tiniest white, yellow or the born sienna. This is my favorite color, is really transparent and it's
so by friends and lively. And I just loved to put it
anywhere in my painting. Of course, this one I
cannot survive without it, is there Oh, Amber. The van that Van ****
brown, ivory black. I'll be using
scarlet red as well. But if you have any kind of bread that you have
that would do. I will be using the
neutral tint as well. The royal blue for
the green, sap green. And I think you can use any
color greens that you have. It's just a matter of mixing. So I think these are the watercolor paints that we will be using for this project. But I suggest that you can mix it up and
play with the colors. And we are doing birds
with different colors. As you can see, it's
just the play of colors. So go ahead and have some fun. Don't be scared. If you make a mistake, don't worry, it's a trial
and you'll get better. These are the watercolor paints. So as you can see, I'm just a little tip. I'm using large
watercolor paints. Why? Because I found it
a really practical. It lasts longer of course, but at the same time with two
I use to brighter than pad, they did tend not to get
a damage your brushes. Tend not to drive your net to damage the tip
of your brushes. It's light to your
brushes, I'm using it. And also, if you buy a bigger, bigger tube, I think it's
less expensive in the end. That's it. So we will be
using brushes that are not so big and nuts so small
only for four brushes. And that would be mop brush. I will be using mop brushes. I think it's different
sites if you are using their regular brushes. But for my brushes we were
using my brush number two. Mop brush number for
mop brush number. I think this is number one. My brush number one. Then this one is 0. So if this is 0 regular
brush that we'll be using for the final
details and some lines. For your normal brushes
adding that will be at least 1011 or
12 or even night. I think that'll be
it for the brushes. Just a little bit of advice. Using brushes. It's better for you to watch it. To clean it very
well at the end of every painting because
you don't want to ruin your brushes
because of that. Also, as you can
see, mop brushes, they hold more water and more watercolor paints
than your normal brushes. It's just a matter of habit. So if you're used to
normal brush, that's fine. If you're used to on
my brush, that's fine. It's just the matter
of practicing. I advise that you have a bigger and bigger maybe
bucket of water and fill in fill it up because we will be using a lot of water
for this water spray. Your tissue paper. So I usually put my tissue paper in a recipient because
I don't want to make a lot of myths on a table with all the watercolor paints
all over my palettes. Gay. So this palette is ceramic. I like it because I
can bring it anywhere. And it's very easy to carry. And also because
when you're outside, it doesn't fly away. We need to very
lightly the plasticity would fly away when
it's very windy. Especially here in
Spain is always a windy everywhere as I have the
second one, This one, well, that's my baby
broke it already, but this is another palette
that I have for mixing. So I usually have two
ballots, That's it. If you have if you
have any question, feel free to send me a message and a discussion and all the materials will be
made available for you, like I said in the PDF. Thank you so much for listening and for
watching the video. And I'm looking forward for
us to be painting together. Birds illustrated. It's going to be exciting. I'll see you.
3. Materials tips: What advice can I give in
terms of buying materials? I think I think the
most important, important advice I could
give you would be not to be overwhelmed with all
the materials out there. I've learned through experience. I tried to buy all the
materials that I can see, thinking it would make
me a better painter. But in the end,
I've had a lot of materials that I
didn't use until now. So by only the basic ones. So for example,
for your brushes, you can have at least four
or five sizes of brushes. They don't have to be
the most expensive one, but I think I will drink. I would recommend you to buy quality brushes with pointed
tip because it sits, it's going to help you create better or
watercolor painting. You will, you will find
that out on your own. For paper, I advise you to have at least two thickness
of watercolor paper. It doesn't matter if they're
rough or smooth surface, as long as they are thick
and solid enough to hold your watercolor
pigments and water. Because as I said, you don't want to
be so disappointed because you're wonderful artwork while buckling up because of the really bad quality of paper. So I think your paper is the most important part of your watercolor
painting adventure. Try to buy watercolor
paints into, as I've said that before in the materials and
in bigger size. Also, at the end of
repainting session, I've learned this in a hard way for every painting that I did. You have to wash and clean
up your painting materials. Although of course, watercolor materials are not
the most expensive ones. But then in the end, I think it still cost money. Try to clean them up after your painting session
and try to store them properly.
Okay, So that's it. So it doesn't get overwhelmed
by the basic and just enjoy going to the materials in. That's it.
4. Palette: Okay, Now, I'm very excited
to show you my palette. And we're going to start now. So as I've said, we will be using
the Van **** brown. These, these are background. That's our brow. Then. Amber. So we'll be using the
raw umber as well. This is our row number. And of course are born sienna. I'll be getting it
straight from our tube. That's your board. Sienna. Now. Yellow or yellow or the scarlet red. So we have started right here. I've already black. Our Chinese wipe. Your Chinese whites is, I'm actually using
Chinese white and mixed up with other
colors to make the, either to make them
lighter or to add more thickness to the pigment. That's your Chinese wiped. Sap green. Sap green in here. Okay. That's your sub green. The new truck them. I really like neutral
tent because it's smooth. It's like black, almost
flow or almost black, but at the same time, it's also, it also has this
color of purple, dark purple, and
your royal blue. That's it. That's our palette
for this illustration. Painting. As I've said,
in the materials, you can go and play with
colors, your favorite colors. As long as you have
the basic, I mean, the main colors that we'll
be using for this painting. And these are then the
Van **** brown, Darrow, umber, burnt sienna, yellow, orange, and I've already black. And of course you would need
the green as well, the blue. All the rest of the
colors that you have. You can use the
app to play around during the painting
process gates. So I'll see you.
5. Practise: Now we'll be doing color mixing. Let's have some fun. And these are the
possible color mix colors that we will be practicing
for this project. So my paper is dry. We will be mixing the Van
**** brown and ivory black. So we have the Van ****
brown, your ivory black. Okay. So I suggest that when you are doing the
mixing like this, sorry. Again, if you are doing
them mixing like this, you have to mix the color paint on the paper
and not in the palette. I think that will give
you a better result. As you can see, I'm using the mop brush and it's absorbing lots of paper
are lots of water, so I have to get used to it. You have to get used to it. Now. It's the burnt sienna
and **** brown. This is your **** brown again. Your born sienna. Go. Now, you're born sienna. And yellow are your thoughts. Yeah, The arc. In principle, usually
with watercolors, we always start with
the lightest color, with the lighter color, and then we go darker
and darker and darker. But as you get
more familiar with watercolor and how it's working, then you can always
change the process. I think what's really matters
when you're making art is, is the, is the final,
the final painting. And you are happy with
how it looks in the end. The neutral tint. Neutral tint, and your royal blue. This is a lovely
color combination. Next, you have the row
umber and the sap green. Let's try to start
with the sap green. This usually occurs,
this is for the trees. And we are, when you are
doing and adding highlights, the usually add
darker colors such as decisis this such
as Van **** brown, dark blue, or in black. Now you're neutral tint again. The scarlet red. Scarlet red. Okay, so
that's your scarlet red. That's it. So if you went to practice more, you can always play around with your watercolor paints and
just enjoy the process. Don't worry if you missed it up, you can do it all over again. We only have the learning. Again, it's part
of the learning. So thank you so much. See you in the next
part of this painting.
6. Techniques: For every art that domain, for every painting
that you make, there's always a
technique behind. But I think, don't worry if you are not the master
of any technique, I think you will achieve that little by
little. So go ahead. You just have to practice
it as much as possible, but probably daily in order
to acquire something takes. So now I'm going to show
you the basics one. So here it's so wet on wet. Why does it mean
wet on wet means that your watercolor
paper is wet and we are applying the
watercolor paint wet. I wet the paper with the water. For example, we're
going to apply to add the board sienna. Sienna fates, exigency, the
water just move and yeah, just your watercolor paint. Move on its own. Now, it's wet. On dry. It means that our paper
is completely dry. I'm just going to
apply the paint. This one is dry brushing.
What does it mean? Dry brushing? It means that
our brush is completely dry. I'm going to use
another brush and just get the pigment here. Okay, so that's dry brushing. Everything is dry. Now, lifting. Lifting, it means
that we are going to use tissue paper in order
to lift some color. Or you can also
use your brush to lift the color that
you want to lift case. So for example, let's see. So we have painted this spot. Let's add a darker one. You want to lift the color. That's it. Now you
just lifted the color from your paper. That's it. That's the technique that more or less we will be using for this watercolor painting class. So I'll see you in
our next project, and I'm excited to
paint with you.
7. Sketching Tips: What advice can I give
you for your sketching? I think for sketching is really important not to overdue,
you're sketching. You just only sketch
as light as possible. But at the same time it should
be enough for us to see your lines and your shapes
when we are painting it. Finally, as much as
possible China to erase as well as it might
ruin your watercolor paper. For sketching in general, how to get better
with sketching? I think the only advice
I could give you is to sketch as
much as possible. Or probably daily
is even better. Practice and practice, forget, I think practice makes
everything better. Pitching is something
that develops from tides. So the more you sketch, the more you're sketching
will get better. I also encourage you to sketch, maybe outdoor dislike now at painting has always
been my passion, but I was a teacher before. I'm still is. But when I became a painter, I noticed that I am more
aware of my surroundings, the shapes and the shades
of the leaves of the trees. I just noticed
everything of it and it's just amazing when
you observe them. So you will see how
they are in reality. When you put them
finally on your paper, you have this great amount
of idea how they look like. So you're painting your
sketch, it get better. Observe the nature and bringing your sketching pads
anywhere you go. So it doesn't have to be
voluminous materials. The guest sketching beds at pencil and our
rubber, that's it. And go outside and paint and practice and
do it every day. And I think everything
will really improve, enjoy, and have as
much fun as he can. So I'll see you on depth
painting parts of this project.
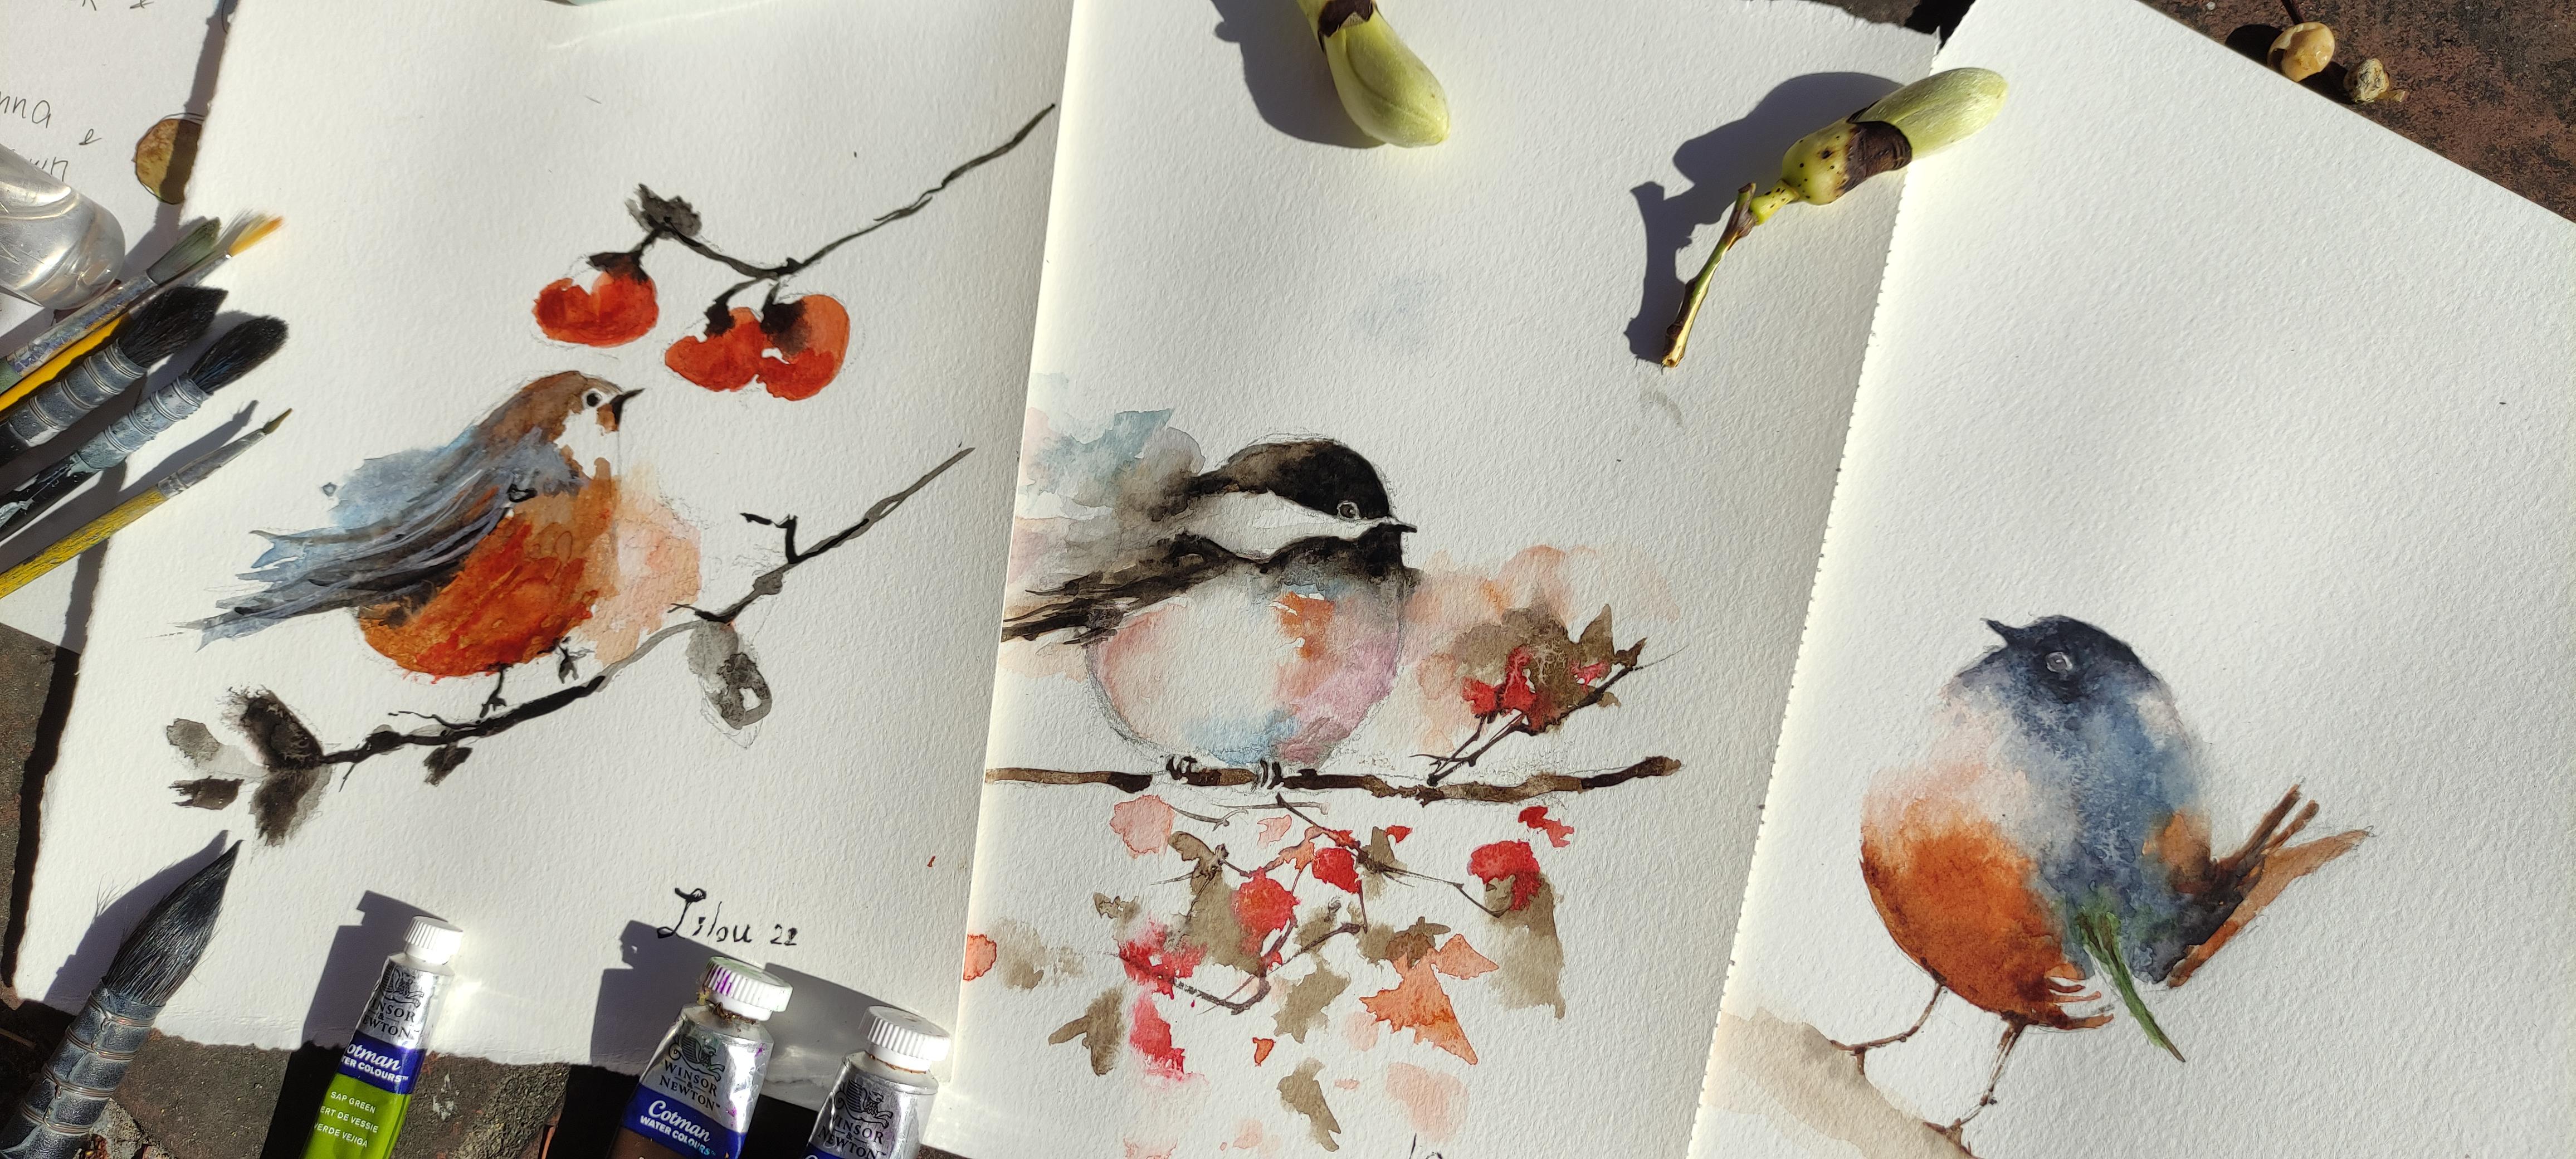
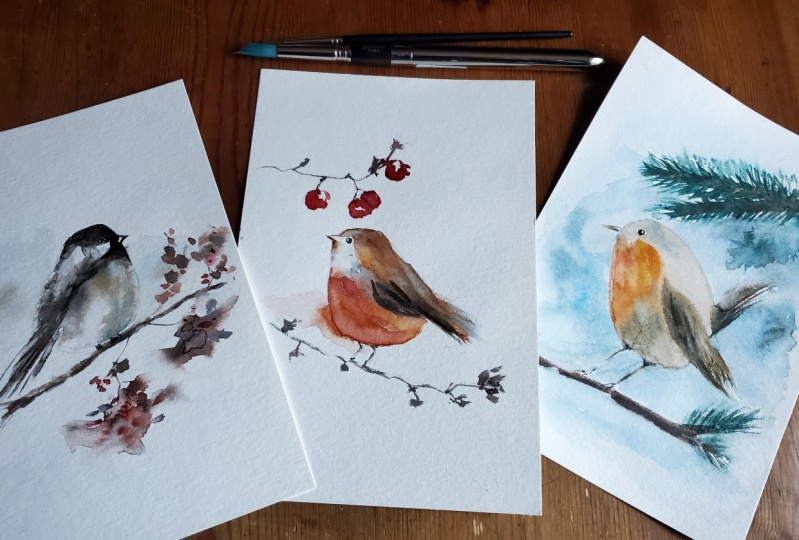
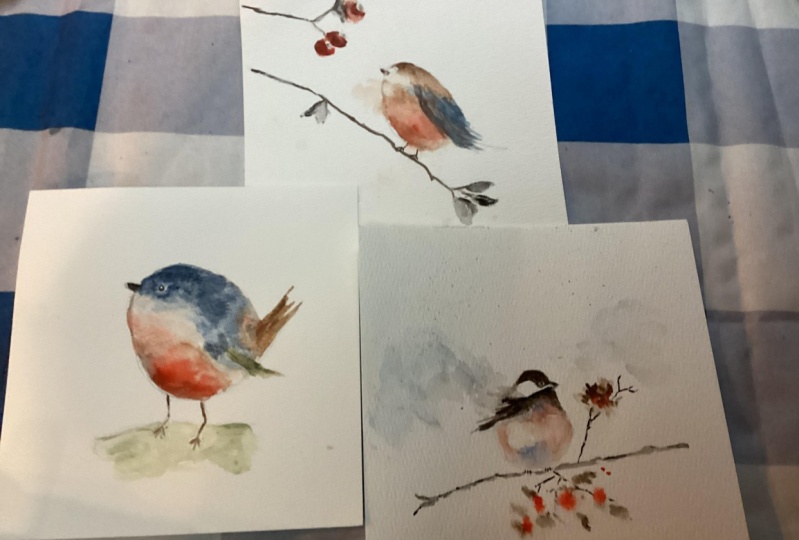
8. project 1 - Robin bird sketching: Welcome everyone to
the sketching part of the bird illustration. So I'm very excited
to start with you. And I will be using fan cell number two and of course a rubber as
much as possible. We don't use the rubber
because he's gonna, he's gonna decimate our
paper a little bit. I'm using this Canson
watercolor paper, A4 size with smooth surface. I told his medium soft surface. We will be sketching this
huge bird right here. And we'll see, we'll start. As you can see, I've already started
sketching a little bit. I'm just going to give
some details now, when you are sketching, this position is perfect. So I suggest that you make the desired shape that
you like in this way. Okay, so you have to
imagine a big beak, the biggest size on your
sketch. From there. You can start with
a small parts of your pain of your
sketch because it's actually very easy
to get lost when you are starting with the
smallest part of your sketch. So it's better to start on the biggest part of your sketch. This is the big bird. As you can see, I
am in the park. It's a sunny day and we can
hear the birds chirping. It's a really perfect
day to sketch the birds. As you can see, I already have the
shape that I want. I'm actually in in
a seating position, so isn't that easy for me to
do like this on my paper? But if you are on a table
sitting comfortably, that I think it's
better to do like this. There you go. The way you hold your
pencil actually, It also depends
on where you are. So you adjust to what
you need. The eyes. As you can see, I'm
sketching really lightly as much as
possible and I'm just giving some details on the most important
part of your painting. The legs of the bird. This bird has eaten
a lot of worms. Fed. By then it's cute. We are doing an
illustration of the birds, not realistic bird painting. I think there you go. Perfect. So I will be putting all the reference and the sketches available
available for you. Thank you so much
and I'll see you on our next sketching exercise.
9. project 2 - Robin bird sketching: Okay, so welcome back
to the second project for this painting,
minimalist birds. And now we have these Senator cute bird
that will be sketching. So as you can see, it's really minimalist and
there's not that much detail, which is, which makes it
really very simple but nice. We are still in the
park and we can hear the birds chirping,
so it's perfect. As you can see, I've already started the sketch just
a little bit so we can, is much, much faster. I'm still using pencil
number number two. Of course there are
Garber and we are boids to stretch your paper, okay, and we just
do this position. This is the shape of the bird. This is the biggest
shape of our sketch. Okay, so we tried
to imagine that. And then we can, when we're done with the
biggest part of our sketch, we can start with
the small detail. I'm actually not
sitting at a table, so my position is it really depends on what your position as
well as I've said. The way you hold your pencil, you tried to adjust your pencil position the
way you are sitting. No way you're sitting up is gay. So I'm just giving a little
bit more of detail here. These will be the focal point of our painting, a barber painting. Then you have the eye. When you are painting birds, you have to be mindful of the deposition or the
distance of your birds. I did that big. Okay, because
that's gonna define the cuteness of your
alveoli are painting here. I'm just since here. You can see here painting
that in this part. So we have to put it
and it's a bit dark. I'm just going to get
some more values in here. Shades. Really the disposition, usually in this
part as well, gay. So it's just going to guide, it says this shade is
just going to guide me. When I will be starting to splash the colors
on my painting. You have the legs. Just quick sketch of the branch. Doesn't need to be
exactly the same. This one is smaller. We can hear the birds chirping. They seem to agree to pay them. Okay, So there you
go. That's it. Keep your sketch as
simple as possible and only use details defined only the details
where you have to. Okay. I'm looking forward
for you to be sketching with me for the next
watercolor painting of birds. So I'll see you.
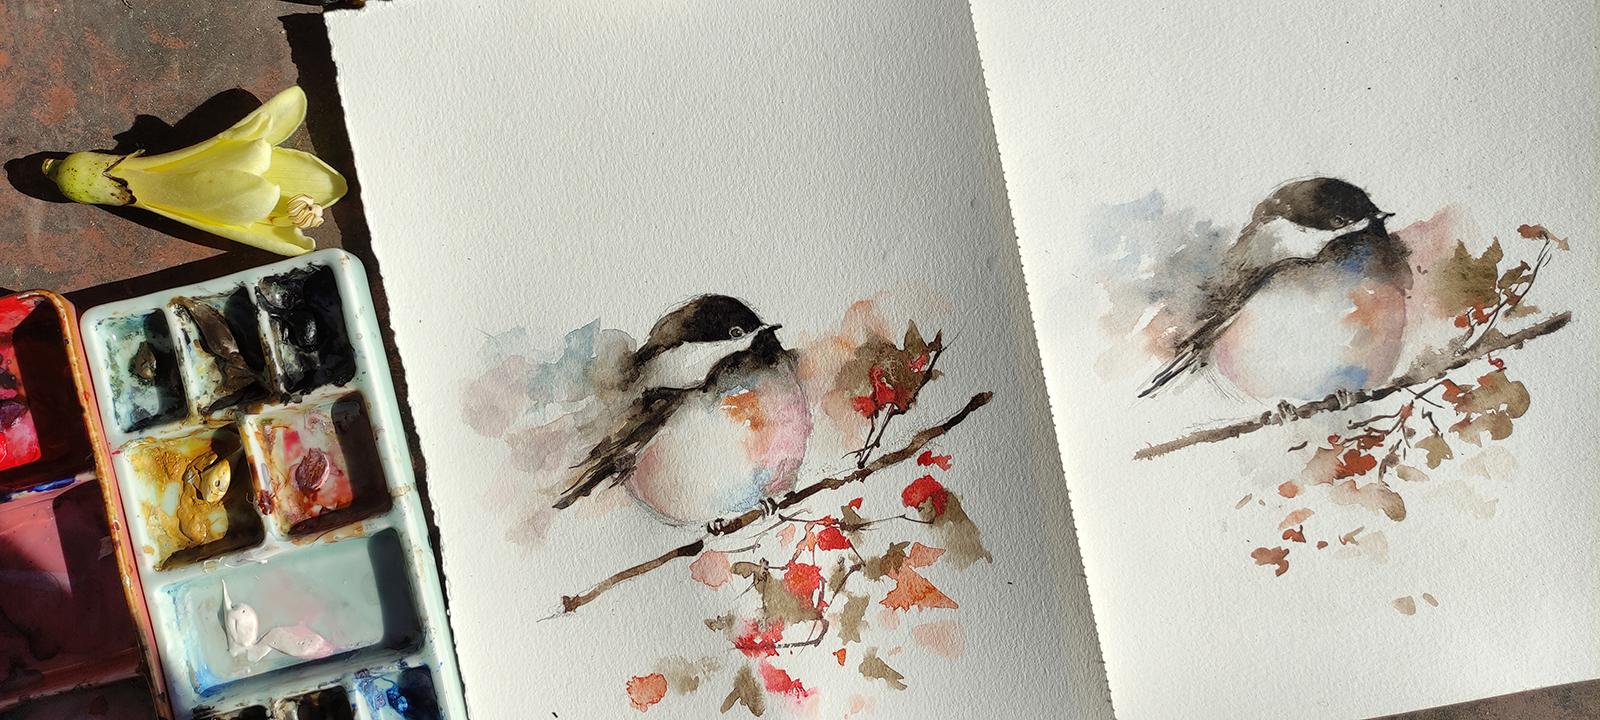
10. project 3 - Chickadee bird sketching: We are on the last
bird illustrations and we are going to sketch
this cute bird tickets. And I'm very excited to
show you how to sketch it. So as you can see, I've already
started it a little bit. I'm still is still
sitting at a table. I'm at the park.
These are usually, this is the best way to sketch. And as I said, this shape, this position, and still using the same pencil,
it's number two. Always sketch, always start with the biggest sketch
part of your sketch. Like this. And then
as you can see, I'm holding a pencil like this
and this part right here. We have to be careful
because it's just really a fine line. Very, very small distance
between this part of the head and the
lower part of its body. So there you go. Carbon here to just
observe and follow. If you find it a little bit
challenging to do this, you can grab a small
piece of paper and do it all over again
until you are happy with it. It's a trial all the time
and it's a challenge. But eventually you will, you will get there. You really want it. It's just a matter of practice. I think. Dedication
on your work. Here. Go. Then. I'm going to
add the branch just quick. C So it doesn't really
need to be very straight. Brushes are not
usually straight, so don't worry if you can't make it straight
to see this one. I'm also making some
some little mistakes. These parts of the
head is like a darker, so I'm just shading it. By the time I will
be painting it, it will remind me that this
part has to be darker. As you can see. I'm just defining detail. The small details in here. Here. You have to be mindful with the distance
of your bird's eye. It's big gay because it will change the kidneys of
your bird illustration. This part is also darker. It's safe to say that our
focal point most of the time, most of the time when, uh, when we paint bird, that's the part, the eye. The eye or the eyes. This one is also
a bit dark here. Okay, so I think that's it. We're really excited to paint
this with you together. Let's move on to the painting
part of this project. Thank you so much for being
patients and for listening. With me. I'll see you.
11. project 1 - Robin Bird Painting PART 1: Hello everyone. Thank you so much for joining
this class with me. I'm really excited that
you are here with me. And while we're painting together three
illustration birds, and it's gonna be fine. Thank you. Thank you so much. Welcome. And let's have
fun and learn together. Okay, Let's begin. We will be painting
this very cute bird. This is in minima, minima list-style,
the loose technique. As you can see, that it's done in
inside the house. This is done inside the
house, unlike this one, because it's very
sunny today and we can hear the birds chirping. We might need to TSA
splash the water spray. Private time to time for the
sun because the sun is going to dry it up for sure a
bit faster than it should. So I'm going to show
you how to do that. And I just wanted
to let you know that there is a possibility that we won't be able to get
exactly the same as this. But don't worry, that's
another main goal. I main goal is how to
create something like this. Because I really
think that there is no Not to painting alike. It really depends on
different factors. It depends on the weather, it depends on your mood, it depends on your brushstrokes. So that's fine. I just want you to know that. Don't worry about it. Everything's fine. You just have to
keep on practicing. Practicing, I think makes
everything perfect, isn't it? Okay, so that said let's begin. And I can here at the
power of therapy, we are, we are in the park
and it's a lovely place. Let's say your brushes. And it's the beginning.
I'm going to use for this painting part. I'm going to use breaths
number one, my brush. And from time to time we'll be using brush number of for us. Well, brush number two, globbing to list all
the materials that timid available for
you and a PDF file. This was done in wet on wet. But I will show you that we
don't wet all of the parts. I'm going to take the
bigger brush that we have. You can use maybe a smaller one. But just to let you know that
the smaller your paper is, the smaller your brushes, the bigger your paper is, it's the bigger your brushes
that you're going to use. This paper is Canson
watercolor paper. It said medium ARAF surveys. So I'm dipping water. As you can see, CD on the bench, holding the brush in a very unusual manner
because of that. If you are at home
and you're sitting comfortably in your
house at your table, then everything should be
much, probably better. But then I like this side, so analyte the birds chirping
and it goes with our topic. Now, we are outside
painting outdoors fine. This part, I wet it, but I didn't wet all of it. Gay. This one too, but not on
this part, not too much. Now, I'm going to
use a smaller brush. And that's number two. If you're at home, you just
use probably better to use a much bigger bucket than these bucket of
water to hold more water. It's faster to clean and dry
to miss too much your table. It's always fun too. I know it's not easy
to mess around, but do your best not
to miss too much. Your table. Here. This one it has
like pinkish color. So to get this pinkish color, well, I just have
to clean this up. We will need white. Lethal beat. In red so that scarlet red
and a little bit of white. To get this pinkish color. I encourage you to have
as minute pigment, I think pigment as Phil. Let me see if we have big
gear, so that's pinkish, then I'm going to add a little bit of
orange as well here. I'm going to mix the orange. As I've said, your
mop brush will hold more water and pigment
than your normal brush. I'm just going to add a bit more pigment with our Chinese white
mix with born sienna. A little bit of scarlet red. There you go, is
pinkish right now. I just have to remind
you that there is a possibility that we won't be able to get the exact result
is this, but that's fine. We will do our best
to get this white and I'll try to remember how
I did it exactly before. Wash your brush, dry it. Well, let's try to get this
one so that's born sienna. That's it makes a board sienna. So it seems to be that I want to
have more pigment. This is what I like with using
the two watercolor paint because you can have a SMED as thick pigment as you alike
without damaging your brush. I'm going to add a little
bit of Van **** brown. Just follow the brushstrokes
that I'm doing, going to dry a bit faster than it should because we're outside
and it's sunny. So I'm just going to use my water spray and
spray it a little bit. That alone is going to change the pigments if you're at home. I don't think you need to spray as much as I'm going
to do on this one. Here, the tail we're
working on the tail. This part is wet but
on the top it's dry. This is why I didn't with
all the parts of the birds, I only choose the parts
that I wanted to get wet. We will try to get
the same results or as close as possible to
this painting that we have. Before this a little
bit of advice before you wash your watercolor brush, try to put back the
color, but again, because we don't want
to waste watercolor. Although they are not
the most expensive ones. I think it could still get
more expensive in the end. So now we're going to
wash our brush again. We're still using
brush number two. I will dry it up a little bit. Blue, royal blue. Neutral tent. We do it, although it looks
dark. Net black. Isn't that black
because I think it's better to use a black alone. You should always mix it with
a lighter, darker color. I'm using the tip
of my brush and I'm trying to avoid the patch
that circle the eye. Also, if you notice, when I put the water on the
bird for the first time, I avoided the I probably
I forgot to mention that. There you go. I
may need to spray it again because the
water is not spreading, the pigment is spreading because our watercolor paper is not
complete and is not wet. So you see this part is
because it's not wet. Watercolor paint is
going to flow and mixed with other color with
watercolor paints. But if it's dry, it's going to, going to be steep and
it will have edges. And for now we don't
want edges because we want loose effect
on this painting. So I just have to wash my
brush with water again and I think I
should, I will help. This part of effect. I also wanted to tell you
that issues value harder to have a model because
we're starting from 0, then we are not really
following a model, then we are more free
to do whatever we want. That's why I'd like
you to know that. Consider this as like you painting and we're
not following this one. We're just using this
as our reference. So now I have to spray it again. I like sunny days, but probably it's because
it's winter right now. So I prepare working outside. And in Spain. In Spain is kind of cold
in houses when you paint, even if you have the heater. Because they are, the
buildings are made for winter, unlike in France where
I used to leave, everything is kind
of warmed insight. Here as you can see, there's a little bit of green. So I'm going to get
a little bit of rain starts from here. So these wings dry. We'll just have to
do it very quickly. That's it. Using
our tissue paper. Just to have this
fade a little bit. You can also use some
lifting if you want. If you want the watercolor
paints to have this effect. I'm just lighting, touch, touching it really lightly.
12. project 1 - Robin Bird Painting PART 2: They using our tissue paper just to have this
fade a little bit. So you can also use some
lifting if you want. You want the watercolor paint
still have this effect. I'm just lighting. Touch it really lightly. Now, we were going
to go a bit darker. Usually with watercolor,
you always starts with light. I'm too dark. But sometimes it could
be the other way around. Breweries, blue, neutral tint, but in darker pigment. More pigment, rather,
there's more pigment, less water, and more watercolor paints
and mix the two of them. Well, we are getting
darker and darker. I'm using the tip brush. I'm holding it really tightly. Walk on this again. I'm really doing my best
to avoid touching the eye. Going darker and darker. For DI, I'm going to use brush. Number one, my brush. And with you if you are
using the normal brush, you can use this
small small ones. The eye is still royal blue. Yes, real blue and
neutral Dan with really thick pigment and
less water and more pigment. Let's begin. As you can see in this
one, it's really dark, but I want to make it
lighter on this one. So I wash my brush and dry it up and I'm
just going to spread it. Because I want a lighter eye. It's more I want more
just bar into one and just try to leave
something white. So I suggest if this
is difficult for you, you can, you can also use
the acrylic, acrylic white, more watercolor
pigment. The hand. In this part. I just want to be edited a bit
more careful on this one. Let's why I'm not talking. Okay, So there you go. This is darker
part here as well. I will leave to spray one more time because it's
trying really quickly. Now. I think I'm happy with
how it's looking for now. We're going to use ivory black. And it's a combination of
ivory black, Van **** brown. I just want to add
something here. More highlights. So I'm adding highlights. Because the shadow
is on the spot. This spot it has toner
by darker tonal values. Now, I wanted to add darker tonal values on the lower part of the
body of our birds. So I'm mixing born sienna and Van **** brown
pigment and less water. I'm just going to add a little bit of
scarlet red as well. Now we scaling, turning
into life or painting, the more you add contrast, the more your watercolor
paint will have more life. I think. I'm going
to wash it again. I'm just going to spread this part spread and made
it look a bit more natural. So sometimes you
also have to help your watercolor paints and help the direction that
you want it to go. This part. I want it to
stay wide like this. So just a little bit, but not too much. That's it. Now we're going to
defeat for these feet. I know it is that with
mop brush number four, I have more pointed tip
then the smaller one. If you can see that I
have more pointed tip, then the smaller one. So I decided to use
these bigger one. We're deploying deep
to work on our legs. The legs, East color, watercolor painting,
Van **** brown. This is wet on dry. Really wet and dry.
So really quickly. Lift it up here a little
bit. Here as well. I'd like to spread it here, although here it's the
despite it is credit. I'd like to spread out a bit of Van **** brown in this part. As you can see, the shadow, the light rather
is all this way. And this is the part where
it's like there's a shadow. There. You are. Happy with my feet. I'm just going to add a
little bit more in this spot. As you can see, the
green here is darker. I'm going back to brush number one of your
mop brush, smaller brush. I'm going to get just a
little bit of green in here. More pigment of your
sap, green, less water. After repeating
here, I'm just going to have a lot of water, so I didn't like it to spread, so I'll just color. I feel like I still need
to go darker here and the big Moore had to spray. So I'm going to protect
this part and display here because I feel
like it's a bit tight. I didn't like it to be tight. So I'm just going to do a
little bit of lifting now. Now that it's wet. Sleep, you don't want
your watercolor paint on your paper type. You just have to
spray it. We'd water. But be very careful when you're, when you're spraying
water because you might drop in your painting. So try to be as distant
as possible not to close on your paper
when you are doing it. These, I'm just adding
the last highlight. Go ahead and enjoy this part. This is the most exciting
parts when you are painting. Now, I'm using the
highlight. New drug. I will read Black, neutral, ivory
black in real blue. Pigment of this tree. These, but just a little
bit of this plot. I washed my brush again
and I'm just going to help it spread a bit here. I'm just wetting it. I totally just hoping
it's a little bit. Now I'm just going to
spray it one last time. Then I'm going to let it dry. That's it. And I'm just going to add a little bit dark, India, I I don't want it
to go really dark, so I just have to be
really, really know. So don't worry if it happens. Yes, slope it. Accident happened. So very, very careful
with the eye. Hey, Dad. Thank you so much
for bearing with me and for staying with me and I hope you had
fun as much as I did. As as you can see, it's not exactly the same, but still they're
almost the same. Don't worry about it. Just enjoy and be proud
of your painting. To really just
enjoy the process. I will be very, very excited to see your
watercolor project results. If you could post that on your, in our comments, sexual report, this project, that
will be awesome. I really never feel full
awards for you to show me and I'm really
excited to see it. If you have any
questions or anything, just feel free to comment. Thank you so much for watching
and for bearing with me. I'll see you in
the next project.
13. project 2 - Robin Bird Painting PART 1: Hello everyone. And now
we are going to faint. Second bird illustration. We will try to paint this, although I would like
to tell you in advance that there is no two
painting exactly alike. So don't be upset.
We don't get upset. If you don't get
exactly like this, that is a challenge. If we are trying to make another painting
that we already made. Every painting is beautiful, It's never be the same, exactly the same, but don't
worry about it, it's fine. So we will do our best. This is the painting. This one was done in this one, this painting was done inside the house and it was not sunny. So normally the paper didn't dry as fast as it
should dry right now because we are outside
and it's very sunny, so we might need to use the water spray
from time to time. And that alone will affect the likeness of
the two painting, like concentrated pigment. The shadow of our
painting is on, is on the left side and the
light is on the right side. Always remember where the light is coming on our painting. So this side is where
the light is coming. I am using brush number two. My brush number two. For you. You should use a normal brush, so that's probably
between 91011 or 12. The secret is that the
bigger your paper, the bigger your brushes, and the smaller your brushes. This model, your
paper. Let us begin. This one. I I kind of wet, so we're walking walking on
wet on wet, wet this area. I'll try to remember
how I did it before. We're going to wet this
area and this area as well. So you just have to be very
careful not to touch the eye. The eye of your painting. Some people use a masking fluid to cover the eyes so
it's accident happened. They still have the
white under paper. But it doesn't matter. I think as long
as you go slowly, you should be able to keep
that white circle for the eye. So we don't wet everywhere. I'm wetting this. Now, we are using the
color Van **** brown. As you can see, a painting
is not that light. The pigment isn't
that that light. Usually we start with light, but this does a medium light. I'm using medium light. I'm actually sitting on the
bench with my feet high. So it's not the same
way I'm old as that. I'm holding my painting as
you are if you are sitting comfortably in your house because I like to paint outside. So this is the consequence. Ok, so I'm just spreading the watercolor pigment
here on this part. I try not to take all the white. Okay. Let's just color it
over. See the tail. The most important parts of
your painting is not to, not to touch the white part. Because once you touch the white part where
you shouldn't, then I think it will be easy. It will not be easy
to go back again. You might need to use
another watercolor paper. If that happens. As I said, if we mandate be able to copy it exactly as it is, but to worry about that, you just enjoy the process. And as long as he had killed birds, painting, that's fine. So now I'm adding a
mixing are born sienna. I need, I want to have a very thick pigment of burnt sienna for the
body, the lower part. Buddy. And I'm just
letting the watercolor flow on its own and
just letting it mix. More pigment. As you can see, this part is a little bit dry. We didn't watch it. If you remember. This part, I've wet. This process is wet-on-wet, so it's really fun and
you can play with your, with your watercolor paints
and just enjoy the process. So that's it. I'm just
going to wash my brush. And as you can see, this kind of brush is absorbing a lot of pigment and water
than your normal brush. I'm just going to
spread this color here. I'm just going to
help it spread. Like this, like fading spread. I need to wash it would spray watercolor because it's
drying because of the sun. We can add one. The first stroke in
there and one in here. A little bit. ****
brown in here. I don't usually use black, completely black
earned my painting. I gradually add black
when I'm adding details, but it's always mix width
and color that I'm using. If you feel that you have a
lot of water on your brush, go ahead and just try it. I feel like I still need to add a little bit of pigment,
burnt sienna here. I'm just going to add more. So don't worry, you can
always add more as Jewish, as long as your
paper is still wet. Moist. I'm just trying to spray one more time. So as you notice, when we spray our our pigments, pigments spread even more. So a little bit
more when it dries. And then I want to add more contrast that I can work
on it a little bit later. Gay. Now we have
the blue and white. So it's combination
of Chinese swiped. A combination of
Chinese white and blue. I feel like it's
not easy to mix it. I will just add it here. I will completely
added on our white. They'll have more pigment. I'm just mixing it very
well to have more pigment. And that anymore blue, a little shade of
neutral tint on it to get that kind of
bluish that we want. So there's a little
bit of neutral tint. The more you will be familiarized with how
watercolor works. And even the watercolors
name that we have. This spot is still
a little bit wet. These has done in dry paper. This way. We may need to wait and Albert
and this one of course, we can already started
it already dry. So I have to clean my watercolor brush and it's already dry
because of the sun. So I will have to kind of
improvised at a wet it. In order to get this
effect closely. I may need to have more neutral, more pigment. I have a lot of
water on my brush. It's a little bit dry. Now. I can continue. So there's a bit
of blue in here. I will have to spray it one
more time, a little bit far. Wash my brush. And I will try to
help it spread here a little bit because I will just have to let it
dry a little bit on this. But it's still try. I will wash my brush. And the black color
in our ivory black. Making sure that
my mop brush is, says have enough load of
water will go into make here. Cute little feet of our birds.
14. project 2 - Robin Bird Painting PART 2: Actually here I've used
the ink, the black ink, but this one I decided
to use or we can use the black, the
black watercolor. We will have to do
it really quick. It's because I used
the aim that it's the pigment is much darker. Then the watercolor will
try to do this. What? If I wanted to add the leaves? I just push, push my paint in order to
have a bigger size. If I want a thin line, I just do it like this, did just the tip of
my watercolor brush. This one is part of
the mix of scarlet, red, and board of Sienna. The color. You can play with, the color you can add yellow if you wish. I didn't color this
part because this is the part where the
sun is coming from. So just leave it white. So that's the light. There you go. I will have to add a
little bit of black here. Black and red is
spreading color. So when they dry the pigment
while the Probably lighter, do you want to get to
have a darker effect? You have to, you may need
to apply all over again. Probably I want to
make this a bit. So as I said, it won't be
exactly the same like we have. So go ahead and experiment it. Don't be afraid to experiment. You can change this one. I'm happy with that, so I'm just gonna leave it like this. We are going to go
back with our bird. I just want a bit darker. So this part, the lower part
about bird, has dried up. Thanks to the side, is faster. And I want to, I want to add more
pigment in it. So scarlet, red and born Sienna. Well, I think that's it. We don't we try not to
overdo it and I will have this spray it so
it will look natural. Oops. I just let it dry a little bit. If you are inside
the house and you want to dry it, you
went to dry it. You can hit you can
use the hairdryer. And now we're going to work
on the beak and the eye. Okay, so I will have to be, I will have to be sure
that my watercolor brush is not too not too wet enough. Okay. I'm using black, Van **** brown. Try although it's not
going to be very easy, but I'll try to leave
the white in the middle. Just let the watercolor
per flow on its own. That's it. Here we
have to finalize here. You have to give a little
bit of highlights on our big If you want, you can use the smaller brush for your eye and even
you're adding detail. Here it is. You can see this is a bit
darker and it's a little bit, It's not completely dry, but we try Boyd net touch this part and just
stay on our wings. I achieve this. You saying accurately, accurately quite a combined the acrylic
white and blue paints, but we're not gonna do it. We're just, we're just going
to stay with watercolor. You seeing. I'll try to get the gray
by mixing blue white, a lot of white pigment
to get the gray. And black. Seems like
Grey is working. So actually, it's just
a matter of practice. So I'm just going to get help. This part is a little bit. This part. We need to add dark. So it's a mix of black and
black and Van **** brown, but it's more in black gay. We're going to add more. This one is still wet. I'm just adding a black
halite on our birds. Since I'm using since
I'm using my brush, it's going to have more pigment. And if I feel like
that's a lot of black, then I can lift it up with
a clean tissue paper. That's it. That's the challenge that we are trying
to follow that or paint that's already done. It's actually easier
to make a new one. Okay. I think we're done
for the block. And I'm just going to
add a bit more here. It's reddish, so more on scarlet red and a little bit
of burnt sienna. Here. I'm just helping the water. I'm not going to wash my brush because it has
a lot of paint and I don't want to throw it away. So I'm just going to
go back here and add a little bit of highlight
just one more time here. So here we go. Help it go out. I need to add more whites, but it's still a bit wet. To finish it, I need to wait
a little bit for the son, Mr. Sun, to dry our wings. This part sweat so I
will have to dry this. They didn't spread
all over the paper. This part, this blue, but it's okay, It's
part of the design. When it dries a little bit
and it's touching to me. Sure. I can add a little bit
of highlight which is white. Completely white. Paint has dried, so I will have to do it again. Okay. So completely white and it's
going to mix with our blue. Okay. These are the highlights. If you notice, I'm
helping my hand to get desired that I want gaze on that too much here. Okay, so I think
I'm happy with it and I hope that you are happy too with her
result of your painting. And if you're not,
it's, it's fine. You can do it all over again. Watch this video, do
another exercise and it's, there's only one
way to go getting better as much as
you paint every day. So thank you so much
and we are going to paint illustration
bird for this project. Thank you so much again
for your patience. If you are happy that I'm
happy I don't forget too. To post your, your
results of your painting on the comments section
for this project. If you have any questions, just let me know and I'd
be happy to help you out. And I'm really looking forward to see your
project as well. Be proud, and I'll see
you on the next video.
15. project 3 - Chickadee Bird Painting PART 1: Welcome again. And this is the third painting
illustration of birds. This is a chickadee
and we will try to have this bird painted. This is a chickadee
and it's in wet on wet and wet and dry as well. And it's painted in a
loose technique that, as I've said in the
earlier videos, that this was painted inside the house where
there was no sign. With this painting is
gonna be a bit different. So we will have to spray more water over and over
again because at the side. And it's a beautiful day and it's lovely
to paint outside. I'm really excited to
be painting with you. And I'm really looking
forward for your project. Let's begin. I'm still
using the three brushes, 124 brush. And of course, this
smallest brush that we have, that's Brush 0. And I'd like to remind you again that don't worry
if you don't get the same results as
this one because it's always different factors
like the sun we have now, your moods, your brushstrokes. So don't worry about it too. You won't be able to get
or maybe me as well. I won't be able to
get the same results. It's still beautiful,
is still watercolor. And we are doing our best all the time and it's always there only one way to go. Getting better. Let's begin. We are going to use the big brush that we have right now
expression and before. For you, you can use any
big brush that you have. We're going to wet this part. Book brush. They're holding more water than the other brush. I'm just making a like a
little U-shape of wet. I'll try not to wet all of this. In the middle here. Here. I'll have to stop this line. And this. Just follow the movement and my brushstrokes that to get
this pink, you'd need Dwight. So I'm still using the brush. This brush, oh, this looks okay, but we're printing chickadee. So for now it's not there. They're not the star
is the pirates. Chirping why Spain? And there are a lot
of pirates in Spain. The green ones. They are just everywhere. It's lovely. Okay, so a little bit of scarlet red and
of course a lot of white. So I advise that you, when you're painting watercolor, it's better to have a lot of, I mean, a thicker pigment. The parents are still noisy. Okay. So that's on
top of my on top of my head because I'm under the
tree sitting on the bench. Just saying, okay, so I've
got a link right here. And right here. I'm going to add a
little bit burnt sienna. In this part. I'm just going to
scoot it right here. A bit more of Boise. Okay, there you go. I'm going to wash my brush. I'm just kind of
noisy right here. It's a fiesta. It's
veins as always fester. Okay, so there you go. And this kind of
helping this here. And I'm trying to, if you
can see that I'm trying to leave some white on the paper. Watercolor is really nice. Iep, you are able to
leave the whites on your watercolor. Now blue. There's a touch,
breweries, blue in here. I'm just letting the
blue spread on its own and there's a blue
right here as well. It's actually more
difficult or more difficult but more challenging to follow another painting
that is already done. Then just starting all
over again with a new. You then you pick, but we're not going to copy it
exactly as it is, especially because we are
actually fainting in. So now I'm having more pigments. Like I said, especially that we are painting in loose
watercolor techniques. So it's not the same if
you are painting in dry, because more or less
you will be able to get the result that you want. Although it's not always happy accidents and loose
watercolor painting, but it's more like you are
able to control, Of course, if your paper is dry. So here I'm using the neutral to mix a little
bit of burnt sienna, and I'm just doing
it really quickly. This is just spreading a bit. Blue and white, real
blue here. And why? I feel like if I overdo it, you can always lift it up. There are some lines. Okay. So it's really wet because it's too close to I
will spray it again. That will make some circles. Pigment on our watercolor
paints on a bird's. I'm changing brush number two, Van **** brown
here. For the eyes. If you are very scared to
touch the eye with your brush, you can use the masking fluid and that will be very
helpful for you. Or LLC. Can you can just use the tip of your brush and do it really carefully and slowly as
I'm doing right now. Okay, So there you go. So this part, as well, as you can see, we have
started from light to dark. Now we're going darker. Mix black. That makes a black and Van
**** brown with less water. I'm just really very
careful being very careful with my brush tip, not to touch the eye. I'm holding it really, really tight because
sometimes the brush can fall. That's a little accident that
we don't want to happen. So now I'm really
holding it tightly. Sitting on the bench outside. The position of my brush
is not the same if you are sitting comfortably
in your house. Just as she know. Although it's really
nice to paint outside. I'll try to be very
careful with a big I'm just following this line. I'm just dragging the brush. Observe and follow
the wings loops. Let's do much. I'm just
going to lift it up. I watched my paper, my brush, and I'm just
going to look it up. I'm still using the same color. Holding your brush really tight. Careful not to let it
fall on your paper. It's not actually really black. It's a combination of Van
**** brown and black. I'm ongoing to help this a little bit spread
a little bit here. I'm just going to spread it. A little bit of
tonal value on this. I don't want to touch the
side here just a little bit. I want to get a little
bit of that shape here. Washing it and doing
a bit of lifting. If I feel like it's too much. By the moment that
you are painting it, you can notice that the
color is a bit bright. It's, it's a lot of
pigment, it's bright. And the color is
very big brands. But when you're done, usually the color will
fade a little bit, especially if it's
painted on wet technique, have it in the really
thick pigment. When you put it on, when you put the
paint on your paper, will stay as it is. Or you can do it all over again. Try to add more
pigment on your paper. I went a little bit
of pink and orange. Bit bigger. I'll do
we want to copy this? It's important to make it
as natural as possible. Or else it will look
as if it's over, over dark, pinkish, scarlet, red, Chinese wiped. And a bit of orange. The orange is
you're born sienna. Add more pinkish in here. So pinkish is Chinese white and a little bit of scarlet red. I think I'm just going
to help this spread a little bit with clean
water. It's smooth. A little bit smoother.
Here as well.
16. project 3 - Chickadee Bird Painting PART 2: I'm going to wet some
part. Not all of it. We're going to do it really
quickly with the branch. That's makes Van ****
brown and black. I'm going to add black
in here, a bit here. Here. The feet above birds. I'm using this small brush. It's brush number one. Brush lifting in here
and here as well. So it looks like a real
branch which shadows, spray it one more time
to close really quickly. This one, these a bit. Let's roll umber, burnt sienna. Sorry, that's born in
Van **** brown rudder k. So now you know why I wet it a little
bit and not all of it. Some parts they are well-defined at some
parts they are not. So it's just the matter
of your friends. Maybe add and I get it. Okay, So we are painting leads. You don't have to follow
exactly like this. Just follow your
intuition and this one. Brush number two. You can still use brush number while a mop brush
if you want to. And we're going to add that
red flower. That's a mix. I'm sorry, That's scarlet
red with lots of big men. That's scarlet red,
just a drop of it. And you allow the watercolor
spreads on its own. That's scarlet red. And I'm just going to add
a little bit bored Sienna, because I don't want it
to be so red, red, red. So I wanted to have
this warm color. Avoid sienna. I'm adding a bit of
burnt sienna as well. Cnas, probably one of my
favorite watercolor paints, just born almost everywhere
in my, in my painting. I use, I use it really often. That's Brush 0. I'm going to get black. A little bit. Van **** brown, but
that's more on black. Let's do it really quickly and
holding it really tightly. I've learned that in a
really horrible way, like almost smash
everything because I dropped the brush on the
main subject of my painting. So you don't want to
having that moment like, Oh my goodness, I just destroyed my painting
because of my brush. And I'm just going to
spray one more time. Okay. We will do the
eye of the bird. So I need a small today. This time I'm going
to use brush. Number one. The eye is probably the main focal point of your
bird watercolor painting. We will try to pay
attention and do it slowly. We don't touch the white
area outside the eye. And do it very slowly. Leaving whites in the middle. You probably going to need a little bit of
practice on this one. I usually spend a lot
of time in the eye, especially if it's
a big painting. Because I want to make it
as realistic as possible. I'm quite happy
about that, but I, I want to add a little
bit of black to add more contrast tonal values in my poke up point, this is the head. We are defining the bird. I'm just being careful here. I'm just really using
the tip of my brush. Okay, I'm just
spreading it here. Just notice the
position of my brush. I'm defining it here as well. Just adding some
details in here. Really quick one, wash it and I'm just adding more white and a little bit of red, scarlet, red, and I'm just
undefined here a bit low, I mean spread and a
little bit more here. So here we see it, as you can see, it's darker. So yes, we're going to add a bit more fun and more scarlet, red and white to
have pink bit of burnt sienna or burnt sienna. I'm just adding the final
details of this painting. I'm almost ready. That's it. I'm just going to soften here. So I watched my watercolor brush and I'm just going
to soften it here. I'm just going to
soften everywhere here. This part as well. I'm taking this small
brush for the less touch. And I'm going to add just
a little small black in here, wetting it. And I'll try to do a little bit of lifting. We're done. Thank you so much
for bearing with me and for painting with me and looking forward for you
to join the discussion. And I'm really excited to see the final projects
that you have. So thank you so much and I
really had fun painting we do. And all the materials, all the things that
you need to know and advice for this class. I'm going to make it available
for you in the PDF files. So thank you so much
and I hope to see you in my next Skillshare class. Goodbye.
 Dawna Mae, Watercolor Artist & Illustrator