Transcripts
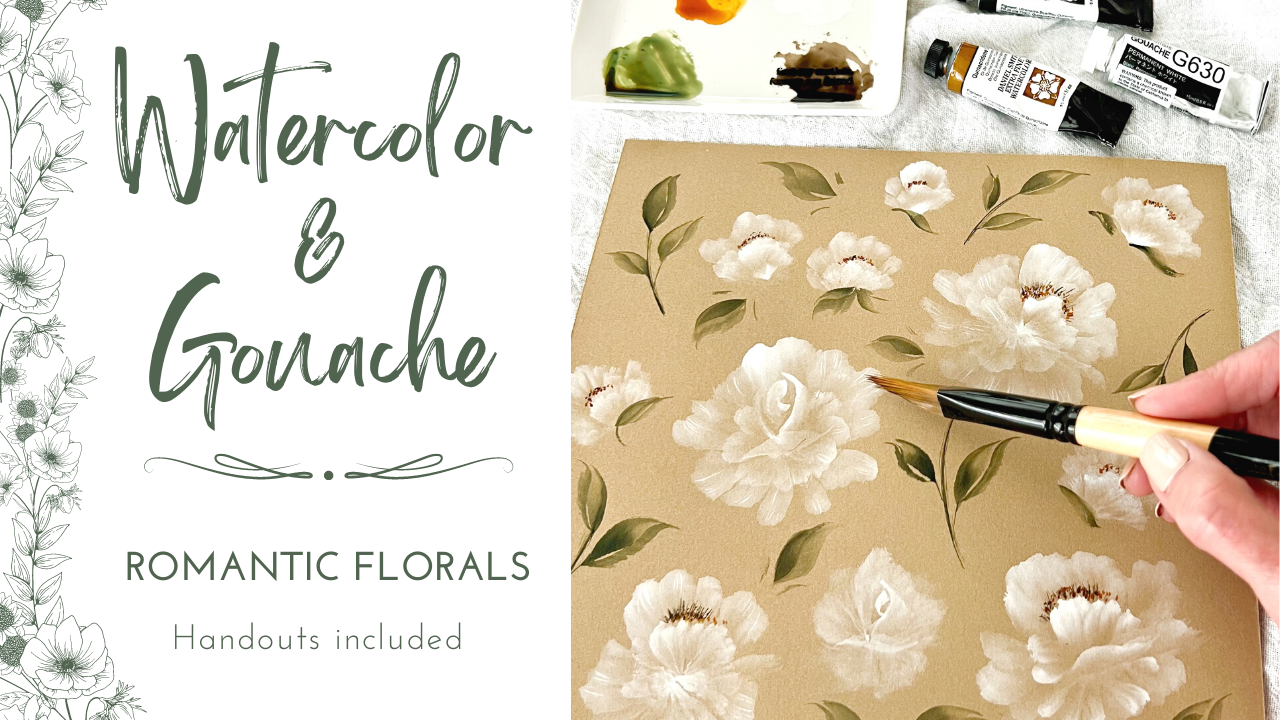
1. Intro : Hey, welcome to class. I'm Jen. I am so grateful that
you're here today. I have a fun class
for you all about white flowers on craft paper. And there's some really fun
ways that I teach you how to load your brush to really
make these flowers pop. So let me take you behind the scenes and show you
what you're going to learn. We'll use a limited
color palette with just three watercolors
and white gouache. You'll learn too simple
but critical elements for creating these flowers. And then we jump right in
and create our pattern. All videos or in real-time with no voice-overs and
no background music. This is an intermediate class, but all levels are welcome. Some knowledge of watercolor and the wedge brush is
helpful, but not required. In the skills you learned
in this class are not limited to just white flowers. Choose any color you'd like. The process and
techniques are the same. You have access to for
simple handouts to use as reference and
for inspiration. Alright, grab those supplies
and I'll see you in class.
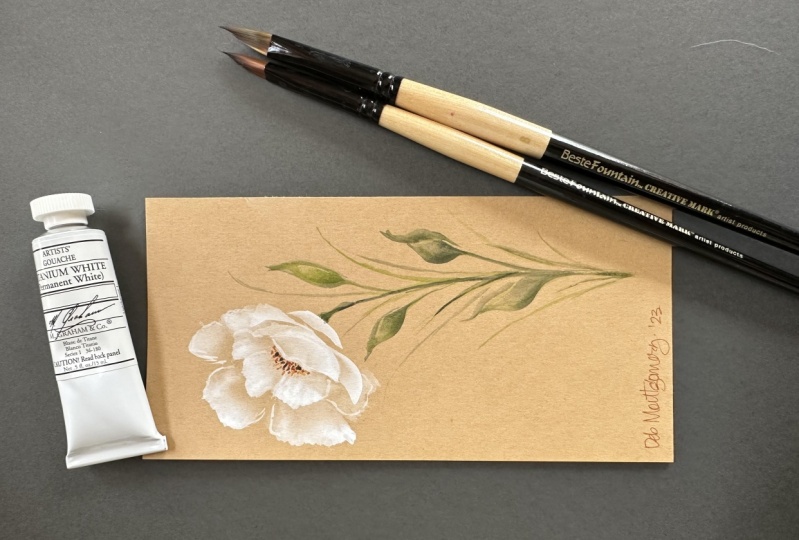
2. Class supplies: So the few supplies that
you're going to need for class include of course,
your wedge brush. Any size you have is fine. I will rotate through
all four sizes today. The size 6,810.16. But really if you
only have one brush, one size, that's totally fine. A round brush size
four or six we'll do, does not matter the brand. Or watercolors, a little
bit of quinacridone, gold, a little bit of sepia, undersea green for our leaves, and then of course, white
gouache for our flowers. The paper that we're using, Legion Stonehenge craft paper. I love this paper. Now it's not watercolor paper, but I do feel that it takes the water and
pigment very well. This is a nine by nine
square piece of paper. Whatever you have, totally fine, even if you want to use black
or other colored paper, It's completely fine. It's going to work
exactly the same. Tau tissues, a wet sponge. Of course, your water jars, and I think that is it. Alright, I'll see you
in the next lesson.
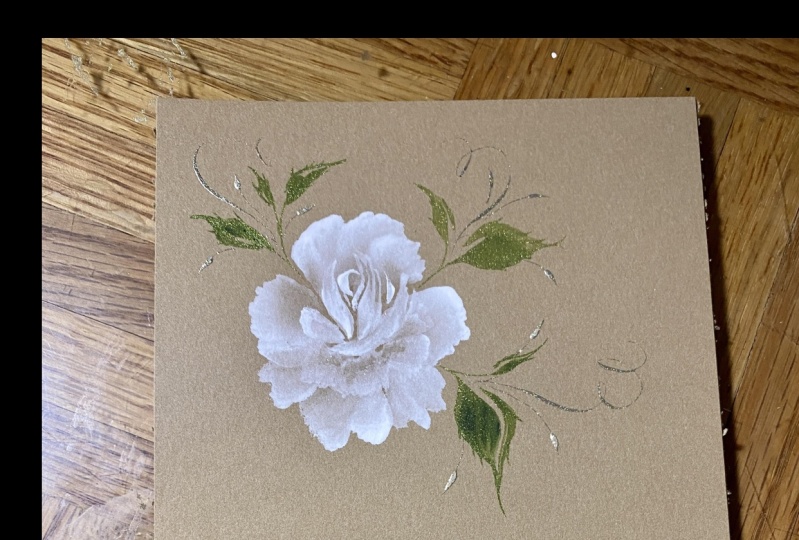
3. Color palette and loading your brush: We're keeping our color
palette very simple today. Three watercolors and
the white gouache, of course, quinacridone, gold, sepia, and undersea green. Let's take a look at these. We're not using much
of the gold or the CPM just to add some interests
in our floral centers. But if you're not familiar
with these colors, they are absolutely beautiful. Get a wide range of
colors, tones with these. And the undersea green actually has quinacridone gold in it. So it's going to pair
very well with the gold. Actually gets
darker, much darker. Just love this color. I like to mix my
greens, but for one, coming straight out of the tube, that is just beautiful. I love more of a muted
palette and that is perfect. So the sepia,
obviously super dark, but nice, soft brown. Okay, Easy-peasy on
three colors today. So the trick with these
florals, not the trick, but one of the secrets is
how we load our wedge brush. If you're familiar
with this brush, and I've used them, used it to make
florals in the past. You're very familiar with
how you load your brush, flopping it in the paint, dipping the tip into the
concentrated pigment, landing your brush and
wiggling it around. Okay. Same with this too. I used a smaller
brush obviously, but all of the
maneuvers are the same. Loading your brush
by flopping it, dipping the tip in, landing it, and wiggling it. We're gonna do the
wiggling motion that's very characteristic
of the wedge brush. But how we load it
is very different. So taking my brush, I've got the size 16 here, just so you can really see it. So I just dipped my
brush into water, dabbing it off my towel. I'm taking my round
brush rinsing that because I think I
had some yellow in there, dipping it into
my white gouache. And I'm going to take
my brush and paint the back portion of the
brush, the wedge part. And I'll show you why I do that after I lay down a stroke. So the goal for doing that. The reason for doing
that is I want the back portion of these
petals to be the darker part. And I want a little bit
of a clearing in here. Because the other key
to making this floral, these florals today
is we start from the outside and move
in with our flowers. Okay? And obviously we'll
do a whole bunch of that in the next
couple of lessons. But just showing you again
now this takes practice, of course, as with everything, I'm rinsing my brush
and clean water. I either dab it on my
towel or on my wet sponge. I want the brush to be
full but not dripping. I'm taking my round brush, dipping it into my gouache, which is really pretty thick. Painting the back portion. I'm definitely
getting all the way down to this metal feral. And I'm stopping just
at about the point that the bristles start
to go down into that tip. Sometimes I hold my
brush a little bit more so it doesn't wick
down in there as much. But I also tried to move a
little bit faster on this too. So I land my brush point
is at about 05:00. Now this one I'm just
keeping the point fixed. The other one did a
little bit of bouncing. And that's gonna give you
some variety in your petals. Okay? But this is what
we're going for, a darker back area
and a lighter center. Because as you see
in the next lesson, as we create these
florals, as I said, we work from the outside in and I start filling
up that cleared area. Okay, So this will make a whole lot more sense
when we get over into the next lesson and start
creating our pattern.
4. Floral pattern Part 1: Alright, so back
loading or brush, I'm dipping my brush
into the water, dabbing some of that
excess water off, getting into the white gouache. Painting the back. Now I should have a
test page close by, but lot of times I
have it under here, full intention of using it
and then I never do. So. Maybe we'll do that today. Alright, so how I like to
do this lay on the brush. Just testing that
and see it always looks great on the test paper. But then when I get to
the page plenty of times, it just doesn't work. So anyway, that's
what I'm going for. A darker back pedal, the clear area in the center. Okay. So let's reload our brush. I'm going to rinse
it. Sorry, I'm shaking the camera there. Dab it. Grab my round brush. Peanut. Let's start like right here, point at about 05:00. Land the brush pretty
horizontal because I'm pushing the back
part into the page. Bounce my strokes
a little bit more. I turn the page That's looking a little wet to me right
there, but that's okay. I'm going to dab some of that out still a little bit. Okay? So I'm going
to leave that. What we're gonna do is do all of the back petals
on our flowers and then get back in and
do the inner petals. So I feel like this
is still pretty wet, but I'm losing the white obviously because
it's on my paper now. I'm just going to reload this this brush
holds so much water. Just have to play
around and feel, you can feel it in your brush sometimes and you just
know when to dab it, when to reload it. But that takes practice. Alright, let's land brush
here, the petals here. So I'll stop here a minute. If you can imagine
an oval right here. I'm angling the point to that
oval each time I try to, at least because if you don't, you're gonna get too wide. And then you've got this
huge center here, okay? Unless you want a huge floral, but try to aim back to
that oval each time. Okay, and now you just have to evaluate what your
flower looks like. Remember we always go
through that, oh my gosh, it's terrible phase before we really start to
like something. So don't give up too soon. Alright, I'm going
to let this go. We've got a lot more
work to do in here. Okay, But we're just
building our floral pattern. I rinse my brush and I get
a little bit thicker white. You want to vary the size
of your flowers too. So maybe what I'd
want to do up here, I could switch to a
smaller brush for this. But if I wanted to just do a little bud per se, same thing. But I'm only going to
use a couple of strokes. Okay. Now, what's, what
you can note about this? Here's a size 16, size 16, and even this little guy is
a size 16 as well. Okay. So it just depends on your pressure and how much of your brush
you're actually using. Just rinsing my brush and
clean water each time. Alright, let's try
one down here. And if you saw maybe on this
stroke and this one here, I did a wiggle my brush. A little bit. Okay,
you're just going to add a little bit of flair
to some of these petals. Now I feel like their
brushes still fairly wet. Not going to rinse it. Get right back in
there with the white. Let's do one here. Aiming right back at
that oval each time. Okay, I'm just gonna leave
it kind of evaluate. Remember we have to
put some leaves in here and we want some
of the whitespace, so don't, don't
worry about that. Once we get all of the
centers in these flowers, they're really going to pop. You don't want so
much that it's so busy for the eye to look at. And then the I gets
tired and then it's just it's too,
too chaotic sometimes. So don't forget about
some whitespace. Can even have some going
off the page a little bit. Let's try this way. Not so much off the page, but close to it. And sometimes I
just get in there and I know how my brush fields. And so I might just tap it for some extra strokes
and just leave it alone. If I get too big here, these guys are going
to crash together. Okay. Now is the time that I
might switch out my size 16 and do something and grab maybe the
sixth or the eighth, um, do maybe one or two. It's getting full. We'll do a couple more,
but I will grab the size. Let's go for the eight. I would suggest just
make a bunch of these. Don't worry about
your composition. Just make a bunch of flowers, get used to that, and then work on a composition. Remember, you're just giving
the impression of florals, okay, they do not
need to be perfect. That's not what we're going for. By the time we add the centers, all will be well, that's my plan, at
least a few more. Alright, so I'm going
to let that dry. We'll come back and most
of these are dry already. But just taking a step back and looking at these
pretty light here. I'm not a big deal. A lot of these are pretty light. So once we get more
into the center, it's going to be darker. But you'll see how it's all
eventually just all pop. And then when we get the
green around it, it's, I'm hoping it's
going to look good, so stick with me and
we'll keep working on that center part
of our petals.
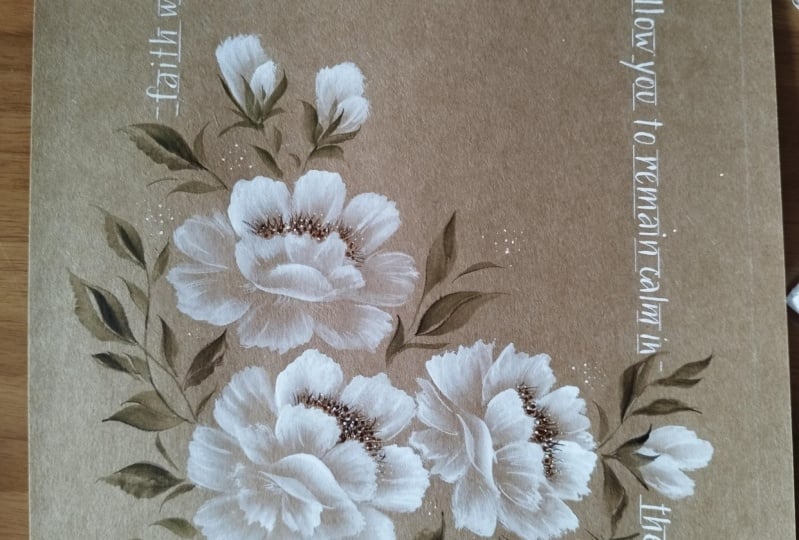
5. Floral pattern Part 2: I'm going to switch
down to a size ten and start working on
these inner petals. Same process as we have
been doing the whole time. So this is where
it starts to get a little tricky sometimes. As I said before,
you just gotta go with the, Go with the flow. And as you're
building each flower, you'll notice where you
need to add some petals. Okay, So back loaded. I want my brush to
be lower because I'm going for the
darkness here now. So here's the spot where
I'm dipping my tip. And I want this area to be darker right here because
I'm going to add the center. There's little
yellow dots up here. Okay? So the typical
wedge brush fashion, dipping the tip into the
concentrated pigment. And then landing my stroke using the tip just to feather
a little bit out here. And while I have
some on my brush, what I could do, sometimes I'll add little bit of highlight to these petals. I don't want to do too
much detail. Right away. We got a lot more work to do. But sometimes I just
can't help myself. You'll notice with using this craft paper,
how things are, are absorbed pretty quickly and they can fade
pretty quickly too, depending on how
bright your white is. Which can be a good thing and
a bad thing if it's fading. Getting a little
carried away with some of the detail there. But we'll leave that one. He can even see some of
these lines are fading back into the paper already. Alright, let's go
for this one here. Now. This one, I'll show you
how I like to do a rose. Okay, still with my size
ten, rinse my brush. Took a little bit
too much off there. Alright, so now I'm
just going to dip the tip into the white. I'll do a C stroke
right about here. And then another swoop
right around to this side. Okay? I can see that it's a
little bit too wet there. Not a problem. I'm just very gently dabbing because I do like how
that bleeds back. Now, I flipped my brush. I now I still have white on
my paintbrush on the tip. And then just do a quick
little swoop around the side. I was leaning the
brush into the page, using the tip in the side. Okay. And then from here, just trying to evaluate
what I wanted to do, Let's back load this. Still kinda wet. They're not wanna get
up here a little bit. So what I can do is
just tap my brush. I'm really not even wiggling
it. Tiny bit there. Okay. So with this open
area here, something else. Fill that in a little more. What else would I like to do? Rinsing my brush, get a little
bit of pigment on here. Dab at, I should test this one. Hi, and then right
here is where I'll do what I call the
little smile stroke. It's almost like a
pedal is folding down. Okay, We're a sideways pedal. And pull some of that
out while I see it. This one I'm going to
walk away from and just let it let it dry. We might come back and add
a few more things in there, but I'm liking the
softness of this. Alright, let's head down here. Be careful where you're
loading your brush too. I tend to do it right over
the piece I'm working on and I might get
splatters on there. So just be aware of that. I can even do one of
those little side swipes, really on any of
these flowers here. Because here's what
I'm going to put those yellow dots for my center. Maybe dab off the
tip a little bit. And some contrast down here. Walk away from that one. Let's just see what
I can get out of this brush for this one here. So for this area here, I just dipped into the white latest little bit of the white down here and then just use my wet brush tip to work
it out a little bit. So we've got this
concentrated center here because there's a
lot of petals in there. But then we want to
have the contrast here to someone's getting
a little busy, but we want to add
the center here, like these petals
are falling forward. Okay, let's get up to this one here then I am going
to switch to a size six for some of
these little ones. And sometimes I just leave
the flowers like this. I don't really add
a bottom to it. So I could even get in here. Get the more concentrated white. Okay, I'll leave that one go. Let's see what we got left
on our brush for this one. Okay, Let's do another one.
6. Floral pattern Part 3: So for this one, I'm going to actually
just redo it. So before I grabbed my six, let me go back to the eighth. I think I want to
work on another rose. This one, my brush wasn't
really wasn't wet enough. My hand, we might have to
go back and add even more. And it can even swoop
the brush around. For some additional petals. I'm going to get
right back in there. Actually, no, sorry I lied. Rinsing my brush. Now I'm gonna get back
in there and do that. See stroke. Dab a little bit off. My brush just felt too wet. Trying to get a
little more height on some of the petals back here. Alright, I'm going to
walk away from that one. Just as I'm doing this, I'm just kinda looking around. Where do I want to add a little
bit more stronger white. Just tapping the brush into the page. Rinse my brush. I just, I think I'm gonna do
and a bottom to this one. Too much there. Let's try it this way. My brush feels pretty dry. Just going to tap some more. Using that back portion to it, really soaking into this paper. And part of it's two. I'm a little more timid
when I'm doing this. So I go lighter and then I just build the layers like this. I was a little too worried. I like how that contrast is. Now. This is a little too light, so let's darken that one up. You want variety. Soften that out a little bit.
7. Floral pattern Part 4: Okay, and then
this spot up here, a little bit too much
for all the greenery. So I'm going to add one
more flower up there. That will leave more
like the little button. Okay, so let's get
some greenery in here. If you wanted to take
a pencil and add where you think the greenery is gonna be, that's totally fine. One way I like to do this, don't forget to rinse
your round brush. I have come back the
next day and my brush is dried stiff and
unlike I did it again, I forgot to rinse it out. Anyway, back to the greenery. Remember we want to save
some whitespace here. I keep this fairly thick. And then we're going
to use my tip. This is a size eight. It doesn't really matter, but I'm going to
use my tip and just do some of these soft lines
throughout the pattern. That's going to
act as my guide of where I'm going to want
to put some leaves. Okay. So we start small and
we can always add more. Typically just do
some soft see curves. I'm not intending for
that to be like the stem. Just kinda ended up looking
like that a little bit. Watch where you put your hand. I am going to switch back
to I think the size ten. I'm doing a whole lot
more switching back and forth than I normally do. I'm just gonna do some
simple wedge brush leaves. So you can tell when
I do these leaves, I'm holding down
on the feral here. I have a whole lot more control as opposed to holding back here. So my leaves are going to
look tighter because I'm holding it closer down, like I said on the feral. Many different ways to make
these wedge brush leaves, but we're just going
to keep it simple. We're getting there
little by little. Sometimes what I like
to do too is just an Without the stems. Some leaves with a little bit
of flair around the side. I need to fix this flower here. I'm trying to keep enough
space without overworking it. And for some of these, what I like to do is just
add a leaf like that. We could do like
a little V there, but sometimes it's just easier and kind of
goes with the pattern. Let me just do some
leaves right around them. Really watching
my hand trying to When a bit too wet there. All right. Let's
stop for a moment. Get back in and repair this one.
8. Floral pattern Part 5: Just a little bit
more on the size six. I'm not quite dark enough. Alright, let that dry. I get a few more leaves on here. Actually, I think what we'll do is work on our centers.
Let's do that. So you can use a small round
brush, a detail brush, or just the nice tip
on your wedge brush. For these centers. Very simple and basic on these, I start with the Quin gold, and I just add some dots. Let's start up here. Just gonna give
that pop of color, pull the eye in. I would be careful on these. The more liquid this is, it's going to bleed
into your white. So you do want a fairly
concentrated mix of the gold. I've had plenty of big old
blobs when it's been too, too wet, too liquidy. And you don't have to
do all of the flowers if you don't want if you want
to just leave some plain. Totally fine. I would say two before
you add the centers, if you look at your piece
and you're like Now I need some more white in there. Do that before you
add your centers. Alright, so those need
to dry completely before we start
adding some sepia. Now these are dry. We still want pretty
concentrated sepia too. And we're just gonna
do a little bit, a little bit of this
goes along way. Just to add another
element of contrast. I'll use Indian red sometimes
too, with these centers. I love that color. Really light touch with this. If you make a mistake
and you do too much, you can get back
in there once it's dry and add some white
over it if you need to. But don't get too caught up in making all of these perfect. Not what we're going for. So even more concentrated sepia, what I'll do sometimes
on some of these is add just a few long lines. Maybe on these
bigger flowers just to pull the eye in even more. Super light touch. Maybe on this one here. And then just keep it these three with a little
bit extra sepia. So I'm looking at this one. I think I want to soften that little C stroke
just a little bit. I may be sorry, but I'm gonna get
just a wet brush. Make sure it's clean. Just soften that
out a little bit. Now, once that's dry and
it'll sound strange, but I'm gonna go back
in just a little bit more and make a little
bit more of the C curve, but I just, it looks
so stark white to me. Okay, so let's take a
look at this and see, I think I want to add
a few more leaves. And we'll go back and
darken some of these too. Pulling some of that green, darker green back on my brush. Just add some contrast to
these, not all of them. I think we are rounding
the corner on this. Really trying to not get my hand right in
the center here. Let's do this one. Sometimes I'll get in on
these green stems and just do more of a
rough sketch on knees. Just some loose
lines around them. Just so it's not so
perfect and just gives another little element of
contrast in dimension. Almost like a dry brush
effect I think is so pretty.
9. Floral pattern Part 6: Alright, last little bit, like I had started
on this one here. These tiny fine lines that
are defining the pedal. Even more. You can do that. You can not do that. Your choice. Add a little bit more here. Some of these, you're following the contour
of the petal. I think it just adds another,
another interesting look. These are pretty light
petals right here, but just adding a few lines, the brain is going
to fill in at all. That's a pedal there. Alright, so this guy is
kinda hanging out there with no leaf around them. Let's just add one more. One last little swoop. Alright, so I'm going to
call it a day on this one. I could get back in
there and fiddle around and add some more
white to some of these. But then I really run the
risk of just overworking it. So I'm going to walk away. And in the next section, I want to show you a
few other options. Maybe for your class project that you would like
to do as well.
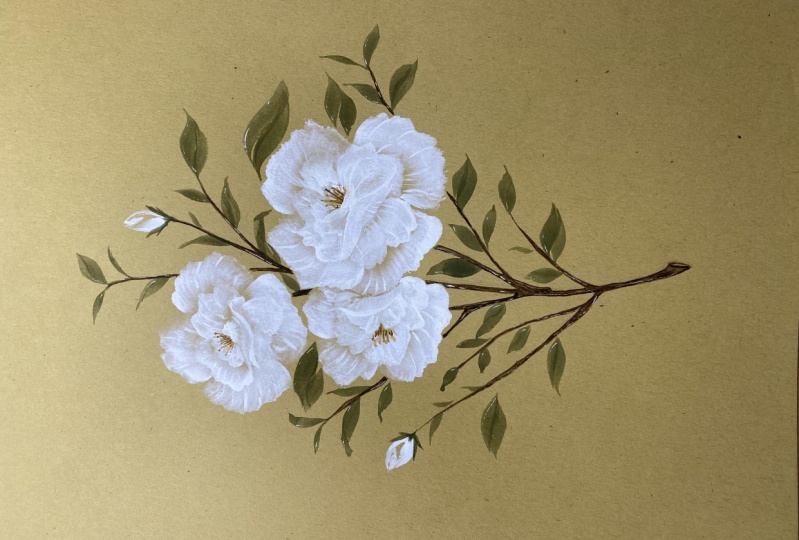
10. Class project & a tiny bit of painting: For your class project, obviously the pattern
that we did today, that's always an option. If you wanted to make gift
tags with the white florals. Great idea. Adding a little bit of an embellishment
to an envelope. And then I found
gift bags like this two and the craft paper
that's always fun to, to create the flowers on those. And then if you wanted to
do a whole composition, we didn't do the stem today, but really all this is, I did the florals
first and then I penciled in where I
wanted the stem to be in. This is just burnt umber. I think it's mainly
burnt umber added a little bit of
sepia on this one, but that's an option as well. We didn't go over
these little buds, more like rosebuds,
but I'll show you real quick how I
like to do that. And so I have my size six wedge. And then I just dip the
tip into the gouache. The point is about 07:00. I land the brush, pull it around, do a little bit of white
for the center there. You can see that. And then
just another little stroke. I mean, it's very, very simple, but once you add some
greenery around it, it's next to a rose bud. Certainly looks
like a bud to me. Do that one more time. A little bit darker, a little more wet then I wanted to just soak
some of that up. And then if I add my green, looks like a bud. Typically once that is dry, usually add another element
of green in there. Okay. Alright, well, I wanted to
thank you for being here and spending time with
me in class again, I can't wait to see what
projects you come up with. It always gives me such
great pleasure when I see you create something
from one of these classes. Alright, so happy painting, and I'll see you
in the next class.
 Jen Sweeney, Watercolor, Calligraphy, Cycling