Transcripts
1. Hello!...and Intro: Hello, hello and welcome to my 11th Skillshare class. I am so grateful that you chose to be here. So in this intermediate class, we learn to get carefree and loose with our wedge brush and create four beautiful rose designs. Now I'm still learning this process and technique myself, but I always promised that along the way I'd share with you what I'm learning. So let's dive in and take a closer look at what class is all about. As for supplies, you won't need much, but I'll explain exactly what I'll be using. I show you how I like to approach the wet in wet technique, making it a little less scary and more approachable. I show you the parts of my brush that I like to use when making these loose roses. And then we jump right into our first design. This one has a fun technique at the end. Next, I show you three different ways that I like to approach each one of these yellow roses. Our third design features to rosebuds with a soft blue background. These videos are in real time so you can see exactly how I paint as if you were sitting right next to me in my studio. Last up, we paint three rosebuds with plenty of greenery. Class is an intermediate class. So some knowledge of watercolor and the wedge brush would be helpful. Don't forget to upload your designs in the Project gallery. Truly the possibilities for making these loose roses are endless. Alright, so let's go get started.
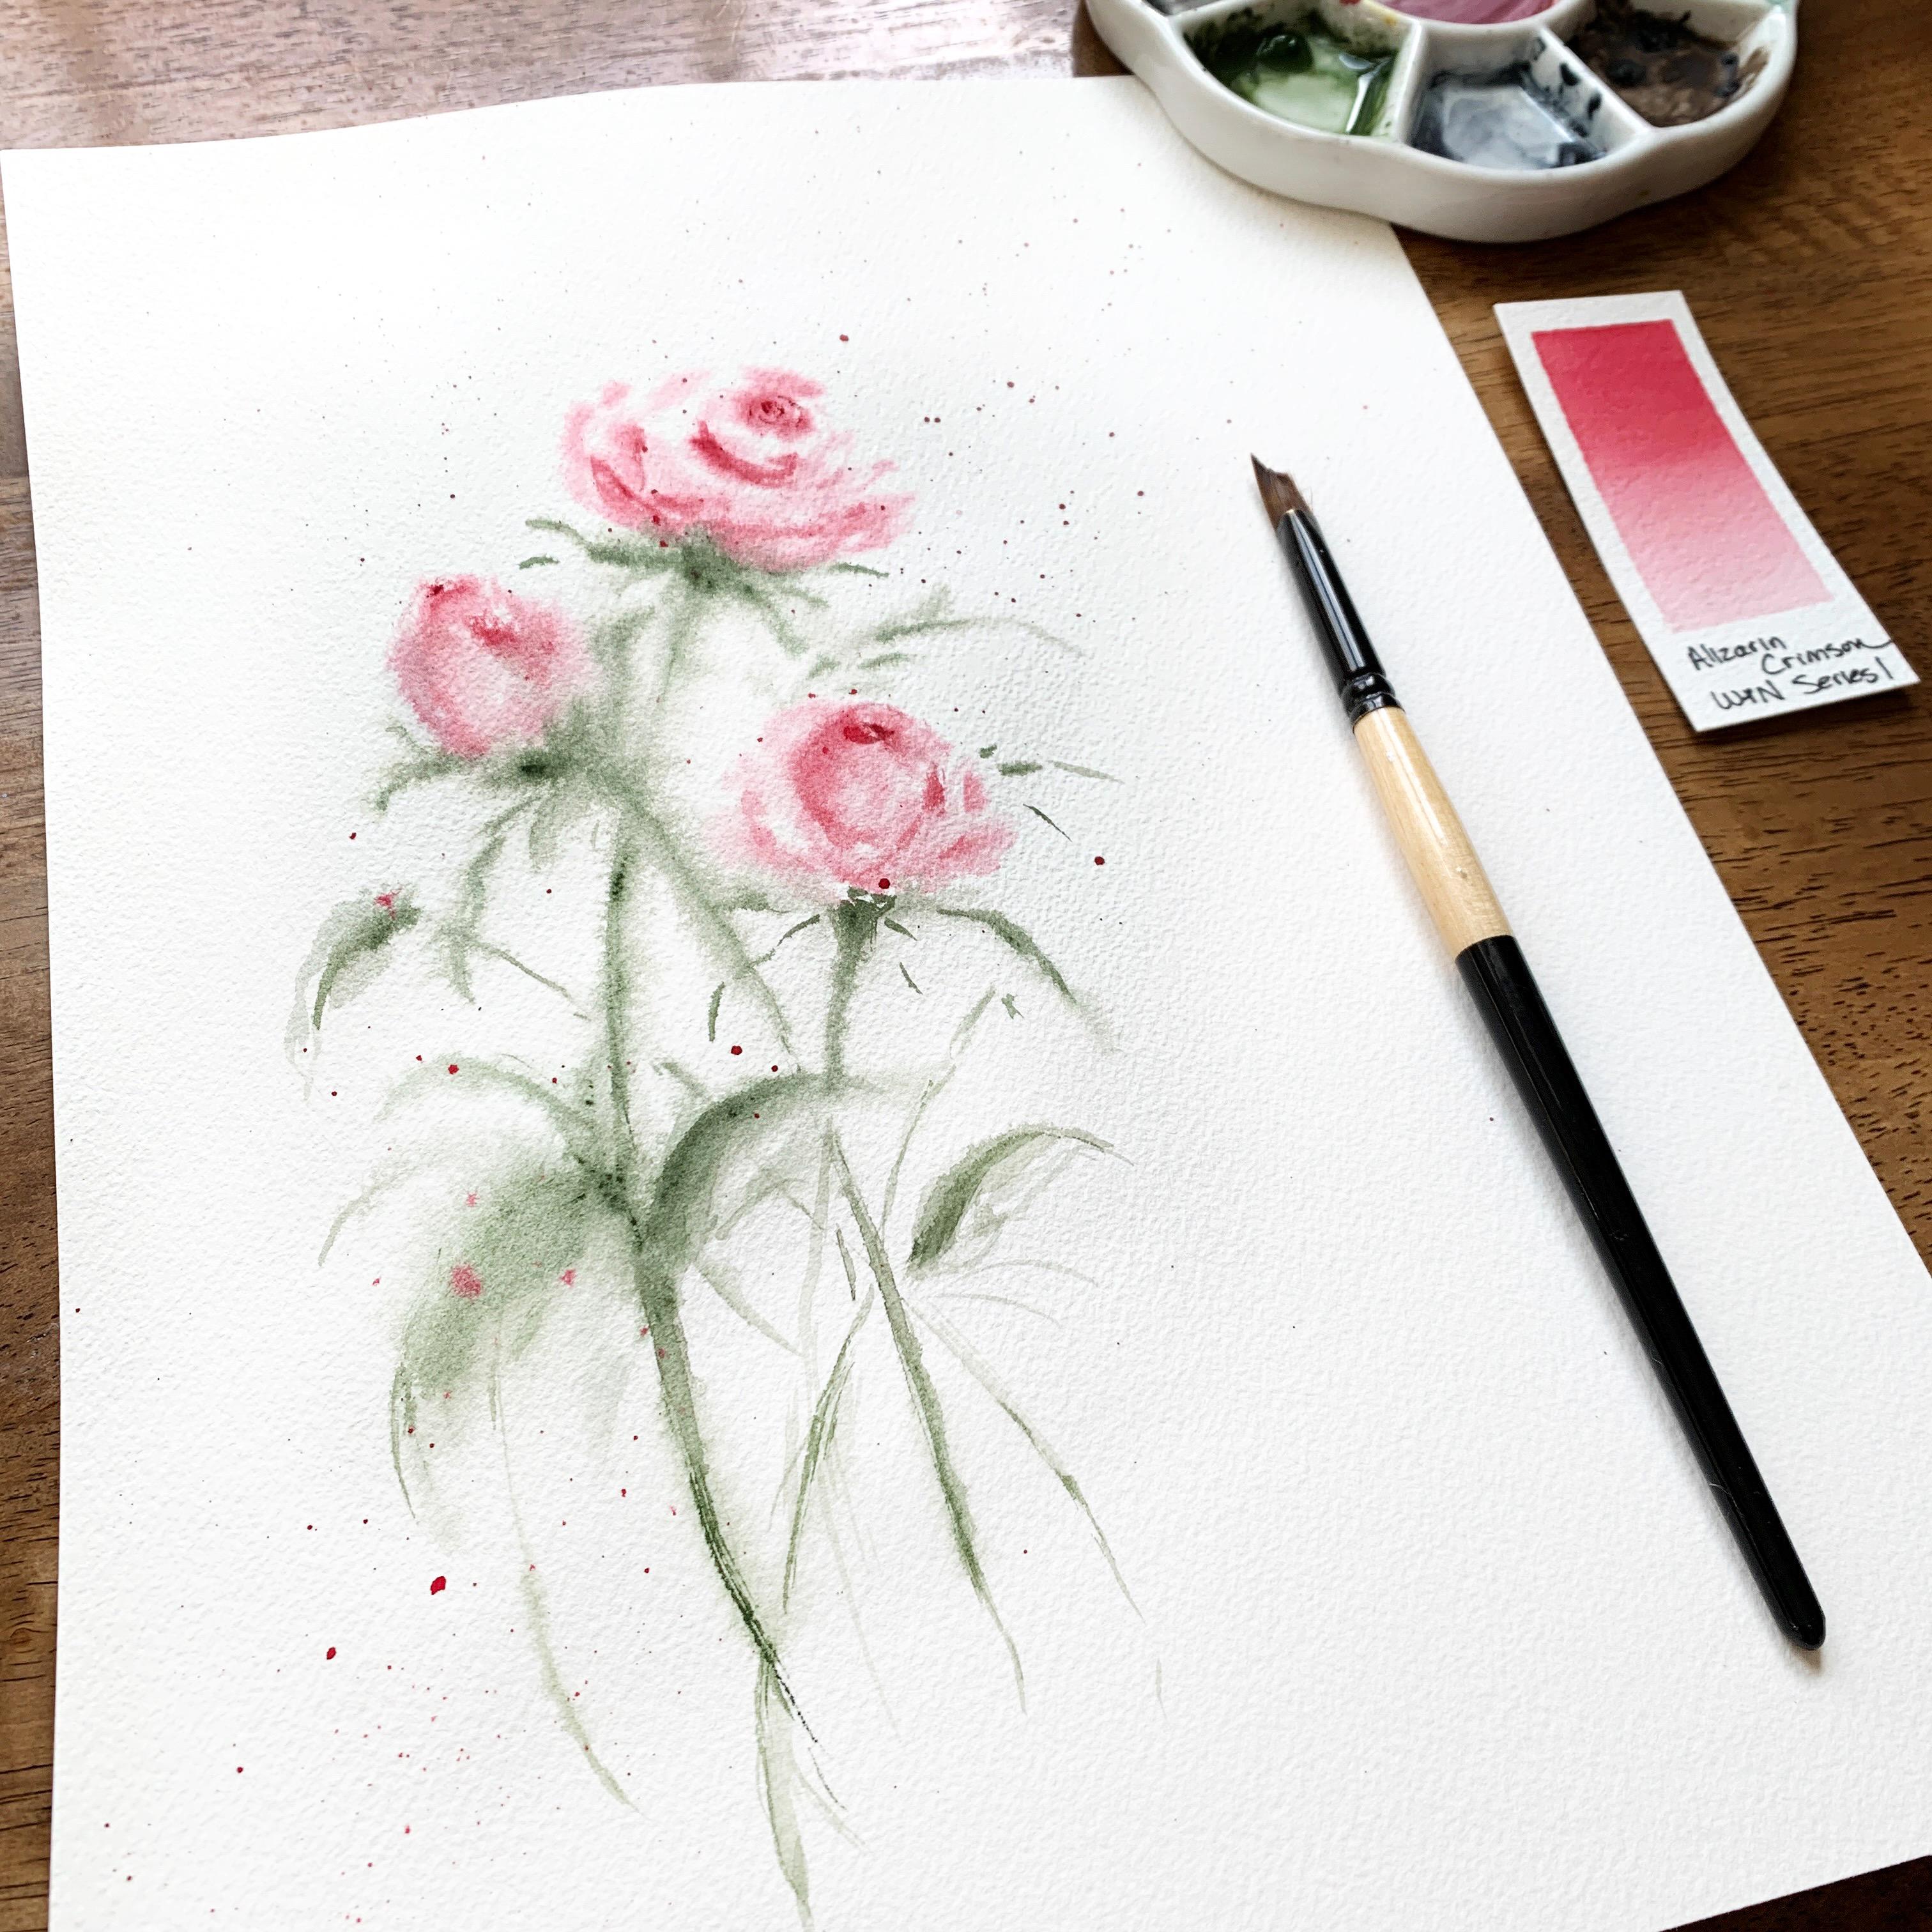
2. Class Supplies: All right, As for our supplies in class, I've got four paint colors here. As always, feel free to use whatever colors you have in your palette or whatever your preference is. So we'll use a little bit of this. Payne's blue-gray by Daniel Smith, quinacridone, gold, I love this color also by Daniel Smith. We've got this beautiful green color, green gray by Holbein and then by Winsor and Newton, Alizarin crimson. I'm going to be using Arches cold press, watercolor paper, 140 pound paper. I've got my size 6 and 8 wedge brush and also a mop brush, or you can use a round brush. We're not going to be painting with that, but just go ahead and have that close by. And we've got a couple water bottles, spray bottles here. I've got my palette, rag to wipe off my brushes, some scrap paper. I've got my water jars off to the side, and I think that is it. All right. Let's go ahead and we'll get started.
3. Important! Wet in Wet technique & Brush Positions: All right, our palette is prepped and ready to go with our blue our green our reddish, pink and our gorgeous gold. Move this off to the side. The way I like to do my palette with my paint, I like to keep more concentrated area on one side and then add some water over on the other side and pull that in as I need to. I also do that because with this wedge brush, a lot of the times I'll just dip in the tip right into the concentrated pigment. And you can do that as well with your pans or whatever whatever else that you have. But I just wanted to explain that part a little bit. So the way I like to do the wet and wet technique, I tend to like a little bit more control. A lot of times the way to do it, you're dipping your mop brush or your big round brush into some clean water and then just spread it out all over the page. I love that. But sometimes when I'm working smaller, I like to have a little bit more control. Also, if you're anything like me, I tend to contaminate my clean water way too often. So that's where my spray bottle comes in handy. Always I'm going to have clean water in here, no chance of contaminating it. And it's also super handy to have to re-wet your painting when you need to do so. And we'll go, we'll go through that throughout class as well. So just to show you what I like to do, spray my area, get it really saturated. Taking my mop brush because you can see some of these puddles. That's way too much. If I put a paint brush with pigment on there, it would just explode everywhere. Not that that's a bad thing, but that's not what I'm going for right now. So I take this brush and I'm getting it into those little nooks and crannies even more and then let it soak into that paper. And then what I'll do sometimes too, I can tilt it up and look and see if there's any more puddles in there. See some up here, but then I like to just dab it as well. So then that way, once I get my paintbrush ready to go here, get a little bit more water in here. And you can see this is not real watery over here. If it was, and I had my paintbrush full and I put the the brush to paper, it would just really explode really far. And like I said, I'm one to try to contain it and control it a little bit more. So that's why I'm starting off with some concentrated pigment. Dipping it around, and flopping my brush back and forth. Kind of sliding that tip up into that concentrated pigment. And I can dab it off on my towel. Try a test stroke if I need to. And then I can just start. So this way you can see it's not exploding as if it was really wet on my paper. It's still giving me some nice soft edges, but it's not doing that big, big explosion. I'll show you what that means if I did have a little bit more water on here, and then I would get into this. And then all of a sudden I've got this big explosion. This is the part I want to contain. And as I go around, I'm just lightly tapping my brush to the page and I'm not really looking for a good example of a rose just yet, but just more so the wet and wet technique and how I like to do that. And you're going to want to work kind of fast on this too. Now this is fine too, but I've lost some whitespace in here, which I try to maintain that a bit. Okay, so just a little bit of an explanation of how I like to do my wet and wet. And as we move to the next lesson and throughout class, obviously you'll see that much more and I'll explain my strokes as best as I can. But as we're doing this wet on wet, you do want to get a little bit quicker in your brushstrokes. That's one reason I had this class listed as an intermediate class because I don't go through my first, second, third, fourth stroke like I do in some of the other classes, because you do want to pick up speed and you want to be loose and carefree in these, in these roses. But I'll explain the best I can as we go along. I will say too, you can see this yellow stripe here. I do that when I flip my brush upside down, I call that the belly up position. Where I'm utilizing this long part of the brush here down to the tip. I'm pushing this part into the page and I just want you to notice that because sometimes I'll be flipping my brush around and I might not say what exactly what the position is. A lot of times in this class, almost exclusively in this class. I'm using just the tip as well, as I'll show you a little bit bigger brush here. I'm using the tip portion, as well as the side of each of that tip area. Okay. It'll make more sense as we go along. But typically with this brush, a lot of you know that typical floral stroke, where you load your brush, you land it, and then you wiggle it around the page. That's not the stroke I'm using in this class. So for this stroke, I use a lot of the wedge portion here. For these florals. I use the tip and about a third, third of the way back on this side. And I do encourage you to watch my hand to as sometimes I'll roll the brush or land it in a certain way and just making these little marks along the way. All right, Well, let's go ahead and get to the next lesson and I'll explain this that even more.
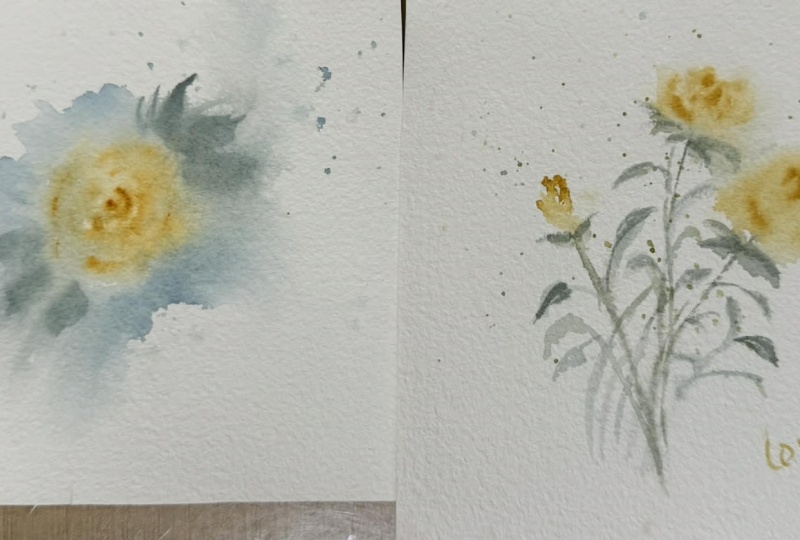
4. Single Yellow Rose - Part 1: Okay, Grab your number 6 wedge for our single yellow rose. Start by saturating your paper. A couple good strong sprays. Grab your mop brush or your round brush and really get that water into those little divots on your paper. Dab around a few random areas with your paper towel. And then loading your brush with quinacridone gold, flopping it back and forth to fully load your brush, dragging it off the side, dabbing it on your towel, dipping it into the concentrated portion. And we're going to start about the center of the page. Our brush is belly up. Start with a little dot for the center of our rose. You can see that beautiful bleed already. And then tiny little strokes around that center. Just using the tip right now. Rinse my brush, dab it off. I know I have some pigment in my brush still using the side of my brush for these wider back petals. And just gradually build up your rose. These are so easy to overdo. Add a little bit more concentrated pigment for these petals. Using the side of my brush, getting a little bit wider strokes. Just lightly, lightly touching the paper. You really don't need much pressure at all. Twisting the brush a little bit to give some really fun, pretty strokes. Paper is still nice and damp so you have plenty of time to really manipulate some of that pigment on your paper. Feather it out, blending it out a little bit. Using the side of your brush. You can see that characteristic wedge brush stroke when you do that. Remember, we don't want a perfectly round rose. Give it some dimension. All right, we're going to drop in a little bit of green on the side of our rose with our number 8 wedge. I'm not making any leaves right now, just dropping in some green. The paper is starting to dry a little bit. Remember to try to work a little bit quickly here. Still damp though. I want to be careful of how wet my green is right there just because that's when you get some of those cauliflowers or back runs if it's too wet. If you're dropping it into paint that's already there. Just going to blend it out a little bit, force the issue of a bleed. I don't want to overdo it with my greenery. We've just got one rose here so we don't want the green to overtake it. All right, You can either let it dry on its own or I like to use this Chandler heat gun drying tool I found on Amazon, it has two settings. I really like to use this a lot. I use it a ton just because I like to hurry up and get things done sometimes. Don't forget to dry the back of your paper. That helps with it so it doesn't warp too much. I mean, you're always going to have a little bit of warping, but that certainly does help to get the backside dry too. All right, back with our number 6, I wanted to add a little bit more to the bottom of this rose here, just a touch. It was looking a little off balance to me. All right, back to our number 8. I'm going to add in some leaves. My brush is pretty perpendicular and I prefer to do a 2-stroke leaf with this wedge brush. And I utilize a lot of the side of the brush as I do this. Then adding some of these little marks with the tip. I think that adds a lot of eye appeal. I don't like to go over my leaves and paint over them, but I am doing that a little bit more here. My green is not as concentrated as I wanted it to be, but that's okay. We'll just go with it. Using the side of my brush. And then the second stroke, I do like to wiggle the brush a little bit. Being mindful not to add too much. Again, we don't want the leaves or the blue to overpower our single yellow rose. Few little wispy marks with the tip of my brush. Keeping my brush perpendicular for these leaves. I want to smooth this out a little bit. That would have given me some hard edges there. You want a little bit darker for some contrast. And then just using that wedge portion right at the bottom of the rose, get a couple little more leaves in there, single stroke leaves, just pushing the brush into the paper.
5. Single Yellow Rose - Part 2: All right, We need to get our painting damp again. So grab your spray bottle, give it a couple of good sprays. You're going to see your greenery kinda go ohhh, and it's going to disappear a little bit. That's okay. We're going to fill it back in. But you want to see that soft edge. That's totally fine. Let's grab some blue. Doesn't matter what size brush you have here. Just going to drop some in in random spots around the flower and between some of the leaves. Now these bottom single stroke leaves are going to probably start to disappear a little bit, but that's okay. Don't worry about that. This is all part of the process and building it up as we go, things do change as you work wet in wet like this. Spray it as you need to. And I just blend that out a little bit. Clean, damp brush, kind of force the issue again, I build this blue up slowly. Do a little bit of splatter. I love the splatter effect. I think it gives great eye appeal. More concentrated blue and just dropping that in. The paper is still nice and wet. Think these colors work really nicely together. Clean, damp brush, this is a little dry in this area, so I'm gonna just feather that out a little bit. The rest of it looks pretty good and wet. Area was looking a little plain to me. So just let's go ahead and drop some blue in there. Blend it out with your damp brush It's a little dry up there so you can try to dab that out. Remember watercolor dries about 25 to 35 percent lighter. Just drop in darker pigment, tilting it to help the bleed. Little bit more wetness added to the paper. Let's go ahead and start filling in our greenery. We don't actually have to do all of the leaf shapes all over again. You can just drop in lightly some of the green pigment and go darker in this area. I love the soft edges of these leaves. Dip tip into your concentrated pigment. And just using the tip, dropping that into the leaf shapes that are already there. Going back to add a little bit more blue, some more splatter. Taking advantage of some of the paper that's dry and some that's still wet. Couple areas caught my eye and will blend it out a little bit. Damp brush, just almost erasing it a little bit and it's kind of splitting hairs a little bit there too, but it's just something that caught my eye. And add some table salt, in a little bit of random areas over the leaves and in the blue. You want to let this completely dry. Don't use the heat gun on this one. You don't have to add the salt if you don't want too. It looked great on its own, but I just love the salt effect, just going to blend this area out a little bit more. Some hard edges there. Again, kind of splitting hairs. All right. Once it is completely dry, then you can wipe off the salt. And it just gives it a really cool mottled kind of look to it. I really like this painting either way, so it's your choice of whatever you wanna do. All right, I hope you enjoyed this one. I'll see you over in the next lesson.
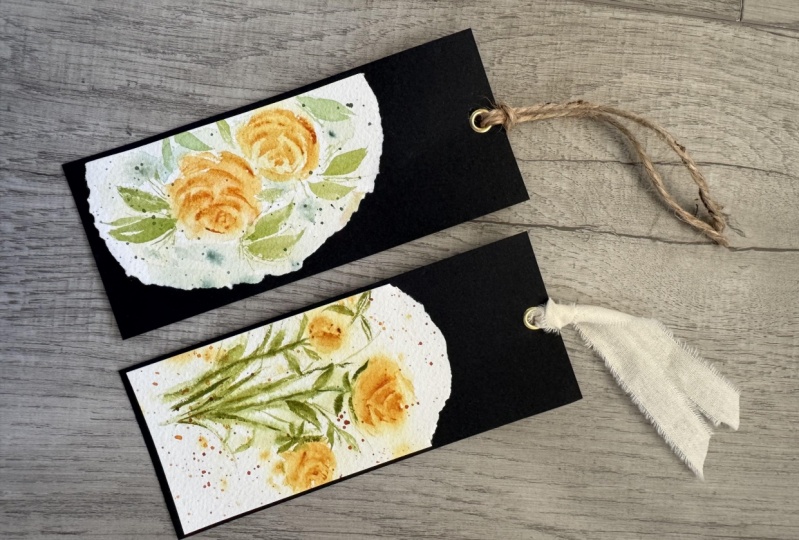
6. Yellow Rose Bunch - Part 1: All right, next up our yellow rose bunch, going to start off the same way. Saturate your paper. Grab that mop or the round brush. Really get that water into the nooks and crannies of your paper. And this is about a six by nine inch piece of paper Cold pressed Arches watercolor paper, dab off some excess with your paper towel. Add a little bit of water to this yellow. Get that fully loaded on my brush. We're going to start the same way we did the first rose... belly up, a little dot in the center. And then just light strokes, little brushstrokes around that center, building the rose up as you go. Barely touching my brush to the page, utilizing the side of my brush for these longer, wider strokes. I want to block in these florals first before I start adding a ton of detail. Utilizing the wet page. This one's going to be a little bit more on the side view. Try not to get too detailed right off the bat. Just blocking in your shapes and your florals. Letting that gently bleed out. Move on to the rose bud area. Over on the left side there. I'm working in threes. I've got three roses. All are little bit different angle, different view, different sizes as well. That's all going to add to eye appeal. I'm going to go ahead and get some green in here. Utilize this wet paper again, trying to work a little bit quicker here. Belly up position of my brush. And I'm just basically drawing in where I want the stems to be. Not overly concerned about them being a perfect, perfectly straight line. In fact, I don't want that. Being loose and carefree. Have fun with this part. Really experiment where you want to add some of the stems and the leaves. This is all part of the learning process. And really at the end of the day, if you make something you're not happy with, don't worry about it. Surely you've learned something. Getting some of these leaves that fall down below the roses and start to block in some of the lighter leaves. Had more concentrated pigment on my brush, that's fine. I'll just utilize that for some of these main stems. Very, very light touch. I pull a little bit more concentrated pigment of green in and dab it on my my rag or my paper towel. Paper is still wet that I'm getting some very soft bleeds and just gradually darkening the areas. I'm definitely a very cautious painter, I would say. I wish I had a little bit more guts to sometimes really get in there with some bolder colors or bigger strokes. But again, all part of the learning process. This can be very therapeutic, very meditative as well. Just take your time with this. And I wanted to keep this at real speed too, because this is exactly what happens in my studio. We get a little bit of a skewed view sometimes when we're watching things on Instagram or Facebook and everything's all sped up and you think, Well how did they even do that? But this is all part of the process and it takes time. And what I'm seeing, you might not be seeing the same thing. You might be thinking, oh, you need to add a leaf over here or darken up those florals it again, we're all seeing something a bit different. And that's the beauty of art. Still working on the greenery here. Really utilizing the side of that brush. right We're going to keep working on this and I'll see you over in the next lesson.
7. Yellow Rose Bunch - Part 2: Little by little, we're going to build up our greenery, pretty concentrated pigment there, and it's not bleeding into the page as much as I would like to, but you take a damp brush and you can blend it out a little bit or grab your spray bottle, give it another squirt and that will certainly loosen it right up. Belly of the brush is down right now. And just using that fine tip to block out some of these stems. Using the side of the brush for these leaves. And just stepping back and sometimes taking a look at your painting, where do you want to add something? It's a very slow process, can be kind of tedious, but also just a lot of fun to figure out where you want to add your greenery. The tendency too, is to just go back over everything and darken it. I would caution you against doing that. Some of the greenery, you're going to dark in, others, just leave it alone. Some you're going to extend and make a little bit bigger too. But that's the part of just taking your time. Step back and look at it and see where what you want to add. A whole lot easier to add something than take something away. Add some movement to your leaves. Wiggle that brush. Change up the size of your leaves too. I'm going to extend this part a little bit. Was looking a little bear over there. Go ahead and spray it a little bit more. Go ahead and build up some of these roses, start darkening some of it, some of the petals. For these buds, I usually start with just either little circle or a little oval at the top. And then using the side of my brush, kinda give it just a little bit of a swirl stroke. Just leaning the brush into the page on its side gives it that nice, petal that looks like it's just about ready to open. This is where this rose could get out of hand. So be careful with that one. A little bit more spray on top, dabbing out some of the puddle area and then getting more concentrated gold to define some of these petals. Gold is pretty concentrated right now. Paper is still wet enough. You can blend it out though. Need to build a little bit more around that top rose. Be light, you don't wanna go too far above that center. Let's get back in and do some more of this greenery. Nice wet area right there for really soft bleed. Just using the tip again. Spray that top area. Can either put a paper towel down there, just use your hand to block the area. If you just want to localize where you want to spray. Kinda lost our edges there because the paper was still pretty wet. That's fine. Just get back in there. More concentrated pigment to define your petals. Still a little bit damp. Let's go ahead and do some splatter. I'm just using a round number four with this, you could use any brush for this. This one was clean and right by my side. So I grabbed this one, rolling it around and do a little bit of a test. Can always add more, go light at first, can always add more. Pull in a little bit more concentrated pigment. Utilizing again, where some of the paper is dry and some is, some of the paper is wet down by the stems you can see some of those pretty bleeds. We're gonna define just a little bit more at the top here, smoothing this out. Alright, I will see you over in the next lesson.
8. Red Roses with Blue Background - Part 1: Alright, next up we've got a couple red roses with a pretty blue background. You know the process, spray your paper. Use your brush to really get it into those little divots in your paper. Grab your brush, make sure it's nice and clean. Get in the blue pigment. We're going to drop that in a couple areas on the top, bigger area on the bottom. Just using the tip of my brush. A little bit of splatter. Keep in that center area open for our roses. Little bit more concentrated blue, rinsing my brush, going to dab it off on my rag and then just try to help it out and spread it a little bit blending it in. You could tilt your paper if you wanted to. But just want to soften this up a bit here. Get in our Alizarin crimson. It's pretty concentrated already, dab it off on my rag. And then you can see how quickly that spreads there. But I'm just going to block in where I want the two buds to be. I do that so I don't make these too big. I just get two areas right off the bat ready to go and then build them up slowly. Utilizing the tip and the side of my brush, ever so gently touching the brush to the page. More concentrated at the top. Using the side to give that little bit of that swirl stroke there. You can see it bleeding nicely, if it's too much, dry your brush off on your rag or paper towel, and then just blend it out a little bit. Try not to overdo it. I'm barely touching that brush at all. And go ahead and start getting some greenery in here, belly up, just drawing in those stems. Just as we did before, little bit at a time. Trying to not overthink this part. This is a smaller size, so we don't want to overdo it on our leaves. Or even the blue part. You want that pop of red for our rose buds. But we need the accent of the greenery around it, of course. Really just utilizing the tip of that brush for these tiny little leaves. Still pretty concentrated green. I'm going to be careful not to get too far up into the rose buds. Making those little marks around the leaves adding charm and interest. Not much room to work on this paper here. And I just tore the side for a bit of a deckled edge just for something fun, something different. You got to love a deckled edge, right? A couple more leaves here. Sometimes just the tiniest marks add the best interest. Darkening it up a bit. And I'll rinse my brush, dab it off a little bit. Blend this dark area out a little bit more. I'll see over in Part 2.
9. Red Roses with Blue Background - Part 2 : All right, our paper is still pretty damp. Going to add some concentrated crimson. It's pretty thick. Brush is wet enough. I can just blend it out, wipe it off on the rag. a bit. Gradually blended out tiny, tiny strokes, little bit of a side swipe stroke down the middle there. And then I just, I really use this brush like a pencil, draw it in and then just blending it in with the side or the tip of the brush. Little by little. Sometimes it's painfully slow, but just, just take your time with it. And especially in a smaller area like this, rinsing the brush, Let's get back in and darken up some of this green area. Either in the belly up position or belly down, whatever is more comfortable for you. I flip my brush around a lot and sometimes I get in the habit of doing it belly up when I do these small little lines, other times, I use the tip when the brush is in the belly down position. It doesn't really matter. Whatever is most comfortable for you and whatever you enjoy the most. And give a couple more sprays. Remember to use in a sweeping motion. Go ahead and add some splatter with our blue. You don't need much. Just a little bit to add that fun little bit of interest. Get back on our rose buds. Going a little bit bolder on the bottom and the top. Nice contrast. Back to some greenery. And see how that's kind of almost veining out a little bit. So just taking a damp brush, you can really soften that up a bit. Really not doing much at all to it. And I kinda like it a little bit like that, but it was just a little too vein-ey for me there. So let's go ahead and dry it completely. Can see how it's dry. It's drying lighter. Get back in with more concentrated, green gray. Darken up some of these stems and leaves, maintaining some of that lighter green underneath. And try to blend that out a bit more. A little too much of a contrast there, a little harsh. This is where you could always spray it again if you need to, or make your paint not as concentrated, add more water. Taking a damp brush and trying to blend that in a little bit more. And just stepping back and looking at your painting a little bit, see and what we want to add or what we want, what we want to do with it next, it's always good to evaluate it. Do I want to add a little bit more in here, so I'm just adding some water, localized area of clean water. I drop in some more concentrated red. I don't want to spray the whole painting at this point. So with a damp brush, blend it out a little bit. Force the issue. Dab it out if you need to. Let's go ahead and get some more, some more of our blue. And here we're losing some of that, some of that contrast. Little bit more concentrated areas of splatter, just a little bit.
10. Cluster of 3 Rose buds: All right, last design of class are three rose buds. So if you followed these lessons in order, you know the process by now, spraying your paper, using your mop brush and then grabbing that paper towel or tissue to dab off some of the excess. We'll start with our rosebuds with the Alizarin crimson and will block in where those roses are going to be. I am going to approach this video a little bit different than the others. I'm not going to explain every single detail like I had in the others just because I want to have some time for you to sit back, relax so we can paint together. The process really is the same for this one too. I'm just blending it out using my brush mainly on the side and the tip. And then spraying my painting as I need to as I go along. But don't worry, I'll pop in every now and then and explain a little bit more as we go. Remember to use the side of your brush for that little swirl stroke down the center of the rose buds. Greenery is the same as before. Using the tip either in the belly up or belly down position. Pretty much just drawing in those stems and building up your greenery little by little. Remember to try to pick up speed and just be really carefree with these strokes. Spray your paper as you need to. Good opportunity to try to correct any mistakes that you may have. That's one area I'm not too happy with right there. So I'm going to blend it out a little bit. Blending it out enough to have it as a light green background area. Going a little bit bolder on these rosebuds. So you can see in my green, I rinsed my brush, but I still had some red on my brush. And that's going to give me a little bit of a brown color. I didn't intend that. But one of those happy accidents, I do like the dimension that it adds a little bit darker color there. Just something, something fun, one of those happy accidents. So you just go with and this is the time to extend some of your greenery while the paper is still wet. I'm going to take advantage of some of that brown. Then I accidentally made and use that. Alright, we'll add a little bit more greenery. Remember, we have three small roses here. We don't want the greenery to overpower those tiny little rose buds. Got to add some splatter on this one. And we're just going to let it sit and dry completely. So of course I forgot to hit record as I added some of the greenery. You can see where I did that here, but looking at the reference photo, you can see where I added even more under the base of those rose bud. So in the next lesson, I'll show you where I did that.
11. Oops! Add'l brush strokes added off camera: All right, so just a few additions that I made. Adding some more greenery underneath these roses just to add some contrast. Same with these two rose buds here. And then as well as these three here, I wanted to get some of these little squiggly lines up into the rose buds just so it looks like it's kinda cradling those rose buds. But that was all I did. I did not do anything on this one back here. But you know how paintings sit for a day or two. And then you look at it and you think, Oh, I need to add a little bit more. So I did that without pressing record and I apologize for that. But anyway, just a little bit of greenery. That's all I did on these. All right, I'll see you in the last lesson.
12. Class Project & Thank You!: All right, Well, Congratulations you did it! You made it to the end of class. Thank you so much for being here and choosing to paint these roses with me. I do encourage you to upload your projects into the project gallery. I love to see what you create. I also want to encourage you to give yourself grace with this. This can be a tough technique. Trust me, I have pages and stacks of paintings that did not turn out and I look at them and I think, oh, what in the world was I doing? But it's all a learning process. So go gentle on yourself. Have fun with it. Enjoy, okay, and like I said, upload your projects into the project gallery. I just truly love to see what you create after you've taken these classes. All right, I hope to see you in future Skillshare classes and I hope you have a beautifully blessed day. Take care!
 Jen Sweeney, Watercolor, Calligraphy, Cycling