Transcripts
1. Hello and Intro : Hi. Welcome to my home and welcome to spring time. Flowers are blooming all over the place. And what better flower to talk about today than the cherry blossom? I had a fantastic time creating this class for you. So let's go behind the scenes and I'll show you exactly what you learn. With their vibrant colors, delicate petals and strong branches, it's easy to see why cherry blossoms represent renewal and hope. I designed this class with a beginner to intermediate artist in mind. I'll explain all the materials you will need. You have access to handouts you can refer to long after class is over. I'll talk about color options as well. A. Some alternatives. We start by practising the cherry blossom elements. You learn my exact technique for holding an angling your brush to obtain these beautiful, delicate results. Then it's time to put it all together. The lessons are in real time, with no voiceovers. You get to see pretty much every single breast stroke I make. I do this so you can paint right along with me. Let's not rush through the process of creativity. I'll show you how to add some delicate details to enhance your cherry blossoms even more. I'm confident you will learn something new in this class. I'll even give you a healthy critique of my own artwork. I show you some examples for a class project. I can't wait to see your designs. So are you ready to paint? I know I am. Let's go create some beautiful cherry blossoms together.
2. Class supplies: So here are all the supplies that you will need for class. The brushes. I will be using either a six or eight wedge. Plus this little guy. It's a 5/0 round brush. Tiny tiny bristles for some little details in those flower centers. And then, if you have a triangle brush that's going to really give you the same result is the wedge. You can adapt a dagger brush or a round brush for this class. To certainly plenty of principles in this class that you can apply to all kinds of water color that you dio. As for the paints, pinks and reds, whatever you have in your palate will be fine. I'm going to be using the permanent Eliza Rin Crimson. This is Windsor and Newton. Siri's three a says. My dad's from my dad's set, and that's a very well loved tube of paint right there. Permanent rose or quinacrine own red is another option. Sap green, and then for Brown, I have stepped CPR or Van Dyke brown. Either one will be just fine. I'll use a little bit of bleed proof white doctor Ph Martin, or, if you have one of these jelly roll pens Bice occur up. This is a 08 a white pen that would work find, too, and then a black micron and the Stardust jelly roll pen, also from Secura. I just do a little bit more highlights with that. Grab your palate, some paper towels, your water jar, and then if you can print the handouts before class, that would be helpful. If not, don't worry about it. We will go over all of this during the lessons. Grab a few practice pieces of watercolor paper, and then I tend to use arches a lot. The £140 cold press paper. Whatever works for you will be just fine for class. So let's get going and let's start painting these cherry blossoms.
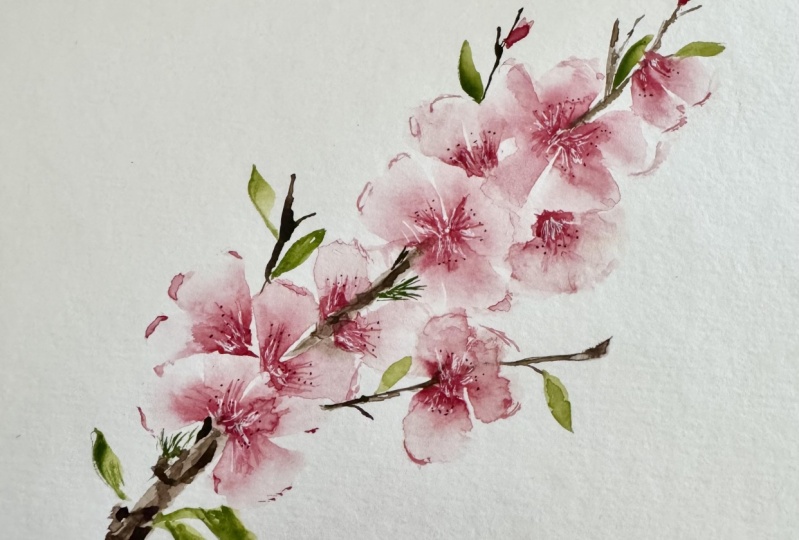
3. Color, handouts, and inspiration: all right. A few quick housekeeping items before we jump into practicing or blossoms. So I wanted to show you this color chart that I did. Ah, while ago, I went ahead and taped it out. That's why the squares look really nice and square. I couldn't do that by itself there, but I just had some extra time one day, and I thought it would be fun to do it that way. Um, so up here the Eliza ran crimson. That's the one I'm going to be using today. But look how closely these two are related. And I do that and explain that just because when you take these classes, don't feel like you have to have exactly what the instructor has. Whatever you have in your palate is gonna be just fine. Any kind of hue of pinks or reds, whatever you prefer, go ahead and have that ready. The Daniel Smith Sap green. This one lends itself really well to the bright green leaves on the cherry blossom branches and trees. As for the Browns, I tend to go back and forth between the Van Dyke Brown in the Windsor and Newton CBO, but just wanted to show you that. And I do highly recommend that you color swatch for any watercolor piece that you dio with the handouts. We're going to go over this one by one in class. You don't need to have these right by your side. But I just wanted to show you those real quickly and explain very simply when you see brush tip here. That's referring, of course, to my wedge brush tip, which is pointing down towards my belly. And as the arrow goes around, that's how you're moving your brush. All right, we're gonna practice that in just a second. Explain a little bit more about the stain man and some of the buds, as well as the branches in the leaves. But we're gonna hop into that in just a second. Also wanted to point out when you do watercolor or you're trying to get inspiration, nature is always gonna be your best bet. I think so. I tend to go to a splash dot com my back yard a park somewhere and try to find the best representation. So here I love this one. Just because it shows such delicate petals and it has a really good. You can see really good here. Where the statement is all these tiny, tiny little filaments and these little tiny dots there. I just think that is gorgeous. Also really representative of Cherry Blossoms. You see these offshoots from the branches here? In fact, this one you can see even better. So we're gonna certainly try to represent that today. And what we create doesn't need to be perfect. We're not going for a strict botanical look here, but I just love how these delicate little offshoots really lend Teoh a beautiful overall peace. And here's a nice picture of a bud, too. I like that one.
4. Blossom practice, Part 1, florals: All right, So to get these red cherry blossoms, the first thing I'm gonna do, make sure my brushes super clean and I always have a clean, very clean jar water. And then the dirty water is off to my side. Here. You probably can't see that too much. But you don't really need Teoh. So really, really clean water. I'm dip in. This is a size eight that I'm using. Dip it and water. I drag it off the ledge just a little bit and then gently tap on my paper towel and especially the tip just a little bit. I'm not smashing it down into the paper towel, and I definitely don't want all of the water off. So that's one of my secrets of how I get lighter edges on the outside and darker on the inside. I'm just using water, Dragon it off the side a little bit, tapping on the paper towel and the tip, and then I go ahead and just dip the tip the tip only into the more concentrated pigment. Move this out of the way. And then here's my test page. Hi. So I'm gonna do that again. I'm gonna rinse it all the way off because that pigment will seep back into all of the bristles I wanted as clean as possible to begin with, swishing it around in the water. Dragon it gently across the side, also on the paper towel and the tip, especially dipping it right into that concentrated pigment or kind of dragging it. You're gonna have the point of the brush facing towards your belly. You're gonna land the brush and you're gonna wiggle it around land and then wiggle that brush around. There's a one pedal, Same thing. Third time forced time. Sometimes you can get off five pedals. Okay, so a darker in the centre lighter on the outside. Now you can see how it's seeping out in bleeding a little bit more. So if we go ahead of me, rinse that off again. Not sure if you can hear the rain coming down. It was sunny and the birds chirp And now we've got rain clean and my brush Nice clean water dragging it off on the side Happen that Billy of the brush on the edge and the tip going right into the center. So this is all wet back here I'm not sure if you can see that, but that's the nice clean water. And as you use that that that pigments going to seep back into your brush, that's totally fine. You don't want all the pedals to be the same. They're all the blossoms to be the same. You can have some darker, and you can have some lighter rinsing it off in my dirty water. Robinet on your paper towel just to make sure you really are clean back into my clean water , dragging it a little bit, dabbing it, dragging it just that tip into the concentrate. Or you can even go back a little bit further. However dark you want it sometimes out. Rest the heel of my hand on the table shaken that brush around, wiggling it three pedals. Four on five, Rinsing it off in the dirty water. Let me show you just what would happen if you didn't do any. Rinse well, you don't want it so soaking wet that it's just gonna drip on your paper. But if I didn't dab it enough or not dab that tip, it's actually not too bad. I don't really mind that at all, but Sometimes it really just leaves a lot of mark on your paper, and it just seeps back too much. That's not too bad. I could live with that for sure. But you tend to get some some marks that it's just bleeding back. And then the hard lines, sometimes around the edges, but really is not too bad just dabbing it a little bit back into that concentrated pigment . So then we'll have Let's do this like one that's coming behind it here. That's how we make a cluster. - Like I said, it's fine to keep this dark because we're gonna have some white lines coming out of there. Once we do the highlights, just do a few more. I think you're getting the hang of this. I'm sure you are definitely takes practice, getting the water in the pigment ratio, how you want it. But this is actually very forgiving, and you can really correct this. Once you have a big cluster and you're adding some highlights, some of the little mishaps you won't even notice
5. Blossom practice, Part 2, buds & highlights: so to do some of the buds. Those are pretty. I try to keep those pretty simple. Now this, I'm gonna add a little bit more water. And if I just do one stroke pointing the brush towards me, I'm gonna land it and move out to the left. That was a little bit too dry. You can just do a one stroke, bud any which way you're just leaning that brush into the paper or a two stroke button. Come around over that first stroke. Let me show you that again. Through all the thunder. I apologize. I'm gonna do this one a little bit bigger so you can see it. One stroke gently left. You go back to that starting point, come around and back up. So you get that bud shape there. The other way I like to do it is exactly how we do the pedals. But just do it a little bit. Only like two or three. There would be one tiny little one on either side that could be a little bud as well. And see how many strokes you can get out of your brush to this. This is such a fantastic brush It does hold, Ah, lot of water and a lot of pigment a little too dry, but you can go right over. It gives it some nice dimension and character. There were. It's lighter on this side, darker on this side. All right, go ahead and practice your balloons. But I do want to show you how I highlight these a little bit. So I'm grabbing my round brush. The teeny tiny won the 5/0 and let's go ahead and get some water back into or bleed proof white. So what I like to do with this tiny little strokes. Now this one barely holds any water or pigment constantly going back and forest. But that's OK. You want to go slow on these two? Just a few little sprays here. You can either do it with the bleed proof white or the jelling role pen. I find that the bleed proof white is a little bit brighter now. Once that's dry, then I go right back into my Eliza or in Crimson might need to add some more water here. Just go back over a few of those white streaks just to give some contrast, and I go back and do a couple dots or can grab my micron. Sometimes I do boast. Sometimes I just dio the paint. Sometimes I just do the micron. Whatever you prefer. The other option I like to do sometimes with this brush is just Just check here is just very loosely go around the pedals and highlight those not all of them. It definitely adds some highlight there, but I feel like it just kind of pulls the flower out a little bit, especially on these lighter edges here. So leave on plane, or you can do the highlight. Whatever you prefer. You can also add down at the buds here, too, a little more concentrated pigment and then wet that pull it out a little bit more. It's a little hard with this tiny, tiny brush, but I'm sure you get the idea, all right, so we're gonna go ahead and work on our branches and our leaves
6. Branch and leaf practice: All right, So for the branches, this actually is the easy part. Honestly, I don't do a whole lot, but just have a couple little branches going in few different directions, keeping a thicker down at the bottom, and then you want to get thinner as you get out to the top. But remember, the star of the show is gonna be our cherry blossoms, Even with the leaves were gonna go light and simple on the leaves. So he even here in this picture, you can see these beautiful little notches here. We're going to try to capture those, and then it's Ah, this one's more like a grayish brownish color. And then I've seen some dark ones. Almost even black too. All right, let's get into this. So here's just a few examples that I did. Um, and sometimes I go ahead and sketch them out. Other times, I just go ahead and go for it and just paint him. So I'm gonna go ahead and do this one. Get my brush wet here, get a little bit more water in my brown paint. Missy. Pia and I left this open here. I do this sometimes. If I sketch it out. Ah, Leven Open area for my florals. I did this in my florals and stems class too. But sometimes the downfall of that is that once I have that down, I'm locked into that so it can work for you. Sometimes other times it can really boxed into a corner. But let's go ahead and get this guy started. So the point of my brush the tip is gonna be Oh, I'd say roughly around the seven oclock position. Let me hold back a little bit so you can see here. So I'm gonna just gently touched down and then guide my brush with my hand on the paper. Up we go. So let me just do this here for you. Touch down and as you touching down, you're getting that nice little notch down at the bottom there a lot of times what I'm doing, I'm rotating my brush depending on if I want thicker or thinner. The tip obviously is always going to give you a nice thin line. But sometimes I flip it over, keep the belly of the brush up, and I pushed down a little bit more, tends to have a little more paint that's going to just seep out a little bit longer, as opposed to just the tip. But honestly, what the's branches? You're going to go back and forth on him anyway. So which ever way the brush angle is comfortable for you? Feel free to do that, and I'm always going back over and dropping a little bit more pigment into these branches. Even after the whole piece is done. I tend to go back and just kind of doctor up my branch a little bit and watercolors always gonna dry, Leiter said. Just be aware of that. So when the paint is wet down here, a the bottom, I do flip it over and use just the point, and I just drag a little bit out to get some of those characteristic notches, which I think are so cool. And if you make them too big, don't worry about it. It can just be an extra notch in your branch. So really, there's not much to making these branches, just like I said. You don't want him to be flat, so you're gonna have some areas that are darker, some that are lighter, some that are you know heavier, down at the bottom, thinner as you get out to the end and I'll show you how I highlights some of these with the white in just a moment here. But just playing around with how you want your branches to go That's the best thing you can dio. You never want just a straight branch because that does not happen in nature. So I would put my florals here, and then I could put some here. I could build a couple more branches, you know, it just depends, But right now, we're just We're just going over how to do branches. All right, We'll leave that one alone for now. This one, this little guy down here. So if I'm gonna have the belly of my brush facing up, they ah, hell of my hand is resting on my paper. So I just land the brush comes straight up, and then I pull up a little bit and I'm getting thinner as I get to the top. So pull out some of these little notches here. This brush is perfect for that. That fine tip is just You can do so much with this. Clearly, I love this brush. All right, let's get this rinsed off. And I did turn the background music down a bit. I apologize. I realized a little too late. That was a little bit louder then. I wanted it to be brown. I want the green here. All right, So this is where I'm just going to simulate some of these little offshoots here. Very simple and totally fine. No big deal. As your green is seeping back into your brand, You really can't even see that. And it just such a nice bleed when that does happen. But I'm just gonna leave that as is. That's where we would put some of those little buds. All right, so let's do a few leaves. Now. That leaves. We're gonna keep super duper simple. Hardly spent any time at all on these guys because the star of the show the cherry blossoms So very, very simple How I do the leaves. You can see here these air Just one strokes, one stroke. Sorry. I lay the brush down and I lean it out into the paper to the left can angle that any which way you want. Just landing the brush, leaning it out one stroke leave could not be simpler. We wanted to do us to stroke, start the same way as the one and then you go back to that starting point come around and and just a little bit of a tip to it. The way I do these sigh, the side leaves like this. The tip roughly around the nine oclock position. Let's see, Let's do it over here on this guy, just land gently and pull it out. The more perpendicular you get with your brush, the lighter your strokes are gonna be very, very simple leaves. So this is the size six and a lot of times one of doing cherry blossoms. I'll use a six for the leaves. Just want them soft and delicate. So with the leaves to you can always go back in, get more concentrated pigment, and then you could go back and enhance one side of the leaf. If you want. Teoh given a little bit more dimension and character, of course, the other way. What you do see on cherry blossoms, I'll grab my very small round brush again, and just like I've done here, just do some vain ing on the leaves. You could leave the leaf plane. You could add the vein. You could do a double stroke here. Pretty much an open book, whatever you prefer. But just keeping it simple. Yes, sir. All right. So a quick way to add a little more dimension on these branches here. So this time I'm just going to use my white jelly roll pen if I just and on one side or so skipping around a little bit, just you could even leave it just like that. That's sometimes what I will dio is take a clean brush and just soften it a little bit. So it gives you a little bit of a gray gray color brown color lips. Now I'm getting reactivating that brown so we don't want that not the end of the world, and just put your white back over that, and this dries fairly quickly. But it's just a subtle, subtle little white areas there, and then just soften it. Not even sure you can really see that very well. We try this one down here, do it a little bit more, just kind of soften it a little bit. Certainly if you don't like that and just go back in with your brown and darken it up again , but just adds a little more character to your branches. So it is a bleed proof white, a white pen like this or what? Whatever you have that if we wanted to get back in if we didn't like that too much. So just get back in there some of your brown easy enough, right? All right, we're gonna leave this as is So the next section, we're gonna put it all together where these beautiful blossoms branches leaves, they all come together, and that's the really cool part. So let's get over to the next lesson and get this all put together.
7. Putting it all together, Part 1: All right. So we've practiced all the elements and we're ready to get thes cherry blossoms down on our paper. If you have your hand out, you can grab that. We're going to try to simulate ah branch similar to this. It's not going to be exact if you don't have your hand out, Don't worry it all. We're gonna walk through this step by step. Now, I have a very small piece of paper here, and I did that intentionally, just so you can see exactly every step that I'm doing. So if you want to go ahead and grab your paints, you're CPR, your sap green. You're a lizard in crimson. And then I've got a little bit of bleep proof white over here that's already drying out on me. Sometimes what I do when I start one of my cherry blossom branches, I'll sketch out the design, especially when I've got a bigger paper and I'm trying to figure out composition will go ahead and sketch it out in pencil and then erase some of the areas where I know I'm going to place my cherry blossoms. But today we're going to do something totally different and I'm just gonna go for it and walk you through my process as I'm seeing things as I'm laying down the paint and how I'm analyzing at each step of the way So I'm gonna have I'm going to start with my number eight wedge brush first. And I've got my dirty water off to the side. My clean water just like we practiced. And we're gonna be doing lots of rinsing back and forth today, so we'll start with part of the branch, Get our c p a all mixed up here. Now, before I lay it down on this piece of paper, let me show you on my practice page. So when I do my branch, I'm gonna be using about 1/2 to 1/3 of the wedge portion of my brush. If I laid down the whole thing for this piece, that's way too big. So I'm gonna pull up, go a little bit more perpendicular on my brush and do it that way. And then I tend to flip my brush around and you'll see me kind of painting it in different ways. So again, I'm gonna use about 1/2 or 1/3 to that wedge part of the brush, and I tend to work left to right. If you wanted to do it the other way or have your branch coming from top to bottom, please feel free to do that. Get some of the excess off here. All right, so the point of my brushes about the seven oclock position, and then I'm gonna get thinner as I go to the top. Now, this is a little tight area for my florals, and this is a small area to, but that is totally fine. We will work through that, and then I'm just dropping in some more of the sea Pia and just kind of skipping along. I don't want it to be perfect, so I can flip my brush around with the point down and get some finer, finer details. And this is basically just to give my my i to know where I'm going to go. I like to have a little branch coming off this middle one here, maybe one coming off here. We'll just see how it goes. And let's more. This pain is a Well, let's pull out some of these little characteristic rough edges, and I do bounce around with my paintings going back and forth between the branch, the leaves, the blossoms, the extent I'll explain everything as I go. And these branches are a bit thicker. Then if I would do just a plain floral stem, especially down here, Okay, I'm gonna rinse my brush. Believe this as is, and we're gonna start adding some florals. You want to make sure your brush iss super duper clean. Test it out on your paper on your paper towel. A little bit more. All right. Getting into my nice clean water, dragging it along the edge a little bit of tapping. I'm going to just do a test page or a quick here just to see if I'm happy with that. That's pretty good. I like that nice and dark in the center. And then I've got this clean wide area here now can always turn your paper because it's that wet and it's just gonna bleed exactly to where the water as it won't go past that that's actually better than that one. I wanted to stay put a little bit now if it does bleed back, that's not the end of the world. One thing you can dio let's take your paper towel and just dab it So many different little tricks of the trade when you're painting and things that you just figure out on your own. Really pretty cool. All right, let's get these florals going. Just dipping into the center of my crimson. You know, start here, branch out a little bit, and then I'll move up to this top area. Just hug in that bottom part of the branch there, and I do tend to turn my paper a lot. Now I can tell in the feel of my brush, I can probably get another one or two strokes out. And as this part is still wet, if you want to make it even darker, get back in there and and some pigment to the center and just let the water color do its thing when it totally rinse my brush off again. - But when I'm pushing my brush down, I am using almost all of I am using the full wedge part of this brush. All right, I'm gonna leave those as is. I'm gonna move up to this section now. I could move to a size six, but I think I'm gonna hang out with size eight for right now, says a little bit bigger area. And I love that color that crimson against that CP. I just think it's so striking. - Sometimes out lean my hand on the table, sometimes not. It's a good dark center right there like that. I really can't even see the white or the water right there. But when I do my outlines, sometimes I even go beyond that. Just toe even highlight that that clear white area a little bit more just makes the florals pop. You're just building up your clusters well, little by little, and figuring out that water the pigment ratio as you go. And if it's a warmer in your house, your paint is gonna dry out quicker, and I tend Teoh. That happens at my house. I tend to add more water all day long. Let's add another one here, kind of hugging the branch here. Now, if you prefer to lay down your florals first and then at the branch, absolutely do whatever smoke, whatever is most comfortable for you
8. Putting it all together, Part 2 : All right, I'm gonna switch out to a size six. No one at a couple smaller florals. We'll get to adding some buds to I'm sure that brushes clean. So add a little one right here. Tiny little one. Same up here. Tiny little one here, too. And I'm trying to keep the buds in this directional flow to you can have a few that, you know, maybe bend down a little bit. But for the most part, since I don't have any other branches yet, I'm going to keep these little ones contained. So since I have my size six, I'm gonna add a few tiny florals down here on this cluster. All right, I'm gonna rinse, and I'm gonna head back into my brown and get some more branches coming out of this main stem here. Gonna leave the florals alone. I think that's a good amount for right now. All right, So I see a little opening right here. And what I like to do sometimes is just give that little peek of a branch coming out there . Not going to do too much, but just given my brain and eyeball an idea where I want to go now. This little guy down here, I can just build off that and come out this way. Leave in maybe another spot there for some florals again. We'll build this up, but I just want to kind of see it as I go. And then while I've got some brown on my brush, I had some dark areas here again. Remember, the Cherry Blossom branch is really pretty dark. But you want that contrast between dark and light. Even though we're doing all this darkening, we're going to get right back in there and a little bit at some white to give it a good amount of character. Just want to clean up these little notches a bit. Can even pull this down a little bit more. - All right, So, rinsing or brush again, I'm gonna add some florals right in this area here with having that brown on there. Get that brush clean. I can't tell you how many times I've made a big old muddy mess. All right, you know what? I'm going to get some more water in my crimson here. It's drying out quickly. If he didn't dry out or if you didn't run, set out, you'd have all this brown seeping back here, Not the end of the world. A lot of times you go. Oh, not the Brown, not right there. But a lot of times that can be fixed. Now, this one is a little bit more dry than I would like, but it's a lighter one, So I'm gonna live with it. You have to just kind of getting a flow of the water and pigment ratio. It will come, but it definitely takes practice. And like I said, especially if your house is warmer than usual, that paint is gonna dry out quickly. E think I want to add a little bit more hugging the branch right there, rights and how we're gonna rent. So we're going to get into our green. We're gonna start adding some leaves, not a whole lot at first, just enough to give the eye that contrast in color between the brown and the crimson. And I think this area right here is a good spot to add. Let me show you. When we talked earlier about these little delicate filaments, that's one spot I see that I can go ahead and add that right there with a piece this small . It's a little hard to do that. But what ISS fun is to just dio smaller florals like this and just highlight him down at the ends. But you can You can find little spots to fit those in. All right. In another spot that I see, we could add some green lines right here going into this cluster. So because I have it on this side, I'm gonna come down here so it balances, balances it out a little bit, and just a hint of those is already all you really need. All right, let's get a few leaves on here. And then I want to go back and build up this branch, especially trying to pull back on the brush so you can see, See what I'm doing.
9. Putting it all together, Part 3: All right. I'm gonna leave that alone for now. I want to build up this area. The branch first. Before I had any leaves in that area. Still using my size six getting back into RC Pia, I want to take up a little bit of this white space here, so just easily add another little notch off this branch. Thicken it up a little bit more. The cool thing about branches, they're not straight. They got these fun, little twists and turns, but again, going in that same direction. So you want the I to be pulled up a little bit this way a little, But down here and then the main direction is going from left to right. Alright, So back to the blossoms. I'm gonna add a little guy here. I think that's that would be a good spot form. And then probably just a little bit like the one here hugging their branch. I'll just do that. And then we'll get into adding a little bit more leaves and then some highlights. So we're getting there, Just given a little bit of a hint, have a blossom right there. All right. A few more leaves and we're gonna call it on this one, then we'll add and the highlights. All right, So I'm seeing this area. Definitely need to be having some pops of green. And there, since this area is kind of getting full, I'm gonna bring the leaf down this way, and then we'll go back up here. I took one more in here, All right? I think we're going to go ahead and leave that, as is We're gonna come back and add some of these highlights in the centres and on the branches and around those pedals to and even the leaves. We got some more work to Dio, but come back in the next lesson and I'll see you there.
10. Adding the highlights: all right. I think this is looking pretty good. So what we're gonna do is start working on our highlights. So I've got my bleed proof white here. Gonna get some more water in that to activate it a little bit out of the container here. I love this plead proof white. I use it all the time when I'm doing calligraphy with the white on black paper. It's really, really striking. So grabbing my super small round brush and I'm gonna have my number six wedge close by and just damp with nice clean water. So then just add and some of this in now this dries fairly quickly. So then I take my damp brush and smooth out some of it. So it's reactivating the brown underneath there and giving me a nice contrast. I'm not too thrilled about the overall look of this branch right here, but we'll talk about that in the in the next lesson. Teoh what I like what? I don't like what it could have improved upon, but looking at it with a healthy I not being a really critical of of your piece, So I tend to just go along the main branch. Now, these are kind of thin up here to, so I don't need to add a whole lot or it can do a little bit, you know, basically on one side or just little spots just to give that contrast. I'm not sure if you can really even see some of this, But if you step back and look at the whole piece, you see that there's some contrast here, and it just makes that branch not look so flat. Tend to go in the corners where these little notches come off just trying to catch some shadows. All right, we're gonna leave that as is. And then let's get this going in the center of our blossoms. So I don't do a whole lot on these because those air just the buds. But these guys, it's a little thick, but that's OK, because we're gonna come right back in and add some of the crimson. - Sorry if my hand is getting in the way there. Just a tight squeeze there. Sometimes I forget where the blossoms are if that center has kind of closed in a little bit and isn't quite as red. But tell you once you look at the whole piece. This all just blends together. All right, let me rinse this and we'll get, uh, do that outlining. First, we'll let the white dry, but let's do some outlining, All right? Just some subtle, subtle highlights here and just skipping around those pedals. If you don't want to do this totally fine, it is up to you. However, you want to create your piece and I'll tend to go beyond where even the water was. And that just gives the illusion. It's pulling your flower out a little bit more that it's a little bit bigger. But if you'd want to leave your florals just playing, I think that's beautiful that way, too. And I certainly go back and forth with this. I don't always add the highlights, okay, so let's get back in this center and add the crimson. Now what I'll do sometimes is a poor little bit out, so it's not exactly the same colors or pedals and add a touch of brown that's going to give it a deep, deep maroon color and just go back and forth until you're you know you're happy with what color you want. There just a few more little lines over the white. They're showing some contrast. Just makes that center really pop. And I'll use this for the little dots sometimes, or the Micron kind of just depends on my mood, but both work really well. And once this is dry, if you think you went over your white too much, no problem. Just get back in there with the bleed proof white or your jelly roll pen and you'll be just fine. So let's just go ahead and a couple of these dots right at the end. There something else to just draw the eye in to these dark, beautiful centers just really lends itself to really pretty cherry blossom. All right, let's go ahead and at some veins to these leaves. And if you wanted to just darken up your leaves, that's fine if you want to leave them as is. But just adding a few little veins sometimes gives it a little bit of attention that it needs just a pop of that contrast in color. Everyone is gonna be every leaf is gonna be a little bit different. Sometimes I just leave the vein. The main, the main centre vein there or sometimes not just again, just depends. And as you're going through your piece, just decide what you like. What you don't like, what you're learning from it. We can always learn things from every single art piece that we dio things that will do again. And things that we definitely won't do again can even go over these little ones just a little bit more. All right, The last fun little highlight that I wanted to show you was this jelly roll Stardust pen. This I will use every now and then. It's just fun to add a little bit more sparkle to your piece. It's just something tiny that will catch the eye. A lot of times I'll add this to my envelopes, and that's honestly one of the first things people notice sometimes is that it just catches the sun and they're like, Oh, what was that there? And it's just a nice little, nice little touch of sparkle. So what I will do is just get right back in these centers and just add some sparkle. I know this is gonna be really difficult to see if at all, but it's just a fun option how either do the centers or even the branches sometimes or just some lines coming out from the flowers or the pedal ends? We're just highlighting the end of the little buds. But I'm not sure if you can see that we're starting to get into some sunlight, rays and things like that here, um, gonna be very hard to focus on. I can't tell if you can see that or not. But it's a fun Pento have. And just to add it to different things, it just gives it that little pop. You can certainly see it. Um, in the sunlight is just catching the rays. But anyway, one little thing I just wanted to show you. So come back and meet me in the next lesson. I want to go over a healthy perspective off this art piece. What I like what? I don't like what I would have done different but again, just a healthy perspective to analyze our work and really see where we can grow the next time we dio on art piece. So see in the next lesson
11. Healthy analysis : All right. So let's chat about this little piece here. So what? I'm seeing my preference. I'll tell you what I like first, and then we'll go back in and tell you what I don't like. So I do like the overall composition of this. I feel like the florals were nice and contained towards the branch. A lot of floral stems. You see these just big, huge blooms. But the cherry blossom, even though it looks really big Overall, the individual branches, You've got these clusters. So I think we captured that. Well, I do like the highlights. I like the little buds. I wish we could have done this part a little bit more pronounced, but that's OK. It's there. It catches the eye, and I like, always like the little delicate ends off the branches, the leaves. I wish I would have darkened up a few of, um, just to pull contrast in. I know we did the vein ing, but just to have a little bit darker edge on some of them again, we're always going for some contrast and drawing the I in. I like the flow of the branch. This I'm not so swirled about down here, but I can live with that, totally not gonna split hairs over that. But I do encourage you to take a look at your artwork, not just the one today, but once you've done in the past. And really give yourself credit for for where you are in your journey. Now, if you're a beginner, that's awesome. I just encourage you to keep practicing, Give yourself grace and keep going. It's honestly taken years and years for me to get to this point, but it's just through a lot of practice and just having fun with that. And nobody wants to be so critical of their work that, you know, you end up serving your paints and brushes out the window. That's not going to solve anything. But look at your work with a healthy I really zone in on the areas that you like and what you've learned and then areas that you can improve upon. We all have those areas, you know. We've got to get through those little bumps in the valleys to get over on the other side to those small victories. So I hope you enjoy doing this. I had a blast making this class for you. So do stick around for the next lesson where I talk about class project ideas and give you some examples what I've done in the past.
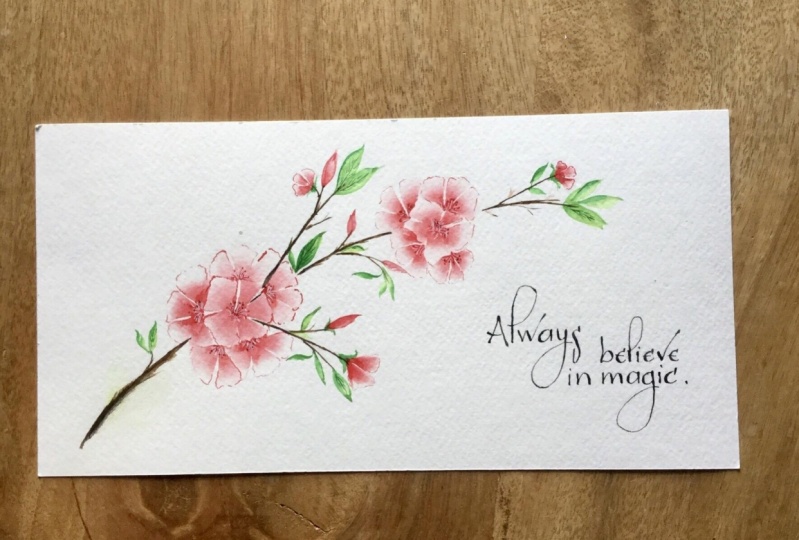
12. Class Project ideas: all right. Time to get creative on your class projects anything in all things cherry blossoms. So feel free to just let your creativity sore. And I cannot wait to see your projects in the Project gallery. If you want to do a stand alone piece or enhance an envelope, make some bookmarks anything you want. I really, really do want to see what you come up with. This piece here. I always say, Don't throw away your practice pages this one I really liked. But down on the bottom part of this white page, I had some other things that I didn't like. So I just tour off the page, made a little bit of a deck old edge here, added some black card stock. I just taped it together, added a quote, Did a little bit of splatter. And there you go, a brand new piece, This one I painted this cherry blossom. I went ahead and split it into thirds again. Just added some black card stock Dekel the edges, and we have a split dimension piece here that I'd like to frame and get up on my wall eventually. So go ahead and let that creativity sore, and I can't wait to see what you upload into the Project gallery or on social media
13. Thank you!: Well, that's a wrap. You made it to the end. Congratulations. Nice job for hanging out with me for the whole class. I hope you enjoyed it. And I hope you learn something new. I would love to hear your thoughts. What did you like? What did you learn? What could I do to improve these classes? How can I serve you better? I really would appreciate any comments that you would leave. Thank you for your time today for your commitment to learning and for investing in yourself . I do ask that you upload your project into the project gallery or on social media. Be sure to take me so I can see it and cheer you on until next time. Have a beautifully blessed day.
 Jen Sweeney, Watercolor, Calligraphy, Cycling