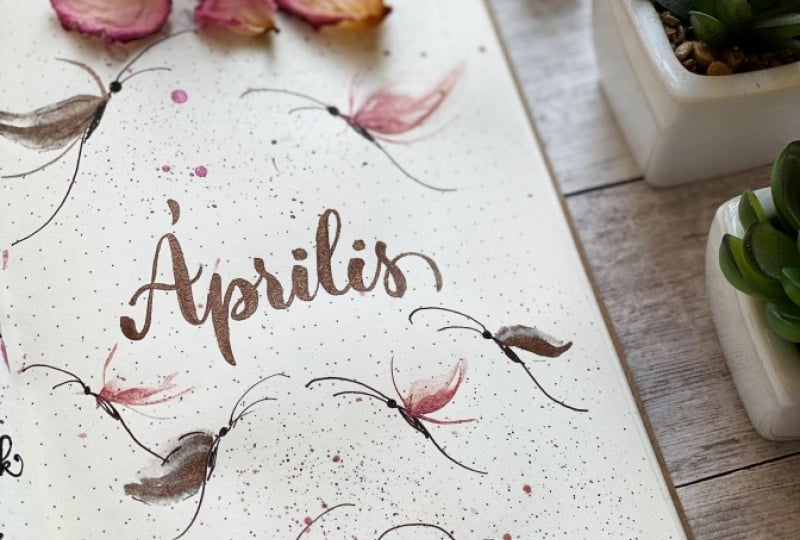
Transcripts
1. Hello!...And Class Project: hi and welcome to class. I am so glad you're here. If you've ever wanted to paint whimsical and chanted butterflies than this is the class for you. I designed this class with the beginner to intermediate artist in mind. Some knowledge of watercolor is helpful. I use several supplies in this class, but truly if you just brought your brush, paints and paper to class, I'm positive you will learn some valuable and useful techniques. You have access to a couple handouts. Want us to help you simplify making the body of the butterfly So the majority of our time and attention can be spent on creating the wings. I take you through my process step by step, and I've purposely kept the wings simple, delicate and light. I then show you some easy but effective ways to enhance your wings. The possibilities are endless, and I can't wait to see your creative touches. And I'm excited to share with you my technique for using walnut ink to make these gorgeous butterflies. You're not gonna want to skip this section. It's truly so much fun. I then show you how this pearlescent liquid acrylic gives your butterflies shimmer and shine. So I hope you're intrigued and ready to paint these simple, whimsical butterflies. Hi. Welcome to my home. I'm Jen Sweeney. Thanks for hanging out with me in the butterfly class today. I really appreciate you being here. I had a lot of fun making this class, and I hope you enjoy it too. I do have to say my favorite part is when you get to the Walnut Inc section making those kind of butterflies just a ton of fun. So your class project obviously all about butterflies, and I'm gonna leave it up to you. However, you want to do that if you want to add some butterflies to a piece that you've already made or if you just want to paint 100 butterflies and upload those into the project gallery, I would love to see that. So we're going to head to the first lesson and talk about all the supplies that you will need for class
2. Class supplies: Let's go ahead and talk a little bit about class supplies. If you can print the handouts before class, please do so. But if not, don't worry about it. We're going to go through these one by one. And I'm gonna explain in great detail how to make thes strokes for your butterfly. This hand out. I may, just because I didn't want you to get too caught up and just worrying about making the body of the butterfly. So feel free to copy this. However you like how often, as you like and then just really practice the strokes with this one. Okay, so I know this looks like a ton of supplies, and it is, but honestly, if you just had your paintbrush, some paint and some watercolor paper or Bristol paper, you would be fine for this class. But I wanted to show you everything that I have here that i'll be using. So let me grab the brushes, so I'll be using the size six or eight wedge brush triangle. Brush will be just fine. If you have that couple micron pens. I like the smaller sizes For some outlining work 005 or the 01 either brown, the sepia or black and the paints that I'll be using. We pulled this hand out again, said this color. Here is a core watercolor. This one is in to go. This beautiful color is an app. Samide Maroon by Daniel Smith This gorgeous gold is quinacrine on gold by Windsor and Newton, and then for the body of the Butterfly. I have Jane's Gray, also by Daniel Smith. Grab your palate and then a couple secura pans again, just for some outlining either just a white jelly roll pan or this one is a sparkle pen, pencil, black marker. Whatever you have will be fine. If it's just a micron or any other, that's going to be perfectly fine. And then that calligraphy pan I have here. This is how I make these butterflies here, and I'll walk you through this step by step. You don't need to have that. It's just kind of a fun thing to do in class. I wanted to share with you and the Walnut Inc that I use. It's a Tom Norton Walnut Inc Now this is the darkening medium, which I also used to darken it up sometimes I didn't have the regular big bottle of the Tom Norton Won'T Inc. But you can use Daniel Smith as well. They have wanted crystals to which are really fun to use. Grab some paper towels and then most of the class I'm gonna be using either cancer in excel Bristol, Smooth. And I have a little bit of stress more bristol to cut this off because I had to throw some of the other papers away. But I just wanted to show you the two options here and then for those water. Or I'm sorry for those butterflies that I use the wont of ink for I'm going to be using arches paper, £140 cold press and then getting close to the end here I used a skansen Excel black drawing paper to make these fun shimmery butterflies. With this f w pearlescent liquid acrylic ink. This one is a sundown magenta, and this oneness sky blue again. You don't need to have these supplies. I just will walk you through how to do this just for fun. And then, of course, your water jars. So grab your supplies and we will head on over to the next lesson.
3. Making the butterfly body: Okay, so let's talk about these little butterflies before we start making their bodies. So I'd like to make them very whimsical and chanted Very like looking butterflies. You know, most butterflies don't have this long tail here, but I just think it gives it a really graceful appearance. If you don't want to do that, feel free to not do that. But there's a little bit of science behind. Why I do what I do with this. So it's going to take a little bit of practice for this and to get your hand toe. Lighten up, Aziz. You do as you're doing this. So I want you to grab your pencil first and I'll walk you through how we're gonna make these little bodies here. So starting off, I want you to just draw a little circle, scribble that in, okay? And what I don't dio I don't just make a straight line down for the body. You can see this nice little curve here. So the way that I do that scribble in your little circle. So then trying to move so you can see here. So I start right? Right about the center of the circle here a little bit down, and then I arc up and then gracefully come out towards the end. So a little bit of an s curve there and the reason I do that is because this part is gonna be the body part. And then you can always go in and just thicken it up around the neck area if you need Teoh . But it just gives it that nice flowing curve there, which I love, and then for the antennas, depending on which way it's facing, I'll either keep my paper this way or a lot of times when it's facing like that, I like to turn it. So again, almost in the center of this circle here, I'm gonna just gracefully come up and out, making a longer antenna in the back and then not right on it, but a little bit off to it. Come around and do a smaller front antenna so you can see how that just all flows very gracefully and nicely there. So this one up here I made with this thick marker it's a little bit too thick for my liking . This one is with a micron, but however you want to practice. These is up to you. So let me just show you with this thick marker here. Process is always going to be this same. I start with a head and so that this one I'm going to do the antenna first come up and over a nice arc and then a little bit to the right of that one smaller arc in the front. There it's again, back to the center of this circle here, up and over. And I'm just scribble in a little bit of a body there. Okay, So with the my crime and you don't have toe paint these butterflies, the body of them, if you would rather just do the marker part and then do the painting for the wings Totally fine. Whatever is going to make you enjoy this process, scribble in the head a little bit, can turn your paper, if that's more comfortable, our king up and down and then get back in there and make a little bit of a body there. I like to leave a little bit of white space there, too, and I tend to do just go back in and dark in that area up by the neck and in keeping in mind of how this curve is here, up and over shorter one in the front. Okay, so let me grab my paintbrush. We'll do a little practice with that now, This is one where I had to practice for quite a while to get to get this down just because that it's just some really delicate strokes here. So again, using my jeans gray. So the way I like to dio the head, you'll hear me talk a lot about the belly of the brush. And that is the wedge part of the brush here. So either say, belly of the brushes down facing the paper or the belly of the brushes up facing me. My face. Okay, so one way or the other, you'll hear me refer to that Ah, fair amount where the placement of the belly of the brush is so for the head. I actually like to turn it. I will call it upside down where the belly is facing up and just again making a gentle circle e turn the paper. A lot of times now I'm keeping the position of the brush a little bit more, A lot more vertical. Actually, I'm not dragging it down, and I'm pretty much holding on the black part of the brush or of this part of it. And so I arc up a little bit and down. So for the body of the brush, the way I do that, I turned the brush where the belly of the brush is facing about the one oclock position. And I touched the tip on about where the neck ISS and then just pushed down, pull up and connect on the tail there. And a lot of times I do like to leave a little bit of white space there. You can go back in and darken it up. If you want. You can close it all up if you want Teoh, and then I tend to get back into where that neck area is. A lot of times I'm repairing these because something looks a little bit wonky and you just got to get back in there and make the head a little bit more round or the body that it just looks a little more cohesive there and then for the antennas, definitely turning my paper just using the tip. So let's do one facing the other way. Belly of the brush is facing up just painting a circle. So the way I do the body here, I'm starting at where the neck is pushing down, pulling up. It's a gentle push down. I've made plenty of butterflies that look way to pregnant and then he just paint it back in to your liking. Don't get overly worried about this part, because the focus, of course, are going to be the wings. No, For this one, I will keep it this way, and then I'll just make my antennas running into each other there. But you see how the flow is not nice s curve there, put in the tip of the brush back towards that neck area, pushing down a little bit bigger body, then I would like, but that's okay. We would just make the wings extra big on this one might even pull this out a little bit more and however comfortable you are getting that body and there's totally fine. Sometimes it feels really tight in there to get your brush where it needs to go. If you want to just do an outline and then go back in and paint. That is absolutely fine. We don't want to make these difficulty. I didn't give myself much room there. If you just wanted to do a little outline, get back in there and paint. Perfectly fine. Okay, so take some time to practice. And again, if you wanted to print the handouts to use, that would be awesome. You can just trace over these or put it on a lightbox and use it. Or just as a guide, however you see fit. So go ahead and take some time to practice, and then we will get into making the strokes for the wings.
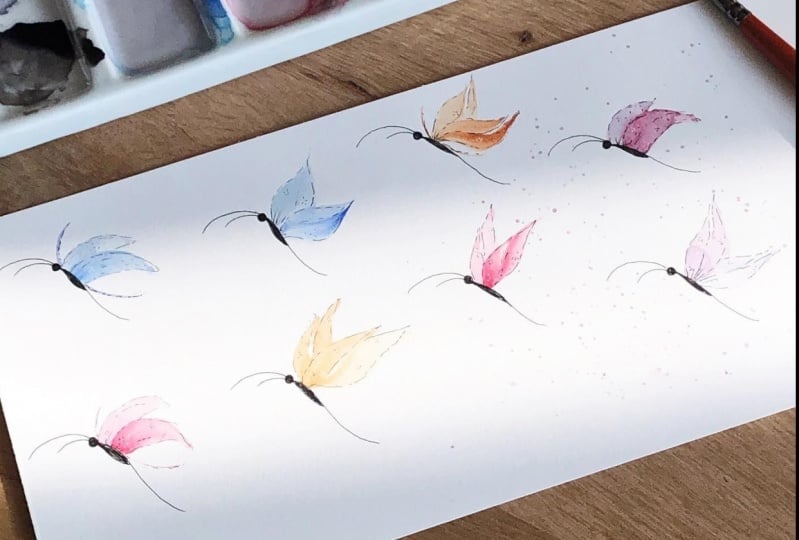
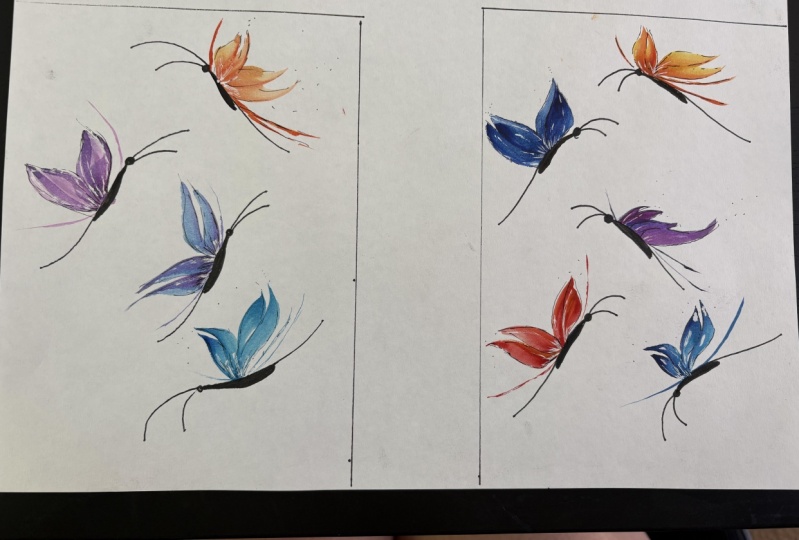
4. Painting the wings - Options 1 & 2: So as we prepare to make the strokes for our wings, I wanted to explain. They hand out just a little bit, so I try to give you as much detail as I can. I know it looks like a little bit off a busy hand out here, but I wanted to try to be as clear as possible. So just for an example, here, where the black dot is, this is where you're going to start your your brush stroke, either with the tip or the belly of the brush and where the arrow is, that's going to be the end of your stroke. So in this first option, what we're going to practice first, The tip of your brush is going to be pointing towards the 10 o'clock position, and the belly of the brush is going to be almost flush against the back of the butterfly, and we're gonna gently and gracefully lip lift up as we come towards the end of the stroke . So we'll have a lighter, shorter first stroke and then a darker, longer second stroke. So let's go ahead and get started, get a little bit of the indigo out into our palate. and this is very pigmented. You don't need a whole lot for this. And because I'm not using watercolor paper, I really don't need a whole lot of this. Just such a beautiful color, their letter times. What I'll do is I'll make too little wells. This one's gonna be my lighter color. And I always always squeeze out way too much paint, okay? And I have a test test page here to just to get an idea. Now, that's gonna be too wet for this Bristol paper. That's a little bit better. So as the 1st 1 shows here, we're gonna dio a lighter, shorter stroke in the back. And then this one in the front is going to be longer and darker. Just too simple strokes for this. So let's practice that one. And you can tell I'm holding the brush a little bit farther back. I had it down here as we were making the body because I needed more control of my fingers as I was making the body of the butterfly. But this I wanna choke up on the brush a little bit more here. So as we lay the brush down and just pull it out like that. You're laying it down gently. Pressing. Lifting up is your coming out? As you're coming out of that stroke, I'm gonna get back in this pigment here, which is richer because I wanted when a darker wing for this one here. So this one I go in, I'm gonna overlap a little bit on this 1st 1 lift up and do a little a little swoosh on the end there. So that is it for this first option playing your brush down, huh? And over and embracing my hand on the table to just to keep it a little bit more steady. Now, when are butterflies facing off to the right? I always turn my paper for this one. We're gonna do this. So the brush the tip is gonna be pointing up towards the head depends on where you're at what time we're going to be pointing there. But let's just try to keep it is flush to the back as we can. You're gonna come up in arc over second stroke. We're gonna go in just a little bit overlap. I didn't quite make it there, but that's OK. You can either leave it as is, or go in and dark and that up Sometimes it's worse when you go over it, but do one more at the bottom here, turning your paper so it is comfortable for you. Gently lift up second stroke. So that is our first option of how to make a whimsical butterfly. So let's move on to the second option. Okay? For a second option, we've got four brushstrokes here with two wispy strokes on the sides here and strokes 123 and four are gonna slightly overlap. But they're all going in that same direction. Okay, let's go ahead and mix this up and you want to have some of these different different shades, too. There's the 1st 1 Now, the second stroke. I'm going to go about halfway into that. Keep it somewhat similar and length 3rd 1 I'm gonna lift up on the brush a little bit more because I don't want him all the same. Thickness. And then the last one squeeze that one in, and then for wispy edges, I'm just using the tip. Try that one again. You get no big deal if you don't have that area covered right up right up front because we're going to get in with the next couple strokes and cover that up Can make the short or long If you like to do these right, facing butterflies a little more challenging. The same position started in this one. Same position laying your brush down. You're barking up and over. That looks good. Just like that. If you wanted to add the wispy edges just on those two Absolutely second struck is gonna overlap that 1st 1 I got a little sick on that one, and I'm running out of some body here, so I'm just gonna get back up in here, overlap even more. The same one. I'm gonna have my brush a little more vertical on this one, too. All right, I'm gonna go ahead and leave that one as ISS. So let's go ahead and move on to option number three
5. Painting the wings - Options 3 & 4: okay for this one, we're actually gonna do three and four, because the only difference on number four here is adding these wispy edges. So I'm gonna grab this Daniel Smith Knapp Samide Maroon Love this color. Clean your brush. Good mix. The Septus is just such a rich, rich color. Just love it. So let's Sherry, this one here on this one, we're going to start on the outside, so our tip is going to be our brush is gonna be a little bit more vertical, and we're going to come in this way, starting on the outside, barking up and over, and then the second stroke is going to come underneath it. We'll turn our paper. Third stroke here. Four stroke here. So four strokes all starting on the outside, working in towards the back of the butterfly. How that works. There's the first stroke, so I laid it down, pushing the belly of the brush into the paper and then lifting as I come to the back of the butterfly. So the second stroke you gonna do about the same thing? They're going to make this third stroke third and four struck a little bit darker, giving that some dimension turning it even more. I want the wings of the butterfly to have a nice look to it here and honestly, the way I'm making these wings, it's just how I make my leaves as well, too. So we're gonna hug. And for that second, I'm sorry, the fourth stroke there. So our fourth option, as we said, we're just adding those wispy ends there if you wanted to. If not, don't worry about it. Try that one again. And I'm pulling my brush up as I'm coming in towards the back. And I'm not really worried about these not connecting here. I think that looks totally fine. Just gonna leave one. Leave one that Like that. So down here to I did want to point out to You don't have to make a black body of the butterfly. Feel free to use any color you want. So I'm pointing the brush about the nine o'clock or so position turning my paper. Same stroke. Shouldn't make that one a little bit darker, but that's OK. Try that one again. So go ahead and take some time to practice thes and you're going a little bit fast here But you know other ways to do this to if you wanted to get back in there dark in these up at some contrast certainly can do that. Ors We'll talk later to will show you how I enhanced these with some of the jelly roll pens or the micron. Okay, so let's go ahead and move on. Toe option five.
6. Painting the wings - Options 5 & 6: okay for option five. I'm gonna use the quinacrine own gold from Windsor and Newton. I love this color. So the strokes for this one, pretty similar to the 1st 1 all the strokes are going to go in the same direction. The placement of the brush is the same for each each stroke. So but the first and third strokes are gonna be shorter. And the second in the four stroke, they're going to be longer. And they're gonna overlap those strokes. Okay, so let's go through that. So for this first stroke, the belly of the brush flush against the back, shorter stroke, get some more concentrated gold for this second stroke, we're gonna overlap them and make it longer. Third stroke is the same as the first shorter one. We'll get a longer one in there, overlap them all headed in the same direction. There. Do that one again. Short first stroke overlapping and longer. 2nd 1 third stroke shorter and the Force one overlapping and longer. Let's do a few down here. The right facing ones. I didn't even test that one. That's okay. We're just gonna go for it. There are two stroke shorter in the last one longer. Nice little swoosh down at the bottom there. I like this one a whole lot better than these two. It gives, um, some variety and the wings there. It just looks much, much better. This is the fun of it. They're just really practiced with this brush. There's so many options, We can really be here all day making wings, and it's just just a lot of fun. All right? Here's the first stroke pointing right at the head, getting right on the back there for stroke. 2nd 1 when overlap. And it's longer. A little swish. 3rd 1 tiny. Third stroke there, your 4th 1 All right, so that will do it for option five. Let's go ahead and move on to option six. Okay. Far option number six. This is probably my favorite, the one I use most often. And it's also the same Starks I use for my leaves the majority of the time to So we've got four strokes here, starting down at the back, lifting up and then the second stroke. I know this is really hard to see here is going to come up right beside it. We're gonna turn the paper. The third stroke is gonna overlap a little bit. And then the four stroke gonna come up behind it. And this one, I'm gonna try to leave a little bit more white space in between there and for this one. I thought we would do something a little more fun instead of just having the same color of the wings. I want to go ahead and show you how to double load the brush to get this little effect here . So, So pretty. So I get a little more into go. I thought I squeezed out too much before, but actually not enough. So I'm gonna have the blue as my main color, and then I'm gonna dip the tip into this concentrated maroon. Get that wet again here. So this certainly takes a little bit of practice to have had plenty of times where too heavy on one color or not enough on the other. But just keep at it. Keep practicing. Let's get a split over here. Make this blue fairly light. So what I do? I have a light blue on my brush right now, and I'm just gonna dip into the tip. I'm sorry could dip the tip of my brush into the concentrated maroon a little bit heavy on the Marine. Let's try that one again. It can either dip it in or just kind of come across the top. Now I can see I'm getting too much already. Let's see what that looks like. Still a little bit too much there. That one's looking better. So what I dio tip is facing about down. I would say 78 oclock position and they come up and around, come back to the back of the butterfly. Same stroke around that way, leaving that white space in there. Sometimes you can get four strokes out of this because it's that Bristol paper, for it was watercolor paper. I would recommend rinsing it and doing the double dipping again. But let's see what happens here, she ban. But that just gives it a fun, a fun look to it there, as opposed to it just being flat with one color to try this again. I like that a lot, and what I'm doing is I'm pushing down. I have the brush a little bit more vertical as I start, and then I'm pushing and then pulling up to get that nice little tail there. Try not to get my hand in it there, putting the tip down, pushing, leaving white space and up. Did this one a little bit different time. I'm really looking forward to seeing all these butterfly show up in the project gallery and looking forward to hearing about what strokes you like or which ones you don't like or what you're having trouble with to do this one here, tip down, up and out. Okay, so go ahead and take some time to practice thes and then we'll come back and I'm gonna add some enhancements on the other butterflies that we've already made.
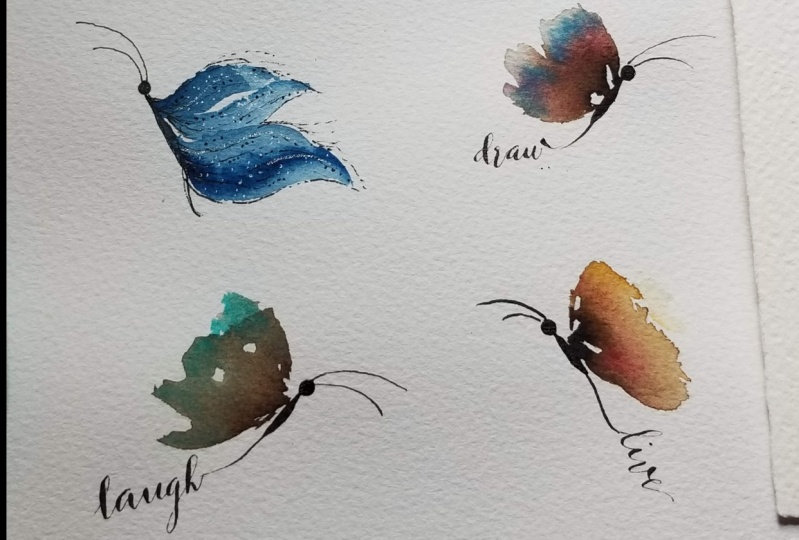
7. A few little enhancements: so the enhancements and the outlining of these butterflies, I don't do too much there just a tiny little bit of enhancements with a micron. Or this occur a jelly roll pans or just some paints bladder, but just to give it an extra little boost. Sometimes I do like to add the's. So let's just take a couple and I'll show you what I do. So this is the Micron. This one is the black micron 005 and I am a fan of outlining. So sometimes what will do? Just a very rough outline of the wings. We'll do this on my leaves and flowers sometimes, too. And then I just get in here and a couple long, wispy strokes. Following the direction of the wing, I might add a couple little dots in there. All of this is just giving it some. I appeal, Okay, that's really about it with a micron. Not much here, but it just adds an extra little character to it. And then I could get back in here and take my white jelly roll pan and the cool thing about butterflies. They are so unique, so I cannot wait to see what you come up with very simple there and then the maroon one. Not sure if you can see this or not, but this is the the Jelly World, a shimmering sparkling jelly roll. In a lot of times, I will just do some long strokes around these wings. Sure, if you can really see how that shimmers or not. But it's just a little fun pop, and you can get as heavier as light as you want. You can even go back and in a little bit of more micron there, and I never just outline it. It's always skipping around and leaving some open spots I don't ever just trace over the wing or the leaf when I'm doing the leaves and flowers, just a very loose skipping motion, maybe just some clusters of dots. And then sometimes what I'll do. I'll just dio tiny little circles, not necessarily dots. Hard to see with the micron. Here I have ah, polka dot effect, but just kind of different fun enhancements. And then, of course, the splatter. That's always fun to Dio. Let's just do it here on this blue one. So what I do for that? He wants some fairly light water color to begin with and pretty watered down does the thicker it is, the harder it is going to be to get off your brush. So what I'll do sometimes is just take ah, brush loaded with paint and then I'll just tap with another brash or a pen. We can add some other color in there, too, for some contrast. And if you're nervous about doing the splatter, you can do it on another test page. But just for an example. I just love the splatter effect, too, All right, so let's go ahead and move on to the next lesson.
8. Very cool walnut ink butterflies: Okay, So these butterflies, some of my most favorite butterflies that I like to make So using the Walnut Inc and my calligraphy pan gonna show you exactly how I do this. I just love the look of these and, you know, they're never gonna be the same as you try to recreate them. And that's fine. That's exactly how things should be. You create something you try to do again, you learn things, you modify things, and then it's just literally could make 1000 of these and they would all look different and they would all look beautiful. So let me put these aside. I'm gonna try to recreate these three so we will see how this goes. So what I'm gonna do here is get my calligraphy nib all loaded up, going toe move my water off to the side and I apologize for the lighting and the sun is going in and out today. So and I've got a small space toe work here. Usually I'm just kind of sprawled all over the place, but it's a bear with me here. So and then this is the arches watercolor paper. So just the same way we did the other ones just make in a circle? And this is a bland Z 255 to nib. You can really use any one that's going to be thicker or that's gonna hold more ink. Not there's really fine NEBs like the Hunt 22 or the Leonard principal. Things like that, um, you could do is with the paintbrush is well, too. But I just really like using the calligraphy pen for this. So same way I'm gonna come up a little bit and then I'm pushing down. I want a ton of in great there and then send out a little bit. So I even go back into this area and pushed down to get it, if you can see that. But that is a ton of in great there. And that's what you want. When we lay that off to the side and then I'm gonna grab my paintbrush. I'm going to get it loaded up with just plain water to have it a little bit and then watch this super cool effect here just to love the someone a dip it into that ink and kind of draw it out and just let it bleed where it wants to bleed, teasing it along with some of this water. And then you can get back in there with your paintbrush and just do some of these really cool, wispy edges. So, like, for that one, I would just let it go. Leave it as is, it's gonna dry lighter. But isn't that just the coolest effect I love the water bleeds like that. Now, certainly you can do that with your paintbrush to. And if you like, the other ones that we did, if you just want a thana paint right there, get a very wet clean brush and pull that out. But I just love that bleed right there. So let's try this one. We're gonna add some paint in the middle of that to let's I just got a fuzz on me. Tip there And how add some antennas there, too. I didn't forget that. Just got caught up in all that bleed. All right, so let's actually wanna loaded a little bit more press in pretty good releasing. So you get that nice edge. Go back in there and get it even thicker. Do the same thing. Get your brush nice and wet, and I'm tapping it off on the edge of my water during apologize. You can't see that right now, but this is a pretty loaded brush with water because I want all this bleeding toe happen. So we're gonna just tip put the tip of the brush into that wet Walnut Inc and just pull it out and you can really pull it out just pretty much any direction. You want to go some of the head and there, That's all right. Just fantastic. And then what I can dio is get back into my paint and then you're just gonna dab some in there. So cool. Now this will dry, lighter watercolor always does to just keep an eye on where you want to tap this into and get back in there. You might be thinking, Oh, that looks pretty dark right now, but it'll it'll lighten up. So as lighter as dark as you want toe, add these highlights. Be my guest so you could do the antennas with the with a micron or with the calligraphy pen . Of course. Let's get back in there and and those these air still super super wet here. No, it's a Let's try this one down here. Go ahead and had at the word here grabbing my brush clean as you can. Lots of water on your brush. And here comes that cool part. And I just kind of tease this out around Teoh. Whatever I feel like doing, really not a lot of rhyme or reason to this making this a little bit bigger to get in here and add. Add some paint and that was drying already there. But that's OK. Just soften that with a wet brush. I really hope you try some of these these air so much fun. Obviously, the color options are endless. It's like a rainbow butterfly. All right, I'm pretty happy with those. I'm gonna let those dry and then we'll come back and I'll show you how, just like we added the other enhancements. Okay, so for the added enhancements on these, I'm feeling like I don't want to add too much more to these can see how this one is drawing lighter. I could go back in, re wet some of this and add some more color there, but I'm kind of like in the really soft, subdued color I did add a couple highlights here with just some of the micron. Actually, I think I use the calligraphy pen for this one. Um, so you can do that. You can leave it alone again. Totally up to you sometimes what I will do their two is when this part is still wet on the back of the butterfly. I might just pull a little bit more out with the brush. Not sure if that's really even making a big difference right now. I can just dip my brush into the Walnut Inc and just get a couple more some lines. They're just to give it a little bit more. I appeal. Um, you don't have to do that. Feel for you to do what you would like. Um, like I said, I think they're looking really pretty good just like that. So I'm gonna leave it. So next we're gonna go ahead and grab our black paper, and I'm going to show you some butterflies that I use the liquid acrylic wet and just gives it a really cool shimmer.
9. Shimmery acrylic ink butterflies: Okay, We're at our last lesson. And I couldn't do this class without showing you how to make the shimmery butterflies. They're made exactly like we did the other ones. But if you can see that shine and shimmer absolutely love that on this black paper. So what? I'm gonna dio shake these up really? Well, making a mess already. So these come with a dropper, but mine have conveniently clogged. So I'm gonna pour out a little bit here. We'll start with the blue, have your test page and paper towels, and I've got my water jar off to the side. I'm gonna go ahead and get that my brush wet and then just Dad. Now, this is pretty thick. So I do add some water, as I like these to be not super stark and bright, but just enough that it's nice and shimmery. And this is not watercolor paper. It's just drawing paper. And I'm just doing this for demonstration. I would never do if a finished piece off watercolor or this liquid acrylic on here. I just don't know how it would do overtime. All right, so get a little bit darker the same way I'm turning my brush upside down making circle. You can tell it's pretty thick there won a dab some of that off. Get in there and make a little bit of a body there. I already see that shimmer. Let's get these antennas out of the way first Reload my brush, dab it on the paper towel a little bit. Here comes that cool shimmer. Hopefully concede this. So Austin and I'm making I'm just really bigger than I might normally do it. But I just wanted you to see these so fun, So fun. So that is the blue. And you can kind of tease this out a little bit too if that looks a little bit too thick for you There Same on this bottom one now again saying poured out so much blue. Let me show you the pink too. Definitely clean your brushes After using they liquid acrylic. I left mine overnight once, and it was it wasn't ruined, but I had to spend a good amount of time cleaning it. It just got all soaked up in there And the brush was the burst tip was so hard. - You want it mixed these up to again add a little bit of water. I can already see some bubbles and things like that and there, and sometimes I get a little bit of sediment, so you want to try to get it as smooth as possible. Not a guarantee that there's not a little bubble or something stuck in your brush there, but not the end of the world. Very cool. Let's do another one and circle there on flipping your brush. Backs of the belly is down. As I said before, the ones that are facing left or a whole lot easier for me, we're gonna go ahead and give this one some bluewings. Actually, let's go ahead and try to double load this. Let's just play around and see what happens pretty wet there. It's always a fine balance, a little dimension. They're not a whole lot different. All right, well, you definitely get the idea. So I hope you have enjoyed this class. I cannot wait to see what you come up with, so please do upload your projects into the project Gallery Always asked me if you have any concerns or questions. I'm here to help, so I hope you had a good time. Thanks for being in class
10. Thank you!: Well, congratulations. You made it to the end of the butterfly class. I want to take just a second to say thank you for being here and hanging out with me and spending your valuable time learning these tips and tricks for these gorgeous, beautiful, whimsical butterflies. I can't wait to see what creations you come up with. And as always, if you have any concerns or questions, please feel free to reach out to me. So happy painting. Enjoy making these butterflies, and I hope to see you in future classes.
11. Intro bloopers! :) Just for fun: Hi. I'm Jen Sweeney. Know I am. I mean, I am John Sweeney. But ho staring at the camera. I want to say somebody come to this video. Just take. And I did it on purpose just so you can flight class. I had a really good time making this class, especially the part about the calligraphy in the Because we got some work to dio bad. Oh, my land top Organizing and planning and executing this sounds company. Oh, my Lanta. Why? Why I want All right. Last I'm super excited that you decided to spend time. Um, I was so good up until that point. What happened? What happened? What? Hi, I'm Jen Sweeney. Thanks for hanging out with me in the Won't know.
 Jen Sweeney, Watercolor, Calligraphy, Cycling