Transcripts
1. Introduction: Hi. My name is Casey Wakalo. As a documentary photographer,
producer, and educator, I often work with a lot of photographers who are
technically skilled, capable of making really
strong photographs. But yet, they feel like
their work is not landing, like something is missing. Most of the time,
what is missing is not them making
better photographs. They already do that.
What I have found to be missing is better
storytelling. And that's what this
class is about. I will teach you
how to move from single images to a clear
structured visual narrative, which is also known
as a photo essay. A photo essay is a
curated sequence of photographs arranged with intention with each
image building on the last to construct a
cohesive narrative. We'll look at the
difference between a photo essay and
a photo series, we'll break down
the narrative arc, we'll look at the four
essential shot types that helps you build
a photo essay, and I will show you
how to storyboard a complete photo essay before
you even pick up a camera. By the end of this class, you won't just understand
how photo essays work. You would have the foundational
tools to build one in the form of a
structured eight frame storyboard for your own project. You will do this using a downloadable worksheet that I've provided in the
class resources. You don't need to shoot anything new specifically for this class. All you need to do is to bring a story that
you want to tell. If your work has the
images but not the story, this class is for you.
Let's get into it.
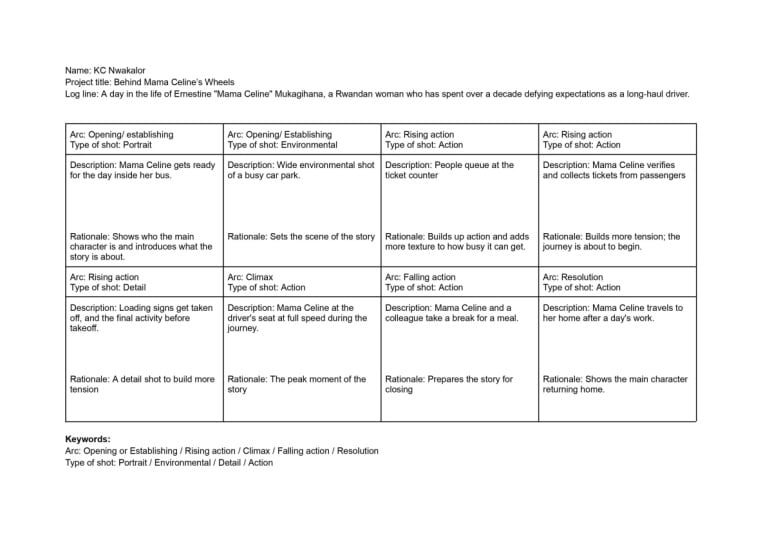
2. Project: Your project for this
class is simple. You're going to complete an eight frame photo
essay storyboard. I have included a
downloadable worksheet in the class resources. It provides a step
by step guide, starting with your name, the project title, and the
logline of your story. Then you will map
out the beginning, middle, and end of your story. All this will be done within
an eight frame storyboard, where you include a short
description of the shot, its rationale, type of shot and the position of that
shot in the narrative arc. This exercise is not about
perfection of ideas, but to help you clarify
your direction. Many photographers
wait until they get into the field to figure
out what they are doing. This project changes that habit. When you plan before you shoot, you arrive with
intention and that changes everything about
how your work comes out. Once you're done, upload your storyboard to
the project gallery. I'll be reviewing submissions
and providing feedback. I look forward to
seeing your project.
3. What is a Photo Essay: And photo essay is a collection of photographs arranged in a deliberate
sequence to tell a story. So the very key thing with photo essays is that it
follows a narrative arc. So it has a beginning, a middle, and end. Photo series is pretty
much a collection of photographs that
share the same theme, subject or aesthetic,
whereas with photo essay, it is the narrative. It's in the way the
pictures are captured, but also in the way
that they are shaped, the way the story is being told. Sometimes there are projects
that are in the middle, but the main thing that separates them is just
the narrative arc. The first major photo essay that we've known is
the country doctor. And this was shot
by Eugene Smith. And it's pretty much
the life of a doctor in Colorado's Rocky Mountains. At the time, you know, it was, you know, more like the
photojournalist boom, where people are trying to take one picture that
tells all the story. But what Eugene Smith
did was, you know, capture multiple pictures that all builds up to make one story. And that is the core defining
factor of a photo essay. So you can see in this
picture, you know, the doctor is arriving
for work with his bag. You know, you can see
the time of the day. You can tell you know, what this environment
looks like. You get a feel of the area. Is it a suburban? Is it rural? You know, you're getting a sense of what the place looks like. You're also seeing who
the central character is with the bag. Then he moves over to the next shot him getting
ready for his job, you know, taking some coffee. He's looking already tired, even before he starts the job, but you get a sense that um, is a very busy doctor. You can see the kitchen. You, you know, every single
thing in the frame is showing is giving
you more context of who this person is and
what this story is about. Then you can see the
doctor, you know, meeting the first patient, you know, how the
picture is framed. You know, you can
see the environment with the captions as well. Progresses to, you know, the doctor seeing
another type of patient. So he meets older people, he meets children,
he meets parents. Then you can see the doctor, you know, treating a bit
of a detailed shots, going a bit closer, you know, showing the doctor the eye, the emotion, the feeling. You see the patient,
older patients. You know, you've seen
young. You've seen middle age now,
you're seeing old. And also you're seeing a picture where the doctor is
not in the frame. So it's not a must that the
doctor will be in the frame. Sometimes you can take
pictures of other things that are happening around the main
subject to build the story. And then you can see, you know, someone I think this person
died or something like that, but you can see that action, that drama, you know,
he's carrying someone. You know, you've
gotten to you've progressed to, like, the middle, the most active part of the
story where he's carrying someone when someone is squeating out water from their mouth, that
kind of a thing. Then it progresses to him closing at the end of the
day in his hotel room, about to have his
bath, you know, making a phone call,
probably calling the family, calling the wife. Oh, today was busy, you know, but you can see
that narrative arc. And this is not
all the pictures. So I've cut down the pictures
in a way that, you know, we kind of see the main actions that are happening in real time. And also, you can
see how the shots kind of ends with a
dark environment. You know, I kind of
just shows nighttime, shows close of the day. So that is the main thing that defines the photo
essay, you know, the ability to build
that narrative arc, that beginning, that
medal, and that end. Photo essay and a photo series, one of the key differences the photo essay is
narrative driven. So it has a clear
beginning, middle, and end. Whereas, photo series sequence is not really
important like that. So you can move one picture from the beginning to the end
and it will still be good. Then for photo essays as well, the photos are dependent
on each other. So when you move one picture
out of the sequence, it makes it harder to understand what's happening
in the other one. Whereas in photo series, each picture can
stand on their own. Then generally photo essay some kind of acts or answers
a specific question. You know, what is a day in
the life of a of a doctor, you know, living in this
region. What does it look like? And a photo series often
explores a subject or theme, something that is a bit broader, mental health for people that have gone
through, you know, traumatic experiences, you know, it could be domestic violence. It could be it could
be so many things, but the umbrella time is
traumatic experience. Whereas with photo essays, is more narrowed down. You're kind of trying
to show something. You're trying to ask
or answer a question. And another thing is
that photo essays have a natural end, you know, because it has that
beginning, middle, and end, at some point, the
story is going to come to an end, you know? So, you know, there
is that clare cut off where the story begins
and where the story ends. Whereas, with photo series, it could go on for a long time. You know, you could work
on it for 20 years. And so if you're doing a
story on food markets, for instance, you
can explore going to other countries, you know, and see compare what food
market is like in the UK, what is like in in Nigeria
or Libya, you know, you can keep expanding
the project in a way that you can do it
for the rest of your life. Whereas with photo essay, is a bit more confined and you just have to
finish up at some. Sometimes there are
stories that are hard to tell in photo essay. So photo essay is often better when it's
a personal story. I would say that how you
would look at both would be, how do I want to tell the story? Do I want people to connect on a personal level,
to this individual, to this space, to
this community, on a very intimate
or personal level? Or do I want to show
the scale of the issue? You know, this issue
I'm talking about, this topic affects
500,000 people, and these are some
of the people. So it boils down to how
you want to tell the story and the kind of outcome you
hope to get from that story. It's not a very hard line. There are stories that you can start off as a photo essay, working with one individual, working with one community. But at some point,
you kind of expand it into bigger thing, you know, where you
are now looking at different people in different locations,
you know, you. So it boils down to what you want to achieve
with the story. So that's what we define it. And as you've seen, you know, it's not a hard line. Sometimes there are crossovers, but just knowing and having
this in your mind kind of helps you know how to
approach your story. Visit one of the
websites that I've provided in your worksheet and distinguish between the projects that are photo essays
and photo series.
4. Anatomy of a Story: An idea is Steve Kelly, for instance, and Macy Crowe, creating a five minute
multimedia story, Hungry living with
Prada Willie Syndrome for Maryland's Howard
County Times website. So the idea basically for this story that was
already brought out was to document the effects of an incurable genetic disorder, whose symptoms include
insatiable hunger, low IQ, and behavioral problems. So that is the idea. But the story is the relationship between a
teenager between a teenager, teenage boy living with the disorder and his
father is a caregiver. You see the difference.
So the idea is, you know, I want to tell a story around this genetic disorder
is incurable. The symptoms are
insatiable hunger, low IQ, and behavioral
problems. That is the idea. But the story is actually
finding an angle that you want to approach
the idea from. A lot of the time,
we stop at the idea. We just have the idea, but we don't have the story. So the idea is, this is what, in general, I want to address. The story is, how
are you going to, like, what builds up that story? And also, the story
is made up of 5Ws and H. So this is the who are the
characters of the story. So every story should have that. You should have a character. You should have the
location, you know, where the story is set, when is it happening? What is the character's mission, and why is it important? Then you also have to talk
about why did it happen? Why did that mission happen? So that is the key thing
that makes up a story. So when you go back
to this story, you can see that the K Ws and H is also answered
in some of these things. So with the story, we know that the central character
is the boy and the dad. If we were to look at
where the story is set, we know it's in
the US, possibly. And then we want to look at
the when it is happening. The story would show us
when we know the timeline. Sometimes they can introduce
it using text or something. What is the character's mission? So, pretty much, we know
that the mission is for how this boy copes
with the disorder, but also how is the
father helping him? And how is the father trying to get the best out
of life for his son? And that is the
tension, you know, the conflict that would help the story be stronger.
Why is it important? It's important because
there are people hundreds of people or thousands of people that are
living with this disease, and it would be even if you're not
living with the disease, you're probably battling with
one disease or the other, or you have relatives
or you have friends, you know, so it's
important to kind of show what living with this
disease looks like, because a lot of people will see themselves in that story. Or even if they don't
see themselves, they can build more empathy towards other people that are going through similar stuff. Then how did it happen
would now be how, you know, so what part of the
relationship are we showing? What journey, what outcome is the dad trying to
get with the son? Is the story focused on the son trying to survive or trying
to achieve something, or is it focused on
the dad and how? So it now boils down
to who is telling the story to kind of know what angle they are going
to tell the story from. There is something they
call the Hero's Journey, which every story basically
follows, you know. So I think from
your TV series to your cartoons to your superhero to whatever story
that you look at, it follows the hero's journey. And I'm not going to go into
too much detail into this, but every story is
built in three acts, pretty much the beginning,
middle, and end. And in the beginning is
like the ordinary world, this normal person, you
know, living their life. Then all of a sudden they
get a call to an adventure. So let me think let's use the story that
we just talked about. This man that has
a job, you know, living his life,
all of a sudden, he has a son that
has this disease. So maybe he battles whether they will have
the child or what to do, you know, about the situation. Then he starts talking to
other people or, you know, he just has that drive
to do something or to support the son to achieve
something out of life. Then, you know, initially, he will now go on this journey, and the adventure would start. He would go through
a lot of tests. You know, he wins. He will
try to overcome some. He won't. And this is
where the tension. So in the middle, which
is the second art, this is where you build up all your tension,
all your conflict. You know, you will meet allies, he will meet enemies, you know, then you will want to retract back into their inner cave,
you know, the ordeal. Then will size up the reward. Like, is this the
what's my time? Am I supposed to do this? Am I called to do this? Is it what it? Then you
go to the third act, which is them, you know, having the chance
to make it right. So they trace back
their step, you know, get this extra training or
this extra power or whatever, and then progress to face
their challenges head on. And then they reach that
resurrection atonement, and then they come
out victorious, or they come out defeated. So when you look at this, this is how virtually every
story that you know is built. Sometimes very intelligent
creative storytellers would move around this piece. They can bring a bit of the
second act in the beginning to kind of hook you and now take you back
to the beginning. So, you know, you
move it around in different ways to take people
on that journey. You know. So at the end, you
want people to leave that story feeling
something or, you know, either feeling happy, feeling
sad, feeling empowered, whatever feeling you
want people to have, but, like, that
journey is important. Choose one of the photo essays from your worksheet and examine whether it answers the
5Ws and That is the who, what, where, when, why and how.
5. Narrative Arc: And when you're
building your story, you should already be thinking about what is the
beginning of the story? What is the middle of the
story, and what is the end? So for instance, let's
say we are doing a story about a student chef
at a culinary school. We know that the
beginning is them preparing a meal, you know, what the kitchen
looks like, you know, getting some training,
making the meal. Then the middle is them
actually serving the meal, practicing what
they have learned. And then the end would be
them closing from work, or tired removing their apron. So without this
clear understanding of what happens
in the beginning, the middle, the end, you will just end up no matter the amount of
pictures you take. If you don't capture pictures that highlights the beginning, the middle, and the end, you will struggle
to build a story. So it's very helpful for you to already think about what
happens in the beginning, what happens in the middle, what happens in the end in my story when you're
building up a photo essay. Specifically in photo essay, that would be exposition, opening or establishing shop, rising action, climax, falling
action and resolution. So exposition sets the
scene for the story. So you kind of introduces the main
characters of the story, the main concept of the story. Your opening shot
or your exposition should inform people about
what the story is about. It should hook
people to the story. It should be interesting enough for people to
want to open the story. So think about it as your, you know, where you
turn on Netflix, right? And the first few scenes you
see in that Netflix movie, as a movie starting,
it's that exposition. It sets the scene. You know, it kind of takes
you on a journey. It doesn't give you
everything you need, but it gives you enough to spark your interest to
want to follow the story. So in photo essays, you have to be thinking
about what picture am I going to open
this story with? How what picture is
going to establish where this picture is where
this story is unfolding. Think of virtually almost
any movie you've seen, it often starts with
at the beginning towards the early
part of the movie, you would see a
wide shot showing, like, high rise
buildings or, you know, landscape that kind of shows
this story is set here, you know, sometimes they use text to kind of highlight that. But that is very important. You have to consider that
in your opening stages. Then you think about
the rising action. You know, something is starting. The story is unfolding. You know, conflict
is building up. So this is the part where you are you're turning off
the gas a little bit. You're turning off the heat
the heating a little bit, but not at the highest. So you're building up that story for people to follow through. And then the climax is the
peak moment in the story. This is where the
highest energy point is, where the highest
action happens, where the highest
emotional peak happens, pretty much maybe where the person is now if
it's an action movie, where the person is now having this very serious
fight, you know, then falling action is the
is immediately after climax. So now the person
is almost tired, they almost giving up, then all of a sudden
they push through. And then you have
the final outcome. Did they win, were they
killed? Did they succeed? Did they fail? You know, whatever outcome
you want to think about your story, you
know, would have. That is why it
comes to full view. So this is pretty
much similar to what even non fiction
writers would use. It's just that Oh,
its documentary photographers we are
dealing with real people, so we are not necessarily in
control of how things end. Sometimes we are
in control of how we show the end, but, you know, the outcome is often dependent on what actually
happens in the story because all this whole
narrative arc is built on real
people, real places. So it's more of you thinking
about how can you, you know, position what is
happening within this narrative arc
to build up a story. So now bringing it down
to photo essays, right? You are now thinking about
the visual elements. What are the visual elements you have to work with
in photo essays? So this is the portraits, environmental shots, detail
shots and action shots. The portraits, you
know, kind of, this is where you would show who the main characters are or the various
characters in the story, using really strong portraits can help us get to know
who we are photographing. And, you know, beyond I mean, from beyond the typical traditional definition
of a portrait, which is more like someone's
face and stuff like that. I photo essays, it's not necessarily that
type of picture. Sometimes it's
environmental portrait, you know, which is how I
like to make my portraits. I hardly unless coming
close to the person's face, you know, contributes
substantially to the story, I would usually want to photograph people
setting the scene, using their environment to
kind of tell us who they are. So don't think about portraits
as just getting up close. Sometimes portraits is about photographing people within
their natural environment, and that kind of helps build up more context about woo
you're photographing. So, for instance,
if it's a doctor, going up close with a
doctor is a good portrait, but a better portrait would
be to photograph them wearing maybe a lab coat or with their setoscope or in
their office showing, like little little
information that helps us know this is a doctor. Then the environmental shot
helps you set the scene. You know, you want to take
your viewers on a journey. You want them to know
where the story is set. Sometimes it's not necessarily knowing the exact location
because, you know, photos are very limited in how
they can communicate that. But it kind of sets the
scene for you to know, okay, this story is setting in Asia, or it's probably setting in Sub Saharan Africa,
you know, or Europe. You know, when you're able to see the environment, you know, busy streets or
something like that, you can get a sense of where
the story is happening. And also the environmental shops helps you know when
it's happening. You know, just little
details around, like, what type of building. Is this the type of
building that I mean, I can tell the time a story is told for Nigeria
because there is, like, a clear architectural difference
between how houses were, you know, 50 years ago
and how houses are now. Um, whereas, maybe
in Europe, you know, it's a bit different unless
you go to new build areas, and even that can give
you more context. Okay, this is a new
development area, you know, so all that kind of information is what you get from
the environmental shot. And then you have
the detail shot. So sometimes you want
to have a variety. You want to bring people a bit closer to certain details that, you know, they might not be aware of that is
important for the story. You know, so it's not everything that needs
to be wide and, you know, show all
the whole thing. So you need to get a
bit closer, you know, show some part of the
story that no one is paying attention to that you think would help push
the story forward. And then you think about
the action shot which is which kind of now shows the actions that are
happening in the picture. Again, each of
these pictures can one picture can be both portrait
and environmental shot. So, you know, doesn't
necessarily mean that one picture would be entirely one of these visual elements. It can be multiple, you know. But you having that in mind. The main thing is that you're getting variety for your story. You're getting the
condiments that you need to make your story. So you need portraits, environmental shot, detail
shots, and action shots. So thinking about
this ahead of time, For this story, what
would be the portrait? What would be the
environmental shot? For this story, what
would be the action shot? What are the type of
actions that I need to capture for this
story would help you, you know, get the right
pictures in the field? All these things into practice, you can now see how I've
laid out the pictures, thinking about this
narrative arc. You know, these are the
two pictures that I used to kind of establish the story. You know, we know it's
about this person in a bus. The bus is not moving. You know, she's in a driver's
seat, no seat belts. You don't know if
she's the driver. You know, there is still
a bit of questions, but then you get enough information to know
what the story is about. Then you have this one
that sets the scene. A Rwandan person I
think it's called, would Know what
this location is. Based on this mountain
is a core landmark. You know, the busy environment. It's like you coming into this environment to see
what it looks like. Then you have the rising
action, you know, where, you know, the other people, you know, people queuing
up, getting their tickets. Mama Celine, you know, collecting the tickets
from her passengers. You know, there is
also this human moment of her mother instinct
kicking in, you know, helping another mother with
their child, you know, still highlights that
gender touch to the story. And then you have, you know, someone taking out the sign from the vehicle kind of shows
where the vehicle is headed and kind of sets the scene for the next
action that is to follow. So you have the climax. You know, she's driving. I took the picture, reducing the shutter speed to kind
of show that motion, to show that action brought down the camera a little bit to
show a bit of the environment. It's very tight, but to show
the environment around her, to show the context around
what her work looks like, and also to show
her as, you know, a strong character that
is driving, you know, vehicle, conveying
people in her country. Then you have the falling
action, you know, showing her in relationship
to other people, you know, things are dropping. She's taking a break. This is what the
location looks like. You know, she's sitting down, having a meal with her friend. You know, this
really quiet moment, you know, to tone
down the action. And then you have
the resolution, which is her going
back in an empty bus. It's now nighttime.
She drops the bus. She doesn't have
her own vehicle. She needs to She
needs to use a bike, a public bike to get home. And then she meets her
daughter at the door, coming back with a pineapple, and she's being greeted
by her daughter. And then, you know,
she's going on a walk, an evening walk with the
rest of her children. So it kind of helps
close the story. Choose one of the photo
essays from your worksheet, analyze whether it follows a
narrative arc and whether it uses a variety of shot types
from the ones we've covered.
6. Making a Photo Essay: And So now we go into the actual stages
of making a photo essay. So we've talked about
the thinking behind it. We know what the concept is. Now we are now making
a photo essay. And to illustrate this, I'm using a photo essay that
I made in Kigali Rwanda, which is very similar
to the country doctor. I shot this for three days, and I was part of a workshop. Rwanda. I think
this was in 2019, and it was a week long workshop. So we were required to make a story to illustrate some
of the things we've learned. And, you know, I had
to make a photo essay, which, you know, I like
and I enjoyed doing. So I'm going to use
this project as a case study to kind of go through all the various steps that I took to kind
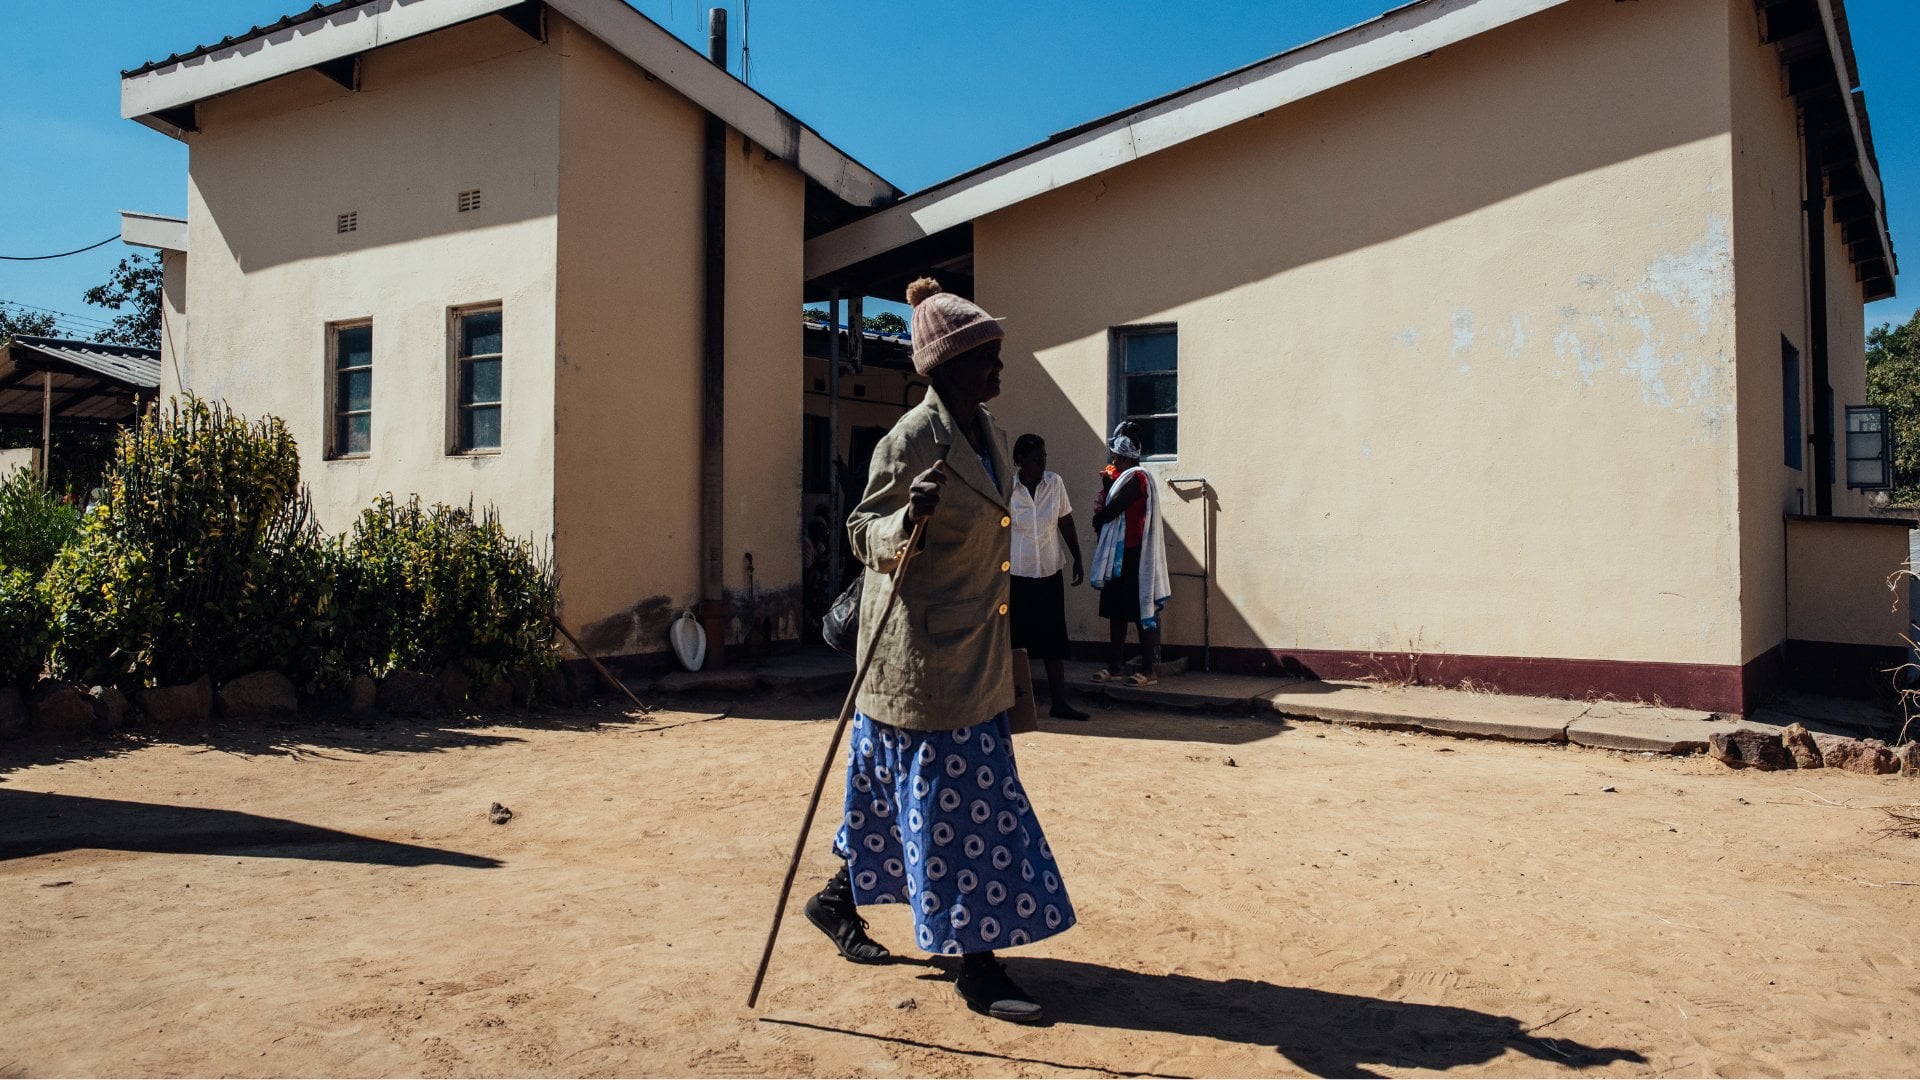
of make the story. Pretty much behind
Mama Celine wheel is about a female driver, you know, not very
common in that region. In fact, we have
countries where, you know, where women might
not be able to drive. So it's something of interest because it's not very common
in that location in Rwanda, for a woman to be driving
a public transport. I think she was one of the few people that I found
that fit into that story. And also, it was a time
that Rwanda is also, like, with Paul Kagame
trying to push, you know, more women involvement in, like, politics, reserving, you know, some part of the parliamentary
seats for women. So I kind of was fascinated
with that whole idea, and I just wanted to, you know, make a day in a life photos, kind of, of this female driver. So we're going to use that
project as as the case study. And then we talk about
the pre production. So pretty much I already
started talking about this. You start off with
the story idea. You know, what is the broad
theme? What is the topic? You know, I just picked
interesting like, Okay, Rwanda is moving
in this direction. How do I photograph that
within a short time? How do I show a fragment
that highlights that? And then after I
got the idea, okay, maybe I could do a story around on a female bus driver that
does long haul driving. The next thing I did was
to research the story. And, I mean, I'm one of those people whenever I
hear the word research, I'm thinking about, like, wearing big scientific glasses, you know, going to the library. Sometimes it's not
that elaborate. Sometimes research is
just Googling stuff, you know, where can I find
this? Is this happening? And for this project, I started off with, Okay, this is the idea that the next thing was for
me to write on Google, female bus drivers in Rwanda. And I started seeing
multiple articles, a few of them, and that's where I saw the woman that
I photographed. So I think I saw
only three women. The newspaper boldly
said that there are only three women
that were driving long haul buses in
Rwanda at the time. Um, so I now
narrowed it down to, okay, this woman, where
would I find her? I went to the park where
the vehicles usually load, and I tried to, you know, speak to the people there to
kind of gain access to her. I took a screenshot of her
picture and just showed them, Oh, I'm looking for this person, you know, and that conversation led to someone giving me
this person's contact. You know, Rwanda is very Um, you need permission to
do a lot of things. It's a very controlled country. So there is a lot of legislation
around a lot of things. So to even be able to
photograph in the park, I needed to get
the permission of some authority to also
access the woman. But we'll get into that when we get to talk about actually
shooting the project. But then after I've
done the research, I now streamline the storyline. So the story line is
the day in the life of a female bus driver
in Rwanda, basically. So streamlining it
the individual, what that story would look like, what I want to
highlight in the story, that's the story outline. Then the next thing you would
do is to make a mood board. I advise people to do this, but having a mood
board would definitely help you know the
kind of energy, the kind of emotion that your
project needs to highlight. And it's not it doesn't have
to be anything you know, exorbitant or very classy. It can be just you putting
different pictures together, putting different
keywords together, and just using different
visuals and texts, even songs to kind of highlight the mood you want your
photo essay to have. And then the next thing
is the short list, it's always helpful to
have a short list because, you know, you could think yeah, you know the story
you want to tell. You know the pictures
you want to get. Sometimes when you get to the field and you are
now taking pictures, you might forget what
you need to capture. So that's why it's important
for you to have, like, a short list that you
can look at and know, okay, I need a picture. For my beginning, I
need these pictures. For the middle, I need
this type of pictures. For the end, I need
this type of pictures. But also thinking about, okay, I'm meeting
this woman at home. What are the likely pictures
I can get from here? Or what are the
pictures do I need from here to be able
to build the story? In the pack, What
pictures do I need? On the journey, what
pictures do I need? So these thinking processes
would really help you know how to
approach your story. So using that idea, so I don't want to go into
detail for every single thing. I've talked about the
research, the story idea, the story line moodboard, storyboard and short list. But I'm picking storyboard
as an immediate concept, and I'm using that same project. So typically, a storyboard
is supposed to have pictures that helps you tell the
story in each frame. You can get pictures
online, or you can draw. It doesn't have to be perfect. You just want to show what
would be in each frame. So you're thinking
about as a photo essay, we've talked about the
beginning, middle, and end. So you're thinking
about this story. How would each picture
fit in into the sequence? Thinking about the
opening or exposition, rising action, climax, falling
action, and resolution. So for the for this project, which the logline is a day in the life of Estin
Mama Celine Mokagina, a Rwanda woman who spent over a decade
defining expectations as a long haul driver. So that is pretty much
what the story is. Then you think about I've done this story board in
four frames, basically. Sorry, in eight frames. And the first two would serve as the opening and
the establishing shot. The third, fourth and fifth frame is serving as
the rising action. The fifth frame is the climax, the falling action, and
then the resolution. So you can make a storyboard that includes up
to ten pictures, up to 15 pictures, up to 20 pictures. But still, you have to be thinking about what
is in the beginning, what is in the middle,
what's in the end? Which part is the opening? Which one is the rising action, climax, and the lights. So for the opening action, I, you know, I used the
rationale for the shot. And that's another thing, right? In photo essays, every picture
needs to earn its place. So every picture
is supposed to be taking and pushing
the story forward. So, let's say, the
first frame is Mama Celine getting ready
for the day inside her boss. You know, what is the
rationale for this picture? So I'm using this picture to show the main character
of the story, but also to set the
scene of the story. So the main character
is a woman, Mama Selin but also
Mama selling in a boss. So you kind of get the idea, even if it's not very clear, you get the idea that
this story is about a woman and this
woman is in a boss. And then the next shot is a wide environmental
shot of a busy car park. So now I'm setting the scene. This story is happening
in this environment, in this area, in this park. And the next word is, you know, people on cue
at a ticket counter. So I'm building up
the tension and building up the
action, you know, to kind of show how
busy it is, you know, how competitive, you know, how busy it can get at the park. Then I also took a picture of Mama Celine as she verifies and collects
tickets from the passengers. And this is for me to build up tension and to show that the journey
is about to begin. Then here, I photographed people taking off
the loading signs, you know, you know, and the final activity
before take off. So this is the part
that I kind of use to show the detail because it doesn't really
show anybody's face. I'm going to show
you the pictures. It doesn't really
show anybody's face, but it's showing, like, a small detail that I can use to kind of break
into the next scene. Then you have the climax. For this selection
for this storyboard, I've only included one climax. But the climax is
Mama selling at the driver's seat on a full
speed during the journey. So this is the highest
energy point in the story. And I'm highlighting
that, as well. Then you talk about
the falling action, you know, we are Mama Celine and a colleague takes a
break for a meal. So it kind of shows how
tedious this trip is that, you know, she needs
to take break. And it also introduces
other people. Introduces Mama Celine and her relationship with
other people and her doing a breakaway from
her from her driving. But also, it's helping me tone down the story
so that I can end. Then you have the resolution, which is Mama Celine, you know, traveling back home
after a day's work. So now we are looking at Mama
Celine as an individual, you know, how she goes back
home, when she closes work, her relationship
with her family, how they receive her
when she arrives, and this kind of helps
us conclude the story. It kind of helps us build
up that resolution. Photo essay can be in terms
of the narrative arc, it can be more
complex than this, but this is a very
linear type of story that kind of helps you know how to
build a photo essay. Complete the eight frame
storyboard in your worksheet, include your name, project title and logline at the
top for each frame. Note the shot type, its position in
the narrative arc, a brief shot description and your rationale
for including. So now you get to production. What we just talked about
is the pre production, which is the things you do before you actually
go into the field. So for the production, you know, you have to think about access, like I already mentioned, I had to go ahead
of time, you know, write a letter, meet who is in charge,
get that permission, speak with Mama Celine
company that she drives with. And they told them what I'm doing and they gave
me permission, and then I spoke with Mama
Celine who was happy for me to photograph her and embed in
her vehicle during the drive. So that's also informed consent. In some cases, you would need someone to sign a consent form, which is very much
advised because you don't know whether if you want to publish the story or you
want to do an exhibition, it's always good to have some form of signed
consent because some organizations
or companies may ask for that consent before they allow you
publish that story. And this is not to be
confused with model release, which is when you are
doing when you are using the pictures
outside editorial sense, where you are using the pictures
for commercial purposes, in those kind of situations, you have to compensate the
people you photograph, because it's now
for profit making, so you have to treat them as a model in that context and make sure that
they get compensated. But for informed consent is mostly for editorial use just to show that you've done
your due diligence and that you haven't
stolen the pictures. Then also, you have to
think about your gear, you know, what equipment
do you need for the shoot? You know, do you need
do you need flash? Do you need lights?
Do you need what type of lens, memory card? Then shooting is now you getting on the field and
making sure your camera is charged and you're getting the right pictures and moments that you
need for your story? And so you think
also about, like, the post production, still
taking the beginning, middle, and end approach. But now in terms of how
you produce the work, you think about after
you've taken the pictures, how do you backup your files? Where do you store them? And then you think about writing captions and
descriptions for your pictures. I'm guessing a lot of
us use maybe adobe light room or forgotten the
other one photo mechanic. There are multiple
options you can use, but it's important to
ride the captions because sometimes you forget the names of the people you photographed. And the location. So
it's always good. Even if you won't write
anything elaborate, just write the name
of the person and the location in the
caption and embed it. Then the next stage would be you now calling the pictures. Obviously, to get that 15
pictures or ten pictures that you used to show your photo essay you probably have taken like
hundreds of pictures. So Colin is, you know, the methodology that you
use to kind of select, you know, the pictures and take out the bad ones and
only leave the good ones. The technically sound ones, the ones that work, yeah, that's where you
would consider Colin. And this is done in
multiple stages. You know, you can
use the starring. You start selecting
the first group, take out the bad pictures. Then the next stage would be you selecting
pictures that work. The next stage would
be pictures that fit into the narrative arc. So thinking more
about, like, well, no, the next stage will
be you thinking more about the various
types of pictures. Which ones are the portraits, which ones are the environment. You know, you get a good
selection for each of them. And then the next
stage will now be more of you thinking
about the narrative. You know, what do you need
for the establishing? What do you need for the
detail for the rising action, what do you need for the climax? And you start, you know, narrowing it down till
you end up to one, two, or three pictures for each of these narrative positions. Think about processing your
pictures, how do you edit? How do you do your post product How do you do your processing? Do you need to adjust
the white balance? Do you need to
adjust the colors? Do you have a preset? Do you have a way that
your pictures look? This is where you do that. Then editing and sequencing. Now from these pictures
that you've selected, you have a variety that fits into the various
narrative arc, then you will now start
sequencing the story. You know, which one comes first? Which one comes second,
all that kind of stuff. Then presentation is pretty
much showing your work. On your website or as a
PDF in portfolio reviews or even putting it in competitions or open
calls on a magazine, you know, those are some of the ways you can
show your work. Yeah, we've talked about
a lot of distance, and sometimes you
have a project idea, but you're struggling with, like, the visual language. You don't know how to
take the pictures. You don't know what the
pictures would look like. One of the things I do
as I'm researching, I'm also looking at what other people have
done on that topic, on that subject, you know, but I'm also looking at other platforms that
publish photo essays, you know, look at the story. How did the photographer
tell the story? And that is one way you can
keep developing yourself. These are some of the
key places that I go to to get inspiration. WordPress photo, you know, you can go through the
archive from, like, 19, whatever, and you see the
photo essays that have won and you see how different
people build up their story. I like the New York
Times Lens blog, which is archived at the moment, but you can still access photo stories that
were published, you know, there still useful. Magnum photos is
also one of them. So some publications
like New York Times, Washington Post,
Guardian Atlantic. Some of these publications have a dedicated section
for photo essays, and this is some of them
that I've listed out. Social documentary
network is also good. They have this SDN Ziki
magazine that you can look at. It's free of charge online. You can look at past workor and kind of see how people are
building their stories, guardianing pictures,
seven Foundation. Even No Aala magazine, we have you know, photo series that
have been published, so you can also draw
inspiration from that. So this is like a
very extensive list of places to go to
national geographic. But yeah, the more you consume photo essays and stories that are made by
other photographers, the more your own visual
language will develop, and you can already you know, start thinking about how
to make your own project. Another thing I do is
to buy photo books. So when I find the photo project that kind of aligns
with my project, in terms of style, in terms
of theme, in terms of story, I can even I go as far as
buying the book sometimes and kind of just consuming it to see how the
photographer approached it. And I try to draw inspiration
from multiple projects. So it's not that you're copying
another person's project, but you are drawing inspiration but sticking to your identity, to your personality, and
to how you tell stories. Complete the eight frame
storyboard in your worksheet, include your name, project title and logline at the
top for each frame. Note the shot type, its position in
the narrative arc, a brief shot description, and your rationale
for including it.
7. Project Preview: Behind Mama Celine's Wheels: B
8. Conclusion: If you made it to the
end of this class, you now know something that many working
photographers don't know. Foundations of strong
visual stories are built before you
head out into the field. They often not improvised on location or
assembled in the edit. That solid foundation is what you've been working
on in this class. And I hope that you
are proud of yourself. We learned about the
difference between a photo essay and photo series. We looked at the narrative arc, the components of a story, and the four types of shots to include in your photo essay. We've also learned how to storyboard your project
in eight frames, ensuring your story
flows with each frame, pushing the story forward. Now the next step is to go
out and shoot your project. As you take your storyboard
out in the world, you will soon discover that not every frame will work out
the way you had imagined. Some shots will work and some w, and that's totally fine. A storyboard is not meant to be a rigid script that
you have to follow. Rather, it's a
foundation that gives you direction and
clarity of purpose. Think of it as a compass that helps point you to the
direction of choice, but the actual
path that leads to your destination will only be discovered when you
embark on that journey. Your storyboard is your compass. So treat it as such. Remember to post your
project in the gallery, look at other students'
projects and leave a comment. That exchange is all
part of the learning. And if you're working
on a longer project, feel free to expand the storyboard frames
to as much as needed. But remember that each frame
needs to earn its place. In photo essays,
less is often more. Each frame should push
the story forward. And if you would like
to connect with me, you can follow me here
on Skillshare and on my Instagram at KC O Cover. If you enjoy the class, please don't forget
to leave a review. It helps other students
discover the class. Until next time now
go tell that story.
 KC Nwakalor, Documentary Photographer & Producer