Transcripts
1. Introduction: Video Editing is
impossibly hard. That's what I told myself after a few times of trying
and failing to do it. But that was two years ago. And after making hundreds of YouTube videos
using Premier Pro, I've gotten so used
to this process. I taught myself how
to edit videos by watching YouTube tutorials
and experimenting myself. And so over time, I refined my editing process
to be extremely efficient. So in this course, I'll take you through my
Video Editing Workflow if you want to create
your first video, but you're not quite
sure how to get started. Then this course is for you. I'll tell you everything
you need to make a YouTube video from
start to finish. Firstly, we'll walk
over all the basics like how to create a project,
navigate Premiere Pro, interface, import and
organize Footage, Create Sequences and cuts, transitions, Effects
and Keyframes. Then we'll learn how to edit Fast by using
keyboard shortcuts, Adjustment Layers, and other effective
editing techniques. Next we'll explore The Art of storytelling
and engagement, which will allow us to make videos even without
showing her face. And finally, we'll add
a cherry on top with audio and sound
effects to create an immersive experience
for our viewers, I'll be going through
things step-by-step. So feel free to skip sections
that you feel like you've already mastered or
slow down and rewind. If you miss something
in this course, you'll see me using
Premiere Pro because that's the software that are used
for Editing my videos. But most, if not all, the things that you'll
learn should work in any other popular
editing software, such as the Vinci Resolve, you'll probably
just need to figure out how it's called
and where to find it. I designed this course
for complete beginners. So you don't need
to know anything about creating videos
in order to start, all you need is a computer
and a Video Editing Software, in this case, Premiere Pro. So yeah, thank you
for watching and hopefully we'll meet
on the other side.
2. Class Project: Awesome, Welcome to this course. In this lesson,
I'll tell you about the class Project and it's
going to be very simple. By the end of this course, I want you to make
a simple video by using the key takeaways
from this course. It doesn't have to
be anything extreme. Just a short video with some of the editing techniques
that you'll learn later and then post it in
the project gallery so others can take inspiration and see the progress
that you've made. But the main thing
that I want to emphasize here is that it's very important to try out new things
that you learn yourself. You see our brains
are not designed for keeping information when
we don't put it to use. That's why I encourage you to open Premiere Pro and go along with me pausing the course along the way and trying the
Keyboard Shortcuts, tips and techniques yourself. As I showcase them, that way you're going to
improve your chances of actually remembering stuff when you need to use
it in the future. And with all that said, I'll see you in
the first lesson.
3. The Types Of Videos I Create: Now before we jump into things, I want to show you what
Types Of Videos I make and how I go about
making them so that there's some context
as to why I'm showing you the specific editing tips and
techniques in this course. So essentially there
are two types of videos that I Create
for my YouTube channel. Number one is a Voiceover Video, and number two is a
talking hands Video. Conventionally, it
would be called a talking head video because people usually
show themselves, not their hands, but
that's what I do. Now it's different as to how I put each of these
videos together. Let's start with the
Voiceover video. So the first thing
that I do is write out a full script for this video
and then record a Voiceover. I then lay out the Voiceover
in my Editing Software, which is Premiere Pro, and then Cut up the Voiceover and remove all the mistakes. Next, I gather or record
Footage myself and add it on top of the Voiceover and thus
compose the video that way. And for the second format
with the talking hands, I usually don't write a full
script for such a video, but just bullet points
or a rough outline. In some cases, I do
scripted out fully. Next, I record my
hands as I speak and then import that
footage into The Timeline. This is called an aryl, and then I record and add different Clips on
top of my a roll, which is called B-roll, and thus can pause
the video that way. I usually never create videos outside because I'd
never go outside. And that's why most of the shots that are
used for my videos are stationary or
handheld and shot inside. So in this course, I'll show you how I make these
Types Of Videos. So a Voiceover based
video where you can just showcase your
screen recording or some footage on the
screen and they talking hands or a talking head video, because they're essentially
the same, just like this one. Now, these formats are pretty versatile for YouTube
videos because essentially you can create almost any type of
video with this format. The only exceptions
being vlog style videos and spectacle style videos
like Mr. Beast mix. That's why in this course, I will not be
focusing on holding your camera or color correcting because that's a
thing that I don't do frequently for my own videos. So let's open up
Premiere Pro for the first time and
see how to do it.
4. Creating A New Premiere Project: Let's open up Premiere
Pro for the first time. So this is what you're
going to see once you install the software on
the screen that opens up, you'll be able to see your
recent projects and then open a new project or
create a new project, I'm going to click
Create New Project. At the top-left, I can see project name where I'll be
able to name my project. I'm going to call
it less than one. Then in the project location, I can expand this and choose where I want to save my project. I'll click Choose location
and select my desktop. Now, I usually
ignore all of this, which lets you import footage from this screen
into Premiere Pro, and they usually do it later. So now I'm going
to click Create. There we are inside
of Premiere Pro. Right now it's empty because
there's no footage inside, but that's what we're
going to figure out next. So this is how you create
your first project.
5. Layout Of Premiere Pro: When you first launch Premiere, this is probably
not how it's going to look like because
you can move all of these panels around and resize them around
however you want. I've resized them in a way
that it fits my editing style. You'll probably see something like this in the very beginning. And this is just
too cramped for me. But let's see how to
move these panels around and place them
wherever you want. Essentially, if you
want to resize a panel, just click on it
to highlight it. And then on the border here, just click with your mouse and
drag and you'll be able to re-size whichever part of
Premiere Pro that you want. Now at the top of each panel, you'll see its name and
this hamburger icon. You can click on the name and drag it somewhere
that you want. You'll notice these blue
boxes appear and this basically indicates where you
want to please the panel. If I want to place it on the very left-hand
side of the screen, I can move it left and
then a little more left. And you'll notice
this green bar. That means that the panel will take up the whole left
side of the screen. I'll show you my favorite layout and you can copy it
yourself if you want. The Project panel goes up
here by the Effect Controls. Then I close out the libraries, I close out the Media Browser, I close out the info Effects, go here at the top. Markers I close and
history I close. Now you'll notice
that the timeline spans across the whole
screen, which is what I want. The Timeline is where I do most of my work when
editing a video. It's where you see all of your Clips and you
can move them around. Now this panel is
the audio meter. It will jump up when there's some sort of audio
playing in the timeline. But you'll notice if you
expand it just a little bit, it starts showing the audio levels and
that's what I want. So I'll keep this
panel very tiny, but not too tiny
so that I can see these Audio Levels which
will be important later on. On the left, I have
all my tools here. I have the Project panel, the Effects panel, and the
Effect Controls panel. Then I close the Source panel
because I rarely use it. And if you accidentally close the panel that you
didn't want to close, you can always go to window and look for that Panels name. So I just close The
Source Monitor. I can click on it and it will
open back up to close it. I can just right-click
close panel. Now, there are a few more
Panels that I like to add to the default layout
that I use quite frequently. Essential Graphics, Lumetri,
Color, and essential sound. Now you'll notice
that now these Panels take up the whole right-hand
side of the screen. So I can take each of
these Panels and attach them to the right side
of the Program Monitor. Now if there are
separate like this, I can click and move them
into one single panel. Now when I want to
change between them, I can just click like so. This is my preferred layout. I have the timeline over here, the tools on the left, the audio meters on the right, The Program Monitor
in the center, the Effect Controls Effects
and the project panels on the top-left and the
Lumetri Color and essential graphics
panel on the top right. Let's import some files to see what each of
these panels can do.
6. Importing Footage & Housekeeping: In order to Import
Footage to Premiere Pro, you can either go to Import on the top
here and then browse for the footage on your computer through this Premiere
Pro interface. But I don't really like that. What I usually do is just
drag and drop stuff in here. So for example, I have this folder here on my
desktop with my footage. I can just take it and drop
it into the Project panel. It's important that
I drop it in here in the project and
not in the timeline. This is how it would
look like if I was using my own layout, I'll be using it moving forward. Now there are few
important things to mention when talking
about organization. So right now I have everything
in one single folder, which is not the best
way to go about things. What I usually do is create new folders for specific
projects that I'm working on. So for example, this will be Video one than another
folder for video two. Now, let's please this
footage inside of video one and see what happens
inside of Premiere Pro. If I go back, you'll notice that it located media
for a little bit. It was trying to find it, which means that
Premiere Pro doesn't actually store files
within the program. It's sort of locates them on your computer and then
link them together. This helps keep this
project file small. And that also means that if
you move your footage around, Premiere Pro will not
be able to find it. So for example, if I place
it on my desktop and not within this folder and
go back to Premiere Pro. You'll notice that it
didn't find my footage. It doesn't know where it is. It's asking me to link media, but I can do now is
click Locate and then go through here until
I'm on my desktop, which is not ideal and I would rather not have to
do this because my footage is
usually deep inside some of these folders
and not on the desktop, but in this case, I can click desktop Footage and click Okay, and now it linked
it back together. The folder structure that I use for my videos is
something like this. I have a folder for each video. Then inside of it I have
a folder called B-roll, which basically houses
all of my visuals. So Footage would go
into the B-roll folder. Then I have a new folder called
unedited sound because I record my audio separately and I'd like to keep the
original after I edit it, and that's pretty much
it for the Video folder now somewhere separately
on my computer. So not within these
Video folders, I will have a music and
sound effects folder, which will house all of my sound music and sound effects from everywhere
that I've gathered. When I open a New
Premiere Project, I will always go back
to the place where my music and sound
effects folder is and drag it into Premiere. I've imported my actual music
and sound effects folder, and you'll see that I can click this arrow here to expand it. And I have sound effects, music and Video Effects. If I expand music, you'll see that I have a
bunch of music tracks here, since I don't really
want to redownload music and place it
within each video. Every single time I
work on a new video, I just have it separately
and import it into Premiere Pro every time
I Create a new project. Now for the projects, I have a separate folder
as well called Project. So my projects live separately
from the Video Footage, and the video footage lives separately from music
and sound effects. Now you'll notice that Premiere
created this, but it is, is basically Premiere Pro saving your project
automatically for backup. So if you're Premiere
crashes or closes unexpectedly or you lose
power to your computer, you can always go back to
this autosave folder and open the recent Auto Save to save your project once you
work on your footage, Premiere Pro will add
even more folders, which will include audio
and video previews. Those just make it easier
for the program to work. But whenever I want to
work on a new video, I will just create a new folder, name it Video three, and then drag it into
My Premiere Project. I usually do is work on phi Videos within
one single project. And then I move on
to the next project. I found five to be
the sweet spot, because if I add any more, Premiere Pro gets cluttered and there's too much
stuff going on. And it feels like I often lose
control of what I'm doing, trying to fiddle
with all the Footage and all the timelines
that I have.
7. Creating A New Sequence: Now that we have our footage
inside of Premiere Pro, what we can do is
create a Sequence. And the sequence is
essentially a container within which you'll be able to place
multiple Clips of Footage, sound effects, audio, and compose your video To
Create a Sequence, there are really two options. The first way is to right-click, go to new item and
then sequence. But this is going to bring up a very confusing menu which
I don't know how to use. So I'm going to click Cancel and then use the second method. The second method
is to either drag your footage into The Timeline and it'll
create a Sequence. You'll notice that
the video popped up here in the Program Monitor. Or what you can do
instead is right-click on the Footage and say New
Sequence From Clip. It'll do the exact same thing. Now you'll notice in
the Project panel, a new sequence appeared. It looks like this. You can make these icons
larger or smaller, or also toggle between
different views. So right now I can see this is my Footage and
this is my sequence. They look the same now
because they essentially are, since I have my footage
inside of the sequence. So let's go back here. Now for example, if I have a screenshot or
something and then I import it into Premiere Pro and then Create a
Sequence From this. You'll notice that
the sequence sort of inherited all the aspects
of the screenshot. So the size is smaller. The FPS over here
is also different. This essentially means that whatever clip you use to greet your sequence will have its settings applied
to the sequence. So if you want to
create a video in 30 FPS and your
footage is in 60 FPS, your sequence will be 60 FPS. How do we change that? We can go up here into Sequence and click
Sequence Settings cure. You'll be able to customize various different things
about the sequence. For example, the
size of your video. I'm going to make it
HD for this example. So 1920 by ten at, now, I want it to be 30 FPS and not 60 FPS here in
the Time-based, I can expand this and choose 30 frames per second
when I click Okay, and then OK, again, my sequence will have changed. You'll notice that my footage is 60 FPS and the
sequence is in 30 FPS
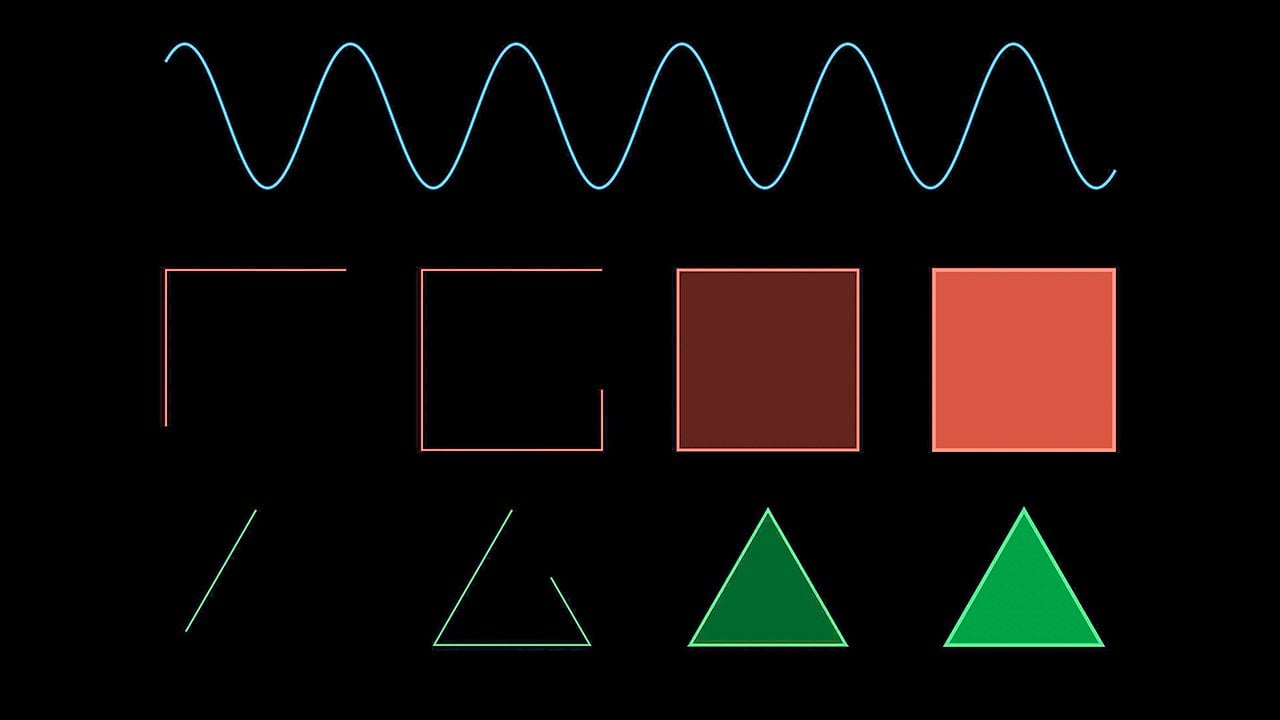
8. FPS - What Is It?: Fps is essentially
how many times per second your Video refreshes. So if it's 30 FPS, that means every single
second that the video plays, your eye will be able
to see 30 images. Because a Video is essentially just a bunch of
images put together. They just switch very quickly, so our eyes interpret
it as a Video. Now, what kind of
FPS Should You Use? Well, for YouTube videos, they are essentially three options that you
could choose from. The first one is 24 of PS. This one loves the copyist, but it's what most people
are used to because most movies are shot at 24 FPS. This makes your footage
look cinematic. Then there's 36. This one doesn't look
super cinematic, but it's also not too smooth. So it's a nice middle ground. Graders like Peter
McKinnon or Ali Abdallah use 24 FPS in all
of their videos. And creators like
MTBE HD use 30 FPS. So it's really just
a matter of choice. And then there's 60 FPS. 60 is best for something like gameplay footage where you want stuff to look super smooth. Now if you're doing
screen recordings like I'm doing right now, your footage will
usually be recorded at either a 30 or 60 FPS. Which means that if
you want to make a video that has a lot
of screen recordings, you should probably make your Sequence either
30 FPS or 60 FPS. The good news is that
footage that you record it at 60 FPS could easily be converted into 30 FPS to know if your footage
easily converts, what you can do is simply divide the larger FPS by
the smaller FPS. And if you get a nice round
number, like to hear, that means that you can
convert from 60 FPS To 30 FPS without experiencing any drawbacks such
as repeated frames. Now, what if I wanted
to convert 60-24? I would divide 60 by 24. And you'll see that I don't
get a nice round number. That means that it
will not convert very nicely and that will get
repeated frames after some time. Now if you're interested in learning more about this topic, this is a great one-hour
long video from Terran, who was a former editor
for Linus Tech Tips. He explains everything
there is to know about mixing
different frame rates. In this video, I highly
recommend watching it. But if you don't really care, just know that 24
usually looks cinematic. 30 is a nice middle
ground and can be converted down from 60
Without any drawbacks. And 60 is good for
smooth playback. And if you're starting
a gaming channel, basically, it looks
very nice and smooth
9. Mastering The Timeline: Once we have the clip
in our timeline, we can start editing the
video first things first, you can zoom into your timeline by using these
sliders over here, but these are kinda finicky
and hard to get used to, which you can do instead is hold Option on Mac or Alt on Windows, and just zoom in with
your scroll wheel. Next up you'll see
this blue thing and that's called the playhead. If you move it two different
spots in your timeline, you'll notice that
the footage in your Program Monitor is changing and now the
video is paused. So if I want to unpause it, I can click Space-bar or this Play button here,
and it'll unpause. You'll see that the
play head is moving along as the videos playing. Now you can click
with your mouse on this clip and move it around. You can move it either left
or right or up and down. Why would you want
to move it up? You'll notice a bunch of
stuff here on the left. These are called tracks. So each line here
represents a track. And what attract basically
is, is for example, if I import something
else here like this screenshot and place
it on the timeline, you'll notice that it was
put on the second track. If I start the video and play
head moves onto this clip, you'll notice it will appear
on the Program Monitor. That's how you can stack multiple clips
together in Premiere. Now there are three Video
Tracks and three audio tracks. You can add a new
track by simply moving your clip up where
there's no tracks and a new one will be created
or moving your audio down here and a new audio
track will be created. If you've done something
that you didn't want to do, You can press Command Z on Mac or Control Z on Windows to undo. So let's talk about
these tracks here. Let's not worry about
all of this stuff here, and let's focus over
here so you can click the mute button and it will mute the audio from this video. Now you'll notice that if I
play it, There's no Audio. If I click this again,
there is Audio. If I have multiple audio
tracks and mute this one, I will still be able to hear the other one beneath it
and the letter S, Let's use Solo attract. So no matter how many
tracks you have, you can have 50 or 100 tracks. If you click S, only
this track will play. It's very useful so
you don't have to mute everything else like
this individually. One more thing that you
can do in the timeline is click and drag to
select multiple clips. I want to delete all
of these audio clips. So I'm going to press Delete on my keyboard and they're gone. What I can also do
is lock attract. So if I click this
lock icon here, I will be able to
move the top track anywhere I want and do
whatever I want with it. And if I start cutting
up this Footage, you'll notice that this
track doesn't change at all. You can also lock video tracks. So now I can screw around with audio and the Video
Track doesn't change, it stays in place, and there's nothing
I can do to it. Now, you'll notice that when
I click on the video track, the Audio Track Select as well. And that's because I have this option enabled
Linked Selection. If I disable it, you'll notice that if I click on the video track, it
selects separately. I like to keep this
on at all times because if I select and
move audio separately, it will now not be
sync with my video. So it's a good practice
to always keep this on. This option is called
snap in Timeline. So if I have another clip in my timeline and I disabled
the snap feature, you'll notice that
if I move my clip, it's very hard to align it. I have to zoom in and
align it exactly. It doesn't snap into place. If I have snapping enabled, if I start moving my
clip close to this clip, you'll notice that it snaps in place so it makes it
easy to align Clips, which you can also
do in the timeline, is adjust the size of Clips. If I move my mouse
at the very edge, you'll notice my mouse cursor changes into this
red thing and they can click and drag left
to make the clip shorter. Now, I can do the
opposite if I want to make it longer and
once the clip ends, it will no longer. Let me make it longer. One more thing that
you can do is click this I here and it
hides the track. It doesn't lock it, but
it makes it invisible. So for example, if I had this screenshot here in
the middle of the screen, and I want it to work
on the bottom clip, but this one is blocking
the view so I can just hide it and do something
with the bottom clip, maybe make it shorter
or add some Effects. I'll be able to see it
because this is not blocking the view to make
this clip visible again, just click on the eye and
it will become visible. I'll talk about the
track targeting later because it's not
important for us right now. Now if you have a
small screen which you can do is make
your tracks bigger, you'll notice that if I hover my mouse over the
edge of both tracks, I can now drag it up
to make it larger, or drag it down to
make it smaller. I can also do the same
with audio tracks. So I can see the
audio waveforms. If I hold the shift and double-click on this
gray area right here, it will make all the
tracks the same size. The first time you do it, it makes them the default size. And the second time that I hold Shift and click on
this gray area, it makes them double sized. So now all the video
tracks or bigger, if I do the same on
the audio tracks, hold shift and double-click, make audio tracks bigger. If I want to return
back to default, I can do it manually
or I can hold shift and double-click and it will
return how it was before. Another way is to use
a keyboard shortcut Command or Control
plus on Windows will make the track bigger and
command minus or Control minus on Windows will make it smaller. I usually never make my
video tracks larger. I only do it with audio because
when I'm editing Clips, I look at my audio waveform
and based on that, I cut them up more about
that in another lesson, you'll notice that there are a bunch of tools
here on the left. So let's find out what
you can do with them.
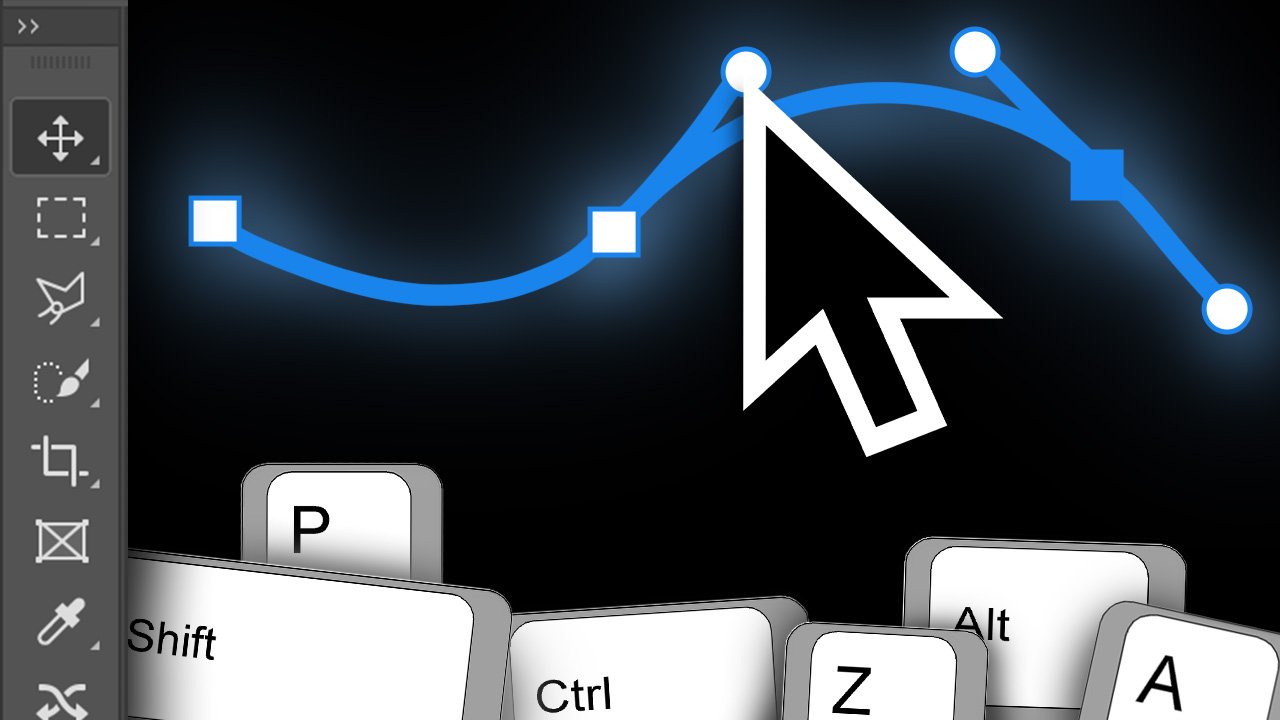
10. Duplicating Clips Fast: The first tool in our arsenal
is the selection tool. It's basically your
mouse pointer, but you can do with it
is click on your clip, drag it around, and also
click on the empty space. So for example, if
I have to Clips like this and I click
on the empty space, I'll be able to click, Delete
and delete the empty space. It will join these
clips together. I can click on the empty
space here or here, and also click Delete
to delete that space. With this tool, you can move and resize everything that you want. Now it's very
important to memorize the keyboard shortcuts for these tools because that's what you're going
to want to use. It's very slow switching
them with your mouse. And you'll have to do
with thousands of times, which will cost
you a lot of time. So the keyboard shortcut
for this tool is V. If I have another tool in
my hand and click and V, it will toggle back
to the Move tool. The next tool is the Track Select Forward Tool and the keyboard
shortcut for that is a, what this tool allows
you to do is select everything on the right of
these arrows in your timeline. So if I click here, it will select
everything on the right. You'll notice that it didn't
select this first clip. If I move my arrows
here where it covers the first clip and
click once you'll notice that it's selected
this clip as well, what I can also do is
select with my move tool, the keyboard shortcut is V, so I can just click
and drag to select. However, the move tool is not always useful for
selecting stuff. If you have a super-large
Timeline with a lot of Clips, then it's going to
be very hard to select everything precisely
with the Move tool. That's why we can use
the track select tool. If I want to select
everything from here onwards, I can click a to bring up
the track select tool, and then just click
here and it'll select everything up
until the very end. Keep in mind that if you
have your track locked, it will not select it. You will not be able to move your locked tracks
with any tool, whether it's the Move tool
or the track select tool. What you can also
do is hold shift, and instead of two arrows, you get one arrow. This will let you select
everything in only one track. So if I click on this track, it only selects footage
that's in that track. So if I want to move only the bottom track,
I can select it, press V on my
keyboard to bring up the Move tool and just
move these tracks like so. The next tool is the
rate stretch tool and the keyboard
shortcut for it is our, don't worry if you don't
remember all the Shortcuts, just try to use them
every time that you switch a tool and you'll
remember them over time. If you forgot a shortcut, you can just hover over the tool and it'll tell
you it's Shortcuts. So what the rate
stretch tool can do is change the speed
of your Video. I can either increase
the speed, like so. And you'll notice
if I play it back, it became wave Faster. And they can stretch it out the other way to make
it slow motion. You'll see that now the
clip plays very slow, but this tool
doesn't really allow you to change your
speed precisely. You'll see now it's at 46.79%. What if I want to
do 50 per cent? It's going to be very
hard to use this tool and adjust my clip to
where it's 50% exactly. What I can do is click command
R or Control R on Windows. And it'll bring up this clip
and Speed Duration panel. The other way to get there is to right-click and click
speed and duration. Now I can type in
50% click Okay, and my Clips speed is now 50%. Cool. Next is the eraser tool. If I hover over my clip
with the razor tool, you'll see this line up here. And if I click, it'll
split the clip. So if I come back to the Move tool V and
then move this clip, you'll notice that it's
separate from that clip. Then I can press C to go back to the Cut tool and then make
all the cuts that I want. I can then bring up
the Move tool with the V Keyboard Shortcuts and move all of these clips around. However, I don't recommend using the Cut tool because
it's very slow. I'll show you a
keyboard shortcut, which will allow you to
Cut up your Clips like so Without using the
Cut tool later on, because cutting is the
action that you'll do very often when
editing videos. Let's move over
to the next tool, which is the hand tool. I'll skip over
these three tools. So the slip tool, the Pen tool, and
the rectangle tool, because as a beginner, you're probably not going to use them and they're
quite complicated. So what the hand tool
allows you to do is just click and drag
on your timeline. That's it. You can use it
instead of scrolling. But I found that using my mouse scroll wheel to
move horizontally through the timeline and
using alt or option to zoom in and out is
just a lot easier. Next is the type tool. Once you select it, you can come up to the
Program Monitor and click once to add a
text to your video. Text appears as a separate
element in your timeline, which you can resize, move around, and place
anywhere that you want. I'll talk about manipulating
text in the next lessons. The only annoying thing
with this tool is that you can switch back to the Move tool by using
the keyboard shortcut, because if I press V, it just Types the letter V. So what you have to do is just click on the Move tool with your mouse and then you'll
be able to get back to it. That's the only drawback of the type tool with
any other tool, you can toggle between them by just using
keyboard shortcuts. So this was the overview
of the most basic tools
11. Tools & Basic Keyboard Shortcuts: Now you'll notice that I'm
always duplicating Clips. There are two ways to do that. You can either click on a clip, press Command C on Mac
or Control C on Windows, and then come somewhere else and Command V or Control V to paste. However, this is very slow, but I can do instead is select a clip hold Option on Mac or Alt on Windows and
just simply drag. This will duplicate my clip
12. Cutting Clips Fast: Cutting stuff inside
your timeline with the razor tool is kind of slow, especially because you
have to constantly switch between your move
tool and eraser tool. It's a lot faster To Cut Clips with a keyboard
shortcut like this, and I'll show you
how to set it up. So to find keyboard shortcuts, go to Premiere Pro and
keyboard shortcuts. Here you'll be able to customize every single shortcuts
in Premiere Pro. And there's a lot of them. So you can see the basic ones
like the zoom tool is Z. You can also click on your modifier keys to see
Shortcuts with those commands. So for example, command
Z would be undo, and I can click on command to see just the
default Shortcuts. Now I think the
default shortcuts to split the clip is Command K, control K on Windows, but the control and
command keys are very far away from the
K key on your keyboard. And since you're going to
be cutting up Clips a lot, it's better to set a more
easy to reach Shortcuts. So what I have done is set
my S key to add, edit, edit, edit basically means split a clip here
in the search bar. I can search ad edit. And then over here
where it says shortcut, I can click on it for you. It's going to look something
like this command K. So I can click
here, click the X, click again, and then press the shortcut on my
keyboard that I want. So it's going to be S for me. So now once I click, Okay, I'll be able to hover
over my Footage and hit S on my keyboard and it
will split it immediately. This is going to save you so much time because
you won't have to constantly switch
to the Cut tool and then back to the Move tool. I would recommend working
not with your mouse but with keyboard shortcuts
because that's going to greatly improve
your editing speed. Also, if you've made
a lot of cuts and then you can't go
back with control Z. As you can see, I'm pressing Control Z and
nothing's happening. You can select the Cut like
so by just clicking on it and then click Delete on your keyboard and
it will remove it. So as long as the
clip is the same, you'll be able to
remove the Cut. But for example, if I
move this part over here, I will not be able to
remove the Cut because obviously it's not
from the same clip. It's not continuous. But if I move it back
where it was before, I'll be able to simply hit
delete and remove the Cut
13. The Effect Controls And Effects Panels: Let's talk about
the Effect Controls and the Effects Panels. The Effects panel
lets you search up different Effects and
add them to your footage. And the Effect Controls panel lets you customize
those Effects. If I go to Effects and look for something like horizontal flip, I'll be able to click
on the Effect and then drag it onto my
footage in the Timeline. And once I let go of my mouse, this effect will be applied. So you'll notice that my
Footage flipped horizontally. This is how it was before. This is now before. Now, what I can do now is
go to the Effect Controls. And here I'll be able to see all of the Controls for this clip. Now if you don't see
Effect Controls, That's because you don't
have a clip highlighted. So once I click on the clip, all the Effect Controls
appear for that clip. Now, every single clip has
these Effects, Motion, Opacity and time remapping, and anything else that you
add appears on the bottom. If your clip comes with Audio, you'll also see Audio Controls. You'll notice that horizontal
flip has appeared. So every single time that you apply an effect to your footage, it's Controls will appear within the Effects
Controls panel. But for now, let's go
back to the Effects. As you can see,
there are a bunch of default Effects within Premiere. You can also create
your own presets and your own Effects
like I have done here. So here you'll find
Effects for Audio like various filters
and equalizers, noise reduction and
everything that you can possibly
apply to your audio. It's easier not to go
through these menus and simply search for an
effect with the search bar, because there are a lot of
Effects here and you'll waste a lot of time looking
through these folders. Now, one of the
most common Effects or Video Transitions,
for example, if I Cut up my video like this and move it
to the very end, you'll notice that when
these Clips change, there's a very harsh Cut. Let's look at that again. What you can do is apply a transition if you want
to make it more seamless. So let's go to Effect
than Video Transitions. And here you can pick from
any transition that you want. These folders are full of
interesting transitions. So I'm going to click dissolve
and choose cross dissolve. This is the most
popular transition that you'll see out there. It basically fades from
one clip to another. Now, normally you would apply Effect by dragging them
onto the clip itself. But with transitions,
this sort of live in-between two Clips. So that's where you
need to drag it. So I'm going to pick it
up with my mouse and then drag it in between
both Clips, like so. Now you'll notice that when I play both of these clips back, they nicely fade together. It's very hard to
see the harsh Cut. Now if I don't like the
length of this transition, I can zoom in. And then when I hover my mouse over the edge of the transition, you'll see that I
can pick it up and extend it or make it shorter. Let's see how it looks. If it's shorter, the Cut
is still not visible. Now for YouTube videos, you don't really want to
use a lot of transitions. It's better to use just hard, simple cuts, but it's useful to know that transitions exist. I'm going to add a
blur to this clip. So I'm going to search
for a Gaussian blur, which is the name
of the blur effect. Click on it and drag
it onto the clip. Now you'll see that
on the Effect has been applied to the clip because this Fx here has turned green on Clips that don't
have customer Effects. You'll see this
yellow rectangle. And here on the clip that I've
applied a customer Effect, you'll be able to see
a green rectangle, but nothing happened. Nothing became blurry. And that's because
I need to control the Effect in the
Effect Controls. So if I scroll down, I'll be able to
see gaussian blur. This wasn't here before because I hadn't yet
applied an effect. So here I can see blurriness
and I can input a number. So for example, 100. This will now blur my clip. Now instead of clicking on the number and then entering it, you can simply hover
over it and then drag right or left to increase
or decrease the value. If you want to go to
the default value, just click this arrow here and it will
reset it to default. This works with any
effect that you apply. So these are the basics of how to add effects to your Clips.
14. Linked Selections: If you want to detach
your clip from Audio, you can select, right-click
and choose unlink. Now when I click on my footage, I'll only be able to
see Effect Controls for this clip because it's
separate from the audio. Also, I can now freely move this clip without
moving the audio track. There's also a keyboard
shortcut for this. It's Command or Control L. So when I press Command L, the footage will be unlinked. And if I select both
of them again and press Command L once more,
they will be linked. This little V here indicates
that the footage is linked. So once I unlink it,
the V disappears. It's an easy way to tell if your footage is
linked with Audio. Now, if you want to
remove audio from a clip, you can hold Option and select only the audio and click
Delete on your keyboard. The same goes for footage. If you only want to select a certain part of a linked clip, you can hold Option and click on the part that
you want to select. It will select them separately. Keep in mind that you can link
multiple things together. So if I unlink and
then link again, all three of these
clips are now linked. So even if I select this text, everything moves
together and you can see that it's linked from
these V indicators. They might not be visible on some Clips if you're
zoomed out too far, but if you zoom in,
you'll be able to see it. So this is how Linked
Footage works in Premiere
15. Mastering Effect Controls: Once you click on a clip
inside of your timeline, you'll notice that in the
Effect Controls panel, there are bunch of
controls that appear. All of these controls
are usually default for every single clip and they let you change the
motion of your clip, the opacity of your clip, and the speed of your clip. If you're clip has Audio, they'll also let you change
the audio of the clip. So let's explore what they do. Let's start with the position. This is the horizontal position, and this is the
vertical position. Now the scale Controls how
much your clip is zoomed in. So if I drag it to the right, you'll see that
it zooms in more. And then if I drag
it to the left, you'll see that it
zooms out more. If I click this reset arrow, it resets it back to
how it was before, but it only reset the scale if I want to
reset motion as well, I'll click on this arrow
and it'll reset motion. Now what I can also do is click on the word
position and you'll notice that this blue rectangle appeared outside of my footage, which means that I can hover my mouse inside of the program, monitor and control the
position with my mouse. So I can just drag this clip
wherever I want it to be. The same goes for scale. If I want to increase
the size of the clip, I can simply hover my mouse
here and adjust the size. Now if you forgot to
highlight your clip, which you can do is come
to The Program Monitor and simply double-click on the clip and it will select it like this. You'll be able to move
it around and resize it. One important thing to mention, if I have another clip on top of this clip and I
double-click onto it. It will select that clip, but it will not select
the bottom clip. That's why if you have a
bunch of layers of Clips, you'll most likely want
to select the clip first, then click on motion, and only then move
it with your mouse. You'll also notice that when
I move this clip around, the numbers on the left in the Effect Controls panel are changing and the same
thing happens with scale. Now, rotation is pretty
self-explanatory. If I drag it right, it's going to rotate it right? And if I drag it left, it's going to rotate
the clip left. If you want to adjust these parameters in
smaller increments, you can click on the
number and click the up or down arrow key, and it will rotate it by one. If that's too slow, you can add shift and these
numbers will jump intense. So if I have the
rotation set at zero, I click inside of it, hold Shift and click
the up or down arrow. It's going to change the
rotation in increments of ten. Now, if I hold Control
and click Up or down, it's going to change it in
very small increments by 0.1. And if I just press my arrows, it's going to
change them by one. So that's also the way that you can control these parameters. Now, let's look at opacity. It controls the
visibility of your clip. So if I drag it down to zero, the clip becomes invisible. And if I drag it up,
it becomes visible. Blending modes basically work
the same as in Photoshop, but I'm not going to go
through them right now. Now. I usually never changed speed in this panel because I can use the Rate Stretch
tool by clicking R and then adjust the
Clips speed like so. Or I can click command R and then input
the speed that I want. So if I want the clip
to be at 100% speed, I'm just going to say
100 here and click Okay, and the clip became 100% speed. Now the reason that
this clip didn't become longer is because this
clip was in its way. So when it became 100%, this Clips cut into this clip. You'll notice that in Premiere, if you move one clip
over another cliff, it overrides the other Clips. So if I wanted to return back
to how the clip was before, I would have to move it back and then stretch it back out. And if I check the Clips, speed is at 100%. So this is how you change Basic Controls of a clip
inside of Premiere Pro
16. Copying Effects Across Clips: Now what happens if you've Cut up your clip a bunch of times and you want to apply an effect to multiple
clips at once. The first way to do that
is to select a bunch of Clips and then drag your
Effect onto multiple clips. But this is not very efficient because you'll still
have to change the Controls for that effect for every single clip individually, it will not change
all of them at once. Another way is to set up all
of your Effects on one clip, then go to Effect Controls and edit all of the effects
however you want. And then select the
clip, hit Control C, select all the other Clips, then right-click and
choose Paste Attributes. A new window will pop
up and it'll let you paste attributes from
one clip to another. And attributes are
basically Effect. So here I can choose
what I want to paste. Right now. I don't want to paste volume, so I'm going to deselect it. I only want to paste the Gaussian blur
and the Zoom amount. So I'm going to leave motion and Gaussian blur checked
once I click Okay, All of these other Clips will now look the same
as the first one, because I've pasted the motion attributes
which are positioned, scale and rotation, and also the Gaussian
blur attributes. What you can also do is select multiple clips or one clip, then right-click and
choose remove attributes. Here you'll be able to change which attributes
you want to remove. So let's say that I want
to keep the Clips motion, but I don't really want to
keep the Gaussian blur. So I'm going to deselect
everything and choose to only remove the Gaussian
Blur once I click. Okay, you'll notice that these three Clips kept
the same scaling, but there is no longer
the blur effect. And the other Clips still
have the blur effect. So this is how you can easily paste attributes from one clip to another and remove
attributes from multiple Clips
17. Mastering Keyframes: Now you know how to zoom into a clip by using the
scale attribute. But if I click play
on my keyboard, this clip is not moving. But what if I want to
zoom in on this rock? One way to do that would
be to cut my clip in half by clicking Command K
or S to split the clip. Then on the other clip, I will just adjust the
scale attributes and the position attributes to where they're positioned
on this rock. Then when I play the clip, it's suddenly just
zooms into this rock. But what if I want to
make it a gradual Zoom? What I can use are
called Keyframes. If I click on the
word scale here, it will add a keyframe. This right side right here, acts the same as your timeline. You'll notice when I
move my play head, it also moves in my timeline. And over here, It's just
zoomed into this clip. So if I move it to the very end, you'll notice that it's
at the end of my clip. So essentially when
I select my clip, this is a zoomed in
Timeline into the clip. It's very useful for
adding Keyframes. Now let's add another keyframe, and you can do that by
clicking this diamond here. And now I have two
keyframes onto this clip. Let's see what happens
when I play the clip. Absolutely nothing, because I haven't adjusted
these Keyframes. Now to select and
adjust the keyframe, you can simply click on it with your mouse and you'll
notice it turn blue. I can now move my play
head onto the keyframe, which will allow me to
see what I'm doing. By the way, if you hold shift and move the playhead around, you'll be able to snap
exactly on the keyframe. So now let's increase the scale. What happened now is you'll
notice if I scrub left, it's sort of gradually zooms in. And that's because
this keyframe is at 89 and this keyframe is at 300. Let's look at what happens
if I play the clip. It starts zooming in when it's in-between
these Keyframes. What you can also do is just
click on the keyframe and move it a little bit to the left to make the zoom and faster. So if I play this again, you'll notice that the zooming
happened a lot faster. So that's what you can
deal with Keyframes. Now, if I wanted to, I could click on the
first keyframe as well, then hold shift and move to
it with my playhead so that I can see what I'm doing and zoom even more out like this. Now if I play back the clip, you'll see that in-between
these Keyframes, it's sort of gradually changes the Zoom amount until it
reaches the second keyframe. What I can also do is
add another keyframe here and then say that I want
to zoom back out To this. I'll just move them closer
together so it happens faster. And you'll see that
when I play my clip, it zooms in until it
hits this keyframe and then sorts zooming out until
it hits this keyframe. Now since there are no
Keyframes here or here, when I play it in the beginning, the clip just stays stationary. One very important thing
to note is that if you make your clip
shorter on the timeline, you'll only be able to see some Keyframes because
you cut off the others. Remember that this zooms in only on the clip,
on The Timeline. So if you want to
see other Keyframes, you have to expand the clip. So and now all the
Keyframes are visible. To remove a keyframe, you can click on it and press
Delete on your keyboard. Or you can remove multiple
Keyframes by simply clicking and dragging over
them and then clicking Delete. Now, I can also add
Keyframes for deep position. So if I add a keyframe here, this will lock the
current position. I will move my playhead to the right and specify
another position. And once I added one keyframe, I don't really have
to add another one. As soon as I start
changing parameters, it will automatically add
another keyframe for me. This makes my job
a little easier. So now I'm going to move my clip to the
top-left, like so. And let's see what happens
when I play my clip. There are no Keyframes here, so the clip isn't moving
and then it starts moving to the position until
it hits this keyframe. And then it stops moving because there's
nothing here as well. Now you'll notice
that the transitions between two keyframes are harsh. So if I want to zoom in, this, Zoom in, sort of starts
and stops abruptly. What you can do to
make the transition nicer is right-click on
the last keyframe and then choose ease in and right-click on the first
keyframe and choose Ease Out. You'll notice that now the transition becomes
a lot smoother. That's because it's not linear. If I click this arrow here, you'll be able to see the
curve of the transition. If I zoom in here, you'll notice that
it's a nice Ark. But when I had them
both set to linear, you'll notice that
it's very harsh. It's sort of starts moving in instantly and then
stops instantly. But when I select the last
one and choose Ease In, you'll notice that the
ending becomes very smooth. And when I choose the first
one and choose ease out, the beginning
becomes very smooth. And so it starts off slow, then gets faster, faster, faster, and slows
down at the end. You can also control the speed of these transitions
with these handles. But for now, just
know that if you click ease in or ease out, the transition is young
to be a lot smoother. The same goes for the
position attribute as well. So if I set my position here and then I want
to move the clip here, you'll notice that if
it's set to linear, it will start moving
very quickly. Then stop moving very quickly. I can select the last keyframe, right-click Temporal
Interpolation, and choose ease in and
for the first keyframe, right-click Temporal Interpolation
and choose ease out. Now you'll notice that
one might Clips moves. It eases into the movement and
eases out of the movement. Like so. Now, if you've selected this clock, which
enables Keyframes, you'll notice that
if I want to adjust the scale or
position of my clip, it automatically adds a keyframe and then if I want
you to do it here, also adds a Keyframes. So if you want to
stop Keyframes and adjust the clip just normally
without any transitions, you can simply click on
this clock and choose, Okay, and it will
remove Keyframes. So it doesn't matter if I adjust the position here or here, the position will stay the same throughout all of the clip, I can do the same
for scale as well. So now whenever I adjust
the scale or position, and if I move my play head to the left, nothing will change. It will not transition from one position and one
scale to another. Now, if I add keyframes, adjust the size here, then move here and
adjusted again, you'll see that it
added to Keyframes. And now if I play it, it's transitions
through both of them. So if I don't want that, I can just click on the
clock, remove the keyframes, and now if I adjust
the Clips scale, it will stay the same
throughout the whole clip. And you can add keyframes to any effect within Premiere Pro. So for example, if I add a Gaussian blur
effect to my clip, and if I want to start
blurring my image slowly, I can add keyframes
to blurriness, then move my playhead right and increase the blur to 100%. Now if I play back the clip, you'll see that the blur
sort of emerges slowly. And this works with
virtually any effect within Premiere Pro. You can set Keyframes, or if you don't want that, you can just adjust the
blurriness normally, but it will not transition and stay the same
throughout the whole clip.
18. Mastering The Program Monitor: This is called The
Program Monitor, and it's where you see what's
happening on your timeline. So if I scrub along
with my playhead, you see the changes that are happening in the
Program Monitor. Now there are few interesting
things about this Monitor. The first thing is that if
your footage is running slow, you can actually decrease the resolution at which
it's playing yet. So if you click here
where it says full, you'll be able to
select the resolution. If I select one-fourth is going to play at a
lower resolution. Now, nothing seems to
have changed right now because when the
video is paused, the resolution is
actually false. So you can see the exact image. But when I click Play, you'll notice that
it becomes a lot more pixelated, like so. And if I stop, it shows
me the normal picture. So if you have a lot of
things on your timeline and then you notice that Premiere starts lagging a little bit. What you can do is simply decrease the
playback resolution. You can go all the way
up to one-sixteenth if you have a big
enough Video file. Now let's say we
add a few pieces of text here. Let's say turtle. Let's duplicate it
by holding Alt, clicking on the
clip and dragging. Then let's put
another word, ocean. I'll go back to
the Move tool and then move this text down. Now you'll see that
both of these are not really aligning very well. So what I can do
is enable guides. Now, if you don't see
these guides button, you can click on the
plus icon and then pick it up from here and
simply drag it down here. Guides are basically
these blue things here. You can remove guides by dragging them out
of your canvas. And you can add new guides
by enabling the ruler. To enable the ruler, just click Command or Control R on your keyboard and you'll
see this ruler up here. I usually don't have it
enabled at all times because I just don't really
use it whenever I needed. I just enable it with
Command or Control R. Then from one of the rulers, you can just click
and drag out a guide. Now I will disable the
ruler with Command R. And you'll notice if
I pick up my text, hold Command on my
keyboard or Control on Windows and drag my text
close to the ruler, it snaps in place. So I can do this with both of these text elements and
they will align perfectly. Now what I can do is add a
horizontal ruler like so. And now the text will
snap to both of them, which is very useful. What's also cool is that you can right-click on your guide
and select edit guide. Here you'll be able to enter the exact position
of your ruler. Now you can either choose to
specify pixels or percent. If I say 50%, this guide will jump to the
exact middle of my screen. Now if I remove
this one and then right-click on the
vertical one, edit guide, choose percent and say 50%, it'll jump to the
exact middle again. So right now I figured out where the exact center
of my footage is. And now I can pick
up my text and snap it exactly in the
center of my footage. If I turn off the rulers with Command R and then turn
off guides right here. I know for sure that the text turtle is in the
exact center of my frame. Now, a simpler way to do this is to just click on the text, hold Command on Mac or Control on Windows
and then drag texts. You'll see that these
pre-made guides appear. Premiere Pro has these
two default guides just here at all times. So you don't have to
create guides yourself. But if you want it to
snap texts, for example, here or here, then you can
create your own guidance. I also recommend adding
this Effects button, which turns off all of the
Effects on your footage. This is pretty useful if you're Timeline is full of Clips that have complex Effects to
handle for your computer, you can simply click
on the FX button and it'll disable all
the effects temporarily. Of course, you can
click it again and all the Effects
will reappear. So for example, if I blurred
this Footage, like so, and then if I mute
all global Effects, you'll notice that
the blur disappears, but I can toggle it back
on anytime that I want. This option will also help your Premiere run a
lot faster because it doesn't have to worry
about showing you all the effects that you've
applied to your Clips
19. Mastering The Source Monitor: What's you'll notice is
that if you double-click on your footage inside
of the Project panel, it will open up any new panel
called The Source Monitor. This is not the same as
your Program Monitor. The Program auditor shows
what's on the Timeline and The Source Monitor just
shows you your footage. Now if you accidentally
double-click on the name, you'll be able to rename the Footage to open
The Source Monitor. Just double-click on the icon or in the empty
space right here. But why would you want
to see your clip inside of another Monitor and
not in your timeline. You see there may be times
where your footage is very long and when you drag
it into your timeline, it takes up a lot of space
and you have to keep scrolling in and out
to see various points. So that's what The
Source Monitor is for. It allows you to grab
certain parts of your footage and insert them
directly into your timeline. So here at the bottom, I can scrub through my Footage, just like with the
playhead on The Timeline. And I can choose to either
insert only the video part into my timeline or only the
audio part into my timeline. I can also just click on the Footage and
insert everything, the video and the audio. Now whatever I want to only include this part
into my timeline, what I can do is
click on my keyboard, which will set an endpoint. And then I can scrub along
and click on my keyboard, which will set an out point. This basically tells
Premiere that I care about this specific
part of my Footage. Now, if I click on the
thumbnail and drag it down, you'll notice that the
clip is a lot shorter and it's because I only
picked up this part. Now you can move your in
and out points like so, or adjust the ends of
it to make your clip shorter or longer to
clear in and out points. You can right-click and
choose clear in and out. Or you can press Option X and it'll clear
the in and out points. Now what's cool is
that you can use in and out points in
your timeline as well. So if I press I and then oh, here, you'll notice that it's selected this part
of my Footage. Why would I want to do
that on the timeline? Well, for example,
if I have a bunch of separate videos in one
Timeline, for example, lessons for a course, I can select only a specific
part that I want to export. I'll show you how to
export footage later on. But now just know that if
I selected only this part, then only this part
will be exported. What it's also useful for
is rendering Effects. So whenever you apply a complex
effect to your footage, maybe add some Keyframes
or something else. It becomes complicated
for Premiere to play back that
Footage nicely. This depends on how
powerful your computer is, but if you add a lot of
Effects and color correction, almost any computer
will start to struggle. So if you want to preview the final version
of your footage, which you can do is set
an end and an outpoint, then go over to Sequence and
choose render in and out. Now Premiere will render
out only this part of the Footage and it to let
you play back smoothly. Now this yellow
line at the top of your sequence basically means that the Footage
hasn't been rendered, but Premiere doesn't have a lot of trouble playing it back. But if you have a red line, it means that Premiere
is struggling. It's probably not going
to playback smoothly. So what I can do now is
hold Shift and then move my playhead to the
very beginning of this clip so it snaps in. I can hit I on my keyboard, then hold Shift again
and move it here, click on my keyboard, go to Sequence,
render in and out. Once Premiere renders it out, you'll notice that it
plays back smoothly. So these are the main
places where you'd want to use in and out points. Now when I edit my footage, I very rarely Use
The Source Monitor. I usually work with short
clips and drag them directly into the Timeline
and resize them there. Or I trim clips with the default preview
tool on Mac beforehand. It's a very great feature
that macro has has, And you basically press
Spacebar to preview a file. Then click here, and you'll be able to trim either
the beginning of a clip or the end
of the clip that you'll know you will
not use in your video. The reason I do this is that some stock footage just
takes up a bunch of space. And if I know that
I will not use it, I'd rather just
save the space on my computer so I
don't have to keep buying hard drives to fit all the previous footage
for videos that I've made
20. Using Nested Sequences: One of the coolest things in Premiere Pro or
Nested Sequences. If I select a clip
or multiple clips, I can right-click
and select Next, this will create a
Nested Sequence. Now I can choose a name for it, but I usually just keep a default name that
Premiere gives me. If I click. Okay, you'll notice that
in the project Monitor, a New Nested Sequence appeared. If I double-click on it, it will open a new
sequence like this. So this is my normal sequence, and this is a Nested Sequence. You'll notice that
the footage inside of my normal sequence became green. And the Nested
Sequence is basically a container that can hold
multiple Clips of Footage. So if I go to my
Nested Sequence, you can see all the
clips that I have here. But why would this be useful? For example, if I
wanted to zoom out on the turtle clip and also on
the text at the same time, I would have to go
into the turtle clip, then go to Effect Controls, then set up the
Zoom that I want. And then I would have to do the exact same
thing for the text. And it would be very hard to get the Zoom amount exactly right. So what I can do
instead is go back to my normal sequence and
set up the Zoom here, which will zoom out everything that's inside of my
Nested Sequence. So everything together. So a Nested Sequence
is just a great way to apply effects to multiple
Clips at the same time, which otherwise would
be so annoying to do. Of course, if I wanted to zoom out only on the turtle clip, I can just go into my
Nested Sequence and zoom out the turtle clip
separately from the text. Now if I go to my footage, you'll notice that now
only the turtle Clips slowly zooms out and the
text stays in place. So essentially, Effects
that you apply to a Nested Sequence will apply to everything that's inside
of the Nested Sequence. And the fact that you
apply to separate Clips will only apply
to those Clips. And you can re-size the Nested Sequence
however you want and fiddle with it just
like you would with a normal clip
of any Footage. So you can add any
transition Effect, Set Keyframes and do
anything that you want. Now if you delete
a Nested Sequence inside of your timeline, you can go back to the project Monitor and simply
drag it back in, which we'll drag all
these separate clips that are inside
of that sequence. However, if you delete this Nested Sequence From
the project Monitor, it will delete everything, so you will not be able
to drag it back in. You would have to select
all the clips, right-click, and choose nest to setup
a New Nested Sequence. And as you can see inside of it, live all three of my Clips. So by using Nested Sequence, you can easily
apply an effect to multiple Clips of Footage
at the same time.
21. Cropping Clips: When you select a clip
inside of Effect Controls, you can do many
things like move it around or scale it in or out. However, one thing that you can do by default is
Crop your footage. So for example,
what if I wanted to show only half of
this lake here? Well, I can go into my Effects
panel and search for Crop. Then I can drag this effect onto the
footage in my timeline. If I go back to Effect Controls, you'll notice that
Crop has appeared. I want to crop the left side, so I'll drag the left slider and you'll see that
it crops my footage. However, this is
very inefficient if you're constantly cropping
a bunch of clips, which you can do instead
is click on the word Crop and you'll notice these handles appear
on my Footage. Now if I click and
drag on the handle, it will crop in automatically. So this is a great way of cropping your
footage efficiently.
22. Adding & Customizing Text: Inside of Premiere,
you can click T to bring out the Text tool. And if you click on
The Program Monitor, you'll be able to type
any text that I want. So I'll say Text. However, this text is blank. It doesn't have a
shadow and outline. So To Add those things
and modify your text, we're going to use the
essential graphics panel. We've added it before here on the right side
of our Premiere, and here it is at the top left. Now if you don't see this panel, you can go to Window Essential
Graphics and it'll appear, Of course you can please the panel anywhere
that you want. I prefer to have it on the
right side of my screen. Now to edit your texts, you'll have to double-click
inside of it so that it highlights like so if you
click only once on your Text, it'll bring out the motion Controls and you'll
not be able to change things like the font size or add any fancy effects
to your text. Make sure you
double-click inside of it so the text is
highlighted in red. Now here inside of the
essential graphics, I can select my text, which is selected
by default if you only have one piece of
text on the screen. And if I scroll down, you'll notice that I can change various things about my text. This is the font size. What I like to add onto my text is either a stroke or a shadow. A stroke is basically
a thin outline on the outside of your
texts so that it stands out better right
now the color is white, so I'll set it to
black and click. Okay, I'll place
the text on top of my Footage so you can see
the changes that are making. Now I'll double-click inside of the text again to
be able to edit it. And if I scroll down, I'll be able to increase
the thickness of my stroke. Now you'll notice the Text stands out from the background. What I can also do is add a shadow here inside
of the shadow box. I'll select the shadow
to be black and set its opacity to 100% so it's
fully visible down here. I'll increase how
big the shadow is. And here I'll increase
the spread of the shadow. You'll see that if I drag
it over to the very end, the whole background of
the screen becomes black. You'll have to fiddle with
these settings yourself to find a text style
that fits you best. Now what I can do, just hold Option and duplicate this text. Or alternatively, I can add another piece of text
within this box of text. If I want to add more text, I usually just duplicate
these textboxes. Instead of adding
another piece of text inside of one
single textbox, it just makes things
a lot more simple, but nevertheless, I'll
show you how to do it. So over here, you can see Text. If I click Control C to copy
and Control V to paste, you'll notice that another
piece of texts appear. I can now move it elsewhere. And all of this text is
inside of this one text box. Instead of copying this text, what I can do is
select this box, then select my Text
tool and click anywhere on the screen and it will
add another piece of text. And if I type something, you'll notice that there's
a third piece of text here. But for me this is
quite complicated. And what I usually do is just hold Option, Duplicate the clip, then double-click
on the text and add another piece of
texts, say nature. Then I choose my move tool and move this text
wherever I want. That way, I have both of these
texts in separate boxes. And if I want to edit
them individually, I can just select the
textbox that I went to edit, double-click on the text and make the changes that I want. Of course, these texts Clips act just like normal
Clips of your footage. So you can also
animate them by adding various Keyframes and increasing their size or their position. I usually just pick and have one text style across
all of my YouTube videos so that I don't have to
fiddle with Text every single time that I want
to add it onto my Videos. It's a good idea to experiment
with a text style that you want and then pick and use it across all
of your videos. This means that you'll have consistent branding
and also save a lot of time since you
won't have to style your text every time that
you make a new video. So that's how you Add and
manipulate text in Premiere Pro
23. Mastering Adjustment Layers: One of the coolest
things that you can use in Premiere to improve your workflow is
Adjustment Layers to add an adjustment layer, click this icon right here, and select Adjustment layer. This is going to show
you settings that you have for your
current sequence. So usually you would just
click OK and you'll notice a new adjustment layer has
appeared in the project panel. Now I can click and
drag it to my Timeline. Now you'll see that
if I move over the Adjustment layer with my playhead, nothing
is happening. And that's because there's
nothing here because I haven't yet applied any effects
to the Adjustment Layer. So what the Adjustment
Layer can do is if you apply a bunch of effects
onto the Adjustment layer, they will all be applied to everything that's below
the Adjustment Layer. For example, if I add
a Gaussian blur onto the Adjustment Layer
and then increase the blurriness from zero
to something like 100. You'll notice that
the clip below the Adjustment
Layer became blurry even though I applied the effect to the
Adjustment layer itself. If we move over here
where there was Text, you'll notice that the
text is also blurry. So everything that's below the Adjustment layer has
inherited this effect. Now if I move here, you'll notice that
there's no more blur. This is very useful in
one specific situation. If you have Cut up your
footage like this, and then you want to apply a specific effect to every
single clip in this footage. What you would have to do
normally is go to Effects, apply a Gaussian blur, then tweak its parameters, then hit Command or Control C, select all the other Clips and hit Command Option V to bring up the Paste Attributes
panel and then deselect all of these and
only paste Gaussian blur. You'll see that now
everything is blurry. However, it would have
been a lot easier to just add an adjustment
layer and simply add the Gaussian blur effect onto the Adjustment Layer instead of fiddling with all these Clips. What's also great is
that if I decide that I don't want blur on
this clip anymore, I can simply cut the Adjustment Layer into two pieces and
delete the middle. And now this clip
is not blurred and everything that's covered by the Adjustment Layer is blurred. And this is how
Adjustment Layers can improve your workflow
in Premiere Pro
24. Color Mattes: In the project window, if you click this button, you can add more useful things. In particular are Color Mattes. A color matte is basically
just a solid color. If I click Okay to apply the sequence settings
to my color Mattes, you'll notice that a color
picker pops up here. I can choose a color. For example, let's
pick this coral red. And if I click Okay and choose the name of
my color Mattes, it'll appear in
the project panel. Now if I drag it
to the timeline, you'll see that the color
matte is just a plain color. For instance, if I wanted
to re-size this clip, I wanted the background
not to be black. I can move all of
my Clips up and then place a color
matte underneath. And so I'll get this
background color. Now if I remove the Adjustment
Layer that adds a blur, you'll see that the background
is no longer black. What you can also do
with color Mattes is insert transitions inside
of my project panel. I will add one more color matte, and this time I'll
make it full white. I will drag it to my
timeline and then duplicate the bottom
color mat on top of it. Now, I will add some Keyframes in the Effects Controls panel. I'll select the clock next to the motion to start
adding keyframes. I'll move the first keyframe
to the very beginning and then move this color
Mattes down, like so. I will right-click on
the last keyframe, go to temporal interpolation
and choose ease in, and they'll choose Ease Out
for the first keyframe. Now you'll notice
when I play it back, it's transitions
to a wide color, but the transition is slow. So I'll move this keyframe
closer to the first one. Now the transition
is a lot faster. What I can do now is
copy these keyframes, come up to the white color
matte and paste them here. Then I'll adjust its
size so that it starts after the first Color Matte
has already started moving. We'll do the same for the
last Color Matte as well. And now this is what we have. However, the transition starts
abruptly with this color. So what I want to do is
extend this clip here, then grab the first
keyframe and move the color Mattes out of the
screen so it's not visible. And after tweaking
a few Keyframes, this is how the
transition looks. Now, I can simply
cut off the end here because there's nothing
visible on the screen. So now if I have to
Clips of my footage, for example, one clip of a
turtle and one clip of a lake. So and then if I place
my color Mattes like so, I'll get a nice
smooth transition between two of these Clips. Now this is quite large. So what I can do is select, right-click and choose
nest and click. Okay, now the transition becomes the single
clip that I can Duplicate around and move to another place where
I want to apply it. What I can also do
is come back to my project window and
switch these colors around, for example, into
a dark blue and then into this coral
color in the middle. And you'll notice that
my transition updates. Now when it plays,
one of the color is blue and the
other one is that coral red color
Mattes are not only useful for adding a solid color
background to your Clips, but also for making
interesting transitions
25. Using Ripple Delete To Edit Faster: Ripple Delete. It's a very useful trick
for Editing a lot faster. So let's see, I have this clip here and I don't
really like this part. I want to cut it out
from the middle. What I could do is bring
up the Cut tool or the razor tool by hitting
C on my keyboard. Then make a cut here, here, then switch back to my move tool by hitting V on the keyboard, select the clip, delete it, select the space and
delete it again. Now, you could do this a lot
faster with Ripple Delete. All you need are two cuts
inside of your footage. And if I hit option Delete or
Control Delete on Windows, this clip will be deleted
and everything else on the right side of the Timeline
will be moved to the left. This is very useful
because it's going to save you a lot of
time when editing. So again, if I want to get
rid of this part of the clip, I will come here, hit my keyboard
shortcut for Add, Edit. And for me the keyboard
shortcut for that is S. By default, it's
Command or Control K. But I've showed you how to
change it to the ascii before. So now if I press S, it's going to split
these two clips here. And then if I press S again, it's going to split here. Now I just have to have this
clip selected and press Command Backspace or Control
Backspace on Windows. And it'll delete that
middle clip and move everything that was on
the right to the left. Now, Control or
Command backspace is on a different end of the keyboard and you'll
probably have to remove your hand from your mouse to
hit this keyboard shortcut. That's why I've set up a custom keyboard shortcut
for Ripple Delete. The keyboard shortcut that I
like to use is the letter X. If you want to do the same, just search for Ripple, Delete, and simply pick it up
and the drag it to the ax. If you want to add
it to another key, you can just drag it on top of that key and you'll
see that now, if I press F 11, it's going to Ripple Delete, but I'll just keep mine to
the X using Ripple Delete is a very fast way of
trimming clips without having to constantly switch
between these tools. It's going to save
you a lot of time.
26. The Q And W Keys: There are two more keyboard
shortcuts that can save you a lot of time
when editing a video. These are called ripple trim, previous edit to play
head, and ripple trim. Next edit to play head. I've set them to my Q and
W Keys so you can search for ripple trim and then scroll
down, and here they are. So I've set ripple trim next, edit to play head
to my W key and ripple trim previous edit
to play head to my Q key. You can do the same by
simply picking up this text and dragging it on the letter that you want to assign it to. I'm going to click
Okay and show you what these keyboard shortcuts can do to better illustrate
what's happening, I'm going to add
a few markers on this clip by clicking
M on my keyboard. Markers are basically used to mark specific
points of eclipse. So you remember where they are. So now, if I come to the beginning of these
markers and hit Q, you'll notice that the beginning
of the clip disappeared and the rest of the clip
moved back into its place. Now if I come to the end
of this clip and hit W, you'll notice that it
just cut off at the end. So that's what Q
and W Keys can do. Let me add some more
footage to The Timeline, and I'll add a few
more markers here just so it's easier to
understand what's happening. And so if I move
over here and hit Q, you'll see that what was on
the left of my playhead got removed and the rest of the
clip got moved into place. Now if I want to remove
the end of this clip, I'm going to hit W and it'll just trim the
end of the clip and move everything that was on the right to the left
in the beginning, Q and W Keys are going to be a little hard
to get used to. But once you do,
you're going to be able to edit a lot faster
27. How I Use The Q And W Keys To Edit Fast: Here I have some footage from previous lessons of this course that I haven't yet edited. And I'll show you
how I Use the Q and W Keys To Cut up the
Footage a lot faster, you'll be able to
see the keys that I'm pressing here on the left. So I edit my Clips based
on the audio waveform, as you can see here, is where I start my sentence. So I'm going to hit Q, and this is where the
clip we'll begin. Then I'm going to hit S here
because let's say this is a word that I don't want and
then move here and hit Q. So it will delete
that word and move everything from the
right to the left. Here, I have a space, so I'll hit S and then Q as Q, S, Q as Q. I'll notice that these
sentences are both the same, so I'm going to hit Q to
remove the second one, or I can remove the
first one by Ripple deleting For me the keyboard
shortcut for that is X. So I'm going to Ripple, Delete that split here, Q, split Q and move
along like so. Let's say that I want to keep this section and then
remove this section. I'm going to split here. Then come here and hit Q. It removed everything and
move this clip to the left. If I wanted to do this manually, I would have to hit C, Cut here, click V to bring
up the Move tool. Select this clip, Delete, select the space, Delete. That's a lot slower, whereas with keyboard
shortcuts is just so much faster To Cut
up your Clips like so, remove silences or sentences
that you don't want. So that's the power of
using Ripple Delete, and the Q and W Keys
28. How I Set Up Keyboard Shortcuts: Now when setting up your
keyboard shortcuts, It's important to have them on the left side of your keyboard
that it's easy to reach with your left hand because you don't want to be
removing your hand from your mouse and then
clicking a key on the keyboard and then
coming back to your mouth, it's going to waste
a lot of time. That's why the keyboard
shortcuts that I use most often are on the left
side of the keyboard. I can simply use one hand
to perform these Shortcuts, and I don't have to lift
up my other hand from the mouse and place it on the keyboard to
perform the Shortcuts. That also saves me time over
long periods of Editing. Of course, if you run
out of space here, you can simply add
a modifier key, like command or shift, or Command and Shift and
then set a shortcut here. So for example, I don't have a keyboard shortcut
with Command Shift X, and instead of setting
it to the minus key, it's a lot better to set it to Command Shift X
because I'll be able to perform this
keyboard shortcut without moving my
hand over here. Well, assuming that your hand naturally rests on this
area of the keyboard. So that's one thing to keep in mind when creating
Keyboard Shortcuts.
29. All My Premiere Pro Keyboard Shortucts: So here are all of my keyboard
shortcuts for Premiere, I'll show you the
most interesting ones that saved me the
most amount of time. I've talked about a few
of these previously, but I'll go over them again just to have everything
in one place. So first I have
set S to add edit. What it does is if I hover over the clip with my
playhead and hit S, it's going to split
the Clips right here. I have the queue set to ripple trim previous
edit to play head, which as we've seen before, this where it removes the first half of
this clip and then moves all the other Clips to where the beginning
of that clip was. I have W set to ripple trim. Next edit to play head, which does the exact same
just to the end of the clip. So if I call it W, This
part is going to get deleted and this clip is
going to move in its place. Then I've set D to
enable the clip. What it does is it basically disables or enables the clip. When I clip is disabled, you can't hear it or see it. So it's the same as
pressing this eyeball here. So my D key just simply
hides or shows the clip. Next, let's move over
to the Shift key. The first one is shifted Z, and I have it set to
open the project window. So to find it, you're going
to search for projects. And under application,
you'll find projects right here
under workspaces. By default, it's shift one, but I've said it to shift Z. Basically what it does
is it lets me get to the Project panel no matter which other panel I have opened. So if I have the Effects panel, I can click Shift Z and it will jump to
the Project panel. Next, shift X is the
Effect Controls panel. So no matter which panel I'm at, I can press Shift X and it'll jump to Effect
Controls panel. And the final panel is Shift C, which jumps to the
Effects panel. So no matter where,
if I click Shift C, it's going to open
the Effects panel. I switch between
these three panels constantly and having
a keyboard shortcut to do that for me, instead of having
to go here with my mouse is a lot faster. By the way, the keyboard
shortcuts to get to the Keyboard Shortcuts
is option command K. So that's pretty much all
that I use the Shift key for. Another useful
shortcut is Option X, which clears in and out points. So if I've set an
in and out point, instead of having to right-click and choose
clear In and Out, I simply hit Option X and it
clears the in and out point. Of course, there are many
frequent shortcuts that I Use with the command key
command Z to undo, Command X to cut, Command C to copy and
Command V to paste. Also Command S to save. One more very useful keyboard
shortcut is this over here. It's the tilde key on keyboards that have a US style layout, this key is right here, but if you're from Europe, you're going to find it
next to the Shift key. This is the key
I'm talking about. It's the squiggly line. So when you press
the squiggly line, it will maximize whichever
window you have selected. So if I select The
Program Monitor by clicking on it and press
the squiggly line, It's going to maximize it
than if I press it again, is going to minimize it. I can do the same
for the timeline, for the Effects panel,
for Essential Graphics. Anything else within
Premiere, even the toolbar. This is very useful when
you want to manipulate something inside of the Program
Monitor or your timeline. Because right now The
Program Monitor is small. So if I hit T on my keyboard
to bring up the Text tool, and then I type something here. It'll be quite hard to edit this text because
it's very small. So what I can do is hit the Tilde key and it
becomes a lot larger. Now, I can move it precisely, exactly where I want. Maximizing is also useful for creating masks
with the pen tool, but more about that later, I also frequently used the G key to adjust
the gain of audio. So if I select an audio track by holding Option
and clicking here, because these two clips are
linked and if I press G, it's going to let me adjust
the gain of my audio. So if I say minus ten, it's going to lower my
Audio Levels by 10 db to more amazing keyboard
shortcuts that I've set or on the comma
and the period key. Whenever I highlight the
keyframe and press comma, it will set its temporal
interpolation into ease out. And whenever I highlight the
keyframe and press period, it will set it to ease in. So it's a lot faster
than right-clicking, going to temporal interpolation and then sending it
manually like so, here's how to set it up. So just search for
keyframe temporal. And you should see both
of these options here. Set your period key to and
the comma key to ease out. Now whenever you have to, Keyframes just come to the first one and click
the comma key, which is on the left, just like the keyframe. So it's easy to remember
and then come to the last one and press period, which is on the right
side of your keyboard. So it's easy to remember. There's one incredibly
useful keyboard shortcut in Premiere Pro and it has to
do with selecting a clip. So normally if you have a
clip and then something else above that clip and you double-click inside of
your Program Monitor, you'll notice that it
selects whatever is on top. So in this case, it selected
the Adjustment Layer and it's letting me move the Adjustment Layer
instead of the clip What I have to do is click on
the clip and then click on the motion attribute inside
of the Effect Controls panel. And only then will I be able
to move the clip itself. So what I can do is set a
keyboard shortcuts for that. And I've set it to command
T, because in Photoshop, if you have something
on the layer, you can simply hit Command T and control the
position of that thing. So that's why I've said the
same shortcut for Premiere. Now you'll see that if I have my command key highlighted
and click on the TI, it will show me the shortcut, which is activated direct manipulation
in Program Monitor. So you can search for that, activate direct. There it is. And then simply drag this keyboard shortcut
onto the letter T. It will apply it
automatically. I'll click. Okay, and now whenever
I click on the clip, I no longer have to go to my Effects Controls
panel and click motion. What I can do instead is
simply click on it and press Command T on my keyboard
and I can move the clip. You'll see that now I'm not
moving the Adjustment Layer, but the clip underneath this keyboard shortcut makes
it so much faster to adjust Clips inside of the
Program Monitor without having to do it
with the motion attributes, especially useful
for YouTube videos because you usually
have to adjust a lot of things like texts and other elements that pop
up during the video. So I would highly
recommend using it. Also, I Use N to nest my clip. I believe this is not a
default keyboard shortcut, but I usually nest
Clips very frequently. So I've set up my N key to
Nesta clip instead of having to right-click and
then search for Nest. Next are the J, K, and L Keys. These are not custom, but they're very useful. They're basically
just like pause, play, and rewind buttons. So the J key will start
playing backwards. The KCI will stop the playback, and the L key will
start playing normally. Now this might not
seem so useful, but if you press J or L twice, it's going to double
the playback speed. So if I'm looking
through my footage, I don't have to do it at one speed because
it's just very slow. What I can do is hit L
and then hit L again, and it's going to start
playing a lot faster. If I hit L one more time, it's going to start
playing even faster. I think if you hit L twice, it's going to play Add to speed. And if you hit L1 more time, I think it's five X or even ten. I'm not sure, but
it's very fast. So you can quickly playback your footage by
using the L key than stop with the KCI and rewind
a little bit with the J key. If you've missed something, these three Keys are very
useful for previewing your finished video or just looking for errors
in your footage. Of course, the minus
key and the plus key or the equals key is zoom in
and out of your timeline, which is pretty useful. Or you can use Option or Alt on Windows and scroll
with your mouse. Let's move over to the
Command and Option key. So they're really only two shortcuts that are
used for this, and it's Option Command
C and option command V. What they can do is if I have an effect applied to
the clip, for example, Gaussian Blur, I can
hit Command C and then come to another clip
and hit Command Option V. And it's going to bring up
the Paste Attributes panel, which lets me paste
attributes or Effects from this
clip to another clip. If I click, Okay, Gaussian blur will be applied
to this clip as well. These are the main keyboard
shortcuts that I Use. There are many more, but
you'll learn them along the way if you feel like
they're useful to you
30. Editing Horizontally: When you're editing
your footage, It's a lot faster to do it Horizontally and
did not vertically. So instead of only working
on this beginning part, cutting it up exactly as I want, then adding effects than
adding something else on top, then adding something else, maybe a transition here. It's a lot faster to
work Horizontally. Instead of finishing everything
with this first clip, what I will do is just
move along and Cut up everything right here until I reach the very end
of my footage. Then during the second pass, I will add zoom ins or blur things that I don't
want people to see. During the third pass, I will add animations. During the fourth pass, I will add sound effects
and doing the final path, I will add music. It's a lot easier to edit Horizontally and not vertically. Because when you
edit vertically, you're going to
spend so much time perfecting this one clip. And then if you move to another clip and add a
bunch of stuff here, you won't have so much energy
to do it all over again. Your video, we'll just have gradually less cool
things And Effects. So for example, the
first thing that I do is Cut up my
footage like this. So there's no ohms us
and breaths in between. And then I will go over it again and add zoom ins and animations. Then I will do the third
pass across all of the Footage and add
transitions and so on. With each new task, I will come back to my Footage
and go through it all. Again, working on that
one specific thing, it's going to make your
edit a lot faster rather than just piling everything on top from the very beginning. Here's an example from
one of my YouTube videos. In the beginning here I have a bunch of stuff and
things going on, but I didn't start
off like this. The first thing I did was layout all of these
Clips at the bottom. These were my main footage. Then I moved on to the second layer and
added more things. And finally, I added
nice touches on top, like this animation here. Next, I moved over
to sound effects and added all of these
sound effects here. And finally, I added the
music as the very last thing, this let me work
horizontally, not vertically, which means that I saved a
lot of time and also didn't spend too much time on one
specific area of the video.
31. My Editing Workflow: This is how Premiere Pro looks when I edit one of
my YouTube videos, you'll see that there
are three videos in this Premiere Project, my music video, and then
a Sequences folder. In the Sequences folder, I just keep all the Sequences
because if I want to come back to one of my
videos from awhile ago, I'll just be able to find the Sequences that
I want instantly. Now this is the
progress of the video. It says done, but when
I'm still in the progress of editing the video,
it says unfinished. When I finished editing it, I'll just rename it to done. This is the number of the
video and that's the title. What I usually do is edit five videos inside of
one Premiere Project. If I start to do
any more than five, it just gets very messy. So for now, I've done
three in this project. Inside of one of these
folders is the video. There's the B-roll and
there's the audio. Now How are usually go
about this is record all the B-roll in the
beginning and then Create a New Sequence
From the clip. Like so, this is just a shot
of me closing my hands. Now the next thing
that I will do is find my Audio and then drag
it into the timeline. I usually edit
audio in Audacity, so I don't have to do
it in Premiere Pro. It's just part of my workflow. But if I don't edit it before, I'll just go in Premiere. And the first thing that
I'll do is Cut up my audio. Next, I will lock the audio track and start
importing my B-roll. You'll see here that
I didn't really named my B-roll
in correct order. So now I can't really remember
what goes after what, but usually I do. It's a good idea to rename
your Clips like so. If this clip was the first
one, I would name it 1.1, then one point to and when
I come into Premiere, I'll know exactly which
Clips is going first. But for now, let's pretend that these clips are all in order. So dialed in goes first.in
the X goes second, then drag and drop and so on. What I'll do is drag the
first clip into the timeline, then play it, listen to the audio and see
where it lines up. I will then cut it up accordingly and drag
in the second clip, I'll go through this process
for the whole Timeline. So I'll just lay out
my a roll like so. You'll see that here. This is the part
where the arrow is. Then after I have everything
laid out like so, I'll move over to
the second step, which is filling in the
gaps if there are any gaps. So sometimes there
may be gaps because I didn't have anything
recorded for this section, which means that
they'll usually get footage from the Internet,
like stock footage, gifts, photos and stuff, or I'll just make
something in Photoshop. So the second step is
to fill all the gaps. And you'll see
that in this video all the gaps are filled. Then I'll move over
to the third step, which is adding nice
things, for example, Text. And I will not worry about anything else as
I'm adding taxed. The same goes for any
part of this process. If I'm cutting up
my a roll Clips in the beginning and I know that there's going to be Text here. What I can do is simply cut it up a part of my footage where the text is going
to be and then go to label and choose
a different color. That way, I'll know
that they're supposed to be something above this clip. If I forget that there were
supposed to be Text here, that means it probably
wasn't so important. So even though I know that I
should put something here, I will not do it when I'm
going through my first pass. I'll only add those things later when the time comes next. I'll move over to the
intro and make it extra fancy because that's
important for YouTube videos. Then I will add a bunch
of sound effects, and finally, I will add music. Finally, I will watch
the final video and improve things or add something
that I feel is missing. This is pretty much my
whole editing process. Some videos that I
do look like this and others looked like
this be in this example, there are a few things
that I show on the screen, namely the shot of my MacBook and the
screen of my MacBook. So I'll have three
main layers here. This at the bottom are just
these dots in the background. So the first layer is
my full screen footage. Then the second layer is this
picture in picture thing, and the third layer is
my screen recording. I'm disabling and
enabling them with the keyboard shortcut that I showed you previously,
which is D, It's very useful in these
situations when I went to toggle between different
cameras or views. And this is how a simple 10-minute YouTube
video will look like
32. Importing Third Party Footage Fast: One of the things that will
slow you down a lot while editing a video is importing
Third Party Footage. So if you have those gaps in your timeline that
I mentioned before, you're probably going to
want to find Footage to download and import to Premiere
Pro from the Internet. Now this process is pretty
slow because if you want to download an
image or a stock video, by the way, pixels is a great website for finding
free stock footage. And if you're looking
for something nicer, I think Envato Elements
has a great subscription. So stock videos,
photos, templates, sound effects, and music
all in one subscription. So it's pretty good for finding footage for YouTube videos. So as I've said before, every single video for me, it looks something like this. I have the state of the
video, so unfinished. Then I will have number of
the video, let's say 69. And then the name of
the Video, Video, one inside of this folder, I'll have two more folders. One will be called B-roll, which will hold all
My video clips. And the other one
will be called audio. That's because I usually record audio separately from
my Video Footage. So how do you make this
importing thing superfast? Well, whenever I download
the clip onto my desktop, I immediately move it to B-Roll, and then from B-roll, I drag it into My
Premiere B-roll. What I usually do
is double-click on my B-roll folder and it'll
pop up as a separate panel. So I know that here I will
find every single clip that I need for my project
and then I'll simply drag it
onto the timeline. If I see that I need
another clip again, I'll go to my stock
photo website, whichever one it is for you, and then search for that clip. So for example, Keyboard, I'll download this shot of the Keyboard now
landed on my desktop, so I'll quickly hide my browser. You can do that on Mac
with Command H. Then I'll switch to my Finder
or File Explorer, go to my desktop and move it
to B-roll than from B-Roll into My Premiere Pro and then it can go
onto the timeline. I found that having folders open like this in new
tabs rather than separate instances is
a lot faster because you can simply drag files
from one place to another. If you have them separate
like this on Mac, you can go to Window and
merge all windows and it will place them inside
of one window as tabs. And I can quickly switch
between Premiere, my Finder, and my browser by using
Command Tab on my keyboard. If I keep holding command
and then press Tab, it will just move from
one app to the other. When I released the
tab and Command key, it will jump to that app. So this is a very quick way of switching between
applications. And it's especially useful when you're downloading
footage from the internet that you want to import into your
Premiere project. It also works the
same on Windows and the keyboard shortcut for
that is Controls tab. So that's my process
of downloading and quickly importing
Clips into Premier Pro
33. Creating presets: A thing that can
save you hours of time of editing in
premiere or presets, and you can make them yourself. So for example, if I insert a new text layer and type
some text over here, you'll notice that
the text is default. Now I've customized my text. If I click the T key to bring up the type tool and add
another text over here, you'll notice that it
has the same features as my customized text. However, if I quit Premier even if I save it
and then if I open it again, you'll notice that if I add
another text layer here, the text is now back to default, which is very frustrating. I will now have to remember
everything that I did to this text to make it
look the same as this one, or I could just
copy previous text, but this is not possible if
you open another project. What you can do is
create a preset. If I select this text and go
to my Effect Controls panel, my keyboard shortcut
for that is Shift X, or you could just click on
Effects Controls over here, and here is where I have
my text effect right here. I can expand them with
this little arrow over here and then edit
my text in here as well. You don't have to only do it through the essential
graphics panel. It also is possible through here, through
effect controls. Right now, I want to
save this as a preset. So I'm going to right click on the text here and
choose Save Preset. Now, the first thing is
the name of your preset. I'm just going to
leave it like this. The second parameter
is the type. This is not important if your preset doesn't
have any keyframes. However, if it does
have keyframes, then this setting
is very important. Tell you the difference
between these a little later. I can also add a
description to my preset, but I'm going to choose to
leave it blank right now. If I click Okay and go
to my effects panel, you'll notice that
under presets, my new text preset has appeared. Now if I restart my premiere pro and then
open it back up again, you'll notice that in
the presets folder, the text preset is still here. Now if I add a text
layer that is blank, I can drag my preset onto this blank text and it'll
add my previous text. I simply have to highlight and delete this
placeholder text, and then I have my
nice text leftover. You can create presets with any effect controls,
not only text, so I can create a preset with
opacity, rotation, scale, position, anything, and I can also create presets
that are animated. For example, let's
say that I want to create a nice pop up
animation for my text. I'll insert a keyframe
here and here. This keyframe is where my
text is going to land, and the first keyframe is
where it's going to come from. Then I'll set this
keyframe to have an ease in interpolation and
this one toes out. You'll see that when
I play it back, the text comes up into the
middle of my program monitor. So now, instead of having to create these
keyframes each time, I can save it as a preset. I can click here
on vector motion. You'll notice that it
doesn't let me save a preset if I right
click only on position. So you have to click on
the group of effects, not the effect itself. So I'll right click on vector motion and
click Save Preset. I'll name my preset
move up animation, and here's where the
type is important. Let's see what happens
if I choose scale. I'll duplicate another
text make it longer, and then I'll go to effects and apply my move up animation. You'll notice that now the text moves up very, very slowly. That's because look at the
gap between these keyframes. When I apply the preset, it looked at the
overall length of this clip and then it proportionally applied
these keyframes. So if my clip is longer, the gap between
the keyframes also becomes longer and if
the clip is shorter, the gap also becomes shorter. But in this case, I don't want. Want my animation
to be the same. So I'm going to remove these keyframes and then
create another preset. Remember, right click
on vector motion, save preset, and
then I'm going to choose anchor to point. What that will do is no matter
the length of your clip, it will anchor the keyframes at the beginning of your clip. No matter how long or
short your clip is, those keyframes will always
start at the beginning of your clip distance between
them will be the same. So this is what I
want. The other option will anchor them
to the outpoint. So if you have a
fade out animation or something that you want to put at the end of your clip, you would choose the
anchor to outpoint, and the last keyframe will also be at the very
end of your clip. I'm going to click Okay, and
now if I find this preset, I didn't set the name for it, so it should be vector motion preset here and
apply it to my text, you'll notice that this text
layer this text layer have the same animation
because the keyframes have been anchored to the
very beginning of this clip. They didn't spread out based
on the length of this clip. Of course, you can create and apply presets to
anything that you want. It doesn't have to
be a text layer. It can also be an
image or video, a color mat, an adjustment
layer or anything else. If I want to animate this
clip, I'll come here, set a keyframe for motion, then move a little bit
and set another keyframe. Now I'll change the first
keyframe to be down here. And I'll set the
appropriate interpolation just so the transition
looks a lot smoother. I'll move them
closer together to make the transition
a little faster. Also, I'll animate the opacity
of the clip. So 0-100. I I play the clip,
you'll see that it fades in and moves
up at the same time. I can hold Command or Control on Windows and select
both motion and opacity, right click and
choose Save Preset. I'll name it opacity move up. I'm going to choose anchor
to Inpoint because I don't want it to adjust keyframes based on the length
of this clip. I want them to stick to
the beginning of the clip. I'll click Okay, and
if I add another clip, I can go into my effects and choose the opacity
move up preset, then drag it onto my clip. And if I play it back,
you'll notice that it moves up in the same way
that the turtle clip so this is how you can
work a lot faster in Premiere Pro by creating
and using your own preset.
34. Batching Videos Together: One of the best ways to speed up your video production process is to batch Videos Together. So instead of working on
only one video at a time, you could be working on
multiple videos at a time. This can save a
lot of time since you eliminate the setup process. For example, if each time that you want
to record a video, you set up your camera, you turn on the lights, remove the battery from
your ticking clock so the audio sounds better
and do a bunch of things. Then each time you
lose so much time, what you can do is set
up your camera once and then record five videos
at the same time, which means that you will eliminate four times
of the setup process. Another reason why this strategy works so well To save time is that you don't have to get into the mental state of
recording videos. If you batch the task, you only have to get into the mental space of doing
that task only once. However, if you work
on only one Video, then each time you have to do another task in the video
production process, it's going to cost you
some mental energy. For example, if I were to
do each video separately, then I would have to create
a new folder for each video, set up a New Premiere Project, import all the Footage and
late all out on the timeline. However, if I work
on five Videos, I can do all of this
at the same time. So I'll create one
project for five videos, then create five folders
for each of the Videos, and then import everything
at the same time. It's so much easier
both time-wise and your mental energy wise to just do it all at the same time. The same goes for editing. If you've recorded
four or five videos, what you can do is edit them all Horizontally
at the same time. For example, instead of
laying out the B-roll for this video and then
Effects on top of it, and then Sound Effects. What I'll do is lay out
the Bureau for this video, then go to another video and
do the same for this video. Then for the third video, until all five of
them are finished. Next, I'll move
over to Effects and do them across all five videos. This makes the editing process a lot faster because you don't have to multitask and switch your brain to
do different tasks. Once you get started
with one thing, it's a lot easier to keep going and doing that thing
instead of switching, I found that switching a task
is a lot harder than just continuing the same task that I have been doing with inertia. So batching Videos Together, Both in the editing process and in the production process. So scripting, Recording,
Voiceover recording, B-roll, and doing anything else. If you batch up these
tasks together, you're going to save
so much time and mental energy and your
output will be the same. It's very useful for YouTube in the beginning because
at the start, every one of us sucks at
making YouTube videos. You need to put in the work
and make a lot of them to get good at making videos and
learn the ropes of YouTube. So with batching, you can create more videos Faster and
thus learn faster. So batching Videos
Together to produce more videos in less time and
waste less mental energy
35. Creating Masks: Now I have two images
right here and I want this image to appear inside
of the screen of this phone. What I can do is mask out
the screen of this phone and then put this picture inside of that mask. Let's
learn how to do that. First, I'm going to
increase the scale of the phone so that it
fits the whole screen. And then here in the opacity, I can either choose the ellipse mask tool,
the rectangle tool. Pen tool. You'll also see both
of these tools over here. By the way, if you see
this little triangle on the bottom of some tools, that means that
there are some tools hidden below these tools. To access them, you
simply hold Option or Alt on Windows and
click on that tool. You'll see that it toggles
between the Ellipse tool, the polygon tool,
and the rectangle. There are some tools that have a few tools hidden beneath them. Like the text tool has a vertical text tool or the
hand tool has the Zoom tool. So since what I want to
mask out is a rectangle, I'm going to choose
the rectangle tool, and you'll see that it
immediately drew a rectangle. But I want to make this part invisible and this part visible. So what I'll do is click Invert it and it'll
invert the mask. You'll see that this
part is now black. Reason it's black is because there's nothing below
the phone layer. If I move the phone layer above the Rick layer and
move my playhead here, you'll see that a mask sort of punches a hole through my clip. So if you select
something with a mask, it's going to only show that
area that you masked out. And if you select something
and invert that mask, it's going to punch out that
area, make it invisible. And now I can make this
panel bigger by pressing the Tilda key on my keyboard and adjust
this mask like so. I'll just grab the
end of the mask and place it where the
phone screen begins. Now, if I come back to my
move tool and click away, you'll notice that the edges of this mask are not really shar, and that's this
option over here. It's the mask feather. If I increase it, the edges of my mask become
more and more blurry, and now I can't really
make out what's going on. So I'll decrease mask
feather to zero, which means that the edges
of my mask are razor sharp. Also, I can adjust mask opacity, which will increase or
decrease its opacity. So if I hide the ric clip, you'll see that when
I adjust the opacity, everything becomes
more see through. That's why you're able to see the ric clip in the background. This doesn't really
fit into frame, so I can click on the Rick
image and then click on motion and simply drag
to adjust its position. I'll also make it
a little smaller. So now I've used a mask to punch out a hole
in the middle of this phone and then
placed a clip beneath it to fill that hole
with Rick Astley. You'll see that under opacity, a new mask appeared, and if I delete hole in
the middle disappeared. You can also create
an elliptical mask with the ellipse mask tool, and it's going to
create a circle. By the way, if you want to
make your circle perfect, just hold shift and drag, and it's going to be
a perfect circle. If I invert the circle, you'll see that Rick
is now inverted. This is very useful for
picture in picture if you want to place your webcam
on some part of the screen, and so if I adjust the
Rick notice that it now looks as though he is making the video and showing
something on the screen. You can create an
elliptical mask and then place your footage of you talking in here and you'll create this picture
in picture effect. Now, of course, these don't
have to be picture files, but they could also be videos. You can create masks not only for pictures
but for videos. For example, what if I wanted
to only see this turtle, but mask everything
out in the background? Well, I can come to my effect
controls and under opacity, select the pen tool. Now, the Pen tool will let
you create a mask for a complicated if it's not a
square or not a circle, you can use the pen tool to define exactly where your
mask is going to be. So I'll make this panel
larger with the Tilda key and then start outlining the
turtle with my pen tool. Now, if you've never
used Photoshop, using the pen tool might
be a little hard at first, but once you use
it enough times, you're going to get used to it. It took me quite a while until
I learned how to use it. So I'll just create a rough
mask around this turtle. I'm not going to do it super precisely because this
is just an example. And there we have it. We only have a turtle, but
there's no background. However, this is a video. So if I play the video, my mask will just stay in place and the turtle
will just swim away. So I would have to create a
keyframe for each frame of this video and then adjust my mask each time that
the turtle moves. However, this would
probably take me 10 hours because I would
have to move along here, then select the mask and
then make it large again and adjust each of these little
points to fit the turtle. So no one wants to do that. Luckily, Premiere has
an auto tracking tool that can do this for you. So if I select my turtle clip and go down here
where my mask is, I can create my first
mask path keyframe here. Mask Path basically means this
blue path around my mask. So the one that I created
with my pen tool. Now you'll see if I
move my playhead, the mask path stays in place, and I want it to move
with the turtle. What I can do now is
click this play icon, and Premiere Pro will try to do its best to track the turtle. So let's see how it performs. Depending on the
resolution of your clip, this process may take a while or it may just take
a few seconds. And boom, you'll see that Premiere Pro automatically
created a keyframe, every single frame
of my footage. So every single frame
has a new keyframe. Let's see if it did a great job if it actually
tracks the turtle. I'm going to click
here to remove the path so we can see
the turtle better. As you can see, it got the
base of the turtle correct, but it didn't really
get the arms, and it doesn't look very good. In this case, what I should do is delete all the keyframes on the right side and then start adjusting the ones
that it got wrong. So it seems like it
got everything wrong. So I'm going to delete these
keyframes and then come here and on the sec third
on the third keyframe, I'm going to click on it
and then adjust the mask. This will tell Premiere
what I want to move. Now I can come back to this
keyframe that I adjusted and click Play again and see if
Premiere does a better job. Of course, with complex
shapes like the turtle, it's probably not
going to get it right, but if you have something
that clearly stands out from the background like a human
or some sort of a ball, then Premiere Pro will
do a much better job. Already see that it didn't
really catch the hands, but that's okay because
this is just an example. You're probably not going to be removing turtles from
their backgrounds anyway. Here's a better example of
how you can use a mask. Here I have a clip of
someone walking across the street and I'm
going to place this Rick image at the bottom. I'm going to focus
on this person right here and mask
them out so that when they walk across
the image will disappear and the RC
image will appear. First things first, I'll
move to a place where this person starts walking and I'll start creating my mask. I'll pick the pent tool, then make this larger with the Tilda key and I'll mask
this part of the frame. Of course, I want to invert the frame so that
this part is black. Also, I'll reset
the parameters for my Rick clip so that it
fits the entire screen. Now, you see that
instead of black, the RC image has
started to appear. I'll come back to my clip
and select this clock here to toggle a keyframe
for my mask frame. That means that I can move one frame forward or
a few frames forward. And if I create a new keyframe, that one will still
stay in place. I'll select my mask and
then make this bigger and adjust the mask so that it
fits even more of the screen. I'll move a few
frames forward and then add another
keyframe then again, I'll move this mask so that
it covers everything that this person is revealing,
something like this. And essentially, I will
have to do this all the way until this person walks across the street
to the other side. So I'm just going to
go ahead and play with the keyframes and I'll
show you the final result. And this is how the
final result looks like. So this is how you can create and use masks in Premiere Pro.
36. The Transform Effect: I want to show you
the transform effect. You'll find it in
the effects panel by searching for transform. You'll see that I already
have a few presets with this, but we're looking for
transform under distort. If I pick it up and drag it
to my text, nothing happens, of course, because
we need to control this effect in the
effect controls. If I scroll down, you'll see
the transform attribute. And this transform effect
lets you transform your text, but it acts very similarly to
the vector motion controls. So you'll see that if I move my vector motion position left text moves left, and if I move my transform position left, the text also moves left.
So what's the difference? Well, there's one specific
setting that's very useful, and it's right here,
the shutter angle. It lets you add very
nice motion blur to the things that are
moving on the screen. So for example, if I set a few keyframes inside
of my vector motion, which doesn't have that setting, and I'll say that it will
start at the bottom, and then it will
end in the middle like, so I'll also make
these keyframes non linear. Remember, you can do
that by right clicking, choosing temporal interpolation
and choosing Ease out for the first keyframe and then choosing E's in for
the last keyframe. Now, the text will move in
nicely from the bottom. I'll decrease the
distance between these two keyframes
so it happens faster. The problem is that when
things move in real life, you usually can't see them very clearly. They look blurry. And if I play this right
now, it doesn't look blurry. It's just text moving
up on the screen. That's where I can use
the transform effect. I'll undo everything with Command Z or Control
Z on Windows, and then inside of
my transform effect, I'll create the same
position keyframes. So first, the turtle
text was at the bottom, then I'll move a little
right and then reset the keyframe so the text
teleports to the beginning. I'll also make them
non linear like so with the keyboard shortcuts
that I set previously. Now, when I play the clip, the exact same
thing happens as if I had set the vector
motion keyframe. However, if I scroll
down and change the shutter angle
to 180 degrees, now when my clip moves up, there's a motion blur. It's hard to see, so I'm
going to set this to the maximum and make
it a little shorter. So you'll see that the text is a little blurry when it
comes up on the screen. This would be a lot more
visible if I were to change my sequence settings
from 60 FPS to 30 FPS. You'll see that now the
blurriness is a lot more visible. Best setting to use for
this that our eyes see in the natural world
is 180 degrees. This will give you the
most realistic blurring that our eyes see
in the real world. So now if I play it,
this text is moving up, but it has a subtle blur effect. So by using the
transform effect, you can add a nice motion blur to the elements that are
moving on the screen. Of course, this works with
everything, not only text. So if I had a shape
here or a clip, I could apply the
transform effect, set my key frames, then increase the shutter
angle to 180 degrees, and that clip will have a nice motion blur
effect when it moves.
37. Color Correction & Color Grading: Premiere Pro has many advanced
tools to do color grading. What color grading
is is basically adjusting the colors of your
clip to fit a certain look. For example, a lot of movies have this teal and
orange look to them. So you'll notice that most of the elements in the background
have this teal color, and most of the elements in the foreground have
this orange color. This is because these are
complimentary colors. So if I open a color wheel, you'll see that orange
is opposite of blue. Tail. That means they're
complimentary colors. They complement each
other very nicely. They stand out for our eyes. There are many other
color combinations apart from the complimentary, which is basically colors on the opposite
side of each other. There's monochromatic,
which are different shades, tones, or tints of
the same base color. There's analogous, which are three colors next to each
other on the color wheel. There's triadic, which is
like a triangle on the color. All of these color
combinations make colors look very nice and
appealing to our eyes. One thing to mention is that there's usually a
lot of one color, and there's a little
bit of the other color. You'll see that
the dominant color in this clip is teal and there's only a little bit of orange in her hair
and in her skin. Usually one color is a
lot more dominant than so within Premiere Pro, you can do basic color
correction and then color grading inside of
the Lumetri color panel. Now here, if I select my clip, you'll notice that controls for various things like color, light, and other
adjustments pop up. And if I change
something, for example, the exposure, you'll see that my clip is
changing as well. Also, in the Effect
Controls panel, a new effect has appeared
called lumitry color. So you can either adjust these
effects right here inside of Effect Controls or by using
the Lumetri color panel. Of course, if I
delete this effect, clip will revert back to normal. There's a lot that goes into color grading and making
your footage look nice. But in this course, I'll
only touch the basics. So if I click Auto, Premiere Pro will
automatically adjust the clip. If I click this FX icon to hide all the effects,
you'll see the difference. So this was before
and this is after. And these are all the
adjustments that Premiere made. So if you want just a basic bare bones adjustment
to your clip, you can simply hit Auto and
Premiere Pro will analyze your clip and try to apply the best color correction
settings to your clip. Of course, if you don't like it, you can simply tweak
these yourself. I'm going to click this arrow to back to default. Now, down here, you'll see various
other controls like the creative control, which lets you color grade
your shadows and highlights. I I drag my shadows
over to the red color, you'll see that the dark parts of this image are becoming red, and if I drag my high life
color to something like green, you'll see that the bright
areas are becoming green. Now, since these
colors are blending together and red and
green make yellow, that's why this turtle
starts to look yellow. Again, I'll click this
arrow to reset everything. So this is how we can add
that teal and orange. Make the shadows sort of
teal just a little bit, and if I make the highlights
orange just a little bit, you'll see that
the clip changes. Now, it's very hard to see on this turtle example
because it's underwater. So I'm going to add another clip and apply a few
adjustments here. If I drag the highlight
color over to orange and if I drag
my shadow color over teal, you'll see that this
clip has slightly changed. So this is how you can apply just a very basic
look to your footage. If I collapse the
creative panel, you'll notice that
there are check boxes next to each panel. So instead of
resetting everything, I can simply deselect the check box and it'll
remove that adjustment. Now, the curves adjustment
works exactly the same, just like in Photoshop. So if you've used it before,
you'll know what it's about. But basically, the top
of the curve controls the highlights and the bottom of the curve controls
the shadows. So if I add a point
here and move it down, you'll see that all
the dark parts of the image are getting
darker. If I move it see that those parts
are getting brighter. If I do the same up here, you'll see that the
bright parts are getting brighter and now the bright
parts are getting darker. The most common curves
adjustment that makes your footage look nice and
contrast is the S curve. You want to add a point
here and then here, and then just slightly drag it down and this one
slightly drag it up. So it resembles an
S. This will add contrast to your footage and
make it pop a little more. I can do the same for
the turtle clip by simply clicking on my
footage, hitting Command C, copy and then command option
V to paste attributes, and I'll be able to paste
the lumitry color attribute. I'll click Okay, and now this curve has been
applied to the turtle. So this is before,
this is after. Before, after, you'll see that there's more contrast
in the clip. So here where it was blue, it's now a lot more blue, and these fish stand
out a little more. So you can use the S curve to add some contrast
to your image. Also, instead of having to
do this every single time, you can come to your
effect controls panel. Scroll down a little
bit until you see lumetri color
with only the curves applied because most
other adjustments will vary depending on the
clip that your color grading. You can right click on Lumetri color and
choose safe preset. Let's name it the S curve. Now if I remove my lumetri color
attribute from this clip, I can go into my effects, click on presets and drag
the S curve onto the clip. It automatically
applied the S curve to the turtle and
added more contrast. More important thing
is that you want these adjustments
to be very subtle. You don't want to drag
this all the way up, so it blows out the highlights, and you don't want to
drag this too much down, so it makes the
shadows super harsh. All the color adjustments
should be barely noticeable and slightly enhance the look of your image. Don't overdo it. One useful tip when you apply color grading to your
footage is to simply leave, go take a walk or
do something else, and then come back
to the footage and look at it with fresh eyes. If you notice
something's not right, you can then tweak it again. You're adjusting the
clip for the first time, it's hard to see
what you did wrong. So taking a break and coming back lets you see
things more clearly. Let's collapse the
curves adjustment and disable it and
move over to Vignette. Vignette lets you add those
dark corners to your footage. So if I drag the
amount to the left, you'll see that the corners of my footage become slightly dark, and if I move it
to the right, they become slightly white. I rarely use this effect, but it's useful to
know where to find it. So these were the basic
color adjustments that you can do in premiere.
38. How To Edit Picture In Picture Style Videos Fast: I want to show you a very
cool editing technique that involves the D
keyboard shortcut. I've set my D key to
enable or disable a clip. So if I click on a
clip and press D, it enables it, and if I press D once again, it disables it. When you disable a clip, you'll no longer
be able to see it, and if you disable
an audio clip, you'll no longer be able to it. This feature makes editing a picture and picture
style video like this where I have my
webcam or in this case, my hand cam and some
other footage over here. I set my clips in
three layers like so. This bottom one is just
a dotted background like that, so you can ignore it. What's important here
are these three layers. If I disable everything, you'll see that the
bottom layer is just my screen recording placed on the top
right of the screen. If I go into my effect controls, you'll see that I've adjusted my motion parameters so that this clip is placed
on the top right. Then above this clip, I have my picture in
picture style hand cam, and on top, if I enable this, you'll see that this is the
recording in full screen. So this makes it very
easy to edit my footage. I will start a video by laying out these
three layers like so and then highlighting the first layer and
disabling it entirely. Now, what I'll be left
with is the bottom layer, which is my screen
recording footage, and then the top layer
is this hand footage. And whenever I want to cut to
my hands during the video, I will simply highlight the top layer and click
D on my keyboard, and it will switch to
this camera angle. Makes it super easy and gives the illusion of
switched camera angles. And if I wanted to
do it manually, I would have to duplicate the bottom clip and then come to motion and reset attributes and also these rounded corners. So it would take me four steps to add this new camera angle. Whereas now I can just hover over the place where I
want to show my hands, click on the clip, and press D on my keyboard to
enable the clip. Or if I'm making a video that's primarily
my hand footage, instead of disabling this
first layer, I'll simply it. Now, wherever I scroll, I'll just see my hands. If I want to switch to the
picture and picture footage, I'll simply highlight
the clip and press D on my keyboard to go back to the
picture and picture mode. If you have a video in this
picture and picture style, this is a very fast way to
put it together in the edit.
39. White Glow Preset: I have a bunch of my own
presets within Premiere Pro, and I want to show
you what they do and also walk you through how
to create some of them. So the first preset that I have is called 1% white Shadow. And if I add it to this
MacBook image here, you'll notice that on the
outside of this image, there's a slight white outline. It's very hard to see
because I made this effect unnoticeable on purpose, but
if I increase the opacity, you'll see that a white outline appears outside of the image. It basically just adds a
subtle glow to the clip. It's also useful for text. So if I add some text here
and then go into my effects, drag on the 1% chado and make it a little
bit more visible, you'll see that the text
starts glowing a little bit. This is what this effect does. In order to create this effect, just search for a
drop shadow effect inside of your effect panel
and then add it to any clip. Then in the effect controls, scroll down and adjust the
shadow to your liking. So my preset has these
settings for the shadow. The shadow color is white. I keep the opacity very low, and then I increase it depending on what's
on my sequence. Direction is 135,
distance is five, and softness is 126. So that's the first preset.
40. The 3D Screenshot Preset: Moving over to the
basic three D effect, and this one is very useful. So for example, if I
record my Max screen right now and do something within Premiere
Pro, for example, just fiddle with my
mouse over here, and then I stop the recording, import it into Premiere Pro, and look what happens when I apply the basic three D preset. Footage turns into
this three D screen. So if I play it,
you can see that it looks three D
and it's moving. What this effect basically is is just a basic three D effect
with some keyframes. I'll show you how to set it up. In the effect panel, search for basic
three D and apply a basic three D effect under the perspective in video effect. I'll go to your effect
controls panel, and here you'll see the
basic three D panel. Let's see what happens
when I change the swivel. If I increase it, the
clip rotates to one side, and if I decrease it, it
rotates to the other side. Now, the tilt does the
same but vertically, and the distance to image is just basically the Zoom amount. So you can control it with
the scale attribute as well. So for this effect, I want my screen recording to
feel like it's moving, like the screen is being recorded with an
external camera. So for that, I'll use keyframes. First things first, I'll
decrease the swivel, so it's something
like this, and then decrease the tilt, so it
looks something like. Next, I'll click this
clock to toggle keyframes. I'll scroll to the top and add a scale keyframe and
a position keyframe. I'll zoom in a little bit so that the black edge
is not visible. And I'll move the position
slightly to the left. I'll move my playhead
over to the right side, then decrease the swivel, so the clip will rotate like so, and also decrease the tilt. So it's going to look
something like this. Now for the final position, I can decrease the
scale because the clip is not rotated too much
so I can zoom out, and then I'll
adjust the position so that it shows the
middle of the screen. Next, I'll select all the
keyframes and move them to the and select all the keyframes over here and move
them to the right. This is how it looks like now. The clip is moving and rotating, which gives it this
three D appearance. One more thing
that I like to add here is inside of
my project panel, I look for screen texture, which I always import
into every single one of my projects inside
of my music folder. I basically have
sound effects, music, and video effects and screen
textures are under video. I'll drag a screen
texture over this clip, which will add this
RGB sort of texture. Then inside of my effect panel, I'll select this clip, increase the size of it, so it covers the
whole screen and change the blend
mode to overlay. I'll just decrease the
opacity, so it's very subtle. Now, you'll see that
this footage does look like an external screen
that's being recorded. I have to do now is come
back to Effect Controls, right click on the basic three
D and choose safe preset. You can either choose scale, which means that the
keyframes will span across the whole of your clip
or anchor to in point, which is what I
did because I like to preserve the movement
that I created. Since if I select scale and
the keyframes are spread out, the movement will
be a lot slower. However, if you choose
anchor to Inpoint, you'll have to manually
adjust keyframes each time that you apply
them to a new clip. So that's the basic
three D effect.
41. Eye Shaped Blur Preset: Next preset that I have is
the eye shaped Goshen blur. If I add an adjustment
layer on top of my footage and then apply
this effect on top of it, so just drag it on, you'll notice that the sides
of my footage became blurry. The reason I did this on an
adjustment layer and not on the footage itself is because the footage
is zoomed in. So only one edge of
the blur would be visible because that end of
the screen is off the canvas. Now I can go into effect
controls and tweak the blur amount so that it's not super blurry.
Just a little bit. This effect helps direct
the viewers focus to the middle of the screen because the edges are a little blurry. I sometimes use it with
the basic three D effect, so for showing screen recordings and images on the screen, let's delete it and I'll
show you how to set it up. Inside of your effects, look for Gashenblur and drag it
onto an adjustment layer. To create an adjustment layer, come to your project panel, click this icon down here
and choose adjustment layer. A new adjustment layer will be created and you can drag
it onto your timeline. Select the adjustment layer
and go to Effect Controls. Scroll down and you'll
see a Goshen blur. The first thing that
I'll do is increase the blurriness so I can
see what I'm doing. Then I'll create
an elliptical mask by clicking on this circle here. Now I want the blur
to be on the edges, so I'll click Invert. Everything that's outside of
this circle is now blurry. What I want to do now is increase the circle
with these handles. But now the blur
is sort of harsh. So inside of effect controls, I'll increase the mask feather, and it will make the masks
transition a lot smoother. Now I can simply decrease
the blurriness and have this natural looking blur
effect on my footage. So everything in
the center is in focus and everything
outside is blurry. You can also click
on the mask here to see exactly which
part is not blurry. Here you'll see that the
inner circle has no blur, but everything outside
of it has a little blur. What I can do is make
this inner circle a little larger by dragging on this handle and you'll see that it
gets a little bigger. So now everything in this
inner circle has zero blur. Everything from this
line to this line is transitioning 0-20 the
amount that I set, and everything outside of
this last line has a 20 blur, so the full blur
amount that I set. So this is 20 over here, and this is transitioning 0-20.
42. Johny Harris Photo Preset: The next preset
that I've created is this Johnny
Harris photo preset. I named it that way because
I took inspiration from Johnny Harris because he showcases his images
in a very similar way. So I have an image of my
MacBook and I'm going to select it and click N on
my keyboard to nest it. If you don't have this
keyboard shortcut, simply search up for nest inside of your keyboard shortcut
and then drag it onto the letter N.
So I'll click N to nest it and then
apply this effect. See that nothing changes
except here in the beginning. What happens in the beginning is the image starts off
a little blurry, and then it moves up the
screen as it comes into focus. This is a very cool way
to showcase an image. What I will also always add with this preset is a sound
effect called shutter click. It's basically just a camera
shutter sound effect. And this is how it sounds like. So it's just a camera
shutter sound effect and a nice pop up
animation with a blur. And it looks really nice when
you're watching the video instead of an image just simply
popping up on the screen. I'll remove all the attributes
from this nested sequence. By the way, you always
want to do this effect on a nested sequence
because it works with the motion and
scale attributes. And if your image is
super zoomed in like so, it's not going to
work very well. So before adding this preset, always nest your image, which will set its scale to 100 and its position to
whatever position it. Select your nested sequence, go into your effect panel and
search for Gaussian Blur, then drag it onto the clip. Now inside of the
effect controls panel, I'm going to enable
keyframes for blurriness and
then for position. In the beginning, I want
the blur to be very high. So let's say 20 pixels. And I want the position to be a little down because
this clip is going to move move my playhead slightly
to the right and reset the position to the
default place and then reset the
blurriness to zero. I'll select the first
keyframes, right click, temporal interpolation
and ease out, and then select the
last keyframes. Right click, temporal
interpolation, ease in. This will make
everything smoother. Finally, I'll select
the first keyframes and move them to the very beginning and I'll see how it looks. It's very slow, so I'll select the last keyframes and
move them closer together. And now it pops up. I think
it's still very slow, so we'll move them even closer, and now it looks like this. The image just pops up. Next, I'll select
motion, scroll down, hold Command on my keyboard, and also select Goshen blur. This will make a
double selection. Then I'll right click and
save this as a preset. Make sure to se anchor to in
point because we don't want the keyframes to
spread out and we always want them to be at
the beginning of the clip. So for this preset, anchor to
in point is very important. And now, whenever I have an
image inside of my timeline, I'll adjust its size to
however I want it to look, then I'll click N to nest it, and then apply my photo
effect to this clip. And you'll see that it pops
up nicely on the screen. All I need now is just
the sound effect, which will make this
transition even better.
43. The Move Up Animation Preset: Is the move up animation preset, and I use it only for text. So I have a text layer here, and if I apply this preset, you'll see the text just
pops up from the bottom. I can also adjust the
keyframes like so, and it pops up faster. So this one is pretty simple. If I have a text layer
without any effects, I can simply set my position
to the very bottom, then move a little right
and reset the position. I'll make the first keyframe to ease out and the
last one to ease in, then move them to the beginning and closer together. And now I play it, it pops
up from the bottom. To save this as a preset, just right click
on vector motion, save preset and choose anchor
to point because we don't want the keyframes to spread out depending on the
size of this clip.
44. Moving Edges Preset: One of my coolest premier
presets is moving edges. If I add an image onto my timeline and then apply
the moving edges preset, you'll see that when
I play the clip, the edges start moving
with this cool effect. What lets me achieve this is
the roughen edges effect. So I'll duplicate this clip, remove the attributes and
show you how to set it up. In the effects panel, look for roughen edges and
add it to your clip. Then in the effect
controls panel, scroll down, and here
we animate the edges. So if I play around
with the border, you'll see that it has
this sort of effect. Next, I'll increase my
edge sharpness 1-10, so the edges are very sharp. The fractal influence basically decreases
these fragments. So if I make it zero, you'll see that this just
turns into rounded edges. I'm going to just
slightly increase it. Then the scale will
make these bigger or smaller and they'll
set the scale to 300. Obviously, just fiddle with the settings and find
what looks best for you. Now, we're going to animate the fractal influence
and the offset. So click on the clock for the fractal influence
and the offset. Move your playhead to the right and then increase the offset, which will make the
edges move to one side and increase or decrease
the vertical side, so it moves up or down. You'll see this is how
it looks like now. This is a little too fast, so I'm going to decrease
the offset a little bit. If I play it, the edges
move a lot slower. You can also add more
complexity to these edges or decrease the complexity by adding a fractal
influence keyframe. So I'll set it to
go from 0.4 to one. So I'll move these keyframes to the left and to the right. And now if I play my clip, you'll see that the
edges are moving. Just save it as a preset, right click on roughen edges, save preset and choose scale. We're setting it
to scale so that the keyframes span out
across the whole clip, and we don't want
the edges to stop moving randomly in the
middle of the clip. So this is how you create
the moving edges effect.
45. The Round Corners Preset: The next preset
is round corners. It's essentially the same as the moving edges preset,
but just simpler. If I apply it to my image, you'll see that the corners
become rounded, essentially, it's just a rough
and edges effect with edge sharpness set to ten, fractal influence set to zero, and the border I set to 129. If I increase the border, you'll see that the edges
become more and more rounded, and if I decrease
it, you'll see that they become more
and more square. So when I apply this preset, I just play a little bit with the border to get the
corners to look just right, this doesn't have
any key frames. So when you're saving
it as a preset, it doesn't matter
which type you choose.
46. The S Curve Preset: The next preset that I
have is the S curve. And when I apply it to my clip, you'll notice that
the contrast of the image increases
or the video. And that's because it's just an S curve inside of
the lumetric color panel. So here's how to
set it up yourself. At the beginning, you'll
see something like this. You can collapse the
basic correction and expand the curves panel. Now, here is where we're
going to create the S curve. So just put a point somewhere
here and move it slightly up and then put one point down here and move
it slightly down. You'll notice that it adds
contrast to your footage. So if I disable it and
then enable it again, you'll see that the blacks in the image became a
little more black. The brighter parts sort
of got more contrast. So before, after, before, after. Now, when watching a movie, you'll probably notice that the blacks aren't super black. They have a slightly
grayish look to them. And so we can achieve
that down here. I'll add one point over here and then move the bottom
point slightly up. I'll move this point over here so that the blacks are slightly if I look at the image, you'll see that this is pretty
black but not super black, and this is the aesthetic
that most movies have. It's also the same
for the highlights. So the brightest part in the image is usually
not full white. So I'll do the same for this
end and clip the highlights. And this is how my own
preset looks like. So you'll see that it's
pretty much identical. So the S curve is a very common way of
making your footage pop. It also works on pretty
much any footage. So if I go back to my turtle
clip and apply my preset, you'll notice that the
contrast increase. Or if I come to this image of my MacBook and apply
the same preset, you'll see that the contrast
slightly increased. So the S curve is just
a simple adjustment that you can use to
make your videos pop.
47. The Whip Transition Preset: The next premier
preset that I have is this slide slash
whip transition. It works with an
adjustment layer. So I have two clips here. One is a truck, and then another one is just a
picture of my MacBook. This preset is basically
just a fancy transition which whips from one clip to another with a
nice motion blur. What I'll do is come to my project panel and add
an adjustment layer, and then I'll make
it super small, so it's just the length
of the transition. Next, I'll go to my
effects panel and apply my slide slash
whip transition. See that if I play
the clips now, it quickly whips from
one clip to another. Now, if I want to
make it longer, I can undo and
increase the length of the adjustment layer and then
apply the transition again. Let's see how it looks
now, and there it was. So because this clip
is not full screen, it doesn't look super good, so I'll just increase
the Zoom amount on this MacBook and let's see
how it looks like now. It looks good now.
So essentially, this preset works
very well if you have two full sized
clips that take up the whole frame and
then if you want to transition between them and
here's how to set it up, come to your program
monitor and then click this icon over here and
choose adjustment layer. This will insert an
adjustment layer to your project panel. You can then grab it and
drag it into your timeline. Now, resize the adjustment layer so that it's roughly
the length of your transition and place two clips underneath
that adjustment layer. We're going to be
using the offset the directional blur and
the Alpha adjust effect. So just search for offset and apply it to your
adjustment layer. Then search for directional
blur, apply it again, and search for Alpha adjust
and apply it to the clip. Next, come to the layer and go to your Effect
Controls panel. Under the offset effect, I'm going to set a keyframe here for the shift center two. Then I'll move my playhead
a little right and adjust this parameter so that it makes a full one rotation.
Just like so. Next, I'll hold shift and drag my playhead to
the first keyframe so that it snaps in place and add another keyframe for
the blur length. Now, we don't want the
footage to become super blurry immediately because
it only started moving here. So I'll leave the blur
length set to zero. Now, since our image is moving from the
left to the right, I'm going to set the blur
direction to 90 degrees. Next, I'll hold
shift and jump to the next keyframe and add
another empty keyframe here, so the blur is zero. And then I'll come to
the middle and add one more keyframe
for the blur and now make it super blurry.
So let's say 100. Finally, under the adjust Alpha, I'm going to select
Ignore Alpha. Also, I'll make these keyframes non linear so they
transition nicely. Since this one's in the middle, I'm going to right click
and choose Auto Bezier. This will turn it into a circle. Since this keyframe
is in the middle, I can't really say
ease in or ease out because it has keyframes
on two different sides. So it needs to ease in and
ease out at the same time. Now I'll move everything
to the edges of the adjustment layer and move this circle in
the very middle. Now if I play this clip, you'll see that I get
this whip transition. Next, I'll come to
the adjustment layer, hold Command and select all
three of these effects, right click and save preset. I'm going to set it to scale
because I don't want all of these keyframes to be anchored to the very beginning of
the adjustment layer. I want them to spread across
the adjustment layer because I'm using the adjustment layer as the length of my transition. So if I insert a long
adjustment layer and then apply this preset, it's going to make this
transition very slow. And if I make the
adjustment layer smaller, it's going to make the
transition faster. And if I click Okay,
I'll have my preset.
48. The Slow FPS Animation Preset: The next premier preset that I have is the slow FPS animation, and it basically
makes things that are animated basically
more stuttery. So here, I'll have
my text come up from the bottom and you'll see that
it just comes up normally. Now, if I apply this preset, you'll notice that
my text now comes up sort of in a stuttery way. It has a lower frame rate. This is just an aesthetic
that I like to use for some elements inside of my
videos because it makes it more interesting.
And this preset is just a posterize time effect. So if you want to apply it to any moving thing
in your sequence, then you can come to the
effect panel and search for posturizeT under
video effects time. If I apply it to my text, you'll see that the
default number is 24. So basically, it turns
this clip into 24 FPS. Now my sequence is in 30. So if I play this clip, everything else will
be at 30 FPS and this hello text
will be at 24 FPS. Now, since this at the
bottom is just an image, I'm going to replace it with some other clip so you'll see
what's actually happening. So here I have a
clip of a Shore, and so this clip is
going to be playing at 30 FPS because in
the project monitor, you can see that the frame
rate for this clip is 30. And since my sequence
is also at 30 FPS, the clip is going to
be playing at 30 FPS. But since I applied the pasteurized time
effect to my text, it's going to be moving at 24. This is probably not going
to be super noticeable. Well, it's a little
bit noticeable, but I like to decrease
the frame rate to 15, and now it's very noticeable. So you'll see that my text sort of glitches as it comes up. Now, this depends on your taste, and maybe you hate this effect. I'm just showing
you that it exists. So in order to create
it, just apply a postiz time effect to
anything in your sequence, then right click on pasteurize time and choose Save Preset. Since it doesn't
have any keyframes, the type doesn't matter. And if you click Okay,
you'll be able to drag the posturize time effect onto
any clip in your footage, and it'll decrease its FPS and make it stuttery
as it animates.
49. Text Presets: Next, I have two text presets. So the first one looks like this and the second
one looks like this. These are just text styles
that I use for my videos. So whenever you have
some sort of a text that you want to
save it as a preset, you can simply highlight
the text here, come to your Effect
Controls panel, select the text over here. Right click and
choose Save Preset. The type doesn't matter here as well because there
are no keyframes. And once you save a preset, you'll be able to click T on your keyboard to bring
out the text tool. Then click once inside
of your program monitor, come to your effects and simply apply the text
preset to your text. The reason that I
clicked once and didn't type anything
so that it inserts this text box into
the timeline but adds nothing onto my see
that this text is empty. I can either delete
it, or what I usually do is just leave it there
because it doesn't matter. No one can see it.
And then I can drag the preset here and have my actual text as a new
separate text layer. I can then change
this text and have its style consistent across
all of my YouTube videos.
50. The Transform Up Preset: The next preset that I have
is this transform up preset. So if I apply it to my clip and then play it from
the very beginning, you'll see that it pops
up from the bottom with a nice motion blur.
So here's how to do it. First, search for transform
inside of your Effects panel, and under video effect distort, apply a transform
effect to your footage. Then come to Effect Controls, and we're going to be adjusting
the transform effect. The only thing that
I'm going to be key framing here
is the position. So I'll add my first keyframe and move this clip
to the very bottom. Then I'll move a little to the right and reset
the position. Next, I'm going to set
the shutter angle to 180 degrees to add
a nice blur effect. I'll also set these keyframes to ease in and ease out and, of course, move them
to the very beginning. Now, if I play my clip, it pops up from the bottom. The speed is a little
too slow for me, so I'll move the last keyframe
closer to the first one. And now if I play it, this
is the effect that we get. So I'll right click on Trans if preset, select the
anchor to endpoint because I always want my keyframes to be attached to the
beginning of the clip, and no matter the
length of the clip, I want the spacing between
the keyframes to be the same. That's why I'm not
choosing scale. If I chose scale and
the clip was longer, then the gap between these keyframes will
also become longer. So if I click Okay, this preset will now be saved
into my effect panel.
51. The White Outline Preset: Another preset that I have is a white outline three pixels. What it does is
it basically adds a small white outline on
the edges of the clip. I usually use this for images, so I'll demonstrate
it with an image. So if I drag this
effect onto the image, you'll notice that a
slight white outline appeared on its edges. So here's how to do it.
Inside of your effects panel, just search for Drop Shadow. It's going to be under video
effects and perspective. Drag it onto my clip and go
into my effect controls. This outline is essentially
four drop shadows on each end of my footage. So first, I'll
configure the shadow. I'll make the color
completely black, then I'll set the
opacity to 100. You'll see that an outline already appeared on
one side of the clip. Next, I'll set the
direction to zero. So it's only going
to appear on top. Then I'll set the
distance to three. This is going to dictate
how thick the outline is. So if you want,
you can set it to ten or five or
whatever you prefer. For me, it's going to be three. I'll leave the softness at zero. Now I'm going to select
this drop shadow effect. Command C on my keyboard to
copy and command V to paste. Now I'm simply going to change the direction to 90 degrees. So you'll see that the
outline is now on the left. I'll copy and paste
it again and set the direction to 180 degrees. Now there's an outline
on the bottom. I'll copy the effect
one more time and set the direction to 270. And now all four corners
of my image have a white outline because the first white
shadow is at zero. The next one is at 90 degrees. The next one is 180 degrees, and the final one
is at 270 degrees. So basically in all
four directions. Just collapse these
shadows like so, then select them all, right
click and save preset. The type doesn't matter because
there are no keyframes, and when I click
Okay, this preset will be saved to
my effect panel. So next time I have an image, I'll simply go into my effects, then expand my presets
and apply this outline, and you'll notice that it immediately looks better because an outline. So these are all the presets that I
use for Premiere Pro. Now, every time there's
some action that you keep doing over
and over again, it's a good idea to
create a preset. It's going to make your
workflow so much faster because you won't have to
do it over and over again. I constantly keep adding new presets to my preset
folder as I discover new tricks or find
things that I keep doing repeatedly every
time that I make a video. So definitely set and
use your own presets because it's going
to make your editing workflow so much faster.
52. Copying a Preset From Others: Now when watching
YouTube videos, you might notice effects that you may want to
use for yourself. For example, I was watching this video from
Benny Productions. He's basically a Photoshop god, and over here, I really like how he showcases
these images. So if I play the video, you'll see that images sort of slightly pop up and
down left to right, and I really like this effect. I'll try to replicate it for myself and show you how
you can do that, too. I'll do this for the Mac image. I'll zoom in so it's full screen because that's how Benny
productions showed this photo, so I want to replicate it
as accurately as I can. I'll start off by
nesting this clip because now all the motion
attributes have been reset. If I was doing this
on a non nested clip, you'll see that the
scale is already 246. So the next time that I
would apply this preset, it would immediately
set the scale to 246, no matter the actual
size of the clip. So always create your presets that require scale on a nested. I'm going to insert the scale and position keyframes and move, let's say, three
frames to the right. By the way, if you move
with your arrow keys, it's going to skip
one frame at a time, but if you add shift, it's going to skip
five frames at a time. So I'm going to hold Shift and move 15 frames to the right, and I'll add two more keyframes. I'll also add keyframes for the rotation because we saw that these images
slightly rotate. So I'll experiment with the rotation and set
it to one for now, and I think that's
going to be enough. Now I'll slightly increase
the scale to 105 over here and over here so that the image fills
up the whole screen. This is what we have now. The image only slightly rotates, but I noticed that here, it also slightly
changes position, and it goes into
these four corners. So that's what I'll do. So I'll move this
slightly to the top left. And now this footage
moved to the top left. Each time that I
add new keyframes, I'll increase the scale by two. So here it was 105, and here it's 107. That'll give me some wiggle
room for the position. I'll also move them closer. So now it moves to the left. I'll expand this and
also expand my clip inside of the nested sequence so I have more
space to work with. Then I'll copy these keyframes
and paste them over here. I'll set the rotation
back to zero. The scale is going to move back, let's say to 106, and then the position is going to go to a
different corner. So it's going to go down I'm just playing with
this, seeing what works. So now we have this, one, two. So these keyframes aren't exactly where I
wanted them to be. Then again, one, two, three, these keyframes
should be over here. I'll now decrease the rotation
to minus one and then move the position to the bottom left of the image, just like so. I'll add the final
set of keyframes over here and then set the
rotation back to zero. I forgot the scale over here, so I'm going to set it to 108, and on the last keyframe, I'll put it to 110. I'll set the position
to the bottom left, and this is what we have now. It's moving very fast, so I'll double the distance
between the keyframes. I'll hold Shift, one,
two, three, one, two, three, and move all
of them to the right. Then again, one,
two, three, one, two, three, move all
of these to the right. I'll expand this clip inside of my nested sequence even more so I can duplicate
these keyframes. So if I have something that I want to show for a long time, these keyframes will
just repeat themselves. I'm going to highlight all of these keyframes and set all
of them to Auto Bezier. Now I'll just highlight all the keyframes,
one, two, three, one, two, three, and paste them once, then highlight everything again. Come to the last one, one, two, three, one, two, three,
and paste them again. So I'll just paste everything until it covers the
whole nested sequence. If I play the clip, it should move very nicely. This is a little
too much movement. This is a lot worse than
what Benny Productions had, but we still managed to copy
the concept of this effect. I'm going to remove all of
these keyframes and tweak the first ones again so
that I get a nicer effect. This is probably going
to take some time and adjustment to dial
it in just right. This is how you can think out of the box and recreate effects that you already see on YouTube. It's going to make
your editing skills better and also help
you notice effects that other people use
in their videos. I
53. Showcasing Images: If you make a lot
of YouTube videos, especially faceless ones where
you don't show your face, chances are you're going to be showcasing a lot of images, and to make your
showcases better, you can use the
Ken Burns effect. It's basically slowly zooming into a picture or a steady
frame of the video. This creates the
illusion of movement and entices the viewer
to watch longer. So for example, I have this screenshot of my
YouTube channel. Instead of popping it up on
the screen like so, I can decrease its scale to something like this and
then add two keyframes. The first one is just going
to be the default size, and the second one, I'll
just slightly zoom in. So now when I play this clip, the image should start
zooming in slowly. It's a little too slow, so I'll move this keyframe
over here and increase the Zoom amount just
a little bit and move it to the very end.
And now it looks something so the image is just
slightly moving into frame, which helps increase engagement. Instead of looking
at something steady, the viewer can see
something that's moving. Now, what you can also do is instead of adding
these keyframes, you can add an
animated background. For example, I use these MKBHD
inspired dots that I made, and so I just place an
image on top of them, and when I play it,
the background moves and the image can stay steady. This also creates
the illusion of movement and keeps
the viewer watching. Don't have to create your own
animated dots or anything. You can simply use
the same image. So, for example, I'll duplicate this image by holding
option and dragging. Then I'll go into
effect and add a blur. Next, I'll increase
the blurriness so it's not super visible. I'll come to the
lumetri color panel, and in the basic adjustments, I'll just decrease the exposure so that the background
is slightly darker. Now, all I have to do is just
zoom in on the background. I'll add a scale keyframe and
then just zoom in like so. And now if I play this clip, you'll see that
the background is slightly moving and the
image is staying still. I can move these keyframes closer so that the
background moves a lot so you get this
background moving effect. To make this look even
better as a bonus, you can add a drop
shadow and then adjust its parameters
so that the shadow is a little more soft and more
visible and you'll get this nice separation from the actual image
and the background. So to keep viewers engaged
when showcasing images, you can either slowly zoom into that image or add some
movement in the background. What I can also use is a preset that I showed
you how to make previously when we
looked at how to replicate presets from
other YouTube videos. I can simply add the Benny productions
movement preset and you'll see that now the image
moves in weird direction. Is also a good way to
keep viewers engaged and add some sort of movement to your steady frames or images.
54. The Compounding Nature Of YouTube: When you're making
videos for YouTube, you have to keep in mind that everyone sucks
in the beginning. If you've never made a video in your life and you're
making your first one, chances are it's
going to be horrible. That's just the reality of it. If you go into a
basketball court and try to beat LeBron James, it's just not going to happen. You're going to fail
many, many times, for many years until
you fail so many times that you can learn
from those failures, and then you become better. And the same goes for YouTube. YouTube is a marathon,
not a sprint. It took me ten months and more than 100 videos
to get monetized. Cringe so hard when I
look at my first videos. They're terrible.
And this is good. If you look back at
your old videos and you can't believe how horrible
you were at making them, it's a sign of progress. The reality is that
if you're not a pro, you're going to have to
pay your ignorance debt. You're going to have
to make a lot of videos to learn the
ropes of YouTube. However, they are good news. Growth on any social media
platform is exponential. It's not linear. It looks
something like this. So at first, you're
going to be putting thousands of hours into
your YouTube channel, making videos and not
seeing any results. It's okay because this work
will compound over time. As your video library grows, more and more people will
start watching them, and your channel will get views not because of one
video that goes viral, but because of the library of content that you create
over a long period of time. Building a successful
channel takes time, effort, and a lot
of trial and error. At first, it will feel
like an uphill battle, but as you learn more
and gain experience, things start to fall into place. You begin to develop
strategies that to hook viewers in and
keep them watching and get a better sense of what
they want to see from you. Consistency and patience are
key to success on YouTube. The thing that I like most about growing a
YouTube channel as your business is
that you have to put in a lot of work beforehand, which clears out a
lot of competition. But once you do
put in that work, it can become a passive
income generating machine. Once you publish enough content and your video library grows, the new videos that
you will make don't necessarily have to bring
in that many views. Old videos that you made
don't disappear on YouTube. They get recommended
to viewers forever. Just notice how on your home
feed, there are many videos three, five, or
even 10-years-old. I really like the way
Ali Abdel puts it, and he says that
you can think of your channel as a large wheel. It's very hard to get that wheel spinning
in the beginning, and you have to use a lot
of force to get it moving, even just a little bit. But once there's enough
force, it's slowly, but surely starts spinning
and rolling on its own. You don't need to
push it any further. Inertia carries it through. At that point, only
a little bit of force is required to
keep the wheel spinning. In the beginning, most
videos will get two, three, tens, maybe hundreds
of views at most. That's why it's very
important to be patient and stick
with making videos. The payoff comes later. You have to delay gratification. The more patience you have, the more each video will spin the YouTube wheel and the
more your channel will grow.
55. Small Changes Remarkable Results: You need to fail
in order to win. The most important thing to
success on YouTube is not the editing software you use or your camera equipment.
It's your mindset. The average channel doesn't
go viral overnight. According to To Buddy,
a Chrome extension that lets you do keyword
research on YouTube, an average YouTube channel
that reaches 1,000 subscribers have
published 152 videos. That's a crazy amount. It's not ten or 20 videos, 152. That's a large number. This just proves that at the start, you're making videos
to learn, not to earn. You know nothing about YouTube. So look at your first 100
videos as a learning process. The beginning is going
to be the hardest because you have to look
at the videos you publish, not as something that can
go viral or make you money. Of course, it's nice if it does, but if it doesn't, you should
look at them just like reps putting in reps to get stronger and learn
how to do YouTube. The best way to learn is
through trial and error. The more videos you upload, the faster you can learn. Of course, don't just pump out videos just for the sake
of pumping out videos. Try to improve something
each time that you do it. If you get 1% better
each day for one year, you'll become 37 times
better by the end. Make each video better
than your last. The changes don't have to be
noticeable to the viewer. At the start, they
probably won't be. You're going to add L or JCAts, focus on the pacing
of the video, but over time, small
improvements will add up. Soon, you look back at
your old videos and think, What the hell was I doing? That's what happened to me.
That's a sign of improvement. With each new video, try
to make it 1% better, even if it's just smiling
when you talk to the camera, cutting out one more breath, watching a video once it's done, and correcting one
mistake or taking 5 minutes to search for
inspiration for your thumbnail. Small changes will lead to
remarkable results over time.
56. 3 Qualities Of A Successful YouTuber: It might seem like small
channels keep randomly popping up with 100,000
subscribers everywhere, but that's just a
very small percentage of people who try to
make it on YouTube. It skews your perspective
because you never see the thousands of channels that never make it
on the platform. So there are three qualities that you need to have in order to maximize your chances of becoming a
successful YouTuber. Number one is long term mindset. Necessary not to quit. Number two is
continuous learning. It's necessary so
that you can improve. And number three is
the ability to adapt. It's necessary to adapt
to changing times and viewer behavior so you can grow and not stay
in the same place. I really like the quote from
Ali Abdaal, and he said, If you can publish
at least one video per week for two years, I guarantee your life will this just speaks for
what you need to do in order to
succeed on YouTube, publish a lot of videos, learn with each video, and improve at least
something for the next one. If you keep doing
that for a long time, it usually takes
around two years, you'll be able to
explode your channel. Take a look at your
favorite YouTubers. Look at their old videos
if they're still listed. They most likely were terrible. It took Marques Brownlee, MKBHD, 100 videos to reach
76 subscribers. Think about that.
To get good faster, take the quantity
approach, not the quality. Quality approach
will not work at the start because you have
no idea what you're doing. You'll most likely put tons of hours into
your first few videos, but the unfortunate reality is that probably no one is
going to watch them. The point of your first 50 to
hundred videos is to learn. Don't expect to have a viral hit within your first ten videos. It's like stepping
out into a ring with a professional boxer having
trained for 10 minutes. Needless to say, the odds aren't in your favor,
but of course, something magical could happen, and you can just knock
him out with one punch. Here's a cool graphic that a YouTube channel answer
in progress made. It basically shows
the four key pillars to success on YouTube. Number one is follow
the terms of service. If you don't do this, your
channel will just be banned. So obviously, you need this in order to have your
channel on the platform. Number two, is make
rewarding videos. The key here is rewarding. Create content that
is attention grabbing in the short term but still
fulfilling in the long videos can be rewarding
because they're either entertaining
or educational. For example, one viewer might find it rewarding
if you teach them something new in your video or another viewer just likes to watch things that
entertain them. You usually don't really learn
anything by watching a Mr. Beast video, yet
billions of people watch his videos because they find them rewarding through
entertainment. Number three, is package
your videos properly. You need to have good packaging, AKD title and thumbnail in order to get views
in the first place. If someone doesn't click on
the video, they don't watch. If your video is super amazing
and no one clicks on it, then no one's going to watch it. Also, don't use Clickbait because you will lose
trust in your audience. Finally, target people
who will be fulfilled. Answer in progress, say to focus on reaching
people who will care about your content and will help the platform
identify similar people. Don't make videos for people
who you don't care about, who you don't want
watching your video. There are so many
people in the world. So why would you
even make videos for people who you don't
want watching them, who don't resonate with you? Just like they say, views
from people who don't care risks noisy data and
low audience engagement. Focus on that one person who truly cares about the stuff that you're
making videos about.
57. Upside Of Becoming A YouTuber: This is what the view graph
for my channel looked like. So for more than 80% of time, I was getting zero views, and in the last 20% of time, the majority of views
for the channel came in, and I've been publishing videos consistently for
the last 1.5 years. Moreover, 5% of videos brought
in more than 95% of views. That's the Pardo
principle in action. It basically says that
in many areas of life, 80% of the inputs will
only lead to 20% of the results and 20% of inputs will lead to
80% of the results. In my view graph, this
is clearly visible. For more than 80% of time, I was putting in the work
but not seeing any results. The views that I got
during this period are equal to less than
20% of total views, but the last 20% of time contributed to more
than 80% of views. So it just goes to show that
YouTube works exponentially. In the beginning, you
put in tons of work, but don't see any results, and over time, they
compound massively. Even though you don't
see results for a long time, it's
still worth it. Starting a YouTube
channel has an almost limitless upside with a
little downside, your time have to sacrifice your
time for the upside, but the upside is that
you can learn new skills, make money while you sleep, potentially have the ability
to not work ever again, have new connections and career opportunities,
make an impact. There's no ceiling for the
amount of money you can make. You can monetize
in so many ways. Even if you're not
monetized through ASNs, you have the ability to work
from anywhere in the world. You have the ability
to turn it into a self sustaining business
by outsourcing later on, and it all costs zero. If you have a
computer and a phone, you can just make
videos for free. The only downside is that
it requires a lot of time.
58. Channel Growth Examples: Let's see some examples,
and this is Ali Ab Dal. And you can see that for half the lifespan
of his channel, it wasn't really getting
that much traction. But in the last 50% of time, he's made over $1 million
from his channel, and each day his
channel is getting more than 150,000 views. That's insane. This is another channel called
Matt Does Fitness, and this is his first
year on YouTube, and this is two years later. He's now making
more than $250,000. So the first year
doesn't matter. In two days, he makes more than his channel made for
the whole first year. That's why in the beginning, you should focus on
learning and not earning. You learn will compound
over time and bring you extraordinary
compounded returns later. All big creators started small. They upload, upload, upload, and then upload one more time until they can begin to
see results like this. I like this quote from Gary V, and he said that it
takes only one piece of content to change
your life forever. You just don't know which piece of content it's going to be. So just keep putting
stuff out there until it all compounds and
changes your life.
59. Picking The Format: Picking the right format for your videos is very important. I have two formats that
I use for my videos. The first format is just a voiceover and
something on top of it. It's usually like a screen
recording or some graphics. With this format, I
usually prepare and write out a full script
that I then record, import into Premiere Pro without any footage
pre recorded, and then I go through my
voiceover and record clips accordingly that I want
to show in the video. So the video is basically
glued together from a script and then a bunch
of separate clips that I record afterwards. The second format is me showcasing something with
my hands as the Face. One usually involves
me doing something real time and going off
of not a full script, but a bullet point list. So this one is
better if I want to show something in
real life without having a perfect script or an outline that I had
prepared previously. And I think your format
is very important. Pick the format that you can stick with and that you'll enjoy making videos with because if you pick something
super cinematic, then you'll get in your head. And instead of keeping
to produce videos, you'll overthink the next one because it has to be
better than the previous just pick a format that's easy for you to do
and stick with. For example, for you, it might just be a talking
head video like this or just a screen recording or doing something log
style like in a forest. Maybe it's slides. Maybe it's a voiceover
and you just pile clips on top
of it like I do. Maybe it's showing your hands. Experiment with
different formats to see which one
works best for you. Of course, you can
have different formats for different styles videos. One video might be
an explainer where you just talk and show
slides on the screen. The other one can be
a cinematic recording of you showcasing a product next one could be you just
drawing inside of Apple Notes. There are hundreds of formats to choose from and make sure to experiment to see which
one works best for you.
60. Importance Of Pacing: The pacing is one of the most important things
about your video. The most common retention hack is just to put as many
cuts as possible, put hundreds of moving elements on the
screen and overwhelm your viewer with stuff
so that they don't have the time to put their
attention elsewhere. But this on its own,
doesn't really work. You don't want to start off
your video with 100 cuts each second and for it to die off as soon as the first
30 seconds are over. Pacing is everything.
It's the flow of viewer is always subconsciously looking for a reason to
quit watching your video, so don't give him that reason. Your video should flow nicely, keeping the viewer
entertained each second. But that doesn't mean that every 10 seconds,
there should be a cut. If there's a part
that doesn't add to the story of the video,
just throw it away. Or if there's a point
that you feel like you dragged on for
too long, remove it. However, if there's some
important formation, don't be afraid to leave it in. Don't just think I showed
this for 10 seconds already, so I have to move on
to the next thing. If you have to drive
the point across, there's no need to
insert 300 effects or text on the screen because nothing was moving for
5 seconds already. That's why editing
is very important. The video comes
together in the edit. If you recorded something, it doesn't mean that it
has to make the final cut. If your footage
doesn't contribute to your video and doesn't
make it better over, should remove it. So
back to the pacing, most people think
that the pacing of the video looks
something like this. This is a bad example, and usually it reflects in
the audience retention. So if you cram all
of your action in the beginning of the
video, add 100 cuts, focus only on the intro, and then it dies off slowly, then your viewers will
also start leaving slowly. Moreover, what's important to understand here is that
pacing is relative. If it's always high,
then that's the base. Order to increase the pacing, when it was always high, you have to put in so much work. Whereas if your pacing slows
down and then ramps up, it creates this contrast, and even though it
was slower than in the first example,
it feels faster. You want viewers to be able
to compare different parts of your video subconsciously and notice the difference in pacing. In reality, good video pacing
looks something like this. You can start off the
video super fast, then slow down to
explain something, then ramp it up again,
then slow down, ramp up again, and so on. Try to always keep it super high because that's going
to become the baseline. So even if it's high, it's going to become the new normal because there's
nothing to compare it to. It's just like becoming rich. Once you're rich, you get
used to the money you have, and ordinary things like buying
clothes or a new iPhone, don't give you
that much pleasure anymore because that's
just your baseline. It's just ordinary.
I'm not rich, so I wouldn't know, but
that's what I've heard. So put your video together in a way that viewers
can subconsciously compare and notice
the differences in pacing so that when your
pacing becomes faster, it's actually noticeable
because it was slow before. Of course, pacing is not binary. It's not just fast or just slow. It could be somewhere
in the middle. It can ramp up and down. But the key thing
here is to not think that it should be high
across all of your video. Even worse is to think
that it should be high at the beginning and then slowly die off as
the video progress.
61. Storytelling: Tell stories in your videos. Humans love stories. Try to tell a story,
even if you're making a gaming video or
a simple tutorial. Stories make it easy
for our brains to understand information
through emotion. Stories can cause laughter, make people cry, and make
them feel angry or anxious. But the outcome is the same. Through stories, people gain powerful learning experiences. If you give information, then it's just that.
It's information. People don't care
about information. Think about it. Information
is all around you. The key pieces of
information that really get you are the ones
that invoke emotion. People don't care
about information. They care about their
transformation, and transformation usually
requires emotions. So tell stories in your videos. They can be super simple, but just try to have a story structure
somewhere in your video. It's going to make them
so much more personal and relatable to the viewer.
And that's what you want. You want viewers to know,
like, and trust you. These qualities make
for a great audience. If your audience knows, likes, and trusts
you, you're all set. You'll have no problems growing and monetizing
your channel.
62. Importance Of Personality: Don't want to watch robots. It took me so long
to realize this. In the beginning,
I was just making faceless videos without
including myself. It was the same like AI
was making the video. I was just scripting things and reading things without
any personality. It took me so long
to realize that people don't just care
about information. They care about you. They follow you because of who you are. If you're afraid to
show yourself, well, not necessarily yourself,
but what you're thinking, what you're feeling, or what
do you think about things. If you always live in
the gray area where you're afraid to express your
opinion or your thoughts, no one's going to subscribe
to such a person. It's just like subscribing to a channel that's been
generated by AI. It has no soul.
Moreover, just have fun. I tend to notice that
videos that I have the most fun making usually
get the most amount of views, not always, but I'm
starting to see a trend. If you think you have
nothing to share wrong because viewers
care about you, your take on things, not
the things themselves. So if you have a thought about something that you read
or you have an idea, just share it. Have fun with it. Your audience is not stupid, and they can immediately
sense that you're making something just for the sake of making it. You're
not enjoying it. So by trying to have fun, you're going to do yourself
and your viewers a favor. Your viewers will
enjoy the videos more, and you will enjoy the video so just have fun. Share
cool things that you learn, express your perspective, and don't live in the gray zone. If you say a thing
that some people disagree with, that's okay. You want them to disagree. It's much better to
express who you are and your perspective about things
rather than being neutral. No one is truly neutral, and your audience can sniff
that out immediately. So if you don't like
something, say you don't you see other
channels saying that this is amazing and you
think it's pretty bad, just say it's pretty bad. It's going to make you enjoy
making videos and also attract like minded people that know like and trust you
into your audience. So don't be afraid
to be authentic. Your audience don't
care about dry facts. They care about
your personality. This took me so many
videos to realize. And as soon as I did, as soon as I showed
some personality, some mistakes, my
audience started seeing me as a human
and not a robot. Don't be afraid to
take a stance on something and don't be afraid
to change your mind about. Ultimately, you want to
build a personal brand. You want people to
care about you, not the thing in
the video itself. Of course, it's great
if they care about you, and the thing that you're
making the video about, it's just a massive plus, but if they care about you, it doesn't matter the
video that you make. They're going to watch it
anyway because you made it. This is why big brands pay influencers to make ads
about their products. If you just see a product
or a random video, just feels like
an advertisement. But if you see your favorite
creator with that product, it immediately feels so much more familiar,
so much more human. And the product suddenly
doesn't really matter. You're watching a video because that person is in the video. It's not about
what's in the video. It's about the
person in the video. So be human in your videos. Don't be afraid to
show weakness because we're all human except
Mark Zuckerberg going to be hard in
the beginning to show personality,
but by doing so, you're going to make
it very easy on yourself because you don't
have to fake anything and also because you're
going to attract people that are like
minded and think like you. And ultimately, that's the
audience that you want. You want people who think
like you in your audience. It's going to be much easier
to make videos for them, and it's going to be
much easier for them to consume the videos that you're making. So just be yourself.
63. J And L Cuts: Let's talk about
the J and L cuts and how they can make your
videos so much better. So here I have two clips. One is this clip of an ocean and another one is
this clip of a ship, and I want to nicely
transition between them. I also have this
music track which will introduce some
music to the clip. So the first thing
that I could do is just leave this clip here
and these two clips here, and then press Space Bar, and they will
transition like this. The music will start abruptly, but this is a
terrible transition. It just suddenly shows the ship and music suddenly
starts playing. The viewer will be
confused because there's just a random ship
popping up on the screen. What we can do in that
case is use a Jcut, which basically means
that the audio of the clip starts before
you show the clip. So simply move the audio here, and this will create a Jacut. Reason it's called
a Jcut is because these two clips
resemble a letter J. It looks like a capital J. And so the letter
L is the opposite. So if the audio was
from this clip, I would move it right there, and this would be
an L. So that's why they're called J and LCAT. Anyway, I'll move this
clips audio over here so that it starts playing
sooner than I show this clip. And let's look at how much smoother this
transition becomes. So you start hearing music
which helps you anticipate that something's going to happen next and only then
you see the ship. And this works exactly the
same with voiceover audio. For example, Peter McKinnon uses J and LCATs in almost
every single video. Let's take a look. I just don't like
many of these photos. Makes it a little harder. You see, he started speaking about a thing that
he was going to show on the screen before he
actually showed that thing. Notice how right now he starts speaking before he shows
what he's speaking about. Wanna call that? I
do like this one. I shot this. He said, I do like this one while still showing the previous
photo on the screen. This helps the viewer
anticipate what's going to happen next and makes your
videos flow a lot better. For example, right
here, as well. I did it again underexposed, a little bit more inside. He starts talking about the
thing that he's going to show first and only then
he shows the thing. So that's the JCAt. Now, let's say that
we want to transition into some sort of a scene
where two people are talking. So here I have a clip from the Pirates of the
Caribbean movie, and instead of plopping it up right here at the
end of this clip, what I'll do is hold
Option and make this shorter and then
drag it to the left, like so, this doesn't
have to exist. So now we'll start
hearing the audio before we see what's actually
happening on the screen. Let's see how this
transition looks. And it's got to be the
best part I've ever seen. So it would see. Okay? That was a little too far, so I'm going to move it there. I want him to say so it would seem as soon as we start
seeing him on the screen. And it's got to be the
best part I've ever seen. So it would seem. This flowed a lot nicer than
if I was to have just this. It just immediately
cuts to these people. The ship clip would
feel so out of place and the video
wouldn't have a nice flow. So basically, whenever
you change a scene, you can use a J and L cut to make your video
flow a lot nicer. Instead of having
a very harsh cut at the video portion
and the audio portion, you can first
introduce the audio and only later the
video of that clip. That way, your video
flows a lot more nicely, and the viewer can anticipate what's going to happen next, which just makes for a more pleasurable
viewing experience.
64. Marking Your Footage: One cool trick when
editing your videos is setting markers and color
marking your footage. So here I have a timeline
of one of my videos, and as you can see, it
looks pretty messy. What I can do in this case to make it easy for
me to understand which clips represent what is make these clips
a different color. So for example, if I wanted to make this bottom row
a different color, I would right click
Choose label, and then set a different label. For example, I'll choose yellow. And now these clips are yellow. Now if I want all of my camera footage to
be a different color, I'm going to select all my
camera footage, right click label and make it mango. So now all of my hand footage is mango and all of this is yellow. It makes it easy to differentiate
between different parts of your sequence if it gets quite complicated
to understand. One more cool thing that you can do is if you're
editing horizontally. And for example, as I'm
cutting up this footage here, I decided that I'll want to insert some text on the screen, but I'm working
horizontally and I don't want to
disrupt my workflow. So what I can do is
insert a marker. To do that, I'll just
click on my keyboard, and you'll see that
here a marker appear. Marker does nothing except adding this little
thing over here. It just marks that
spot in the sequence. So when I finish
cutting up my B roll and then come back
to do another pass, I will see that
there's a marker here and that I should
add something here. Of course, I might forget
that I wanted to add text, and what I can do
in that case is hold option and
click on the marker, and it'll split it
into these two parts. Now I can drag it and
it becomes larger. So now it highlights a
bigger part of my sequence. Then I can double click inside of the marker
and give it a name. There should be text here. Now, you'll see that inside of the marker,
there's this text. So the next time that I come to this part of the
sequence and zoom in, I'll know exactly why
this marker is here. Also, I can double click and
choose a different color, but I usually keep
the color the same because I don't add
too many markers. What's also cool
is that instead of adding a marker on
top of the sequence, you can also add a marker
onto a clip itself. So for example, if I wanted to add a marker onto this clip, I would highlight it and then
click M. You'll see that now the marker is on the clip
and not on the sequence. If I want it to be on
the sequence, I would select the clip by
clicking anywhere else and then click and now it
adds it on the sequence. To remove a marker, right click and choose clear all markers or clear
selected Marker. Clear markers will
clear everything, and clear selected Marker
will just remove this one. All the tricks that
apply to this marker also apply to the
markers on your clips. But in order to split
a marker on your clip, you can't really hold Option or Alt on Windows and
click over here. Instead, what you
have to do is go into the source monitor and then hold Option or Alt on Windows and
click on the marker here. You'll see that it split
it up in the time. If you hold option and click on a clip inside
of your timeline, it only selects that
clip and nothing else. So if the clip is linked with an audio track and
you hold Option, you'll only be able
to select that clip. That's why it doesn't work on the marker because the
keyboard shortcut is the same. And now I can expand this marker and double
click to say something, and now I'll see this
marker on my clip. I rarely use markers
on my clips. Instead, I add them on the whole timeline
because it's just a lot easier to fiddle with
them when they're on the whole timeline
and not on the video. This is how you can
label your clips with different colors so that
it's easier to remember what they are and set markers inside of your sequence
in order not to forget important
places or things that you wanted to add onto
your video later on.
65. Showcasing Screen Recordings: Now let's talk about
screen recordings. When you want to show
something on the screen, there are so many options to make your screen
recording look better, especially if you
record your voice over and then make a
screen recording later. That could present
some challenges because it's going to be hard to sync what you're saying and what you're
showing on the screen. So here are a few tricks
that you can use. Let's say that this is the
audio for my screen recording, and this is the video. So I made the voice over first, and then I recorded the
video, and now they're not I could do is cut the clip like so and then remove the
parts that I don't need, but then it wouldn't really sink to what I'm saying
in the voice over. So there are two options
to hide these cuts. The first one is to zoom in. Let's say that I want
to make a cut here and then for the footage
to end up over here. Instead of just
making a cut like so, you'll see that the mouse
cursor teleports randomly. What you could do is zoom in on the second clip where you
can see the mouse cursor. And now, when they
transition from each other, it doesn't look like it was cut, but rather it was zoomed in. The other option is to use the rate stretch tool by
clicking R on your keyboard. So we don't want the
mouse cursor to teleport, and we can make this
middle clip very fast so that it looks like the mouse
cursor travels a lot faster. I can also make this
clip faster so that it ends exactly where
my voiceover ends. And since this is a
screen recording, no one can really tell
that the video is sped you're just moving your mouse, there's nothing else
happening on the screen. Of course, if you speed
up the portion of the screen recording that
has some sort of a video, then it's going to be
obvious that it's sped up. But if it's only your
mouse cursor moving, it's not so noticeable and it's better than just
having a harsh cut. But I do prefer zooming in instead of making
clips faster. So if there's a cut here, I'll
just zoom in on this clip. And if there's another cut here and I want to
remove this middle part, then instead of having
this last clip zoomed in, I will reset it back to default. So now, these two
cuts are sort of hidden because this
clip is zoomed in. So as I play it
now, it zooms in, then I showcase something,
and then it zooms out. It seems like there
was no mistake there, and I just zoomed in to show
the viewer what's happening. Another trick that
you can use to hide cuts like this is
instead of zooming in, just showing something
else on the screen. It will really depend on
what you're talking about. But let's say I
was talking about something to do with
growing your audience. So I'll add a brief clip of me showcasing how audience
growth looks like, and now it hides this cut. So when I play my video, you don't see the
cut, and then it resooms back to the
screen recording. Makes the video flow
a lot nicer than if it were to have
harsh noticeable cuts. Now, if you don't
have anything to add here and you don't
want to zoom in, instead, you can use an effect. I showed you before how to
create this three D preset, and if I apply it to my clip, you'll notice that it sort of becomes three D
and starts moving. So it's also a great way to hide the noticeable cuts in
your screen recordings. Now here it doesn't
look quite right, but I can add a transition, and it will look amazing. Inside of my music folder
and video effects, I've downloaded a 16
millimeter film burn, and now it looks like this, which doesn't look good at all. So I'll go into my
effect controls, increase the scale so that it
takes up the whole screen, and also I'll set the blend
mode to linear Dodge add. Now I'll scrub through this clip to see where
the brightest part is and it's over here,
I'll add a marker and then move this clip
in between two clips. So now when I play this clip, it has a nice transition
into this three D effect. I can duplicate this
on the other side, and now it will
transition both ways. So it transitions in and
then out of the effect. So by using transitions,
different effects, making the clips
faster or shorter with the rate stretch tool
or adding B roll, you can easily hide noticeable and harsh cuts
in your screen recordings, which will make your
video flow a lot better and just make
it more professional.
66. MKBHD dots: Now you'll notice that
in some of my videos, I use these moving dots
in the background, which were basically inspired
by MKBHD because he uses a very similar style of background to showcase
something on the screen, for example, images or
photos or something else. I really like the
aesthetic of it. Now, these are
obviously not exactly the ones that he uses
because I made them myself, and I'll show you how
you can do that, too. This will probably make
your computer pretty laggy, so just be prepared. So firstly, you're going to need a color mat set to black and then duplicate
it twice more. So I have a black color mat on the bottom with
completely no effect. Then I have two on top of it. Let me start with
the top color mat. This one has the VR
fractal noise effect with these settings. You can copy them if you want or experiment with them to have
different style of dots. I also animated
the evolution from 55.3 degrees all the way
over to 50 times 84 degrees, this basically dictates how
fast the dots are moving. So you can play
with the evolution. And so this color mat
only has this effect. Now, the second color mat
has three more effects. The first one is a cell pattern, and this basically makes the have the cell pattern
set to bubbles, the contrast set to the maximum, which is 10,000, and I
have the size set to 35. Then I have a turbulent
displace effect which makes these dots move. So without this effect, the dots just look steady, and I also have their
evolution animated with key frames which
dictate how fast it moves. And the final effect I've applied to the
second color mat is the Track Matt key. And the composite is set to mat Luma and the mat
is set to Video three. This video three is
basically this color mat. So if you have your top
color mat, for example, on video track number five, you would select Video five
inside of the Track mat key. So basically, wherever
this clip is, you go onto the second color under the track mat key, you choose whichever layer
that third color mat is. So for me, it's on video
track number three, and I will select Video three. Now, at the top here, if I hide everything else, I have just moving
dots like this. It's just basically
a dotted texture that I change the position of. It's very simple to do. You'll see that the position for the first texture is default, then for the other
one, it's different. For the third one, it's also different for the
next one and so on. I just cut this texture up, then changed the
positions of each of these little clips and then duplicated all of them
across all of the sequence. So this is how you
can make these moving MKBHD inspired dots for the
background of your videos. Of course, feel
free to experiment. I've made separate versions
of these dots myself, so these move slower. These are a little different, and these ones have
different movement and just move vertically
a little bit.
67. Value And Time Ratio: Viewers will choose
the highest value and time ratio when deciding
which video to watch. A viewer wants as much value in as little time as possible. Now, value is relative
and it's also perceived. The real value of the video
usually is not the same as the value that your
viewer perceives when choosing to
watch it or not. So if you can give infinite
amount of value to the viewer in as little time as possible and other
videos can't do that, then the viewer will choose
to watch your video. Now, time is very simple. It's the length of your
video or the play. Value is a little bit more complicated. It can
be many things. It can be entertainment,
education. It can be how funny
your video is or how familiar the viewer
is with your channel. The more familiar the viewer
is with your channel, the more perceived value that he's going to
get from your video, compared to someone
who he doesn't know. I really like how
Veritasium once said that the hardest part on YouTube is letting people know
that you even exist. Most times the
viewer will assess the value of the video
just from its packaging. So the thumbnail and the title. And that's why the thumbnail and the title are very,
very important. They're as important
as the video itself. If a viewer doesn't
click, they will not Now, what's cool is that if you've already
made the video, you can't really change it. It's there on YouTube,
and to change it, you can only delete parts with the built in
YouTube editor. But if you want to add
something, it's impossible. But that's not the same
with thumbnails and titles. If your title and
thumbnail sucks, you can simply change
it to a new one. This strategy can
revive old videos that were underperforming
because of bad packaging. However, don't use clickbait. If the viewer perceives the time and value ratio
to be extremely good from the thumbnail and
the title and then clicks on the video to
realize that he's been trick never going to watch
another of your videos. That's why it's very important
to deliver and if you can overdeliver with the video after the viewer
clicks on the title. So these two things
go hand in hand. You want the viewer
to get as much value from your video in as
little time as possible. But also, you don't want
to overpromise what's going to happen because expectations are
the thief of joy. If your viewer expects
the video to be extremely good and entertaining,
and then when he clicks, he sees that you're
just rambling something that wasn't even
related to the thumbnail, he's immediately going to quit watching and then never
watch your channel it's best if you reinforce the viewer's
decision to click on the video within the
first 30 seconds. For example, if your video
is about the latest iPhone, don't start it off with a travel montage where you're going to
pick up the iPhone. Just immediately
show the iPhone. That's what the viewer came for. He's going to get
the value that he expects in as little
time as possible. So that's one thing
to keep in mind. Think about it this way. A
viewer will always be looking for a reason to quit watching your video as soon as he clicks. So don't give him that reason. Give him a reason to stay,
to watch till the end. And the only way to
do that is to provide as much value as possible in
as little time as possible. But again, value is subjective. One viewer may see value as education or some
sort of information. Another viewer will find value in just seeing
a familiar face, or another one will see value as entertainment or
laughter or relaxation. Many forms of value that
viewers look for your videos. You have to know
what your audience expects and then
deliver on the promise. So to summarize, a viewer
will always watch a video that has the highest perceived
value to time ratio. The more perceived
value your video provides in as little time
as possible, the better.
68. Become An Active Viewer: Good artists copy,
great artists steal. The best way to improve on YouTube is to become
an active viewer. Make it an experiment to analyze yourself when you watch
YouTube as a content consumer. Think about why did you
click on this video? Why did you not
click on that video? Why did you quit midway
through watching a video? Why did you watch all the way to the end? Analyze everything. How did the YouTuber
begin or end his video? What clever words did he use
in the title to hook you in? Why did you click on that thumbnail and
not this thumbnail? Can ask these
questions in your head as you use YouTube as
a content consumer. Over time, you learn to transfer this knowledge to
your own videos and make them a lot better. The only thing you need to do is make videos that
people want to watch. That's what it comes
down to. And if you become an active consumer where you try to notice what made you watch or what made
you not watch, then over time, you'll start
noticing and adding up simple things that make a video that others
want to watch. So when you watch a video
that you want to watch, chances are it has some elements that would make
your viewers watch your. Just need to notice
those elements and apply them to
your own videos. And if you try to do
this a few times a day, whenever you watch YouTube, these little things will add up in your
subconscious mind, and your videos will
naturally become better because you'll try to
include the little changes, effects, cuts or thumbnail
colors in your own video.
70. Enhancing Audio: So here I have a recording for some of the lessons
of this course, and I'll show you how I
process this recording. So for Editing my audio, I use a software
called Audacity. It's basically just a
free open source software that anyone can download
from the Internet. It's available for
Mac and Windows. So just go to their website
and click download Audacity, you install it just
like any other app. So I'll open Audacity and
drag in my Sound Recording. You'll see that it's pretty
long and that I make a lot of mistakes when
recording my Voiceover, but nevertheless, here's
how I process my Audio. The first thing that
I do as soon as I hit record is just wait 10 s, just sit completely
silently and just wait for 10 s. This gives me this silence in the
beginning of my clip, and I will use this silence to remove the silence from
the whole recording. So I'm going to select the silence by
clicking and dragging, then go into effect
and noise reduction. What this does is it basically
analyzes this clip of my Audio and keeps note
of the noise profile. So it gathers information for what to remove in the
rest of my recording, I'm going to click
Get Noise Profile. Nothing will happen. Then I'll double-click to select
the whole recording, go into effect and noise
reduction one more time. I will leave all
of these settings default and just click OK. It will do its magic
and the hissing noise in the background will be
gone if there was any. The next thing
that I do is again double-click to highlight
all of the clip, go to Effect and normalize. I have it set to my
end keyboard shortcut. What normalisation
basically does is it changes the volume of your overall clip by a fixed amount to
reach a target level. So it basically makes
your Audio quieter or louder based on
a certain standard, which is usually
minus one decibels. So I'm going to leave minus one decibels
here and click Apply. You'll see that my Audio
became slightly more silent. Next, I'll go into effect and compressor for me the keyboard
shortcut for that is C, to set your own keyboard
shortcuts within Audacity, you can go into Audacity
preferences and then Keyboard. Here you'll be able to
set keyboard shortcuts, highlight your clip,
Effect and compressor. For most of my recordings, I Use these settings
for the compressor, but the default ones
that come built into Audacity work just as fine. If you want to use my settings, you can copy all of
them right here. And if you change
something and you want to go to the
default preset, just click Presets and settings, Factory Presets and defaults, and then click Apply. What a compressor does
is it basically makes the quieter parts of your audio louder and louder part quieter. So it just compresses everything and makes it
so the person listening can hear the quieter parts and the louder parts
are not super loud. Once I have the
compressor applied, I'm going to normalize
the footage once again. So again, go to Effect and
normalize. And that's it. I'm going to zoom out
to see if there are any strong peaks like this. This is probably just a
mouth sound that I made. Nevermind. It's me sneezing
and sometimes there will be loud peaks like this, which will make the
normalization not work. So if there's one
super loud part, it's just going to decrease the volume of the rest
of the recording. So what I can do is highlight this part and hit
Q on my keyboard. And what Q does is it
basically silences a clip. So I'm going to search for Q
within Keyboard Shortcuts. And you can see that
it has silence audio. It's under the Edit menu
and remove special. If you don't want to set the
keyboard shortcut for this, you can go to Edit, Remove Special, and
then silence Audio, and it will just silence
this part of the audio. The reason that I don't remove this part of the
audio with Command X, which basically
cuts out a piece, is because I'm going to sink this Audio To my
screen recording. And it would make it
super annoying and almost impossible to sink my Audio
if it was a different length. So the way I do my
recordings is I record this Voiceover on my iPhone and then I'm going recording
the screen as well as the computer's microphone
on my computer itself. The reason I'm doing this
is because I can get my iPhone closer
to my mouth and I can't really get my laptop's
microphone close to my mouth with the ability to
see the screen very well. That's why I'm recording
it separately. And so if I remove this
part of the audio, I will now have
trouble sinking it up with the audio
that comes from my computer because
the audio from the computer is just going
to be a little longer. Once I silence it, I'm going to double-click and normalize my Audio once again, it should become a little
louder, and it did. Now I'm going to double-click
to select it again, go to File, Export
and Export Audio. I'm going to leave all
these settings default, then pick a name for my clip, and then click Save. I'm going to click, okay, and this will be exported. So now I can import this into Premiere Pro and use it
as my Voiceover audio.
71. Balancing Audio Loudness Levels: Now here I'm inside one
of my video projects and I'm going to show you how
to balance out the audio. As you can see, I used different audio tracks for
different parts of the audio. I Use the A1 track and the
A2 track for my Voiceover. The reason why I need
to trax is because overlap my audio clips
on top of each other. This helps reduce
empty space in between sentences and are
not sure that it works in terms of
audience retention. And it also takes a lot of time. So you should
probably not do this, but basically what it
is is just the end of one sentence overlapped
with another anyway. So I have my Voiceover on A1 and A2 tracks and I
put nothing else here, so no sound effects
and no music. Then on A3, A4, and A5, I have sound effects. These three tracks are always reserved for sound effects
because I sometimes have to stack them on top of
one another and they usually require three
tracks at most. I always put music
on track number 86. And there's a very good
reason to do this. There's one more panel within Premiere Pro that I Use that
I haven't showed you before. And it's the Audio Track
Mixer to enable this panel, go to Window and then under Audio Track Mixer,
select your Timeline. So it will basically
change based on whichever Timeline you're on. So if I go to another video, it now changed to this Timeline. And if I go to the previous one, it now changed to this Timeline. And as you can see, I can balance my audio
within these meters. So this says Audio one, and it basically means the
audio of the first track. This is Audio two, and this is the audio
of the second track. This panel basically
allows me to add audio effects or change
volume of the whole track. So instead of me having to change the volume of this clip, then paste all the attributes
to all the other clips. I can just do it in here and
the fact the whole track, That's why I have the Voiceover, all the sound
effects and music on separate tracks so I can change
their volume separately. So I'm going to solo
the first two tracks, which are basically only
going to play the Voiceover. And when I play
it, you'll notice that in the audio meters here, the audio levels hit
between zero and -12. And this is where I
want my audio to be. So if it's not there, let's say it's somewhere
like here, it's very silent. I'm going to boost up the
audio with these meters. You can either do
it with this slider here or just input a
number. So let's say two. So it's going to be plus 2 db. I'm going to do plus two
for both of these tracks because my Voiceover is
on both of these tracks. And now when I play it, the Voiceover is loud enough. Now for this video, I had many different
sound effects and I wasn't really consistent
with their placements, so I changed volume of
sound effects individually. So this is a whoosh. The Effect and the volume
of it is actually -10 db. And this is a typing
sound effect, and the volume is also -10 db. But for example,
here it's -3 db, so it's not consistent
and I didn't do it through the
audio track meter, but usually I'll keep my sound
effects within this range. So in-between -24
db and the -18 db. And finally is the music. I always set my music to be
in-between -24 and -30 db. So here you can
see that I've set my A6 Audio Track Two -24, and everything that's in
this track is at -24 db. Now if I play back the video, it is that Sound
effects are too loud. I can simply come here and
just take these three just a little down so that the sound effects become
a little quieter. And if I notice that
my music is too quiet, I can simply bring this
up a little bit and the music Across all My video
will become louder. So to summarize, I tried to keep my Voiceover levels in
between minus three and -12. My sound effects in
between -18 and -24, and my music in-between
-24 and -30 db
72. Exporting Footage: You've added transitions, some animated text
to your video, and now you're
ready to export it. Now, make sure to unmute all
the tracks that you have muted before because
they will not be audible in the final exports. Also, if you have gaps
in your sequence, you can close them by
using the Delete key. Or if you want to export only a specific portion
of your sequence, you can come to the
beginning of your Clips, kid I on your keyboard
to set an endpoint and then come to the end and
hit 0 to set an out point. And now you're ready to export
a keyboard shortcut that I always use to export my Clips
is Command or Control M. On Windows, it'll bring
up the Export Panel. Now, another way to get
there is at the top, just click this Export button. And here you can set
settings for your footage. The best preset for YouTube videos is already
built into Premier, so you don't have to
configure anything. Click here inside of
presets and simply scroll down until you find
YouTube for K ultra HD, if this is not here, press more presets and
then look for YouTube. Here you can favorite
that these presets, and then they will show
up in the preset menu. So if my sequence was in for K, I'm going to use
the fork a preset. If I want to export
a ten ADP video, I can use this preset and so on. I'm going to select
it and click okay, here in this panel, you can see two columns,
Source and output. Source is basically what
you have in your sequence, and output is what
you're going to get after your
video is exported. Now let's take a look
at the resolutions. You'll see that my
Source video resolution is a lot smaller
than the Export one. And that's because I've
applied this preset. If I wanted to keep my
original resolution, what I could do is
customize the preset. I could go into video and
here are fine frame size. So basically the resolution that it's going to export that. But I know that my original
resolution is a lot smaller. So what I can do is click Match Source and you'll see that the resolution in the output
has also been updated. In this panel, I can
tweak just about any setting about my video that I want to change
for the Export. In the video section, I can also click More and see even more settings that
I could customize. For example, the bit rate, but the preset that I
chose before already set very good settings
for a YouTube video. So I don't have to think
about any of this right now. The only thing that
I wanted to change, what's the resolution
of my Export, what I would potentially
be interested in, as well as changing the FPS. You'll see that now
it's at 60 FPS. But what if I want to export at 30 FPS instead of going to
edit and then sequence, sequence settings and changing the Time-based of my sequence. I could instead use to edit in 60 FPS and then
Export in 30 FPS. You'll find the frame rate below the video resolution
in the Video tab, I will unselect this
box so that it doesn't match the source clip
and then pick 30 FPS. Now you'll see in the
output it says 30 FPS. Now here in the filename, you can also set the name of the new file that's
going to be exported. And you can choose the
location by clicking here. I'm happy with my desktop, so I'm just going to click, Save and then Export. Since my clip wasn't super long and there weren't
too many Effects. It Export it very quickly. Now if I go to my desktop, I'll see Footage one, and this is my footage. If I play it, there should be an animated text
and the transition. There's the text and
there is the transition. One more thing that I can do in the Export tab is
saved my preset. So now what I've done is set match source for everything
else except the frame rate. And I can save this as a preset. You'll see in the
preset section, it now says custom
because they've customized this YouTube
for key preset. If I want to export all of my videos with this
custom preset, instead of having to go into YouTube for K and then change it up every single time I can
save my own custom preset. I can click on these three
dots and click Save Preset. Then I'll choose a name for it. Demo preset and click. Okay. Now, even if I have another
preset set to my footage, I can simply click here
and find my demo preset. And when I selected, all of the settings will change to the ones that
I wanted before. So this is how you export your footage inside
of Premiere Pro
73. Conclusion: Congratulations, you've done it. Thank you for embarking on this incredible journey with me. I hope that now you'll
have all the tools that you need to make
incredible YouTube videos. Because look, all that
it takes is analyzing other people's videos to
see what works or doesn't. Then applying those
lessons for yourself, recording the video
and putting it together in your video
editing software. So if there's one
thing that I hope you take away from
this course is that creating videos
doesn't have to be a super hard and
daunting process. You can just have
FUN experiments, see what works or what
doesn't, and go with that. That's why I encourage
you to share the video that you've made
in the project gallery. I really hope that
this course was helpful and I'm looking
forward to your feedback. Could you do me a
favor and helped me improve by leaving a
review for this course, I hope that you enjoyed and
gain some knowledge from it. Thank you once again and good luck creating
amazing videos
 Thaomaoh, Learn Creatorpreneur Skills