Transcripts
1. Course Intro UV Mapping Bootcamp Master Unwrapping & Texturing in Blender: Stretch textures,
misaligned maps, distorted checkerboards, I've been there, and
I've built the scores to fix it all. Hi, I'm Luke. Over the last five
years at Fred Tutor, I've created stylized diam sines and expansive
environments you can run around in building
not just the art but the UVs that
hold it together. I wanted to create an
all in one UV focused course to pass on everything
I've learned about clean, production ready and
wrapping in blender. This is a UV mapping boot camp, master and wrapping and
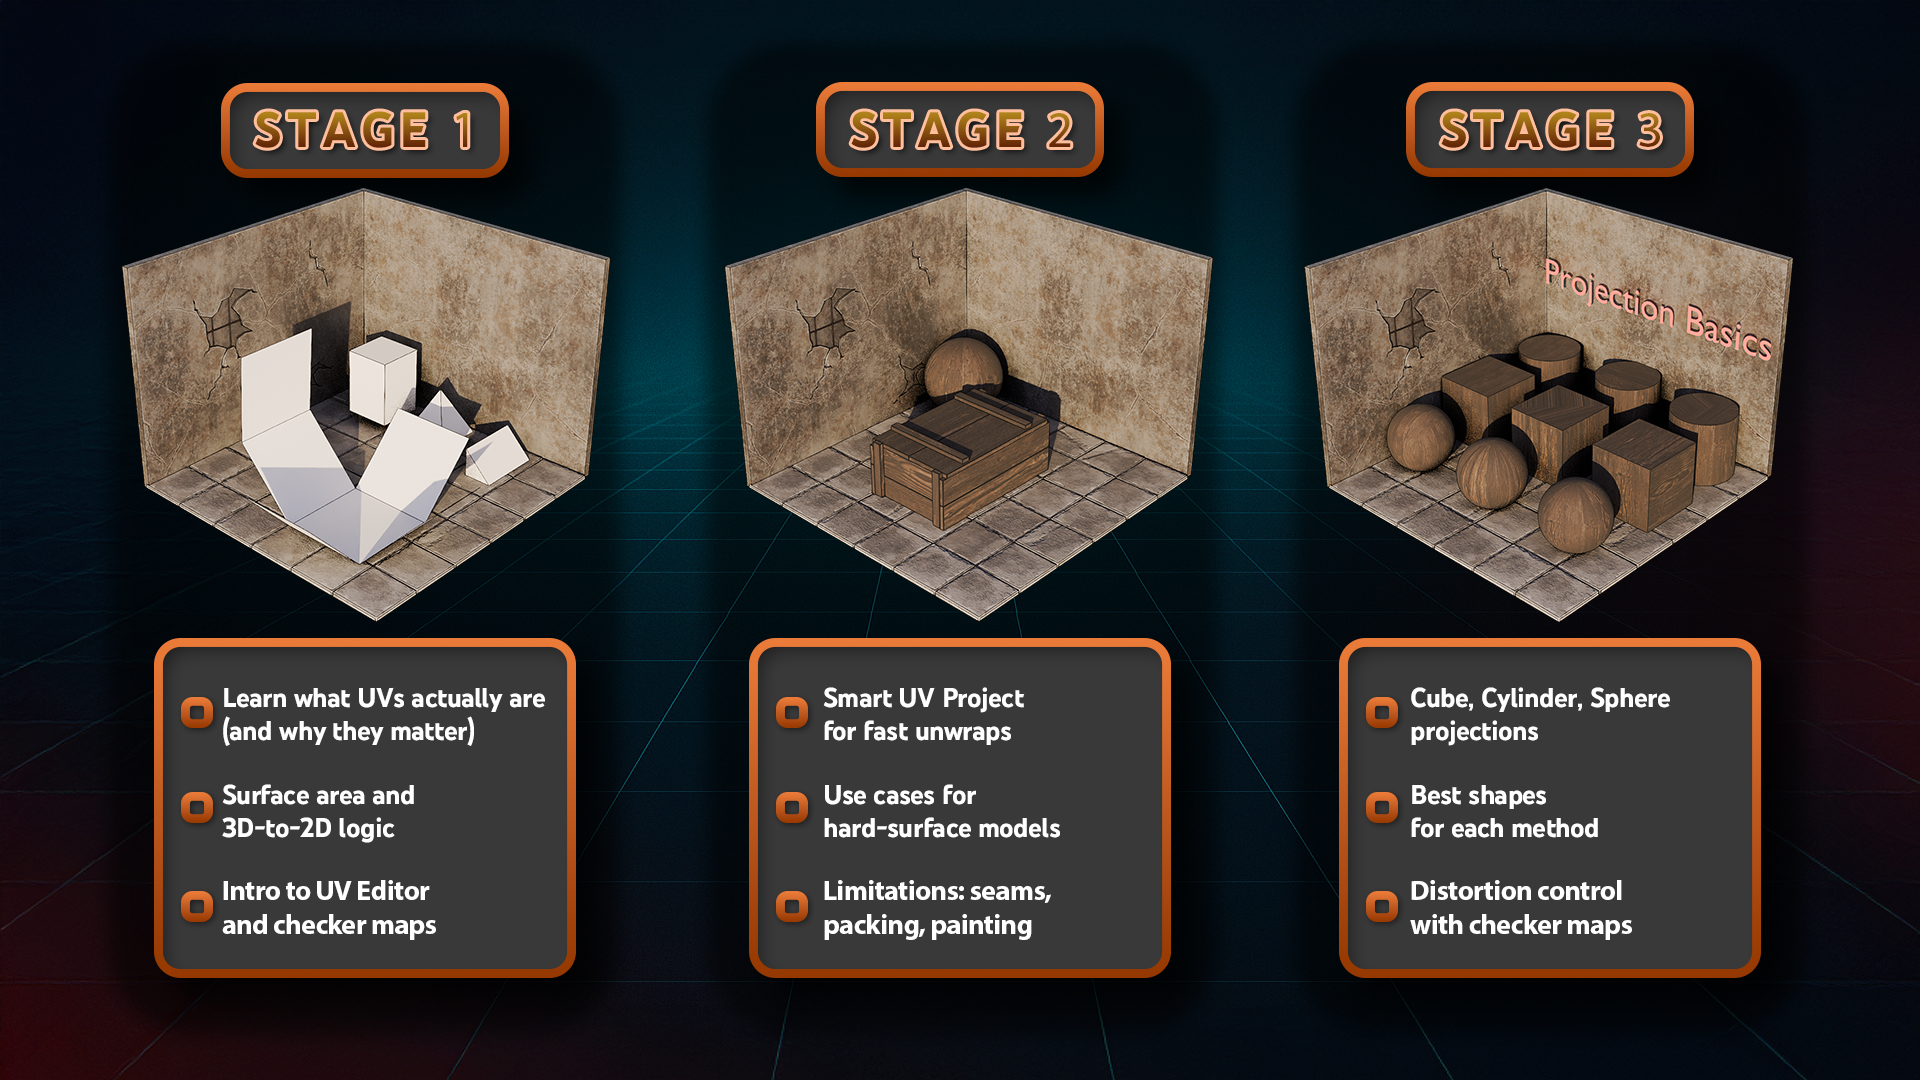
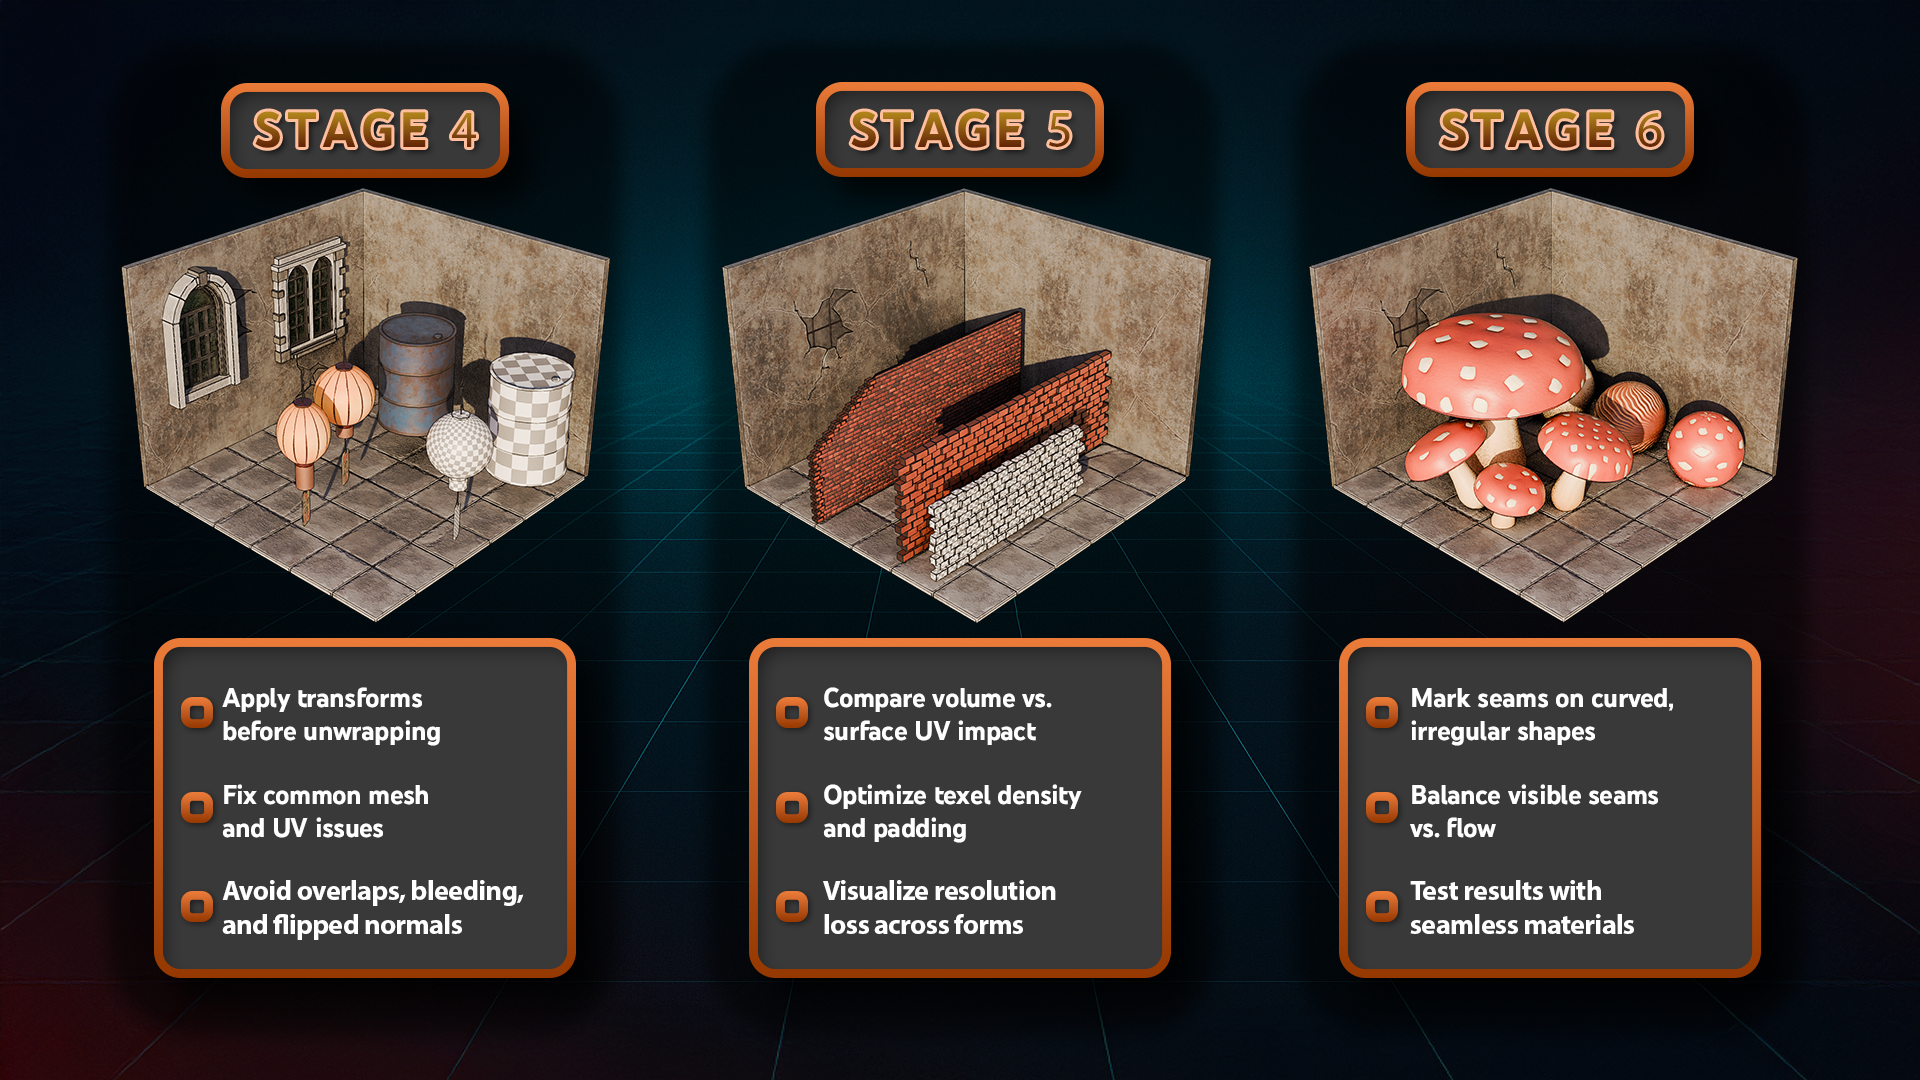
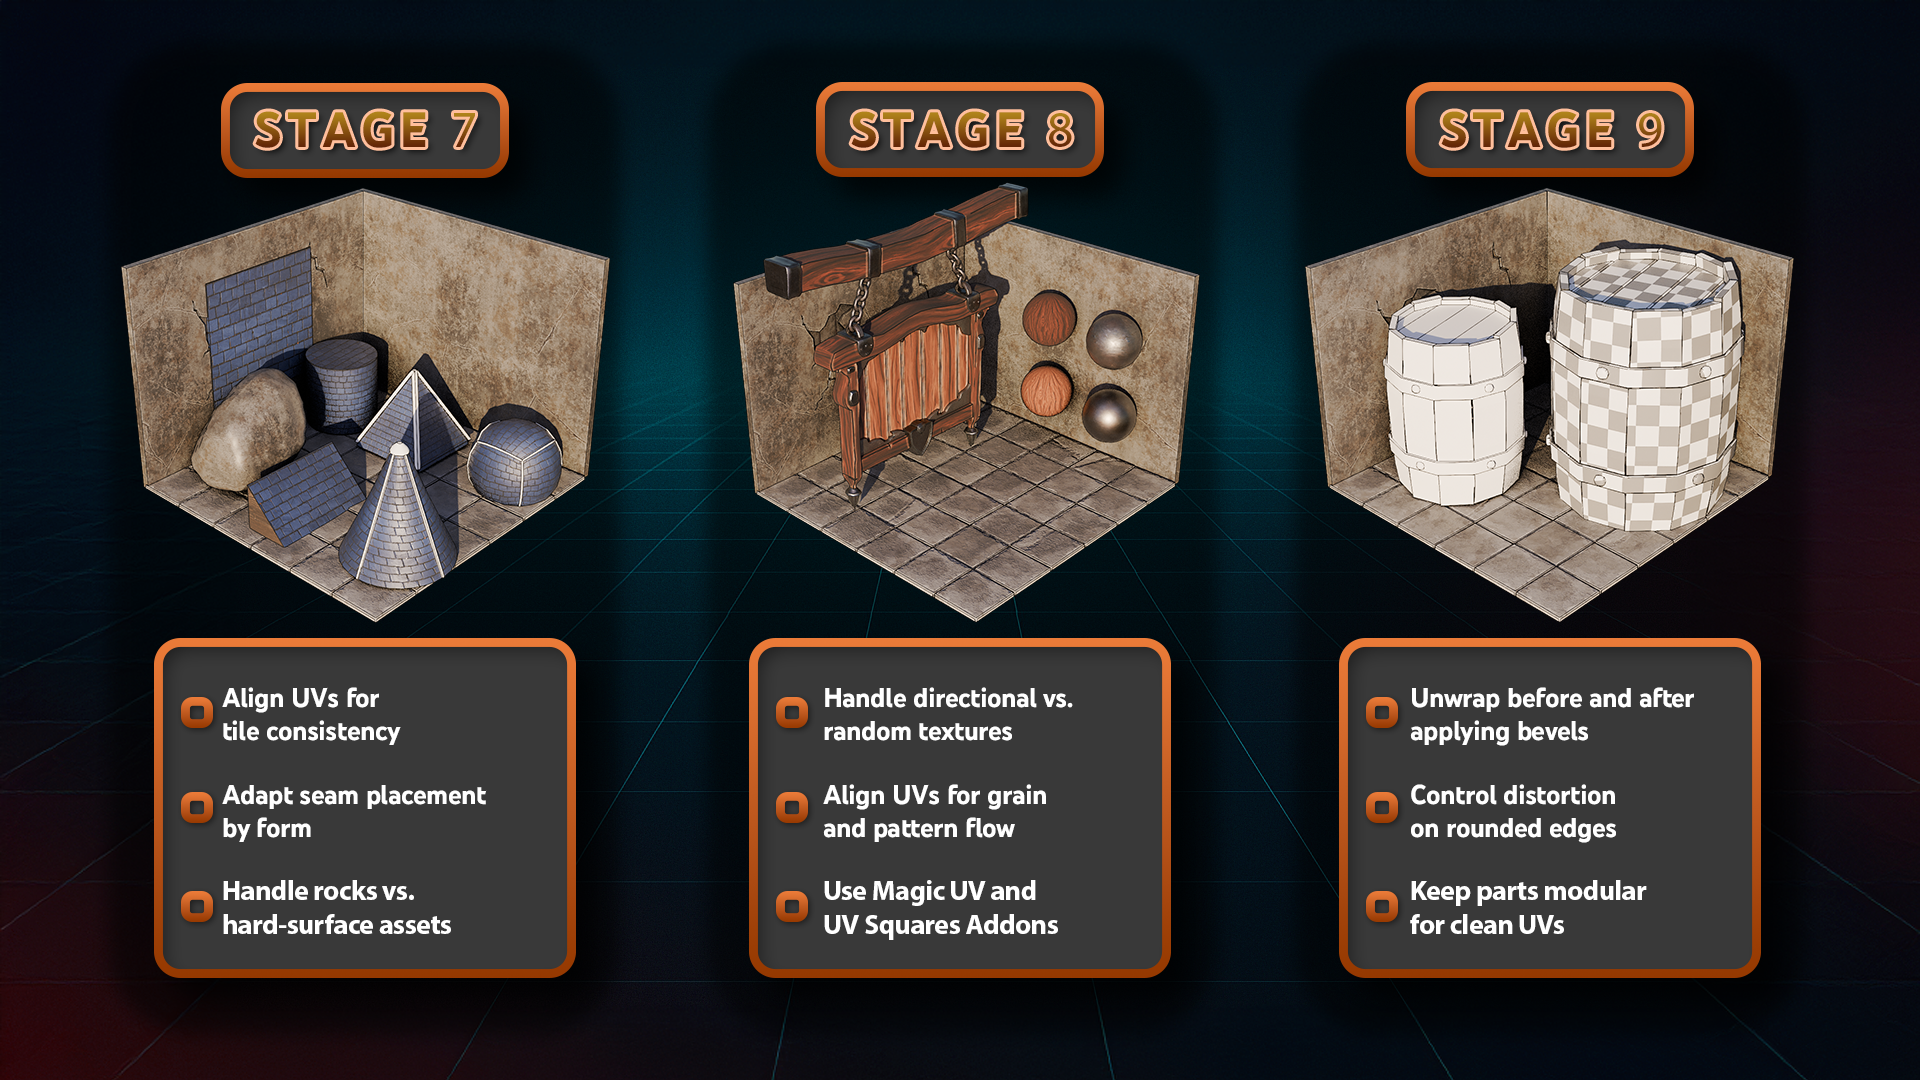
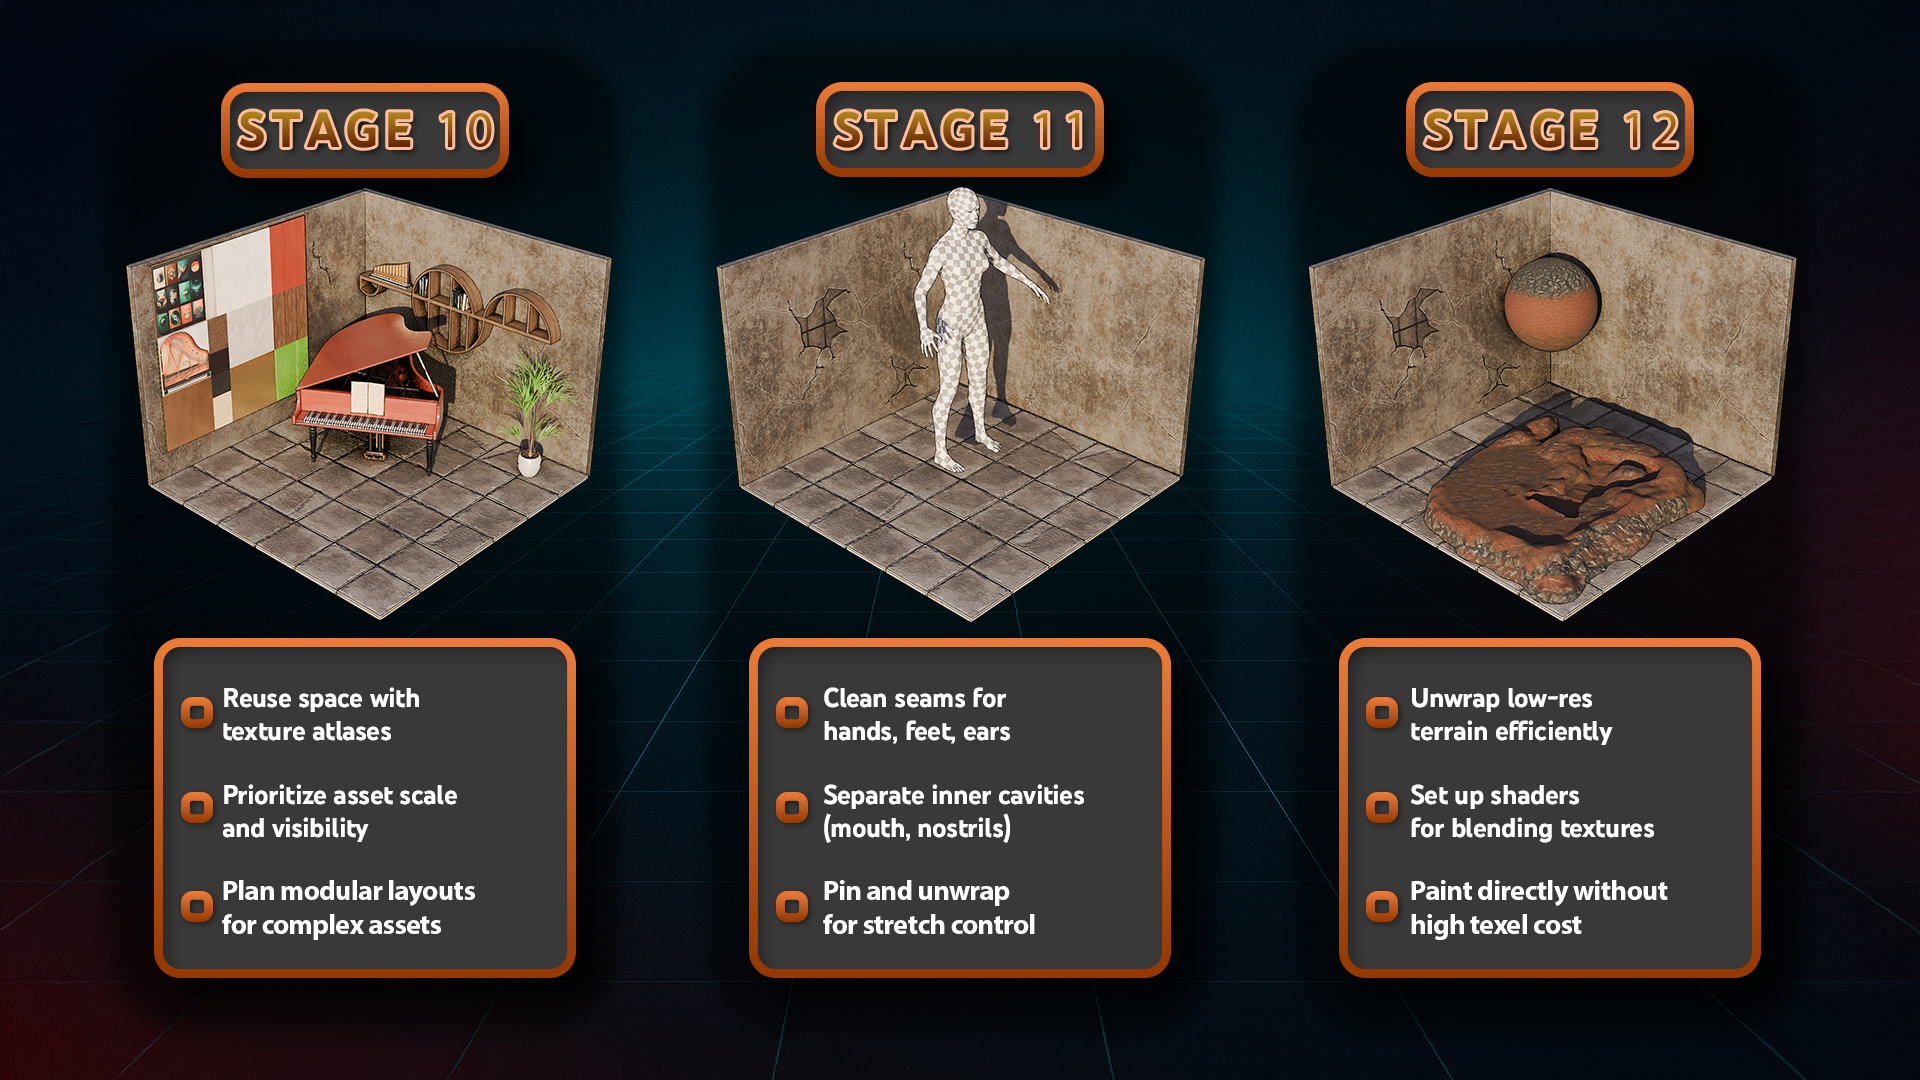
texturing in blender. A complete 12 stage journey through every major
unwrapping technique. From beginner basics to
complex asset preparations. You will learn
Smart TV projection and manual seam workflows, plus cube cylinder and
sphere projections will dive into textile
density, mid map padding, flip normals, distortion fixes, and unwrapped strategy
across barrels, mushrooms, crates, stylized sins, terrain, and even humanoid characters. This course doesn't
just follow results. It explains the why
behind every UV decision. You learn the real
production style and wraps that stand up in blender, unreal engine, and substance. The resource pack is included, and it is a master blender file with all 12 stages
of the course, giving you structured hands
on practice to sharpen your UV skills on
every type of asset. I've compressed years
of trial and error and real world fixes into this
one focused bootcamp. So you can stop wrestling with UVs and start designing
with confidence. So let's de mystifye wrapping
one asset at a time. Enroll now and start mastering
UVs in Blender today. Oh
2. Mastering UVs Mapping Textures with Precision: Hello and welcome, everyone
to UV mapping boot camp, Master and wrapping and
texturing in Blender. All right, so let's get
into the basics and go over what exactly are UVs and how
we make use out of them. So firstly, by definition, UV mapping is a process
projecting three D models onto a surface of two D space so that you
can apply textures of it. Essentially, if we
have a look over here, we get ourselves a model. We're able to texture it
using the UV coordinates, which then applies the
texture onto a three D mesh. What do the UV mean? Well, U and V are basically
X and Y coordinates. It is within a two D
space and honestly, I'm not sure why
they're not just called X and Y
coordinates as is, as there would have been way
less confusion, I think, if that would have been the
case, but it is what it is, and essentially U is going
to stand for a horizontal, that's going to be V is
going to be a vertical, and everything in here is going to be this
space over here, giving us this nice little
square we have, like so. So why are UV
coordinates important? Well, in order to
texture the object, we need those coordinates. Whether it's color, roughness, normal maps or anything else, they're going to need those
coordinates in order to determine where to place the
textures on a free D object. So, for example, for
this lantern over here, we used not only
roughness, normal, base color and metallic, which is the standard
for a PBR material. We also used emission, which allowed the lantern to glow whenever it's placed
within a certain scene. But all in all, all of these texture maps used this same UV spacing
that we see over here, and all of them can be
located in the same sections. So even though you can see the information changes
based on what it is, if it's, for example,
base color, metallic, you can still see that the
placement of these objects are still going to be located in those same
identical locations. So whether it's base color, metallic, roughness, et cetera, et cetera, they will still have those same locations within that same box we talked about. Now, going back to the Vs, they can be represented in a huge variety of
different ways. There is no proper,
correct answer to them. If we have a look over here, we can see that, for example, this barrel only used
this amount of space because it was shared
with different objects. We're going to cover that later. Or, for example, we
even have this kind of a setup which goes outside
of the normal UV space. You might have heard
that like, Hey, it might not be correct to have a UV coordinates oxide
of the UV space. We're going to cover that in the lessons further
down the line. But all you need to know is
that at the end of the day, if it helps you generate
exactly the desired results, it's going to work out
quite well for you. The only thing that
you need to be concerned whilst working
with that kind of stuff, are bad UVs, which
can be stretched out, broken textures, if we have
too many little parts. Good UVs usually are clean, which means that
they're not overlapping or not way stretched
out, consistent, which would be something to
do more with texture density, which we're going to cover that in a bit and professional. So professional, what
it means essentially is whether it fits
the right scenario. And again, we're going to
cover that part a little more down the line on what kind of effect we
can get out of UVs, essentially, how to get from point A to point B in the
shortest amount of time. So we're going to get the best result in the
shortest time. The UVs are the
cornerstone, I think, for any game asset VFX, animation, all of that
will need to use UVs. Even procedural
materials will need a certain amount of UVs
if we're using that data, although that can be a
little different if this, for example, uses a projection
based setup or whatnot. But again, most of the setup will use the UV
coordinates or texturing. And we're going to go back to the procedural materials
once we reach that point. In terms of real world analogy, you can imagine
yourself wrapping a football with a single
sheet of wrapping paper. This kind of analogy
might help out. We're going to go over
different analogies as we go further down the line, especially for more organic or more hard surface
type of modeling. But here is a perfect
bit of explanation that essentially we're going to need to in order to turn
a freed object, we need to cut it and fold
it just like a piece of paper properly, or
we'll end up with, well, crinkles and in our case, what we talked about before, stretching or bad textures. My main examples will be making use out of
blended specific setups. So in that regard, the
software allows us to edit and unwrap a model, just like most of the free D modeling software these days. This process can be either
automatic or manual. We're going to cover both
of these techniques. The procedural would be more for things like geometry
nodes and whatnot. But once you understand
the basis of UVs, I think it will help with the procedural
understanding as well. We will talk about
visualization of UVs, how to make use out of
checker maps, and such. Well, again, for distortion
and stretching to make sure our setups are
clean and neatly set up. That's going to be it
from the first lesson. Thanks so much for watching, and I will be seeing
you in a bit.
3. Essential Blender Navigation & Duplication: Hello and welcome back everyone
to UV mapping boot camp, Master and wrapping, and
texturing in Blender. Before we get started
onto the setup, we're going to need to make sure we have the downloaded file, which is going to include
within the resource packet, it's going to include
a blender file. Make sure you extract
this file and zip it, and then afterwards, you're
going to get this file which will include all
the necessary setup. But before we go
over everything, I'm going to play a quick introductiony video
to familiarize everyone with the basics of blender and how to
navigate within the setup. So without further ado,
let's get into it. Welcome, everyone to the
basics of blender navigation. Now before we begin, it's
important to understand how the axises work within blender. So we can see at the
moment, we've got a green line going this way and a red line
going this way. This is called the Y axis, and this one is
called the X axis. We also have one
that is the Z axis, which we can't see right now. It doesn't actually come in with blender viewport as default. But if you want to
actually set it on, you just come up to the
top right hand side, where these two interlocking
balls are and just click the Z axis, and
now we can actually see. So how do we actually move
around the blend of viewport? There's a number of
ways of doing this. One of them is over on
the right hand side here. You can see if are over here, it's the zoom in and Zoom out. I can actually left
click and move these up and down then to
zoom in and Zoom out, or I can use the actual
mouse to actually zoom in and Zoom out using
the actual scroll wheel. There's also another thing
you can do with Zoom, which is holding control shift and pressing the middle mouse, and you'll see you have
a lot more control over zooming in and zooming out. Now the next thing we want
to discuss is actually rotating around an
object. So how to do? First of all, we'll bring
in a cube with Shift A, bring in a cube. Now, if I press the
middle mouse button and move my mouse left or right, you can see we can
actually rotate around. Unfortunately, though, we're not actually rotating
around this cube. So to actually fix
that, we need to center our view onto
the actual cube. We basically want to focus our view onto this actual cube. So to do that, we're
just going to press the little dot button on
the actual number pad, and then you'll see that we
actually zoom in to the cube. If I scroll my mouse wheel out, you will see now if I hold the middle mouse button
and turn left and right, we're actually rotating
then around the cube. And this is important because if I actually bring
in another cube, so if I duplicate this
cube with Shift D, move it over, so bring
in my move Gizmo. And now you'll see if I
rotate around this cube, I'm not rotating
around this one. So it's fix that, press
the dot button again, zoom out, and now
it can actually rotate around this
cube, as well. Now let's look at
something called panning, which means that we're actually going to move left and right. And we do this by holding the shift button, holding
the middle mouse, and then we can actually
scroll left and right around our
actual viewport. So now we've actually discovered how to zoom in and the
different ways we can actually do how to rotate around an object and
how to actually pan. We can also come up to
the top right hand side here and use these buttons here. So again, remember we're
looking at the Yaxs, the X axis, and the Z axis. If we come to our Yaxis
and click that on, you will see now that you've got a front view of the Y axis. If you click the X axis, then we can change it
to that red X axis, and finally, the
Z axis, as well. Now, there are
other ways as well that we can actually look
around the viewport, and these involve using
the actual number. If I press one on
the number pad, it's going to take me into
that white axis or front view. If I press two, it's going to actually rotate
that slightly. And if I press two
again, it's going to rotate it slightly more. Now, if I press
the eight, it will rotate it the other
way, as well. Now, to go into the side
view or the X axis, we can also press three
on the number pad, and that will give
us that effect. We can also press seven to
go over the top, as well. Now, what about if we actually want to go
to the opposite? So instead of going from
the bird's eye view, we want to come to the
underside of our model. Well, that's actually
quite easy as well. All you need to do is
press Control seven, and that then will take you to the bottom view of
our actual model. We can also do the
same inside view and on the x axis and YXs. So, for instance,
if I press one, I'm going to be
going into Y axis. If I press Control one, I'm going to be going into the opposite side on
the actual Y axis. Can also find these
options just in case you forget at the top left
hand side here under view. So if I go down to view and
go across the viewport, you can see here that this actually tells me exactly what I need to press to
get the viewpoint that I've just
actually explained. Now, we also have the button on the number pad, which
is number five, a number five button
in blender toggles between perspective and
orthographic views. Perspective view offers a more natural and
realistic viewpoint with objects appearing smaller
as they get further away. Mimicking human vision. Orthographic view removes
perspective distortion, making all objects appear
at their true size, regardless of distance, useful for precision
modeling and technical work. The other thing that number
five does, for instance, if I come to my
cube, at the moment, I am able to actually
zoom into the cube. However, if I press number five, I will not be able to
actually zoom into this cube no matter
how far I zoom in. I'll still be able
to move around it by pressing the little
dot button, like so. But if I actually
want to actually work on the inside of an object, I can quickly press number five, and then I can
actually go in and work around the inside as well. You're working on a laptop
or something like that or a tablet and it doesn't
actually have a number pad, you can also use,
if a press five, the actual squiggle key, which is under the escape board on the left hand side
of your keyboard, and that then will
give you pretty much the same options
as we had before. So we can click the right view. We can actually
click the back view. And we can click the left view, for instance, the opposite
to what we had before. So instead of pressing
one and three, we just press the
little squiggle line, and then we can actually view
whichever side we need to. Now, we're nearly at the end
of this short introduction, there are a couple more things
that you can actually do. If you come over to
the right hand side and you see here where we've actually got the name of the actual parts
within our scene, we can also grab them from here and then press the
little dot B to zoom in. So I can grab this one,
press the Little dot B, and that then will zoom us in. The other great thing about
this is we can also come in, Shift select them press
the little dot button, and then we're able
to actually rotate around both of these
cubes. Alright, everyone. So I hope you enjoyed
this short introduction to the navigation
within Blender, and I hope from now on, it won't be a struggle
navigating around the viewport. Thanks, lo, everyone. Cheers.
4. Advanced Unwrapping Mushrooms to Trim Sheets: Hello and welcome back
everyone to UV mapping, boot camp, Mass and wrapping
and texturing in Blender. Now, once we have the file, the resource pack doloaded, we're going to get ourselves
this blender file, which will include
everything that you need. All of the sections
are easily split up, and we can see each
one of them by just clicking on this
button over here like so. Now, I must mention
that to make it easier for us to go through
this entire setup, I did make some
adjustments in comparison to the lessons just to make
it easier for you guys. And that is mainly I made
the walls unselectb. So if you do want
to make the walls, if you want to select them, what you need to do
is you simply can go onto the upper
right hand section, go onto the restriction tab, make sure this
mouse is ticked on. And then afterwards, when
you go into the folder, you can just locate the walls and tick them on if you want to. But honestly, you
will not need to. It's just simply easier to make selections when
you're doing it like so. And yeah, we can go through
the sections together. So firstly, we have the
surface area exercise, which we're going to use to visualize how the
wrapping happens. Then we got ourselves
a little bit of a talk about
automatic UVA wraps. Afterwards, we go into
different types of projections based of
spherical projections, cylindrical cube projection,
all of that good stuff. Then we start going into the
troubleshooting section. So we'll go over how to fix more commonly seen issues
within UVN wrapping, especially within
blender itself. Then we'll talk a little about the difference between surface area and just the volume and how we can negate some of
that low resolution that we get from a high surface
area type of a mesh. Afterwards, we're going to talk more about organic UVN wrapping, which is going to be nice with this little mushroom over here. We're going to move
on to the section of more tilable type of
unwrapping with custom shapes. We're going to touch
into how to unwrap well, a basic rock and how
to set ourselves up with nice tiles
for specific shapes. If you can imagine,
like, a roof, that sort of stuff, that
would be pretty cool to know. I think that's quite
a needed knowledge when it comes to unwrapping. We'll go into making use out of directional noise versus
just a common type of noise, such as metal over here. We're going to go all into that detail and what's the difference when
the grain is going just one way versus just like some dirt type of grunch where it's just scattered
all over and how we can adjust our mentality for, well, UV and wrapping
when we know the type of material
that's going to be applied within that
specific section. In this section,
we're also going to cover a couple of addons, free addons, that is, they're going to be UV
squares to help us to kind of make UV Island into
more of a grid setup, and then we're going
to cover magic UVs, just to learn how
to copy and paste UV layout from one
object to another. Later, we're going to talk
about beveled barrel section, which is going to be
mainly showcasing what can be done
and what cannot be done when we're using bevels, how to unwrap certain parts when an object is
already beveled, or what kind of expectations we need to
have when we are just unwrapping a mesh when the bevel is used
with a modifier stab. Then we will go on to
zero to one UV space. In this part, we're going
to cover the atlas setup, basic material type
of square setups, and we're going to unwrap our
little scene with a piano, bookshelves and
the books itself, and a plant next to it. We're going to cover that
whole miniature type of environment by just using
one material of an atlas. So we're going to
learn how to do that. Then next up, we have
human unwrapping. So this one is going
to teach you how to unwrap more humanoid
type of shapes, what we do for
creatures and whatnot, all of that good stuff within
human wrapping section. Next up, we have ways
for negating some of the UV and wrapping type of issues when we have a
bigger type of mesh, such as this terrain over here, what can we do when we need more resolution of our objects? So this part will show
you how to make use of vertex painting to overlap
multiple seamless texture, and even though
we're going to use one simple UV and wrap
we're going to learn how we can get most out of that U V island to
texture larger objects. Then next up, we're going
to learn a little bit more about procedural
materials and masks, meaning that we're going
to basically go over the basics of how we
can adjust whether it's a normal seamless
texture or whether it's a mesh that just simply needs more resolution or
more detail within it. We're going to learn how to make use out of decals firstly, to add smaller detail and to avoid showing more repetition, for example, out of
seamless textures. We're going to go into
how to make use out of custom masks for edgewaar, for cavities, all
of that good stuff. We're going to learn how to make use out of it both within a procedural generation
of cycles render engine, as well as we're
going to cover how to do that in real time engines, how we can potentially
bake out all of that stuff onto
our other meshes. Next up, we have trim sheets. So this one is going to be quite interesting one
because make use out of a single trim sheet
to add a bunch of detail onto our box
set up over here, and we're going to have
this claw machine over like So you can
practice your skills to manipulate your UV tiles to
get unique patterns and to create a design for
this low machine that will look great in
both high resolution, and it will be quite
nicely optimized. Of course, this last part
is the most complex. That's why we're leaving
it for the last section. But that's pretty much it. That's the whole overview of
the entire resource pack. We're going to go through
every single one of them step by step until we learn everything that you
need to know about UV editing and all the necessary information
that you need to know. Well, to manipulate them to get the best
results possible. That's going to be it for me. Thank you so much for watching, and I will be seeing
you in a bit.
5. UV Islands, Packing & Texel Density Control: Hello and welcome back everyone
to UV Mapping Boot camp, Mass on wrapping and
texturing in Blender. Alright, before making use
out of the resource pack, let's go over the main
concepts of the QV, the main keywords
that we should know. And for that, I'm just going to go onto the resource pack. Everything is turned off, and I'm just going to go
ahead and click Shift and A, create myself a cylinder, just to use it as an
example on what it is. If you're feeling
lost at any point, just remember that on
the left hand side, you see all of the keystrokes being clicked off
whatever I'm doing. So right now, for example,
I can click the dot on my keyboard just to
focus on this object. And right away, what we're
going to do is we're going to go onto UV editing. The reason we're going
onto it is because it allows us to essentially rearrange the whole layout of blender for the
specific purpose, in which case, it is,
well, UV editing. And I'm just going to use
it as a basic concept. Again, I'm just going to
reposition onto my object. And you'll notice that
we have two windows. One is for Fred. Three D view, and another one
is for the two D editing. Right now, we're not
going to see anything and we might even see an image, which is seen like that from
previous selected object. If we want to see the
UVs of this object, all we have to do is go on to Edit mode and then we'll
be able to see the UVs. I'm also going to go ahead and click on this X
button over here, which is going to take off that image that we
previously had. We can just start with a
fresh blank grid for the use. So these are UV islands. If you're not seeing
anything in the viewport, it might be because you don't have the entire
object selected. I have this nifty
little tool turned on. We're going to go
over what it does in later lessons within a
troubleshooting section. For now, though, I'm going
to go ahead and disable it, and you'll notice that once I disable it, nothing is shown up, and the reason for it
is because by default, in order for you to see the UVs, you need to make sure
you make a selection. So by clicking A within
the Free D view port, I'm making sure my mouse is hovering over the
free D view port, I'm going to get those
UV tile cells back. And within here, we
get the UV shells. So going back onto
the explanation, these are UV islands. Each and every
single one of them, are considered
separate UV islands, and they can be moved
around, like so, and you'll notice that even though they are part
of the same object, these UVs are split. The movement that we can
do by the way within the UV editing space is very similar to what we can
do in the free D space. We can click G to move our piece around or
selection around. We can click S to
scale it up and down. Like so, and we can click
R to rotate the UVs. Right now, we're not
going to see anything because we have no texture, no material on our mesh, and we're just
getting familiarized with the UV editor itself. Next thing that we
should know is Seam. Seams are essentially
what would allow you to break object into
multiple pieces. There are other ways of breaking an object
into different pieces. But what SEMs allow you to do is control certain
unwrapping functions, and it could potentially
give you this type of setup. The setup that we have over here was not using any of the seams, so we're not going to
see any seams in here. Going to cover that
more in later lessons. The default primitive shapes that we can create
within blender. So all of these shapes
that we have over here, all of them will have
certain UV maps. They are not unwrapped
whilst being created. Instead, their UVs, these parts over here are part
of the mesh code, meaning that there's no
specific unwrap that would just give you by default this
kind of setup back. Like, so there's something, for example, like UV sphere, which if we were to go
into it looks quite interesting with these parts split up on the top
and the bottom, but again, it's part of a code, and we're going to
go much more in depth in regards to
them down the line. All we need to know now though, is that these primitive shapes have their own unique UV maps, not created by
unwrapping process, but rather by a
certain code system within the mesh itself. So texture coordinates, we already talked about it
on the very first lesson. Essentially, texture
coordinates is location of a texture, and we can either
change the location of our texture coordinate
by moving the UVs, or we can also do that within the material
shading itself. Although we're not
going to go too much in depth in
regards to the shader. We're still going
to cover some of more unique uses like atlases
or shader generations. Of course, there's
going to be more down the line in regards
to UV packing. This is what allows us
to organize UV islands, to maximize texture space, and minimize empty areas. This can either be done by hand, essentially just
moving it within the UV space of 021 or there are alternative
spacings that we can do, which we're not going to go
too much in depth right now. Alternatively, there
are certain algorithm, certain code that will allow
us to scale down and put the UVs into
proportional spacing to essentially pack
everything into one section. So if we were to have all
of these pieces scattered, UV packer would move everything into one
nice and tidy section. Of course, it would
be more tidier than this than
moving it by hand. So I'm just going to click
Control Z to bring this back. Texel density, you'll be
hearing me talk about a lot about texel density
within the lessons. But what it is is basically, it's a ratio of pixels
on a texture to the size of the model
surface in freed space. If we have a smaller UV size, the texture, the pixels that it can make es out of
would be a lot smaller. But if we were to make use, for example, out of
this entire UV space, there would be a lot
more texture density within this section, and therefore, the resolution of the setup would
be a lot larger. We're going to make use out of texture density in
the later lessons. Now, overlapping UVs, I
actually just show you do this. When we overlap the UVs, we get this sort of result where one UV island is on top
of another UV island, and it doesn't always have
to be different UV islands. Sometimes, for
example, we can move some parts of UV chunks or maybe it was not
unwrapped properly. They can be overlapping
with one another, stretched weirdly or just simply cross across one another, causing you some
artifacts for textures, especially if you're using
some texture painting program. If nothing is overlapping, we call them non
overlapping UVs. Each part of the UV bottle has unique texture space and
it is best for baking. This type of a setup is the most commonly found within props, and it's the most
beginner friendly type of a UV workflow. So we're going to
actually start with that in the next lessons. We're going to make
sure we're focusing mainly on the non
overlapping UVs, and of course, as for how to make use out
of overlapping UVs, there's always options for that. I often hear people say, how UVs have to be this specific way
or this specific way. In reality, there
is no specific way, and it really depends
on the type of outcome you're trying
to get out of your UVs. What type of texturing
you're planning to do, what type of setup, shader, or even what type of
program you're trying to do? If you're planning to set
everything up within blender, it would be completely
different than setting everything up in
unreal engine, for example. But let's not get
ahead of ourselves. We now let's go and simply
go back on to object mode. By clicking tab, we can go
ahead and delete the cylinder. We're going to go
onto the layout because that's where the
first section will start, not within the UV editing,
but within the layout. So that's going to be
it from this lesson. Thanks so much for watching, and I will be seeing
you in a bit.
6. Unfolding Geometry Seams, Nets & Tiling UVs: Hello and welcome back everyone
to U V Mapping Bootcamp, Master and wrapping and
texturing in Blender. Now, just a quick reminder, I am within the layout tab over here simply
because we're going to make use out of
this timeline just for the very first
visualization. And before doing
anything, though, I'm going to talk a little bit about the, well, visualization. And previously, I mentioned
how it's good to visualize UVN wrapping as a sort
of gift wrap football, but it's not quite there. A better way to
visualize it would be if we were to split it into
two ways of visualizing it. So we're going to start with
the first one cardboard box, a hard surface object
type of visualization. So think about packing
when you are unwrapping something like a crate
building or Sci Fi panel, you are essentially cutting
along edges and unfolding it into flat shapes just
like unfolding cardboard. If we were to go now
onto our resource pack and open up our first
collection over, like, so we'll notice a
couple of basic shapes. So in terms of visualization, if we were to click Play, we'll see that the box is
being unfolded and unwrapped. So that's the best way to visualize it as a
beginner point, just to simply see a shape and imagine how you'd
be able to cut along specific edges in order
to make it unfold like a certain box or maybe orgami
or something of that sort. I think that's a
really good way, as a beginner to just
visualize your UVs. You essentially want
clean flat surfaces with minimal
stretching and seams are placed along hard edges or where a real box would
be glued or folded. This is ideal for modular
acids or tiling textures. Modular meaning that they
can be combined like lego pieces or something of that sort just being
snapped together. Whilst tiling textures means
that even though that we have the zero to one UV space
we talked about previously, the tiling texture
would allow you to place it anywhere above it
or below it, left or right, doesn't matter
because when you are outside of this zero
to one UV space, the texture itself normally
would start tiling on itself. So if we have texture over here, if we have a look at it like so, this texture ends up being
in a nice simple square. But you can imagine if I was
to go to the left of it, this same texture would start
lapping over here like so. So that's what tiling means. So yeah, precision matters. A 90 degrees bevel should
stay 90 degrees on UV map when we're looking
at this box over here. I was unfolded in
the right areas, and nothing is being
stretched when it unfolds. And that's exactly what
we want with our UV grid. People end up making use
out of Smart UV project, but we're going to cover
that a little more in depth actually in a
couple of lessons. So in regards to the visual tip, People tend to avoid such visualization and
tend to get shredded. People tend to avoid
such visualizations for hard surface modeling because auto UV and wrap
is so easy these days. I'm going to cover
that in a bit, but I still think it's important to really get to know how to visualize UV maps as a
sort of a cardboard box. In terms of getting more
practice in terms of actually visually seeing it,
what's it like? I really recommend you doing some maths exercise actually, in terms of the ones that say how to
calculate surface area. I do have a couple of tests
over here on the side, which we can go over it. And for that, I think the easiest way what we
can do is we can grab this corner over here for the layout and just
simply drag it across which will open
ourselves up with a new window. The reason I want to
open up a new window is because I want one section to show a free D view and another section to
just go to the top view. The top view that we're going to go is going to be
on the right side, so I'm going to hover my
mouse on the right side, click seven, and that's going to give us the
right side view. Whilst the shapes can be seen more in free D
view on the left side. I think I'm just going
to move these out of the way so we can get a
better visualization on what they are so let's
try to visualize how we can unfold them
for a surface area. So first things first, we are going to go
with this shape. It's not entirely a cube. It's a little bit
more alligated. So we're going to try to visualize how it
would look like. And I'm going to use, oh, I'm going to
click seven again. I'm going to hold shift
whilst moving around just to make sure that
we're moving it normally. Uh, I'm going to make use out of annotate just to
help us out with, well, visualization
of the shape. So this shape over here, the bottom is going to
be, well, a square. So we're going to
start with a square. Again, it's going to be
just a simple sketch, but hopefully it'll
give you a better idea of how it would look like. Then, we got four sides, essentially the same size, four sides, but they're
not going to be square. They're going to be
slightly longer. So we're going to make them
a little bit longer like so and they should
be the same size, so forgive me for
my drawing skills. But just like that, we're
going to get these sides. And then finally,
let's not forget. Oh, I'm going to
click seven again. Finally, let's not forget
the upper section, which is again going to be
the same as the bottom. And for that, we can either
place it at the top, bottom, left or right to attach it to either
one of the sides. We could even technically have it on the side just like that. But for the sake of just
having everything combined, I'm going to place it on
a side, just like that. And you can visualize that this shape would be
unfolded into this. I did actually pick
this, as I said, previously, pick this up from my math problem, so
this is what over here. And it wasn't the
same type of shape exactly because it was a bit
longer in this direction. And you can see that this
is not exactly a square. But even so those surface
area exercises, I think, are really important
in helping you to visualize how the shape can be unfolded and how the UV
UVs would be unwarped. Next up, we got this
pyramid over here. So I'm just going to move this downwards a
little bit, like, so just to kind of
have more space. We can still see this
pyramid over here. The bottom is going to
be a normal square. So just a normal square, let me just make sure
my drawing skills are a little bit better,
just a little bit, though. Then we have, well, these shapes over
here, triangles. Which are having its sense
centered in the middle. So if we have one like so, we're going to pretty much
have that exact shape, and we have four sides of it. So each one of them is
connected to the bottom piece, so we can do all of these tringles to be
connected to the shape. And as for the top, there is nothing there because,
well, the top, all of it end up
connecting to the sides, like so, essentially folding it upon itself and giving
us this nice permit. This permit would be
this one over here. Again, a nice surface
or calculation. Really helpful when it comes
to this type of stuff. And finally, we have
this type of shape. So what can we do
about this shape? Well, for Saras the bottom
is a bit more longer. We can go ahead and do that. So a little bit longer
of a bottom, like so. We then have some triangles. Like, so this type of triangle, sorry, let's not
rush up too much. This type of triangle, if we have a look
at it from a side, is going to be, well, just going straight
up 90 degrees type of an angle instead
of the previous one, which we had with the pyramid, which was more tip of it was more centered
to towards the middle. This is not the
case for this one. This is a 90 degrees
type of setup. The other side, we
need to also visualize that this is going to be
essentially mirrored. So this side and this side are going to have the
same type of triangles. Let's just make sure we have
a paropl position like so. And then finally the
backside and the front side. So the backside would be
rather easy, I'd say, it would be basically the
same shape as this one over here around so the
front, however, will actually be a
little bit longer, and the reason it
is a bit longer is the most favorite
equation by everyone, A squared plus B squared
equals C squared. This is the triangle equation
that everyone loves, meaning that essentially
this longer area, if I was to just position the triangle a little
bit to the side, so this longer area, the area of it would
be equal to the sides, it's a little bit of a random
mathematical equation, but even so all of that a little bit larger,
probably like sew. And that's pretty much it. It only has one, two,
and three sides, giving us these three
sides, like sewing, of course, two at the
side, the two triangles. And that is going to be
this part over here. Again, surface areas,
very useful stuff. That's going to be it
from the first exercise. Now we can go ahead and
close down the tabs. So what I reckon I'm going to do is I'm going to hover my
mouse over in the middle, right click and
join left just to make sure that we're
getting the same setup as we had previously. I'm going to just move my mouse and it's going to
go out of the top down view. If you are working on
the same annotations, just make sure to
go on to annotate eraser and just simply
start erasing it. Whilst holding your
lap Mouse button, you can use your mouse
wheel to make it larger or smaller
this setup, like so. So thank you so
much for watching, and I will be seeing
you in a bit.
7. Fast UVs with Smart UV Project: Hi, and welcome back everyone
to UV Mapping boot camp, Master wrapping and
texturing in Blender. Now that we're done
with the service area, let's go ahead and hide
it out of the way and move on to the next stage. So this is automatic
UV and wrap, and it might be at first
glance, a simple thing. After all, automatic UV and wrap is the
most commonly used, and it's the most
basic of the setup. All you need to do
realistically is just press one button and it
will do it for you. But in order to actually
make a full use out of it, it's important to
understand how it works and where the best
uses are for it. So first things first, let's go ahead and make use
out of this setup. We have a simple box
with no material and a material shader in the back
with a simple wood texture. We can go ahead
and start applying it onto the crate itself. So for that, I'm going
to select the box and find a wood crack wood
texture, like so. And right away, you'll see
that nothing is here because all the UVs are essentially
non existent for this create. So for us to get the UVs, to make sure that we are
getting that texture as seen on this sphere, all we need to do is just
simply select the box, go on to editing mode
by clicking tab. And selecting all of the
faces by clicking A. That way it selects
everything within the setup. Then we can click
U for unwrapping. And you'll notice that we use U as a shortcut
all the time. It's a really nice shortcut within blender to
make use out of, which has a whole
menu of unwrapping. We're going to go
through them one by one. But now we're just going to
focus on SmartTV projection. So that's the automatic
UV unwrapping method. We're going to click on it.
We get ourselves a menu. This menu, we can
leave it on for now, because when we click on it, we still have this menu on
the bottom left hand side. As long as we don't do
anything in regards to well, going out of editing mode or selecting
different selection, we're still going to have this SmartTV projection
window over here. If you're not seeing
it, you simply might need to expand
it by clicking on it, like so and right away, you'll notice that we are
getting textures nicely placed within our well, box, just to make sure we
are seeing it properly, I'm going to go ahead and
just click this icon off, which is going to take off the overlay for the
editing selection. We can see that the
grain of the wood is going nicely in all
the right directions. So before we actually
touch all of this menu, let's simply talk about
the automatic V and wrap. So what is automatic
V projection? It is a UV projection method
where software automatically generates UV coordinates for a freed model based
on its shape, and it is without
needing to manually mark Seams or guide the unwrap. This is key over here. It does not use Mark Seems. We've not touched this just yet, but essentially Mark Sims
is going to allow you to control how an object
gets unpacked, and automatic V and wrapping does it based on
its own algorithm, so it does not use it, which is good because it
lets you do it faster, but it also is bad because you don't
have as much control. Even so, it still does have
a certain bit of control. So let's go a little
bit about what it does under the hood. It analyzes models geometry, specifically the angles
between the faces. The past, it was more of
automatic UV and wrapping. What it did was basically, if I was to just quickly
go onto this example, it was doing certain projections
from different angles, and that was pretty much it. By default, for example, I believe I remember
doing it in Maya. It had four different
projections, and you could up that count. To have even more projections
from different angles, and if there is an object, and let's say, the projection
from the top would pick the faces based
on that object. When there is
another projection, it would also pick
the specific pass to project the UVs
from A three D space. Now it works a little
bit differently, meaning that we have
something called angle limit. It's not going to work quite as well on this box over here, which we're going to
cover why by simply going and opening up the sphere. So I'm going to go
on to adding mesh, going on to object mode, clicking Shift A, and
selecting UV sphere, which is going to create
me a nice little sphere. That way, we can talk a little bit more in regards
on what this does. U V spheres are great in
previewing certain parts, but they're not perfect. We're going to touch them. We're going to cover
them a little bit better in lay the down episodes. I'm just simply making a simple sphere with
smooth shaded surfaces. And let's go ahead and
apply wood over here. And this is the default type of sphere that we had over
here in the corner. I'm just showing you how to
set this up from scratch. So if I was to select
it with in edit mode and click U Smart
TV projection wrap, that's what's going to give
us this type of a setup. Now, its analyzes the angle, so we're able to use
angle limit to tell at which point it starts
creating a new UV shell. So if I was to put
it up to a maximum, which is 89 degrees, it will try to well, start off from a certain point, which is usually from the top. Let's say if I was to make
a selection over here, this is the top the program would start the
projection from here, and then once it starts
going downwards, it would try to
detect the angle at what we were unwrapping and because it was
angle limit of 89, once it reaches that limit, it would end its projection and create a new
projection elsewhere. And that's so it
essentially works with the setup if we start
to lower this down, it's going to give us angle
limit that's way less, and in turn, the
projections needed and the UV shells created
are going to increase. So this is how it tects the edges with
sharp angle differences, and it cuts along those
edges automatically, again, without using seams. In regards to flattening it, it does flatten face groups, and it keeps it somewhat
to minimum stretching. In the past, it was way worse. Now, it kind of relaxes
the UVs a little bit. Although if we have a look at those specific UVs,
it's still not perfect. So right now, we can see
that these, for example, parts over here are
somewhat kept as squarish. But if I was to unwrap it with an angle limiter
that's way higher, so less projections, meaning that it tries to relax
the vertices all at once. And you'll notice, especially at the corners,
especially at the angles, those parts that are supposed
to be squares are now stretched out to be,
well, non squares. So these are the distortions, but it does avoid overlap, so it's pretty good
in regards to that. If we zoom out, all of these UV islands are being kept separate and
they're not overlapping, even when we zoom in, if it
looks like it is overlapping, if we zoom in, we'll
notice that they're not. So it's pretty good
in regards to that. Finally, it preserves the proportions as
much as possible. So even if it is
warping and whatnot, if we look at the texture, we can see that the overall
texture from all of these UV shells are being
kept somewhat same. So even if they
are being warped, it's still going to give you
a pretty reasonable result. Now, we pretty much
talked about how it's basically a UV shredder that slices it into logical chunks
and lays them out flat. So the pros, it's fast and easy. Simple one button
click will give you perfect background assets or early testing type of setups. So even if we have this default, for example, sphere, by default, you saw that at the very top, they're getting
squished up and here, we have those general setups. Even if it looks like
a jigsaw the grain, for example, maybe we
wanted to keep it as it is, and we're still going to get this overall nice pattern not being squished up at the
top or anything like that. So it might be better
to make use out of it as a quick and
easy type of methine. It's great for hard
surface objects like mechanical parts. So this is quite
an important one. Hard surface objects
like mechanical parts. The key here is that it's great for objects that don't
have a lot of an angle. And what I mean by that
is this sphere over here, you see that it's somewhat struggling with UV
and wrapping and whatnot in regards to making
it less like a jigsaw. But if I was to create a cube and put the wood that
we have over here, so it's going to give us a nice pattern if we unwrap
it and projected to setup, so a nice little
setup just like that. The key point here that
I would like to make is that it's not based on
the complexity of a mesh, although that somewhat matters, it's mainly to do with how
many angles the object has. So even if I was
to right click and subdivide it to something
quite complex, like so, and I was to try to make
a smart TV projection, it's going to give us all of these cubes over
here, but even so, you'll notice that these
cubes are separate into four or six different
chunks just like that, meaning that they're being
quite nicely set up. The problem comes when we
try to complicate this mesh. And what I mean by that
is even if I was to well, if I was to make it just a little bit more complex
by just lowering this, it would still do right if I
was now to SmartTV project. Now, you can see that the
angle is warping over here, so we definitely need
to re inwarp it. And there we go. It's going
to give us nice little setup. So it's still right. The problem becomes when this angle variation
is more different. So if I was to select
this edge over here, move this over here, like so, and then use beveling, like so with lots and
lots of lots of detail. Maybe profile shape, I
will increase it as well. Then we can we unwrap it, like so and based
on an angle limit, it might still be okay. But you'll notice that once
we start lowering this down, it'll start struggling
with this specific part, or maybe it's not. In this case, maybe it's not. So I'll go ahead and just add
even more detail over here. Like so now I can go
ahead and v and wrap it, and this part will definitely
start causing some issues. We can see that it starts
breaking up a little bit more. And this is only, again, for one surface,
but you can imagine, if we start getting closer
and coast closer to something that's more like spherical,
that's softer edges. You can imagine that
it's going to get more and more complicated
or automatic VN wrapping to be done. That is why for something
like this crate, where it has basically just mainly 90 degree angles,
even if it has, like, lots of planks and
whatnot going across, it's still just
mainly flat surfaces, then it's going to start
doing it quite well. You'll notice that
if we zoom in, we do have some
bevels over here, and those bevels are going
to be mainly those parts, like smaller parts and whatnot. It is going to get a
little bit of some issues. But because they're so small, these bevels, we don't
really care about them. So even if we have small
bevels for an object, it's still going
to do pretty well.
8. Smart UV Tweaks for Better Painting Results: Hi and welcome back
everyone to UV mapping, boot camp, master and wrapping, and texturing in Blender. Let's continue on for this. So again, many marking seems even if we have
anything marked up, it's not going to do anything. So that's something
to keep in mind. Then it is a good
baseline for light maps, tiling and procedural materials. So one of the things is, even if it's not
perfect with layout, if we have a seamless texture
like this wood over here, I can even preview this wood
just searching for wood, correct wood, so you can
see how it looks like. So this type of wood, we can zoom scale
upwards, like so, and it doesn't really matter how much we scale it's
still not going to be an issue because this would is tilable meaning that whatever is at the top is going
to be identical to the bottom left and
right, vice versa. So it makes it super
easy and simple to do. The only downside is, if we
start scaling it up too much, we're going to start
seeing well, repetition, so we need to avoid that in regards to
automatic VN wraps. Going to go over how to counter that way later down with
the vertex painting mainly, but let's not get
ahead of ourselves. In regards to the QVs, I'm just going to go ahead
and do this a little bit. Let's talk a little bit
about why it can be so bad. So Cs usually produces a
lot of small UV islands. So again, this is especially true when we have some bevels, when we have softer angles. If this was just a simple
type of a cubic plank, it would have been way better. So for example, one could
do bevels using a modifier. Modifier bevel
would allow you to keep that 90 degrees angle
whilst UV and wrapping. If the bevel is not applied beforehand to champer
off these edges, it would work quite
nicely overall. But again, even with those
UV chunks like soap, visually for something like this wood is still going
to be pretty good. And the other thing is harder to paint on programs
like substance Baer. So this is quite
important over here. Something like basic previews or just singular
props and whatnot, it might be okay. But the key issues here. The first most
important one is that UV and packing is not
going to be the greatest. So for example,
over here, we can see that it produces
lots of holes, and we have some empty spaces
that could be filled in, and in turn, the texture
density is going to be a lot smaller in
comparison that if you were to make it
with less chunks, less unwrapping, and whatnot, these parts are going to
matter when texturing. Especially if you're
trying to have larger props or more props
within the same texture, that is definitely going
to matter in the long run. The other thing that I'd like
to mention is that, well, the distortion might
play a huge part in the texturing setup right
now because it's wood, it might not be as visible for those warps that we have in corners and
edges and whatnot. But even so when texturing, that can play a huge part just the quality of
the well the acid. And one thing in regards to
that is that in the past, it was way harder to well, get the right type
of orientation. We're going to cover
a little more in regards to orientation
down the line. But for now, what we
need to know is that in terms of orientation, not only can we not
control realistically the rotation of these
placements for the UVs, even though realistically we
can rotate them afterwards, so it's still important
to know that in the past, it was way harder to make
sure that these placements of UV islands are placed
in the right direction. For some materials like stone, it wouldn't really matter
because they would have this neutral
type of grunginess, so it doesn't matter which
rotation we are taking. Something like wood or maybe stainless steel that
has a grain, it might matter. So something like wood over
here, if I was to rotate it, neither degree still
notice that right away, like, what's going on here? Everything is rotated. This is not supposed
to be like that. And that's the key
thing over here. We need to make sure that it's placed in legated type of way. And the way to control
that is if we click U, the Smart TV Project, there
is a rotation method. So rotation method, you can
select it, for example, to be horizontal, which
will give you horizontally. You can select it
to be vertical, or you can select it
to be axis aligned. So all of these are just gives
you additional controls. Of course, alternatively,
you can also control it afterwards by
just rotating it. But all we need now to
know is that you can use rotation method to
get it properly set up. And what's key here is that it really depends on
the length of, well, the face or an
island, I should say, because in props that
have the same sizing. So let's say the
usual cube over here, if I was to unwrap it, it's going to give us that rotation which we're not going to be able to control. So if I was to unwrap it, we can't control this
to be going sideways or both of these parts to be
going sideways and whatnot. But if I was to make
this longer, like so, now this part and this
part is going to be facing has that same
kind of length. So if I was to unwrap it, both of these parts will end
up being placed like so. But again, the front or sorry, the sides in this
case, are going to be rotated at random. So what I'm trying to say is that automatic
VN wrapping works especially well when there is no just default type
of cubic setup, and it has eligated parts. So even parts over
here on the side, we can see that they're
not just simple squares. They are longer,
meaning that this is going to be oriented the
same as this wood over here, which is perfect for
something like wood as we do want these
to be well, sideways. We wouldn't want them
to be horizontal. I don't think it
would look quite right if they were
rotated like this because the main part that's visible is going to be aligned with this part at the side, and it just kind of visually breaks off the overall
aesthetic, I believe. So in terms of the controls, we still have a
couple of controls. We have the main one that we would like to
touch is island margin. Make sure you have this never
set a zero if you are using this by default and use a
value of something like 0.02. Just to make sure we're getting some gaps in between the UVs. This will avoid any
of edge bleeding, which we're going to cover
in a little bit later. But just make sure not to overdo it because if you're
doing it too much, it's just going to take off
the how should I put it? It's going to take
off the resolution from your UVs because
everything is going to be forced to be smaller to fit within that zero
to one UV space. You can see if I was to increase it to
something like this, resolution of this box is
going to be much much lower. So that's going to be
it from this video. Thank you so much
for watching, and I will be seeing you in a bit.
9. Cube, Cylinder, Sphere Projection Techniques: Hello, and welcome back everyone
to UV Mapping Bootcamp, Master and wrapping and
texturing in Blender. Last time we left ourselves
off in this situation, I'm going to go ahead and
simply delete the access that we had and move
on to the next step. So projections. This is going
to be an interesting one. As a quick little tip. If you want to apply
multiple materials all at once, you can do so. We can go ahead and select all of these parts, hold control, and just deselect
everything that was not these little
objects over here. Then afterwards, we can
just have holding shift, select one of them like
so to make sure one of the selections is the main
one, which is orange. We're going to go ahead
and select it to be wood, like we had previously, just to help us visualize what
we're doing here. And if we want to apply the
same material to all of them, we can click Control L. And link materials just like so. And now we're going to talk a little bit about the projection. So the next thing that is on
the list is going to be we hit if we select
the last or sorry, the first object on the line, we can go ahead and select
it with an edit mode. Click A to select it all. Click U, and we're going to go ahead at cover Cube projection, cylinder projection,
and sphere projection. So these ones I consider
to be somewhat outdated, to be honest, but even so it's still pretty good
use in certain cases. Let's go ahead and have a look
at them. Cube projection. So this type of projection
will allow us to essentially project from
the top and sides like so, giving us this type
of well, projection, and it's going to be looking just like this if we zoom in, going to notice that it
looks somewhat similar to what we had previously with
automatic view projection. However, in this case, it's going to look different
because if we click L within the three D
space by clicking L and selecting delimiter as UVs, so we're going to see
the type of projection. So starts off from the top. Usually, that's the
first priority, and then it kind of fills
in the spaces in between the sides and one for the
bottom as well, just like that. And this is pretty
good when we want to have more of a squarish
type of an object. We can do square
project, cue projection. It's going to give us
nice little setup. It might not work as well for organic or for more
curved type of setups, but it's pretty good
when we want to just get a general UV is done fast and if we don't mind
them being overlapped. The one thing I
would say when using this is that we
have some options. So cube size will allow
us to scale the size, but we can honestly do that
from within the setup. Scale to bounce would
essentially mean that if it goes outside of the
zero to one UV space, it's going to go to the parts. There's also clip to bounce, which is more interesting
because it basically keeps everything within the UV space
to be part of the section. But once the UV start going outside of the zero
to one UV space, it gets stuck at the edges. So that's why if we have a
look by changing the size, we can start seeing that, it
basically stretches it out, which might be interesting use in certain cases to
get perfect square, for example, to
stretch out some of these vertices, like so. Again, it's somewhat
of an outdated. And most of the cases,
you would end up using Smart UV
projection instead. Cylinder projection. This
is an interesting one. You might consider that, Hey, it's perfect for cylinders.
Well, not really. What cylinder projection does, if I was to select it and use UV cylinder projection,
it's going to give us this. Well, what's
happening over here? It's quite messy.
We don't want this. First things first
is that we need to consider the direction. Right now it's set
as view on equator, but if we just set it up
as a lined to object, it's going to basically start the projection with the
centerpiece of the object itself. And that is, I believe, from the origin
point of the object, which is this orange
dot over here, the more zoom in, the
less is smaller it gets. But if I was to try
to move this out to the side and then redo
the same projection, I believe it's going to give us a little bit different
type of projection. So having the origin
point set to geometry will most likely give you the best outcome depending on what outcome you want to get. The other thing is, again, this doesn't mean that it's perfect for cylinder
projections. It means that it goes
all the way around. So if I was to go on to our trusty screenshot
of just a simple axis. What it means is when
we have an object, let's say, something
just a blob, it would make a rotation
all the way around like a cylinder and
basically it would make a sheet that would
project it across. So the top and the bottom would not have anything in
regards to the projection, or rather, we can
see that these lines are what's causing
this projection. If I was to delete the
top and the bottom, we would get these
lines deleted. So if I was to just
delete these faces, we can see that now we have a perfect projection
for the sides. The other thing that we could do potentially in
order to avoid that is if I was to just mark UV project the
top and the bottom, we'd get perfect tops
and the bottoms and then cylinder projection
for the sides. I'm holding Alt and just
selecting everything around it, so just for this because the UV mapping works
based on selection, we can go ahead and do
cylinder projection just like this and we
get this same setup. Now, if it doesn't always work, you can change the
alignment from polar Z X to Z Y and vice versa. Although if the object
is rotated, let's say, if we have something like
this, and we try it, you'll notice that it
doesn't quite work the same. So if I was to use the
cylinder projection over here, it's going to give
us this result. So just make sure you have
it rotated accordingly, unfortunately for blender
that's the way it works. I believe some
software would give you a better visualizer or more control over
such projections. Again, maybe because it's
the Smart TV projection or other unwrapping algorithms
are doing quite well. These primitive type of projections might not
be needed as much, but it's still
pretty good to know when you are unwrapping bottles, for example, or pipes, maybe, it's just a good
alternative to know in case all the other
UV projections fail. The final one is going
to be sphere projection, and you might think that you're going to
get something like this where we had it on
a default UV sphere. Unfortunately,
that's not the case. If I was to project it, actually, this one
already had this type. If I was to do
sphere projection, it's going to give us
this type of result. If I was to change it to SY, it might be a little bit better. But essentially, it
tries to be, well, very similar to what we had with cylinder projection
except in this case, our object, that if we
were to have it like so, instead of the usual type of a cylindrical projection
which we had previously, this one would be more of
a curved type projection. So you can imagine it going all the way around 360 degrees whilst maintaining that curve, and it would basically make
the projection like so. Us this unique result. Sometimes it's good,
sometimes it's not so good. Sometimes it might
even look quite messy. Even so, it's pretty good. I will align this to an object, like so, and there we go. That's the default UV
setup that it has, and it's going to give us these pinched up
corners at the top. When it comes to well, topology type of cubis
objects, if we were to use it, it's going to give us
around the same result as we had for the
cylindrical projection. However, it's the top is
still going to be an issue. Even if we were to
change it alignment, it's still going to be off. We can try to negate
that using pool fan. Sometimes it helps to well, change up how the UVs
at the top behave, especially for something
organic like this setup. So if I were to change
it to from pinch to fan, you can see the type of
result that we're getting. And actually, I believe, yeah, this fixes it the top. So you're going to get the
default type of sphere or very close to it because
as mentioned previously, it uses more of an
algorithm rather than the projections
that we see, but there we go, we get
ourselves the fix at the top. In regards to cylindrical, it's not going to
do anything for the top bottom because
they're flat surfaces. And unfortunately, if
we want to control it, we would have to
rotate the object, the it degrees to
then v and wrap it. Alternatively select only the
ones that have issues and UBN rapid when we rotate
them to get a better result. So that's going to be
it from projections. We're now going to move on
to troubleshooting stage, which is going to be making more sense when all of the UV
information comes together. So thank you so
much for watching, and I will be seeing
you in a bit.
10. Fix Stretching Apply Scale Before Unwrapping: Hello and welcome back everyone
to UV Mapping boot camp, mass and wrapping and
texturing in Blender. So we finish ourselves
off with the projections. We're going to go and move
on to the next stage, which is going to
be troubleshooting. So we have few props
for this example. We're going to start off with
the windows in the back. And first things first, you'll notice that it might
look a little off in regards to how they
have these materials. Firstly, these materials are set up with procedural
generation. All we need to know is that
if we go onto cycles View, changing it from EV to cycles, we will get ourselves some nice edgewaar and
whatnot on these windows. Even if they are
procedurally generated, this particular type
of window would still require some UVs to work. And for that, we
would still need, well, to sort out the UVs. If we were to go back onto the material view because it's
not really advisable to do any type of editing within cycles when we have it like so unless it's
small tweaking, because it's going to be
slowing down our computer. So what I'd like to
mention first things first is if I was to try to
select both of these windows, try to go onto the selection and just
unwrap all of them at once. I would allow you to do that. But if we try to do that, so we'll notice that, hey ho, one window is, well, has this type of detail whilst the other window has
much larger details. So what is going on with
that? Why is this happening? Well, if we look at the UVs, if we go on to Edit mode while having
both of them selected, we'll notice, oh, there is
a small issue, actually. Let me just fix this up. The island margin
is way too large, leftover from the previous
setup. There we go. But even if we were
to do that, we'll notice that this window is having much different type of result than this window
and what's going on? They're using actually the same materials if we
have a look at it. So why is this happening? Well, the reason for that is because if we check
both of these UVs, I can click L and see that
this section is super tiny, whilst if we click on this part, we're going to see that
it's much, much larger. So why is this happening we are unwrapping both of the
objects at the same time. For some reason, they're giving us much different
scale in the UVs. Well, the reason for
that is if we click on N to open ourselves up with this little tab over
here to go onto items, transform menu,
we'll notice that we have some options for location, rotation, and the
main one is scale. This is what matters
in this case, because if we have a look at it, although both these
windows are well, seemingly similar sized,
if we look at the scale, we'll notice that they are
having different numbers, different values over here. And this affects actually how the unwrapping
process is being used because it's not actually checking the object
as is, like so. It is actually
checking the object how it was, well, created. Or how it exists before
the transformations. We can actually reset
the transformations to see how it looks
like the window. If we were to click Alton S, it's going to reset the size, and this is actually the
real size of the UV. So when we are unwrapping this massive window and this
tiny window in the back, it's going to, well, try to think that like, Hey, this needs a lot more UVs in comparison to this
tiny object over here, and that is why we were
seeing those small UVs. This same issue can also be in regards to what's it
called rotation as well. So when we are
using, for example, the previously mentioned
cylinder projection, it has to be Z facing upwards if we're having something like
cylindrical over here. If we were trying to rotate
an object by 90 degrees, it would still give us
that same rotation. It would still give us
that same projection. The reason being is that we
have the default rotation, um, being a something
completely else. So if I was to click Alt and R, we will be able to see
what it looks like in regards to the default
transformation rotation. So Alts does reset the
transformation scaling, Alt R resets for rotation. And if you have an object
that's actually, well, tilted 90 degrees or you wanted to use it
with projection, sort of projection from one
of the items in the menu, you would have to
go on to edit mode, and when you are in edit mode, you can rotate this
object like so. Then you'll notice that we are not changing the
rotation itself now. The rotation, even if we
click Alt and R is going to be kept the same because we are actually changing the vertices, the position of all
the vertices inside. And the instance that the object is spawning this prop
is not going to change. So I'm going to click Control Z to just undo this step like so. The same thing can be
done for location, I believe it's Alt T
or Alt and L. Sorry, it's Alt G. We don't really need to use
that, though, because, well, the location doesn't
really matter as much. Again, if we were to use something like
ciliar projection, we can just align
it to the object, so it's going to be centered
to the object itself. The location for that
wouldn't matter. Much. So yeah, going
back to the Windows. If we have different locations, if we resize it in an object mode and rotate
it in an object mode, what we can do in order to apply these transformations is if we were to click Control and A, there is apply options, so we can either apply location, rotation and scale some people
just do all transforms. I wouldn't personally
recommend you doing that because if you apply
all transforms, it's going to reset the
location itself as well, meaning that the origin point now is going to
be at the center. When you're moving it,
it's going to be off. So that's not super
good practice, especially if you're
having an object that's already located off
the world position. If you have an object
that's, you know, within the world position, you can just do that and it's going to be totally reasonable. But again, if you just want to apply rotation
and location, you can just use
rotation and scale or simply use rotation
or scale separately. And that will, if we
have a look at it, right now, the
scale is like this. If we use rotation and scale, the scale is going
to be set to one. Means that now if we have both
of these objects selected, click A, and Smart UV project, it's going to give us the same exact type of uniform scale for
both of the windows, which is going to
be much better. This type of a transform setup is also needed to be known. When we are even if you are UV and wrapping
objects separately, you would still want
to, for example, well, get the same type of
UV density on both of them. So real quick, I'm just going
to go ahead and control Z. To make sure I get
my wonderful scale that's overly sized. Now, if I was to, well, UV and wrap them both. So just like that. And afterwards, let's
say I want to average out both of these densities,
both of these scales. Once I'm happy with the
result of my UV islands, I can go ahead and
select all of it, go on to UVs, sorry, UVs on the two D side, which side you use does matter. So UV panel over here. Average island scale. If
I was to click on it, we're going to get
this type of a mess. Again, because we haven't
applied the transformations. You can think of transformations
as a way of basically controlling an already
existing mesh instance, how it's being applied
onto the world. A better example of this
is if I was to use, Alt D, which allows me to
duplicate linked object, meaning it's going to be an
instance of the same object, meaning that if I was to make adjustments to
the mesh within this one, because it's a
duplicate instance, essentially of the mesh, it's going to also
adjust this mesh, all of the meshes that
were linked together. But if I was to
move this around, if I was to scale this up and down, if I was to rotate it, it's not going to do
anything because we are basically just changing the transformation
of an instance. But when we are rotating
it within an edit mode, it's going to start rotating everything because
now we are changing the location of actual vertices and not just the
transform tools. So that's something that's
a good way to visualize. Go back to this, again, all we need to do is just
make sure we rotate, apply rotation and scale. And then once we have
both of these objects, we can use average island scale, and now it's going to
average everything out in regards to the
scaling of the UVs. Another way that
it can potentially look bad for the
UVs, for example, is if I were to start
modeling, let's say, from a cube, just
a quick example with our usual correct wood. Let's say I want
to just start off by scaling it outwards and getting something long
and just maybe for a plank or something like
that. It looks already nice. Let's then try to
UV and wrap it. This type of plank. We can do Smart TV projection, UV and wrap, and you'll notice that UVs are actually squared. So that's also going to
cause issues because automatic UV and wrap
is going to start thinking that, because
this is a square, it can have the rotation
whichever way it wants, and the wood is going
to be distorted, randomly rotated, and everything is going to be badly done. So for that, if you're working
on well creating a plank, make sure you are doing it
within edit mode itself. When you're doing it
with in edit mode, it's not going to change that transformation, as
you can see over here. The scaling is still
being kept the same. While the scaling over here is being completely distorted. So now if I was to
unwrap this object, so it's going to give
us a beautiful wood, like we all love. So that is something
to keep in mind. Again, it's not a big deal, even if you start off
modeling process like that because you can just simply
apply rotation and scale, then UV unwrap it
again, and there we go. It's going to give you those
nice UVs that we all love. So that's going to be
it from this video. Thank you so much for watching, and I will be seeing
you in a bit.
11. UV Sync Selection & Clean Editing Workflows: Hello and welcome back e
un to UV Mapping Bootcamp, Master and wrapping and
texturing in Blender. Now we're going to tackle
yet another problem. By using a default blender, you might have
noticed that if you were to click on an object, go into its UVs, like so and just have
everything diselected, you'll notice that
the UVs are missing. So what if you want
to just, you know, locate specific UVs and stuff and you can't do
that, for example, we click on this place, and it would just
show just this UV and the rest would disappear. That's going to make
some things complicated. There is a button
to fix that within Blender this option over
here, UV sync selection. It will basically
show everything that you have within
your editor mode. Meaning that you can have both these objects
within editor mode, have this selected,
and now you can go between the UV selection. Why is this important and where
you would avoid using it? Honestly, 90% of the time, I personally find to be using it, using this all the time. So if you have UVs that are
not shown or something, just having this on it's
going to be so, so good. Uh, also, the other thing
in regards to this is that it helps you locate the
specific UVs much easier. So you can just click on one
of the faces like so and click the dot on your UV map and just
see where the UV is. Alternatively, you can do the opposite from
this end as well. So, for example, I want to
locate where this faces. I can click on the dot and it's going to show
me where it is, which is a bad example, probably because it's probably
on one of the back faces. So I'm just going to
select an alternative. So let's say this
piece over here, I can click the dot, and it's going to show
me exactly where it is, which is really, really nice. Other feature of
this, why I love it, especially is that
because we are able to locate the orientation
of the UVs. So right now, we might not know exactly how this
square is being faced. We can go ahead and go on to the edge selection mode
within the UV tab. We can click on the top and then we are able to
see which exact face, which exact side of the
edge is being selected. So if I want to click
on this one over here, we'll notice that this
is the selection. So this is actually
rotated 90 degrees. I can click R z and 90, and that's going to rotate
it in the right way. Now, the bottom face is going
to be this one over here, meaning that this is exactly
rotated as it should be. The top will be here, the left will be here,
the right will be here. In some of the cases,
it doesn't matter, but in other cases, it might. It's just something
that's good to know. In terms of when you might
not want to use it is when, for example, you have
this turned off. If you want to inspect an object that's not connected to certain
phases within the setup, you can click L, use normal delimiter,
and that's going to select this entire
column on the side. And we are able to
then manipulate and shape the UVs as we see fit, which is pretty nice because the other parts of the UVs
will not get in the way. The thing that thing that it's a little tedious with the setup is if I was to click on
one of the pass now, it's going to be still okay
because the selection is going to be in the free
D view still the same, so we can go between these UVs. But if I was to try to move
this square over here, you'll see that everything
is being still attached, so in the UV sync selection, if I was to have
this phase selected, I can now move it and you'll
notice that it actually separates from these phases. So that's something you
need to be wary about. It automatically,
um essentially sees out or stitches out
the parts of the UV. And that being said, the best thing to do
when you're trying to move all these parts
is by clicking L, you can just select extend, and it's going to be extending to grab this entire island. And now we can just move it around, and it's
going to be fine. But I really do like this
personally because we can just go ahead and select some of these parts and
move it outwards, and it's just going to
detach it from the section, whereas if we are within the UV sync selection,
having this selected, if I want to detach
these parts over here, I would need to click Y, and that's going
to detach it like, so just an extra button. We do want to reattach it, if we want to reattach
something, personally, what I do is I simply re UV and wrap a specific part
of the section. I find that to be easiest. But let's say we still want
to, well, reattach it. We can go ahead and select this. You can select these sections
as you had previously, you can click Alt V, and then it's going to allow
you to reconnect it. It shows you how it's
going to be connected, and you can click Enter, and that's going to put
it back into the spots. For example, again, I can
just select it so Alt V and shows me where it's going to try to attach
it, what kind of chunk. If we don't want it,
we can hit Escape. At the bottom, we see
additional information about how to use it. So for example, L
can be a limiter, so we can see which edges
are going to be connected. Anyways, we can click Enter and it's going to reconnect it. Just like that. But usually my
personal preference is if I have these
separate, like so, I would just simply
click LLL and then just unwrap it either with
unwrap algorithm, which we haven't touched
just yet, or, you know, be project, like so and it's going to give me the same stuff. At the very start, I don't
worry about the scale. I can just always,
you know, average island scale if I want to. I can make some parts smaller later or
something like that, and it's going to be giving
me a we set so yeah, stitching, breaking
things apart, and both UV sync and without it. That's so it's going
to pretty much work. The other thing is
that these parts in regards when it's UV sync
selection when it's enabled, you can still control what
you're seeing with the UVs. If I was to click L and have
this entire part selected, I can use Alt and H or sorry, shift and which is going to hide everything
but the selection. And now you see that because
we hid in these parts, we even with the
UV sync selection, we're able to see that. So we can have both of the of
the two worlds, basically, we can control what we're
seeing with the UVs, and we can still
select it and just see where the selection
is and whatnot. So that's my
personal preference, and we can then unhide
everything using AltnH like so. Or alternatively, we can select specific parts like
what we don't want. We can click H to hide
it out of the way. And then that part is
going to be missing out of the UV section. Like so. Again, we can use Altng
to bring it all back. With that technique, though, you really have to be mindful. If I was to, for example, hide some parts and then
go out of the object mode, it's like, Hey, it
looks pretty good. It looks like it's all okay. But then we go onto UV mode, onto the editing mode that is, and we'll notice that, Hey,
some parts are missing. So there were plenty of times
where I personally had, like, some small part hidden. Like, let's say, this
part at the bottom, if it was hidden, we
would barely notice, for example, when it goes off. And when you be wrapping
everything and stuff, you know, we're trying to move
everything out of the way, changing scaling and whatnot. And then in object mode, it's going to be okay. We might take it to
substance painter or our texturing
software to texture it, and it's going to
start causing issues. And the reason it starts
causing issues is because there might be that UV, if I click AltenH that UV
that ends up being, well, still existent,
but in edit mode, we just don't see it because
when we go check the UVs, we had something hidden. Always, always,
always, make sure to double check Alt and H
is your friend here. You really, really need to
make sure that everything isn't hidden when you're
finalizing your UVs, because then you are able to have all of them nicely set up. So yeah, that's going
to be it for me. Thank you so much for watching, and I will be seeing
you in a bit.
12. Cleaning Ngons & Non Manifold Geometry: Hello, and welcome back everyone
to UV Mapping boot camp, Master and wrapping and
texturing in Blender. Next up, we have
ourselves a little bit of talk for engons and
non manifold edges. So we're going to start
with non manifold edges as I think it's best
thing to start with. And in simpliest terms, a non manifold edge is a
pace that is non planar and the program has to deal with its way of keeping
a normal geometry. What I mean by that
is right here, we have a simple plane. If we were to use a wood, the usual wood texture, we're going to
have it like this. If I was to start moving,
for example, this edge, it's going to be quite
okay in regards to just changing the
angle the steepness. If I was to just select
this corner over here, like, so I can click GZ, and it starts moving
upwards like this. And notice how it starts
creating a sort of an edge over here from
one point to another, trying to get essentially this entire plane to still
be a viable geometry. But there's no edge over here. It doesn't exist. We
don't have anything. We can even, for example, if I was to create an edge between those two points by
selecting these two points, clicking J, you'll
notice that right away, it changes everything
because now instead of using the predetermined programs
type of edge for non manifold, it's going to try to well triangulate this in
our specified way. If I was to just get
an edge over here, I would still keep that same
type of stability of a mesh. So even if I was to move
this upwards and downwards, so it would still be counted
as a non manifold edge. So the quickest way of sorting this out would
be if I was just selected and use actually, yeah, if I was to go click free and use something called
trangulate faces, it would trangulate
phases automatically, and you can see it right
away, change that shape. So if I was to, for example, bring a specific object from
one software to another, it would have some
non manifold pass. For example, this one over here, if I had non manifold paces, it the program could either try to have it
like this or like this, and there's no way for us
to tell which way it's going to be and it would
break the texture. It might even warp
it in the wrong way. That is why we should
avoid having them. So one way of checking if
we have manifold edges, if I was just to extrude
this in this direction, just a quick preview. So if we were within
phase selection, we can go on to mash
cleanup and there are some options for well helping us out with
regards to our problem. So, for example, we can select make plinar faces if I had
the selection that is. So again, clean up,
make planar faces, and it's going to make it into more of a
planar setup, like so. So that would be one
way of doing it. Another way would be
to go on to clean up, go on to clean up and make use out of split
non planar faces. And that's just going to
automatically, as you can see, detect manifold edges, and it's just going to
start splitting that up. We can also adjust the
threshold and whatnot. So it's going to find the face that has some oddities in regards to its angle
and then split it up. Now, in terms of end goons, we have over here on this
window this section over here. This is called an endgon and
the reason for it is when we have more faces more
edges than four. So for example, if I was to
make plane again over here, and we can add edge loop. By default, it starts adding
edge loop with edges. It will still keep these
as having four vertices. If I was to delete this, dissolve edge, like
so right away. By default, this is going
to be kept as four points. So the phase is going to be
made out of four points. In other terms, it's something that we
call a quad quad phase. There is an alternative,
so it can either be a quad or a triplanar. So if we trangulate the faces, so that would be trangulated. We can also have object from trangulated to use
tries to quads, which would attempt to turn the triangles into
quads based on angle and the geometry itself. Now, everything would
end up working. There would be some
trangulations that would be kept depending on
angle and whatnot. But it's still something
useful to know. Anyways, going back
to this problem, if I was to have more faces, they would still have
those four points on each one of those faces. But now if I was to
delete this vertices, so this all vertice over here, we can see that it deleted. It looks like we have that
same topology, but on ends, we see that we have some
additional vertices, and it gives us control to move them anyway we want,
which is fair enough. But this phase itself
is now an end goon. Once the topology has
more phases than four, it's going to turn into endgon. We can use that previous
trangulation method, trisquad to kind of
negate this entire setup. We can also use Alt and F, which will beautify the setup. I would try to attempt to well, triangulate it everything
in a nice kind of pattern. But it's not perfect. So for example, right
away, you can see that this turns into a
separate phase, and this was not the phase
that we were looking for. So maybe we would want to
manually adjust some parts, like so and then use
Old F to beautify, which would give us
a better result. Anyways, the problem with
this doesn't always show up. It's sometimes okay to
make use out of endgns. But this really depends
on the situation. If I had this attire
setup as completely flat, so if I were to resize
it as, you know, just completely flat
type of surface, it's going to be quite right. Most of the programs
these days end up having a certain algorithm, triangulation and whatnot
that would end up doing it. Real time renderers such as a real engine will only
accept triangulated meshes, even if it's a quad they would trangulate it
within an engine itself, although it's still
recommended to keep parts, you know, as quads like this. So even though all
of this would be trangulated in sort of
trangulated within, like, a game engine and whatnot. So that's something
worth knowing. And in regards, for example, of this, top over here, we can see that all of the vertices end up
being set up like this. Joining onto this
part over here. And it's mainly because we have this little chunk at the bottom. If we didn't have this
chunk at the bottom, so if I was to delete it
and if we just had, like, a simple fill, this part would be totally okay
to just have it, like so and just have
something like this, I would be totally okay, even if it is an end go because
when it's a flat surface, it's more reasonable to
keep that end going because the programs tend to
just strangulate it in a random way or based
on an algorithm, depending on the program. And there's no way of going wrong when
it's a flat surface. The problem comes when flat surface is a little
more complicated. So, for example, it has
depth as previously shown with this
little abomination, or if we have
something like this. So over here is a
causation of bullying. Operation, which
allowed us to cut into the whole of
this planar surface. And if I was to just show you how it looks like that's
how it looks like. So in this particular case, we might have a problem because sometimes when it
tries to triangulate it, it wouldn't just
keep those holes. I would try to maybe join
some parts like this, and you would get these kind
of pass where it's just weed cuts into the surface, and you would get,
just some glitchiness within your well, mesh. For that reason, just
make sure you have this either triangulated or you
can manually fix that up. So if I was to
just, for example, trangulate faces, we
can have it like this, try quads, just a little
bit quick cleanup. It's somewhat acceptable. If I was to use beautify tenf it might not
work quite as well, or you might want to delete
these parts over here. But then the UVs would
perhaps need to be redone. So beautified Alt F
doesn't always work. Alternatively, what you can do is you can get some control. So if I was to just
triangulate this, real quick just to show you
what I mean with control. So right now, we have all of these vertices going from
this particular angle, and it's a lot of vertices, and it might sometimes
give you some issues, especially if you
are having maybe, like, some depth, maybe it's not a completely planar
type of surface. So for when that happens, I would recommend you just
doing some parts manuals. For example, this would
be joined over here. This might need an
additional maybe vertice, so we can just select the
edge and we can just click Subdivide and
hopefully it will give you additional vertice like so, and then you might be
thinking that, hey, the other face would be
an end goon anyways. So we can click Old and we
can see what happens here. I can click L, making sure
that it's set to normal. Click Shift H to see
the entire part. So this over here,
it's a flat surface. You can't really
go wrong with it. You can just triangulate it or whichever way you can just leave it as
an endgon itself. It's not going to get it wrong, but the main part is
because this has holes. We definitely need
to make sure that it's well, not an end gun. So for that reason, I sometimes prefer to just, you know, subdivide
some surfaces, just make some control
points like this, making sure that parts
that combine have, like, some, um, specific edges
that they're going towards. So this for example, we go here. This last point, I would
like it to go here as well. But this point, I
would like to go here. And because we're
creating these edges, these parts will end up just
naturally being trangulated. So if I was to select these
edges, so by clicking L, selecting it maybe a UV, so I can click,
what's it called? A trangulation? There we go. So trangulate faces, and
now it's going to do the trangulation in a
bit of a better way. Now it's definitely not going
to cause us any issues. And again, I'm going
to click Old Age. Let's not forget to do that as previously mentioned in
the previous lesson. So, yeah, that's going to
work a lot better if we are exporting this mesh for
texturing or other purposes. So, yeah, that's going
to be it for me. Thank you so much for watching, and I will be seeing
you in a bit.
13. Correcting Normals for Clean Texture Bakes: Hello, and welcome back everyone
to UV Mapping boot camp, Master wrapping and
texturing in Blender. In the last lesson, we left ourselves off with
a troubleshooting, couple of engons and whatnot. We're going to now continue
on with our setup. And if we look behind
the environment, we're going to find three
barrels hidden in the back. Let's go ahead and
select them free, like so and raise them up by clicking GST and just
moving them upwards. All I did was for
these free barrels was simply create new material for every
single one of them. So it has mesh one, mesh two
and mesh free materials. And I just simply
selected them free, like so exported out as FBX and import it into
substance better. And this is what we get. Right away, we'll see this
issue for the barrel one. It's going to be self evident. It's going to be
way more visible in comparison to what
we see in blender. And the reason for
that is that by default blender uses something
called a two sided shader, meaning that a face can be seen from the inside and sorry, from the outside and the inside. So if I was to go get
my camera inside, you see the faces in here. So, on the other hand, we have a barrel over here. If we have a look what's
happening on the inside, we'll see that some of the
faces are transparent, whereas on the outside, we have transparent
faces on the right, and on the inside, we can see through on the
left what's happening. The reason being is
that by default, substance banner will
use one sided shader, meaning that faces are only
visible from one angle. And this is actually more
common than Nude fink in blender because it mainly
uses cycles render engine, which is a tracing setup. I can't afford to have
two sided as a default. But something like unreal
engine, substance painter, just real time
renders in general, they would almost always would prefer to have one sided shader. Now, the other thing
why it's an issue is because not only we get
those type of visuals, when we are texturing, we are also going to
have issues with them. So let's say we still want
to keep it in blender and we don't really care about chose sided type of orientation. Well, if you decide
to do some texturing, you still would want to have normally align normals
in the right direction, giving us a proper outcome. The reason we can also
get issues in blender, if we want to do some texturing, like in substance painter, we would need something called procedural
generated textures. So if I was to go on to
baking menu like so, we have all sorts of
textures, normal, which would allow
us to get it from HIMAp from high topology
to low topology, something like
worlds base normal, which will allow us
to, for example, get a gradient,
curvature position, thickness, et cetera, et cetera. The main one, though, is ambient inclusion for
this particular case. The reason being that
if I was to bake it only on mesh one for now, I'm going to go ahead and
just deselect everything else because we don't
really need it. Let's go ahead and
bake this out. So return to painting mode, and if we have a look at it, this is what we're going to get. So notice how we are getting some darker
parts in between. Notice how the texture
is actually being, darker on the inside. What ambient clusion
does is basically, if I was to show you the
ambien occlusion mask only, is basically it goes within
those crevices that goes into areas which would have
more depth and darkens them, giving us more of visual feedback out
of the depth itself. So you can imagine that
without amber clusion, you'd have more of a
flat looking surface, but with amber occlusion, it's going to darken those parts around areas where there
is, well, more detail. However, this changes when
we have the normals flipped, meaning that darker areas would be considered like
this part of a year, where it's supposed to
be more of a curvature, a lighter area, and everything like that gets just
simply messed up. It just darkens everything and it's not going to look good. So even if we were to
export out this texture, it's already a lost cause. And well, that's not good. In blender, it's
quite easy to fix. If we were to go back
onto the project, there is a nice little thing
to visualize our paces if we were to go onto this overlay icon over
here onto this arrow, we can click on it and
select face orientation. In the older versions, you would see blue and red. Blue is basically good. It's facing towards the camera. Red, on the other
hand, in both cases, is going to be facing inwards, is going to be facing
away from the camera. So the best, the easiest way to show you would be
with a simple plane. If I have this simple
plane, top is okay. If I were to rotate my camera, I can see that it's now
facing away from me. Essentially, if I
was to put it in an unreal engine,
from this angle, it would be invisible, same for substance painter,
just like that. So all we need to do in order to fix this is go
on to Edit mode, select all of the mesh
and hit Shift and N, and that's going to
fix it just like that. It might have had some issues with Shade Smooth. I'm
just going to go ahead. It's still a mess. And the reason being is that
if we were to go on data, there is something called if I was to find it
geometry data, there we go. Clear custom split normals. And if you were to select
this barrel over here, click Clear Custom
slit Normals data. It's going to give you
the default reset. Then we can go on to
shade Oto smooth and then use just based on
an angle to kind of get that result of smoothing
the sections where needed and keeping the sharp bits where it's not necessary
to be smoothened. All right, going back to the normals in case of them where it's being
faced and whatnot, face orientation, that is. So on the inside, you
can see it being red. But let's say some parts
would be still an issue. This entire selection doesn't
fix it, so shift and N. So shift and N does not
fix it. What can we do? Well, we can select specific
paces, using, for example, C and just selecting it and right clicking
to cancel it out and hitting Shift and N. Then we can select
this button over here, which will flip it out,
like so and that way, we can essentially control which faces are facing towards you and which vases are facing away
from you or from your camera. And that's pretty much it
in regards to the control. If we had some issues
with red being visible, we can just click this on and off in specific areas
just like that. And once we're done, we can
go on to face orientation, and then this barrel would
bake perfectly for you. Now, let's go ahead
and test our barrel. So I went ahead and
just exported all three of them out
in one FBX again, simply because I
want to update this. And once we have this version, I can just drag it
in and right away, it will ask for
project configuration, essentially allowing us to
update all of this FPx file, going to click Okay, and
that's what I'm going to get. Right away, we'll notice
that it's still dark, although the faces
now are flipped. If I was to check it, we can see that everything is
nicely set up and we simply need to go on to baking and re bake
this amber occlusion, which hopefully it will fix
this issue just like that. So that's going to be it for me. Thank you so much for watching. And then in the next lesson,
we're going to continue on working with these barrels,
trying to fix them up.
14. Checker Maps Visualize Your UV Layouts: Hello and welcome back everyone
to UV Mapping boot camp, Mason wrapping and
texturing in Blender. In the last lesson,
we left ourselves off with the first
barrel being fixed. Now we can add texture and have a real
nice type of setup. Speaking of setups, we
might as well go over how to add some visualization for
the density of a texture. In substance banner, it's
quite an easy thing to do. I will show you how to do
that in blender, as well. Don't fret. Let's go on to just simply
adding a fill layer. Then we can create
ourselves a generator, like so and holding Alt, I'm going to just only
apply color channel. Then select generator, and
there is our UV checker. It is great for visualizing
how the rotation is. We can also click, I
believe, there we go free. So this one was part of a
multi mesh type of setup. Don't worry about them being
scattered around like that. I simply wanted to show
you how it looks like. And you can see the
alphabetical order is going that way upwards. Like, so if we were to
check our UV in freed, we can see that it's
going sideways, meaning that it actually
is rotated like if I was to be able to rotate
a camera is a way I want, which I can't seem
to be able to do it. Unfortunately, either way, we can see that the UVs are
going that way to the side. So that is pretty cool. Although personal preference
of mine in substance beater, to check UVs would be by making use out of
a simple material. It might be a silly thing,
but even so if we were to go and use fill layer like so and click on
the material mode, we can check it
with something like a skin or a reptile skin. It gives us a real nice pattern, and it is quite shiny. If I was to select it, we can go ahead and
increase the tiling, and it might be a
somewhat silly setup, but honestly, it's
what works for me. So if we have a look, we can see everything being reflected. I can hold shift, move the
lighting around and see if, for example, any of
the seams are visible. So for example, right away, we can see this seam over here. So in terms of hiding, seems and whatnot, we can talk a little bit about that later. Honestly, it doesn't matter. All we need to know now,
though is that checking Vs, checking how they look like is pretty good with
this material. Before there was this
metallic crosshatch that I loved seems to have
they have removed it. So this is my alternative to use the reptile skin to
have a quick look. So for example, maybe over here there's
something wrong with it. I can offset this and see, Okay, this is part of the
skin, and that's fine. Like, so and all in all, it is good. All right. In blender, if I was to go ahead and test out this barrel or
lovely barrel over here, we can go on to shading tab, which will rearrange
our entire layout, and you'll see that even the
camera is a little bit off. So let's go ahead and
zoom out and we can even if we have the
barrel still selected, we can hit the dot button, which will zoom us back in. So in terms of this setup, let's go ahead and change from shade of type from world
to object over here. I'm also making sure that the material preview
is visible for me. If the window is too small, just make sure you make
it a little bit bigger. And then we can simply click Shift in A,
find checker texture, like so and use this for
base color, just like that. The scale I prefer
to have it is 20. That way, I'm able to see it. Oh, and I've completely
forgot one more thing. We need UV mapping so
we can get object info. There we go and set this up Sorry, that's
not object info. Object info from UV map, like so, and we can attach it
to vector, and there we go. Nice, lovely type of setup. In this case, even scale might
be a little bit too small, but by default, scale of 20 would work in
most of the cases. The reason it's not
working now is because the UVs that we're having
are a little bit scattered. Again, because this was used
from another prop setup, and it was part of, well, multiple assets were
placed in one UV space. So, yeah, that's pretty much it. You can test this
stuff out of program. If you're using something
like a game engine, you can just download
yourself a checker texture of the Internet and plug it in into your material
to check that out. So yeah, a pretty simple
and straightforward lesson. I just wanted to showcase you how we can use a checkerboard. We're going to learn how to make a better use out of
it when we start manipulating the items of UVs. But again, let's not
get ahead of ourselves. Let's continue on with
the barrels first. Thank you so much for watching, and I will be seeing
you in a bit.
15. Avoid Overlaps UV Baking Best Practices: Hello and welcome back
over on to UV Mapping, boot camp, Master Unwrapping
and texturing in Blender. In the last lesson, we checked our barrel vitalized with
this UV checkerboard. Now we're going to move
on to our second barrel. So let's see what is
going on with it. On this side, it looks
well, it looks quite right. Let's see what we can
do with our texturing. We're going to go
ahead and bake out our my clusion just to
see what is going on. If maybe it's okay,
maybe it's not, I think it isn't because I'm the one who
made these barrels, and if there is a mistake, well, I might have created
those mistakes on purpose. Let's go ahead and generate Amateoclusion, and there we go. Right away, we'll see some interesting and unique
type of outcomes. So what is going on over here? We have some bizarre setup. We're trying to paint color, and it seems to be painting
on this side as well. We also have a little bit
of an issue over here. It just doesn't
look quite right. Let's go ahead and test
out what's happening with, well, texture preview. I'm going to use my reptile
skin because it's just quite nice and going
to increase the size, so just to see what's going on. So in terms of
applying the scale, it looks like
everything is okay, but the thing that's
not making it okay is just this
section over here. So let's open ourselves up
with UV tab over on the side. Just hide this out of the
way and see what's going on. And there is our culprit. As you can see, over here, we have an overlapping UV, and overlapping UV is great and if you're just using a
simple, seamless texture. So if you were to use this good old trusty wood
that we had over here, of course, it's not
that type of a mesh. Perhaps you would use more of
a metal, but for this case, let's go ahead and add wood so you wouldn't be
able to tell that there is an issue
with the top of the section because it's
a seamless texture. You don't really need to
have any generated normals or ember occlusion or
anything like that. But when you're
starting to use them as unique maps for well, texturing specific parts
like in substance painter, you would then need to
consider that placement. So for that, we can simply go ahead and
fix it quite easily. Well, in terms of checking whether or
not it's overlapping, where we're not something
that's overlapping again, you would just go ahead
and bake out amid clusion and click B
on substance Banner. And that would
preview your mistakes quite easily because amid
occlusion when it bakes, it will try to bake out
this plane over here, and it will try to bake
out the overlaid setup. Which would give
you those errors. So it's quite easy to see. Just make sure you rotate
your object around before doing any
type of texturing. Just checking that
kind of stuff. So for example, bottom over
here is also an issue, which might be sometimes
because of low resolution, sometimes because some of the pass maybe are bleeding
through or something, and you might need
to where is it, lower the distance,
marks occluded distance, minimum occluded
distance you might want to play around
with those values, delete couple of
zeros from here, add couple of zeros over
here, stuff like that. And if you tried
lowering those values, and it still doesn't work, odds are UVs are overlapped. Again, I'm showing this
in substance Beta, but some other texturing
software, other baking, am occlusion, and whatnot, is going to do quite well
in these cases anyways. The fastest fix for this
would be to simply, well, we could just click L
and move this out of the way, and that would be our fix. The alternative would
be to pack UV islands, but I'd like to firstly
finish off with this other barrel
because it's quite similar in terms of an issue,
but it's not quite there. If I was to quickly bake a
mesh free and occlusion, we'll notice a little bit
of a similar issue except, hey, ho, it has some black mask. So what is happening over here? Why is it turning purely black? One of the reasons, again, could be because the
maximum occluded distance was just a little bit off. Maybe you had a what's
it called D D D D do? Self occlusion is set to always. But if you have this set to
only the same mesh name, you would essentially
be trying to use A, if you go to common settings, you'd be trying to use
high definition meshes. If you had a mesh that
doesn't match with the name, then it would give you
this kind of issue. You could try use low
poly mesh as high poly. If you don't have
any high topology, that might fix an issue, but let's get to the bigger issue that could
potentially be at fault here, and that would be we can
even look at the UV map. That would be UVs are
outside of the 021 UV space. We can even see that in here. Even if they are out
by a little bit, it's going to cause issues. I really recommend you to just making sure that
they are within a space, and that's going to
be quite all right. But right now, how could we tell that they
are outside of UV space? When baking amber clusion, the amber occlusion
will only test what's inside a zero
to one UV space. It will not check
anything else whatsoever, meaning that you could
potentially have, um, how should I show
you as an example? You could potentially
have this piece over here as a duplicate, as a separate face over like so, and have this selected because this is a
duplicate as well, have this moved by G X one, like so, which will
move it to which will move it to identical spot
on zero to one UV space. But this is going to be
moved exactly by one, meaning that whatever
this UV space is having, this will also contain as well. So you can have, for
example, like table legs, or, for example, maybe
you want this piece. This little piece over
here to be duplicate on, like sides and stuff, and you just want to
have this exact type of a setup and you want to
save up some UV space. You could just duplicate this, like so move somewhere else
and have this move GX one. Like, so the reason we're
moving it like so is because Amberclusion
would not detect this. If you had multiple
parts overlapping would start getting issues like this where it would start
giving you artifacts, mainly because it
would just try to overlap the same object
onto one UV space. And that is not
really acceptable. But if you have this same spot basically duplicated
over on the side, it's going to
ignore it just like it's ignoring this
part over here. Because the UVs are outside
of the zero to one space, it's going to give us artifacts like this being completely
black and whatnot. And again, if I was to just have something like
this seamless texture, this being outside of zero to one space would not matter
whatsoever because, well, it starts
looping over itself, so it doesn't really matter. It only matters when you start
wanting to texture it and having that zero to one space as a unique
mesh to be textured. So yeah, that's pretty much it. We can see that
some of the parts, for example, over here, look like they might try to do something with
the ember occlusion, and the reason for
it is because it's trying to duplicate
what's on the up side, which was this next
to its corner. So that's why it's giving us basically the continuation
of this piece. This part over here
would try to be, well, what's over at the top, which might be a little
bit harder to notice, but even so we'll
still see some, like, streaks and
whatnot for no reason. So that is something
to keep in mind. And yeah, that's going
to be it for me. Thank you so much for watching, and I will be seeing
you in a bit.
16. Mipmaps & UV Packing to Prevent Bleeding: Hello and welcome back
every on to UV mapping, boot camp, Master and wrapping
and texturing in Blender. In the last lesson, we left ourselves off by
going over some of the basics for how to identify some of the
most common issues. Now we're going to
continue moving on with our Lantern over here. And I'm going to talk a
little bit about how to make use out of our setup, how to make use out of your
RUVs to better optimize them within zero to one
UV space for the mesh. And for that, we're going
to introduce ourselves with UV packing
option in Blender. Which I think I'm going to start actually with
the window over here, just to showcase
you what it does. If I was to go ahead
and select the UVs, so we can go onto the UV
section and select PAC Islands. Pack Islands is great, as it will allow you to, well repack your islands. As you can see, over here, we have lots of holes and stuff. If we were to make use
out of the Pack Islands, it will allow you to
repackage them essentially. So at the bottom, we saw a bar showing us
packing process, and we see that it's
going to save up our space quite
nicely over here. So all in all, it's quite good. But let's say we want a
little bit more control. Let's go ahead and
talk a little bit about how to make use out of a packing to better
enhance your UVs. So first things first, I'd like to talk a little bit about well, something like
wood, for example, if we want to have all of our UV islands to be facing in one direction
for something like wood, do actually want to go back
onto our crate for that. So we have our wood over here quite a bit messy and
everything is small. We can use packing
islands like so and talk about a
rotation method. If we have rotation
methods to vertical, it's essentially
going to do what UV packing did beforehand, which is going to give us those lengthier islands to
be rotated in correct way. We do need to make sure that
this is ticked on though. We also have scaling, which is going to allow us to rescale all of those
little pieces. If we don't have this tikton, it's just going to keep
them as small as this. And yeah, let's go ahead
and repack this right away. We're going to see that this is the result that
we're going to get. So much, much better result. So that's pretty good. Then going back to our
troubleshooting section. Another thing I'd like
to talk a little bit about is going to
be if we were to use packing the
option for margin. So margin will allow us to get more of those gaps in between, and that is something
very, very important. The reason I'm saying it's important is because if we were to use packing with no margin, it's going to give us no gaps. And you might be thinking
that it's alright. But the issues come when
we start using it in other engines in something like real time engine
unreal engine itself, we would start getting issues. So, for example, if
I was to increase this instead of 0.002 to 004, we're going to get bigger gaps. And you might be thinking that there is no reason to do that, but that is where you are wrong. If you're using
real time renderer, especially, it's going
to give us some issues. So for that, I'd like to use some of our lanterns
as an example. If I was to open up a
project with Unreal engine, just going to change
this to a lit mode. Like, so, so this is the
lantern that we're having. So what's nice about Unreal
Engine is that it has some optimization setups already pre built within
the engine itself, one of which is going
to be a MP map. And if I was to explain
to you what MP Map is, I'm just going to go
ahead and real quick, open up an emissive texture. MP Map is this part over here. It's a level of
detail for a texture. So if you know what level
of detail is, essentially, it allows us to simplify an
item based on a distance. So the further we
are from an object, the less of a resolution
it's going to get. And that is quite important
to know because MIP Map, if we start increasing it, it will start lowering
the resolution. So right now it's set to this, and if I were to set it to ten, it's going to just blur
everything out completely. And you notice those
pixels that we have over here are going to start
blurring out completely. If we were not to have any
type of shell padding, any type of gaps, those blurriness will start overlapping and merging
with one another. And that's especially
important in sections that we have
certain glow, for example. Because if we were to have a mission like something
for this lantern over here, once we start zooming out, we would start seeing the items bleeding in for the areas
that they're not supposed to. So for example, if this item
was a little bit closer, so let me just show you
a little bit better on the color itself. So this item is placed way far away from the
emission over here. But let's say it
was a little bit closer to the
emissiveness over here. If that was the case, then
it would start bleeding in that chunk of detail
onto the post over here, and you'd start seeing
even if you're far away, you'd start noticing
that something is glowing in area that it's
not supposed to glow. That is one of the
reasons why MT maps need to be threaded carefully and why you
need those gaps to be there to kind of elevate
the setup from that. Another thing for
why it's important is because when you
are working with, well, free the softwares, they're not always using super
accurate result for UVs. So these UVs, if we
start zooming in, you might think that
they're going to be pitch perfect when it comes
to the UV setup, but it's not quite true. If we were to go onto
our static mesh, there is an option
called UV precision, so let me just go ahead
and try finding it. There we go. Use
full precision UV. You might want to look into that if you are interested
in more information. But what this does is
going to basically allow you to use more accurate
data of this created UV. But the reason it's not using it by default is because it's way more performance friendly to just use an
estimation of the UVs, and that is why
having this it off by default is going
to be more useful. And therefore, good practice is to have some shell padding, some bit of gaps in between. Those gaps depend on the type
of resolution of texture, to be honest and whether or not you are
using emissiveness. So for example, in an
area where it's a barrel, a general type of
a noise of blue, metallic type of rust, if you see this part of
a chunk, for example, starting to overlap a bit
elsewhere from a distance, it's not going to be visible. You're not going to really
care. So shell padding for this can be, you know, way, way, way smaller, and something
like packing it to a value of 0.001 would be still
right and reasonable. The other thing
is that if you're having four K
textures, of course, the gaps don't need
to be as big as well, so 0.001 would also work. In this case, also
notice how there's not too many well items
in comparison to something like a window where it has lots of UV shells, and for that reason, there's not many ways of optimizing it, so you can just simply pack it up with a little
bit higher of a margin, and it's not going to make
too much of a difference because those gaps,
don't add up. The more UV islands you have, the more of an issue it's
going to start becoming. So if you have it over here with a pack for the same margin, you'll notice that it
makes everything much, much smaller and more you
grow with that margin. It will start changing up the resolution and you
don't want this to happen. So if we were to change
something like one for a margin, this is clearly too
little resolution. Everything is very blurry. So let's not have that. Big final thing that I'd like
to mention in regards to this entire information is that within texturing softwares, there's also
additional option for negating that additional
space in between the UVs. If we were to go
and export a mesh, ignore this little guide. This is a sample
that you can get by using just open sample
and finding a toad. Ways, going to export textures, there is something
called padding, and this padding is what causes our textures to be well
somewhat stretched out. If I was to go onto
this setup over here, onto our lantern, you'll notice that these
parts start bleeding out once they reach their
UV shell outer space, and they start bleeding
out until they well, they start merging
with our parts. So, for example, this over
here was an empty space. All the pixels start
bleeding out until it reaches another part and
they start meeting up. And every single one of
them is going to do that. The reason for that is because
I don't have dilation, usually, it's set to
dilation infinite, which will allow us to do that. But if we have something
like dilation diffusion, you can select the amount of
pixels and start dlating. For example, after ten pixels, it would stop only giving you
an outer shell instead of bleeding it out to the
edge of the canvas. But using infinite
padding, personally, is just I feel like it's better because since you're not
using that space anyways, you might as well
just bleed it out. Though I would say that
in regards to, like, countering this
argument, it might be a little bit less sizing
to the texture. If the space itself was just
purely black and whatnot, the compressing of PNG
format or JPEG texture, whatever you're
using would end up being a little smaller, although the difference
from what I noticed, is not really that much. So yeah, hopefully that all of this information
made sense. I really am glad to share this
information with you guys. Thank you so much for watching, and we'll be seeing
you in a bit.
17. Scaling UVs for Sharp Text & Shared Materials: Hello and, welcome back
everyone to UV Mapping boot camp Master wrapping and
texturing in Blender. In last lesson, we went over
some padding techniques, how we can make use out
of them and whatnot. And now let's talk a
little bit about, well, adjusting UVs, kind of changing up how we want
them to be and whatnot. We're going to start
off with something rather controversial
about the idea of not moving UV vertices once you
well captured something. And that's most of
the cases in most of the cases is going
to be true because if you start moving anything, it's going to start
stretching anything out. And that's nothing. Like, it's definitely
something we don't want. Not only will you start
stretching shape, you will also start
stretching the pixels itself. So the more you
start stretching, the more you'll notice
that those pixels are going to be well, more less resolution because
you're stretching it out. Well, if you're
stretching the vo way, it will start also
being smaller as well, but Evo way, it's not going
to look the same as if you were to just texture it after you're done with the UVs. That being said, though,
there are a couple of workarounds or a couple of
ways to make use out of it. So let's say you want to
slightly offset some of the UVs. Let's say we want this to
be moved down. Do that. We can, for example, select
one of the vertices, and we can click G
and then G again, which will allow you to
go into Vertex Move tool, sort of a vertex
slider that will just let you to slide the vertices in between the points like this. So this is quite nice. It
allows us, for example, select an entire edge
loop holding Alt, sell anything like that. So licking G twice
and then moving this downwards and notice how although the shape
is somewhat changing, the UVs are still
being kept the same. So we can use that to
maybe even, you know, make an interesting shape
if we want to at the top, having this maybe would
work quite nicely, although even so it still might be needing to
be a little bit careful, not doing it too much
because as you can see, it gives us a little
bit of a wobbliness. So just make sure not overdo it if you're
using this technique, especially for multiple
edge loop situations. But if you're using it for something like just one vertice, I doubt it's going to cause too much of an
issue, to be honest. It's going to keep that
shape more or less the same. In terms of using it to help
you out, you can do that. You can, for example,
select it over here. So I have a little
vertice over here, and notice how at the bottom, the point over here is
not rightly set up, centered to be right
underneath the rope. Use this vertice over
here to move it, and I'm going to use
this gizmo over here to move it to the side because
this is a flat surface, I'm going to only move
X and Y direction. So using this square
will allow me to lock the Z value over here. And by just doing that, I can move this and slightly
reposition it, so notice how they
are being warped. But, for example, if you
look at from the bottom, it's going to look like
additional type of depth in this particular case. So visually, I think it's actually
going to look even better. So we can see before and after. There we go. So yeah, really up to you in
regards to the usage. We can also do some bit of
more unique type of setups. If we want this, for example, to be more unique, we
can totally do so. I'm going to go
ahead and duplicate this mesh off to the side. And let's say we now want this mesh to be a
little bit different. How can we do that? Well,
there are multiple ways. We can be a little bit creative. We can select just this
bubble over here with an L delimiter set
to normal over here. And if I was you use
S dead and minus one, I'm going to flip this
entire part around like so, and it seems like shade out of smooth wasn't
working properly. But just like that,
I'm able to flip it, and we have basically
two variations. It's going to be two
different meshes, but they're still going to
use that same type of a mesh. So that's pretty nice.
That's pretty cool. Another thing that we
could do, for example, we could extend this at
the bottom over here, which is going to start
stretching out this part like so, but because this part is
just somewhat of a well, just a simple basic
type of noise, it's not going to matter if we're looking at
it from a distance. So we can have some bit of
variation in regards to that. We can also grab this as well. We can use a Z. Like so, and I'm
going to then make it smaller afterwards,
just like that. And just by playing
around with this, we can see that
basically we can get just a more unique
type of a look. Now, let's say this part over
here looks a little bit. Well, maybe we
want to change it. Let's say we want to change
it. Okay, we can do that. We can select it like
so using only UVs. And now we're going to switch it around a little
bit in UV section. So by just rotating this
around by the 90 degrees, which I'm going to just
rotate it like so and sorry, not 90 degrees, 180 degrees, like so, which just rotate
this entire part around. It's going to flip
those characters, but maybe it's
something that we'd want and it's going
to look quite nice. And I just realized
for some reason, it's shade order smooth is not
ignore sharpness, perhaps. I'm just going to set it up as shade order smooth
and leave it as this. It might be because, well, the geometry data was set, there we go, and
we just reset it. Fixed. Alright, so you can see that it wasn't
because of the UVs, but what was because of the UVs, if I was just to select
it again, R Z 180. We can just do it
like that as well, is we'll have some
of the issues. For example, this part over here is because we had
a hole on the top. So from a distance, it might still be
okay, you know, if you're willing to sacrifice that type of detail. Like that. Or alternatively, if I was to select this
mesh on the back, we can use just flipping
it mirroring it around. So I can use S, Y
minus one, like so, and it's just going to
flip it to the out side, keeping that hole at the
very top, just like that. So maybe something you want, maybe not up to you. And the reason I'm using
S Y is because, well, it's X and Y type of directions, although they're called U and V, X being horizontal,
Y being vertical. So we can make use out
of that to just flip S Y minus one and scale invert
for that, basically. And, yeah, that's pretty
much it in regards to the basic type of scaling,
rotation, and whatnot. We can make use out of
it to make a variant for the setup in terms of making use out of,
well, one material. Previously, I mentioned how
this mesh, for example, was used with multiple pieces, and that's why it's
being stuck like that. Let's say we want
to set it up with this lantern and the
spiral with this lantern, what we would have
to do is basically, I'm just going to duplicate
it to showcase it. We would have to just
use the same material. So if I was to just replace
this material with props big, like so, and this is going
to be a mess at this point. But once we have
them both like this, we can go ahead and
select them both, go on to UV and
pack islands again. In terms of pack islands, one thing I really should have mentioned that previously
is going to be it's going to pack it based on the default scaling
of your well, mesh, not mash, sorry, your UVs. So because your lantern
was in a bigger scale, it's going to have
a bigger chunks. So again, if I was just
to show you like this, it's going to give us a
much bigger resolution. If I was to have
this entire mesh, all of this scale much smaller. It's going to start packing them in much smaller
size like this. And if we want to have
all of the sizes to be, well, the same size, we can
use average island scale. It's going to average everything out, and then we pack it, and then it's going to give us that ideal perfect resolution. Or alternatively, let's
say this sign over here, we want to be well, bit higher resolution
for something like text, it might need to
be more readable. What we can do is we can select this sign over here once
we average everything out, so let's go ahead and
average island scales. Then we can select this sign, like so, and I'm going
to scale it upwards. And scale ratio really matters. So we can either do
it by hand or I can use S two and enter, and that's going
to give us well, we'll try to give
us a resolution that's twice the size of
what we would else see. So if I was to now unpack the islands like so and actually reuse this back chunk
texture checker. I'm going to go ahead
and do that. I'm going to go ahead and select it all, so click Control L link
materials. And there we go. We see that this is the type
of a scale that we get, and it's going to be
somewhat consistent. This is a little
bit stretched out, so tries to
accommodate for that. At the bottom, we're going to see them a
lot densier though. So that's pretty much it.
In regards to the setup. We're now going to move a
little bit in regards to, well, unwrapping our techniques. So yeah, that's
going to be for me. Thank you so much
for watching, and I will be seeing you in a bit.
18. Optimize UVs with Modular Wall Reuse: Hello and welcome back. We're
on to UV mapping boot camp, Master on wrapping and
texturing in Blender. In the last lesson,
we went a little bit over the setup for, well, having some variation,
tweaking some UVs, rescaling, and whatnot,
changing that type of stuff. Now we're going to move
onto our next part, where to close this
volume versus surface. That's a little bit of
an interesting it's going to be a little bit
reminiscent to our surface area, the first chapter we did. But in this case, we're going
to talk a little bit about, well, what does it mean
surface versus area? Obviously, the UVs, the items
that we have on the faces, the textures and
whatnot, are going to be dependent on how much
surface an object has. So here we have two walls. One wall is just
a simple square. The other wall is going to be well made out of
individual bricks. And although those sizes
seem somewhat looking same, if we were to just duplicate
these parts like sew apply or Trustee checker, so if I was to
just use that mesh one that I didn't
want to rename it, we'll notice something
interesting. So mesh one there we come. These parts are much, much bigger in comparison
to this part over here. Although they're using
somewhat of a similar space, this one we might repack it, but ebay, it's going to give us a much, much bigger resolution. What is happening? Well,
you might think on how the items of the wall end up being stuck in between
the faces and whatnot, all of those little
crevices and everything, they end up making use all
of that additional space, and it's giving us those
individual little faces. So plus, if we start using
something like shell padding, which we talked a little
bit about previously, it's going to be even worse. You'll notice that the same
shell padding that we used as 0.03 is going to
start freaking out because of the amount of little tiny pieces that we're getting. So even using it as 0.01, it might be a little
bit pushing but if you want to have a wall like this, you might need to do that. And having mesh one, you'll notice that it's
even worse than before. So that is something
to keep in mind. Now, let's say we want to have some detail from
brick wall over here, you know, the depth
and everything, but we still want to
kind of have variation of the the texture, density, and everything,
the resolution of it from the first wall. So what we can do is we
have multiple options. Firstly, the main thing
with such walls is, well, if we're using
a PBR variation, we can just increase
normal value. So increasing the intensity of normal will increase
the depth of the wall, like so, but still the main
issue would be on your edges. For the edges like that, if I was to go over here, for the edges, we can
hide them actually. So you can imagine that
we'd have another wall being stuck like over here or something or maybe a
pillar on the sides. If we were to hide
them out like this, you wouldn't even notice that this type of wall
is quite plain. Hopefully, that makes sense. If I was to go into a render, you'll notice a little
bit of an extra depth. So stuff like that really,
really does matter. If I was to hide it, so alternatively, we
could, for example, have an edge of a wall
to be partially bricked. So we could create
a similar something to like a pillar of
just brick walls. So just these walls
over here could be an individual piece.
Oh, sorry about that. I need to use limiter of normal. There we go. But
make to duplicate. So something like that could be a part of the mesh over here, if I was just to make it
set its origin, like so. If I was just to
make it on the side, we can see that by
integrating it like so, it would work out quite well, but that would need to have a little bit of
adjustment and whatnot. Maybe brick lead it over here. But just like that, you can definitely visualize
how it would look like, maybe scaling it or something. So, of course, you
would need to have specific color shading and
whatnot on the bricks, match this a little bit
better in comparison to that. But visually speaking,
you can see that hey ho, it would have a nice
effect overall. Oh, yeah. And of course, the wall itself, you know, it could easily
be a seamless texture. So that means you can even have even more of a resolution. And if you have more resolution, you can have this
same brick wall over here to be just simply duplicated into multiple pieces, and that's going to
work quite well. Like, so, then of course, this part would be
like anova variation that would be just
deleted meshes. And just like that,
you'd get yourself a really nice type
of a brick wall. Even with that, if you'd
want even more variation, what you could do is you
could cut out a little bit of the wall using something
like a knife tool, whereas knife tool, there we go. And if you were to have it a quick cut like
that, click Enter, and you could then delete these faces over
here, just like that. Faces like so, and
then you could try to fill in this gap
manually little bit by little just to kind of give you a nice brick
texture over here. So just like that, you
could do it for the wall entirely and just have some more interesting
shapes and whatnot, have some specific combinations, and you could have both
of the best worlds. And, yeah, that's
pretty much it. If you'd want to use this, if you're very
adamant about this, what I would recommend you
instead of doing it like this is just simply grab
a section of a wall, it's going to make a
selection like this. Like so, going to
hit duplication, move it off to the side
just to showcase it. Once you have a
section like this, you could then re
UV and wrap it, or use the packing islands, like so ignore the
texture at this point, we're going to change it to mesh so it wouldn't get in our way. And at this point,
you could just make wall that would
be more modulus. So this part would
connect more with this part and
whatnot, like this. And just like that,
you'd be able to connect the parts perfectly
together, just like that. And yeah, once you have just one wall set
up as modular piece, you could then duplicate it
multiple times and you'd have that nice resolution
that you'd wanted. Just like that. So it might be a little bit
repetitive with the texture, but it's way better than just
unwrapping an entire wall. Honestly. This is just going
to give you so much issue. You saw the amount of
resolution here getting out and there's basically
nothing. It's not worth it. It's definitely not
worth it. It might be working for something
when you zoom out, but if you're zooming
out, you might as well just use this kind
of wall, honestly. Wow. Alright. That's
going to be it for me. Thank you so much for watching, and I'll see you in a bit.
19. Organic UVs Mushroom with Minimum Stretch: Hello and welcome back
everyone to UV mapping, boot camp, master and wrapping, and texturing and blender. In the last lesson,
we left ourselves off with volume versus surface. We're now going to move
on to the next section, which is going to be called UV and wrapping organic items. So once we have it opened up and I have my
material enabled, like so, we can see we have a mushroom with three
different materials. Usually with props,
you'd see all of the item to be placed within
the same material map. But sometimes, in some cases, you end up just having
three different materials that you can go in between, and we have one for stem. We have one for
underneath the mushroom, and we have one for the upper
section of the mushroom. So we're going to
make use out of it. And for that, we're
going to use this mesh. I'm just going to go ahead
and just duplicate it and put it off to the side, so
we can just focus on it. First things first, we're going to talk a little bit about our UV unwrapping method,
these three over here. These three items unwrap angle
based, unwrap conformal, and unwrap minimum
stretch are actually a similar algorithm in which it will make use out of seams, which we're going to make
use out of in a bit. To unwrap your mesh. These are three
different algorithms. The second one conformal, what's the default
blender algorithm. Angle base tries to, well, straighten it
out a little bit, and minimum stretch is best for organic shapes as it allows us to relax some of those vertices. I'm going to show you
how to do that in a bit. Now let's just simply use
the conformal O though. Let's click on it if we were
to just make use out of it, so nothing would happen, you would see fail to
solve one islands, and the reason for
it is because we're trying to do all
of them at once. That's not going to
be useful for us. We need to make sure
we are unwrapping it whilst telling where
exactly to cut the UV mesh. So, for us to do that, I'm going to firstly
actually remove all of these materials just to get the checker to visualize the setup
a little bit better. So let me find the previously
created checkerboard, like so, and this is
what we have by default. It's a little bit of a
mess as a right though. We're going to start off by clicking two going on
to phase selection. I'm going to move this to
get more space, like so. And we're going to start off
by thinking about the top so the top can be just simply flattened out like
a sort of a panky. Now, before we actually make use out of the seams themselves, let's talk a little bit about the previously talked visualizer for to help us out
with UN wrapping. We talked a little bit
about cardboard method. Now we're going to
make use out of the Latex sheet type
of visualization. Essentially, you
can imagine that organic items such as
creatures or mushrooms, objects with flowing
rounded shapes are fitted in a stretchy
sheet around the surface. Can bend and deform, so it doesn't need
to be conformal, like with hard surfaces, and your goal is to distribute
the tension evenly. That's the main part over here. So there can be some stretching a little bit minimal type, but we're making sure
that around the shape, we're using less seams. To avoid too many shells, as you've seen previously with the surface versus area
section with the brick wall, we had that issue where too many shells caused our
resolution to be quite lower. So yeah, some stretching is acceptable and it
should be controlled. Seems need to be
placed more strategic. So in areas where there's
like cavities or more of a sharper edge where it
would make more sense because there'll be
well, better hidden. In certain cases, the unwrap needs to preserve the flow of a topology more than
the edge sharpness, meaning that there are locations where it would have to flow with the organic
shape, the texture. We're going to go
back to the mushroom, and I will show you
what I mean exactly. Using flow active quotes, we're actually going to use
another type of an exercise. So we're going to
leave it off for now. And yeah, without further
ado, let's get right into it. Oh, right off the bat, we can start drinking
from the top. And you can imagine
this part over here being just flattened out
like this, like a pancake, it will give us a
really nice setup or just the top of a texture, especially since our
texture, I remind you, is going to be just these
dotted mushroom textures. So it's just kind
of a neutral noise. We can make use out of
that. And we just need to think about where we're
going to place our seams. So we can firstly, think about placing
it perhaps over here, although if you think about it, red dots also need to go around
it a little bit inwards. So it would have more
depth instead of just having this part over
here to be either, you know, the white section, or if we were to try to use
the red part again over here, the seam over on the side would be quite visible
because these dots, if we have a look at them again, if we try to make well, an edge going straight
through the section, we'd have those white
parts intersecting with one another and
you'd get some issues, especially if we have
a look over here. We start getting those kind of issues where it just ends
and stops and whatnot. So we might want to avoid that, and that would be a
good thing to hide it. So we're going to instead use this edge loop
over here, like so. Now, if we were to right click whilst we
are in edge mode, we can make use out of
something called mark seems. Marking seems will
show up as red line, like so, meaning that we marked it as something to be
cut within that section. Now if I was to click L and set it my linked
to B set as UVs, we'll be able to see
that this is now marked as just an island by itself. And now, if we were to click
U and use on Brab conformal, we're going to get this
nice little setup, and you can see the squares are slightly distorted,
but not too much. For something like
an organic shape, it's going to be qua. If we have sci fi type of a setup and they
have straight lines, then it might cause
a bit of issue, but even so there's
ways to go around it, like using projection wrapping in substance painter or
something of that sort. But we don't really need
to worry about that now. Since this organic
mushroom is going to be more than
enough for the setup. Now I'm going to click on
plus symbol over here, get myself the mushroom top. And with this selection, again, I press L to make sure it's
UV selected, just top. I can click Assign,
and it's going to assign me with this texture, and already it's
looking pretty good. Now, we can do something similar for the
bottom piece as well. We're going to basically
separate the stem from the bottom piece to get this kind of result
as we sit over here. Notice that with this
texture for the bottom, we have more of a radial
type of a texture, meaning that it will just end
up meeting on its center. So we have a real nice pattern for a mushroom, well,
something like that. Let's go ahead and make use
out of that radial pattern. And it's just simple, again, turning this into
a flat pancake. We can just make a seam
over here, Mark Seam. Click L, and now we
can unwrap it like so, using conformal,
will be all right. Now, I noticed there is a
bit of an issue on my end. There is this little section over here, somehow
missed it out. That's right, though. I'm going to go ahead and just select it, click L on the rest and
just redo this wrapping, like so, and now it
should be fixed. Somehow, it's not fixed. So what's happening?
It's actually is fixed. It's used the same UVs, but it's using a
different material. So I'm just going to
go ahead and click assign, like so,
and there we go. Now it's properly fixed. But this part, we
already unwrapped it. We just need to add
a new material. For a stem, like so and
assign it for our selection, just like that, although, sorry this is not a
stem. What am I doing? This is not right. To
change the material, we can just click on
this pattern over here and select the bottom. There we go. We're now going to get ourselves a nice little
pattern pattern like so. Let's just make sure we are
positioning it and nicely, maybe making it smaller, like so to get it right underneath the mushroom,
just like that. As for this little part, it's going to be a little
bit more interesting. The reason being is that, well, it's more of a
cylindrical shape. And if you remember the way the cylindrical shapes are unwrapped from the
earlier stage, from the first stage, if we
create our original mesh, we're going to add ourselves
something like this. Essentially, the side
the side is going to be unwrapped as
just one piece, and top and bottom can be
unwrapped as separate. So with that in mind, we
can do something similar. Because this part is just doesn't have
anything on the top. We don't need to worry about
it, but at the bottom, we might need to worry about it. So we're going to select
the bottom piece. We're going to right
click and Mark SM. And then we just need to unwrap it like we would cylinder. So I'm going to select the
bottom edge over here, hold Control, select the top, and now we're going to
have it all selected. Go right click, Mark Sam and I'm going to click Alton He
just to get back to the mesh. It's not necessary to hide
the parts, but if you do, it's just sometimes a little
bit easier. Work with. In this case, I just wanted to visualize it a little more. Although I will say it's also pretty nice
to make use out of hidden features out of hiding feature because if I
was to go on edge selection, hold Alt and select, it will take all of this
edge loop across our mesh, and we don't want
this to happen, for example, what if
we want to happen? What if we only want this to be only for the
base of the stem? What we could do is as
a cheeky little way, we could select, for
example, the base. We can click Control plus
multiple times to grow our selection or click
Control minus to contract it. Once we have a
selection like this, we can click shift
an edge like this. Then we can hold Alt. Sorry, we can go to
the edge selection, hold Alt and just tap
on the edge like so. And if you'll notice,
we have that selection. Although we had a previous
selection happen. So if you do encounter
this kind of issue where everything else
was selected previously, but you had a real
nice selection over here and now just
partially selected this, partially selected this, we
don't want to say happen. I'm going to click
Control Z. I'm going to click Control I to
invert my selection. Now I'm going to go
ahead and hide it Alton H. So we only have that
we want deselected. Now we can click Control
I to make a selection, and it just is quite
fast and easy to do. These kind of little methods, it's just nice to know about when you're thinking
about how to speed up your workflow for
creating seams. But yeah, all in all,
that's pretty much it. We have the marked
seams for this section. I'm just going to
select it as UV. Click and use Conformal, although in this
case, Notice how conformal basically just has a bit of warping and what not. It has nice density, but if you want it to be a
little bit straighter, we can use ankle base would
work quite well, as well. But in this case, it tries to warp it at the bottom,
especially even worse. Minimum stretch
though will give us a much much cleaner result. So it might be a
little bit better, although you notice
that the stretching is a little bit odd, but for something like this,
it might be quite a right. And the reason I'm
saying it might be a right is because if I was to maybe low iterations.
There we go. So by lowering iteration, sometimes increasing it
really depends on the setup. We're able to kind of help us with the relaxation
of the UVs. We can now go ahead and
just rotate it like this. I'm going to put it
outside, actually. I'm going to now just change this material to be mushroom, stem, like so, and now we are
going to place it back in. I am going to turn off the UV sin just so we
could see this part, like so, and we can even
have darker part at the top, although in this
case, we can probably use Z 180 to rotate it and
have it at the bottom, since the dirt would
be there and stuff, it might be a little bit
better in that regard. And this little circle can
be placed on the bottom, and it's just going to be
quite alright. Like so. So, yeah, that's pretty much
it in regards to the setup. I really hope you enjoyed. And I'd like to talk a little bit more in regards
to mushrooms, how to unwrap them, and whatnot. But we're going to continue on with this in the next lesson. Thank you so much for watching, and I will be seeing
you in a bit.
20. Project from View & Seams for Stylized Unwraps: Hello. Hello, and welcome back everyone to UV
Mapping boot camp Master and wrapping and
texturing in Blender. In the last lesson, we talked a little bit about unwrapping. Now we're going to continue on with the mushroom unwrapping. Let's go ahead and make a
duplicate out of this mushroom over here and start doing
alternative unwrapping. So what we can do with this is if we were to make a
selection by clicking L, having select linked as UVs
because it was already, well, unwrapped a little bit, just to kind of split it off. We can go ahead and make use out of something called
projection wrapping. So this, I find it
to be complimentary to the unwrapping we
talked about previously, because it helps us to get those organic
shapes sometimes, um, easier to be enwraped at the cost
of wells stretching. But if I was to firstly click seven to position my
camera to the top down view, I can then click and make use out of Project from U or
project from view bounds. Both of these do the same thing. One will try to stretch it
to zero to one UV space, no one will not care about it and just do
a simple projection. You can use v one. I will give you the
same result and we can then just well, have the selection and make it bigger or larger or whatever
to better fit the setup. You'll see that it gives us
a pretty nice type of setup, although there will be some
stretching on the sides. In most of the cases where
it's simple organic shapes, it would be totally fine. And it kind of helps when we are and wrapping organic forms because after we're
done with this, we can make use out
of this relax tool. So relax tool will
do what we had done previously with what's it called minimum
stretch iterations. But this time we can
use this manually, and we can use Wait, the
brackets don't work. You can only use the
size turns out manually, like so to increase
it on the top side, strength as well if you need it, and we can click and hold, and then it's going
to start kind of bringing everything
back like this. And you might be wondering,
what is it doing? Well, what was to increase
the size even more. Just click and hold
on the entire setup. It will start stretching
all of these UVs, try to conform it a little
bit better, and using that, we can help ourselves
a little bit with avoiding the stretchiness,
although in this case, that might not be as easy, and the reason for that is
because it works around it and it doesn't know what exactly to do around
these edge corners, so tries to shrink
this entire part. But if we click it a couple
of times just a little bit, you can see that these parts that had basically no pixels, we'll start getting just a
little bit of resolution. And sometimes that's all
we need for helping us fix it and making it seem
like it's a nice mushroom. Well this base, however, actually, this one is first. This part over here
will be something similar except instead
of clicking seven, I'm going to click
Control and seven, which is going to give
us a bottom view. It doesn't matter if it's
a top or bottom view, but it just helps me to
visualize and see the selection. Then I can click and
project from you. Bounds will work here as well. So in this case, bounds gave me the perfect setup, and
that's all we need. And now this part over here, if we click one to go
to the side down view, click Project from view, bounds, is going
to give us this. And you'll notice that it is a bit stretched out
because we use bounds. If we were to use
project from view as is, it will not be stretched out. So maybe in this case, it might be a little better, like so, and in this particular part, I might not even do
anything because this stretchiness on sides
doesn't even look that bad. But let's say I want to add a little bit of that
resolution to the sites. So by just tapping
a couple of times, I might help it
out a little bit, and even by zooming in, you'll notice that
you don't really see much in regards
to the setup. So I think that's pretty
much it for this mushroom. Let's move on to the next part, which is going to be an
alternative for U VN wrapping. And this one is much faster and although a lot cheesier
let's put it that way. We can just simply go
to the top down view. Click Al Z to go into
transparency like this. And then we can click free, select all of the parts from one side like this.
I'm just making sure. Yeah, it goes all the
way across like this. I'm going to click Old Z
to see a little better. Then let's click on two, which is going to give
us the edge selection, and we just want to have a cross section of
the entire mushroom. So we can use selection, loops, select boundary
loops, I believe. Yep, that's the one.
It's going to give outside of that selection all of the selected item like this. Then we can right click Mark SM and we can unwrap it like this, minimum stretch, like so,
although, in this case, we also might want to quickly add those additional
edge loops over here, the bottom parts
just kind of help us split up the entire
mushroom like this. And if we were to unwrap
it using minimum stretch, it's going to give
us entire mushroom split into multiple pieces. So let's go ahead and select everything, put it
off to the side, and determine how
we can make use of the pieces to make our
lives a little easier. Well, for solders, we
have those two pieces. We can bring them onto mushroom. And we can position this to
essentially have no edges of these to be part
of the white pieces. If we were to align it
ourselves like this, make it a little bit
bigger if needed. We're going to get
no white parts that getting cut in the
middle and whatnot. I can do the same part for
this as well, just like that. Like so, and it's going
to be quite right. There's going to be a visible seam going through the middle, which is honestly quite right. It's not going to be quite
as visible or small prop, it's more than right. And if we want these two, we can just bring them
in to this inside. Although I'm not seeing the
I'm going to go ahead and just doesn't seem to want to doesn't seem
to want to change. There we go. I went on a phase
selection and now changed. If your mesh is not changing when you're having
a different selection, if the texture is not changing, keep in mind that if you scroll
a little bit on the top, you might have this icon
ticked on image pin. So if you have this on, make sure it's on, and it should give you back
that resolution. Not the resolution,
sorry, that image. I can just turn it
off, for example, and now if I was to go
back onto that selection, it will pop me back
in just like that. Um, I am going to go ahead and make a
quick selection of these two and upscale
it out like this, put this out a side, like this. Oh, Z 180. There we go. And just have it like so. So it might not be perfect. In this case, it
definitely is not perfect. So we're just going to go
ahead and adjust it like this. But you'll notice
that for some cases, it might be more than
enough with the setup. Maybe conformal. There we go. This one will work
a little better. So I'm just going to
go ahead and do that, like so and there we go. As for this part, not a problem. We can go ahead and
use minimum stretch, and this bottom piece is right. This needs to be rotated, like so make sure the dark parts are both covering this
up, and there we go. Now, when it comes to, you know, perfect UVs and whatnot, some people might say, Oh, you need to do this and do that. As long as it gives you
a visually good quality, as long as it's not too
overly clutter in the setup, meaning that there's
no weird like duplicates or something,
it's going to be all right. Uh, for example,
this part over here, maybe we can just separate it. So I'm going to go to
the sing selection, have this part selected, and then move it
off to the side, unwrap it, make it small again, put it off to the
side, there we go. Maybe a little bit like this. Again, it really
depends on the type of setup you're using the type of materials you're
trying to get, and just overall outcome
you're trying to get. But all of these
mushrooms, as you can see, have texture, top,
bottom, and whatnot. All of them will be
nice as props overall. So I think that's pretty much it when it
comes to mushrooms. These mushrooms are
sorted, they're done. Let's go ahead and move
on to the next section. Thank you so much for watching, and I will be seeing
you in a bit.
21. Rock UVs & Triplanar for Seamless Textures: Hello and welcome back
everyone to U V Mapping, boot camp Master unwrapping
and texturing in blender. In the last lesson,
we finished off with organic item section. Now we're going to move
on with unwrapping, custom shapes. And this one is going to be somewhat similar
to the previous one, but we're going to go
a little bit more in depth with how to set ourselves up with
patterns or more of, well, high level textures, in
this case, quite literally, where there is actually a pattern that needs
to be followed, and it's just not some
random noise that can be just altered
and play around with. Before we get into this, I'd like to play around
with this shape, which is supposed to be a
rock. It is actually a rock. It's just a simplistic
type of a rock, which we're going
to make use out of well to give it some texture. I'd like to start
with this because I wanted to place
this somewhere, but all the sections were
just not suitable for this, and I figured I might as
well have a nice grid of all of these shapes and have
a rock as a first item. So first things first, what do we do about this rock? I'm just going to go
ahead and duplicate it, move it off to the side,
so we'd have a clear view. And let's start thinking
about what can be done? Well, usually, I would
do it either two ways. One way would be just to
grab it the top down view as we did previously and
just cut it across, like so as we did
with the mushroom. However, in some cases, it would be decimated, like a bit of a nastier mesh. In other cases, you
wouldn't be able to get that nice
straight edge loop, as you can see over here, ignoring this edge loop
that grows across, so but you might not be able
to get that straight edge. And when setting up a
rock, that might matter. The reason being is
that you wouldn't want to jagged edged lines to
be going across like this, you know, just do do do do do. So what would you do? Well, you could go to the
top down view and make use. If we go onto Face Selection, click A to Select All. You can make use out of bisec. So with this whole
selection for an object, go to Mesh Bisec and then drag your mouse
across an object. This will create an edge loop, essentially going across
the entire faces. We can then go ahead and just simply adjust some
of those values. So, for example, if I
set up y to be zero, it's going to go right
across in horizontal value, or we can use this to turn
it a little bit if you want. Or X is the values. We can also use this to, well, change or offset
it if we want to. And also, there is
a gizmo over here, which we can use it to kind
of better visualize it. Like so simple setup. Just make sure to have
none of these tick toned. Clear inner would basically
cut it and remove the part. Same goes for the second one, and fill would allow you to fill in that mesh.
We don't want this. We just want this
edge loop like so. We get our edge look
like, so we can right click and go to well, edge selection first,
we can right click, Mark Sim and now
we can select it, right click and use
minimum stretch to get ourselves these two
chunky blobs just like that. For the sake of this, I
don't have a stone material. I think we can just use this wall texture to kind of
visualize how it looks like. So I'll just real quick
get wall cracked, like so, and just kind of place
it anywhere just like that because concrete is very similar to just
normal looking stone, especially if we're
doing a stylized setup. So just like that,
we're going to get ourselves pretty simple
type of a result. If we start rotating
it and whatnot, the seam is going to
be barely visible. The reason being is that well, it's a noisy texture
to begin with, and there is no pattern like
we'd have with roof tile, for example, which
would be very, very obvious over here. For that reason, that's pretty much it when it
comes to the setup. Alternative way that I would do it is if we were to
imagine, for example, a balloon wrapping an object, then you start
cutting across it, it would start unwrapping, and the object would pop
out of that balloon. That's kind of a way that I like to visualize it sometimes. So if we get a selection
going across like this, maybe just make sure to
get a straight line. But even if it's not
completely straight, even if we had
those jagged edges as we talked about previously, it would still be okay. Was once we do a
selection that's around 50% of an object, we can mark SM like so, select it all and do a simple unwrap minimum
stretch like this. You might want to
play around with iterations a little
bit if needed, but it's going to be pretty
much as good as it gets. Let's use that same
wall crack like so, put it somewhere just like that. And this is going to give
us even less of well, seams, as you can see. And if we position it like this where the
seam is at the bottom, you're really not going
to see a difference. You can see me zooming in. And the rock, even with all
those stretch the UV maps, it's not going to give
us any type of an issue. Alternatively, I will
start talking a little bit about projections in texturing
programs themselves. So within substance Banner, I have this tiny little setup. There you go. Rock. So
it's the same on wrap. It could have maybe
made the size a little bit bigger to
fit the entire space, but it will do for
this explanation. And instead of just thinking
about too much about, well, the stretching
and whatnot, if I was to use something like this cobblestone material
that I had previously, we can see that by default, it might be, well, stretchy. It might give that stretchiness
on the sides and whatnot. But if I was to use projection from
within substance banner, there is a change of projection. So by default, pretty much every texturing program
will use UV projection, this too deep plane that
we're always doing. But what we can do here is make use out of
triplanar projection, essentially giving us
this box over here, which will project
from all the corners. This is basically
the box projection that we saw previously
within blender. But in this case, this
projection is being used to apply texture
onto the two D plane. And in here, we can control, well, rotation, for example, there is alternative offset
settings and whatnot for each individual projection to just fine tune a lot of
those settings like this. I really do recommend
you playing around with that in a program. But the one that we really, really need to use would
be once we are done with dialing, to use hardness, and hardness will
allow you to blend in that value like this
instead of just having those sharp Seems
basically we're taking from one seam to
another seam type of setup. If we lower this hardness, it's going to blend
in the value, leaving us a very, very nice type of stony texture. So that's one way of doing it. Yeah, that's pretty much it. When it comes to rocks,
there is no easy way of unwrapping them when there's just no stretching or nothing. There's just ways around it to make sure
that we're getting something that would make
our acid well, organic. So I can just change
up, for example, to be maybe a
concrete like this, try playing on projection again, increases to a
value of two maybe, and then we go another
version of a stone. No seams would be visible,
nothing like that. And then, you know, if
you want to get a bit of additional detail instead
of just worrying about where the placement of those
detail for the texture is, like in here, we could create our own detail by
just, you know, using masking generators and something like a
curve generator. Of course, we need to bake out those additional curvature
setups over here. So by lowering this, we can get additional
detail just like that. And, you know, we get some
depth out of our stone. So, yeah, that's going to be it from this lesson. Thank
you so much for watching. And now in the next lesson, we're going to start
focusing on our roof tiles.
22. Stylized Roofs UVs, Frames & Shingle Rotation: Hello, welcome back everyone
to UV Mapping boot camp, Mass unwrapping, and
texturing in Blender. In the last lesson, we talked
a little bit about rocks. Now we're going to continue on moving with the roof tiles. And I'm going to start off with this particular object
over here instead of, you know, the usual
order from this or this because I am a
little bit of a rebel. Let's go ahead and
just simply talk about how to apply
this roof tile. Well, if you see a roof
like this type of shape, it would be rather simple to do. We could just start off
by usual Smart UV and wrap with high angle limit. And then we are going
to select roof tile, like so apply it and rotate
wherever it's necessary. Honestly, for this roof tile, you would just want the roof
part to be only at the top. The sides, the back and all of this part would
be actually wood. So what I will do is just
simply select this piece, rotate it like this,
maybe -90 degrees. Make this quite a bit larger. Something like this, nice tiles. The only thing we would be
concerned about would be, for example, where the tiles
start and where they end. So I would make
something like this, reposition it a little bit, just like that, and there we go. Alright, for the sides, I'm just going to actually
move this upwards. For the sides, the back,
and everything else, we can turn this into wood. So let's go ahead and add
this wood cracked wood. Like this, assign
it, and there we go. That's all we would need to do. Maybe this part wouldn't even have the bases on the sides. Maybe they would be more
like a frame, you know, made out of logs and whatnot, but we don't need to worry
too much about that. This is going to be pretty
much it for our roof. Like so. Now, moving
on to this roof. This is going to be
rather simple as well. The bottom piece wouldn't
have much of a roof. It would be also wood,
this piece over here. And instead, we can just
simply use Smart UV project. You'll notice me
doing that often. But in this case, you'll notice that this shape is being a little bit weird
and that's because the angle limit is too
high at this point. Let's start lowering it
until we get this type of shape and assign
our roof like this. And I'm going to just make the tiles smaller by
making the UB larger, like this, maybe a little
bit larger, even like so. And just like that, we're going to get
ourselves to set up. You'll notice now that
we have a little bit of an issue with tiles being
a little bit over here, and this part is good, but to make sure that
everything goes nicely around, we're going to grab these two triangles over
here and move it, angle them up to be
in the same spot. And now, they're all going to
be going in that same well, the same tile. And
that's pretty much it. If you want to, well, avoid the seams over here, you would basically add
some sort of a frame. To do that, all we'd
have to do, for example, we could create a simple cube, grab this cube over here. And just as a quick
little example, I'm going to set it
up for you guys. So this kind of frame is a real nice basic
type of a way to hide it to hide or seems. So just like that. Like so. And I'm just going to make
it smaller, just like that. The base part can be a little
bit higher up, like so. After some tedious readjustment, we're going to get
something like this. And with that, we'd be able to, well, have a nice frame
on all the parts. So now if I was to
use cursor to active, set this up to be just a
bit of playing with Gizmo, precursor, I can then
do Shift D R z 90, shift D R z 90, shift D, Rz at 90,
and there we go. Just a bit of a modeling,
but all in all, in some parts, it's just best to hide the seams
out of the way. Again, with something
like this roof over here, you would do something
similar around the edges, and you would get nice result. And I know some of
you would want to, well, get the base
properly sorted as well. One way would be just to well, grab another cube like sew, mesh cube, and put it
into this side over here. I'm going to just do a little bit of adjustment
just like that. Something like se and
there you have it. So we'd have a little bit of
a way to hide those seams, maybe even put it in
words a little bit as well, something like that. So that would be one
way of doing it. Then we can just switch it
up to wood and whatnot, set ourselves up
with a nice frame, and we would have
the right solution. Alternatively, I know
some of you would ask, about how to get the tiles to be more in shape and just
sticking out a little bit. We could totally do that. One way for that would be, well, if we were to grab
this and I'm going to separate it by selection just to be as a separate piece, then I'm going to make
this bottom piece quite a bit longer, like, so just stretching it out, not afraid of stretching it. We could, you know, unwrap it again if we want
to but we don't need to. And then it would be a little
bit of a tedious process. We would use a knife tool. By clicking K, and then by going around the
shape like this, we could get ourselves some
bit of additional detail. Could probably zoom in
a little bit like this. Not going to spend
too much time, but hopefully you get the
point, you get the idea. We could get some
basically avoidance of a straight edge that
we have at the bottom. And a very, very tedious
type of A work and a setup. But once we're happy with that, we would be pretty
much finished. So we would delete the
bottom bottom pase, and we'd get these tiles to
be like so, just like that. If we want additional let me actually just get rid of this as well. There we go. All right. If we want additional depth, we could just simply, well, grab this entire edge. So I think that's enough. Actually, we don't need this
edge over here or to E. Yeah, I'm just going
to make our lives a little bit easier. We're
going to select it like this. Click E, Enter, and then alternS
and just move downwards. Not too much, though,
because as you can see, it starts stretching
out the tile itself. But honestly, if it's something
super small like this, it's never going
to be noticeable. You're going to see that the
stretchiness is not even going to be visible only unless you zoom it really,
really closely. So something like this from a distance is going to look
pretty good, you know? Alright. Again, something like this could be done over here as well, but I don't want to do it
for every single group. And even in this
situation, you know, I would usually delete all of these tiles because I'm going a little bit lazy
when it comes to this, and then use the method with weld selection for the
precursor in the center, Transform per point
to fred cursor, then use shifty RSt 90, shifty Rz 90, shifty Rs
90, and there we go. Now we have the tiles
that are technically duplicates of each one
of those weld sites. But you're never
going to notice that. So repetition because tiles
end up repeating itself, the uniformity is
within a texture, and honestly because of that, we can get away
with a little bit of an extra
duplication, let's say. So yeah, that's going
to be it for me. Thank you so much for watching. And in the next lesson,
we're going to continue on with a couple of
additional objects. So yeah, I'll see you in a bit.
23. UVs for Cylinders & Spheres with Pattern Flow: Hello and welcome back everyone
to UV Mapping boot camp, mass and wrapping and
texturing in Blender. In the last lesson, we went
over some of the roof tiling. Now we're going to continue on with the setup, and this time, we're going to start off
with the cylinder over here. So the top section, if we want to have a cylinder, it would be quite
simple to set up. We use the same projection
as we always do. Let's go ahead and
just simply apply roof tile material like
so the top section, we could just select the
face just like that. Click U F ap, SmartUVPject, and there we
go. We'd have it like this. Unfortunately, we'd have to rotate it if we'd want to have
some additional controls. So if we'd have this selected, we could just
rotate it around if it wants to be
perfectly aligned. Or what we could do is
if we'd want to have a perfectly aligned
type of a pattern, we, we could create ourselves with an edge that goes right across
in a straight line. But for that, you need
to make sure that the topology is going to
allow you to do that. So because we have
the same amount of vertices on both sides, they are going to
align perfectly. If a click J is just going to
create this type of a line, like so so we have ourselves
this line which we can now see it within our UV map
because it's at end gone, it would be triangulated for
a game software or whatnot. But because it's a flat surface, we don't
really care about that. We just need to make sure that
this is more straightened. So we could use this line to manually perhaps
rotate it like this, and that would be good
enough in most other cases. In certain cases,
though, we would need to have it perfectly aligned. And for that, we would just
simply select this line, right click and
align vertically. In order to perfectly
snap the item, what we could do is we could
make use out of pinning UVs. So pinning is an
interesting one. If I was just to select these
couple of vertices like so, I can use Right Click to pin it. Meaning now if I
was just to select this entire part and
try to, for example, relax some of the parts,
those UVs will never move. So using that, we can slightly adjust and
tweak something. We could make use out of our
unwrapped minimum stretch. This, as you notice, will still keep the
pinning up on the setup. So if I was to make
this a little bit smaller and try to unwrap it, you'll notice that
it will still keep the same size because we
had those pinned vertices. So if I have these, for example, moved around a little bit
just as an example like this and unwrap it, because
they were not pinned, they're not going to do
anything, but these two, they're perfectly straight
and perfectly pinned, and they're going to
force the rest of the sus diss to go around it. So it's a nice little option to make use out of
whenever you want just to have some additional
control for unwrapping. So not only seams, can you
make use out of seams, you could also make use out
of pinning to make sure that whatever you did within the UV space is going
to be kept in here. So for the sides we could, well, do a simple projection that is a cylinder
projection, actually. But actually, I'm seeing that this part is giving
us the wrong results. Looking at the edges, I can see that item is getting
smaller UVs and whatnot. So I do know that it might give us there we
go the stretchiness. So in this case, what I
will do is just create Mark Sam click L with the UV selected and just rewrap
it using minimum stretch. There we go. Oh. You might also need to do it for
the top and bottom. Mark Seam. Now we're going
to select it like so. And finally, there we go. Now we're getting something
that resembles a little bit more towards
the nicer result. The reason I rotated right
off the bat is because I saw that it's not
aligning properly. These elongated squares need to be going upwards vertically, and I'm just going to
just in case select this and just see which side is
top, which side is bottom. So I can see that this is
the top, which is correct. Yes. Alright, so that's pretty
much it for the cylinder. Let's move on to the sphere. You might be wondering
when would you set up roof tiles for a sphere? There are some objects where
you'd want more tilable of a look, and
that's fair enough. One way you could do it, it would be similar to
what you do with a rock, where you just grab
an entire piece. I'm actually just going to
drag it upwards a little bit, so where you would drag the entire piece
across like this, unwrap it, and that might
give you a reasonable result. But if we have a look
at it with the tiles, it's not give me the
option for a tile. So sorry, it's a roof, not a tile. There we go. If I was just to unwrap
it with this setup, it would give me this, which is not perfect. So you can see the type of variance and distortion
that we would get. So what could we do? We could just simply treat it as a cube. And what I mean by that is
this object, if you notice, is not the usual UV sphere
like this, instead, what we're using is
the good old technique for setting the
cube into a sphere, which you can do
so by going into edit mode, subdividing it, setting this moveness to one, and then increasing the number of cuts to as many as you want. And that's going to give
you this type of setup. And on top of that, the UVs are going
to look like this, which might be quite all right. So if we have a look at it
over here, before this mess, that is like, so we're going to see that
we're having this cubish type of unwrap. So sometimes, reusing
the same type of setup is also quite right. If I washes to make
this quite larger, we'd get reasonable layout. And that in itself
would be quite alright. And if you're wondering about, you know, the seams and whatnot, there are a lot of the cases where you would need to
just simply hide them. To hide these seams, what we could do as a sneaky
way we could make use out of these UVs to
grab a selection. So by holding Alt within
the edge selection, we can double click
on one of the edge, and it will give you an
entire selection going all the way around for
where the seams are, which is pretty nice. But to get some consistency, some additional setup, you
might want to get, well, some additional way or some additional framework that
would help you out with this. What we could do
is we could just simply hold Alt Shift
and just tap on additional edges to make sure we have a certain frame
selected like so. And with this frame, what we could do is we
could hit Shift D, escape, and now we have
another frame like this. We can then hit P,
selection separate, and we have this little thing. If I wash selected, like so as a separate object. With this, we could use
something called skin, and skin would allow us to
get something like this. Or alternatively, if we want
a little bit more control, we could turn this into a curve. If I was just to
go on to object, convert to a curve, then we're able to have
this as a curve like this, meaning that it's
not a geometry, and we're now able to use
out of this curve data. With it, we can use bevel to maybe add a bit
of a bevel like this. We could turn this into,
like, a metal or something, and we'd get ourselves
nice set up. So again, sometimes it's
all about just hiding the UV and now the seams that were visible are not
going to be an issue. It's just going to look
like part of an object. Unfortunately, with
such an organic shape like this one, like the sphere, that's my best
recommendation that you could get out of when creating a pattern for a
roof or something like that, just to simply hide the seams. And yeah, that's pretty
much it in regards to this. We are now going to move
on to this part over here, which is something that some people would
definitely like. It would be more for
castle roofs and whatnot. Let's leave that though
for our next lesson. Thank you so much for watching, and I will be seeing
you in a bit. Oh.
24. Cylindrical UVs for Castle Tower Roofs: Hello and welcome back
everyone to UV mapping, boot camp, master and wrapping, and texturing in blender. In the last lesson,
we left ourselves off with more organic type of a shape this sphere over here and just hiding
some seams around it. Now we're going to
move on to, well, certain Castle tower
type of rooftops. Let's go ahead and
make use out of this to set ourselves up
with roof tiles. So the reason this would
be more interesting is because you might be wondering, how could
you set this up? How could you make this work? Because, well, if we were to use simple unwrapping for
the top section, or, sorry, for the side sections, or, like, so using well, we could use actually start with
unwrapping like this. So I'm just marking seams and grabbing this for
a minimum stretch. Like, so you'll start
noticing that there are it changes to rooftop like this,
there are some issues, and those issues involve tiles not being
properly aligned, not being properly
covering the setup as we want them to,
which is fair enough. The other thing that we could do is if we were to unwrap this as a where is it
cylinder projection? There we go. It's going to give us more consistent
type of roof. For cylinder, for some reason, it's not giving the right setup. It should go all the way around, and I noticed that actually
with cylinder as well, and I just realized
the issue that we're having for some reason, right now, it's being using precursor as its
main projection point, meaning that it tries to do wrapping around this object and it tries to encapsulate
this object as well, and then it starts stretching all the vertices in a weird way. Uh, to avoid that, just
make sure you have transformed pivot point
change to individual origins. But there you have it. It's just based on
transformation origin, I suppose, cylinder
projection. There you go. Now it's going to give you
a more accurate type of setup going properly all the way around the selection. So
that's what we want to see. And we have ourselves
this square over here. And this square over
here is quite nicely fitting for the 021 UV space. But we're going to
have some issues. The top parts are going
to be stretched out, or sorry, squished in, and the bottom parts are
going to be stretched out. How can we negate that? Well, for Cats, we could
try making a shape that would be very similar to what
we have in the UV setup, making parts of the
top to be smaller. Before making a
selection like this, I am going to tick
off this UV sin because as you
might have noticed, if we have this selected, this top section also
have those same vertices. And if you try to
scale this downwards, it's going to also affect
the part at the top. So to avoid that, I'm just going to simply
click this off, have this selection only, and now we're only
working with this. Now we can just make
the smaller bigger. It's not going to affect
the upper section. So as I mentioned previously, we could try to match it up
a little bit to have this quite a bit smaller and it's going to stretch everything out. And then afterwards, we
can select it all as X and then we'll increase it like this until we
get proper form back, which actually would
be quite alright. My recommendation, though,
is instead of just trying to scale the upper
section right off the bat, try to scale it up in halfway. So it would stretch out.
And then the bottom piece, scale outwards halfway again. So basically, you're just scaling by 50% and the
bottom piece by 50%, just to make sure that
right off the bat, you're going to get this shape, like so and then
you can just scale it the entire oh, sorry, scale the entire part to get
a nice consistent setup. So it's just a little
bit faster of a process. Scaling the upper a little bit and scaling the
bottom a little bit instead of trying to scale the upper section
right off the bat. Alright, so that's going to give you a nice setup just like that, but you still might notice that, hey, we're still getting
this stretchiness, especially if we
try to make this a little bit more resolution. We're still going to
get those tiles to be smaller and smaller and
super small at the very top. And that's unfortunately
the way it is. If we want to make this, well, if we're squishing this in UV and making the tiles
larger at the top, it's going to be quite right. But if I check the side, where the side is there,
go this side over here, we're going to have a tile. So the tile is going to
be reckon, more visible, especially when we
are stretching out those UV tiles a little bit to make sure we have
the same uniformity. Unfortunately, and we can see that the tiles
start going sideways, so I'm just going to right
away pick that up, like so. So just making sure that
it's nicely set up. There we go. Much better. So there isn't an
easy way of fixing the tile issue for the
seam, unfortunately. My recommendation would be
to simply grab a couple of seams if I was to
go to top down view. I'm going to select four
seams in between like this, make a duplicate
and essentially do the same thing as I did
with this sphere over here. So going to hit Shift D, P, separate by selection, then select this part over
here and convert to curve. Curve. Then we can
use the bevel depth. If we want, we can change
to use extrusion instead. So that would give you
a nice little setup, maybe even offset, doesn't seem to work quite as well here. And then afterwards, we could
have a nice little bevel or even we could use something called
solidify, there we go. So solidify would give you those nice little
planks over here. And just like that, we
would have something like so nice little planks going
across our roof tile. Maybe some decoration at the
bottom as well, maybe even, you know, cut it up into four chunks and set it up
something like this, as well. That would be quite nice. My recommendation for this little upper cap
would be to just simply create a
different separate cap. You would just delete this
upper section like so, so you wouldn't make
useless use out of faces. Then you could just grab a circle with lower oriscunt
something like nine will do. Reposition our setup to be right above or tower top
because honestly, you wouldn't have
tiles at the very top. You would have something
that would cover up and maybe even have
a tile or something, sorry not a tile, a flag
or something like that. And once you have it, so you
can click F, extrude it, maybe bring it inwards, something like this, and just, you know, adding as much
detail as you want. And once you are
happy with that, you're pretty much set to go. You can also just, you know, select these go to convert mesh because it didn't seem like
it was properly offset. So I can just readjust
it to make sure that it's a little more aligned
with the tower itself, something like that,
and there we have it. We got ourselves a very
nice type of a rooftop for medieval settings and whatnot, all of that good stuff. Maybe afterwards, you'd want to maybe make some adjustments, maybe put it inwards
or something, just a bit of an extra
detail out of this prism. But that's pretty much it. So, yeah, that's going
to be it for me. Thank you so much for watching, and I will be seeing
you in a bit.
25. Substance UV Projections & Efficient Layouts: So And, or, welcome back
everyone to UV mapping, boot camp, mass unwrapping, and texturing in blender. You thought this section
is over, but it is not. I'd like to go on to
substance painter real quick and tell
you a little bit, what if we just, you know, dump over with much
of unwrapping? If we have a look on
some of those textures, it's going to be just
basic, very basic textures. So some programs allow you to change up just like we did with the rock, triplanar projection. So programs allow you to
do some projection in within the program itself. But it's not going to project or change UVs in
any way or form. For example, this cylinder
that we have over here just has default
cylinder type of a mesh. If I was just to apply some
sort of a tied material, let's say this one
over here, why not? And I'm just going to
increase it like this. We're going to get
ourselves this result. But let's say we want to get the same result
over on over here. If we have a look at the setup, it's going to have some cheeky
automatic UVN wrapping, which you might
think, like, Hey, it's not going to
be quite alright. It's not going to be good
enough for roof tile setup. Well, as a matter of fact,
we can just apply it. We can set up the projection to be where is it
cylindrical projection, and I'm going to go
to the top down view, realign where it starts
projecting like so. Just a little bit more maybe, like so, and then
increase tiling. And right away, we're going
to get this kind of result. So it might not be
quite the same. But if we start
changing up the tiling, if we start playing around
with the sizing like this, we're getting more and more
similar type of result, and we can even stretch out
the projection as well. Get basically whatever
we want in this case. So, honestly, it can give
us very similar results, but as you can see,
over here on the top, it's still going to give us some issues with the
pinching and whatnot. So it might not be ideal, but if we're
covering up the top, it might be more than okay
for a nice visual result. As for something like
this roof over here, let me show you an alternative. If we were to set it up,
so might not be getting the right kind of
result because this was used with automatic UVs. We can increase the size, sure, and it might almost
be good enough. But if I was to do something a little bit
better with more control, I could change my projection to planar projection like this, and it's going to
start giving me, well, a projection that goes one way, and it's going to
give us perfectly straight life of setup. And we might need to make this quite a bit smaller like this. So we get it looped
a little bit more. So both sides now are sorted. I could make a
duplicate out of this, could make some masking setups just to play around with it. So right now, if
I was just to add a black mask and add white
only for that projection side, we're going to get this result. Now for this part, if I was just to rotate it, what is happening? Going to disable
the previous layer and rotate it like this, and now it's going
to start projecting it in to the front and the back. So what essentially
I'm doing over here is basically having
some controlled projections. The first one was projecting on the sides like
this, back and forth, and we're using
masking to cover up the unneeded projection
sides, just like that. And the upper one,
the material on top, we have used it to do the same basically
but inverted values. And with that, we're going
to get ourselves, well, somewhat of a nice type of a
result or our projections. The parts on the side, though might need
to be covered up, but they're going to align much, much better with total setup, especially because if
we have a look at this, we had the same issue
previously where these tiles were upwards, so it's not going to give
us the exact same type of setup where if we were to put it sideways
horizontally in the same row, they would keep that
same pattern yeah, even when we have the UVs
somewhat placed oddly, we can still have some
additional control with them if we're using certain
texturing software. We're going to
have lots and lots of UV space left,
but you know what? It doesn't always need to
be completely filled in. Sometimes, if we are working
on smaller projects, it is acceptable to
keep UVs like this, as long as visually we are getting the right results,
exactly what we want. Now, one thing I would say with unwrapping is
that we really, really need to make
sure that we are having the UVs positioned at the
bottom left hand corner. And basically, you can imagine
that the rendering buffer, whoever reads the texture, the GPU of the
program will start off by reading the
UV information from the bottom left and corner, and it would do pixel
by pixel go in rows, or they would sometimes
do like parl in chunks. But Ivo boy they would end up grabbing some rows from
the bottom upwards. So if you are to leave
some of the UVs UV space, you might as well
leave the upper sections, upper writer sections. These are the parts
that get red last. So if we are having UVs that end up being red and nothing needs
to be read at the top, it's just going to be a little faster and a
little more optimized. Or alternatively, you if we
want to be super cheeky, we could just upscale this even if we're not going to have the same UV size as this
bottom piece over here, because this bottom piece
might be, not as visible, we would be okay to
just lower it down, put it in a corner somewhere, and that would be acceptable. Because, again, this part, as we talked previously
with the first roof, it wouldn't realistically
be a roof tile. It would be wood. And if we want to get more
resolution out of roof tiles, we could just keep the wood at a bit of a lower resolution, and that would be
totally acceptable. So, yeah, hopefully, that's
right for the roof tiles. We're now going to move on
to yet another section. Thank you so much for watching, and I will be seeing
you in a bit.
26. Directional Noise Mapping for Chains & Wood: Hello. Hello. Welcome back, everyone to UV
Mapping, boot camp, mass and wrapping and
texturing in Blender. In the last lesson, we left ourselves off with
the previous stage. Now we're going to move on to
directional noise and rap. Now, before we get
into the texturing, I'd like to talk a
little bit about non directional versus
directional noise. Directional noise
itself is what I would call personally the
type of material that would be something
like this with over here where the noise of a texture ends up going
in a single pattern. That was also true with the previous material we
use, which was tiles. So you can imagine the
tiles had a certain grid, and you can only have a flow
that goes in one direction. Now, with something like metal over here on the
right hand side, have well, just random type, seemingly random type of noise, which allows you to, well, rotate this material
left and right, and you're not going to see
any type of difference. And that also gives you a
little more control with UVs, a little more freedom
that is because with UVs, sometimes you can distort it a little bit to the
right to the left, depending on the mesh, which I'm going to show you in a bit. And it's not going to
change the pattern. It's not going to change
how it looks like, but it will help you
to pack everything up into that zero to one UV
space that we all love. So let's see how we can do that. For starters, let's start off with well done
wrapping process. Let's get ourselves this
little window over here. And start wrapping. The first thing
that I like to do is once we go on to Edit mode is select the whole setup and then click and
Project from view. I also make sure to
have my camera slightly slightly sideways like,
projecting from view. And this way, I can have
this entire selection and just move it off to
the side just like that, simply because it just
helps me to organize what has been unwrapped and
what hasn't beforehand. The next thing would
be to make use out of, well, UV sync selection. This is my favorite piece, and most of the
time would use it. Now I can just deselect everything and just
have it off like that. So we're going to start
off with the chains. The chains will allow us to make use out of
the metal material. And actually, before doing that, I would like to go on to
Material tab and just quickly apply the previously
created checkerboard that we had just like that. So we could see what
hell is going on, and you can see, well,
it's not perfect. It's nothing close
to perfect yet, because everything's stretched
out because we don't have any proper UVs from this. So, let's start off
by just clicking onto the Face Selection
and selecting all of these little
chains over here, just like that, all the way to the top to the
half link as well. And I'm going to click on
all of them just like that. Once I have it, like, so
I'm going to just move the chains to the middle part or actually just right
above the middle part. And I usually just
click Shift and H on the viewport just to
hide everything out of the way and start
working with them. So how do we unwrap the chains? Well, you can start off
by finding the seams, setting it up with some seams. So for Saras, these parts at the bottom and a top these
four parts over here, they're not going
to have anything. They're like half doughnuts and the bottom has no
face. So it's hollow. All we need to do is basically tell where to start cutting. And the best part
for those kind of setups would be always
on the inner side. So on the outside, it's not
going to be quite as visible. If we were to mark
seam over here, we can pretty much do it
for the rest of them. So holding m, just selecting it, making sure it goes all the
way from back to forth. Marking seem like so
and just like that. We can also just holding Shift, select both of them
at once, Mark Sam. Just like that, we
got the same set. Now we can do the
chains as well. I'm only going to do one
side for now and I'll show you just how to unwrap it. Let's go ahead and go
on to edge selection, hold Alt, and do the same type of
selection on inner side. So I'm just making sure
that every single piece is having that edge loop. Holding Shift and Alt
will allow us to do that. Like this, I believe that's all. Yep, just checking. We can also click G real quick just to see which vertices are selected and then
hit Escape to make sure we're not actually moving
anything out of the way. Then right click Mark
C and there we go. Now, unlike this half
of the doughnut, we don't have a place where
it cuts it out to flatten it. It just tries to unravel this, but it's not going to put it as a tu plane because we
need to get ourselves this edge loop going
across on itself, like so. So for that reason, I'm
going to hold Alt and just use some Oh, going to click Control Z because that's the wrong selection. Just like that,
we're able to select those kind of pieces like this. We're doing it on the bottom. It can be done also on the top up to a
personal preference. But actually, sorry, no,
the top is not going to be quite as great because it doesn't have an edge
loop over here. The bottom does have it
right in the middle. So half of it is already
going to be hidden. It's going to be a
place where it's less seen or least seen. And with that selection in mind, mark SM and there we go. Now we can click Old Z, select this entire
piece like this and use the unwrapping minimum stretch to get this type of a setup. I'm going to click Old Z again. We have this piece and
this piece on the top. It might be a little
bit different for you, so we can go ahead
and select both of these and just move
it off to the side just to make sure we
don't switch them around, and I'll show you why. But for those pieces
at the bottom, all of these over
here are going to be the doughnut shapes, essentially, these chain links. And already looking quite
good with the material, with the checkerboard, you might notice that it is a
little bit zigzaggy. And because it's a
somewhat low topology, we have some really straight
or really fast type of a bends if we want, we could, if we have some
specific alignment that needs to be going straight, if we wanted to be
wood, for example, we might want to make use out of the what's it
called angle based? Angle base would
allow you to preserve that a little bit more like so, but even so it seems like
it still wants to well, not follow the
direction completely. Honestly, the best way
would be to either break this down
into multiple uh, UV islands into even
more islands, that is, or increase the apology because such strong sharpened
sections would allow the UVs to be
a little bit more deformed and avoid those exacts over
here, as you can see. But the main way for
us to do now will be to make sure we optimize
the UVs a little more. And the reason we want to
optimize those UVs would be if we have a look at the UV section over here on the UV Islands, you'll notice that they're
not perfectly straight, meaning that we have a whole lot of space in between them. And if we're packing them
up nicely and tightly, making use out of every type
of pixel that we can get, this would not be perfect, and luckily for us, there is a way for us
to fix it on Blender, although we would
need to make use out of U squares add on. If you don't have the
UV squares add on, you can just simply
Google it UV squares, like so, and then
just find the Github. Download the code as a zip, and you'll be able to
just install it into your blender by going into
Edit preferences, add ons. And within here, you wouldn't have to click on this
arrow over here, install from disc find the zip, you download it, and then
once you install it, you should be able
to just search for UV squares and find it over L S. Once you have it installed, you should be able to
within your UV space, click N, which will open up
this little arrow over here. So by clicking N,
you can do that, and you'll find yourself
this tab called UV squares. Now, UV squares is pretty
good, but realistically, we only need to use
it for one purpose, and that would be
to turn it into, well, squares, UV squares. And this will allow us to change the UV shell into a grid. You can use it either
this button over here or click Alt and E. So if I was to select one of the one of the
islands in pay selection, we can click Alt and E, and
actually you'll see at the bottom, disable mesh sync. So just make sure you
have this disabled, and now you can click
on it, and there we go. It's going to turn
it on, like so. You can do it for
multiple pieces. So if I was to just real quick make a selection
for this side, you can go ahead
and once you have a selection because we don't
have the UVSnc selection, once you have the
selection on the viewport, you can now go
ahead and just make selection just for
these parts over here, like so and click Alt and E. But honestly, the more
Vishals you have, the more likely it will
fail, fail you essentially. And it also only works realistically when
you have squares, when you have just
simple squares. So these parts over here, why we're not using it
on them right away, is because we have triangles. If I was just to select it
and try using Alt and E, it's going to break it
because it will try to put a square into a triangulate
space and will be messy. We don't want this.
We don't want this happen at hole, so that's that. This part, on the other hand,
seems like it would work. Let's go ahead and
see it. And yeah, it works reasonably well. You can see our UVs
now are properly tidy. We still have those
little zig zags. But now, if we use the
metal, yeah, iron dark. That's the one.
Let's go ahead and click on the plus
symbol once we are in the sign and select metal dark. There you go. Oh, that's not it. Iron dark. Sorry, there we go. And now let's click a sign, and we're going to
get this medal. So you see, even with those
exacts previously seen, we're not going to see any
issues even when we zoom in. So that's that although
I will say this though, if we have something like, let's try using Window wood. So this part, if I was to add the material window wood
and assign it over here, you'll notice a little
bit more of issues. And the main issues
is because, well, low topology will
start having that flow of having well zigzaggy shape. Sometimes it's
okay, though, well, if you want to make it look like the wood has set up in small
chunks, it would be okay. But in other cases, you would definitely want to have
it wrapped like this. Perhaps that would be a
lot. Oh, that's not it. Sorry about that. Let me just use minimum
stretch. There we go. Something like this
would be way better, even if we still
have those angles, they're a lot softer,
in my opinion. So that's that now,
going back to this, if we have a look
at our chain with the proper metal
assigned, we'll see that. Well, again, it's totally fine. And that is why when I think about objects
and unwrapping them, how I am unwrapping them, I really am considering whether they have this
directional noise and whatnot. If they don't have a
directional noise, we're able to work with
certain different assumptions. So, for example,
here, were able to pack them up nicely in squares. They're going to be much,
much better unwrapped. Packed into the UV size because we can fill in
more of those spaces. So, yeah, that's going
to be it for me. Thank you so much for watching, and I will be seeing
you in a bit.
27. Mirroring UVs with Magic UV & Symmetry: Hello and welcome back everyone
to UV mapping boot camp, mass and wrapping and
texturing in blender. In the last lesson,
we'll left off ourselves with these chains, which we're now
going to make use out of them to set it up on
the right hand side as well. And I will actually show
you two ways of doing it. First of all, the first way
would be just to delete one section and just duplicate it or mirror it
onto the other section. And for us to do that, we can do it like this. We can go into Edit mode, have this part deleted and then mirror it
onto the other side. For us to do that,
we need to make sure that the mesh actually
has a certain symmetry. So within object mode, we
can see that although we do have some junkiness with
some parts and whatnot, if we have a look at it
from the front view, we can see that one side
is identical to the up and we only need to actually focus about
the chain itself. So this part is located directly on the
other side as well, and that's exactly
what we want to see. Don't have any type of
changes on this chain, so we can just reuse the
topology and mirror it. All right, so how do we do it? Well, first things first is we need to identify where
exactly the centerpiece is. We're going to be using this
origin point over here, so we can either click
Select This Object and use shifts and use
cursor to active, which will give us
this free D cursor to be placed on
the origin point. Let's say we don't know
where the origin is. Let's say we have set origin to geometry or something,
and for some reason, it's a little bit offset or maybe we don't know
if it's perfect or not because there's some variant in offset for the wood or
something like that. Well, what we can
do is we can go onto the object onto Edit mode. We can go ahead and just select one piece and then another
piece on that same section. Basically, those two faces are placed in the same
identical location, which will give us
the median point which will be in the center. Then we can use shift and S
and use cursor to active. Or sorry, cursor to select
it, and there we go. This precursor is going to
be perfectly positioned. Now we can go ahead and
I'm still by the way, making sure that only
the chain is visible. Just to make my life
a little bit easier, I'm going to click Old Z
and just delete this part, this outside of the mesh. Let's go ahead and just delete
it, and then afterwards, we can select this and
hit Shift D Escape. So we have this
duplicate like this, going to hit Escape, making sure that it's in
the same place. Then we can make use of the transform pivot
point to be placed as free decursor and
use a X minus one, or sorry, S Y minus one. We're just looking at
the Gizmo on the top. So see which parts from
minus Y to plus Y, we're essentially inverting it, and just like that,
we're able to invert it. I do recommend you checking
the phases as well. So if we were to go to phase orientation,
they are inverted. Let's just click Shift and N,
and that's going to fix it. Now we're going to have these pass to be overlapped
with one another. So these parts are a
duplicate of one another. We can actually even
move it out of the way, and that's going to be quite
alright because we now have them all nicely compact. That's the word I
was looking for. And the alternative way, though, I'll show you
the alternative way. And that would be to make use out of something
called magic UV. And for that, we'll need
to go on to preferences, search for magic UV. Which I don't seem
to have. Let me just go ahead and just
go to extensions. Search for Magic
UV. There we go. So within get extensions,
just click Install. And once it is finished, we can go back to add ons. And we'll have magic UE. So what can we do with magic UV? Well, we can start
off by grabbing a selection just
like that to make sure we have, well,
the selection. Then use out of it, we would need to have
identical object as a separate piece. And what I mean by that is this is just one
object and we're using we're just editing its
faces, its UVs and whatnot. But in order to make
use out of the well, UV magic option over here, magic UV, we would have to
make a duplicate out of this. So let's go ahead and
make a duplicate. I'm going to hit Shift
D, going to hit Escape, P, separate by selection. And now we should have, there we go, a separate piece. And for the reasons
of the showcase, I would like to just move
it outside of the setup. And let's say, you
know, you have this nicely set up already
packed up so we can, you know, pack it
up or actually, I will make another
duplicate for this case. The reason being is, well, I want to pack the islands
like this into UV space. And how everything is nice. And let's say, Hey, we have another object that's
identical to our previous one, but all of the UVs, you know, are a complete mess. I don't know, we can just use project from you
and it's just like, Hey, this is a mess
and this one is not. How once we're done modeling, how can we place the UVs
from one object to another? There is a way for
us to do that. And you can imagine, for
example, windows or well, multiple signboards
being already modeled, place all over the scene, and we need to make
use out of this tool. We can go ahead and
select the object, select all of its pieces, click U, and then there's
going to be copy paste UVs. Again, this is because we
have the magic UV installed. It wouldn't show you
otherwise that stuff. Then we go on to copy
paste UVs, copy UV map, like so and at the bottom
you see 573 phases copied. We were to go to this part, we can then select
it all and hit U, copy paste, paste, UV map, and then it's going to be
giving us that identical setup. This only works, though, if the object has not been
tampered in any way possible. And what I mean by
that, that includes the stuff like simple
deformers and stuff like that. If we start using
even a little bit. And, you know, if you apply it. So even by just having
a value of 0.01, seemingly identical
type of stuff, we can apply this and now try to apply or sort paste
the UMp will well, in this case, it
actually quite work. I noticed personally,
I tried using some deformers when it has like a curve deformer
or something on a bridge. This type of setup
wouldn't quite work. They have the objects have
to be just placed and, you know, not edited in any way. So I'll try visualizing
a little bit. For example, this chain would
be a little bit longer. Then I try to paste the UVs, paste UV map before I will
just unwrap it like this, then paste the UV map. And it still seems to
work, so that's good. But again, just make
sure to be wary of that. It only can be or only
most of the time, we work with just duplicates. So if you have multiple, for
example, chains, you know, placed on the side
as separate objects, you can then just UV
and wrap one object and paste the UVs onto
multiple other ones. So just a little bit of an extra information
for general use. Now we're going to move
on to our section. So we're going to
end our lesson here. Thank you so much for watching, and I will be seeing
you in a bit.
28. UV Straightening for Curved Wood Planks: Hello, and welcome back everyone
to UE Mapping Boot camp, Master and wrapping and
texturing in Blender. In the last lesson, we
left all cells off with these symmetrical
shapes for the chains. We're now going to move on to the upper section of this log. Let's go into the Edit
mode, hit Alton H, and Alt and Z, if you're seeing through your mesh,
just like that. All right. So let's
start off with this log. I am within my UV
sync selection, like I always am because
it's a lovely little thing. With this selected, let's hit Shift and he and work with it. For starters, it
doesn't have end bits, so it's a little
bit easier for us. All we need to do is just tell where we want this
to be wrapped. And for that, we are going to go ahead and select the edge. So holding Alt, we're
just going to tap on one of the edges like this, and it's going to go all
the way across, hopefully. Like so, but it seems
to end over here. So I'm going to hold shift
and just select it like this, just to make sure it goes all
the way across like this. If for some reason, it doesn't go because
in this case, there is a bit of an bevel
issue, honestly over here. I do want to actually
fix this beforehand. But in case there
are issues when, you know, it doesn't go
all the way through, all you can do is
essentially just select one starting point of an edge, go all the way to the top, sorry, all the way to the end. Control and just tap and it will pick the shortest
path, just like that. Mark seem like so,
and there we have it. This part I definitely
want to fix now. Let me just go ahead
and select these. Click, Car lapse, merge at last. Like this. There
we go. All right. What was I saying? So we
have this wood log section. Right away, I'm going to change
this to be wood material. So I'm going to pick
this darker wood, which was called planks. It was used for planks wood. So that's why it's
used like that. Let's go ahead and
click on plus symbol, select planks like
this and assign, and we're going to get
ourselves this solution. So if we were now to use
unwrapping as a minimum stretch, we're going to get this setup. Notice how the texture
is going one way, but it is going an
other way visually. This is because of
the Shada setup. So I do want to let you know that not
always is going to give you a perfect type of
identifier for what the UV is. In terms of the
image being used. So if it is bothering you, you can easily fix that. Simply go on the Shader
and within here, if the rotation is set
to zero over here, you're going to be able to get
the right type of a setup. So now if we were just to rotate this, we're going
to get it like so. Again, I rotated Shader in here, even though
personally I see that the image on the UV
editor is wrong, I still know that it
is going vertically. So that's my quick way of fixing materials in something
like blender, simply rotating them in shader mode will
allow you to do that. So that's something for
personal knowledge. Yeah, I don't like it. I don't like the UVs
going horizontally. If you do like it, if you don't have much of a
preference or whatnot, go ahead and use it as it is
for me, though, 90 degrees, having these UVs going vertically like this
is much better. We're going off the
topic a little bit. Here, we're here to
talk a little bit about the plank of wood. So right here, as we
talked previously, the directional noise, this
is the directional noise. And because the plank is
not perfectly straight, it is going a little
bit wonky when it does unwrap the setup, it's going to try
to adhere to that. And for that reason,
if I was to scale it upwards like this so we can
see the flow a little better. For that reason, we see that the flow is somewhat trying
to follow the entire setup, but it's not quite there. So we can one way of fixing it, we could just use
Alton E. Again, the UV sync turned off Alton E to help us out
a little bit over here, and now we'll turn this back on. And this will allow us
to have straight UVs, but because the entire
mesh is warped, it's going to try to follow the setup a
little bit closer. So the entire pattern of the wood ends up being a
little bit bent as well, which is exactly what we want. If we are visualizing the
way the wood was made, for example, over here,
there are essentially two ways that can be done. You can imagine, for
example, a massive log being like this,
and then out of it, it would start using X or
something to just carve out the mesh into something that would have a
bit more of a curve. Or alternatively,
you can imagine that the wood itself sometimes
can be bend a little bit. There are some heat treatments
for more modern type of furniture that would
allow you to bend the wood, giving us that sort of
a bend more and more. Over here, of course, this is more of a
stylized type of a sign. But, for example, maybe it
was having some weight. You know, there is some
weight attached to it. So because of that, maybe it was bending a little bit inwards
or something of that sort. And it was just giving
us that extra weight. So this entire piece, ends up being weighted down. And for that reason, the entire flow of the wood
really needs to follow it. And that is why
unlike the chain, for example, where we can
have it somewhat random. And even though we turned
it into UV square, it's not like, crucial. You can sometimes leave it as it is, and it's totally okay. In this case, though, you would definitely need to make
sure you straighten out those UVs and
have the UV itself follow the entire wood flow. And that way, the
mesh itself will have the flow of the
grain of the wood. So a little bit tedious
of an explanation, but it's really, really important
for that kind of stuff. When you're working
with, you know, multiple pieces within a prop with multiple
materials and whatnot, or you're planning to texture in something like
substance banner, you really need to consider how each object is going to be, what kind of material you're
going to be applying, even if you don't know
the entire a type of color grading or whatnot. It's important to kind of
determine whether you want to use directional or
noisy type of texture. So going back to the setup, we have ourselves some
wood on the sides, and I reckon we can start working on our
upper section as well. Yeah. Seems to be quite alright. It's going to be the
same type of setup. So I'm going to go on to
Edit mode, old and age, bold Z, to make sure we
are not in C fru mode. Then let's click L, select it. And yeah, shift in H, like so. So this time, it's going to
be a little bit different. So we have that same
squarish type of a pattern, but the end bits are a little bit harder because
they're going to be curved. Also, we do have all the
bubbles in, so stat. And yeah, I will
show you my passes way of just sorting this
out this hunk of wood. Let's go ahead and click free
into the face selection, and then double tap A
to select everything. And then the first thing that
I'd like to do is click C, which will allow us to use something called select Circle. I believe that's what it does. That's exactly
what it does. So it's a little shortcut. If we click and hold
on this, we can select it manually or you know, clicking C will allow
us to get this, which you can use
scroll mouse wheel up and down to scroll it up. You can hit Escape
to go out of it, or you can use left
mouse wheel to select, sorry, left mouse button to select and middle mouse
button to deselect. So these are basic options
that it has, and using it, I'm just going to go
ahead and just drag it across with a small selection
like this, save it like so. Then we're going to
click Control plus to make sure we
select these edges on the side and hit rap or
just to future proof it, we could also do seams. But now, though, let's go
ahead and just unwrap it. Normally, we don't
need to overwork ourselves minimum
stretch like this. Then we have the same
setup at the bottom. So I'm just going
to double tap A, make sure everything
is selected. Make a selection like this, and then Control plus like this, make a selection grow. And yeah, unwrap minimum
stretch like this. Doesn't matter if it's let's make sure we have proportional
editing turned off. Let's not worry about
the placement just yet. Like so. But once we
have it like this, what we can do is we can just simply select it
within the UV section, hide it out of the way
within our viewport, and click seven to
go to top down view, click Old Z to make
it transparent, and this is the wrong selection. Needs to be box selection.
Sorry about that. There we go. Let's go ahead and select the
front, the back like this. Let's make sure no other phases are selected, which they're not. And now let's go ahead and click Unwrap unwrap minimum stretch. It's going to be
right. Like this. And finally, we got these
two pieces over here, which we can also unwrap
minimum stretch, like so. And now we can click Alt and He Alts to make sure
it's not transparent. Select this entire part and
just move it out of the way. I don't really care about
the sizing at the moment. We can leave it as is and
worry about that later. But yeah, that's pretty much it. The only other thing
that we can do is, again, because it's wood. So if we assign this as wood, it's not going to follow
maybe the grain just as well. I'm just going to make it a little bit larger just to see. So to make our lives
a little bit easier, let's go ahead and just
select all of these parts. Actually, the top
and bottom are okay. We just need to
select this as UVs, so clicking L, selecting front, selecting back, and just
making sure that it doesn't have any triangles,
which it doesn't. Let's turn off the
UVs selection, Altne. And now it should have
a bit of a nicer flow. There we go. And
the top and bottom, we don't need to
unpack it too much. It was quite right as it was. I think, honestly, this is quite right. Let's
leave it as it is. But it would work, although these parts over here, maybe it wouldn't, they seem
to be quite working as well. I don't like them being
wrapped like this because, well, they don't
need to actually. The flow of the wood
is going quite well. There is some
thickness, for example, over here in certain parts. So this part fickness,
let's see where it is. The bottom over here. If I was to straighten it up, it would have a bit of distortion in this
directional flow. I don't want to see that. I want to make sure this is more of a straight for
the bottom and top, but only has a bit of a curve
for the front and the back, and I think that's going
to be much much better. Alright, so that's going to
be it from this section. Thank you so much for
watching and not section. We're going to continue on
with this in the next lesson. Thank you so much
for watching, and I will be seeing you in a bit.
29. Smart UVs for Hinges Wood vs Metal Strategy: Hello, and welcome back
everyone to UV mapping, boot camp, master and wrapping
and texturing and blender. In the last lesson,
we left ourselves off with this nicely bent wood. We're now going to continue
on with the setup. And actually, yeah, don't worry about this being a
different size and whatnot. We're going to fix
that in the future. Let's move on to these
hinges over here. Yeah. That's what we're going
to move on to next. Let's go ahead and select
them all like this. So these on the top, and these at the bottom,
just like that. Let's click Shift and H, just to hide it out of the way and see what we're dealing with. So the first one is going to be just like
a simple square. We can go ahead and just select
the square in the middle, click Control plus and then
use that to make our Sams. So the way we can do it is we can go on to
edge selection. So edge selection,
then select loops, boundary loops, Mark
Sm just like that. That part I'm going
to go ahead and make some selections at the
bottom and over at top, I'm not going to keep it as a ring because I know this
is going to be metal and I'd prefer to just have it as
four pieces like this. This is also perfect
viable option. It will give you
a little bit more of extra islands,
but not too much. Honestly, Evoway
would work fine. But this part, this is a
little more interesting, so we can ever do
a quick selection. Like, yeah, we can
even do it like this. So holding Alt and Shift, I'm just going to select it
like this, just like that. Making a couple
selections mark seem and this way would give
us a oh, sorry. This way would give us
a minimum stretch if we were to use it would give
us this kind of unwrap. This kind of unwrap for a metal would be
somewhat reasonable. There would be some
stretches a little bit, but all of the texture would
be applied just like that. The next one, let's just
use it as an example again. The other way, I'd say, if you're using it
more for a wood, let's say, we'd have to set ourselves up with
additional mesh pieces. The reason being is that if
you're imagine, for example, a wood made out of
multiple pieces, this type of ring made
out of multiple pieces, you would have to
combine them somehow. So if you're thinking,
for example, something like wood frame, it would be combined
over at edges. However, we wouldn't be able to split that off over a edges, and it would be extremely hard to do some texturing otherwise. So what I prefer to do
is I prefer to just join these pieces over on the
edge, just like that. Just like so on all the ends, so we're getting
those diagonal lines. Let's do it for these
parts over here as well. And just for my
easier accessibility, I'm just making sure
that this line, if I start at the top, so this is the upper vertice,
and this is the bottom, if I start at the top, I would use also the upper
vertico here as well. And just like that, we're able
to get this kind of setup. So this way, we're able to
make a nice little selection. If I was to use Old Z, I can just make a
selection like this. Let's make sure
we're not touching the upper ones like so. So we can just reposition our
camera and do a selection, something like this. Hold shift. We can redo it if
we want to like so. And for this part, I think we just have
to do it manually. So clicking C, making
selection like this, nice little bit of selection. So what I'm doing right
now is I'm making sure that selection
we're having is basically allowing
us to split off these parts into
multiple chunks. And just like that,
we'd be able to get ourselves this type of
a seam, just like that. All right. Next up, a selection, loop,
boundary loop, and right click Mark Seams. Let's see how this
would look like. So I'm just selecting it
all with linked normal, unwrapped minimum stretch, and this is what
we're going to get. If we were to check it with
wood, so quick assignment, we'd see what I mean and this
is not exactly what I mean. I just realized I
made a huge mistake. I forgot to make a proper
selection over here. My bad. Let me just control z
real quick. There we go. Click free and just undo
selection over here. There we go. Just quick fix. Loops, boundary
loops, Mark, Sam, and now we're able to click L wrap this with
minimum stretch, like sew and a sign of wood just to quickly
showcase this. And all of it is mostly
set properly except for, no, no, this one,
this one, yeah. So if I was just
to select this one rotated 90 degrees, there we go. That's what I meant. So if we were to have a shape
or something like this, I would sometimes make cues out of additional
topology diagonally, just to get the shape
the UVs to work with us to basically let us break the flow and make it look like they're made out
of separate pieces. That works quite
nicely sometimes, especially for lower
topology type of meshes. So that would be another way. The final way would be, well, this one also has a
part on the edge. Let's go ahead and
select it maybe to this amount. I'm
going to unwrap it. I'm not even going
to bother with the seams because once
you have an island, honestly, it's so easy to do seams if you
need another time. Long as you are
not UBN wrapping. So if we want seams in the
future, we can hold Alt, double tap edge, and then
just do the seam over here. Right. This part over here, I'm just going to
go ahead and just select it as a separate piece. Okay, let's not do it like that. I'll just go ahead and hold
Control, select it like this, all the way around,
and unwrap it, minimum stretch, like this. And finally, this part, u hold Alt, select middle. Control plus a couple
of times. There we go. Except I forgot to do an
edge loop, not an edge loop. A seam. So usually I would
do it at the bottom, somewhere less
visible, sometimes even in the middle over here, but I really prefer
to avoid parts in the middle because it's
harder to hide the seams. And even if it's been
more visible spot, doing a thing in the corner just makes it a little bit
more logical visually. So that's why I do it like this. Go to go ahead and select it. Actually, I can just
click L using UVs. Don't need to use Control
plus or anything like that. Go into the phase selection, unwrap and minimum stretch. There we go. All right, so all of these parts are done. The bottom pace,
the bottom hinges, let's put it that way. We
got something like this. So these phases are
deleted from the bottom. A nice little
optimization, like so. And honestly, basically,
let's click L, select it using normal, and just unwrap it using minimum stretch would give
you something like this. A little bit of
warping, honestly, it doesn't matter because
if we assign a metal, no one is going to absolutely see anything for the warping. So if it is a metal, it would be the best
to do it like this. A more perhaps complex, not complex, a longer way would be to have
selection like this. Maybe even going all
the way like this, basically ensuring that we
have more flatter faces. We can then unwrap this with minimum stretch to get
something like this. For visualization, I'll go ahead and use a sign or a wood, and we got something like so. So now we have, I believe, two different TV spaces. So this one and this one,
they're separated completely. We can go ahead and unwrap
it with minimum stretch, and let's see if it
gives us what we want. If were to assign
this as a plank, it's not giving us we want. So this is this particular
case is stretched. It's not good. It's
really it's not good. Let's try using UV conformal. Let's see. There you
go, much better. So in this particular case,
we could, for example, do something similar to we had with would go in
diagonally across. We could have this piece
separate from horizontal piece. But in this particular case, you could imagine if we
were to have wooden hinges, sapo hinge perhaps would be carved out with a
knife or something. So it would be just
one entire piece, and that would allow us to just make use out of
this type of setup. But because it's metal, we can reuse the same type of method as we did previously. Eve of way is fine. Sometimes you got to
think about whether or not it's worth it in UVs, whether or not the
end result would be good for what we're
trying to achieve. So just unwrapping it with
this and just putting it as metal will solve
all of your problems. So that's that. The thing here, though, is that we want
this to be dark metal. So something for chains, I prefer to get lighter metal, something for, like, hinges, darker metal, just indicate that it's just
different variation. So I'm going to go
back to my edit, just select all of these hinges and choose what's it
called black metal? Yep, black metal. Let's go ahead and just create a new material for black metal
assignment. There we go. And we're going to
get ourselves with a nice little setup that's
slightly different to a chain. Something like these, honestly, for these little bolts, they just flattened
out pad cakes. We can just flatten them out. So we're selecting them all, clicking on wrap
minimum stretch, and assigning as a iron arc. So just to have more variation in metal, we're
going to get this. So just flattens it out to
give us these type of pieces. Like, so so we still have these parts over
here left to do. And did I forget to I feel like I forgot
to do this real quick, even though we set ourselves
up with the seams. Let's go ahead and select
this minimum stretch, and there we go. Nice and solid. You can see the wrap all is
good, successful. So these are the
only parts that are left. Okay, okay, okay. We have some volts
in the back as well. Real quick. Let's select them. So that's why I prefer
to have all the UVs in one space somewhere separate before unwrapping
because we can just, you know, go into that
section, just make selection, and kind of literally visualize from that
perspective what's left. So these parts were
floating. I noticed there's something in the back, and I was just able to make a quick unwrap for
these parts as well. Also going to assign
it as an iron dark. That's pretty much it. I'm not caring about the size
or anything at the moment. Just worry about
these little parts. So we're going to continue on with this in the next lesson. Thank you so much for watching, and I will be seeing
you in a bit.
30. Final UV Touches for Chipped & Warped Wood: Uh, Hello and welcome back
everyone to UV mapping, boot camp, master and wrapping
and texturing in blender. This is already
taken long enough. I think we should
just continue on with this and get to
the wrapping point. Let's start by getting
these planks in the middle. We're going to go
ahead and select them like so and unwrap it. So the way I would
do it, in this case, I would honestly just use
automatic UV and wrap. I'm just going to use
shift and H first, make sure that the bottom
and the top doesn't have any additional pieces because honestly, that
should be removed. It's a good practice to have so we could just
simply, you know, use SmartTV Project, and that would give us
most of our setup, except in this case,
yes, the bevels. I completely forgot about that. It's gone out of my mind. So what should we do? Well, we could do it. One way we could do is
we could have a seam, go in on each and every side like this and then it would give us that type of a
doughnut unwrap. But honestly, it's okay to
have multiple islands for this particular case
because I would really want the sides to be
a separate piece, even if it's curved like that, if it has that nice
little bit of a curve with the bevel already set up, you could still
think of the edge of the wood to maybe have a little
bit of a different grain, and I think that would
look just nicer visually. So just personal preference. So for that reason,
I'm just going to make a selection of each
individual phases like this for the front, control, for the
front and the back, maybe make the selection
a little bit smaller. We can make it super small. That way, we're only selecting these faces just like that, and the ones in
the back as well. So, so like so. So what we're doing right now
is we're just making sure that the front and the back
selected just like that. And now we are good to go. So we could make seams using
the edge mode and whatnot. But again, why waste time? We can just do it
unwrapping like this. Minimum stretch might
not be quite as nice, conformal, there we go. It's going to work quite nicely. And then I'm going
to move these out of the way and select
the leftovers, which are going to be
the edges like this, again, wrap conformal,
and there we go. That's pretty much
it for the blanks. Let's click Alt and H and
have them out of the way. Now they are
overlapping over here. I don't really care about this at this point, so it
doesn't really matter. But if we were to have an
issue like that in the future, we could always
just try to select some pieces or re select our items like this and
then just move them to another place just to
get them out of the way. Again, in this case, it
doesn't really matter. Now, let's unwrap the sides and the bottom and these
pieces over here. So these pieces are
a little bit more interesting because if we
were to have a look at them, I forgot one more piece, sp that because this
little chunk at the bottom is actually two
pieces because it wasn't needed to be so let's click Shift and H and see what
we are working with. So top and bottom
don't have the faces. They're not really needed.
So they were deleted, which makes our lives
a little easier. The reason why it's a little
bit different is because they have those chipped
parts over here. Right away, I'm just going
to go ahead and assign it as a window wood like this, just to make sure we are seeing
what we are working with. And let's work with
this. All right. So what we can do
firstly is we can unwrap the bottom ones because they're
well, just solid timber. To make my life easier, I am going to go ahead and just select these edges over here. Making sure that it goes
all the way across. So this part has a piece that
needs to be taken through. So what I will do here
instead is select one piece, hold control, select
the last piece, and it should give us
the shortest path. In this case, it's going
to be quite right. We'll see why. I'll do here the same thing. So holding shift, I'll
select the first piece, move to Oh, got mixed up, sorry. Move to the outer side,
hold control this time, and select the up
piece like this. Mark seem and there we go. Now we can go ahead and just
select them all like this, hit wrap, minimum stretch,
and we're going to get this. So what's wrong with
this? Well, because we have those chipped off pieces, they're going to be trying to interpret that as
part of the mesh, meaning that whenever it's
trying to set this up, going to warp the direction of the wood into this
particular part. So it's going to also expand when it's like stretching out when
it relaxes the UVs. It's going to relax
them outwards, and it's going to well, start moving that texture
into the section over here, leaving a little bit less
of resolution outside. So what I tend to do
with those kind of setups is I tend to just
dislocate the entire sections. So I'll just select this and these parts over here
and holding Shift, I'm just going to select
these little parts all over the section,
just like that. This part over here
is not necessary because it's just going
to be part of this. It's too big to be
a chipped off wood. So having it like so is okay. This, and this is
actually one piece. So if we click U and
wrap minimum stretch, it's going to turn into one. So from four pieces, it's
going to turn into three. Hopefully, I'm just going
to check real quick. It did not because
they had a seam, and I do not like that. So what I will do here
is I'll remove the seam. So holding control,
remove clear seam. Now I'm going to go
ahead and select this L, L, unwrap and stretch. There we go. All right. And now because I
remove these chunks, we can now unwrap this
entire thing again. This missing UV seams doesn't matter because it's going to be broken by the missing
chunk itself. So once we click on
wrapping, again, you'll notice that these
parts are now much, much smaller, meaning that
they're going to try to just purely focus on the keep in that direction
of the wood flow. Leaving us a nicer
type of a look. So that's how I usually
work with this stuff. And yeah, that's it. I'm not really worried
about the sizing because we can just average
out the size later. And even the texture
and whatnot, you know, making it smaller
or larger, that comes later. Right now, we just
focused on chunks. This part, this part
over here, honestly, we can split it up into
into into Yeah, in two. We can split it up in two. If I was just to select this, hit Alt and H and
actually just select just these two
Shift Click seven, Alz and now we can try and attempt to make a selection that will go all the way across. So hopefully, that
would be quite right. Let's see if we can do that. Yeah, that almost
works actually. Not quite not quite there, but it's a good starting point. So even if you make a
selection like this, it's okay, better than nothing. We can click Olds to go out of the transparency
mode, Xray mode. So we want to select
our faces behind. Click C Middle Mouse
button, Boom, boom, boom. And even here, I'm just
going to do it like at this L so and in
the back as well. Unfortunately, a little
bit of tedious work, but it's quite right. Okay, now that we
have it like this, let's go ahead and unwrap it. We're not going to bother
with the seams this time because it is the
way it goes for me. Unwrap conformal,
just to make sure it flows better with this
type of particular wood. In here, it doesn't matter with the chipping
because it goes inwards. Or actually, it might matter. Yes, it does matter. Sorry. It does matter. Having
a look at this, I notice because the
wood is going inwards, it's not going to
look quite right. Where there is a chip like this, it really is important
to just, you know, select holding control, select this part, maybe, like this. No, no, no, no, no. These edges a little
bit too much. So we're just going
to deselect it. So once we have a
selection like this, I'm going to unwrap it, conformal, and yeah,
have it rotated. So now, when it goes inwards, it's going to change
direction of the wood, making it that much more nicer. And I think that's
honestly much better. If you're worried
about these edges and whatnot in something
like substance painter, you would do edge wares
and that would hide um, this seems way better. Also, we can check it in our random mode because
this does have, well, some generative shader setup, and it would give us quite
a nice type of a look. Yeah. Good stuff. All right. Move on. Let's see. So this was entire setup
over here. Seems good to me. We are still missing the
V and the V, I believe. Let me just go ahead and
unwrap it like this. Should we or should we not duplicate it
to the other side? That is a good question. I notice that the chipping
is a little bit different. So, unfortunately, because these chipping parts
are different, duplicated to the
out part would end up removing that detail. So let's go ahead and do it the good old fashioned way
and just make selection. So the sim will
just try doing it manually without using
vertical selection. Like this. Looks good. Let's do it over here
as well. B, bom bom. I'm not too worried
about this chipping, or maybe I am, we shall see. But let's go ahead and make some nice little
selection just like that. Unwrap conformal. All good. And now let's click on one
of the pass selection UVs. All good, all good, the
other side as well, and unwrap selection to conform. This is good. This is
not perfectly straight. We can straighten this
out in a little bit. All in all, it's all good. And yeah, I will change this up. So I will re select
these parts like this, having those chippings be
part of a different TV. The main reason
for that is, well, I think it just
looks nicer when it just looks like a
different grain once it's chipped into and I'm checking if there's
anything else I'm missing. So this part over here needs
to be rotated as well, which we can do once we
move this out of the way, essentially breaking
up the setup. And I'll just quickly manually
go ahead and hold Shift, select one, bom bom, bom, make quick selection. I don't want these
bottom pieces. I don't think they'll look nice. Let's have a selection over here wrap minimum
stretch, like so. A is good. Just in case I'm going
to re unwrap it, mainly because now we're
missing those chipped parts, which I'm also going to
unwrap again, because, well, just making sure we have all the detail
as much as we can. That's going to be it
for this chipping. Hopefully. Well, let's see what is over here. Am I
missing something? I am. This, this will be just a separate piece
as well. Like so. And yeah, all in all is good. I just don't really
I say it's good, but I found another piece over here because I've totally
forgot to do the outside. So let me just go ahead and
just break these parts off. Let me grab over here. These parts like
so, sol like so. So this one is going
to be actually, these are fine. The
bottom pieces are fine. Totally fine because we
already unwrap this. So it's only just this,
and it's all good. So the only thing
that we need to do is worry a little bit
about the rotation. So right now, it
didn't allow us to rotate them perfectly
for the grain to flow. So what I'd like to do is
just I'd like to rotate them manually because
of this unique shape, it's not going to give
us a perfect result, so we're just doing it manually, like so, and that's that. Just doing it manually
is quite all right. It doesn't need to
be perfect perfect. All is good. And same thing over here. Like so. Alright. So that's going
to be it from me. We are almost done
with this setup. Thanks so much for watching, and I will be seeing
you in a bit.
31. Smart UVs & Materials for Chipped Wood Signs: Hello and welcome, everyone to UV Mapping boot camp Master and wrapping and
texturing in blender. In the last lesson, we left ourselves off with a
nicely chipped wood. We're now going to finalize
some of the pieces, and I realized just
now that these parts, if I wish to select them all, should be a plank wood. Like, so or actually, I'm sorry, we need to use
Windows wood for this one. And for the other sides
should be planks wood. There we go. There we go.
That looks much better. So, in regards to some of the decoration
over here that we see, these little lanterns, we can either find them as
metallic or some pattern. If it was just a small
tiny little piece, I would honestly
just unwrap it with smart projection with a maximum angle limit
and something like that, a little bit of a
cheeky way of doing it. These type of pieces
would be well, it would be a mess, honestly. Let's not do that.
Let's quickly unwrap it in a little bit
of a nicer way. So shifting age, let's
see what we can do. I think I'll do it
in a cheesy way, but less of a cheesy way
than automatic VN wrap. So top down view, A Z, select one part like this, unwrap minimum stretch, and
then we'll do Control I, unwrap minimum stretch, and we have two
pieces, hopefully. What's happening over here? Oh, the bottom is
a separate piece. Interesting. Yep, it seems to be the case.
Should we fix it? We could fix it? Should
we fix it, though? This particular part?
Probably. Probably, yes. So yeah, let's do it because
it's such small pieces, we don't really need to
worry about, you know, upper and lower parts. Like we would
sometimes, I'm just going to make my life
a little bit easier, Mark Sm, select L, and that should
select only one part. It's not selecting one part. O based on SMs. There we go. Yeah,
it is selecting. Okay, we can unwrap
that now both at the same time. Minimum stretch. There we go. Except what
is happening over here. Oh, oh, right. Okay. Okay. So what I did
here was by accident, I selected an entire edge loop. So this part is not
needed, clear seam. Wow, good thing we checked. Let's go ahead and unwrap it. Make sure. Yeah, we need
the bottom piece to be marked seam. Now
we should be able to. I see that it's
properly unwrapped, not properly unwrapped, properly
marked for us to unwrap. Now two little pieces. There we go. That's going
to be great for metal. Yeah. This is good.
Very, very good. So this top piece also
a separate piece, for such a small detail, but honestly, it's okay. It's okay. Let's go ahead and
just duplicate it to the other side
because I don't really want to do this twice,
and it's identical. We are going to be
fine. I still have this free decursor
set up in the middle. Feel free to set yourself up
with a new one if needed. It's shown in the
previous lesson. Just going to check if I have this cursor, duplicating it. Shift D S minus one, sorry, no Y minus
one, there we go, and shift N to take it out of the nastiness
for flip normals. I'm going to select
them both going to assign black metal. There we go. I think I think
black metal is fitting. I think it's better than light metal in this particular case. So this part over
here is also metal. So we can just click Shift in H. Let's see what
we're working with. So for this part, I think I'll just get
the front flat back flat and use that
what's it called again, minimum stretch to
relax the vertices, get a bit of texture
density in here. And because it's small,
not really deful, we don't really need to get additional too many
islands out of this. So we're going to
be fine by just simply doing the top
view selection, like so. So Yep, that's a good selection. And I am going to just
simply do minimum stretch. Let's see what's happening here. So is this part separate? It is Oh, this part is
separate. Okay, okay. But honestly, it
works out better for us because it gives us a
nicer amount of detail. We can have a quick check, actually, if we assign
it to a black metal. Yep, looking perfect. So I will go ahead and make
a selection over here. Actually right in
the middle. So no, right in the middle is
going to give us this. Selecting one, holding control, selecting another, marking Seam. And the upper section, I will split it into
its own flat surface. The reason being is because, well, it's more of
a pyramid shape. And I'd like these
parts over here to have enough space to kind
of unravel themselves. Yeah. So marking some
edge loops over here, and then selecting it, making sure I All right, because I don't have it
anywhere else, it's fine. It is fine. Fine, fine, fine. I'm just going to go ahead and find it within the UV space, select it like so,
and unwrap it. Hopefully, that's going to be assigned with black metal and it's going to
look quite nice. It does look nice.
These parts over here, not going to waste my
time too much with them. Simple metal, simple unwrap. Not much detail anyways. All is good. Let's do unwrap minimum stretch, assigned black
metal. All is good. Yes, perfect. So now, with these parts, I'd like to mention
something real quick. If they are metal, we could just do simple assign
and do minimum stretch, and that would give
us those wreakishly wedly type of setups, which could be quite right. It could honestly be quite
right for this type of setup. Uh, if it was metal,
though, sorry, if it was wood and not metal, if it had a directional pattern, we would have to break
it up, unfortunately. In this case, I
think leaving it as metal or maybe iron metal is, yeah, it looks quite nice. But if you were to do wood, and I want to show
you how to do it. I will just show
it on one piece. We would simply just break
it up into multiple pieces. So just like we did previously, I would select the front part, the end part, hold
shift select this. This, Oh, my. This is not right. So if this is happening to you, select one piece, hold
control, select it. Oh, doesn't want to
go the shortest path. Let's select this
part, hold Control. Wow. Okay. It really
is struggling. So there we go. Let's just lead it
out into this way. Shortest path, huh? Alright. There we go. Now it's following. So this would be reasonable
type of selection. Although notice how there is some additional
topology and whatnot, it's not the cleanest, perhaps, but we can click Control
plus to increase it, click Control plus
again, to increase it, and that might give us a
bit better type of setup, which we can then
get it cleaned up. The reason I'm doing
this, by the way, is because we really
want to make sure that when it flows to UV, you're getting more
of a straight line. So over here, for example,
it was going up and down. So these jagged lines would
be really visible on texture. Whenever you're working
with these kind of setups, just make sure you're getting a nicely straighter
type of lines, like so. And just once you have
it nicely straight up, you can unwrap it. So, yep. Perfect. Almost perfect. There we go. Now it's perfect. Then you can unwrap
it using conformal, give you a nice straight
up straight type of UVs, although the thickness
now is varying. So if that happens,
minimum stretch perhaps would work better. Yeah, it does work better. And these parts over here can be unwrapped
separately, minimum stretch. No, minimum stretch is a
little bit too too wonky. And this, if we were to assign
wood would give us really, really nice type of
flow for the wood. But since we don't need it, I can just assign it for a iron dark and just keep it as it is because
that is quite right. Okay, so now we're left
with the final thing, which would be to grab
the entire setup, including all the
decorative pieces that we did for the edge of the sign, all of the bolts and everything, and we can now yeah, we could just now unpack it. The way that I would do it
personally is I would, well, average island scale if we want just constant neutral
sizing like this. Then I would check the rotation. So, for example,
this part over here, we might need to just rotate
it just a little bit, and it's way bigger than this. I was scared for a second because I noticed
that it was bigger, but it's no need to worry about. So this alien thing
is okay for a metal. We don't need to worry
because it's going to give us the right resolution
and everything is nice. Um right. What I want to say
is before unpacking, I just check the rotation, perhaps rotate some parts
manually if needed. The reason I'm doing this is
because when I am unpacking, so once I have
properly sized scales, I unpack them, and then
I turn off rotation. The reason I'm turning
off the rotation is because I really
want to make sure that the grain of the wood and whatnot is flowing
in one direction. And whilst I was unwrapping, I just made sure that just has
that nice flow everywhere. So even if we're doing texturing and substance
being or whatnot, we can technically fix
those kind of stuff. So it's not like super, super needed because it can be done within the
texturing software itself. But then you would have to
manually just do duplicates of material and
masking and masking. It's just a little messy. So yeah, just having it
like this. Packing it up. Everything is set up nicely. We can even check some of
the, for example, scaling. Maybe the wood is a little
bit too big or something. In which case, because
this is a shader, I could always
just go into this, find myself the right wood
and change up the scale. For example, over
here, something like that would be pretty good, not needed, but if
you want to change up the grain of
the wood, make it. This is too much. We don't
need it, but we can do it. So, yeah, that's pretty
much it for the sign. Congratulations. We made
ourselves the first prop. We could even take
this now to substance banner and have it textured
with this type of UV. And it would give you
some great results. As a quick review of the packer, you'll notice that, well, we had a lot of square type
of tiling and whatnot, which is great for,
well, everything. This part over here, because we left it off as more organic, ended up causing us a lot
of loss for, well, texture. We could definitely fix
that up potentially. But even when fixed, you
can see, like, for example, the side of this because it's
such an intricate shape, ends up leaving a lot
of space over here. The more islands
we have sometimes, the better it fills
that space in, but it's not always good. This part over here
being slightly rotated is acceptable
because it's metal. So I would say this is a
reasonable good UV map if you're trying to fit
in a good workflow. Getting it through the
pipeline, through, you know, the prop
texturing pipeline, you will need to do
something reasonably fast for pieces that would
give you good outcome. And this honestly is a
pretty good outcome. So that's going to be it for me. Thank you so much for watching, and I will be seeing
you in a bit.
32. UV Pitfalls with Bevel Modifiers: Hello and welcome back everyone
to UE Mapping boot camp, Master and wrapping and
tecturing in Blender. In the last lesson
we left ourselves off with the previous
Chapter eight. Now we're going to move on to Chapter nine, beveling Barrels. And this one is a
little bit more of an interesting one
because we're going to talk a little bit
more about the mesh, the topology itself, and what can we expect
out of beveling. Saurus bevels add
additional geometry. If we look at the
edges of this mesh, we're going to start seeing
them being beveled off, essentially being smoothed off. So instead of having those
chunky 90 degrees type of corners with bevels, we're going to see them
being smoothed out. Now, there are multiple
ways to add bevels, which includes using
modifiers for starters. So modifies will allow you to do it in a non
destructive way, although we are
adding topology when we are exporting this
mesh beforehand, it's just going to have
this type of topology, so it's not going to have
anything on top of it. Only purely visual
type of setup. Let's look about how the
bevels distort the UVs. And if I was just to duplicate this type
of piece of mesh, notice how these pieces are separated into
multiple parts. So we have lt rings and
the links themselves. We're going to talk about
why that is the case. Now though, let's go ahead and make a
duplicate out of this. So the top section only, we don't need to worry about
anything else at the moment, because we're just going
to go ahead and select it all UV and wrap with SmartTV Project
because thenia degrees is going to give us all of
this nice type of topology. But when you are exporting it, you're not going to
see this UV because the added extra topology
is going to go somewhere. So what happens is, when you are exporting and you have the apply modifiers setup, you are going to see we can actually apply
bevel right away. You are going to see
something like this. So actually, in all
the blended versions, it was way different, but now you're
actually able to have the beveled edges to be
incorporated into your UVs. And that's all great and nice. But let's go ahead
and have a look at the differences between them. So I'm going to
compare these two. Let me just go ahead
and grab this, click GY one, just to move it upwards and
select both of them. So so let's compare this plank
and this plank over here. For Saras, although this setup
is not using any padding, so there is no, extra
space in between the UVs. Not really good
practice, but for automatic UVs, you know,
that's what it gives. See that even though they
were close by before, the UVs themselves go inwards into the shell
of the UVs base, meaning that there is no need
for extra shell padding. The other thing I'd
like to mention is that because it goes inwards, we're going to get
a slight bit of distortion towards the corners of the mesh when we're
using the modifier bevel. So if I was just to have a look at this little
piece over here, actually, let's go ahead and
add little wood just to kind of visualize,
correct woodlk. So just to visualize
what it looks and we Oh, that was a different
one, actually. Oh, crack wood. There we go. So onto the bubble
edges, we can see that. We're not able to see
much because we need to upscale it quite a bit and
just see how it looks like. So these edges over here, we're not always able to control them, you know, over here, because this is part of the
same UV islands going to just insert that UV information from this specific plank,
but not from this one. This one is going to
have its own UV setup, and we are now able to determine where those bevels which
UV shell it would use. So right now, this island is also supporting
these UV spaces for the bevels,
but not this one. And if we want to
have, for example, this part to be
rotated differently, we wouldn't have that
much of a control with this particular setup. The corners over here on
the side, also, well, we don't have much control,
so they're going like, just downwards straightaway,
and that might be an issue. Depending on the perspective, in this case, though,
it kind of works. The other thing is
that if we were to have more of a
curved surface, so you can imagine this
plank, for example, being a little bit more well
bent or something like this. The bevels over here on the side would struggle a little
more with the distortion, how it looks, and I can
actually show that to you. So right now I distorted
this plank over here, and because this had
already topology, this is how it looks
like with the UVs. If I was just to try doing
that same thing over here, which only has the modifier, as is without a topology. So I'm going to go
ahead and do that, like so and then
use bevel, like so. We can see the difference. I'm actually going
to make this UV islands quite a bit larger. Like, so so you can see
the difference that the maybe even larger
sort would be easier to see that it is not
it's slightly distorted. Maybe it's better to see it with the piece like this instead. If I was to make it a little bit larger for you
guys, there we go. So you can see it
has a slight bit of distortion when it works
with more of a bend wood. And here, for
example, the flow of the wood wouldn't
be ideal either. So something like that,
you definitely need to put into consideration when
working with textures, especially when working with
directional type of wood because it will have a
little bit of an effect. And this only applies, though, I will say to parts where
you need more of bevel. If you're using just a
small value of bevel, it's not going to be visible. You don't need to
worry about it. It doesn't need to be perfect. Because this chunky type of
wood is a little bit softer, you can see that, for example, over here, the wood tries to flow over here on the corner, where for this one,
it flows like this. So yeah, that's the type of lack of control that
we're talking about here. And for that reason, honestly, when using the UVs,
I really, really, personally prefer to just apply the bevels that modifier
setup onto the mesh itself. Before doing anything in
terms of UV unwrapping. And that puts some
complication towards how we unwrap certain parts because there would be a lot
more mesh detail, a lot of mesh
complications instead of just using those 90 degrees. So it would be, it would be just simply more complex to
unwrap this type of mesh. The other thing that I'd like
to mention about the UVs, and this is the
reason why I have the separated is because if I was to make a duplicate out of this like so if we were to try to
join them all up together, we'll notice that, hey,
we're losing these bevels. What is happening?
Well, the thing is I made actually a mistake. Let me just go ahead and make a duplicate
out of this again. So what is happening?
Well, let's go ahead and join this up and see
what's going on. Right now, we have
this type of bevels. Everywhere is the
same type of bevel. So in this situation, we had different bevels. Over here, for example, over
here was a different bevel. This had a different
bevel value. I believe this didn't
even have a bevel. So all of that plays together. To create specific parameters
because we need it. Over here, though, if we join this entire object and
just use the bevel as is, we're only going to have
one certain control over the bevel detail, like so. Now, when it comes to beveling, there's also something
you might have noticed is that it doesn't go
past a specific point. So if we try to bevel
it off like this, it just stops.
What is happening? Well, the thing is this beb right now
by default settings, it only allows us to
bevel off edges as much as we have the topology, the smallest topology
that allows us to do. So over here, I believe because of these bolts,
let me have a look. Yeah, because of
the SR topology, it will only allow us to bevel off just to the maximum
amount of what it includes. If I was to add an edge loop, let's say, over
here, to this point, for whatever reason, you know, maybe we wanted to have this stripe a little bit thinner or
something of that sort, and you'd have topology
that's closer. Once you do that, you'll
notice that, hey, now everywhere else is as
thin as that last piece, and we can't exactly go
any further in comparison. So that's the downside of using just a bubble as is
on just one mesh is because there's only
one maximum value, and every other geometry
piece would have to use that. There is a way to
go around that, and that would be to use
or unused clamp overlap. Now, this option is
an interesting one. You'd think that clamp overlap
by just simply clicking it off allows you to have a
bunch of different control. And even if I have topology, so it would be
totally okay to just, you know, increase it over. And right away, you'll
notice what the issue is because I had the face
orientation turned on, so it's going to spoil
us a little bit of that. So face orientation
will show you that clamp overlap will
basically allow you to extend the bebls to anything
past maximum, honestly. So right away, it'll start
ruining the bolts and stuff, the hedges and all of that. Of course, you might
think that, like, Hey, maybe we're not going to
use it to an extreme value. We just want to soften
this part up now it works. But you'll notice that
these parts are still red. So even without the
face orientation, you might notice
it a little bit, or you might not because when
you are applying a texture, let's put for the sake of the
argument this iron piece. Like, so you might notice
that, Hey, it's alright. It doesn't look that bad,
right? Everything is fine. What's the concern?
A bit of an overlap, nothing wrong with that? Well, the biggest
problem comes when we are putting this into
texturing software. Even here, you can
see a little bit of issue right off the bat, slightly overlapping, but you might think, like,
Hey, that's okay. It's not going to be
Zoomed in disclosed. No one is going to see that
or something like that. Well, here's the thing, though, if we go to texture
set settings, start baking the ember clusion. This is the main
problem causer for us, most of the time
because ambiclusion gives us a nice
little bit of depth, which is really dependent on
the geometry that we have. And right away, we'll see that, Hey, what is
happening over here? We're getting some
black faces on here. Here is well, it's fine, but on bolts, though, we're getting a lot
of messy stuff. So it enhances all of that
artifacts, all of that data, and it's really
important to not only work with, well, good UVs. It's also important
to make sure that the UVs beforehand are
not overlapping to get good data out of those UVs when textured stuff
gets put in place. That's the gist of it. We're now going to move on to
figuring out what to do with this troublesome barrel of ours in the next
lesson, though. Thank you so much
for watching and I will be seeing you in a bit.
33. UV Flow on Beveled Barrels & Bolts: Hello, and welcome back over
on to UV mapping boot camp, Master and wrapping and
texturing and blender. In this case, we're going to
master this bevel modifier, so we're going to
make use out of it professionally in our fields. Let's go ahead and get back
to our default barrel. Alright, so let's start
off with one way of sorting out the
bevel UV beforehand, and then another one
another way afterwards. I'm going to go ahead
and just quickly select this entire barrel, make
a duplicate out of it. Because usually when I'm
doing modeling or whatnot, if I'm applying
modifiers and whatnot, I prefer to keep a copy
previously just in case. So let's say you have
applied multiple bevels on the object and you have set up different setups
because why not? That's totally viable.
Then let's move on to UVs. And I will start off
by just grabbing the little checkerboard
that we had previously, going to apply it
everywhere just because it looks nice and easy to
visualize, just like that. Alright, so first things
first, these bolts, they don't have any
modifiers for the beveling. This smooth shader tool just
allows it to be smoothed off based on an angle.
So that's right. Let's go ahead and
select it all and just unwrap move
minimum stretch. Doesn't need anything else. It's just going to
be squished into these plain pancakes,
which is what we want. So next up is going to be
these parts over here. So one way of doing
it would be to, well, create seams beforehand. And I'm going to go
ahead and select it, isolate the view because
it's a separate object. We can just click or
dash a sideway next to your shift and move
on to adding seams. So because it's such a
sharp curves and whatnot, we're going to get
this type of setup. Like so, you might be wondering why we have some
on the inside as well. Well, if the planks
have, you know, gaps and whatnot, they're
going to be quite visible. So if we zoom in over here, these gaps in between
the planks and whatnot, you could potentially see what's on the
inside of the ring, and that's why sometimes
it's okay to leave that in. Go back to isolation mode with this selection
type for edge loops, we can now go ahead
and mark seams. And to straighten it out,
I'm going to mark Sam right in the middle
as well, like this. And that way, we're going
to get ourselves, well, four pieces that will
be nicely unwrapped, except it's not
nicely unwrapping. So what's happening
over here? Ah. Okay. Okay. I see. Marked
sharp, not seem bad. There we go. Let's go ahead and unwrap it
now. There we go. That's what we're
getting. And it's a little bit wonky, a
little bit wobbly. That's right, because we can use lt and E with this disabled. There we go, nice and straight. So it's going to be quite
a bit more compact. That's a nice way to
unwrap the rings. So we have these setups. And now, if we were to, well, apply a bevel afterwards, out in the object mode, we are going to get this,
which is quite right. For something like
metal, it's great. It doesn't have any of
those weird triangles or edges because, well,
we didn't have them. Like these triangles over here, we didn't have it as
previously mentioned. So here, it's going to be great. We got ourselves a
nice little setup already with multiple bevels. Now you might notice that the seams end up being
split into two parts. Over here. So that's quite important to know,
because basically, if you are going to be wanting
to unwrap this part again, it's going to split
into multiple pieces, more than four sides
that we had previously. So that's going to be
quite a bit of a nuisance. Just make sure you
are aware of that. We can just leave
this bevel off as is. Honestly, at this point,
it doesn't really matter. But these edges over here, because they are seams, they're going to be split into two teams. They're
going to multiply. So be wary of that is
all I'm going to say. Ways, whether or not we apply the modifier does not matter in this
particular case because we're going to just
convert this all to a mesh and just apply everything
at once down the line. So next up, we have, well, planks. What
do we do about them? Well, for SaaS, we have upper and lower lengths over here because this is
basically the same mesh, we can go ahead and
just delete one, and that makes our
lives way easier. Next up, we can
apply the modifier, and I will show you
an alternative way for sorting out and dealing with these pesky beveled
off well meshes. Because we already did
the sign beforehand, this is going to be rab
or simple in comparison. All I'm going to do
for Saus is turn on this UV sink because
I really like that, and I'm going to just
turn this sideways and get myself the projection from view because I like
the start like this. It just makes puts my mind at ease when
I have it like so. So I know what's
missing and what's not. Alright, so next up, we have, well, these planks over here. What we can do is we can
use Old Z because we are from top down view and
just using transparency, we can select it like so, using shift just the main parts. The bottom pieces are also going to be selected
just like that, and we can click Control plus, and it's going to
select those bevels. And that way, we can unwrap
with minimum stretch. To give us these
lovely placed planks. And over here, they're going to be fine
being like this, actually. So yeah, that's fine for us. Let's see what we're left. We're left with all
of these edges. So what do we do
about these edges? Well, for Sas, we can
just go ahead and just select all of these pieces
that we had previously. Click H to hide it,
and we have this, these lines over here. What do we do about them? Well, we can just
go ahead and just drag it across like
so holding Shift, select them all like this. Click on Wrap minimum stretch going to give us
nice little planks. And all that's left is just
front and back like this. Click minimum stretch, and
that's pretty much it. We can now go ahead and click
Alt and H to unhide it, select this piece, and I'm
not going to unpack it. Honestly, I leave that
for the very end. I just know that all of these
are nicely facing upwards, like so, and that's
pretty much it. That's exactly how we want it. We got ourselves these planks vertically going in one
direction on the side. Over here, this is going to be going in this direction as well. These on the side are going to be go in just in this
one direction over here. And that's it. That's
pretty much it. We don't need to over
explain ourselves, right? So let's move on
to the next part, which is going to be very
similar to the upper piece, except we also need to duplicate
this to the bottom part. Let's not forget the
bottom of the barrel. So let's click shipped in
D G s, move it downwards, and I'm going to
just flip it around and does it matter
if I flip it around? It does not. I'm
planning to have this as a separate UV chunk. If I was to have this to be duplicate of the upper
section over here, I would unpack this
entire part first. So, you know, average islands, pack islands, making sure
it's properly set up. Then I would duplicate this and use S z minus one to
kind of invert it. And that way, we can just reuse the same UV and
save up the space. In this particular case, it
doesn't matter because we can just place it and keep
this as a unique object. And once we're packing this, we're going to have those
packed up as a separate chunk. So we are left with
this plank over here, these entire chunky
planks that we have, so maybe a little
bit too chunky. I'm going to hold shift and
just love this down there. We go nicely placed up. What can we do about them? Well, we're going to use yet
another way of sorting this. Um, let's see. We could do it, like we did
previously with the rings, where we have the
upper selections, and then afterwards,
sorting it out. But I'll show you
a more fun way. I think that'll be better. Yeah. So let's go ahead
and apply the pebble. Let's not be afraid of these extra topologies that
we're getting out of it. I'm going to go into
Viewport Shading just so I wouldn't have to
see the checkerboard. We don't need a
checkerboard over here. So what I'm going to do
right now is I'm going to select these
chunks like this. And what we can do is
we can go on to select, select all but trade and Sorry, select similar, I believe, area, and there we go. Selecting similar area
will allow you to get, well, similar area,
which is like this chunky planks of wood. If you want to lower
this, you can by using the threshold that
appears at the bottom. But now we got the fronts and the backs selected, all lovely. And we're going to essentially
do the same thing, which is Control
plus to add it in, to get that extra bebl. We might need to do
it at another time. And I'm wondering if
we should because here we have additional
segment added to the part. So I will leave it for
another chunk of island. The reason being is that
you can imagine over here, for example, the flow of the wood going
in this direction. And if it was just this small
type of face over here, it would be a little
bit too much. I think having this entire
chunk would be having a much nicer flow for the
entire area of the wood. So whilst unwrapping, we need to think about
those kind of stuff. So yeah, that's why we're only
clicking Control plus only once just to get the
first level of bevel, and we can now do unwrap minimum stretch.
Let's see how it turned out. It turned out right.
In this case, this part over here, I
was considering about, well, turning these
to UV squares. But because it has that bit
of a wobbliness in the wood, I don't think it's
needed too much. We can test it with actual wood. I will go ahead and
do that, actually. So I will change this
real quick to wood just to see how it
looks, correct wood. And let's see. Give
it a quick test. Yeah, the wood itself, the grain is looking
quite alright. Let's not worry about
turning them to UV squares to make it more
compact, because if we do, because of this
type of topology, for example, this
goes straight up, and then this face over here ends up going a
little bit going sideways. So it would look like the grain is going up
and then, you know, a little bit sideways
or something, and here, overall, the grain is just
going in the right direction. We don't need to fix it. We don't need to
worry about that. And I think it's worth
the expense of just, you know, having those
small spaces over here. It's not going to matter much. All is good. So moving on, we have these parts over here. We're going to just make
a selection like this. Select the entire part,
unwrap, minimum stretch. Heh. We got ourselves
nice set up. Do the same over here.
Minimum stretch. There we go. Nice and easy, super simple, super nice. And now we're going to well, you can change it back to the checkerboard that
we had previously. And we have ourselves
unwrapped barrel. Of course, if we
want to take it to a texturing program to do some extra textures,
we can do that. The way we would do it is right now some of them
would have bevels. Right now, some of them
would be, you know, already unwrapped and whatnot
with the bevels applied. We can just select this
entire mesh like this, go on to object, convert, mesh, and just like that, we're going to get ourselves everything already
applied for modifiers. So that's something
that's cool to do because if we were to join everything all
at once beforehand, it would take off some
of those mesh add ons, mesh softeners from modifiers, or it would apply additional
modifier on top of it. Either way, it doesn't
work quite as well, so just make sure you
convert it to a mesh, and now we can just select
it all, click Control J, and we've got an entire barrel that we could texture
within or work. Of course, we would
need to select it all, use average island scale to make sure it averages
everything out. Then pack it nicely
into the setup. I'm just going to double
check real quick. Yeah, everything is in the
proper direction, I believe. So we can just pack islands
with the rotation turned off. Margin, 0.03 is right. Let's pack this up, and
that is what we're getting. So there we go.
Nice, little setup. One thing that could
potentially work against our favor is the length
of this chunkiness. So if I was just to
select it using normal, to get all of these parts. So these ones,
sometimes with meshes, something like
sort, for example, would have extremely long UVs. And because of that,
you would, for example, try to keep the
density the same as everywhere else, not
making it smaller. So when you're
packing an object, I could actually
show it to you right now if I make this a little
bit larger beforehand. If I was to try to pack
this now all like this, you'll notice a little
bit of an issue. Even real quick, let me just change the
margin because consistency. So even with margin without
margin doesn't matter. You'll notice that
what's happening? It's not using all
of the UV space. Well, the reason it's not
using all of these UV space is because of these
extremely long UV chunks, they are not helping us out
with sorting out the UVs. If that does ever happen to you, only viable thing to
do is just simply grab the chunks in half
and just split them off. And although there
would be an extra well, UV seem somewhere over here, you know, there would
be an extra UV Sam, even though we
haven't created it. That's the most viable option because now when we do this, ignoring this chunk over here because let's
not ignore it. This was part of the bubble. So once we split up,
those along pieces, we can repack it, and
then we're going to start making use out of
the entire UV space. So that's something
worth knowing. Of course, in this
particular case, I did not want this
to be the case. Average island, pack island, and it look quite nice because it's just the
right type of size, the right type of well,
you know, length. So yeah, perfect setup. Good job for finishing this up. And now it is time to move
on to yet another section. Thank you so much for watching, and I will be seeing
you in a bit.
34. Curved UVs & Atlas Prep on Bookshelf: Hello and welcome back everyone
to UV Mapping boot camp, master and wrapping, and
texturing in Blender. And last lesson we finished off ourselves with the
bevel barrels. Now we're going to
go on to the zero to one UV space or Atlas setups. And in certain cases, we would want to
optimize our textures. Instead of using
multiple materials with seamless textures, we would use one material with multiple textures
inside of it, meaning that this
entire setup is just one UV space and it has,
well, multiple textures. On the top left hand side,
we have some book covers. We have a book side
over here for texture. It's a little bit larger
than a book cover because we want to have more detail within the size of those
pages, perhaps. It really is dependent on the setup that
you'd like to do. So for example, the books are going to be
relatively small. We can have them
smaller in comparison, whereas, for example,
this piece over here, if we want a marble tabletop
or something of that sort, we could have more texture. Something like, you know,
dirt over here would be smaller if it's within
just a small plant pot, like we have the
plant pot over here. All of that sizing and
setup really depends on planning of the
type of messes and morals you would have
and determining whether or not you want larger
or smaller materials. So with that said, let's
get right into it. For Saudis, we're
going to start off with this book shelf itself. That's a rather interesting one because it's going
to be a wooden type, we can either go for
a non painted type of a brown look or
a painted type. This really depends up to you. We don't even need
to consider that at the moment because they
are the same size. So at this point, we can just focus on wrapping and setting
ourselves up with that. If you're wondering how I set up this atlas for PBR materials, all I did was in substance
paper, just open a sample, get myself just a simple square, and then afterwards, just delete whatever is not needed to
get just a simple plane. After which I'd have
folders based on each separate
materials and would use masking to well create
out these blocks over here, which would allow me to have different materials for them. But anyways, that is a
topic all on its own. I'm not going to go
too much creation on the setups for atlases. Let's get back into the course. So have this
bookshelf over here. We're sting off strong because
this is, well, curved. How do we sort this out? Let's go ahead and go into it. I already sort it
out for you guys. So when we are checking, all of this is just
projection view. So we don't need to redo
that over and over again. We can just move
all of those pieces off to the side just like that and start thinking about
how the setup would be. If it was normal noise, we could just do
automatic UBN wrapping or something of that sort,
then that would be okay. But because we want
this to be more wood, these entire curves need to follow the direction
of well the setup. So first things first, let's check real quick if this is part of the
same mesh, which it is. All of it is connected,
which is okay. But let's say we want this.
Well, except for this piece. This piece is a separate
piece, and that's also okay. Let's determine how
we can split this up. And the easiest way for us to do that would probably
be if I was to just, well, let's go ahead and isolate this entire piece
shelf over here just to make our lives
a little bit easier. Now, let's click Old set to
go into transparent mode. Let's position our camera
like this to grab selections. And most of the cases,
it will be just, you know, how can we
make our lives easier? So now we can just
split this part off. And because this is one mesh, we're just grabbing these chunks into separate pieces,
just like that. Like so, and I'm grabbing this
and this and this as well. And that's going
to be quite right. I think, this part also needs
to be the same. Like so. We can just move
it out of the way. Let's see what we
can do with this. This would also need
to be separate. So I'm just going to
move it off to the side. The reason I'm doing
this is basically I'm separating straight from the curved versions because we will do slight different
processes in them. And I'm just checking
at this part. No. Okay, that's fine.
And this selection over here doesn't
matter too much. At this point, to be
honest, what's split, what's not because once we
have something like this, we can just make a selection across like so just like that, having this entire selection. We can do automatic UV on wrap. Working smart, not hard
is always the way to go. And most of it will be done exapse little things, what
is happening over here. Well, they are
front and the back, so we need to
slightly fix them up. What we can do here is just
a quick selection like this, like so, like so, like so. And by having this simple
type of selection, we can now move them out, and that's going to
be it, I believe. No, over here as well, going to select this part like
so. Yep, that looks right. Okay, once we have a
selection like this, we can do automatic
UV and wrap again, and that's going to repack our
items to make it straight. And these will be
separate UV chunks now. We can click LL,
automatic UN rap, Smart Project, there
we go straight. We're just straight and
everything out. Nice and simple. And now the curves. Whoa, boy. Okay, the curves, let's
go ahead and click L UVs. Let's see what they
look like and lovely. They're looking lovely
is what they look like. What is going on with this one? Let's have a look at up a curve based on the
projection from view. Um, right. So let's
go ahead and do this. To make sure that we're not
selecting some random parts, for example, if holding Alt, selects an entire
circle, including this part that's
already been unwrapped. Want this to happen. So what
we're going to do is we're going to make a selection
that we unwrapped already, and we're going to hide
it out of the way, making sure that we're
only having the curves. Now, next step is going to
be let's see, let's see. Let's see. We have some
holes over here and stuff, which was the reason because
it was hidden and stuff. That's all good. Let's see. So the best way because it's straight is if we
click seven Olds, we can just select
using face selection. One side, holding
Shift, another side. Both sides selected
just like that. Es Bs. We can now click
U and minimum stretch, and it should be
reasonably straight. Yet, it's not so
straight in some areas, what is happening over here?
I'm just double checking. So for example,
this part over here going to focus and see, it is not perfectly
straightened up, which makes us wonder if we should straighten
this out or not. Mm hmm. Mm hmm. So instead of using Alt
and E with these, what? Actually, I will
do AlternE first. So what I'm thinking right now, what's happening right
now is basically I'm deciding whether or
not to use UV squares, my usual add on that just
straightens stuff out. But here's the problem. Now, we have some of the topology that is
not perfectly straight. So if we straighten
this out, you know, if we straighten this
type of a curve, this curve itself
would be D D do, if I was to show you
would be make it larger, would be stretch out. We don't want this to happen. These stretches is not correct. So what can we do?
What can we do? Well, we can do the
pinning method. I think that would
be the best choice. But we can combine
the pinning with our lovely and beautiful
setup or UV squares. So yeah, I think
I'll just do that. Let's go ahead and select
these parts over, like, so turn off the
UV sink selection Altny and there we go
nice and straight. Now what I'm going
to do is I'm going to select only one side. Yeah. Yep, yep. So
what I will do is, I'll just do
selection like this. And one side, I can just select this
upper part over here. So basically, out of UV shells, I'm only selecting one side, like, so it doesn't
matter which side, because the thing
I'm looking for is when we are having some vertices
of one side pinned out, the upside is free to
be a little bit loose. So we can simply allow
it to move freely. So I'm going to just
click P to well, use the pinning,
same as just pin. And then let's go ahead
and just unwrap it again. Using minimum stretch
with iterations, and that should
give us something, although this is quite messy. So what is happening over here? Well, let's try angle based, but it's not working in the
right way that I want to. It's freaking out
for some reason. Why is that no
flip? There we go. So still giving us the wrong options,
let's use conformal, and that would allow us to well, move some of those vertices. And now, if we check the UVs, if it is a little
bit of a warping, it might be still okay. So this part over here.
Is going to be this part, just like that because these
parts were well pinned. It's going to keep
that straightness, but other side will, you know, go back and forth, depending
on the need for resolution, and honestly, that's
going to be okay. It's going to give
us that conformity of nice straightened up UVs whilst not messing up
the density too much, not doing too much warping, something in the
middle of both worlds. So that's going to
be quite right. And now for these
parts of a year, so I'm checking some parts
look a little bit interesting. So I'm just curious about this part in
particular, actually. Let me try finding this part. You can also just click on it, and this is what it looks like. That's okay. That's okay. I guess it's just based
on the perspective. We can go ahead
and select it all, click on Wrap minimum stretch. Let's see if it gives us the right setup, and
honestly, it does. It does look like it is. And in this case, let's see the parts. Is there any distortion
or if you sort. For these parts, it's going
to be perfectly squared. It's going to be quite alright. There's no curves, no
nothing like that. So we can select it all. We can go out of the UV sink, select it again, old E, and it's going to be
straightened up nicely for us. Now, let's put this
all onto our atlas. So if we were to pack
this up, we can do so. Actually, we are
running out of time, so we're going to continue on with this in the next lesson. Thank you so much for watching, and I will be seeing
you in a bit.
35. Atlas Mapping for Bookshelf & Sculptures: Hello. Welcome back,
everyone to UV mapping, boot camp, master and wrapping,
and texturing blender. In the last lesson,
we left ourselves off with sorting out
some of the curves, getting that nice little
shape out of the setup. We're now going to
move on to well, pssing it into our atlas. Let's go ahead and simply unpin all of these little parts, like, so just in case, because I don't like
just red spots on it. And if we do forget Wilson
wrapping or something, it just tends to
make a little bit of a nuisance out of the setup. Let's simply check what
we're going to do now. I'm going to go out
of isolation mode. Let's see. So here we have the setup. We can pick whichever
way we want to go. We have a nice little
marble over here, some parts of the wood. And in this particular case, I think we're just going to stick with this type
of wood over here, so that the flow that we set up for the
curves would allow us to, well, got a nice wood.
Let's go ahead and do that. I'm going to click Alt
and H with an Edit mode, and we are going to change
our material to be atlas. So there we go. And
how it's going to be a little bit looking freaky because it's well, just
all over the place. We don't want this to
happen. So we're going to start placing
everything in one spot. Started off, we're going to
average out island scale, like so to make sure that the
sizing is properly set up. And the next step is going to be stacking everything
in one spot. Unfortunately, by default, it
doesn't allow us to do it, even if we set individual
origins to well, pivot to individual origins. It's still not going to allow us to just use shifting
S and, you know, selected cursor or something of that sort or even
selection to cursor. It's not going to
allow us to do that. To make sure that islands
are sacked on one another. And this is needed for making sure that we're just making
use out of the same space. Luckily, for us,
we have magic UVs. The magic UVs will
allow us to do that. We can go ahead and make sure we are within UV manipulation, Align UVs, and there
is snapping option. Make sure that the group
is set to UV island, and then we can just snap it, and it doesn't matter
where to snap it onto because we are just looking to overlap everything to one spot. And just like that,
we're going to get ourselves a nice little setup. Now the thing is, though,
if we have a look at it, the sizing and scaling
and everything is little bit too much,
little bit too long. So some of the pieces end up being a little
bit too lengthy. I recommend you just to
grab all of it in one spot, all the lengthier ones that is. Maybe this one as well. And is this okay? I think this might be just
just o, I'm going to check. I'm going to grab it as
well. Might as well. There we go. So Oh, Nava one. We're grabbing all of them. So we're making sure that the
short ones are left behind, and the lengthy ones
are moved to the side. And now we can just grab
it and cut it in half. I am going to go ahead and
just have a quick check on the selection just to
manually check how it looks. So, for example, this
one would end up being cut in here,
which I'm okay. This one would end up
being cut in here, but the upper section needs to maybe be in the same selection. Like this part over here also would be nice to have it
cut in the same selection. The bottom, do we care
about the bottom? Not really. I'm fine
with this. It's okay. And rest is fine. All right. So now I'm going
to click G, again, with our wonderful
UV sing selection just to offset it and
cut it up like so. And we're going to probably do the same
thing again, actually. We're going to click N,
Magic Vs Snap point. Now that's going to be nicely
placed in our section. Let's move it up to
the wood section. Go to the materials, and let's click S
to just scale it down until we get to this kind of part like so to get the wood going all the
way around for us. So that's quite nice. And I'm seeing an issue here. I just realize if we click AltnHe we left behind
a lot of parts. Let's make sure we
grab all of them and do the same thing up points, and we're going to just
scale it down a little bit, move to the side and should be right in most of the cases, except it's not what is
happening right now. So for Sarus, the texture
quality is quite a bit lower, which is fair enough because
I realized that we have not set ourselves up with average islands,
average island scale. Now we can just redo
this step real quick, like so, and let's see
how it works for us. So we're going to scale
this upwards like this. Already looking much better, except for this little guy over here going all the way across.
We don't really need that. Let's go ahead and just
break it in half, like so, and I'm moving these
parts a bit more randomly to scatter them up,
just like this. We can just place it like
so and get a nice result. This one part needs
to be rotated just to make sure it flows
nicely with the wood. And the rest of the parts
can be also slightly offset. So this part would be here. This part over here can be moved a little
bit to over aside, so forth, and so forth,
like this, like this. So just quick bit of motion. Doesn't need to be perfect. Just like that. And I think that's quite
right. There we go. We got ourselves a nice
bookshelf. All right. Let's move on to this
little art masterpiece. Whatever it is, it's
looking pretty good, but it would look better with
some additional textures. And right away, we can
just probably put on atlas on the setup and grab it. See what kind of textures
maybe it would work with. So bronze with marble for the base would
look quite nicely. So let's go ahead and use that. And let's just go and start
the ecturing process. We're going to
select this object. We're going to start
unwrapping it. So what would be the
best way of doing it? In this case, we
don't need to unwrap the circle of parts to be
going straight. It's not wood. We don't care for the grain. And because it's an atlas, we don't really care
about the texture density doesn't need to be going
next to each other, so we can just overlap it. So that being, you know, nicely set up by separate
pieces would be okay. I think the way the best
way to do it here would be just to start with
automatic V projection. Let's see what it gives us. There we go. This is what
it gives us. Very nice. Putting it off to the
side, just in case. And let's see. We got this little
ring over here, moving in multiple
directions. Fair enough. Can we make it better?
We probably can. The backside is a
little bit of an issue. What's happening over here? Is there a little
bit of a mistake? That's fair enough. Let's just maybe I moved it by accident. Let me just go ahead and I'm
just going to go back to the individual the
individual median points and move this
back a little bit. Like so. I don't know
what's going on over here. A little bit of a mistake. It's not going to be
visible behind the back. Even so, it still looked
a little bit odd. As a piece. So I just
had to fix this. Like so. A real quick fix. Okay, so what do we have? What are we working with? We
have this ring over here, set up into multiple parts. I'm actually going to re
unwrap the star ring, like so and use
SmartTV projection. Can we get away with
this? We probably can, except maybe there's a lot
of little chunks over here. What's happening with
these little chunks. And it's on the inside. I don't really care
about the inside. Do we care about the outside? Probably. Let's go ahead
and just simply unwrap it. Like this, Mark Seam. So now I can just select
this entire part, like sew all the way
around it, just like that. And then hopefully, if I
were to use where would it be uniform confrontal's going to give us a nice
little piece over here. That's fair enough. Let's put it to the
bronze, just like that. And the rest of the pieces
would also go to the bronze. Like so so whilst I'm
working with this, I can just right away, start moving all the pieces, checking how they look visually. And because we are working
with Atlas, we can easily, you know, change between metal if we want
to, for example, we can just move
this over here and see how it looks like with
a different type of a tone, which is, you know, fair enough. So just like that. But
this part over here, we are going to do
packing, pack islands, like so, and a quick set up over here like this I think is
going to be quite right. Maybe even metal, maybe even so. Again, in this particular case, we're only caring
about when unwrapping. We only need to wonder
how big the UV chunk is. So, for example,
this one is a bit smaller in comparison to this, and we can get, for example,
more detail out of it. In context of entire scene, you might start wondering whether or not it's
going to be okay because the wood would be less resolution in
comparison to the marble. In certain cases, it's okay. It's acceptable. In
other case, it's not. So, for example, marble
over here would be a smoother setup and whatnot. It would have that
sharper texture, and it would look
more fitting overall. But yeah, you do need to be wary sometimes when it
comes to texture resolution, if I was to have this over here, for example, the same type
of wood, but, you know, smaller pattern in comparison
to the shelf over here, then it would start
looking problematic. Then it would be, you know,
from a distance even, you start wondering, like, it's the same material,
but it's smaller. Your eye would start
picking that up naturally. So that's something
to be wary about. But because this is marble, completely different
material, totally okay. And yeah, whilst I'm wrapping, you would think of the size of the material type that is and
the sizing because of that. And you would think
about directional noise versus normal noise because
this is a normal noise, the marble I would consider
to be a normalise noise. We could put it either
over here, if here, it wouldn't matter what kind of a setup I
have for the UVs. That's a little bit
me rambling, though. Let's go ahead and
just fix this up, finish these up, and just grab all of these little
tiny pieces just like that. And what are those, though? Are we missing
something? Let's have a where would this be? I just want to check real quick. What am I selecting? Oh, the backside, of
course, of course. The backside, let me just put this over here. We don't
really care about it. It's not going to be visible
for us. We don't mind it. This part, we can just
pack the islands like so. And at the same time, I'm also just going
to snap to point, overlap everything like this. And I think that's quite right. And I am going to move
it to be maybe gold. Yeah, gold looks quite right. If you're wondering
about, you know, having some variation
or whatnot, for something like this where
it's like a raw metal look, it's going to be quite okay with the reflections
and everything because realistically lighting
this lighting setup will make a huge difference. This is more of a
spherical setup. So just by changing the light, you would have you see there's more reflection over
here and on the back, you'd have a little
bit less reflection, and you wouldn't even notice
that it's the same overlay. But if you want to,
you can always just, you know, select a
couple of these. Like so click G, move
it off to the side, select a couple of these,
move to the side, like so. Alternatively, you
select parts at random, what you could do, you
could Eber click L, and then have the
select linked UVs, and then you could just
grab somewhat random, like so and then click G and just offset
it just like that. Or alternatively,
what you can do is you can do selection. Click on select
random and just have some bit of
probability just like Tat scattered all
over the setup. Then you can click Control L
and select Linked all UVs. And then it will give you, well, the UV islands, you can just move it to
the side a little bit, and then you have your
variation just like that. And yeah, that's going
to be it for me. Thanks so much for watching, and I will be seeing
you in a bit.
36. Atlas UVs for Book Pages & Covers: Hello and welcome back everyone
to UV Mapping boot camp, Master and wrapping and
texturing in blender. In the last lesson,
we left ourselves off with this nice little
statue in the back. We're now going to continue on with our UV and wrapping process for the atlases and set
ourselves up with books. So it's going to
be rather simple. We're just going to
go ahead and grab all of these little books. I'm just going to
go ahead and drag it like this, hold control, drag it out, like so to make a selection just for the books so we can isolate them. And I reckon we can work
on all of them at once. We know that we have pages
over here on the side, which are going to
be these sections over here on the top, the front and the bottom, and the rest is going
to be for a cover. Well, let's go ahead
and sort this out. So for Sus, we're going to grab all of these
little books like so, go on to edit mode
and make a selection. So we're able to
encompass all of that page setup, just like that. And I might as well just start this book as well
in this book over here. So I'm just doing multiple
books at once at this point, which I think is reasonable. Let's make sure we don't
remove the selection. Making sure we're taking
on the edges, as well. And just like that, we are going to be able to grab all of them just like that. So a little bit of a tedious
process, but it's okay. Not too bad. There we go. All right. Now if we have
a selection like this, we can simply click U
Unwrap minimum stretch, and maybe minimum stretch
is not going to work here. Let's see what the issues are. Let's try conformal. There we go. That's
what we're looking for. I believe there are a couple
of issues though over here. So what is happening here? I believe I might have not
selected all of the edges. So that would have
been a problem. What's the best way of
sorting this? Well. To make sure we have
that same selection, I'm going to hit
Shift and he just to make sure that we still
have that same selection. Then I'm going to select
one of the edges like this next to it and see
what's happening over here. Okay, so this book is missing.
What else is missing? We are quickly
checking through them. And this part would also be missing. Let's see
where that would be. Alright. So just two
of them, I believe. Okay, so what I'm going to
do is I'm going to click Alt and H. AldenH there we go. Back to the selections,
going to re select this same
selection that we had, just like that, and check. I already forgot
which one it was. There we go, that
one. And something at the bottom over
on the other side. Over this one, I believe. Now we can go ahead and
use wrap conformal, and now they're going to
be nicely straight up. There we go. All right. Let's go ahead and simply
apply the material first. I'm going to go out
onto the object mode, going to find Atlas. Just like that, click Control
L and L link materials. That way we have those materials
nicely placed up for us. And now we can well,
overlay them first. Let's go ahead and
make use out of the UV squares to Sorry, no, UV squares, magic UV. I get confused with them a little bit sometimes.
But there we go. Once we get them overlapped, we can just simply do this magic trick and put
them on one another. So first things first, some parts might be
a little too long. And another thing
that can be the case, we could break this stuff a little we could break
it up a little bit, but let me have a
look if it's needed. Yeah, definitely needed. We need to have more pages than here. So the seams can be on the edges, and
that would help us out. And I think that's exactly
what we're going to do. So right now I'm
actually going to do unpacking real
quick. Back islands. So we'd get those
separated and just visually make sure we grab all of those edges at
the bottom, just like that. Some will be different
length and stuff, so we just need to pay attention
to what we're grabbing. And the way I'm discerning
what I'm grabbing is based on these bells over
here because on the corners, I know that there's
going to be bevels. And that way, by selecting
this type of settings, you can just move
them off to the side, and it's going to
be quite alright. And this is also going
to be part over here. I'm going to check real quick
where this part would be. So this is going to be
the entire top section, which is fair enough. But what about this
part? We already broken this down. That's right. And this part was different. So I'm already making
a bit of a mistake. Let me just go ahead and
click Control Z real quick and just kind
of do it manually and actually take this outside
of the images because it was just getting in the way of me visually seeing
what I'm doing. So I'm just going to go ahead and see each one of
them individually. So over here is okay. This one is going
to be the front, so that's going to be okay. This one is going to be
the up top at a bottom. And this is another part
and just doing it one by one while solding shift and seeing where
those bevels are. Identifying that kind of stuff
is sometimes pretty neat. And just doing it one by
one is going to be quite right because I have
phase selection on. I'm not worried about selecting the wrong faces because you only get selection when
you're dragging over the dot that's in the
middle of the face. So that's something
worth knowing. And the selection is right. This one is going
to be the front, and it was broken down. And we can just do
multiple selections over here like this, like
this, like this. And I think that's pretty
much it. Let's have a look. So I'm just making
sure that none of the front sections
are selected, which don't seem to be the case, but this part is not
selected for some reason. So let me see where
that would be. Oh, this one was this
part of the year. That's right. Eva way. Let's go ahead and just move
it out of the way. And that way, we can
just select all of these little parts and now use the magic UV to snap it to our
UV islands just like that. And in turn, we can now
have a really nice setup, which one more thing before that I forgot was
average island scale. Now with this, we have ourselves nice little book
setup, just like that. And if we want even more pages, we can do that for some
of them, for example, if we decide to do that, we can. I can select this one book over here and then use S
and X to expand it, in turn, making the amount of pages more, as you
can see over here. We can also squish it
down to make it seem like it's less and
that's pretty good. So for example, over here,
maybe we want this to be less, which is, you know, fair enough. That can be totally done, so I can just use S&X
to scale it inwards, maybe move to the
side a little bit for a different pattern,
and that's right. But honestly, all in
all, it's quite okay. This one over here is a little bit too thick
with the texture, so I'm just going to expand it just like that,
looking pretty good. And let's move some of the patterns out of
the way a little bit. Mm hmm. Move this like
this. Yeah, okay. That's good. We are done with the page insight,
at the very least. We can now work on the covers. So let's see what we can do
with the covers themselves. Let's go ahead and
select all of the books. Let's find the book selection, which should still
be within our UVs. If they're not part of it, we can just select this
part of the here for the book pages and
then click Control I, and that's going to
invert our selection. Oh, now we can just do
unwrap a minimum stretch. Let's see what it gives us.
Oh, my, that's not right. What is happening over here? Well, we're getting a mess. Let's try unwrap. Again, that's not quite. So we need to identify
what's happening. We can click Shift and H to make sure we
hide the pages out of the way and see what is going
on with this type of ***. So I'm going to
select the issues of one of the areas of issues, which is going to be just in a place where it's
overlapping and whatnot, going to see where that
would be, and there we go. Now we see an issue. So what is happening over here is that it has
additional topology. I'm going to try to
use normal selection, which we can totally do so. And that's going to give us
this selection on the side, which seems to have been
unwrapped properly. So what is happening with
this part over here? Why is it not
unwrapping properly? Let's try unwrapping
it on its own, and it's not giving
us any good results. Even though it should, I will now check
what it looks like with doo doo doo doo,
overlay, face orientation. Maybe there's some faces that
are being a little bit odd. I'm going to hit
Shift and H just to kind of identify
what is going on. So in theory, this should
be unwrapping on its own, and it should just flatten
it like a pancake. So why is it not doing
that? Maybe it does. Uh huh. So that's a culprit. All right. So we found ourselves a culprit, being this part over
here, that is, well, part of the mesh for
the inside of the book, which, you know, fair enough, we can have that but
in order to fix that, we'll need to split
that up somehow. And we already have
mark sharps set up. These sharps, by the way, are set up if we were to right
click shade Auto smooth. And when we have this, it creates the sharp
pieces for us. If we were to apply this, it should give us those blue
lines which are mark sharps. And I'm just now making
side of them too. Hopefully, there we go, make
a selection that's separate. The piece, and now hopefully
this entire section, we can that's not
going to work still. So what is happening right now? What is happening? Well,
this part and this part and this part are still having smaller issues
over here on the side. So it had smaller
parts inside of it, which is, fair enough. Go to turn off the
material for now so we can see what exactly the type
of selection I'm making. So middle part, left and right part on the
inside of the book. If we were to unwrap
it now and if we were to try to unwrap
this now, there we go. Perfect type of a
setup. All right. We got ourselves one
book unwrapped properly. We're now going to figure out what to do with
the rest of the books. So that's going to be for
the next lesson, though. Thank you so much for watching, and I'll be seeing you in a bit.
37. UV Stitching & Layout for Book Covers: Hello. Welcome back around
to UV mapping, bootcamp, Master and wrapping
and texturing blender. In the last lesson, we
identified a problem with the unwrapping with
this quick little setup. And it was basically the
issue with one of the UVs, one of the faces being
hidden in our end. So we're going to go
ahead and fix that. We're going to go ahead and
select all of the books, click AltnH and
make sure we have all of them prepared to
be fixed, basically. Let's go ahead and see
what we can do with it. Well, for Sarus, I'm just
going to go ahead and select all of the troublesome
parts just like that. Going to then hit shift in H to hide
everything out of the way. And this part, I believe, was, yeah, it was another
part that we can hide. Like, so and actually, my bad I clicked L, and it needed to be
clicked L with extension. There we go. Like so we can
hide this out of the way. Speaking of hiding
things out of the way to make our lives a
little bit easier, we can notice that some of the parts are, in fact, square, which we can find and just
simply hide it out of the way. So this part was part of the inside of
the mesh like this. So we can just hide
it out of the way, actually move it and hide
it out of the way, like so. And now we have all
the problematic parts. And this also is something
that we can hide. Before moving and then
hiding. Oh, there we go. So these parts, the
problematic parts, let's see what we
can do with them. All right, so we can
go ahead and click L, selecting using SHAP and seeing if we can make our lives
a little bit easier. I'm going to try
to click Control plus and I would select
upper section as well. I don't really want
this to happen. I'm going to actually do it manually in this
particular part. I don't think there
is a faster way, although there could
be a faster way. We could potentially create some seams that are
top and bottom and then just use
Limiter using seams. But for now though, I'm
just going to go ahead and select these parts
of the books like so. And we're going to select all the inside part using Mark Sharp parts just like that. And hopefully, we're getting
exactly what we want. This part over here,
it's okay as well. Alright, so now we can go ahead and click on rap Conformal. It's going to give us a dice
squarish type of setups. And yeah, that's good. We can go ahead now and
select all of the book parts. Oh, I found I'm a
little mistake. So this part over here was
not supposed to be here. This was supposed to be a
tiny little part in here. So I'm going to just move it
like this as a quick fix. Just rotate it as well, and making sure that we have some bit of
texture over here. Yep. Alright. So the way
I noticed, by the way, was because we had just simply sticking
out for this part. And this part actually over
here also has the same issue. So I'm just going to
go ahead and check. It seems like I
made some really, really silly mistakes
while selecting. I'm just going to make sure that these faces are now properly
selected just like that. And whilst I'm
repositioning my camera, making sure that
whilst holding shift, I'm making a selection
that wouldn't select anything else
within the mesh. So now only these
parts are selected, I can unwrap it real quick. Rotate it 90 degrees and move it onto the page setup,
just like that. I could stitch it potentially
back to the setup, but because it's
such a small detail, we don't always need
to fix it manually. We can just keep it as it is. And if we have a look at an
object with a material view, it will be visible,
actually, yeah. The reason it's visible in this particular part is because it does have larger pieces. So real quick, I'm just going to go ahead
and select it like this, then expand it like so and now now if you go to Object
mode, still visible. So we're going to, we're
going to fix that up. So what we're going to do now is I'm actually surprised
this is visible. You just need to
extend it like this. Sorry, use SX and just shrink on itself just to kind
of match the tiling. A little bit, so,
even more, actually. Like so. And now, it's going to be quite alright. Even more maybe. Yep,
that's quite right. So if we zoom in, sure, it might be quite visible. From this distance, it
starts being totally okay. Let's go back to
covers, shall we? All right. So we have
ourselves these books. Let's go back onto selection. And let's quickly fix
up this little issue. So I'm just making
quick selection, turning off the material, so we could actually see
what we're selecting. And oh, sorry, we already
had these selected. Just double checking.
Yep. We already had the selected Dasido. We need to make selection. So this part yeah, this part was
already fixed, okay? And just like that, we are able to make selection. A little tedious
process, perhaps, but using select
a link is totally okay for the type of
selection that we're doing. And just like that, we got
ourselves the backsides. So now, hopefully, if we
were to select at all, use An bapicfmal, we're going
to get this. There we go. Perfect. So now we can adjust it and tweak it to better fit whatever
we have over here. All right. So first
strings first, this isn't a perfect
type of setup. You can see a lot of
outside space and whatnot. This was just a quick
sketch up design, just to use it as a
sample so it wouldn't actually portray any
real books or whatnot. And yeah, let's go ahead and put all of our covers
onto this section. So what we're going to do is we're going to go
onto material view. I'm going to click
Alterng to go back onto the visibility and start
off with our first section. So what we can do now is
rotated by 90 degrees. But the front of the page, we can just select the
front like this and a selection like this or
back on front Eva way. And then just put it
onto one another. Like, so and we can scale it down until we fit
one of the books. So choose whichever
book you want. We can just fit it like so, and it's going to
be quite right. We're basically doing back
and front to be the same. But for a decorative purpose, you know, for the scene, it's
going to be quite alright. No one is going to be checking, you know, back in
front like this, especially when
they're covering each other up a little bit. It's
going to be quite right. Alternatively, we
could, for example, if we're having a darker front, we can also find an alternative that would have a
similar result, and we can apply that same
type of a look for the book. Then we have the backside. Let's go ahead and fix that. We are going to click L UVs
to select where that is. Going to hold control
to select our parts and just apply it to
the side like this. And just by applying it like so, clicking S Y to kind of maybe stretch it
out a little bit, we're going to get ourselves
this type of a look. Think it's looking quite right. We might want to have a text
or something over here, but honestly, not every book
needs that I don't think, so it's quite all right or we could just rotate it a little bit, make it
a little bit smaller. And if you see a text over here, just a simple blurry text, we could potentially
have it as part of it. I'm just making sure we are adjusting to a
reasonable amount. So this seems to be quite right. However, yeah, you know what? Visually, this is quite right. I'm a little bit worried about
this section being dark. So I will do is I will just
grab this upper section, like so, like GY, and just kind of pull it back. And although it
starts overlapping like this for
something like a book over here for small
resolution type of a prop, it's perfect. It's going to look
quite nicely, like so. Yeah, just manipulating
a little bit of text. And I just noticed this needs
to be rotated 90 or sorry, 180 degrees like
this, and I believe. Yeah, it was upside down. So now the text looks like
a little better, like so. The backside is covered. I don't really mind
if a so that's okay. And we have more
books to go through. So let's get ourselves
a second book, this little one over here. Let's go into Edit mode, select the parts to go through. So this 90 degrees. And I do want to actually check since there was a
mistake with the previous one. Last time, which is the top
and which is the bottom. So I'm just selecting
some paces with UV sync, clicking on a dot and seeing, this is the bottom,
so we might as well rotate it 180 degrees. Oh. 180 degrees, there we go. And this part is going
to be also bottom. So we also need to rotate
this 180 degrees like so, and I'm going to check over here as well, so this is the bottom, so we can just rotate it
180 degrees, there we go. To be the top, yep. All right. Now that we have the
top and the bottom and whatnot and this little
piece over here, which I don't think
we touched on the inside of the previous book. So real quick,
I'll just go back. Click L to select it based
on the UVs and just put it inside of the edge of the
book actually over here. So even though there
is some empty space, I'd like this to be like
soon darker and whatnot, and I think it looks
quite nicely like that. So, yeah, going
back to this book, let's go ahead and do
some manipulation. So we're going to grab
this, overlap it. Like, so it doesn't
need to be perfect, by the way, this type
of setup with the UVs. Especially when we are
overlapping on atlases, because it will look
quite off regardless. For example, this
book over here, even if we expand it, the book itself maybe is a
little bit wider. So, for example, we'd have to
widen this up and whatnot, but even so the edges might not still be
quite as perfect. For that, we could grab
this part over here, for example, just realign
it a little bit, like so. So yeah, we could do
some smaller tweaks, and I just realized by mistake. Let me just control. In
this particular part, we need to make a
selection like this. We need to take off
the UV sync selection, and now when we have
this selection like so, clicking GY is not going
to break our UV islands, which I have previously
done it before. And simply I'm just realigning
what I want to the setup. And just like that, we're going to get a real
nice book cover. Now what is going on
over here, though? This is missing a face. So that's not right. It
seems I have missed a face. Where is the face gone? Well, if something like
that ever happens to you, just, you know, select the
face, and we can either, you know, unwrap it again, using Eva Smart projection, conformal, unwrap, anything like that to get the faces back. And then we can just simply
go into Edge selection, select all of those
edges like this, right click and Stitch. So it stitches back up, and
how we can just reposition it like so and get
ourselves the book back. And I'm just checking if this also needs to be
moved, which does. That's fair enough.
Let's move it somewhere. Like so. And that's Hmm. We also have this on the side, which, yeah, we definitely
need to move it. So in this case, we left off this side as
a separate UV space, which is fair enough, but I am worried that this is this is looking a
little bit off. What is this? This is not right. Yeah, this is not right.
So what happened here was it wasn't
properly UVNwraped, so I'm just going to unwrap
it using non conformal. I guess this book
was left behind. I could either stitch
it like I shown you before, or in this case, o I can move it to a certain
section over on the side. So I'm just going to rotate it, maybe put it like this,
stretch it out a little bit. And now the name is going to
appear nicely on the setup. And I think stretching it out a little bit just
to get it nice text. And I think that's
looking pretty good. It also matches up with
the edges and whatnot. So yeah, we're going to continue on with this little
practice in the next lesson. Thank you so much for watching, and I will be seeing
you in a bit. M.
38. Final Atlas Tweaks for Book Variations: Hello. Hello, welcome back
everyone to UV mapping, Master wrapping and
texturing blender. In the last lesson,
we left off with some creative ways
for making use out of the atlas to add a little bit of text for the books to
the covers and whatnot. And now we're going
to continue on with the placement
of those UV tiles. So let's go ahead
and keep moving. We're going to
basically go through the same process now
for all of the books. And see what else
we can do with it. So let's go ahead and just, you know, unwrap
them a little bit. Break them up, that is, into
a little bit of islands. Let's see if they are
properly positioned. They are most likely not. Both of them need to be
rotated, and that's fine by me. Let's go ahead and use
our Z Z 180, not 108. Like so. And let's see what
we can do with this one. So in this time, in this case, this kind of book is, well, actually also quite covered. So I'm not going to bother about getting this book
a unique cover. I just want this to be nicely placed up for this type of look. I think that's going
to be quite alright. For the side, we can just simply put it as
the name of the book, which is over here. Like so it's a
little bit too big, so let's go ahead and just try to get that text
back just like that. Something a little bit. Like so small tweaks, and we're going to get
the text onto our book. So this is a nice little setup
front cover, side cover. That is pretty cool. Let's see. We have
this leftover. So this is what's keeping
the pages of the book, the backside, the binder. Let's go ahead,
and you know what? Let's make use out of a
more interesting color. But it's still, I think, bluish hue is going
to be quite right, so I'm just going to
move it over here, so to get this kind of result. And I think that's looking quite nice. This book on the side. So this is going
to have the front, the back both visible
quite heavily. So for that reason, we can
make use out of or setup two. Get more unique looking cover. I'm going to actually
right away and rotate them 180 degrees because I know for the fact that they're
going to be same. There we go. The upper
section is here. So this time, we're
just going to move the parts into the same section, and s not the same section
into different sections, yeah. So one section perhaps
could be over this one, like so, just like that. The upper section could be over somewhat of a
bluish hue book. Something like so. And now
it's going to look quite nice. Back to front quite right. If you'd have an atlas where you have some variation of front, some
variation of the back. And depending on the type
of color of the books, you'd be quite set with
that kind of setup. So the binder can be it
can be brownish tint, I think it's okay or
greenish tint, actually, there we go to match
the color of the book. It's quite right. Can make it
a little bit larger though. Here we go. Nice
little setup like so. And the back or the front, the text of the setup. Let's see what we can get. I think we can get this. Like so. And something
like that, perhaps. Yeah, you know what that
would look quite nice. It would look like a binder is a bit of a different color, but will make it basically look like it's just another part
of a design of the book. So I think that's quite right. I'm just going to widen this so the text
isn't stretched out. Make it a little bit smaller. And just like that, we got ourselves
yet another book, except this time, I
just realized that the same name is applied
over here on both sides. So put to do to do
what can we do? Well, we could move
it to another name, or we could, it's
moving to another name. We could pretend like, you know, it's like Book one, book two type of a setup, and it's like an Alfors name
or something of that sort. But I really, really
don't like that. So let's go ahead and
just quickly fix that. I'll just move this to
whenever green book that I find over here and just kind
of squish it quite a bit, so we would get this nice
type of idecal result, which I don't like, actually. I'm just going to move
it over here instead to the book that we had
yeah, that's much better. So mix and match with, like, atlases and stuff
is quite right. Checking whether
or not they look quite okay is reasonable. Also, we have a little bit more of leeway I'm just
letting you know, because these are like, low resolution type of setups. If this was like
a four K type of atlas instead of
2048 resolution, we'd have way more
need for accuracy. So maybe a text over here, you know, is overlapping a
little bit or something. We'd have to well, tweak the parameters
a little bit. But look right now, it's
looking pretty good. This over here, I'm going to go ahead and make
yet another piece. So right away, we
can just rotate it, 90 degrees, rotate it. Again, 90 degrees and we have the front and
the back of the book. And I just realized 180 like this is going
to be quite alright. I am not going to worry about having a duplicate
front and the back. I'm just going to
place it as it is, and it's right, and
it's not alright. I want to move it over here. I was thinking about
speeding this up. I changed my mind. I think that's
going to be better. So let's go and
move now this part, which is book binding onto onto maybe an orange book
binding would be quite nice. The book bindings themselves
are quite low topology, so I'm wondering if we can get a higher topology out of it. Honestly, it might be
might be quite right. We could also just, yeah, shift
it a little bit outwards, you know, so it would look
like a separate color. That would also be quite cool, up to you for just playing around with the UVs
with atlases and stuff. And finally, we have
this little piece, which is going to be over here. And let's rotate it, and let's put it as
a nice name or text. So I think I'll just
put it over here. And just like that. We are getting some
nice looking books. We still have the outside, so let's see if we can speed this process up because it's getting a little tedious for me. I'll be honest, probably
for you as well. So let's see if we
can speed it up. So I'm picking all
books at the same time and just grabbing all of
the pieces like this. To do to do this part
needs to be actually, I'm just moving it
up to the side. And did I make a
mistake over here? I did make a mistake.
Going to go ahead and click Control Z, like some. So what's happening
here is making sure, well, slightly moving them apart because there was
no gap in between. It was hard for me
to make selections, and now I can make
selections like this with ease not making sure that I'm not selecting
our island accident just up and down, up and down. So we can now separate
the front and the backs from the
book binder part, the front where the text goes. We can click G, move
it out over the side. We can click, R 90 will work. And then I believe
all of this is the bottom parts, correct? Bottom bottom bottom, I'm just checking visually if you're not seeing over here. So visually, I'm just
seeing them highlighted whilst I'm selecting them. So now I know that all of these are actually facing upside down. So 180 like this will now
mean that this is the top. Yep, perfect. All right, so now we can, well,
start overlapping them. And to make my life easier, I'm just going to go ahead and do this for
every single book, just like and, like, some. And now we can just
quickly do what two free and be done with it. Yeah, let's do that. So
this book, pretty good. Nice book. This book let's
move it onto a number one. Feel free to, you know, mix
and match them front and the back if you so choose to. That would be quite cool. I think it gives nice
variation for the books. Feel free to create your
own design, you know, for the book covers and whatnot and use it to just apply
it as a separate material. That would also be pretty cool. Give a way. Let's go ahead and
finalize these setups. So let's go ahead
and for this book, I'm going to put it
over here probably. There we go. Nice
little book over here. And now we got these
parts over here. So I don't want to bower
too much with them. I'm going to overlap them with our Trustee UV manipulator, snapping it to
part and moving it to just some random binder looking boring type of
setup, maybe even white. Since it's binding the pages, it would be totally reasonable, although it's a little too bright, it is a
little too bright. I don't like this being as
a binder. Such a white. Contrast. So I am going
to put it as gray. Yeah, I will put it as gray. I'll squish it up a little
bit, put out, like so, and we got ourselves
some black binders, which is pretty cool, I think. And now we got to work with, well, these parts over here, let's go ahead and
just rotate them and start speeding
through because we can. Boom, boom, boom, I'm just going to pick some books at random. So this one has blue cover. I'd like to have, well, maybe blue text over here. Like so. And that's quite right. Is it right? It's not. I do want just to be
a little bit wider. Like this, yeah,
that's quite alright. Although this part I don't like I don't like
this part, honestly. And to fix that, what I will do is
just grab this part. No. This part over here. Just move it up a little bit, or you know what? I'll just move it
down even more. So it would look even more
intentional like this. Yeah, it looks quite
cool, part of the design. Very nice. Another site, another page. Let's see,
let's see, let's see. This one over here, can be can be res or whatever the
thing is saying over here. That's quite alright. Expanded a little bit to squish the text. There we go.
Something like this. Perfect. Now just realize this part, what
happened to this part? Uh oh, I ended up. Did I end up with
the text? I did. I'm going to go ahead and
select this part over here. Click G. Oh, no, no, no, no, no. Let's do it like
that. There we go. So yeah, the text was
not visible over here. That was a mistake on my part. Now we can move on to, well, finalizing
the book covers, making sure the fronts are nicely manipulated
with the UVs, making sure we're adding
that extra bit of detail. And you know what? We can even keep these
vertical as well. No one says we can't. So, for example,
over here, we have text on top and the bottom. Some of the book
designs are like that, and that would be really cool. Although here it's a brown book. It's not going to be
quite as fitting, so maybe even, you know, move it over here and use Sx and just squish it like this. And that way, we need to also rotate it 180 degrees like so. And that way, we are able
to get the entire text. Kind of squished into
the section over here. It's going to look like
it's part of the book, and I think that's
actually pretty cool. It is looking quite nice. So that's another way to
manipulate this part. Finally, we got this
little piece over here. Let's see what we
can do with it, and we just realize
there is leftover UV, which we're going to look
at it in just a little bit. I would like maybe to
have yeah, you know what? I would like to have this.
This part over here. I think it's going
to look quite nice. We have some nice
text over here. We need to rotate it, though, to make sure that the text
is nicely on the top. And, yeah, that's
I think that's, you know, that's looking
pretty cool, pretty nice. So we are I believe
we are finished unless there was
this part over here. What is this part? So
I'm just going to check. Oh, it is the inside.
Of the setting. And I for some reason, just slipped my mind. Let's go ahead and apply it over here onto somewhere
like a side over here. It's going to be quite alright. And I forgot about the rest of the
books actually with that inside piece of the cover. I'm just seeing the mistake now. So let's go ahead and make sure we hide
them out of the way. We're going to
overlap it like so, because it's such
a small detail, we can simply put it somewhere
in our book uh, parts. I'd prefer to have it like
somewhere like a bit of a dark edge like this. And now we're going
to have a nice little dark gradient for
the inside parts. Even if it's a light
book, I think it's quite alright to
have it like so. And let's have a look how it
looks like within the scene. So there you go. We're going to have
some really nice books. So that's going to be
it from this video. I really hope you enjoyed
it in regards to how we can manipulate the book visuals
to edit for the front cover, for the side cover, and whatnot. Out of simple Atlas, we can have so many variations. Thank you so much
for watching, and I will be seeing you in a bit.
39. UVs for Pots, Plants & Organic Elements: He. Hello. Hello, welcome back
everyone to wing Mapping, boot camp, master and wrapping, and texturing and blender. In the last lesson, we
left ourselves off with this nicely finalized
type of a shelf, but now we're going to continue moving on to this plant
section over here. So to start off, let's
go ahead and just work on the pot part of
this plant setup. We're going to make use out
of one of the textures, and I think we can just use out of this darker
gray over here. This one will be a nice
little marble setup. Let's go ahead and do that. Let's select the mesh, and now you'll notice that this, hey, it looks a
little bit different. Well, this mesh over here is
actually a decimated mesh. So sometimes from pred
scans and whatnot, you'd get this type of setup. And although it's not
perfectly type of a setup for an optimized use, it's still usable overall. But that being said, it is a
little bit harder to unwrap. So I'm going to
isolate this plant or plant like so and start
working with the setup. So for Sas, we're going
to check around the mesh, and there is actually a little
bit of a hole over here. So bottom can be either
placed and hidden, like so, or it can be just
deleted completely because it's part
of the same plant. I know that it's not
going to be tilted or anything like that
because it would look really wrong being like that unless the pot would
be a separate mesh. But to save up some um space on Vs or just to make our
lives a little bit easier. It's okay to just look for
things to delete if needed. So maybe over here if we select this pot and hit Shift and H, we'll see maybe some parts underneath the dirt,
which is not the case. But if there was some parts underneath the dirt, we
could easily delete that. Right now, there
is nothing here. And actually, this read
is getting in my way now, so I'm just going to go ahead and hide it out of
our way like so. Alright, so we are going to unwrap this as a
cylinder, actually. But we're only going to do it up until this point over here. The reason being is that if we try to unwrap it all the way, it could work, but I try to avoid such sharp corners
with this corner over here. This entire part piece, if I wish to change
the material is, well, a little more
than 90 degrees. And then it'll start
warping the entire setup. So I don't really like
having that type of setup. Let's not think about that
just yet and select one piece, then go all the way
to the bottom and select like a piece over
here using control, and that's going to give
us a shortest path. Now, we need to
consider whether or not this setup is going
to work for us. So if we want a bit of
a breakage and whatnot, we could potentially use it with our neutral noise of a texture if I wish to apply atlas like so with the neutral
noise of a texture like this, it's not going to be
as visible for a seam, but even so when I'm working with a decimated type of meshes, one way to avoid this entire setup would
be to use bisect. And if I was to click seven, select it all, use mesh. Bisect and just drag it across, so I can create myself
additional seams, and those additional
seams would help me to break up this entire part. Now, on the other hand, I might not need it
on this up side, so I'm just going to go
ahead and deselect it. Or alternatively, what
we could do is we could simply select this
edge only, this side, then use mesh bisect and when we're using it with
the selection, it's just going to give
us a much nicer way to go for only one side. So with that said,
let's go ahead and have the selection mark seam and we can now
unwrap it actually. We're going to use a shell
setup on the inside. But just having a look at the seam as the way it looks
like right now, there we go. A nice little waist pars. And yeah, this part over here. We can go ahead and
make a quick selection. If I was to hold Alt and just select this
entire edge loop, seems like it will go
all the way around. Now I can click
plus Control plus and click free to make sure
we are in a phase election. This will make sure that gives
us a nice phase selection, and then we can keep
on pressing Control plus until we get
to a certain point. And maybe once more. Even once more, there we go. So this type of selection
is going to be good for us. We can go ahead and click two
to go on to edge selection, then go on to well,
select loops, boundary loops and click Mark Sam It's going to
market at the bottom. I don't really care
about the bottom. Ivo way, it's going to be not relevant
realistically for us. Let's go ahead and select
this based on a Sam. Click U and wrap
minimum stretch, and now make use out of it, put it nice like so. And this is going to be unwrapped with minimum
stretch as well, to get us a nice little shape. Alright. As for the dirt, let's click Old and H,
select this using L, and we can just unwrap it or even Smart Project,
if a wave will work, honestly, because
it's a flat surface, and we can just
place it over here. Nothing too much. It's already looking
pretty nice for us. Now, in terms of
the plant setup, we have over here to
make it easier for us, just a simple green
type of a grid, not a grid, just a
directional noise. But with plants, with atlases, sometimes you'd get partially
transparent type of setups. Those would be a
little more complex. You'd have some well cut
outs of leaves and whatnot, which you could set
up your own shapes of well, the foliage. In here, though, we can
simply select all of these. And I'm just looking at leaves. I believe these leaves are
separate. Yep, they are. Which means that we can make our lives a
little bit easier. And what I mean by easier
is if I was just to select this bottom section like
so, yep, that's good. We can then click Control plus
or actually hold it even. I'm going to hold Shift and
select this part as well. Click Control plus,
hold it until it grows this entire
stem to be selected. I'm then going to move
it off to the side like just these UVs, basically. Like so just a reminder, though, they were previously unwrapped
with project from view. That's why I'm seeing those UVs. If you're not seeing them, make sure you do that beforehand. Now, these leaves are
going to be simple planes, which we can go
ahead and select. And I'm seeing there is
actually something else additionally over
here at the bottom. So what is over here? So there is a small stem
which is part of it. So another reason why I'm doing project
from view sometimes, because it allows me to see what I don't usually
see otherwise. So for example, the trangle
over here, that's not needed. We can go ahead and delete it. This part over here is also not even going to be
visible, I believe. So we can also delete it. Delete vases, just like that, and we got ourselves set up. Now, going back to the leaves, let's go ahead and
select those leaves. Let's unwrap using I think conformal will work
quite well. It does. And now we use our
magic squares. Yeah, magic squares
and snap the point. So it overlaps everything. Then we can move it off on
to the leaf, just like that. And to make it a
little bit nicer, I'm going to go ahead and
just click Alt Sorry, shift in Always get
those mixed up. Once we have it
like so, we can go ahead and just click
Double click A. The select select
random. There we go. Small percentage,
somewhere on the leaf. 0.005, perhaps that
will be enough. Yep, seems like it's enough. We can then move it
like so double click A and do the same thing a
couple more times, actually. L so move off to the side
and select random, like so. And oh, actually, let's
change up the seed as well. Gives us a bit of that extra
randomness. There we go. And yeah, just moving
it around a little bit. That should be enough for
variation. Just like that. Now we have ourselves if we
go out of the hiding mode, the hiding mode, we have
the stems over here. Now, with these stems, we could do it as we always
do and unwrap it as cylinder. But because these are
such pin type of setups, what I tend to do sometimes is just simply overlay it as is. Again, this is with
the project view. So project from you. I think I'm actually going to
reposition my camera to be sideways a little bit
and project from you. And now I'm going to place
it on the wood part like, that's going to give us just a little bit
of that texture. And that's actually
it for the plant. So if we have a look
within the scene now, by clicking the out of
isolation mode, there we go. We got ourselves a nice, luscious little plant
over on the side. So that's pretty cool. Alright. Let's move
on to the piano. We're going to continue on
with this in the next lesson. Thank you so much for watching, and I will be seeing
you in a bit.
40. Smart UV Flow on Piano Exteriors: Hello and, welcome back everyone
to UV Mapping boot camp, Master and wrapping and
texturing in Blender. And now we are finally ready
to do our piano unwrapping. Let's make sure we
have a look at it at the beauty of it and elegance
before we start unwrapping. And right away,
we're going to apply ourselves atlas
material onto it. We're just going to look
a little bit messy, but that's okay because now
we're going to start doing some texturing using
the UV appliance. So what we're going
to do is yeah, we're going to just
simply start with the overall shell and
work our way inwards. Okay. So let's go ahead
and select free, click L and see what
we're working with. We're going to base our
delimeter based on normal and then see which parts are
well separate pieces. This part is a separate piece. This is quite a nice
little flat surface. Let's go ahead and
make use out of our UV and wrapping for
Smart UV project. Let's use it like so, and we have the upper section
and the bottom section. All of it is nicely set up. The only thing now
left is the sides. And the sides can be just, well, marked UV seems. Actually, it does seem to
have the seams already. I'm not sure if I place it by accident during the
practice or if I just add it right off the start
within the resource pack. Either way, if you
notice like that, you can just clear the seams and we can have a fresh start. And for this part, well, let's go ahead and hide these flat surfaces out of the way so it wouldn't
get in our way. Now, select edges. So we're going to select
one edge over here. We're going to select
another edge over here, bolding old select and this
part would be way too long, so we're going to
have to divide it. Folding Alt and Shift. I'm clicking over here. And just to split
this entire length, so from here to this corner, we're going to just place
it somewhere in the middle, so it's a small
thin little piece. So even though it's
a smooth surface, it's okay to just mark seams in such areas because what
we're trying to do here is simply we are trying to unwrap it
using minimum stretch. Oh, not minimum stretch,
uniform conformal. Somethin is not right. What
is happening over here? Well, this part for some
reason, decided to stay. Why? I don't know. What's happening over here? Aha. That's a culprit. It was not properly unwrapped
because this part over here had its own
unique little setup. Okay, so I'm going to
hold Alt and remove the seam and select one
that's a little bit closer, like so, so it would just
touch the edge like this. Mark seam and it's probably the same thing
on this end as well. If I was to guess going to just select
it and use ShiftinL. There we go. And let's see. I'm going to also select the
edge over here and click the dot button so it refocuses so we can get this
close up shot. That way, we have a little
bit more control over here. Alright, now, hopefully we
can go ahead and select it. Click on wrap and minimum
stretch, perhaps. I a way, I think
it would work the same way because they're
just lengthy pieces. And we're going to use red
wood for this because I think red wood would look very
nice for this piano. I was considering
to make it like a whitish marble type of a look, which would have been quite
nicely set up as well. No marblesh. This is more like painted type of a material. If we have a look at it
a little bit closer. But Ava way, it would
work quite well. Ways, let's click AltnH. Find ourselves these
little pieces over here, overlap it one with another. Doesn't matter because it's
upper and the lower part. So from the same angle, it's never going to be
visible both sides. And for that reason, no one is ever going to detect pattern. So even if it's completely overlapped, no one would notice. All right. That is
looking quite nicely. So next up is going to
be well, let's see. Let's click L, and we're going to unwrap all of
this rounder part. So let's click Alt and
H or Shift and Again, I keep on missing that. I'm not sure why. I'm also going to hide this out
of the way because it's just been bothering
me a little bit, like so. Now, let's go ahead and start the unwrapping
process for this. I think for this particular
part, let's have a look. Let's have a look. Actually,
it'll work quite well. So I'm going to hold Alt,
select it like this. It'll go all the way
around the loop because it's a bevel selection,
which is fair enough. We can mark SM and hopefully do the same
for the bottom part. Yep, goes all the way around. Mark SM Now let's see what
else we're working with. So this part over here, perhaps. Nope, doesn't want to select it. That's okay. We can always
just select it up to this. Nope. And that's okay. We can also just do a
selection like this. I'm just constantly looking for ways to make my
life easier with selections when unwrapping
and setting up these pieces. So now I simply went into C free mode and position my camera so it doesn't select
this out side by the way, just to get this
type of selection. I'm going to click G and
just move it out of the way. I'm not even going to
be bowed by marking SM. I don't need to in
this particular case, because I feel confident enough in whatever I'm doing right now, which is not much,
but it's something. And this is the part
I start regretting why I've not done the markms because I don't
know where it ended. I believe it ended
closer to this part because the selection
I did was massive. So I'm just going to make sure these little parts
are also selected. That's looking good
except for this part. I don't like this
little part. Let me make sure to deselect
it, and there we go. We click G, move it off
to the side, like so. So now if I select
this side on the UV, it's going to select
them both completely, just like that.
Perfect. Really nice. That's one side done. Let's go to the other side. Let's see. Probably the same
way, probably the same way. Old Z, making sure we're
getting those dots, CFR mode, and selecting
it just like that. Then selecting whatever
is not needed. In this case, also, you might
try using select Lasso, which would allow you to, well, make some organic, more
organic type of selection. Personally, though,
box selection is my way to go, my jam. Totally, I'm going to
just use it as is. And move on to the small piece. So this small piece over here. Actually, you know what? What we can do is just
simply select these pieces, click H, and hide
it out of the way. I'm also going to
select by clicking L, select the SM if I can, there we go and just
move it out of the way. Click H to hide it.
And there we go. Mm hmm. There was a bit of a different
selection. That's okay. So I'm just hiding
the piece out of the way when I feel like it because it simplifies the mesh and shows me the rest of
the progress that's needed. This part at the bottom
should have been also hah. Okay. So this part over
here is a separate set. So that's good to know because
we can make a selection. So mark SM. And now just use L with
the Sam delimiter. G, move it out on the side. And this part, this part. This part can probably
be selected like this. I'm hoping it what is
happening over here? Is it selecting? Is
it not selecting? It seems like it is selecting, but because of the bowels, the visibility was quite
a bit hard to see. So holding Alt and Shift, I'm just selecting
this upper section. By the way, the way the
selections work is, if you hold Alt and Shift or talking about just
selections in general, it's going to select
closest to the cursor. So you don't have to be
exactly on the line. You can be a little bit
to the right of the line, and then it'll select the
closest to the cursor. So that way I'm
making sure that it just selects this outer piece, so and it's going to give me
this nice little selection. Is it a good selection, though? That's an oral question because I noticed there are some issues. Yep. I don't like these issues. That's okay, though,
because we can click old Z and just
remove it like so. And on our side as well, Old Z, remove it. So we have these edge
loops at the bottom, which we can just
remove it like so. When it comes to the
selection with edges, now, in terms of this selection,
I can, for example, deselect this little
piece over here, but it's not going to diselect this longer part over here. And the reason being
is that if I was to basically cover the
entire diselection, it's then going to
diselect it like so. So holding control, deselecting
the part over here, is going to make
sure that it dis selects everything horizontally, but not vertically, unless, of course, there's nothing
to diselect in that case, anything it touches,
it's going to diselect. So just something interesting, bit of a mechanic in blender. So, yeah, let's go ahead
and continue on with this little bit of abomination at this point,
honestly. Let's see. We have this part.
What is this part? This part is separate. That's okay, though. We
are still good to go. We can stitch it back in. I am just seeing if everything else is properly unwrapped. So these I'm hiding. And, yeah, now we are
basically left with, like, just two dimensional
type of apiece, which I'm going to just
make a seam in the middle vertically just like
that to make sure we're fitting within
this little square. Because, again, length sometimes is the only limiting factor. So now I can go ahead and
just select all of it, so including this little square, by the way, and using
minimum stretch. Hopefully, it'll give
us no, I don't like it. Conformal. There we go. A little bit better. What
is this little piece? Have I missed it? I did. Uh huh. Okay, not to worry. I'm just going to move
it off to the side, because that's a little bit of a different way to set it up. I'm checking now if
everything is right, and this part should not
be like that or should. It's huh. So I selected like so. There is a piece that is connecting them.
What could it be? What could it be? Aha.
I missed this part. Alrighty. That's not a problem. Let's go ahead and just
select the using Control, the News Control plus
because everything else is hidden for the
top and the bottom. And then I can just click G
to move it out of the way, like so and then unwrap
these parts conformal. There we go. That's
what we're looking for. I'm going to also use Magic QV, snap to point to just overlay everything and
just make a little bit smaller until we start fitting everything into this nice
little square, just like that. So we're almost done. We just need to unwrap Oh, we just need to unwrap
the other little parts. Yep, I'm going to now click
AltnH and see what we have, which we have quite a bit. We have all of these
little chunky parts to do. I'm checking my time to
see if we have time. And honestly, I don't
want to rush these parts. I think we're going to continue on with this in the next lesson. Thank you so much for watching, and I will be seeing
you in a bit.
41. Curves & Small Part UVs for Piano Details: Hello, and welcome back
everyone to UV Mapping, boot camp, mass and wrapping
and texturing in Blender. In the last lesson, we left ourselves off with
well, the piano. We're going to continue on with the texture process for it. In this case, we're
going to, well, make sure we finalize
this wrapping over here. And I noticed that there is this little section
over here at the top, which I would like to, well make sure it's
part of something. So I'm just going
to go ahead and select the edge and going to stitch it onto just
another side like this. Now we have all of these parts, and this part looks quite small, but it's acceptable because it's this little
piece over a year. And what about
this little piece? This little piece is
going to be over here. All right, seems good to me. Let's go ahead and select. Oh, one more thing I'm missing. Did I miss something over here? I did. Uh huh. Alright. Not a problem. We can go ahead and just stitch
it back into this. I'm not sure how I missed it. Probably because of the
selection. That's okay. Go to well, select it on the
edges and use the stitching. There we go. Now it's going to be part of
the setup. All right. So right away, what
I will do is I will simply unwrap
it using conformal, see what we're going
to be able to get, and I will just do it for
the top and the bottom. And that's going to make sure we don't get this as one piece, because if we were to
unwrap some of the pieces, some of them will end up
being well the same spot. So I don't want this to happen. I just want to make sure we
are getting something out. In terms of these UV chunks. And the reason I'm taking
an extra care with these particular ones
is because, well, they are curved and we want to make sure that they
are following UV, well, not UV or wood over here. So this part, let's
see what this is. It's the bottom, fair enough. Yep. Okay. So we can
use Altny like this, let's see what it gets us. Seems like it gives
us a nice setup, except for this part. What is this part
over here? Uh huh. So this part gets
unwrapped sideways, and that's fair enough. So I'm trying to think
on what would be the best way of
sorting this out. Honestly, The easiest thing would be to just lock
one position and just simply unwrap the whole thing. But I will continue using this and just move
this sideways. Then grab the selection
over here, stitch it, and stitch Yep, like so. Now we got ourselves nice
little setup over here. The same thing goes over here. So I'm just going to remove
these pieces like so, and just ditch this part. And although some of the
pieces are not going to be connected and
some of them are a little bit going
to be distorted, it's such a small piece, you are definitely not going
to be able to see it. So if I was to show it to you
and just put it over here, you will get this
type of a result. Real nice type of
piece for wood. And here, what happened here? Well, I believe I moved
some of the edges, so I'm just going to
re UV and wrap it again and move it
up to the side. Because I was in
the edge selection. I made some little
bit of a mistake. That's okay, though We have ourselves nice setup right now. Now, in terms of this piece, we can probably make
it follow the length. So with this selection, I'm just going to hold Shift, double tap on one of the edges and use follow active
quads unwrap it. Hopefully, that
will do the trick, which it does,
except these parts. Why are these parts
split over here? And I am not so sure, actually. So I will just stitch it
back to its piece. Like so. Now we've got ourselves
a nice straight piece, which we can, well, move it to the side. Again, I'm making sure that it's face selection and just
placing it like so. In this place. I believe these are
the only curved areas, so we're not going
to have too much trouble later down the line. Let's just make sure we
place all of the pieces in the right position and making sure it has somewhat of the same type
of the sizing as well. So this piece, for
example, will be smaller. Just like that.
Looking pretty good. And there is one more piece, which I'm missing
somewhere, there we go. Oh, those massive
pieces over here. I'm going to unwrap it conformal and just place them out like so. To get this a result. All in all looking
good except for the top part, which
is fair enough. We can go ahead and fix it. We're going to go ahead
and click L to select it. Hold Shift, double click to
make an active selection. Then right click and right click and not right click U
four follow active quads, length average to
get this result. And this piece though,
yeah, it is too long, particular because
it's the upper part, we definitely want to make sure that it gets nicely placed. For most of the resolution. So I'm just going to do
it something like this. Yeah, to get a nice bit
of texture for the wood. It's looking pretty
good. All right. Let's move on to
the next section. So we have some of the
parts over here with the piano. Can we sort this out? Of course, we can?
We're going to click LLL and just move it out
to the side a little bit, see what else we're
missing because I am seeing that we are
missing some parts. So this part at the bottom, and I'm going to click
on the dot to make sure that we refocus our mesh so we get easier ways
to zoom in and out. And I'm seeing that
we have some of the little piece over here, going to click Old Z
to just select it, making sure that we're
moving it out a little bit, just to see what
we're dealing with. And we're dealing
with these parts. Okay, so Alright. So this part over here, we can see that it is a
separate mesh, actually, or it is not, but for some reason, over here, it was being separate,
which is fair enough. We can get back to
that. For now, though, let's grab the
nuts and let's put them on the unwrap conformal, nice little bit of geometry and shrink them down until we
get this type of piece, like s and just put
it on a black setup over here with a
little bit of texture, like so, get this result. Nice little black spots.
Very nice. Alright. Now over here, we can grab them like so and just
checking where they are. You over here, I'm going to start with this part over here. Let's see what we can
do. I'm going to click Shift and H just to see
if the backside is Yep, it's still there or is it? I think I will just use space
orientation just to see. Yeah, partially is partially isn't don't think
this is visible. I'm going to double
check. No, it's not. So I'm not sure why
this part is here. We can might as well
just delete it. Just double checking for,
well, anything additional. And once we have it like so, we can just cut it in half,
honestly, the cylinder. So this part over here would be a separate piece,
which is fair enough. We can just hold Alt and it
would go all the way around. But it does in this case. Mm hmm, mm hm. Alright, to make my life way easier to not worry
about the topology, I'm going to hold
Alt and just click on the faces going
all the way around. Now this time I know it
goes all the way around. Hold shift and select
our side as well. This time, it doesn't want
to go all the way around. So that's kind of
annoying, but oh, well, let's go ahead and just hold tunnel and part,
and there we go. Now we got this outer
and inner selection. Moving to click two going to
go on the selection loops, boundary loops and Mark Sam. That way, I can make a
selection over here, just on an edge, like so make an over
selection over here. And just like that, we're
going to Mark Sam this way, we essentially create ourselves a little doughnut going all the way around which we unwrap. And the flat surface
is also going to be well with seams
nicely unwrapped. So if we were to use
minimum stretch, we're going to get this result, which I think is quite
alright, except what? What is happening over
here. This is not right. So I think I'll try it again. Maybe it's not enough iterations or maybe it's too
much iterations. Mmm hmm. This part just doesn't want to
work at the very end, which I am not sure
why, to be honest. So what I will do is I'll try a different method
for unwrapping, and there we go,
much, much better. That's exactly what we're
looking for. Alright, perfect. Let's go ahead and just move
this on to the bronze part. I think a bronze
holster is going to look quite nice or even
a golden one, actually. Now a golden one doesn't
look quite as nice. Broonze looks perfect. Alrighty. So we got ourselves
the cylinder over here. I'm going to click L just
to make sure that these are the only parts that are here
going to hit Shift and H, like so, and optimize
the mesh a little bit. Well shift selected
over here on the top. So just deleting the upper
lower parts, just like that. And they have some
parts over here. Which is fair enough. It can be kept as is, or we could just do a little bit more of a
cheeky way and just use SmartTV Project as a
starting point and then kind of optimize it afterwards, all
the little parts. Yeah, that's exactly
what we're going to do. So right now, I just
grab the setup, make sure we get these
lengthier tubes over here, and we can just turn them into L into a nice
cylindrical projection. That way we have best of
both worlds quick on wrap, and the parts small over
here are going to be taken care of by UVN wrapping
because as an atlas, we don't really need
too much optimize it, and we still want to grain the grangins to be reasonably
hidden with the UVs. All the artifacts and whatnot. So what I'm saying here is
that we're going to turn these longer cylinders into
more reasonable setups. Let's go ahead and go
on to edge selection, loops, boundary loops, Markem, and now we can just simply believe select one
part over on one end, another part over
on another end. Like, so Markem. And now, hopefully, if we were to
select all of these parts, unwrap conformal,
it's going to give us a real nice setup which we
can place it in a bronze. I think it's going
to be quite right. Or if it's a wooden stick, maybe it would be
quite nice, as well. In this case, I'm
just testing it out, seeing if it would work or not. So I think it definitely
should be a bronze. Or we can make it a
bit smaller as well. This black piece should still have a little bit of a
resolution enough for this part, which I think is fair enough. And for these parts,
we can just move them onto the bronze section,
and there we go. Nice little setup like so. This part over here, we need
it to be also unwrapped. So it's just a cube with a
hole, which is fair enough. We can go ahead and
just click Shift and H, click dot to make
sure we focus on it and use quick UV unwrap. And if we want it
to be extra fancy, we find the hole over here, like so, and just
stitch these parts. So I'm going to stitch it I believe it's not going
to work because yeah, there is a novel part over here. So I might as well
just select it, like, so I was trying to be a little
bit fancier. But no need. We can just, oh, my right,
right, right, right. There is no Sam, so I'm going to mark Sam from
upperside actually. Like, so then click L on U Vs. Click free Face Selection, unbrab conformal,
and there we go. Nice and easy, little
simple type setup. Let's put it in the
bronze section like so to get nice bit
of a resolution. So that's looking quite nice.
It can be even smaller. Doesn't really
matter in this case. I think it's looking
pretty good. Although I don't like
how this is black, actually, I will change it. Sorry about that. Let me go
ahead and click Old and H, and I will change this
little part over here. You'll be on a white
section, actually. Or even on a gray section. Yeah, gray section
works quite nicely. So just me testing
out certain ideas. Feel free to, you know, it's a decorative stick, bit of metallic
parts and whatnot. But, you know, feel free
to play around with it. Putting it maybe as wooden, even red would work quite
nicely as part of the setup. White would also work, or
even golden. Golden is cool. It's quite nice. Little piece. But I don't think
we need it. I think that leaving it like
this is enough. We are running out of
time, so we are going to continue on with this
in the next lesson. Thanks so much for watching, and I will be seeing
you in a bit. Oh.
42. UV Mirroring Techniques on Piano Legs: Hello, welcome back
everyone to UV mapping, boot camp, mass on wrapping
and texturing in blender. In the last lesson, we
set ourselves up with a nice little decor
support for the piano top. And now we're going
to continue on delving into the
piano section itself. We still have some bit of parts, and I think we can just move
on to the legs, honestly. I think it's going
to be a nice and simple type of a setup. Let's go ahead and just grab it and see what we are
dealing with here. So it is made out of multiple little chunks of
geometry, which is fair enough. I think we're going to keep
it as it is, actually, and just simply do
a quick unwrap. Yeah. Sounds good. So what we're going to do
now is we are going to use, I think, magic UV yeah, that sounds like a
reasonable plan. Let's go ahead and just select this piece Philly Control
plus to just grab it. We're going to
separate it for now, and we're going to isolate it. So we're working
with just one leg, like so, we're going to just work with
multiple shapes at once. So I'm going to select this cubic setup and this
cubic setup over here, just use SmartVPject, just identifying the
shapes and whatnot. This part is fine. This part is not, and
I'm trying to select it. So this part just
needs to be split off. So is this part that way
when we are well packing, we can get straight pieces
like this. Awesome. So we can just put it off a little bit off to
the side for now. Let's just make sure
it's not grass. For some reason, I
don't really like that. This part over here, it seems like we've not
selected the entire piece, so I'm going to click Alt and H. Or go out of isolation mode and see
what's happening over here. And yeah, I made a little bit of a mistake. I'm
going to fix that. Just a quick selection, Control Plus, select it all, separate by selection,
select these pieces, and I'm going to
quickly fix that up. Luckily, none of the
previous unwrapping we did made much
of a difference. So now we have,
well, two pieces. This is the mistake
I did. That's okay. I'm going to just rejoin them using Control J, going into it, clicking and merge by distance with a very low
vertic out this way, we have this as one piece again. No, nothing much, but
it's still good to do. And now we can just go ahead
and see what's going on. So we don't have a good
selection over here. Very unfortunate for us. Can we make our lives a little bit easier?
I believe we can. Well, we can go ahead and just select these
little chunks over, so click Shift and H. Click seven, top down view, click Old Z and try
to make a selection. This time we're going
to use Lasso for sure because we're
going to start our selection from
here and then drag it all the way around
until we get this radius, and we can use Spacepar
to re select it. And just like that, we get
this type of selection, which I think going to
work quite well for us. Yep. That is good for us. I'm going to I don't like this. I'm going to just simply try to remove pieces from the middle. See how that goes. Just to make my life a
little bit easier. I think that's a
reasonable amount. Let's go ahead and
just let it like so, and we cannot let it. So I'm going to click Control Z and just keep it as
this. It's okay. We can go ahead and just simply use selection loops,
boundary loops. We're getting something
like this, Markem, and it's going to be okay, even if we have those little parts. The reason it's going to
be okay is because, well, I'm just planning to use some
black surface over here, so no little pattern, no
pattern or anything like that. We can just simply
do minimum stretch, and that's going to give
us exactly what we need. With the point of just
making sure that we are overlapping everything
in one section, so going to give us
a nice little setup. That's good. Let's
go ahead and move on to the bottom pieces over here. So this part, we can just
with a selection like that, I can just simply mark Sam
and I will select it all, actually, based
on normal select, click Shift and he and see what's going on upper
and lower part. Seems reasonable. That seems so reasonable that we can
just simply cut it in half. I think that's
going to be enough. And I'm just going to cut it right down the
middle like this because I know there is
holding control that is. I know there is a
nice little seam going all the way
across like this, not even going to bower, trying to go by the
edge because, well, there is no nice seam on edge, and just doing it like
this is going to be right. I'm just going to merge
by distance again. Real quick, see if
everything is right. Seems right. Let's go ahead
and unwrap minimum stretch. We get something like this.
If you have something like this type of shape
with, well, you know, subsurface, subdivisional
surface that is, and you need to unwrap it, then it's going to be a
lot of a hassle. Honestly, you might
want to do it before the subdivision setup because right now we have
some bit of issues, nothing too much,
though, because holding Alt we can identify
some edge loops. For example, these
edge loops over here would allow us to well, make cuts like these, you know, and you'd want to maybe go
all the way around like this. So it would just turn
into more of a hassle. Again, for this particular part, we don't really need to do that. We can just simply do
our wonderful setup and overlayment on this
black, nice little square. Like, so just to get a bit of that resolution just like that. And finally, we got ourselves
this shape over here, which is more wind in shape. If we have a shape
like this, treat it as something organic
like the mushroom. You know, you would just
unwrap it like this, put some seams over here. And maybe this one
over here at the top, and everything would
be nicely unwrapped, just like that. Mark seam. Then you can just select a
piece unwrap minimum stretch. Let's see. All seems good. We can now overlay
it, make it smaller, and get really nice little
bit of setup, just like that. Is this piece separate
as well? Really? Okay. We can still wrap it using just a single
seam. Fair enough. Wrap using minimum stretch
to get something like this. Make it smaller, put it
in, and there we go. Nice, solid, little pieces. These pieces over here,
speaking of the pieces. Let's just snap them to a point, make them a little bit
smaller and overlap them. Just like that,
you got ourselves a very nice looking leg. Yep, that's looking good. Now, because I don't really want to redo this entire part, again, I'd like to just
to reuse the same setup. So I believe this is going
to be the same type of UVs setup as this identical. And I think I can just
copy the UVs or we could just honestly replace the legs. Evo Boy would work fine. I'm just going to use Old set and make a selection using a box selection,
just like that. Tro plus and it seems all right. Let's separate it and do the same thing on
the other side as well. Folding shift, select it all, Control plus, P,
separate by selection. There we go. All right.
Let's see if it works. If it doesn't, we can
just simply replace it. That's not going to be an issue. Copy UV map, go to
this part, select it, and paste UV map.
And did it work? Partially. So what is
happening over here? Well, it seems like this part over here did not get
unwrapped properly, which is very unfortunate. That means the easiest thing to do is just put it
out of its misery, just delete the legs or
before deleting that. Let's not do that just yet. Let's hide the piano
out of the way and move the legs into their
designated locations. If you want the exact placement, I could actually
show you as well. I could show you the exact
placement. It's totally fine. What you can do is you can select the upper
section of the leg, make sure you are outside of the transparent mode, the X ray. You can select upper section, click Shift Z and select
cursor to select it. And that way, when you
go back to the object, you can right click Set
origin to free cursor. What we're doing here
is just resetting the origin points to be right
placed in that section. And that way, we can do a
little bit of a trickery. So we can select this
piece over here. We can click cursor to
select it, like so. Now it's going to
be at the very top. We can now delete this
part, select this part, click Shift D, so we make a
duplicate just like that. And use a shifts
selection to cursor, and it's going to place
it in the right spot, assuming that you don't need to do any rotation or
anything of that sort, but having a look at this, you don't need to do rotation. They are identical. So I'm going to do the
same setup over here. So cursor to active, select this and do
selection to cursor. Make sure you delete now the
right one because I didn't click on the I'm going to
hide this out of the way. Delete this, click Old Age. And I've got legs just
like that. Beautiful work. Good job. Alrighty. So we still have some bit
of a way to go. That's okay. Totally acceptable. We can work on this
in the next lesson. Thank you so much for watching, and I will be seeing
you in a bit.
43. Piano Keys & Strings UV Placement: Hello. Hello and welcome back everyone
to UV Mapping boot camp, Master and wrapping
and texturing Blender. In the last lesson, we
got this setup over here. Now let's go ahead and
continue on with well, the texturing part,
the UV well, tiling. Let's go ahead and work with the front part
of this point, I'm going to hide this out of the way and see what
we have over here. I'm going to click L just to see what type of thing
we're working with. It's seemingly looking right. We can actually even try
using Smart V Project, see what kind of
tiles we're getting. And these tiles
looking quite nice. So I think we are going
to make use out of them. Let's go ahead and simply use
though snapping to island. Yep. Let's put them
in the position. And just like that, we got
our selves nice texture. Next up, we got these
keys over here. Before the keys, though,
I'd like to put these also as smart project. Let's see if we're
getting the right wood. We are. It's looking good. Now, the tiles. So we have a little bit of a
tile setup over here. Which is actually just from
the top of this piano, which is just going
to be used for decorative purposes for the
top of this section only. And honestly, we
don't need a lot of detail when it
comes to keys because we just need to figure out how much textured detail we are going for because
it's somewhat of a brand new looking
type of piano. We don't need to worry
about, you know, any type of grunge
masks and whatnot. For something like this,
it's okay to just select the keys and and just, you know, unwrap
them, place them in a nice spot, and it's
going to be okay. Whilst I'm talking, I'm
just thinking about this masterpiece of unwrap. What can I do to
make my life easier? I'm just going to go ahead and make a selection like this. Hold Control plus, just
tap on it all like this. And now we have the most
selection that we can do. I'm going to click one, click Old Z and
just Hold Control and just deselect this part, which will allow me to
now click Control minus. And it's going to
deselect any of the parts that had any
deselection, basically. So control minus on here, and we got just the selection
for the piano keys. Now we can use a beautiful
Smart TV project like this, and this is what we're getting. Most of it is okay, except for these parts. What is happening over here?
Well, let's figure out. I'm going to check
and nothing, nothing. Nothing that seems too
bad, to be honest. I don't know why
that's the case. I'm just going to go ahead
and select it all and just do a quick give unwrapping again,
increased angle limit. See if that gives me a better
result. And you know what? It seems to give me somewhat
of a reasonable result, except for these parts. So these parts I wouldn't like because this is long
and this is short. This would need to be
completely different. What I'm going to do is
I believe the reason for this weirdness is because, well, there are end goons, so we're going to go
ahead and fix that. We're going to just
select these piano keys. Click right click, click
on Trangulate faces, and then quadragulate,
stri quads, and then UV and wrap it again. Let's see if that fixed issue. I believe it did. Seems
to have fixed this issue. That's quite nice. I'm going to make sure
we average island size and unwrap it on one
spot just like that. And now the up part would be figuring out
where to place the keys. So we can even maybe put
it on here if we wanted some extra detail
out of the keys, but honestly, not really. We can also make use out of some empty spaces from the
piano, for example, like this. We're going to get
a nice little look. I think that's going
to be perfect for a nice plain type
of a setup yeah, that's definitely going to
be quite nicely set up. We just need to grab
those black keys. And to do that, to
make my life easier, again, I'm going to click one. Going to click Shift in H like this and then just
select the upper part. Like so. So only a bit of the upper sections
are selected. Now, click Control
plus until you get all of those
keys just like that, and we can move these to a black part to get
something like this, which I think looks pretty cool. So now we are left with
this base over here. Let's make sure we
don't forget this part, which we can just use
Smart We project, and that's not right. What's happening over here? I'm going to click Shift
and H and see that hu This is also part
of the top and bottom. I don't want this
to be the case. I only want the
bottom, actually, so I'm going to go ahead
and select only the bottom, which is going to be
this part of here. Like so. Now, only the
bottom is selected. I'm just checking as well, shift in Only the bottom is selected, and just place it actually
over here where the wood is. It wouldn't be exactly
painted or anything. The bottom piece wouldn't
exactly always be painted. Sometimes it would. So we
can just do entire piece. But, you know, just to
have a bit of variation. I think it's okay
to have it like so. And the upper part, though, let's work with that. So let's go click
Alton H in Edit mode. Select this piece. Which is part of our
automatic Van wrap and reposition it to be placed nicely in the section over here. So just like that. If you want a little bit
more control over this, you can have that. So if I was just to align the bottom pieces a little
bit like so to the base. Now I can just grab, for example, this upper pieces. I'm going to make sure that
this UV sink is turned off. Otherwise, it would allow me
to select multiple pieces, which I wouldn't I'm going
to select it like so. Then there is a nice little option for proportional editing. So this will allow me to move
a lot of the parts and use mouse wheel to change how much of the proportional
editing is being affected. This way, I can
just stretch it out just a little bit like
so onto this side. I can stretch it out a little
bit off onto this side. And just like that, I
can realign my texture. To look a little bit, you know, fitting for the setup. I think that's looking
much, much better. So now we have this part done. I'm not worried about the edges, which are, I believe, over here, if I was to go back onto UVSk so these parts of
here are going to be well, on the inside, so I can
just make it smaller. I'm going to turn off
the proportional editing because it would when we get
close, it would mess me up. So I'm just going to place these somewhere on the
side because again, we're not going to
really see that. Now, let's go ahead and sort out some stuff with the
pieces over here. To make my life easier,
I'm just going to select all of the pieces within
zero to one space. Click H, and now we know
what exactly is left. And these pieces can be
also part of the piano now. But I'll just hide
the legs for now, actually, yeah, aside the legs. So we know exactly what
we're working with. This is what we're working with. And to make my life
a little easier, I'm going to go to
the top down view and select the strings. So let's see how
well we can do that. And not going to worry
about what's at the bottom, going to make sure that I'm selecting parts that are
a little bit higher up. Like, so like so. And just like that, we're going to get ourselves
a nice little look, clicking one Old
Z Olding Control, deselecting this part,
only the strings. We can click G to see if
that's only the strings. We can click Control
plus multiple times, so to see that, this
is only the strings. And, uh huh, I might
have made a mistake. No, that's not a
mistake, actually. I might have just made a
duplicate out of this, which is fair enough. To fix that, I'm going to just
do Quick SmartTV project. Put it off to the side, click H, and now delete the strings that were a duplicate
for some reason. Like this. And like this. All right. So now these parts
can be deleted. I'm not sure why they were
over here, to be honest. Just checking. They
seem to be right now. We can move this
to a golden part. Little golden strings
will look really nicely. Yeah, they look really nice. Nice. Awesome stuff. We now can continue on with
the rest of the piano piece. Again, just selecting everything in zero to one U V space, clicking H, and seeing
the rest of the pieces. And to make my life easier
and your lives as well, we're going to
select this piece, and these actually over here, I see a couple of extra
strings from the duplication. Going to go ahead and
just let them off. Like so. Going back to these pieces,
let's just select them all. They're nicely squarish. We can just use
automatic UV unwrap. Yeah, that's going
to be quite right. Let's go ahead and do
that. Do do do do. And now we can use step
to point and move them. On two. Maybe the redwood,
maybe the gray marble. Let me have a look. Yeah, that doesn't
look quite as nice. So I'm going to move it. I'm going to also actually
move it outside of the 021 UV space and
click Alt H. That way, I can select those piano pieces, the frame when we
unhide the piano entirely and just
move it to the part where I think it would
look a little better. So maybe over here. I don't
like the way this looks, so I will just move it to 22, two, two, two to the
black pieces, probably. If so, Yeah, that
looks quite alright. I think that's okay.
But it could be better. I think Yeah, the white
piece looked quite nice. All right. So this part
is also forgotten, so let's make sure we unwrap it. The inside of this piano
is definitely shaping up. We unwrapped the strings. We unwrapped all
this frame setup, and we are left with
smaller and smaller pieces, which is nice. But let's start thinking
about these holes over here. And I think I'm going to
select it so Li Control Plus and just do SmartTV
projection with a maximum angle. Even if those are broken down, I think it's going to
be quite alright if we place them in this
black spot over here. This way, they're going
to look like this, which I think is
quite acceptable. Yeah. This part over here
can be different look, can be bronze or gold. Let's have a look. Yeah,
this is looking real nice. And This piece over here needs to be fixed up.
Let's go ahead and do that. We're just going to select
all of these little planks in the front and unwrap it
using Smart TV projection. And this part can
just be red wood. Like so. No, not redwood. Definitely, no red wood I
didn't like the way it looked. There we go, much, much better. The only pieces that are
left will probably be the little pieces
over on the front. Yep, all of these
little front pieces. And this part over
here, what is this? This is like so. I think I want this to
be actually marble. So I am going to use
Smart TV projection and just place it in
the marble part. Like, so No, that's not
looking quite as nice. The wood part will
look much better. Unfortunately, I say
unfortunately because we now have to make sure that this is well following
the proper curve. So we will have to work
with this a little bit. Let's make sure we have
a proper selection. If I was just to select based
on the normal shift in age, seeing what is set for us. So these pieces over here. Okay. Let's use unwrap conformal not going to work quite as well, of course, but we can just
select the piece over here, use follow active quads, average length, and there we go. Nice little piece for
the grain of the wood. Yep, looking quite nicely. I think I'm also going
to click S Y, sorry, SX just to get a bit more grain
out of this. There we go. So it's going to look
like a pin or wood, and that's looking much
better. All right. So next up is going
to be let's see, Let's see these letter
parts over here. So for catus, I'm just going
to go ahead and just select all that's not these parts. And like so, like, se like so. So click Control plus a few times until everything gets selected and move
this downwards. Now we're left with
these tiny little knobs, which we can just
select the mold. Just like that, use
our Smart TV project and use Shift N don't
worry about the amount. That's okay.
Acceptable for atlas. Nothing to worry about because we can just overlap
them and put them in at this black little spot
to get black little knobs, which I think could look
better with bronze. Yeah, definitely. I definitely look better with
the bronze medal. Okay, so we're still left with the last final
piece for the base. We're going to continue though with this in the next lesson. Thank you so much for watching, and I will be seeing
you in a bit. O.
44. Final UV Unwrap for Piano Components: Hello and welcome back, everyone
to UV mapping boot camp, mass and wrapping and
texturing in Blender. In the last lesson, we are almost finalized with the
setup for this piano. We're going to
finalize it by, well, getting these pieces
out of the way and moving on to the
next stage, finally, let's go ahead and grab these parts that
we have over here, making sure that
everything is selected, which they are going to identify these little
screws over here. And where are they actually? Leave they are already placed. Yeah, they are already placed, so that's good for us, okay. Just making sure that we
not missing anything. Everything else is selected, going to hit shift in H, just to hide everything
out of the way. Make all lives easier. Then let's identify
some of the shapes. Well, forzadas, these parts
at the top are squares. I'm just going to click L whilst the limiter
is set to normal, just to make sure we see
what the shapes are. And yeah, they are just
simple squares with bevels, so let's go ahead and unwrap it. Smart we project with maximum
delimiter for an angle, and let's see what
we're getting. Well, most of it is right. Yeah, I like most of it,
except for these parts on the very end because of, well, these soft curves,
they're going to try to unwrap some of them
like this or yeah, also because this is just
straight edge of here. So what I'm going to do is I'm going to select all
of these parts, so just like that. And yeah, here in the
middle, for example, I go ahead and just select
these parts over here. On the side, I try to
select the tiny bevels, as well, so no small islands
are going to be left behind. And now we can just
rotate it like so, and we can see if
it would work well. I was thinking about
setting it up as bronze, and I think that will be best. Whether bronze or wood, he away. They would both work in
this particular case. Let's go ahead and just
pack it up real quick, pack up the islands. We
don't need to rotate it. Actually, we rotated
it ourselves, and let's just put it over here. It's a nice big chunk of
setup, see how it looks like. I think it looks quite right. Yep. Looks quite alright. These two bits, though, I think, should be definitely
different color because they're more like supporting
legs type of setups. So having it either
red or black, although this part is
a little bit smaller. So if I was to consider
the piano as a main piece, I would probably make the black section a
little bit larger. But if the environment was using a lot more props
and whatnot and we had other pieces and what not, that would have
been totally okay. Also because it's
underneath the piano. It's not a primary focus of this entire prop,
so that's right. This part can also be I
think it can also be black. I think it's going
to be quite right. Let's go ahead and actually
let's have a look. I'm just going to move it
out of the way a little bit. Let's see what we
are working with. And this piece, I would
like to unwrap it manually. The reason being is that it has such curve setups
that I know that automatically V unwrap
is not going to be able to unwrap in the right
kind of way that I want. So I'm just going
to do it myself. And what I'm essentially
doing right now is separating this upper section and
this upper section as well, like sort of pancakes. And then we're left
with sides here, this side over here, and this side over the side. And that will be it. The part in here, we can
just select it like so. We can Control Plus, and that's going to give
us this type of selection, which we can use MRTVPject
to unwrap it manually and put it in the
black spot like so. And this rest of the piece, actually just realized
that this part doesn't go all the way around. So to fix that, we are just
going to select it like so and mark Sam just like that. This part over here can also
be just using Control plus, selecting it all,
SmartTV project, and just placing it over here. Just like that. Now
this part over here, well, let's sort out the
bottom part, actually. Going to select this middle
line because I don't want to go for its entire selection like I did with
the upper section. It will work in the same way. And also, we can even lower this down because it will be
less visible as ACM. Nice little practice to have. Let's go ahead and
click on Mark SM. And this time we're going to
go ahead and just click L, Doliory UVs, which doesn't
seem to want to work. Why is that? Is it missing? No, it's not. Oh, sorry, it's not delimior Vs. It's limit SMs. There we go. And we can just click on the upper sections
over here as well, unwrap and use a
minimum stretch, just like that and put it in our little corner chess like so now we could actually
leave it as that. That actually looks pretty cool. Having metal parts
broken up like that. If you'd like to, feel
free to leave it as is. And you know what? I will also
leave this as is, as well. That being said,
though, we do need to do a little bit
of unwrapping here. So what's the easiest way to
unwrap this entire piece? Well, I reckon we can go
ahead and select this, hit shift in H to
deselect everything. Click seven, and then use our olds to make it transparent, use our lasso, and then select the pieces like so just a quick, sneaky little way of selection. That way, we're getting
the front and the back. We can move this outwards, like so and have the
selection with the selection. We can hit wrap minimum stretch, which is going to give
us this type of piece. The parts over here are a little bit I'm not too keen about them being
just unfolded like that, so going to go and
use conformal, just like that way better. And I am going to
put it over here. And these pieces, because
they're just size, we can use the same method, conformal unwrap and make them quite a bit
smaller, just like that. And yeah, that would
be the black piece. Although, in this case,
I want to select them all because I really like
that previous setup, so I'm going to go ahead and just move this to
the bronze section, like so, and now if
we were to click Alton H, we're going to see it. Well, that's a
bronze typo section, which I think is looking
really, really nice. What else are we missing?
Well, we're missing few pins. For sats, these little
tongues over here. Which, if we have a look at
it by liking Shift and H, they don't have the back pieces. All we need to do is just
unfold them as flat pieces. So I'm just going
to hold Shift and old and set up mark Sims. Oh wrong wrong button. Mark Sims, there we go. Now we can go ahead and
just make a selection, unwrap and use Do do do
do do minimum stretch. Yeah, seems about right. Let's go ahead and put them as gold pieces. I think
that would be. Pretty nice, actually, yeah. They're like, a
little bit of gold coated to make them stand
out. It's pretty cool. And something else was
missing, actually, I believe. There we go, this little piece. So what is this? Ah ha. So this is the main back setup, which is, you know, fair
enough, fair enough. So I think these are squarish enough to be well unwrapped using
automatic van wrapper. If I was just click called
the Z because CF remote doesn't give us a lot of
control over the well, selection individually
because we can select past objects, and we don't always
want this to happen. All right, so let's go ahead
and do a quick unwrap. Let's put them in somewhere either bronze or even
a stone if you want. That would look kind of
cool. But not cool enough, I don't think. Wood. Wood is also not really. Yeah, I think I'll just
leave it as bronze. Or actually, I'll put
it as a black piece. Yeah. That will
look much better. This part on our
hand is two parts, so just like the upper
section on the top. So I will probably
do the same thing where I'll set it up as white, and then these parts, I'll set it up as bronze. Yeah, that sounds
about right. So let's see if we can select
it based on normal. These parts are actually. We're going to just isolate them and work our way outwards. So let's go ahead
and just simply make a selection with a transparent
mode, just like that. Make a little bit of
additional selection. Unwrap Smart project. That's going to be good enough
for these little pieces. We can put them in the bronze
section, just like that. We could make, you
know, a bit of additional work with the
whole like we did previously. But it's such a small piece. I don't think it's worth
it. Yeah, sometimes it might as well just leave it. Especially it's underneath
piano and everything. It's all good. So that's that. Yeah,
that looks quite alright. Except the bolts now
are not standing out, so I'm just going to need to
fix that in a bit, though. Let's go ahead and just select
these parts over, like, so Mark seem if it wishes
to mark Sam, there we go. Now we can hopefully unwrap
the minimum stretch. I've not. Oh, okay. So what happened here, I realized before doing that, I'm going to click
Control set and do it. And there are parts, at the top or bottom that we are going to need to
clean up real quick. So let's go ahead and do that. Selecting the upper section, the top section as well. Clicking lead faces. And now, finally,
finally, finally, we can hopefully select
it Mark Sims exist, and we can click U
and minimum stretch, and something that's not wanting to let it go.
So what is happening? I'll do one by one,
a uniform conformal, and that's the upper one
that's not wanting to let go. And I don't know why. Let's see. The bottom one. The
bottom one is fine. We can just put it up as, as a gray type of marble. What's happening
with the upper one? Well, let's go ahead and see. We're going to select it as UVs, lick, shift H to
hide it and see. The upper section is fine. It's just a cylinder. So what's happening? Well,
uh huh. That's a culprit. We didn't go all the way
through because there was a little knob
over here, which, to be fair, could be also
part of well bronze section. Let's see how it
looks like, though. If we were to unwrap
it using conform. So unwrap is it's not the best. It's not the worst ever. I'm going to do minimum stretch
and see how that come up. That comes up way worse.
So let's keep it as this. And yeah, I think I'll just separate
this little piece over here. So I'll just go ahead and grab the entire piece, actually, and just use a minimum
stretch, and there we go. We're going to get more
resolution out that way. And then we can just put
it wherever we want. But it's a little piece, which I believe should be over here. Yep. All right. Let's see how it
looks like Aldinge. And that is our piece,
except for the bolts. Let's not forget the
bolts because these bolts are going to look the
same, too much the same. So let's go ahead and
put it on a black spot, like we did, I believe, for the upper section
over here. Yep. So same consistency,
and that's it. I'm going to click Alt and H to check what we are missing, and I just realize we are
missing this piece over here. So let's go ahead and place
it up on just the back. So I'm going to click seven, move this a little
bit to the back, like so, and even
more, actually. Just like that. I
that's quite right. Or let's go ahead and
use local and Gizmo, and now we can just manually
attach it like this. We can imagine that something
is sticking to the back. And actually, looking at this, it seems like the
back is even missing. So what are we going
to do with this? Well, we could leave it as this, actually, or we could
replace the back. I think replacing
the bag is okay. So I'll go ahead and do that. I'll just go ahead
and select the back, click AltnF and it should. I should place it
nicely for me. Like so. Alright, very nice. So now we just have, well, set it up for this little piece, which is going to
be quite simple because it's just a
couple of planes. We can use automatic
smart UV project and put it in the note section. The notes section,
though, needs to be a little bit more
carefully placed because we have well the placement of this needs to be matching
up a little bit more. So what we're going to do
is we're going to grab these individual faces and just scale them to the
right proportions, and now I'm going to click SX and just scale them
out like this. And the reason for this is because we want to match
them a little bit more. And I just realized this
needs to be flipped. There we go. Now, the up
side can be quite similar. I'm going to unwrap conformal. The reason being is
that it wasn't quite matching just a simple square. And I'm going to place it
over like this and like this. Now, it is just one page, and it's just repeated, like so we could
leave it as this. And yeah, you know what?
It works quite well. It is opposite, though. It is flipped, if you
have a look at it, so we will need to flip
it as well, like that. And, you know, from a distance, it's going to look quite nicely. The backside can be actually quite a bit more interesting. So I can click Control plus, select these little pieces
and move them you know where? We can move them to
this black spot here. This way, it's going to look
like a cover just like that. And I think it looks very cool. And finally, we are
done with the piano. We can check the little
pieces and even, you know, make a
selection like this, hold control to deselect the upper pieces to
just have the piano, select the piano,
click Control J, and now we have
it as one object. And if you want to
take this a step further and you're planning to do some experimentation with, well, texturing and whatnot. You can just go ahead and
select all of these pieces, use average islands as we did before and pack
islands afterwards. And that will pack
everything you want out of these UVs into just
10 to one UV pase, which you can take it to
substance bana to make out ambient occlusion and do
some additional texturing. But we're going to have
some really nice work because everything is
going to be set out for, you know, all this direction
of wood, for example, it would still be
kept with you and you wouldn't need to worry
about any of that stuff. So, yeah, that is pretty
much it in regards to this zero to one UV
space, the Atlas setup. Thank you so much for watching, and I will be seeing
you in a bit.
45. Clothing Based UVs for Legs & Lower Body: Hello and welcome back
around to UV mapping, boot camp, mass and wrapping, and texturing and blender. Now, we're going to start
off with human unwrapping. And this is quite
an interesting one because it is something
that at some point, everyone has to unwrap, I think, because it teaches
you how to well visualize some of the
unwrapping parts. And just in general, if you ever do some more of organic creatures
and whatnot, by just doing the human, you're able to take
it halfway there. You know, if it has limbs, you'll be able to unwrap the
limbs and whatnot, the head. If it's more like a human shape, it can also be unwrapped
in that kind of way. So first things first, what I like to tell you is, in case you're wondering, sometimes you can visualize
some of the parts, how we did primitive parts. In which case, for
example, the limbs, you can visualize
them being more like, well, cylinders,
something like that. And this kind of
visualization helps sometimes well with some body parts, like, you know, legs, arms and whatnot, in some
cases, even well fingers. If you're doing some
close up shots, you'd have cylinders
as individual fingers. But in most cases,
that's not how it goes. You'd better it would be easier
to just visualize person, a human wrapping as some
sort of a clothing. So previously, we talked a little bit about
how, you know, a latex sheet is great
for organic setups. In this case, it's kind of
similar except you'd have to think about how it would
be stitched around a person. And for that, you
could, for example, visualize how the legs would
be as pants, as trousers. And I think that would be the best spot to start
off with our human. And as always, when it comes
to more complex shapes, I prefer to just start off with unwrapping with a
project from view, simply because it helps me to visualize what the
hell is going on, and then we can put
it off to the side, and then it can remind
me and you guys as well, whenever we're
missing some parts that needed to be unwrapped. So when it comes to the
geometry of this setup, it's best off to
visualize it as trousers, and we can start off
with that to get an edge loop as low as
we can next to the feet. So, for example, I'm going to hold Alt and just
select it over here. I was thinking about
holding putting it lower, but then I realized this is not exactly going to give
us that edge loop. And although we could manually select this part over
here would give us, well, just a bit
of a sharper seam. So it makes it easier for
me to select this part, as well as it makes it
easier to not see the seams because it just gives a nice clean cut when we have
well textures and stuff. So that's why we can just go ahead and just select
both these parts, mark seam and there you go. We go ourselves the bottom part. Now, as for the upper
part, can go ahead and hold Alt and just select
in a little bit higher up, be honest, over here, right underneath
the belly button. That's quite a nice section. We can unwrap it over here. And this particular part, I'm just showing one
way of doing it. I've seen plenty of people who do it over by
this part over here. So perhaps they would
unwrap it in this section, something like so,
and maybe like this. More like this. In this case, the edge loops here
are not really supporting this kind
of a flow for Taurus. And secondly, we don't
exactly need to do it. But if we were to
do it like this, we'd be essentially
unwrapping each one of those legs as
individual cylinders, and then we'd get ourselves a nice edge loop going
across like this. And we'd be able to, well, essentially create
a cylinder unwrap and that would be,
you know, still fine. That would be
totally acceptable. In this case, however, I'd
prefer to do it over here. So I'm going to mark seam
mainly because, well, it makes our lives a
little bit easier, as well as we are doing
it slightly differently when it comes to visualization in this particular
case, that is. And you can visualize trousers
and how the seams are. And the way they
usually set that up is they have
seams on both sides. So front and the top Sorry, the inside and outside, and they just end
up unfolding that. So right now, I'm just seeing where the upper section
is and holding control. I'm going to select
the bottom section right in the center piece, and then I'm going to
mark Sam just like that, going to the same part on
the upper end, as well. I'm just going to
select holtingOlt, select part like this, visualize where it is for the upper section and
the lower section, and mark C. And
in certain cases, you can make use out of the symmetry part for
these kind of parts. So if you were to
click on, I believe, it's X or Y, is it Y? Yep. So if you
were to select it, you can with the X selection, you can click Mark Sim, and it's not going to do it. If we go to options,
turn on topology mirror, and this is mirroring. Marksem just doesn't
want to work. So I'll show you my preference
when it comes to well, symmetry in the bit
though, not right away. Usually, I'll just give
it away right away. I just delete one
side of the body. If I were to have ox selection, I delete one side of the body, then mirror it to
the other side, and that's how I
get my UBN wrap, a nice little feature. Anyways, going back to legs, let's go ahead and simply
make a seam like this. So this is an ice seam
going right in the middle, and I'm going to click
Olds to make the mesh transparent and deselect the
bottom part just like this. So it only goes up
to the SM parts. And that way, if we mark SM, we can click L to use
Linked based on UVs. So not UVs, SMs. There we go. Select the back, the front, and we've got
ourselves nice unwrap. And we can either use conformal or minimum stretch depending on what it gives us, and this gives us way too much. So conformal will also
give us quite a bad setup. Let's click on Angle
base, and there we go. Angle base is the way to go I'm going to go ahead and
just rotate it, like so. And yeah, that's pretty much it. If we want to be, you know, more pactful or whatnot, we could technically select everything up to the
half point, like so. And just have
basically two sides. So it would be split
into four pieces. I've seen some people
doing that as well. And that way, it's easier to, you know, pack up the items. So that is totally valid and completely reasonable given
how the unwrap looks like. The other way that
I saw some people do was select one section, if I was just to select
this part over here. No, there we go. If I was to select one edge
like this using lt, I can click SX and zero, and then we can click
P to pin this down. And I just realized Oops,
I made a big mistake. That was quite a big mistake. Let me go ahead and
select this and use U V sync the selection. So I can show you properly by
selecting these edges over. Holding, tapping on
one on the other, clicking SN zero like this, clicking P to pin it down, and doing the same on
the other side as well. SX Zero, clicking
P to pin it down. And now, what's going
to happen is if we select this and unwrap it
using minimum stretch, it's going to try to well, put everything in a
nice little place. Like so the only downside, though is that right now these pieces are a little
bit too stretched out. If we have a look at
this by changing to our created checkerboard to visualize and we can
see what is happening. So these parts over here, are
a little bit squished up. So in this case, what I will do is I will
select my pinned sections, and I will just drag
it a little bit backwards to this amount. I think that's right. Then redo the stretching and there
we go more squarish. So that's, you know, a little bit more reasonable, although at the bottom, we're getting a little bit
more of stretches and whatnot. As it is trying to warp itself. But by playing around
with iterations, we might be able to get away
with this a little more. I think something like this
is totally reasonable. So yeah, I just want to show
this process on one side, not going to bow the other side. I think it's totally
okay to have it as this, especially since we're going
to have smaller pieces. And before doing that, though, let's go ahead and do
the same thing for arms. Although we can continue on
with this in the next lesson, so thank you so
much for watching, and I will be seeing
you in a bit.
46. Minimum Stretch UVs for Arms & Feet: Hello and welcome back everyone
to UV Mapping boot camp, mass and wrapping, and
texturing blender. And the last lesson, we
left ourselves off with this nice little trouser
and wrap over like so, which is looking pretty good. Now we're going to
continue on with arms, actually, because I think it's the next
easiest thing to do. And the way we're going to do it is basically
we're going to split off the shapes from the hands, and arm pieces are going to
be unwrapped separately. So in this case, unfortunately, this human does
not have nice edge loops. And what I mean by that is
usually it would go like, on the shoulder over here, and that would be a much more preferable
type of solution. Though in this case, we will
have to do it manually. So yeah, this part
over here is not happy with our selection.
So what can we do? Well, we can just
manually selected or, you know what we are going
to keep it as over here. In this particular
case, it is okay. We can keep it as this. But again, usually, there would be more of an edge
loop over here or in places where I'm
trying to work characters. Or alternatively, we could potentially use bisect to make
a cut over here like this. So this is the type of
cut I'm talking about. That is what you would create. In this case, though,
it's fine to not have that and just have
the closest edge loop that goes around the arm. That is totally acceptable. So let's go ahead and do that. And yeah, that will be
okay because we are going to unwrap the main body as some sort of a
shirt, actually. And you'll see in a moment how. So that's why, although
I don't personally like this edge loop over here, it's, so low, but all all is
good. Honestly, all is good. I'm just checking if it's I have not made an edge loop
over here for some reason, so I'm just going to
go ahead and do that, like so, and I believe it
was this one over here. Yep. And like so. And now when it comes to
marking Seams on this part, what I tend to do
is I just select it based on SM both of these parts, like so, clicking shift and he, and now I can make mark SM going on the inside of the arm. That way, it is as well
hidden as it can be. It doesn't need to be
an exact location, but just underneath
the arm like this. And we can now select it and
use the minimum stretch, which is really good for
organic setups, just like that. I think that's right. We got to sell some
nice little squares, and now we're going to
move on to the body. So in terms of the
body and the head, the head will need to be
definitely split off. So we can just put it somewhere over here on the neck or
lower end of the neck. And Mark Seam. And
just like that, we got ourselves, well, this nice little t
shirt. There we go. That's what we're
having right now. I'm going to go on to
the face selection and see what we're having
over here on the side. Go to click Shift and H, and that way, we can unwrap it. Don't worry about eyes.
Eyes are usually left as separate meshes, like se. And when unwrapping, that's, you know, totally acceptable. It is what it is, although it's creepy when it
has eyes like that. So for this part, I just
create seems on sides, just like a T shirt would be, making sure that
we are basically hiding those kind of
parts just like that. Even if it's just a
human skin and whatnot, it's best to have
pieces like that. Seems like that to be on
the side of the human, not like the front or anything
that would be more of a visible area and
more noticeable, therefore, let's go ahead
and do minimum stretch, and that's the body parts. There we go. And we can
now move on to the feet, I think the feet is the
next great chapter in our unwrapping for this
person, for this human. Let's go ahead and
click Shift and H and see what
we're working with. And this floor is
getting in my way. So I will just raise this entire human a little
bit higher up like this, or even click on the
dash to isolate it. So dash isolates everything
except for the selection. It's a different piece than
in comparison to hiding it. So now we have part that's
isolated and hidden. The entire scene is isolated,
except for the human. And when we go on to edit mode, everything is hidden
except for the feet, so it gives us this
nice isolated view. Oh, okay, so when it
comes to the feet, it's kind of
visualizing like shoes. Usually, no one I've never
seen anyone unwrapping individual fingers off
the feet like this, like small cylinders, even if they can be done, like that. So usually what people
do is they just end up grabbing or trying to grab an edge loop that goes
all the way around. And in this case, it's not working for us.
So what can we do? Well, we can grab an edge
loop that's closest to this. And I think that's reasonable except for this part over here. I'm going to go ahead and just
deselect all of this part, like so, like so, like so, and do selection over here, or even or even even no,
I think that's right. So now I can just
with this selection, I can click Control over here, and that will try to
at the very least, Oh, my goodness, it's so bad. Let's go ahead and
redo it again. So holding Control, I will try to guide it
a little bit better. It goes across the
middle section of this finger, and
I do not like it. So I'll just up it
up a little bit, so it will be just one
sharp turn over here, which is it is what it is. If if we have that, we might try to
move it over here, in some cases, on the
inside of the foot. But because of such a clean
edge flow on everywhere else, except for this, I
think it is acceptable. So I'll just go ahead
and continue on with this setup and then I'll just go ahead and select the last piece just like that. And we have ourselves put seems. So let's go ahead and select
it. That's what we have. We can go ahead and unwrap it, minimum stretch, and this is the type of stuff we are having. So we can maybe do conformal, which is reasonable in
terms of, you know, keeping the squares the
same the same and whatnot. Honestly, though, using
minimum stretch as well is totally viable if we're doing something like
triplaina projection, if we're having, like, manual brushes, brush strokes on a well
substance painter, or if we're just
having neutral noise, it's totally acceptable
to have it like this. In cases where we
have, you know, more directional noise,
maybe there's, like, streaks of dirt or
something that well, visually, you're trying
to tell a story. So this would be more ideal. But even with this, you know, there's not much of distortion, so it is reasonable
to keep it so. And as for this foot, it is it is what it is. And we're having
something like this. And now we just need
to well unwrap it. So we can honestly unwrap
it as minimum stretch, and it would give us this
type of abomination, which is kind of
reasonable, to be honest. Alternatively, we can split off, well, half of this foot. I'm going to hit
Shift inH and just split off like this in
these areas and, like, for the heel way the cylinder is not going to disturb
the overall flow, and we're not going to have some wave stretchiness over here. So that is one way of doing it. Like so, like so, and we can just unwrap it
minimum stretch. And this would be reasonable. Perfectly fine. Yep.
So we have one leg. I'm not going to power
with the other leg, because I will
show you how to do symmetry from one
side to another. Not at the moment,
though, because we still have this
arm to work with. So you know what? We're going to continue on with this
in the next lesson. Thank you so much for watching, and I will be seeing
you in a bit.
47. UV Mirroring & Finger Unwrap Workflow: Hello. Welcome back
around to UV mapping, boot camp, master wrapping
and texturing in Blender. In the last lesson,
we left ourselves off with nicely unwrapped feet, and the body part, now we're going to
move on to our arms. So I'm going to go
on to Edit mode, hit Alt and and start working
with this little piece. Let's go ahead and hit Shift
and So we only have arms, sorry, no arms,
hands to work with. And let me tell you, before
doing anything, sometimes, in some cases, you want
extreme close ups of hands, more like cinematic and whatnot. In those cases, you would unwrap each finger as a
cylinder like so. And, you know, you would
have all the marks just like that and then maybe have some seams like this
or something of that sort, just to make sure that you'd get all the necessary textures. And that would be fair enough. You know, if you need more
texture, detail, and whatnot, put it on like a four game map, use UDIMs, stuff like that. All fair enough. In this case, though, if you're
working for, like, a game or something
of that sort, you would want to just
make sure you're well, set up, just pass
nice edge loop. So I think this one is
the most reasonable one. And it's still not
reasonable enough. So I'm just trying to figure out what kind of edge loop
we can get out of this. And I think, I think,
I think, I think, this is the most
reasonable amount, most reasonable base
setup, at least. We can then go ahead
and just use lb Z and just remove some of the
parts from the fingers, like so just like that. This way, we can do
manual selection because it should never
go over the nails. It would look very, very odd. So this is reasonable. Once we get to this part,
we can just lower this down and maybe over here. Now holding control, I can
just re select this part. And holding Shift, I just
de selected this part. So we have this kind of a loop, not ideal, not perfect, perhaps. But if you're working with
subdivisions and whatnot, this type of subdividable
service actually is going to give you
quite a lot of detail. And that would be a
fair excuse to use this kind of well, topology. If you want to subdivide
the surfaces and whatnot. So yeah, we're just
retouching the fingers, making sure that nails
don't have any of the wide selections because otherwise it wouldn't
look quite as nice. So we have selection like this. Let's just make sure we hold
shift and just tap on this. Then holding control,
we can just go to the very end of the
hand just like that. And I think that will be done, except this part over here is also needing our assistance. So let's go ahead and
just do it real quick. So I really whenever I'm trying to work on
these kind of setups, I really am trying to
avoid these sharp turns, and in some cases,
you can avoid it. In other cases, you can if I was just to make sure I
save my previous progress, you can create some
additional lines. So for example, if
I was to select like this, I can click J, and that would maybe create
a nice line to follow so it wouldn't be a sharp
but the thing is, you can sometimes do it if it's a subdividable
type of a surface, meaning that if you
are planning to add a subdivision, like so, you know, to add additional detail or something of the sort, you would not want to have
that because in here, I'm not sure if it's
shown properly. Maybe if showed like this, you would see a little bit some of the artifacts,
to be honest. So that's why it's better
not to have those kind of edges like so and just
small little advice. Really is depending on what
you use this model for. You need to figure
out if it's just like the mesh is preexisting or if you're trying to use it
for subdivisional surfaces, for, you know, cinematic
cases and whatnot. All of that will come into play when you're setting
all of this stuff up. So this part over here, what hell is going on here? That is not correct.
There we go. A little bit better.
Again, sharp edge, but it's fine. It's fine. Let's go ahead and select it, and let's click and minimum
stretch, and there we go. We got some wiggly fingers, which, you know,
might not be ideal. But we could also use conformal, and that's also not ideal because it's a little bit of
too big of a middle finger. We don't want this
so angle based. Okay, that's probably the best. It stretches out all
the arms like this, which is fair enough. It gives us the most
reasonable result and not weirdly unpacked at all, and we're going to get
ourselves basis of the setup. Now, let's talk a little
bit about the body itself. So we got all the body
parts and everything except for the head,
which, honestly, we're going to leave it as
it is for now because we want to have some arms over here and some PT over
here done as well. So let's talk about how one could do that once we
have everything already wrap. So what we could do
is we could click on L. We could just
separate the set. So clicking P selection, the set is now separate. Ooh floating. So we can now
just hide it out of the way. We have just a body. And now the body can be split. So we could, firstly, the easiest way or one of the ways that could be done
is just to make sure we have a selection
that goes right down the center just like that. So right now, it has a
nice little symmetry, so it's able to go
right down the center. And you could delete
this part and then just mirror it to
the side, the upper side. But we already have
this body unwrapped. We already have those trousers
unwrapped, those legs. So we don't want this entire
part to be just, you know, unwrapped again or these
UVs to be mirrored. So we just want
the legs and arms. And for that reason, because
this is a symmetrical piece, what we can do is we can click
L. We can delete the feet, like so we can go to the
outside, and first starts, we're just going to
make sure that we are matching where the UV Sam is, which I think is matching, and then we're
going to delete it. So then what we're going
to do is we're going to select both the feed and arms, I'm making sure that I'm
selecting all the pieces, so the whole selection
of the foot on arms. The next thing would be to make sure we have the symmetry
in the right spot. So what I can do
is I can do do D D D. So the origin point to notice that is
already centered, you could you just select
the piece in the middle. You could use Shiftins
cursor to select it, and then you could right
click when in object mode, set origin to free the cursor, and that would be
centering your position. So that could be, you know, how you do it for a setup. Now though, I have this
little origin point, so I think I'm going to
make use out of that, which is, fair enough. Although because I click Control Z because
I already did it, the freecursors over
here, even is fine. So once we have the precursor, we can just change the
transform Piper point to B freecursor and then we
can just click Shift and D, Escape, and then it
duplicates these parts. We can then click S Y minus one. Nope a X minus one. There we go, and it's going
to flip it to the other side. Now we have a nice little setup. Except this part over here, it turns out there were some
bases that were missing. It's okay. We can
fix it. All is good. For now, though, I do know for sure that these parts are going to have flipped normals because we just
flipped it around. So I'm going to hit shifting end before leaving the connection
to have it like so. Up for most of the parts
if we're doing it like so, we can just simply
select the entire piece, use M to merge by distance, and then with a
very small value, we're going to
reattach the parts. So now, it's reattached,
as you can see, like so. And I just realized I have
mirroring still turned on, so I'm just making
sure I turned it off. And now, basically, these
leg parts and everything, we have duplicates of them. So these parts over
here, are separate. This part is the same
in the same area, but they have two
separate pieces. That's how you can
duplicate the UV shells without the need of
just reworking it. This part, however,
let's go ahead and just select both of
the edge loops using Alt and Shift and
clicking F and Alter F. There we go. Beautify, ah. Now let's go ahead and
go on to face selection, right click and tries
to quads. There we go. Lovely setup. Now I'm going to go ahead and just
remove this seam, clear seam, and then
make sure that, how, whoa, whoa, whoa,
that's not right. That's not right.
Good thing we checked it because it seems like this piece just didn't
want to attach itself. There we go. Much, much better. This piece is still
being a little bit odd, and it's just misbehaving
a little bit. Yeah. We'll go ahead and just use C to make
selection like this. So at this point,
it is more like topology cleaning rather
than just unwrapping, which is fair enough.
It's fair enough. It's a nuisance, but I think
it's worth to show that. And in this part, I will
mark the same over likes. Wrap this part specifically. So minimum stretch to
just get line like this. Then we can select
this line over here, which is going to
select the, you know, line that we just created, as well as a part that would
be part of this over here. So that's what we're selecting. Now we're going to
right click and stitch, stitch stitch, there we go. And you know what, we are
going to unwrap it again. So minimum stretch, there we go. Nice little setup. A quick fix, not so quick,
but reasonably quick. And we got ourselves the
UV UV checkers back. We can now go on to a mesh, click Alt and H, and we still
have this head over here. So let's make sure
we combine it. So let's go ahead and join
the body and the head and use selection all merged by distance,
and there you go. At the bottom we see
removed 42 vertss, meaning that this part is
now part of the same mesh, and we are left
with just the head. So let's go ahead and continue on with this in the next lesson. Thanks so much for watching, and I will be seeing you in a bit.
48. Optimized UVs for Head, Nose & Ears: Hello, and welcome
back everyone to another exciting UV
mapping boot camp master and wrapping and
texturing and blender. In the last lesson,
we left ourselves off with a bunch of UV shells, which we're now going to
continue on adding on top of it with this
head over here. So how do we wrap this head? Because it is a unique
type of a shape, and you might be wondering, you know, how would one do it? Well, for SRS, we would get rid of anything that would go
in our way and start off. And with that in mind, we're going to
look at the mouth. So mouth comes in multiple ways, multiple shapes,
depending on their use. In certain cases, there would be just one closed off loop. In which case, it
would be totally okay. In other cases, you would have
some mouth bag behind it. So in this case, this
one was removed, but you could out of
this type of setup, create whatever type
of mouth bag you want. And what I mean by mouth bag is if I was just to go
inside of the mouth. So real quick, I'm just
going to expand it, click Shift in H and
see what is going on. So this is what we have inside of the mouth, just like that. And actually, it might already
have a mouth bag as it is. And yeah, it does have a
mouth bag, so that's good. So what a mou baag is if I was just to hide
half of the head, we could see it a little
bit better from the inside. This is what a mouth
bag looks like. And we would be able to
put teeth inside of it. We would be able to put
like tongue inside of it if we want to
or alternatively, sometimes you wouldn't
have mouth bag at all. So this entire piece would be removed and
filled in with just, well, just a simple filler. But if you do want to have your mouth moving and
stuff, you would need this. So how would we unwrap it? Well, we would simply just
grab the inside like this. I would just select the mouth
baack just like this and click Control plus until we get to perhaps this point over here. Then click Control minus. See the selection,
how it looks like. And there are some parts where I see that well,
it's not selected. In such cases, what I
sometimes do is I would expand my selection just like this until I can see the
entire edge loop. Then I would just select
those spaces like this and use Control minus to
deselect it this way. The selection now has a perfect edge loop going
all the way around. This only works if well, edge flow is properly set up with the flow of the topology. If it is, though, we can
go ahead and select this. We can simply unwrap it
and use what's it called? Minimum stretch? There
we go. And we get this. Although the shape is, well, quite an interesting
one like this, unless you are putting a camera inside of your mouth
at some point, I'm not sure why
you'd want that, but if you are not planning to have wrap would be more than
enough for such a setup. I just keeps a nice basic look and you'd be able to
add certain texture to just put darker
texture or something of the sort darker
skin texture to well, have some substance, some
volume behind your teeth, your tongue, whenever you're
speaking as a character. And that's pretty much it. Now, in regards to other pieces, I'm going to go ahead and just click Old and H to
unhide my head. Go to select this piece over
here and going to click H because it makes our
lives much easier. What we can't see, we're
not going to harm, and if it's behind
other pieces of mesh, it would be
problematic sometimes. Now, in terms of the ears, let's talk a little
bit about that. When the mesh goes, in my personal opinion, when a mesh goes
over 90 degrees. So right now it goes over that degrees and goes inwards and starts getting
some additional complexity, you would realistically want to separate that
piece of a mesh. So you can imagine, for example, if this character would have, well, let's say, something like this, and
you can imagine, like, maybe, like, a word would
be coming out or something, and to do, do to do, but just to change
this to median. I could get this kind
of a word like this, anything like that, you
know, and it's like, Hey, there's a bit of a pimple. Honestly, I would
definitely separate this piece of a mesh
as a separate island. And the reason being
is that we don't want the parts of the mesh from
here to be distorted too much. So that would be my reasoning. And the same goes with
the ear, by the way. This ear over here would be
best to be just removed. So we'd make sure
that all the pieces, you know, that go around it, around the ear would end
up not being distorted. When they're trying to
unwrap all these well, cavities and go
inwards and outwards, it would try to add that additional type of
texture density. But to avoid that,
we can just go ahead and select
our ear like this. Click Mark Sam and there we go. I will do the same on
the other end as well. So this part over here, Yep, marking, and there we go. And honestly, that would
be more than enough. We could just select
these ears like so and unwrap it using a minimum stretch because it would give us these
type of settings. And although there would be some bit of a
stretching, you know, in and out, but all in all, it would be kept quite nicely. And I believe I made
a mistake right here. Which is fine. It
doesn't matter. I used edge selection over here, and that caused the outer walls to also try to
unwrap themselves. But because we have not
unwrapped the head just yet, it's okay to leave
it as that for now, because we can now
hide the ears and start working with this
entire face, like so. The thing is sometimes you would have eye
sockets, as well. In which case, you
would do the same thing as you would do with the eyes, and you would just
select these sockets. You would just cut it out, same thing again like we
did with the mouth, and you get, well,
this kind of shape. But in this case,
we don't have it. And the reason being is that
we have, well, the eyes. They will hide the sockets up, and for some reason, my ones have moved a little bit by accident,
so it's fair enough. I'm just going to
reposition them. We're going to have something
like this for a character, which is, you know, pretty cool. Next up is going to be, well, the main head. So the way most of the people
would do in terms of, like, unwrapping, the most
general use would be just to split the backside
and the front side. I'm going to hit shifting he
to make sure nothing else topology wise when we do the
edge loops get selected, so we can just do nice little edge loops going
all the way across, like, so and that's
pretty much it. You might be
wondering, you know, maybe it would be better to
start with the back side, just touch the side of this. Maybe it wouldn't be as
visible with the edge seems, but distortion then for the front face will end
up being a little more. Some people tend to do also edge loops a little bit
closer to the face. That way, the places where it goes inwards
and outwards for, like, nose and mouth and lips, have more freedom to be relaxed. The smaller the UV shell
is, usually, you know, the easier it is for the shapes
and forms to be relaxed. Some people would even go
with this kind of face, like so to be just
completely separated, and then perhaps
they would create an edge loop going
from here to here and separate these parts, like so, essentially,
essentially, creating half of the loop
something like this. So you'd have three
islands if you were to create it like
this, like one backside, another backside, and
you'd have the face as the main proportion being just completely unwrapped.
And that's fair enough. That would be a perfectly
valid situation. But again, from what I've seen, most of the times, it would
be just halfly unwrapped. Like, so and we have a look. There we go this part
over here and mark seem. And basically, we'd have the backside unwrapped using
minimum stretch like this. Then the front side would also be unwrapped using
minimum stretch. And I completely forgot
one more thing, the nose. So let's talk a little bit about the nose after we do
minimum stretch like this, and we get the result, like so. So what I want to
say about the nose was that if you have a
look at the stretching, if I was to make this
squad a bit larger, so it would have more
density for the squares. We could see that quite a lot of interesting stuff
happening around the bits around the nose, and the reason for
that is the holes. Right now, the holes
aren't too big, but usually you would also want to just
unwrap these holes, so for the same reason
as you had the ear, where the moment it starts going well in and out and
it starts trying to add additional topology within you would want to make sure that the overall shape also gets well used up for the texture density for
the main nose part. So because yeah, that would allow the nose to be
more free, let's say. So that would be mark
Sam part over here. And other thing I've noticed in certain cases is if the
nose is quite a bit bigger. So, in these areas over here, if you're having more
of a stylized nose, and it just starts sticking
out quite a bit more, something like this, or I'm just going to use there we go. Something, you know, like this, perhaps, for some reason, whatever you're trying to make, it would end up
having, you know, more depth in these areas. In those cases, I would
also recommend you to just do the nose separately. So having this entire
nose selected, all the way around, try
to follow a topology. In some cases, it might
not work quite as well. But that would be
also an option. To make sure that, you know, the cheeks and those
areas wouldn't have too distorted of topology trying to save up this nose over
here this entire nose. And like, so Yep. That would be that would
be reasonable to do. And when you are working in substance
painter and whatnot, those edge seams, you'd
be able to somewhat hide them with a triplanar
projection materials. These are quite handy when it
comes to making sure that, well, we hide the
material using the seams. And yeah, let me just go
ahead and click Control Z to make sure we
get the nice noes we had previously. There we go. And I just realized that this part is a little
bit smaller than this. So I'm just going to
make sure we have consistency, and that's it. We can just go ahead
and now select the face again using SIMS, and I'm going to unwrap
it and we can see the difference of our nose. So right away, Oh, I am making a little
bit of a mess. What's happening?
Well, proportion, everything is on that's
what's happening. Alright, so this is how
the nose looks like now. It will have way more control over the relaxation process
over those squares over here, and that would be much better. And that is it. We have all of our
needed body parts. Now, if we are having
some, you know, clothes and armor
and stuff like that, you wouldn't want
to realistically see all of the body parts. Some cases, you
would even want to just delete some pieces. So for example, these body parts might not even be visible, and you would end up just
simply deleting them like this, and this is what would look
like out of the main mesh, simply just to optimize
the entire part. So that would be
potential, you know, if they have trousers on, if they have a t shirt
on, that would be perfectly viable
and totally okay. Um, but Eva way, if you want to have a full model of a body, it's fair enough. You can then go ahead and average island
scale and pack it. And let's go ahead and
make sure we rotate it, have a margin, and that's it. Pack it up. Let's see. All right, so this is
what we're going to get. Now, you might be
thinking that it's over, but I would also
recommend you for a face. You might also have a little
bit more of topology, so I would increase the size by two or even 1.5 like this, and it would have just a bit of an extra topology
to work with. The back mouth. So this one over here doesn't need to have this
much resolution, it can be smaller like so. And that's pretty much
it. Hands perhaps. If you're doing hands, I would recommend you doing both
sides of the hands. But that's a foot actually. Missing a hand, there we go.
Another piece of the hand. If you're doing additional, you know, resolution for the hand, you just do it up top and
bottom part of the hand. And now we can redo
this packing stage, and we get more resolution for both the head and the
hands just like that. To make sure we emphasize
it a little bit more, we can upscale it like this, even if we want some super
close up of facial shots, that will be totally fine, and we get something
like this resolution. Which, you know, might be
a little bit too much, but hopefully, you get the idea. It is completely
reasonable setup, and that is it. Thank you so much for watching. I really hope you enjoyed it, and I'll see you in a bit.
49. Vertex Painting Textures with RGB Masks: Hello and welcome
back everyone to UV Mapping boot camp mass and wrapping and
texturing in blender. In the last lesson, we
finalized the human unwrapping. Now we're going to continue
on with the next stage, which is vertex painting. And in this stage, we're going to talk a
little bit about, well, what to do when the Yumi space
is just simply not enough. This entire mesh,
we could say that, for example, it looks pretty good for a nice little
bit of chunk of rock. But if we make this, you know, quite a bit larger
to be placed in the scene to be used as
a terrain right away, you'll notice that
the texture is low and it's not as
good. What can be done? Well, we could try to, you know, increase the size of our mesh, but then the repetition is
going to get ahead of us, and then everything is
going to look the same. Obviously, we're not
going to want that. The seamless texture will
not help us in this case. Just a simple
seamless texture is not enough. What do we do then? Well, in those cases, this type of material called ground material will
come to our help. And the way the setup for this
material is quite simple. If I was to show you in
the shading parameter, we got this nice little setup. What does it do? How does it work? The important thing is
that we essentially have three seamless materials
tiled up with one another, which have the scaling
setup like this. And it will allow
us to mix them up based on we have a Zoom in
over here, color attribute. This is essentially,
well, vertex painting. What vertex painting is
is if we go to edit mode, each one of those vertices
allow you to have and contain RGB information in a
vertex paint in other words, meaning that we can paint
out whatever we want. To create a vertex paint
is quite simple, actually. I could show it right away. And by using BDSFPrinciple BDSF, I'll just put it over here
and attach it to the surface, just to kind of visualize
how it looks like. So color color attribute, like so just going to
attach it right away. And this is what we're
going to get by default. It's going to be black
if we start going into option for that
for vertex painting, going to make this a little
bit smaller, like so. So we would have
more of a screen. If we were to go on
to vertex painting, it's going to turn
why. What happens? Well it by default, right away, it
applies an attribute, an attribute for
allowing to save color information
onto your vertices. And with that, you
can then just change the colors and start painting in any type of way you want, which is pretty cool. You know, you can just have
colors and stuff like so. And you can also use
these as well as masks. If we have a look, for
example, over here, we can use separate There we go. We can use separate color
to separate the colors of RGB values to be used independently to give us
black and white masking. Meaning that if we start using because right
now, just as an example, I attach green to
the base color, I can set it up to be green and it would give me
that white mask. If I were to set
the value to black, it would led me to well,
turn everything black. Same goes if I wash this to set this to just completely blue, it would also turn everything to black because it's not green. When using these kind of masks, you can essentially use the RGV values independently
to create masks for, well, you guessed it,
three different shaders, three different
seamless textures. Each one of them
has a little bit of unique setups and whatnot, but that's how it works. And we can use these
to our advantage. So I'll just plug
this back in for a mixed shader and there we go. Essentially, we're
able to now make use out of it to use R, sorry, R for red, green, and blue values to blend in the tiles quite nicely,
just like that. And just like that, we're
going to have dirt for one, the rock for another, and a lighter dirt or
soil for the final one. And when I'm using it, I
prefer to change a HSB, which is used saturation
value to RGB, which then allows me
to change from green to red and to blue
just like that. And if I want to blend
those values up, I can also change the strength
to something smaller, and then it starts just blending in these values much
more naturally. And that's basically it. And we can use this, for example, to
rain to get well, anything we want out
of it, to be honest, we can make the size,
for example, rocky. So I believe that will be
green, if I'm not mistaken. Is it green? No, it's not green. Sorry about that. Blue?
There we go. It is blue. So now we have a
terrain out like that. The first thing we need to
do is sort out a little bit with the UVs because
they are not proper UVs. We can see that they are
a little bit squiggly and there are issues because it's not been
unwrapped properly. And the reason for that is
because I really want to talk to you about how to
unwrap certain terrains. If you're making a platform, you wouldn't need to have
anything underneath. So for that reason,
my recommendation would be to just simply
select the mesh, go to Edit mode, select it all, and then
go to mesh and bisect. Make sure you click
one beforehand because that would give
us the side view like this and bisect will allow us to go all the
way across like so, and then we will simply need to change up plain
normal values. So only one value
would be perhaps minus one. The rest
should be zero. And that will give us the
straight setup like this, and we can use this
gizmo on the side to kind of control how far
we want us to cut out. Then we just need to select
if clear inner or outer, and we get an empty base, which would allow us to unwrap it with using
minimal stretching. So that would be the
best way of doing it. If you do want to keep the bottom if you're using
for rocks and whatnot, I would still
recommend you to have creating this edge line like so, because it would
give you edge loops. And the reason the mesh itself is looking a little
bit wide like that with a bunch of triangles
and whatnot is because this was well
decimated, actually. If we go ahead and
select this mesh, we can click on 22, two, two, two, remash and then
there is a auxlRmash. You could try using quad
remash I would give you cleaner topology,
but with auxlRmsh, you would be able to when
you are out in object mode, you would be able
to topologize this. The reason it's important is because you actually do need to have this type of topology,
the density that is. You need to make sure you scatter the topology everywhere. If you're just having,
you know, some plane with maybe, I don't know, having a plane some bit
of an inset on the side, then this would not be enough. You would definitely need to make something a little better. And for that reason,
if you create something additional like
so and have it like this, you can just simply use
axel remsh if I was just to make it I'm not worried about topology
at this point because, well, we are showing auxlRmash. So when you click auxlRmsh, it gives you topology like this. You can lower the auxel' size, and that would start adding
additional topology density. So before doing
anything like that, just make sure you before
using the auxlRmash, make sure you set up
the right auxel size, which you can visualize
using Alt and E, I believe, in sculpt mode. If you go to sculpt mode, R, and then it will allow us
to well change up this. We can see the grid
on the side and going up and down or
sort left and right, will allow us to adjust
the scaling of the grid. And then this will adjust
the auxel side over here. Or if you are in sculpting mode, you can just simply
use this button on the top right hand side. It is the same button. So once we have the
setup for auxel size, we can hit axel remash
and that would give you the right type of
density for a mesh. So yeah, the reason I'm
saying this, again, mainly because when we
have a mesh like this, we definitely need to
have this extra topology. I'm just going to go ahead
and redo this part real quick to make sure we have, well, the upper section
cleanly set up like this. And afterwards, we
can just simply use unwrap minimum stretch. Or if you have the
bottom piece set up, just make sure you do
mark seam on the cut. And that way, the top
and the bottom would be set well separately. Then afterwards, we can simply make use out of
the vertex painting and make use of
painting abilities. So I do often change from
HSB to RGB for that setup. Red will allow me to
paint piece in one way. The green will allow me to
paint it in another way. And again, all of it
is because I have separated them based
on their channels. So RGB are three
different masks now, which are used to overlay
three different materials. And that's pretty much it. Feel free to enjoy play around with it and see
what you come up with. And, you know, if you want
more resolution out of this, all you'd have to do
is just because it's a similus secture you
can go onto mapping itself and change this up to
well have more resolution. I just need to find
the right one. I believe the light
soil is the one. So if I were to go here,
I can set this up, and now we'd have even more
resolution, of course, the pattern would
be more visible. So we'd have to
well hide it with even more of the painting. And if we want to, we can even change
up with strength and then start blending the
values up a little bit, like, so to get more
variation out of our pieces. So, yeah, just make sure
when you're doing this, although it's not much of a texturing type of focus setup, make sure when you're
doing this, to have identifiable spots. For example, the cliffs would be more well, rocky and whatnot. You know, you could start
off by just quickly, you know, painting it
out, it over, like so. And then afterwards,
holding shift, I can just blend in the values a little bit more
and then even go further the next step to get
even more detail out of it. But just like that, we can
just go ahead and just do a little bit of painting
and then slightly, you know, soften it up
for the top perhaps, going in with yet
another channel, so green perhaps and just using the smaller
strings to kind of help us break
down these cliffs, just like that,
maybe more dirty on this side over here
and something like so. That will be lovely. And, you know, the
rest is up to you. So, yeah, that's going
to be it for me. Thank you so much for watching, and I'll just put this back in its place right
where it belongs. Like, so we can move on
to yet another section.
50. Modular UV Tricks & Decals for Detail Boost: Hello and welcome back
around to UV mapping, boot camp, mass and wrapping
and texturing in Blender. And in this part of the lesson, we're going to learn a little
bit how to make use out of our already existing
UVs and how to get more resolution out of
things that we can control. Instead of trying to
squeeze everything within a high resolution
or using more materials, let's look for alternatives. So first things
first, what we might notice is this floating
wall within a wall. And this type of
wall is actually the duplicate of the
lower pieces over here. It's the same type of setup, but you'll notice
it's much shorter. So if you have a
look for example, behind the wall, we'll notice that we also have well the
texture behind it and whatnot. So that's quite interesting because if we look at the material or if we look
inside of the material, we'd see that the
textures are exactly the same as set over here. So how did we make this smaller? Well, for SaaS, we have
these tiles over here. And these tiles are quite cool. But if we want to
make them smaller, if we were to try to delete
these part over here, for example, try to hit delete, not like that with
normal delimeter, try to hit delete, like so, we'd see that we are
now having dark spots. And the reason we are
having dark spots is, well, this particular chunk
was set up as a module piece, and we baked out amber occlusion in between
all of this til space, meaning that, we have
issues when there are gaps in between and when we want to well
delete some of them. One way to fix that would be to well bake out these
tiles separately. So we'd have some
space in between. Another way would be to well
have an entire section like so and just have a couple
additional tiles for whenever we want to delete the
area that's not needed, we'd be able to then
replace it with the correct tiles in areas afterwards that wouldn't
have baking issue like this. And if you think about taking separating all of them
all at once and just manually building them
up or maybe having free variations and then using something like
array modifier, then you wouldn't have all of this unique detail for
starters in the texture, and you wouldn't be able to have these darker spaces in
between tiles as well, because, well, you
wouldn't be able to bake it out amblclusion as this. So, what I did over here was simply hide it
out of the way. I ended up just deleting
the outside for Sarus, like so, and just hiding
it behind the wall. Nice and quick, cheap type of way for a fix, but it will work. The other way would be using what I did with this
wall over here, which seems quite alright. And for this part, I actually just simply used the bisect once we use a bisect, like so, we clear out
the outer or inner, and then we use fill. When we fill it in, we just
make sure we go to edit mode and we unwrap the
part, just like that, minimum stretch or conformal, and fit in wherever looks like it could just be overlapped like
so, and that's it. It's not going to have those edgewaar that
we'd have over here, for example, but it
would do its job. So those are quick
ways of getting use out of our using maps, making more module
pieces, for example, and whatnot, and it's
nice and simple. Now, in terms of additional
way of making more variation, well, we have some parts
over here at the bottom. If you're not seeing
it quite as well, we can go on to modeling mode
for Sarus and we can just click on this
shading button like so to see that there
are four planes. These four planes are
basically decals. Now, decals are
simple they can have more detail or more PBR
values like roughness, metallic and whatnot,
but these ones just have base color and opacity. And the base color
is just, well, color for specific decal
and opacity will allow you to just put it into the Alpha so they would be transparent. Sometimes it's set
in one PNG setup. If it's a transparent image, you'd be able to just use
Alpha directly on the Alpha. And yeah, that's pretty
much it. Enough of that. By making use out of it, you're going to be able to,
like, how should I put it, distract the player with
the magic and make some of the more noticeable
parts seem more unique. And that way, you
wouldn't notice as much for the repetitiveness
of some of the pieces. If I was to make, you know, these pieces overlap like this, it would end up being very clear that it is the
same wall, like so. And that it wouldn't
be quite as good. But if we start using
decals, we can change that. So first things first,
we can make use out of decals to add something
like graffiti, for example, where it's just a distracting nice piece to make sure that we're hiding
those repetitive textures. So here, I'm going to
just simply use Snap with face selection and set up with a line
rotation to target. And that way, when I
have this selected, I can click G and move
it upwards like this. Then I'm just going to move it, so then I will just turn off
the snapping tool real quick and use local transformations
to click GY or X or Z. There we go. And just offset it a little bit from the
wall, just a tiny bit. Then use RX or sorry R Z and just rotate this decal
in any way, shape or form. Sapo decal is,
well, quite seafru. So we have an alternative one. We have this one, for example, we could put it on
the wall as well. So again, I'll just turn on the snapping tool and put it somewhere on
the wall like so. And I think that's going
to be quite right. Just like that. And again, I'm just going to turn this off. Gs, move it outwards,
just a little bit. So if you want it to
be super accurate and make sure it's not,
you know, hovering, we can just do we can go into the move section once
we move it from local axis, we can move it to 001, and that's going to barely
go out of this section. The reason we're doing
this is because, as you might have
saw previously, if we set something that's straight up overlapping
with the mesh, it's going to start
glitching out because it's not going to know what render what
to render first, the plane or the wall itself. That's why just simply
upsetting it by just a tiny bit not even
visible from the side, we're going to be able to
get something reasonable. It still might be glitching
out because, well, we are in the preview
camera preview mode. It's estimating the stuff. But if you are rendering it, we wouldn't get that issue. Even so, though, you can
always just, you know, move it outwards a little bit, like so, and that
would be fair enough. Now, other decals
include something like blood splatters or
dirt, stuff like that, grunges that would be going
by the edges or on the walls, top sections, for example, if we have some
repetitive edgewar, we could make use out of
these splatters over here to kind of get a little bit more of a
unique type of a look. So right now I'm just
placing it like, so I am going to it upwards with well
snapping turned off, GE or in this case, GY, there we go. And I'm just going to make
sure we have a nice alignment. And just like that, we're going to get
ourselves nice set up. Now, if there is too much
open space in a decal, what I like to do is just
simply move these downwards, so double clicking G
and then moving it. So Edge slide will allow us to kind of save up some space
on our performance as well as certain times it starts glitching the top section because it's just
an empty plane. If you're using cycles, it's not much of an issue, but it's just worth
knowing just like that. Anyways, we'd get something
like this and, you know, a bit of a splatter.
Is pretty cool. Pretty cool, yeah. So again, right away, what's it called? The repetitiveness of a
texture starts fading away, so this black spot and
this black spot, you know, are going to look
exactly the same because there is a small little, what's it called graffiti
on this wall over here. And because of it, you're just not going to see
that same pattern. This dirt over
here, where is it? This tiny, barely visible type of a dirt can also be used. We could cover up the
space on the floor. Something like that. So if you were to
use, like, you know, multiple tiles as we
talked previously, you could use something like this to kind of get that
extra bit of detail. And that way, it's not
going to look like, you know, it's not going to
look like the same pattern. And yeah, just by having
something a little bit, like, so we're able to break
off this pattern, this seam and, yeah, that's pretty much it
from the starting point. I just realized I lost a wall in the process of
deleting one of the things, so I'll get back to you on
that in the next lesson. Thank you so much for watching, and I will be seeing
you in a bit.
51. Procedural AO & Grunge in Shader Nodes: Hello and welcome back
your run to UV mapping, boot camp, master and wrapping, and texturing in Blender. In the last lesson, we left ourselves with a little
bit of variation. We also had a wall missing, which I ended up
just duplicating it and putting it
off on the side. Now, in terms of the setup for getting
additional variation, additional detail
out of our props, we have procedural materials. The main title of this section. Let's talk a little
bit about that. Firstly, I'm going to show you the setup with using cycles. Basically, in trace rendering, you get a lot of
information that you can make use out of as masks. So let's go ahead and
make use out of them. Well, for sats,
I'm just going to select this wall over
here on the side, and I'm going to
start off by making sure I duplicate this material. It should be already different
to the walls in the back, but I am just going to make sure I have a
new material to work with. That way, when we
go onto shading, we have, well, new piece of
information to work with. Oh, within a shading
tab. What can we do? Well, within here is where magic happens with all
the material setups. We're not going to go
too much in depth, but we're going to touch the
main subjects on how you get additional variation
out of your materials. For Saus, this already has am occlusion mixed up
with base coal just to make sure it kind of darkens up some pieces and not
leaves the wall as flat. You can see it, especially in the crevices and
what not. Like so. But if you want to not
have that and just make use out of renderers
default ambit occlusion, you can do that. You actually have a
real nice setup boda. So within the shader itself, we can use ShiftinA and
search for ambient occlusion. This will give us an
input ambient occlusion, which is this node over here. It's not the same
as this texture, which is just already
pre make texture. This is something that
uses the cycles engine. Going to go on to Renders
property real quick, make sure that we
have cycle support, and the device is set to GPU compute just to make sure that it runs a
little bit faster. And then we're going
to go onto viewport shading to see this
wonderful wall that we have. So that's a nice little wall.
What can we do with it? Well, for SARS, let's go back
to the ambient occlusion. We can plug this directly
into base color. I'm going to use color
like so in case you are attaching
additional parameters onto the color channel
and start combining it. So both of these will actually
give you the same piece of formation at the
moment because nothing else is attached to it. So yeah, we have a
couple of options for SARS there is only local, meaning that it's
not going to grab any information of amb
occlusion from the edges or from the outer wall
or from the floor. If we use only local, it's only going to grab the information from the object itself, as you can
see it, like so. And essentially,
ambit occlusion, what it does is it gives some darkness in crevices
in all the darker details. That allows us to add additional type of information
onto our material, even when, you know,
maybe you have a low resolution or something
on a wall and whatnot. By just simply using
ambit clusion, you're able to get
extra depth out of your geometry and imbuing
that into your well texture. So just like that, just by looking at this Amter
clusion over here, you can see the
already difference that we get by just
simply having just white by having a white wall in comparison to well having ambit occlusion
added to that. There are samples
here and whatnot, distance that you can somewhat
control to help you out. But honestly, what
we need to do with this amber occlusion
for controls would be to make
use out of color. This little shader over here, this little node will
help us to control how dark and how bright we want us to get and
how much of a contrast. We have 2 hours
basically at the start, and we can just use
those as a default by dragging the dark arrow.
We can see what it does. It gives us darker
shade on the setup, and by dragging the white, we're able to bring
out the white. By getting those hours closer, we're getting a nicer
contrast into our setup. Just like that, we're able
to get something like that. Alright. But here's
the thing, though. Using it by default might not
be quite as nice because, well, we would need
additional texture. It just makes use
out of the topology, out of the crow
system, or whatnot, and it's all good and nice, but it's not quite
there in the setup. So what can we do? Well, we can make use
out of noise texture. Making use out of
a noise texture, we're going to be
able to combine it and get a much nicer look. Right away to show
what we're doing, I'm going to click Control Shift and just tap on a noise texture. This gives us a preview directly attached to
the material output, which we can cancel by clicking Control Shift
on the last node, principle Shada BASF, and that would give us back
to the Shader setup. Anyways, going back,
Control Shift and click, we're able to get this
out of a noise section. And by simply scaling this up to ten and adding detail of eight, we're able to get some
bit of roughness. Speaking of roughness,
we're going to increase the roughness to
one, and that's it. We're getting some nice
little distortion out of, well, this noise, L as
you can see over here. Now to combine the amber
occlusion and the noise ture, we can use mixed color. Mixed color will allow
us to combine it, so I'm just going to drag it
into the point over here so it gets the amber clusion
gets attached to A, then we can use noise exture attached to B, and
this is what we get. We can use factor to control
the setup between those two. I'm going to click Control
Shift and just tap it over here so we can see
what is happening. So factor of zero is
going to give us this, factor of one is going
to give us this. And if we change the blending overlay whilst
we have the factor of one being essentially
meaning that both of these are completely
overlay with B being on top, we can set up as overlay, and it's going to now overlay or amber occlusion with
this noise texture, which is pretty cool because we get
additional bit of well, variation out of this amber
clusion type of a noise. If you want, you
can also well set up this part again with
color ramp like so, and we can get even more
variation out of our setups. So if we just drag it like this, we'll see that now it's
breaking up quite nicely. So before we had this, which is nice and smooth type of detail by just making
use out of color ramp, which is looking like that
with the noise texture. We can now get some
real nice type of detail or something like concrete wall for something
like Grange type of texture. It's going to look quite
nice, just like that. And that's a good base which
we can now make use out of. So I'm going to just move these notes a little bit higher, just like that because in
order to combine them, what I'm going to do is I'm
going to use principle BSF. So if we were to make
another BDSFFPrincipled, like, we can combine this with the principle BSF
that we have at the bottom. So we can use mixed
shade of for that. So let's attach
one to the other, like so, and attach it to
the surface, just like that. So this will allow us to
blend in between those two. To get our color
back, let's just put the base color back
onto the base color. We're not using the Amer
occlusion anymore because, well, we might as well just use this amir occlusion
that we just generated, although it can be used
both at the same time. There's nothing
wrong against that. And let's go ahead and
attach this overlay that we created onto the
factory onto the mask, essentially, to get this result. So what is happening over here? Well, we are essentially
telling to overlay the principal BSF to be well mixed up with this principle
BSF, which has nothing. So if we were to
increase the roughness, if we were to change the color to maybe more like an orange, rusty type and darken
this quite a bit, we're going to get something
that's, I'd say, quite nice. And, you know, if you don't like this amount, as we
talked previously, what we can do is we can simply
go on to ambit occlusion, find only local and remove it. And now we're only going to
get some details in crevices. So here. If that was to see
that, that is, there we go. B just increasing it like so, we're able to see it over here. So maybe that would be
more of a preferred setup, and you'd be able
to get more details out of all the
crevices and whatnot. So even if it's like, lower resolution
like this material, you'd still be able
to get and pick up some real nice edgeware and
whatnot out of your mesh. So that's pretty cool. I'll
just put this back onto Local and just
readjust it because I quite liked that dirt
that we had over here. I think it looked
quite cool, actually. And, yeah, that's the
basis of Amber clusion. We're now going to
move on to a couple of additional tricks to make use out of a
procedural generation, and then we're going to look
a little bit into, well, how to generate mass for
real time type of engines. Thank you so much
for watching, and I will be seeing you in a bit.
52. Edge Wear Masks with Bevel & Gradients: Hello, and welcome back
everyone to UV mapping, boot camp, Mass and wrapping
and texturing in Blender. In the last lesson, we
left ourselves off with some procedural texturing using cycles, and bet occlusion. We're now going to find
ourselves a couple of more additional tools
to make use out of. So let's head right into it. The next thing I'd
like to teach you about would be bevels, and they will allow you to essentially create
your curve maps. Which would give you edgeware. For that, to create that, we would have to make use
of a thing called Bevel, like so, and we'd actually get ourselves information
if we were to click Control Shift
and click on it, we'd get this type
of information. By default, it's pretty cool, but we need to actually have
two of them to differentiate on the thickness of what
we're getting because Bevel, by default is just basically
taking the normal formation, but faces facing where
and we don't want this. We want to make
sure we're able to get well, some edgewar. For that, we are going to
use mixed color mixed color. We're going to change
this right away to differentiate like so, and we're going to attach two of them just like that onto
the setup to get, well, nothing by default
because well, firstly, we need to make sure we
increase this to one. And secondly, we need to change the clamp overlap
is already titone. We need to change the difference because one has to be lower if we were to change
this to point. Or we'd start seeing some
additional detail out of it. So this will allow us to well tell the differentiation
of the edges. And well, the upper one, I'm going to leave it as 0.4, and the lower one, I
usually leave it as 0.01 to get this type of result. If we want to have
thicker type of edgeware, we can always just increase
this to higher value. If we want lower, we
can change this to smaller to get this
type of mass default. 0.04 is fine. No and then we are going to make use out of the color
ramp because color ramp is important when we are setting up the edgeware because we can then do some additional
fine tuning with it. So by lowering this, you can see the type of edgeware
we're able to get simply out of this bevel
method, just like that. And of course, in order to
mix this up with something, we could make use out of the mix shader
setup additionally. So another version of this, and we'd make another
principal PSF. And that would be fine.
That would be fair enough. But the thing is not
always do we need that. We can also just make use out of this as a mask just
for a base color, just like we did with amid clusion like we saw with
amid occlusion by default, we can make use out of the
base color with a color mix. So color mix, like so, and we can attach this little
piece of work that we had, is going to move it all
the way to the back. Like, so don't mind this. Let me just move this up top. So I'm grabbing right now the bevel that we
set with color ramp, and I'm going to mix it
into the base color. And putting it into
the value of B, so I'm going to click
Control Shift and tap just to see what we're getting. This is
what we're getting. It's almost there, but not
quite because we want to increase this to one and
change it to screen. That means that we are getting the brightest value out of it. And we can play around
with the factor a little bit to get
additional adjustments, but you can see just
how easy and simple it is to get some additional
edgeware in comparison. We're getting such a nice
result just by doing that. If we want, we can also just
lower this a little bit, kind of tightening this up, and we get just some
nicer nicer result. So that's how we get edgeware. Now, the other thing that
I'd like to mention would be something that would allow us to get more of a
gradient type of masking. For a gradient type of masking, what we can do is if I was to
make use out of attribute, so there is something
called attribute, so we can make use out of attribute to get, well,
vector information. It's not visualizing that. But if we are to separate that, separate XYZ because vector
has three values for X Y Z, we can then preview this. And again, it's not showing up because we weren't
using the right one. What we need to use
actually is attribute. Sorry, attribute
position. There we go. So it's the same node
except at the bottom, it will have information
grabbing the position. Now, if I was to
just move this out, so we're going to get some
information out of it. If we were to change
this to a z value, so we can preview what
the z value looks like, we can see that we're getting
darker mask at the bottom. And essentially, we can
just make use out of this mask to use it
with color ramp. Like, so tweak it, adjust it, make it suitable for you and even make use out of the noise texture that
we had previously. So we can just even copy the ambient occlusion
that we previously had. Like so put this up
with well, the overlay. So right now what we have is attribute taken through
separate XY z color ramp, taken to the overlay, and the
noise texture will be here. Now we're going to get
this kind of a look, which is looking pretty good. And I'm going to make
copy out of Mix Shader and this single
principle BDSF like so. Just like that. So now we can connect already existing mix shader onto value of B. Is it B? Yes, it is. And we are
going to get a nice result. Well, not by default, because
we need to make sure we put overlay into the factorio
so and just like that, able to get some
nice bottom parts. So this bottom part can be done for whatever
reason you want, you know, if you want to make it a more grotesque type of a look, you can totally do so by just
making it look like this, maybe even lowering
the roughness, and it's going to
look like, you know, something creepy, crawly and
all of that beautiful stuff. And, you know, you can
just adjust where is it? The color ramp over here
to well increase it, make it look really gruesome, like so or just barely visible would also
be quite alright. All of that good stuff.
Also, you can well, change the color ramp itself. You can change this
value over here, so it would barely
be visible like so. And now we're getting
some interesting results, really
interesting results. Usually, though, black is actually the one
that's well removing the mask while white is
the one that's adding the mask because we have
these essentially flipped, we have it like so. But any way, we are just
basically telling to the factorial value what counts as zero is
going to be one value, what counts as is going
to be another value, and we are using the values in between to
tell how to blend that in. And yeah, but now I'm just
going to go ahead and make it a little dirty instead because I think
that's going to look, well, that's
grotesque, actually. Now we can copy this same result onto
the rest of the walls. So because these walls are actually using the
same type of material, we can just be a little
bit cheeky with that. We can just select
all of these walls. Hood shift, select this as a
first wall or the last wall. So we will have that
orange selection. Click Control L, ink materials, and now it's going to do this. In order to avoid
this kind of issue, all you need to do
is go on to object properties and find
yourself visibility tab, then scroll down until
you get to the shadows. By turning off shadows,
you're going to, well, disable that detection, and you can just put
it back onto the wall just like that and just have it turned off for the rest of the items just like that to get yourselves some nice bit of decalts which this is
a little bit too high. You just noticed and
that is pretty much it. In order to make use out of this same shader for the floor, what you could do
is go on to well, shadings panel that we have created all of this
type of setup, like so, and you can just select all of these panels just like that, including the screen
bevel, all of this. So I'm just selecting
these tabs. So A clusion section, the edge ware and
finally, the gradient. I can hit Control C,
move this on over here and make sure I
am making a duplicate. It's probably it's actually a fur duplicate.
That's right, though. And then I can just
paste it like so. And then we can just
simply rearrange it. So for Sarus, we don't need
am occlusion over here, but we are going
to mix it up with the wonderful screen
for the edgeware. I believe they need to be A and B like this,
different positions. Like, so, put it back
on the base color to get this result,
which, you know, we can just use this value to darken it a little
bit like this, but bit of an extra edgewre. Next up, we got ourselves,
well, mix shader. I'm going to move our trusty material output
all the way through back, and that way, we can
just start kind of well, realigning everything
that we had previously. And I believe I am
missing mixed shader. So real quick, I'll
just make a duplicate, put this like se and so,
wait, what am I doing? Sorry. So duplicate
mix Shader, like so, put the principal BDSF
onto the value of A and put the mix
shade that we had previously onto the value
of B and just attach it to the factorial for
the overlay that we had from our gradient. Now, the gradient here is not
going to work well because, well, we don't have
much of a gradient. Can we get anything out of it, though? Let's have a look. I'm going to click Control Shift and just see if we're able
to get anything out of it, which we definitely are. So let's get this onto the mix Shader and see
what we can actually get. Well, Turns out we can get
quite a lot, actually. As you can see, like so,
this one also forgotten, little decal, needs to be taken off with the shadow, like so. And we get some What are
we doing here, actually? Let's see. So this
is what we have. This is what we're working with. And by getting it as close
as possible to a value, we can even just select this white arrow and just
use the position over here to just set the value,
something like this. We can see that we are getting
some parts going inwards. So we change it to 0.015, it starts picking
up from the base. And here, we can make use out of a color or maybe more
of a mossy look. That would be pretty
cool, something like so, and that helps us
also to darken, as you noticed,
these parts inside. Something like so I
think it's pretty cool. Maybe a little bit
more even so 0.17, getting that bit of an
extra, just playing around. I think it's pretty
cool. And that's it. That's how you get the
floor to make use out of the same type of masking that we had on from the
wall to the floor. Thank you so much
for watching and I will be seeing you in a bit.
53. Smart RGB Masks for Reusable Textures: Hello. Hello, and welcome
back around to UV mapping, boot camp, master and wrapping
and texturing in Blender. In the last section,
we left ourselves off wave while
showing how we can generate certain masks to add detail onto our UV maps
for the texturing. And in this case, I'm just going to tell you
real quick that, yes, you can make use
out of certain masks. To do somewhat of
a similar setup, except this time I'm
using RGB values, and I'm using substance pata
to bake that stuff out. I'm using smart masks to create, well, certain detail
for edgewar over here. Then I have green mask
for all the cavities, which is going to
work kind of like, well, the ambit occlusion. Then finally, I have the
base setup over here, which is going to work
well, like the gradient. And using all of that, I can make use out of the
where is it linear Dodge, which is going to add
all of this together, all of these values,
blending all of that in, and then I can export it out. Once I export it out,
I can essentially go onto any of the software, whether it's unreal engine
or in this case, blender, and I can make use out of it
just like I did with well, the previous
procedural materials. So over here, we have this baked out mask
already exported, and then I just
separate the colors to RGB and make use out of it. So just like I did with the Edgeware I'm
making use out of it over here and added just a color ram just to have
sort of control over it. But what's nice about this
is basically we don't really need any of the additional
detail for the UV map. This is, like, maybe,
like, not perfect. It has some space on the
top, and you know what? It's totally okay, because
the way we're using it over here allows us to
do something like this. We're able to use
seamless texture just like that to get detail
out of or barrel. So by increasing the scale
something to like six, we're able to get
much fiiner detail, much nicer detail out
of this overall setup. And then we can, you know, just play around with, you know, edgewaar stuff like that. We can then go and
make use out of that same mask
over here to well, fix it up with dirt. So dirt, all of this little
dirt over here, you know, we're able to make
use out of it and just turn it into a nice little additional
type of detail. And then there is also, well, the most at the bottom. We can make use out of
this mask, which again, is the same mask from the combination except
this time is blue. This blue can be
made use out over here to well create this
nice little detail. So just like that, we are able to well get
additional detail out of our barrel by
combining the masks. And again, this type of method would also work
in unreal engine, you would also be
able to set us up in Godot or Unity
without the need of, you know, adding
multiple type of setups. Although I will say, well, you wouldn't need to
add multiple materials, but in here, we are using
three different materials. For welded wood and two
variations of metal. And you might think
that, like, Hey, wouldn't that be the
same thing as just using just multiple UV maps and using three different
material setups? Well, no, because in each case, we're basically
going to be re using that same seamless
texture setup. So you can imagine if
I were to make, like, table this time, chairs
and stuff like that, I could reuse that
same seamless textures that I have over here and just simply have a new
mask unique to the prop. That way, the size for the
project would be much simpler. The performance would be
much greater overall instead of just having each individual
texture for base color, for metallic roughness, normal, all of that value
unique to each prop. That would be a lot of
rocles that would take a lot of performance if
we'd have a large scene. So, yeah, that's going
to be it for me. A little bit of a
short explanation. Thank you so much
for watching and I will be seeing you in a bit.
54. Creating Trim Sheet Textures with Extrusion: Hello and welcome back eon
to UV Mapping boot camp, Master on wrapping and
texturing Blender. And this time we are
within the trim sheet use of the section in which we're going to make use out
of well, trim sheets. But before doing
that, let's learn a little bit about
what exactly they are. So a trim sheet is a single high res texture
atlas of reusable details. Things like bolts,
seams, panels and such, you can use to essentially stamp out the detail onto your mesh. By manipulating UV islands, you're able to match the regions instead of just simply modeling that additional detail or using texture techniques for
each detail individually. It is great for efficiency
and consistency. You're able to get some
instant iterations out of it by manipulating the UVs and you're able to use
precise UV mapping to get pixel perfect type of
detail out of your meshes. This is what it's
going to look like. It's going to be a texture sheet with a lot of different
patterns, perhaps. We'd have variations
in horizontal lines, so we have maybe some
additional panels at the bottom that are a little bit
larger to make use out of. But having it so
would allow us to, well, create a lot of
detail for the meshes. We can think of them as
sort of a toolbox of unique textures
that you can carve up and assign to different
parts of the model. Again, everything is done
using UV island points, and you can adjust them
and make them larger, squish them around until you
get your desired effect. By manipulating them,
you can essentially get unique pieces that don't
repeat unintentionally. Is a special purpose
atlas full of small repeatable details that
we can tile across islands, snapping mirroring and
such for the same regions. Now, the difference, though, it's not an atlas. It's not exactly an atlas. Although we could categorize it as part of being an atlas, it is completely
different to one another. The texture atlas would be just having many different
non repeating maps, such as wood, metal,
plates, and such. To be placed into
10 to one UV space to reduce the material count. The UV parts would
be non overlapping, meaning that each one of them
would have its own section and each island samples
a unique rectangle. If we have a look at the
previous section over here, you'll see that all of those little small
pieces in Section ten, we had them as separate
little squares, and that's the big
difference on atlases, as they're simply
there to help us reduce the material
count within our scenes. On the other hand,
the trim sheets that we can use are a
little bit different. Their purpose is to pack modular surface details and stamp them repeatedly
across a mesh. It is a more advanced variation, essentially, the UVs
are often overlap. They're tiled outside of
the zero to one UV space. That's quite important because I see a lot of people saying, everything needs to be
in zero to one space. In the past, there were
some issues, for example, with light maps whenever they're
being used game engines, but now they generate automatic
UV light maps themselves. And especially with
something like trim sheets, you ideally would want to work outside of the zero
to one UV space, mainly because it helps to get more organization into
your well, UV islands. Once you start editing them out, once you start manipulating
and reusing the same detail, it can get pretty well,
pretty complex, actually. So in short, an Atlet group uses unique textures
for different parts. A trim sheet reuses
the same texture, snippets over and over again for efficiency
and consistency. So we'd have those
patterns that we can be re using to
exaggerate certain, for example, edges,
certain angles, and whatnot within our seen. The other thing that
I'd like to mention is that they're
often repetitive, not in terms of just
a seamless texture, where it would be, you know, an entire piece could be just
repeated on itself. Although in this case, it could potentially
work like that. If we were to have this
selected, we could upscale this, and now we can see this
entire repetition, so making it seem like it's multiple panels attached to one another, which
is fair enough. The main thing,
though, is that well, it is having repetition
in terms of X axis only. And in most cases, when I see trim sheets, they have this type
of repetition, meaning that they
can't go horizontally. To the side, but it can't go vertically up or
maybe it's opposite. Sometimes it would go vertically
up and not to the side. We can actually test that out. I can actually show you
the technique real quick. So if we were to go to
extrude region like so, and we can use this extrusion to extrude outwards like this with orientation set to normal. So it's the same as
just clicking E, but orientation is set
to normal over here. When you click click N, we
get active tool options. And one of the options is
within the extrude region, within the active
tool, if we were to make sure we have this
option turned on, correct face attributes,
it will allow us to extrude the faces just like
that whilst giving us, well, the UVs right off the bat. So it's a little nice
feature to make use out of, and we could make walls just
like so and on top of that, what I'd like to mention
is before going right into the trim sheets to
unwrapping it for the objects, we can make use out of the setup to well,
get some nice panels. So what I mean by that is, let me just duplicate
this real quick. So, for example, we
can start off by clicking control R and using it in edit mode to create edge seams where the pattern
is in between the panels. So for example, in
these parts over here, we could just create some
edge seems just like that. And if we were to continue
on doing we'd be able to, well, make use out of the UVs, the already existing planar
type of projection for the UVs to get some additional edge loops
and additional detail. And once we, for example, we set something up like this, we can then just, you know,
extend this a little bit. We can, for example, turn
this a little bit into well, additional extra detail like so and have this even actuat
even more, just like that. And by playing around, you
can see we get some, well, additional depth out of this
mesh by simply just adding already onto already
existing plane or projection,
this type of mesh. And this is by the
way, not a plane. This is, well, a more
three dimensional objects, just to make it
easier for you guys. But you can see the type of a setup that we're able to get. It's really nice and simple. And over here, for
example, we could add parts of we're like so and
just extrude it like this. And in such panels, it's actually better to just avoid well straight
edges, like so. But even if you are
doing straight edges, once you get some detail
onto the texture, you could click S
Z and just extend it like this and we
get more of that, you know, type of a setup. Maybe this one
lower down as well. But make sure you have what's it called the tool for correct pass
attribute turned off? This will allow
you just to adjust the topology a little
bit better if needed. But yeah, nothing too
overly complicated. It just helps you to visualize where you want the
detail onto your mesh, and add all that nice little
pattern onto your setups. And, you know, once
you're happy with, let's say, this part, well, I'll add one more over here because I think it'll
look pretty cool. So I can just move this
outwards like this. And once you have, so, you can start adding
even vertical parts. So, for example,
this one over here, we could try getting
additional detail out of it. And the easiest way
would be to just add extra edge loops
around it, like so. And once we have
extra edge loops, we can select this part. We can click I and insert
this type of setup and then use slide method
by double taking G. It allows us to slide R um, what's it called topology by just moving it
around like so. We can also do it individually to the vertices, just like that. It just lies though around
based on the setup, and just like that, we're
able to get some nice detail. Of course, we can go back to the correct basic attributes
and just move this around, and that will also keep
those UVs aligned. So up to you how
you want to do it. But once you get
something like this, we can select back the face, turn off the correct
face attributes. Because if we do not
have that turned on, it might sometimes start
glitching out a little bit with Vs when we
are extending it. But you can see
just by doing that, we're able to get
some interesting and unique type of details. So over here, we
could also extend it, like so get this
little part inwards and select these parts, click I put something like this. And I don't think we even need to use correct based attributes. We can just extend it, like, so get a bit of
additional detail. And just like that, we're
able to get something nice. And afterwards, we can
just select the section. I'm just going to make sure
we select this entire piece, correct based attributes
and just maybe, you know, move it outwards
or in this case, because if we want
to make use out of the same already
existing topology that are on vertical pieces, we'd have to, well, duplicate this entire piece like this and move
it to the side. We could also use
snapping tool because this is a two by two
type of a panel. So we can use this with
a grid and just move it. Oh, what happened here? Well, I had the align
rotation target, to make sure we turn this off. And we can, well, snap our panels just like that. And I have one like so. And we have some, well, interesting little detail to use within, like,
scenes and whatnot. And it looks like it has
some bit of a nice depth. And yeah, nice little
Sci fi panels. Now, going back to our setup, let's try to make use out of this exact triplanar
not triplanar, sorry, trim sheet type
of AUV panel to well, applied detail onto our meshes. So let's see what
we can do about it.
55. Trim Sheet Alignment with Magic UV Tools: Hello and welcome back eon
to UV mapping, boot camp, master and wrapping, and
texturing in Blender. In the last lesson, we
left ourselves off well, we're showcasing some of
the wall abilities for the trim sheets and panels
and that sort of stuff, which is pretty cool. But let's get into objects. Let's ignore the claw
machine over here for Stars and move on to
the back box over here. Have one sample preview
over here set up like this, and we have another
one that just has the same material
applied but has no UVs. So let's make use out of it. Let's go ahead and just
simply select these two and isolate
the view this way. Nothing gets in a
way. And we have our nice little sample
box to make use out of. So let's get right into it. Let's select our box. Let's
go on to the edit mode. I'm going to hit old Z
to make sure it's not transparent and we have
this type of shape. You might be wondering
what's up with, well, the triangulation
and whatnot. In certain cases
with trim sheet, because you don't
have control over the textures that already
are set with the setup, well, maybe you can
change, you know, the trim sheet, type of
patterns and whatnot, but you don't have control over each individual pieces
if you're trying to use those trim sheets
on multiple objects. So what you certainly
in certain cases, what you need to do
is you need to add extra topology onto your mesh, in this case, triangles, which we are going to make
use out of in order to help us cut up
those patterns into more of a unique UV
island setup to get, well, a nicer look
out of the crate. As you can see over
here, we're going to get all into that in the BitoF now though let's prepare ourselves with
trim sheet setup. So firstly, make sure you
click on one of the faces to get yourselves this
trim sheet visual. If you're not seeing it,
just make sure you click on this part over here
and just select the trims basical like so. And I believe this one
is ticked off for me, but it should be turned on automatically if you have
this pin selected like so. Now, we are going to
get ourselves more visualization out of this
square because we're going to work outside of UV
space, zero to one space. We need to click on button
over here to open up the panel within
the UV editor mode. Then we're going
to go on to view. And we're going to
select repeat image, which is going to
give you a bit of a flashback because
everything is so white. It's just, Wa, maybe I should
have given you a warning. I think you're going
to be okay, though. And let's just get
right into it. We still have the visualization where the zero to
one UV space is, by the way, so you should still
be able to see the setup. And I'm going to just
select all of this. Create and just
move this UV space, which should be this tiny chunk over here onto the bottom piece. So just letting you know that just like in
a previous setups, I simply use Project from
you. Where would that be? So clicking U Project from view just to make sure I grab the entire
setup of the UVs, and that way we can go back to it whenever we want and just, you know, see what we're missing perhaps and whatnot,
all of that good stuff. So first things first, let's start with
something more basic. Let's start with those
borders over here because they're nice and straight
types of unwraps. We can go ahead and make
selection like this. And I'm using C button
on my keyboard and just getting this little
circle selection, which we can use
right mouse button to cancel it and left mouse
button to select it. Of course, mouse
wheel to move up and down with the scaling. So that is it. And if you
make wrong selection, you can just use your
middle mouse selection to deselect it. I'm just making sure that
nothing else is selected. So we got ourselves
something like this. Afterwards, we can do the same selection for the bottom pieces. Like, so and this will make our lives a little
bit easier, just like that. Now, we can go ahead and click
Unwrap UV Rap Conformal, and we're going to
get this nicely placed in our zero
to one UV space. Of course, because
we're using drimsets, we actually don't want this. We want them to be overlapping. For that, we can click N and make us out of
the magic UV section, just like we did use previously. Again, this is an add
on. A free one at that. But you can use UV manipulation stage with
the group set as UV Island, and we can click Snap
to Point to make sure we have all of these nicely
overlap just like that. You can then rotate
this by 90 degrees. And once we start moving it, we can see that all
of these details start popping up
into our section. So what we're going to do
now is we're going to make use of our well, the edges, the longer
parts over here. To just place them
horizontally like this, and we can even upscale them. And in here, we had some nice little
patterns in the middle. I am actually going to go on the Object mode real quick,
have the a selection, and just make sure
we have the panel in the back for more
visualization purposes, just to see what we're doing. It's a little bit
easier perhaps. As a starting point. So we
have this part over here, which I'm going to
make use out of. And for that, I'm just going
to move it to the side like this and see how well this goes. So we're going to actually move it outside of a
zero to one space, just put it off onto
the side somewhere, and we are going to just now ignore basically that
pattern, zero to one space. And if we look at it over here, we'd basically be
just putting it into it just a tiny bit like so and
get ourselves the pattern. That. Now, this part over
here, if we have a look at it, is actually just 1 bar over, like, so with two
railings on the side. So essentially,
what we're doing is setting it up like this, and it would give
us that pattern. The thing is, though,
that this pattern would be on our sides. So
that's not good. We want to be more
in the middle. We would have to do a
little bit of mirroring, actually, for that,
and that's okay. Because we're going to
get some nice detail. For Stano, let's grab
the smaller pieces. We're going to use
UV linking, like so, and just make sure we grab all these smaller
ones and just have them somewhere placed with detail a little bit off onto
the side, just like that. And when I'm sorting this
out, I'm also upscaling it, making sure that the
top and bottom pieces are where the panels are. So it would be like,
over here and over here. That way, we're
getting ourselves this nice edgeware
out of our setup, something like S is giving
us really nice setup. I notice there is a bit
of a line over here, so I'm just going to click
Gx and just move it off to the side and a little bit
more perhaps like this, nice clean little
base, just like that. And now let's go back onto our
beautiful setup over here. What can we do in order
to get just well, not to grad not to type
of grading but just one. We could, of course, just
move it like this honestly and that would be quite nice. Maybe we could leave it
as is but let's say, you know, it's not okay. We want this to be not
that way, basically. What can we do? Well, we can just select one of the pieces, one of the sides with
the phase selection, and now we start moving
this, it's going to split up all of
these parts because, again, they are overlapping. So what we're going to
do is we're just going to click Rs 180, like so and overlap them
yet again, just like that. And if we want to make use
out of alignment, we can. I will show you in the future, a little bit different
way of aligning. But for now, what we
could do over here is just simply align it like so, and I'm making sure that
this is just the middle, which it is perfect for us, meaning that when we select
these vertices over here, we can click what's it called No We can just right click and we can
just straighten X. And that's going to straighten
it up for us, like so. And it's still not going
to look quite as good. So what I'm going to
do is I'm going to show you this other
method right away. We can select all of
the UV islands like so and just simply use button
to merge by distance. This will put all the
islands merged up like so, and it's only going to
do it in UV island, meaning that we can
just select one island, like so, and it's still going
to be a separate piece. But all of these
are now going to be properly stacked and
overlapped, like so. And one thing I will say is that I didn't mirror it properly. So it wasn't mirrored, but
instead rotated 180 degrees, meaning that we're going to
get something like this. We actually want this
to be on other side, so I'm going to rotate it, rotate everything 180 degrees, and now we're getting
this centered up. And we can just move
it inwards like so until we get a
right type of a look. So maybe something
like this would be pretty good just like that. And we're getting
1 bar over here. We got 2 bars over here. Again, because of the mirroring, didn't we didn't mirror it, meaning that what's
on the top on one topology over here is going to be on the
bottom of the other. So that's why there's
two selections over here or one
side and another. Like so. And that's
right, though. So I think I'm going to leave
this type of bar as it is, because instead of
using mirroring, which I could have done, I
ended up using just rotation. I'd like to show all
of the techniques. So I think I like
this even more. We are running out
of time, so let's go ahead and continue on with
this in the next lesson. Thank you so much for watching, and I will be seeing
you in a bit.
56. Corner Details & UV Mirroring for Trims: Hello. Hello, and welcome
back everyone to UV mapping, boot camp, master and wrapping, and texturing and blender. In the last lesson,
we set ourselves up with a nice bar going across, like so, and now we're
going to continue on with, well, the detail. So let's start off with
this part over here. We can go ahead and select it. And for Saras, we can
just set it up as a panel like so UV conformal, and just put it out 90 degrees. Move this inwards, and I'm
just going to put it up. Somewhere like this. I think it's going to look quite nice. So for now, we're going
to keep it as is. In order to make
squares like this, I will actually show
it to you how to make it on this part over here. I think it's going to be enough. But let's move on to
while adding detail. So now let's say we want to add these edge borders on
the side. We can do so. We can go ahead and
select these edges, so I'm going to select both
of these on both sides, click and use uniform
on rap conformal. Like so move this outside
a little bit and do the selection on the
longer pieces like this. And use on wrap, not minimum stretch, conformal. It's the same but a
little bit different. Now we can go ahead and select
both these pieces and use average island scale to make
sure the scaling is proper. Now we can overlap
them using magic UV, snap, two point UV islands. Yep, that's going
to be great for us. And we are going to rotate
at nine degrees and find ourselves what are those
stripes that we have over here, which are going to be used
to add detail like this. The important part here, though, is that we are making sure that this panel for the stripe, as you can see over here, it has some nice bit of edgeware. And this edgeware we
need to encapsulate it into the edges over here because for the
top, we didn't do that. For the top, we just
made sure we have, more of a plain type of a look, and we need to make sure
that we have, well, an edgeware over here to
make it seem like it's well, part of the mesh to make it seem like this edge over here is actually being affected
by the weber and stuff. So when working
with trim sheets, it's important to think
about this kind of stuff, how we can incorporate all that little stuff
into our setups. So I'm just going to
upscale it like this. And we don't need to worry about it going outside
of like zero to one UV space or going into
our repetitive parts because, well, it's quite repetitive
in terms of X axis. There's not going to be
a single upper panel. Meaning that it's going
to be quite all right. I say that and I see this part over here,
which I do not like. So I'm going to click Gx
and just move it outwards. Yeah, Gx and move it outwards. Making sure my mouse is on
the right side, by the way. A voice is not going
to look quite right, and I think that fixed it.
I think that's quite right. We can select by
clicking L with the UVs. We can select these parts
and click Gx and move this because I see this
part over here and I don't like this being
offset like this. So maybe in the middle, like so I think will look
quite nicely for us. Yep. I think it looks
quite alright actually. And yeah, adjustments
like that, you know, making sure that
the detail goes, the pattern goes in the right places to kind of
make it look more believable. That's the key over here. And yeah, in terms of
this panel over here, let's go back a little bit to it and talk a little
bit about it. We can make it larger or smaller, depending
on the setups. We can also move it
so we wouldn't get as much detail or
get some detail, for example, over in
the corners like this. And stuff like that
is also important. When it comes to sizing itself, we can make it, you know, a bit small or we can make
it a little bit larger. But the point is that when
we are looking from, like, you know, a screen, we are seeing like, somewhat of a similar detail. So even if it's, you know, the detail over here is a little bit smaller in
comparison to here, when we zoom in super closely, we can kind of see it. But if we're looking
at it from a distance, there's no way anyone would
see that type of difference. You know, the reflection is
there. The pattern is there. The sizing of the pattern
is somewhat similar. And that's pretty
much it, you know? It's okay. It doesn't
matter too much. General rule, though, is that, I try to avoid going
twice the size, more than two times the size or smaller than half the
original or the main pattern. So, for example, if
this was the main size, I wouldn't go more
than scale two, like so, and I wouldn't scale it down more
than scale 0.5. Oh, scale 0.5. Like so, so nothing less than this, nothing more than two. It would give you a
reasonable setup. Now, let's move on to these triangles over
on the side, actually. I think that will be a
nice little transition because they are quite
fun to work with. So the reason I mentioned
previously about, you know, adding topology, making sure we have more ability
to work with, like, different patterns and whatnot, let's say we have something
like this where we want the pattern to go in their
own like little loop. We don't have anything
like that. We don't have any triangles.
It's only lines. So what we're going to
do is we're going to cut up this entire square, not this entire square,
this entire quarter into three little trangles. To do that, we can
go ahead and select the edges like this because we're going
to mark them as seam. And we can simply
after doing that, we can simply go
on to a selection, select all of those
pieces like so, and unwrap them with
conformal setup. And this will give us three different triangles
just like that. Now, if you don't have I'm just going to move it where
there's no up UV islands. If you don't have all
of them rotated in the right angle, no, don't fret. It's okay. You can just
simply select one of the islands and use R 180. To rotate it, like so, and that will give
you the right setup. And afterwards, what
we're going to do is select those three
little triangles. We can click N, use
the Snap point, and now it's going
to be overlap, but they're not going to
be perfectly overlap. So that's going to
be an issue for us. We can use M by distance and just increase this until
we get something like so. And now we got ourselves
a little triangle. And if we start, for example, overlapping somewhere
where it has, like, a bit more of a
vertical pattern, we'll start seeing that, hey, it's actually creating
some interesting and unique little patterns. So that's pretty cool. Let's go ahead and
make use out of them. If we start actually overlapping these holes
over here partially, so we're going to get
some pattern like this, and that is really cool. And yeah, by knowing that we have
these triangles over here, which to do do do, I can click L and
click G. Oh, actually, we can click L over here with the UV selection
and now click G, and you can see
it moving around. Because they're
perfectly overlapping, they're going to be
basically mirroring this pattern right
away as it finishes, it goes to UV island. So from this section,
finishes over here, it starts mirroring right
away to another part, which is going to
give us somewhat of a nice detail, just like that. And yeah, we're also making sure that we are placing this
close to the corner, close to this little chunk over here, where
the edgeware is, just to kind of break
up the pattern, just to make it seem like
it's another object piece. Otherwise, it's going to be
quite visible with the seams. And that's another thing I'd like to talk a
little bit about. In terms of scene setups, if you start zooming
in, so for example, this island over here and
this island over here, you start, well, seeing the UVs, it's going to be sharp, and that's one of the
downsides of trim sheets. Although you can get
a lot of resolution, and it's going to
be quite optimized. One of the downsides is
that it is going to, well, be shown somewhere
with the seam. So even with these
trangles over here, you know, if we zoom in really, really closely, we start seeing, like, a bit of blud just
over here, and like, this metal grunge over
here is being connected. So those are the small
little downsides. But again, there's so
much we can do with it. There is so much
creative freedom. And although it can
take a little bit longer in comparison
to other UV setups, you have a lot of control over how you can make
use out of the pattern. And well, you don't
really need to worry about the texture
density or anything like that. Out of one material
drimset you can make use out of it for
many, many objects. So we got ourselves
one triangle. What can we do? Well, I am too lazy to work on
multiple triangles. So my lazy way of fixing
this would be to well, grab all of the rest of
the triangles, like, so we can just make a
selection just like that, and we're going to
just simply delete it. Why not? So let's go
ahead and delete it. We're going to leave the
unwrapped one as is. And that did not
leave unwrapped one. I'm going to click
Alter L or Controlling L. AlternL ShiftnL, there we go. Shift L will allow you to just select linked and
deselect it, essentially. So making sure that only D
D D D do we just turn off the snapping tool only turn off the snapping
tool, there we go. Only these corners are selected. We can go ahead and delete it. We can select these
little free UV islands like So and make use out of it. And before doing
that, I'd like to go on to vertex selection. So vertex selection is tacton and select this
vertice right in the middle. We can use it as a
cursor to active. So free Dcursor now is placed, is set, and we can use
this as a pivot point. So let's select these
corners over here. We can now go and change it. So the pivot point
would be free Dcursor. And now we can just click
Shift and D and click Escape, use S Y minus one. There we go. And now we
can just do actually, we can do all of them at once. So we can just re select
this part over here. This is now also selected, and it's making a mess, actually, what's
happening over here. I just realized that aha. Yeah. So make sure you have
correct face attributes turned off because it was
giving me a mess on the corner. So by having this turned off, I can now do S Y minus one, and now it's going
to keep that same UV setup as we had over here. Okay, so we avoided a little bit of a
disaster, but that's okay. We can just make duplicate out of the two corners
already at once, hit Shift D, click S X minus
one this time. There we go. And we're going to
get this setup. I'm going to go ahead
and I'm going to go ahead and go on to
the viewpoint overlays, select the face orientation. And yep, that is correct. It's going to have
some flip normals. So quick fix is I'm going
to select everything in an object merge by distance
and then you shift an N, and that's going to
flip them back on. So, honestly, when using a trim sheet before the face orientation would
preview everything as red. Even if it's not red, everything as blue or red, even if it was facing
in the right way, it was visually cluttering up. So maybe right now these days, it's best to just keep the face orientation as
turned on all the time. So right now you can see that this part over here is flipped. We can just unflip it
and continue our work. And yeah, I think we can continue on with
this in the next lesson. Thank you so much for watching, and I will be seeing
you in a bit.
57. Efficient Trim Reuse with Rotated UVs: Hello and welcome back
eon to UV mapping, boot camp, mass and wrapping
and texturing in Blender. In the last lesson, we went
over the basic setup of, well, the frame sheeet. We're going to continue on with making use
out of it, too. Well, continue on with the box. So for us to do that, we're going to, well, check
the previous box over here. We're going to get these
stripes vertically over, like so. Let's go
ahead and do that. I'm going to go on to
the face selection. So over here, grab all of these little faces
just like that. And we should get ourselves nice little setup for
unwrapping conformal, which we can now find
it on the UV setup. And of course, we are
going to make sure well we overlap them. Then we can just go
ahead and rotate them, like so, find a
nice little spot. We can either do it with
just complete gray like so or we could make use out of the orange sides as well to get some nice vertical
beams just like that. But I think we're
going to add vertical, sorry, the orange
parts over here. So I don't think
there is much of a need to do that on this part. So we'll just make use
out of this instead. And I'm going to
make it a little bit smaller just
to make sure that no orange part is being
placed up, and there we go. Nice little base. All right, so now next up is going to be, well, these squares over here. Let's go ahead and set these up. And for that, we are going to actually do something
similar to what we did with the triangles
over here in order to get these kind of squares where it is at the front on the side, and even on the top over
here, not on case though. Let's go ahead and just grab this entire piece
and split it up. Let's see how we can split
it up and might as well just use shifting he just to kind of see
only this selection. So shifting age so. And then we are going to actually put all of these into their own
triangles, I reckon. Yeah. So in order
for us to do that, we're going to just go
onto edge selection. We can select all of
these pieces, like so. And we're going to mark SM. So go on to edge
selection, Mark SM. Then we can go to
phase selection, select all of these faces and wrap minimum stretch or sorry, conformal, evil one would work. Then we can simply Ooh. They are not nicely
packed up, which is okay. We can manually
move them around. So let's do that actually. So what we're going to do
is we're just going to make sure that all of them
are at 90 degrees, like so, and just manually
moving them around, like so. The reason we're
doing 90 degrees is because if we have a
look at over here, so this is 90 degrees,
this is 90 degrees. Every single square
has 90 degrees, and we're just going to make
use out of it to make sure that overlapping is
going to be perfect. And if I was a little smarter, I would use actual
rotation by the 90 degrees instead I like this to make
my life easier and faster. And there we go. We're going to get this sort of a setup. Now, what
can we do with it? Well, for Cats, let's
go ahead and do merge by distance
to make sure that everything is
overlapping nicely. And then we are
going to place it in the section for
the wide pieces. I'm just wondering which
one we should use, and we could use probably
this one over here. If we were to move them a
little bit off to the side, we are going to get
something, like this. Now, the thing is, though, we want to get these parts over here on the corner.
How do we do that? Well, we can make use out of
mirroring setup, actually. So for us to do that, we're going to firstly identify the ones that we're
not going to move. So this one I like where the
dark spot is, for example, I placed mine on the section where it just touches this dark
spot over here, giving us, well, what we're trying to do with the hinges
over here kind of a setup. So we're going to leave this. We're going to leave this
this and this as well. We're going to
leave all of those. So I'm going to just hide them out of the way or actually, I'm going to click GX one, and that way it moves our UVs a little bit
off to the side, so now just make a selection for the ones
that we don't want. And we can use mirroring. So mirror X is going
to flip them around. Now we just need to rotate it by nine degrees -90 degrees. And just like that,
we're going to able to get this type of a setup. So by mirroring the
part around and then basically rotating
it back to its shape, we're saying that, hey,
whenever it touches this, it's going to then move
on to well the upside, but this is going to be flipped. So it's just going to take
this little piece over here and do that exact
type of bit setup. Again, we might need to readjust the dough
just a little bit because my rotation was not the best. So
let me have a look. I'll just zoom in a little bit, like so, and let's see. So G Y, and there we go. We can just slightly reposition
it like so, like that. The rest is going
to be quite right. Actually, I need to readjust it just a little bit more because, well, it's now offset for
the square over here, so I'm just going to
go ahead and do that, see how it looks like and
readjust our part as well. Well, actually, what am I doing? We can just simply overlap
them like this, again, merge by distance now
that we know that well, they're mirrored, and we can
just position it like this. Makes life much, much
easier, just like that. If you were wondering which side you needed to be rotated. So for example, before
in this particular part, I just rotated, you know, -90 or 90 degrees. In this case, it was super simple because we
just need to get the 90 90 degrees up on
this side over here. But in other cases, it's okay to just have a well, selection done and
then, you know, try to rotate it until after you've done the
mirroring, of course, try to rotate it until you get
to see where this edge is, where the mirroring
needs to happen. Based on that edge, basically
we try to align that both the sides would be
mirrored from this edge. So this edge that
we see going across diagonally would be
our main pivot point for well, the mirroring. And that's what we would
need to basically align that when we make a selection
like this for an edge, we can see that these are the lines where the
mirroring would occur. So yeah, that is a way
to make this square. We can do it again, actually, on our side
or on the front. So this part over here, now we can go onto the side, select all of the
pieces over here, and simply go to Edge
selection, right click, Mark SM and let's talk a little bit about how
we can sort this out. So if you look on
the right hand side, we basically have
this type of square, but it's a little bit different because this part is also mirred and then we get some mirring part going
diagonally, as well. So we're going to sort
that out. We're going to have some little nice, well, rectangles coming
out of these pieces. For us to do that, we'll firstly need to organize
this a little bit. So once we have those
entire sections, so we can just move it up
to the side somewhere where we don't have already existing UVs and start well
overlapping them. And most of the triangles seem to be right in
terms of well alignment. I'm just going to adjust a
couple of them just to make sure that they're straightened
out a little bit more. Don't need to be
perfect, but we can have it something like so. Now we can just simply, well, try to overlap
one of them. And we'll notice that
we have two variations. We have this variation over here and this
variation over here. And if we try to
overlap it, well, it's going to look
something like this because the right angle is placed on the other
side. And that's okay. To start off, we can
just simply match them or match the triangles into
two sections just like that. And that will help us to kind of get everything
nicely overlapped. And identify where
everything is. So let's go ahead
and just do that. Like, so, like so, and like so. And we have essentially
two pieces. But you'll notice that once we have a selection like this, we have these squares
over here on the bottom left hand side and upper
right hand side to be, well, these UV items on the left and the items on the right will be
the opposites of that. And this is not the exact
position that we want, but it will be a
good start for us. So to start off, we're just
going to go ahead and use Merge by distance to make sure we are getting
some nice squares, some nice UV placements
overlapping with one another. All of those UV shells
will be in one's location. And we can also mirror this in X and then put it up like so. Again, we can just do merge by distance to make
sure that all of these pieces now are actually nicely
overlapping one another. And now, if we start
putting them up like so, onto some of the
pieces like this. We see that we're getting
somewhat of a nice look, but it's not quite there.
So what are we missing? Well, to starters, we have
these pieces over here are actually quite nicely set up because the entire part is
going downwards, like so. What we need now is to
make sure that this is going rotated sideways, as well as this, this and this. So all of these need to go,
well, 90 degrees like this. But if we start doing this, we'll notice that, hey, we can't exactly do it if we want to get this
direction to be in the same way because
then if we try to align this particular
piece on the side, it might be a little
bit more complicated. So what do we do in here? What do we do in this situation? We could for starters locate which edge we have over
here, for example. This is the edge that
we're trying to, well, put the triangle on. So now, for example, if I was to put this edge over here,
over the strangle, we start seeing
some of the faces, and we could potentially create something like this maybe. So something like
this, maybe it would work, but not quite. So in certain cases, what I like to do is I like to make these UVs a
little more uniform. And what I mean by
that is, firstly, let's go ahead and just select it and use Merge by distance. And then, secondly, we would actually shrink this entire
square to be more into well, a proportional square type
was setup more like this. Something, something like so. And all we need to
do is just move this a little bit downwards. I'm actually going
to go ahead and select roll and just
make sure we have the UV snc selection turned
off just to make sure that when we are moving the vertices,
nothing else is moving. So let's go ahead and just
move this downwards like this. So we are starting to
stretch some of those parts, but this will allow us
to now we need to make sure that these lines over here actually go, well, horizontally. These already are
looking nicely, going vertically, but these
are not. So what can we do? Well, the thing is, it would be best to have them
rotated like so, and to make sure we a little
bit match up the well, these upper triangles,
we would mirror them and get the
what's it called? Right angle side
on the same edge. So all the bottom would
be on the same part. The thing is, though, because these triangles are
actually allogated, they're not going to
work quite as well. They're not going to
help us out too well, get the right results. And for that reason, what I usually do is I actually
make them more uniform. So it's going to give us a bit
of a backlash in terms of, well, stretching
out some texture. But because the texture that
we're using is a trim sheet, we can afford
ourselves to work with stretching out a little
bit with that texture. And if the pattern is nothing overly complex,
so for example, these grid lines over here, nothing too much,
we can do that. So real quick, I'll just put
this little piece back in its place just to make
my life a little bit easier and re select
it merge by distance. So now, in order
for us to, well, get this square properly set
up to make it more uniform, you know this
entire square to be properly this triangle to be a proper square type of
setup of a one to one ratio. What we're going to do
is we're just going to create ourselves a simple plane. Doesn't matter where we can just put it off to
the side over, like, so because we're
just going to use, well, this UV grid
from the square. And I'm just going
to move all of the UV coordinates from
one section to another. Going to select
these entire faces. Tick off the UVsn
selection because the vertex editing would not allow us to just
select these UVs as is. It would grab the
other sections, unfortunately. That's
the way it is. We can now go ahead and grab
these vertices over here, select the snapping tool
and use vertex snapping. This way, we can just
snap these over here, grab this vertice snap
vertice selection, put it over here and grab
this and put it over here. This way, we're getting
ourselves a perfect triangle in a uniform
type of a mode. And that will be good. Oh, that will be
good if we were now to delete this square over here. What we essentially did is made our triangles more uniform. So now we can do some
bit of editing for them. And the editing that we're
going to do is firstly, we are going to locate
ourselves this setup. So maybe something
over here, perhaps. I'm just looking for
something a little bit nicer. Or one of those, you know, darker hinges and whatnot, seeing what we're able to get
out of it, maybe over here. Maybe this one
over here actually quite nicely would work. I'll make it larger. Right now, I'm just playing
around with it, honestly. But once we find a nice piece, for example, this
hinge over here, I'm just making use out of it, we can see that this hinge
is placed nicely over here, over here, over
here and over here, and we need to, of course,
rotate these pieces. So once we have this selected, we can go on to, well, turning back on the
UVs selection because, well, we need to see
the other faces. Once we see the other faces, we can now rotate this by 90 degrees and mirror
this in X axis. And we're going to hopefully get this nice little
mirroring effect, like so the downside of this is that it's going to be a little bit stress,
for example, this hinge over here in
comparison to the width of this part is going to be
a little bit noticeable. But honestly, it's
quite alright. And if you see over here, we don't actually have any hinges, so we could even, you know, select all of these faces
like so and move them even somewhere like this to
get nice box shape, of course, up to
you in that regard. But yeah, once we get, you know, nice uniform triangles, everything is mirred in the
right way that we want. By just moving it
around, we can get so many different
patterns and whatnot, we can even get
something like this, which is, you know,
pretty, pretty cool. So it is up to you
when it comes to that. I will though, just
put some edges, these kind of edges on the side. I think it's going
to look pretty cool. Maybe a little bit like this. Very nice. So I love
this type of design. Now we can go ahead and just
grab these parts, like so, and basically do what we
did with the upper section. So I'm just grabbing
it all like this, which I think we can
use Smart TV Project. In this case, might be faster instead of just
selecting one by one, which is not faster because, well, we can try
with a small angle. There we go. 46 degrees. We'll do the trick.
And now we can just overlap these to an island and put them somewhere nicely tucked away in our orange section. So something like that. We'll do the trick, maybe a little bit Gx and just move it off to the middle part
like this. Oh, nice. Everything is nicely
in the middle. Very nice. I quite
like this design. Okay. So yeah, we are pretty much done with
this side of the section. Thank you so much
for watching. And I will be seeing you in a bit.
58. Finalizing Trims with UV Mirroring & Snaps: Hello and welcome back
around to UV mapping, boot camp, mass and wrapping, and texturing in Blender. In the last lesson, we left ourselves off with some more of an interesting pattern for the
square sections over here. We're now going
to do some bit of cleaning up for the
rest of the items. And I am going to just select these parts over here
and did what we did. Do what we did last
time, which is we're going to make use out of
automatic UV and wrap. Reason we are able to use automatic VN rap when the angles are not
so high is because, well, this is going for upwards. This is the normals going to the sides and these
normals going downwards, which if we lower this angle
to quite a low degree, 35 degrees and around that amount will allow
us to well grab each of those islands
separately basically splitting this entire
frame into four parts. Now let's go ahead and simply, well, do what we did last
time, snapping to a point, putting it somewhere
nicely up on the trim sheet where we have some little bit
of space, just like that. So firstly, we are aligning the upper and bottom
sections just like we did previously to get something like and then I'm going to
check if we have anywhere, you know, those parts over here where it's just
end of trim sheet. And I think leaving
it like so is okay. We don't need those bars
breaking up such short pieces. And yeah, that's quite alright. Now, I think I think we're
pretty much done, actually. You might be thinking like,
why, what's happening? We have so much left to do. Well, we can reuse a lot
of the pieces, honestly. It doesn't need to be overly
complex in terms of that. We just need to
identify the patterns and just replace them
with what we have. And I think that's quite
a reasonable thing to do. So what we can do is just select the corners like
we did previously, and I'm going to select
them all just like that. All every single
one just like that. The bottom ones can be now deleted and the top
ones that we had, and I just made a
mistake because this one was not
supposed to be deleted. The frame that we did previously
supposed to be kept on, only the corner is
deleted so now I want to identify that these frames
are properly unwrapped. This section at
the bottom is not, so we're going to also replace this section at the bottom. Like so, selecting this
piece in the middle and clicking Control plus
to grow the selection. Now we can just
delete it, and we're just destroying this
little piece completely. We're going to do
the same thing for the back sides as well, deleting this center
piece because it wasn't unwrapped because we can
unwrap it ourselves. I've missed a couple
of pieces over here, which is fair enough. And I think the rest is fine. So I'm just looking around,
checking if it's all good, which seems to be the case. Now we can select the
unwrapped pieces. Click Shift D. I still have this cursor placed
in the center, so we need to just
make sure that our pivot is at the Fred cursor, and I'm just clicking G because I use Shift D to duplicate it. Use S and X minus
one, click Enter. Hopefully that puts
it on our side, which it does. It's red now. Let's not worry about it because we can just fix
it all in one go. We can select these
corners on the top now using the C selection,
the circle selection. And honestly, once you
master the selection, it just saves you a lot of time. So I do recommend you just playing around with it
as much as you can, because as you can see, it's
just a quick selection. Now I have made a little
bit of a mistake. Mm hmm. Mm hmm. The
mistake I made is simple. I didn't make a selection
for the free de cursor, so we're going to have
a bit of a trouble. Do not fret, though, because there is a
solution to this. And the solution
would be to make use out of the cursor
editor over here, which would allow us to just use Leftmuse button to
click wherever we want. The upside of this is that, well, we can use
snapping, as well. By turning on the snapping, making sure we are within
a vertex snapping, we can just drag it onto
this vertice over here, which is going to be Z
axis mirror point for us. Like so now we can go
back to the Move tool. We still have that same
selection that we had. I'm just going to
click G to make sure that everything is
properly selected. Going to turn off the snapping because I don't want
this to be messed up, and I'm going to hit
Shift D, escape, click G. All of these
are nicely set up. And we can use SSt
minus one like this, and that would be pretty
much it except it's not ha. We have the bottom pace
that we need to fix, which we can select
this vertice over here, and I'm going to
select this AA vertice over here and use Shifts, cursor to active, and
cursor to selected. This will give us hopefully a freed cursor right in
the center of our box. We can go ahead and make
a selection like this. Click Control plus
to make sure that these edges also selected,
hit Shift and D, Escape, and then use
R Y 90. Hopefully. Yeah, there we go.
If it doesn't work, just change it here to -90 and it would put you up
in the right spot, hopefully. And yeah, that is pretty
much it. Or is it? Ha ha. I found another
piece. This piece over here, we totally forgot. Sorry about that. Let's go
ahead and just delete it. Grab this piece over here. Control plus Shift D, escape. We can also use, right click
and mirror tool over here, which I'm not seeing here. So what I can do is, I'm
just going to click G, make sure that it is
separate, duplicate. We can click F free
and search for Mirror. Like so and just use, I believe, local X. There we go. Or, you know, once we
select the mirror, we can just do whatever
one of the constraints. And it's just the same method in reverse to scaling
using S minus one. Here is just the same
method in a different way. And then we can just use shift and N to invert everything. And of course, actually,
let me just double check. Yeah, everything seems right. We can now go ahead and
merge everything by distance because we've done
some lots of duplication. Need to make sure that these
parts that we, you know, created and everything are
part of the same piece. And this part over here, for example, didn't
want to connect. So what is happening over here? Maybe some of the pieces just didn't get connected,
which is unfortunate. Maybe needs to do a little
bit of manual connection. I'm hoping it's
only for this part. Must have missed
it the first time. That's right, though.
And this part also needs merged last. There we go. So hopefully, the last parts, they
still have some issues. Uh huh, uh huh, uh huh. So what I'm going to
do is I'm actually going to merge by
distance and start slowly increasing
holding shift just to kind of there we
go. Merge it up. I'm just making sure that only
these are being merged up. So just checking anything else that might be
closer to vertices. And yeah, that's the part that also
doesn't want to be merged up. So I'm going to increase
it just a little more. There we go to get
this type of a result. And that's pretty
much it, actually. We got ourselves a
nice little box, which can be used in scenes and environments and anywhere
you'd want to have it in. Next up, we have
this little guy. So let's leave that on
for the next lesson. Thank you so much for watching, and I will be seeing
you in a bit.
59. Radial UV Mapping & Trim Workflow Wrap Up: Hello, welcome back
everyone to UB Mapping, boot camp, mass and wrapping, and texturing in Blender. In the last lesson, we learned a lot about the box over here. Now we're going to
learn a couple of extra type of setups, which would be helpful for unwrapping such a
piece like over here. And the thing that we need to
learn most would be how to make use out of radio setups to get these kind of designs. So how do we do it? Well, let's go on
to the selection. Let's make a selection for one of those radial
setups like so. And then we can
simply unwrap it. And in order for
us to unwrap it, we can just use unwrap
conformal like this to get ourselves
a massive circle. Then we can put this
circle in half. So let's go ahead and select
half of the pass like this. It doesn't have to go
right across because it's a little bit rotated
and that's okay for us. We can grab it like
this and use our 180 like this to make
use out of the setup. Now I'm going to just select one of the edges, and
as you can see, this edge over here is actually this bottom
edge at the bottom, meaning that whenever we
have a certain pattern, it's going to well,
not align perfectly. If we grab one of those islands and mirror it in
wide directions, make sure you are within
phase selection first. If you have a selection like this and mirror
it in wide directions, now the setup will mean that
when we have the bottom, it's going to also
be at the bottom, meaning that if I was to, well, put these over, so and just quick alignment
to showcase that. This pattern over here
is going to be mirrored, meaning that it's well, going to be harder to see
that what's it called seam, you know, the edges that
would be splitting apart. And that's already pretty good. We can make use out
of the entire setup. I'm going to go on to the
a well face selection, just select both of
these islands at once and use merged distance. Make sure that merged
distance is set to quite a small value and
just hold shift and then start increasing it until you get all
of these merged up. And now we have well,
perfectly overlapping setup, meaning that we have well
symmetry on two sides, but we need to have radial symmetry because
this part over here, we need to make sure that the lines are able
to go around it. And for that, we'll need to do some deformation for
the set let's go out of the UB sync selection because
we need to now go on to verte selection
and select all of these edges outside
just like that. And then we can simply we can now with the
selected use well, S Y zero, like so, and it's going to give
us this type of a look, which already you can
see it's giving us, well, a nice radial pattern. We simply need to
slightly readjust it. So firstly, I'll
just make sure that the first section is
normally vertical. Then we're going to make sure that we're stretching
the parts inwards. So what I mean by that
is if we're selecting this first vertice and
using proportional editing, we can use S and X with the proportional larger to bring these vertices inward
just a little bit, making sure that we're
giving the vertices outside a little more space. And I'm going to select these
vertices over here as well. And actually, I'm not sure if this is a separate
vertex or not. So let me have a look. And I'll give a quick check
because I want to make sure that
this vertice over here is properly set up. So this is actually two our vertices. Okay,
that's fair enough. I'm going to select
this and click GX with proportional
turned off just to make sure that edge parts
have well, some texture. Going to do it
over here as well. And you can think
that, you know, we did a lot of well warping, and it's not going to give us any texture or
anything like that. Well, the thing is, we are, well, using trim sheets. So if we need more of a scale, we can just upscale
this like so, and I'm just going to
re select this and then upscale it if needed
to get a nicer design. But by just simply adjusting
something like that, we're able to get some
clever little ways of, well, getting some
radial texturing done. And keep in mind, such a type of UV island doesn't really need to be part of
the trim sheet. If you're doing some texturing
in an object as well, like using substance painter
or something like that, you could totally use
this kind of an island, and that would help you to
get an instant radial type of a texture by just using directional noise or
something of that sort. So yeah, play around
with this type of mesh, get the design that you'd like. And once you're happy with it, Feel free to share your work. For this part, for example, we could put Mark Sam and re
unwrap it using angle based, I believe. Yep, like this. Now we can just turn off the sync selection and use Alton E for the beautiful
squares UE squares. And this way, we are
able to get well, whatever the type of design
that we want, actually. So maybe a bit of a black
wiring on the side or something of that sort could work quite nicely making it
look like hydraulics. By just simply turning this
UV shell into UV squares. We are getting some
nice ways of putting our trim sheet around
this radial setup. And you can see how easy it is just to get some
nice hinge work. And all of the rest
of these pieces, we pretty much use that kind of same work as I have just now. The rest is pretty much
the same type of work. The wiring would be, you know, unwrapped nicely as one piece. If I was to show you. So the wiring is just unwrapped
as one piece and just simply turned into UV squares. So nothing overly complex. We can even do that over here. I'm going to go ahead and
just simply hit Shift and X. Shift H, that is, to hide the pieces. Going to select one
of the items like so maybe over here and mark C, then just simply unwrap
conformal to get this result, and now we can just put
it wherever we feel like. So we can just put it over here, make it a little bit
smaller, make it larger, up to you to get some nice little cable
designs out of it. And the rest is up
to you honestly. If you feel like finishing it up and playing around
with this piece, please feel free to do so. The reference is in the back. Although I would
really recommend you to just play around with what you can achieve with
this type of trim sheet. I would love to see
your creativity, and I generally think
that it helps with problem solving skills
to improve them, to kind of see how the UVs are attached with one
another by again, just simply playing
around with them. Thank you for joining me on this comprehensive
UV master class. We walked through
every step from understanding trim
sheets and out of bounds mapping to advanced on wrapping techniques
and tool tips. So you now have everything
that you need to tackle UV editing with
confidence and purpose. I truly believe these skills
will elevate your texturing workflow and deepen
your grasp on UV shape, the look of any fred acid. Feedback is invaluable to us, so please take a moment to leave a comment or rating on a
platform you're using. Whether it's a quick
like or a short review, your input helps us refine our lessons and deliver an even better content
in the future. Happy modeling, happy wing, and I look forward to seeing
what you create next.
 3D Tudor, Bestselling Blender Author & 3D Educator