Transcripts
1. Introduction: Hello friends and welcome
back to my channel. I'm Elisa, then Italian
watercolor artists. In today my new class
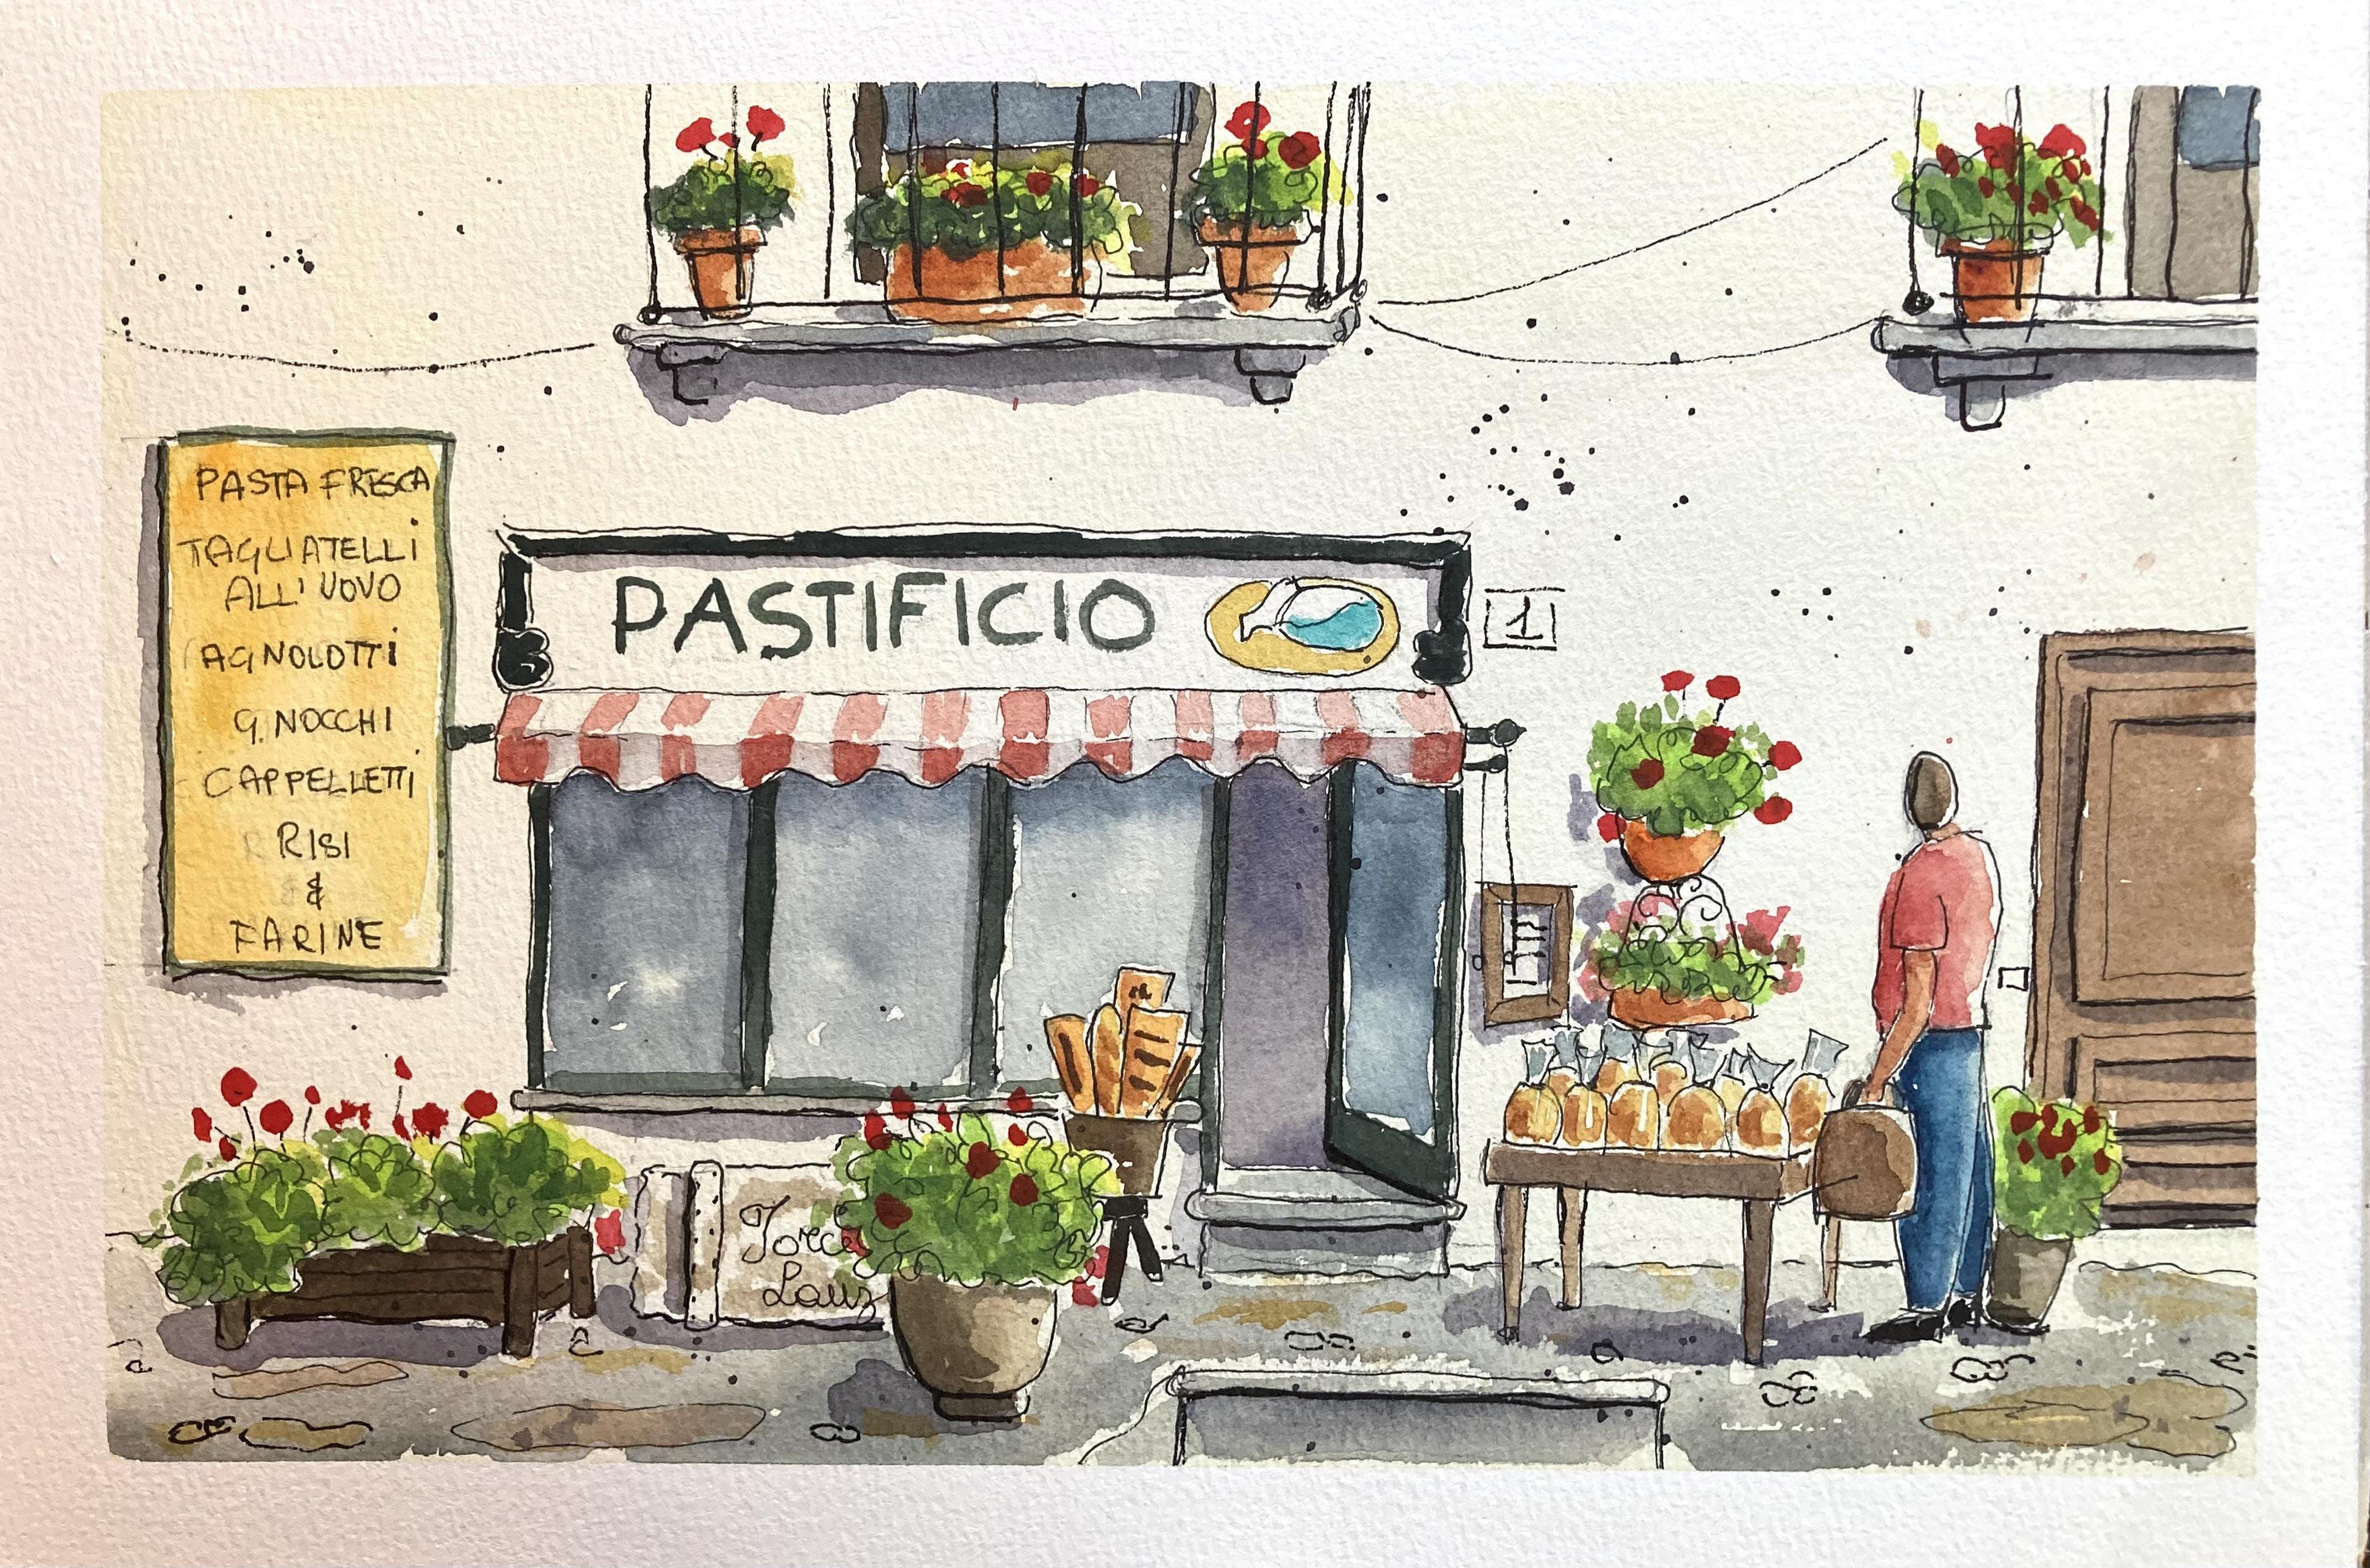
is about streets scene, shop front in Italy, shop from the small village near my hometown
that I have visited. But I found it so cute
that I took the pictures. And I want you to make a class surrounding what's so
special about this job. It's typically Italian because
they sell fresh pasta. It's a full detailed scene, but you won't get lost
because I will take you by your hand and explain every
single step in detail. Flowers, stems, the
balcony is food. There are all the
typical Italian features that animate a little bit. I am so happy to sketch
these videos today. And you will learn plenty
of little tricks with me. How to add 3-dimensional loops
through light and shadow. How to accentuate the important
details with the pen. Texture to your sketch. How to add a wherever loop, two walls and boards. How to make natural
people in the scene. It's going to be a lot of fun. And I hope you join
this class with me. And I'll wait you in
my next lesson where I explained to you the very basic supplies that you will need.
2. Your Supplies: Before we dive into sketching, we need to talk
about the materials. You know that in watercolor, the good material or the right material
makes a difference. So the most important piece
of supply for me is paper. I'm using these
student grade paper. It's called academy
watercolor paper pad. But the important thing it
is that it is a 100% cotton, so it's top quality
for water color. If you don't have a 100 per cent cotton paper
for this particular sketch, it, it's not so bad. It's not so important. The important thing is that
you have watercolor paper. It can be cellulose, but it must be 300 GSM, so it's 300 grams
per square meter. This is the matrix
used for paper, for drawing paper and make
sure you have these waves. These is, this brand
by our hunger is very nice and it has a very
good price point. So it's good value for money. Dimension is like a knife for, is 31 by 21 centimeters. You can, of course, work in a different size. But because this particular
sketch is quite detailed, this is a good size, but you can work
in a smaller size and a five if you prefer. Second important
piece of supply, of course, is watercolor. I have these Padlet that
I have set up by myself. I have watercolor of
different brands. You can also use ready made
water color set the like, these one of 48.5 bands by Luca, which is a very good brand. Or you can use a smaller one, even a 12th one. I will give you some colors. If you don't have them, you can use some alternatives. So that's it for watercolors. I will tell you
what colors to use, but I will always give
you an alternative. Brushes. It's difficult to say exactly
what brush you need to use. The just have some different
sizes of round brushes. Some smaller for the days, there's some largest
for larger washes. Also, when we draw buildings, it's nice to have a
flat square brushes. So if you have it,
keep it handy, then you need a pencil. This is a mechanical pencil, but you can really use
would depend sealant, normal benzene, and some
fine liners for ink, just make sure that
it is waterproof. This is a very good brand. It's a classic brand. Pigma Micron 05 is a
standard width of the tip. So it's a good
it's a good pen to have or you can use these
one uni-ball Eye Micro. She's also very nice pen, just make sure that
they are waterproof. These are both waterproof. There are other brands, but always make sure
there was a waterproof. Otherwise, they will bleed
into your watercolor as soon as you apply some
kitchen paper to blow, dry your brushes or
to absorb a mistake. So excess water. An eraser, some paper, Artist's
tape and palate. This is an old plastic. One important thing
is that it is why? Because don't use a color, they should just white shirt. Make sure you don't use it for eating because it
might be toxic. Just any palette that you have, these very cheap one. But at the Dollar Store, I like it, I love it. I use it all the time and
have a two jars of water. Because one, you use it to
rinse your brushes or it will be soon very dirty and one that you keep it clean
to clean water, to dilute your color. So two jars of water. I also have that. This is optional spray to
spray bottle like Lisa. You can spray painter in the palette to
revive, revive it. Have you ready to paint? Also, I will be using
a ruler, a larger one, and the smaller one because
it's a building and I like to have straight lines when
I mean the pencil face.
3. Pencil Sketch: Let's start with
applying some days. But if you are afraid that these can stick to your paper and tear your paper once you take it off. You can stick it
once to twice on your genes before it loses some view and will not tear apart your paper once
you turn it off. Okay, I will start
by placing my shop. And the shop is the
focus of assault, would be almost central. Here. Not completely central, because it's nicer if you have your central find
slightly off the center. It makes your drawing
more interesting. So let's say that we will
occupy this space or less. Keep your lines light. I'm not keeping them
like so you can see them on screen. Here. We have the feature here, and we can radically
new feature. We have rolling here. These can be slightly this way. You like to use a fancy
so that I can erase. Yeah, We had bad. Which means fresh pasta maker. Who they make fresh
pasta not just to shop. And so soap maker. It's like could, they could. Okay, here we have sort of board here around you have a frame around in here. We have a sort of
not sure what it is, but it's like a decoration here. Then here we have Kurt day goes down here. Then I need to go
out with weights. I will erase the
unnecessary lines. We need some space in
front of the store. Is more or less space
that it occupies. It doesn't have to be perfect, just slightly larger than. And here we have. I need to divide in
four parts so I can use my ruler to divide it into
four parts, like one here, one here, one here, one here. One here. Goes to the third. Line and here is the door. It's very much a
geometric worker. So we have three
short windows and then the door opens here, this small stair here. And the door goes here. And inside. And we make a little frame. So this is our doors. This is step is like this. Here. Here. The metal frame arrives to this step. Here is stone, stops here. Then here we have a step. And then you have the wall
going slightly inside. And same here slightly inside. This is the scores and
each of these costs. Now pasty feature is there. Now here there is a sign. We put this sign here in order to be slightly longer here that would be
hidden by the plant. Maybe we can slowly
move the plans. So I want to hide these
nice wooden board and VCs, the wooden board. We check. So you can write, this is not long enough to come to that
doesn't have to be identical. We have trilobites. This is shorten with a basket on top and bread sticks, bags that just come out. I would put it,
although it's not true. But I get to here. And then another bag of
bread sticks and one behind these lines
would be erased. Then we have here table. To make things easier, I will make it slightly
away from the doors, so it will be easier to draw it here. Then we will erase lines. Once we apply ink. In here we have all the bags
Transferring bags of Tercek. Tv land switches. Typical sweet bread
from this area. Here with ink will be complete. Then we have a plant
here in this area, but we put it here. Here we have stairs. So I would put a
plant here behind. So here we have
around small babies. Around the belly. Can make all the
mistakes that we want here indicates where
it wouldn't be. Okay. Then we have
another phase here. Some green and some flowers. We go little by little
and we add the details. Then we have Iran. Here. Simplifying. We can all support strikes slightly slanted on the site. The more tika didn't know, slammed with Booth. He's a rope and another
pole with it all. And here there is a board. I would only put a
simple one, not two. Not to put too many
details in here. I have a basket with flowers in a vase and
hanging base with flowers. Here we have another
rectangular face and we have, we'll make it shorter than in reality because I
don't have enough space. This is my drawing. So I wouldn't make this
maybe slightly shorter. Okay? And decoration. Then I will put this other plan here
with a base like this. And there is a door here. But we don't have it. Let's put it behind
here, the door. So let's see some pretty
clear from the picture, but I put this door
arise more or less here. I put it here. Just
a hint of a door. And there is a frame. Normal frame here. Two frames actually. Here. There is a doorstep stone
and this is the door. This is our door,
maybe second frame. And this would be our door. Then we have balconies here. But there is a very
important thing is there is this sign, the yellow board comes down here. And here we will write down all the specialty of the house. This will be the phrase. You can write exactly copy the Italians signs or you
can write what you want. That I don't write them
exactly as they are. I just like these. I like them. Because from this area, keep all Sophie pastor, to be eaten that easy. Your eyes and fatty
next flower. Okay. Now we put the balcony up here, exactly in the center. But we will put
it in the center. So it's nicer. Stone. Pavement here. And here there is behind some stone that
holds up the balcony. And then we have here the iron fence behind the fence. So we had the door. We also have quite good tight just vague sketch. We will refine it. Same thing here, so we make exactly the
same basket needs. We don't see the whole balcony. Just see vase, the door, the beginning of the door. And we can put a
man if we want to. And there is a man, but we will bring him up. But, so I will draw a
man No more or less at these high small hands. Always remember to
put a small head. Exactly. Put this one men sketched on. Don't become crazy. And we will put
some shopping bag so that he might have bought
some pasta in the shop. So here is a man with him put longer
trousers instead of shorts. Easier and nicer. Okay. Here we have stairs. Now we just don't suggest
that the stairs like this. Okay, That's it. Now we outlined with ink full of details
more than I wanted, but it's going to be nice.
4. Ink Outline: I have these two outline 0508. I would start with the 05 for the smaller details in there that we use in the end, the zeros for underlying
some important nights. I can use this or
my other pin. Okay. Now I started with my 05
medium thickness. Okay? I will start from
right hand side. And my lines will not be
with the rulers, the sign, because I want them to have
an alveolus hand-drawn Luca and also rewrite
what he's written. I tried to be maybe
more precise. For instance, this is
not completely Center. So I will start slightly
more on the right, so it's more centered. Same here. I tried
to be more centered. Then when the ink is dry, I will erase everything. Here. I know you said Teresa, embellishment here and
I put it at some side. Maybe they need to be seekers. So in the end, maybe we can use just the
current fine liner. Here. We drove. You know what, disease is not very fresh. I will change it. We've
continued with this pen, which is my favorite one, is a curve line. We can't cheat. You can also break your line. Just fake some leaves. Here is the door
around the base. After. You see that I am very regular. Messy as possible. Same here. Slightly rounded. The door. Okay. Then we come down
and we start from here. Iv coming down,
leaves and greenery. And then I will
drop, is visible. There are also some lines here. Here we have our old board here. Very, very intriguing. To me. Instead. The English word now it's very Messenger. Even inside some irregularity. In here you can write a check. Okay? What you see here, you have your base, you'll see that I
make it much better. Now. Here we have our basket. Is a small stone below. Here. We don't see the leg. Here. We have some
bags of bread sticks. We liked one here
at the last minute. Now, I start with
this metal frame. Can really break my lines. And then a piece
decoration to Tim, not sure what it is. And here we might
need to attain. I have here puts the door is a certain
sequence here, around the stone here. And then my text frame. The stone. Also here. Here. Rounded stone here,
slightly irregular here. Here it is all irregular
because it's stone. And same here. Let's rock. Here. We have better
to draw this. We didn't need it,
but it's okay. We will cover it with paint. Let's paint it is sir. Belly. He has both. Some fish past from the future. Here we said we would put some trousers. Here we have planned. Yeah. He's just behind
the plant. By the plant. Beside the plant. Now, the small sachet be the Che Di, the typical sweet bread. Bread of these. Down. Here. Can feel it. Here. Board. Hanging dates. Here we have the decoration. But first, we need
to put leaves here. Okay? And then the door details, correlations in the door. And here we have the throat, maybe some strong
here and there. Just to make it nice. And I think we finished
with them on stone. And we're finished with the ink. Let these dry and
we'll erase it. Now. I hope it's dry. I start from the left-hand side. So that's where I
started to apply my ink. So it's probably dry and I'm very impatient to
start painting, applying my belonged
to water color and erase everything just
when you have erased it. When I have erased
everything and do to be better, just
erase everything.
5. Watercolor First Wash: Now the first thing that I do
is I make sure that I have not gotten any detail that
is more graphite here. But if I have forgotten
some details in pen, I can see it now as the staging. Apply some here, only a two here. And there are always
some mistakes, but it's not important. It's just a sketch. I have seen some here, for instance, I forgot. But you can see very
well at this stage, you can also just dots the lines where
there is apply here. First thing that
we do is we do an under painting because
the building is Y2, but it's not completely
white. White. It's what we call
dirty white cell. To replicate these will apply
some diluted Naples yellow. If you don't have Naples yellow, which is a sort of very light sunny yellow mixed
with Naples yellow. That I have one lighter and the other one's slightly darker. If you don't have
it, you just dilute, really diluted, yellow
ocher or raw sienna. And that will work all the same, but very, very diluted. So this is very
watery and I will apply all over just to give a suddenly
look and take it away, the optical white of the building because it's
going to be whether building, so maybe it was meant to
be white in your region, but it's not now. So everywhere. Everywhere. Diluted with a big flat brush, even larger brush if
you have it everywhere. This is called an underpainting. It will give a sandy look
more or less everywhere. Then we need to lead
this restaurant and dry. And I will make
myself some coffee in the moment that it dries because now we are going
to be very patient. Do you remember when
we were lethal? And we were coloring
within the borders so with our pencils and select
children coloring, but slightly more
artistic and detailed, but that's what it is. We have to apply color
within the borders. Basically, it's going
to be fun and relaxing. Okay, now I let these dry
and I'll be back when it's dry and make myself a
nice cup of coffee. Okay, now I have proved
myself some coffee. And because I'm going to spend quite some time on
this sketch with you. So the first thing to do is you make sure that
it is dry and you touch it with the back of your hand with the fingerprints. And this is because you
want to leave any sign, any mark if you do so. It's still a bit cold. So I should wait. I am too impatient. So I am starting. When you draw
buildings like Visa. It's very handy to have
a small square flat for. When you have to
draw straight lines. I always start from the left
because I'm right handed, so I don't smudge my colors, my watercolors,
progressing in my sketch, you will do the opposite
if you are left-handed. But in this case, maybe you can come up
with some attention. Follow my direction. And then next time when you make your own drawing or you
will decide where to start. We don't decide where is
the light coming from. And I decide like always, that light is coming
in this direction. From this direction, this
is certainly the cell. So the shadows will be on
this side of the drawing. This is a decision that I have
to take immediately. Okay. So I start here with
these yellow sign. The first thing that I do
is I take these needs, some cadmium yellow
or some warm yellow. Maybe I take some gambles. These cadmium or some gumballs. Because it's very
warm yellow that we apply here to my son
who will not cover, might try and give some weather Luca
and to know how I try to keep these
weather Luca, I can lead some unpainted
that I have not done, but I will thin patch some coordinates to make
it a slightly uneven. I take some pure
color here and there. I will touch with some gamboge, which is slightly darker, so it will be slightly uneven and this will
give a weather. Then I go to my balcony. For the balcony, I'm
needing a thinner brush. So I will take these
medium round brush. And let's be patient. And we start putting
some very light green. And we can put this all over their plans so that then
we can apply some shadow. But we start with the
lighter green, which is, I have some may green, which is like this. You see, it's a
very light green. If you don't have it,
just take some sap green and add some lemon yellow. But I'm taking this will apply with little dots
on my leaves everywhere. This is just the first layer for lease will apply everywhere. I see Lisa, The small dots. I can go outside the lines. Of course. This is just a light layer. Just to start
applying some color. It's always a very nice moment. Okay. Then I don't want to apply color around the leaves because I don't want
this color to bleed. So when I have fresh paint, I have to stay away. But then I can start
mixing the color of stone for pavement and
the stone details. How can I make so
the stone color, I take a larger brush
because I need to find a lot of the stone column. Basically, I will
mix a sum blue, ultramarine blue, a lot
of ultramarine blue, and some burnt sienna. And this gray is
called James Grey. You can have it more
bluish or more brownish. Depends on the ratio
of your pains. You see that you're
starting to form some nice green more because
they need more of this. I will tell you this because
this is too concentrated. I like to add a touch
of yellow ocher, just to give it an
organic look like Lisa, I like it very
much this mixture. So now I will water, like more water and start applying it
with a thinner brush. So this is tricky. You wanted the very word
watered, watered-down, very diluted because
you want not too dark, but at the same time, you need to control water. So you use this kitchen tower. You just statute and
you go like this. Also below and weight them. We will apply shadow to this, but not for the morning pink. Same here. Here we have drawn the vase but pretend
it's not there. Okay? And this is done. Then
what can we draw here? Maybe we can draw, now that this is dry the leaves
so we can start applying. The base of the
vase is for this, I take some burnt orange or you can take
some burnt sienna. We'd take some burden tolerant. But you can take
some burnt sienna. And you remember the
light is from here. You leave some
white on this side. Don't touch the edge here
because we're going to have light here so you can leave
some untouched and paint. Here we have shadows. So here we have column is paint. You can reinforcer
this edge where we have shadow which is away from refugee is not enough or we would
put a second layer. Same with these phase. Remember I'm using burnt orange, but you can use burnt sienna, maybe add a touch of yellow. Here. Planets are lethal here, so it's darker, slightly
reinforce it here. Same here. You think you have
shadow below the rim. Okay? Now we can start painting green frame
around our shop. We need to meet a
very darker green, afraid that very darker green. You take any green
that you have. I will use these
permanent green, that green that I
don't like very much. So I use it for
mixing with black. And then you take some black. I have a neutral tint, which is perfect instead
of black to dark. And our paints and
neutral tint is a mixture of primary colors that will give us
sort of blacker. And it's used to
darken your values. Noise that you can hear
is my character on the table that is
eating his keyboard. I will mix some more because
I will use maybe more. It's better to have more
pain than not enough. Okay, So now for mixed
with this very dark green, you take any green and you just add that neutral
tint or black cats. And remember always that
flight is from here. You will have some
whites and man, I'm painted areas. On top. You see Be careful
here, not too careful. Just a little careful. These sketches are meant
to be done quickly. But you'll see that I have
some unpainted lines on top. If you don't leave it, don't worry and stress because we will add it in the end with some white gel pen or some acrylic Hawaii
Tour Washington. Same here. If I can leave some unpainted. The areas here you can be slightly below that contain just a matter of patients
you've seen these. Okay? So be careful
but don't stress. So it's perfect to be a little
warmer, little imperfect. It's very much in the
spirit of these type of sketches here, also. Here. Okay, That's for the
frame. Then I need to add. Let's go back to my stone. I need to apply some here, some stone color here also. And then we can apply it started applying is tone color to finish on the youth
meant about these quick, we can do as a last step. Then I take the same green
and I will write the past. If I take this scene
to scene brush. And I will write pasty feature or pastel sharp or
anything that you like. You can also write
Bakery if you prefer. It's really up to you. This is a real pasty
feature that I have visited myself when I was taking a trip to these
nice down. Okay. Now I can use this
same green to add some shadow to my foliage. I will put the shadow
wave from light. I did exactly the opposite. So we add more yellow. Afterwards. You see
light is from here, so you have shadow on the
bottom and away from light. So what I can do now, I can take some lemon yellow and add it directly
to accentuate light. Too much water. More yellow
is fantastic for this. To add the light
accent when you have. We started from the
left-hand side where we have shadow and the little dots. Again, I take some lemon yellow
with some patch of light. Okay. Now with that route
with touches of light, now we can draw the
little sand cocktail. I'm not sure. For this. I will take some
Alizarin crimson or any red that you have, just maybe break it with
some yellow or some green, just don't use it
SET straight from the pan because you need to make it slightly more organic. I have mixed it with
my burnt orange. So it's gonna be Sammy. And I will start and I have slightly
erase my pencil signs. But I would try to you
remember with the ware. Worry if you don't
have some more paints, otherwise they wouldn't
finish it, then. Don't stress if you don't
fill the whole space. It's actually nicer if there
are some areas I'm painted. Now we use this return
and pay the after, but maybe I don't
catch any small line, white, like a white
line between the two. That there must be
more diluted cell. And you see that if you see that, it's obvious that it twice, then we have some water here. We'd take some, any
blue that you have, I will take some turquoise. Turquoise. And some Roseanne are some yellow ocher. Take what you have
from the building and added some yellow ocher. And how we painted the
costume border here. Be careful not to touch
it. So it doesn't bleed. Hope it doesn't bleed.
Okay, for this assign, which is whether
you take a brush and the larger brush and
we make some dry brushes. So I will take some burnt umber, burnt amber, how we
mix it with my dark. So here we've plotted here, so it's dry and apply some
dry brush here and there. Okay, Just science. Now, you can find these ways. Our, I take some burnt umber
and it's going to be dark, so we'll add some neutral tint. And I will apply carefully, but not too carefully. Also be carelessly here. Okay? Now we have the DSpace, which is almost like bronze. Or we take the same burnt
amber with neutral tint, but I will add
some yellow ocher. And it gives these bronzes. Luca. I start from
the left-hand side and I go towards the
light with just water, so it's obviously darker. That would reinforce the
dark with some burnt umber, neutral green, and yellow ocher. Here. Always count
with the second layer. Same here. You can use a smaller brush. If you're not confident. I think some olive green, not completely API,
I'm taking some sap green, olive green. Not completely happy
with these leaves. And I will just draw some
leaves with my smaller brush. In water color, less is more, but sometimes it can really fix the situation
if you don't like it. Small dots around my scene.
6. Watercolor Second Wash: Now, what can we do here? I don't touch it because
it's too fresh the paint, but I can feel the
glass of this window. So we prepare some Payne's gray. If you don't have Payne's gray, you can make black and blue, black and indigo for instance. Now we start by wetting. Here. I wet it a bit messy
way not to everywhere. Leave some areas unpainted. Next one is Payne's gray, but you can use indigo
with some good. Be careful not to touch
the bread sticks. And the glass door. Make sure that you have few here because it's going to be
dark just below the curve. So for shift, Okay. Now we can paint
with these basket. I will take some burnt umber, mix it with some burnt sienna. I make it all in the same in C. So they mix colors in the GIF, say become more cohesive together because they're
all mixed together. And this is my basket. So I will give some horizontal
strokes and like this, maybe I will not touch here. Then we the same Amber. I wouldn't mix it
with my Payne's gray and add some shadow here. Here, here, and here. Below the leaves on this side. And also on this side of because if the
session is from here, this side will be
slightly darker. So how would you apply
some color here? This might, some
shadow here, maybe. Okay. Now we need to paint
as a stool which is in a very dark very, very dark brown, almost black. So I mix more neutral
tint to my burnt amber. Hear my story. We can start painting
my two windows. The windows, I take a
slightly bigger brush and I can use the
same dark brown. We got some more brown. And here is my might. The bag that just go around. This same here. We will have, here
is not the blend. And then this is
glass and we will have to fill it with
some Payne's gray. Now, we can start
feeling the bread sticks and this board is the spore. Then we can take
some burnt sienna here with our brown mixture. Now we need to change slightly changed color not to be the same with this table. I can just add more
burnt sienna nasa, we change the ratio
and we will paint it. A smaller brush. And of course, these legs
behind will be the market, but these will be done later. Start with the bread sticks. They are yellow oranges, so I take some darker yellow. Also. I'm pretending a
baguette for debugging. Take some raw sienna. You can take some yellow ocher
if you don't have Rosanna. And here is my budget. She's not existing in reality, but I'm taking my gumball wash, mix it with some transparent
orange or touching red and paint my bread sticks, bags. You can leave these
unpainted sign because it's towards the light. Now after we can take our darker green and
paint frame here, because it's going to be nicer. So I take it and I just painted. It, gives some more
finished look. Now, now with a very diluted, raw sienna, yellow ocher. We can same color
of the bijector. We can feel with stripes. These sachet, This is
the sweet, sweet sticks. And here we can take
some Payne's gray. I don't know what to
put my Payne's gray and just plastic bag. Maybe we can take
similar Oceana just to add some shadow. With the same burnt sienna. We can debug it. So it looks like a baguette. And we can also, with some dark like
some burnt sienna, very concentrated at some, I don't know, on
the bread sticks. Now, I went door to door
and we take a larger brush. We'll take some burnt sienna and we mix it with our brown. You can really take
what you like, a brown that you like. I see a very warm,
almost reddish brown. So we'll add a touch
of Indian red. You can add a touch
of alizarin crimson. Or no. It's perfect. It's
perfect mistake. It's a happy accident because we will be adding some splatter, so anyway to the wall. But we will add strokes. Some brown to this door. Here. We will have stone. Then we will add
shadows, but not now. And now we need to
add some shadow. In the interior of our shop, I will use a color code,
the purple shadow. If you didn't have
it, just mix some black with some purple. I wouldn't make c2 here. And then we start from dopa, what it's going to be done. That could be careful here. Don't touch the door. We've just come down. Okay, So we are more concentrated paint
just called purple shadow. It's very handy.
Purple and black. We'd just be ideal for this. Purple and Payne's
gray just didn't use the same face grade
that you have used here because theses
glass and disease. Now, this is the interior of our shop. Now. We take once again my dark
green, black and green. And I can turn it to fail. I draw a frame. You see, I turn it so
it's easier for me. So don't touch where
I've painted. Okay. Now, we need to add some
flowers here and there. So I will take some
permanent red, which is very opaque. You can take some cadmium
red when you opaque, color even yellow,
whatever you like, and add some some some flowers, whatever you like. Even on that one. I have more than necessary even when where it wasn't
completely necessary. Oh, we forgot to
paint these phases. We immediately go and challenge that we have enough hours. Now. I always see
what we can paint without touching fresh paint
and we can add glass here. I will take my
usual Payne's gray and that will add it
directly without wetting it. Such a small area. Okay. Now, we can aim to
this gentleman. And for the gentlemen, I will make it present to him. Give him a hair. So we start by painting his
skin for skin and we'll take some yellow ocher and mix it with some Alizarin
crimson so that I have a pH. It's the summer. So if it's
going to be quite ten. So it's okay. Him. And then until this dries, we can we can so
that we can paint her his trousers and t-shirt. We can paint the pavement
with our stone color. And we have to remain kid with some burnt sienna and
some blue sienna. Yellow ocher. More blue. More burnt sienna. Okay. And we got here. The sweets launch. Strokes. Don't doesn't have to be
perfectly homogeneous. It's better if t isn't
perfectly homogeneous. Be careful here around the lengths of the tables,
around the gentlemen. And also here you see some
stone that we skipped. Now the gentleman will give him a nice red alizarin crimson, maybe this Permanent
Alizarin crimson shirt, the lights from here. So I would start
painting from here. Leave untouched, the left hand or maybe found hat. And then we will make
a brown bag here. Here. Then he's genes. So we have some indigo, take some indigo. Indigo genes. Just bled for sure. Would fix it. Here also. The leg. Some black shoes. Okay. Now, we are finished
applying paint, I would say, and we
can start with shadow.
7. Final Details: Okay, let's now apply
shadows. For shadow. I will use my usual
purple shadow, which can be done
combined mixing black and purple or
Payne's gray and purple. It's just a shadow
with a hint of purple. So I start applying my
shadow under the balcony. Remember that light
is from here, so it would be under the same under the other class. Then it will be on these
two sides on the frame. Because like this
from this stone here, below, this face, on this side of his face. Here. These stone. And side of the table below, below these men. And the left hand
side of the space. It would be on the
side of the frame. Now, because it would be below below these frame
and on this side. And below here. Between these two. And here we have the easiest. Actually, don't weed. Now in the rain forest. The Payne's gray, just below. Here. I will have some shadow. Here we go. So rainfall, colors
like everything that it needs to be signed
with, some burnt sienna. This is the shirt. On this side. Let's hear some more leisurely. On the site. The shirt and some more indigo. We darken some of these
stone or I can put some yellow ocher over. I would also add
some yellow ocher, some splatter to indicate the irregularity of these older. I will add some burn time
here in the shadow tone that would splatter slightly on the pavement. Adaptive Shonda, burden here. And also I need that to shoes. We'd also add some burnt umber just to give some roundness. Last night. Shadow. This is his son. Could attain. They cannot sue shadow effect. So we can imagine that it
just reject some shadow here. Food directly, some
purple shadow here. We just check. Invade the home side. Okay, now I have to
connect flowers. If that's flying in
the air, I can do it. I have taken my 08. She's slightly thicker. You can use, of course, the same pen here. Awesome. Now with this thicker pen, we can maybe send, trade those lines, sitar, guitar, or maybe these. Every time you see a shadow, you can accentuate the line. We make the shadow just assume
we are away from light. We can give it. No, we can do some
chicken wire from here. We can also reinforce line actually to clients. Here. And here there is none, but I wouldn't touch it anymore. Some small stone here. I wouldn't touch
it anymore. Okay. I think we've done, I hope you found it
easy to follow me. Now the most satisfying moment which is tearing the tape off. Well, we strip it away. Tear it away from
the paper like this. You want to if you
tell the paper, you don't tell the drawing, but you tell me after slowly
away from the drawing. Here you are. I
hope you liked it.
8. Final Thoughts: Congratulations.
You have finished my Italian street scene, my Italian shop front with me. I am sure that it wasn't difficult than hope you
found it easy and fun, and do not hesitate to upload your project
in the gallery. I will be happy to give you my feedback to other students. We'd be happy to see
what kind of results that they can accomplish
with this class. Also, you can find
me on social media. You can find me on Instagram under my name
and select the food. Take to tag me. If you post your project
on social media. That's all for now. And I can't wait to see
your projects channel.
 Elisabetta Furcht, Anyone can paint!