Transcripts
1. About the Class: Hello my friends and
welcome back to my channel. And we are here today for
a new water color class. In my new dress tied, very friendly, relaxed is
suitable for beginners. But yeah, generally the
very pleasant test result. I hope that today we
are sketching together CT escaping that are full of people working in this three. So it's interesting because you will learn the
importance of values. Even in a monochromatic sketch, you need to differentiate the different elements
through value. And we're learning,
in this class, you're learning how to add
people, to add energy. And Dina me snapped people
with different clothes, a different distance, walking
in different directions. And it's easy. But to me, how to
do that properly. Learning how to add
reflection on the wet ground. And that's also something that
the ones to the week two, you will keep it for life. You can apply these techniques to your sketches, to
different subjects. It's a short glass, is slightly over 30 min. And it's perfect.
People like me that lock stitch or every day
but don't have much time. I am an artist myself, and I believe that anyone can set the drawing and
sketching teachable skills. That's why I'm here to sketch these cityscape to get hazy day, to drop your supplies.
2. Supplies Needed : The supplies you need a very, very basic stuff from paper. Paper is the single most
important piece in this class. You have cotton paper, it's going to be much easier. It's maybe time to upgrade
to cotton paper by Sam, but if you don't
have it, Never mind. Please make sure to
use watercolor paper so the weight should be 300 GSM. At least. If you have cotton paper is much
easier than you need. Of course, watercolor.
Watercolor. I am using only two
colors, black and brown. If you have sapiens, you can use safely or
you can use indigo, you can use Payne's gray. Just use what you like and
what you have available. But it needs to be
darker because we need to reach a nice range of values. So then you need a
pencil, an HB pencil, and a kneaded eraser to
lighten the pencil marks. You need brushes. I'm using basically
three brushes. For brushes, actually. One that is always clean and you only
use these for water. If you have one. Just for water is better so
you don't put paint on it. And then I have
different round brushes. So one mock prefer background
and then for larger areas, for dictates a smaller one, use what you like to use. Three is not a rule. I'm sure you know what you use, but if you are in decided three different
brushes like this, at least to one larger and one smaller for details
would be perfect. The important thing is
that they have a pointy, a very fine point. Then we're using
some artist's tape. If you have it, it's useful. And white gel pen, if you don't have
a white gel pen, you can use some white wash
or with the fine brush, or you can use maybe
some posca pen, or you can use some
white watercolor. But if you have a white gel pen, It's easier, Let's say
for the final touches. Now, just add some kitchen
paper and a glass of water. And that's it. Let's dive in. Let's start sketching
my friends.
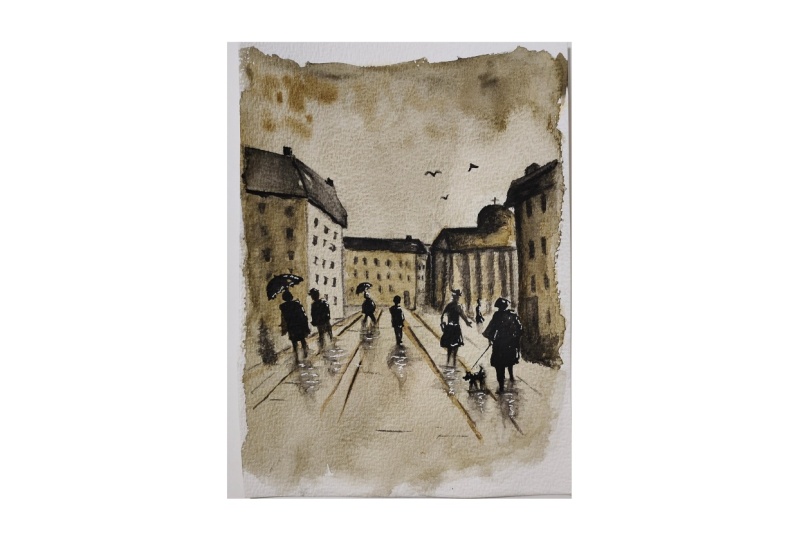
3. Pencil Sketch: Dear friends, the pencil sketch
is going to be very easy. Basically, we need
to use a ruler. But fairly light pencil drawing. I hope you can see
them on camera. But around two-thirds
in the middle, I will draw the line and I would choose focal point
for perspective. So this is our horizon line. This is our focal point. I will draw just, just a very simple sketch. Some houses here, maybe a
church from imagination, or you can use maybe
some references. Here. Have a dome. Here. A house. You see. All the lines in
perspective will converge towards
the, These bind. It's not the perspective lesson, but you know that they
go towards this point. Even larger. This will erase this line. And then we can
put some buildings here always converging
to this point. And he roof. Here we have some, maybe some rules
here. That's it. Here we will put some people back directly with
the brushes out. That's all for this sketch. We can start right now.
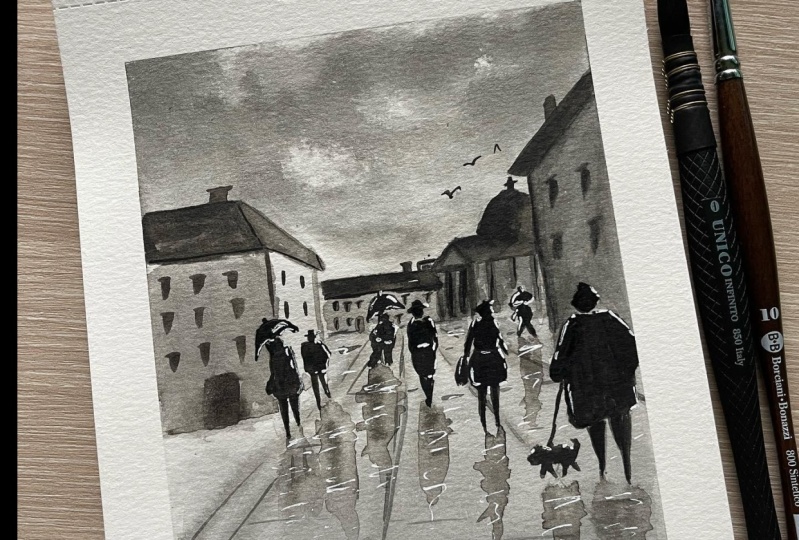
4. Background: Okay, I will erase the unnecessary lines
and I will wet my paper. I take a brush brush lip I
only used for wet the paper. So it's always clean. I don't use it for not too
much water, just some water. While it dries. Just to return. We start preparing our color. Here. We already have
some blue and some gray, but I can still use these because it's nice to use what you already
have on your palate. It gives some flavors
and personality. So I would use a large brush. What is called a mop brush, is working too much. So I would put some, some warm water, some artistic. Well. Now I have my mock brush
and I will take some black. Really that's personal
you can choose. But what I'm suggesting
is a good example. I take some black, will prepare a lot of this. But I don't like to use just
like it is straight black. I will add some brown. You see, just to give it
some warms and personality. You can directly use
CPI if you have it. But I like to use sepia, but not everyone has it. So I'm using lots of brown
and black. Add some water. Okay. So here should be wet. Handsome. This is to just add clean water to dilute
your painting, to dry. Just some background everywhere. Here. It can be darker. So we started from here
because she's cloudy. The wash must be some
somehow texture. Maybe you can drop
some first Clouds. Drop some paint here
in the sky for clouds. And that's it for
the background. You let it dry, but you don't wait until it's completely dry. Just a little. While
this is drying. We can start sketching slightly the shape
of the houses here. So we take some pain to draw so it's fuzzy
and blurred. The dome. This should be slightly
more concentrated. You see it's all blood. Let's pretend that
there is some light, not too much coming
from this direction. So this face of the
building is going to be, those are going to
be maybe darker. The roof, the dome
here and this face. This time. Then we can just draw, remember this is
our focal point. We can draw some lines that
you put the H from here. Let us try later.
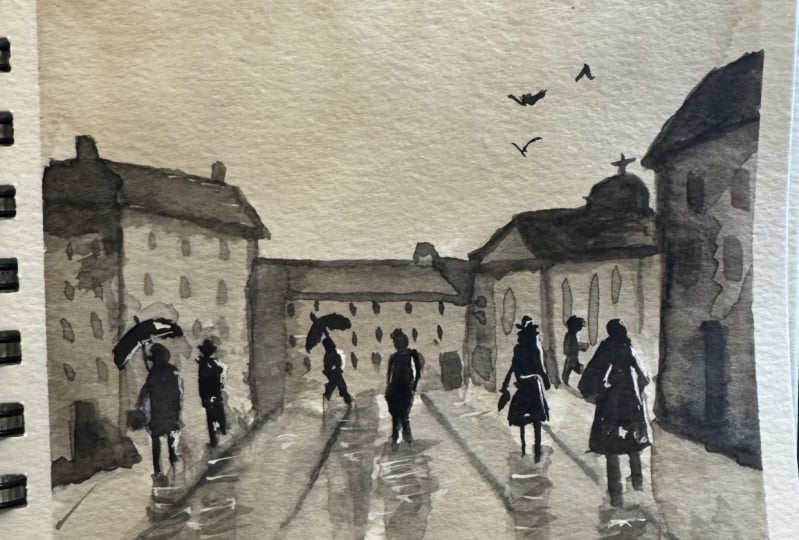
5. Add People: So I will take a smaller
brush, not too small. I will try to do
with this chest. Good point is not to find. Maybe I'll take a smaller one
if I need further details. I have prepared
more of my brown, black, my sepia brown and black. And they start putting people, the secret is to put all the heads more or
less at the same level. And you vary only the
distance of the feet. To make distant people
you will put the head at eye level here and
shorter person. And the longer person. But the head always at the same level will have
her feet closer to us. So the important thing is
to vary position, clothing. Start maybe with a person
here and easy one. The bank must be
concentrated because the background is
not completely dry, so this must be
more concentrated. And how we make a
code like this. Sort of rectangle, small
head and two legs. One shorter, one longer because they walk
in this direction. And maybe we can add
a bag like this. And then we can put the
person next to her or him, someone that is
working, put the hat. And he will have maybe
a shorter jacket. And he will also work
in the same direction. Like this person. We can change it. We can put actually an umbrella on some highlights, maybe. Okay. Maybe we can now add
another person here. We would put smaller hat and more fancy coat with maybe a bad like this. Maybe shaky. Scurrying. Here. A shopping bag. I person walking
in this direction. Here. Smaller, one,
man with big belly. So he wouldn't be
walking like this. You see the heads are
always the same level. Let's give him an
umbrella as well. We can put someone closer to us, maybe here, maybe here. Hence in a pocket. And this maybe can
put a small dog here. Maybe two more people
here. Smaller one. Maybe you would put
someone with a skirt. Jack agenda is correct. Nice. Let's put the hat. 234567, odd number,
that's perfect. Now, the wedge reflections. So maybe we need to wet the background below them. Slightly wet. It takes UC and final part. Okay. You have to research
the little poodle. And then we go out exactly
from the food down, down, single stroke. Then with a clean brush and
we slowly zigzag like this.
6. Add Definition: Now let's define the houses
always with my smaller brush. To draw the roof. This is going to be darker. This is going to be
slightly darker, but remember the
light is from here, so this is lighter
than this side. I keep mixing black and brown. Hand we have maybe this the Buddha and people can
draw just a hint of Windows. Remember that more or less
around the hand of this lady. That is the focal point. You can put a door. It's easy. So we have the wall. And here we have the
church, the dome. Remember the
direction of flight. Sadly, bigger brush. Just to, just the
indoor do want to do. And maybe we can
put here triangle, maybe just some columns. Just a hint. Remember that the hair
is going to be darker. It's going to be much
lighter when it dries. And here we have
some other windows. The roof, shimmies, chimneys tend to really decide is going to
be slightly darker. Sound smooth, Ambler. Yeah, column and again, this probably some dark
inside the columns. Remember they also some horizontal line details. We can she is going to be shadow. So defined. Maybe better. He knows. To defined, defined dog. We have lost him. Lady maybe needs to be somehow maybe because the light is
coming from here is going to be darker here, the pavement. I would draw a line here that was some
blue bits, Perfect. Perfect. Add some variety. Here we have to refine. This. Was someone we need to define
our dog better. Last time. Just very I took triangle here. I think we've done, we
must await the strikes.
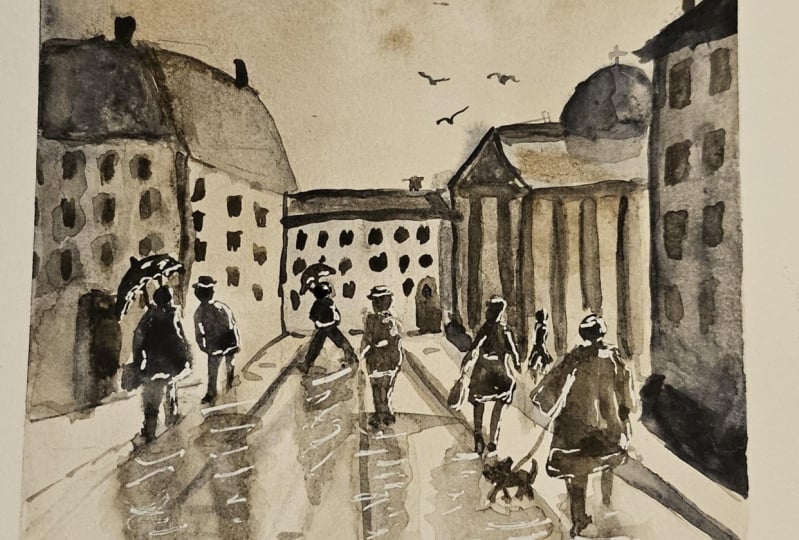
7. Details & Highlights: Now I see if I need to
define better some details. And I do very
little because it's important to know
where I need to stop. The dog definitely needs. I'm paid to shape. And maybe here we'll define the columns. To be better defined. Columns to define some fruits. Remember, convergent
here, cross here. The windows need really to just, just a hint. What tense. Okay, so I think that maybe we
can take our gel pen, white gel pen, and
add some highlights. Okay, to add some highlights, we must make sure that
everything is completely dry. So adding highlights to people
and they should be dry. So let's start. On this side, for instance. They can have some high. That's where no, the
sun hits relative son because they just slightly, we have lost our
men walking here. So we might jump in. Maybe even with some more black. Just pure black. Was walking like
this. Just done. An arm going this way. This way because
he was nice way. Important thing is
to know when to stop and think we
need to stop it. Now. I can put that maybe the
sky is slightly empty. So I think the menu, we can add some birds. Also. We can use our web Jin
Pen tool is not dry. It clogs the pen to
add some highlight. The shadows. To be nice. That's a touch of reality. It's okay to ticked. I don't want to
touch it anymore. I think it's done. We just need to let it dry. Once it's dry, you can do
the most satisfactory par, which is you take these off and you have and you have your CT in the
rain. I hope you liked it.
8. Final Thoughts: Thank you for having me
please find the scanning. But I hope you had fun. Don't hesitate to upload your projects in the
gallery because I am happy to interact with my students and I will be happy to
give you my feedback. So other students can also see what type of results
you can get. These glass. I am also on social media, so I will be delighted
if you upload your projects and Instagram
and you can tag me. You find me under my name. And he said a cheesy. Thanks again for having
joined the class and see you in my next class. Woman being a B
path from exhibit
 Elisabetta Furcht, Anyone can paint!