Transcripts
1. Welcome to Class : Have you ever wanted to
illustrate the world around you, beautiful places you've been, maybe places you
would like to go, or even amazing buildings
that you admire, but you don't really know
where to start. Don't worry. This class is for
you. Hi, I'm Jovana. I'm an artist and illustrator, specialized in pen
and ink drawing. And today, I'm going to show
you my favorite techniques to draw urban scenes with ink. We're going to go over all the technical part of
urban sketching, but I'm also going to show
you how to give life to your drawings and how to express the feeling of a place
in an illustration. In this class, you're going
to learn urban sketching in a ometric perspective,
realistic perspective, how to use one and two vanishing
points to create depth, and how to create an
illustration from beginning to end using the techniques
learned in this class. Going to show you some
drawing methods that are exclusive to ink pens, but, of course, most
of this class can be applied to any
medium of your choice. So if you're working with
watercolors, markers, or even digital arch, this class will bring your urban sketches
to a whole new level. It doesn't matter if
you have 10 minutes or ten days to create a drawing. After this class,
you're going to be able to tell the story of a place in an illustration
through your point of view. And before we start, don't forget to follow
me here on Skillshare, so you can be the first
one to know when I post new classes and when I do
updates to my current classes. Now, grab your pens and
paper and let's get started.
2. Class Project : This class was designed to help you create a final
project with me. And today, I want you to think of a place that
is special to you. It could be a place that you've
been and that you loved, maybe a place that you would love to go and
you've never been, maybe somewhere where a
big life event happened or even just a building that has some special
meaning to you. And I want you to
draw this place or this building using the
techniques learned in this class. I'm going to show you
four main methods of creating urban sketches. So you can choose one
of these four methods to create an illustration. You're going to see
they're all very different, but don't worry. I'm going to make
it easy for you and explain step by step
how to do each of them. Once you're done
creating that project, I would love if you posted your project in the project
section down below. This is a great way for you to connect with other students, get some feedback from me, and also be more of an active
member of this community. Now, join me on the next
lesson so I can tell you about all the materials you're going to
need on this class.
3. Materials : Hello, everybody.
Don't wind my bandage. I burn myself cooking because I can draw,
but it cannot cook. So in this lesson, we're going to talk
about all the materials I'm going to be
using in this class. Of course, you can adapt to whatever you
have in your home. So don't worry if you don't have something from this list. Just start. This is my favorite
paper to draw with ink. It's Bristol vellum surface. As you can see, the surface is not chew texture,
it's pretty smooth. So it really keeps the
ink in place and it doesn't absorb too much
ink from your pen. So I really like
this kind of paper. The good thing about
drawing with ink is that most papers
will work well with can just kind of,
like, test it around. But my suggestion for
you you should get a type of paper that
is not printer paper, is not too thin and too fragile, but also not too textured like watercolor paper, and it
should be good to go. We're also going to be
using ink pens, of course. These are my favorite ones. Here I have a 01, a 005, and a 03. To be honest, after
filming this class, I basically only use the 005. But it really all
depends on your style. If you want to approach something more detailed
and more realistic, you can go for the
thinner lines that you so the 005 is pretty
good with that. We're also going to be
using a catching pencil. I really love this
mechanical pencil by pentil. It's a 05 HB pencil. It's really, really
smooth to draw with. So if you're looking
for a new pencil, I totally recommend this. You also need a good
plastic eraser. I really love this one by tumbo. Of course, this one is optional, but it's super nice
for little details. So I just wanted
to show you guys. You also need a ruler. A 30 to 40 centimeter
would be ideal, but if you have a smaller one, you can totally make
that work as well. Have rulers like this, they can be pretty useful, too, but they're definitely
not super necessary. It's just easier to use
them for guidelines. Now, something optional
that can be really useful in this class
is tracing paper. You can buy them in a row
or also in a pad like this. This is definitely
not necessary, but it can be helpful if
you really want to study the proportions and
the perspective and use reference
pictures to trace. So this can be a really
helpful study tool. You will also need this grid
for isometric perspective. This is a printable download in the projects and
resources down below, so you can just go there
and print it at home. What you experiment with
tracing your drawings and tracing over reference
pictures just for study, you can use dodge tape like this just to fixate the
page in place, but you could just
use paperweights or something more simple, like a razor, pencil, just to keep
everything in place. Now, join me on the night
lesson so we can start.
4. Elevation View : It's a little example of what elevation view
could look like. So if we have a horizontal line, this could be our horizon line. If you were to draw buildings
in the elevation view, you would get them
flat like this. So you basically don't
have any perspective. You don't see the sides of the buildings here, for example, you don't see basically only be able to see
this front side. All the lines are basically
parallel to each other. I know this is the
kind of free hand, so they're not
perfectly parallel, but you would notice
that this line here is parallel to this
side of the page and then the top of the building or the ground is parallel to this horizontal
line right here, which is the horizon line. We could have, if
we have cars here, we would have it
facing from the side. If we have a person
walking here, this is very terrible
proportions. But let's say we have
a little tree here. This is the sidewalk. We could have some
other buildings here. This is basically what an
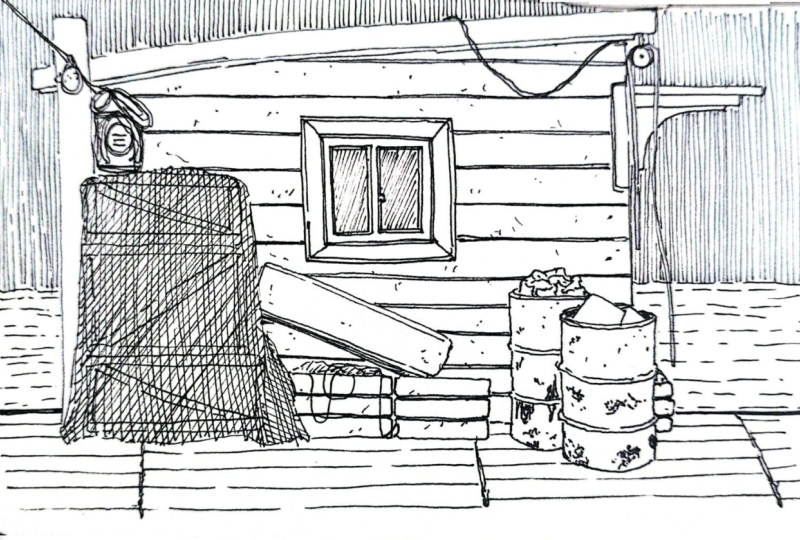
elevation view would look like. I'm going to show you
some pictures so you can understand some
other examples. One thing that's really
nice about this type of drawing is that because we
don't have perspective, everything has the
same proportions. All people, all cars, all trees are going
to be basically the same proportion and the same distance
from the viewer. So in general, we're going to have everything
be very cohesive, very balanced, and it's
very easy to look at, very comfortable to digest. We can practice doing these drawings by
placing a tracing paper like this over a
reference picture and sketching the important
lines that we see. We hope you have a clear
understanding of what lines matter and which ones we don't really have to sketch. Or if you want to step ahead
and draw from observation, by all means, go for it. But I thought we could take a little bit of a
step back first and kind of just practice by tracing on this
drawing first. I'm using the seed stickers
to hold the paper in place. You can basically just
use tape for this or even something heavy just
to keep the paper in place. And now we're just going
to roughly go over the main lines that are forming the structure of this building. So basically all the
straight lines you see forming windows,
doors, walls, signs, roofs, and you can
choose to focus on just the architectural aspects and do just the
buildings and objects. Or you can add a
little bit of life to your drawing and also
roughly sketch people, trees, cars, animals, and basically just add some movement like we have in
this picture here. I didn't want to draw people. I could have just
made up the lines to complete the drawing
without the people in it. But I like the idea of
having people in it. I think it kind of represents
the real aspect of a place and not just the architectural structure
of this place. I also think it
adds a little bit of personality to the drawing. And as you can see, these
people I'm sketching, I'm not being very
detailed at all. I just wanted to be kind
of like a rough sketch, and I think this is kind of
the idea of the drawing. It's not supposed
to be perfect and super neat and super realistic, but just to be a
representation of this space. So if you're out there in the world just sketching
from observation, like maybe you're
sitting on a bench or on a cafe and just
sketching what you see, it's a fun exercise
to capture things as they are with people and
random things you see, just for documentation or
storytelling purposes. You can also choose the amount of detail you want to add to your drawing and use the hatching technique to create different tones for things. You can also create textures
and shadows if you want. Here, I'm just choosing
to keep it simple. So I'm not playing too much
with tones and shadows. Here, I'm just
practicing tracing the important lines
that make the structure of this drawing, and I'm also adding
a little bit of texture where I can
clearly see one, like on the sidewalk and the stop side of
the building here. Also, the thicker your lines, the more stylized your
drawing will be in the end. So if you want
your drawing to be more detailed and
delicate, for example, you can choose to go
with a thinner tip This is a super cool
style of drawing. I think it's super
cute and simple and it really represents the
space really nicely, and it really helps us practice our observation
skills in finding the important lines
for a sketch and draw things that
call your attention. Basically just what kind of pops out in your eyes, from
your point of view. Of course, this sketch looks very different than the picture, but it's a beautiful simplified
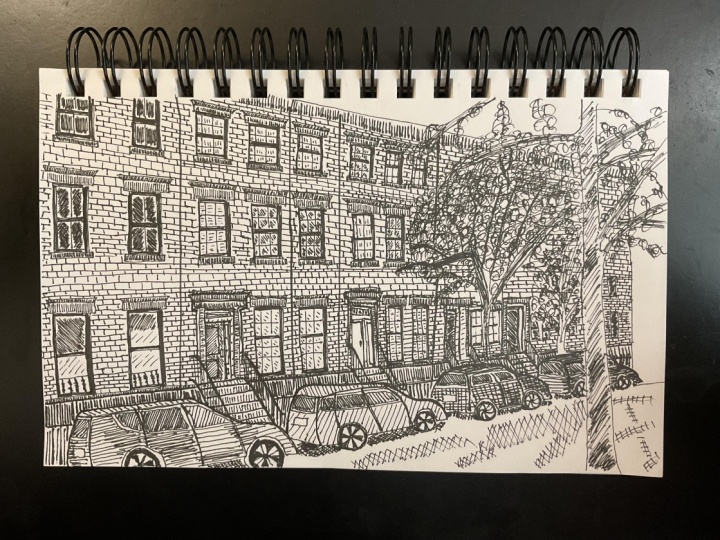
version of this place, seen from your perspective. Have one more example
here, and in this one, we don't have any people on it, so it's going to be even
more straightforward. We have all of these vertical
and horizontal lines, and I'm going to
start by sketching the most prominent lines, the one separating
the buildings and defining the doors
and windows and walls and all of these vertical and horizontal
lines that we see. And then we're going
to start adding a little bit more details
like the wall patterns, the store signs, and
you can keep adding more and more details as
much as you would like, or keep it simple like this. And this is what
this sketch looks like away from the picture. I actually really love
the simple style, and I think it would
be super cool to fill a sketchbook with
drawings like this. What do you guys think?
Okay, let's go to the next lesson
so I can show you how to sketch using perspective.
5. Perspective Drawing : One point perspective
drawing happens when all the lines in the drawing lead towards this one
point in the middle. So we're going to have
lines moving from all directions towards
this point in the middle. Where the point in
the middle is is also where the horizon line is. And if we are talking about
urban sketching specifically, let's say we have the street
here ending in this point, we're going to have,
let's say the sidewalk, and then we can start
having some buildings are all going to lead
towards the point. And then for the sides
of the buildings, we can just make it parallel to the line that we just
erased, the horizon line. So this side of the building
here would be parallel. So that's just a
horizontal line. This is, of course, not how it would actually
happen in reality, but just for the sake of
learning the perspective. All the lines that actually
matter for us to create a one point perspective view are the lines that lead towards
the point in the middle. From here, you would be able to create the windows and
the doors, and again, the top and the bottom
of all the windows and doors would also lead towards
the point in the middle. So you're creating
a little door here. Let's say we're creating
a set of windows, they would all lead towards
the point in the middle. I'm struggling to make
straight lines here, but you get the idea. As I mentioned for the sides, if we have any
windows or anything, they're going to be all
parallel to the sides of the page and the base
of the horizon line, which is a horizontal line that's parallel to the
bottom of the page as well. That's interesting to note for a one point perspective drawing
is that everything that is closer to us in this direction is
actually becoming bigger. This same window here in this corner would
be much smaller. Let's say you're drawing some
other things that are not necessarily buildings
or city structures. Let's say you have people.
If you draw a person here, that's basically this size here, this person is
probably going to be really tiny over here.
Same thing with cars. If you're drawing a car, let's say this car is
this size over here, here, the car is basically
going to be super tiny. We're going to think the
same thing with trees. So if we have a big
tree over here, maybe here, the tree would
be a really tiny tree. Here, it's kind of
a middle ground. So anything that's getting closer to the dot
is getting smaller, anything that's
further from the dot is actually getting bigger. As you can see in this
picture, every line in this composition leads to
this one point in the middle. Know that in some of these
windows here, for example, it almost looks like
the lines are parallel, but they are actually leading
to the vanishing point. So if we decide to trace
over this picture, of course, since we're tracing, we can just go over
the lines by hand, but maybe try using a ruler
so that you can kind of test the theory and see how all lines are actually leading towards
the vanishing point. Move the ruler around
to get the lines right, and you'll notice
that with time, you're even going to stop
looking for the lines first, and it will just use
the vanishing point as your actual starting point. Just move the ruler around it. It's also an interesting
exercise to practice the change in scale for all
elements in this picture, like the cars, the people, the street signs, the windows. As you can see, everything gets smaller as it gets closer
to the vanishing point, and sometimes it's hard to get these proportions right just
through observation, right? So this is a great practice for your hands and your brain to get used to this
kind of perspective. For a two point perspective, you're actually going
to have the same idea, the same concept of the lines going towards the
vanishing points. But now instead of just one, we are obviously going to have two. Let's say we have two dots here, these are going to be
our vanishing points. If we have our
vanishing points here, this means our horizon line
crosses both of these dots. Let's say we are looking at
the corner of a building. So let's say this is
a corner right here. If we were to draw the top of the building going
in this direction, it would lead towards the vanishing point and the
bottom of the building, same thing, it's also going
to lead to the point. If you were to draw the
other side of the building, it's also going to lead to
the other vanishing point. So now that we have
these lines crossed, we could have the
ending of the building. This is what our building
would basically look like. If we have windows and doors
and things of this nature, we would have, let's say,
we have a door here. The top of the
building would also go towards the vanishing point. And also, if we have streets and trees and
things of this nature, they would also lead
towards the point. Let's see, we have
a sidewalk here. Similarly to the one
point perspective, let's say we have trees and cars and things
of this nature, they would also be
all getting bigger the further they are from
the vanishing points. The same tree that's being
put here in this corner, it would potentially
be somewhat smaller like this you can basically measure this by pointing a line. Let's say they are
all the same height in the context of proportion. You would have
this difference in size for all the elements. Let's say we have a car here, the car here probably
would be much smaller. In this context, we have
depth in two directions. We have depth in this
direction and in this direction based on
both vanishing points. There can also be a case where the vanishing points are
not visible in the picture. Let's say you have
a picture that's disproportion and you
can trace the lines, you can see that the
lines are there, you can see where
they're leading towards. But the vanishing point
is you cannot see it. It's outside of the frame. That is totally
fine. That doesn't mean that the point
doesn't exist, it just means that it's
not visible in the frame. This picture here. This
is a great example of a chew point perspective
since it gives us the illusion of depth
because it gives us an idea that some elements
are closer to us, the viewer, and some of
them are farther away. This is done through
the illusion of scale in this drawing. So whatever is closer
to us is going to be bigger and whatever's further from us, it's going
to be smaller. But how do we know in what
scale and what direction to draw all elements in order to keep a
realistic proportion? The answer is you're
going to define points to help you create the perspective. Work
with an example. So in this case here, we
can see two points by drafting the main lines that are shaping everything
in this picture. So all of these main
important lines on both sides of
the building will meet in these two
points that could be inside of your picture or outside of it, like
in this case here. When you find the two points and connect them with
a horizontal line, you found your horizon line. One fun exercise
you can do to warm up and start understanding
these proportions is to just trace over the
picture so you can really pay attention
to the direction of the lines and how the
windows and doors and bricks change in size
according to the perspective. Just do this freely
by hand or use a ruler to get the
straight lines first like I'm doing here. This is an amazing way for
you to practice how to translate an urban scene
into shapes and lines. Even though we're not drafting the perspective
lines to guide us, we're still practicing
perspective drawing with a real example. So when you're out in the world actually drawing
from observation, you have some muscle memory on how to draw in
realistic perspective. From a picture is
also helpful for us to get more details
in our drawings that maybe would be ignored if we were just observing
an image to draw. So this is a great way
to train your hands and your brain to understand
perspective by just drawing it. You can do this with as much or as little detail as you want. And as usual, if you use
a pen with a thinner tip, you can get more
details and have a more delicate
result in the or you can use a thicker line to get something a little bit more
stylized than minimalistic, which is also pretty cool. It's totally your choice. I personally tend to
overcomplicate my drawings, as you're going to see
in our final project. So I decided to go with a little bit of a
thicker pen here, just to experiment with this different more simplified style, and I personally love
how it turned out. Of course, this is just
a warm up exercise, but if you're feeling inspired, you can scan this and color it digitally or even by
hand if you prefer. Now that you understood how
to use the vanishing points, let's check out
another way to draw perspective, the
isometric perspective.
6. Isometric Perspective : In this lesson, I'm
going to talk to you about isometric perspective. There are tons of books
just on this topic, so this is a very
complex topic on itself. So we're going to keep
it really simple here. Basic with isometric
perspective, you are going to be looking
at everything on an angle, and you will be able to see
both sides of a building, for example, and
everything is parallel. So we're going to have
these lines being parallel. These lines are parallel, and these lines are parallel. So instead of working
with vanishing points, we're just going
to be working with these main parallel lines. We were to draw the same cube
in a two point perspective, just for reference, this is
what it would look like. Let's say we have the two points right here and we're going to have the top of the cube
here. Basically like this. As you can see, in a
two point perspective, we can see the scale changing. The side of the cube here is bigger than the side
of the cube right here. This doesn't happen in isometric to make this easier for us, we can work with a grid
like this where we already have all of these parallel
lines for us to work with. So everything is going to
be much easier using this. And you can go on the project and
resources tab down below to download this and print it at home and
then just trace over it. You can totally
just draw on top of this page or put
tracing paper on top, use the grid as guidelines. The isometric perspective is an unrealistic way of showing objects and scenes
where everything looks equally sized
from every angle without any vanishing points like in traditional perspective, as we saw in the
previous lesson. Means that when you're looking
at an isometric drawing, each side of an object will have parallel lines and all
dimensions will stay consistent, which makes it
easy to understand the depth and relationship
between different parts. This style of perspective is actually super popular
in video games, for example, because it gives a clear view of the game world. So when you're
playing, you can see everything all at once with enough perspective to
make the world seem three dimensional without
being too realistic. Though we can understand
what elements are farther away and which
ones are closer to us, they don't change in
scale as they do in real life or in the
traditional perspective. And sometimes in games, they instead use colors to represent a
difference in depth. So elements that are farther away are sometimes
lighter in color or with a faded color as if they're fading
away in the distance, and when elements
are closer to you, the colors turn just more
vivid and more saturated. Architects and engineers also love using isometric drawings to illustrate a concept and even complex structures
more clearly. Also used a lot to
illustrate infographics, and it's basically a
great way to illustrate a concept in three D without
making it realistic. So to practice drawing
in this perspective, you can go on the
resources step down below and find this isometric
template to use as a guide. You can print it and just
draw on top of it or use a tracing paper so
that you can use just one of these for
multiple drawings. If you want to draw a building or a whole city, for example, you're going to use
the vertical lines as the edges of the walls
and the diagonal lines in both directions to
define the ceiling or the top of a building and
also the base of a building. You can see, I made
a tiny mistake here, and to avoid making
these mistakes, remember that the elements
in the front or closer to us the viewers will be
at the bottom of the page. And as closer they go
to the top of the page, the farther the
buildings will be, and this is how the illusion of depth is created in
isometric drawing. So you definitely want
to start at the bottom of the page and then
move up from there. This means you're
going to be drawing the front buildings
first because they're going to be covering
the ones in the back. You're drawing a bunch
of buildings like this, you can use your creativity
to make the building shorter or taller,
thinner or thicker. You can add some
different block shapes on top of them to make
it a bit interesting. You can also draw parts of the street if you want
that to be visible. And you'll see that
even though this is a little bit weird
in the beginning, it gets much easier as
you get used to it. Once shapes down on paper. You can start adding
windows, doors, and other details you might want to incorporate in
this little city. You can also play with
the shapes of windows, making them horizontal or
vertical, thinner or thicker. You can even do some of them
a little bit rounded or just keep it simple and keep
them rectangle or squared. And you always want to use the isometric
guidelines to guide you so that you stay
in perspective. If you're not exactly going over the lines on the template, just use them as a guide. Remember that in
isometric perspective, we have only three
directions of lines, vertical and two diagonals. So if you're drawing
outside of these lines, just make sure they
are parallel to one of these three main guides, and your isometric
perspective will look great. After adding all the
buildings and details, you can also play with some
other elements like trees, people walking their pads, cars, street lines, and
signs as you can see, this is completely
different than traditional perspective
where the things that are farther
away become smaller. In this case, everything
looks the same. The size of the cars and the trees are the
same at the bottom of the page where things
are closer as they are in the top of the page
where they are farther away. So just keep adding
some fun elements that you can imagine
in this little city, and you can also add
some hatching to create different tones and create a more three dimensional effect. For example, here, I chose the left side of all
buildings to have a shadow. So I'm hatching over every
left side like this. You can see, the contrast kind of makes the drawing
pop a little bit more, and it's just a cute touch that you can add
to your drawing. These are the principles
of isometric drawing. You can absolutely
try to do this without a template or
just do this by hand. Just remember to keep
the lines parallel to create this cool serial
perspective effect, and don't change the
scale of elements. The scale remains the same
all over the drawing. Now let's move on
to the next lesson.
7. Pencil Sketch : In this lesson, we're
going to work on our final project
for this class. You can choose a style
of urban drawing to do, and I'm going to
walk you through the process from beginning
to end on how to draw a much more
elaborate urban scene from a place that means
something to you. Just by observing
it, no tracing. First, look for a
reference picture of this amazing place that
you would like to draw, or even take a
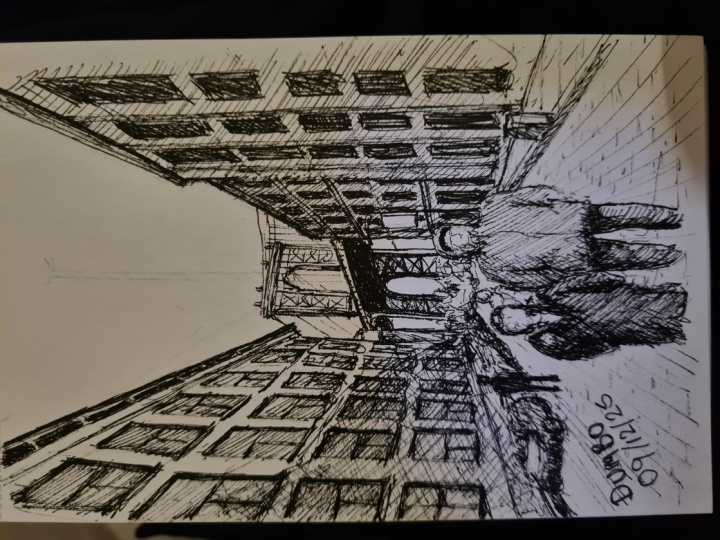
picture if you want. I'm going to draw
the Palista Avenue, which is a very iconic
spot in San Paolo. It reminds me of the
time I went to college, and this was a really
cool phase of my life. So this is what this drawing
is going to mean for me. First thing we're going to
do is we're going to define our guidelines for the perspective style you
choose for your drawing. I personally chose to do a drawing in one
point perspective. So my first step is to look at my reference and find the horizon line and
the vanishing point. If you're doing a two
point perspective, for example, same thing. You need to find
the leading lines, define the two vanishing points, and this is how you
define your horizon line. If you're going to do an
isometric perspective, you're going to have to adapt a real live picture into the parameters of the
isometric guidelines. So this will take a little
bit more brainwork to do. But I believe in you, if that's
what you want to do, go. Back to this example here, I'm sketching with a pencil some very clear leading
lines I see in my reference, not paying too much
attention to how long they are because we're
going to raise them later. These are just our
main guidelines to create the structure
of our drawing. I'm sketching the lines
that define this balcony, this tree, the top
of the buildings. And as you can see here, a lot
of these lines will clash, and that's totally
fine at this stage, because you just want to
make sure that you have the right proportions before
we go over them with a pen. You can also try to observe
how much space each element takes on the scene
and kind of use that as a guide to
position other elements. Though we know where all
lines are pointing towards, you might struggle to
know where to put them, like how long they should be and the distances
between each elements. So in this catching phase, you want to really start
big and then go small. So you're going to start
with the bigger elements, the things that really
call your attention. Maybe there's a specific line or a specific building that really
marks this illustration. So you're going to try to position those
elements first and then add the details later in relation to
the big elements. For the most prominent
lines, the straight lines, and then you refine the shapes and other
elements as you go. Leave the details to the very, very end, and don't worry about them so
much at this stage. The goal here is to just draw the structure and the
baselines for your drawing. When you're ready, join
me on the next video so we can outline the
drawing with ink.
8. Ink Outline : This last time, we're
going to finally introduce our ink
pens to this project. My first tip before
we get started is to lightly erase any
pencil marks that you're not going to use
because when we run the ruler over the pencil
sketch over and over, it just might smudge a little bit and stain
the paper a little bit. So make sure you have
light pencil marks before you start working over
the drawing with the ink. Next steps here are pretty straightforward, as
you can imagine. Since you have
most of the pencil structure already down on paper, you can just outline the
main shapes of your drawing. You can totally do this
by hand if you want to create a more organic field
to your illustration, you don't really have to be
super neat and super precise. If you don't want to, honestly, this is all just about the
style that you choose. So play around and change
anything you would like in instructions and kind of do it in the style that
you're looking for. But I'm planning to
make this a pretty elaborate and more leaning
towards realistic, just so I can show
you guys how to come up with more
realistic effects, textures and shadows
if you decide to go on this more complex route.
Let's put it that way. So as you can see here, I'm basically going
over the pencil lines where they are defining
the buildings, the street, this balcony on
the left, the street lights. And at this point, I'm
keeping it simple. I'm just trying to
be mindful of which elements are on
the back or behind other elements so that I leave enough space for the elements in the front to cover the ones in this stage, you want to be a little bit more
detailed with the lines. So as you can see
here, I'm adding a little bit more detail
on the street lines. I'm also adding a little bit of scribbling to be the
foliage of the trees, and I think that's
such a cute touch and such an easy way to draw trees. And as you see, they need
to add more details. If you're not super
comfortable of just jumping straight to
doing that with the ink pen, you can totally bring
back the pencil and sketch it with
a pencil again, like I'm doing with
this hotel sign here. And then when if
you're ready, you can just outline
it with the pen. This is where it starts to
get a little bit more fun because once you have
the full outline of the buildings
and the main shapes of the larger elements
in the picture, you're going to
start translating the different patterns you
see onto your drawing. So, for example, here in
this building to the right, we have these
rectangles that also, as it is in perspective, lead to the vanishing
point. Now, for this other Notice that we can see
the side of the building, which for illustration purposes will be represented as flat, kind of like we did in
the elevation view. So basically horizontal
and vertical lines that are parallel to
the sides of the paper, and we have the front
of the building, which is the side
facing the street. And when we look at it from this point of view
of the balcony, we can only see this
side in perspective. And the lines also lead
to the vanishing point. This is basically the rule for all the buildings in a one
vanishing point perspective. When you feel like you don't need the pencil marks anymore, you can start erasing it so you can keep your
paper neat and clean. I like to do this over and over. As I add more ink, I erase more of the
pencil and I try to keep the pencil on paper the
least amount of time needed, so I don't smudge it and I
don't make a mess on my paper. You can also start adding more details for all the
buildings in the street, like windows, balconies, and other patterns you can see
in your reference picture. You can also be creative and kind of create
things if you want. You can add people
and add trees and add cars and just start
having fun with it as you go. And if you're feeling confident, you're more than welcome to jump straight to the pen sketch. A ruler is absolutely optional. Just keep the perspective in mind if you're
using perspective. If you're like me and
you want to be very precise with your
lines or you're just not really
sure if things are going to fit in a space
or anything like that, you can totally go back to
the pencil again and sketch everything first before going over to the pen,
like I said before. Here I'm adding this extra set of windows on this
building here, and again, this is the site
that's facing the street. So here we are
again, working with our vanishing points and drawing the windows
on perspective. A lot of this is
pretty repetitive because you're
basically working on a but I find it to be
pretty relaxing, like when you figure out
the pattern and you kind of decide on a game plan on
how to draw the pattern, you could almost turn your brain off and kind of just follow the lines and kind of just do it without thinking
about it too much. Put the windows, doors, and all architectural details
down on paper so that we can shade and add a little bit of contrast
in the next lesson. So just have fun with this part. Remember that you
also don't need to draw things exactly like
the reference picture. You can kind of play
around with the patterns as you see fit. The most important thing
is for you to keep the perspective consistent
if you're using perspective, and then you can really draw
this in any style you want. Once you're done with
the Pen outline, you can finally erase
all the pencil marks you still have left on
paper and meet me on the next lesson so we
can make this drawing really pop with some
depth and textures.
9. Texture & Shading : Hi, everyone. And this lesson, we're going to play
around with texture, stones and shadows, which if you have seen
my classes before, this is my absolute
favorite part because it's the stage of the
drawing that you can really make your drawing pop and
look more intricate and more dramatic and just a
little bit more used. When I say we're going to add different tones, I'm, of course, talking about different
tones of gray, since we're just using this
beautiful ink pen right here. If it's hard for
you to visualize the different potential tones you can play with
in your drawing, you can always remove
the saturation from your reference picture to
see it in black and white. And as you can see
in this example, it's just so much easier to see how the colors would
translate into gray scale. To create these different tones, there are several
techniques you can use. If something is black or
really close to black, you can just fill it in
with ink or you can hatch some short lines like this to create some different
tones of gray. The closer the lines
are from each other, the darker the final
result will be. And if they're farther apart, the final gray would
be a little bit light. Also use a ruler like I'm doing here to help
you do this faster without letting the lines go beyond the space that
you want them to go in. So I'm basically just blocking the space here with the ruler, and this is pretty helpful. I can do lines way
faster by doing this. Another way to create a
lighter tone of gray is to use an older used pen
because with an old pen, the lines come out
a little bit faded. The pen is releasing
a lot less ink. So, side note, this is
why you always save your old pens because you never know when they're going
to be useful for you. Anyways, in this
stage of the drawing, it's time for you to
be brave and color in some windows and things you see are pretty dark in
your reference picture. So basically, here, I'm just
doing this little windows, and I'm trying to play around with the grays on
the patterns of this building here so that the windows don't
look all the same. So some of them are
going to be darker, some of them are
going to be lighter, and some of them are going
to have horizontal hatching, some of them will have
vertical hatching. And this ended up creating this effect that's
pretty interesting, in my opinion, and a fun way to represent different
colors in gray scale. You can see here, I
started using a piece of paper under my
hand just to protect the drawing from the warmth of my hand and to make sure that the ink doesn't smudge as I'm working on top
of it like this. Of course, you don't need to
use tracing paper for this. You can just use a simple
piece of printer paper, and that will, of
course, work just fine. For this building here, we have an interesting
effect to work with, which are these
reflective glass windows that are clearly pretty
different in tones. So to create the glass texture, I'm just hatching
diagonally like this, making the windows
at the bottom much darker than the ones on top and leaving a little white space between each window
just to separate them. Of these windows are open, so I'm leaving them for last since they're going to be a
bit lighter than the rest. As you can see here, I'm doing the same movement with my
hands. I'm using the same pen. But what's helping
me create such different tones of gray is the way I'm tilting the
pen on an angle as I draw. And, of course, the
pressure towards the paper. So if we compare, I actually have the pen on an
angle that's closer to vertical or perpendicular to the paper when I'm
hatching the darker lines. And as I move up, I create the lighter tones for
the windows on top. Pen is more sideways like this. Do you
see the difference? It's a really small
difference in the way I'm positioning
the pen towards the paper, and it does a world of
difference in the final results. It helps create all these
different tones in the end, and it's a great practice to control your pen a
little bit more. To make this look a little bit
more natural or realistic, I'm going to make the gradient a little bit more
uneven and create kind of like a
random pattern while still keeping the bottom
ones darker than the ones. Nest, there's not much
secret from now on. This is basically
the gist of it. You observe your reference, you find the different
textures and shadows you would like to
represent in your drawing, and then you choose a repeating pattern to create that tone. This is an amazing way to practice the control
of your pen, and the more you master creating the exact final tones
you want to create, the more you'll be able to
do this in your drawings. You can, of course, practice these techniques by
creating value scale. So basically just coloring some squares or circles and
try to reach different tones. But of course, practicing on a drawing like this is way
more fun, in my opinion. Anyways, back to the drawing, you can always start
with a set of lines to create the base of the
texture and then go over it again and again to create some more shading and add
more contrast as you like. To be honest with you all, I absolutely
underestimated the time that this drawing would take me. This took me days to finish. So don't feel pressured to get a result like this if you
don't have that much time. This really is a patient's game, and in my opinion,
ink drawing is really an amazing
teacher of patients. If you rush it, you
will notice that your lines will start becoming messier than you would like. Won't be so happy
with the end result. So if you find yourself
tired and you start to rush the process and you're just like not enjoying it
anymore, that's fine. Just take a break and
pick it back up later. This definitely
doesn't need to be completed in just one setting. Also, you can just pick a simpler reference
picture with, like, less buildings and less details, and it will probably take
a lot less time to finish. So my invitation for you
with this project is to really embrace the slow process
that is drawing with ink. Take your time, put some good music or a good
show in the background, and work on this when
you have time too. Trust me, you will feel so proud of yourself once
you finish your drawing, and all the time
and effort you put on this project will
be totally worth it. I honestly don't have that much more instructions
to give you on this. Just have fun with it, play
around with other techniques. You can try scribbling
for the trees. You can even try stippling
if you have, like, a stone texture, for example, and you're going to end
up with amazing results. Want to see some different
techniques with ink pens, I have another class that's just foundations of
drawing with ink, and this class will
guide you through ink pen drawing in a
little bit more detail. As I just mentioned, this
drawing took me days to finish. So here, I'm just adding more and more texture and
shading on all elements. I see in my reference picture that I think could use
a little bit more ink. If you want to watch
the process in a slower version
and more detailed, I'm leaving an extra video
at the end of this class with more real time
sections of this drawing I'm doing right now just
for your reference so that if you see some
area that you're like, I want to see how she
did this in more detail, go to this other video, and you will probably
be able to find that specific part of the drawing in a little
bit more detail. There's no need to
watch that video if you understood the process. Just in case you want
to see this drawing in a more slow and real time pace. Now, join me on the next
video so we can talk about some super
fun final touches. We can at illustration.
10. Highlights & Corrections : Now that you finish your
beautiful ink masterpiece, you might find
yourself stressing over some little spots that you would love to fix somehow and erase the unerasable
permanent ink. And although most of the time, anything you might see
as a little mistake can actually add a lot of
personality to your drawing, you might still want
to know some tips on how to magically erase the ink. Little spots, not large spots. Technique number one is
to use an exacor knife to lightly scrape the
ink off from the paper, which should be done very, very, very, very, very,
very delicately. You can practice
this on a side paper first because you don't
want to ruin the paper. And depending on the kind
of paper you're using, this just simply will not work. I'm using kind of like a little
bit of a textured paper, and I have this super
light and short line of ink outside of my drawing, which is driving me crazy, and I'm pretty bummed about. So I'm going to attempt a tiny delicate scrape
of this line here. I don't really know
if you can see. It just helped a little bit. It kind of, like,
faded the line away, but it's not perfect. It's not like a
full on solution. Another way you can erase the ink in little
areas or to just add highlights is to use a white gelpin or some white
ink with a tiny brush. I am personally obsessed with
this opaque white ink by Copik that already comes with a super delicate
brush attached to it. It's kind of nail
polish, but it's ink. And it's so awesome because
it can create some really, really thin and delicate lines, and it's way more precise
than a white gelpin. White ink from this little
jar of amazingness also ends up a bit whiter than the
white ink from a white pen. Because if you notice,
if you compare them, when you use a white pen
over your ink drawing, sometimes the white ends
up a little bit blue. Like, sometimes the black
ink from underneath, it pierces through the white, and you can kind of
still see it sometimes. If you want to invest in
this marvelous little jar, which, by the way, I'm not
being sponsored by any means. I'm just giving you guys my
honest opinion because I've looked for something like
this for years, guys, years. And now I found
it and I love it, and I want you guys to
know how amazing this is. I'm not keeping this
Opa quite ink, okay? I am sharing this discovery
with you lovely people. Anyways, this is how you kind of erase the ink
in little spots, and also how you add highlights, and I feel like
this part is super, super duper satisfying to do. So I hope you enjoy it. And this is our final
project for this class. Me on the next video
for some final words.
11. Thank You : I hope you enjoy this class
and you learn something new. Don't forget to
share your project in the project
section down below. This is a great way
for you to connect with other students and me. I give personalized feedbacks
from every project. So if you have a
specific question you would like to ask, feel
free to ask there. Or if you don't want
to post a project, but you want to
ask something, you can do it in the
discussion step. Don't forget to follow me here on Scull share so you can be the first one to know when I
have updates on the class or new classes coming up. If you want to connect with
me a little further, I am on Instagram, Tik Tok, and YouTube, and I usually post some quicker tutorials
and arch tips there, so follow me around there, too. If you share your
project on social media, I would love if you
tagged me so I can share your project with
my audience as well. Thank you so much for watching, and I'll see you next time. Bye.
 Gio Vescovi, Visual Artist