Transcripts
1. Welcome! :): Portrait drawing is more than just drawing someone's face. You're drawing a person that has a life, a story, feelings, emotions, and all of these invisible information is what makes a portrait come to life. In this class, you'll learn how to bring your portrait drawings to the next level by bringing your own feelings, personality, and style to your artwork. First, you will learn the fundamentals of portrait drawing, facial proportions, easy hacks you can use to draw faces in any position you like, how to create contrast and texture, and how to make your drawings really pop from the paper using different ink techniques. You'll be able to practice drawing from a reference using a more realistic approach and then later, add your own style and personality with more creative and abstract lines. This class will give you a good base for an expert your drawings, while also stepping up your game and start drawing with more meaning and intention. If you want then improving your drawing skills, you really want to start drawing like an artist and thinking like an artist and feeling like an artist, this class is for you. Now before we start, don't forget to follow me here on Skillshare. Just click this button up here so you can be the first one to know when my next classes are coming up. Now, grab some good drawing paper and some ink pens and meet me on the next video where I'm going to tell you everything about the project we're going to finish together here in this class. See you there.
2. Class Project & Materials: Today, we're going to create a portrait drawing together using fine line ink pens. We're going to draw using a reference photo and through this class I'm going to show you many different techniques you can apply in your drawing. First, we're going to be focusing on a more realistic approach. So we're going to really look at our picture and try to portray what's in the picture in our drawing as well as we can. With this, we're really going to practice our technique and our control over our pens and our ink. Closer to the end of the class, we're going to get more creative with our textures and our lines to add your own unique style to your drawing. Remember to reach down in the discussions board down below if you have any questions. Of course, don't forget to post your project and your process while you're drawing so we can all get inspired by your art. Now, let me tell you about the materials I'm going to use and give you some pro tips on how to choose the best materials for this project we're going to finish together. To complete this project, you will need sketching pencil and eraser. My tip for you is to avoid the B pencils as they're really hard to erase from the paper. Choose H pencil so that you can sketch lightly and have a very clean paper in the end. I use a 4H pencil and a plastic eraser. You also need good drawing paper. I'll be using Bristol paper, but you could also use mixed media paper as they are really good with ink. I would only avoid watercolor paper as it will absorb so much ink that your pens just won't last too long. Now, of course you need ink pens. Try to have a few different sizes. I'll be using mostly a 01, but I'll also use a 005 and a 003 for very tiny details, and a 1.2 and a brush pen for some darker areas. You will notice that the thinner the line, the more delicate and smooth the result, but it's also more time-consuming. I always find that the 01 pens are a good balance between time spent drawing and the result I want. Lastly, this is of course very optional, but you could use a white gel pen or white calligraphy ink to add some extra light in the end or fix little mistakes or even add some new details on top of the ink. If you want to try calligraphy ink, you will also need a thin round brush like this one. When you have your materials ready, join me in the next lesson so we can start working on this portrait. See you there.
3. Creating Connection With Your Portrait: Before we start, I want to share with you some pro tips that really changed the game for me when it comes to portrait drawing. First thing I want you to realize is that you're drawing a person. You're not drawing just a face, you're not drawing a picture, you're not drawing still life. You're drawing a real person that has a story, that has a life, that has thoughts and feelings. There's all of this complex information about this thing that you're drawing, which is a person. I think that's what actually calls us to draw people. I want you to look at this portrait drawing as an opportunity to really express something through someone else's face. By looking at someone's face, we can get a first impression of them, and we can get a vibe from them, and we can get their own perceptions of them. Are they sad? Are they happy? Are the worried? Are they stressed? Is this the kind of energy I want to be around or is this the kind of energy I don't want to be around? There is so much reflection and so much information that comes across in a portrait. right so powerful and I want you to realize that, as an artist, you have that power. I don't really think you can separate our art from us as artists. Art is really an expression of ourselves. It's coming from places maybe we don't even see, maybe we don't even know. To do this in a portrait drawing, I want you to find common ground with the person you're drawing. Even if it's a random person you don't even know. Don't worry, I'm going to walk you through it. For now, what I want you to do is just relax. In all my classes, we're going to do a little relaxation exercise, which you are completely free to skip if you want to. But in my perspective, this is a very important step if you're trying to develop your own style and find your own artistic language. This is a very quick exercise. I just want you to close your eyes for a moment. You don't really have to be in a super awesome posture. Just relax a little bit. Give a little stretch. Sometimes we are sitting down or we are curved on the couch and we don't even notice how our body is feeling. I want you to just acknowledge if your body needs a little stretch, if your body needs a little movement. Let's just take a few deep breaths really slow. Try to fill your body with air and then release it all. All at once opening your throat like this. When you release the air, try to put your shoulders down and just really relax all the tension. Let's just do a little quick emotional check-in. I just want you to acknowledge whatever you're feeling, whatever is going through your mind. Any worries, any thoughts, any feelings are all valid. You're not trying to change anything. I just want you to accept everything that you are at this specific moment. Just acknowledge, bring to your consciousness a little bit of what's going on emotionally in you. Sometimes we have a really hard time separating what's thought, what's mind, and what's feeling. What's emotion? What's feeling? I want you to try to do this exercise of separating the thoughts from the emotions. It doesn't matter why you're feeling what you're feeling, I just want you to look at whatever you're feeling right now, even if it doesn't have a clear name, even if you're not completely sure what it is. Just acknowledge all the feelings you have at this specific moment. Take a few more deep breaths. When you're ready, start coming back. Open your eyes. Now, once you have a few feelings to work with, join me on the next video so we can start drawing.
4. Facial Proportions: Now that you tuned in with your emotions, I'm going to show you the basic anatomical proportions of a face. Every time we draw a portrait, I use the same system as a base. First, mark a straight vertical line in the middle to create the symmetry. Then you draw a simple oval shape to mark a general idea of what the face would be. Remember you should not make any big decisions at first, you always start easy drawing general shapes and then the details will start becoming more clear with time. From the top of the oval shape, I want you to draw a big circle like this, and the bottom of the circle will actually mark the cheek bones of the face. Now in the middle of this oval shape, draw a horizontal line. This is where the eyes will be. I know you usually think that the eyes would be higher than that, but they are actually more around the middle of the head. Mark where you think is the exact middle between the horizontal line and the bottom and the top of the oval shape like this, and here you can draw two more horizontal lines. This, of course, doesn't have to be perfect, you can measure it like how I'm doing, and if you want to be really specific, you can also use a ruler if you want. Once you have your guidelines, you can position the eyes and they will be positioned like this with the central horizontal line right in the middle of the eyes. The distance between the two eyes should be of one eye. You can draw three eyes if you want just to have a general idea of the distance, and I usually mark this third eye softly just to make sure that the distance is right. Of course, leave some room on the outside of the eyes, usually around the size of half an eye. Once you have your eyes defined, you can start marking the nose, which will be positioned at the bottom of the circle. The size of the nose, of course, varies but in general, it is this size of two straight vertical lines coming from the inside corner of the eyes. Now, let's do the mouth. You should start finding the height of the mouth. The mouth consists of three lines; the top of the top lip, the line that separates the bottom and the top lips, which is the actual mouth, and of course, the bottom of the bottom lip. First, mark the middle line where the actual mouth is. From the bottom of the nose until that shin or the bottom of the oval shape, if you divide that by three, the mouth would be around one-third lower than the nose. Once you have your mouth height, the size of the mouth will be following this diagonal lines coming from the inner corner of the eyes. Once you have the basic proportions now, it's time to make some more the size of lines. You can also draw the circles of the eyeballs like this to have a better idea of where to draw the iris and all the details of the eyes. Usually, if the face is in a relaxed position, the eyelids will cover a little bit of the iris like this, so you don't see the whole circle of the eye. Now, eyebrows will start at the continuation of these diagonal lines. The hairline would be around the middle, in between the eyes and the top of the oval shape. Ears will also vary on the position of the head, but if the person is facing front very perfectly, then the bottom of the ear aligns with the mouth and the top will align with the eyes. Now from this system, you can actually draw a human head in any position. Let me show you a little example. Let's say that the head is facing up 45 degree angle, draw the circle and the oval-shape the same way, but that central vertical line will actually follow the 45 degree angle. Think about the shape of the head, the line will be curved following the movement of that shape, and now everything follows this line. If the head is sideways, same thing. The only difference is that when the head is completely sideways, you will have this angle here defining the jaw line, and of course this varies, especially between men and women. Men in general will have a more squared, more defined jaw line, and females will have a more delicate and smoother jaw line. Using this system you can actually draw a human head in any position you want. Now we're going to apply this proportions using a reference picture. This will really help you understand how this proportions actually work with the real example. Let me know if this makes it easier for you to draw faces and if you have any questions, don't hesitate to ask down in the discussions board. Now meet me on the next lesson so we can get some inspiration and find our reference picture.
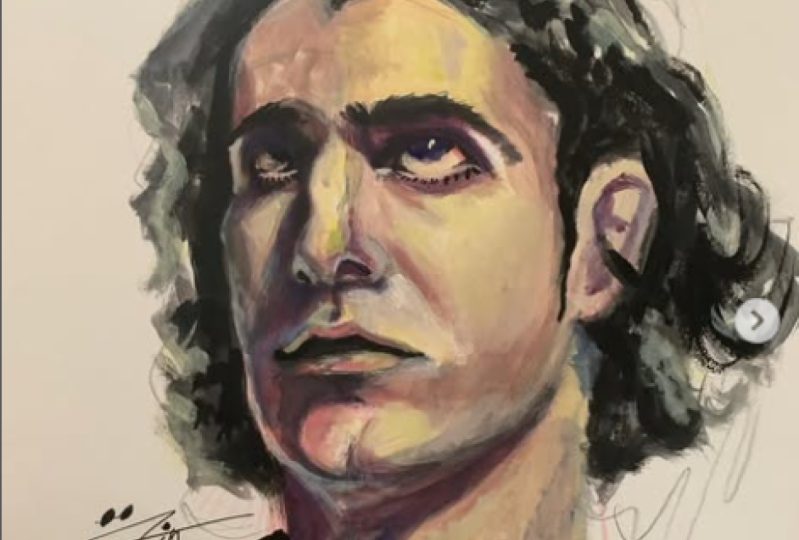
5. Inspiration & Reference Research: In this class, we're drawing from a reference photo. This will help us really study and understand the proportions, lighting, and shadows of a portrait. I have a few tips on how to choose a good reference photo. To find good pictures, my go-to websites are unsplash.com, pexels.com, and the good old Pinterest. First, when choosing a portrait picture, you want to have interesting lighting, which means lighting that comes in a diagonal angle and not directly facing forward towards the person's face. Lighting that meets the person diagonally creates this beautiful shadows on the other side of the face. We have one side of the face that's lighter, one side of the face that's a little darker. This makes our drawing really interesting, because when drawing with ink, you're actually drawing the shadows. If you have a very even light on the face where the face looks completely lit on both sides, it's okay, but it's not as interesting to draw in my opinion. The light on your drawing will be actually the white paper you're working on. I usually like to choose my reference photos based on the shadows because that's what we're going to be drawing actually. Second, I want you to pay attention to their facial expressions. Try to find someone who you connect with. That's very intuitive and subjective of course. But you will naturally see faces that you find interesting for some reason and faces that you're not so interested at. Don't pick by, this would look good in my drawing, or this will be easy to draw. Try to genuinely be interested in that person and what they're feeling, what's their story? This is your opportunity to draw your feelings through someone else's face. You could try to find a person who looks like they're feeling the same as you. For example, if you're feeling sad, maybe try to find a sad face. If you're feeling grateful, try to find what looks like a grateful face. This will help you tell the story of this portrait much better. Third, find interesting textures to draw. You can choose a person with perfect hair and perfect skin, a person who is completely Photoshopped, for example. I guess it depends on what is your goal with this drawing, but you could also find someone with marks on their skin, wrinkles, messy hair, interesting clothing, or an interesting hat, and that's so real. It makes them are interesting, in my opinion. When you have a reference photo with a lot of different textures, this will give you a lot of room to get creative with the lines and with the ink. I totally recommend you find textures and people who seem interesting to you somehow, even if you don't know why. Now, let's say you have a client that has a specific portrait for you to draw, so you can't really choose the picture you're going to use as a reference. My tip for you in this case is that you can actually still create this connection with the picture you have to draw by matching their energy. Of course, this is all very subjective and it's an intuitive work. In the end, it's all our imagination. This is all just a little exercise that helps us create more and better and with more meaning. In this case, what I would do is, I would look at the picture and try to understand my perspective of what they're feeling, what's going on in their minds, and I would even try to create a little story in my head. If I have an actual client that's giving me a picture to draw from, I would try to understand who this person is, what's their relationship to that person. All of that information would help us create a connection with them. Now, if you have no information, if your client doesn't want to give you or if you're not comfortable asking, try to create something in your head, maybe look at them and they remind you of someone you know. Then you can create your own story in your head of who this person really is. Now, of course, this is not a black and white process, it's not a one size fits all, but it's a process that works for me and I really enjoy, and I hope it works for you too. Now, once you have a good reference photo to work with, join me in the next video so we can start sketching our final project.
6. Sketching From Reference: Hello, beautiful artists. I hope you're ready to start drawing. First, I'm going to show you my reference picture. This is the one I chose. I really liked the way she looks, I like the texture of her skin, I really like her hairpiece, and I think we can create something really interesting with this reference photo. To start sketching our portrait, we're going to start positioning the main shapes on paper. Keep in mind how much of that person you want to show. You can draw only the head, the neck and shoulders; or just the head; or just the head and neck. Keep in mind the space you have in your piece of paper and what size you actually need to draw each thing so you can show whatever you want to show. Also, depending on the direction your person is looking at, you might want to position them more to the left or more to the right of the paper. Just start positioning your oval shape and mark the symmetry line, so you have a general idea of how it's going to be looking on paper. If you don't like it, if you think it's too big or too small, or if it's too much to one side, or too much to the other, just to erase it and try again. Remember to look at your picture and understand how did the photographer frame that image. This can be a good indicator for you on how to position your person on paper. Now, once you defined the general position of the face, it's time to start adding some more lines. Start by finding geometrical shapes and angles for you to follow. A trick is to observe an angle and draw a straight line of that angle, even if it's too sharp in the beginning, and then you can smooth it out later. Start slow, no rush. Don't make any early decisions of where things are yet. Don't draw any details just yet. Just keep following the angles you see and your geometrical shapes and the drawing will start creating itself. Another important tip for you is, if you were working on a horizontal surface, you will be looking at your drawing from an angle and that will affect how you see the drawing in comparison to what it actually looks like. A lot of artists work on a 45 degree angled table, which makes it easier to see what your artwork actually looks like for real. In case you are in a normal horizontal surface like I am, lift your paper once in a while to look straight at it and this will give you a better notion if you are hitting the proportions right or not. Once you're more confident about your initial sketch, you can start adding more details and smooth out all the lines. On the next lesson, we're finally going to start using our ink pens. See you there.
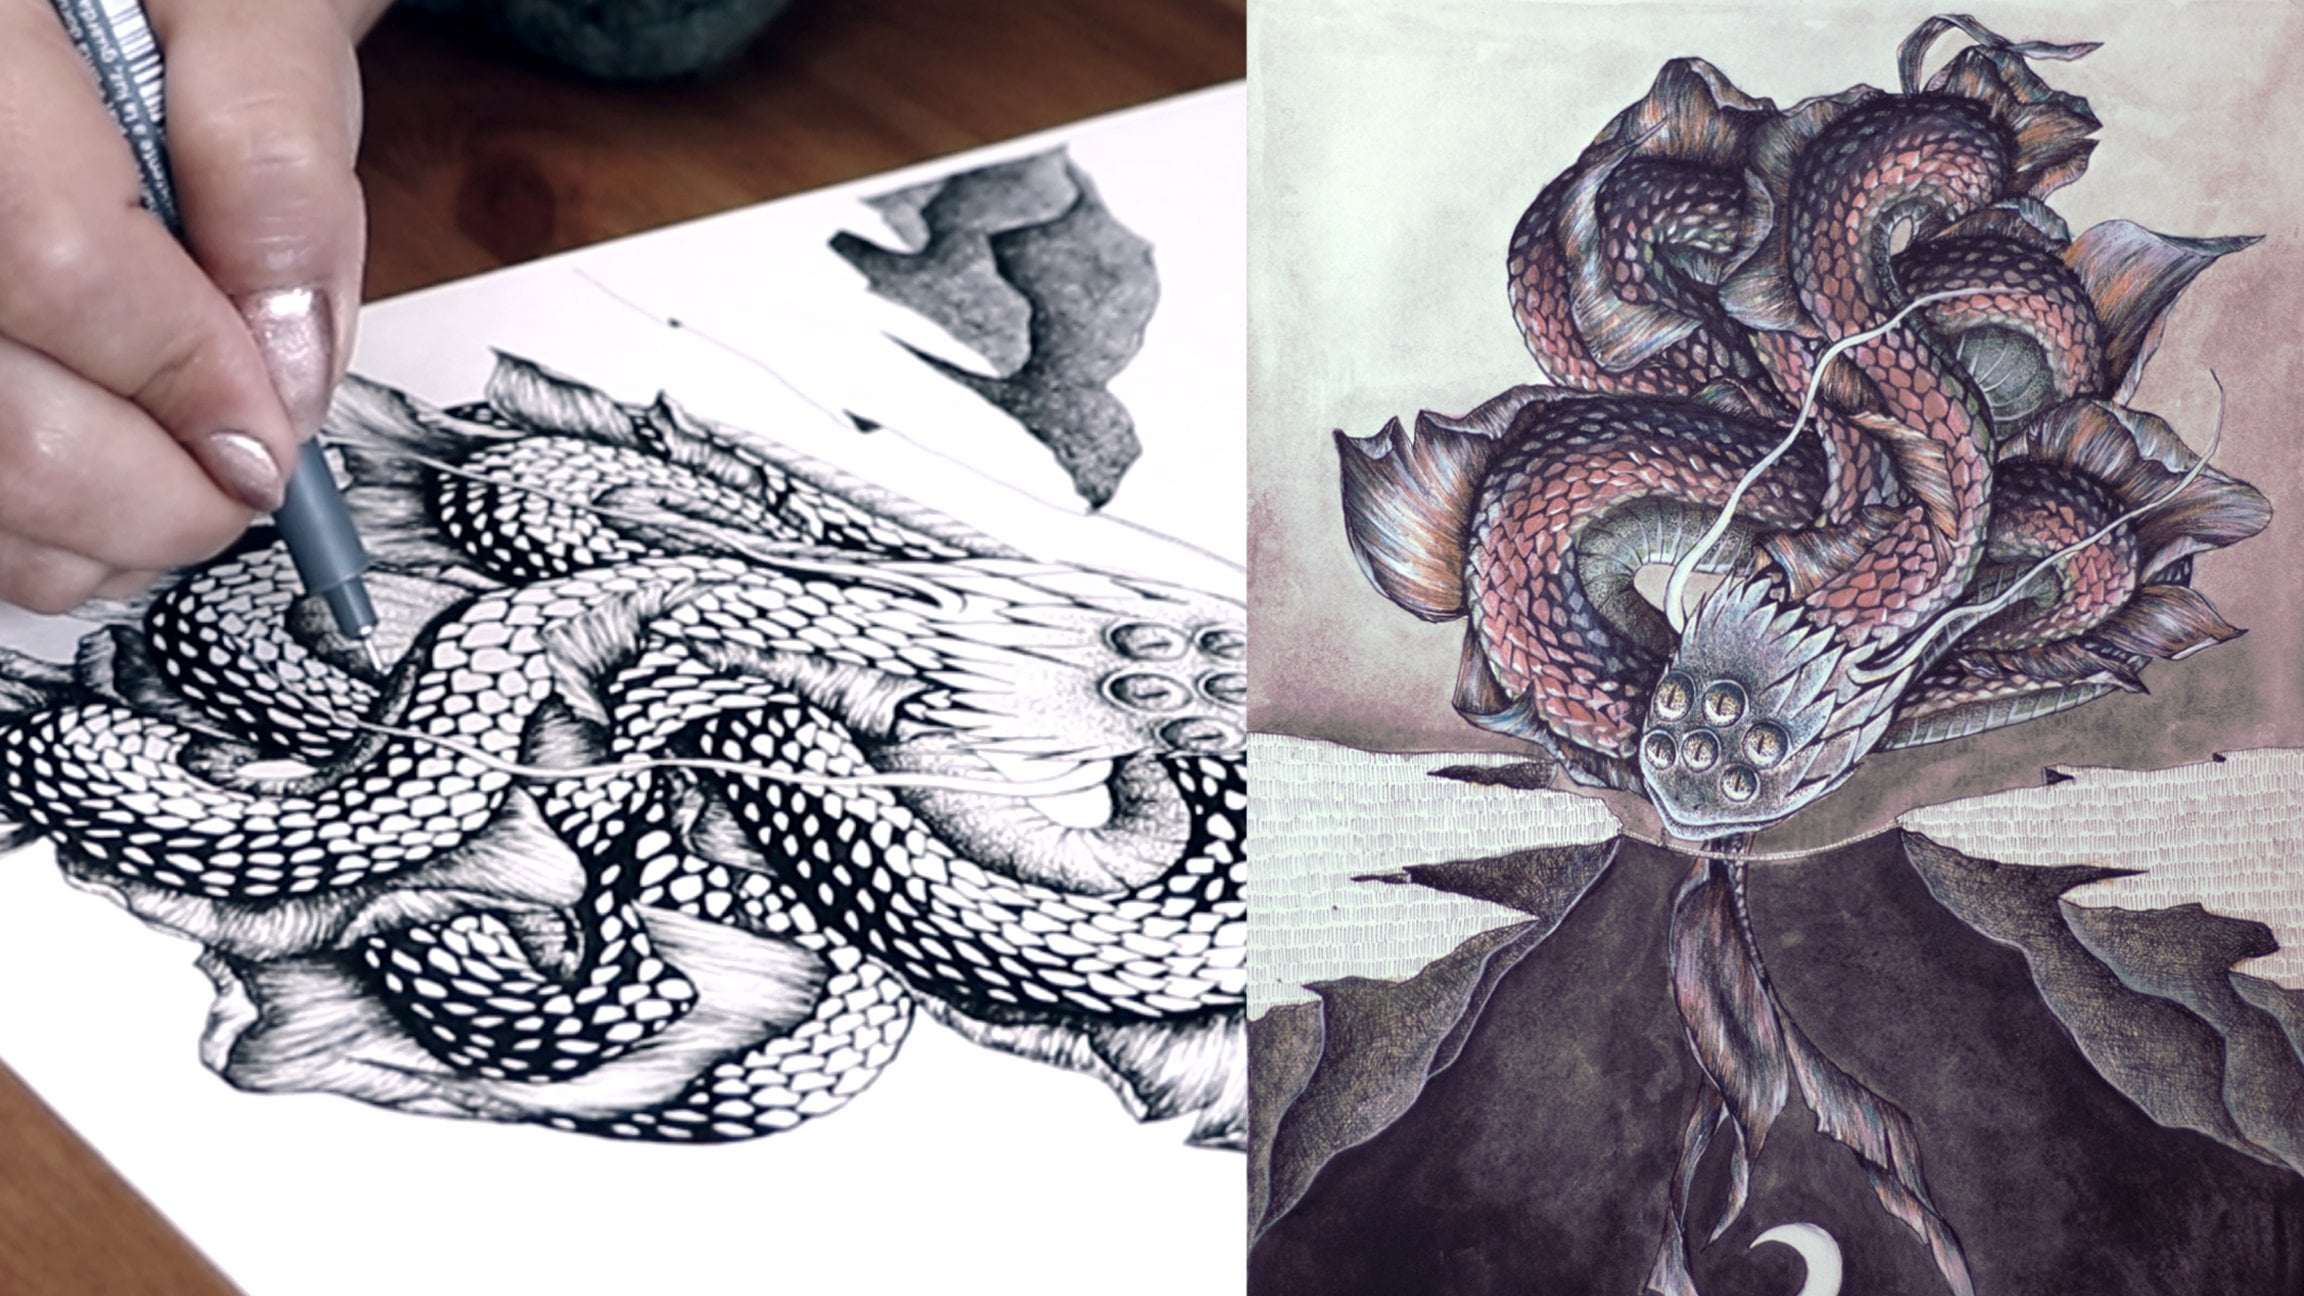
7. Ink Outline: Best Practices: Hey guys. Now that you have your sketch ready, we're going to outline this sketch so we can erase the pencil marks to keep our paper neat and clean. One thing to keep in mind is that you can't erase the ink. So look at your reference picture and mark only where you have a very clear line or a very clear shadow. For example, you never outline the whole nose, because most of the nose is shaped by a smooth shadow. The only parts of the nose that can be outlined are the bottom part where you have the nostrils because that's where you have a very clear definition. These are the things you're looking for when outlining at this point, you're looking for things that are very defined and very clear. You might have noticed that I'm using a smaller piece of paper underneath my hand while I'm drawing. This is so I don't smudge the ink and mess up my drawing. My hands get sweaty really easily and I don't want to risk them messing up my art. The ink takes a few seconds to dry. Sometimes in the excitement of the process, it's easy to forget where you just drew and where the ink is too wet, and that you have to wait a little bit before touching it. You don't have to use this trick especially if you have a really dry hands. But it's a good practice that helps me relax a bit more while I'm drawing. So I don't have to worry too much if I'm touching where the ink is wet or not. If you have lines that are not so clearly defined, you can mark it with a few dots like this. This is a more subtle way to outline your sketch if you need it. For example, the line marking her upper lip is not super clear and it's not super defined. If you look yourself in the mirror, you'll notice that your lips fade into your face. There is not a super clear and defined line, usually. Now, the mouth itself, the line between the two lips is a very clear and defined line. This one, I'm going to use a full line because it's very easy to see in the reference picture where the line is. Just start where it's very clear to you, and then if you want mark more subtle lines with the dots. Once you have a good outline of your drawing, meet me on the next lesson so we can start adding texture and depth to your artwork.
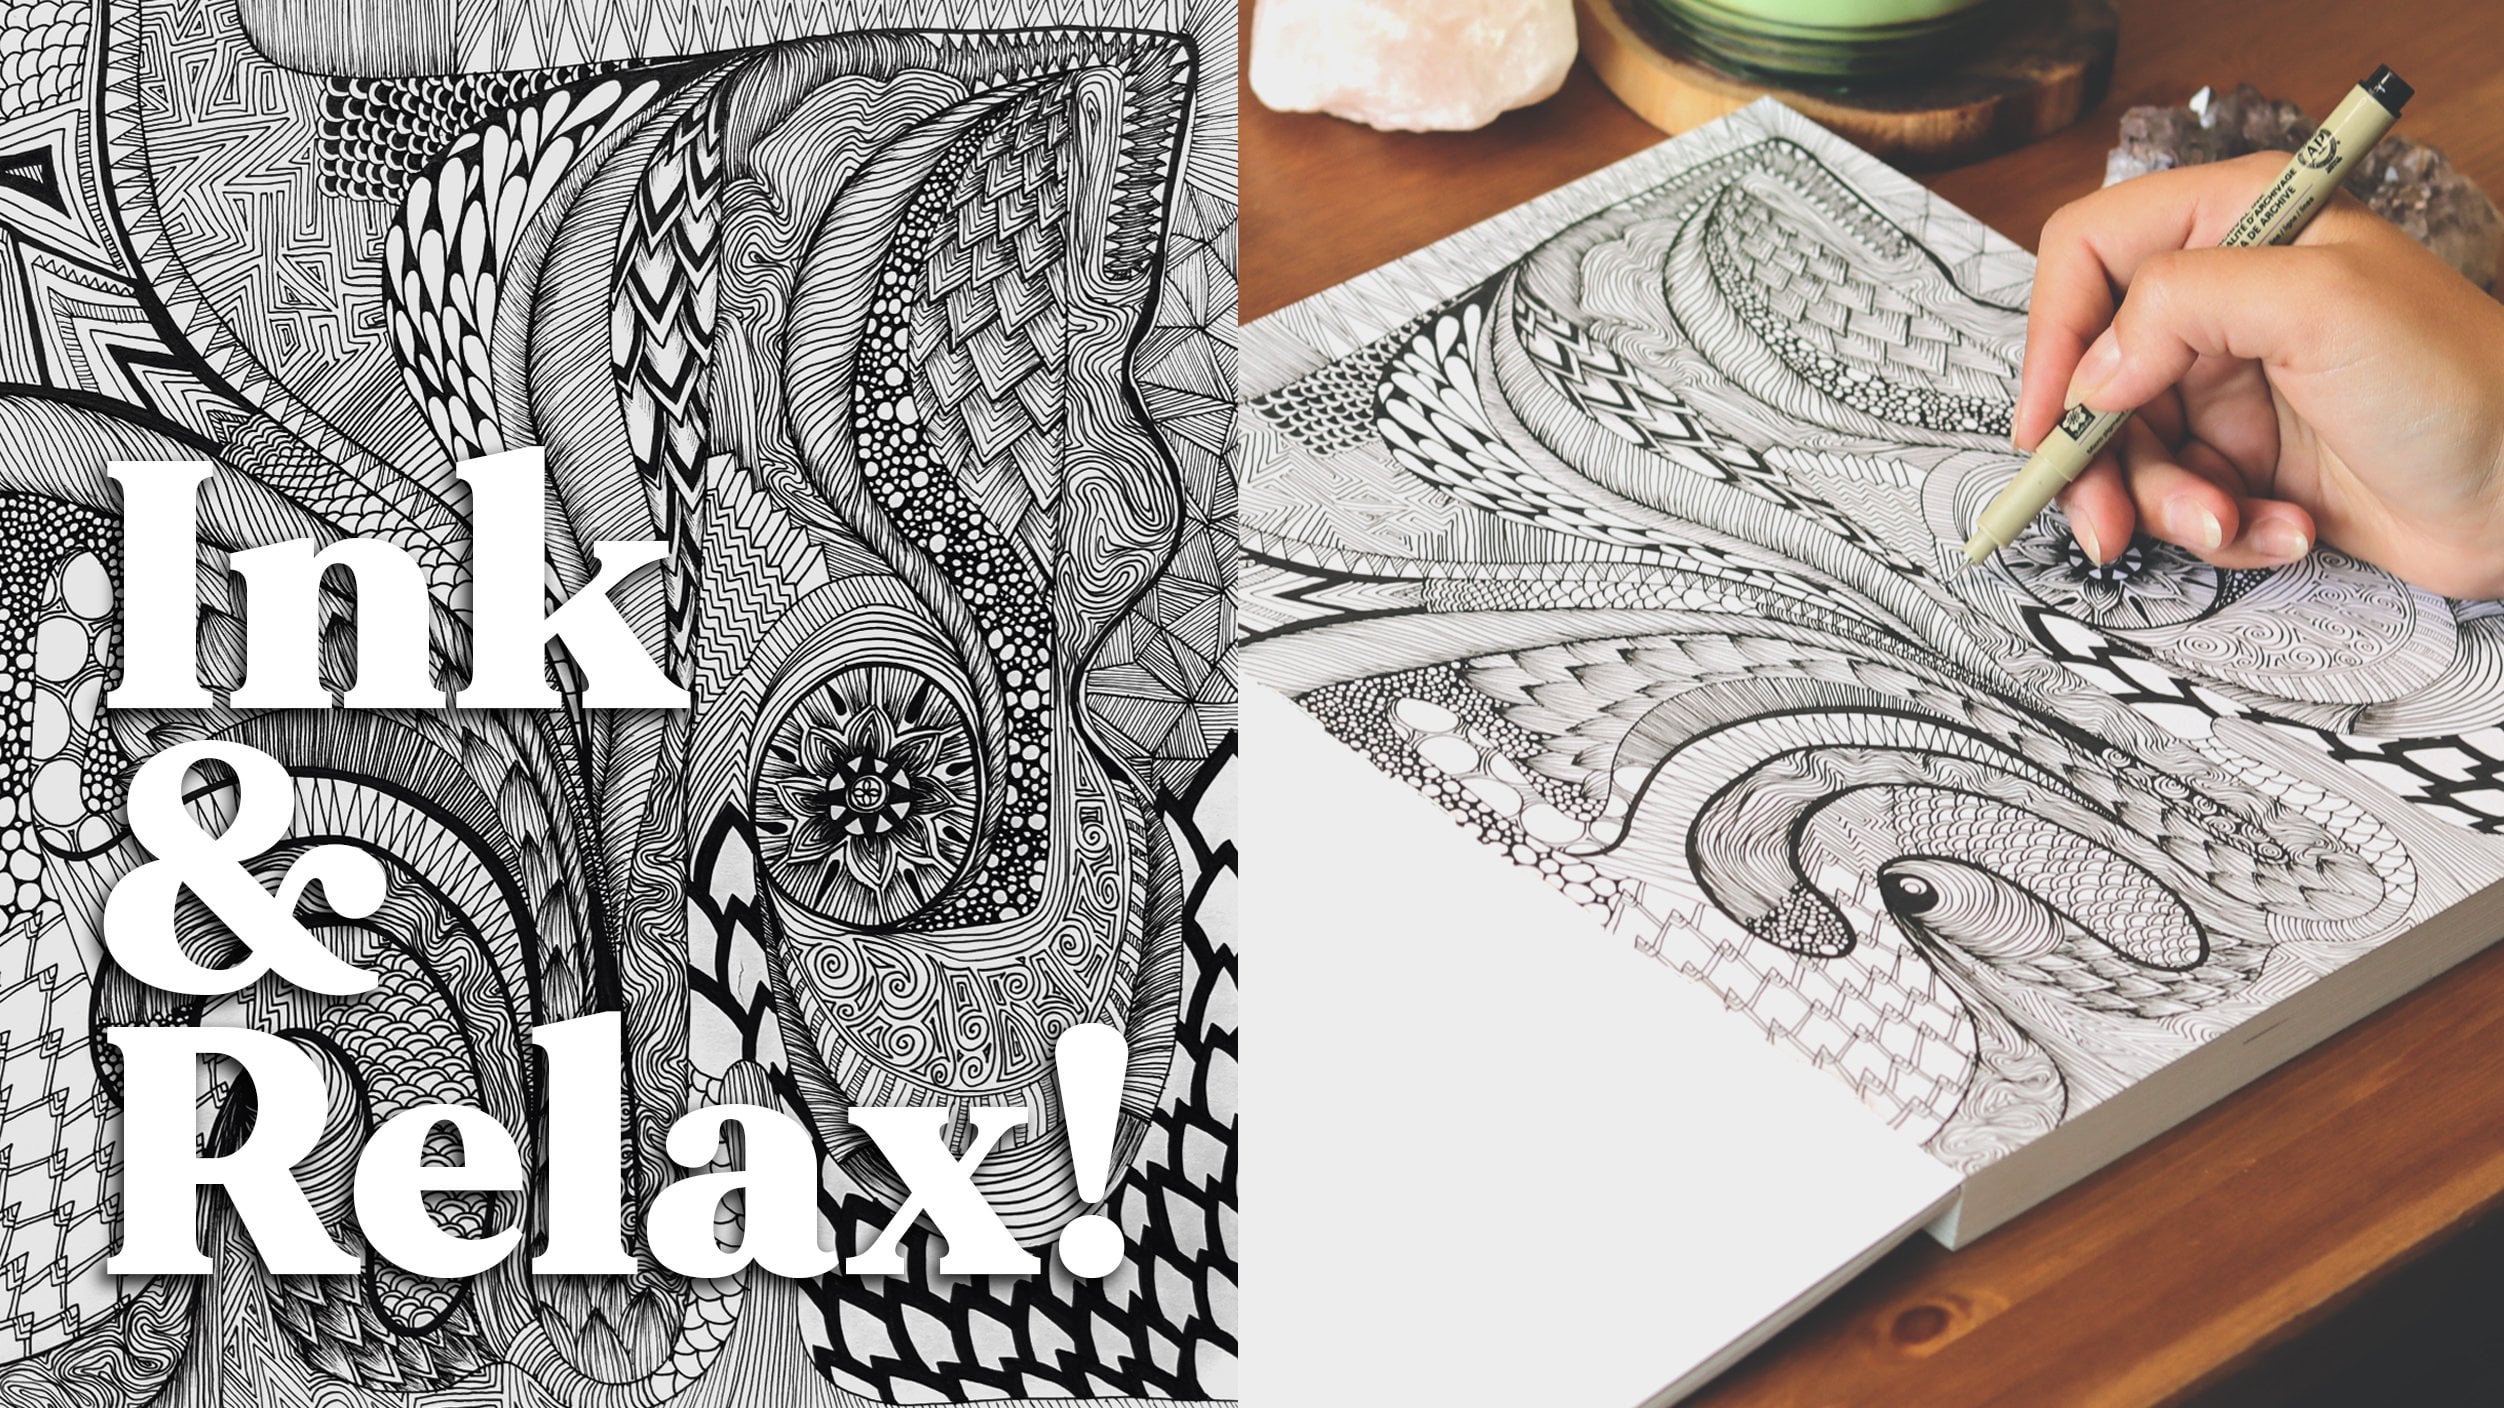
8. Stippling, Hatching & Skin Textures: So glad you're still here with me. In this lesson we're going to create the textures and shadows of the skin and face. I'll give you two options of techniques that I believe are the best choices when it comes to portrait drawing with ink. First one is stippling. You basically will add lots of dots with this fast movement like this, moving from shadow to light and fading in the direction of the light. This can be very time-consuming but also super relaxing. I love this style and this is the one I will be using to do the skin on my drawing. The other option you have is using cross hatching. To apply this style you want to use an old pen so you get a smoother result. You basically add short strokes like this in all directions creating this layer of ink that can be darker or lighter. With practice you will get better at controlling how much ink you're releasing and how the distance between strokes affect the final look of your texture. I'm adding an extra layer using a newer pen, just so you see how much more ink is released from a new pen compared to an old pen and how much darker your texture will get. Notice how both styles looks so different. It's totally a matter of personal preference. I only choose which style fits better with your personal tastes. Maybe before you start adding it on your final artwork, practice a little bit on a side paper just so you can feel which one you enjoy doing more and which one you think will look better based on your reference picture and what you're trying to express in your art. Once you decide which technique you're going to use, start shading from the darkest parts first. I usually start making the shadows with some dots just to mark where they are and with time I'll get them deeper and darker. Notice how I move faster where it's darker and then when I start moving towards the light, I move a little slower to see very clearly where I'm adding the dots. The more space between each dot, of course, the lighter the skin will be. When you're ready to move on with your drawing without the pencil sketch, you can start erasing it and keep following just the ink outline. It's good to do this sooner than later because the more you draw with the warmth of your hands on top of the pencil, the harder it will be to erase it later. It's really easy to mess your drawing up. The sooner you erase it, the cleaner your paper will be in the end. You can also start defining some dark lines where you can clearly see them in your reference photo. Like the eyelids and the mouth, for example. These are some very clear dark lines on my reference photo. I can start marking them already. From those dark lines, you can use the stippling or hatching to create this smooth fade away shades to create the depth and contrast. Remember to leave room for the lights. Sometimes I get too excited with my shadows and I end up invading the light spaces a little and then my drawing ends up a little dark. I personally like the dark look. I think it's super dramatic and intense and I like it. But just keep in mind that you're drawing the shadows and the light is the paper. The light is already there. You're only drawing the shadows. You can do this by observing your picture and understanding where the light is hitting the face. Maybe their face is shiny in some areas. It's always interesting to leave a lot of white where you see a lot of light. If you want you can also mark with a pencil where the light is so you don't cross it with the ink. Also to draw the eyes, it's always important to leave a light spot inside of the eye. You always see a spark of light that sometimes is round, sometimes it's square, sometimes it's weirdly shaped like mine. This is super important because the light gives your drawing so much life. It's a tiny detail that makes a huge difference. You can also use the white gel pen and the calligraphy ink in the end to add those slides spots, but it's better if you just leave the white from the paper to do that job for you. Now, join me on the next lesson so we can get a little more creative with our lines and add some of your personality to your drawing. See you there.
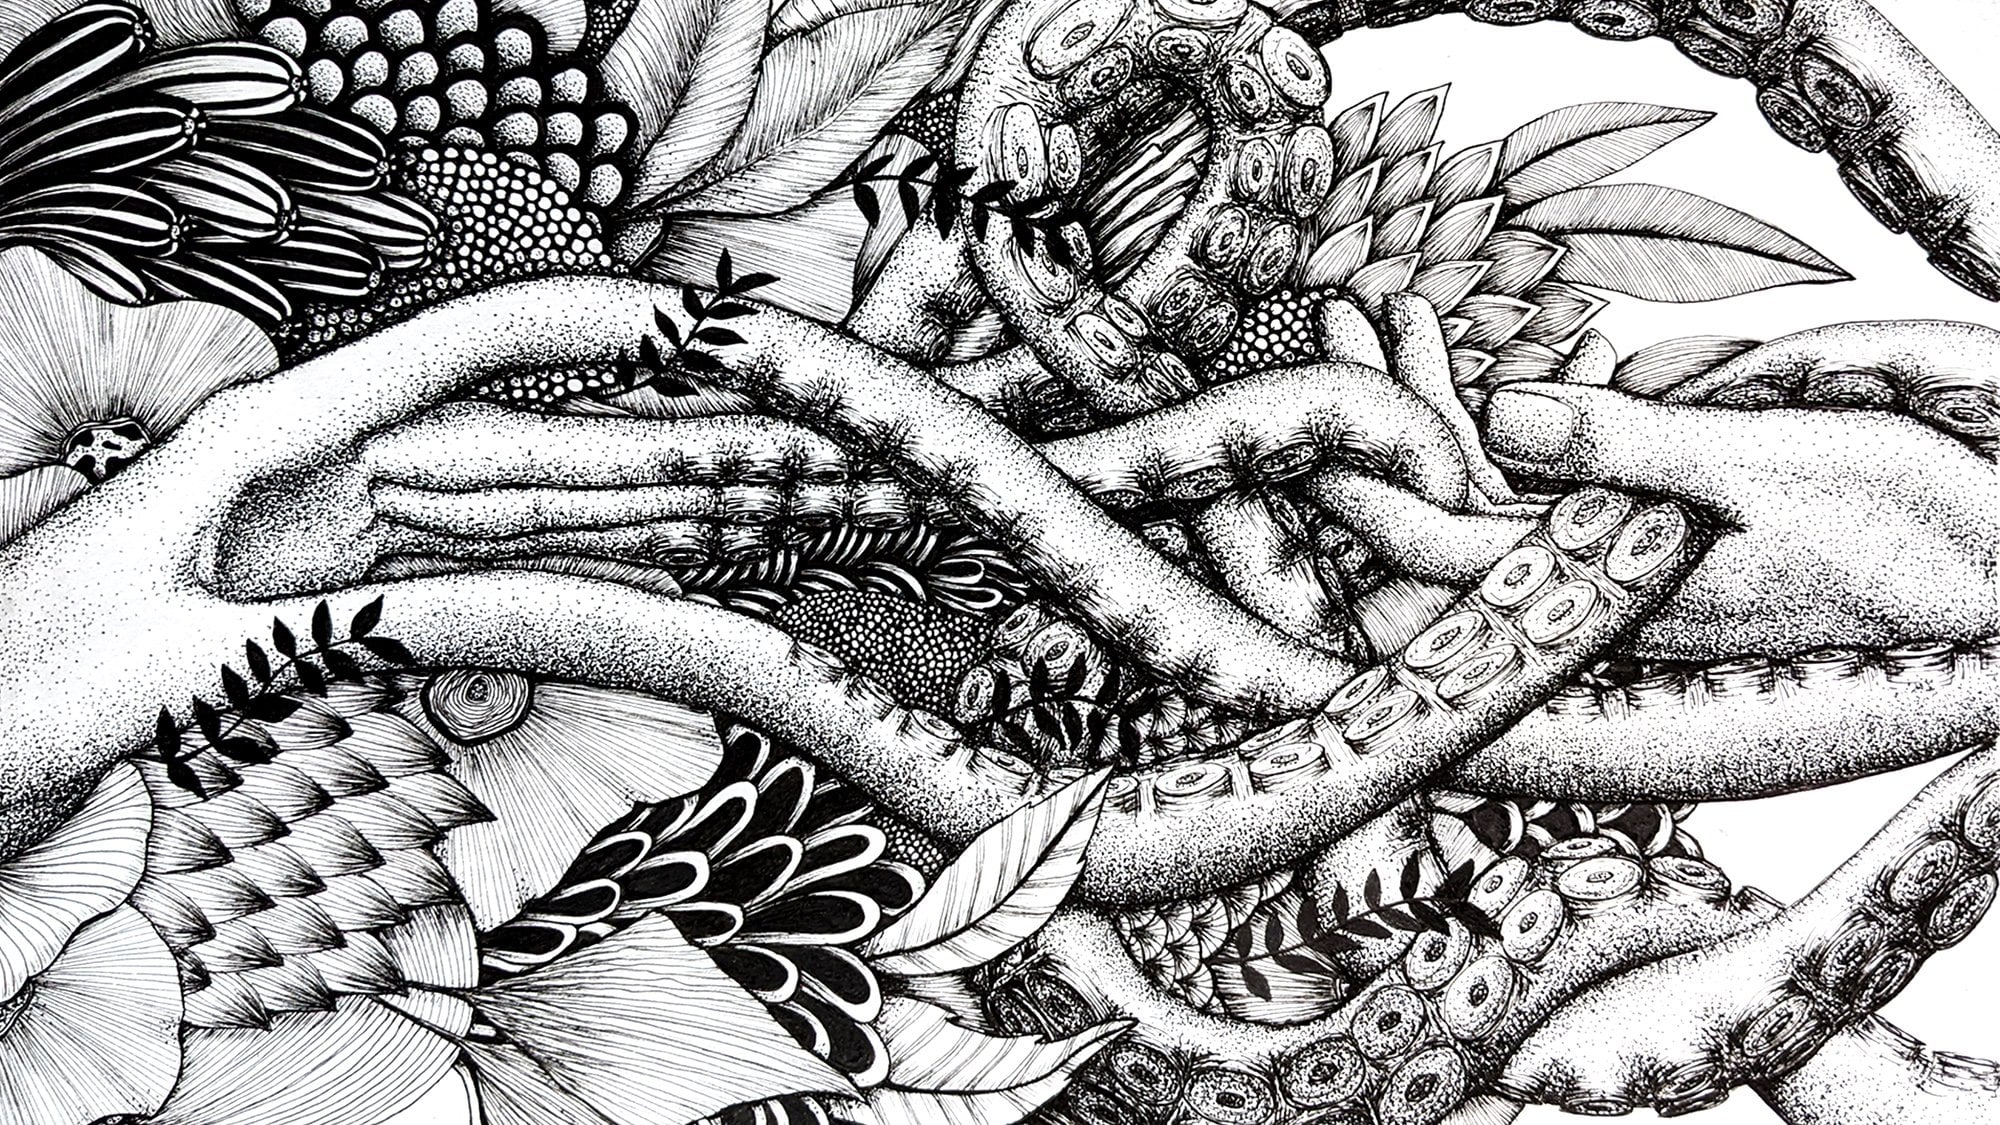
9. Get Creative With Abstract Lines: Now in this lesson we're going to do something a little different. I want to invite you to get a little more creative. I mean, you could keep following your reference picture to a T and try to be as realistic as possible. But you could also use different techniques to add a little style to your drawing and make it more unique. Usually, I really like to play with the hair and what's around the head in a portrait drawing. In my case, I chose this picture where the girl has this beautiful curly hair and this fabric piece as well. So I have a large work width. Just try to get out of the obvious approach and think, "How can I draw this in a more creative way? How can I draw this in an abstract way? How can I draw this in a more messy way?" You can do so much with the ink. To do the hair, I'm just going to draw some curvy lines like this to create this wavy effect. This is a time for you to relax even more and do something more abstract, more simple, so just go with your intuition here and try to add something creative to your drawing. Use the reference picture as base, but try to represent something from your picture in a more creative way in your drawing. For example, for the fabric piece, I could keep using this stippling technique if I wanted to keep drawing forever,. The beginning of maybe a lifetime together. I'm joking. But it's just so interesting to mix different textures. Don't you think? It gives the eyes some space to breathe if that makes any sense. For the fabric piece, I'm going to draw a series of lines following the movement of the fabric. At first when I was drawing this, it felt a little weird to find the right direction in which I should draw the lines. I didn't like the first ones I did, but I started getting the hang of it throughout the drawing, which is great. So don't worry if you're not so happy with part of your drawing. We are all learning here and there is no competition going on. Really anything to do here is simply amazing and it's part of your artistic journey. Now, to create some extra contrast and some extra drama, I'm going to add lots of black on her hair. I didn't have to because I actually like this lighter look, but I want you to experiment with some darker, thicker curvy lines on her hair. To do this, I'm using an ink brush pen as it helps me add a lot more ink, and it also helps me create different thickness along each line to create this beautiful wavy shapes. Now, I hope you had fun in this lesson and you were able to get a little creative with your portrait. When you're ready, meet me on the next lesson so we can add some extra spice to your drawing with some final touches. See you there.
10. Final Touches: In this lesson, I want to invite you to take a little break. Well, it's about time. Go have a glass of water, go look through a window for a few minutes, and just allow yourself to refresh your mind. When we draw for too long, our vision can trick us sometimes. It gets harder to see if something needs a retouch or something like that. After you take your nice, awesome break, come back and observe if your drawing looks cohesive to you. If the proportions are right, if the shadows are correct. This is a time for you to fix little things here and there, and add more shadows if you need. Of course, even add more light with the white ink. In my case, I still have to shade the neck and I decided to keep using the stippling technique. I can also see some places where I could intensify the shadows a little bit just to add some more contrast. When you add more shadows, you create more definition in your drawing. That's what makes your artwork pop from the paper. Now, I'm going to use the white calligraphy ink with a thin round brush to add some extra lights and to create some more lines on her hair with this white on top of the black. It's just an idea I had and I'm not sure yet how it's going to look, but I want to try this out because I think It's going to make her hair pretty interesting and stylish. Remember you could also use a simple white gel pen. It works great as well. Of course, this step is completely optional, guys. You can totally just stick with your ink pens and draw with black, and use the white paper as your light. Sounds amazing to me. In case you're using the white ink or a white gel pen and you want to intensify the lights on your drawing, you just add white where the light should be. I'm adding some extra light in the eyes and also in the bottom lip of her mouth because I can see in the picture that it has a lot of light and I went to intensify that as well. Of course, if you use your black ink somewhere you shouldn't, you can use the white ink to cover that up. You can't cover super big mistakes, but little things here and there. It's just perfect. You can't even notice. Making little mistakes is part of the process of creating something with your own hands. You have to accept that you're not a machine. In my opinion, making something that is not completely perfect is actually more interesting. It's taking so much time to create this artwork and it is a result of you, your hands, your energy on that day you're drawing. There's so much influencing the final result of your artwork that you can only expect for it not to be completely flawless. I personally love that. I hope each little mistake makes you feel proud of yourself and it reminds you of how special this artwork is. Not that many people have the patience to create something that takes so long. I think that's something really special that we all share in this community of ink artists and we should appreciate that about ourselves. Now, this is my final artwork, guys. I can't wait to see yours. Make sure to share down in the project section of this class. Let's keep practicing and growing together. Now, meet me in the video so we can say goodbye and wrap up this class.
11. Thank You!: We've finished another awesome drawing class. Congratulations on coming all this way. That's how it's done. I hope this gave you a good ideas and insights for your own drawing process and that it inspired you to create more arts and to be more authentic in your art. Because I know you are a beautiful person and we all want to see you through your art. Now, don't forget to share with us your projects in the project section down below. This really helps us create this awesome community of line artists here on Skillshare. You can also ask any questions in the discussions board down below. I'll be so happy to connect with you. Lastly, don't forget to follow me here on Skillshare so you can hear about all my next classes that are coming up and I have some really exciting classes in the oven for you guys. I can't wait to share it, but for now, just follow me and then I'll let you guys know as soon as they're posted. Of course, if you want to share this class with friends and family, or if you want to share your artwork or anything you create with my classes on your social media, makes sure to tag me so I can share your artwork and your projects in my platforms as well. That's it for today, guys. I hope to see you soon on my next classes. Bye.