Transcripts
1. Introduction: I've been an urban sketcher
for many years now. I've spent countless
Sunday mornings out with my local USK chapter, sometimes as a participant and sometimes as the organizer. I've also been lucky enough
to have had a sketchbook handy whenever I've traveled to various cities
across the world. That said, my
favorite subject to sketch is right here in
my hometown of Mumbai, and that subject is the
colorful markets all around. In this class, I will teach you the techniques that
I have developed to capture the hustle and bustle of these vibrant markets
that I love so much. Irrespective of
your skill level, this class has a little
something for everyone. I've divided the lessons
into two main parts. In the first part, we
will be looking at the three elements behind every
successful market sketch. Those three elements
are color, light, and I will be sharing examples
from my own sketchbook, looking at each of
these elements, and we will analyze and
practice techniques associated with each one by doing small thumbnail sketches. This will be your chance to slowly build skill
and confidence. The second part will be about combining the three
elements that we learn. Together, we will learn
how to sketch a scene from one of the iconic markets
of Mumbai Crawford Market. Our technique of choice will be a free flowing
line and wash method. As for the final
assignment of this class, I give you two options. First, you can choose to submit this sketch
that we do together, or you can head down
to your local market. Use the techniques that
you learned observing this class and make a
little sketch on location. You can choose to submit either
as your final assignment. I will be here to
offer you feedback on both the final submission and any thumbnails you
make along the way. My name is Ani Ruta. I'm a professional
watercolor artist based in Mumbai India. If you want to learn more
about me and my work, I would suggest you come find me on one of my social
media handles. I have a small YouTube channel where I post more
short form videos. You'll find a few
birds there as well, but you'll find a lot of urban sketching and product
reviews, too. I'm also fairly
regular on Instagram. My Instagram is unfiltered
in the best possible way, where I post both my
failures and my successes. If you want to have a chat
about watercolor and wildlife, that is the best
place to do so. Oh.
2. Materials: This class is designed in
such a way that you can use any materials that you already have available
at your desk. You do not need the
same colors as me. You do not need the
same pens as me. Let's start with the basics. This here is the paper
that I will be using. It's a Saunders Waterford
cold press paper, 11 " by 10 " in size, 190 GSM in weight. I prefer this lighter
paper as it is the same paper that I have
in my sketchbook here. The lighter paper
means that I'm less precious choosing what to
sketch and what not to, which means that I eventually end up sketching a lot more. In the class, I place my
paper on this drawing board. I use this tint to angle my drawing board and to
control the flow of paint. I have this mason jar for water. I have this spritz bottle, which I use very often to keep my washes going for longer. I have some paper tissue
to occasionally lift, paint and wipe up any
spills I might have. And I have this Turkish towel
rag to wipe my brushes. These are the drawing tools
that I use in the class. Now, don't be intimidated
by their number. You won't be using
half of these. These are just here so that
I can give you options. So for the initial drawing, you can choose to
use a simple pencil, I like a three B or you can
draw using an alcohol marker, a very light one like
a cool gray one. This is a Shinhan. For inking, you can choose to use something like this fude nib fountain pen by Sailor. This fude nib gives you a lot
of line thickness variety. It also has waterproof ink. I love using this when I'm sketching outdoors and
I highly recommend it. However, it does have a
very steep learning curve. If you're not used to this, I suggest you use a
combination of these. This is 1.0 tip gelpin by Nibl. This is a 0.2 sakura fine liner, and this is a humble Sharp. Together, these
three will give you more line weights
than this individual. Next, we come to our
white drawing tools. This one is a 1.0
cheli roll pen. It's a type of white gelpin. You can use any white
gelpen you like. I like this particular one. However, this is
entirely optional. It's not needed per
se for the glass. You will, however, need one
of these, not both, but one. This is an oil pastel, and this is something called
a glass marking pencil. They can both be used to make chalky white marks at
the end of your sketch. But another reason they are very useful is that they're
both water repellent. At the beginning of your sketch, you can put them down in
areas that you want to mask out and keep
free from color. This right here is my lovely little fun sized
urban sketching palette. This tree of colors
comes out so that I can have more area
for color mixing. Let's talk about the colors. Now, you don't need any
specific colors for this class. You can use whatever
you already have. That's what I would recommend. The brand doesn't matter. The exact colors don't matter. However, I just want you
to see swatches of what my colors look like.
These two are the same. They're both Areolin. This is Indian gold. This is burnt sienna. This is Pyrrole red. This is quinacridone rose. This is ultramarine. This is cobalt azure blue. This is called green. This is a color
I've mixed myself, but for all intents
and purposes, I'm going to be
calling it neutral. The only one color that I can recommend or I
would like to recommend is that it would
be useful having a transparent golden color
like this Indian gold here. This one is by white knights,
but any manufacturer, all manufacturers make a
golden color like this, and it would be very useful
to have for my class. These right here are my
Oben sketching brushes. The first three here are
retractable travel brushes. They are made by ESCOda. This is the versatile range. The versitle are all rounders. They are nice and soft, hold a lot of water, but still have a
decent amount of snap. These are all synthetic brushes. I have a size four, I have a size eight, and I have a size 12. This is one of my
oldest brushes. This two is all round. Size five would mean that
this is around half an inch. It's a half inch flat brush, made by a local Indian
manufacturer called Aurora.
3. Colour: We've established three factors underpin a good
marketplace sketch. Colors, light, and people. Let's first take a look at
what we mean by colors. I'm going to jump to a
scene from my sketchbook. This one right here. This was obviously painted in a
vegetable market, plein air. What attracted me
to this scene was this yellow tarpauline and how the light passing through
the tarpauline is also affecting the colors of the people and the
produce under it. Sketch was done in August
during the monsoon time. So this tarpauline is often used to protect the vendors and
their produce from rain. Sometimes these tarpaulines are red, sometimes they're blue. Very common sight
in Indian markets. Let's try to recreate this effect while also
maintaining the vibrance of the individual
colors which are being affected by this light passing
through the tarpaulin. I'm going to put down
some pencil lines. Somewhat recreate the
scene that we just saw. This can be the
tarpauline very simple. Somewhere sure we can
have our vegetable. Maybe some of it is angled. Maybe this is the vendor. That seems about right. So let's recreate
that yellow tarpaulin for which we will obviously
need a lot of yellow. This is my cool yellow, my areool in which I'm going to mix a little bit of Indian gold. That seems about right. I want this to be at
around coffee consistency. Cleaning up this brush of mine. Maybe I can go a little
bit thicker with that mix. It's gonna dry a lot lighter, and yellow is quite a weak
colour to begin with. I'm also going to
mix a few colours for the vegetables in advance. There's always an
orange vegetifsh. Maybe one green. Might need a purple as well,
but I'll do that later. So I'm going to use
my biggest brush, and first, I'm going to wet down the area right under
that tarpaulin. Clean water is ideal. My water is a little bit tinted so that you can
see it on camera. If you're working
at a tilt like me, a bead will form at the bottom. Now, with my slightly
smaller brush, I am going to introduce that
yellow to the tarpaulin. Make sure the yellow
is nice and strong because some of it
is going to float down into that wet area, and it is going to dry later. I'm going to help that
yellow flow a little. You can always use your spray to induce it to flow
a little bit further. I'm going to sop up some of this water
right at the bottom. This sometimes helps the pigment flow a
little bit better. Now I have a nice
gradient going here. And before this paper can dry, I'm going to start introducing some color where the
vegetables are supposed to be. I don't need to define
the vegetables. They just there to be colour. The paint will need
to be a little bit thicker than what is
already on the paper. Otherwise, it'll
flow a bit too much. Play with the shape, make it up a little
bit interesting. Maybe I can have some Bingo. Aubergine as it's
called in some parts. I'm also going to try and lift a little bit of pigment
from this person. Mm, I like how that looks. At this stage, it's difficult to come in
with a fountain pen, but something you
can use is a gelpen. What's nice about a
gelpan is it works perfectly fine on
this wet paper. And I can use it to define these vegetables
a little bit more. That's some very interesting
effects with this ink. It's not always predictable. And of course, it depends
on at what level of wetness you actually introduce
this ink onto your paper. Since I'm recording, I cone a little too early with the
ink. I'm going to wait. Maybe I can lift a little bit of
paint away from some of these vegetables,
give them more fur. This wet stage is a nice
time to work on things, some of the things in
the background as well, you're going to get this
blurry effect happening. Also going to establish the
tar a little bit further. Maybe this is the wall. This is also a nice exercise to see the kind of effects you get at different
levels of wetness. It's a humid day.
Sheet is still wet. Take that opportunity to add a few more vegetables.
Let's see what happens. I like the hallo that is
developed around this guy. I think that's about
enough for now. If I was going to do a
more detailed painting, another step which I would
have taken as I would have darkened the area
behind this person, so the person stood out, and then this part would
look like a wall. Since this is a quick thumbnail just to give you an
idea of the technique, I'm just going to
leave it there. We splash calls. Okay, I'm going to
call that done. Let's come back to
it once it's dry. Our paper is now dry and our colors are
lovely and bright. The gradient of this yellow obviously could have been
a little bit smoother. Ideally, something like this. The reason why this happened
is fairly obvious to me, and I'm going to take this opportunity to
share it with you. Firstly, I could have
worked at a greater teeth, which meant that the yellow
would have flowed more. Owing to the fact
that I'm filming, I'm a little bit limited in
how much I can tap my board. Secondly, I did not
tape my paper down. Quite often when
I been sketching, I don't tape my paper because
speed is of the essence, and I am using a
fairly thin paper. Actually, this is the
paper within my sketch. So the thin paper and the
lack of tape also means that the paper ends
up forming wrinkles, crumpling up a little bit. And because of those wrinkles, some of this yellow
has been pushed back up instead of down. Overall, it doesn't affect
a painting all that much. This will happen when you're painting
outdoors very often. In this particular instance, this section would get
covered with darker paint. So these qualiflowers
would just vanish. Anyway, moving on to the next factor that we have
to consider, which is light.
4. Light: I the most common source of light within these markets are these incandescent bulbs. This is another page
from my sketchbook. I had done this sketch in a
flower market in my city. You can see how the
lights are acting as spotlights both for the
flowers and these figures, and the background is thrown
into relative darkness. And to create a further
sense of contrast, you can see the natural
lighting in the far background. There are similarities
with how the light is behaving to what we saw
with the tarpaulin here, but that isn't always the case. In this next little thumbnail, I am going to show
you how to replicate the light emitted by one of
these incandescent bulbs. Okay, so first thing
to take into account, this time, I'm
going to work with my drawing board perfectly flat. Let this be our hypothetical
source of light. Maybe this is the holder
and the wire coming. I want to maintain the core
of this bulb to be white, for which I'm using this glass
cutters pencil to kind of mask out this area so no
watercolor can enter here. Now I want to create
a circular gradient around this light bulb of mine. Here's how
I'm going to do it. To start off with, I'm going to first mix the color
I'm going to need. Gonna need various
strengths of yellow. Can use some which is
already on my palate. So I need to mix. This yellow is good as my lightest yellow. Ideally, I would have
preferred cleaner water, but this will do for now. I do actually have
a small containers of clean water here off camera. This is my lightest yellow. Lightest in terms of
paint consistency. This is at P consistency. Next one, I'm going
to go darker in he and thicker inconsistency. So a little bit
more of this gold, some burnt sienna, as well. And less water.
Coffee consistency. This one needs to be the
thickest Milk consistency. It has some red, it has some
brown, it has some gold. I can even add some blue, some ultramarine to it
without worrying too much. Just a little bit. Okay, so I have three yellows
here in my palette. Just as I did last time, I am going to start
with clean water. So this water has to radiate from my light source outwards. Be generous with the water,
but don't overdo it. Now that's about enough. My paper has already
started to buckle. I'm going to go in with
my low density yellow. I'm going to keep a gap from
the yellow and the bulb. I'm just going to lay it here. Since the paper is so wet, it is going to dry lighter. As I move away from
the light bulb, I am going to go stronger
and stronger with the color. I'm dipping into the
second puddle now. And now I can dip into
this third thicker party. And the paper is wrinkling. So I'm going to lift it up, move it around a little bit. Even at this stage, the
transition is fairly obvious. If some of the transitions
aren't as smooth as you like, you can add further strain. You can also lift some
pigment, if you like. Say, for example, if there is too much color coming
close to the light bulb, lift some color away from you. Paper is still wet, the
pigment is going to move. So after you've done this, it's best not to
touch it for a while. Let the pigment do what
it likes and then come back once this
whole thing is dry. I'm also going to show you
how to add a second layer to this and still maintain the feeling of light
when we come back. Sheet is now dry and
for a second time, we have cauliflower edges
that we did not predict. However, this time, these edges are enhancing the
sense of light. That is the joy of watercolor. It's unpredictable. It often
throws out these surprises, these fun surprises and you just have to use them
and move forward. Just as last time I'm
going to use this as opportunity to explain what has happened
in this thumbnail. This time, these edges have been formed not just by the
wrinkling of the paper, but also because of the different consistencies
of the paint that we used. This was milk consistency. This was coffee, this was tea. Since this was wetter
and this was drier, the wet area has expanded and thus given
us this feathery edge. Unfortunately, in
this next step, we are going to lose this edge. What I want to demonstrate
now is what to do when this light bulb is just opposed to a
fairly dark background, how to maintain a sense of
light in this situation. The process I'm going to do is exactly the same as
what I've done here. I'm just going to start with thicker and darker paint as I
move outwards from the but. For which let us begin
as we did the last time by mixing our paddles of paint. I'm going to use this DIY drill So I'm going to start with the slightly warmer color first. This might be Mm. Let's call it coffee for now. Next puddle, I'm going to
start with the nutrit. I'm going to add ultramarine. I'm also going to
add some bunts. Now we are at milk here. And this last one will
need to be cream, need to be cool as well. My ultramarine is
dried, fairly solid, so it's going to be a
little bit difficult for me to mix a cream
consistency paddy. Even this neutral is dried. If you have the opportunity, you can also use
paint fresh from the tube that will give
you a thicker paddy. Okay, so we have a
cream puddle now done. Wash off this brush. Start with clean water
as we did last time, beginning from the bulb. Again, I'm working with
my drawing board flat. Generous amount of water, but don't overdo it. Again, we will have wrinkles
forming on the page, and we'll have to account for
that. That's about enough. I'm going to start with this
relatively warmer colour. Put it at a fairly safe
distance away from the bulb. It will, of course, move
closer as time progresses. Make sure you mix a
sufficient amount of color. Something with these
indoor scenes, something to keep in mind is you need large puddles of paint, larger than what I've
mixed here actually. Because if you are
going to go so dark, it does end up using
a lot of pigment. Now into this cooler
What did we call this? We call this M consistency. Already, we have very
little space for cream. Different cream now. Maybe I'll just put it
here on the lower side. I clean off my brush again, go back to me body
out of coffee. Is it worth that? So judging my piece as it is, I think I can move a little
closer to the light source. I am out of this coffee, but I can just use the paint already on the paper to help
enhance that transition. Look at your piece. Do you
need to go closer or do you need to lift some
paint away from the bulb? I think I'm done
with adding paint. I will show you a little
bit of lifting, as well. I can see that the paint from
top is a little bit close, so lift some of it up. I like that as it is. I'm just going to
fray a little water. See if that helps
the paint move. And I'm going to
leave it to dry. If the paint
approaches too close, I will lift it a
little bit further. If not, I'm just going to
wait and see what happens. Our paper is now dry. We have a lovely smooth
transition and a sense of light. Now, you might say that there are some
imperfections here. Our shape isn't
perfectly circular. Transitions are a
little bit, I mean, aren't evenly transitioned
all throughout. But what you need to consider
is that in a large sketch, this will be just a tiny part, and it will perfectly, perfectly resemble
incandescent bulb.
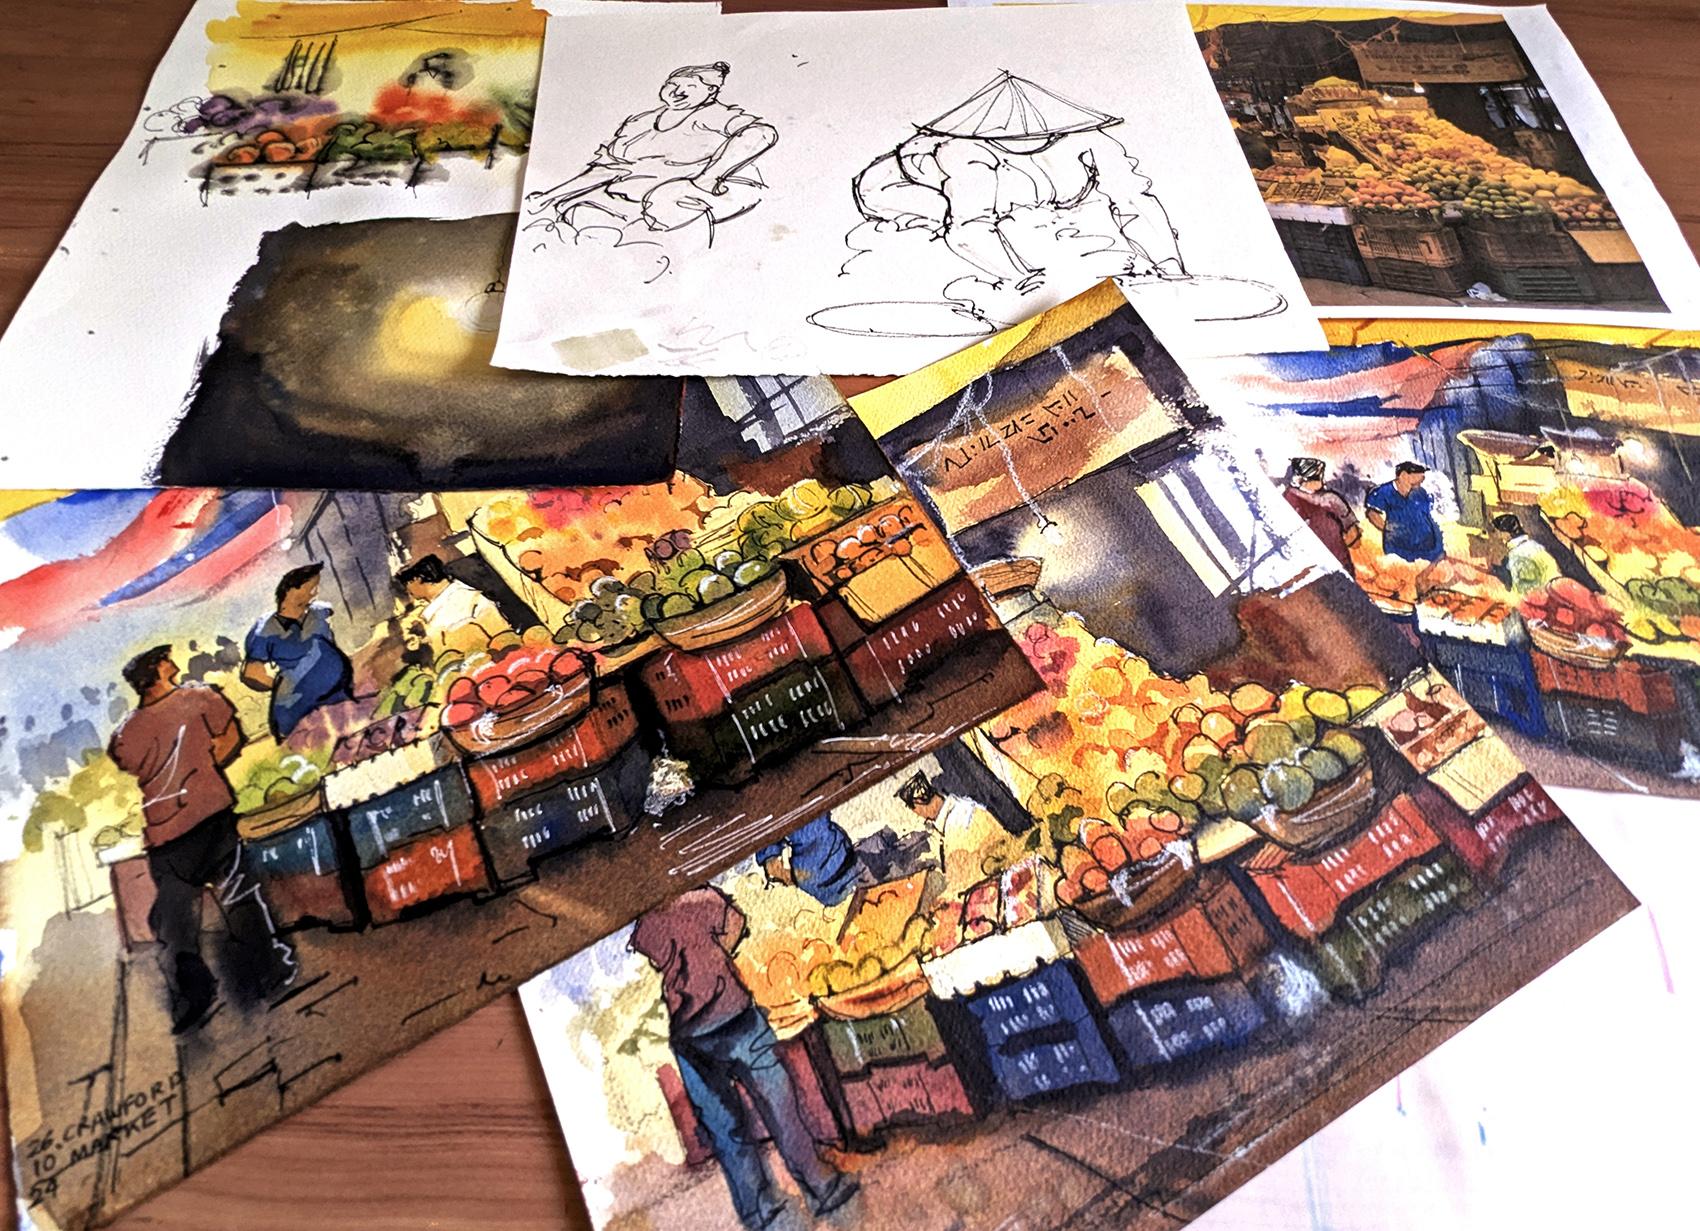
5. People: A the third major subject we tackle in this class
is human figures, adding human figures in
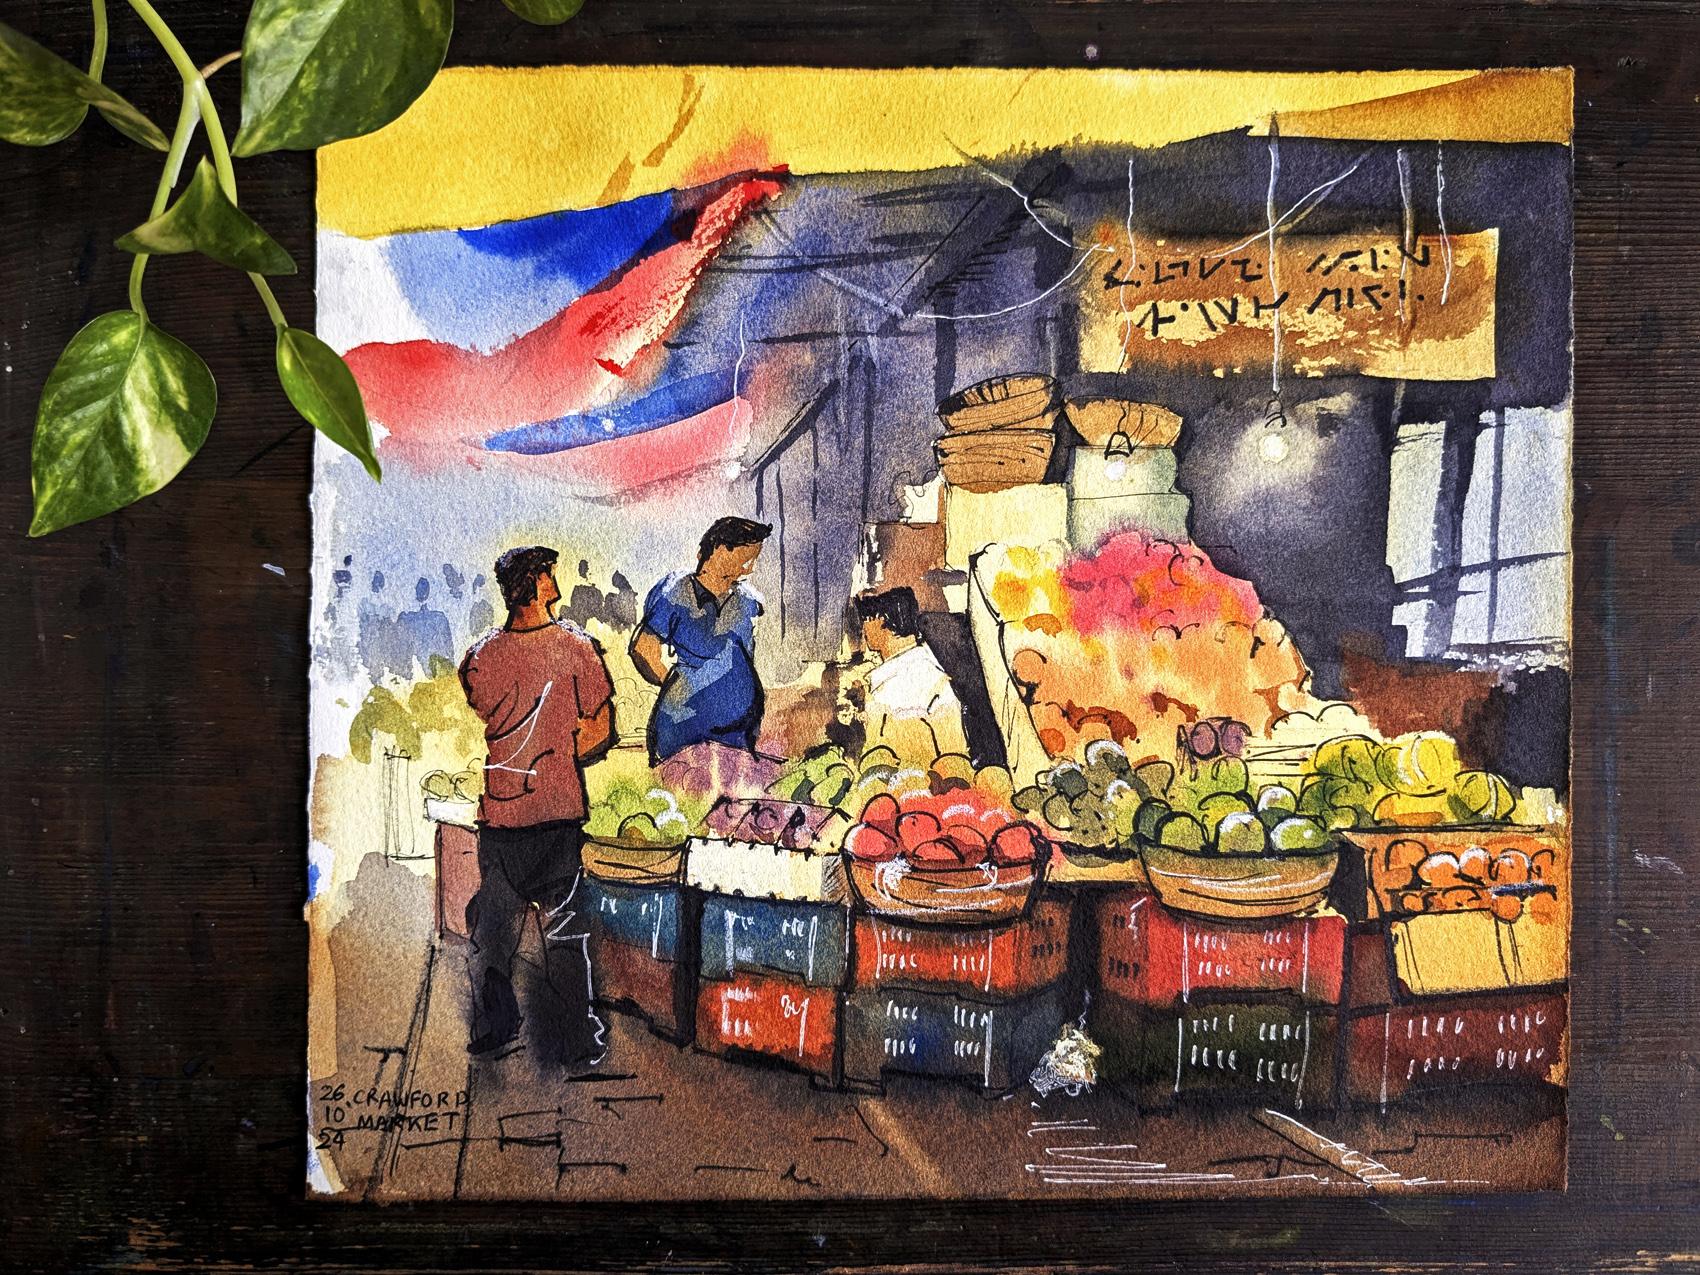
these market scenes. This is a sketch I have done
Pinare at Proferd Market. Proferd Market is
also the location for the class assignment that we
are going to do after this. These figures are fairly simple. Their poses are fairly simple. So just to add a little bit
of complexity to the task, I am going to use
another reference. This one is done
from a photograph. We will try tackling
this figure here. This one is also done
from a photograph, and I want to give this figure a go as I demonstrate
how to do human figures. Human figures are something
many people find challenging. New urban sketches often
tend to skip adding figures. A market without
people has no life, so you have to add them. People will obviously not pose for you. They
will keep moving. But one thing to keep in mind, especially when it
comes to these vendors, is that a lot of their
actions are repetitive. They will keep doing the
same actions over and over. They might stop and then come
back to that action again. Let's say weighing
up the vegetables or receiving money and
handing over a carry bag. People are best sketched
in a two step process. First, capture the essence of the action pose using pencil, later, come back and add
bolder lines in ink. So I'm going to put down the
pose of the figure first. First thing I see is, at least in this particular
figure is how the head goes. Head is fairly straight. Let's say this is the
angle of the head. And there's a nice
curve to her top. Let's say this is the curve to the top that she's wearing. In respect to this,
arms would be shirt and forearm goes all the way to the end
of the zipper shirt. Sorry, this is the forearm. Now for the most
interesting element, her hair That is obscuring the face right at
the top of the face line. Let's start with ellipse. It is at a slight angle. That's enough for now.
Let me put in her torso. This is where her waist
is approximately. And these are the flowers. No details yet, proportions. Now that I have the
basic proportions down, I can jump to my pen
for more defined lines. There isn't actually a need
to erase the pencil tins, but you can if you want later. That's her collar,
I can see her face. A few wrinkles on her sleeve. Let's say the arm
begins for sure. Be mindful of how
the arm muscles go. It's wider and thin again. Wider and thinner. The top folds in this way
and her leg comes here. Now, there's no need to draw it, but adding a little bit of hatching just defines
the area of the leg. Can put in the
zipper, if you like. That will give her
top a sense of form. I'm going to add these first time I'm going to add the arm. Again, mindful of the muscles. Be playful with your marks. Okay. And also, feel free to jump from
one section to the other. If you feel stuck in
one particular area, you can always jump to the next and come
back to this later. I'm going to say this
is the other arm. At the back end of the arm, I'm just going to
add a little more line thickness
just for interest. Good time to jump to the hat. Playful with your marks. These flowers to negatively
define her arm it further. You can also put in that basket. This area can be a little bit looser than the
face and the body. I think it's starting
to make sense. Let me put in her tosona. It it crease in her top here. This line needs to be
dark because this is where her stomach and her
leg are coming together. Don't need to commit
to any lines. You can always put in a
larger fatter line later. And you always have
the opportunity to modify the shape with
your watercolor as well. Sure, as well, I'm going
to add some hatching. Line for the cap is a nice place to add a
little bit of line weight. It doesn't need to look
perfectly like a person. The context plays a large part in making these
sketches believable. Once the other elements
come into the scene, the figure will
read like a figure. Done. Go to flip this sheet over
and try the second figure. This time, I'm going to use my sailor food a pen
and alcohol marker. Hui gray one. Not going to draw an
mature so much this time. I'm going to draw figure using bold strokes with the chisel in and then come in
with the fountain pen. So heat. That will put the rest of the
figure in proportion. His shoulders drop
a little lower. Men have broader shoulders. Women's shoulders group
a little more than men. I can put in her at least
where the knee comes. Just blocking in her
arm and then the other. Again, keeping in mind
the muscles and how they contract around her leg and headscarf is a
really nice element. Not only is it colorful, also has a lovely
sense of texture, something which always
enhances drawings. So arm is getting covered
by that weighing scale. So you can just put in
a line to indicate it. Indicate. Don't state. In the shopping bag. Just checking how
the shopping bag is aligned with her head. I think at this point, I have a good idea of proportion that it can
come in with my fountain pen. Right now, I am not
consciously deciding which lines should be
thicker and thinner. That will come later. Cross legged figures are very
common in scenes like this. This line can be
dark as there is a shadow from the
floor she's on. And there's a
polythene bag here. This part is covered. Now I can be playful with
the fabric of her clothes. This shoulder is a
little bit hunched. He's using that arm to
search for something. I can add for the
definition of face, separate the cheek,
from the chin. This line needs to be dark. This one does not. Folds don't need to be exact. Need to indicate that there
is fabric flowy fabric there. That's all. This line where her arm
slums over the leg, though it can have
a few dark lines. We will, of course, come over this or
in a final sketch, we would obviously put
some paints over this. But if you want to
start separating light family elements and
dark family elements, you can hatch certain areas. I think this figure has
already taken shape. To What I'm doing now is I'm just
adding line weight where I think it is needed. Yeah, I think this is done. I'm not going to add in
the details of the pace. I have sketched this individual
figure fairly large, but in a big sketch, it will be a very small part.
6. Linework: If you've made it this far, I'm going to assume that
you've had a fun time learning the three basic elements and now feel confident
to move forward. In this next sketch,
we're going to combine these three basic elements that you've
just learned. Let's start by
first constructing the sketch onto our
sheet of paper. Instead of simply
showing you how I draw, allow me to teach you
to see how I see. We're now in a window of Photoshop with our reference
image opened up here. There's a bunch of layers as you can see to the bottom
right hand side. First one is the
reference image. The next one is a
layer at 50% opacity. Think of it as a tracing sheet. The third one is a
layer for me to draw. As you already know,
we're not going to use the entire reference
image as is. We are going to cmp it to make it aesthetically pleasing and relevant for our composition. The area that I am
going to be drawing is approximately this one. Give or take a few millimeters. Okay, now I have my area
of interest established. The first thing I look for when I'm putting
a sketch down on paper is the horizon line. In this scene, I want
the horizon line to be a little bit above the
halfway mark of the paper. Somewhere here, for example. As you can see, most
of the heads of the figures aligned
with this horizon line. Having already
sketched the scene, I know that the vanishing
point is somewhere here. But I also want to tell you
that the vanishing point and the one point perspective
is not really all that important when you are sketching this scene onto
your sheet of paper. The first point I found relevant
was this one right here. This is approximately
one third along the vertical axis of the
paper. This is one third. Duplicating this, you can find two thirds and
another duplication will obviously lead to
the top of the paper. This point is important
because it helps you identify somewhere close to the top of these
boxes right here. The distance from the edge and the top of the box will
have to be approximate. But from the top of the box, you can put down
this angular line all the way here to
the one third mark. From this mark, you
can then put down a mark close to the bottom of the page where these
crates meet the floor. This line, although
not perfectly parallel to the bottom
edge is almost parallel. Next line relevant to us demarcates this
next set of crates. Then for the third
set of crates, you can see the angle
changes slightly, it becomes more acute. Now, where this create ends may not be easy to
define at this point. You can just drag this line
all the way into infinity. Another vertical angle of importance is this
one right here. This one too, you will have to put down using approximation. However, you can refer
to this line on right here to guess where you
want this line to begin. Now we can turn our attention to the
top part of our paper. We can put down where
this tarpauline comes, although that is not
all that important. What is more important
is this banner here. This banner forms
somewhat of a rectangle. For the approximate placement
of this banner, again, you can use this
point right here. Once you have the banner, you can also include
this line here. This line plus the banner
gives me somewhere approximately a little
less than half my paper. I'm going to duplicate this and the next point of relevance will be let's say here
somewhere here. Maybe a little further. Now, this point is important
because it helps me identify this leftover space midway
part of this leftover space, I'm going to drop
a vertical axis, which helps me identify where I want to place
my human figure. Now for simplification sake, we can erase a few lines. These lines are no
longer relevant to us. Where this figure ends
where his feet touch the ground is something you
have to be approximate with. However, you can very accurately now guess where
his head will align. The top of his head will be
aligned to this horizon line. With that in mind, we don't need the rest of this
vertical line here. This vertical line also helps helps me define where
these last set of boxes end. They're a little bit to
the left of the figure. From here, I can draw
another vertical line. This line demarcates the
endpoint of those boxes. Now I want to place in
my three human figures. The second figure I'm
going to put in is the one to the right,
this guy right here. I can put him in using this blue angular line
as approximation. The reason I put him in
first is because now having these two
magenta lines help me approximately put in this line with enough
distance between the two, so that all three
figures fit in. This middle figure is slightly
taller than the boy to the left his head can be a little
bit above the horizon line. This middle figure
also helps us better define the line between these two sets of
crates right here. Once I have these lines
down on my sheet of paper, they are enough for me to construct the rest of the scene. The fruits, the
details of the people, and the structure
in the background, those details are
not as important and are easy to build once you have a
foundation in place. Something similar
to what you see on your screen is available in the resources
section for this class. If you're having a
hard time getting your lines down on
your watercolor paper, you can use that as a overlay to make sure that your
sketch is proportional. Before we jump in
with watercolor, there's another step
we need to take. We need to mask out some
of the light sources in the scene and a
few other patches that we want to keep white. This is exactly the same
thing we did when we were painting in the incandescent
bulb thumbnail earlier. There's one bulb which
overlaps with those boxes, and I'm shifting
one of the bulbs to be against the dark background. I'm also masking out
a few other spots based on what I can see
in the reference image. Any water repellent medium
such as oil pastel, a wax crayon or a glass cutters
pencil will do the trick. With that, let's move
on to the watercolor.
7. The Colour of the Light : I'm filming our class on
a rather dry and hot day. I want to work wet and wet for
a long time, and to do so, I am gently spraying down both the front and
the backside of my paper. Moistening both sides will also reduce the
buckling in the paper. I'm going to start by painting
in the color of the light. The color of the light is bright gold as
it's being emitted from one of those
incandescent bulbs that we learned how to
represent earlier. From this lesson forward,
I'll be going at a slightly faster speed
than what I usually do. It might help you if
you watch these lessons at 1.5 X speed first
from start to finish. After that, you can
choose to either sketch the very same sketch
which I am doing right now or you can find
something from the Internet, or better yet, you
can walk down to your local market
and find a spot, find a corner there that you might want to sketch using the techniques that
you've just learned. My first wash will be
a fairly large one, covering most of my sketch. These initial
puddles of paint on my palette are
relatively dilute. As we progress with the layer, we can gradually increase
the paint consistency. We start from our light sources, the two incandescent bulbs. I'm applying a clean
layer of water around those light bulbs
in a circular pattern. Depending on what the conditions are in the room where
you are painting, you probably won't need
to spray as much as I am. As I begin this layer, I am going to work with my drawing board perfectly
flat on my table surface. I started applying
that golden color a little distance away
from the light bulbs. I intend to cover the
entire area being illuminated by those bulbs
with this golden color. As I move away from
the light sources, my color will get darker, but also less saturated. At the moment I'm using
my number 12 brush. If you have a brush bigger than this, feel free to use it. The size I am using is a
little less than ideal. In the reference,
you can notice that not all the surfaces
being hit by the light are that
strong and golden. Surfaces such as the
shopkeeper's shirt or that styrofoam box containing the fruits aren't as bright. So I've used my tissue paper to lift some pigment
from those spots. As my paper is not taped, neither is it stretched. It has begun to buckle. I will occasionally be
lifting my paper up off the table and moving
it around a little bit, just to ensure that the pigment doesn't stay too long in any of those puddles that
are now being formed. I'm now going to prop up my drawing board
at a slight angle, about ten degrees using that
aluminum tin that I have. Paint consistencies I'll be using now moving forward will all be a
little bit thicker. They will all be somewhere between coffee and
milk consistency. I put in that cooler
yellow tarpaulin. I'm going to connect it to
the warmer yellow wash below. I'm also occasionally
going to come in with my spritz bottle. This not only helps the paint
flow a little bit further, but it also gives me softer
edges in some areas. Back to my palate, I'm thickening up
that golden yellow, making it a little
less yellow by adding a little more
brown, a little more red. This mix is something like
low fat milk consistency. If the yellow is
coming too close to your light bulbs and you're
losing that transition, you can come in with a clean, almost dry brush and lift some pigment away
from the light bulbs. I'll now turn my attention to some of the warmer
colored tarpaulins. For these red tarps, the plan is to simply put them in with a
large confident stroke, make a few minor
adjustments, and leave it. Having placed my drawing
board at a small angle, I now have a nice bead of paint at the bottom
of that golden wash. I need to continue that wash all the way to the
bottom of the paper now. For this, I'm changing the hue of the color on my palate again. I need to reduce some
of its saturation, and I also need to make
that mix slightly thicker. I want to be at full fat
milk consistency now. So to that pre
existing golden mix, which was there on my palate, I added a little bit
of Altramarin blue, a little bit of burnt sienna, and a little bit of quin rose. The floor on the left is a
little more illuminated, so I do need to be
a little lighter there and darker to the
right of my sketch. I've reconfigured my
palette on the right because I need a little
bit more space for colors. For the first time now, we will be introducing some cool colors. This is a T consistency
mix mostly of ultramarine and a
touch of the cobotd. Just using my big brush and blocking it in
where I need it. No need to be too precise. Just block it in. Let it merge with what is already
there on the paper. Although it would have been nice if I had gotten a little bit of broken brush stroke
at the very coins. I did on my previous
attempt, but not this time. I can also put in little stronger paint on
the banner to the right. My paper is still damp, and this is the point
where I will be introducing patches of color to indicate fruits and vegetables. You I'm making
puddles of orange, red and green to indicate
those roots and vegetables. The thickness of these
puddles is full fat milk, and these puddles need
to be a little bit thicker because if
they are too dilute, they will cause cauliflowers on the sheet because it
is still slightly wet. The dampness of the sheet also
means that the colors will dry a little bit lighter than what they appear when
I put them onto the sheet. The exact brushes you use here
doesn't matter very much. However, something that
is advisable is like me, using a combination of
two or three brushes. What this means is that each brush can have a
different color and you don't need to keep
washing them as you move back and forth
between two colors. I've seen students
getting stressed out by overthinking which
color goes where. Well, you don't
need to replicate what you see in the
reference photo. Just go with the flow, do what feels right to
you at this stage. I feel that I could
use another color. Maybe a nice little muted
purple for something like figs. Before the page
goes entirely dry, make sure to add some of the fruits and veggies
in the far background. I should have actually done
this a little earlier, but lucky for me that
area is still damp. The dampness makes those strokes fuzzy and the fuzziness
creates a sense of distance. Now on to our inclines. As we saw earlier when
we did the thumbnail, the choice of pen
quite often depends on how much time you have and
how damp your papers offices. Again, I had the choice between
gel pen and fountain pen. And since my page is
still nice and damp, I chose the gelpen. Now, there's no hard
and fast formula to this kind of line work. Some artists prefer long
continuous strokes. My strokes are usually shorter. One thing to remember is to maintain a sense of
playfulness and confidence. There's no need to worry about line weight too
much at this stage. We can do that later
down the line. Make sure to vary the sizes of all the fruits that
you have in the scene. Some can be mangoes, others need to be pumpkins. M. My paper is getting dry now, so I can switch to a
different pen if I want. I do want to switch for a
slightly thinner fine liner, 0.2 tip for some of the
objects in the background. Notice that dark triangle mark. It gives further emphasis to the spherical form of the fruit. That's my 0.2 fine liner. The pen is not only
for outlining. Use it to create contour lines and emphasize the volume
of certain objects. This lesson is almost done. In the next lesson,
we'll be tackling the areas in the
back of our scene.
8. Distant Shapes & Structures: My paper is nice and dry now. Just as with the last clear, this one, as well, before I actually start
applying the paints, I want to mix the puddles
to the consistency I need. The first one there is pure ultramarine at
coffee consistency. In this layer as we
are working with shapes and structures
in the background, they all need to have a
slightly cooler tint to them. The puddle I'm mixing now is ultramarine blue
and burnt sienna. It has a little
more ultramarine, making it lean towards
the cool side. The next one is, again, ultramarine and bird sienna, and I'm adding a
third pigment to it, which is my neutral tint. This puddle is also a little bit thicker
than the previous one. The previous one was
at milk consistency. This one is very
close to being cream. Again, I want to be
working at a tilt. However, this time, instead of elevating the top of
my drawing board, I am instead going to elevate the left hand
side of my drawing board. With the left end of my
drawing board elevated, the paint will flow
from left to right. My plan is to visualize all the elements
in the background as one large connected shape, starting with that blue
tarpauline on the left. As with the red tarp, I'm just going to come in
with a single brushstroke, make a few adjustments, and then leave it as
quickly as possible. I messed up that
edge a little bit. It doesn't matter I can fix it. So as I'm moving
towards the right, I'm also changing the
color on my brush. I'm connecting that
ultramarine to the ultramarine and Sienna
mix at milk consistency. That red mark is just
to hide my error. F. So as I make my way to build
that shed area, I want its very back end to be a soft or almost lost
edge to its left end. For this, I am
first putting down some very, very watery paint. To this I will slowly add the thicker milk consistency
mix that I've created. As we move our wash
from left to right, we also need to make
our mixture darker. Towards the right end is where the entrance
way of the shed is, and this entrance way is
closer to the viewer. Hence it needs to be
a little stronger. S S. You also need to be
mindful that there is a light bulb Juxtapose
to that dark background. We've already learned how to tackle this in the
earlier thumbine. Around the light bulb, I'm applying clean water
in a circular shape. As I move my wash
into that area, I'm simply going to touch the edge of the water
that I've laid earlier. Try not to fidget with this
area too much and too early. Wait, see what the pigment does. Then come in and make any
adjustments that are needed. So I'm feeling the need to come in with almost clean brush and smoothen the transition between the light source
and the background. A There's opening to the right with some
natural light coming in. The silhouette structures
there don't have to be exact in relation to
the reference image. Just put down some
random strokes. You just need to indicate that
there is something there. Also in the back,
there are some boxes that are catching a little
bit of golden light. They're fairly dark,
but they are warm. In an ideal scenario, I should have mixed this or
before I started the layer. You don't need to
separate those two. It's just one single
shape we're painting. If you're lucky,
you might even get some interesting
transitions between the warmer and the cooler mix. So our connected background
shape is now complete. This is the best time to make any alterations to it
that you think you need before it is
completely dry. Take a look at your piece. It'll probably look a
lot different from mine. See what it needs. I feel mine needs a little bit more help with the transition at the back. Next, I want to
push that banner to the right to appear a
little further to the back. For this, I am going to give it a quick hit
of darker eight. This hit also connects
it to the background, and that connection will give me some lovely smooth transitions. This damp stage also gives
me the opportunity to use my fingernail and scratch in to indicate some of those
hanging ropes in the scene. I wanted this area to the right to be damp
at the very end. This is why I painted
from left to right. Next, let's look
to give that shed some structure by adding
a few vertical pillars. It's okay if that area is
still a little bit damp. The mix we're using for
these pillars will be, again, very close to
cream consistency. I'm currently using
my number four brush. A I also want to add some texture, some character to the roof. Usually markets like these
have perforated tin roofs. And as we conclude this lesson, I want to add some of the
figures at the far back. I call them figures, but they will just be shapes, a combination of rounded
rectangle and a square. This lesson is done.
In the next one, we will work on the foreground
and the finishing touches.
9. Foreground Details: This layer too will
require a lot of colors. Again, forcing me
to remove my paints from my palette box so that I
have more place for mixing. You need to spend a
generous amount of time mixing the right color as
you progress in this layer. Patience is the key, and I will keep reminding
you of that. The colors that I'm
mixing now are meant to be the shadow colors of all the fruits that
we depicted earlier. The exact pigments you use for those shadows doesn't
really matter. Just make sure that
you have a shadow for all your fruit colors. That puddle there was initially meant to
be for the floor, but it didn't quite work out, so I will mix a proper one a little
bit later down the line. All these puddles are
currently at milk consistency. You want fewer of
these shadow shapes on the distant fruits and you want more of them on the fruits
closer to the viewer. You don't need to put
all the shadows in. You can be random in
your application. But you need to be mindful of maintaining the shape
of all these fruits. A lot of them are
spherical and you need to enhance that spherical shape when you put down the shadows. Take your time,
enjoy the process. Once the shaded areas
of the fruits are done, we can come in and begin
painting those wicker baskets. Next, I will turn
my attention to those plastic crates that
the fruits are stacked upon. The reference, all those crates are of a lot of
different colors. Now, we don't need to match every single color as we
see it in the reference, but it would be nice if we
keep the crates colorful. The exact colors you
use don't matter. You can take the color
straight from the pan. I don't think mixing
is really needed. However, you do need to be
mindful of the consistency. We are still working
at full fat milk, almost cream consistency now. Let the colors merge
into each other. Think of this entire
area as a single shape. If you want to
assist the merging, you can come in and give it
a little bit of a spray. Since we are now applying paint over a surface
that already has color, that will obviously influence the new layer of paint
that we're putting on top. For example, now that I want
to paint this create blue, since it is already
on a yellow surface, it appears a lot greenish. You may choose to paint
around that person's legs. However, it doesn't matter all that much because
we'll be connecting his legs to all the wet paint which is already there
on the paper very soon. The bottom edge of all the colored crates
are still nice and damp. That is because I continuously sprayed that edge and because
I'm working at a tilt. And now to that edge, I'm going to connect the
color for the ground. The exact mix that I'm
using for the ground is just a muddle of everything which was
left over on my palate. It's got quinacridone rose, it's got burnt sienna, it's got ultramarine, and
it's got Indian gold. There is more quin rose in it, that is why it leans
towards the red. And as I move the wash
from right to left, I am using some uler pigment, some more neutral
and ultramarine. I'm also going lighter
from right to left. So there is a lot of nuance in this
particular application. Next, I want to put in
that boy's trouser. For this, I'm using
mural tint and I am getting it on my brush
straight from the pan, and I'm applying it at a
nice creamy consistency. I'm still using
palette leftovers as I move into his T shirt. To begin with, it's
a flat application. I might just lift a little
color from his shoulder. My skin tone, I'm
just picking up some of that straw colored paint which is already
there on my palette. I've now decided to create
a little separation, create a little depth in
those crates and the floor. So I've come in with some
nice creamy neutral tint, and I'm hinting at some shadows on the floor under the crates. Paper is still nice and wet, and I'm not even
going to try and control how that
neutral tint flows. I'm just going to
wait and see what it does and then react
to it a little later. I also want to use a clean damp brush to lift some direction
lines on the ground. This will give the scene a further sense of
perspective and depth. Each time I start with my
brush at the vanishing point, then I ghost it over
some of the area. Then I touch it down at the
ground where I want to lift. I touch it down and drag. I'm now trying to
use my gelpen to add some more perspective lines and cracks in the floor tiles. However, that first
line I put down is wildly off from the perspective. Oops.
10. Finishing Touches: Turning my attention
back to the figures. I'm going to paint the
shirt of this man and his face and arm as one
shape for the time being. If I need to create any
separation, I'll come back later. State State State State State. For me, I can see this being a dangerous
time in my painting. Although I have
gotten the foundation of this painting spot on, this is where tiny mistakes
have begun to creep in. Some of those boxes behind the shopkeeper
need to be darker. It'll help him stand
out a little bit more. The area behind his
back is the darkest, from what I see
in the reference. I'm a bit disoriented now, not entirely sure
what I'm doing. This area in front
of the shopkeeper is one of the areas I'm least
happy with in this sketch. I did it much better in a
couple of my previous attempts. The thought behind what I'm
doing is that I don't want to represent individual boxes or individual things
which are there. I just want to create some
tone to separate that area from the background
and also help the shopkeeper stand
out a little more. In these finishing stages, you don't have to do every
step that I'm doing. Take a good look at your sketch, see if you can observe any gaps, see if there are any areas where you need to add
further emphasis. We set up a scene to
have two light bulbs. The second one, the one juxtaposed with the boxes,
has almost disappeared. So I'm going to help it
stand out a little more. Is Sissi Sims S I'm going to jump back
to my gel pens now, not just the 1.0 tip black gelpin but eventually
also a white gelpin. I'm trying to add some hair on those figures with
my elpinV quickly, I realized that this is not
the correct tool for the job. Would have been
easier to do that with a black sharpie instead. However, lucky for
me, I can just come back with a black sharpie and draw over the gelpin marks. I'm just going to try and add some volume to
those boxes there. First by putting down some
very thick and dark paint at the crease and then using some water to
help it spread out. This now is my white chil pin. It's a 1.0 tip jelly roll. Those slits really help add character to
those plastic crates. These kind of finishing
touches are icing on the cake. They only work when everything
else is properly in place. Among other options for adding
such white highlights is a glass cutters pencil
or a colored pencil. Even a white pastel might work. Just that simple scribbly mark helps enhance the ground plane. So now, there are some spots where I would like to
have a thicker line. For this, I am going to
use my humble sharpie. Personally, I'm terrible at
lettering in perspective. So instead of adding
actual letters, I just add hieroglyphics there. Congratulations on making
it so far into this class. There's only one
short lesson left. In it, we'll be
looking at how to apply what we have learned
throughout this class, and I will also be making a few additional resources
available to you. I.
11. Conclusion: I hope you had a
wonderful time capturing the energy of the marketplace
in your sketchbook. Please, please, please do leave your virgin down in the
project section below. Nothing gets me more
excited than getting a notification about
a new class project. I will be here to provide you all the
feedback that you need. If you have any further
questions about the class or there's a particular
section that you're finding
challenging to do, you can start a discussion. No question is too small, and I will be here to
answer all of them. Also, a heartfelt
request from me to you. Kindly consider leaving
a review for this class. Not just about the
things that you enjoyed, but things you believe
that I can do better. Feedback ensures that I can make classes that
you truly enjoy. It also ensures that the algorithm knows that there are people
watching my classes, which in turn ensures
that my classes reach a wider worldwide audience,
you're on scale share. It takes a lot of time and effort to put
together these classes. So it really hurts me when it doesn't reach enough
watercolor enthusiasts. That's it for me.
I have a lot of exciting plans for this
channel in the coming months. Stay connected so you
know when the next class is out. I will see you soon.
 Aniruddha Gupte, Urban Sketcher & Wildlife Artist