Transcripts
1. Introduction: Welcome. In this class, we'll be painting an
urban landscape of Melbourne's Queen Victoria
market in watercolor, learning how to capture urban
landscapes in a quick, fun, and loose manner is an essential skill that every artist should
learn to master. Watercolor is the perfect
medium that allows you to produce spontaneous and
expressive paintings on the go. Urban landscapes
can be confusing to paint with so much going on
and an overload of detail, we can often get lost
in our painting. In this class, I'll
show you how to paint any urban landscape
easily by using layering techniques
and understanding light and shadow
planning is crucial. I'll show you how to
simplify buildings, cars, figures, and shadows
into basic shapes. Getting those large
components in accurately beforehand is essential for
your painting to make sense. Join me in this class.
You'll see just how easy it is to create this amazing
scene in no time at all.
2. Materials Required: So before we get started
with this class, I want to talk a bit
about the materials that I'm using over here. I'm using a bit of 100%
cotton watercolor paper. This is medium texture. I normally use medium, or rough texture for
landscapes, urban landscapes. And I find that's a
lot easier to use because if you're doing
these wet in wet techniques, where you're dropping in
paint such as these clouds, even in the buildings
back there, the paint just spreads
a lot more easily. And you're able
to get these nice granulated and interesting
variations in the paint. Usually, when you're
using hot press paper or paper that's
completely smooth, these effects are
a little bit more difficult to get and
the paper dries too quickly for you to be able to add in these little variants. So if you're not able to
get 100% cotton paper, have a look around and find yourself some textured
watercolor paper. Even if it's cellulose paper, that's going to be fine as well. The cellulose paper
does dry quite quickly, so that's why I recommend using 100% cotton paper if you
have that available. All right, so here
are a bunch of brushes that I'm using
in this painting. These are some
watercolor mop brushes. They're great for
getting in large areas such as the sky here, the ground, even the buildings. Just getting large washes, even shadows and things like
that. They're fantastic. And you know, picking
one that's large enough to pick up
a lot of paint, get in that large
area without having to continually just go
back to your palette. But still be able to cut around shapes is
really important. So something like this
might be too large. Okay, I might use that perhaps
in the sky, in the ground, but I don't think I'd use
that in the building or in the car or anything like that because it'd
just be too big. So you'd have to pick
one of these ones. So these here are synthetic brushes.
This is a round brush. Number six round brush and
this is a little flat brush. These are great for detailing. I use them to paint in, you know, like figures, cars, shadows, details
in the buildings, trees, buildings in the
background, things like that. They don't pick up much
paint and for that reason, you can actually control what
you're doing a lot better. So the paint doesn't
just sort of mix and cause big blooms and
things like that because they have a sharper tip and they're also a
little bit more rigid. They are more suited for
detailing these two brushes. And these brushes
combined together, you get the full range of
brush strokes that you need for this painting
in terms of colors, you can see here, I've got
a whole bunch of colors, but you're not going to
need a lot of them really. You're only going to need a
few of them for this class. In the sky here, I've got a
bit of cerulean blue and I've actually dropped
in a tiny bit of purple into the sky as well. It's a pre mixed purple
that I have in the ground. There's another purplish
color here as well. There's a bit of black and purple and almost
a grayish color just that I mixed
up here with grays, You can mix up your primaries
if you've got a blue. So maybe like a thalo blue
or an ultramarine blue. Mix that with a
yellow and a red, you'll get a nice gray color. So you'll notice a lot of the
darker areas in my scene, they're either purplish in hue
or they're actually black. The premixed colors that I
have here have got a bit of lunar black and a little
bit of neutral tint. These are just
convenient colors. Now, if you have your
three primary colors, you don't need them,
but I have them anyway. Just makes it easy for
me so I don't have to continually mix up
different colors. You notice here on that
side of the building, it's a lot more vibrant
compared to the left hand side. That's because I've used
a bit of lemon yellow, which is, yeah, definitely
a lot more vibrant. Then you've got some more
of this other yellow in the front and the sides, which kind of this color here. This is a yellow ochre, so it's more of a subdued
and earth and sort of yellow granulates a bit more so you don't want all the painting to look
too bright and gaudy. So that's why I do
alternate and yeah, between using more
saturated yellows and desaturated yellows as well. So that's about it
in terms of colors. I mean, you would say
there's a tiny bit of a brown or a purplish
color that I've used for some of
the shadows there. Again, a bit more of
that, cerulean blue. But apart from that, that's it. This is a tube of
white quash that also use in opaque water color. It's fantastic for getting
in little highlights as you can see on the building on the figures, little highlights. And you can mix it in
with any other paint. So here I've actually
got it mixed in with a bit of yellow, bit
of yellow ochre. Or either Hansa yellow
or yellow ochre. Probably yellow ochre. And
you can use that to get in some nice little opaque high lights on areas
of the painting. It gives that extra
kick at the end. So that's about it.
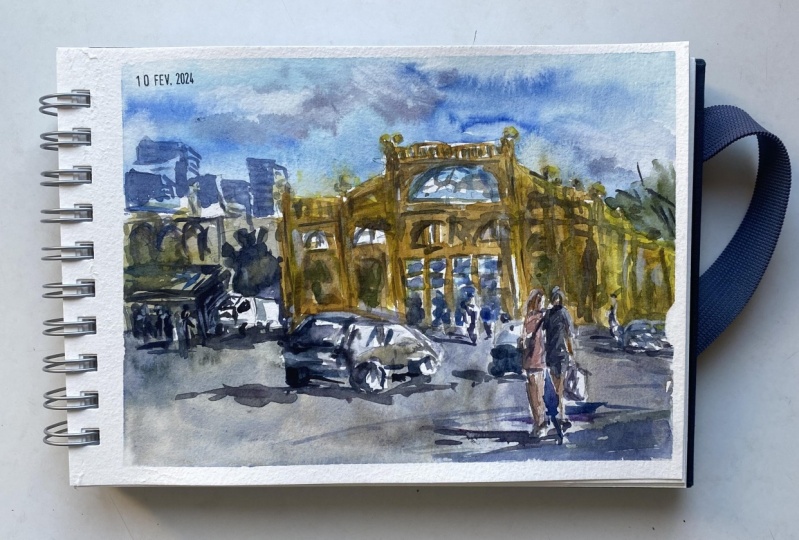
3. Drawing: All right, so in this
particular scene, I'm going to be modifying
this reference photo a bit and adding in
some extra details. I want to tell a bit
of a story here. And what I've done is
I've taken liberty to sketch this little composition
from the reference photo. Everything's the same,
really besides the cars, because in the
particular photograph, there's no cars and really no figures that I thought
it would be nice to have a couple of figures
perhaps walking towards or even walking away from the
scene in the background. And this is the Victoria
Markets here in Melbourne. Victoria, of course, and one of my favorite places to go shopping and getting
some groceries, having a nice little snack or little meal from some
of the vendors there. It's a nice area and
I quite like it. I want to just make
sure that I've got some additional elements
here in the foreground, because right at the moment
in the reference picture, it's just all this detail
in the background. I want that to be an
important part of the scene, but I also want there
to be a bit of a story, that's just a bit
of a sketch to get my mind thinking about what
else I could add in there. I'll refer to that
sketch a little bit, but mainly we will make a start. First things first,
I want to get in the bottom of the buildings. I reckon I'll place
it round about here. About a third of the
way through the scene. Okay, Nice straight line running across the
scene like that, just placing really the ground, the road or whatever there. Now, the buildings in the background are
a little bit easier because we've only
got two of them and then obviously some more
out in the background, But I'd want to make sure
they aren't too tall. We're going to split
this scene up. I would say that this
building probably goes in it, let's think it's little more than a four of
the way through. I could just estimate
it roughly here. The actual yellowy color of the market itself.
The market front. So I'm just going to draw the
side of this building in. Okay. I'm also just going
to have a little play around to see roughly how
high I want to put it. Okay. I want to make sure that I'm leaving a touch of
sky in there as well. I think that's a pretty
decent height for the top of that building
because we've got enough sky up there. Okay. So the question is, on the right hand
side of the building, I want to actually add in a little bit more
detail in terms of just the sides of it having more of a three dimensional
look to the building, having it come down a
bit more like that. And then you can
actually see part of it just go off into the side. It actually goes
all the way down. There's tons of
little stalls down the left hand side
of the marketplace, but I'm just going to
simplify it down like that. Obviously, some of this is made up because you can't see it in the reference photo. But a little bit of that I think is going to
be interesting. Give the building a bit
more dimensionality I think will be good. Okay, just drawing in
a little bit of that, the side of that building. Okay, let's continue on with
this part of the market. And I want to make
sure I've got a bit of upward part of the
building like this there, that seat slants
upwards like that. And then you've got these,
what you call them pillars, or features of the
building roughly here. Just going to put in
a little bit of that. You've got the doorway right
in the center here as well, but again, you've got these
pillars that just run down. Okay. I'm just gently
penciling these in, thinking roughly where to put them at the base
of the buildings. It got the squarish cutouts
there in the center. There's like a bit of darkness. These separated out like that, just emphasize that
a touch there here. It doesn't have to be exactly how it looks in the
reference photo. All we want to do is just create a general impression of
what's happening in here. Okay, On top as well, you've got these to parts of the that just a little
indication there. This part here as well. The top part just has these grills up on
the top like that. Even here. Look at
that. I don't even take much time to notice the
artwork in here, but there, it looks to be
like some animals, like a lamb and a cow or something there
in the background. And I don't want to certainly spend all
day doing this. Okay. Maybe just a quick
indication like that. I want to get this more
in as a silhouette. Okay, here we are. Let's put in some
of the windows. I'm just separating
this out like this. And you can see the front
part of the markets here, little sections, four by two. Then at the base you've
got these doors. It's quite darkened
there actually, this whole region
there is fairly dark. Okay. Of course, I can sit here and get in
every little detail, but I'm just going
to mark out basics. I'll work it all out
with the brush later. But we do need to get, yeah, we do need to get in a
good amount of details, especially in the separations
of the buildings. You see these pillars,
for example here, part of the roof
of that building as well. Market building. More of the roof here as well. Look, there's like a section down the side of the building. That doesn't have to
be too much detail. Got enough in there to imply
what's going on. Okay. I'll add some more detail
on there perhaps later, but I think that's a good
amount for the time being. You've little
semicircular windows that you've got these
little trees here. Something I didn't notice
that much. As well. Got the square bases, that dark square bases there
connected to the tree. And let's separate
out this one as well. So we've just halfway through, we've got this pillar
running down like that. Then on the left hand side,
again, the same thing, just to be that pillar like
that. Another one there. Okay. Roughly where
you think it is, a little bit darker
down the center at here. Separate out some of these windows,
a touch like that. Of course, these plants, again, more detail, okay? Simplify, of course. Okay, Let's get in a bit of this building. I'm getting too bogged down in the small
details of everything. This is like the side
of this building. This is actually a role of
sharps and little restaurants. Sometimes people
go there and eat breakfast and things,
just something like that. I know it's about as tall as
that one there underneath. You've got this little
shade like that. You know, I can emphasize that a bit roughly where I think it is. There's even a car here, like a van parked here, which I can put in some
detail for like that. I do like that van
there as well. Just something interesting
to have in there, okay? That something there, okay? Even traffic light or something. A lot of this stuff we can
get in with a bit more detail afterwards and just
simplify it down for now. Okay, We've even got these little bits on
the rooftop like that. Okay, good. There's actually a
shadow that's just cast on the side of the
building like that. And I think this is nice
because it actually creates a negative shape for
the van behind it, in front of it, I mean, as well. Okay. Now I want to go
ahead and get in some cars. Now, I did have that reference, that little sketch I did before, and you can see I've added a car just in front, some figures. I'm going to just have a
play around with that. Let's put in a car, say here, putting it roughly in the
one third mark of the scene. I just wanted it to be a bit of a focal point in the scene. The back of the car just get in the roof and then the
front of it, a bit like that. We've got a wheel here perhaps, where that one to the left put this one
a bit more like this. Another wheel here in the front. Okay, just fix this one up. A touch should
only just be maybe a sliver like that that
I can see of that wheel. Okay, these will drawn up
and form a shadow running to the left that let's tell a look, what else
did I put in here? We got some figures. Of course, these are quite important. I just want to tell a bit of a story here with a
couple of figures. I'm going to put,
this is tricky, I think I might put them
maybe here, another one here. I have to cut over the top
of this flower pot there. Another thing I
want to do as well, I just want to make the
heads a bit taller. Now, remember the car, when you're standing up, head's going to be around about here. I need to make sure that the, the heads are significantly
taller. Okay. There's one, just to get the
body of this figure in this, we'll get the other
figure in here. Maybe they're just both crossing the road or something like that together and this, maybe they're holding hands. Okay. There's a bit of a
little bit of detail in here. Okay? It's kind of just trying
to do a bit of this shirt, bit of a T shirt
or something for this figure to the right, for the one to the left. More kind of wearing maybe a dress or something like that. Figures can be quite
tricky to draw and I'm just making
it up really as I go. Sometimes maybe like a handbag
or something here as well. Okay, let's look, maybe some
shorts for this figure. There we go. And the
figure to the left, maybe just ***gthen
that out a bit. There are a couple of legs. The hair I'm going to have
to play around with later. I'm just thinking I might have her head facing towards
the right hand side. I do that by just emphasizing
the hair going by the left side like
this, the left. Then this figure
here on the right, just the head facing a
little bit towards the left. Again, placing the hair more towards the right hand
side of touch like that. Okay, so let should
do the trick. Maybe got his hand held out here or maybe more towards
the side as well. Could look better
like this there, holding onto who knows, like a bag of something. Like a bag of
groceries or whatever. Okay, good. Okay, so there are
the figures and I will put in some little
details for the car. For instance, maybe like some
windows here on the car. Just a bit of detail like that. What else do we
have? We might have another car behind like this. It's the car that's behind
and also another car here. Just as we go into the distance. I find by having this effect of the cars
getting a little bit smaller, perhaps even overlapping
with each other, helps to create a sense
of depth in the scene. Something I like to do
anyway, where possible. Okay, like that. There's shadows in cars just
driving past that thing. I'll put in some shadows
here on the ground as well. Whether I want to put anything
over here, for example, I could put in
another figure just walking in the
distance too small. Let me just double check that. Nope, just a couple maybe underneath these
shades or whatever. Just walking around
near the markets. You're going to get people just walking and doing their
thing off into the distance. Having a little bit of life or something
going on back there, I think is important. There's another figure, but I don't want too many
of these figures, especially in the foreground. I want these two figures to
be more of the story telling. What's going on here,
more of a focal point. And that car as well, the eye just focused around
this area but also lead into the scene with these larger
shapes, these large car. And then cars get smaller
leading into the scene as well. I like this drawing. Let's go ahead and get started.
4. Painting: First things first, I'm
going to be picking up some lighter colors. We'll go firstly with
some yellow ochre. Now this market building, the background is
a yellowy color. There is more
contrast saturation. I mean, on the right hand side, the yellow is more
like a subdued yellow here on the front. But then as you move towards
the right hand side, it becomes more warmer
and brighter as well. I want to make sure
that I am just implying that even on
the rooftop you'll find there's actually
a little bit more of a sharper and brighter
yellow up there. I'm just going to get
that in like this. There are some blues and things running
through the building. I'm going to try to indicate
some of that, okay? But in this stage we want
to use pretty light colors. We're using a concentration of maybe 20% paint and the
rest of it just water. So it's a very light wash.
What's happening in here? Okay, I'd like to start with the yellows first because
I find that it's so easy to just accidentally mix up some greens if you're not careful just to touch
of that in there. The rest of it really
can just paint the whole thing pretty
much yellow downwards. And in here as well might put a bit of
blue in the windows or something like that just to get a brief indication of some
reflection from the sky. But really it's not necessary. Just coming down around here, you'll notice there are
trees here as well, which I'm not too concerned about because
with the yellow, we can easily go over the
top and mix a bit of green. Later I'm going to pick up
a bit more vibrant yellow. This is acrid yellow. Just drop a bit
of that in there. Look, it needs to be brighter.
Something like that. It's a lot more vibrant. This is actually lemon yellow. I ended up picking
up lemon yellow, trying to mix it in a bit with that yellow ochre that
I've Yeah, just to b***d. It's not completely out of place because sometimes
when you use too much of a bright
yellow like this, it starts to take
away from the scene. Looks too gaudy. I try my best to b***d and make sure I've got other things
like running through, for example, a little bit
of darkness in there. I noticed even on the
building back here, it's like brownie color. So I've picked up a
bit of burnt sienna cutting around the cars, just bringing that across. Notice also, I'm leaving a little bit of that
white on the paper. Don't be afraid to
leave in a touch of that white these things
on top of the buildings. I just want to get in
touch of whatever it is, the ops, some more yellow ocher. I just want to dial
this down again a little further using quite a large round brush here because I'm not trying
to get in really any details. It's just some indications of what I think is happening or the lighter values you
notice here as well. I'm just picking up a bit
of this more vibrant yellow And you can go ahead and just
dab it in there as well. If you want to create a bit of extra brightness or contrast in some areas of the building
that it mixes in. It doesn't, it doesn't
look too gaudy as well. Let's have a look here in this
building to the left now, it's mostly just
a grayish color. Actually, I'm going to
pick up a bit of black and just mix it with some
water like that. There we have it. Just a grayish color that building and it doesn't require
just a bit like this. The tone of that yellow
is even darker than the gray that we've got on here. Comes all across like this. You don't have to keep
it that color as well. For example, I
might pick up a bit of burnt sienna and
think to myself, why not just put in some
burnt sienna in here? Don't feel like you're
limited by that reference. Infinitely change it if you
feel you want to experiment. Around a bit. We're not, again, putting in any dark bits, it's just painting the
light around that van. There's some figures
here. Look a bit of cutting around
these figures as well. It's nice notice how everything
b***ds together a bit. That's what we want. I also want to move this
wash down further. I'm going to actually
spray the paper to keep it wet around. Some of these bottom parts
can be quick as well with it. If I just pick up, it's
really just a bit, a bit of purple and
a bit of this black. Okay, I'm going to mix myself up a gray color,
really like that. I want to do this preferably
while the paper is still wet up here so that it
flows and runs down nicely. Okay. I don't want it to
completely dry, so I'm just going to spray that a little bit up
the top like that. I can come back to it later. This is just that gray as
you can see for the road, but it has a little
bit of purple in it. It's more interesting
in my opinion, than just using black. You get a texture to the road. And I like this, it makes it
look a lot more interesting. I vary my brush strokes as well. I have some just varied
areas of pigment, so it's not completely
smooth all over. Cutting around the
figures a bit as well. More purple even you could
potentially add in here, but you're really just making sure you're not
going too dark as well. I'm like I mentioned before, just a very small
amount of pigment, even 10% of pigment or
less to the 90% water. Okay. It's like a
purplish color. The reason why I want to
use some of this is because we've got all these
yellows back there, right? And I think a bit of that
purplish color is going to help create a nice contrast and a little bit of
coolness to offset some of that color back
there on the buildings. This color. Okay. You can always drop
in some color in there too. A bit of cerulean. I'm going to pick up
a touch of cerulean and cerulean blue just
to do things like this. I don't just, again, it's, it's quick little
indication even here. Let's put in a bit for these potential windows or
what have you here as well. You can leave a bit of that
white on as I move down. Let's pick up a bit more purple and just darken a
bit down the base. Okay? Simplify
that down a touch. I'm still trying to cut over
those figures. A bit tricky. Yeah, something like that. Because we've got a
figure and then we've got that car directly
in front there, which is tricky to get in. Okay, good. Let's put in a bit of the sky. It's a nice blue sky, cerulean blue like that. I might actually add
some clouds in mind you. I just like having
clouds in there that make a scene just look
a bit more interesting. In my opinion, I'll
start off with a bit of darker cerulean blue at the top and also got
a bit of this stuff. It's ultramarine,
ultramarine blue. I can just drop in a bit here
in the sky. As I move down. Just add more of the cerulean blue and more water as well, more water coming down. I'm just using this opportunity because you can see part of that yellow is also starting
to come into the sky. I can let it mix
in areas and then other areas I can just cut
around as you can see, leaving little bits
of white and spots. A bit more water. Okay, more water on here. Bring that wash down. And join it on a bit to the
buildings as you can see. Just join it on
nicely like that. If it touches, no
problem. Just let it mix. As long as it doesn't go completely into those
buildings, you'll be fine. Okay. A bit more blue here. Now, while this area
is still drying, this is where you can play around with some
additional colors. I might pick up, for example, a bit of purple,
a bit of purple, purple and brown mixed together
and dry off the brush. But I can add in, say
a little thing here. Just drop that in like
that. Do one here as well. Okay. Do its thing in there. You don't have to do it
for the entire scene. Entire are of the sky but just some areas I think for the clouds
and especially when you're going up the top, sometimes you'll find
that the clouds get a bit darker because they're
closer to you. This will nicely b***d in here. You might get a bit
further down the scene, like that little bit
of fluffy light. That creates a nice
contrast here. We'll just drop in a bit
underneath the cloud as well to give it
more body, okay. But I just want them to
be pretty soft and not, I don't want them to stand
out too much in the scene. Something like that.
Should do the trick. I'll let that looks decent
enough for the time being. I'm going to swap over
to use a flat brush. This is the brush here,
It's just a flat brush. Okay, with this brush, I find that I can
actually just get in a few more little
details and things here. I want an example would be, say for example, this car. I might just want
to get in a bit of darkness here and I don't
want it to run too much, so I can just go like that. The color in a bit of this car. Okay. I want to leave the
right hand side of the car and the light better. Okay? Just to indicate more of that light source coming
from the right hand side. So I can just do something
like this. Okay? A little bit of that edge
of the window there. Okay? This van here, there's
probably a well, there is a bit of darkness
in front of it like that, but really on the
other side of it, it's pretty light, I mean. Okay, there's a car here. I want to just put in a
bit of darkness behind it and a bit there as well. You just playing around with
some of these mid tones. Okay, here just
color a bit of that. Darker, you can leave that part in some
of the windscreens. Top of the car,
kind of like that, sort of reflecting
a bit of light. Okay, good. Really, I'm just using a
little bit of purple mixed with some black consistency. Again, is about maybe 15% paint because it is quite
a dark paint. This purple, it's easy to
go overboard if you're not careful the figures I want to get in a
little bit of color. I'm going to go with a
bit of pink or something. I'm mixing up a bit
of white with some red to get in a bit of
a pinkish color here. Okay, this figure there,
something like that. A tiny bit of red and
a tiny bit of titanium white for the legs and the skin. I'll just go with a
bit of Wd down red. A bit of water down red. The legs in the arm. We had one arm roughly
here and here. Okay, simplified. Of course. Figure on the right. I'll just go with a
bit of darker color, maybe some purplish color differ for the shirt there, can get the shorts in there. And just some red and maybe
a bit mixed together. A bit of yellow, a
bit of yellow ochre, and a bit of red makes a nice generic lighter
skin color as well. I'm going to just
redo that a bit later as well and in
some more detail, but that's a good start. Put in a bit of the
face and for the figured for that face. B***d that in a little
bit with the rest the scene bit more red. A tiny bit of yellow. Okay, good. I think this building in the
background is starting to, I'm thinking I'll just go straight into it with
a bit of darker color. There's just a bit of black, a bit of purple here
that I'm picking up. I'm going to try
back here first. What I'm trying to do is get in some of these
pillars and things. For example here that's
not completely dried off. So I don't want to go
too much in there yet. But for example, maybe here
it started to dry off. I can just put in a
bit of detail for that roof area like that here, for example, there
looks to be like a separation in these pillars. I can just go ahead paint a
little bit of that in. Okay? This little area
here where you've got more like a bit of
darkness back in here. Okay? There, there, like these little openings on the side of the building
like that. Okay. You're really just drawing
and indicating details there and it's not a whole
lot really, but Just enough. Just enough in there
to imply Yeah, just a bit of
darkness I suppose. And even around these cars, I will go just
dark in this area. Touch to help the cars
to stick out a bit. Okay. There's like a
large shadow here. Softer shadow. I'm picking up a bit
of darker paint, dry off that brush and just dab that bit of
darkness on there. That, that just creates a shadow on the side
of this building. Tiny bit of shadow there. What I'm doing here is abstract. The main goal I'm
trying to achieve. Get in some sharpness and some detail in areas
like this part of the roof there and
like a little bit of this detail there, okay? Parts of the building
just touch and go. Really, I'm not wanting
to spend too much time to imply every little detail, but you do see that there are these little pillars and things that are quite important
to put in there. Just a bit of darkness
like this is good. Okay, another thing that
I will do as well is at the same time I'll also work on like
some generic shadows. More so, like in the center
part of the building here, you'll have just
this bit here that's significantly darker underneath
here, for example, here. Let's have a look.
This top section here, just a bit of shadow. Let's move downwards,
and you can see it's just in this section. But cutting around
that bottom detail, there is some green
here as well. Just drop in a bit of this tiny bit of
green or something. It doesn't matter there, purple. Bring that down here. A little bit of that going on. Let's have a look, really, if we look at this
shadow pattern that just runs across these pillars and covers a lot of this
part of the building. We can get it all in a few indications like
what I'm doing here. Just one large shape. Okay. Down here. Yeah. Okay. I'll probably have to redo this a bit
afterwards as well, but this should form a good
basis for these shadows. You know, up the
top here as well. You've got a bit
of that darkness underneath like that, that, that tear that down. And a bit of that separation between
the pillar, again, like that, that there. This pillar here. This
one here as well. The other one here. The good. I think I got one here
as well like that. Okay. It looks a little
bit loose at the moment, but we'll get there a little bit of color
here. Inside as well. Underneath is in
between these pillars. You can see the sun
catches some of the light, the yellow on the pillars. You want to leave a bit of
that yellow still on there. Use this also to cut around
the outside of the figures. Probably darken
that a bit later. Okay, I've got a bit of a
shadow here on this building. It's quite dark. I'm
going to go like this. Bit more paint, Maybe 20% paint. This would just be
the shadow cast by that building to the
right, from the right. That creates a bit of
negative space as well. As you can see here
just cutting around this little pillar on the right. See just exposing a
bit of that yellow. Here we are again. It goes all the way
around the car, this van and you get a bit of
light hitting it like that. Okay, I like that little shadow. Let's continue on and get
some more shadows in. I know underneath the
building here you're going to get a lot of darkness. So I'm going to mix up a bit
of that purple and black, sometimes a bit of
brown as well in there, just to darken off bits in here. And I'm going to cut around, firstly that van, you've got some poles and
things in there as well, which I'm going to cut around. You know, you could
even France and a bit of something
there so you can just color part of it in and leave the rest of
it see how dark it is. Really quite in that section. I'm trying to add
more color in there. There could do with a bit of extra darkness with that shadow. But here for example, you can even see it in the
wind screen of this car. Bit of darkness like that. A bit of the wheel. Again, coming to the left side, there's a bit of that shadow. And underneath the car, you'll get a bit of a
dark shadow as well. A few little bits like this. You'll be surprised that
really just adds detail. Continuing on using this to cut around the car a bit
as well. Extra darkness. Little white highlight there. I'll leave that ad that figure, the rest of it, I can
just darken a fair bit. Here you go. A bit of dry brush
further down. No problem. Shadow for the car
to the left. A bit. Shadow. Okay. You can just start working a bit
on this one as well. See darkness on the left side
of that wheel like that. You can even just start bringing together like the shadows
underneath the cars. You can see here some
more bits near the back, the windscreen and that
thing to dirty it up a bit. Also because we've got a
cars in the foreground, so we want to make sure that, yeah, we want to
make sure that we have enough contrast
here for this car. Connect that wheel up, get more purple here and here. And a bit, sort of running off that car to the left
hand side like this. There we go. Just a bit of shadow for that
car. There we are. You know, sometimes around
the back side as well. Here you might want to darken
behind the car slightly. This actually helps to bring
out the detail details in the car even though there's this darkness
isn't exactly there. I'll add something
in there anyway. Can you see it just cuts around the top of that car and will
bring it forwards more. Just a bit of pop thinking. I might add a bit of
color to the car as well. Maybe a bit of this yellow
or something like that. Yeah, just a bit of
that would be nice. It's becoming
difficult to see where it sort of starts in there. Okay. A little bit of color. Okay. To do the same thing for this one pit of darkness underneath
the car like that. Create a little shadow
here on the ground will just connect up
to the car like that. These ones here in
the background. Again, I'm going to
just dark en off in front of the cars a
touch to make them stick out more and then just continue working a bit on this shadow
underneath like that. A little bit of
that shadow under the car running to the left. There's one, another one like
that, there's another one, they join up together at some point and
they look similar, but that's a row of cars. Okay, I'm going to put in a bit of color
for these figures. Mainly the left
side of the body. You're going to get a
little bit of darkness. Okay, Like that for this shadow. Bring that down.
Little bit of shadow. You do get it across
the body as well. For example here, just
a bit of darkness like that across the
clothing as well. Maybe a little bit of
something like that, let it dry off. But the important part
is this shadow as well. We've got to get
some of this in. I also want to make
sure I've got the feed in a bit more darker. I don't know, just anchors
the figures a bit more to the ground that
then I can combine. Just join this on that a bit of a shadow and maybe
change this one up. A touch coming
across on an angle. Thinking of these shadows
now and whether I want to have them come off a touch more on an angle actually because it can
look, I don't know. A little more
interesting, I suppose. Be careful with this
car over here can lose that directionality
of the shadows and consistency if
you're not careful. A little bit of detail
for the figures. Normally you do
get a bit of, say, darkness on the left side
of the body as you can see under the chin as well, that just a little
shadow cast to the left there to the chin. Put a bit of hair
on this figure. I'm going to here on this
other figure as well, I'm gonna use some bit of orange and a bit
of yellow ocher. Who, who? I'm going to go back
into this building. I've actually got
distracted down here, but I'm glad that I finished off most of this
stuff down the bottom. But one thing I've realized is that there is
actually some bits and pieces. Like for example, this is
a light light green tree, which I'm going to just
a bit of green in here. It's like a tree or something
coming in from the side, but you also get
a bit of it here. This is like a tree here. I might have to actually
use some gas later to just get in an indication
of those trees again. I lost them, unfortunately. But you can also scrub a little bit like this
to bring out touch of that little light
in there that will help draw out this bit of
light there for the trees. This building, I
will have to get in a bit more of an edge
here like that just to make it look like the edge
of the building essentially then goes around the
edges of these windows, a little bit of darkness. So you can see that just form
around the edges like this. Yep. There, um, a bit more here that there there. So you can see there's like a element of light
on the building. Okay. That's quite important. On the back end of the scene, we've actually got
some buildings and things like that and I'm
going to just make this up. There's all these
cranes and stuff, and I think they make the
scene look quite messy. But I'm going to let this
dry off a bit first.
5. Finishing Touches: I'm going to just do a quick indication of some
of these buildings here. I've forgot to draw
them in before, but I think they're going to be useful to have in here just a, I guess a little guide as to where I'm putting
in these buildings. I actually want to
put them in not because they are in
the reference photo, but because they
also help to form a negative shape here for these buildings
in the foreground. Another one coming
over like this, like here, maybe here. There's actually
one that connect, connect up a little bit with
this market front there. Obviously, I've
exaggerated some of these a touch as well. I'm thinking if that's
going to be good enough, I think I might put in a tree, like a shrub here behind there. It looks like there's an indication of a
little tree there that's a balance this out a
bit as well that you've got. Yeah, some of that coming in there, some of
this coming in there. It looks just a
bit more balanced. I'm not going to fool around
too much with the colors. I'm just going to
pick up a bit of purplish color that I have
already on the palette. Maybe with a touch of
Sullan mixed in there. Remembering the light sources coming from the right as well. I'm going to just
go in like this. There is a building here. I want to just get
it quickly done. And here's another part of
the building like this. Okay? Here. You want the buildings in the background to
be dark enough, but not too dark that it overwhelms everything
in the front, okay? This is just to bring
out the light, Okay? Here some more here. That directionality of these bits of the floors of the apartments and things like that as
well. Little bits like that. I hope to just try to connect
them up a touch and a bit of dry brush, okay? Start looking too rigid. I do this kind of
thing and I just start scrubbing at parts. And it actually helps to b***d
it and look more natural. Okay? This area here
just helping combine, join the background a
bit with this building. Okay. I don't want to join, I want it to join
in some parts of the entire area though. You see that? That's doing okay. A bit of green for this
tree or something here. Just the same flat
brush, something behind. There doesn't have to be much. Okay, There's a couple of figures here to the left. I've not gotten them
in the legs in yet. I'll just put in some
quick indications of the legs there like that. And get a bit of a
shadow as well for those two figures.
That's better. Even a figure here. Just get in some more of
the detail for that figure. Just with a bit of the dark background,
a little bit more. You see these figures as well. Couple there, there's
one maybe here as well, that's what you get. Slight indications of figures
in the background but not too overwhelming and overpowering of these ones
here in the foreground. This is where we're
just doing detailing. For example, this bag
that we put in before, it's like a sling or something, I'll just put in a
bit of detail there. That, that bag. Um, just a bit of maybe
bit of darkness like that. Bit of brown as well. It's a bit of brown. The bag Kate, touch more detailing for just want to add a bit more
shadow to the left hand side. And a bit of dry brush maybe, don't know, folds in the
clothing and stuff like that. Let's just try for the shorts
like that. Not too much. I think it starts getting a bit. Kay, good. Really just picking out some little areas to
draw out the faces, the head positions
of the figures Here, there's like a little
shadow on the left side of the arm that will help to draw out indication of
that right arm. Not much to really
do here, that one. Okay? Okay. Now I want to just work on the buildings attach
in the background. And what this means is I'm
picking up some darker paint, bit of black and
a bit of purple. Mixing that again together
again here I will just really bring out the final finishing touches
of what I want to achieve. So for example,
this windows a bit of dry brush here to just add in some details
on the building. The trick I find, anyway, the trick is to just
break up the lines a little bit so that you're not having too harsh lines running through
the entire scene. Okay, I'm just doing is emphasizing some of
these pillars again, these little parts
in the center. A little bit like that. Over the top of that
previous wash, this rooftop. There's a little
bit of this detail here as well that you can see bringing together the bits and pieces of the background. If I've got a little rigger
brush that might actually be easier to get some
features in these top. This top sort of part, anyway, that branches imaginary branches. In these little light
windows here as well. Just u in a little bit of them, little extra darkness
here. The base, a little bit of darkness. I've forgotten to get
in some shadow in here, just to add that in quickly. You've been here just a
touch of that as well. Getting some quick,
final touches of guash. Okay, a little bit on the car, the top of the car here as well. On the figures, just the
heads of the figures here. Here, shoulder, Just a little more like just a little high light
indication that, you know, the car just clean, almost just cleans it up a
bit in there is bringing back a little bit of that light
here in the cars as well. Figures, again, just some
more kind of light on the shoulders and
the heads of some of these figures back over
here as well is one. Okay. I want to bring
introduced a bit of yellow into this squash. Just touch a yellow
warmth in there. Maybe I can just bring back some little highlights
and things more white. Just a little bit of the
top part of the buildings. 0 He a quick finishing touch, I thought I would
add in some shadows running across the
scene on the ground. Just a bit of purple color
and bring some of this. Okay, just another bit
of shadow, I suppose, coming in from an
object or could be a building or something
like that in the distance. But the trick is just
to be quick with it, I don't want to, yeah, I don't want to overdo it. Something like that. You can even get part of it to just of overlap with the figure. Run through the figure as
well like this if you'd like. Something like this. More
dark down the front.
 Watercolour Mentor (Darren Yeo Artist), Art Classes, Mentoring & Inspiration!