Transcripts
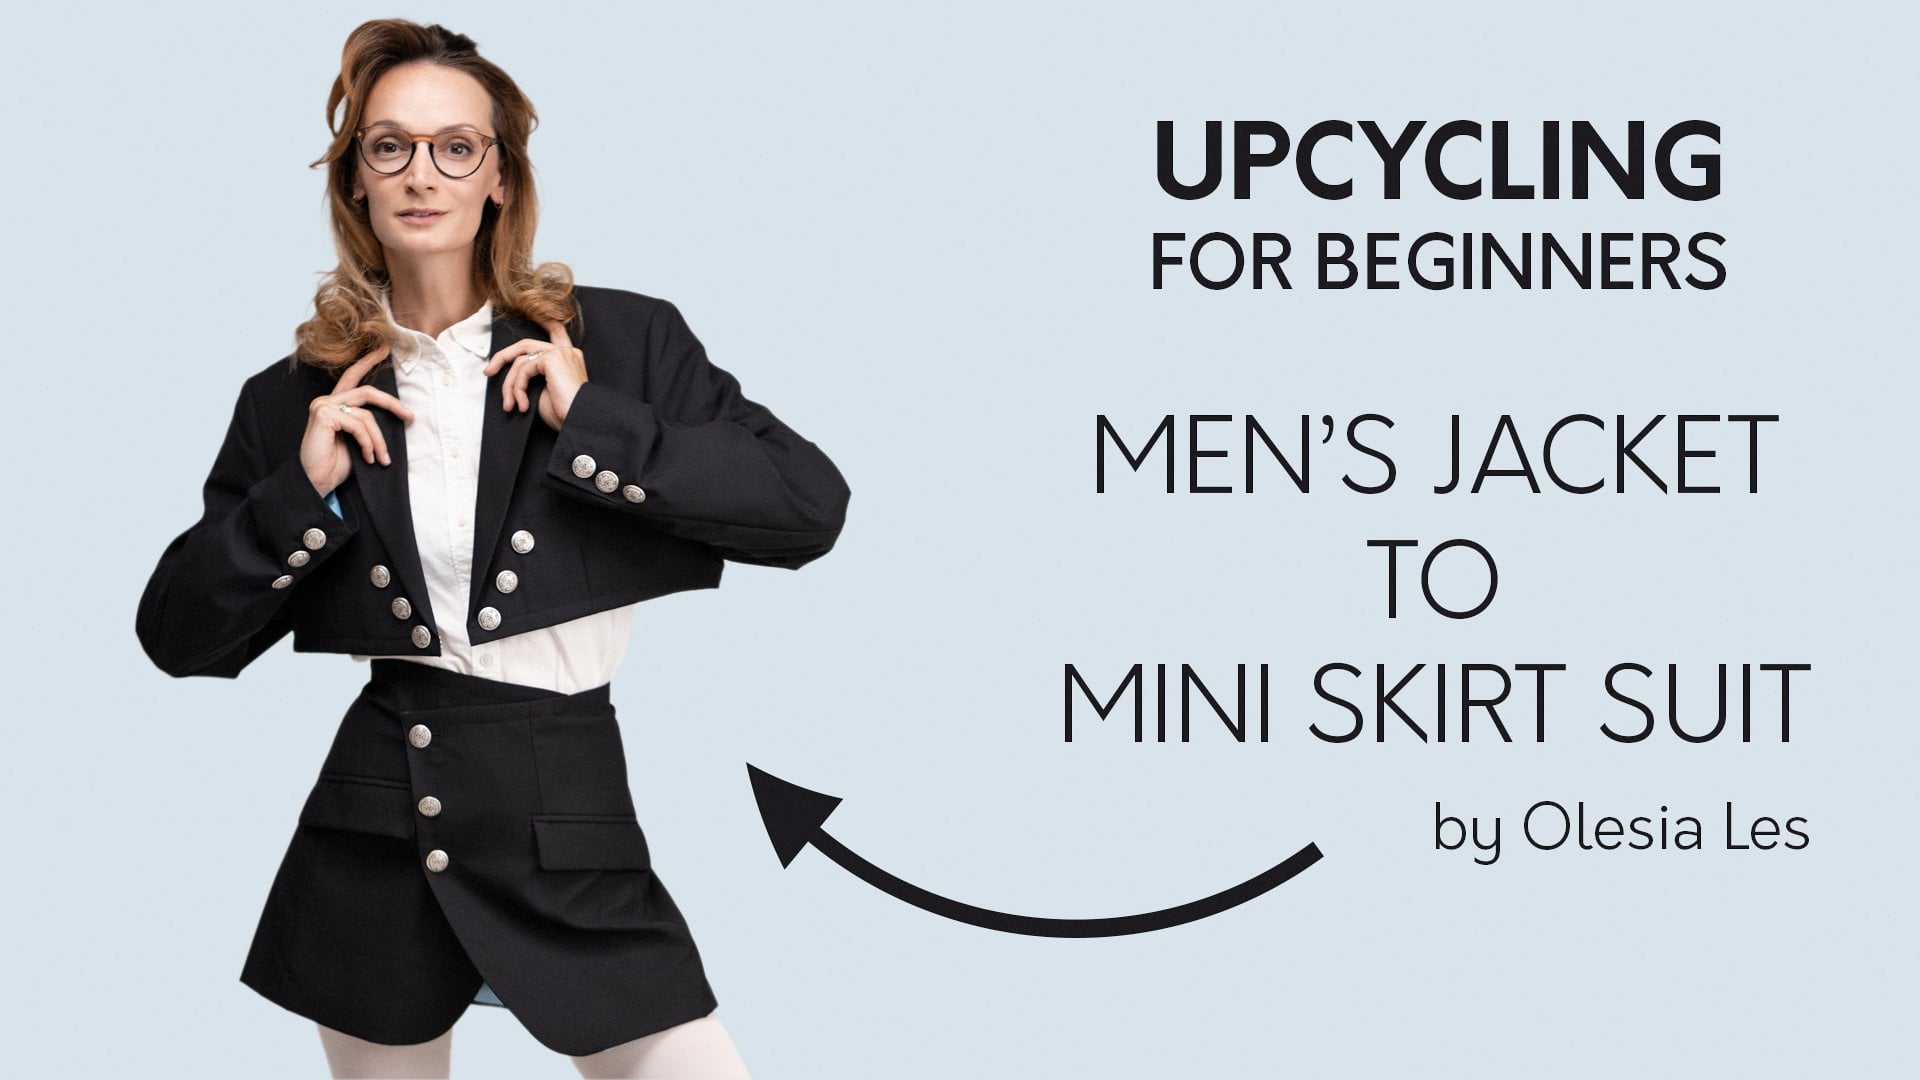
1. Intro + Project overview: I want to share a little secret with you. Your dad’s old clothes are worth their weight in gold. And if you can’t find any - thrift shops are your next destination. If we believe the numbers, that classy looking neighbor of yours is throwing out her clothes after only wearing them five times. Can I change that? I don't know, but I can change me! and if I can do that in style - count me in! To me, upcycling old clothes is not about being trendy. it's just a simple way to express my creativity and slow down on that consumerism a bit. In this class, we are going to create a new, original jumper dress step-by-step. Not only that, but I'm going to teach you how to select the best secondhand clothes for upcycling, how to use every last bit of it and then share some tips for styling your new favorite dress. My name is Olesia Les and I'm going to show you how to take someone's trash and turn it into a piece of fashion. This is the jumper dress we are going to be making today. There will be two overlapping parts in the front, which will ensure we're not showing too much body. We will use metal buttons as a decorative element to imitate a double-breasted opening. There will be a metal snap inside to stabilize the inner edge, preventing it from folding over or shifting. At the back, the width of the dress is easily adjusted by gathering the fabric and tying the band. The length of the straps are adjusted by tying them in the preferred position. The garment is completely universal and easily tailored to your needs. The cut edge is finished with the bias tape, so you won't even need to have an overlook. A consumer grade sewing machine is more than enough.
2. What you’ll need: For this project you will need scissors, ruler, pins. Tailor's chalk, any basic needle to stitch on the buttons and snap. Bias tape. The color is up to you. I choose black because I like it to be an accent. The amount of a bias tape depends on the size of the jacket. 2 meters should be enough, but I will explain how to measure the exact amount in one of our upcoming lessons. Threads, one should match the jacket and another should match the bias tape. Small scissors to rip up the jacket. You can use a special tools for that, or just regular small scissors that you could easily reach the seam with. Six buttons. These are up to your imagination. The only requirement is that the buttons should fit through the existing button holes in the jacket. One metal snap for inner age, Some fabric fusing material. This will be used for the band holes at the back of the dress. A 5x10 cm piece should be enough. And most importantly, the jacket itself. Any jacket will do as long as it is large enough. Check the arm hole. It should not be lower than your waistline.
3. Tips for choosing the right jacket: Here are some tips for choosing the right jacket. First of all, check the fabric. We can't build a house on a weak foundation. Good fabric Will make the garment durable, good-looking and comfortable. The best material is wool. You can have some part of polyester or other additives, but the amount of wool should not be less than 50 percent. Next step, checking the level of wear and tear. Best-case scenario, the jacket is unworn or as close to it as possible. That way it will not have any unpleasant odors, worn-out or stretched parts, or dirt. To determine how much the jacket was worn, take a look at the inside of the collar and the sleeves. These parts should be clean with no signs of wear. The jacket lining in will also give away the condition of a jacket. If you see any lint near the inner pockets or any damage in the arm hole area this jacket is not the best choice. Finally, take a look at the outside of the jacket. It's not a problem if you see any minor stains on the fabric. But if somewhere the fabric is disintegrated or thinner than usual, the garment will not last long.
4. Measurements: You will not need any measurements at all. The only thing you have to do is check if the jacket is big enough. The dress will be fully adjustable. Both the straps and the width.
5. Ripping off the buttons: Now we can begin upcycling the jacket. First of all, we need to prepare it. Dismantle the buttons both from the front and the sleeves. If there are any spare buttons inside, take them off too.
6. Ripping off and ironing the sleeves: Next step is to completely rip off the sleeves and separate the lining from main fabric, we'll need this fabric for the straps. Carefully cut the thread without damaging the fabric. Don't try to rush the process by tearing the threads, the seams are strong and the fabric may rupture. Even though this part is probably the longest in the whole process. And you can get fed up really quickly. Try to look at it as an educational journey. You have a unique opportunity to get a glimpse of how much knowledge and craftsmanship is put into one garment, which we're usually very quick to throw away. If you don't have any patience to carefully go through all the seams you can just try and cut the seams without damaging the needed parts of the jacket and the sleeves. After separating all the parts thoroughly clean them from all the thread leftovers and lint. Now steam all the parts. They were specifically shaped to be round and we have to make the pieces of fabric flat again.
7. Making the straps: For this specific design, we could use some pre-made straps, which would be a lot faster. But our goal is to utilize the most of the jacket and have the lowest amount of waste possible. The longer parts of the sleeves come together with the good sides of the fabric facing each other. We set the direction of the fabric by looking at the pattern. Striped or checkered patterns help a lot. Take the tailor's chalk and mark two five centimeter wide strips. You can make the straps any width you like, I personally, just like how the finished straps look. Now, pin the layers together so they wouldn't slip and cut the straps out. Now, even out the edges. On both of the shorter parts of the sleeves mark the direction of the fabric and fold it in half. Put both of the folded parts together. Check if the fold lines are even and pin down the layers. Mark 2.5 cm on one edge, 7 cm on the other, and connect two markings with a smooth line. I try to maintain the line around 2.5 cm for about two-thirds of the way and then broaden the area in the last third. Now cut out the marked parts and cut the edges perpendicularly. Next step is to remove all the pins and separate all the layers from one another. We now fold each one of the future straps with the good sides facing each other and pin them down. The seam, will go along one short edge, and one long edge. The remaining short edge will be left open so we can turn the strap inside out. Now we're ready to sew all the straps. The longer ones, the broadened ones will be used as shoulder straps, whereas the middle ones will be used at the back of the dress for width adjustment. The width of the seam should be half centimeter. I always increase the frequency of this stitch at the corners to make them stronger and prevent the thread from showing after we turn it inside out. After finishing the seams, before turning the strap inside out, cut all the corners of the fabric diagonally. You should cut really close to the seam, but be careful not to damage it. To turn a corner you don't have to cut the seam. Simply leave the needle at the lowest position, lift the foot up, turn the strap, lower the food down, and continue with the seam. When all straps are prepared, the next step is to turn them inside out and iron them out. To turn the straps out I use a simple chopstick. Form a plane at the corner. Rest the stick at the plane and gently pull the strap over the chopstick. After turning out the strap carefully adjust the corners with a pin, don't pull too hard because you could rip a yarn from the fabric. Now iron the straps gently adjusting the shape with your fingers.
8. Optional step: closing the slits: Now that all of the parts are ready, we can start working with a core of the garment. If the jacket has slits, you have two options. Sew them up and be calm you're not showing anyone your buttocks or go the sexy route and skip this step altogether. If the first option is your choice pin down the slits and make a seam around 1 to 2 mm from the edge.
9. Marking the dress line: Next we need to mark the top edge of our future dress. Mark 7cm from the collar fold line and connect this point with the most prominent point of the arm hole. Do the same for the other side. And then connect the lowest points of the arm holes together. Fixate all of the layers with pins and just do the cut following the line. After cutting the fabric remove all the pins and get rid of all the internal parts such as shoulder pads. If those are attached to the fabric, make sure to carefully cut them off and pull them out.
10. Attaching the front straps: Now we'll join the top edges, inserting the front straps in between. Put the straps the way that the diagonal edge is facing the center of the garment, fold it over top of a jacket and pin it down to the main fabric without pinning the lining layer. Then take the inside of the collar and wrap the strap with it. That way, the good sides of the collar are facing each other with the front strap inserted in-between. Make a half centimeter seem following the cut edge. Make a small cut on the corner so you don't get any excess fabric after turning it out. Now, iron this part thoroughly. When ironing, gently pull the good side so the lining will not be visible when turned over. Repeat the same for the other side.
11. Making the tunnels: Now let's get to the rear. We need to make openings for her back band. We'll use some fabric fusing material to strengthen the fabric in the back near the center seam. Now that the fabric is strengthened mark the place and the width of the openings. Mark 3cm to both sides of the center seam. The width of the opening is 3cm, and I'll mark that leaving a 2cm gap to the cut edge. Also mark the place for the future tunnels through which the band will go. Mark the tunnels in parallel to the cut edge, up to the front parts of a garment. The width of the tunnels is the same as the openings, 3cm. When everything is marked, we can start sewing. Be careful, the openings should only be in the main fabric, leaving the lining free. Now we'll do two things at once. Make the tunnels seams and simultaneously sew in the bands for the back gathering. Put the band in between the fabric and the lining, so the open end would be at the start of the marked tunnel and the other end would go through the opening. Make sure the open end of the band sticks out from the edge of the tunnel. That way we'll be able to attach it with a seam. Pin the band down so it goes in-between the marked lines of the tunnel. Pin all the layers together, making sure your pins go from one side towards the center. We need to do that because jackets have an excess lining fold in the middle and we need to keep it centered. Pay attention to the top edge, the fabric edge and the lining edge must be aligned and should not be shifted or turned. When everything is firmly pinned and double-checked, we can make the tunnel seems following the marked lines. Start from an opening and go around the band making turns with a lowered needle. At the points where the band is attached, make bar tack stitches, to make sure the band will not tear off when wearing the garment. While sewing the tunnel seams, always use your fingers to double-check if the band didn't go under the seam.
12. Attaching the back straps: Only a couple of small things left. One of them is the back straps, and we need to mark their place. I choose the distance from the center seam to be 10 cm. Align both the garment's and the strap's cut edges and pin the straps down. Now sew them with a straight seam.
13. Closing and finishing the cut edge: We need to cover a cut edge with a bias tape. This is a very useful tool for upcycling clothes, because it helps to nicely finish some complicated edges of the garment. To find out how much bias tape you'll need measure the cut edge and add 2cm on top. The thread color should match your tape. In my case, they are both black. Make sure the sides are not too thick. And if they are, you can always trim down the inner layers. To start, fold in the end of the bias tape, so everything looks nice and clean. Sometimes when you start the seam, layers may shift. So to prevent that, you should pin down this fold or even stitch it by hand. Start the seam with a bar tack, making a couple of stitches back and forth. Continue with the seam as usual. Double-check both sides of the garment once in a while. At the end of the bias tape, make the same fold as you did at the beginning. Now it's time to iron everything out. The finished garment is only a couple steps away. We need to make the bar tacks for the back straps to prevent the edge from folding over. Fold the straps up, pin them down so the layers down shift and secure them with an overstitch.
14. Finishing the garment + Styling tips: Final step is to sort out the buttons. Put the front pieces on one another, fully overlapping, and make sure you're not leaving a slit. Mark the spots for the functional buttons directly through the button holes. Mark one decorative button straight in the middle, and then three more in parallel at the same height and at the same distance from the inner edge, which you can feel where your fingertips. Just before stitching the buttons, we need to attach the metal snap. As I've mentioned before, its purpose is to prevent the side from folder over, or shifting. The snap goes at the exact same place as the topmost decorative button is, just on the inside of the garment. After that, just stitch on all the buttons. One optional step is collar bar tacks. You could leave the collar as is, but I prefer for it to stay flat. So simply stitch the corners by hand. All that's left is to tie the straps, try on your new sustainable fashion piece, and adjust the back to your unique physique. I hope this course was easy to follow and you've enjoyed this time spent with me. I would like to encourage you to upcycle old clothes and experiment with them. If you do, I'd be extremely happy if you shared your discoveries in the project section below. Thanks for watching and see you on the next Upcycling 101 course.
 Olesia Les, Fashion Designer