Transcripts
1. Introduction: Hey, guys. Welcome
back to another class. My name is Braden Messer. I am an artist, an
author, a YouTuber. And today, I'm gonna be the one that teaches
you how to draw. So welcome to unleash your charcoal drawing
potential. This is part two. Of a three part series that
I'm making, in part one, I walked you through,
and I showed you how to draw a bald eagle. We went through all the steps from showing you how to
draw the contour lines to placing your base
layers and building up your midtones with
medium charcoal. And then we also addressed
linework, plumage, high value retrievals, blending, and that led us to an amazing
drawing of a bald eagle. So we've gone from drawing
a bird to drawing a snake. In this class, I'm going
to show you how you can easily draw a cobra, one of the coolest
snakes out there. So I will say that if you find yourself enjoying this class and you're like,
This is awesome. I'm loving this,
then I would highly recommend that you pick
up a copy of my new book, drawing the portrait, step by step lessons for mastering classic techniques
for beginners. The reason why I'm recommending
my book is because it gives a thorough analysis of the three layered
method in action. So it teaches you
everything from definitions to application
in step by step format. So pretty much everything
that you learn in this class, you will be able to
digest it in book form. If that sounds like something that you
would be interested in, then I will drop a
Amazon affiliate link in the description of the class so that you can pick
one up for yourself. Okay. What to expect. In this class, we're
going to start off, and I'm going to
show you how you can easily lay down
your contour lines. Once we have the contour
lines of the snake drawn, I am then going to show
you how we can use soft charcoal to lay the
foundation of our drawing. Once we have the
foundational layer placed, I am then going to show you
how we can start to build those midtones and get our values to a point
where they become dynamic. Once we start to build up our mid tones and we have
a variation in our values, I'm then going to
show you how you can use medium charcoal to build out the linework
of the cobra. Snakes have scales, and so each scale is going to be
built out with linework. And then we're also going to use our smudgers so
that we can blend, and I'm going to
show you how you can begin to understand
underlying form. So that as you blend
your charcoal, you can make sure
that you're pulling and pushing your smudger using the proper technique
and in the right direction. This will give your
drawing that dynamic look. We're going to be
doing this drawing in step by step format. So each lesson will be
a different section of the snakehead until
it is completed. Now, I get it, right? This is a lot. There's a lot of steps a lot of techniques. So what I would
recommend for you just for your own sanity is go through the first time
and just watch the class. Try to soak it all in and really pay attention
so that you can truly absorb all of the information and the
techniques involved. Once you've done that, then I would recommend
going back through, and this time, as you watch, draw along with me and
create your project. Once your project is created, make sure you go ahead and post it so that I can
give you my feedback on it and make sure to also leave your
review of the class. By leaving your review, that enables me to share your class project in my monthly newsletter that comes out in the first half
of every single month. So this is a great way for you to not only get
your name out there, but your art amongst
the community of artists that we have.
Here on Skillshare. Then one last thing
before we dive into class is that I do offer one
on one sessions now. Those can be found at the top of my homepage here on Skillshare. Basically, what it is is it's a 30 minute console with me
where I can look at your art. I can give you my
feedback on it. We can talk shop, we can even draw together if that's something that you
would want to do. That's it. That's all. And
I hope to see you in class.
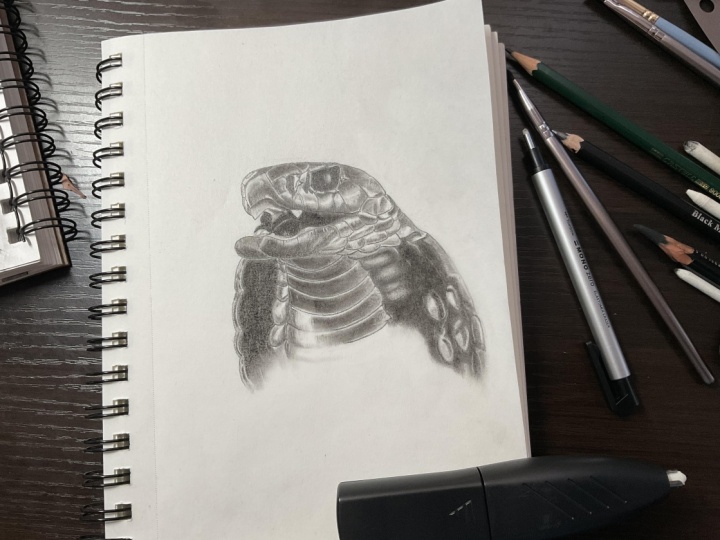
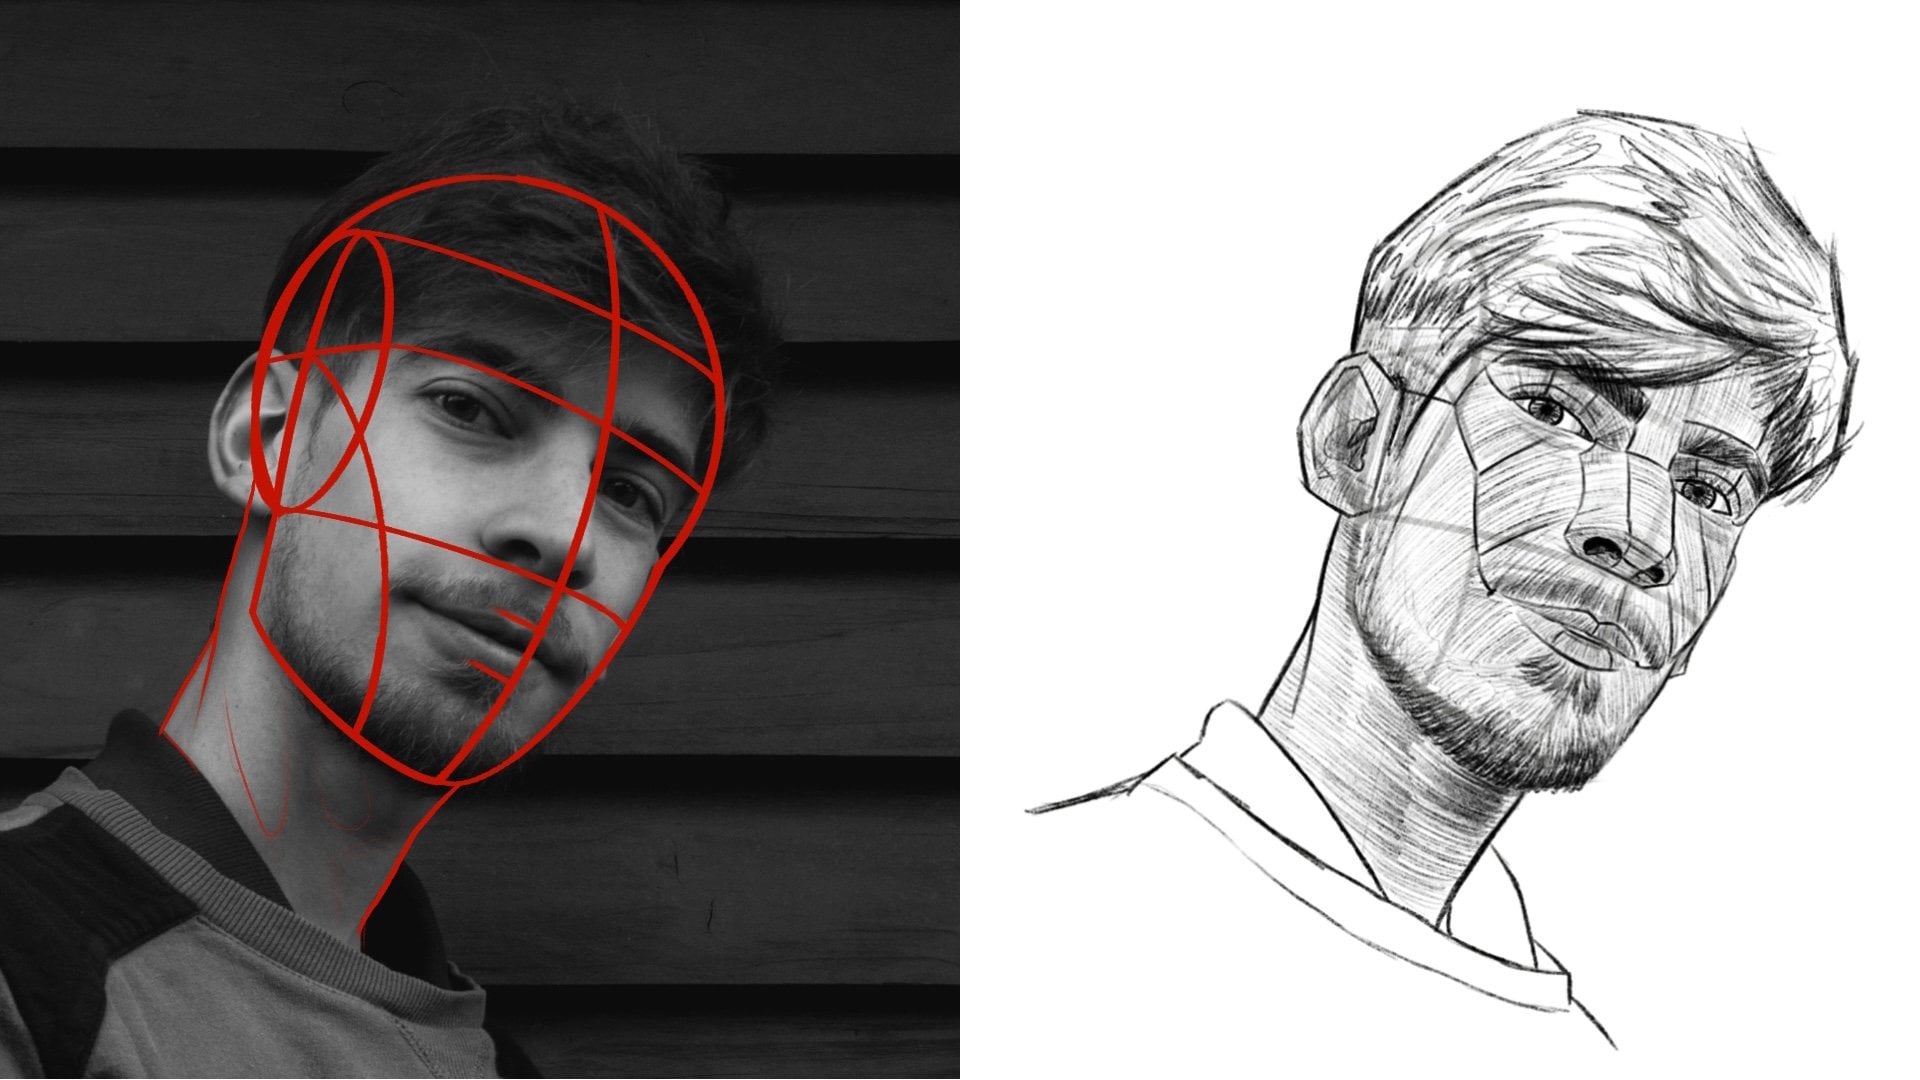
2. Tools & Contour Lines: So in this one, we're going
to be using an HB pencil, as well as a soft, a medium, and a hard rated
charcoal pencil. We're going to be using a uhu, a Pentel click, and
a mono zero eraser. And we're also going to use a
kneaded eraser in this one. A sandpaper strip and
our tone check paper. We grind the charcoal onto this, and then we check
the tone on this, and then we apply to the paper. And last but not least, our brush is two
different types. I got a horizontally cut elf
brush from makeup kit here, and then my number
six paint brush. Okay. And here we go. So when it comes to getting
your drawing started, the first thing that
you should iron out is the basic shape of
your reference image. Think of it like this. The shape of any reference
image is basically going to be its outside contours or main lines that make up the shape of your
reference image. So here what I'm doing. As I'm looking at my reference
image of cobra, and I am ironing out basically the main lines that
comprise the snake's head. And it's important to note
in this step that there is no exact way
to do this shape. All you need to do is focus on the lines that will build
your confidence when it comes time for you to lay
down the charcoal and identify those low values
and those high values. And snakes are a
little different than most other things
that you will draw. Say, for example, I've
drawn a lot of sharks, and I've done a lot of
drawing tutorials on sharks. Sharks are different
from snakes because sharks don't have a
lot of scales, right? With sharks, they're more about form than they are scales. And so when it comes to snakes, as long as you can draw out and identify each individual
scale that you see, on the snake's head and
the rest of its body, you will already be ahead
of the game because you'll know exactly
where to shade because what you'll be
doing and what I'm going to teach you in this tutorial is to focus on each individual
scale on its own. And this is a way to basically
draw in sections, right? Focus on one part only. And then you see here, see
how I rearranged that line. I brought it in a little closer. We were just gonna hit that with our monozuraser real quick. And we can do that.
We can do that. That's the big thing
that I that I always, focus on in my tutorials is that it's okay
to make mistakes. We're all human and we're
all gonna make mistakes, and as long as we, adjust and make that adjustment
and fix that mistake, it's not really a
mistake, is it? But that's what I'm doing. I'm looking at the
reference image here. And now that I have those main lines identified, you know, the top of the head,
the side of the nose, and then the bottom
of the mouth, now I can start to go
in and I can start to solidify exactly
where those scales are, the outside edges of
the scales, right? I'm not concerned with outlining any other
part of the scales, just the main lines that
comprise the scale itself. And that goes for
every single scale that we see in this
reference image. It looks like we got this
part of the mouth here. Is gonna make a quick
adjustment there. And actually, that mouth looks
a little close together. So what I'm gonna do
is I'm gonna hit it with my monozur
eraser right here. Just clean that up. Boom.
Not a problem at all. I'm gonna go back
in with my HB here. And I'm gonna re
redraw where I want that basically the top of the bottom jaw of
this snake to be. It's also important to note
in this step that none of you can think of
this as the framework, the bare bones of your drawing. None of this is
concrete, far from it. This is actually just
a basic framework, but a framework that is
adjustable. Think of it that way. One of the things I'm going
to show you in this drawing, tutorial is that you don't
actually have to sketch out every single part of your outline for your
charcoal drawing. And I'll show you
how we can make adjustments as we go along. And one of the things
you'll find is if you approach drawing in that manner with the idea that I'm going to be making
adjustments as I go along, not only will your
drawing be more accurate, but I think you'll like
the overall aesthetic. And not to mention it
gives you some freedom, gives you some creative freedom. And when it comes to
the creative space, no matter what the medium, like we all like the
idea of freedom. We all like to be able
to think, Oh, well, nobody's ever done that before, but I can do it, and I'm
going to do it, right? It's the same principle here with having the
freedom to to draw out this outline this basic
shape of our reference image. A lot of younger artists tend to get confused and
they think when they go to basically sketch
out the outline that they have to put in
all this detail, think of it this way. The less detail you have in your basic
outline, the better. And the reason why
it'll be better is because the detail comes when you throw down your
charcoal onto the paper. It doesn't come in
this step, right? It's kind of like
when you see people building houses or buildings, they build the framework of
the building first, right? The skeleton of the building. You know, and that's essentially
what we're doing here. Out here, as you can see,
when it comes to the scales, what I have found
is if I just focus on one row, right,
from left to right, one row of scales at a time, it actually enables me
to be a little bit more accurate with the
placement of my scales. And in this step,
what you need to be concerned with is just the
placement of your scales. But if you make a mistake
like I did there, just use your monsur eraser. We are using very
light pressure control with our hand here. And that's also one of
the things that you will notice as we progress through
this drawing tutorial, is that the majority of the
pressure control that we are going to use regardless of tool is going to be
extremely light handed. We're going to be
extremely light handed. I always say, you know,
light like a farier? That's that's what we're
doing here in this step. So just keep that in mind. But one row at a time,
one row at a time. And the cool thing is,
if you do it this way, if you go row by row by row, what will happen is
as long as you are fairly accurate with your
first row of scales, the rest will follow in line. Then here I'm just continuing to build out
each individual scale. Because when you look
at the reference image as a reference image, what it has is it has
high values, low values. It has mid values or what
they call a mid tone, right? And that is what we are
trying to outline here. Yeah. And then here, if you look
at the reference image, you'll notice how these scales, they tend to just kind
of dissipate into the lower value on the inside
of the hood of the cobra. Then here, we're
going to be going back through later
and establishing exactly where these neck
scales are on this cobra. But for now, we're just
going to basically put in some placeholders for where
that neck is going to be. And we can do. We can do that. Again, that's what
I was talking about with making those
adjustments as we progress. And I'm not going to put
too much more detail to the right of where my pencil head is at simply because I need to
have that part, that bottom right
part of the snake. I need to have that clear of any graphite so that my
glove doesn't smudge it because I'm going to be doing
a lot of work on the head of the snake and the mouth
of the snake, as well. And eventually, as I
complete everything from top left on down, then I will draw out the
basic shapes that I'm going to need to
complete this drawing. Okay, then I'll sketch out this, uh, reflection in the eye
here. And that is that. Okay, we're not
gonna worry about form frame lines in this one.
3. Drawing the Nose & Forehead: What I've done is I've taken
some soft charcoal and grinded it onto the
sandpaper strip here. I'm going to lay that on
top of my tone check paper. And I'm going to
use Number one and a number two sized
smudger for this one. Both of these smudgers give me a little bit more
control when it comes to applying the base layer of soft charcoal onto the drawing. I find that smudgers work
the best for smaller areas. So we're doing here is we're using a very
light pressure control, and I'm referring to
my reference image, and I am focusing on
all of the spots on these scales that
have a lower value. Now you might notice
that the values that are being conveyed with
the smudger in this step are not as low as what you see
in the reference image. But don't worry
about that because what we're going to be
doing is we're going to be going in and I'm
going to be layering charcoal on top of charcoal. I'm going to show
you some cool tricks that you can use
when it comes to using your makeup brushes
and using your medium, charcoal pencils, as well. So a lot of tricks in this one. The cool thing
about this tutorial when it comes to
other ones that we've done is that this one has
pretty much everything. It has linework, it has a
ton of linework actually. It has base layering. It has value building. It has brushw. It has brush tricks. It has texture as it has it all, so I'm excited for this one. I thought we're just
going through again, and I'm just looking at
all of my low values. Basically, for those of you who have been drawing
with me for a while, you already know
that what we do in this step is when we're
laying down our base layer, which is our first layer in
the three layered method, basically what we're doing is we're laying the
groundwork for building up those values and
really accentuating the value scale from complete
black to complete white. You know, the monochromatic
scale, as they call it. Okay, that's looking
good. And also, bear in mind on this
step the pressures, different hand
pressures will give you different values when
it comes to the paper. If you press harder, what you'll find, you'll
get a much lower value. If you press a little lighter, what you'll find is you will
get a higher value, right? But that's the big
thing is now that we have the basic shape of
the drawing in place, laying down these values
isn't hard at all. So now here, notice
what we're doing. We're taking a very
sharp medium pencil. I'm gonna lay out some
defined lines, so. There we go. Get define line
there, define line here. The big thing when you're laying down these lines is more or less have short little throws. Then when you go
to end your line, lift up on your pencil
and that'll give you a really nice line that actually gets thinner as
it reaches its conclusion, which is more aesthetically
pleasing to a viewer's eye, especially when it comes
to, you know, reptiles, animals that have
kind of this kind of aesthetic that's what we're doing and notice what
this is also doing is even though we're laying
in these defined lines, what's happening is
this is allowing us to really bring out each one of those scales and exactly where that
scale ends, right? This is one of the
reasons why I always say in the initial steps of your outline and even laying
out your base layers, um, of your soft charcoal.'s
not worry so much about where exactly that portion of the drawing is going to end, let's say, for example,
in regards to a scale because the defined
lines will achieve that. So now what we're going to do is I'm
going to switch it up. We're going to a number
one. Smudger here. The reason why I switched
to a number one smudger is because I wanted to have a little bit more control
in smaller areas. And notice here what I'm doing. I'm taking my smudge and
I'm going right up to that defined line that I just laid down with
my medium charcoal. I'm going right up to the line. I'm not on top of the line because if I
was on top of the line, what that would do is
that would mess with the integrity of the line, okay? And it would basically negate
everything that I just did by laying that line down with my medium charcoal
in the first place. So just be aware of that. Just keep that in the
back of your mind, okay? When you're blending
right next to a line, do exactly that, blend
right next to the line. Don't blend the line itself. The lines already
serving its purpose. It doesn't need to be blended. Okay, we are flying
right along here. So now, as I need it, you'll notice I'm going in and I'm grabbing more and
more charcoal and see. Notice how as I am putting the charcoal down onto the
paper, my values, right? My values are getting lower and lower in areas where I want
them or need them to be. And as we're working
our way towards the eye and along the top jaw
of this cobra notice, one of the things that we're
doing is we're starting from pretty much the very
bottom of the scale. And why are we doing that? Well, look at the
reference image, and you'll notice that area that's where our low values are. And remember what I always
say, low values first. Because if you can take care of the low values and really get those to where
you want them to be, you'll discover that
the high values are pretty much, left alone. They start to come out exactly where they need to be anyway. So You know, what we're doing is
we're just packing in packing in this mouth, what we're actually going
to be doing to achieve the lowest value
that we can with this technique because
I'm actually going to be going in in all the
areas that need it, like the eye, the mouth, the inside of the Cobra's hood. And I'm gonna be going in with a soft charcoal pencil which I don't think
I've ever done before in any of my tutorials, but this aesthetic with this
specific snake calls for it, so I'm excited to show you that. But before that, we have to put in a nice little
base layer so that we basically cover all the pores in the paper so that we
get a really rich, really dark, low value. And then here notice how
I'm basically just building up the shape of these scales. Because if you look at
the reference image, and then you look at what
I'm doing onto the paper, you'll see that
basically what I'm doing is I'm laying down
the base layer for everywhere that
needs a low value to be conveyed for the
accuracy of the drawing. Okay. So now I'm
switching it up. I'm taking a medium
charcoal pencil, and I'm just putting in some
more defined lines here. See what that basically did
is that brought the inside of that mouth forward and
pushed that far left side of the snout of the co Lines are
incredibly powerful, so it's important to
know how to wield them to get the best result. But again, short,
short little throws, and then as you want to
end the line, you lift up. Because you don't want to hold the line at the same
pressure control all the way through because it's not going
to look nearly as serpent, like, I guess, is the way
that you could say than if you lifted as you were
concluding your line. And if anything, what this
specific drawing will do for you is it'll really give you a chance to
practice your line work. Snakes are perfect for that. If you ever need if you're ever sitting there and you
think to yourself, man, I really need to, you know,
practice my line work, what could I draw to help
me with that? Draw snakes? You know, cobras, vipers, you know, Pythons,
rattlesnakes, whatever, Strom. And you'll come out
of that knowing exactly what it takes to
throw down a good line. Okay. It's got that line there. And I think what I'm
going to do while we're here is I'm going to take
my medium charcoal pencil, and I'm just going to go
through and just kind of bring out all of these scales here in the
back of the Cobra's head. Because these lines, if I
look at the reference image, are pretty they have
pretty heavy line weight, and they have a really, really intense line
quality about them. So I might as well
bring those out. Then here, I'm gonna run a defining line all the way to the corner of the snake's mouth. Around the top jaw
here. There we go. You see that membrane in the
corner of the snake's mouth? By putting those lines
there, what that does, that makes that membrane
look like it's inside of the snake's mouth. Okay. Now, here's a quick little
trick that you can do as well. If you want to have pinpoint
control and you want to bring out those
super super low values, you know, those rich blacks, what you can do is you can
take a soft charcoal pencil, make sure that
it's fairly sharp. And the sharper it is, the more pinpoint control
you'll have, right? And just go in just like this really soft
pressure control. Everything about this drawing, like I mentioned before, when we were drawing
the outline, everything about this drawing
is soft, really soft. Just more or less let the charcoal fall
off of the pencil. And if you have to go
back over a spot once or twice, feel free to do that. But always keep in
mind pressure control, light light light light. Lot a fan.
4. Drawing the Eye & Head Scales: But as you can see, the pencil allows you to get into
really, really tight spaces. Of the three tools that you will use to play with
your value scale, the brush allows you to move the most amount of
turqal the quickest. However, it provides you the
least amount of control. Over your charcoal
as far as where it goes onto the paper. The next tool is the smudgersT smudgers will give you more control
than the brush will. But the one tool that will give you even more control
than the smudgers is, of course, the pencils and
the sharper the pencil, the more pinpoint accuracy or control you'll
have when you go to run your dark values right up against these
lines and actually incorporate a lot of those
lower values into your lines. Now, I know some of you
have probably heard me say this in the past and
other tutorials. I said it in the crocodile
tutorial that when it comes to laying
down defined lines, very rarely, very rarely, will you want to lay down those defined lines with
a soft charcoal pencil. But being that this
is a snake and just the nature of the scales, it does dictate for
us that we can get away with using a soft charcoal the reason why I've said
that in the past is because depending on the
line that you're trying to run with
your soft charcoal, there's not enough binder
in the soft charcoal. So because of that, your
tips will break and you won't be able to lay down lines with maybe say a thinner
line quality or thinner line weight than you would be with say hard charcoal
or a medium charcoal to have more binder and thus they really hold
their integrity, the tips do as you lay down that defined
line onto the paper. That's just something to
keep in mind as well. No, no, no, no, no, no, no, no, no, no. Yes. So here, as you can see, when you lay it down
with your soft charcoal, it's gritty, right? It
has that grittiness. That's because the charcoals
resting on top of the paper. It hasn't necessarily been pushed and mushed
into the paper. And so, um, this number two
smudger allows for that. So a couple of things
are happening here. The value is becoming
lower on the value scale, and the texture of the charcoal
onto the paper is going from a rough coarse texture
to a smoother texture, which is what we
want, considering we're trying to convey the look of cobra Cobra scales. So and then here's
the other thing, too. Notice that we do have
our extremely low values, and then we have our, you know, white space, which of course
is our highest value. And now, with a
dirty smudger tip, this allows for us to go in
there and start bringing out those those
midwight values, right? And of course, when we accentuate the value
scale in that way, it gives us a drawing that has a lot of resolution in the wake
of what it is, right? It tends to pop
versus looking flat. Now, flat drawings,
for the most part, are simply just drawings
that maybe the person only used one specific
grade of graphite or maybe they only used one
specific grade of charcoal. But we see it more
with graphite, and I think the reason why
is just because there's a lot more to the
graphite scale in the wake of value and texture than there is
to the charcoal scale. So just keep that in mind. But notice every little tweak
that you give the paper will start to bring out the
overall form of that scale. And you'll notice this is the first drawing
tutorial that I've done where we haven't
used form frame lines. Now, for those of you
who have never drawn with me or maybe this is
your first drawing tutorial, check out the video
I have on form. I give a really
good definition and example on what form
frame lines are. Definitely check that
out. But here we go. We're we're beginning the
steps on the Cobra's eye. So much like we did
inside the mouth, this eye is going to have our lowest value with
our soft charcoal. And what we're doing
is we're taking a soft charcoal
powder and we're, you know, getting it started. We're laying down
an ice base layer. And now, when we take
this soft charcoal, it's going to allow us to
convey a really low value. But the trick to this step
is simply to not press hard. And when it comes to
this specific eye, one of the things that I
like to do is I like to take my soft charcoal while
I got a sharp edge on it. And I like to more or less outline and define that value
relationship between the high value that we'll
have on the light reflection and the low value that comprises the rest of
this snake's eye here. Here I'm going to
draw out this looks like a little
membrane here. Okay. So now, now that we
have that base layer, we're going to maintain a very, very light pressure control, and we're just going to go
nice tight little circles, nice tight little circles,
but not pushing hard. Don't push on the paper.
Don't push on the paper. Just just focus on filling in every high value spot
within the eye that you can. So basically, we're
doing this. See that? That's the motion. That's the motion
that I'm using. So see, basically what happens
is the pencil tip goes back over itself and gives you
another layer of charcoal. Thus, a lower value when we go to hit it
with our elf brush. And you can do either of these. You can do either of those. Just whatever
pattern you follow, just make sure you're consistent with that pattern so that the pencil tip goes over
its previous track. Okay. Just filling this sin. Nice light pressure control. And now I know what you're
saying. You're saying, Wow. That looks really gritty, right? Well, well, that's 'cause
you're right. It does. But we don't stress
because this is not the final
aesthetic of this eye. So now what we're gonna
do I lo brushes for this exact reason right
here. Just dab the paper. It's nice and light.
Nice and light. Let the brush. Let the
brush work its magic, right? Let it do it. It was designed to do I'm
just packing this chart, see how that texture
has been changed? Just like that. It
doesn't take a whole lot. And, of course, bear in mind, I am actually hauling, and I'm going very, very fast. But when you draw your
cobra, just take your time. With all of these steps
and all these principles and little tricks and stuff
that I'm showing you, just take your time with yours. And I bet you it'll be amazing. It'll be amazing. Going to darken up that membrane
there a little bit. And I'm going to go
in, and I'm going to bring out some of these middle values here. But notice I'm spring from the bottom and I'm
pulling from the top and I'm leaving the middle
of the scale alone, see? And what that does is
that inherently makes that scale look like there's
a high point, right? Like, there's a
ridge almost on it. And that is what we see in
the reference photo here. Okay. So now what I'm doing is I'm taking
a medium charcoal. I'm making sure my pencil
tip is sharp here. I'm just dressing out
this little membrane here that's part of
the snake's eye. And then here notice how, if you look at the reference image, what I can do is I can take my medium pencil and
I can very lightly place lower values precisely
where I need them. And then, of course,
I'll just go back in with my number one smudger, and I'll hit any of the parts, you know, that are gritty
or whatever, right? Because I applied
the charcoal with the pencil and just
blend them real quick. Just like this. Just
taking my number one smudger and hitting
it a couple of times. You don't have to you don't have to use hardly
any pressure here. The smudger will smudge that
charcoal and it'll push it into the paper real nice. And it'll give you a nice blend and it'll give you a nice, you know, middle
of the road value. Not too high, not too low. Okay. So now I'm just gonna take
my monozoreraser and I'm just gonna lighten up this
reflection a little bit. So this is what they call retrieving, higher
values, right? Okay, so now time for a little bit of brushwork.
Just gonna take this. And I'm just gonna dab the um, and notice how it's giving me a form of gradation
across my values. It's giving me a nice soft look nice smooth look,
which is perfect. That's what that's what
we want in this drawing. Snakes are, for the most
part, fairly smooth. Alright. They're not hairy,
that's for sure. Okay. That's looking good. And if you need to grab
a little more charcoal, make sure you check your check
the tone of your charcoal, and then Go ahead
and start applying. And a good rule of thumb, something to keep in
mind when you are applying your charcoal onto the paper from a brush is that always target those
lower values first. That way, if you hit the paper and your
values a little too low, it's in a very low value
area to begin with. So it's not like, you know, you have to go and risk
overworking the paper, right? So just keep that in mind.
And then here I'm just just cleaning this
up a little bit with my model zero eraser. Charcoal has a
tendency to, you know, doesn't like to live
inside the lines, unless you just put it that way. It goes all over the place. So just take your you
can take your model zero eraser and you can go
right up next to the line. Right up next to the line, just lift that charcoal
away. There we go.
5. Drawing the Mouth, Chin, & Hood: Okay, so now switching it
up for our smudger here. This is, uh, my number two. And I'm just gonna
go in and very, very softly build any of those values that
need to be lower. Alright, making them lower
and lower and lower. And also, notice how I'm
pulling the charcoal away from the defined
lines on certain scales. And so you can add
different textural elements to your cobra, too. Like if you just press the
paper with your smudger, it'll give you little
dots like that, little reflections
kind of shows you that the scale itself is
kind of chorus, right? That's why the light is
reflecting off of it differently. There's a quick little trick. If you just pull down
real quick like that? Well, that actually
gives that brow. The almost a roundness
to it, a rounded shape. Okay, now what we're
doing is we're taking our medium charcoal pencil and just wanted to punch
a line right there. There we go. Okay. So
now I'm going back in. And I'm just building up
these lower values and making them lower and
lower, darker and darker. And that is a good
principle to follow when you're utilizing the three layered method,
which is this method, method that I'm teaching
you, is that just go slow, you know, gradually
build your values, you know, make them
lower and lower. You don't have to
start off, you know, making them super, super low, you know, right off the bat. So just keep that in
mind, build it up. Okay, so I'm not
here what I'm doing. So I'm taking my
little elf brush, and I'm just hitting
these values. Just getting a
nice little blend. And I'm pushing the paper.
I'm dabbing the paper. I'm pushing my brush into
the paper. I'm not swiping. That's the key key difference there between this tutorial
and other tutorials is I'm dabbing almost almost
everything instead of swiping my charcoal
for the gradation effect. And then here I'm just going in, and this is the thing that I absolutely love about the
Monozura eraser, man, is you can go in
there and you can retrieve high values pretty
much pretty much anywhere. It is the most
pinpoint tool that I have personally found to retrieve higher
values like that. So, I mean, if you don't
have a Monozura eraser, like, definitely do
yourself a favor. Get one. I'll
definitely help you increase the accuracy of your high values
in your drawings. Okay, so now, remember
what I was saying earlier. We went in with our smudger
first and we laid down all of this base layer
of soft charcoal. And now what we're doing
is we're going in with the soft cle pencil,
using the pencil. And this is where we're
pinpointing exactly where we want that super super
low value in the mouth. Because if you actually
look the reference image, yes, it's low in value, but there are multiple
values in there. It's not all just
complete black, right? Especially once you get past the e and you're
looking to the left. Now, again, this is a lot
like that eye, right? It's greedy. We're
using title circles. We're using very light
pressure control, but now we're gonna
take that Lf brush. We're just going to start
dabbing that paper. Over and over and over again. And also keep this in mind. The more time you spend dabbing the paper with your
brush in a specific area, it will get lower
and lower in value. Look at that. So cool. Such a neat little trick. But you'll notice,
if you look, you see how kind of like
the reference image, we do have those
variations in value. And we can go in with erasers, and we can really, you know, narrow that down to exactly what it looks like in the
reference image. But I'm just going to go ahead and put a defined
line right here. Really separate the
inside of the mouth from, uh, the cheek there
of this cobra. It running this
defined line out here? Define lines can
make or break you, so it's good to have a general understanding of them
and how they work. And then I was just
going in and kind of just more or less, you know, working on the boundary
of this low value mouth. I was taking my monoz
eraser and doing some high value retrieval. I just did some quick
little swipes there, and you'll notice the kind
of texture that that gave me for the inside of
the Cobra's mouth. And here, basically
what I'm doing is I'm just because the texture is different and
because there are inherently more high values
in this part of the mouth, I'm just hitting
it with a smudger. Now, here's the chin.
Check this out. Start from the bottom
and pull up. See that? Pull up from the bottom and pull up right along that
line, just like that. And what this does is this gives you that sense of, wow, okay. This cobra's chin is very
round in nature, right? And then you just go in and
you continue to blend, right? The more you blend, you're pushing that charcoal
into the paper. And because it's
a soft charcoal, it goes right into
the paper very, very nicely, very smoothly. Without much fuss. Okay, so now what we're gonna do is I'm
going to take my elf brush. Then I'm going to
go ahead and I'm gonna hit this, and I'm
just gonna blend this. Now, I'm gonna be conscious of the direction that
I'm pulling and smudging in order
to get you know, in order to keep that form, that underlying roundedness that we conveyed with the
smudger to start. I just taking this brush
and just taking my time. It's going slow here. And the cool thing
with this technique is you can actually just
like I'm doing here, you can actually go in
and continue to build up lower values where
you need them. And that's good, especially
if you need to move quickly. Okay, so now what I'm doing is I'm running a define
line through here. This is a medium. This
is a medium charcoal. And I'm establishing the edge. We have this cober's mouth here. There we go. But
you see now I kept that very front part of
the inside of the mouth, a high value the way that I did. So when I ran that defined
line right across it, we have value relationships
right there, complete white, and then a complete
black defined line. And that basically helps
with depth as well. That makes that makes that
mouth look like it is, you know, behind that left
lower jaw of the cobra. So now what I'm
doing is I'm picking my hoo hoo battery operated
eraser and I'm just going in. And I'm just retrieving
any high values that need to be
retrieved in this mouth. And the Yahuhu eraser is
a really good eraser, especially if you
want to move quickly, and you have a lot
of eraser work to do in the wake
of detail work. Now what I'm doing is
I'm just going in, I'm just retrieving some high values for it looks like this is the spitter right of the
venom of this cobra. Someone's gonna bring that out. That's it. Leave it alone. Less is more. That's
what they say. Okay, so now we're gonna start. We're gonna start drawing out
this this hood, this cobra. I think I'm pretty sure
that's what they call it. The hood of this cobra. I always thought Cobra
snakes were so cool. Alright. Now what we're
doing is I'm going grabbing some more
charcoal here. And what I'm doing is I'm
establishing the edge of, uh of the cobras hood.
Now, check this out. Basically what I'm doing
is I'm going through, and I'm building
up any low values, or trying to bring those
out as much as I can. Now I'm going to take
my number six brush, and I'm just going
to go ahead and I'm gonna run this brush right up to that high value line that you
see right there, right up to it initially. Just gonna go in
nice little circles. And what I'm doing
is I'm prepping this area for the soft
charcoal pencil to come, see? I'm using the brush just
because I want to move a little quicker, a little quicker. Then just on this side,
and then on the next side, just like I did on the outside, start from the high value mark, where those rolls are and then
move your way to the left. Okay, now what we need to do is clean this up a little bit, reestablish exactly
where this boundary is between our high value and our low value that we just put down
with our brush, see? There we go. Okay. Now, just like what we
did with the eye and just like what we did with the Cobra's mouth,
we're going to do here. Taking a soft charcoal
pencil and we're starting right from
the high value. In fact, we're going to put down some defined
lines right here. Again, I know this is a
soft charcoal defined line, but because we're going
to be blending it, we're going to take
our blend right up to the defined line,
it's going to work. It's going to work out very
nicely for us, you'll see. Okay. So now that we have established the
boundaries that we want, we just need to go
ahead and establish this a little bit more. There we are. That looks good. Now, effectively,
what that line has done is that has
brought the jaw of the cobra forward while pushing the hood
of the snake back. Now what we're doing
is we're just going around tight little
circles again, using a very light
pressure control. You don't want to push too
hard because if you do, you'll scratch the
paper, and then you're going to have a
whole another problem. When charcoal scratches,
it reflects light, much like graphite does. And so we don't want
that. That's bad. What we want is we want a nice, smooth, undamaged,
low value blend. That's what we want.
That's what we want, and that's what we're
gonna get. Okay.
6. Drawing the Hood Scales & Jaw: I went to throwing
some real time there just so you guys saw
that that, you know, I wasn't able to do
that in 30 seconds if I hadn't sped
it up 500 times. So now, what we're gonna do? So I'm gonna take my elf brush. We're just gonna I'm
just gonna dab this, right? I'm just dabbing. Take your time and
don't move on to another area of the
hood of the cobra until you're satisfied with
the gradation that you have applied with your brush and gotten the aesthetic
that you want. Remember what I say? The more time you spend dabbing
in one particular area, the lower that value will
become the more that charc will push into the paper. This mixed media paper is wonderful for this
specific method. There we go. And if you have
a little rough blend here, just go ahead and hit
it with the brush. Just notice how I continue to hit it and it
just dissipates. It just blends. That blend becomes smoother and
smoother between values, between high to low value. And here I'm just gonna
hit this real light. I'm not pushing here at
all just real lightly. Just wanted to get
it kind of amo, smoother, more wholesome look. Pull that down. That looks good. A Okay, now, here what I'm doing
I'm taking my mono eraser. I'm gonna clean this up a little bit. I'm just going
to clean this up. It's gonna give me
a nice implied line there on the outside of the on the outside
of the snake here. And then what I'm
doing is I'm taking my mono zero eraser. And if you look at
the reference image, you see the kind of kind of texture that I'm
going for here. Because that mono zero eraser
gives me so much control, I'm really able to get in
there right up next to that low value defined line that I laid down with
a soft charcoal. Then here we go. What
I'm going to do here, I'm going to take
a hard charcoal. I'm just gonna run this down. There we go. That looks good. But now, did you notice the defined line
that we just laid down with the hard charcoal, notice how it actually seems
to convey a higher value. Well, that's just because
there's so much binder in it that it's unlike the medium and the soft
charcoals in that it doesn't convey as low of a value inherently
onto the paper. So if you ever need
to put a really really thin defined line, lay it down with
a hard charcoal. Okay, that's looking
pretty good. I'm just gonna go in here and
notice how there's some of those some high values
showing through. I'm just gonna go ahead
and darken those up. There we go. I'm just clean up these lines
with the soft charcoal. Alright, so now what I'm gonna do I'm gonna take
a medium charcoal. The reason why I'm using
medium charcoal here is because if you actually look
at the reference image, these scales here come down. And I want to look I want
them to look almost heavy. And so what I'm going
to do is I'm going to put some defined lines on
them. And then I did that. I put that line on
the neck scales to kind of push
those other scales, those round scales
back a little bit. And now what I'm doing I'm
taking my number two smudge, and I'm going from
the defined line, and then I'm going up and I'm slightly pulling to the left. You see how that is bringing out that form that we see on the scales in
the reference image. That's how we convey that. Start from that define line and then work your way up.
That's all you got to do. It's that simple. Then
here I'm just gonna pull. I'm gonna pull this
charcoal down a little bit. I'm gonna follow the
same contour as before, but I'm just gonna let
this kind of fade off. Just let it fade
off into nothing. Okay, so now what I'm doing. I'm taking my diagonal
cut elf brush, and I'm just going to hit this paper real
light, real quick, boom, boom, boom,
boom, hit it twice, three times, maybe, and
then leave it alone. That'll bring out
that gradation. Now, if you're worried
about the high values that we lost by doing
that, don't stress. Because I'm going
to hit it again with my model zero eraser.
I'm going to go in. I'm really going to bring out and retrieve
those higher values. So But by using the brush here, it just gives us
a nice aesthetic. Okay, so here we
are, as promised. Bringing out my Monozero eraser. Just gonna hit this
real quick and see how I'm able to bring out those high values fairly easily. That's called, that's
a pretty good example of what it means to
retrieve higher values. And then here when I'm
doing some scono with my soft charcoal pencil, and I'm just bringing out
some of those lower values. For those of you who have been drawing with
me for a while, you're probably thinking
to yourself, Wow. I've never seen him use soft charcoal as basically
a value builder before. And one of the reasons why is because it's just the nature
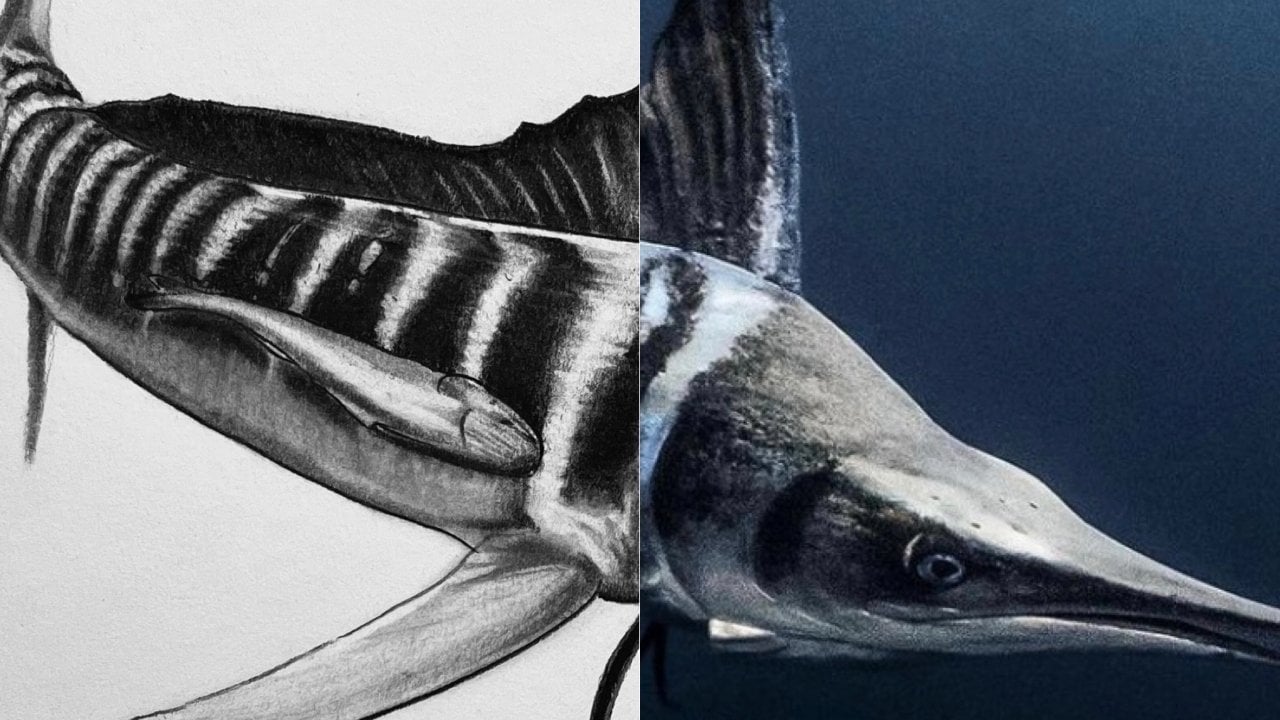
of the reference image. I really wanted to go bold
with this COBR drawing. And so that's why when I saw this picture, I absolutely
fell in love with it. I was like, This is perfect. This is exactly what
I was looking for. I loved how rich and low
the dark values were, and I loved how
there was a lot of contrast on many of the scales. So I knew that we could
accentuate the value scale. It would be a good
one to practice. Now, here's a trick.
So what I'm doing here is I'm taking my number
two smudger and I'm basically just going back
over all of the lines that I laid down in the outline
phase with my graphite. And one of the
reasons why you want to do that is because
if you actually look at the scales at those specific scales
in the reference image, they very much have that
kind of aesthetic, right? The majority of the
scales is a high value, but then as it rolls
away from the eye, as it connects to another scale, it almost picks up, you know, this middle of
the road value, right? And so now, what we're going to do is we're going
to take our medium charcoal here and I'm going to establish the boundaries
of these scales. Define lines, but notice how as I conclude the lines,
I always pull up. I always pull up
and what that does. As I was explaining earlier, is it makes that line, the weight of that
line dissipate as you gets closer
to its conclusion. Versus the line keeping the same weight all
the way across, that would look kind of
kind of cartoony, right? So just flick the
line at the end. Kind of like a whip. Think
about how you crack a whip. Kind of like flick
flick your pencil. Alright. And so what that has
done is that has really solidified for the viewer's eye exactly where those scales are. Now, these ones are a little
trick A, little trick A. But basically, if you look
at the reference image, you can see how
there's scales here, but they basically dissipate into the low value to the point where you can't really see them. So this is how we're going to this is how we're going
to bring those out. We're basically gonna
put define lines on all of the kind of in your
face scales, right? These are the scales
that are crucial to the overall form of this
side of the cobra's head, so now here, I'm just gonna
jump back real quick, and I'm just gonna
put a nice soft define line right here. Kind of pack in these low values a little bit. There we go. I think this one here,
I'll do that, as well. Just kind of fill in these side of these scales. It's wonderful. Now, do you remember the top of the snake's head when we took our soft charcoal
and we went in, pinpointed exactly where we
wanted low values to be? Well, I just wanted to
show you that you can do that for the jaw as well. Now, you can do it this way or if you like the smudgers
and you just want to continue to reach
over to your strip and pick up soft charcoal and continue to build
with your smudger. You can do that, too. Or
you can do it like this. You can lay it down with
your pencil and then go in and smudge the charcoal. Really the only difference
between doing it, like I just showed
you versus doing the whole thing with
your smudger work only, is that your smudger work, it'll be a little bit harder, even if you have
smaller smudgers to be accurate on your low values. I mean, you might be able
to get away with it if you really go in
there and clean it up with retrieving
your high values when it comes time for
your monosa eraser. But that's the big difference, more accuracy, more control. Accuracy so much of the time has a correlation
to control because if you have control of exactly where and more importantly, where Tarcal does not go, right, to the paper, you typically have a much more realistic
drawing in the wake of, you know, being accurate
to the reference image. Okay, so now what we're gonna
do is we're gonna unload. We're just gonna
hit it real light. Gonna blend this real lightly.
I'm not pushing hard. This is more or less
for gradation because I really like exactly where
my values already are. So I just want to just
want to blend them. Okay, so now switch it up. Oh I'm gonna go in here and
I'm going to start giving all of these all of these
scales, their form, right? And of course, the
easy way to do that is to focus on your
low values first. And then lo and behold,
it gives those scales their own unique
form. Just like that. Nine times out of ten, when it comes to
these scales, guys, if you start from the bottom and kind of
just work your way up, the bottom's usually always a really good starting
point for snake scales. And
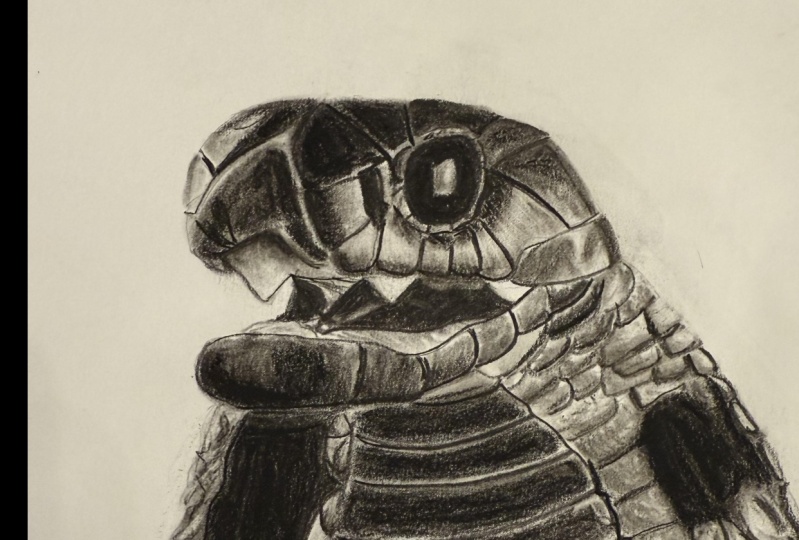
7. Drawing the Throat: Now, bear in mind,
we're layering here, right? We're layering. So basically what
we're doing is we are targeting the low values as
far as where they are at. And then when it comes
to smoothing it out and really bringing out
the texture of the scale, we'll do that with
brush work and even some medium
charcoal pencil work. But then notice how
all of the areas, you know, if you look
at the reference image, you can kind of see
what I'm doing here. All of the areas that are going to have a very, very low value, we're talking we're talking
pretty much as low as it gets completely,
completely black. We want to lay out
the charcoal base, just like we did for
the eye, the mouth, and the other side
of the cobra's hood. Now what we're doing
is I'm just dabbing. And this is just for
gradation effect. I'm dabbing all
these and notice how that greediness
dissipates goes away. And not only does it dissipate, but the value does get a
little lower in nature, and that is what that is what
we want in this drawing. Okay, so now I've swapped it
out for my number one, okay? This is my dy bitty smudger. This is the one that gives
me the most control. So now if you actually look at the reference image, you can
see what I'm doing here. I'm just This is how you put texture texture on these scales. This will make them look a
little bit more accurate. A little bit more accurate
to the reference image. I see how in order to keep that same look from the
reference image on that scale, I kept my low value away
from that defined line, so there was a little streak of high value. That's
how I did that. Do, to do do. Yeah, this is pretty much
essentially what I'm doing is I'm doing the same thing
to each and every scale, principally, the only thing that is obviously different is exactly where I'm putting
those those low values. And that's just because
each and every one of these scales is a
little bit different. So definitely want to stay
true to the reference image. Okay, so now what I'm gonna
do is I'm gonna load up here my diagonal cut elf brush. And this is where the
magic starts to happen. I'm just gonna go in here and I'm just gonna
start dabbing. This accomplishes a
couple of things. This gives me gradation
across those values. It softens up, basically
brings that smoothness, that smooth or aesthetic that the scales have in the reference photo
to the drawing. Then here I'm just going
to run into fine line with my medium charcoal that
pushes that membrane that's on the back of the cobras mouth, pushes
it in a little bit. And I just wanted to
show you guys this, too. So basically what this is, you can go in and you can use your medium charcoal because
there's more binder and it actually rests very nicely on top of the soft
charcoal for detail work. What I'm doing here is
I'm actually playing with the line weight and the line quality of
each one of these lines. So when it comes to a line, it can be thicker or thinner anywhere throughout
the length of it. And basically what I was doing is I was
going in there with my medium charcoal and
I was putting thicker, you know, higher line quality. And higher line weights in
certain spots of the line to make the line convey
a different look, right? If you look at the
reference image, the lines that comprise this cobra scales are
they're not all the same. In fact, most of them are different weights,
different qualities. So that is a way that
we can speak to that. And then here's
another trick that I wanted to show you
when it comes to this. Notice how certain parts of this layer of soft charcoal that I'm putting down with my charcoal pencil. Notice how certain parts
already have a lower value. That's because I've
spent more time and I've pushed a
slightly harder. And now, when I
go to hit it with my elf brush, watch
what happens. You see that? You see how it's starting to look more
and more like that area in the reference image?
That's how you do that. Okay. So basically, the more paper you can
see through a rough, chunky layer of
charcoal like that, the higher the value will be, albeit it's not going to be a lot higher,
but as you can see, you can clearly see
how it looks like, Oh, wow, there's some
scales right there. Now what I'm doing is I
love making mistakes, so I am actually going
to reslidify with my graphite that first
big throat scale. And I'm using a brush
here just to show you that it can
be done this way. And also that, it allows me to move fairly quickly as well. And just like we did
with the first scale, remember how back
when we were doing remember how back during
the outline phase, I was talking about how these
were just placeholders. Well, this is why
I wanted to really bring out these
scales that run down the sides of the Cobra's throat first so that I could match
up to the reference photo, more accurately exactly where
are those throat scales at? You know, where do they begin on the right side and where do
they end on the left side? So Now here, light
pressure control. I'm starting from the bottom,
kind of working my way up, but it really doesn't
matter because we are going to be blending these quite a bit,
with charcoal. So Then here. It
looks like that. Other one starts
right about there. Okay. I'll go ahead and erase this with my
model jerra eraser. Remember, I don't
call these mistakes. I call these making adjustments. The more adjustments you make, the more accurate
your drawing will be. Every artist makes adjustments. It's just part of the
creative process. When I was a kid, I
didn't understand that, but, you know, you keep drawing, you talk to people,
you read books. You study the masters. You know, like I read up on I finished my book on
Leonardo DaVinci. Now I'm now I'm on to a new one. It's called Michael Angelo and the Sistine Chapel
by Graham Dixon, and it's a really really
cool book so far. As far as the Leonardo's, the Michel Angelos,
the Donatelllos, and the Rafaels of the world. One thing they all
seem to agree on is that the creative process is very much all about
making mistakes. You know, I think it was, um, you know, starry
night from Van Gogh. I mean, from what I've read, he actually Van Gogh
actually considered that work of art to be one of
his biggest failures. He didn't like it
at all. And now, of course, it's
it's very famous. Everyone knows everyone knows
the painting Starry Night. Okay. Sorry about the tangent. Yes. So basically what we've done, if you'd notice
with that throw is, we just did the same thing
over and over and over again with our brush
work and making adjustments with the graphite. But now what we're
doing is we're going in with the smudger. And this is part of a you know, and this is just basically
the middle step here. We've laid down the base layer
with a number six brush, and now I'm going in with
a number two smudger I'm lowering that value and more or less solidifying exactly where
that scales going to be. And now to complete
the aesthetic, I'm going to hit it and
dab it with my ELF brush. I'm going to hit it and make
it real nice and smooth. Lower that value
at the same time. And then I'm going to take my monozera eraser
and I'm just going to go ahead here and I'm going to establish
a nice high value. Which is the specific
break that we see between all these
scales on the throat. I'm gonna take a
medium charg on. I'm just gonna put a define
line right there, bone. Yo. That is it. That is it. And now I'm gonna do
the exact same thing to the next throat scale. Nice tight little
circles. Again, I'm not pressing very hard at all,
but notice what I'm doing. As I'm blending this charcoal
and lowering this value, I'm also keeping a nice break between the defined line
that I just put down with my medium charcoal and this soft charcoal that I'm
blending with my smudger. Because that's what we see
in the reference image. If you look at the scales on the Cobra's throat and
the reference image, it very much looks
looks that way. And again, exact same thing. Exact same thing that I
did to that first scale. I am now doing to
the second scale. And this is basically, this is going to be
rinse and repeat, right? Just do this again and again
and again, all the way down. You know, as far down
as you want to go, I only went down, you know what, six or seven scales just because I had a lot to
show you in this tutorial. But when it comes to you drawing your cobra, draw as
many as you want. Make it yours. I'm
a big fan of that. I I, uh, I don't agree with
the idea of perfection, especially in drawing,
simply because, you know, you should always
I would hope that I never ever draw
a perfect drawing, because if I was able
to accomplish that, I'd that's the pinnacle, man. That's perfection. Like,
what else is there? Like, you've made
it. You've arrived. Like, move on. Like,
What else is new? And I don't like that. I love drawing too
much to worry about. To worry about
becoming that. So. But hey, I mean, if that's if hyperrealism is what you aspire to, and that's
what you want to be, then hey, I, you
know, all the best. All the best. It's
just not for me. I'm a simple person that way. I just like to draw so
pictures of animals.
8. Finish Drawing the Throat & Hood: Alright. So now, of course, we are blending.
We are blending. Now, I mean, I was dabbing here, and you can swipe if you
want, but just be careful. If you use too much
pressure control when you swipe these scales, you will get swipe marks. And that might not be nearly as accurate or exactly what
you were kind of going for, so just be aware of that. Now I'm going to
use I'm gonna run this define line
all the way over? Oh, there we go. Okay. So now I'm gonna take
my I'm gonna take my smudger. And I'm just gonna continue to do what I was doing before. Well, yeah, it's
kind of interesting. I've been reading this, I've
been reading that book, Michael Angelo and
the Sistine Chapel, and it's kind of crazy. I never realized that
when Michael Angelo was commissioned for
the Sistine Chapel by Pope Julius second, that Michael Angelo
did not agree with it. In fact, Michael Angelo
thought that the reason why they had commissioned him to do such what
seemed at the time, such an impossible task, such an impossible commission, was that they were
trying to ruin him because Michael Angelo, according to Dickson,
thought that, uh he considered
himself a sculptor, first and foremost, which,
of course, makes sense, anyone who knows of
Michael Angelo who obviously knows of
his David, right? Which actually replaced
one of Donatelo's statues, you know, where they
put in the courtyard. But I just I just
thought that was funny. You know, I think that
the Sistine chapel was an absolutely
beautiful work of art. And it's just funny when
you do research and you learn about these
artists and what they, you know, what they thought of pieces of art that
they had made. But very interesting. He also, because of how long it took him to paint
it and everything, he actually suffered from some irreversible,
like, you know, I think it was neck and
back injuries during the time that he spent painting, but the one thing that I
have learned from, you know, the Leonardo's and
Michel Angelos is that even when things
got rough for them, they always continued
to make art. And I think that's
one of the big things, especially in, like, today's society is it's really
easy to give up, isn't it? It's really easy
just to be like, Ah, yeah, I can draw, but, you know, it's not
gonna pay the bills. I don't think it's
really about that. I think it's just, you know, Michael Angelo never stopped making art. Neither
did Leonardo. And I think it's because they took their they took
their art seriously. You know, for them,
it was, you know, it was how they made
their living and they were completely
committed to it. And, you know, maybe
if you find yourself struggling or maybe if you're
thinking about, you know, giving up and not making art, just because you don't see the value in it, maybe
you think twice about it. You know, just draw. Kind of like how I always say, you know, draw because you like to draw
because it makes you happy. Okay. So now check this
out. Or there's this break in the high value, I'm I'm pulling down
with a smudger. And then I'm not going to run these defined lines
all the way over just because I wanted
the drawing to have kind of my own take on it
as far as the throat goes. But then here, just
pull down. See that? Just pull straight
down. And then what that does is that gives
you a really cool texture. Very similar to what we see
here in the reference photo. Okay, here, actually
I'm gonna take my medium truck and
I'm actually going to pull this defined line
over a little bit more, and I'm going to end
it right about there, and then I'm going
to grab this one. I'm gonna do the same
thing. Boom. There we go. And that's just because this
is more of a almost like a floating floating
head type piece. I guess I want that throat to fade, fade off into nothing. Okay, so here what
I'm doing is I'm just taking my brush and I'm just, uh, blending this charcoal. I notice how the texture
textural element of that scale changes. I'm gonna do the exact
same thing to this one. Just hit it real quick,
kind of keep that high value break right next to that defined
line as best I can. Just kind of pull
this. Now, here's kind of cool trick
if you pull over and down or pull down and
over, pull down and over. Look at that. That's nice. That gives us a really
cool, really cool look. Alright. So now, I got a lot
of runaway charcoal here, so I'm just gonna
blast this real quick. Oh, boom, boom, boom, boom. Get this all cleaned up. Alright. Okay. Yeah,
it's looking good. Starting to look like a snake. Alright, so now what
am I going to do? So I'm gonna take my monozera racing I'm just gonna
beef up some of these high value lines that we have here on the
throat of this cobra. Yeah, little details, it little knickknacks,
little lines. And that's the thing
about the detail work, especially with high value retrieval detail work
is that, I mean, you can spend hours literally just hitting every little every
little spot that you need. Okay, I notice how here what
I'm doing is I'm basically building up right around where these scales plug into
those other scales, on the beginning of
the cobras hood here, and I'm just more
or less hit it. I'm using a very, very
light pressure control. I more or less want the tarcal to rest on top of
the paper, right? And now, because it's
resting on top of the paper and it has that
gritty texture to it, I'm just going to go ahead
and hit this real quick. Boom. I'm blending
this all together. Just like that, that grittiness
has been taken away. That's one, with this, it's all about the direction
that you're pulling. You know, make
sure that you when you're hitting the paper
with your smudger, that you hit in the
same almost in that, rounded that rounded way to
bring out that rounded scale. The Is blasted those
with a monozura eraser, little high value action. Okay, so now what I'm gonna do is I'm
gonna take the smudger. I'm just gonna continue
to blend all of these lower values cause I want to bring out this last
big scale on this neck. One, two, three, four, five, six, Okay, the right about here, you look at the reference image. We have some more
scales on towards the outside where the hood kind of rolls back towards the head. And so what I want
to do is I want to basically draw out the shape. Remember how in the
beginning of this video, I was talking about how
I didn't want to draw out that lower right portion of the drawing
because I was afraid that I would smudge
it with my hand. Well, I would have. And so
that's why I've waited until this point to establish the
framework of the hood here. Have it. I'm just going to load up my
number six brush here. Make sure it's fully
loaded with charcoal. And I'm just going to
start blending the paper. I'm actually going to run
this brush right up alongside where the edge of these higher
values are going to be. It's looking good. I mean, if you
want more control, you can do this with your
number six elf brush, but I'm just gonna blast
it with a number six. And now, here what I'm
going to do is I'm going to take my number two smudger. And I'm just gonna
start establishing the top of the cobra here. Again, the big thing that
I'm focusing on just I'm focusing on those low values
because those low values, those are really what bring out the overall form
of these scales. If this looks a little
rough, don't worry. This is all base
charcoal, right? It's all base charcoal. Now here, what I'm going
to do is I'm going to take a soft charcoal pencil
and just very lightly. I'm just going to hit
any of these other parts that need to be basically, or lower values need to be brought out. That's
what I'm doing. Nice tight circles just
like I did for the eye, the mouth, and the
other side, right? Nice tight circles
because these are the areas that are going
to be the lowest value. And I want this
variation, right? I want these different values, complete black and then, you know, complete white
and everything in between. That's what I always
that's what I always say. Now here, check this out. See how the tip of
this soft charcoal has been grinded basically
flat on one side. Well, you can use that
edge, right? Look this. See that? You can use that edge to put
down a really nice, define line, which
is perfect for the boundary of these scales. And then just like that,
you can go in here and get in between these
scales and lower that value. Okay. Now, of course. A good old elf brush. Again, we're just tapping here. Just dabbing. That's
all we're doing. And notice how when
we slow it down here, we're just we're
dabbing it, right? Now, you can swipe it as well, but I'm telling you that
dabbing it and pushing it from top to bottom down into the paper is going to give
you not only a smoother look, but it's going to give you a smoother look in
half the amount of time as it would if you
were swiping the paper, not to mention when you swipe, there's so much charcoal in this soft charcoal
that's resting on top of the paper that you risk blowing charcoal on two areas
that you might not want to. So just keep that in
mind. Now notice this. Notice how I'm taking
my brush and I'm pulling straight down,
only on one side. And what that's doing is that's creating that bowl look, right?
9. Final Detail Work: So now what we're gonna
do. I'm going to take my number one smudger, and I'm just going to
go right up next to these defined lines that we laid down with
the soft charcoal. And the cool thing
about the number one smuter here is you can get into these really tight areas
and you can continue to build out these scales the
way that I'm doing here. Basically, what I'm doing is I'm going to take it like this. I'm just going to pull it,
so I'm pulling it down. And then just very
lightly, like that. See that way, you have your
darker value right here. So it gives gives
the scale some form. And then you have pinpoint
control of where you want that middle of the road, that middle weight value to be. But yeah, just like that. Okay, so now it's time to go in and do some
high value retrieval. So I'm just gonna take
my models or eraser, and I'm just going to refer
to my reference image and bring out these
these high values. It's funny when
you do these short little pools for
your high values, it's almost like line work, essentially, albeit on the
other side of the value scale. But this is kind of
like where the magic happens with this technique. You know, you go in and
you can really bring out scales that are kind
of all in you know, surrounded by low values. And that's the things
when you get into places like under the
hood of this cobra, there's not a lot of
value relationship. Not like you see in the scales, so just be aware of that. Alright, cool. Now, here we go. And what we're gonna do is I'm going to take my needed
eraser and I need this. So I'm going to
use it. And yeah, so here we are. Just like this. So I'm barely
touching the paper, and I'm pulling from right
to left, from right to left. And if you look at
the reference image, you can kind of see what
I'm kind of going for here. The there is definite
value fluctuation in these scales that are on
the throat of this cobra. So this is how we convey that. Okay, so now what
I'm going to do because I need to, you know, pick up some steam here, and Hall is I'm going
to take my huh eraser. Now, the cool thing
about this eraser is that it comes
with these tips, and what I did with
mine is I actually sharpened the tip
on my Huh eraser, which, of course, you know, those of you that have
seen the crocodile, the step by step crocodile
tutorial that we did. Um, you already know that that's when I first tried
that technique. And, man, I tell you what, I mean, just watch it
go. It's pretty cool. It definitely definitely
allows you to move quickly. Albeit, I wouldn't recommend this eraser, unless, you know, you're fairly confident
in, you know, let's say, maybe a
model zero eraser or more of a traditional eraser. But hey, the only way you're gonna get confident
is by doing it. So I would say, you know, if you don't already
have one, just get one. And you can start you can start hauling like
this on your drawings. You'll make retrieving
your high values your, you know, favorite part
of the drawing process. Okay. So now what I'm
going to do here is, I'm just going to
kind of beef this up. I mean, this is more or less, more or less detail and
remember what I always say about the three
layered method. It's one of my it is
my favorite method simply because of the
fact that you can spend, um, as little or as much time on your drawings as you want, but always remember this. The more time you spend, the more looks you give it, um it's funny how you
learn from other artists. Basically, one of the reasons why I draw all my
tutorials twice, I discovered that work
ethic from Bob Ross. You know, the painter,
Bob Ross used to do that. Used to paint every
single one of his paintings twice,
once for practice. And then when he got in
front of the camera, he knew exactly exactly what he needed to do and how he was going to approach his piece. And so I figured, well, that's
a really good work ethic. I want to replicate
that. And so, you know, that's what I did. My kind of nonchalantness to each individual
drawing that I do, I learned that from Da Vinci. Leonardo said, you know, if you get overwhelmed
by a piece, take a break and come back
and have a fresh look, and you'll notice things about the piece that
you never noticed before was too close in front
of your eye for you to see. Leonardo was also one could say famous for a
lot of the wrong reasons. He was a very
lackadaisical artist. Many commission pieces,
say, for example, the bronze horse that he built that was
destroyed in Milan. That took him a long, long time. Um, to get to the
point that it got to, and it actually was
never finished. But the point that
I'm trying to make is just, you know, if
you get frustrated, come back and have a
second look, you know, these drawing tutorials, they take me, sometimes days to do. So I do take multiple breaks and I do multiple
drawing sessions. So those of you that
have been following me for a while may have heard me talk
about the 30 15 rule. Basically what the 30 15 rule
is, I draw for 30 minutes, and then I take a
15 minute break, and then I draw for 30 more. And my 15 break is mostly, mostly just me reading about the masters of the Renaissance. I hope this drawing helped and good luck in your
future drawings.
 Messer Creations, Artist | Author | YouTuber