Transcripts
1. Introduction: Hey, guys. Welcome
back to another class. My name is Braden Messer. I am an artist, an author
at YouTube, and today. I want to be the one that
teaches you how to draw. This is part two of a three
part series that I'm making, where I'm taking you through, and I'm showing you
how you can draw three different reference photos from three different angles. We are going to be
using the Loomis method and the sorrow method
throughout the series so that you can begin
to understand just how easy drawing human
portraits can be. Now, I will say that
if you find yourself enjoying this class and how it's constructed,
how it flows, then I know for a
fact that you would love my new book
drawing the portrait, step by step lessons for mastering classic
techniques for beginners. This book does a great job of
breaking down step by step exactly how to use the Luis
method and the Aro method, and it explains the principle of which these two
methods are rooted in. So that sounds like something that you
would be interested in. I will drop a link in the description of class so that you can order one for yourself. Now, what to expect. In this class, it
is comprised of 11 different lessons
where we start off by breaking down the ums method into its step by step flow. Once we have bums
head constructed, I'm then going to
show you how you can easily use contour lines to place the ear and the hair on your Lums
head From there, we are going to switch from the lumis method to
the Asso method. And I'm going to show
you how you can begin to break down the
facial features of the individual using
the Oso planes with the Oso head
model as your guide. We're going to go through
and draw the eyes. The nose, the lips. And then we're going to
break down the face into its individual sorrow
planes so that the portrait has its structure. Once we have that, we're then going to
switch gears again, and I'm going to
start showing you how to hatch and double hatch, eventually cross hatch,
and build your values so that we can introduce volume
and form to the portrait. Once we have that, we're
then going to go in, and I'm going to show you
subtle techniques that you can use to make the eyes pop, to give the nose a little
bit more dimension. To really make that hair
on top of the head pop. And by the end,
we're going to have an amazingly drawn portrait. So that's what to expect with
the actual class itself. Now, I know this is a lot, and especially if you've never
drawn a portrait before, it can be very
daunting, absolutely. So What I would advise is the best practice is go
through and just sit back, relax, and just watch
the class, right? Really try to just
soak everything in and treat it almost
as if it's a movie. Once you've done that, and
it's fresh in your mind, then I would say, draw along with me and
actually do your project. Once you have your project, make sure you upload it and and leave your
review of the class. Yes, I love reading your
reviews not to mention, it helps others that are maybe searching for
a class that would benefit them to make the decision on whether or
not they should take it. And it also allows me to showcase your project in
my monthly newsletter. It comes out the first half
of every single month. So this is a great way for you to not only get
your name out there, but your art as well amongst other artists here on the
Skillshare community. Then to wrap everything up, I wanted to let you
know that I now offer one on one sessions. So how those work is if you go to my home page
at the very top, it says, Book a one on one
session with Messer Creations. From there, you can book a 1 hour conference call with me where we can
meet each other. You can e mail me as many
drawings and questions as we can fit in that little
60 minute time frame, and I will give you my critique. I will tell you what I would do, what you've done great. We can talk about
different mediums, whatever it is
that you're using. The whole point of this one on one session is think of it
almost as an investment that you make in yourself
because it allows me to help you develop
as an artist, as far as the
different techniques, maybe thought process, right? There's lots of things that go in to being a
really good artist, and the whole point of
this one on one is for me to help you grow
and develop yourself. So, yeah, that is it. That is all. And
hope seeing class.
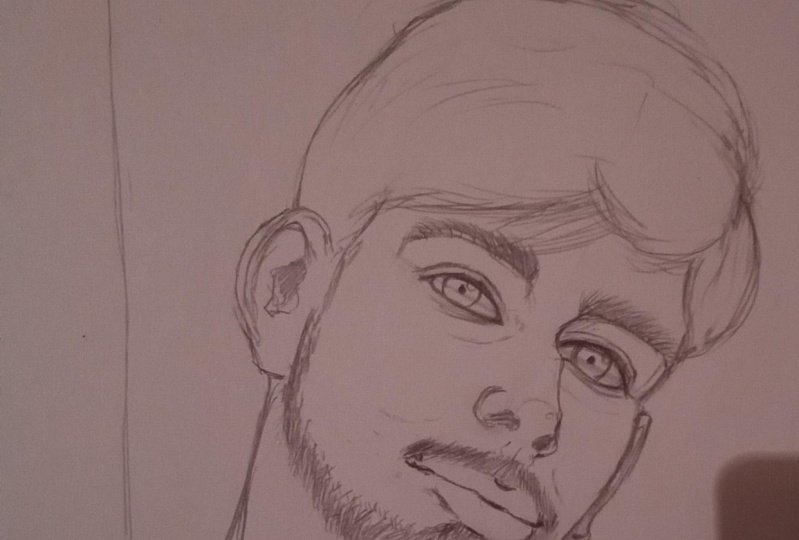
2. Draw your Loomis Head: All right. Step number one is we need to establish our ums heads. We want to draw a circle. Now, if you struggle
with drawing a circle, you can use a compass tool, and that will give you
a perfect circle every time with very minimal effort. Then the second step is that we want to draw our side oval. Now, what this is doing is effectively elongating
the cranium for us, and it's giving
us a good idea of the dimension that
we're working with as far as the basic
shape of the head. Now we're going to draw a vertical axis line and
then a horizontal axis line. This is to help us understand
the orientation of our subjects head for
this specific angle. Then we're going to draw this line here from the
top of the oval over, and this is a rough guestimate of where the hair line
of our subject is. Now obviously, when we're
referring to reference one, the hair line is hanging down
a little bit with bangs, but this is a general line. Then we're going to extend
this horizontal axis line over and this is roughly where the
subject's brow line lives. You can see in reference to with Luis head where that
line is living. On the subject's face, and then we're going to extend the bottom of the side val over, and this is going to give
us the bottom of the nose. Then once we have all three
of these lines established, we're going to place
this line here. This is the center line
of our subject's face. It falls directly in
the center of the eyes, the nose, elips, all the way to the bottom
of the subject sin. Then we're going to
pull this line up and over and bring that
up to the brow line. Then we're going to extend the vertical axis line down
and then we're going to pull that line over and connect it to the bottom of the
center line of the face. This right here is about
85% of our overall head. This gives us the
proportional foundation of our subjects head. Now a lot of artists
want to just jump ahead and they want to start
drawing the eyes, the nose, and I would encourage you
to refrain from that. Really really focus on the basic structure of your
ums head because this, just like when you
watch a structure being built is the foundation. Foundations are
always laid first, and then everything
comes after that. Your Lums head is
that foundation. We want to make sure that it
is as solid as we can get. We're going to erase this
part of the initial circle. Then right about here. You
can refer to reference two. But this right
here is the top of our upper lip Then this right here is the
bottom of our lower lip. These are what they
call anchor points. Then here, we're going
to extend this line from the center of
those axis lines down, and this is going to
be our cheek plane. Then once we have that,
I'm just going to quickly place these
lines here for the neck. These are an extension
off of the Loomis head. But now I'm looking
at reference one, and I want to establish
the color of the subject, the top of their shirt. I don't like to get too far
in the weeds when it comes to the detail of clothing because obviously this
is a portrait class. I always put more
effort and energy into the actual detail work
of the subject's face. But We still want
to do this here. We still want to
draw these lines out and the reason
why is because these will help us with
the overall proportion. We can use the tops
of the shoulders to help gauge how far out
we need to pull the ear, maybe the beard, and whatnot. So keep that in mind. Yeah. Just do a nice
short little polls. If you feel more comfortable, If you have the
confidence where you want to really throw down some longer poles for the collar right here
of the subject shirt, you can definitely do that. I'd just like to do a
little bit smaller, shorter poles, and
the reason why is because when you do a
shorter pole on a line, if you're trying to draw out
the contour lines of say, like the collar of the shirt, by doing shorter poles, that enables you
as the artist to see discrepancies in
your proportion sooner. Where if you do a really
really long pole, you're committed to that. Now, not saying that
you can't erase it, but it makes it harder to see those proportional
discrepancies sooner. So just be aware of that. Yeah, that's looking
pretty good. Here, I have this
little like seam that I want to place here. I just pull this line
down just like this. I'm using the three point grip for my collar and the shoulders. If you feel comfortable with the three point
grip by all means, if you want to use the
overhand grip, you can. If you don't know
what those are, I have pages dedicated to that terminology and examples in my book drawing
the portraits, so just be aware. Okay. So I'm pretty
happy with that. Now, what I'm going to do is
I'm going to take my eraser, and I'm just going to hit this looms head and make it
more or less transparent. Onward to the next lesson.
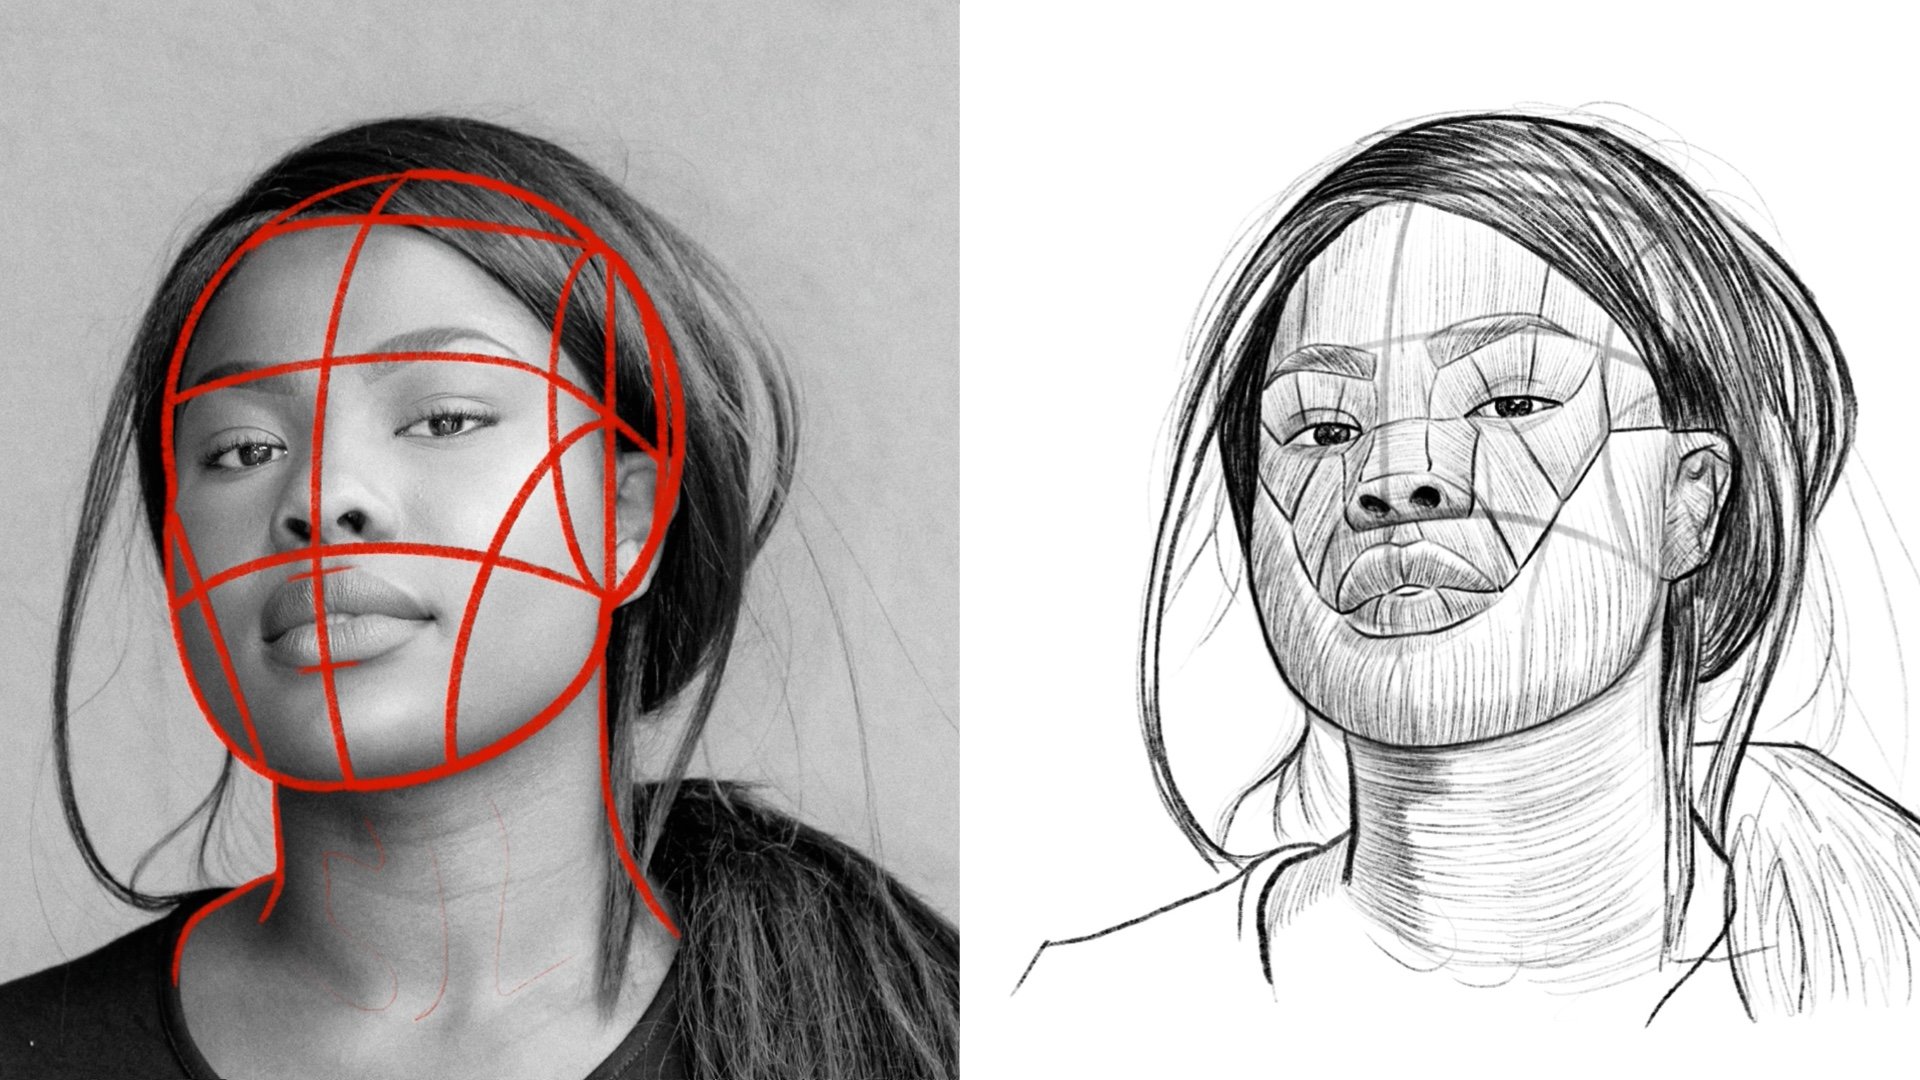
3. Placing your Ear & Hair Outlines: Okay. Now we're going to establish the contour
lines of the subjects ear and the contour lines of the subjects hair.
Right about here. If you refer to reference
to the one with the lums head over
laid on reference one, you can clearly see what we're
trying to accomplish here. The ear is always
going to reside in that bottom rear quadrant of the side oval of
our L lums head. Basically this is how I like to do it. I like to start out. With the outer contour
lines of the ear. I'm just going nice and slow. I'm doing nice short poles here. Now, if you want to use the overhand grip for
this by all means, I'm using the overhand grip, but I know that there
are certain artists that just for whatever reason, whether it's confidence
or skill or both, they like to use the
three point grip, whichever you prefer. But then I'd like to
draw this vertical line right about there. And that's pretty good. I always like to
establish the ear on the Lums head first
because then I can use that ear to help gauge the contour lines of
the hair to come. So But once you are satisfied with the outer
contour line of your ear, then you can go in
and you can start to give that ear a
little bit of character, not too much because
obviously we're still very much focused
on our proportions, and I want to make sure that we don't get carried
away with detail work. Proportions first, then
detail comes later. But just like this, you notice how there's
that fold in the ear. We can use this as
the opportunity to bring that character
out, if you will. If you want to switch,
I find that a lot of times when you're drawing that outer contour line
with the overhand grip, you can jump back and forth. You can draw the outer contour of the with the overhand grip, and then you can switch
to the three point grip, and then you can go in
and you can start to add these lines in
here so that you can really understand the form of the as far as
the inside of it. Okay. Now we're going
to start with the hair. I'm just going to pull
up just like this. I like to go up a little this way and then I'll jump to
the back a little that way. But I'm just doing
these poles here. I'm not worried
about the detail. I'm just trying to get a rough guesstimate of the
outer contour of the hair. Where does it end?
We does it begin? Not worried about the
details or the texture. Something like that.
Then this right here is where I'm going to start to use the Lums
head that's underneath, that's transparent, and I'm
going to use that as a gauge, and I'm going to
pull this line up. I'm just going to do a rough line scratch,
something like this, just because I'm going
to have to go in and add a lot more line work to bring out the folds in the different segments of
hair later on in the class. Yeah, something like that.
Then you can just do rough detail work here to get a general sense
of the flow of the hair. Yeah, that's looking
pretty good. Okay. All right. Now, let's move on
to the next lesson.
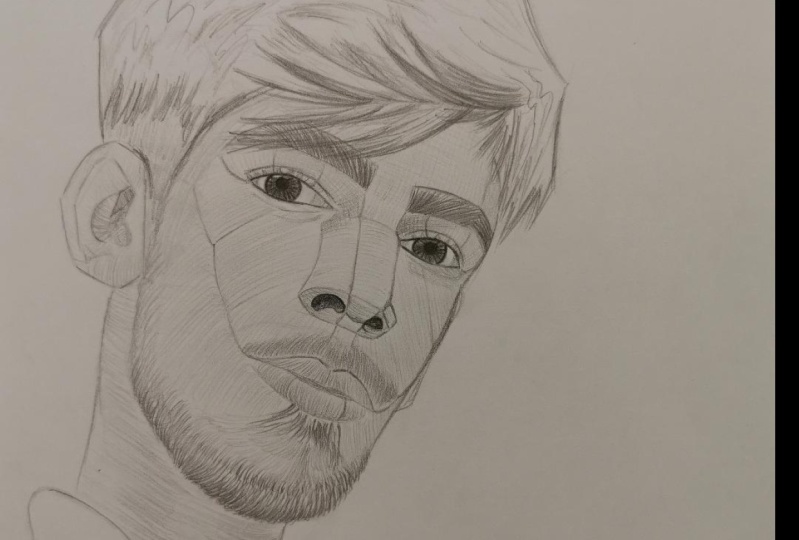
4. Draw your Eyes using the Asaro Method: In this one, what we're going to do is we are going to
draw out the eyes. Now you may notice that
reference to has been switched from the L lumis
method to the Asaro methods. We are going to use
the Asaro head model as depicted in reference three. We're going to use that as our reference in tandem
with reference one so that we can iron out the planes of the features
here in this case, the eyes. So we start like this
with a horizontal line, and then we pull up from the edges on each
side, a vertical line, and that plugs in to the corner of the
subject's eyebrows. Now, like we did with
the ear and the hair, we are only focusing on the contour lines of
the eyebrows here. So the outer edge.
That's what we want. Going to pull this
line, this way roughly. And then there's an angle here as this teeters
off, like that. Now we're going to start
on the other eyebrow. Same thing. We're just going
to pull up right here where the eyebrow ends, and then I'm going
to start pulling this slide from right to left over so that I can start to bring out the contour lines
of the other eyebrow. If you want you can
pull the bottom line over and then you can go to
the top and pull that over. That way you can identify
the spacing of the eyebrow versus doing all one side and then switching
and then realizing, I'll wait, my proportions
are slightly off and then having to make an
adjustment, the arrays. But notice how
we're establishing the eyebrows and then we're
going to draw the eyes. I have found over the years of drawing people that this is the best approach
as far as helping you to nail your proportion
of the eyes from the get go. So now we're going to identify
the corner of the eye. It's right about there. And then here on the far side, I'm going to kind of pull
this down because this is roughly kind of the top of
that far side of the nose. And then I'm going to draw
this line right here. I'm going to connect
that corner of the eye to the bottom of the
nose bridge plane. That's the plane between
the two eyebrows. Then I'm going to pull
these lines down here. Effectively, there are
three frame lines, is what they're called. There's this one, then there's the second one which aligns
with the temple plane. Then there's this last one here that goes off to the side. Now, technically there's four framed lines if
you count the one plugging into the bottom
of the nose bridge plane, but then what we're going to
do is we're going to connect all of these lines together
just one, two, three. What this does is this gives us the framework for the
top of the subjects. Now once we have that, it's much easier to gauge the eye
opening of the subject. This person has their eye open, and they have
almond shaped eyes. We want to make sure
that we adhere to that. But now once we pull
these lines over, then we have a
really, really good framework for the
eye as a whole. And we've effectively drawn out that basic
shape that we need. Now when we look
at reference one, we can see not all
eyes have this, but in this particular
instance, they do. There's a fold, or the eyelid tucks itself back into the eye socket
of the subject. We want to bring that out. So we're just going to
pull this line over. The cool thing is we can use that initial line that we drew when we
connected the bottom of our frame lines as
a gauge for exactly where that eyelid fold
line needs to be. Then there's some
folds underneath. I don't want to get
too carried away here, I'm still very much focused on my proportions, but why not? Let's go ahead and
put some of these in. Now what I'm going to do
is I'm going to establish the ris of the subject,
and then the pupil. Yeah, something just like that. Then I want to give
the eye just a bit of character while I'm here
a bit shady, nothing crazy. Now we're going to do the exact same thing on the far side. So we have that
first frame line. Now we have the
second frame lines pulled down from
the temple plane, and then we have
that far frame line. It's smaller and we're
going to pull it up because of the nature of the angle
that we're dealing with here. Now that we have all
those lines drawn out, just like we did before, we're going to go ahead,
we're going to connect them. Yeah, something just like that. It's effectively ins and repeat. It's the exact same thing that
we did for the other eye. Only the angle is
slightly different. We we place these lines is going to be slightly different compared to the other
side of the face. But principally,
it's all the same. We got that bottom line. Here's the. There's the pupil, and then just a bit
of detail work, I guess. All right. Let's move on to
the next lesson.
5. Draw your Nose using the Asaro Method: Now that we have the eyes drawn, we want to draw
our subjects nose. L how we built the eyes
from the top down, we're actually going to draw
the nose from the bottom up, and I'm going to show you
how to do that in this one. Right where we had
that nose line. Remember that helped us identify where the bottom
of the nose lives. We're going to draw
this horizontal line, and that is the bottom
plane of our subjects nose. Then once we have that
width established, I'm going to pull these lines up because when you
look at reference one, right in the center of
the subjects far eye, that's where we could
fool up for that nose. And then pretty much the corner of the subjects closest eye, that's where we can pull up
for that side of the nose. Okay. And then once
we have that drawn, what we want to do is we want to draw the bottom
plane of the nose. I want you guys to
think of drawing people's faces in their
respective planes like this using the Asarro head. This will help you so much when it comes to
basic structure, and then when you're farther along and you're drawing,
shading as well. Okay. But just like this. So now, you can see we have that
bottom playing drawn. Okay? Now, what we're going to do is we need to
draw the nostries. So there's the top
of this nostril. And then the bottom, right? And then we've got the
top of this nostril, and then the bottom.
All right, cool. So now, what we want to draw,
we have that bottom plane. We want to place
the ridge plane. So that far side of
the ridge plane, we're just going to pull
this up right here, and we're going to
connect that with the previous line
that we had when we were drawing the yes
in the last lesson. And I like that. Now
we're going to draw the other side of the
nose ridge plane. This is going to go straight up, and it's going to plug in
to the nose bridge plane. The bridge plane is the one
that lives between the eyes. The ridge plane
follows the top of the nose all the way down
to its bottom plane. Something just like this. It's important that
you understand the definitions of what it is
that you're actually doing. It just helps with
overall comprehension. Yeah, we have something
just like that. We have the ridge plane,
we have the bottom plane, and now right here, this is what is called the slope plane. Now, the nose is structured
like a mountain. When you think of it. You have the slopes
of the mountain. They go all the way
up to the ridge, which is the top
of the mountain. It is very much the same
thing when it comes to the As method for
drawing anyone's nose, not just this subjects. But see now, I like those
proportions. Those are decent. Now that we have those drawn, if you actually look at the
ASO head model reference, you can see how you can add
more planes if you want. What I'm doing is I'm adding the tip plane of the
nose right here, just because I want a
little bit more structure. You don't have to do that
if you don't want to. That's one of the
beautiful things about the ASO method is
that you can pick and choose which planes you want depending on
your own preference. So Alright. Let's move on to
the next lesson.
6. Draw your Lips & Beard: In this one, we're going to
draw the contro lines of the lips and then the contour lines of
our subjects beard. Right here from the
bottom of the nose. We're going to pull
this line down to roughly where that top
anchor point resides. Then we're going to draw a second line down
just like this. What this brings out is
the subjects filtrum. Effectively it's
the filtrum plane. But the filtrum, you
have both lines drawn, you want to bring the bottom
lines in just like this. What this forms is the top of the Cupid's bow of
the subjects upper lip. This is a great way to
get the foundations, to get the center of
the lips established, and then you can branch
off from the center. But always draw
your filtrum first. Then we're going
to draw this line down as a guesstimation, right? F right about here, we're going to put a mark here. That's roughly
where the corner of the subject's mouth lives
on this side of the face. Then we're going to do
the exact same thing on this far side right here. We're going to pull this line
down. Right about there. Okay. That is where
the corner of the subject's lips
live on the far side. And now we can start
to this line up a bit and connect it
to the Cupid's bow. And then we're just
going to pull that line down and it's a little bit shorter of a pole
on the far side because of the
nature of the angle. Something just like that for
the top of the upper lip. Now, we want to figure out where the bottom
of this upper lip lives. His upper lip is fairly skinny. We don't want to have this
line be too far down, but we just identify
the center and then I'm going to pull this line over to the right and
now I'm going to pull it over to the left roughly. A. Just make sure that you guys are using a very
light pressure control. That way if you
need to erase and make an adjustment,
you absolutely can. Then right here, this
is about where the of the subject's lower
lip is and then it curbs up a bit on the far side, and then we're going to pull it this way to the bottom now. It's crucial here that you
don't connect this line. As you're pulling it,
don't connect it all the way to the mark that
we made on the face, lift up as you conclude
and let it fade. We want that line's quality
to be thick to start, but then we want it to the n out towards the
edge of the mouth. Now we're going to place our eso planes for the upper lip. The upper lip is split into two, so we have this
one vertical line, and then the bottom lip is split into three
different planes. This one and then this one. Upper lip is comprised
of two planes, bottom lip is comprised
of three planes. Now that we have the mouth
placed and I like that. Now, we're going to go and
we are going to roughly sketch in the contour lines
of the subject's beard. Now, obviously, it
is a shorter beard, trimmed up, but it's still very much there and it's something
that we're going to have to address in our drawing. So I want to make sure
that like with the hair, I know where it lives because where we
place that beard is going to matter proportionately speaking to the rest of the
face as far as the features. So I'm just going to pull this line down from
the side burns here. And I'm going to connect that. And then right about here on
the bottom of the ums head. This is where you can see that the Lums head is only
ever a mannequin. So if you need to extend
the chin out a little bit, like I'm doing here, you can. Don't think that you
can't. You are in complete control of what you want to do when it comes to your drawing as
far as what it'll work. All right. So and then kind of like how we did
with the hair. Once you're satisfied with that basic two
dimensional shape, then you can kind of
go in and you can give the hair a little bit of
character depending on, if there's a place where you
know you're going to have to put in more
hair or something, kind of like the sole
patch underneath the subject bottom lit there. So Alright, let's move
on to the next lesson.
7. Place your Asaro Facial Planes: Okay. Now in this lesson, what we're going to do
is I'm going to show you where to place the
Saro facial planes, just to give us more
structure for shading and bringing out the
overall proportions of the subject's face. Just like this,
we're going to pull this line up from the
corner of the mouth, and then we're going
to pull this line up right here and join it roughly to the corner of that bottom plane
of the subject's nose. And then we're going to
continue to pull this line up following the cheek bone. Then right about here,
we're going to branch this line off and
it's going to fall in line with that first
frame line of the i. Something just like
that. Now we're going to extend this
line back even further. And then we're going
to pull this line up roughly where the end of
that third frame line is. Then we're going to pull
this line straight back. Straight back right to the
top of the subject's ear. Effectively, what we have just done is we have framed the face. Then right here on this
last intersection, we're going to pull
this line all the way down all the way down to
the jaw bone. All right. Now, you don't have to draw the sorrow plane lines if
you don't want to. I would recommend
it specifically because it just helps you understand the
bone structure and the basic planes that
you're dealing with when it comes to
most any portraits. Alright. Now, on the far side, we're going to do the
exact same thing, right? Now, just be aware that that
angle is slightly different, so you're not going to get
every single Aso plane line, but we still have
to accommodate. And then right here, this is a good opportunity
for us to figure out where the edge of our
subjects face resides. So right about here, I'm going to pull this down. Yeah. Notice how the underlying Luis
head is past that. It's past that line
that we just drew. That is totally fine. Because what we're going to do is we're going to go
and we're going to erase that at a later
point in this class. Well, that's looking
pretty good. I'm really happy with that.
If there's any question, where you need to place
your ASRro planes, refer to the ASO head model, because you can clearly see where those planes
are on the model, and then you can use that as your basis for
drawing your subject. Now here on the far side,
I'm just going to draw the contra lines of the ear because if you actually
look at reference one, his ear on that far side
is just barely poking out. We want to make sure
that we speak to that. Yeah, let's move on
to the next lesson.
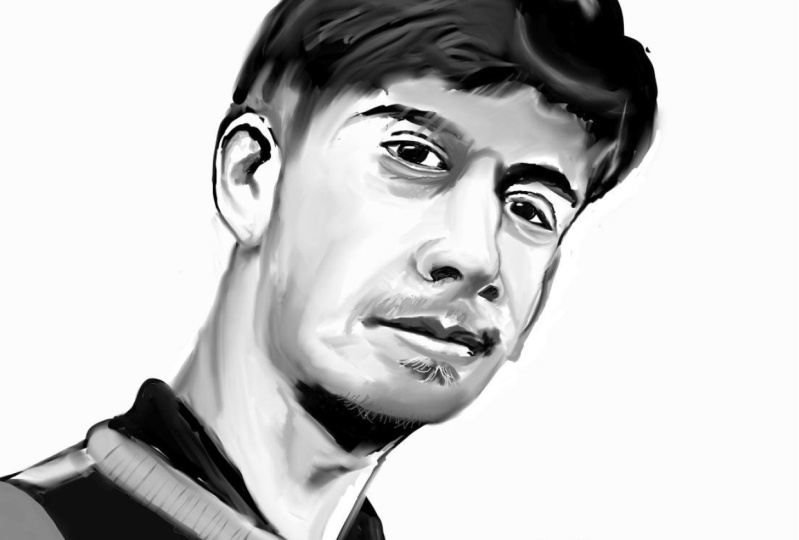
8. Begin first layer of Hatching: All right. On this lesson, what we're going to do is
I'm going to show you how to hatch the
planes of the face. We're also going
to hatch the neck and a little bit of the hair. Now this is going to help us
give form to the drawing. This is a type of volume that we're
doing. Just like this. Was doing nice vertical
hatching, just like this. I'm pulling down on the paper and then I'm going over and
I'm pulling down again. It is best practice when
you are hatching like this to use an extremely
light pressure control. That way, if you need to make an adjustment,
you absolutely can. Now, right here, remember
how I was saying before that the subjects bangs
are kind of hanging down, so this is an opportunity
where we can go in and we can actually start to
bring those bangs out. This is also going
to help us with the overall flow of
the subjects hair. Okay. So nice light poles. You can do longer poles
for this if you want, given the texture of the subject's hair that
we are working with. So Now, I kind of like that. We don't need to go
to him just yet. So I'm going to
continue to hatch the nose bridge plane right
here in between the eyebrows. And then I'm going to drop down beneath this closest eyebrow, and I'm just going to
do nice short poles. Notice how I am adhering to the underlying form of the subject because
I want to adhere to that form with my hatching
because that will help my drawing exude that
form on paper, right? Yeah, something just
like this. And this is also a really, really good practice for you because this will help
with your muscle memory. It'll also help you solidify in your mind how to think
like an artist, right? Like, it's one thing to draw, but do you actually think
the way that you should? And this is one of the
main reasons why I teach drawing portraiture
in this manner is because this covers all of the foundational principles that you need to be successful
in this space. Right here on the hair. I want to thicken up this line here. Okay,
cool, like that. Now, right here on
top of the cheek, I'm continuing to follow the underlying form
of my subject's face. Bar in mind, if you want to convey a higher value
through hatching, all you have to do is space
out your hatch marks. The more spacing between
each hatch mark, the higher the value will be. If you want a lower value, you can either hatch
over a hatch mark again that will lower the value, or you can bring your hatch
marks closer together, and that will also lower the value in a specific
part of the drawing. But now notice right here, I have changed up my
angle slightly, right? Now I'm on the top
the ridge plane, so that dictates a different
angle for my hatching. I hope that now you're
starting to see, cool, that's why those
ASRo planes exist. They are there to help you convey the proper
underlying form. That's why they were
made in the first place. This not only helps visual
artists of multiple mediums, but it also helps painters. In fact, the ASRO method, as designed by John Aso back
in the 70s was originally developed for painting
students in California. So But we can take this method because it's rooted
in principle and we can apply it to our drawings. A lot of the old masters
back in the Renaissance, what they would do is before
they ever started painting, they would take graphite or
they would take charcoal, most of the time
it was graphite, and they would actually draw their subjects first before
they started painting them. Then of course, they would
just paint right over the top, as layer after layer
after layer after layer, but to begin, that's what
most of them would do. Del arochio, who was the
master of Leonardo Da vinci, was very famous for that. In fact, Leonardo
picked up a lot of those best practices
from his old master. Yeah. We're just pretty much continuing to do the exact
same thing on the far side. Remember, we are
being conscious of the underlying flow of our subjects face while
we're doing all of this. And then right here.
Never mind the fact that the mustache is
going to be going and following the top
of that upper lip because we can just right over the top of it because
that's going to be a lower value anyway. So hatching over
an initial hatch isn't going to be a bad. Alright. That's
looking pretty good. So now what we want to do is we want to start
with the upper lip. So we're just
hatching this, right? One hatch after another. Yeah, that's looking
pretty good there. And now we want to
hatch the bottom lip, and we can use those saro plane lines as kind of a guide for
exactly when we need to pivot the angle of our
hatch marks to make sure that we're
giving those lips the best form that we can. But we're going to go all the way to the corner like this, and now we're going to go all the way to the other corner. There we go. Yeah, that's
looking really nice. Now we're going to start on this far side and
we're just going to pull these hatches
over nice and slow. That's the thing. Make sure
that you take your time. Really try to just feel out each one of those hatch marks. A lot of times, and even I'm
guilty of this is we tend to rush through the hatch
marks. That's fine. You can do that if you
have the confidence, but the whole point of
drawing is that you enjoy it, that it brings you
a sense of piece. So by slowing down and
really trying to just feel every component of
how you are drawing, that will help you develop, not only in mind. But in muscle memory as well. It's like when you're at the gym and you're lifting a weight, it's more beneficial for you. If you don't let the
weight slam back down. If you take that weight all the way just before it touches, and then you force
yourself to pick it back up, that is control. And that is awareness.
We can very much bring that same type of
awareness to drawing. Here on the ear, we are
just doing just that. We are being aware of where
we are in the drawing. We are being conscious of
the type of form that we are wanting to convey through the technique that we
are using of hatching. And we are better
artists for it, and our drawing
is better for it. And that's one of the
cool things about hatching is you can
do multiple things. You can double hatch. This is single hatching
that I'm teaching you here. There's cross hatching.
There's all sorts of different ways that you
can hatch your drawing. But obviously in this one, I am teaching you the simplest, the most straightforward
way to start to introduce volume and thus
form to your drawing. Because up until now,
this has basically just been a contoured portrait. We've busted out all the
contour lines, the frame lines, everything that you
need to start to bring the dimension
and the volume to it. So now we're starting right
at the bottom of the ear, and we are working our way down. We're pulling from left to
right. I'm right handed. If you're left handed, obviously, right to
left it doesn't matter, whichever makes you
the most comfortable. But I'm just pulling this just
like this. Just like this. You don't have to worry
about giving the neck too much detail because we want our viewers to focus more on the face
itself. Now here. Immediately under the chin, I'm pulling from right to left, I'm pulling these lines
back on themselves. This is a cool visual trick that you can give your drawing. Because as we layer
these hatch marks right, we start to double
hatch and lower the value in certain places, you'll see how the
form of the throat, like the Adam's apple
and whatnot shows. I see, just like this. Now under the chin, I'm double hatching, so I'm going back over the
hatch maarks that I just made, and you can clearly
see the difference in value between the
front of the throat, the back of the neck,
and then the center. Yeah, it's looking pretty good. All right. So let's move
on to the next lesson.
9. Detail out the Hair: All right. So in this lesson, what we want to
accomplish is I want to bring more character and
flow to the subject's hair. So right here, right
above the ear. I'm using a heavier pressure
control, as you can see, and I want to bring out the
different lengths of hair. Longer hair, when it rests or the hair is
shorter underneath, it will be of a thicker quality. The lines will. They'll be thicker because they're heavier. There's more volume of
top than there is below. This is how we can start to bring out that
look on the paper. Now, I've mentioned
this in my book, but hair is comprised
of segments, regardless of
texture, Each bit of the hair lays a certain way
and thus flows a certain way. So by going in like
this right here with the bangs and using different
qualities of line work, meaning different
thicknesses of line work. We can really start
to push hair back, bring hair forward,
shortened hair, lengthen hair, add
specific texture to hair, all by the use of our linework. Now, just because I'm going to be using
these terms a lot, Align's quality, as defined
is its inherent thickness. The more quality to align, the thicker it is,
the less quality of align, the thinner it is. Now that's not to be
confused with aligns weight. Now aligns weight is
essentially its saturation. If it of a heavier weight,
then it is darker. If it is of a lighter weight, then it is more transparent. Right. Those are the
two major differences between those two definitions. But just like this, we
can use thinner lines, like this like little
squigglies if you want. It really depends on the
texture of the hair. This subject's hair
is very straight. So we want to be more focused on the flow of the hair
than anything else. We're doing medium to light line qualities
on most of this, with the exception of the
outer contours of the hair, we can go in certain
sections and we can actually thicken up
that line's quality, and there tends to
be this correlation between a line's
quality and its weight. So most of the time, not
all the time though, if a line is of a
thicker quality, it tends to have a
heavier weight to it, or more saturation. And then, of course,
the opposite is true. The thinner the line,
the lighter the weight. But yeah. That's
looking pretty good. But notice how just with
the use of that line work, we've really brought
that hair out. We can start to see
how it's flowing. Now here above the far eye, I'm just going in
and I'm putting thicker lines in the edges of the hair because I
want the hair to sit on top of the head and I
want it to look like that. By using thicker lines, we tend to give the
hair more volume. It's a play of value. But the biggest thing
that you can do here for the hair
in your portrait is just go through and just pull
these lines a little here, a little there and experiment. One of the things that you'll
find is you can overdo it, but what you're trying
to out is you want to bring out those different
segments or sections of hair. You can think of it
like that as well. Because each section
of hair is but one piece of the overall
composition, the overall flow. And so if you can tie all of those different
segments together through the use
of your linework, effectively what you're doing on paper is you are
layering the hair. There's a layer on top of
a layer on top of a layer, and that's going
to make your hair look a lot more dynamic. Right here, I'm
working on the bangs. I want to make them
a little thicker. I don't want to
make them too thick because if you look
at reference one, these bangs at this point in the portrait are
fairly transparent. You can see through them
to the subjects forehead. So I want to be aware of that. Yeah. It kind of thickening
this up here. And right here. And I hope by now, you're starting to
understand that the more love and attention
you give your subjects hair, that hairs dynamic will
continue to develop, and it will just
become and prominent. But then that calls
into question. Another aspect of drawing hair is that you
can overwork hair. So it's best to really focus on the bottom of hair and not so much the top of the
hair as far as your line work. The reason why I say that
is because all portraits, whether they be indoor or
have light from the top. The way it is. What
that means for you as the artist is if you're going to be laying
down thicker lines, or if you're going to
be laying down a lot of thick lines next to each other like I'm doing
for the bangs here. I did for the side of the head where the long hair
is resting on top. When it comes to the very
tippy top of the head, notice how I haven't really put any super thick lines up there. The reason why is because when light hits the top
of hair like that, it makes the hair
look almost not necessarily transparent,
but it thins it out. When light is cast across
the top of someone's hair, it tends to thin
the hair as far as the contour lines are concerned out because of just
the nature of light. Whereas when that light is cast across the hair, the
hair on the bottom. The bangs above the
ear on the far side, those tend to be of a thicker quality because
the light doesn't reach them nearly as
fluently as it does the top. Let's move on to
the next lesson.
10. Detail the Eyes, Nose, and Mustache: In this lesson, we're going to start detailing out the face. Just like this, we're
going to start in the corner of this nest eyebrow, and we're just going
to start pulling up. We're going to start
hatching in some lines. We want to be conscious of
the flow of the eyebrow here. I did one hatching all the way over and then I
brought it back on itself so that I could give the eyebrow some
necessary thickness. Now I'm just going to
do some longer poles. Moving from left to right. This is one of the
reasons why it's very important when
we were initially drawing the eyebrows to iron
out those contour lines, because we can always go
back in and detail them out, but those contour lines
help us as the artist to identify the basic proportions of that specific facial feature. Now we're going to do the exact same thing on the far side. I'm referring to reference one, and I really want to make
sure that I am drawing out these eyebrows as they actually flow in the reference photo
so that they look accurate. Just like this. That's looking pretty good. Once you have the first layer, if you want or if you need to, you can go back through
just like this, and you can start to hatch
over those initial ones. And you can see what
happens, right? The value just
lowers and lowers. Yeah, that's what we want.
That's looking good. Okay. So now that we have
the eyebrows drawn, we want to move on
to the eyes here. I'm going to darken
up the corner here. And what I'm going to do is
I'm actually going to place some eyelashes here on
this eye closest to us. Because like I mentioned before, we are detailing
out this portrait. I'm going to switch
to the far eye. I'm going to do the
exact same thing. Be eye lashes aren't too long. Now I'm going to switch
back to the eye closest, and I'm going to start
filling in this ris. I'm going to go
to the other one, doing the exact same thing. Notice, I'm just pulling the
lines in towards the pupil. Now I'm going to
fill in the pupils. There we go mean Boom. That's
amazing how that brings out the eyes and makes them
just that much more dynamic. Now I'm just going to darken
these up just a little bit more because he does
have pretty dark eyes. When we actually look the
reference photo as a whole, his eyes are one of
the lowest points of value in the entire drawing. I want to make sure that
I adhere to that by just going over
those lines again. Again, in the exact same way, like how we did
for the eyebrows, we pulled all the lines
one way and then we went back over and did
the exact same thing. Rin repeat. We're doing the exact same thing for
the ris of the eyes here. That's looking pretty good. Then I'm right here on
this eye closest to us. I'm just trying to put a
little bit of shading on the edges of the eye because that makes the eye look
a little bit more round. Now I'm doing the
exact same thing to the far eye right here. Okay. That is looking pretty good. Now we're going to
fill in the nostrils here. Something just like this. When you're filling
in your nostris, every reference is going to
be a little bit different, but you want to really lower the value along the
top of the line, and then you want to fade it as you go to the
bottom of the nostril. That'll just make your nostril look that much more dynamic. Now I'm just going to do a
quick little on the bottom of the nose plane so that I can bring out
that dimension there. And now, as promised, I'm going to go
ahead and I'm going to actually start double hatching where his mustache is. So just like this. One after the other after the
after the other. Notice how I'm following that initial contour line that we lay down a few lessons back. You can do the same
thing with yours, that'll help you
identify exactly where those double hatchings
need to occur in the C of all of
the other hatchings. Then here he's got this
part of his beard. They call this the sole patch. Looks like that's next
to his actual chin. This is one of the longer
bits of his facial hair. I just want to make sure
that I'm bringing that out. Something just like
this. All right. And that's flowing pretty good. I'm still working
on that sole patch. Just kind of pulling it down. And I'll join this
hatch mark here. But facial hair is just as important as any other
component of the drawing. You want to be very,
very aware of how that facial hair flows on the subject's face
because everyone's facial hair is different. Some beards are
super super wiry, curly, some are super
straight and thin. This one's straight. Let's
move on to the next lesson.
11. Detail the Beard: In this lesson,
what we're going to do is we're going to go through and we're going to
fill out the subjects beard. Rather than doing very, very
long poles, just like this, right underneath his sole patch, we're just going to do
nice short hatch marks. Now, when it comes to beards, even super curly beards, they all are pretty
much the same, especially when
they're this length, and what you want to
do is you want to do short little hatch marks, and then effectively,
you want to layer them. Just like this, I'm
going left to right, and you still want to be
extremely conscious of the direction that
you're pulling when you are laying down these
individual hatch marks. Now, you can use different pressure controls here if you want to like
this right here. Notice how the hatch marks themselves have a thicker
quality and a heavier weight. That's because I'm pushing
a little bit harder. Now you can accomplish this same look if you just layer your hatch
marks, but be aware. If you layer your hatch marks
when it comes to beards, what will happen is you're
going to make the beard look extremely dense
in that specific area, whichever area it is
that you're working on. Now, just for some context, when you're drawing
someone that has a beard. The normal growth
pattern for the chin. Falls roughly in line with
the corners of the mouth. From about the lower lip down and different people have
different growth patterns. But that chin is where most
beards are the thickest. Then as you move up the jaw
line back towards the ear, most beards, not all, but most beards tend to
thin out a little bit. So keep that in mind. But just like this,
I'm going through, and I'm pushing just a
little bit harder and I'm making the quality of my
lines a little thicker, and because of that, my line
weight is also increasing. But the biggest part of drawing the beard is to just
take your time, like how I was mentioned, you want to take your
time with the hair, and you really want to focus
on those different segments and just appreciate every
hatch that you lay down. When it comes to the beard,
it's the exact same thing. Now, right here on the jaw line, notice how I'm actually switching the direction
a little bit. Typically that growth pattern or at least on this subject, halfway from the tip of the chin to the
bottom of the ear, that growth pattern
actually changes a bit and the angle for my hatch marks needs to accommodate that
shift in growth pattern. Like this. Also, I'm pushing lighter
because if you look, the hair that leads up
to his side burn there, not only is it shorter, but it is more transparent. That is most beards. Most beards when you cut
the hair and it's shorter, it will be more
transparent versus if it's longer and
it lays on itself, it'll be a little
bit thicker looking. Just keep that in mind. But here underneath
the side burn, we're just picking this up just a little bit,
nothing too crazy. Then I'm actually going to fill in the hair here
because there is texture and I want
to apply texture. I'm just doing a
little squiggly lines. I'm doing a row of squiggly lines from front
to back of the head, and then I'm just doing that again and again all the way up. That gives me that
texture that we're looking for when it comes to the sideburns and immediately above the ear on
the subject's head. Okay. Well, it's looking more and more like the subject
as we progress here. So now I'm back down
here on the chin. I'm filling this in. The more you take your time
with placing facial hair, the more accurate your
drawing tends to be. Don't get discouraged and
don't try to go super fast. I have been drawing
for a long time, for me, I'm able
to draw quickly. But if you need to pause and just catch up and get
situated and then you can always press again and continue the class,
that's totally fine. We're all different. We all
have different skill sets, we're all at different levels, and that's why we're here.
We're here to learn. There's absolutely
nothing wrong with that. I was actually driving
yesterday and I saw a sign in someone's yard that said a reader today, a
leader tomorrow. I like that. Because
it's very true. Knowledge elevates
the individual. No matter what
that knowledge is. The old adage is
the more you know. It's the same in drawing as it is any other subject matter. Now here, I'm going
back to the sole patch. I just want to thicken
this up a little bit. What I'm doing is I'm
following the growth pattern, the same flow of hair, but I'm just thickening it up. This is what I was mentioned
about where if you want to rather than pushing
hard, you can double hatch. It thickens up the hair, and it also brings out the
flow of the hair, facial hair. Beards. They have the
same type of flow to them as the hair on the top
of a subject's head does. The only difference
is the texture typically is slightly different. Then most facial hair that
you'll draw on subjects is going to be shorter to mid range as far as
the length goes. Every once in a while,
you'll draw an old sage. An old man from
the mountain top, but those portraits tend to
be more on the rare side. So but I'm just like this. I'm just going through and
notice how each hatch mark, as we are progressing and
building up this beard, makes it a little thicker, brings a little more texture, and thus it makes the drawing look a little bit more dynamic, and it really brings out the
character of the subject. It's amazing what
a little bit of facial hair will
do to a portrait. Now, just like anything,
you can overdo it. One of the things I'm doing here is I'm actually
going through and I'm making my hatch marks
that I'm double hatching, by the way, a little bit longer. What that does is that simultaneously ties
the hair together, and it also makes the hair
look a little thicker. However, it maintains
that short texture, that we see in the
subjects facial hair. That's just a quick
little technique that you can use to thicken up your hair while not sacrificing
the texture that you've spent time building. So Yeah, this is coming
together quite nicely. I am like how this
is progressing. Then here I'm in the
center of the jaw, and I'm just working my way slowly back to the
center of the chin. Yeah, just like this, sir. Because remember what I
said, that growth pattern, the bottom of the chin in line with the edges of the mouth. That is going to be your
thickest part of the beard. So if you're going to spend any extra time on the facial
hair for your subject, you want to make sure that that is where you
spend the time. Okay? All right. Let's move
on to the last lesson.
12. Final Detail Work: All right. Now we are in the final lesson. What this lesson is going
to be comprised of as I'm going to be
going through and double hatching
in certain areas, lowering some of those values, going through the hair,
the facial features, the neck, and just really
bringing it all together. Just like this here, we're
starting above this far eye, and what I'm doing is
I'm cross hatching. Remember how I said there's
different types of hatching. Cross hatching is
something that you can do where it immediately
lowers the value. In fact, it does it quite a bit quicker than double
hatching does. So This is a very
useful technique. Like Right here on this
eye closest to us, I'm going to go ahead
and I'm going to cross hatch right here at
the corner of the eye. And then I'm going to cross
hatch right here leading up to that nose bridge plane. Notice how when we
cross hatch like this, not only does it lower
the value for us, but it also maintains that underlying form
that we were able to bring out with our
regular hatching, right? Oh, yeah. Bringing this all together here. Because a lot of times
when it comes to how light across the human
face, the sockets, most of the time will
be of a lower value, and that's just
the nature of the human face as far as how it's comp and how light
is affected by it. Now, what I'm doing is
here on the forehead, I'm just doing very, very light cross hatches,
super super light. Now, the cool thing about cross hatching is like with
regular hatching. If you need to go back over it again and cross
hatch it once more, you can definitely do that, and it will lower the
value just a bit more. I would always recommend
unless you're absolutely certain that in
this specific area of the face that you're working, that it needs a super low
value, you can press harder. You can use a harder
pressure control. But if maybe you're working on your confidence and you're
not quite there yet, I would just use a very
light pressure control and continue to hatch. Right here, the bottom
of the lower lip. I'm just going to thicken
this line up a little bit. Right? I'm going to increase
that line's quality. And it looks like the
mouth is slightly ajar, so I'm going to go ahead and kind of line that
out a little bit. Then here on the
corner of the mouth, actually, I want to revert
that. I don't want to do that. But yes, we are very much at the point in the
drawing where you can spend as much time
on detail work or as little time on
detail work as you wish. I've said many times that
the more time you give it, the better it's going to look. If you need to, you can
always take a break, walk away, go do something, maybe go for a
walk, read a book, have a snack, whatever
you need to do. Then you can come back
to your drawing and you'll see things about it that maybe you didn't
notice before. They say that maybe
you're too close to it, and you need that break for the betterment of your
art. That's totally fine. You don't have to
rush through it, and don't think you have
to do this class in one sitting. You don't. It's completely up to you as far as what you
would like to do. Okay. So now, what
we're going to do. As I'm going to
start building up this mustache, a
little bit more, so I'm starting here from
the corner closest to us, and I'm just going
ahead and I'm going to double hatch this mustache. I'm not going to cross hatch it. I'm just going to go
over it again and notice how as we
go over it again, it is getting thicker, that value is lowering, because of those two things, the mustache is becoming
more prominent. Now, this individual
his mustache is somewhat transparent even
in its thicker parts, except for on the chin. Now what I'm doing
is I'm going back over the mustache lines
from left to right, again, and again, it is getting thicker and that
texture is coming out. Each time you go
over the mustache, you can also press a
little harder if you want. If I would have pressed really
hard right off of the bat, my line qualities would
have been a lot thicker, and I wouldn't have
had to have gone over it three or four times, but be aware that you risk your texture not looking
the same if you do that. It's always better to go
over something again. Then again, it's one of the reasons the masters
from the Renaissance eras, paintings were so beautiful was because they were comprised of in some instances
a hundreds of layers. I know it sounds crazy
to think that way, but that's how they
were able to make their paintings look as
dynamic as they did. Yeah, see that
mustache is really coming through now. That's good. That's the texture that we want to bring out
in our drawing. But now I'm going to go
through here up above the ear, and I'm just going to add a little bit more
texture to the hair here. When it comes to
hair and texture, you want to have this nice
range of line qualities. You want th qualities, medium qualities, and you want
very, very thin qualities. Then not only that, but
you want to line weights. Now, like I mentioned, there is a slight correlation between the quality and the
weight of a line. But for the most part, by having that variance in Align's
thickness and alig's weight, what you have is you basically utilize every aspect of what a line can do
for you on paper. And because of what
we're drawing, hair, hair is very much
that way by its nature. So it's one of
those things where you can definitely overdo hair, but just be aware of the tools
and the approach that you can use to make your hair
look as dynamic as possible. Alright? Okay. We are coming down to the
end of this portrait. But I hope that you've been
learning a lot from it. Remember this is part two of a three part series that I am
making where you'll be able to progress and go
through and draw different portraits from
different angles using the same techniques that have
been rooted in principle. So I hope that you
take all three parts and remember that I do
offer my one on ones now. So if you want to get in
on the books for those, they are on my home
page where you can enroll and pick a date. It's a Zoom call with me, and I can critique your
art and make you better. So So we're getting down to
the wire on this one. I will say, if you
go to my home page, I have a ton of different little mini series of drawing portraits
that I've made. I'm coming out with classes
on how to draw animals, how to draw pet portraits. Those are all in charcoal. So check those out. I cannot wait to see your guys' projects. Remember, when you upload your project to leave
your review of the class, and I look forward to having
you in other classes. Say, and remember.
Never stop drawing. H.
 Messer Creations, Artist | Author | YouTuber