Transcripts
1. Intro: Hi, welcome to the class. Today, we're gonna be doing
dried flower compositions, which will include initials, beautiful cards,
and so much more. You can really take
this technique and make whatever
you want out of it. My name is Summer.
I'm an artist. I do fine art. I do live events. I do textile design. I do basically whatever I want with an art,
and so can you. And I'm here to show you how to do some amazing things today. You don't have to
be a fine artist. You don't even have
to be highly skilled. This is suitable for a
beginner or relaxing enough and fun enough for
a very skilled artist. So please join me and check out all the beautiful things you
can make with dried flowers.
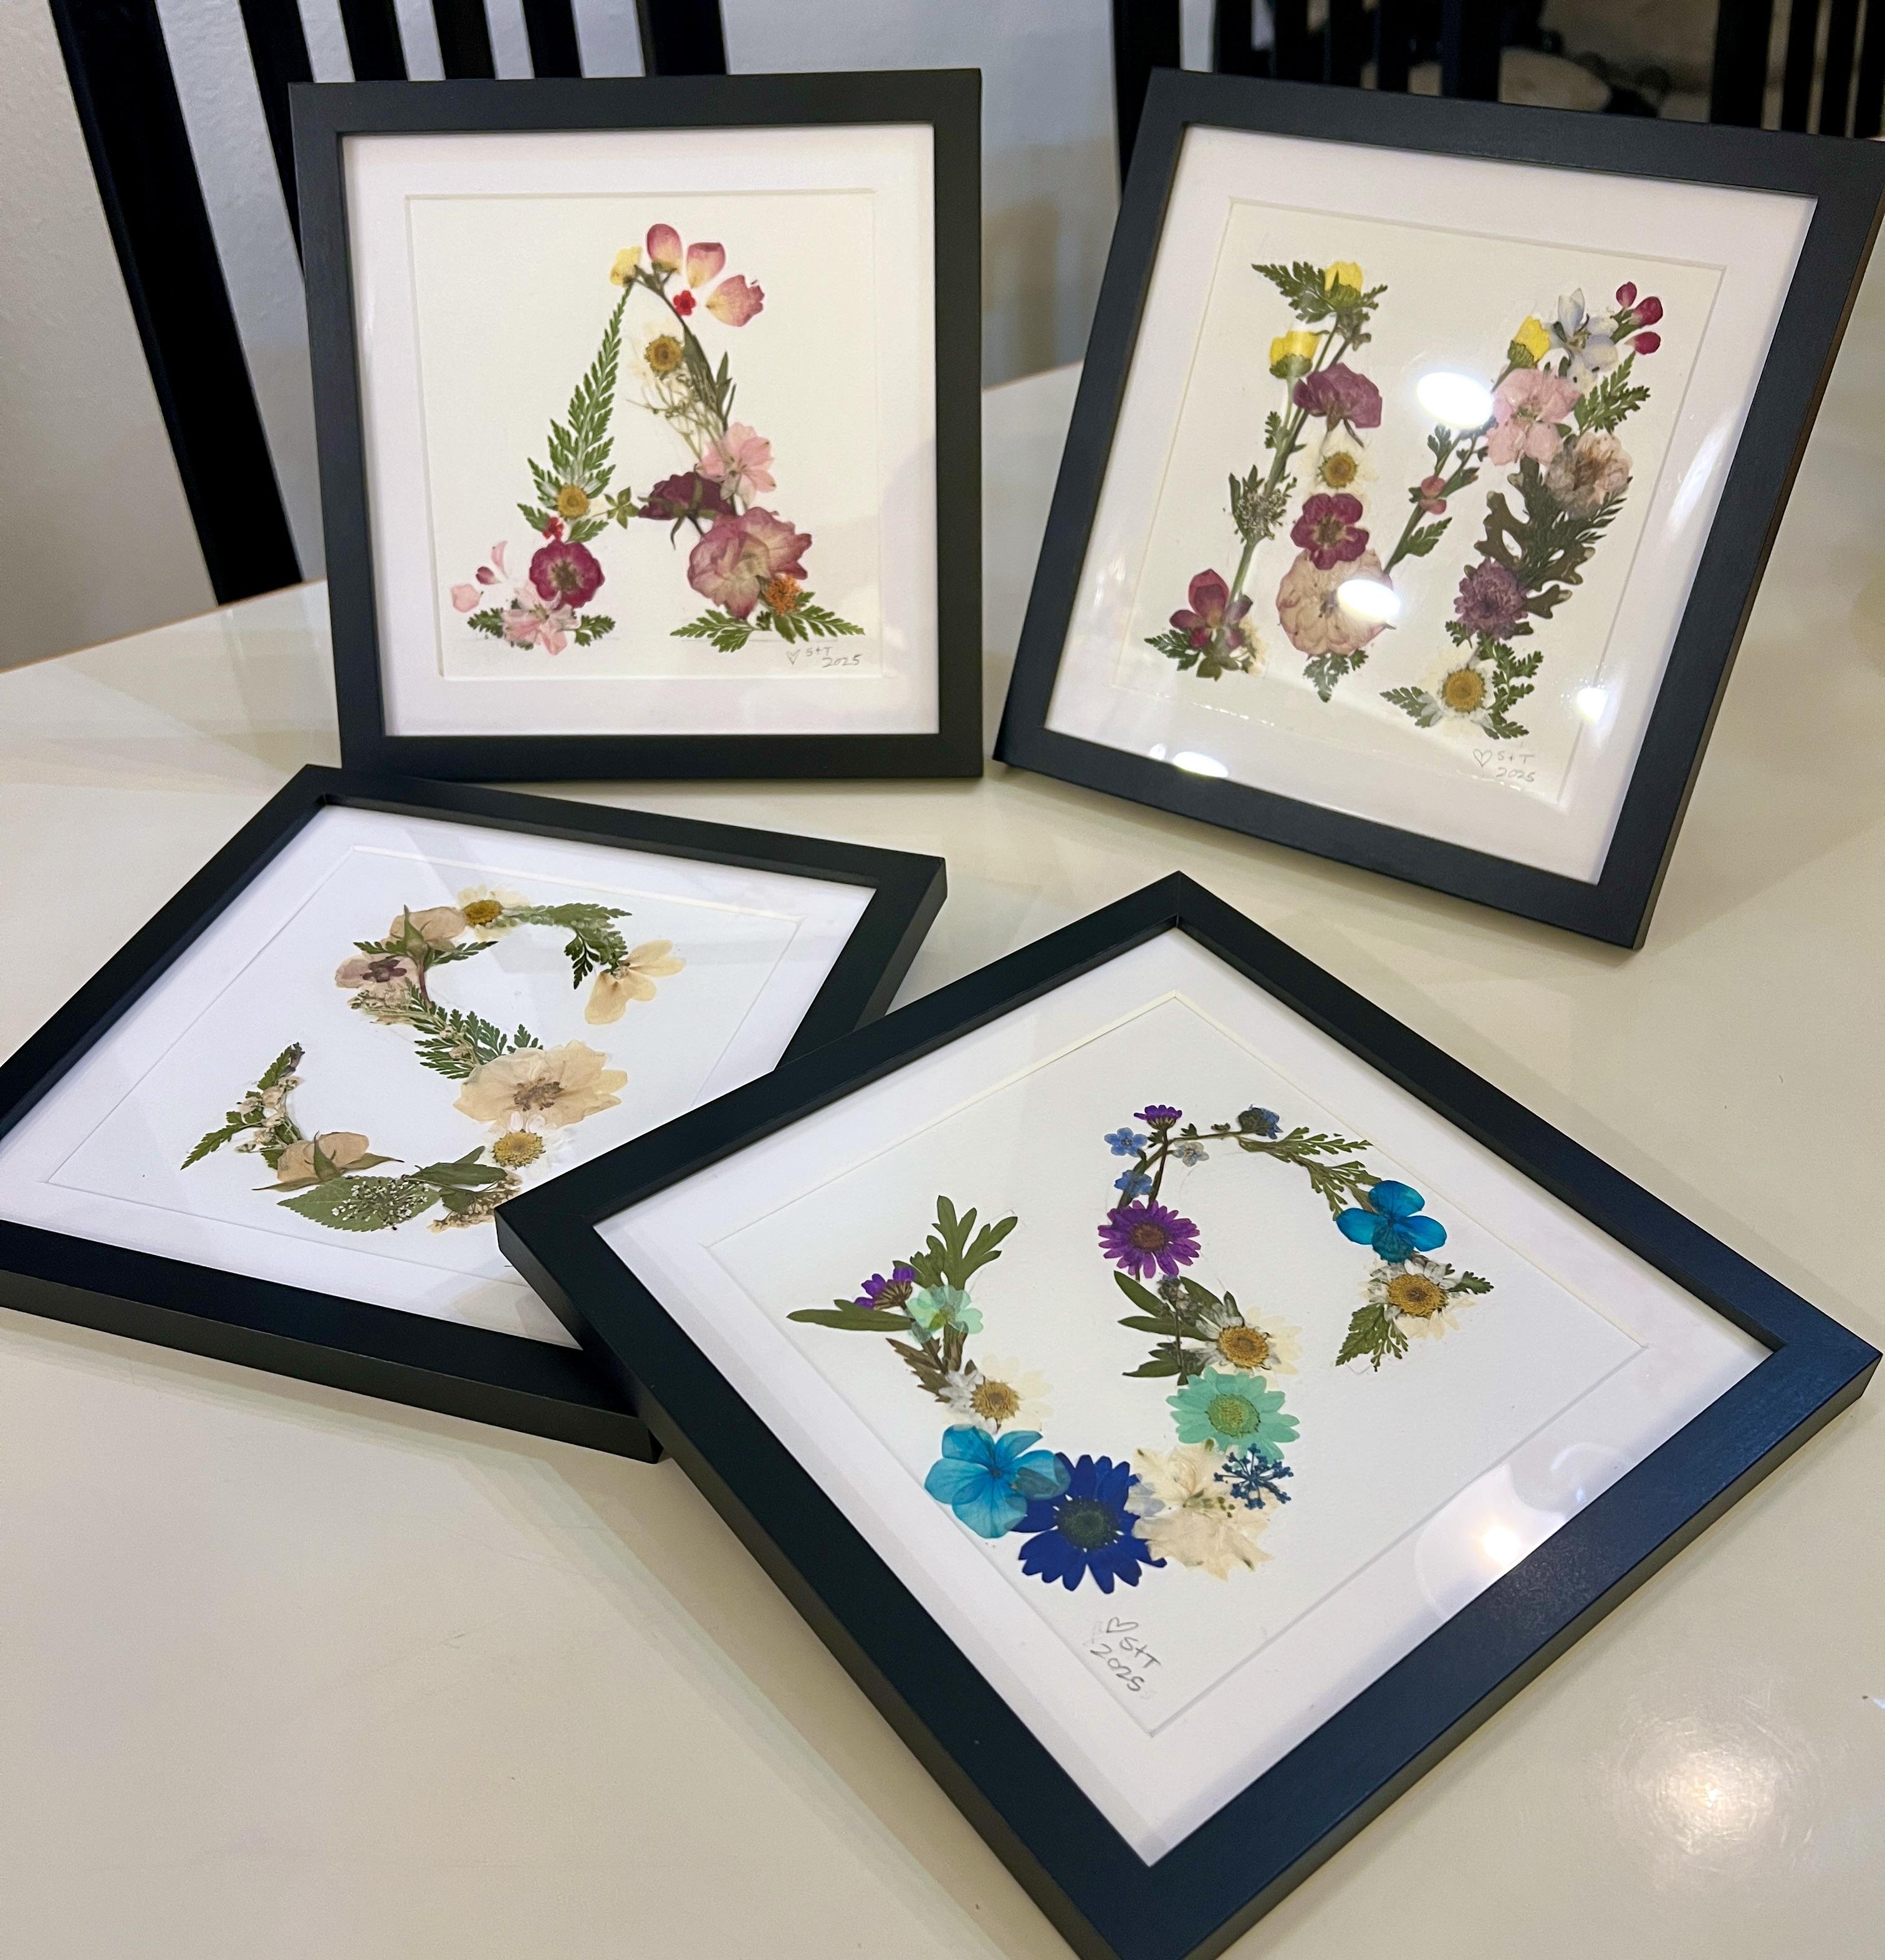
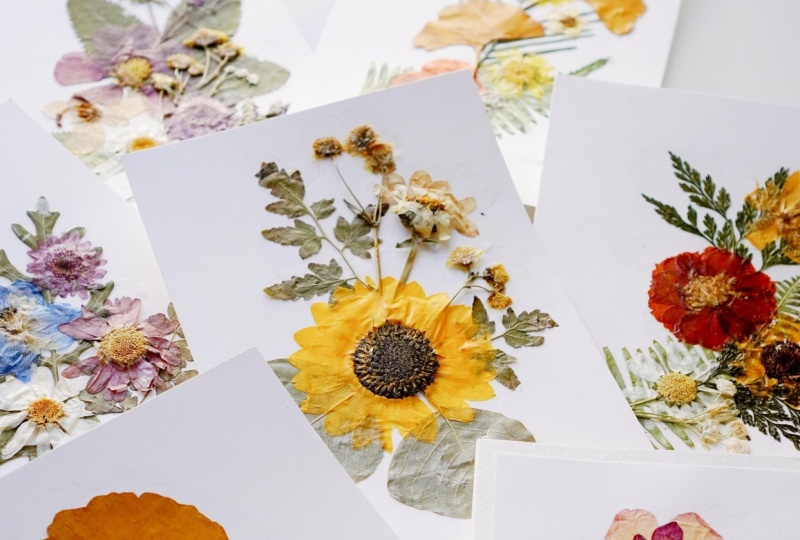
2. Project: You've got three options for the project that I'd like
to see from this class. You can do a floral monogrammed
initial of your choice, yours or someone else. You can do a framed
floral bouquet, which sits beautifully
on a desk, or you can do a
floral greeting card. I can't wait to see
which one you choose, and I can't wait to see
how beautiful it looks. Once you're done,
make sure you take a picture and post it
in the projects tab. I'll put a screenshot up of
where you can find that now. Alright. Simple enough. Once you have your
project ready and posted, I will comment. I
will look at it. I can't wait to see it.
Let's get on to making.
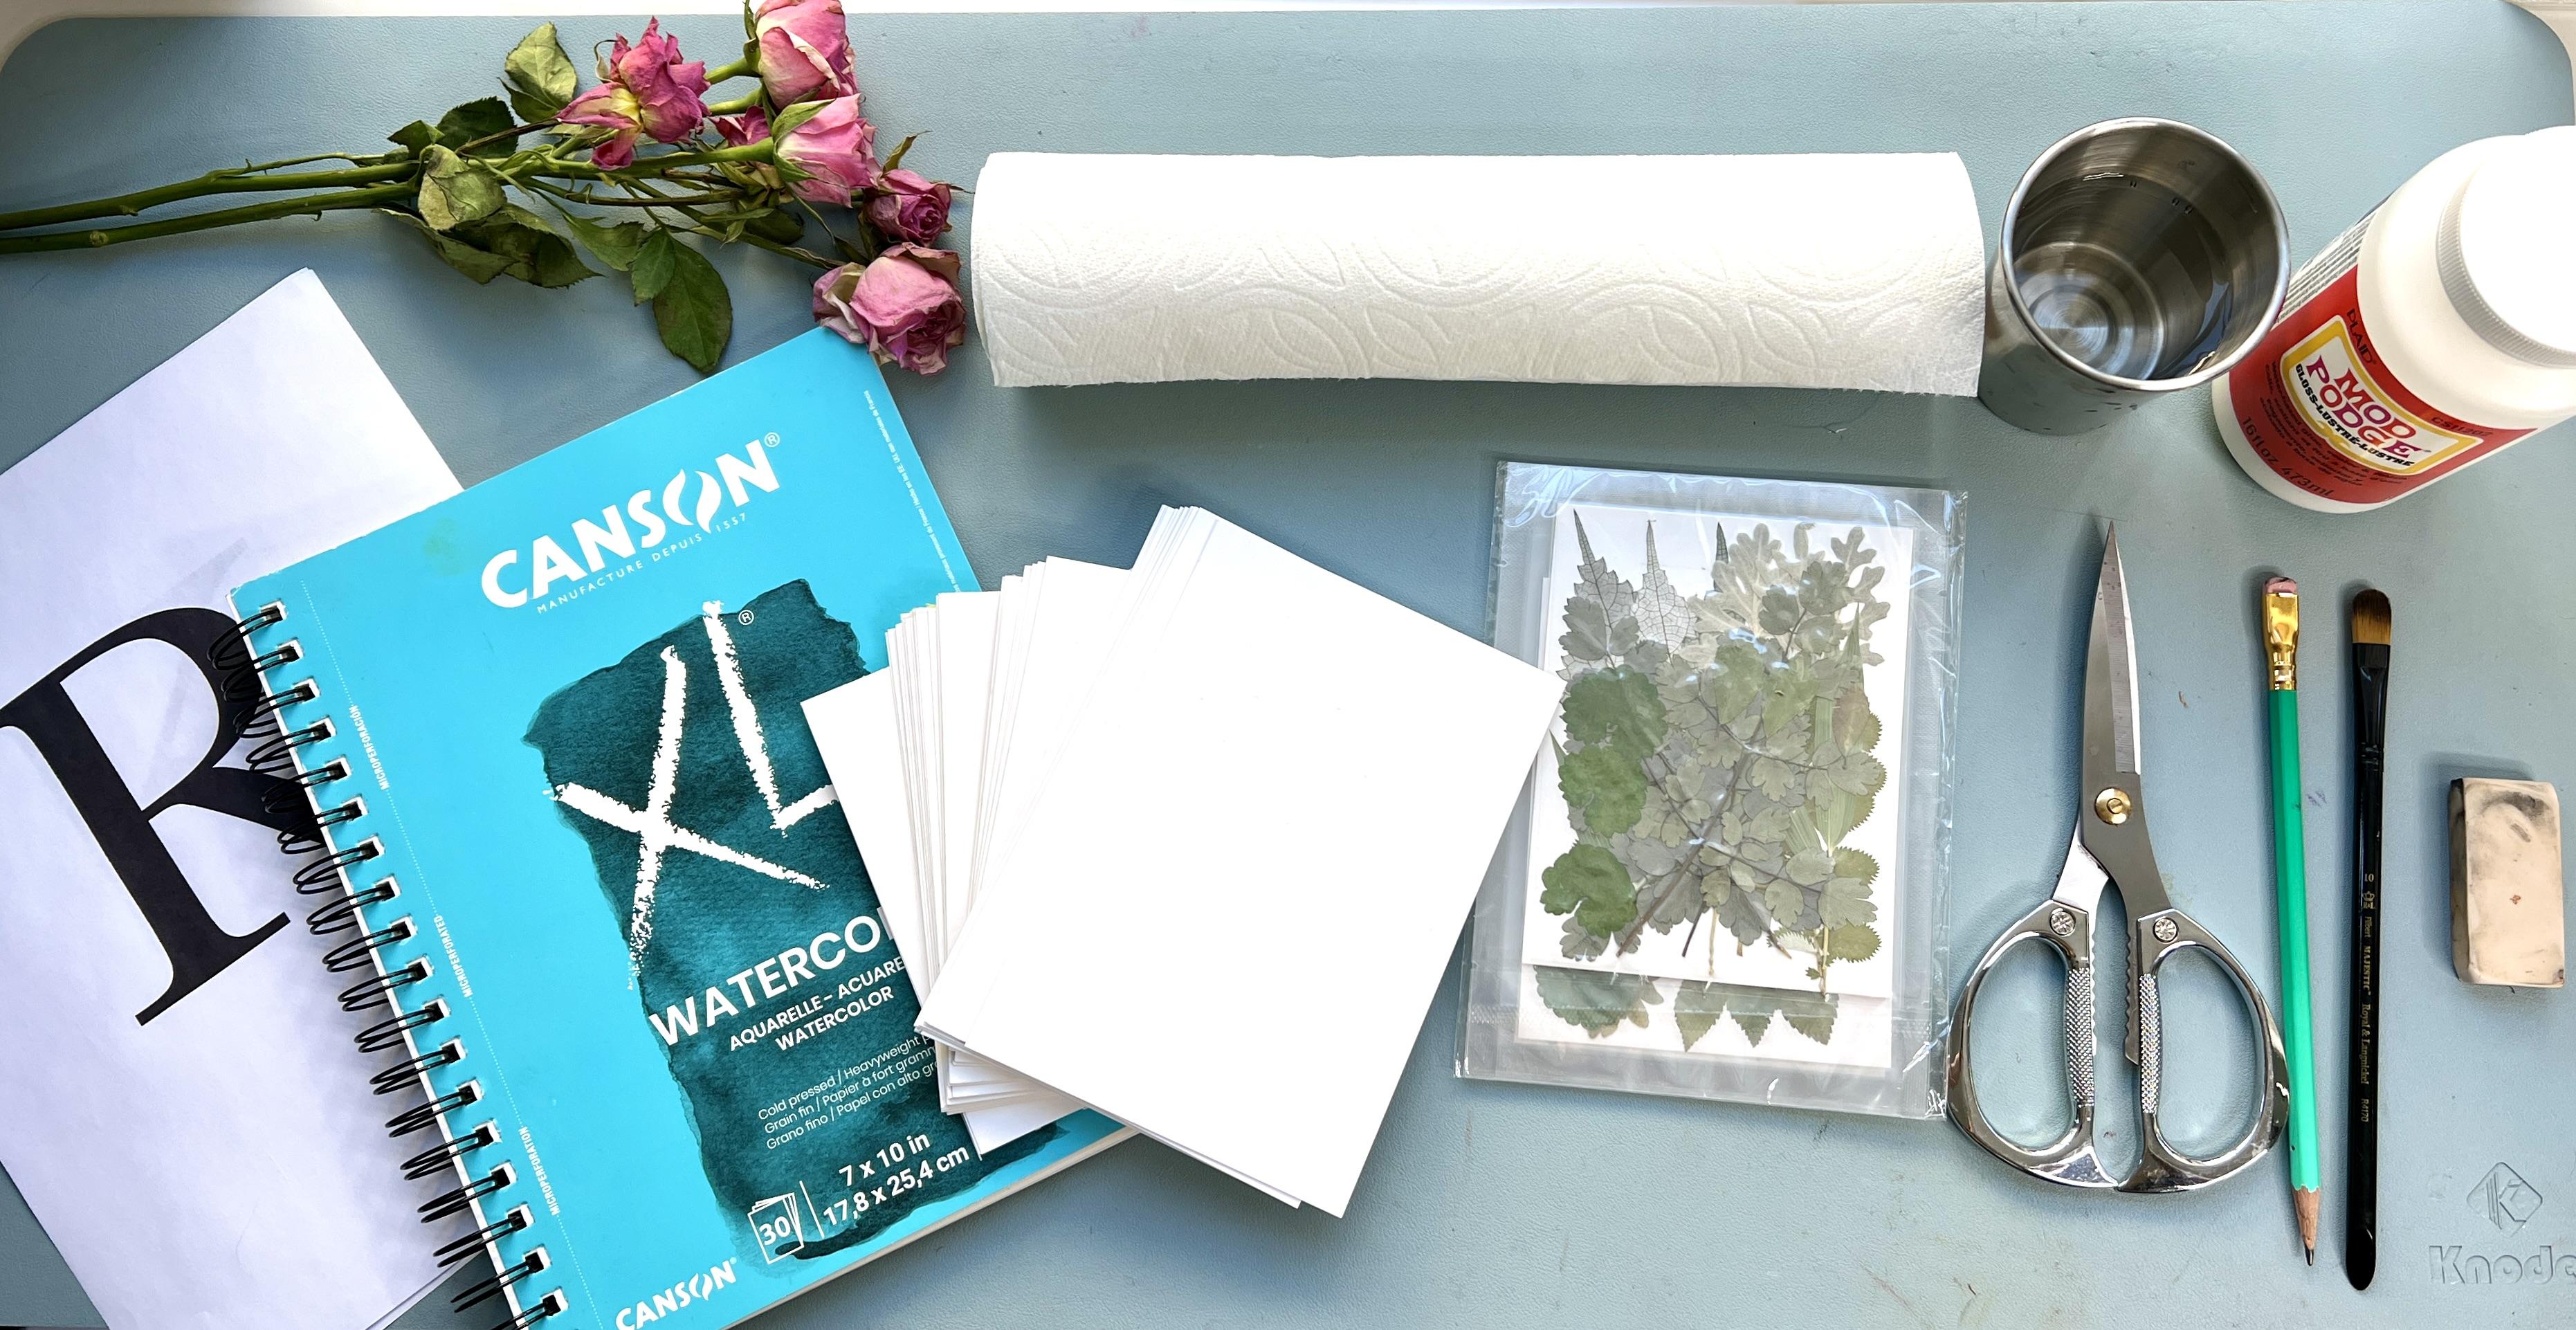
3. Materials: So I wanted to go over all the materials I recommend
for these projects. So I have them laid out here. So let's go over them. You want scissors.
These are really handy, not only for the obvious reason of clipping some of the pieces, but as a weight to hold pieces down when
they're being glued. You want a pencil for tracing
your stencils onto paper. You want an eraser
to lighten that tracing so it's not
too heavy or dark. And you can use any
eraser that works. This is not like the end
all be all over erasers. It's just one I have. Mod Pod, I have it in this container,
but it comes like this. You can use Matt gloss, whatever you think
you want to use. I am using the gloss, and I think it works
really well for this. But use what you have
or what you prefer. Then you're gonna need paper. You can use this or Bristol
paper. I prefer this. I've used both bristle
buckles a little bit, and you can see on a
couple of these examples. They start to bend a little bit with bristle, which
isn't a big deal. I mean, they'll still make
beautiful, beautiful work. But watercolor doesn't
really do that. You can see. Here, watercolor also gives
it, like, a nice texture. It's really, really
beautiful to work on. So and you can see a little bit of this, but
that's not a big deal. So, this is the watercolor
paper I recommend. It's cheap comparatively, and I like this
size seven by ten. And one of the reasons
I really love this size is because this has
a tear out ability. And when you tear
out this paper, and you want to make a card, if you fold that card
directly in half, you get a perfect sized card. This is that watercolor
paper. In half. And the way I did this was I just carefully folded
it corner to corner. And then I used you can use a
bone folder if you have it. I used a small sharp ruler. I've also used things
like heavy scissors, anything that's going to make a nice crease and
not make a mark. And I'll tell you,
I'll go over that again when we go over cards. But it makes a really beautiful makes a really beautiful card. The other things I wanted to go over are the dried
flour options. I linked both of
these in the class, and I wanted to go over
what they included. So this one, we open it up. Includes a pair of tweezers, which I do recommend having. If you're using your
own pressed flowers, make sure you grab
a pair of tweezers. I've ordered so many pressed
flowers over the years that I have a lot of tweezers, because almost all of
them come with a set. So, it comes with tweezers, and this comes
with several packs of different colour flowers. And you'll see these are very
natural, pretty flowers. And then a pack of
greenery, which is key. You really need this
greenery for creating beautiful pieces that are akin to what I'm
going to create. If you want to create
more flower forward pieces that don't have as
much greenery, feel free. Do whatever your heart desires. But if you want more greenery, you're gonna have to
either get a set with greenery or buy a separate sets greenery
that I don't have linked. But if you're going onto Amazon, you'll see all those options. This is the other
one I purchased, which did not say that
it came with stickers, but how cute is that? Anyway, it came with these, and I wanted some
brighter florals, some blues and I'm going to be doing some
things for young girls. And I wanted these to be a
little brighter and happier. So I ordered this
set in addition, and I'm going to be
using those today. If you notice this has a
little bit of greenery in it, but not nearly enough to use
as, like, base greenery. So I am going to be using
greenery from my other sets. Or like I said, you
can buy a set with greenery or buy a separate
set with greenery. So use what you have, use what you like, and
use what calls to you. The other thing I wanted to
discuss was your stencils. And I've put this ring on here myself. It didn't
come with this ring. But DC is a beautiful set
of five inch stencils, and I've linked that
in the class as well. And you can do this with
or without stencils, and I will show you how to
do it without stencils. But with stencils,
if you're gonna be creating quite a few, is great. And this five inch
size is perfect for this paper if you're
using the full paper. If you want to use
this as a card, let's pull out the
folded one as a card. These are too big to
really use well as a card. It kind of goes over the edges. It's just too big for the space. So I would suggest a four or even a three
inch letter if you're gonna be doing the front of
cards for your monograms. So this is five inch. Let me write this on here. This is a five inch stencil. Okay? So if you need smaller, get smaller. They
come in all sizes. Just pay attention to
the measurement from the top to the bottom
of the stencil because that's your
size you're looking at, not the size of the
outside of the stencil. You want 5 " from the top to bottom of the inside
of this letter. A quick recap on
the items you'll need pressed flowers, nod podge, heavy paper,
watercolor or bristle, access to a printer or get these stencils that I've linked. Craft brush. Don't
use a good one. Water cup, paper towels, scissors, tweezers, and
a pencil and eraser. This entire list is
in the description, so check that out
if you need to, and I will see you
in the next video.
4. Tracing Initials for Monogram: So if you're looking to create a composition
using a letter, my favorite way to do
that is to start in a word document or I'm using pages because
I'm using a Mac. So the easiest way to do this is you're going to
open a new document. You're going to center the text, and then you're going
to write your letter. For me, I have a few people
I want to do initials for. So I'm going to start with a K because my sister's
name is Katrina. Want to make that as
big as I possibly can. So I'm going to take
that and make it. Just start bumping it up
to, like, 200 points. And you see, that's not even
big enough. 500 points. Uh, somewhere around
there looks good to me. Maybe like 400. My paper is not the full
size of a letter sheet, so I want to make sure that it will fit on what I'm
trying to print it on. Now, I think this font
is ugly and I want something pretty that has some personality. This
is a really good one. This is also really pretty. I think she would
like that very much. This is nice. Just kind of go
through, see what you have. You can download some
new fonts if you like. But really sticking with what
you already have is nice. That is not
appropriate for this. It's way too big and
way too stylized. It looks a little off. If you're looking for text that has kind of an
older style to it, you want to look for stuff
that has what's called serifs. So something like this
does not have serifs. It's just the full block. Serifs are kind of like the
little dippy ends on things. So this is another Sans serif, meaning no serif one. But if you look at
Baskerville that has serifs, meaning it has the edges that kind of pop out almost
like a typewriter style. So that can be really beautiful. And you can make that, you know, bigger or smaller, depending
on what you want to do. So I'm going to print out I
think this is more suitable. It's a little more classic. So we'll do one of this, and I'm going to put it at 4:50, I think, that should be good. And you just want to print
that out on a piece of paper. I'm just going
to print that out. So as I discussed before, the other items we need for this are our printouts of the
initials that we want to do. Need some paper. So this is the
paper I'm using for the initials because I like the size and I like the texture. You can use whatever
paper you have. Just don't use, like, typing paper. It's a little too thin. You want something that's
going to be able to stand up to a little water,
a little glue. Bristol paper is
also a good option. I have some bristol paper cut to size for myself right here. You can buy bristol paper
or this Canson watercolor, Excel paper, any art
store or online. And these are pretty
inexpensive options. But if you just have
some card stock, that will also work really well. Just cut it to the size that you want and understand
that if you're using an initial
that's like this size, really tiny paper is
probably not going to work. You need something
a little bigger. So we're going to
start with initial. So we're going to start with R. And what you want to do is you want to tear or cut out your piece
of watercolor paper. You'll see this is pretty thick. So we'll just gently
tear this out. Okay. When it doesn't want
to tear, we cut. We just tear it out
like that and then cut. So we want it to
be really elegant. That means clean. So then we have our
piece right here, we can see that the R is
going to look good on it. So just to show you a little
better how that will look. Cut it up like that. And you can kind of see, Okay, I like it, but maybe I don't need it to
be quite that big. You can also make sure it's in, like, a framable size. So this is a seven by ten. If you want to do it like
a little smaller size, make sure you don't get it in, like, a funny size for framing. If you make it a little
bigger where they can cut the edges away to
frame it properly, I think that's a
really good idea. So I think I'm going to
center it right here. And what you want to be
able to do is I like this has a smoother side and a little more textured
side on this paper. And what I really like to do is have it on the
more textured side. I feel like it gives a little in siqui little elegance to it. So you need to be able
to trace your letter on. And you can't really see through this paper.
It's pretty heavy. And you see I hold
it at an angle, you can because there's
light coming through, right? So the best way to do this is
to tape it to the backside, make sure that you can
kind of see through. You just want to
use a little tape to tape that onto the back side. Good enough. And then, yeah, it
looks straight enough. What you're going to do is if
you don't have a light box, I do have a light
box, which I can use, but I'm gonna do this in a
way that's easy for you. You're gonna hold this up to a glass that has outside
light coming in. It doesn't have to be
super bright in the day, but it does make that easier, and you're gonna trace
it with your pencil. And I'll show you
that right here. Please don't mind my windows. They desperately
need to be cleaned, but that won't take away from what we're
trying to do today. All right, that was method one, where we traced something
we had printed out, and now I'm going to
show you method two. What I'm going to
do is I'm going to use a stencil because
I'm making a lot of these. I'm making a bunch
for family members. So I went ahead and
bought the stencils. And as I discussed, a
five inch stencil is about perfect for a piece of
paper that's seven by ten. And if you want to use it
for the front of a card, look at maybe a three or
even a four inch stencil. Four might still
be a little big, a three, 3.5 might be perfect. So I'm just going to center
this on my paper and lightly trace the stencil of the letter. Okay. We have that
lightly traced. And although I can see
that that's pretty dark, it looks a little
light on camera, but in person, it's
pretty visible. So what I'm going to
do is lighten that up. By just taking my eraser. And the first thing
you want to do with your eraser is put it on
a piece of blank paper. And make sure it's not going
to put more dark marks on your paper because
some erasers, when they're dirty, will
transfer dark marks. So use it on a piece
of blank paper first. That's not transferring
dark marks. So I can come on here and just lightly use this to
lighten up the marks. I want to barely be
able to see them on here because once I start
putting the glue down, you're not going to
be able to erase it. Now your monogram is prepared.
5. Monogram Demo: So we've already
traced our initial. The next step we want to
do is to create kind of a composition of what we want
this to look like overall, using the biggest pieces and going into, like,
smaller pieces. Sometimes I use vines to start. If I want this to be
a really pretty A, I might start with
a flower there and some pink flowers and
some other spots. These white flowers are great for fillers,
and like I said, you can make this
very flower forward or you can make this
flower and greenery. So especially on lines that
are kind of long and thinner, like this side of the A, I will use long thin pieces
to give that effect. It doesn't matter if you go a little bit outside the lines. You're not trying to
fill in this so much as using it as a guide
for what you're doing. I really like the white
with these fern pieces. So we're going to
kind of do that. Maybe use this down here. Just kind of play, see
what works for you. I usually end up with stuff
all around me as I decide how I'm going to lay
out all these letters. And I do find that using greenery works really
cute for the serifs. Almost like a little almost like little leaves that would normally go next to
a flower, right? Like the flowers
just kind of sitting there on the leaf like
that. It's so cute. You can see the front
and the back of the flower are very
different, too. So just use what
you think works. And you can move this around
and see what works for you. Do you like that,
or do you maybe like that and then something
different for the up? I like this for the up. I think it's nice. And then I'm going to stack a
few flowers down here. I think that looks
like a good start. So even though my composition
isn't fully there, I'm going to start gluing
down because once I start putting this other
side together, I don't want this moving. Alright, I forgot to mention
you need a paint brush, didn't I? You need a paintbrush. I'm gonna use this one. You can use a cheap paintbrush. In fact, I recommend
a cheap paintbrush. Don't use an expensive
paintbrush for this. Please. And I'll make sure that that's in
the other video. So we just start by putting down just a little
bit of Mod pot, and you can use a
stray from that jar or put it in another jar,
whatever you want to do. Just put it right down.
And then the way I like to secure it is to then
put a little layer of mod podge over each piece. So you want to go
under then over and you want a thin layer. You don't want this
to be too thick. And also, remember that especially these long pieces will kind of form differently
once you start gluing them. And what I mean by that is, if they're not bendy enough, once you start wetting them
down, they will get bendy. Um, I went ahead and sped
things up right here. Please just keep in mind that the entire process for this took a little
over half an hour, and it can take between half an hour and an hour for each monogram
depending on how long I want to do it and how much effort I'm putting into it and even how
much energy I have. So it takes the time it takes, but it's not a super fast thing. It really takes, you know, half an hour to an
hour for each one. So I slowed into real time here because I wanted
you to see something. Some of these larger flowers, the petals come off. There's too many petals for
you to glue it down in, like, a solo layer. So a lot of times I'll
take these petals and use them as accents, and they look
really, really cute. You can even make false
flowers with them using three or four petals to create the idea of
another flower. As you can see here, I'm using it along the top,
little accent pieces. And if you look closely
on the bottom left, I've also used little pieces
of petals as accent pieces. There are really
pretty little elements that you can use, but
you don't have to. It just happens that
when you use this glue, the wetness may pull away some of the petals,
and you can use that. Alright, let's
speed it up again. Right here, you
can see I'm using the scissors as a paper weight
to keep some glue down. And here we go,
our finished A. H.
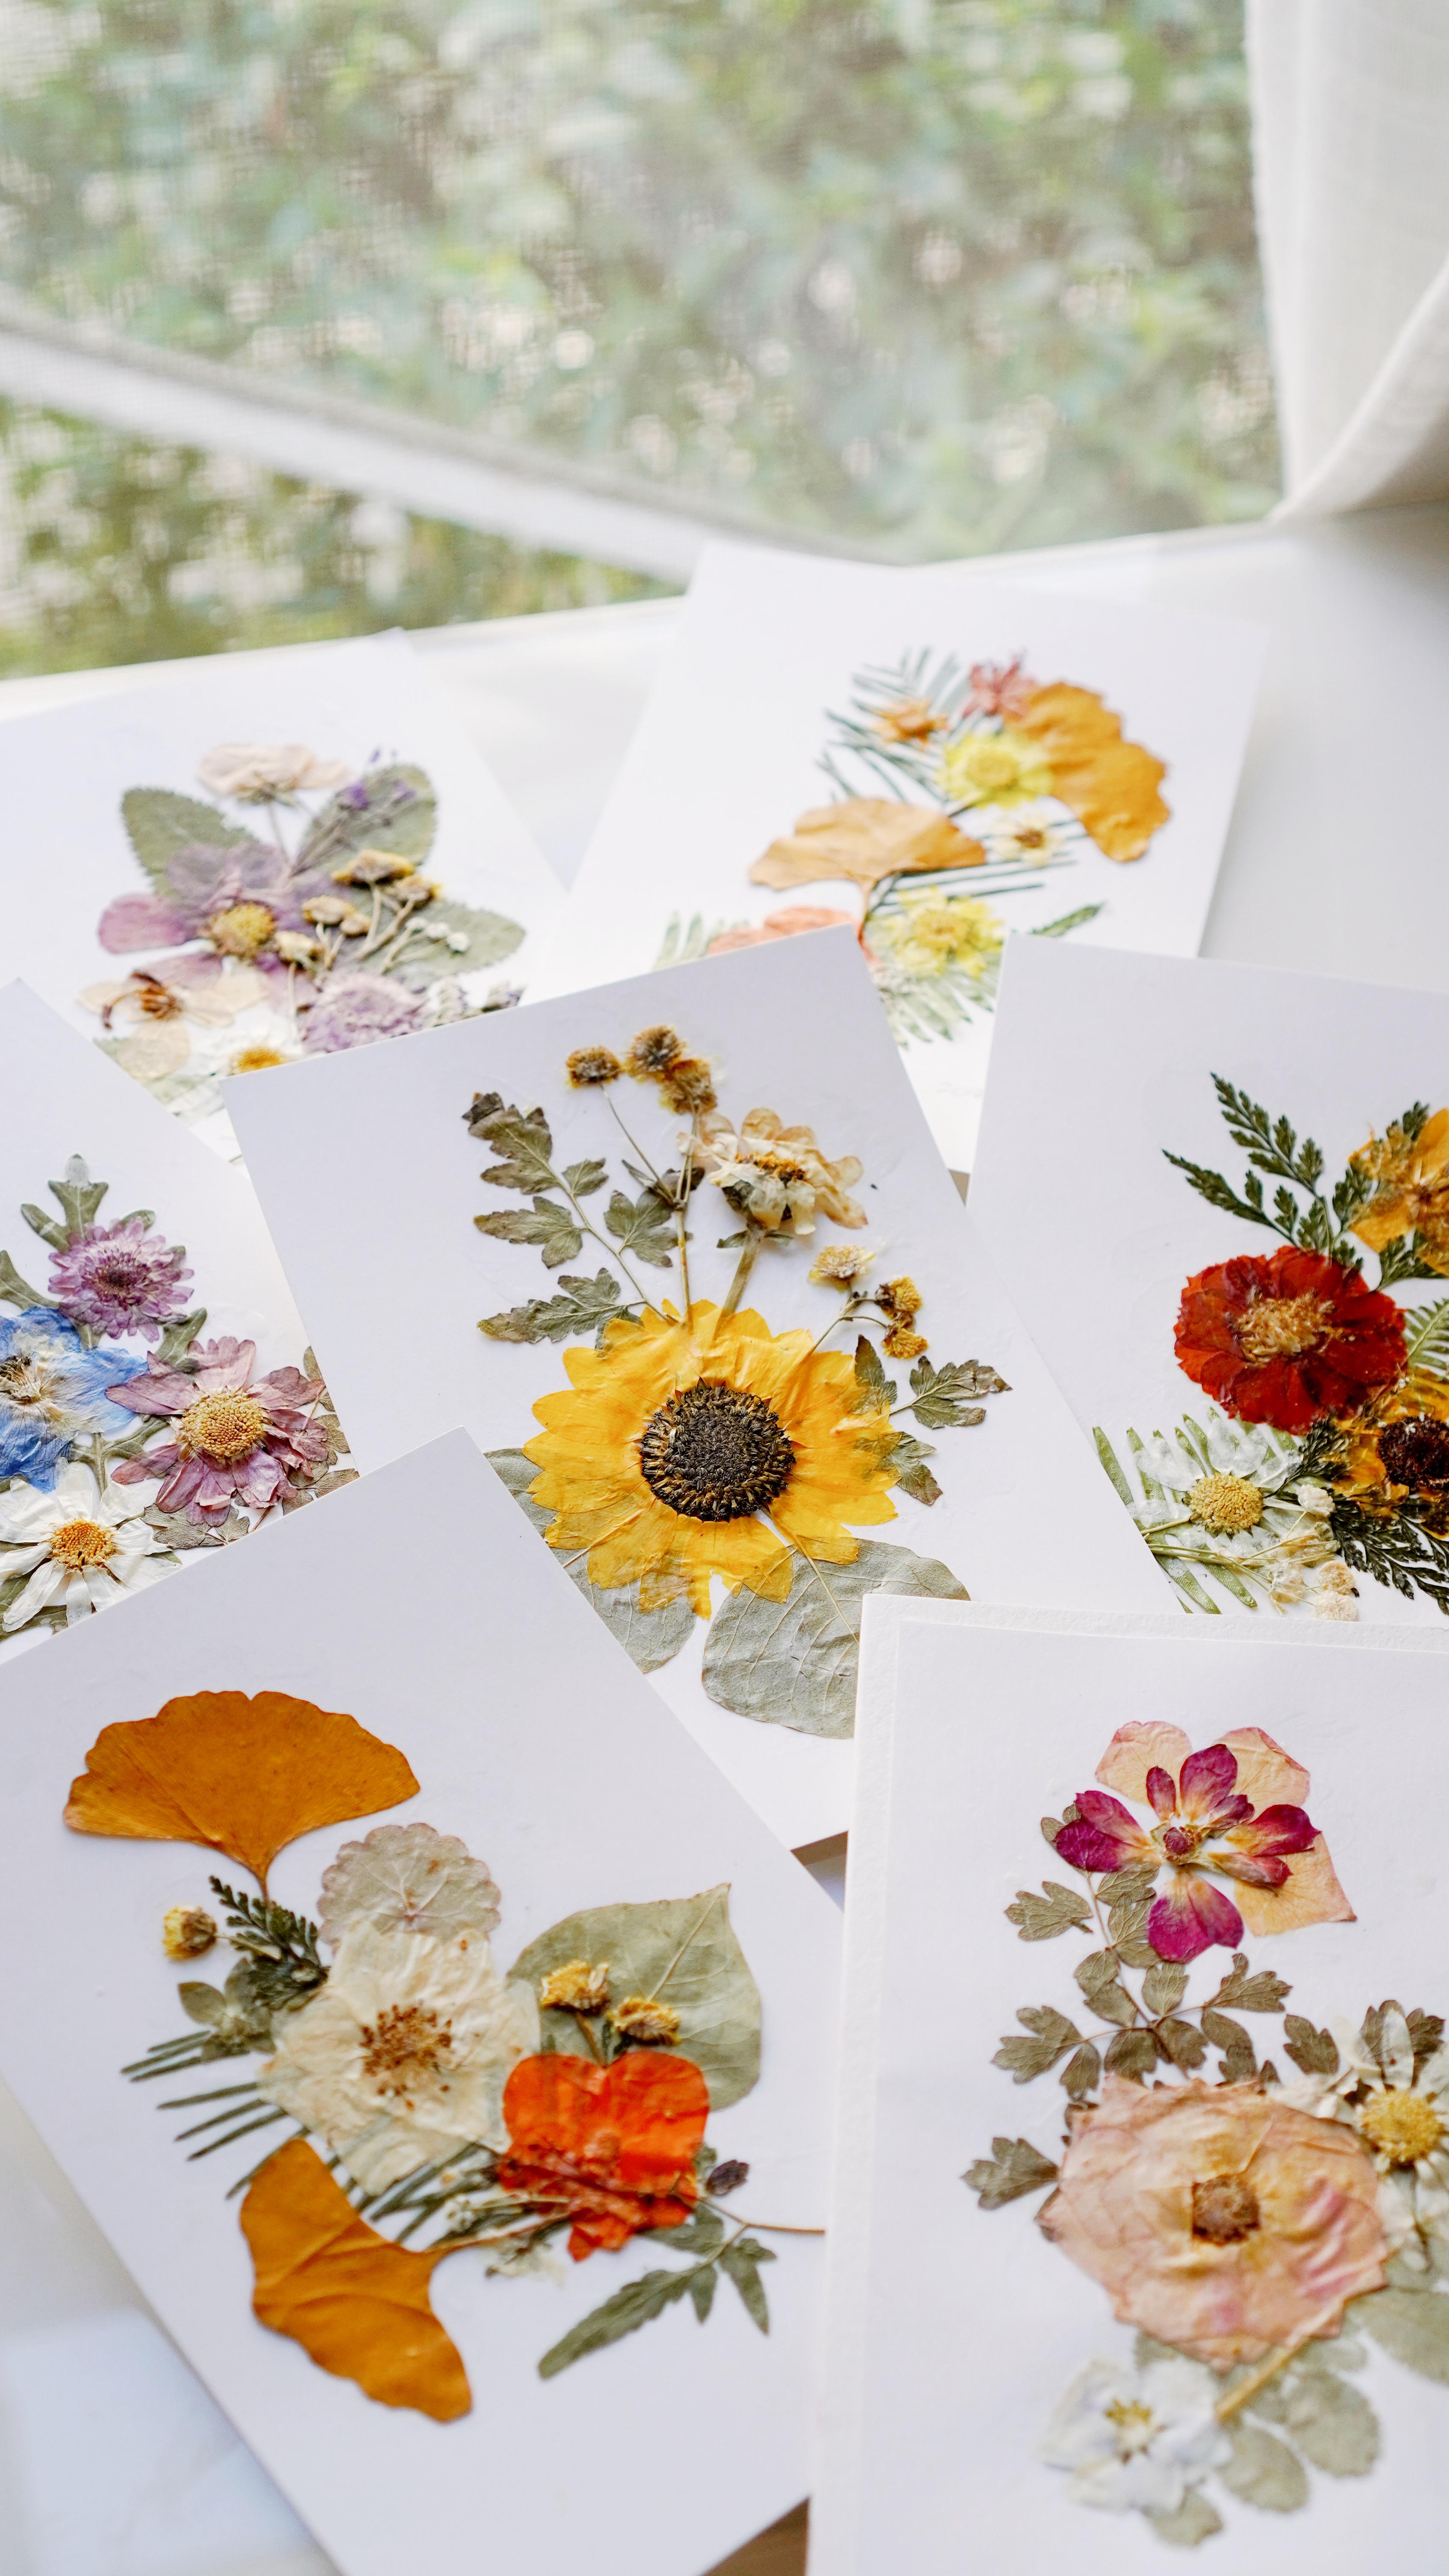
6. Frameable Bouquets: Hello, for my cat. And
now we're on to it. So for these framable bouquets, I'm working on pre
cut bristol paper, and I already knew what size I wanted these so they'd
be easily framed. The first thing I do
is lay down greenery, and then I'm going to put down some glue because I know I
kind of want to do, like, a tilting one way and then the other with the greenery and
then put flowers on top. The next step is to glue those down with a thin layer
of the Mod Podge on top. And you can see I'm
using the smaller brush because if you use
too heavy of a brush, sometimes you can break
off some of those leaves. So I just want to
glue all that down. And I have this sped up to, like, three times the actual
speed I'm going here. And I want to put
the glue on top, and then I'm going
to pick out some flowers to just make this into, like, a very pretty bouquet. I like to kind of
give these direction, so I kind of splay
the greenery out behind and then put
the flowers in. And as I showed you on one
of the previous videos, when petals come off some
of the larger flowers, you can use these as little
accent pieces to kind of give a little movement and flow or even act as little buds. Faking out the flower technique. You can see I'm doing that there and picking out some
different colors. Sometimes you want to go
all pinks and pastels. Sometimes you want to put a
little more umph in there. And this was one of
my favorite ones. So let's watch this. And then I have another one in the same video where you can see a little bit
different process. So that last one
turned out beautiful. You can see I'm starting this
one again with greenery, and I'm kind of giving
it a direction, this kind of curve, which will give the
entire composition a little movement and
a little excitement. If you just throw flowers down
on there without thinking about giving it some movement,
it'll still look pretty, but this can give it a little
more vibrance and help you decide where to
put the flowers. Now, I don't want to
kill the movement here, but I do want to
make sure there's enough flowers and greenery
and feeling in it. And again, I'm using those
petals as little accents or almost like little buds
coming off the bouquet. So this is more of a spray, and I really like how
this one turned out with the lighter colors and
the soft greenery.
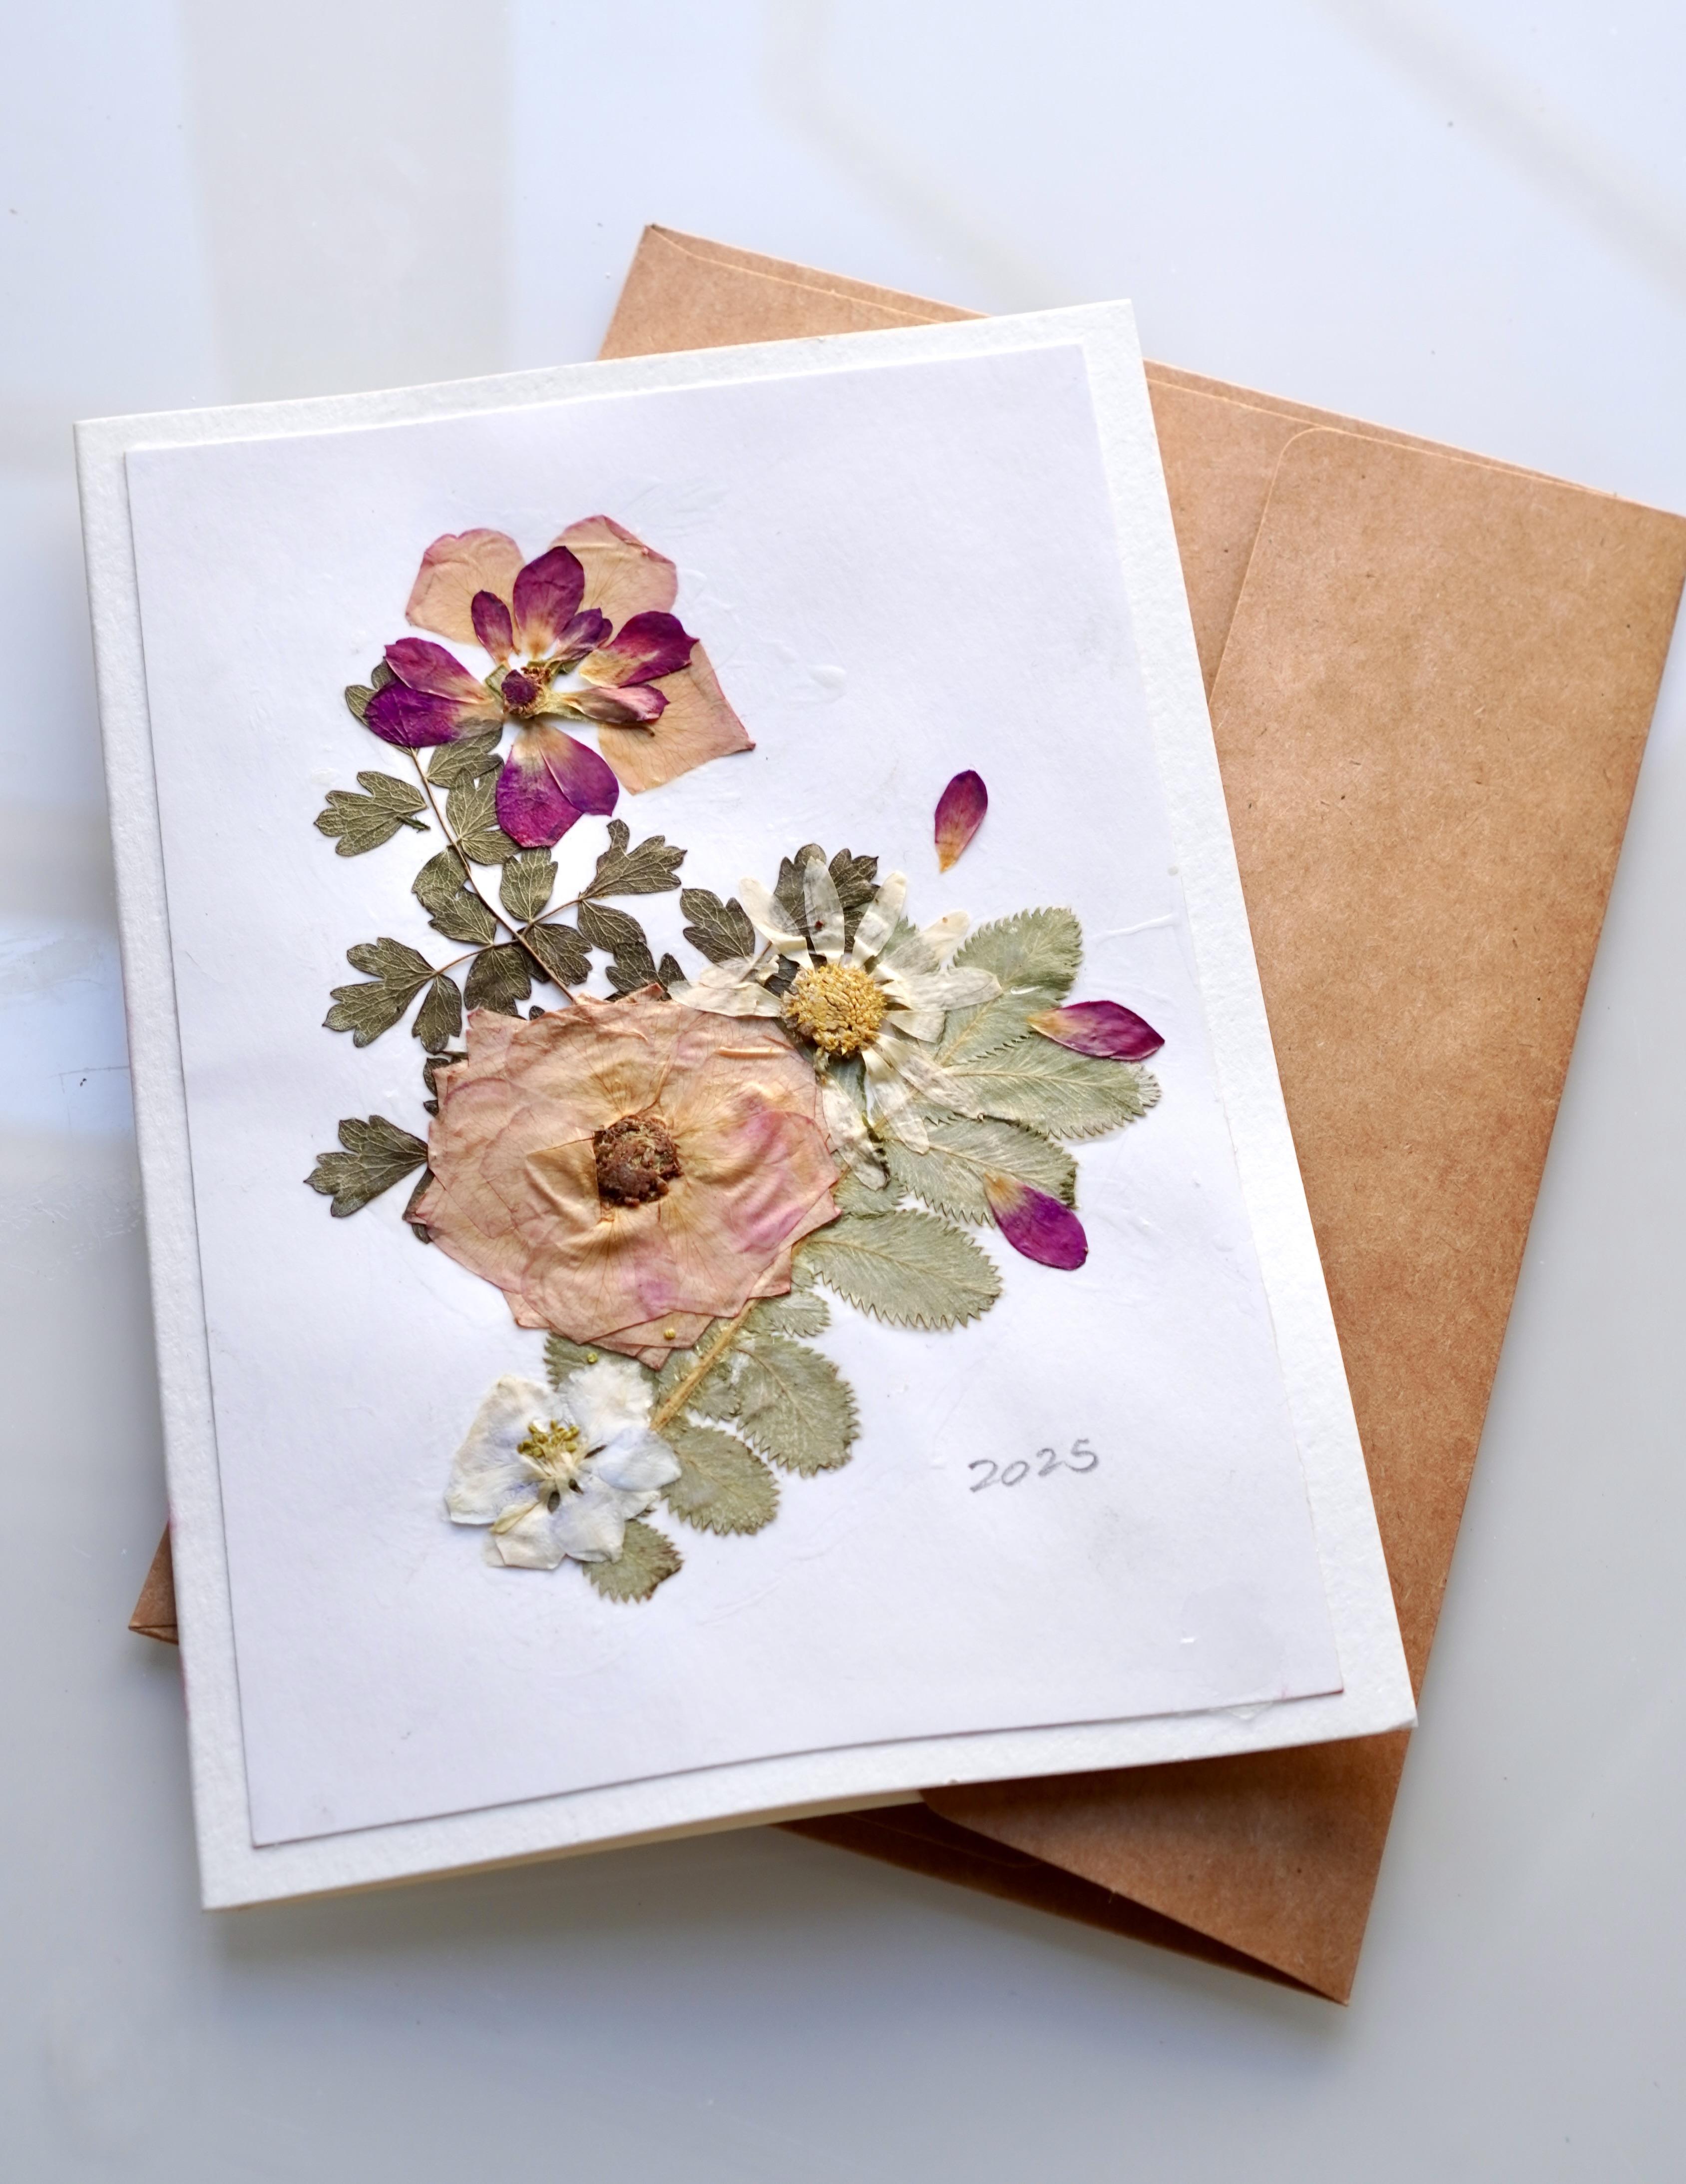
7. Greeting Cards and Framing: Alright, I wanted to show
you some examples of the beautiful bouquets that I was able to create
these framable bouquets. And I'm going to show
you how it looks framed, and I'm also going to show you your options as far as making
them into greeting cards. Now, you can always just create
right onto greeting cards instead of creating onto Bristol and create these
bouquets as greeting cards. So there are watercolor
cards you can buy, or you can take the seven by ten paper that you use
for your monogram, fold it directly in half, and
that becomes five by seven, which fits beautifully into five by seven
envelopes. Hello, Cat. So you have options. For framing these, you
can use any cheap frame. This is probably not
the most ideal one. This is just one I picked
up, and it's really cheap. It's just glass and
the frame itself, but you might want
to pick up one that also includes a mat because it will give
you a little more space behind the glass for framing. However, I just want this to
be able to sit on my desk, like, no frills, very simple. Let me wipe it
down a little bit. Get my fingerprints off of it. And it's a beautiful
piece to sit on your desk or to give as a
gift minus the cat hair. This is what it
looks like framed. It's absolutely gorgeous. And I did have to
trim it down a little bit from my initial size. So this is a four by six. If you go ahead and trim
your pieces to four by six, they will be framable
in four by six, and you can create entirely knowing what the composition will look like within the frame. Next, I want to talk
about the watercolor. You can create directly
onto watercolor cards or fold your watercolor paper and create onto the cards that way. And it'll be just fine. It'll work beautifully. This is the watercolor paper
that's been folded. This is the watercolor
card that I purchased. There's really no
discernible difference. They're exactly the same size, and you
can use either one. So what I did here was I took one of my favorite
compositions that I made, one of my favorite dried
floral bouquets that I made, and I pasted it
on literally with just this glue with just the Mod Podge onto the
front of the card. Now, you can leave
it like this or you can use little
frame stickers around the edges to make it look
a little more elegant. You can jazz it up if you want, or you can leave it
exactly as it is. And these do fit perfectly in either the I like to
use craft envelopes. These five by seven
card craft envelopes. Its beautifully in there, or if fits beautifully
in the envelopes that come with the watercolor cards. So those are just two
options that you have to make them into greeting
cards that are really nice. So once you have these, you
can do anything with them. I think these are probably the two best options is to either frame them or
make them into cards. And one thing that I
really like to do is pick out what kind of gift I'm gonna be giving
everybody for the year. So I might say acquaintances are going to
get something more like this, like a beautiful card
for their birthday, whereas my closest
friends might get this. If they're far away, I'll
just ship this directly and tell them to trim it
and put it into a frame. Or if they're in town, I might frame it for them and
give it to them as a gift in a floating frame or
in some of the frames which you've seen already
in the other videos. So there's 1 million
ways to do this. And I actually think these
are beautiful if you have them above on somebody's door, like a kid's door
or a bedroom door. And I've also seen
them hanging in bathrooms or above the bed on each person's
side of the bed. Just make sure they
won't fall down in case of an earthquake because you don't want that
hitting you on the head. But they are beautiful. They're always
personalized, and you don't have to worry about what you're going
to get somebody. And I think that most
people would say this is a fantastic gift
because your initials, you know, or your
monogram is so personal. Yet you don't have to overthink
what they would like. You just go, Okay, everybody's going to
get this this year, and it'll be personalized enough that everybody
will love it, but it's easy enough where I buy all the stuff to do
it once or twice, and I have all the materials to make everybody's
gifts for the year. So that's why I recommend doing this stuff with
the dried flowers because not only is it
extremely versatile, but you have, like, uses for all these things. They don't just sit
around. Other people get to enjoy the beautiful
things you've made, and they do enjoy them. Anyway, I can't wait to
see what you're making. So make sure you put your
projects into the projects tab. I want to see all
your beautiful cards, all your beautiful compositions, and all your beautiful
monograms. Please.
8. Bonus Timelapses: I've included some bonus
time lapses for you to see what it really looks like to make some
of these objects. This one is the letter A. I've also included a couple of the flammable floral
bouquet time lapses.
9. Wrap-up: Thank you so much for
taking this class. I hope you had as much
fun as I did with these dried floral
compositions and monograms. I can't wait to
see what you made. Make sure you post it
in the projects tab, and join me in my other
classes here on Skillshare. You can also find me on Twitch streaming a couple
of days a week. I can't wait to see you here
and in my other classes. Have fun and keep making.
 Summer Voelker, Textile Designer and Artist