Transcripts
1. Introduction to Paper Pumpkins: I have the cutest
autumn project for you. You're going to let out a lot of creativity because
we have got paint, we have got paper craft, and we have got fiber. This is a bite sized class. You're going to
walk away with the most adorable paper pumpkin that you painted yourself,
which is pretty cool. We are going to be
exploring texture together. We're gonna be breaking
some rules when it comes to watercolor in a
very liberating way. Leads me to who I am. My name is Peggy Dean. I am an artist,
author, and educator, and what I like
to teach the most is how to learn the
rules to break them. You're going to walk away
with an unconventional project that is adorable and will brace your home during the beautiful
autumnal season. I used to say that word
wrong. Did I say it wrong? I was right. This
is for everybody. If you want to
bring your kids in, if you want something
to do in the afternoon, if you want to do something with your hands that's tactile, this class is the answer. I've got it for you ready to go. So I will see you inside.
2. Supplies Needed: Let's take a look at what
we need for this class. What you're going
to need is paper. Any kind of papers fine. This first lesson we'll be
going through will be to do your own watercolor textured
paper for your Pumpkins. Please feel free to use
any paper that you want. It could be construction paper, it could be newspaper. Anything goes, I just
want to make this as multifaceted as we
can, because why not? We have an excuse to get messy, and I'm all about that. So I'm using watercolor paper. It doesn't have to be anything fancy because after
we cut it out, any sort of warping or
issues with the paper, they're not going
to matter at all. So it can be like 90
pound mix media paper, whatever you have is great. You'll need a paintbrush
if you're going to paint along with me
in the first lesson. It doesn't matter the size. Obviously, the larger it is, the more area you
can cover in one, but you can use anything. Next, you're going
to need some water, jar, water, and some paints. I'm just using what is in
my watercolor pan here. I'm not going to be
too finicky with it. I just want to get colored down. You'll need some scissors, and then you'll need
either glue or string. I'm going to show you
two different ways that you can bind these up. And then lastly,
you're going to need either crape paper
or a newspaper. I think newspaper would
look really cool as the stem or anything else that you can twist
and make for the stem. So we'll go through that
whole process together. Without further ado, that's
all you're going to need. So grab your supplies, and I will see you in a moment.
3. Paint With Wet-on-Wet Watercolor: We're ready, we are going
to dive in with painting. Now, if you have never
done what on what effect, essentially what that
means is you are painting with wet paint and a
wet brush on wet paper. So you can absolutely paint
this however you want to, but I'm going to
start with wet paper. So I'm going to come
into the water. I'm really going to
push my brush and there push down on it so that
bristles get nice and wet. And then I'm going to move that water along the full
surface of my paper. Usually, I would have
little tips on how to avoid pooling any water in certain areas to
get a nice even sheen. But that's the fun part about this particular class
is that anything goes. If you have a dry
spot somewhere, that just adds character.
It adds texture. We're looking for texture
in this exercise. So this is where we
really get to play. I just want to make
sure that my page is nice and wet so I can get a lot of that bleed that I
love so much in watercolor, that blooming of the paint. Again, see my papers starting to work. I'm
not worried about it. We're going to cut these
into small pieces, so you're not going to
be able to even notice. Now, my brush is far too big for these paint pans, but luckily, I have them laid out
in such a way to where the colors are similar, and I actually want multiple
colors in there anyway. So I'm just going to work that
color and I want a lot of pigment so I can get that
nice and wet and dig it in. And then I'm just going to
start setting paint down. Yeah, the bleed just
looks so pretty. Oh, it's so satisfying. You can also drag that
and let that bleed. So just marks, any
kind of mark making, you can let it do its own thing. You can wait for it to dry a little bit and add some there. But I'm just setting this color
down throughout the page. And then I'm going to go in. I don't care if my brush is
completely rinsed or not. If I you know, mix colors or end
up mixing colors, that just adds to the fun. And I'll add in a
warm color here. If it mixes, it's going
to create a nice orange because yellow and red. Make orange, and that works
perfectly for a pumpkin. And then I might add a
little pink in here, but maybe more of
like a creamy pink, just to have a fun subtle, neutral for grounding it. Maybe we'll see. And then
when you use wet on wet, it's just natural,
especially when it's really wet for that paint
to really disperse. So a lot of that saturation
is going to go away, so you can always go
in and drop more in, and that's going
to continue doing the same thing where it
starts to bloom away, and the drier that it gets, the more it'll stay
in that one place. So like this area here, I have pretty much dry. So you see how that's not
going to go anywhere. If I set this down, It's
pretty much I mean, it's bleeding a little bit. Was this one's bleeding
quite a bit more. Like, that one's going
to bleed quite a bit, whereas that one still
stays and it's spot. You'll be able to see how
your paper is working, but I'll be honest with you, when I first did this project, I was not looking half the time. I was just going in
messily and just kind of spotting the page, which is so satisfying
because we're so used to being so like, perfectionist about
what this looks like. But to be honest,
because they're cut in such small shapes, it adds a lot more character
when it is more messy. It doesn't have to blend pretty. You can have weird marks. You can have mistakes. I had five of these papers kind of sort of stacked
on one another, like, basically
effortlessly drying. And it would make marks on the
opposite side of the page. And that was kind of
part of the charm, like, You can see little splotches
throughout these that just make for interesting
like this one here. That was a bleed
from another page. But see how it just kind
of adds to the charm. So you just never know
what you're going to get, and that's part of the
fun of doing this kind of a project because
you're celebrating those, Imperfections. It's also a great exercise
when you are like, Oh, I hate how this turned out. I'm going to throw it
away. Don't throw it away. You can always salvage it and make something
cool out of it. So just paint, add
even more paint to it. Make it come to life more, give it a new purpose. You can use You
can.in like this. The drier it gets, again, the less it
will bloom out. And that's going to make
for a pretty cool effect. Now, what we're going to do
is let that completely dry. Unless you want to
be messy like me. And then you can flip it over and do the exact same
thing to the other side. Now, what I'll say real
quick before you do that, depending on how you
want to create this, you have the option
to leave it blank because if you choose
to do the glue route, you're going to end up gluing one side of the paper
to another paper. So for example,
this is one piece, and this is one piece, and the back side of
it is glued together. So you can see I didn't
paint underneath there. That was just glued together. So it's pointless to paint the other side if that's
how you're going to do it. However, if you're going
to use a string method, that's going to give you
a lot more to work with. You'll be able to see the front and the back of each paper. So for example, we have
this is one piece, and then we have a break. So this is the back side,
what was glued on that one. And then we have one
piece, and then the break. So this is actually
the way I prefer, and I thought it would
be more difficult, but it's actually
it's pretty secure, even if it's like even if it doesn't feel
like it when you're making it, because the glue, while that seems to be
like the right answer, you can see it's not going to be the most
solid necessarily. So, I mean, I liked making both. I'll probably do them
both ways again, but I wanted to give
you that insight before you decide to
paint the other side. If you do want to go
along the string method, go ahead and paint
the other side, and we will continue and
start to cut out our shapes.
4. Cut Your Pumpkin With a Paper Guide: Okay, I'm actually going to use some paper that I already
had dry and was a scrap from before while my other one's drying because I really
like blending colors. So this one, like, I
think it's so pretty. So it has some of this pink. And then it also has a lot
of the orange and red. And so clearly, I have a preference over here that
you can really pick up on. And I'm sure everybody does
a lot of blues and purples, a lot of greens and ochres. So it's really fun to do a
color, like, a set color. So I'll start with these scraps. If my paper was landscape, I would have probably
cut half of it. And then that half into
like quadrants, basically. You can also cut it
into thirds this way. So basically your vertical
in two slits this way. However you want the idea is just to make it so that
it's the size that you want your pumpkin to be when it is like the distance
away from the center. You're going to do
that with a fold. So if you are familiar with drawing a heart on a
piece of paper and cutting that out and then you open it up and you have a heart, it's the same concept. We're just doing it
in a curbed shape to form the side of a pumpkin. So, if I wanted to make mine, let's see, I kind of want
to make it in the middle, those two or around that. I think just around that
size is going to be good. So you can draw this out first. If you wanted to
draw it out, I'll do it kind of dark,
so you can see it. It would look something like
Yeah, you can see that. Okay, I wouldn't go
this dark if I was sketching it for real, but it would look
something like this. That's more apple, so I
want it to be more pumpkin. Now, see, that's why
I wouldn't do it so dark because then you can't
erase it, which is sad. But this seems to be about the right size. So
just something curb. So it's pretty even
on both sides. You can see right here and right here, and I'll cut that out. I'm not worried about that
too much because again, the whole thing is
meant to be textured. So I'll cut around this shape. I'm not worried about keeping
that shape anywhere else right now because I
just want to make sure that's what I want. So this is going to
be a taller one. L et's see in ratio. Yeah, I like that size. And then I have
three tiers here. So from here, what I want to do? I want to get the most
bang out of my buck, if you will, here. So I can go one, two, three, four, and that's
probably going to be my best. Yeah, so I'll go this direction. So I'll cut a slit here. Cut this into two pieces. And then I'll cut this in half. It doesn't have to be
pretty because we're going to end up cutting the
shape out of that. And it can be approximate. From here, we're going
to use this as a guide, and there's two
ways you can do it. You can either, so you're going to want to
go fold on fold. This is the folded side,
this is the folded side. You line that up, and you can go in and you can sketch
that shape again. And then remove it,
and then cut that out. So this is the first way,
which we'll do just fine. These don't have to be
perfectly aligned as long as they're overall
the same shape. So that's the first one. Or you can take your
paper fold to fold. And this is how I do it because I don't have a ton of patience. I actually just cut
along with the guide. I just hold it firmly in place. It might be a little tricky if you're doing this
with younger kiddos, so it might be easier to draw So it doesn't take
too long to draw it. But There we go. And then I have my
guide that way. So that's what I like
to do because it just makes it so much more simple or not
simple, so much faster. How about Removing a whole
step from the process. I mean, I know the process
is what it's all about, but you knew what to mean. So I'll finish
cutting these out, and then I'll bring
in the next color. Which is the one that's drying
that we painted together, that has the orange in it, and I'll start to blend those colors as we form and
build the actual pumpkin out. Oh, it's going to be
pretty. I can't wait. Now, I am so curious as to what color you are working
with because colors. One of my favorite
topics ever. Real quick. If you have hard edges from
cutting, you could keep them, or you can always smooth them out after you have
the guide away. So you don't have those. You know, Rough Rough cuts. Okay. Now, let's see how
this paper is doing. Okay. Once, your papers dry. Okay, so we'll get eight
out of this if I cut it in four, I'll
start in the middle. The middle and cut this down. Do the same thing in
the middle of each one. And then when I have
my four strips here. I can do cuts in the middle
of those the other way. If you have a lot of
edge right here, like, let's say it's much thicker, you could cut that off to avoid getting it
into your piece, but honestly, when we fold
it and we cut out of that, that's also just as easy to
avoid when we're cutting. So I would say
that'll work, too. Okay, so take any
one of those guides. We're going to cut or
we're gonna fold this. Notice, my folds are not neat. They're not, like, pretty. They are going to be um
They're going to work. They're going to work just fine. Looks like this would
have been Oh, I see. It leaves room for that border. Okay. So go ahead and
cut around this one. Again, if you want to draw
it on first and then cut, that is also just fine. When we do it this way, it does make for some more
choppy cuts sometimes. I've noticed with mine, but I'm not a perfectionist.
I'm just not. I also think that this
particular project, this craft, really invites a lot
of the let's say, rough around the edges, m in. But then the result
is such a quaint and fun like elevated
piece of decor. Who would have thought
out of all these scraps, which is what makes it so fun. Okay. So when you're finished
cutting all your pieces out, I will show you how to
combine it based on your preference if
you want to use thread or you want to use glue.
5. Attach the Stem: Mentioned it earlier, but
I really do think it would be really fun to use
newspaper for the stem. So if you have
newspaper, try it. Try it because I think
it'd be really cool. I have crate paper, and you don't need very
much of it, maybe, like, I mean, the length of the stem and then probably around this much, even with newspaper, you don't need a whole lot
because what we're going to do is roll
it really tightly. So really, it's just
like the thickness after you roll it and maybe come off the kind
of go to the side, so it's a little bit wonky. So it's not that perfect roll. So maybe something like this. And that way, it's
tight on one side and it's starting to loosen
up on the other side. And what that will do is
allow this part to be twisted tighter and
have a nice thin top. And then the bottom can
be kind of split out. So what I mean by that I the bottom can
open up like this. Now, to create this kind of
where it looks like it's more connected on the side
rather than it being straight down or one of
these big blobs of paper, what I do is I cut
little splits, in the bottom, and
then I smash it open. This is a little too long. So I can just tuck that
under a little bit, and it really doesn't
have to be pretty. It doesn't have to
be. There's not a certain point where
it's like, Okay, we've got it because the idea is for it to be
more of an organic stitch. Then we can go in and twist the stem or you can do
this with any paper. It's not just create paper
this will do it with, but I'm just bending it, and then see how it
creates that kind of curl. So you can get
creative with that. This one I have where it's bent at the top and
then bends back up. This one is a elaborate curl. I'll put these on the
side again so you can see those. Maybe. Okay. So then for this one, I can just tighten
it up even lower, so it's not so wide. And then come back in
to that flat spot. And that flat spot is where
we're going to add a drop of glue and set it on top. So drole, any glue. This is just liquid glue. It doesn't tell me if it's
permanent. I don't know. I mean, it might. I
just I didn't read. So glue. And set it on top and just let it
and hold it for a minute. And then once that is done, you can kind of you can
do it as it's sitting, but you can kind
of start bending a few pieces of that paper kind of over the sides so that it feels more like it's resting and attaching instead of just like a blob that's
sitting on top of it. When that is done, you have
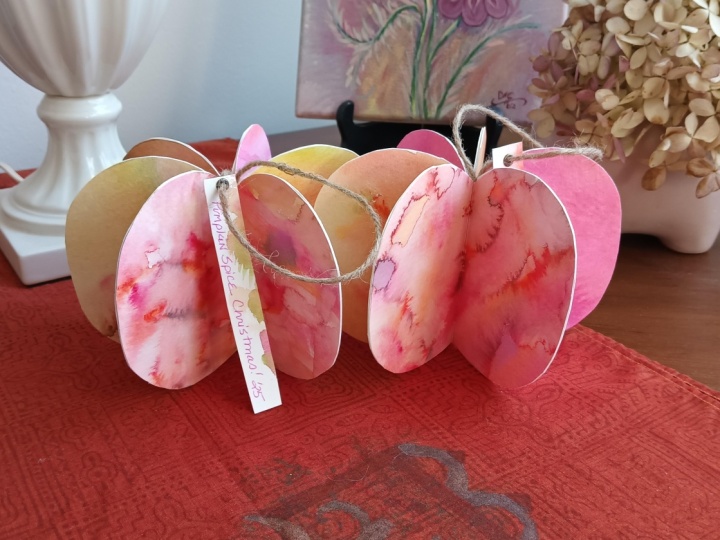
the reveal on the side, and it is so cute. And that, my friends, is your
accordion paper pumpkin. Oh, I just love the
way these turn out. Okay, I'll see you
in the next video.
6. Assemble Your Paper Pumpkin: First of all, can we
take a moment to admire all of these cool little many masterpieces
that we have created? I mean, they are so much fun. Some of these are giving ti die, which was not the case
until this particular sesh, whereas this side is
really feeling sunsety, What do your many
masterpieces look like? I encourage you to take
photos of this part, just because it's so
fun to see, like, how a piece has been
organically isolated. Because we didn't plan that out. That's just how this ended up. And I think that is part of, like, just so fun 'cause it's, like, a little surprise.
It's a surprise. Like, this is a pink Wonderland. Okay. So what do
yours look like? Okay. When we're done with this. When we have cut out our pieces, it's time to put them together. Now, I'm going to use
string for everything. So before I do that, I
want to show you how to glue them if that's
the choice that you want to take to create yours. So the first thing to know
is when you're putting the pieces together
for both ways, you're going to want to make
sure that they line up. So, for example, These
pieces dip a little lower. So if it was flipped, this does not match up,
we want it to match up. So if you held this
together like this, and you see all that
opens the lingering, paper underneath,
you're going to want to flip that and see how
now it matches up. That's what we want. And so it doesn't matter which is top
or bottom, you can choose. This is your art, and right now, it really doesn't
matter because all we're doing is connecting them. So their folds look like this, and it's going to be the outside that you're going to place glue. And then you're
going to combine. Like this in their
folded form and hold that as the glue cures, or if you have a glue
runner or something, you can start right away, I use a glue runner on this
one, and it works just fine. And then when you release it, it's going to be
connected like this. They're going to be a it's
going to be a thicker chunk, but it'll be like so, and you will continue
that process. So you'll take the next one. Make sure it's lined
up, apply glue, place it on the next
one, and so on. If we're using string, it's a little trickier
to hold onto because we want to make it tight,
but it's doable. I just grabbed
embroidery thread. You can use anything.
It also doesn't matter the color because
it's virtually invisible. I'm only going to use
one piece of this. I'm going to get
rid of the rest. On tiny piece, you
can barely see it. But I'm going to take one of these and I'm just going to hold I'm going to
give myself some slack, and I'll wrap it around once so that it's really on there and it's not
just going to come loose, but I'll still hold it in place. And I'm going to do the
same thing where I line up. I think I want it
to go this way. Yeah. Where I line up, Back to back, just like we did the way
I explained the last way. And then I'm going to see
how it's in the center here. I'm going to flip it and
wrap it on this side. Now, the easier
way to do this is to hold it in place and
just go in the center. And then pull that tt. Okay. And you'll see
now that has combined. So that's going
to stay in place. But again, I'm just
going to go to the last part and
hold my thumb there. I'll grab the next piece, make sure it's the same
direction back to back, and then I'm going to pull that string into the
center of the next one. And then I might wrap it around once so that it's really secure. I'm going to hold my thumb
the last place that it was. Grab the next one, make
sure it's the right way. Put that on the back side
and loop that string down. Now instead of wrapping
around this one, I'm going to turn the page
in not to the back to back, but into the next one
that I had just added, and I'll wrap that into the last one goes into
the one previous. I'll hold that in place. I'll flip the page to the
center of what I just added. Wrap this next one, line it up. And go down the center. Wrap around that previous one. Hold it in place,
Lip to the new one. Grab the next one. Back
to back down the center, bold it in place, and. See, I'm just combining them to the previous u the new
addition to the previous one. You just want to make sure that you're holding these tight. Okay, so we'll continue
adding all of them, and then I'll show you how to really secure it so that
it won't fall apart. So that it won't the
string won't move. And we will have
this solid finish. If you do run out of string, that happened to be
on the first one, If that happens, you can just tie another piece to
the existing piece. Again, the string will not be showing when we're finished, and so it really isn't going to make
much of a difference. Actually, it's
happening right now. So I'll just make sure
that that is tight, and I'm not going to
move it around a lot, and I'll just take
another piece and just tie it on with a
normal style of knot. If you know a better
style of not, do that one, but it's not
going to matter too much. So I just do one of these. A quick loop and tie. We can cut that extra
off in a little bit, but not going to
mess with it until I have this whole
thing really secure. Got that. We'll add the rest
of these pieces. When we get to the last one, I'm going to just
go over it twice, and then I will bring it around. Now, if there's any areas, this happened to me
just now because I was not wrapping enough
on all of these. So some of these are
going to have an issue. Luckily, we have been
holding this tight. And so I will be
able to fix that. I didn't have that
happen the first time, so we're troubleshooting
together. The first thing I want to do is connect this one to this one. So I'll just open up the other side and come around and then
tighten that together. Which seems a little strange, but it will work. We're just going to move it and wrap it on both of those sides. Now, I can see where the areas are that I
have a little ops, and what I'll do is just
come up through any of them and just bounce on over to the one that's
having the issues, and I'll wrap that again. At this point, this is
where we can come in. And cross. I would do this anyway, where even if I had one that
wasn't fully connected, that's where you start to
just pick any of them and then open up one on the
other side and connect it. Maybe I'll do this one and then open one up I like to pick the ones that don't have a
ton of string already in the center and then pop
over to the other side. Then I'll just flip through.
See how things are going. If there's any loose area, I can adjust that as needed, and this is looking good. I did just see that area I did just see the previous
string, here it is. So I'm going to go into that
spot and tie off right here. There's a few actually. I caught them kind of
all over the place. All right, so I'll go in
here and just loop it once, and then grab any of that
string spare string and tie it. And then I can just
cut off that excess. I'll find the other ones and
cut the excess off there. You might have something that looks a little bit like this, which is not the goal. So What we're going to do is
fan out all of these folds, anywhere that it looks like, they're not quite even. A lot of times it's
the back to back. But then once you do that, you can see that it's
starting to form better. As long as you have
where it's evenly spaced, it's super cute. Look at how cute this is ready. Now, all we need to do from here is finish it with a stem, so I'll see you in a moment.
7. Show Off Your Personalized Pumpkin: I hope that that was as fun
for you as it was for me. Now, I want to see
your pumpkins. I want to see the texture
that you put in there. I want to see the
colors that you chose. So be sure to share
because nothing makes me happier than
seeing what you guys do. I get to live vicariously through all of your
creative choices. Yes, please, thank you. Hm. Again, my name
is Peggy Dean. My website has got a
plethora of goodies for you. You know where to find me.
Tag me at the pigeon letters, and I'll see you next time.