Transcripts
1. Introduction: [MUSIC] I love creating things that are unique and individualistic
to us and our art; things that nobody else is
going to have out there. That's why I like making my own textures to
use in my photos, I like foraging my own
mark-making tools, whether it be from things
outside or things in my house. I love creating things to use in my art that nobody
else is going to have. Even though I create things and show other people
how to create them, the elements are
still going to be very unique to me
that I created. I love that. I love using things that are not
mass-market produced to make my art more authentic
and more original, and that's what this
class is all about. I'm Denise Love, and
I'm an artist and photographer in
Atlanta, Georgia. Today I want to show
you how to make your own rubber
stamps and combs. These are super cool. These are going to
be things that only you have, that you thought of, that you created, and
they're super easy. Once you see how easy it is
how to create, I guarantee, you're going to want
to make a whole bunch of these and put them in your little box
of stashed things to use in your art
going forward. You're going to pull from them over and over and over again. They're easy, it's not a lot
of supplies to create them, and the sky is the limit
on what you can think of to make it all niche. You can make random lines and designs and
dots, which I like. You could make pictures and butterflies and
more elaborate art, which might be your style. The sky truly is the limit, and what I love about
these is they're easy, anybody can do it first time. I guarantee, you'll
get something that you love if you're
doing random lines and circles because it really is that easy to learn and carve. Then the pieces that you
end up after the fact I created some little
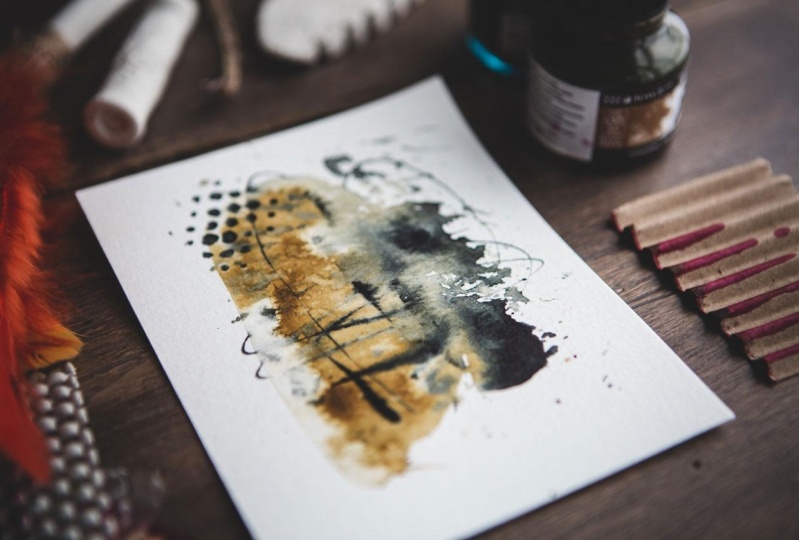
pieces of art just to test out what my different mark-making things were that I created in class. I like making pretty
little abstracts, that's what my tools
go into creating. But we create lots of
different patterns in class and then test them
out to see what we got. I know that you are going to love some of the ideas that
I've come up with today. I can't wait to see how you
use them and what you create. Definitely come back and share what you made when
you were in class. I can't wait to
see those and I'm excited to show you
some good stuff. Let's get started. [MUSIC]
2. Class Project: [MUSIC] Your class
project today is to come back and show me a few of the stamps that you've made and maybe some of the marks that they made or the piece of art that you created
with that stamp. If you did the combs, I want to see your comb and
maybe some of the marks and the art that you made
with the combs or the stamps. I hope you have fun
with these projects. I can't wait to see your pieces. Come back and share them. I'll see you in class. [MUSIC]
3. Supplies: [MUSIC] Let's take a look
at the supplies that I'm going to be using
throughout class. This is a very easy project. We don't need tons of supplies, but there are some
things that you got to have and some things that
just make it easier. What I've got here
that you just must have is a carver and
something to carve on. I'm using an inexpensive
set of carving tools. This is the Speedball
Lino cutter set. What I like about it is it has five different heads in it, Number 1, Number 2, Number 3, Number 5, and number 6. One is the smallest and then two gets a little bit larger and then three is a little larger and then five
is the largest. They're all like a v cutter for cutting out different
details and stuff. Then Number 6 is this one that looks a little bit
like an X-Acto knife. Now if you want to just get one or two little
tools that are separate rather than this
piece that has all five in it, Number 1 and Number 2 and an
X-Acto knife would be fine. I like this. They all fit into the little handle and you can screw the end of
the handle on and when you're ready to
use one of the heads, you just unscrew this, fit the head in and screw it tight and that tool
is ready to use. It's really nice as a
starter kit and then after you have carved plenty
of things and you're like, I love doing this, then you could look
at other tools that maybe you're interested in. But this is a great
one to start with. One's about $20
for the whole set. The other thing that
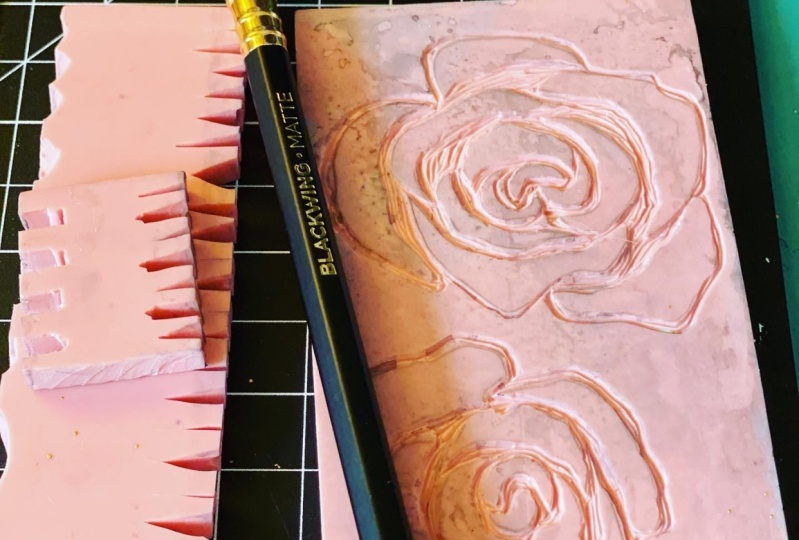
you just have to have something to carve on. I'm using the Speedy-Carve
pink rubber stuff that Speedball ball
because it's easy, it's flexible, and it's just definitely the most
economical way and I just really loved it. This size is a four by six. This ran about six or $7. This size was a six by
12 and it ran maybe $20. It wasn't that much, but you can do so many
stamps with this. If you just take an example
of a few that I've cut out, you can see like how many you could get out
of each of these. If you just want to
dip your toe in, get the smaller one, if you think I want to make a whole little collection
of stuff for myself, maybe get the larger
and we can cut that up. The other thing that you're
going to want to have is if you want to draw
something organic, just four lines and dots
and mark-making like that, then you don't really need to flush out a really
complicated pattern. But if you're wanting
to do something with shapes and patterns,
maybe flowers, maybe something
more in a folk art block-looking thing
or Scandinavian folk art kind of patterns, I find very interesting. If you're wanting to do that, then you might want to
get some tracing paper and a very soft pencil. You don't want to
use an HB pencil. You want to get more
like the bowl so 2B, 4B. You want something
that's really, really soft that's going
to make a pattern, fairly easily that then you
could take your bone cutter. This is like a bone folder. I like this because it's got this little edge
that I can do this on. You're going to draw some
marks with a very soft pencil, whatever that happens to
be that you want to get, and then with your bone folder, you could do this
number really hard and that's going to transfer your design that
you want to carve. You don't have to use this.
You could use a spoon if you don't happen to have
one of these bone folders. This is what they do
to press pages down when you're creating books
and stuff like that. But like a 2B pencil
and some tracing paper, you can create a nice
intricate design, and then you can transfer
that design to our rubber. Those are nice, easy things to have to create a more
intricate design. Then I also have over here
a pair of scissors because this stuff cuts fairly easily with just a pair of scissors. This stuff is nice
and malleable. It's easy to carve and cut. I think you're really
going to love doing this. Then to test out our paint
when we're all done, we can have like a
little palette pad and some acrylic paint just
to give it a test, a little whirl to try and
see what our stamp looks like and see do we need to carve it and refine it a
little bit more, so that's something to have. Then I'm just working on a cutting mat because
if I'm cutting and creating say like
my own rubber comb that I'm going to use
to drag stuff through, then I'm going to want to
be using my X-Acto knife or the little knife
that comes with this and I'm cutting
down into stuff. I don't want to be cutting
down into my table, so I do have a cutting mat
under here. That's it. This is a pretty easy, creative, fun process and you don't
need a lot of tools to do it. Once you carve one
or two of these and see exactly how easy it can be and how amazing and unique
it makes your piece of art because you've got
something nobody else has something that's completely
new and original, then you're going to want to have a whole little collection of these for yourself. You're really going
to love doing this. That's the supplies
we'll be using in class. I can't wait to get started, so I will see you
in class. [MUSIC]
4. Book Inspiration: [MUSIC] I thought
I would show you a couple of books that I use for inspiration that
I had in my library. Basically, even though I'm
cutting out fun combs and just some basic little
stamps that are organic that I could
use in my abstract art, you could also use these
for bigger pieces of art that you carve a whole piece and do
prints off of that, and that's basically
called block printing. This Block Print Magic book by Emily Louise Howard of
the Diggingest Girl. [LAUGHTER] But that's it. This book is really
nice because it has larger art projects in it if you decide that you really
love the carving. Let me tell you, the carving is actually super fun and it's got
some further ideas and just inspiration in it
that I absolutely love and it's got smaller projects in that just you
may find inspiring. This is a fun book
that you might check out for some
further inspiration. Another book that I have is
Block Print For Beginners, learn to make lino blocks and create unique relief patterns, and this is by Elise Young. This book is really
nice because it, again, it focuses on block print
because technically that's what these were marketed
as for block printing, but I'm using them for
little stamps and stuff. Again, it's very interesting, some different
patterns and shapes and ideas and collage materials. Here's a great little section on shaped stamps for exactly
what we're doing, lines and dots and
different ideas like that, and then using it
for collage papers. That's another use for
these wonderful pieces that we create is for
making collage papers. I'm going to be using
them as stamps in my art. But this is the other thing that these would be really
wonderful for. It's just got lots of
simple patterns and shapes and ideas
that you might like. That's another really nice
book to just glance through. Then I was talking in one of the videos about really loving Scandinavian folk art stuff
and this Imaging a Forest, Designs and Inspiration for Enchanting Folk Art by
Dinara Mirtalipova. I probably just read
that wrong but here is a quick look at the book
and you can check it out. What I loved about
this, it's not specifically for block printing, it's more of pattern
inspiration and to give you ideas in
this specific style, which I really love. These birds are
really beautiful and look how easy that looks
like it would be to carve, super simple, and
that's a stamp. That's exactly what we're creating but she's
made a bird and then used it to stamp fabric and make a
pattern on some fabric. Here's a lion as a stamp. You can do quite a lot with
pattern books like these. Look at these letters,
beautiful inspiration. That's basically
what this book is. It's an inspiration
book for you to get ideas for wonderful
folk art patterns. I love that because things like these leaves
and the flowers, those would be not
super difficult to recreate and you can
have a beautiful pattern. I love this leaf and dot pattern that
they've got in here. This was really pretty and inspiring and it
makes me want to create some type of
leaf and vine stamps. That might be a good
idea because I really like leaves and vines
and stuff like that. This is just a super fun
book for inspiration. I wanted to share with you just a few things in my
library that you could look at for some
further research and inspiration if you decide, I love this and I want to
even dive a little deeper, these are some nice
choices to consider. I'll see you back
in class. [MUSIC]
5. Tool Safety: [MUSIC] Let's talk about tool safety. These are very
sharp and you could very easily gouge yourself with these and have
a serious injury. What I want you to do is
to just right up front, learn how to hold
your tool safely. This is created with a handle
that's meant to go into your palm, and so I like to hold it with my
finger up here, it's in my palm, I'm ready to then
gouge into my piece. I cannot hold the piece with my hand anyway in front
of my gouging piece, because as I'm gouging, if I slip or get to the end, I might gouge right into my own hand or finger and
have a serious injury. So you always want to keep
your hand off to the side. It doesn't matter how small of a piece
you're working on, you need to keep
your hands out of the way the tool is facing. Get in the habit of keeping
your hand to the side, to the back, by anywhere
that you can then carve, and when you're going forward, nothing in front of
the tool at all. If it slips or you gouge or
you do something like that, you're not injuring or poking or hitting anything that
you don't want to hit. Just keep that in mind that
these are all razor-sharp. This is a razor-blade, basically, and the tips of these are basically
[NOISE] razor blades. You just want to get in the
habit of carving forward, don't pull it towards yourself. Don't try to hold it weird. Hold it like this. Use your finger as your guide. Your other hand can
be to the back or to the side out of the way of
the direction you're carving. I just wanted to
cover that first. Before you get in there, put your hand right
here and go, no, I have cut my finger really bad. So just be aware. I'll see you back in class. [MUSIC]
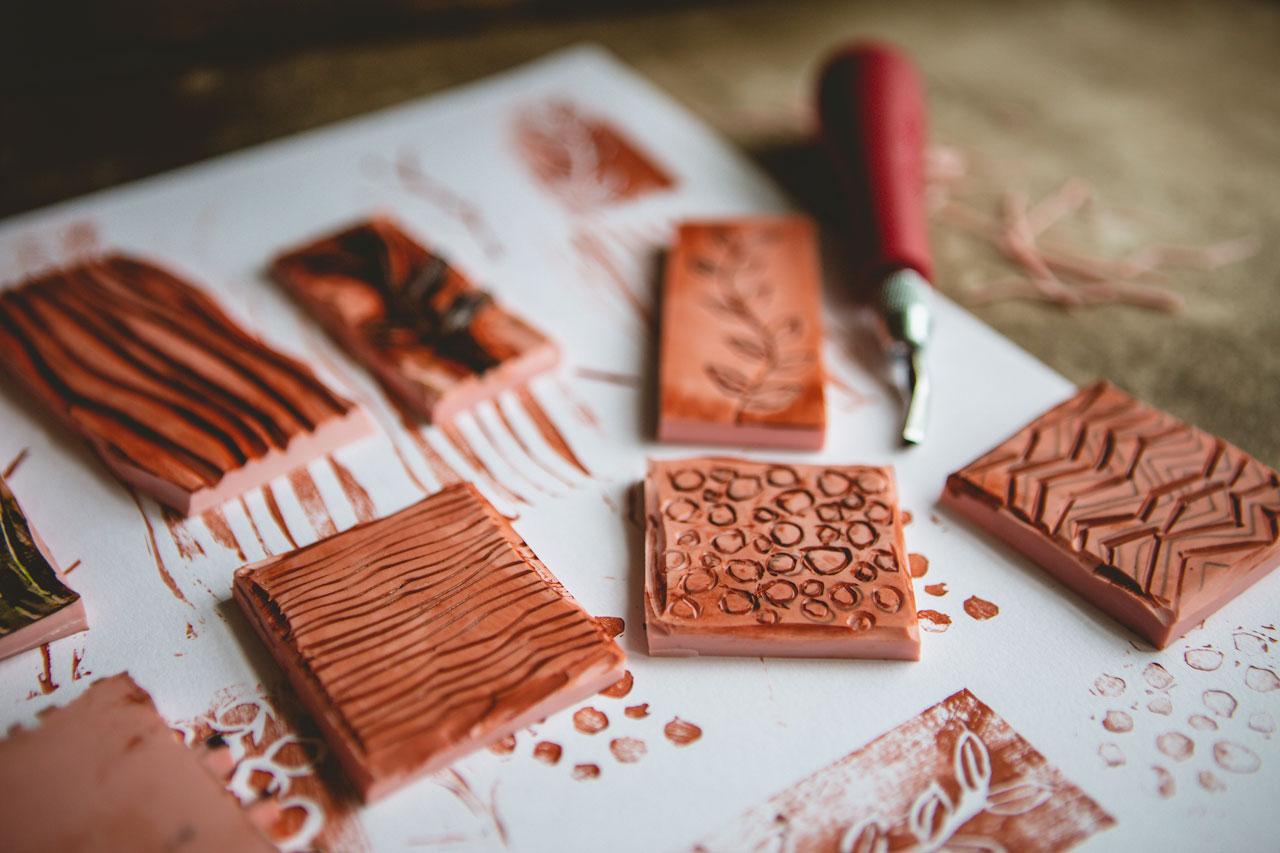
6. Testing Tools: [MUSIC] Let's test out all of our little carving
tools and make ourselves a little master like I've made here because
this is going to then be your guide as to what you might choose and
you'll be able to say, oh, I need this, or
oh, I need that. So those are very easy to make. I just took my scissors and cut myself a piece of
this and I think for this one I
might actually just take my X-Acto
knife because I got really crooked and I want a straight edge, doesn't matter. But I'm just thinking, it would be nice to be straight and I'm just
using my X-Acto knife. I could use my X-Acto tool
there on that handle, but I have it switched out
for the moment so hang on. I'll just cut
ourselves a piece of rubber and you saw
how easy that was to cut with just a ruler
and your craft knife there. It doesn't matter if it's
a metal ruler it just happens to be the one I
have sitting over here, any ruler is fine. I might just cut myself
another little piece here two swipes is what makes
that work really well. Let's just set that
back out of the way. Now, we have a
little sample block to test things out so
I've got the Number 1 in here already and I
want to keep in mind my safety tips, hand to
the back or to the side, not in the front or
in any space that the tool can run into
your fingers and I just want to start
off by getting an idea of how this
carves how hard I need to press to get
fine details versus a deep detail and just see
how does this tool work? You can tell because
it's rubber, it's not sliding all around
so that's really nice. I've got this nice
cutting mat here, so that's really keeping it
there so my table is not super slick and then that's the Number 1, so Number
1 is the smallest one and you could
take a little pen and just put Number 1 or
a pencil or something there just so that you can indicate for yourself
which one was that. All right, so this
is Number 2 and I'm just going to slip Number 2 in. Be careful when you're
doing this because again, that end is very
sharp and I'm just going to get it where the
slides in. There we go. Tighten it up and now I'm
ready to gouge Number 2. Then we can see how
much bigger is that. How much more space does
it carve at a time? It's very interesting
to see the differences. I want you to do this with
each of the tools you have, whether you have the set that I have or you've gotten
individual pieces. This is Number 3. I want you to know
what each tool you have does and
see I can already see that Number 3 gives me a bigger gouge than Number 2 and Number 1 so that was one. This was two. This was three. All right, we've got Number 5. I wonder what Number 4 looks like because I don't have
a Number 4 [LAUGHTER]. I'm sure it's one space in-between the ones
already got here. Screw that on. Then Number 4. Oh, yeah, much larger so
you can definitely tell 123 are your different
detail brushes, and then Number 5 here would be like gouging out larger
background spaces and then I'm going to show you
what we're going to do is we're going
to make some of our own dragging combs and we can do that
with this blade. But basically, this blade
cuts through just like my X-Acto knife and so
if I cut through here, maybe several in a row. I could do something like
that and now you can see it cut all the way
through very easily. I was thinking in my mind
that we could then go back to the Number 1
blade and we could come in from the top and just all the way down and we can just get
rid of that piece there. You can see how doing that, we can make our own
rubber teeth and you can decide how thick and thin that you would really want
those so if we kept going, we just do it with a knife
here to get one more. You could see that
we could then have our own unique rubber combs
to drag stuff through. Let me tell you, I like all of my rubber
combs and so making various size teeth and doing some different
things with that, would be really nice. We could also if we had just
the cutting piece on here. We could cut these
at a triangle at an angle, and then I would
still get my teeth in there. Making the combs are super easy and now we've got
some cool pattern there that we can drag
through paint. Super fun. Those are Number 6. That's the carving
Number 6 tool there. Make up your own
little test sheet here so that you
can say, oh, okay, I want that Number 3 or
I need that Number 5 or whatever it is
and just have that available for yourself
so you can see how fine a detail that you need to get and what
size you need to pick. All right, so I hope
that gets you excited about the carving tool and the different things that
we can get with those. All right, I'll see you
back in class. [MUSIC].
7. Tracing A Pattern: [MUSIC] Let's take a look at doing
tracing our pattern. I did a little bit of that in
our testing video earlier. But I'm just going to
take a bold pencil. This is too bold. I want a nice bold pencil. I can either trace a design if there's something
that I really love. Let's say, if I really loved
the design on this tin, I could very carefully trace that design and we could
create that as a stamp. I could also just
do a random design, like circles, wavy
lines, or something. Let's just do wavy lines. I just want to show you, I've cut this about
the size of my stamp. You can either
draw on the stamp, but I do want to show you
how to transfer a design. Let's just say that
we're going to do some interesting wavy lines. Doing it on something
like this rather than directly on your rubber gives you a chance to decide on spacing and
then you could be like, oh wait, I don't like
what I did here or there. It gives you a chance
to think through your ideas and decide if you need to change it
or do something different. Let's say this is what
we want to create. Turn that over. If you do anything with words, remember that your
words need to be backwards on your stamp because then when you flip the stamp
over and stamp it down, you want it to be forwards
when you stamp it down. Keep in mind what you're doing. But I'm doing something neutral, I guess, you could say here, and it's not something that needs to be directional for me. You can pick up your paper or you can see it curls. But you can see how easy
that transfers with me just dragging my spoon or bone
folder right on top of that. So a bold pencil, you don't
want a regular pencil, HB or a hard pencil,
or any of that. Go from a 2B pencil, something soft, and that
will transfer really nicely. See you back in class. [MUSIC]
8. Carving & Tips: [MUSIC] Let's talk about
some carving tips. When we're carving,
I like to start off with the smallest
tool that I've got. In this case the Number one. I want to start off carving
around my details first. Then you can carve further out with bigger tools as you get further out into bigger spaces, like if I wanted
this carved out, I might switch to a larger tool. But to get started with, let's just say that I want to keep the line that I've drawn. I want to come
right beside that, very carefully and just let
my tool be guided by my line. It doesn't have to be perfect. If you're off a little bit, you can come back in and
get a little closer. Once you've got that
first initial line, come beside it with another little carve
out from the same tool. This has given you a little
bit more wiggle room, for when you get to
your next larger tool, so that you're not carving on
top of a nice tiny detail. Then work your way up to
say, tool Number two. Then I want to come
in right beside those details with
my next larger cut. That will protect the details because you've already got in real close and done
your detail work. Now you're ready to do your
larger work and just go slow. You don't have to
rush through this. You don't put your
fingers in front of it, so you're going to
gouge your fingers. Don't forget that, be behind the cutter
that you're pushing. Use your finger out here
to really guide yourself. Then cut off the parts of the stamp that
we just don't want. If I don't want anything
outside of this line, I can go ahead and cut
some of this further down. Cut that out a little bit. I can come right in from
the side and cut that. I could also use my
exact dough knife if I wanted to really cut in on that and you
can see how easy that is just to trim a
little piece off, if it's in your way
and it's interfering. [LAUGHTER]. If you need to, you can turn to the
side a little bit. This is a sharp edge all the way along the back to the tip. If you need to turn that a little bit to get
some of that carve, you could do that also. Let's just go ahead
and we can cut this. I've got a circle one here because I want to
show you something. I just cut that off. [NOISE] Then once you get
those details on there and you're
like,"okay I've got that line where I need it", you can come back to the
other side of the line with that Number one tool and
then start your next cut. You could do all the detail cuts at the same time and then come back in and do the
larger pieces. If you could do all of this, come back in with your
bigger piece after that. You could also on
something like this, because we're not doing
something like say a flower. We could gouge out
the line itself, because this is a little
different than doing a pattern. I might go with the
big one, Number five. It's a little
different than cutting a specific pattern like a
flower or something like that. This, I'm almost wanting that line to be
the gouge itself. If I wanted, I could
take the bigger tool. Let me get on this other side, I want enough hand-holding
position over here. But you could use the
line as your guide and gouge a nice deep
line. Just like that. Then everything outside of
the line is what we will be getting in our design. That's another way that we can use the lines as our guide. Because it's not a
specific pattern, it's not as important to keep all those details as it is to create something that I'm
using for mark making. Two different little
methods there. Now, if you're doing
something like a circle, these are going to be
a little bit slower, because you want
to take your time. In this case, it
actually might be easier rather than
trying to move a tool all around the circle and be really unsafe
in your carving. It would be easier to move
the block as you're going. Let's just cut this circle. Then when I get to
about right here, I might need to turn that block to then come in and continue around the circle and
just work it like that. Because these are like interesting marks and stuff
that I want to create, if they're not completely
perfect, that's okay. But if you want
them to be perfect, just be careful as
you're going around. Keep your hand out of the
direction that you're carving so you don't
slip and gouge yourself, and work these circles
with the little tool. Then you can come back
with a larger tool, and take out the
spaces in-between. Then once you've got it carved, then you can test your
stamp with some paint. Then you'll be able
to see if there's any spaces that you need
to go back and refine. I'm going to continue
cutting these. [MUSIC] I've got all the
little circles cut and it doesn't have to be super
duper perfect or nothing. I want these to look a
little more organic. I want them to look
a little rough and fun and handmade stuff. But I can't leave all the areas
around here still raised, so I need to gouge out
everything that's not part of that circle so that when I
go to use this as a stamp, I'm not getting a wash, let me just demonstrate
real quickly. Doesn't matter if we
get paint on this, the paint might be
a nice easy way to judge where it's going. But let's just get a
little bit of paint out. Then I could see, do
I like it like that or do I need to
carve some more way? I just have a little piece of Mix Media paper trying to
get flat. There we go. I'm just going to paint
over what I've done, stamp it down and
see what we got. [NOISE] Look how cool those look. Oh my goodness. We're
going to call all that a positive and what
I really want is just those little circles so almost like I just
want the negative. That's very interesting
to at least see. Did you get
everything carved out that you wanted
or do you need me to go back and get
rid of some areas and clean stuff up and see? I really love [LAUGHTER] the
organic rough look to that. That's a pretty awesome
stamp. Just like that. I'm almost tempted
to leave it and cut another one but we
saw how we did it. It's really super cool. That's a really neat pattern. [LAUGHTER] I think because
I did that and I love it, I might have to go back and
do another one of those. But for the purpose of this, I want to [MUSIC] get the
circles out and so I'm actually going to
switch to tool number 2 and go ahead and gouge it. But I'm feeling that
might be a stamp I redo again because
that was super cool. [LAUGHTER] Then I'm just going to paint everything that's got pink where
I didn't want it to. I'm going to carve
it down to be in pink and then it should really show me what's left because we can see where we've got
paint on something. I'm just going to
switch back and forth between
whichever tool that I need between the one
and the two to get all the paint off of the area that I
don't want paint on, and what I should be left
is my fun little circles. I'm going to do that. You don't have to
press down very hard. You'll see once you
get this pink stuff how very user-friendly it is. You don't have to push
down super hard to get that little bit of a stamp away. I do like to gouge
down a little bit further than something
really right up near my pattern
because I don't want the paint to stick
in the groove and then not give me a
nice clean pattern, so I do want those to
be a deep enough carve. But you don't have to press real hard to get that deep carve because this stuff
is soft and really malleable and really
user-friendly. You're just going
to love how easy it ends up being carving it. Again, I'm turning the block, keeping my fingers out of the way of the direction
that I'm carving. I'm not trying to
recarve the circle. I'm just trying to carve any lifted area around those circles that I
didn't already carve out. Because I've already
carved by the circle, I don't want to
change that pattern. I just want to get rid of all the extra
sections around that. [MUSIC] Once you think you've got
all the pieces carved, will need to test
it again to see, did we really get those
where we wanted them. Let's just get our
pen again and make sure that really all I've got left are
these little circles. Then once we do that, we can trim up this stamp closer to just the
stuff we want to keep. [NOISE] [LAUGHTER] Look at that. I know I just did that a little off-camera so I can pull it back over but check it out. [NOISE] Then we'll
be able to say, there's places here
that are still raised and you can decide, did you want these extra
little bits in there? Does that add
interests or do you need to go back in and clean up anything that's
stamping that you didn't intend to have there? Now's the time to go back in for any cleanup after
you've figured out. This would be negative, positive, so then
you can decide, are you trying to get the whole pattern with just a little bit
of white left out? Or are you trying to
get the circles as the pattern so negative, positive, that's what
we're doing there? Do you want a negative stamp
with just some designs out? Or do you want a positive
stamp with just that pattern? A very interesting
and completely different look that we got off of the same circles that we carved and I like
this so much that that would be a really cool to have one a little bit bigger, maybe longer, and that would be a cool pattern stamped
into my art too. Super fun. What we can do is decide do we
need to clean it up. We could also come back
in with our scissors now and trim off any
extra little edges because those edges are
more likely to give you some bleed or some ink
where you didn't intend it. If you'll just
carve that out too, basically, just where
your design is. It'll give you a cleaner
stamp when you're using it. You just want to
end up with that, and that way you don't have
any extra area that could accidentally get stamped down when it didn't when it
wasn't supposed to. That's super fun. Then in that process, I could then go
through and just make sure everything really is
carved out that I intended, that I didn't have raised
spots where I didn't intend. Just one final clean up and then you're ready to test
it out, see if you love it. I just clean this off in
some water in the sink. If it's dry, you could just throw it down into
your cup of water. You're not going to hurt it. Let that soak a little
bit and then you can run that under some water in the sink and that'll
come right off, so easy to keep clean. The circles are super fun. Going to actually pull it back out and let it
just do its thing. I don't mind if it's got a little bit of paint
on it for the moment. But I do try to keep most
of my stamps fairly clean. We'll leave that out. Let's finish carving
our other one because I stopped
to do that one. Again, I'm keeping my
fingers beside out of the way of where I'm pushing because I'm pushing fairly hard to get these to go
how I want them. Then this is again, an instance
where I might come in, carver cut the edge, how I want it [MUSIC] I think I've got that where
I want it so let's get out our little paper
and test it out. Then we can do any
final carving cleanup if we don't love it
but I'm feeling it. [LAUGHTER] Look at that [NOISE] that's
exactly super fun. Look at that. I got
paint on there, sorry. But these are just my
little test pieces anyway. I can see to the end here
we'll pick up a little paint, so that might be
an instance where I either take the
scissors and cut that in half so that what
happened when I was carving was I would start at the end and
start carving in, but you'll notice
at the very end, it's up all the way. It's not like I started
carving from off the stamp and so if you
cut those ends off, now we should have a clean edge. There now we have a
clean edge without the extra paint catching on
the raised part at the end. Look how pretty that is. I'm loving that one too. Really nice. [MUSIC].
9. Carving Rubber Combs: [MUSIC] I've got lots of things
that make marks. I've got some catalyst wedges, and I've got some of these
little paint brushes from Jane Davenport that
you can drag through. [NOISE] Then I have some of these fun ranger plastic things that make a little texture
when you drag it through. This is [NOISE] some
good inspiration. Looking at some of
these texture tools that maybe you already have in your stash and
you're thinking, what can I make,
as a rubber thing? If we take a little
rubber piece, doesn't have to be very big, that's only an inch and a
half about three inches. Then we could do some of
these are very interesting. This one, you just get a pencil. So you can use these as
tracing inspiration or just to get your thoughts together, and I'm just
getting my thoughts together. I want the 2B pencil if
I'm going to do that. Some of these are inspiring, this one is up, up, edge, up, up, edge, up, up, edge. Super easy. This one is edge, a loop, edge, a loop, edge, a loop. While I don't have that
little roundy thing, I could do edge and then
the V of our piece and the edge of the V of our piece like the other inspiration. This one is cool, it's edge, longer,
edge, longer, edge, longer, so you can
see how we could just really make
an infinite number of edges for ourselves. This one's pretty cool. It's like a wave and
then it goes up, and it's a wave, and
it goes up, and it's a wave, and see it
comes down like that. So interesting, just
different inspiring pieces. You could look around and
see what edge might look interesting and then
you could create something like that on
each side of your comb. We could very easily start
here a little bit over, do a little triangle, and then do a little triangle, little triangle,
little triangle, [NOISE] and then
there to the end. Perfect. Then on this side, we could do edge, a little bit longer, edge, a little bit longer, edge. You can be as exact as you
want to be or as free-flow organic, we can do just some different things
there, maybe I want an edge. We could also do ones
that are way closer, but just to give you an example, I've got a little knife here. Let's change this out to
our little X-Acto one here. [NOISE] I just liked this
one that comes in here. We can use a regular
X-Acto blade though. [LAUGHTER] We could, especially
with the triangle ones. I like it because it comes to a tip and it can be real specific about getting to the tip and cutting
the triangle. [LAUGHTER] I love this, [LAUGHTER] this stuff
is so much fun. Telling you, you're going to just fall in love with how easy
these are to carve. I avoided making stamps and mountain combs and
stuff because I thought, it's like probably like
woodcarving and in my mind, wood carving is hard. But this rubber stuff [LAUGHTER]
is very user-friendly. [NOISE] There we
go. Look at that. Then just as an example, because I have some
paint on this palette, we can just use that to drag. Look at that. [LAUGHTER] To drag right through paint
and make patterns and designs. If we've got paint on
our piece of rubber, we could make other lines and designs like how
super cool is that? That was super fun, and it's easy to clean up because it's rubber
and there we go. Then we could do this
on the other side, and I'm just going to
cut all one direction then come back and cut
the other direction. It's very satisfying to hear it crunch right down
into this rubber. [LAUGHTER] Then this has the rounded edge and
the straight side, so I'm going to use
the straight edge just to get right in here to right
there and look at that. [LAUGHTER] Got to be real
careful though you don't want to cut that little foot
off that we just created. But look at that. Really depends on
how tight you want those little feet to be as
if you would use this thing or maybe come back in with your little tiny V peace and cut a little v in
between each thing. If you wanted them
to be a lot closer, you could cut a whole
bunch of lines. We could cut a whole
bunch of these. Let's just demonstrate that. [LAUGHTER] Could just cut
a whole bunch of these on this end and then could come back
with our little v piece. Now we could use that v to pull out one of these instead
of the bigger cutter that we're not going to be
able to get in like that and seen then we've got
one little cut like that. It's closer. Super easy to make stamps in different
shapes here that we like. Let's just finish off this one. Look at that. Oh my goodness. That would give us a
different line base. Look at that, see,
cooly different line there with that than we
had with the other side. A little bit wider, a little bit more
different. I like it. Then these little bitty
ones would be real close up and see you could do something like
I've done here too. You could have some long, some cuts in the middle, some long, totally get
something unique with that. You wanted to put
something like that on each end and have it
do its funky thing. So combs [NOISE] are super fun. We can use it to drag
through paint and then to drag that paint further
out if we wanted to. I like having lots of
different comb shapes, so definitely
encourage you to just pick different widths and see what you can
come up with for some interesting combs that
only you are going to have. I'll see you back
in class. [MUSIC]
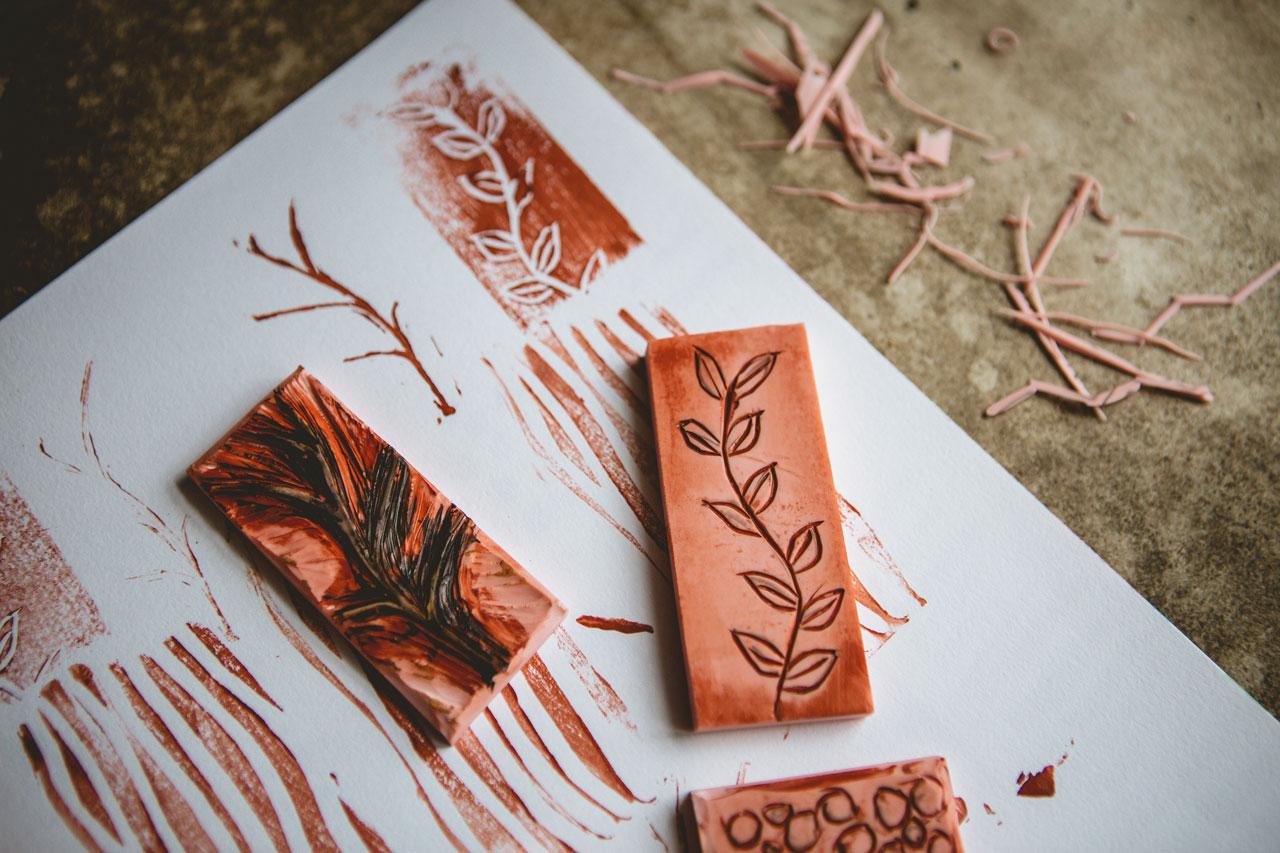
10. Leaf & Twig: [MUSIC] I thought
it would be fun to carve a leafy pattern
on a vine perhaps, and we could do lots of different ones like that but I thought it would be fun to, I'm just going to
freehand a little vine, and then some leaves on the vine [MUSIC] Then I've got my exact dough knife and I'm
just going to cut this off. I just do two swipes
to get that nice cut, and then another thing
that we might could do is just some twigs. Just as an interesting
something. Then you have to decide, do you want this to be a
negative or a positive? If we look back at some
of our early samples, did you want it
to look like this where you carve it
out and you can see the lines and
the stamp is solid? Or do we want to carve it
like this where we just see the twig lines itself but
not the color all around it? We need to decide, are we going to cut this in
the negative or the positive? Depending on what you choose, that's going to depend on
how you carve the stamp. If we're going to
use the negative, we could just gouge out that
pattern and call it a day. If we're going to
use the positive, then we have to carve out on
each side of those twigs and carve off any extra that we
get in addition to that. I want the twig to be a twig. Let's carve it the
side and so I'm starting off with
my number one on here so that I can
carve each side of those lines and see
what I end up with. I want the lines to give me a raised twig and I don't
want anything else in there. I'm going to carve a line and then we're going
to have to come back on each side of the line so that we've got some twig left. If you like, look how
big that twig is, it's way too big, you can come back
in and carve in closer as you need to
and tweak as you go. [MUSIC] Don't get too heavy-handed
with how deep you get. Sometimes I do, I get too deep and then you just cut more than
you were expecting to cut. Here, I'm just going
to come in right beside the line that I did, try to keep more of a
light hand rather than a heavy hand and
really give myself some room to carve with the bigger piece after I
get these details sorted. This is why I like starting off my carvings with things like
lines and zigzags and dots. It's not like it's
an important piece, doesn't have to be perfect, and then when I'm done
I've got something cool, and then the whole
time, remember, keep your hand out of the
way of your carving piece. I'm trying to stay
beside my carving piece, trying to keep my hand out
of the way that I'm going. I am holding it a little
more like a pencil today, so I just noticed that. I might [LAUGHTER]
go back in with how you're supposed
to hold it but that just goes to show
you it doesn't take a whole lot of strength
to carve on these. They're really
very user-friendly [MUSIC] After I get
the details carved, I'm going to switch up to Number 2 and then I could carve a little bit
bigger area at a time. I just want to be
real careful not to carve my little line that
I'm trying to leave in there but I do want to
get everything else carved around so there's
no raised parts leftover. If you want it to
get real fancy, we could add a little
leaves left on this, but I didn't do that. But we could do some vines with some little
leaves leftover on it. You could just be so
creative in the things that you are doing with these stamps. Now I'm not worrying about
this big piece right here because I can trim that off. This big piece right here. I'm not worried about
trimming all of that. I'm really just trying
to get in here with the part next to the
branches, really. I can trim off these edges, and down here I can trim
some of that [MUSIC] I decided just to keep
all of the the edges, but I don't want the
edge to be raised. You'll notice as you're carving, that your knife or your carving tool tends to scoop up near the end
and leave an edge. I don't necessarily
want the edge so I'm just going
through with the side of the blade and just trimming
all those edges down so that they won't have a hard
stop and then a raised edge. I'm just trying that out. Now once we've got, there is our vine. Let's see what we've got. I'm just going to
put a little paint out and give our
little piece a try. I think I hid the
paintbrush for myself so let's just grab
another one. There it is. You can use a brayer. If you've got a brayer and you want to roll
this on with a brayer, you could do that. Look at that. That also shows me
maybe up near the edge, no, I think it was
just how I was just pressing. But look at that. That's super cool. That's exactly
what I was hoping. Some type of vine. Look how pretty that is. The vine is a success. I'm going to call that a favorite [LAUGHTER] Let's get
some of that off of here. What I call the vine
is really like a stick with some offshoots or a
tree with no leaves on it, that is a winner [LAUGHTER] We could do a leaf one here if
we wanted to trim a leaf out. I would start off with
the easy things like the dots and the lines
and the twigs like I just made and then
work your way up to where you're carving around stuff like leaves
here or something. Because if you start off
with the hardest thing possible and it doesn't work
out like you were hoping, then you're upset about it. Or at least I am. I think this one, we carved everything out of it. This one I might want
it to actually just be that pattern and so I'm thinking if we just
carve where I have lines, then we will end up with
a full leaf pattern, which I'm really feeling like it's what I
want for this one. I want you to try that more
than one type of pattern. Somewhere you carve
everything off and somewhere you're
leaving everything on and just carving
a pattern out of it. Now we can just carve that
center part in there. Yeah, I'm doing it
[LAUGHTER] For this one, I'm just using the
smallest carving. I'm using the Number 1, just so I can get more
delicate details, perhaps. Keeping my finger
out of the way, whichever way I'm carving. Get those hands out of the way. The lighter you press this tool, the more delicate
it's going to look because that little v comes to a nice little point
and gives you that delicate tool feel. Let's see how we did [NOISE] Again, this will be
the perfect way to see is there anything else
that we need to do to this? Let's see [NOISE] Look at that. That's pretty. For what I'm wanting that's a nice pattern. Think this one's
one of my favorite, I might have to go back
and do another one with all these little circle
cutouts and just have the whole thing
covered in circle cutouts. I really like lines. Some jagged lines would be cool. Some zigzags or
something like that. Different line patterns. I like the twig. The twig is pretty exciting. I like the dots and
I love this one with the rounds cutoff and it being everything else
not cut out around it. That was super cool. I'm really loving
some of these ideas. I hope you're loving
some of these too. Then let's create some art with some of these and see
what we end up getting. I'll see you back
in class [MUSIC]
11. Random Patterns: [MUSIC] I'm just going to
create a few more pieces, because there were several
things that I really liked. I liked the crazy circle one, then I thought why not just go ahead and while I'm creating, create some of these that
could possibly be in my art. Patterns that become
well used and loved. I'm just using that 2B
pencil to draw on here. Remember, if you're doing
a nice complicated design, feel free to use tracing
paper and a spoon or a bone folder to
then transfer it onto your piece of rubber here. But if you're comfortable with
doing something like this, definitely just do it then. If you feel comfortable
just doing it without even drawing on here
like just lines. Do that too, just jump
right into carving. If I knew I just wanted
some weird uneven lines, I could just jump right in. I'm just going to carve
a few extra to play in. Look at that. My goodness. [LAUGHTER] Look at
those little lines. Now that could be exactly
what I'm looking for. [LAUGHTER] Already feeling
good about this one. [MUSIC] That one's pretty, I'm liking that one a lot. [MUSIC] Even though
I drew on this one, I've decided to free
wing it because I know I just want
some interesting little zigzags and look at that. These are turning out great. Even if you draw on
it and you decide to free hand, go for it. Again, I don't want edges on it, so I'm just trimming
these edges down. [MUSIC] All of those
three just to give you an idea on time because I
know I just sped those up. But the circle one,
I'd say was the most labor-intensive and that
one took me seven minutes. These don't take a long time. I did all of these three
in probably 15 minutes, these ones were even faster. Let's just test out some of these patterns and let's
get some paint back out. I don't know where my paint
went, maybe I threw it out. [LAUGHTER] Let's just get a
little paint out and test these and then we will be ready to experiment on a
piece of art maybe. Let's just see what we got. I'm feeling pretty
good about this one. Look at that.
[LAUGHTER] I like it. This one I'm really
going to like. If you've got a stamp
pad you can use it. Look at that, you can very easily use a stamp pad on these. Let's just do that one. Well, I pushed it back
down accidentally, but look how good that looks. The more effort you
put in the press down, the better the stamp will
be but look at that one. [LAUGHTER] I'm excited
about the circles. We'll see what we got here. Look at that. I love that. My goodness. I'm loving those. That's going to be just as fun as these others with
the circles raised. You can definitely see, well different pattern
going here on these with the different way
that we carved them. Look at that. [LAUGHTER]
We're loving these. I hope you have fun doing
some random patterns. This video was a
little bit more about just getting a few more
random patterns under your belt and creating just more that you'll be ready
to make art with. I like all the different lines, this twig one was a
particular favorite. Let's just try that one
again while we're over here. Particular favorite. [LAUGHTER] Definitely
a favorite. My goodness. Do one of these
that looks like sticks. [LAUGHTER] Look at that. I can see that in lots of art. Then, of course, we've got
our little combs here. Look at the combs. Now
the combs are fun. Now if I were to paint
some paint on my paper here and come back
with the comb, we could easily make a
pattern in our pieces. I could also dip the
comb in some paint over here and I can just come
back. Look at that. [LAUGHTER] That might turn into my favorite
way to use these. Get some paint on the comb
and then drag it through. Look at those. I'm feeling it. Now we've got lots of
stamps to play with. I want to see some patterns, I want to see circles, I want to see some lines, maybe a few twigs. These are super fun and
then we will be ready to test these out on a piece of art that we're
making or something. Definitely carve and
do some tests and then we can create some art. I'll see you back
in class. [MUSIC]
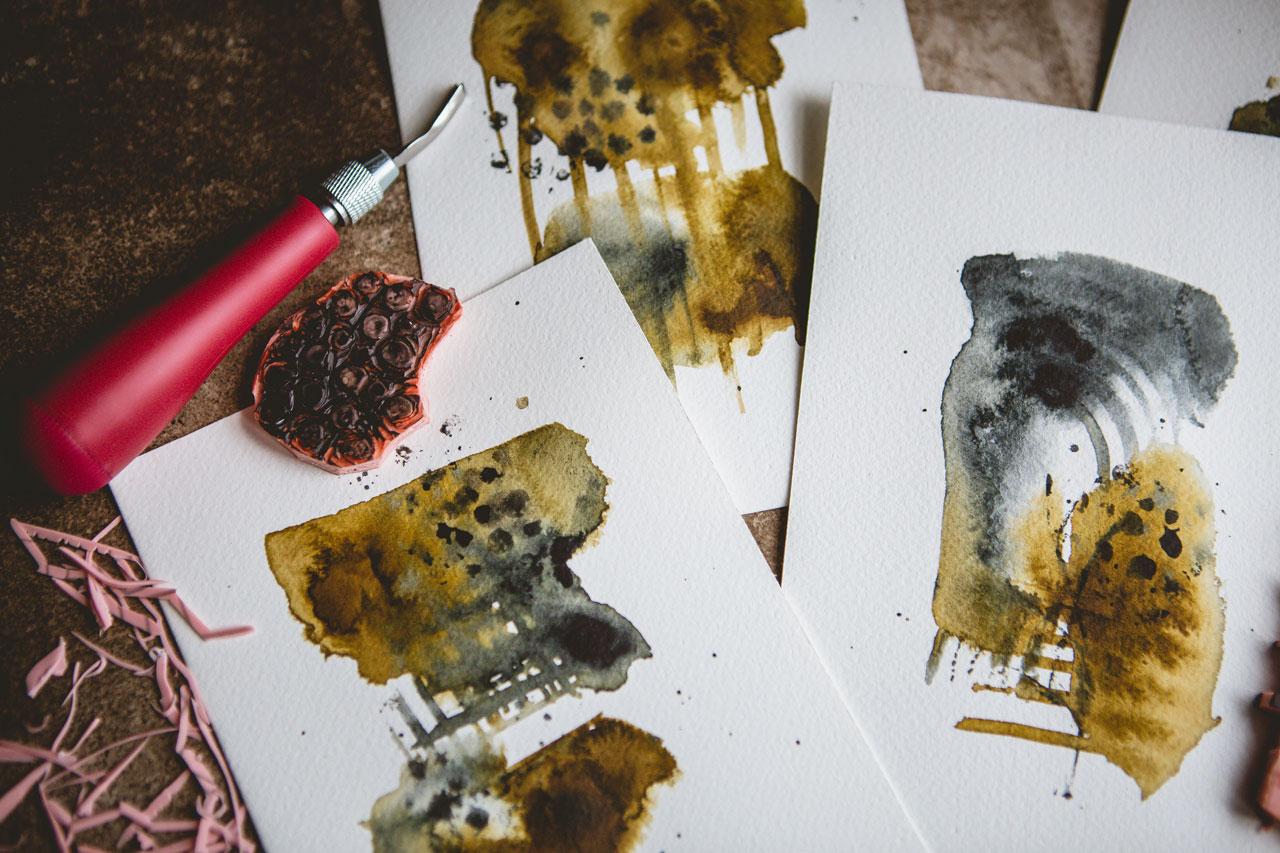
12. Creating Art With Our Stamps: [MUSIC] I personally would
like to create some of my little abstract ink abstracts
that I like to create. I'm simply going to create a few of these and then
I'm going to need to let them dry and then maybe come back on top
and mark make, I don't know. I'm going to give it a little
go here. Let's just see. This is antelope brown
and Payne's gray, they're own favorite
in the acrylic inks. We're just going to
see what these do if I just let them do a little
bit of their own thing, let a little bit of
moving common here. This point, I could
decide to put some more on there or could let those dry and do their thing a little bit and then come back and mark
make on top of it. The point of test in this stuff out after you make it is, test it the way that
you're actually going to use it and that's what I love making these right there
with some satisfying. [LAUGHTER] Oh goodness. My god, just made me happy camper watching that ink
spread out and do that. Once I've let them do
their thing a little bit, we'll come back in with
some stamp work and just see what do we get. Seriously, antelope you
make my heart happy. [LAUGHTER] Creating
whatever way you create to test out your yummy stamps once
you've got it made. Look at that one.
[LAUGHTER] This is the minimalist abstract pattern or technique that
I'm doing here. If you want to go
check out that class, it is so satisfying to watch different inks
dip and move and do crazy things and then [LAUGHTER]
do things that you never would have expected and then
you end up with something that's just amazing
when you're done. Then when we have our
own beautiful stamps that we can add in with this, these are going to be gorgeous. [LAUGHTER] Look how
pretty these are, I don't want anything to
look like just a dot. That's why I'm
moving these around a little bit with
some extra water. I want some great big dot right in the middle of my piece. [NOISE] Then if I've got
too much ink in a spot, I can soak it up. I don't want these to
take forever to dry, but I do want them
to be a little bit organic in the way they dry. Then I want to come
back in and add some interesting mark-making
with my stamps. I like doing this with a tissue because it's soft enough
that allows me to grab color without really changing or doing
anything to the piece. It's not adding a texture, it's not so thick
that it's making some dramatic
changes. I love that. I'm going to have to
let this dry and then come back and see what
we can do with our mark. These are not completely dry. I've let them sit
while I thought about this and
I've realized that our rubber comb could be perfect before we let this
completely dry. Because we could
simply come through with the wedding and
add some marks and do some stuff in here with
some dragging and stuff. Oh man, look at that. That's super cool. Now, I'm glad I didn't
let it completely dry for what I thought
about some mark-making. I also think I could
use a tiny bit more of this darkness. Super fun. [LAUGHTER] I like that. Now we'll let this
dry some more. I probably could actually
add some of this now. It's not completely dry, but let it sat here for a moment and I could put
some of this ink out here on my paint palette and we could see because I'm really
feeling this dark thing. The dots got some orange in it, but I think I'm okay with that. [NOISE] I'm just getting a random paintbrush to
give me some color here. Look at that. That's
not what I wanted. [LAUGHTER] I just
love the yummy. I love the yummy surprise of things that you get
that you don't expect. What if we take this vine
and put it over there? We should wait till it's dry, but I'm filling it now. [NOISE] I just get so excited at the surprise of how
things turn out. That's what I love about art. I'm not super specific. I want it just to be a little
bit of some serendipity. Look at that. I like that. [NOISE] This will be fun. [NOISE] Again, once you get
acrylic paint on these, if it dries, just soak this into some water, it'll come off. Look at that. Those
are super fun. I think a few drops of
something would be fun and then we could call
this one done. It's more than anything.
It was just a test out. How are these stamps
going to work for us? You have to think,
do you want to wait till the piece is dry? Do you want to put
it on when it's wet? If you put things
on when it's wet, they spread and
do a little more. But I really love the
comb, super favorite. I really love the dots. I'm always going
to love the dots and the twig, super fun. These have just really turned out even better
than I had hoped. I hope you enjoy making
some of these yourself. Once these are dry, I'll come back and show
you what they look like. I'll see you in a bit. These aren't 100 percent dry, but they are drier and
I feel like I want some more dots out
here in the dryer, so dryer paint so that
it doesn't spread out. There we go. Just
trying to do it. Pop it up. My
fingers are clumsy. Yeah, that's more what I wanted. Depending on if you use a
more wet paint on dry paint, definitely going
to be determining what they spread out or sit where you put
it, so I love that. Let me let these dry. Look how these turned out. These are dry and I
love abstracts because, you can flip them
around and say, which way does this go best? I love how these particularly
came out because I used my own original stamps that we created here in class. How cool is that? I made the coolest thing ever. I love using tools and
supplies like this, one like this, that we create ourselves that nobody
else is going to have. We're going to have unique
pieces that we can use in our art over and over and over again with a
little dot thing, definitely going to be one
of my personal favorites. At this point, I might decide
to leave it as they are. I might decide let
me do some more mark-making or color
on top of that. I don't know, your choice there on where you
take your art, but I love these. I love that we use all our own mark-making
tools and definitely make a couple of combs on
each side if you want, if you don't want
to do the end too. Because dragging
your wet paint is so much fun just to
see what you can get. Look at that little
drag right there. It's beautiful. Look at these drags here. It almost makes it look like
we had drips when we didn't. Excellent way to do that. These are super exciting. I hope you enjoy creating
beautiful stamps and combs of your own
to use in your work. I cannot wait to see what
you end up creating. Definitely come back
and share some of the stamps that you created and the art that you're
going to use it in, that'd be super cool. I'll see you next time. [MUSIC]
13. Final Thoughts: [MUSIC] How much fun is it to create your own
stamps and columns? Seriously, these are some of the easiest things
that I know of besides the foraging outside for things to create
mark-making tools with. These are right up
there in forms of easiness and they are
super unique to you. They're going to
make your art more authentic to the things
that you love and want to create with and make it
extra special because you created those mark-making tools that you're then using
in your piece of art. Nobody else is going
to have these. They can't go just buy a stencil or a stamp that's
already on the market. You're going to have
something nobody else has. When somebody looks at your piece of art and
they're like, "Wow, how did you create this or that element on
that piece of art?" You can be like, "Well,
I created my own stamps," or "I
created my own combs. I created that element unique that nobody else has ever going
to be able to duplicate." How exciting is that? To me, the art that's
the most exciting are the ones that have all
original pieces in it, not ones that maybe you got a stencil from somewhere that everybody else
can get in use also. You're using elements that
nobody else is going to have. I find that very exciting
and I hope you do too. I hope you enjoy making some of these pieces that
we created today. I can't wait to see which
elements that you come up with and how you use them
in your pieces of art. I'm looking forward
to seeing those, so definitely don't
forget to come back and share some
of that with me. I'll see you next time. [MUSIC]
 DENISE LOVE, Artist & Creative Educator