Transcripts
1. Introduction: Welcome to the world
where fabric meets paper in the most artistic ways. In this unique art
journal workshop, you'll unleash your
creativity through the beautiful craft
of journal making. We'll start from scratch, designing an eye catching
cover with fabrics, ribbons, and vintage buttons, and select papers that add a personal touch
to your creations. I'm Denise Love. I'm an
artist and creative educator, and I'm excited to bring you
this fun and exciting dive into handmade art journals. Whether you're looking
to preserve memories, start a sketchbook, or simply explore new artistic techniques. This class offers the perfect
blend of instruction and inspiration to help you craft a journal that's as
unique as you are. Get ready to transform ordinary materials into
extraordinary keysakes.
2. Class project: For your class project, you'll create a personalized
art journal that showcases your unique
style and creativity. Start by constructing a
fabric sone or no so cover, using your choice of
textiles, embellishments, and a closure mechanism that resonates with your
artistic vision. Inside, create a
collection of papers, whether that be your favorite watercolor paper or a mix of various textures and colors to enhance your
journal's purpose, whether for writing, sketching, or mixed media art. Share your process and
the finished journal with the class to inspire
and get inspired. Oh.
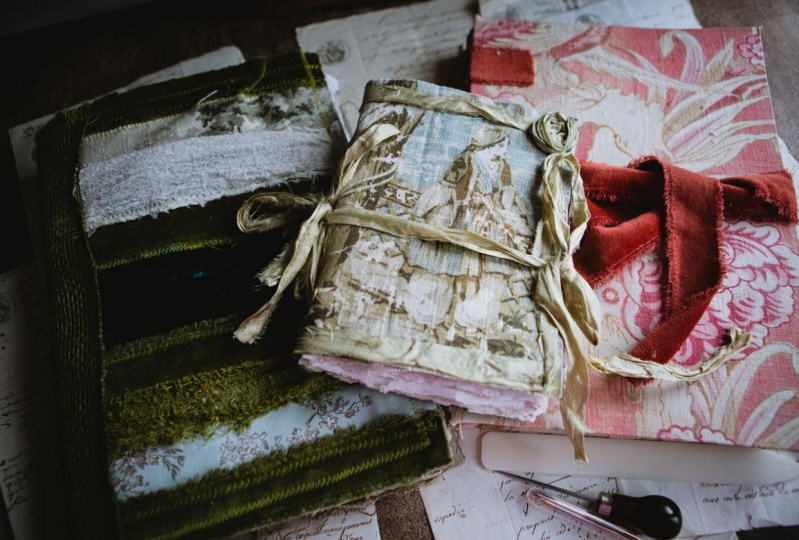
3. Inspiration: Wanted to just tell you a little bit about
what took me down the rabbit hole of making
a lovely art journals. I started off with the
Dana Wakeley Media journal and I shared it in an art hall and when
I started using it. They basically sold out
worldwide because they no longer make these
and apparently I found it at the end of
when they were making it. It's a giant journal.
It's pretty big. It's like ten by 14 or
something like that. It's pretty big. I love that. It was very intimidating. I started in the middle of the book painting to begin
with because I was like, if it's in the middle
and I mess it up, then it's in the
middle, I don't matter. But what I really liked about this journal is it has several
different types of paper. It had the watercolor paper
and the burlap paper, and it had some craft paper, and it had some canvas. It has different types of paper. It's really gigantic. The big spreads are super big, and I have had such an amazing time painting in this
journal that I'm like, Okay, so myself and everybody else that
wants one of these now. We need to figure
out how to make something like this
for ourselves. This is where all of that
inspiration started, and I figured out what
papers that I like the best and I like the
watercolor papers best, but I do like the mix of papers. The Canvas is fun to paint on, but it shrinks and the
craft paper is fun to paint on but if you don't seal
it before you paint it, then things sink in like a stain rather than
sitting on top, like it should, so this has
Jess on it and this doesn't. It's a really fun
challenge to figure out, what papers do I like? And how do I handle
weird papers? If you're looking
at weird papers, if you'll just those papers, the burlap too thin to
really do much good on that, but all the other papers, if you'll put clear
Gesso on them, then they will work out great. If you're using a
canvas, the canvas, even with the clear gesso on it is still going to
shrink, it shrinks up. A raw Canvas does. But I think that's
cool that it's shorter in the book when it's
done, so I don't even care. This is my original journal
that I'm still working in. It's been my dream when
I see other people with their finished art journals to be jealous and I want that too, and so I've started working almost finished
with this one. I've got a section
in the back and then a few pieces up front that I left
because I was like, maybe by the time I'm
really good and going, I'll be not afraid of
these front pages anymore. I've had a really fantastic
time painting in that. My version of that was
the first book workshop, the Artisanal
journals that I made, and I did it with
the craft paper, and I did it with some
other pieces in here, not just canvas, I used a linen. Because the craft paper
is not my favorite, I did not use it in every I didn't use it in
the same quantity that's in my original book. I did one piece of burlap, and then I only had one piece of the craft paper in each section, and then I did one
piece of canvas and then when I got to the
section back here, I had that other piece of linen. I changed it up a little bit. This book is about 2 " shorter than the one I
was just showing you. It is a tiny bit smaller by about that much and
by about this wide. Man, what a fantastic size. I'm still thrilled
with this size. I like the watercolor
pages the most. I put more watercolor pages and less of the original
inspiration pages, and that's where we started
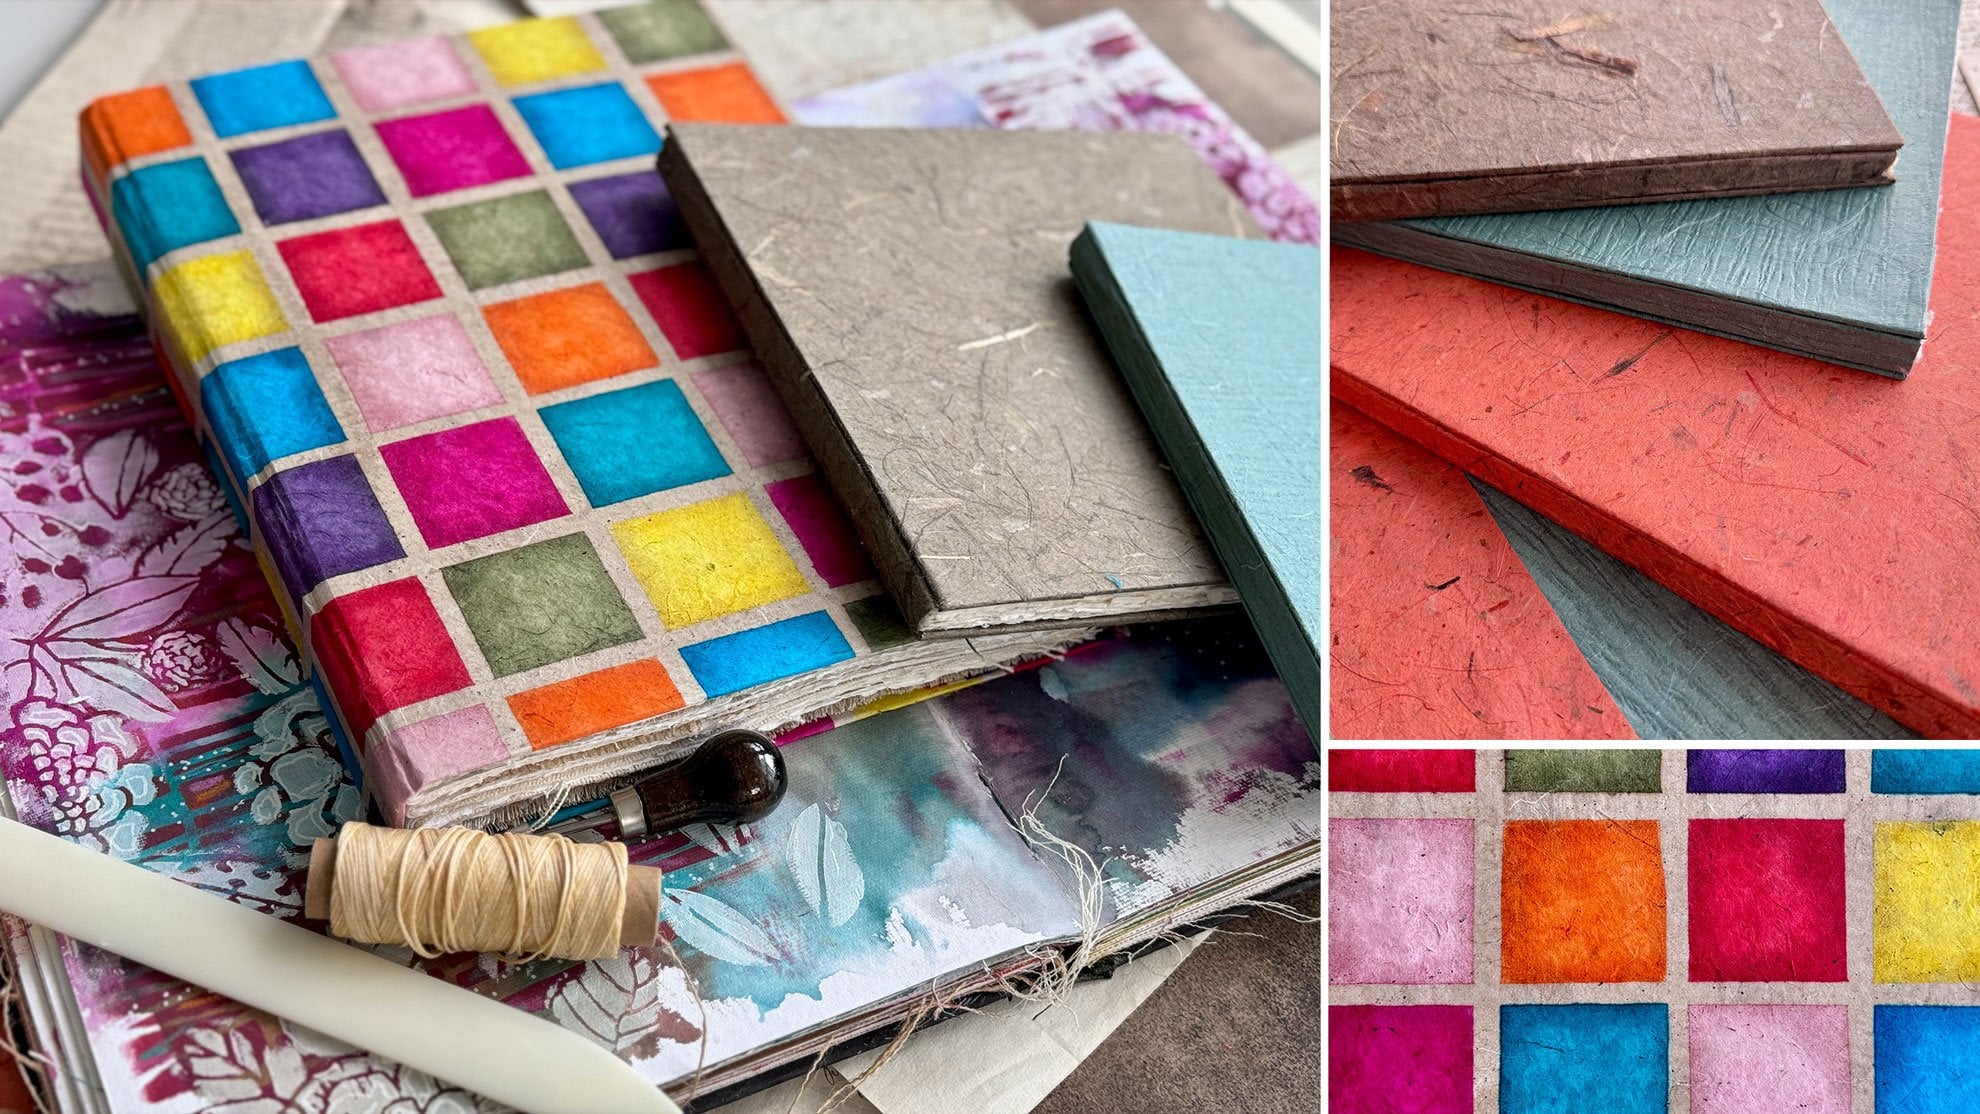
with this bookmaking journey. Then I made myself another
one of these books made with different handmade
papers because I love the handmade papers. I'm obsessed with them. I've been buying them for a
long time and storing them, thinking, I'm going to do
something amazing with this. Then I didn't know what that amazing thing
was going to be. But now, I'm like, this is why I was saving those and collecting
those and I was even at the art store last
week and had bought some more, and my friends like, what are
you going to do with those? I'm like, I don't
know, but I need them. Now I've used
almost all of them. This was the next thing
that I did for myself, and then I made the
second book workshop from scrap to treasure, where we jumped into a whole otherther collection
of interesting art journals, including making some with old book covers and
stuff like that. Then that's what led me to
this third companion workshop is working with some fabric because I've seen some lovely
fabric covers out there. You can look at
handmade journals on Instagram and
Pinterest and you see lots of beautiful
handmade fabric journals. I thought, that would be
a great companion and third version of the book
with a lovely fabric. Cover. That is what led to this workshop
because I'm like, I want to use some
of these treasures that are stashed around my house for years and years and years and some of them
I've used in photography, and some of them I've
collected since before that. Some of these things
are 30-years-old, and some of them are
brand new that I got out the hobby lobby like this blue fabric in
here that might not match as well as
it did when I had initially come up with my idea because there was a different
color on the spine. But I love it so much. It's the most beautiful cover. It's beautiful on the back. See the edge, and I would not
have made this for myself if I weren't making
a workshop because sometimes I just
won't get to it. Then this one I thought I want some other handmade papers in here and some different pieces
to inspire and excite me. That was a piece left over and I thought that
could be a bookmark, a little snippet roll there. This one has different
lovely papers in it, and I've almost used my handmade paper
supply, and I'm like, I might need to go
back to the **** Blick and look at their
papers some more. But this one has lots of watercolor papers
to paint on it. If you're going to paint
on handmade papers like I've done in this book, I've got a beautiful pattern on one side that I would not
consider painting on top of, but maybe the backside
needs something else. Again, I would use
clear Gesso on that. Then let it dry and
then it would be ready for whatever you
wanted to do on top of that. Have a thing of clear so handy. Look at this pretty paper. It's like tissue paper. I tore it crooked and I
don't even care because I might come in and just really
tear this extra short. I don't even worry about things being perfect or
things being exact. I think the imperfections are what make this so beautiful. Then I even put the snippet from the other cut
off on the other end, I glued it in here,
and then look at this. We can actually slip
some pins and things in here to keep with our
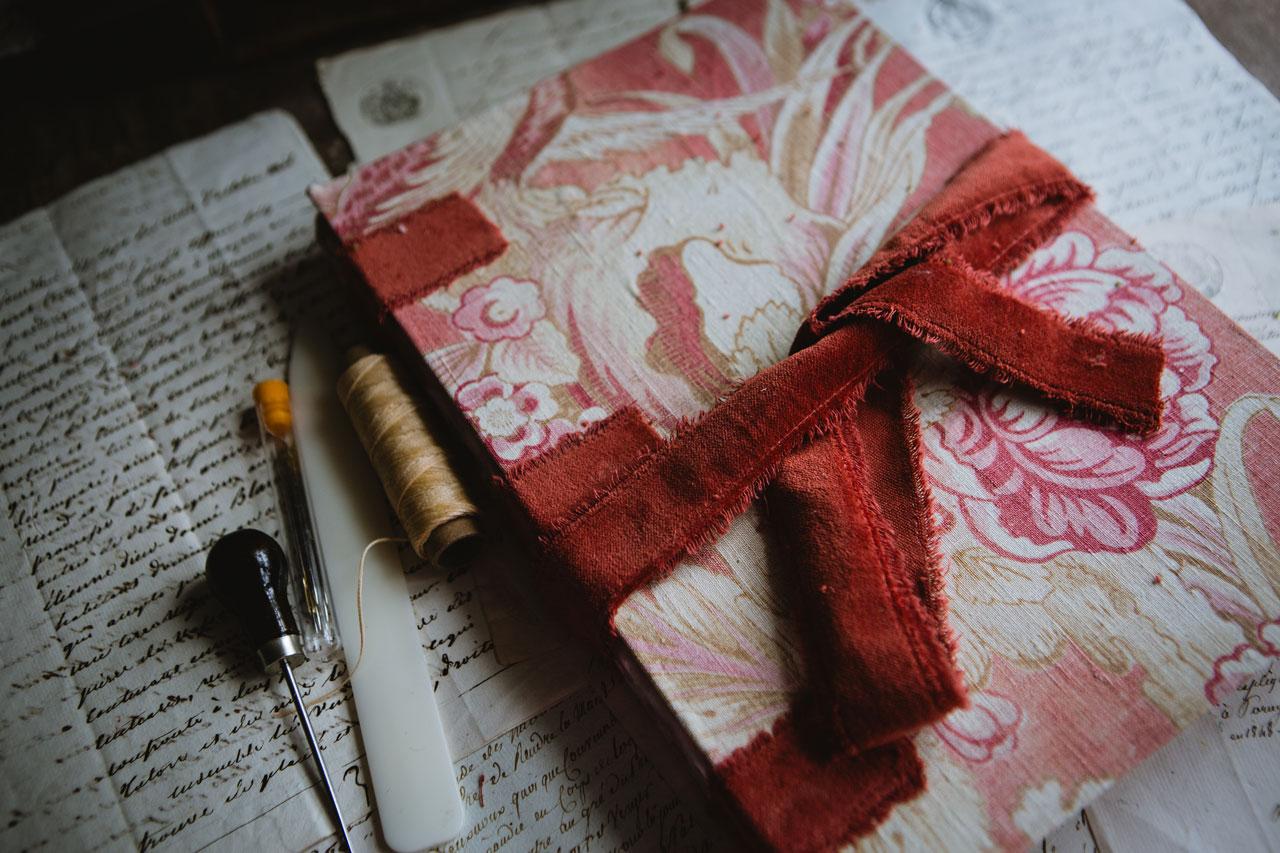
book if we needed to, how fun is that? So I had a lovely button
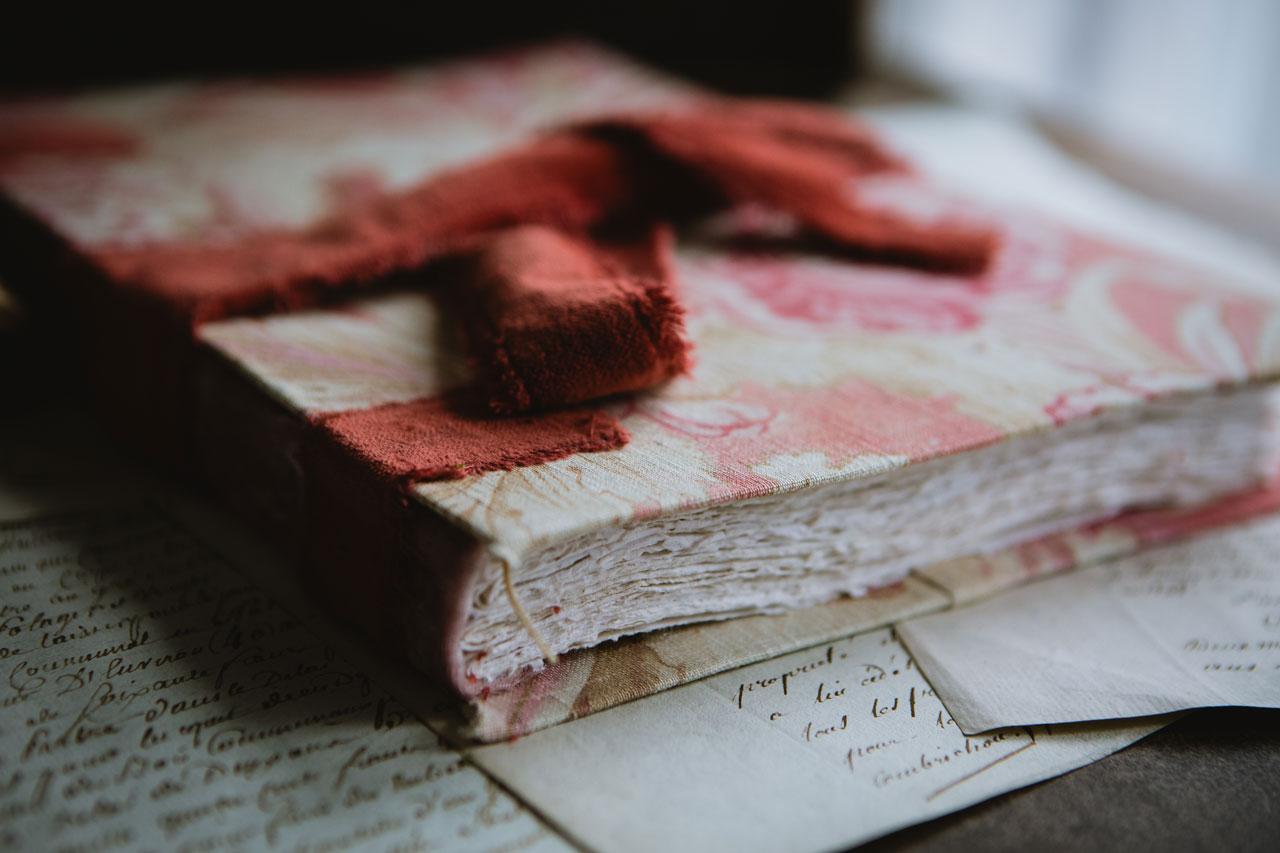
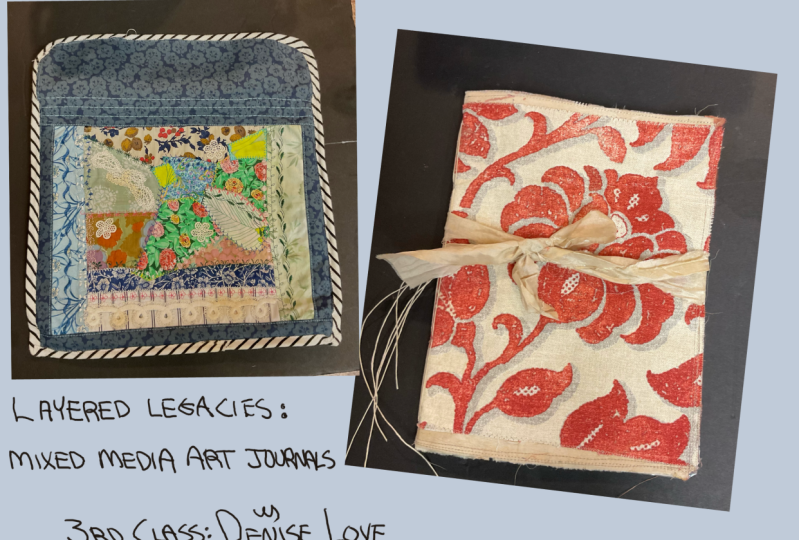
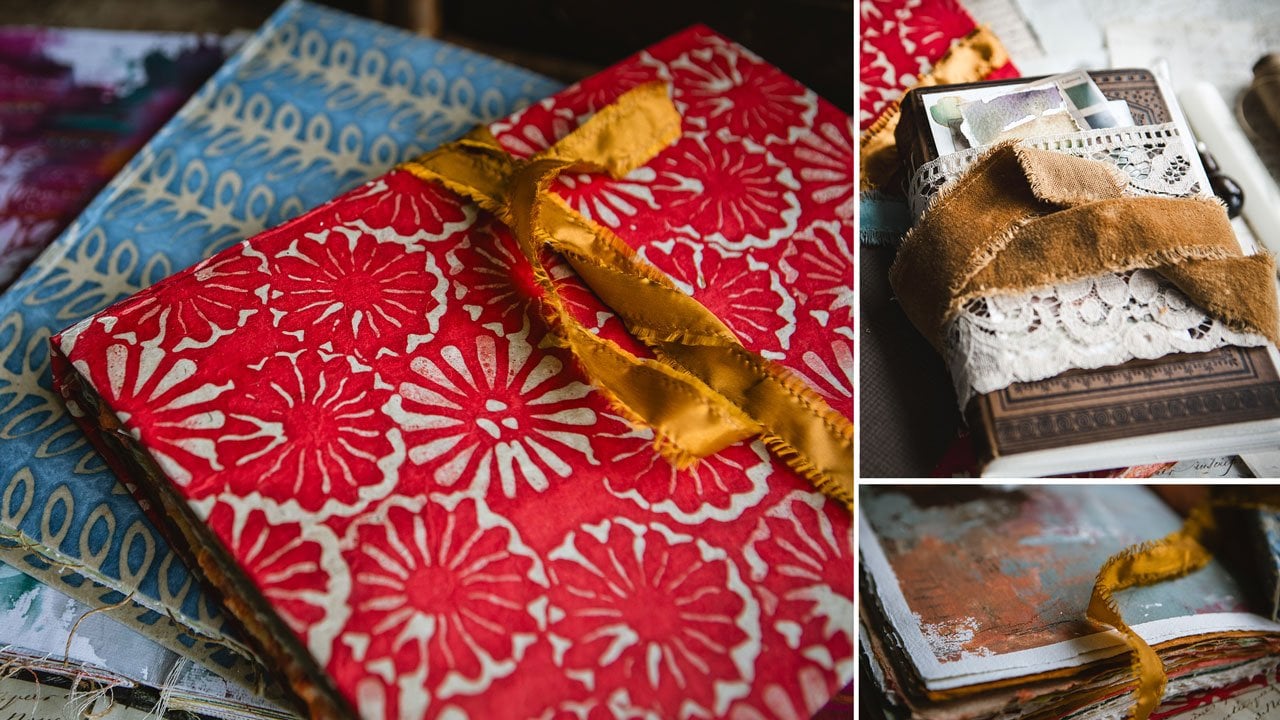
and a fun closure. Then that led me to want to use this beautiful red
fabric that is an antique fringe fabric that I got off of Ladies selling it. This one, beautiful, different binding with the velvet and then the little pieces
that come around. Look how beautiful
that fabric is. It's so gorgeous. I love it so much. This one, I have a few
painted pieces in here, and I decided I wanted it
to be all watercolor paper. I'm going to make it just a big abstract journal
of things I paint, but they're all watercolor
papers in here. Yummy for that one. Then I love the wrap
around ribbon things. That's why this one also has a lovely ribbon
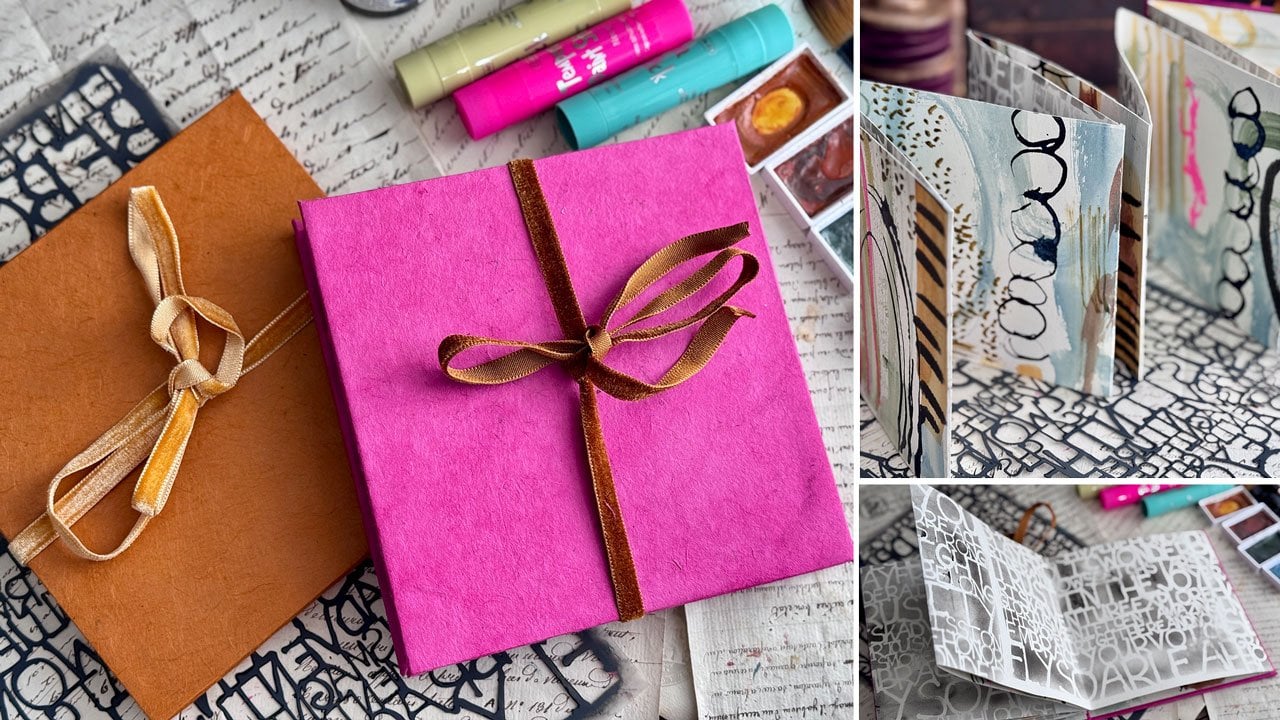
to wrap around it. Then I thought, a little one
that we could tote with us, this idea of using grommets on the edge to bind was super fun. I hope that you enjoy where this inspiration came from and how I got to where I got to. I just want to show
you a few books that you could reference. I did share these in the
other two workshops, but I want to just if
you didn't see those, I don't want you to miss them, some lovely books for ideas and I've got Kaylee
Gray G messy art. This one is a beautiful
book with inspiration. Then you've got some
artists and their books. I love looking at stuff
like this because I'm like, that's very inspiring,
I love the colors. I love the way they've
done some layouts. I've got some inspiration
things in here and some ideas. I just love looking
at stuff like this. I'm really inspired by something like this in
this color palette. I love this, which is
Robin Marie Smith. I actually have been on
her Instagram and pinned some pinterest things
because I just love these colors, S's in there. It's a book of
different artists and their journals and
what they've done. Very inspiring book,
I love this one. I also have handmade
books at home, and this is a beginner's guide. Now, it's almost
easier and you may be a person that follows graphics
and things really easily. I think it's almost easier
to watch a video and see how somebody's putting
a book together and then getting
a basic idea of, I've seen the process. Now I'm ready to
dive deeper and get some other ideas and see how I can level up my game
because my game is Not perfection. I
don't want it perfect. I'm fine if pages stick out, I don't have to have
everything be perfect, I want it to be beautiful, but it can be beautiful
and imperfect. Then some of these
get really precise. I took book classes years
ago and made a book, and it was one of those five day free things that
was going to lead you to a membership thing and the lady made everything really
seem so difficult. By the time I made the one book, I was like, not for me. But I think that knowledge
just lived in my mind, and I pick up, I'm handy, I pick up stuff very easily. Then when I wanted to make my own big journal like the one they've
sold out of worldwide, I just instinctively knew, here's how I'm
going to make this, and it just came to me. Then once that idea came to me, 50 other ideas came to me and that's how we've
ended up with three of these little workshops so far and I'm not even
saying I'm done. I could put another couple of projects together
and say, Okay, here's another lovely
set of ideas for you because I just
love to make things. I love coming up with ideas and when you're
generating ideas, they just seem to flow
and flow and flow. This book, treasure
treasure bookmaking is another good idea
book with lots of ideas and things that
step outside the box. Most of my journals, I have stuck with papers that I want to paint on because
I want these for painting, but who's to say later
that I don't go full on junk journal and put
vintage papers and everything and want to do some of the ideas that are coming
up in some of these books. This one is Treasure bookmaking
by Natasa Marcin Covic. I know I said that wrong, sorry, but I will link
everything below. Then another book here is
this making handmade books, 100 plus binding
structures and forms? This is not a beginner book. I don't even think it
gives good instructions. This is where I was saying, if you follow the graphics, when you're making
stuff really easily. Maybe this would be an okay book for you to
have and start with, but I think that's difficult. Then sometimes you see that
they've left to step out somewhere and I
don't understand how they got to the end or whatever. If you will take and make a few books with some
basic binding techniques, then I think a book like
this can help you level up your game because you're
like, now I got the basics. I understand what
These first diagrams are doing and I think
I can follow the rest. This would not be
a beginner book, but I do like looking
through all the ideas. That's making handbag
books, 100 plus bindings. I like telling you that that
was not a beginner book. This book, I go
through those two, This book is creative Wonderust, and this is by Kasia Avery. I might have said that wrong, but This lady has
lovely art things and classes and stuff and lots of beautiful ideas here in
making some journals also. I thought wonderful and
it takes you through whole layouts
inspiring your layouts to help you finish the journals. If you need help and ideas
for your pages and stuff, she's got lots of good ideas
for painting the pages, and it does at the beginning, start off with making
your books to to get started so that you've got a little bit of
journal making in here, and then you've got lots
of ideas to follow. This is a nice, creative,
lovely book also. I hope you enjoy
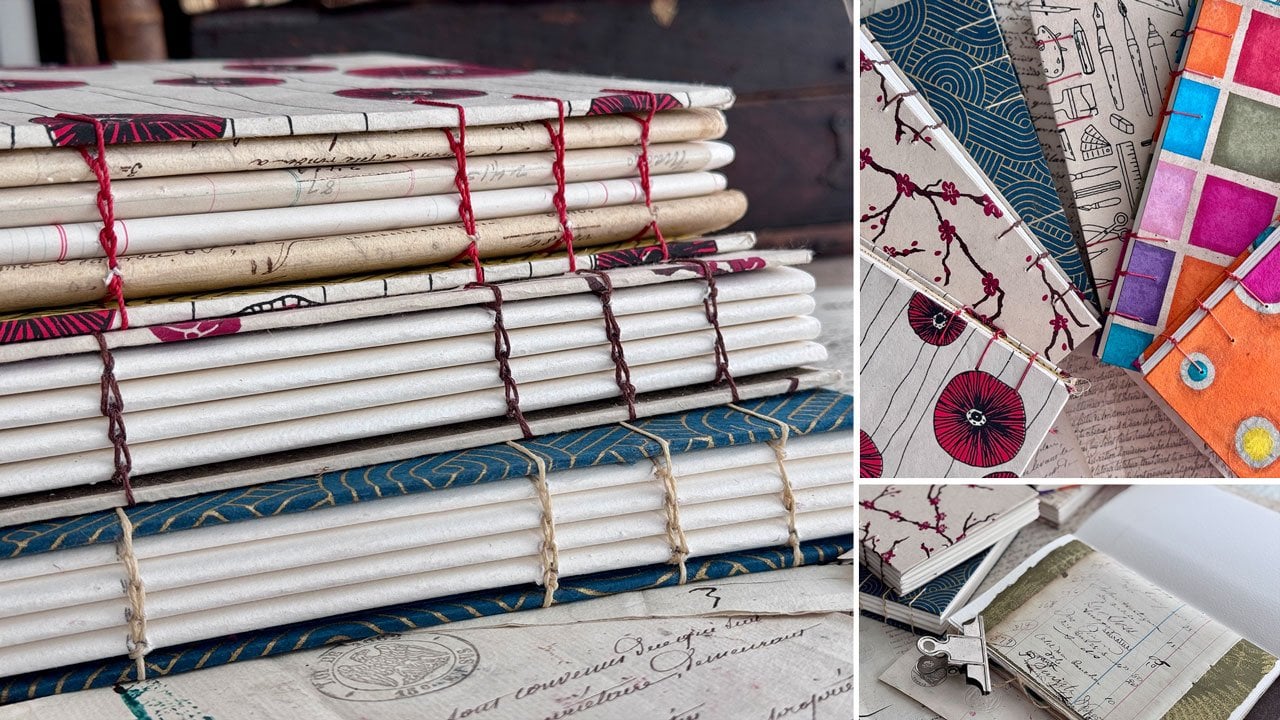
making books with me. This is the third of the set of workshops
where I'm just advancing each time into more
decorative covers and then we get into sewing. This is a noS one where
we didn't sew anything. We glued everything, but
it's just as beautiful. Don't feel like you have to have a sewing machine to
do this workshop. Um, because this one
is just as good. Alright, so I hope
you enjoy working in class with me and creating
beautiful journals, and I will see you there.
4. Sewn Cover - Supplies: Let's talk about the
supplies that we're going to use to make our fabric
covered journal. I have created this
with some fabric, and I have done that with some linen fabric that I got at the Di blk and there's
two layers of that. You need enough linen or
cotton fabric or duct or drop cloth or anything that you're going
to use as that inside cover. You need enough for two
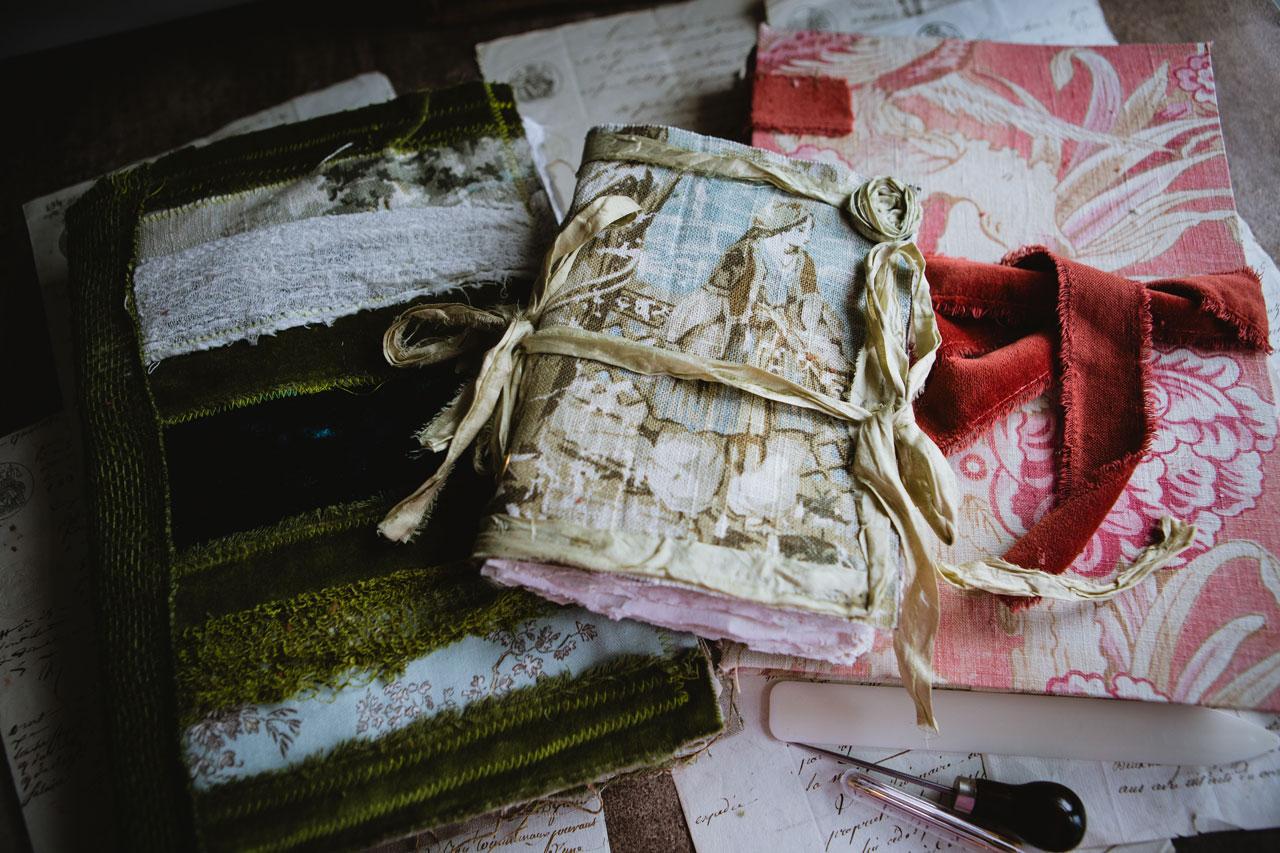
layers of that. Then I have picked out a colorway. I have dug through 30 years of different things that I've
collected in the drawers around my house and my
grandmother's button box, and I pulled out fabrics, and I pulled out a
couple colorways. I ended up making this
one in this class, but here's another colorway
that I pulled out, I thought was interesting. With different reds
and cheese cloth. If you don't want to go
buy a bunch of fabric, but you want a
bunch of choices to play with cloth napkins. Genius like this is a cloth napkin that I used
in steel life photography, and I absolutely love it. I think it make a super cool
pattern on a journal cover. They're nice and thick
and they're like anony they're thick,
so I like those. Look at cloth napkins for some super fun
choices for fabrics without having to buy
larger pieces of it, and they're nice thickness
and weight. I like this. I've got cheese cloth in different colors because
I happened to have it. You could have five
or six napkins, you could have a
couple of fabrics like this because what
I ended up doing was two layers of fabric, and then some
cheese cloth layers and then velvet ribbons. I like the velvet ribbons
and I match up to that. You just need enough to
cover the whole thing. Then I actually had
some fun burlap ribbon for the
spine that I used, but you could just do
ribbons all the way around. You don't have to
have the bur lap. You could also had extra wide, some type of ribbon like this could have
been like a spine. Just trying to give
you some choices here. Then I like buttons. I did a button closure on this
one and then I covered it up at the last minute and it's going to be able to have
a ribbon wrap around it to hold the book closed as
it gets fatter and fatter. So I liked fun
buttons. These were my grandmother's buttons
out of her button box. Who knows how old these
are because she was collecting buttons since 1940. Every outfit that
had buttons on it, she saved the extra button. She'd have it if a button
fell off and then she bought buttons and some
of these are super old. That was really fun. Whatever you're going
to do for the cover, get creative with
your fabric choices and pick several that
would maybe go together, but maybe aren't all
Matchi Matchi possibly. That would be fun. That is considerations for say a cover. I went color theme. This is like red and cher shade. This was the green and blue. You'll also possibly need
some book binding glue. I did a little glue at the end. I did not use it on the
actual cover itself. I sewed with just a plain
zigzag stitch on this. You don't have to sew, you could glue everything down and if you're
going to do that, test out the glue
you're going to use. Maybe a glue stick would
be a better choice because real liquidy glues you're going to soak
through the fabrics. Do some little tests there. With whatever glue that
you have it might work out better for a fabric
glue or maybe a glue stick. You're just going
to have to test the waters there if
you're not going to sew. Then you also need whatever your favorite
paper is going to be. I chose to use the
A three coti paper. One package is all I needed, and I still had some leftover. I used five of those
per signature, five, ten, 15, 20, really I used all 20
sheets now that I count that because I did two
pieces of cody paper I did one handmade paper, and then I did two
pieces of cody papers, two here, and then I
did a handmade paper, and then I did a cody
paper for the center. That's how many pieces
are in each signature, and I did four signatures. I used one piece of the
cotton paper, 20 sheets, and then I did two
handmade papers in each section because I love the handmade papers and
I have a big collection, but I've just been
collecting and I'm like, I want to do something
great with these one day. This is the thing that
these were meant for, and so I am just using up my
stash and almost feel like, Oh, no, I need to go
to the art store and get some more papers
because I'm almost out. I've almost used them
all. But then I'm like, what am I going
to use those for? More books, probably, but
these make gorgeous papers. To use this, I almost would
paint a piece of art here. And you could collage
on top of this, you could leave this
just like it is, and I tend to want
to maybe leave the handmade papers as they are because
they're beautiful. But some of them
might get painted on. If you're going
to paint on them, I would do a clear eso over the surface of whatever you've used if it's
down newspaper, old piece of old papers, like vintage papers or whatever, tissue paper, T bag paper. I got some T bag paper. Didn't end up using it in here. But any of those odd surfaces. Burlap Canvas, craft paper. The clear Gesso will
prep that surface and make it ready for
you to paint on it. Just keep those in mind. If you're wondering how
would you paint on these, you would clear Gesso on each side that you were going to paint on like this right here, I'll just leave and try to
compliment it over here. Then each section is separate in the book because
it's actually sewn to the cover. Then
you get to the back. I have used a little bit of our runoff scrap to
glue down our ribbon, and if it's thick enough, you see you don't see the glue come through on either
side, that's great. I've left a tiny bit of a gap here between
the two sections. I glue it here here and
here to glue this in. I can now store pins and things. I can have a little pin
storage to take with me. How cool is that? I love it. Then the button, I'm
letting the button dry. It's still wet, but then this will loop around
and hold it closed. You also need. Any decorations consider
anything pretty like that, if you've got an old
button or an old pin. My grandmother had some
beautiful old pins. I almost used one of those
instead, but I didn't. You also need some
bookbinding tools. You need the waxed thread or If you're going
to wax it yourself, you need the bees wax and
say like a linen thread, which I like this way better. I'm sticking to the waxed
thread. You need an all. You need some gigantic
embroidery needles and a bone folder. This is the $7 Amazon kit. That I got that I
absolutely love. I have a separate all, I
have a separate bone folder. I had some needles, but I
thought this is fantastic. I've got some threads
in other colors. But for $7, this is my favorite. Now I'm just using
it all the time. I'm going to give you
a link to this one and a little bit larger
kit because I've actually ordered
myself the larger kit. It has rounded needles and
some other thread colors, and I was like $13 for everything in it because it
also includes some of this. I thought best deal
ever, best deal ever. Definitely need your
book binding tools. You need some scissors. If you're going to sew, pick a thread and you need
your sewing machine, but pick a thread that matches the color theme
that you're going with. With this, I used a green thread so that it wasn't hopping
off the page at me, going black or white or
whatever it blended in. The goal here is not perfect. This is not perfect, but I love it, and it's
perfect to me. I'm a happy camper and
then there's the backside. It's just going to be
loved and be and more beautiful the older
it gets. I love this. That is how we make journal with a fabric
cover and a closure. There's lots of
interesting things you could use as closures. I chose a button and some
lovely spool of ribbon there. All right, so let's get started.
5. Sewn Cover - Choosing Fabrics: This journal, I'm going
to do a fabric cover, and so I'm showing you here what I have been digging out of
my closets and my cabinets, and some of these fabrics I've had for literally 30 years, because when I was in school, I hook interior design. I got a degreed interior design, but when I went to
school starting out, I was going to do
fashion design. I've always like sewing and my grandmother was
a big sewer and she paid all the clothes for my aunts and
uncles and my mom. The whole time they
were growing up, my mother didn't even
have a store bought shirt until she was
in high school, and she asked for one because all the other kids in school
had a store bought shirt. I've always had an
interest in sewing, but once I got to
college and actually had to sew stuff,
like real stuff. I decided I really
didn't like to sew. I like to make fun things. The thing that I like to make
the most was fur blankets. I've always got a little bit
of fur hanging out because my grandmother had
this fur blanket in the 70s and
absolutely loved it. It was like my favorite
blanket at her house. One side was fur
and one side with some random fabric that she had that was really ugly in 1970s, burnt orange and gold, I'm sure. That's That's what
it was in my memory with some weird zig zag pattern.
But I loved it so much. It's like my grandmother
had the million dollar idea and didn't put it out there in the world
before fur blankets were a thing and you can
get them at every store on every corner now, she had the fur blanket. There for years,
in my early 20s, I made fur blankets for
everybody for Christmas, and everybody had fur
blanket that I made. So I've always got a little
bit of fur hanging out. I've always got some
fabric scraps and things. I pulled out just random
upholstery fabrics that I have saw and thought, Oh my gosh, I love that. What am I going to do
with it? I can make pillows out of it and
obviously I never did. I got into twi one time. I was obsessed with it, so I had several pieces
of pretty twi fur. Et's move this out of
the way a little bit. I've got some just
Canvas, burlap in green. I wish I had remembered I had green burlap when I was making this beautiful art journal here because when I made these, I made the handmade papers. Then this was another one
with the handmade papers. I wish that I had remembered
that when I made that first one right here from
our inspiration thing, I wish I had
remembered that I had green burlap because I
put burlap in this book. If I remembered I
had green, so cool. Maybe the next art
journal might get a green burlap because I don't even remember I had that. I don't even know
why I had that. I just thought it was pretty
I guess. That's really fun. But let me tell
you an idea that I had as I was digging
through stuff. If you're not a fabric collector or you don't have a
bunch of fabrics, then you're like, Oh, I
don't know if I want to go and buy a bunch of
fabric or whatever. I don't know how to get a
bunch of fabric or I don't want to go to the
fabric store and buy yards of fabric to make one or two art
journals for myself. Napkins. Oh, my goodness. Now Now I want all the napkins. I have a bunch of napkins. I had this one
that I just found. I had this one that I found, which I'm in love with. I like the crazy ones and
this one spoke to me. It was a photography prop. I used it in steel life setups, and you can go to TJ Max and get all kinds of amazing
napkins, cloth napkins. These are the perfect size for getting small squares out of or a ribbon of fabric out of. Without having to buy
yards and yards of fabric. Cloth, napkins, perfect idea. I was already gathering up my ideas and pairing
up some color ways. In the one that I have
sitting over here, and I'm going to move
the camera for a second. But this one, I just put out a piece of
linen onto my table, which is what this fabric at the bottom is
because I'm thinking that's going to be
the base of my cover. Then I started pulling
together a few of those tails that I just had
showed you. I had a few more. I was thinking that
maybe the t could be part of a stripe
pattern on this book. Maybe I could have
stripes and then the spine could perhaps
be something like this talla ribbon that I had found that I
used for steel life. I have a couple of colored
bur laps and I'm like, I don't think I actually
ever actually used these because I never
took the little tags off. I think this was something
I got near the end of really being serious about doing the photography
like I was. I've just got random
beautiful things. I was thinking it
could be maybe stripes of stuff and that stuff could be maybe some of these
tills in the right colors. I'm thinking blue green
since those are blue greens. Then I had some velvet ribbon That could be another stripe. I had that in the teal and I had that in green, I'm
thinking stripes. Then I also had
some cheese cloth in the most delicious color, which is a photography
prop also, but I'm going to sacrifice
a little sliver of it. I got little threads everywhere. I'm going to sacrifice
a little sliver of it to be part of my
art journal cover. Then I also had some cheese
cloth here in a lovely cream. I'm thinking blue green cover, different stripes of stuff. Same set of stripes on the front of it as
on the back of it, and maybe this burlap
piece as the spine. I was just laying
out ideas here. Then I was thinking it would be cool to have a button closure. I have my grandmother's
button box, which is nice baker
light from the 1950s. But my grandmother was
the person that saved all the buttons that came on clothes when they
had an extra button. Or she would buy
buttons that she loved. Or if a button fell
off of a garment, she would save those buttons. So I have dug through
the buttons because I found this hobby lobby when I was looking for different
other things and I'm like, Oh my gosh, I love
these buttons. But for some reason, they're not grabbing me
with my blue green journal, and I could still use them, but out of my
grandmother's button box. Who knows how the stuff is? I found this super
fun button that I think I actually
like and might use. It's not as fun a
color as that tal, but I think it blends better with the feel
of the fabrics. Also found a really
fun wood button, a fun, dark charcoali,
deep deep brown. I wouldn't call it quite black, but it could look
black on camera. Another brown button, an
ivory colored old button, which might be nice
as a contrast. I pulled a few buttons out and I'm feeling like this
is one colorway. Then I'm going to show you a second colorway
of stuff I dug out. This was another color way. I found another great
color of cheese cloth in my stash of fabric for
photography. It's a great color. I liked it because went
with M napkin that I loved. I'm thinking those colors and
I also loved this fabric. I might even use some of
that fabric or I might not. This is vintage fabric from
France that I got from an EtS seller a while back because I just absolutely
loved it more than anything. I may or may not use that. I was pulling out different
fabrics and ideas. That could be my fabric for my little hero fabric
or this one could. I'm just going to have to
look at those and decide. I've got some lovely
gold ribbon, velvet. I like the velvet ribbons. I've got some other
velvet ribbons in some good colors
that might blend. I've just pulled them out
to have them available and then another cheese cloth
in a beautiful gold. Pulled out the button
box and I was looking at the different buttons
and look button. That's the greatest
button ever and I'm not even a yellow person,
but I do love gold. Now I'm thinking, I love this button and I found
a cool pink button, but I'm really feeling like this button is going
to be the ticket. Looking at these and
thinking and deciding. This could be the first one I was thinking a
striped pattern. This one could be even
a patchwork pattern and what makes me think of that. In my stash of stuff, and I've had this for 25 years, I found some patchwork
fabric that's already made. That you could then do something with and I
absolutely love this also. It was sold by the
yard years ago. But I just loved it. I was thinking that's a
patchwork fabric, and I actually have this
lovely brown volure feeling. It's a velvety feel
that might make a nice combination with this
lovely patchwork stuff. I actually made a blanket with
fur on the other side out of this with that fur that
I showed you actually, the front of the
blanket is this. And the back of the
blanket is that fur. Then it was so lovely and so beautiful that
I have not used it. It's not one that I put out and actually use
because I'm like, Oh my gosh, this is the
most beautiful thing ever and I have saved it. I need to. As I get older, the
less I save things, and I need to get that
out and just make it a blanket that we use
because it's so beautiful. But I was thinking, I
like this patchwork idea. We could do that patchwork
idea with something like this. I don't know that I would put
this in there, but I might I don't know, I might look
around and see what else we could do besides
just what I've pulled, but I like what
I've pulled and I could do a lot of
it in that fabric. Just trying to give
you some ideas of different things
that you can start searching out for
your fabric stash and things that you might
make a cover out of. You might have a whole bunch of stashed fabric or
you may have none. If you have none, then I would
definitely start looking for napkins because they're affordable, they're not too big, you're not going to have
to store giant yards of fabric and pick Maybe three that you could or if you're going to do
stripes all the way down, say 1 " stripes down the cover, it would depend on how big
that cover is and of course, you could repeat your stripes, but at least three patterns, I think, to do your cloth. Maybe a button for
a button closure, maybe some ribbons to match also and just see what
you can come up with. These are the ones
I'm thinking of. What we need to do first, before we can cut out a cover, we need to decide what
size we're going to make and pick our papers and fold our papers and
make our signatures. I'm thinking maybe two
to three signatures of your favorite papers, and I'm going to get some of those out and start
thinking about that. But start thinking
favorite papers, favorite vintage,
things, handmade papers? Anything that we've
used to make some of our art journals here that I'm using to
paint in and stuff? I'm making the same
type of thing, but with a lovely fabric cover instead of a handmade
paper cover. Start thinking papers. What's your favorite
thing to paint on? What textures do
you want in there? Do you want to have
handmade papers or do you want to go ahead
and have things painted? Because you could paint
everything first, and then assemble a book because after I put
this book together, I actually used a
painting in here. Look at how gorgeous it is, and now you don't
have to worry about messing up your book
pages and stuff. If you've already
painted a whole bunch of pages and you're assembling a finished
book basically. I think on a book that
I'm going to create, I'm going to paint on
my favorite paper, I'm going to paint both sides. Of several pieces and then
intersperse those with handmade papers and
maybe a few papers that I could paint
because in this journal, I only included one pre painted
piece and now I'm like, why don't I do more? Because man, that
turned out fantastic. Just things to think of
as we're going forward. I'm going to get some
paper and start deciding on my signatures and you can see where I'm
thinking with the fabric, but I need to know what size my signatures are going
to be before we can decide what size our
journal cover is, then we can decide how many elements we
need in that cover. Let's do that next.
Let's talk about papers. You can put any papers in
your journals that you want. I want to use these
as things that I paint in for big
abstract journals. That's just what I'm thinking. I want to use the handmade
papers. I love that. I love that my cover is going to be fabrics that have
some meaning to me. Then I'm going to have
some watercolor pages using my ti paper because I like it and it's affordable compared to say some
more expensive papers, but you can use any
paper you want. Especially if you
have some big sheets of watercolor paper, like the great big
22 by 30 sheets, then you could cut tear like
different sizes out of it. I'm going to go with
this. I've pulled some fun handmade paper
choices that I had my dish. Let me tell you after
making all these books, I'm finally working
my way through the dish of all these
papers that I collected, that one day I was going
to do something with, I can't even tell you
how good that feels. But I like this crinkle paper. This paper was amazing. In the other books
that I created. Let me just pull one down. I did one book that had the same things in
every signature. We just pull the other one down. Had some linen in here, and then the next section
had like a burlap, and then the next section
had a piece of Canvas, so I made it different
in every section. I really loved
that. That was from our inspiration journal that just pushed me down on
this little rabbit hole, which was the Dina
Wakeley journal that they no longer make. I wanted to have Other choices, but this is where that
inspiration started. This had craft paper in it, it had watercolor paper in it, and it had burlap in it, and I had Canvas in it. That's where I started with my inspiration and I
made one that was very similar that I can
then continue to use in paint in when
I fill up the journal that I have now been painting
in for a good six months at least covering up all
the different pages with different painting
and different surfaces. I like having different surfaces because it makes
you think outside the box and get outside your
comfort zone and figure out, how can I paint on this very loose
weave surface versus a canvas that's sitting right next to it or a
watercolor paper. I liked having those challenges. I like big double spreads
of watercolor paper, and then I liked having a spread where maybe two
different surfaces. I've had a whole lot
of fun working on all the different surfaces in my inspiration journal here. Now I want a whole bunch
more going forward, but maybe customized in
different papers that I love. Here's where my little journey
of the bookmaking started. I did bookmaking
years ago and made, I'll show you the one I made. I made this little book and
this is like book cloth, and it's got little
signatures in it and little signatures
have a wrap around so that it's like little individual
books in the book, but when it's closed,
it's real pretty. I made it. The instructor was very exact and precise and you had to do
it just like this or that. Just even making the
one book was almost not fun because it almost
seemed too difficult. When I was making these, I was not as precise. I'm precise enough
that it looks amazing, but I wasn't so precise
that I was like, I'll never make
another one again. After I made this, I was
so inspired that I'm like, I need to make some more. I hope that I give you that same amount of
excitement for bookmaking, or at least making these
amazing art journals because I've loved it so much that we're now working on a third
companion workshop, doing this workshop
with some others because I cannot wait to
be digging into these, but I'm so inspired for
making these that I'm like, let's keep making while I'm in the mood to make and then I
may not make another book the rest of my life
because I've got enough to last me for 15 years. But man, I can't even tell you how excited I
get to look at these and to tell everybody about the journals that I've made
that before I put these out, I'm like, I have nobody to tell, so I tell my best
friends and I'm like, Look how amazing these are, and I get so excited, I can't even tell you
because they're so gorgeous and you can see once
you start painting in them, how they could offset
different papers. I don't worry about the different
papers either because I can either leave it like that because it's a handmade paper, that's why I like
the handmade papers. If you make paper, make some
papers to do this with, So they're very textural and
interesting in themselves. Next to say a complimentary
painting that you do with it. But I could also just
put Gesso on that and I can paint on top of that or I can glue things
on top of that, I could make collage
work on top of that and make that work. I choose to make my
treasure journals out of these treasured
pieces of paper that I've now collected
for quite some time. I've just collected
them and thought, I'm going to do something
great with these one day. I never knew what that
was. This is what it is. These are the things that
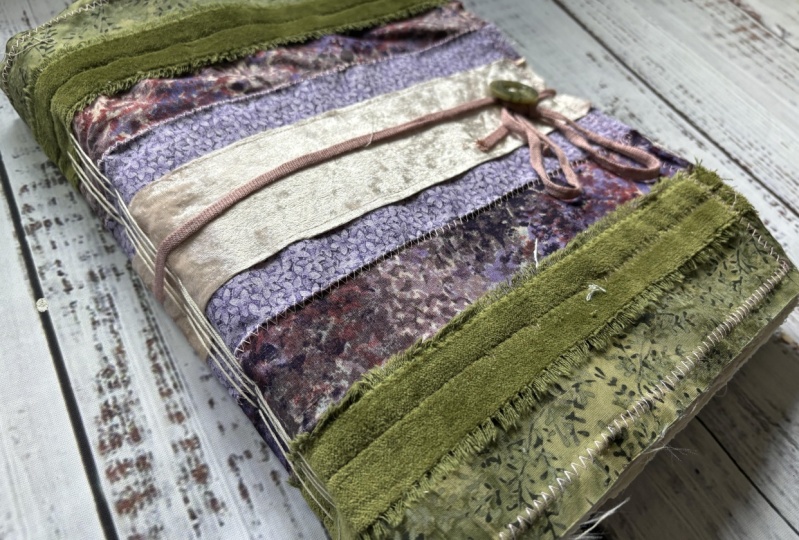
are going to be great. I've also pulled I'm
thinking in the blue. I'm thinking that
I'm going to make the blue green cover this time
because I'm feeling that. Then I was thinking
it might be nice inside to have some of the blue papers that I've
collected rather than the rainbow of papers I
did in that last book. Maybe some blue papers
in there will be fun. I also have some t bag
paper and I'm like, it's basically big
sheet of t bag. That wasn't made into a T bag. That's going to be
super delicate, but it might be a fun as one page option in the
book just because. I pulled that out of my closet. Then textural elements. I like textured ones too. I might use these texture ones. I've just pulled
out some choices. I don't know which ones are actually going to
go in the book, but I thought let's just get some different
choices out here. Some of your choices might be Jelly prints that
you've printed. If you make some big
jelly prints, especially, or this might be the
chance that you've wanted to have a reason
to make big jelly prints, those can be your handmade
papers or your painted things. It could be newspaper, it could be old vintage papers. It could be just all
watercolor book, if you like. That watercolor paper,
but you don't want to do different types in there. You could do all
watercolor paper and then it's ready for you
to use and paint in. That's another good choice. This one, I have some
watercolor books that I made already
in the other class. We had and I had a fabric
cover in that one, but we didn't actually
sew this cover. In this class, we're
sewing the cover. But I did have one
that just made of watercolor and all
watercolor paper. That's really a
nice thing to do. You could also make these covers to slip on like you could
have a pocket and slip that down in there if you
wanted to be able to change the cover out or change
books out of the cover, you could make it with a pocket. I'm going to make
it a permanent one, but just throwing more
ideas out there at you. What we're going to do is
we're going to have to decide what size paper? Do I want it to
be the full size? I'm using the A three ti paper. And this size, if I leave
it like the full size, it's a book this size, which is a pretty good size. It's a tiny bit smaller than the original inspiration book by about an inch and
inch and a half. It's a little tiny bit smaller
and this is a big book. But this is big enough. I'm happy with this size. I think it's like
a ten by 12 isis. Let me grab a ruler and I can
tell you what size that is. When we're done, this will
be the approximate size. It's approximately 9 "
by 12.5 ". Nine by 12. You see that's a
pretty good size. I'm going to go
ahead and go for it. I'm going to do the big sheets. This pack of paper comes
with 20 sheets of paper, which is plenty for
one journal because this journal only took one pack of paper and
there were some extras. This journal took three
quarters of a pack of paper. This journal again, took three quarters
of a pack of paper. They don't take a whole pack. You end up with usually
a sheet or two leftover. Depending on how big
you want to make it, this one I made a little
bit bigger and I had one, two, three, four, five
signatures in it. Because I'm like, I love that, I want to make it even bigger, whereas the original one
has four signatures in it. You can see how much thicker there you get with
one extra signatures. If you're wanting something
to work in for a while, use as many sheets as you need. Basically, too,
what I had decided on those signatures
was six sheets. I had two sheets of
watercolor paper because when I made
these, I'll show you. I made this one, and
I had one sheet of watercolor paper and then
a sheet of handmade paper, and then two sheets
of watercolor paper. I attached the original
first sheet of watercolor paper to the spine to be the opening
page of the book, and then that made a handmade
paper, my first page. That's interesting. But wanted that first page to
be watercolor paper. If you do two sheets
of watercolor paper, that sheet that
maybe is going to attach to the spine
and this sheet, if you're doing a hard cover, then you have something
to go with before your first paper or
whatever it is that you put in there, get started. Now, because we're
doing a cloth cover, We're not actually
going to attach that watercolor paper to
the spine in the same way. But I still want it to be two watercolors and
then a decorative paper, and I'm just going to take
scissors to cut these down to the right sizes and
then or my rip ruler, which you know I
love my rip ruler. Let me go grab that.
My dual edge ripper, is my favorite rip ruler. It's about two feet, long decod edge ruler. Basically what you do is you line up this
to where you want it, and then tear your paper towards the ruler holding
the ruler down as you go. And now we are going to get a handmade torn edge
on our papers to match the handmade torn edge on our paper that I've selected
that I'm going to use. That's another reason
why I like using this paper because it's got
the handmade paper edge. And it is a weird cotton
watercolor to paint on, but once you paint enough
on it, it becomes fun. The way I like to paint with acrylic paint and watercolor and lots of different
stuff like that, I'm not just painting
with one medium. I have found that this
is very versatile and I ended up liking the cloth feel of the paper.
That's why I pick that. It's like say $34, I think this past time when I've been buying these to
make these journals. So Where did I just
put that rip rower? I just lost it. Oh, it's
clear, so it's right there. But if you've got 20 sheets and it only takes one to do a great big journal, you can see how
affordable that could be because if you're
thinking $34 is a lot, the handmade journals are
just expensive or more. When you're buying them, I think those Dina Wakeley
ones were around $40, but they're making thousands at a time when they made these. This is called cream texture stripe deco paper,
handmade in Nepal. Most of these handmade
papers are made in Nepal. Yeah. Then that's my next page. Look how beautiful
that paper is. And then I might do
another handmade. Another watercolor sets one, two, three, four, five. I might put seven sheets because the handmade
papers are so thin. Let's do this one. So,
when you go to buy those, they were like $40. And so you could
probably get away with about $40 in materials, but if you're going to make something that's
truly custom for you, you might end up
spending a bit more, but still fairly reasonable for making a one of a kind handmade
art journal for yourself. Especially one that's completely customized to something
that you love. Oh, my goodness. I
can't wait. With that. There we go. Once you decide
what size is your paper, what papers that
you're going to use. Then you're going to have to put all those
signatures together. Now I've got two pieces
of watercolor paper, one, two, I've got
a handmade paper, and then I've got two
pieces of watercolor paper, and then I've got
a handmade paper, and then I'm going
to have a center be the watercolor paper. Once I get my signatures done, I'm going to need to
fold them in half. They're not all going
to line up perfectly, and that's what I like about it. So we're going to
fold that in half, and then we're going
to line all of them up together to
get our thickness. So I'm going to go ahead and get my other signatures made,
and so I'll be right back.
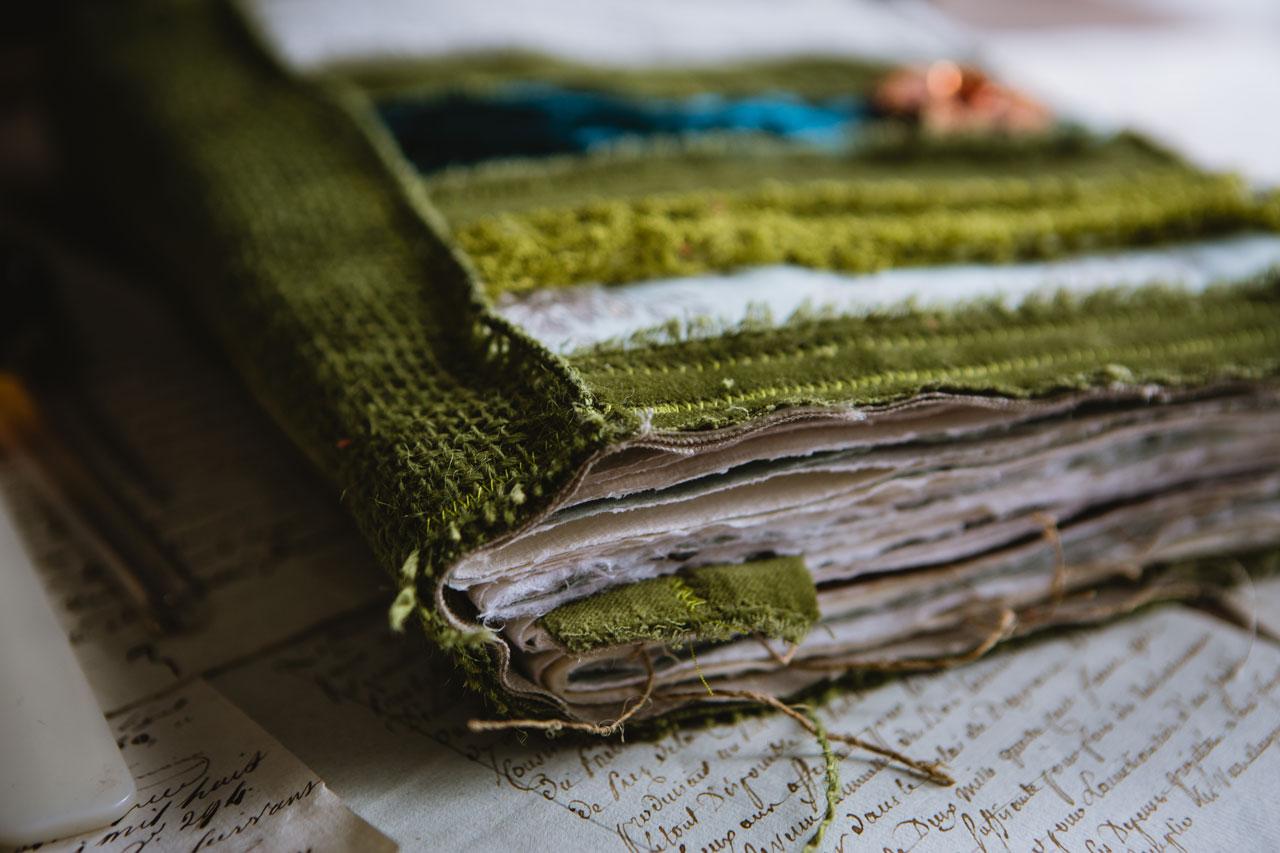
6. Sewn Cover - Creating & Sewing Cover: Now, I have four sections made because I think
I'm going to do four, but we'll see how
big that makes it. I'm taking my bone folder
and really flattening out the spine with all my weight
so that it lays flatter. On this one, I've used a paper that comes outside the spine like all these
little scragglies. I love that. That does not
bother me that that does that. If it bothers you,
you can cut those off if you use a paper like that,
but I'm good with that. I like it. I like the
imperfectnes of it. All right, that and
then the fourth one. Again, I'm not looking
for perfection. I'm looking for just
something cool when I'm done. Let's see how thick that makes. That's thick. That gives
us a good thickness there. Now, I think what I'm
going to do is have the base of my cover
be this linen. This is the linen that
I got at the Blick. It was called Belgian
Belgian linen, type 66 j, unprimed, extra smooth, and
it was a 54 inch by 1 yard piece, 8.8 ounces. Medium weight. It says, medium weight, tight single weave construction, 92 threads per square inch, ideal for realism portraiture. It's a linen that you
paint on basically. But since I got it
at the art store, it was convenient for
me to buy a piece of it for book pages and I didn't put a linen
book page in here. I could have, but I didn't. I'm just going to give myself some extra space here as
I'm measuring this out. I'm giving myself a
little extra room here to think and I can
see if I go ahead and fold this over that
I've got plenty of fabric if I go
ahead and cut that. On this side of this fold. I'm just giving myself some extra room and we'll
trim some of this down. But I don't want to
be stuck with not enough. There we go. Then I will just set the
rest of that to the side. This is going to be the base of what I'm doing because I've
already got a fold here, that might be on the spine. Let's just look at
where that puts us. It puts us about right here. So I could trim that down to about there and
the same on the other side, or I could move it
down because it doesn't really matter and
then we're not wasting it. Just trying to give
myself enough up here, but not so much that now I've
got too much to work with. I'm going to just flip it over. And then I know exactly
where we've ended up here. I'm going to give myself
a good 2 " to work with. If you're a sewer and
I'm making you cringe, by giving myself extra
space, I'm sorry. Now that's going to be
the gist of my cover, and now I'm ready to set this
to the side for now because we're going to be sewing these directly to the cover
once it's finished. Now we need to decide which
one's going to be the inside. I actually like this texture. But we're going to
cover up both sides, so it doesn't even matter. Now I'm thinking that
it's time to figure now. I was thinking I wanted
this for the spine. I'm just going to
go ahead and cut out a length for that
that would work. And then we're just
going to play and experiment with the
different fabrics and stuff, until we get a
layout that we love. I was thinking one
stripe in this velvet. I just give myself some of that. I was thinking a stripe
in this velvet green, maybe even two
stripes in the green. Yeah, I'm feeling
that we might get two stripes out of the
green because it's thinner. That's not the
final layout here. I'm just getting my
thoughts together. Then we've got these
lovely options. I was thinking a cream stripe. Let's just see, is
that wide enough? Do I want to pull it like
that to sew that in? I could do that,
I could do that. Then I'm only
sacrificing the end. Instead of the whole thing. Because there's
plenty to do that. Let's just cut off a little
bit of the end here. And then the rest
of this can still be a photography prop. If you're one of my photo
people. I know you're going. That's pretty cheese
cloth though. It's a stretchy,
pretty ivory color. I like that I picked the
edge with the f on it. I did that on purpose. I might cut a little bit of the fray off, but I
did that on purpose. I like these little
edges that do this. Once we've got enough stripes, then we can play with the order, and then we see how
stretchy that is. There we go, look at that
and then we can pull this to the top because
that's going to be on top of it in my mind. Really, might as well
just pull that out. Then I like this green, so I'm thinking the same
thing, cut off an end. Let's just do it because
I love the texture, and I might trim it down again, but I'm going to start with enough just to see or
we could crunch it up. It could be texture. I like
the texture and the color. When we're attaching, I'm going to be I'm
going to sew these on, but if you don't want to sew, you could use glue. Yeah, that's plenty. Then we've still got enough
space here that we need to decide on a fabric stripe. It goes to about right there. I could either leave this
salvage edge on there, or come to the other end or I could trim it
off either way. This actually has people on it. Do we just want the
implication of whatever it was and have the pattern, or are we trying to get
some design in there? I'm just trying to get the
implication of what it was. I don't want to get the
people necessarily. I'm going to cut myself. Large enough strip
to just think here. You can see why having
napkins would be a good choice because then
you've got lots of choices. You don't have to lock yourself into a yard of
fabric or whatever. This is about a quarter
of yard, I think. I'm sure the poor soul that
I tortured cutting lots of little pieces of fabric really appreciated
me coming that day. But that's why they're there to cut you some samples
and stuff, right? Now we've got some
little texture going. It's not perfectly cut straight, but it's enough for me
to straighten it out. Then I've got this blue one
and I've got this green one. Feeling like this green
is a little crazy. Is it even long enough? It's not even long enough. There we go. Totally solved
that problem, didn't it? Now, I need to get my
rotary cutter out, make it easier to cut this. Now, another tall. Don't
want that in there? Why not? Why not? I'm just going to cut
myself a big enough strip. To decide on. Well, see this got
people all in it. Do I want legs of people? Or do I want legs of
people over here? I like, you know what? Yeah, Maybe I just want
legs of people with sheep heads. Is what it is. Let's just cut ourselves
a strip of this. Is the color more than
anything that I wanted? Is that long enough?
Yes. Yes, it is. There we got that. Now we can start rearranging and deciding exactly how is it
that we wanted this to be? Do I want a ribbon at the top?
You know what that means? That means I could do maybe
a third of the green ribbon. If I don't have enough here
filling everything in. We've got that like the
blue being in the center. That does give us
maybe enough space for another ribbon, filling it. What do you think? I'm digging that. We've
got that in the center, and we've got this
piece coming up to it, and we've got this piece. That's going to be here. When I zigzag stitch all these on, then will be good. Then got this piece
here and I'm almost feeling like green
stripe at the bottom. We'll have a little
green stripe as our thing that's
pulling this together. I'm like in that. Then
this is going to be say, our spine in the
middle of the book. I like that. Then
still thinking, this button here.
What do you think? I'm filling it? That's filling
pretty good right there. I'm thinking that's going to
be the cover of our journal. Now what I'm going to do
is get some stick pins, and I'm going to pin
this into place, and I'm going to put some
thread in my sewing machine, and I'm going to zigzag stitch
all these pieces together. Actually What I might do
because I want another layer of this linen there to really give it
some extra strength to be on the inside. But I'm almost thinking that I could do that last all the way around and that'll hide all this stitching inside the
two pieces of the fabric. Yes, I think that's
what I'm going to do. I'll cut another
piece of linen and we'll do that lat and then we'll be ready to sew
our signatures in. Is feeling good. Now, I've
put a button on here. We've put a button on
here for a reason. Now we have to decide what kind of wrap
around that we want. What do we want wrapping
around this also? We've got to decide that before I'm done because I'm
going to want to sew the wrap around onto the other side in
between the two layers. I've got more ribbon.
Let's make that decision before I take everything apart. Let's see what all we got
here. We've got more ribbon. It's a big enough journal that it needs to be
a big enough ribbon. I've got another green color here that's a
different color green, but that's almost
too much the same. I like that orange. Let's see. I like yellow. I've put the yellow. Where
did I put the yellow? I've got a yellow
one because I used it because I used the yellow on this pretty one
here. I don't know. Now that I'm looking at it,
that's almost too much. We could have just a little
one that loops over and ties. I'm glad we're thinking through this before
we get much further. I could have a little piece of ribbon that comes around
and either just ties around it or a loop that you can then close like a
button fastener. I've got some cord. Oh, I'm thinking cord. It's a pretty yellow cord, so I still get the yellow that I was maybe want a little bit of, but not too much
of. Feeling good. Feeling good about this.
Let me go ahead and my sole machine over here
and I'm going to pin these pieces on here and then we'll stitch them together,
so I'll be right back. I went ahead and got some pins, a little pin cushion here, and then I remembered that
I left myself extra space. Before I pin all
my stripes down, I needed to actually
cut my length of fabric closer to the size that it's actually going
to be for the height. I still have time
to trim the width after I get everything of Attached down and then give
myself some room to sew, I can cut the extra
off of the width, but I need to go ahead
and cut the height. I cut off the little bit
of extra that I left and then I realize that
my stripes are not even, and I want this to
be in the center so that it covers the same amount of spine once we get those in. Now I need to actually
figure how much of this? I want this blue stripe
here to be in the center. I need to re up everything here to just get that
closer to the center. The height of this is
about 13 ". 6.5 ". We put the center
about right here. I know that I need that blue to come up to about right there. That's where I want
the blue to sit. Now I just need
to get everything else lined up with that and still use all the colors
that I've picked. And feeling like that. Then I had I think I'm going to cover
up the blue edge there. And then I had one of these. Then I had this other
piece of fabric, and then I had a green. Now we're more lined up with where the height
is actually going to be. Otherwise, if I waited to
center that up correctly. I would have lost half of my striping that off
the bottom. Last. I didn't want to do that because I want this blue to
be in the middle. Just some problem
solving before. I get it all stuck down and now I'm just
going to go ahead and tack a needle down on these to keep them
where I want them. When I pull out my
sewing machine, I can just stripe it real easy with some zig zag stitches without too much going into it. I've pinned one side where I think I want
everything to be. I'm going to go ahead
and pin this side. I'm going to sew all the
strikes with a zig zag stitch, just run along with a zig zag, and then I'm going to zigzag stitch that right in
the middle of this. I'm going to mark the middle. I don't forget where that's at. I'll zigzag stitch that down
and then we'll be ready to put the the second piece
that I'm going to use, which will cover
all that stitching. Let me go ahead and
finish taping these down. I'm just going to
zigzag stripes. I'm going to zig zag
these stripes with a color of thread that hopefully is complimentary
to what I'm doing. But you could use
white or black, but I'm wanting to use something in the
family that I'm using. I'm going to see what I've
got, and I'll be back. Try to do this where
you can see it. My sewing machine is so old, I've managed to
lose the plate that goes here while it was
living in the closet. I don't even know
how I did that. So we'll just hope that it lets me sew with
that plate missing. I think I'm going to
start could start by sewing these down.
And I've got it. Ow. Got it lined up
there with the edge. Just poked myself with a needle. But I'm going to make sure
I'm on the edge over here. And I've got the
pedal down below. I'm using a zig zag stitch
and I can adjust the size, but I've got it set it
whatever number three is and number one over
here on this thing. I'm just going to try
to keep it going. I might have been easier if
I'd cut all this ribbons on this side to the size of
that actual piece there. And I picked a green thread because we're working with
the blues and the greens. I'm not looking
for perfection at this point because
if you'll recall, I left myself extra room on the length and I may be cutting off this
side when we're done. We'll just see. Now I'm
just going to run down the lines and try to
get at least the set. I'm not so in the other end yet I'm going to let the one end be my guide and just keep hopefully
lined up, so we'll see. I got off a little
in the center, but it's in the center. I don't mind. I did get off a little bit
there in the center. I might come back down in the
part that I got off and run a zigzag on that fabric
because if I don't, that's going to f for
the rest of its life. Let's see. Here's
the center. Far. I've got a tiny bit of edge right here that
I might want to do, so I'm just going to
go and tack it down. All right. It's not perfect. I'm going
to leave the top edge, not sewn down because
I'm going to sew another piece of fabric to this. But before I do
that, I'm going to get the final size that I need and trim it down based on the thicknesses
of my signatures. Then I'm going to just sew the front piece to another
piece exactly like this. That we can't see all that. But I do need to cut
the edges and then redetermine what
the center is so I can sew this on before I zig zag stitch the
back onto the front. Let me do that real
quick and I'll be back. I've set the sewing
machine on the floor. We're not looking
for perfect here because I have sewn hardly any in the past 20 years and
still and I have a very, very old sewing machine, and you could glue all this
down, if you'd rather, you could probably do
it with a glue gun, maybe some fabric glue, I'd test the glue on the
fabric before I did that, to make sure that just to make sure that I'm thinking at the same
time that I'm looking. Anyway, I would test the fabric before I did that just to make sure that it didn't soak through and look
weird on the fabric. You could use a glue stick, that probably would
work the best. This is about where
it's going to be. That's about even so I can see what the spine
is going to look like. I have enough fabric
here that I could add another signature,
but I'm not going to. I go. I'm going to go ahead
and trim this side here. And I'm looking at about
a quarter of an inch. I'm going to have the same
overhead in the front and the back that I
have right there, and it's about a
quarter of an inch. And I'm going to grab
my rotary cutter. I've actually grabbed a rotary cutter and
quilting fabric thing because it's going to
make it easier for me to see and judge this
correctly or more correctly. If I'm right here, and I can set this right here just to really get
it in the right place. I really want that right there, and I want it to be straight. I'm on a cutting mat underneath
this, I'm good with that. And that was several
layers of fabric, but man, look how easy that
makes that to cut that. I got a little overhang there. See I was cutting
off that end anyway. Now I've got this right here. I want to make sure I've
got my quarter of an inch. That's where I want it. I'm
going to flip this over so that I can see how much space I've really
got there on this side. Make sure it's exactly
where I want it. Make sure I've got
my overhang still, and now I can give myself a little overhang here on
the front and cut that. A little bigger than my
mat, but that's okay. Just makes it easy to get it straight and get the whole
thing sized up correctly. And then let's test it out. Did I get it where I needed it? I've got all four of my
signatures that go in. Tiny overhang on the top, little tiny overhang on the
bottom, so that's perfect. I'm going to mark the center
by just folding it in half and giving myself a center. Then that will
give me a point to reference with my piece that I'm going to
run along the spine. All right, so let's just
see what we got here. So I still want this stitching
to be on the inside. I'm going to put my
spine about right here and just to give you an idea of what my thinking is before we stitch
it down for good, that's what I'm thinking. Then we have a button closure over here. That's interesting. Then you can decide after you
look at it, do you like it? I don't know if I like
that. I'm glad we did that, Let me grab the green one
and see if I like that better. Here's the green one. Yeah, I do like the green
one better. Look at that. Let's just look at that. You
might not like it at all, but I'm feeling that. What do you think of
the green instead? I think that's pretty cool. Does give me no reason
to have that blue there and the blue gave me the
reason to have that there. It's okay. Or we can just leave it without you
could stop at that point, so the front onto the back
and sew those on there. I just wanted to be a
little fancier than that. I think I'm going to be a little fancier than that
and do it anyway. Well, in the center. Let's get that
centered as we can. I want it to not be
all over the place. I'm just going to
pin this in place. Then I'm just going to zigzag stitch these two on
here on each side. Then I'll be ready to get
my next piece of linen. And sew it on the
bottom. Hang on. I didn't leave myself
enough space here. It's going to fray, so
I'm okay with that. I'm only going to do with
these lines because I've got all the way around that
I'm going to do in a minute. I'm not looking to down the top yet. Okay. Now I got the back on, and now I'm going to cut a second piece of
linen real quick. I'll be right back
and it's going to be this exact size, and
I'll be right back. Okay. I've got another
piece of linen cut and you want whatever the nice
side is to be outside. If you see a side, you like
better than the other. Then I've got the
piece that we've sewn And I want all this to be on the inside. I don't
want to see it. I'm going to sew this piece of linen right on it like this. Then we can do a little
final trim up of everything to make sure everything's
perfect on our journal, but we could actually
do it at the end. Let's see. I'm trying to
just make sure I get it all in the right place here. All right, I'm just going to
run around all four edges, keeping it as straight
as I can here. I'm giving it a little
bit of a lip here. I'm going to need to do a
little bit of trimming and I'm giving myself a little space
to be able to do that. I hope. We'll just
do the best we can. I've taken that off
the sewing machine. I know it's not perfect
because I actually had extra linen over here. That's okay though
because I have left myself plenty of space
to come back and trim. I already know I need to
trim this part right here, so I'm going to go ahead and
trim that out of my way. I might trim some more, but I didn't have it perfectly
straight apparently. I'm go a and trim the
extra off this side. Then I can see how
much space I got. I've still got plenty of space to trim this on the edge
here. I'm going to do that. I'm just going to do
that with my scissors, and I'm just going to trim really like an
eighth of an inch. I'm just making the eve eve and you're going to
get off any scraggs. So if you're doing
it with scissors, that's how easy it
is just to trim it. I'm just trimming along my
edges for any weird stray, not straight extra pieces. Like I said, I'm not going for perfect
when I'm doing stuff. I'm going for interesting
and pretty when I'm done, but it doesn't have
to be perfect. Don't get hung up on
perfectly straight lines or everything being exact. Let's test here because I got
some extra space. Oh, good. I still got room. And then you'll never know that my piece of linen wasn't
perfectly straight. Leave yourself some space. Then this edge, I'm leaving raw, and then with any luck, it will fray and be interesting and pretty as the journal ages. Oh my gosh, that was a
lot of fabric to cut through. There we go. You could even fray
it some now if you wanted to pick at the threads
and pull some of that out. You could start the
fray There we go. Now, we've got the right size. We need to decide, the
buttons going on here. I want to go ahead and
put the button on there. I'm just going to take
a needle and thread and sew that button on there just
coming through the holes, it's in the spot that I want it. And I can even
check the spot with the signatures right here. Se there. I like
it with the spine. You might have thought it looked better without the spine, but that's the choice
you can make on yours. I'll put the button
there. Let me go get a needle and thread. D
7. Sewn Cover - Assembling Book: All right. We are now ready to sew our signatures
into our cover. I've got my bone folder just to make sure everything is
as flat as I want it to be. I've got my all,
which is going to poke my holes in my book for me, but I don't need
to poke holes in the fabric because my needle should go through
the fabric itself. I've got my waxed thread, and I'm going to go
ahead and be using this thread that came in the
little Amazon kit along with my my needles because this little Amazon
bookbinding kit is perfect and it's cheap and it had this color thread in it, which matches my button, and it's going to match
the little cording that I decided to use
on the other side. I saved a piece of
this stuff that I cut out because I'm going to
use it I think in a minute. Basically, what we are
going to do is find the middle of our journal and fold that where
I can see it. Be I've got four of these, I might even mark it
with a pencil just to make it a little more clear
to myself where that was. Because I've got four of these, there's not one that's going
to sit in the middle per se. But I'm just lightly giving myself a visual with a
pencil where that middle is because two of these are
going to go on one side of the middle and two of these are going to go on the
other side of the middle, and then it should be centered
when we are finished. What I'm going to do is go ahead and just make sure these are in the order
that I want them in. Because I've got different
papers in each one. I've got a blue paper
in the first one and the last one because remember
I used handmade papers, and I can see that upside down
because I like the paper, looking like the tree is supposed to go where
it's supposed to go. Before you sew these, if you've got any papers with a directional thing on it
like that had that tree. You need to go ahead
and decide before you start which way is up
and which way is down. I apparently had all of these
upside down, we'll say. There we go now the tree is
going the right direction. Just going to give it one
last little firmness there. I'm going to put these in
the order that I want them. There's a tree and I
had this blue paper, too, but I think I want the tree in the first and the last. And then just making
sure all of these are as squished as
I can get them. And then I'm going
to number the m so that I'm keeping
them in order, and then I can just
erase that number later, but that will also help me keep going in the
right direction because I tend to turn all over the place when
I'm making stuff. Now, what I'm going to do is just mark where I'm going to put the holes because we're going to do a very easy
stitching with this. I'm going to put the
hole in the middle, and then I'm going to
put the hole at about 2 " in from the end
on both of those. I could go a little
further if I wanted, but I think that I'll be fine. I'm going to take my ruler. This is why you want
to keep them all in the same order because
I'm just going to take I've got a tiny that's
got a flat end. I'm just going to mark all
four of these in the place. Now that I've got that marked. Now I can just run up the
spines and give myself a mark. Now I want to keep them all in the same order or they will not line up when you sew them
even though I measured it, trust me, they just won't. Now I'm going to take my all and I'm going to punch some holes. Basically, what I'm going
to do is flip it to the inside and then find each hole and I'm
going in at an angle, and that will get me to the other side right
in the center. See how I did that. I'm going to do that for all three
holes at an angle, there we go right in the center, and I'm going to
do the third one. And then there we go. Perfect. Just make sure
I got a big enough hole. I'm just going to go all
the way through again. And then I'm just going to
fold these right side out, and I'm going to
do the next one. So I'm going to do all
of those real quick. That one I got off to the side, so I'm going to try
that one again. I'm not worried about it making
an extra hole if it does because I can fix that with
paint and stuff later. If you're not directly in
the center and you get a little tiny bit
off, you're okay. Sometimes I'm a little
more than a tiny bit off, but it still comes
together for me. I just don't worry about it. I'm just making sure I've got
a big enough hole in there. Okay. And once I've got them all cut, I'm going to put them
all back in order. And I'm going to start
with the second one. I'm just going to
thread my needle here. And this stuff is thick, so I'm not going to double it. You can double it
if you want though. I'm going to set these to the side and I've got
number one and two, and I think I'm going
to do number two first because then I can be right there on
the edge of this. I want them to be as close
as I can to the center. I'm thinking right there and I'm doing it
with the number two first because two and three are going to be in
the center of our book, and just make sure that I'm actually where I want to be
at the top and the bottom. I Then once I've got it
where I want it, I'm going to go through
the center hole and come out the cover. I'm actually going to push all the way through
to the cover. Let me make sure I'm all
the way through the papers, and then I want to go all
the way through the cover, and I want to make
sure it's I want it. I think it's where
I want it through the papers and then just
to the left of center. Then I've actually
just pushed it all the way through
to the outside. What you want to do is then come to the top and now we're
judging where the hole is. I'm trying to find the hole. I could poke it all the way through if I needed
to find the hole. I could actually get like a pin, show me where the hole is, or the other sewing needle. Let me grab the
other sewing needle. I just want something
visually to show me where I'm poking my
other needle through. Let me just get these lined up. Okay, all the holes
are lined up. And again, I'm just
I'm trying to be the same distance but to the
left of the center line. So we'll say right there. Yeah, is that right? Is
that where I want to be? That's where I want to
poke in the next needle. Now I'm going to come in
right where that needle is. I'm just going to pull one out and follow it in with the other. Easier said than done, but
that's what I'm trying to do. So that I find the right spot. Then I can poke that
through the holes. There we go. Just takes
a little bit of pengln, but it's not hard. What I'm doing is I'm pulling it through and I'm pulling
this one as we're going, but I'm leaving a
tail on this one. Because we're going
to tie this off. Now we can go through
the center hole, same hole that we've already been through and I'm going to go back through the hole
here going to the outside. All right. Now, pull
that all the way. Now we need to come
in the third hole. I'm again going to guide myself
where that third hole is. There we go. Then
I want this pole tight so that's where it's supposed to be as I'm coming through
with the third hole. And st to the, just slightly to the left of the center that
I gave myself. Now I'm just going to direct my other needle right in where
that needle is coming out. Look at that. We did it. Then I'm
just going to pull everything nice and taut and from the outside, it
should look like that. When we're all done, we're
going to do that for each one of these signatures. When we're all done, we'll have of the tha lines
on the outside. This thread is nice
and sturdy and thick. I'm not worried about
it being one thickness, but you could double
thickness if you needed to. I just pulled that thread through the other loop that
we had out there and that's going to give that's
going to give me a spot to tie these now without worrying
about it coming loose. Then I'm just going
to double knot that. Now it's your choice, whether you cut these off
or you keep them. Um, you can just cut them
short if you wanted to, those are just going to live
inside your journal there. You could tie charms
on the end of those if you like that charm look. Now you can see it's attached to the cover and
we are good to go. Now, I'm going to
go and do number one because we just
sewed in number two. And I might need a
longer thread since I just trim that off
as short as I did. That's okay. I'm going
to trim them all. I'm again going to go
through the cover. I'm going to try to line right
up with what we just did, but over like an
eighth of an inch, I want to give it enough
room to be in there, but still be right beside that. I want them side by side
as close as I can get them because that'll give
me a nice tight fit. You don't want them
on top of each other you can't
do it right neck. You still got to
have a gap in there, but doesn't have to
be a big big gap. I'm thinking like right there, which is about a
quarter of an inch. Go right over from the
hole that's there, go about right there
and I'm going to go all the way through the cover. I'm going to leave myself
a little straggler here, and then I'm going to go
ahead with the other needle. Again, just help direct
myself into the right spot. I'm trying to stay
the same distance up here that I just
created down there. I've given myself about
a quarter of an inch. Let's see. That would be
exactly a quarter of an inch. If I wanted to measure that out, see that would be the
exact right there, which is basically what, one, two, three, four, 4 millimeters. Is that how many is in there? One, two, three, four. I have to get my
magnifying glass out, but it's about a
quarter of an inch. Now I'm going to go
back where I was. And give myself a hole
to come back through. I pulled my thread
out. There we go. All right. Going to guide myself back into the
hole that I just created so that I can be
in the right spot here. There we go right into the book. Good deal. There we go. All right. Now I'm going to go back through the middle hole that
I created there. And I'm going to go back through that hole on the
outside of the cover. Now, I'm going to pull that down and come back
in the third hole. Let's find the third hole. About a quarter of an inch over, just trying to keep the lined up there and making sure I'm beside the hole there on the other ones that we
just already sewed in. I want them all to
be about the same. There we go, coming back in. Here we go. Got it again. All right. Just pull everything taught. Don't pull it so hard that
that it's tear in anything, but just pull it taught, and then I just loop it through
here twice to really give myself a moment to get the needle off and then
double not it. There we go. Now we've got two of our
signatures in there, and we've created our spine or we've started the creation of our spine and now I've got number three that we're going to line up on
this side of the line. Where did I just throw
our other needle down? I see this needle. Here we go. I'm trying not to lose things
right in front of myself. I'm just going to get this started with a new
piece of thread. Can't believe we're almost done. I love how I can make a
whole gorgeous art journal that's going to last me
basically my whole life. After we painted, it's going
to be something I love. I'm actually going to flip this around so that I
can work this way. But I've numbered all the books. I know that I'm in
the right direction because I've got the number three down there
at the bottom and the number two and
the number one, but I find it easier to work
towards this direction. We're going in the center
again just like we did with the other ones. There we go. I know that I want to give
myself a quarter of an inch. I'm going to line up
right with that threadhle and give myself about
a quarter of an inch. Here we go. I'm going
to go on through. You can see I'm lined up
steel with the other two. Leave my tail here. Then I'm going to
go ahead and take my little guide needle and guide myself into the right spot. I could probably do
a quarter of an inch over on the spine
looking for it, but it's almost easier just
to go ahead and do this way. You do whatever
way works for you. Go right about there. Judging where that center line is versus where I'm going in. I've still got enough
room on that side though. I'm still feeling
pretty good about that. There's my guide
needle that I just pull all the way through,
but that's okay. It's stilled in the
right spot. All right. Let's just take up that spot with the new needle.
There we go. And right into our hole there. F. Back through the center. I need a thimble. I
have a thimble here. Very helpful if you especially pushing through
all the different layers, the thimble is super handy. If you need a thimble
because you're hurting your fingers as you try to
pull and push your needle, you might have that on hand. Get one of those
while you're at the. Let guide our to the hole here. Come off on my little all hole. Let's just go ahead and
make that. There we go. Again, I just don't worry about if I've got a spot
like that I've created because I can paint that or I can
collage over that, or I can I can fix it. It's not a big deal, I
don't get stuck on that. Here I've gone
through the center of my thread when I went
back through that. If you go through the
center of your thread, it's going to get
stuck just like this. You want to avoid going
through the center of that thread when you're going
back through that hole. If you do that, you
need to pull this out. I know that sucks
right there with you. Then you need to out. Which one was that? There we go. We're going to pull
that back through, and then we're going to
pull it back through here. Then we're going to pull
it back through here. We don't want to be stuck in the center of that
piece of thread. It stops us from
pulling it tight, and I'm glad I could show you that so I could tell you what to do when you do that because
you're going to do that. Just do the best you
can, but pull it back out if you go right through the middle of that
thread like that. It's obvious that I
did that when I did it because everything got stuck. A. Let me find the exact
hole that we were in again. We were right here, so I want to come back
in the same spot. I don't want to get
off of where I was. There we go. And find our
way back into our signature. Now this time, it ought
to work. Let's see. There we go. Now we can
pull everything tight. I can check the outside. It's tight. I don't have any weird things that
won't pull tight. I'm just going to loop through
our loop here two times to just give me a moment two. Then cut that loose and tie me a double knot
without it moving around. Holds it tight for me. If you just do it once,
it still moves around. All right. We're almost there. Number four. I think these are upside down.
Let me just double check. I put number four
in the same way. Number three, right
down there on that end. I need to make sure that number four is right down
there on that end, even though I'm
sewing this away. And just to check that we
can still shut our book. I love it it's coming together. All right. I got one
last thread here, but I don't know that
I left it long enough. So let's grab one
more piece of thread. Again, this is
already waxed thread. If you use some other
type of thread, it's good if you can wax it. You can use a little stick
of bees wax to do that. I have the bees wax. Here we go. If you're using a linen thread or
something like that, and it's not waxed, run that thread over
the wax it over the wax and hold your finger
over and pull it so that you're
waxing the thread. That gives the thread
ale extra strength. It puts all the fibers
in their place, and then it I go off
where that needs to be. Let me just there we go. It also helps not to tear your paper as
you're doing stuff. I'm right here, I'm coming over about a quarter
of an inch or so right next to where
the last hole was. I'm keeping them all
as lined up as I can. When you're sewing
something like this, you're just doing
the best you can. I want to have a
little tail left over, so don't pull that
all the way out. Then let's go find the top hole. Surprise myself. Again, I'm going
to come over from that top piece there over
about a quarter of an inch. You could make yourself
a template if you feel like you can't judge
the sizing correctly. A little paper template is very helpful with the holes on it. That might be that
you would consider. Just throw an idea
out there at you. We're coming and then I felt like that wasn't
quite where I wanted to be. I think I want to be like, right there. Is that
where I want to be? Just looking at that compared. Nope, I think that was right. Okay. Yeah. All right. Just going to guide myself through the whole. There we go. Oh, my gosh. All right. And then back through
the middle hole here. And then out here. All right, I've come
through my thread, so I'm going to go ahead
and come out of that. I've just looped part
of the thread there. So we'll come out of that
before I get any further. If you try to move that piece
of thread out of your way that sometimes still catches. If it catches, catch it, catch it early. Catch it early. We don't want to be worried
about that back through that hole and come on
down to the bottom. We're getting there.
Last one. All right. Get my little guide needle here, which I could just come on in a quarter of an
inch from here. I mean, you don't
really need to do that. I could just come
right through there and put that a quarter
of an inch over. Is that where I want it?
Is that where I want it. All right. All right. There we go. And
just pull it tau. Oh, my gosh. Look
how good that looks. See, take a minute,
but we get there. I'm just going to
it while I've got it and that will give me a moment to separate the
needle and ties into a double knot. Okay. I'm actually going to cut all
mine to about that length. I don't mind having a fun
little thread in there, but I don't mind
hanging out the bottom. Some people love it. Your choice. You can
cut them real short, doesn't matter, but they're
going to be in there. Now, I flip it correctly. Now I've got one down
here where it should be. I'm wanting to make sure that these all line up
the way I wanted. It's going to flow in e though. It's not
going to be perfect. It's sown here, and then now
we can use each section, and then we'll have a
gap. T is what it is. That's the way the sone to
fabric binding is done. But I like it because
now it lays flat, I can work on double layouts, when I get to this edge, I might treat each one as a
separate thing or I treat the whole thing and we
just work it as we go. And so now we've
got four sections. Everything's trimmed up, though I like the
way it's trimmed. The only thing left is, I am going to attach
on the inside. I'm going to do this
with tacky glue, so I have my lens acid
free tacky glue here. What I'm going to
do is tacky glue this ribbon and then
a decorative patch on top of it because
that's what I want to do. I could have been even
more careful sewing the spine and sewed this into that so that it
was coming out of that. But because I didn't do that, I'm showing you another
option that you could do. If I could get this piece
of plastic off of here. Come on, plastic. I know this is
probably the best way to do the ribbon for them. But for me, it's not
working. Oh, my goodness. What I want this to be able to do is to come up
and wrap around. I'm going to leave
a little tail. And then you can unwrap it. The other thing that you
could do is a loop and then attach the loop down here, that the problem with the loop is if I put too
much stuff in there, it's going to get fat and the loop might
eventually be too small. I almost like it better
that maybe we could loop it around to close
it off. Feeling like. Let me just give myself
enough ribbon to think here. Think about this, how I actually want to do it because
I was thinking. Let's see, want that
about right there in the middle of the blue,
which is right here. I was thinking that
I'd put that there, and then I could actually glue, I could glue this on the inside, and this could be
like a pencil holder or an extra pocket. Oh my gosh. Really,
I I do it this way, we have the overflows
and Oh my goodness. Oh, my goodness.
Then we would have this come out and
we'd be able to loop it shut and you can
loop it as many times as you need. What do
you think of that? Ha. I'm filling that. Now I wish this was sown, but I think I'm
going to glue it. To show that you could glue some of this stuff
and it'll be fine. Am I right there in the middle I want to be in the middle. We're going to go ahead
and attach this here, and you'll just have
to let that dry. Then let's see. I
love it. I love it. I'm actually going to attach a little more here
in the middle. And then I'm going
to attach each end, I'm going to allow these
open so that I could, if I wanted to, have a
little free flow area. Tissue, to get that
clue off there. The old card I used to
smear stuff around. But if I leave these open, I can attach pins in there. If I have a pin or
something that, for whatever reason
that I wanted to carry around with me, I could have a
place to put that. But you could sew all
these, but I'm just showing you another doable way. Let's go with the
same There we go. Look at that. Oh, my gosh. I love it. Now we do not want to pull that
while that's doing that. You may have to go back and
tack that with thread anyway, but I think that
will be fine once it sets up because this
glue was crazy, good. The lens tacky glue that I use with the regular bookbinding. Then we are done. We could at this point to
embellish these any further. I actually had one
more piece out here. I had these random appliques. I think you iron them on
that I've had for years, and I don't think I paid
that price. This says $5. I don't think I paid
that years ago, but I'm almost thinking
I could glue it on. What about right there? I'm thinking that could be a pretty extra
little decoration, I could go a little higher. I also had these little
dragon flies. Look at that. That's fun. I don't know how cute you want
your journal to be, but just throwing another
little idea out there for you. But I do like the flower. I could even put the dragon fly somewhere
else if I wanted it. Then you could be like
this a garden journal or something like
that I'd be fun. Mine is going to be an
abstract art journal. But I thought I would show you
another idea that was fun. I'd be fun too just to
loop it around the button. I really if that were
the top of the button, that'd be fun, but then we
couldn't loop stuff around. But we could take that off and that could be the
top of the button, then you wouldn't even
know that was a button. Oh. Oh, my gosh. I'm feeling that.
That's what I want. I'm going to cut this off. It was a flower, no more. Wha. Now it's going to
be the top of my button. I hope it sticks down in there. Let's just see. I don't know. Will this stick down in
there? We're going to do it. I don't want to get too far
down into those button holes and stop that from doing
what it needs to do, but look at that. Oh my gosh. How does that look, Let me see. Right there. Okay. That's what mine is
going to be doing. I could put a dragon fly
over there if I wanted. But I don't think
I'm feeling that, but I'm feeling that a little
jo on top of the button, even though I used a
super cool button. Dan, I used a super cool
button. Now we are done. We just have to let
our little cord dry, and then we'll be able to
use our cord as a closure. I could have done the cord
long enough to wrap around it, but I didn't really
want to do that. That's our closure. We'll be able to wrap that
around the button and. What do you think
about our fabric colored beautiful
fabric covered? Journal with different
yummy papers. I can't wait to see what
you with this technique. You can glue the
if you want to do a hard cover and cover the hard cover with the
fabric, you could do that. Lots of different choices. I just think it's beautiful and another option for
your journals. I'll see you back in class.
8. No Sew Hard Cover Journal - Supplies: Take a look at the supplies
that we'll be using in class. I have decided to make
this journal with the watercolor paper
because I'm making journals for myself that I can
now use for years to come. And so I am using papers
that I like to use. Your paper of choice
for the inside. We're going to make signatures just like we do with
the other books, and you can pick vintage paper, you can pick papers that
you've already painted, you can do jelly plate prints. If you like to jelly plate, that's a good way to do stuff. You can do any
watercolor paper or mixed media paper or whatever you're making
your sketch book for, your art journal
four, whatever paper you love, use that paper. I have been using the Cty paper, which is 100% cotton
watercolor paper in the largest size that I usually see these four
like in a package. This is the 12 by
sixteens size paper. It's a little bigger than that, but that's about the size. It's A three. I like this because it makes the big
journals in a good size. It's not the little ones. This is a good size for
me to then paint in and collag in and do
whatever I want to do, it's a great size and
when you open it, it's a big double spread, so I just love it. That is the paper
I'm choosing to use. It's weird paper. It's not like a regular watercolor paper. Just know that this
paper is strange, but I like to paint
mixed media on it, and I've decided cost wise. You can get 20 sheets
for about $34. If you compare that
to say the Homul or the arches or the
bigger pieces of paper. This is a little cheaper to make a whole art journal with. For the different
things I like to do, I've decided I do
like this paper enough to make journals to work in and not make the price so expensive that I don't feel
like I can use it. I don't want it to
be the nicest paper I have and then may
be afraid to use it. I feel like by
using a paper that I like that's not
super expensive, I feel like now I
won't be afraid of it. What I have chosen to use, you can substitute and
pick whatever you want. I also am using bookboard, because we're doing a no
so fabric covered journal. We're going to be
gluing the stuff. I wanted a hard front
and back cover. I'm using bookboard. If you don't have bookboard, or you don't want to wait to order it if you have
all the other stuff. If you have watercolor
pads of paper, An brand. The back cover of these.
Here's one that's open. Mule. The back
cover of these is a little thicker than the chipboard bookboard
that I'm using. Fantastic for books. Go steal the back cover of
your watercolor paper pads. It's perfect for
that, and it's almost even just a smidge thicker
than the bookboard. I'm using chipboard sheets. These, I think are 11 by 17. Which they're just short
enough that for this book, I have to use two of these. But then I end up with
all these lovely scraps that I can then use
for other stuff later. So I do keep those scraps. Then for this book,
These are easy to do. It just takes a little bit of prep work, but they're so easy. For this book, I have used a vintage fabric that I had
for steel life photography, and it's antique fabric
that came from France. I ordered it from a lady
that lives in France that offered it up for sale at one
time and it wasn't a lot. It was about a third of a yard by the width of that fabric. It's like an holstery fabric.
It's perfect for this. If you can go to an
phosry fabric store that sells upholstery fabrics, those are perfect for journals. I just had enough
to do one book and have some scraps
leftover that I could then use for other stuff.
I'm going to save all that. I picked a fabric that I wanted. You could also do a aj
paja fabric on here, but I feel since
we're not sewing it. It's almost easier for it
to be a lovely big piece. Then I was very strategic and what I wanted
to be on the front. Look how beautiful that is. I sacrificed a little bit
of the fabric to get it in the exact right spot of where I wanted it,
but it's gorgeous. Then on the back, I've
got the little birds and I see that I've covered a
bird head, but that's okay. I still think it's beautiful. I can't believe I
covered a bird head. Then you'll notice that I
have decided to get fancy, and I've got a little velvet on the spine and then I've
got this yummy velvet Visually creating the look that it's holding the cover on, even though it's really not, it's all glued together
rather nicely. I picked a couple
ribbons to do that. I've got about an inch
and a half ribbon here, velvet ribbons, about
an inch and a half. Then the spine is using
a 2.5 inch ribbon, which everything is glued and placed where it's pretty when you look
at it, but it'll stay nice and attached
when we go to use it. It's going to be very
sturdy to use that. Then on the inside, I've used the signatures and
a couple pieces of art that are already painted. If you've got some pieces
you've already painted that you want to slip in,
that would be fantastic, or if you want to
paint all your pages first and then make your signatures and attach everything and have a finished
book right off the bat. You could do that too if
you're afraid to work in a book and you find it
easier work on paper. Paint everything first and
then assemble the book. You don't have to stress
too hard about that. I have enough ribbon
that I've made these little spine pieces and wrap around piece
so that as I'm working, I could close it up and I've left myself
enough ribbon that it can get fatter or I can
cut that shorter later. That's what I'm doing there
on the cover with the ribbon. You also need a glue. This one I ended up like in the tacky glue better
than the PVA glue, but I do have some PVA glue. That I was using on
the bigger pieces, but I also used glue stick. I have a tacky glue acid free, I make sure
everything's acid free, and then maybe have a
good sized glue stick, makes it really easy to do
large areas pretty fast. Then I also have my
little book binding kit, which basically consists
of a bone folder, and all so that you can poke your holes for those signatures, a really heavy duty, large needle, embroidery needle. And then waxed thread. All of these pieces
came in a kit together. I have them separate, but I like this kit the best
because I have an all, but my all looks like an egg
with a shorter needle on it, and I like this one better. I actually love this $7 kit off Amazon the best.
I will link that for you in the supplies. That's basically everything that I've used to put
this book together. Then what we're going
to do is still tacky. Everything is set up,
but it's not dry dry. I want the book cover to
be flat when you're doing this big thing and you do glue on the cover warps a tiny bit. I'm just going to set
this under a pile of books overnight
and then tomorrow, this will be ready to go. All the glue will be
dry and it will be the most amazing art
journal to then use. This is another thing that I
like about the ti papers.'s hand torn edges, and I love the look of the
hand torn edges. I think it's going
to be really fun to work in the best thing
I just thought of. I did use I did a little cheat in class and you'll see it
when we get to it, but I used a little bit of two inch self adhesive
book repair tape to cheat the spine a little bit after I glued it to attach it a little bit better
so that I could then move along with my book and
have it done in one day, basically, rather than letting things dry for a long time. This was my little cheat. I
do have some two inch self. He's a book repair tape, which you don't have to have, but I have really
appreciated having that, making these bigger journals and being able to
keep on moving. I just thought I
would throw that in there because I
saw it sitting to the side and I forget to
mention it. See back in class.
9. No Sew Hard Cover Journal - Getting Started: This project, we
are going to make a fabric covered hard cover. No se art journal, so that you can still use some of your favorite
fabrics and ribbons, but maybe you're a
little intimidated by sewing the cover
for your first one. Or you don't sew. This would be
another fun option. I'm so obsessed with
this lovely fabric, this antique fabric that
I have now held onto this for years because I used it in steel life
photography stuff, which I can still do now. I mean, I I could actually use this book
as a photography prop, but it's so beautiful and
I've always loved it. I think I'm going to use this fabric as a cover for
the book that I create. Then if I have any
leftover scraps, I will just save
every little scrap that I have and that can be some scrap for another book or something else that
I want to make because I'm going to
have some leftover. I'm going to have enough
that I could maybe do another small book with it
or some other stuff with it. This is about, I'd say, It's like a third of a yard, maybe half a yard times
whatever width it is. It's an old upholstery
fabric or curtain fabric. It's nice and thick and
it feels like a linen. If you've got an upholstery fabric store anywhere near you, which let me tell you now
I'm dying to search out upholstery stores here
in my town and go visit because I feel like I need some more scraps for some
more things to work with. I'm going to use this
fabric as a cover and I have pulled some other things to
think about with it. I like this pink ribbon, so that's a consideration
because there's pink in here. I actually really love this red ribbon even
though it's super red. But what if that were say a little sliver on the spine
and not the whole thing? It's not like it would
be a whole lot in there, but it's like a wil color. I also like gold because
there's some gold in there. I wish I had this
in the wider size because that would definitely be a gorgeous color
on the spine. I also have this
lovely rust color. I get this off of here. I found all of these at the hobby lobby, but
now I want to visit. I've loved these velvet
ribbons so much. That they're my favorite to
work on with these books, and these are an
inch and a half. They're about an
inch and a half, which is about 3
centimeters in size. That's like the perfect size for wrapping around the book and being the closure of the book. But I like this rust color, so that could be something I wrap around the book possibly. I don't know that I'm
going to use all of these. I'm just gathering inspiration and just throwing
some ideas out there. I also liked this
green burlap ribbon because that looked
pretty on there too. Lots of options that
I've pulled over here out of my different sashes to see what we could create. This one, I'm still going to use that ti paper in that
very large size. This is that 12 by 16. It's a nice size, 12 by 16, so we end up with an eight by 12 Is it eight by 12
that we end up with? I think it is. You see, we end up with
eight by 12 size book, which is a really great size. It's not too big, and it's not like the
little bitty books because I'm obsessed with the larger ones that I can
paint a larger spread. If you always are thinking, Oh, what am I going to do
with all these pieces that I'm painting or
something like that? Well, if you're painting
them in the book, they're not loose sheets of paper that are laying
all over the place and now it's created something
amazing when you're done, and you have a reason
to then show up and paint all the time because
now you're filling a book. I'm going to use the cody paper. It is a cotton paper. Like it because it's good
for various mediums. It's a nice heavy paper, and it's not expensive. You could certainly be using
any paper that you've got. If you like the arches paper and you want your book
to be arches paper, and maybe you have
the big sheets, you can tear those sheets into this size and then fold it and
have this size sketchbook, or you can fold it
into smaller ones, or you can fold it
and make bigger ones. Don't limit yourself in
what choices that you have. Now, this one, I have decided for it to be a watercolor book. I don't have the mixed
media papers in here. But I do have this painting
that I already did and I don't want to necessarily
use it for anything. I had it just in my bin of it was a fun thing to do and
experiment for the day because a lot of times I do color
challenges or whatever I'm inspired to paint for that day and I just
show up and I paint. It's not really
meant for anything. I thought, Look at this. Wouldn't that be pretty
because I want the first page of my signatures to be the
inside of the bookcver? Won't that be pretty
if you opened, you know, the book
onto that first page. Now my page that I'm gluing down to the book cover
is a finished piece. I thought that was fun. Not everybody makes
a book that way. You can learn how to make
a book and then make it your own and make stuff
the way you want to make it. A lot of people leave these intact and glue a
different book cover down. It's your choice. The goal is to make something where
everything's attached, it has a cover and it's
not going to fall apart, and there's 1 million
ways to do that. Some of this, I'm just make
it up for myself and like, here's how I like to make the
book, so let's go for it. That's what I like to do. We're going to use this paper. I'm going to use the full
size because I like it. You can make smaller journals. You don't have to make
the big journals, but I'm going to make this size. I've done four signatures, and all I've done is this was the piece of
paper that I started with. I took five sheets, and I folded them in half, and then I took my bone folder and just really
tightened that down. You'll just take your folder, whatever folder that you've
got on your surface, you'll just flatten those down
so they are good and set. It's good if you stand up and you can put all
your weight on that. I just tighten those down
like that with a bone folder, and then they are ready
for me to sew together. I'm going to make this one
where I sew it together. Do a little glue
here on the binding, and then we're going to
attach the cover to that. I'm debating on that if I want the spine to be separate from this to begin
with and then the cover, and then an overlay
on the spine. I'll show you what
I mean, but that's what I've dreamed up for today. Those are my four
sections of already just flattened them into that. Also pulled some lace that's just a pack of old lace that
I had, just another option. Then I'm going to
be using chipboard, which is the book board, and you see, I keep
all the little scraps. We might could use that
for something else. This stuff is basically
if you've got watercolor pads of paper, Let's say you use the
watercolor pad of paper for your paper for
this, which I do sometimes. I take all the paper out and
I use that for these books. This back cover is fantastic and is just as thick or maybe even a tad
thicker than the book board. Don't throw these
back panels off of your watercolor pads or you mix media pads,
or whatever you have. Keep those. That's basically a bookboard, and
they're fantastic. I'm going to cut out We'll get a fresh new piece because
I'm going to be needing it. I'm going to cut out of this
piece a front and a back, but I'm not going to cut a spine because I'm going to do the
spine a little bit different. I'm just going to get
this cutting board. And I need a utility knife. I'm going to grab
my utility knife, which I think is in
here, not in here. Who knows where I've
hit it from myself. But what I'm going
to do is take one of these and decide
what size I need. I want it to be I might
need two of them. That's right. Because of the size I've picked in the
sides these boards come. I need two of these. I'll get a second one out for myself because
this is too small. I don't want to be cutting this and the board not even
go to the top and the bottom. I'm going to cut it this
way and that's how I ended up with extra
pieces leftover. Actually I want the
spine side to be flush, but I want a little bit of overhang on the top and
the front and the bottom. And so I can decide how much overhang by just
moving it out and seeing like How much I've got
there and thinking, I like that amount of overhang
and that's what I'll have leftover on the
front because I'm going to draw with my
pencil around this. If I double that for here, then I'll have that
amount on the top and the bottom. That's
about what I want. I'm just going to draw
myself a line here and I'm going to use a big ruler
and a big utility knife. I actually have a
bigger utility knife, but I don't know where it went. You just want a nice
sharp utility knife and you want to be careful
and not cut yourself. Because we're going to
cut the board with this. I can line the board up
with the lines on my cut, which would make that nice
and easy to get it straight. There we go. Then I'm
coming down here Again, I can line the ruler up because it's got the
lines on the ruler. I can line the edge of the ruler with the
edge of the bookboard, even though my line when I
drew it wasn't straight, my line when I cut
it will be straight. This is real thick
stuff. I'm going to do two or three passes
until I've cut it. I'm just real careful, keep it away from your fingers. Don't get in a hurry and a couple passes here
with your knife, and that's how you
cut the bookboard. You can see it comes
right off very easily with minimal stress. All right, Let's just
move this this direction. Again, I'm going to
just line that up with the top with the side line and the top line and make
sure that it's straight. And then I can line the bottom of my piece with
the lines on the ruler. I like these rulers like this. You don't have to
have this ruler, but I just happen to like it. This is a quilting
ruler that you get over there in the
fabric department and makes it easy to cut squares and exact size sizes when you're
sewing, but I love it. Now I've got this
one, I just want a second one in the same size. I'm going to go
ahead and mark that. And cut this one out. And just line it up with
the line here on the side, make sure that we're straight. We go. Then just save this because you can make
other stuff with that, other books, other
things with it. I do keep all of that. And now we are ready
with our book cover. Now I'm going to have a left and a right or front and the back. I'm going to have my book with
a little bit of overhang. That's basically
what I'm building. So Got that. Now, need to decide
on this fabric. What do I want showing? I like the birds, but they're off
the top and I need enough fabric to overhang
so that it can do this. I'm definitely not going
to get the birds there, but I could get this
big thing of flowers. I'm thinking maybe the big
thing of flowers is the front. Then I'd be looking at
something like this, and that could be the front. I'm digging that. Do you think? I think that's the front. Because if I just
come really from the side and you don't really pay attention
to what's there, you just end up with
whatever's there. Maybe the whole thing is plain. Maybe you like that,
but I thought that I would like the flower. Since I can't have the birds, I can at least have the flowers. I'm going to leave myself
a good runway of material. I'm just going to doesn't
have to be perfect, but I'm going to
cut this and leave myself about that
much space all the way around so that I've got
to fold into the inside. You're not going to
see it when it's done, so it doesn't matter if it's
perfectly straight or not. Then the piece that
I've got leftover, we're going to save that and I'm going to use that
in other projects. Got plenty of fabric
on that side and this fabric got It's
got a lot of hand, but Just do the best you can when you're cutting it
and give yourself enough space where if you've cut something
off a little bit, you've got plenty of space
and it doesn't matter. Now, I'm going to go ahead and trim the top here so that I've still
got about that much space. That's about an inch and a half. I'm leaving maybe 2 ". Keep that little scrap.
There's my front. Now I want to cut a second
piece for the back. Let me set the front to the side and we'll decide
what do we want on the back. I like this bird here. If I do the birds on the back, It's got a seam right
up the two birds. It'll fold under a little bit, but let's just see what section of this that would give us. I could do that and
that be on the back. I'm actually liking that
because then we get the birds, even though it's
got a seam on it. I don't mind that,
but I want the birds. Because the birds are fun. It'll be at the
bottom and there'll be a flower at the top. I'm going to see
where are the birds, there we go, and we're
going to cut that. It's the least
efficient way to use your fabric because we're cutting large swaths and
little swaths off of it, so you don't end up with a great big piece that you could then use for
something else. But when when you're
dealing with something like a pattern like this,
it just is what it is. You decide if you want to
keep part of the beauty of that pattern and
cut around it and sacrifice all the little
pieces. It just is what it is. I want I wish I'd had
that tiny bit longer. Let's do a tiny bit
longer because I'm going to cut that little
piece off anyway. You'll see what I mean
when we get to it. I want plenty of space here. Now we've got our front
fabric and our back fabric. We're going to go ahead. We put some of these
little ribbons to the side and hope they don't
all fall off the desk. We're going to go ahead and
sew our signatures together, and then we're going
to fix the book cover. I'll put that right there. I'm going to bring my
book covers around. We're going to sew
these together first. So I'll be right back. I'm
will get me some thread. Right. I'm just throwing around some ideas
here on the cover. Definitely think I
like the pink spine. And now we need to sew
these signatures together. One option is to do it like
we did on our first project, and so up through the spine and have the
spine hold it together. But I think that that's going to make it a little harder for me. Then the book would be like
a cloth book and you'd have the gaps in between each piece like we did
in our first project. I actually prefer when we
don't have those gaps. I'm going to create
this with where we sew these together and then maybe glue this onto there, and then attach where
this is up underneath. The book cover, it's going to be like underneath that because then if it's underneath
that, holding all those in. It's what you see at
the very end here. But then we could come over with an overlay over the
spine for a decoration. Just throwing some ideas around. I actually have the
burlap in brown, which I could get
the brown burlap, that might even be better. Then I could wrap
it in. I'm just throwing some ideas around here. I definitely want the pink. I'm going to cut it longer
than I need it because I'm going to instead
of sewing this down. This has a wire in it. I can take this and fold it down and then
fold it again and put glue up under here and that be a finished
top and bottom. I need enough of the
ribbon to do that. I'm just going to give
myself some extra length, but cut that piece of ribbon
so that we can do that. And I put that to the side. I'm going to mark where we're
going to put our holes. I'm going to line
these all up and I'm going to go ahead and number these because I need
these to stay in order. I just put a number at
the very bottom because when I'm sewing all
over the place, like rotating it around
and stuff like that. I need for these to stay in the same
order that I intended. Then you just have to decide how many stitches
are you going to do. Before I was doing
one in the middle, one in that, and
then one a little further. We can still do that. That does make it nice and
tight all the way down. I'm going to mark a mark here in the middle with my pencil, and then just decide, I think I do want to do the
same one at 2 ", one at 2 ". Then we've got 2 " to the end because I need
these to also stay tight enough so that I'm going
to glue those so that a book where all the
things are glued even the sections that are moving from one
section to the next. I want these to all stay. I've just got another little
ruler that's just handy. I'm just going to draw that mark all the way
up all four pieces. But I'm thinking that I want it to I'm glue, I'm going to sew it, I'm
going to glue the end, and then I'm going to put this over the end and glue that, and then I will be ready
to glue the cover. It's the direction I'm going. Now I need my all. I've got my little
Amazon kit here. It's it's my favorite. It's convenient and now
it's the way I want to do everything and then my bone folders
on the other table, but I did have a little
one that I was just using. The little kit comes
with the bone folders. It comes with a long one and a short one bone folder,
it comes with the needles, comes with the waxed thread, which is protective of the thread and
protective of the pages, so it doesn't fray and it doesn't tear your paper and all. You can buy these all separate, but this kit with all these pieces and it
was only seven bucks, totally worth it and
it's now my favorite. I'd recommend that. If you
don't have the book materials. If you already have your
own all and you have your own thread,
use what you got. But if you don't, I
highly recommend that. This signature, these
have five pages in it, folded in half and I have
included two pieces of already painted art because what else am I going
to do with that art? If you've got some
that you've already painted in the same
paper in the same size, you can include
these in this book and be a couple paint things up. I'm just going to
fold it backwards so that I can then come
in to this hole, and I want to come in at an angle because I'm
trying to come out on the back side on the fold and sometimes I get it all
right and sometimes I don't. It might actually now that I think about it
because they move, might help if you have a
clamp helping you keep these papers from moving as
you are going down the line. That actually is helpful because they do move
as you're going. It might be helpful
to clamp both sides and just that way
you can keep it. Where you need it. I don't
know if that moved or not, did that consider clamps because they do move as
I'm moving down this page. I've had by the time
I get to the end, I'm way off to the side. I don't worry about
that too much. I just try to poke
it again and get in the center because extra
holes in the paper are okay. I can just paint or collage over those when I get to actually
painting that page. Then once you get
it folded back, I'm just going to
get it nice and tight and set that to the side. This is why I need
to number what was the right order and
which way was up? Because you want all of these to line up
when you're done, if you get them flipped around or turned around the other ways, they do not line up
anymore, and that sucks. The whole book doesn't line
up they'll be like this sewn together. Let's go backwards. Let's go ahead and clamp our paper so that
it doesn't move around and we'll take
our all and do the second one and I'm going to
do all four just like this. Clamps are the way to go. This is like the best
ones I've poked holes in. In the several classes
that I've now made. See, the more you do,
you start thinking, oh, I like this or Ooh,
this is it right here. Helps if you're
folding it as you're pushing because then you
go in at the right angle. These little clips. Those are fantastic to have. If you've got any of those or any other clips there,
definitely grab those. That's number four. I'm
going to start with number one and grab a needle, great big needle with
a big hole, a end. You can double these if
you want it to be super strong or you can
just do it single, The spirit is already
super strong. I think I'm going to not use double. I'm
going to use single. What I'm going to do is just
start right at the bottom, and I'm going to weave my way all the way through
this and then back down and that's going to
be my starting piece. Usually I not it, but I think I'm going to
do I'm going to try something
different this time because on that first book, we come back at the end and
double knot these together. I think I'm going to
do that rather than have a whole bunch
of knots go on. I'm just going to leave myself a tail and I'm going to
try not to pull it out. I'm just going to zig zag
my way all up and down this going in one hole and then up to the next one and come back
through that hole. I lost my way here. There we go. And then back
through the last hole. Then I'm just going to come
right back down and go back into the hole that
we have right below it. I'm just going to make
myself a little ladder here. I can keep pulling
these tau if I want, and then back through
that hole there. Come out on the back side, go back in the hole
right below it. I don't want to come through
the thread that's there. I want to clear the thread. If you're stuck in the
middle of the thread, pull your needle back out, so you're not stuck in the
middle of that thread. Then I think what I'm going
to do is come back down. I'm going to loop around
this right here two times to lock that size right there because I really
want minimal nodding. I've noticed on the other
ones, I had more nodding, I was doing it the
correct official way that they tell you
to do these things. I've just looped
around that twice. I'm going to go
back in. I've done it like the official way. But after you do things like the official
way and you're like, maybe I'd like to do
it this other way. Definitely experiment, and
now we can tie this off. I'm just going to cut myself a thread and I can
double knot that, and then I can leave it. I can cut the pieces. I could have done
that on the outside. That would have been even
better if I had already had that on the outside.
That's okay, though. I'm just going to leave myself
a little thread in there. I'm just talking out loud and thinking as we're doing that. Then I could in
the end flip this over and this could
be like the top instead of coming
out the bottom. I'm just thinking out loud. For the next one, we're
going to attach Book one to book two on the next one, and I've got enough threads, I'm going to go ahead
and start the next one. I wish I had not cut that
off now that I did that. I think what I'm
going to do come over here and not this
on this piece here. Actually I actually should
have just kept going. I'm just nodding this on here, and that'll just let me
keep on going to the next one so that we're continuing
rather than cutting it off. Now this is book two. I'm just going to go
through the first whole I'm attaching one to
book two at this point. I've just gone through
the first hole, I'm going to come up
through the second hole. I just got out of order. This is why I checked the order. I need this to be on this side. This is why I put
those in order. If you do that to, just
no, I do that too. We're going to go back
through the bottom hole. Now I'm going to come up through the second hole. There we go. Then to attach these two, to pull this tight because that's going to pull
that tight for me. Then what I'm going
to do to attach that second hole to the first
hole is come up through number one on this side of that thread going through that hole and come back
through the second one. Then I've made a loop
right around our piece, and then I'm going to go right
back in the hole here of number two and come right
there and pull it tight, and then I'm going to go that
center hole of number two. And We're going to
come up here and come on this side of the thread on the side of that
hole and back down the other side and I've
made myself another loop. Now I'm going to go back through the center of that
hole for number two. And then come back up
through the fourth hole and left side and right side, making yourself a loop again. And then back through
that same hole. There we go. I've managed not to keep my thread
tight on that one. I came right through the thread. That's why. Let's see if
I can back through that. By just pulling that I like, is that is why you want to be careful not to go
through the threads. But if you do, just pull it
out and then keep going. B the top hole, L et me close it here. Go back through the top hole, and here I'm making
my last little loop, making sure all those
have pulled tight now, not leaving them loose. Pulling through our
top piece here, and I'm just going
to loop around that and back with number three. Now I'm attaching number three. Because if you go back
in at this point, you have to come
back out somehow. It's going to be like this one down here where
we've just gone from the last hole and we're going to skip and come
down to number three. Still making sure
I'm all in order. I'm going to go through the
first hole of number three. There we are. And pull that tight. Come back through the second
hole of number three. Now, I don't want
to go back up to the first hole because we've
already looped around that. But there is a little loop here between hole one
and one and two, I do want to go
underneath that one. Underneath the two
loops like underneath these two loops here to
attach number three. You might have to just open these two if you
don't have a round needle, which I've ordered
myself a round needle, and it should be
here later today, but I wanted to make
this book this morning. But you can come inside
and then loop it back outside if you don't have a round needle and you can't get it to come through as easy. You could just Go through the two
sections and find it. Now I'm looped
underneath those two, and I've made myself a new loop. I'm going to go back down between the middle
of number three. Try not to snag that thread if I want to
come back in on the outside. I think what I'm going
to do real quick because my thread is coming
down is I'm going to go ahead and not two
pieces together. I'm actually going to run
that right under there so that it grabs it so that
I can not it easier. Makes it a lot easier. There we go. I just made
myself a not coming in there. I can just cut those off. You can cut it off completely, but I'm going to leave
a little lip there and hopefully give myself enough to go through the
two books here. Just another through
the last two sections I meant. All right. Now I've got another thread
ready to go right length, long enough, and now
we're going to come back through this hole in the
middle to the outside. There we go. And look on the inside and make sure
we've pulled that tight. Then we can come
through the two. I've actually managed
to make that work. There we go. Let see I'm right up under
those loops there. Then just that and
then we're going to go right back through this hole that we
just came through. There we go. And then we'll pull that tight and we'll go through the fourth hole
and do the same thing. Right through that
hole right there, the two loops right
through that. I've got the little half round book needles coming
so you can see how sticking around needle in there would
give you the edge. Now I've made a dozen books
in a row and I'm like, Oh, totally need that needle. B that same hole, pull it tight up
through the last hole. There we go. Pulling it tight. I'm going to loop under
the one piece that I have available there since
it's not a double thread, and now I'm ready to go
to book number four, making sure it's still
in the same direction and making sure that inside
of book number three, it's no weird loops. I'm going to go straight
from that two number four, that first hole down
there in section four. Excellent. Then back up
through the next hole. We're just going to do the
exact same thing that we just did on the other
three sections. I'm going to cut this
tail off. It's in my way. Then we are just going to loop between the two sections
number three and number four. Each time, you're
just moving down to the last little
loop you had there. If you can't get your needle
to pop back out easily, you can just go in between the two sections and
pull it back out. The needles right here, can just push it through that way. Then pull it tight, we've got a nice little loop, and then we're going to go
right back in that same hole. L et me find the center of
number four. There we go. So I'm going back in
the number four hole. There we go. And I'll finish all the way to the
end doing the same thing. Last hole. Now, just make sure everything
inside is pulled tight. Now I'm going to go in
this last one right here and I'm going to
go ahead and get that. I could come back in that one. Let's go back in to number. That hole that we just
came out of. Here we go. Because we're looped around, I'm just going to pull it tight, and then I'm going to loop around and tie that
off on the inside. I go up underneath that. And then I do it again because that first loop just
tightens it there. Make a loop and then I'm just going to come
through the loop, and then I will be able
to pull that all the way down and tie and knot that off. I can do a double knot, which is what I prefer,
I do that again. I just loop it underneath
this loop here, and then this loop
that I just created, I just go through
that and pull it tight and now I have myself
a double knot there. I've pulled it because I pulled
it tight, that got loose. I pull it back out, I'll give myself enough
room out here on the spine. There we go. Now I've got
my spine, my book together. At this point, it's
really nice if you have some big clamps and I'm
going to glue the spine. Let me go grab those clamps.
10. No Sew Hard Cover Journal - Finishing Cover & Book: All right. I actually have the little
clamps right here beside me. But I'm going to go ahead. These are great big clamps from the hardware store.
You don't have to do this. I do this because
it makes it easier. You clamp it in between some big heavy books
if you wanted. But I'm going to go
ahead and clamp this and this paper is
nice and thick. If the paper were thinner
and more delicate, I would put something in between the clamp and
the paper to protect it. But because the paper
is thick and this doesn't really do any
damage to the thick paper, and I glue the front piece
down to my book cover, you're never going to see this
where I've got this clamp, so I just don't worry about it. Now this is what our
book looks like. Now I'm going to take the PVA glue and I have
a brand new bottle, and I'm just going to cut myself a spout and remove
the glue thing here. Then this glue is acid free and hop I cut that down
py low for the lid. It's acid free and
it dries clear. I'm just going to shake it up a little because it
seemed very liquid. Then I'm going to
glue the spine. Because I've clamped
it together, it'll glue these pieces right
here together on this side, but when I get to the inside, I'll be able to still open it, but I won't be able to
see the spine through it, which is why I do this. This is super liquidy today. I'm basically going
and you could also I think I might
use the other. This is super liquidy. Let
me put that over there. I'm going to use the tacky glue, the acid free tacky glue
because it's thicker and it dries clear and it's another popular
book binding glue. It dries clear, it's tacky, and I'm just trying
to get the top edge. I don't want the glue to drip in between the pages really, but I do want to glue
this little edge here. You can see here, I'm
just going in between and then I have a little cheat
so I can keep on working, which I'm going to show you. Because it'll take 30 minutes to an
hour to really set up. Then I wouldn't open the
book until tomorrow. Once I've got everything
attached and going, We're not actually going to
open it up until tomorrow. For the moment, I'm going to set this to the side because I
want this to dry a little bit. Let's go ahead and
sew the front cover and then I'll show
you the cheat, but I do want that to set up a tiny bit before I
do the next thing. Well, actually, it doesn't
matter. I'm going to. I'm going to use my book tape. I've got some book repair tape. You could also use
the gaffers tape, which they've got a
Gaffer book repair tape. I'm using white, it's
the same color just about as what we're using here. T. And I might have
to trim it again. But I do about the
length of our book, and I'm putting this on one side and I'm just
going to smooth that down, and I'm going to pull it taught over to the other side
and smooth that down. That's going to let me keep on going and have an added benefit of making making it
extra strong back there. I plan on beating
up on my journal. Now I'm going to set this on the floor and let it
just stand up just like that and start setting up
while I work on the cover. And we'll come back to
what we're going to do here after we've let
that set for a little bit. Let's see here. Now got
our covers, got one piece. This is going to be the back.
It's the one with the seam. That's like the most liquid
PVA glue I've ever seen. Not sure. What's up with
that? Set this up here. The other one I had
was a lot less liquid. I feel like that's got
water in the or something. I'm going to try not to dump this all over the
place there we go. Yeah, I like the a
little bit thicker glue. Now, for this spine, I'm actually going to try to use a glue stick and see how
that does with the fabric because I just want
to get it attached and not moving around and I don't need it to be super gluey. With the glue and
all. Let's just see where this is going to end up. If I like what that's doing, and then the bottom
would fold down. Yes, I do I like that.
I'm good with that. Let's just go for it. I'm
going to glue stick this down, and we'll just see
how that works. This is just a stick from the blick and see how
that works for us. In the end, we'll have other things that are
stick in this too, so this won't be the end all
But a really nice layer. I could have use also
some of my theses, I could have used the yes paste, which is super nice and thick. Let's just about the middle and see if we'd like
where we got it. I've got the seam is crooked, which I did not want that seam to do that.
That was weird. There we go. Let's make sure
the seam is mostly straight. Then what I'm going to do is
take my scissors and then cut like almost like a little
y shape out of this here. I don't want it to
be to I want to be about an eighth of an
inch from the tip, don't cut it to the tip. A little angle shape there with about an eighth of an
inch left outside that tip. If you're using a glue
stick and you don't feel like it did what
it was supposed to do. You could go back and
try some other glues, the yes paste, a fabric glue. You could use this tacky glue, the tacky glue is a good choice. But man, when you're doing
little pieces of fabric, it's it's guy and
there's a lot going on. I'm going to glue
the one side here. Let's just see did we pull that same goods pretty straight. Then I'm actually going to do the opposite side.
I'm still okay. It doesn't matter
if there's a little bit where there's no glue because this is
going to be covered with more with a piece
of paper and more glue. We got redundancies here. We just want it to
definitely be tacked, but it doesn't have
to be perfect. Let's see what we got. I
love it. Then do each end. Then you'll notice
that this cardboard is slightly boeing a little bit with the wet glue
and stuff on it. That's okay. We're going
to when we're all done, set this under a stack
of books for overnight and then that just flattens
right back out as it dries. Then just go ahead
and pull that. I do want it on the edges here, so I'm going to come back up
and try to get that edge. There we go.
Beautiful. All right, and we'll do the other side and then we'll do the other piece. I usually have a piece of wax paper to protect my table
surface as I'm doing that. But I wasn't
thinking. All right. We'll get the end here. We'll get the end here. If you end up with too
much on that edge, you can just clip it. It doesn't have to be perfect. We're looking for
beautiful imperfection, basically, but there's
our back cover. What I love it. Let me go grab my bone folder. Sitting on the other table. Now we can just really one
extra little smooth down. Make sure there was
no weird air bubbles or like a hunk of glue that'll just
smooth everything down. Oh, this is so pretty. And now I'm going to
do the other piece the exact same way. The reason I go from one
end to the other and one side to the other because
if you go here to side, you're liable to pull the
pattern in a direction that you didn't intend and it could stretch
in that direction, whereas if you go side to
side and then top to bottom, you won't be pulling your
pieces in ways that you didn't intend and
pull the fabric off center because this fabric definitely would
pull off center. I can feel it. It's got a lot of movement, a
lot of hand there, and I just don't
want to risk that as I'm pulling that tight
for a good edge. And again, don't worry about
what the inside looks like. You're not going to see
it when we're done. All right. Now we got
our front and our back. Look how pretty that is. Oh. Oh my gosh. I can't even tell
you how excited I am that this piece
of fabric is going to be something amazing
like literally. Got the front. And our book back up here and
I'm going to cheat. I'm going to stick
with my tachy glue. I'm going to tacky glue this. This is the acid
free tacky glue, if you use glue on
your piece like this. You want to make sure that it's not going to
yellow as it ages. I'm just going to
glue this down. It's going to be on the inside, so I don't have to
double fold that. But I want it to be
the right length. Now let me just measure this. I need it to fold right here, and then I'm going to cut off the extra here in just a minute. But let me make sure I
definitely have the right size. I feel like I need a
tiny bit more fold. I like that this ribbon
has metal in it, has the little wire
in it because that's working out great. I
like that right there. Now, I'm going to cut a little extra off of here and
glue this side down to. And you see you
can do this no so. You just got to be about your edges and giving yourself some space to
maybe finish edges off. Now what I'm going to
do I'm going to make this like the inside spine and it's going to go like that. I'm going to tacky
glue this whole thing. I really wanted to
make sure it stays. And because all the ribbon here this all has finished
edges basically. And we're going to glue
the cover on top of this. It doesn't matter if
I'm edge to edge, but now I do want
to make it even, I want to make sure I'm
in the center there. Yes, right there. Look
at that. Oh my gosh. We want that to set up. I'm going to t that
do something weird. I want that to set up. I'm going to let that sit for a minute and I'll be right back. I have been letting
this set up for a bit and it's not dry, but it is at least firm enough, I think, for me to go ahead
and attach the cover. Need to decide, do
I want these tied off strings to be at
the top or the bottom because I could decide if one is on the top versus the
bottom at this point. That one's tied off fine
that's tied off in the middle. Does it even matter
because I could cut the strings off in
the end it's not like it's in the way and or I
could just weave them back into what's going on here so that they're not even
a consideration. Your choice if the strings
bother you or not or tie off on the outside if you think that is
going to bother you. Now, I need to decide, am I going to do a
wraparound because I need to glue the
wrap around piece in between the cover and
what I have created? Because of the way
I've done the spine, you can see that that's
now on the inside and I am thinking
that what I want to do is have like a secondary
spine here on the outside, which it's sticking
up at the moment because the overhang is
supposed to be on the front. But I'm wanting maybe
a secondary spine so that we're seeing
that lovely pink spine. Let me get it lined up here. Let's get this lined up. Overhang is on the front, you can see a little
overhang over here and I hopefully have the
same overhang on the top and the bottom.
This is the backside. I can tell, I got the birds, that's the back of the book. But just to judge
what I'm thinking. Thinking a secondary spine
attached on the outside. We have basically like an inner spine and
an outer spine look. That's what I was hoping. I could also take
a piece of ribbon. And we could have
some ribbon pieces as say a topper here. I'm going to have
a piece of ribbon there, piece of ribbon here, so that it looks like like that where you have
almost like two spines. You know what we could do. We could actually
wrap that all the way around, like the back, and then that could
be like that, and I could make it short here on the front so I could see the whole front. That's one option. Just
thinking out loud here. Or I could just have the ribbon on the spine
do like right here, maybe have three
or four of them, and then it can come around that same amount of
length on the front. Then that would be
like a secondary spine where we're seeing
the inside spine, but we're almost visually tying the front and
the back together. It doesn't look like it's
floating on top of that. Then we could Because
I'm using that color. I could use yellow too. I
really like the yellow. Which one do you like better? Do you like the yellow? I
need a little vote button. Do we like the yellow or do
we like this lovely rust? Because then I could have
these ribbon pieces over here. Then over here, I could have that attached
where it's now a wrap around closure that we can then wrap around
and close our book. We'll have the ribbon pieces and the wrap around
closure basically. We could tie it off
or we could have a button or we could do a
lot of different stuff, but we could have a
little wrap around closure and the little
ribbon closures here. I'm feeling this rust
because it is really pretty. I know I'm all over
the place there, but I think that's where I'm going with it.
Let's go ahead. I need to I'm going to wrap it, I need to have the wrapping available coming
out the back side. How much do we want to wrap this? It's coming out the back. It could wrap like that and
then just tie off possibly. Let's just do two wrap arounds and that'll give
me some choices. I definitely need to know that because I need to attach
that in the back. Let's go ahead and attach the back. This would
be the time to. If you wanted some type of ribbon coming down
in the middle, keeping your place for you, you would have attached that
underneath this piece, that's where I would stick that. If you think you want a
ribbon coming through, put that ribbon on and
then put this on and then that could then
keep your place inside. This is what I'm going to
do here for the backside. I'm attaching this inside
piece to the back cover. Now that covers all of our
seams and you don't see that. A lot of people have
a different cover on here themselves, like a separate piece, and then they leave
this free floating. I wanted this to be part
of the front thing. Feels like to me, it makes it stronger when that's part of it. When I'm using the book, it just feels stronger. I want to line this
up on the outside, exactly where I want it. Let's make sure it's
exactly where we want it. Thinking about right there. Maybe in a tiny bit. I'm thinking right there. What I'm going to
have to do. What I'm going to have to do is
put the glue on and then we'll realign that back up. Let's just go ahead and do it. I'm putting the glue on this because this is
completely covering that. If I put it on the
books on the book back, I am going to maybe put it too far out and then
that would suck. I'm going to use the tacky
glue again because I like it. It's easy. I could I could go ahead
and use the liquid pH PVA. Let's just use
this because maybe it's just what's up
top that's so liquidy. I'm definitely going to get
some glue here on this. I'm not too worried here about
getting it even because I can just take a random tag
now and spread this around. I am wanting to make sure
it's just on this paper, not the papers underneath
it because I'm using a paper that's not
completely even. I don't want necessarily want to have the glue on
the paper below it. This glue the last PVA glue I had was a whole lot thicker. I think on just the spine part, I'm going to come through with
a little extra tacky glue because I really want this
to stay on the spine. And I'm just going
to spread that out. Once you've got that, nice and covered and you
feel pretty good about it. Now, I am going to try to
get this on the right spot. Once you think you've got it, now get your bone folder out and spread that nice
spread that on here, and then I'm going to shut the book and let that
be doing its thing. But you'll see that piece
of paper is now covering all the edges of book
cover that we made. I just want that to
sit on that nice and heavy while I do the top cover. Again, the top cover,
I'm just trying to get exactly even with how I
did the bottom cover. I'm getting excited too, man. This is looking good. I might as well
use this on there because I don't
want to waste it, but I don't know that I don't know I was thicker
than the other bottle of this stuff I had Tth. Just not even getting
out what I want to say. I keep a baby wipe handy, just wipe all that
off my fingers. Then this is Yes, this is up. I'm just making sure I've
got this lined up with the back cover and com where I want it
to come on the spine. That's just your
judgment going in there, but that's how I'm
wanting that to look, that's where I'm trying
to line that up. Then I'm going to open that
page up and smooth that out. This is the one that
I've got the art on it. That's fun. And I'm going
to use the bone folder. Let's just flip it over.
Now that we're there. I got glue on my thing. Not what I wanted
to do. This glue dries clear and I've
got baby wipes. If you do that, use a baby
wipe and wipe it back off. It's not going to hurt
anything and it'll dry clear. Ls you're using a velvet, then that's probably not good. But this is exactly I
keep baby wipe sandy. We've flipped that over and
what I want to do is take my bone folder and just really smooth that down because this paper has got
a texture to it. I want to make sure it
all gets smoothed down. If you squeeze any glue
outside the paper, then just take your baby wipe, and again, just
clean that edge up. Then we're going to let the sit. This is I'm going to
glue the top part on it. But we're going to let this sit closed overnight so that
it has a chance to do its thing as far as the cover
drying, the edges drying. What I want to do, I'll stack it under a
bunch of heavy books, but what I want to do,
is what I just forgot. This was the back.
This is the front. I forgot to attach our ribbon. That I said, We need this. Let's just we're not
completely dry, dry yet. I don't think. This was our piece that I wanted to
come around at the front. I'm going to try to
sneak it in here anyway. Then I'll glue this back down because it's still
tacky at the moment. It's set up pretty good though. But I'm going to try to sneak
this just under the edge. I did it with the
non velvet side and the velvet down because
then when I close it, that's going to
allow the velvet to wrap around the book
and the velvet side. I was thoughtful there with
how I wanted to do that. Then because I've
pulled this ale bit, I'm just going to
run a little bit of glue right down this edge. If you forget that, like I just did because I'm
talking at the same time, you got a few minutes, but after that,
it's probably set. Then this side, just wanted to make sure we get
all that attached. Then we need to decide, now this will wrap around
exactly like we want it, and we can decide how
we want to do that. But I still think I want to
have a ribbon edge on here, going from about there
and on the back. Yes. That's exactly what I want. Just got to decide
where we want that. Let me get them all the same
size about right there. Not worried about the edges, and yes, it will fray, and that's what
makes an art journal pretty to me. I'm
okay with that. But you could sew
these if you're sewer and you don't want to
do that, go for it. You don't have to do
this at all this way, you can pick any of the
different art things that we've done in class, but I'm getting creative here. Am I think three or four. Let's look, there's.
We'll have one here. Yeah, I'm thinking
three. Definitely three. So I'll tacky glue
these on here, and we could see where
the exact center is. The center is at We're at 12.5. Center is at six and a quarter. I'm going to set
this one right here, and then we might
put this one in 2-3 and this one in 10-11. Maybe I'll come down a hair. I think I want that
further down, actually. Let's see. I'm thinking
about right there. I'm going to have
about the same amount on the front on all
three of these. I'm just going to You know what? I think I'm going to run well, I'm going to run the tacky
glue on the front side, and just get that set and
then we'll flip it over. Then we can still
trim it when we flip it over we didn't get it exact. Not firmly pushing it yet. Is that where we want it?
Do I it where I want it. Make sure they're straight. I think that's where I want it. We're just committing.
I'm squeezing those down, and we're going to let
them do their thing for a moment as I move
them accidentally. We're that set up for a second. Before I flip it over. Are they all in
the p? Let's see. Let's get them all in the same place while
we still have time. I'm going to let that sit up for a moment and I'll be right back. I've let that sit for a bit so that these
have firmed up a little bit and we're going to flip this
to the other side. Now, I should be even when I glue all
of these three down, what I'm going to do
is just check that. This actually looks
a little crooked, and then I'm going
to shorten this a tiny bit since
I just did that. Again, just looking for close
doesn't have to be perfect, perfect, but I would
like it to be nice. Now, I am going to glue this to the spine and
this top part here. Just going to go ahead and
get my glue on here ready. And then, let's just
loop it up and around. If you have any glue ooze out, just have a baby white handy or like a damp towel would work. But I just want to
make sure I don't have a glue bubble hanging out. We're going to need to
that set up before we flip it over and see if
we're done. I'll be back. Now that I've given
that time to set up, it's not completely dry, but it is set up enough
where I can now look at the book and see how is it going to look
as I'm going forward? Almost wish it was
a little tighter, but if it's too tight, then when we go to open
the book and use it, it'll be too tight
and not lay flat, currently, as you can see, we can lay p flat. This is why you don't
want to open it early. I'm going to close this back up. But this will glue
together tomorrow. Be set so that in
between each section, we have a completed section. Definitely not dry. But I'm going to, I'm going to stack this under a
stack of books tonight. Then I have this part
that I can use as a wrap around and closure as I'm working in the
book. I like that. As it gets thicker, I
have a little extra, little extra ribbon there. If I decide later, I've
got too much ribbon, I can just trim
that. That's fun. I do have a little scraggs
here I could get rid of that is my completed no so cover using fabric and something
that I find really beautiful, just some extra decoration that I thought I
would like on mine. Hope you enjoy creating your
own version, your own cover. You could do something
different for the spine if you wanted to
do something different. But I just thought that would be interesting and something
that I hadn't done before. Hope you enjoy this project. I can't wait to see what
books that you guys are creating and I will
see you back in class.
11. Small Grommet Spine Book - Supplies: Let's take a look
at the supplies that you'll need
for this project. I'm just making a fabric
cover and I had two fabrics. I had a front fabric
for the face, and then there is a second
fabric for the inside. These are upholstery
weight fabrics and that is perfect
for a book cover. Then inside, I personally
chose a handmade cotton paper. My silk threads are shedding. But I use the hand
torn cotton paper that I got off of
Amazon that I liked. These are really
beautiful papers, and they're from
leather village, which is a village in India. It's an Indian
made cotton paper, and it's handmade by
artisans that make paper. Then I'm using a
silk ribbon that's I came this way and was like a vintage ribbon
that the ribbon lady had died in different colors. You can use any ribbon. I just liked the
way this looks with this tall fabric
that I was using. Then I'm using a a gramma kit, and the gramma kit
is to do grommets on the spine so that we have a big enough hole to pull ribbons through
and then tie off. Then extras that I did I glued
ribbon on the inside and the outside because I
did the stitching and I didn't love the
stitching and so that's how I completed that off. Now you could make these
covers even a little larger. I recommend you make it about
the size of the paper plus an inch or a little bit more than an inch because once you get the
papers in there, you might end up with it short. I don't mind that. I could go back and tear these if I
want these all in the book. But once you fold it around it, you've got to figure
these signatures have a bulk to them. Maybe an inch more. Experiment with that. Then
once you get this cut out. You could sew it
all on the inside and flip it all out
and have nice themes. I like for an art journal for these things to eventually fray. I like that, not sewn
correctly look personally. Then That's why
mine are not sewn, but you could
definitely figure extra and sew those and turn
that right side out again. But I've done a
pretty little ribbon on the inside and
a pretty ribbon on the outside covering
my stitches because I liked it and I made a little
bow on top of a button. That's basically
what we're using. To be fabric, the
paper of your choice, the gramic tool kit, some ribbon to be your binding material and
your decoration. Then you need your
tools for book binding. You need your bone, folder, you need your all. You need your needle for your project, which
I have around here. Here we go. You need
your sewing needle. The bigger the needle, the better, especially
if you're doing ribbon because those are harder to get
through the needle. Then let's see, what
else is in here. I used some scissors. Instead of thread because normally you would
use a waxed thread. But instead of thread,
I used that ribbon. If you're not going
to use the ribbon, then you need the waxed thread. That's the basic tools that
I'm using in this class. I kept it simple. I wanted it to be
easy and doable. It does take a little, man power to pull the ribbon
through the paper, but that's the most
complicated part of that, just trying to get
that ribbon through. Other than that, this is
a very easy way to make a really lovely art journal to be working in.
Let's get started.
12. Small Grommet Spine Book: Hello, everyone. Today, I'm
going to make a journal with a fabric cover that's going
to be really simple cover, but to make it fancy, I've used I'm going to use a pretty fabric and a
pretty second fabric. Then I found some vintage
ribbons that were hand dyed, that I got at a ribbon
store a while back, the antique store had a ribbon. Booth in it and the lady
had handed all these. I use them for photography props for a long time, but
I just remembered, I have a bag of ribbons and I'm thinking that I'm going to
do a different binding on this fabric than I've done on the other ones
that we've done in class to give you
another option. I want to pick one of these
that I think is going to compliment this the best. Wondering if I like that one the best because that one pulls
out all these lighter greens. That might be the way to go. This one was a
little more vivid, but I don't think that color
is really in this fabric, so maybe not that one. This one's a little greener. That might not really be
in that fabric either. Now that I've had a chance to study this and think
about it for a moment, I feel like this might
be the right color. I'm going to pick a
section out of here. I'm going to make a little smaller
sketchbook watercolor book because I want different
types of watercolors. But you can make this with A paper that you happen
to have and want to use. You can mix it with the
vintage papers and do the Junk journal thing where you mix all kind of interesting
papers in there. Your choice on what you actually put into your paper pack. But I've got some
new papers to try. These are cotton papers
from the leather village. I got a rough handmade paper set and a smooth handmade paper set. I like that they put in
here who the artisan was that made your paper,
that's super cool. I think I'm going to use the rough paper because I actually really like it and
fold it in half. It would make a journal
about this size, which is about 5 " by 7 ". About a five by seven
journal with this paper. I think it's pretty cool. I'm thinking that that
would be a great size. Then I'm looking at
this upholstery fabric, that's a tall with
some different colors. I used a tiny bit of this
in our very first journal, the one with the different
stripes of stuff. This has got a lady in
it, some people in it. I could figure out
which section of this, I want to be my journal. I only need it to be like this big with just a tiny
bit of an overhang. Do I want it to be like this? That do I want to have
the people in it, or do I just want it to have the trees because I
really like the trees, or do I want trees on one side? People on the other,
that's a possibility, or do I want it all
trees because I do have just color and trees
down on this end. I like this palm tree
right here actually. Really if I did this right here, I could have palm tree on the
front and look like that. I'm going to look around
at what I want this to be. What I'm going to do is this is going to be the top
of the journal, like we did on our other ones, and then this is going to be
the underside of the top. I'm going to cut two pieces out of one piece
out of this fabric, one piece out of this fabric, and this is that
corduroy feeling fabric. I just think it's cool, and it's going to be the back
side of this front. I'm going to cut it.
A I'm going to give it we'll say quarter of an inch all the way around because it's going to overhang
just a little bit, and then that would be like the size of the
book when we're done, which would be a good size. I'm going to go ahead
and cut this out, giving myself about a quarter
of an inch all the way around and then I'm going to cut out that same size
out of this fabric. Then I'm going to go
to my swar machine and I'm going to
do a zigzag stitch all the way around just to
keep the two fabrics together. I'll be right back. All right. I have sewn this two pieces, if I cut it the same size. I had the right side
facing up and the u Corderoy side of
this facing up also, so the wrong sides are together. I just did a zigzag stitch
all the way around. Then I thought, it'd be nice
not to see that stitch. I decided to just take some of the ribbon that we're
already going to use and glue it around
my cover here. Then I took a little
bit of this ribbon and a button and I
made a rose out of it, which was actually
really easy to do. You just grab the end and
then run this in a circle. Until it's big enough. Then I had a rose that I could put a glob of
glue down on my button, I just glued it to the button like that and I ended
up with a pretty rose. Then I thought on the inside, be nice, but I didn't
see that stitch two. I just glued a little piece
of some random coring that I had and a little
button to finish off the edge and they're still wet because I just
finished glue in it. I just thought that would be pretty because that
button will be on the inside and that'll
be there on the top. I thought that'd be really
pretty as a finished journal. Then this is going to have some sticking out here on the edge from the way we're
going to stitch it. Don't you think
that'd be fantastic? Now we need to decide
while that's drying, just I just picked a size that was a little
bigger than my paper, and then when I fold
my paper in half, hopefully, this will cover
all our handmade sheets. Now we need to decide
how many sheets of paper and these are
all different sizes. They're not the same size. Just do the best you can with whatever paper
you're working with. But we just need to see how many sheets of
paper would make a fantastic little art journal to play and sketch in and you could carry it around
with you and you could paint and decide, That's pretty thick right there. I might want to do I might want to do
even two signatures. If I did five sheets, that would fold
down really nicely. If I did ten sheets, that would be like 20 pieces. There's five. If I did set
five, one, two, three, four, five, I think
that was five, one, two, three, four, five. If I did two of these, would that might be too much, but then again, I might like it. Maybe six pieces of paper. Maybe I'd like six
pieces of paper. We can always take one out. Let's just see because
I want to fold it and press it real tight
with my bone folder, and they're all different sizes, so I'm just going
to do the best I can to get it in the middle. Then I'm going to
get my bone folder. I've put all my little
tools here in a tin. Now I have a little tin that I can have my
bookmaking supplies in. They were in a little bag, but I like the little tin. I'm just going to press that
down with them all together. And then I'm going to do
the other one the same way. If they poke out of my cover, I'm okay with that because
they're hand torn, so it's going to
be really pretty. I could have made the
cover tiny bit bigger. You just judge how
you want to do that. If I do two of those, I will
hang out a little tiny bit, but it's still really pretty. I'm doing that right there. Now, I'm going to mark
these and we're going to put three holes,
one in the center. Let's see. Let me get my pencil. I'm going to mark it
about right there, because it's only two,
I'm just pulling it up. Uh 2.5 " from that I think is where
I'm going to go. That's not perfect.
That's all right. Then this is 12. I don't remember I don't forget which sides up and which side, which one goes right
behind the next. Then think what I'm
going to do is take my little all and take one piece of this and mark this
fabric because that hole in the fabric is
not even going to matter because we're going to do something that
we haven't done With this. We're going to
use grommets on the outside. Let's just mark these and
hope I can find Let's see. At that. I'm going to get Let get this right here
so that that will mark it. Then where was the next one? Oh, my goodness. No, I can't
see it. That's hilarious. Let's see if we can do better. Did I get the right
spot? Yes, I did. Now Hang on. Want to make sure. Let me get Where's my bull clip. Let's bull clip
this. There we go. Make sure it's not
going to move on us. There we go. That's going to be the center
of my g basically. I'm going to mark the next one. Just go straight down. There we go. There's the
center of my Gromet. And then the third one. There's the center
of my grommet. There we go. Now
we can see them. I think that's right. Then that one will
be right there. Yeah, it's close enough. We'll
put that one back on here. While I've got all out, I'm going to go ahead
and punch my holes here. G will be big enough that
we've got a little bit of if it's not p. We still be fine. I'm going to fold
this backwards, and then I do like
to once I fold it, g hold this in the
same place here. Then punch that
hole at an angle, so you come right out
on the fold of that. I'm going to do the
same thing on this one. So much easier if you
have this thing holding this paper. Steady for you. We come right out where
we're supposed to. And I'll do that
on this other one. Get these two down. All right. So there's number one, and
let's just do number two. All right. Now we got
one and we got two. What I'm going to do now is we're going to put
grommets in here. I've got a little gram tool kit. This one I did get the one with the hand grommet plier thing, but tested it out. I know how to use this kit. I got a little gramt box. We've got a little grommet tool. I'm going to use the
smaller grommet, I want the smaller
tool. There we go. R grommet for the
right tool there, and I want the
smaller gram tool, which I'm going to go
ahead and attach to my little grommet hammer here. Then we want three gromts. This is a 38 inch grommet. I believe before actually just grommeted those holes
down without this thing, but that's actually the
top of the grommet. It's been so long since I've used my little grommet things. I'm going to flip this over. Still being careful.
It's not dry dry, but it's getting close. This goes underneath
that protects your t and then you
make a hole with your hole and you just hammer that
until you're all the way through that fabric. And we're going to
completely cover the whole. Just as good as you can because you're not going
to see this underneath. There we go. Now we got a hole. What we do is we have this little get tool
that that sits right there, sits right on the piece of wood, grommet comes right
through the top. We should have our top
of our grue there, and then we put our grum Piece right here and
we hammer this down. And you hamer it until
it's down and tight. You don't want to
be loose at all. Then we have our
lovely little grum think that probably
should have been the back because that's
a little prettier. But since I did them that way, we're going to do
all three that way, so they look the same, but
doesn't matter either way. You just have to know
when you're making it way do you want that to be on the front of the back? It'll work either way. I'm going to do the next one. All right. And once you got your grants set, we are ready. We put all these little
pieces back over here. This gramma tool
is pretty handy. I like having it. I had
that for a long time, but it's the same set
that you can get now. I think I got it at Home Depot, but I've also found
them on Amazon. I do love my little
gram tool kit. Now we have three lovely
grammt holes that are going to be the spine of our
book basically, which may push these
out a little further. If it pushes them out too far, we could always trim our paper. We could always tear
the paper shorter. I could have figured a
little bit longer on these. But when I tie these in, I might pull them
in pretty good. We're just going to do it.
I don't mind it sticking out a little. Here's
what we're going to do. I am going to make sure I
got a little needle here. We are going to not do wax thread, we're going
to do this ribbon. It may be harder,
we're going to do the ribbon. Let's see. I want to hold these
together with ribbon, and then I want to
tie the ribbon off on the outside and I haven't
tried this before. I'm just expecting it to work. I'm glad that these little
needles have a gigantic eye on them so that maybe I can thread the ribbon
through the eye. If we can look at
that. Look at that. That's what I wanted. We're going to do
number one first, I actually want to come from the outside in the
center hole first, and then I want to
end out the outside. Normally we begin in
the inside middle. But let's see how much of this we're
going to actually need. I'm just going to pull
that. I'm going to let this be a straggly out here and now I'm going to
go into our signature. I'm going to go in
that center hole, and I'm just going to force
the ribbon through and I might not want to
come through because it is a lot of ribbon there,
but we're going to make it. I need a pair of
pliers to help me. Ooh. There we go. Did it. And there's of
course, like a nod or something here. All right. Just to force it,
do the best we can. And then if we've
got some extra fuzz because this ribbon
fuzeut the fuzz off. I want to make sure I got
plenty left over here. I don't want to lose
my little tail. Really to make sure I
don't lose my tail, I could probably clip
it and make sure I keep enough tail without
accidentally losing it. Then we're going to go through The last hole and the grommet. You're just going
to have to work it. It might be easier to
work it sheet by sheet. That's going to be what
our center looks like. Now this next one is
going to be hard. We're going back
through that hole just as if we had a
little thin piece of, but I want to go
through that hole and not snag the ribbon. I don't know if that's possible,
but we're going to try. Back through the grommet, back through the hole, not going to defeat me here. All right. Through the paper
top hole. Through the get. This is the last hole
that we have to go. We're about to tie it off. A thinner ribbon would
definitely be easier, but it wouldn't be
as for what I want. There we go. Now we've
got these two in there. We've got this one. I'm just pulling it taught, make sure I don't have
any poking out weirdly. Then I'm going to go underneath the loop that I've
already got there to give myself a little bit of stability there and now probably
going to do that. This one on this
side of this loop so that they're not both on
the same side of the loop. And I'm going to tie that off, and then we're going to
make a nice pretty bow out of that when we're done, but you might double k that because that one is
not going to keep. Then that ribbon is going to be a bow or we can just leave it hanging out and now we're going to sew
the second one in. And I can see that it's definitely going
to hang out some, but it's mostly on the back
side, the way I've done that. I could cut the paper shorter. At this point, I could just go tear all of these smaller with my little rip ruler
or I could just leave it because it fits out there. But let's sew in our
second one of these, and then we can see what we
really want to do there. Might just leave it.
I plan on leaving it. That bugs you, you can see what you're going
to come across. That's why I do some of this for you guys like this
because then you can see what I've come across
and you can go, a ha. Now I know that's something
that's going to come up. Let's thread the ribbon. You can you don't
have to use ribbon, but if you're going to
do that big gram hole, Big ribbon is nice, and I'm just going
to keep all that. Let's see. Coming
from the outside, we just want to move all this
over and come in beside it. I'm trying not to basically
snag that ribbon. I'm coming in right
there beside it, and then we're going to go
through the center hole and do the same
thing on this one. I'm going to make
sure that they are in order to make sure
because our holes will be in different places if
they're not in order. I allow a quarter
of an inch extra, but all this paper
is different sizes. You might allow a half inch
extra if you really want to make sure that you're going
to have plenty overhang. I didn't really allow extra. I need these to be
out of the way. I'm just going to twist them and maybe snag them out
of the way here. Maybe the back side, and then I don't have to
worry about that piece. This piece needs to be about
that same length though. It's just the back
side. There we go. I want to pull that
through or I've got maybe about that length. That was a piece that had a seam on it I didn't
see. Let's go with this. There's a seam at the end.
I think that's better sown. I'm just trying to get it about the same length as the
one that we've got here. So back through the whole
and I'm trying not to catch any of the ribbons that I've already got
coming out of here. I know that's a lot
of ribbons there. Just trying to be
careful as I go. Try not to lose the one that we're going to be
tying off later. As I'm pulling this through. I don't want to lose
that length there. Not so tight that we
wrinkle our book. Then through the
last hole, tied off. Once you got the second one in, we are going to just do the exact same that we did
with the first one, but the first one was on itself, and we're going to tie
the second one on itself. Now I'm going to take
this bottom ribbon here. And loop around to the back side of
that first ribbon like I did that
first one so that I can tie these off
and I'm going to take this one and loop under the ribbon that that hole I just created so that they're on
opposite sides to tie it off. Make sure it's tight. Make
sure there's no gaps. Make sure there's no
gaps where we don't want them and then tie that one off. Now we have two of these. Make sure I didn't just
make that too tight. No. I can even tie it
in this ribbon here. Underneath it. There
we go, Let's do that. Let's just tie it underneath it. I want the same length. Then you won't even know
that that's under there because it'll look
like part of those bows. Yeah, there we go. Then we can just tie it off to close it as we're working in it, we have that extra
little piece over there. I like that. There we go. Just got to get creative
with some of these. Think about logically. On what you're going to have
to do to maybe do the cover. My cover mostly fits
in with these pages, except I'm about a half
inch short on this side, so I've got two choices there, I can leave it and not care about it, which one
I'm going to do. Second choice is I could
cut those with my rip role, I could just rip
a half inch off. But I actually
like it like that. I like the handmade quality, and I could have made the cover
about a half inch bigger. Just figure like the length of the cover and I added about
a quarter of an inch, so maybe the length
of the cover and add an inch and you should be good. But some of this is just playing and figuring out as you go. I hope you enjoy playing with
maybe a gromet as you're outside edges with some ribbons coming out to be the
binding for your piece. Now we are ready.
These are sewn in. Got little threads I can cut
away because I'm using silk and that silk just poles
as you're using it. Now I'm ready to paint and
use this, however, like. Then as you get to the part where you get to the next piece, you just see the grommets
there. Super cool. It's a fun little
binding technique that I thought maybe
you would enjoy. I can't wait to see if you
do anything with this one, and I'll see you
guys back in class.
13. Final Thoughts: As we wrap up our art
journal workshop, I hope you feel
empowered to continue exploring the boundless
possibilities of journal making. The skills you've
learned here from the delicate art of
fabric color creation to the thoughtful assembly
of paper types can serve as a foundation for
endless artistic projects. Remember, each
journal you create is a reflection of your journey
and your creativity. Keep experimenting with
materials and techniques, and don't hesitate to revisit lessons to
refine your craft. Thank you for joining me in
this creative adventure, and I look forward to seeing how your art journals evolve.
 DENISE LOVE, Artist & Creative Educator