Transcripts
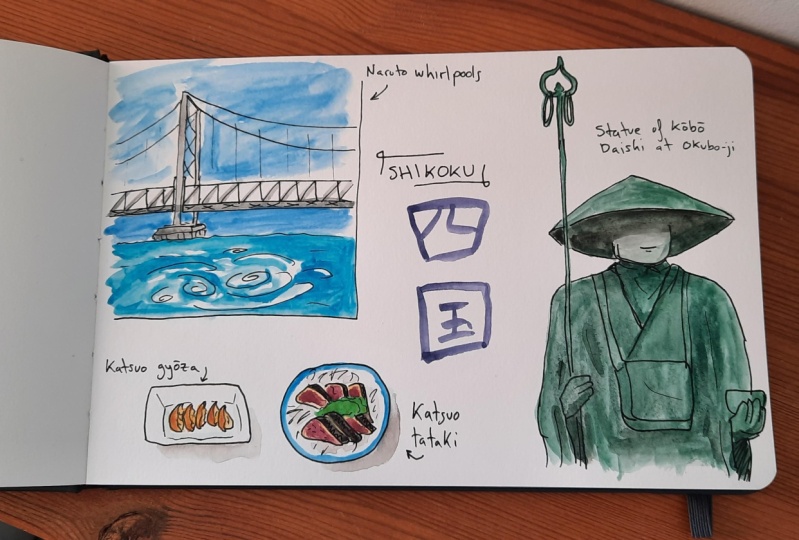
1. Introduction: A trip to New Zealand is one of those amazing
experiences that people spend years dreaming
about on a map. New Zealand looks like
a pretty small island, but it's really quite large. It's almost the
size of California. When you take a once in a
lifetime trip like this, you're going to want
to see everything. People plan these
epic road trips across New Zealand where they're traveling for a month or two, but never staying in more than one place
for like a night. Because you want to
go everywhere from Stewart Island at the very
tip of the South Island, all the way to the
fabulous beaches on the other side of Auckland, way up at the other end
of the North Island. It's a lot of ground to cover
on an epic trip like this. Of course, you want to take a sketch book and
record your adventures, but the question is, how do you really find the
time to do that, especially when
you're on the move so much and maybe
traveling with a group. I'm going to tell
you what I did. I drew a lot of thumbnails. I'm Amy Stewart. I'm a writer, an artist, an urban sketcher, and a very
enthusiastic traveler. I took my sketch book to
New Zealand recently, and I documented my
journey with all kinds of paintings and sketches
when I was short on time, I did these thumbnails. You remember
thumbnails, don't you? If you ever took
a painting class, you probably learned to make
small thumbnails first, just to work out your design
and get the values right, the lights and the darks. But thumbnails aren't just for planning out a big painting, they're also a great way to very quickly record a moment
on your journey. When I say quick, I
mean really quick, like a minute or two
and then you move on. Maybe you even color them
later in the car or at a cafe, or back at your hotel. I think thumbnails can be a really wonderful way to
tell the story of your day. Think of them like comic book
panels or illustrations. In a graphic novel, you can write notes or captions as much or
little as you like. You can add some fancy lettering or even some not so
fancy lettering. You can glue in some collage
elements like stickers or ticket stubs or bits of maps or something you tear
out of a travel brochure. These are really quick, unfussy, little drawings that you can do without slowing down the
group you're traveling with. When you stop at
a scenic outlook and everyone else
is snapping photos, you have time to make
a quick thumbnail when you're drinking
your morning coffee. Another thumbnail,
strolling through the conservatory at
the botanical garden. Another thumbnail.
These little drawings. They might not look
like much individually, but when you fill a
sketchbook with them, it's magical because you've captured your experience
in a way that's much more creative and
personal than a bunch of photos you took on your phone that you're never going
to look at later. This approach is
great for beginners, but if you're a more
experienced artist, I think this is going
to remind you of what you loved about doing
thumbnails in the first place. So I'm going to show you some light portable
sketching supplies and give you ideas for what
and when to sketch. You are welcome to
work for my photos, or you can use your
own travel photos, or even better, go out and make some own thumbnails
around your neighborhood. It's all great practice for your next big
adventure. So let's go.
2. Project: The project for this
class is to do a bunch of thumbnail sketches based either on the reference photos
I'm going to give you, or you can work from your
own vacation photos. Or of course, you can go out
in your own neighborhood wherever you happen to be and do some of these
drawings from life. You don't have to
go all the way to New Zealand to make an
interesting drawing. If you do, I definitely want
to hear about your trip, but wherever you go,
have some fun with it. What we're going to do is before we get going with each sketch, we're going to take a
minute to lay out a page. And we're either going
to decide on a pattern of boxes for our
thumbnails to fit in, or we might just start with
one and see where it takes. The main thing is to not spend too much time looking
for the perfect scene. You're doing a drawing that
might only be a couple of inches high and you're
going to do a lot of them. You don't need to
worry about finding a perfect picture,
postcard view. It's really the
collection of thumbnails, like the totality of them, that make such an impression
When you do your thumbnails, I hope you'll be
following this process. First, figure out a
shape for your box. Build a series of
boxes on that page. Maybe leave some room for text. Remember, you don't have to actually put
the art in a box. I don't always. As you can see on this page. You can also add some
lettering or some stickers, or stamps, or collage,
whatever you like. These are meant to be interesting
and diverse pages that really show your personality and what you discovered
while you were traveling. By the way, these thumbnails
are still a great way to work up some ideas for a
larger sketch or painting. If you're sitting at the
beach all afternoon and you have all the time in the
world to do a bigger scene, go ahead and do some
thumbnails first. They'll really help you
decide what view you like best before you jump
into a bigger drawing. I hope you'll try that too. Be sure to post your projects in the projects section below. I really want to see
what you're working on. Of course, if you
have any questions or comments, please post those. I'll be happy to pop
in and answer them. All right, let's take
a look at supplies.
3. Supplies: Supplies for this class
are really simple. I've posted a supply
list for you, but if you don't have
these exact materials, just feel free to work
with whatever you've got. First thing is I have given
you the photos that I used. If you want to follow
along with me Exactly, you can download those, but you don't have to feel
free to use your own photos from your own travels or go out and draw in
your neighborhood. Also, I've drawn some examples of little thumbnail templates
that you could use. This is helpful if
you want to pre draw some boxes and
fill them in as you go, Like a comic book or a
graphic novel layout. I have a page for a horizontal layout that you might use in a
sketch book like this. Or I did something similar for a vertical layout for a
sketch book like this. Now personally I don't usually
do a layout in advance. In this class, you're going
to see that I will just draw my first box and
figure it out from there. But if you want to plan
it out in advance, these templates are just
here to give you some ideas. And of course, don't
forget that you can leave some blank space to write
in or fill in with collage. You don't have to fill
in every single box. Okay, those are the
template sheets in the photo downloads. Other supplies in
terms of paper, make sure you're using paper that says it's for water color, like a student grade spiral brown notebook
like this is, I think, great for taking classes or in this class you're
going to see me use these soft cover, still mint and burn sketchbooks. And I have the Zeta series, which is very smooth paper but heavy paper that can
take some water color. I love this, especially
for a mixed media, because marker and
colored pencil goes down very nicely on
smooth paper like this. Anything is fine as long as
it says it's for watercolor. You're going to want a pencil. I usually use a
mechanical pencil, so I don't have to carry a
sharpener with me an eraser. When I'm traveling, I do take one of these
needed rubber erasers, but I put them in a little
container like this. They just don't
stick to everything. Other things I take
with me when I travel, I usually have a couple of these clips to hold my
pages down in the wind, also to attach my
watercolor palette. This is a very tiny
watercolor palette. I'll put a link if you're in the market for a
watercolor palette. But any watercolor set you have is going to
be fine for this. Don't worry too much about
having the exact thing, but these are great
because they're so very small and portable. I'm also going to use one of these very portable
water brushes. You can put water in the barrel. I don't always use the
water that's in here, but I do like the shape of the brush and it's good
for really small things. But also any watercolor
brush is fine. You don't need to go out
and buy something new. If you don't have
that exact thing, that's really all you need. But optionally, I'm
going to do a couple of demos where I use
some colored pencils. I'll sometimes carry a
dozen or so colored pencils with me when I travel. I'll also do some demos where
I use just a few markers. Again, completely optional. You don't have to do this but like tambo markers or these are Faber Castle pit
artists pins with the brush tip at almost
like a paint brush tip. It's fun to just have a few of these but totally optional. That's really all you
need to get going. So with that I think we're
ready to get started 0.
4. Landscape pencil sketch: I think landscapes are the
easiest place to begin practicing these
kind of thumbnails because they're
sort of forgiving. You know, if you don't get
the shape of that tree or the contours of the
mountain exactly right. Nobody's really going to notice. Let's start off,
we'll see if I can actually draw a rectangle. There you go. That's not bad. Okay, so let's start off with some simple landscapes
and I'm going to use a day that I spent on a
jet boat in New Zealand. It was right next
to a sheep farm, which was really
fun, very scenic, kind of a classic New
Zealand experience. For these thumbnails, I'm
drawing in pencil, obviously, just trying to get a
very quick take on the contours of the land and the water and
where the trees are. Now this one has
a little bridge. I'm going to put that in. That's the point of this one. Now you might be thinking
I'm on a jet boat. How am I able to
get anything drawn? But the fact is the
boat pulled over a few times and we got
off and went ashore. In that amount of time, I can make a little two
minute thumbnail while everybody else is walking
around and looking at stuff. It really only has
to take a second. That's what I'm doing Here are little thumbnail
drawings that really only take two or 3
minutes apiece to draw. Just getting in
some basic details. I may be going a
little bit slower here than I might if I
was out and about, but this is pretty close
to how I'd actually do it. I'm going to suggest the rocky shoreline but
not draw it exactly. Mostly what I'm trying
to do is to just remind myself that's the
rocky beach area By making a few little marks
like that and I can show the contours of the cliffs
of the mountain face. Just use some little
scratchy marks with the pencil to suggest trees. You definitely don't
have to draw every tree. My goal here is just to get a handle mostly on the
values, the light and dark. If you imagine this picture
in black and white, that's what I'm
working on doing. It doesn't have to
be 100% accurate. I don't have to put every
tree exactly where it is. I'm just trying to suggest like, oh yeah, there's some
trees over there. Then I'll always do
a few squiggly lines where the water is. Again, this is just to remind me later when I want to
come back in with paint. It's real obvious to
me the difference between the water and a
beach area, for example. That's all I'm really
trying to do now. I'll do a slightly larger one. This is actually a
place where we stopped and the boat is sitting
up on shore here. I do want to show the
boat just a little bit. Again, I'm not going
to get super detailed, I'm just going to show
that like it's a boat with a little canopy on top and
it's sitting on the shore. And that's all I need to show. But as people are walking
around and exploring, I can take just a second and
turn around and do a quick, just very quickly capture some of the details
of this shore line. Again, really fast,
like getting in the contours and the bald, rocky, sandy areas on these slopes and then also where the little trees
and shrubs come in. Doesn't have to be perfect.
That looks pretty good. I like to darken right
along the water line there just to emphasize that it's good to just make
the lines different, honestly, in any way you can. That's always a
good thing to do. Then there's this
other hill that's quite dark because it's
completely covered in trees. Then another mountain behind it, I'll just sketch that in. You can't see as
much on that one. You can just see some slopes and there's probably some trees in some areas without trees, that's good enough for that. But for this one that's
in the middle distance. Rather than do a bunch of squiggly lines to suggest trees, I'm just going to use some quick hatch marks just to show that this whole area is dark and to remind me
that it's all green, I'm going to look at
that later and go, okay, well, that had to be
where all the trees were. Just darken up the shoreline right here and
underneath the boat, and some little
squiggly lines to differentiate the water
from the beach area. That's really all I need
to do for that one. I've already got two
little thumbnails done. I'm going to do one more. I hope the idea
that you're getting from these is that you
can be at the beach. You can be on a hike, you can just be sitting and looking
out over a beautiful view. Rather than try to do
one big perfect picture. You can capture three
different takes on it. Like all three of
these could have been done at the same place. As it happens, we stopped
a couple of times. I had different opportunities
to capture different views, but it doesn't necessarily have to be that it could
have been that we stopped once and I just
turned and looked in three different directions and caught three little
perspectives. And these are so small
and so simple that you can almost do them in a
walk at the same time. I've actually done
that on a hike before, I don't recommend it. It's pretty easy to trip and
fall if you're looking at your sketchbook instead of watching where you're
going on a hike. But the point is, it
can be really quick. People can pause for
just a minute to tie their shoes and
get a drink of water. And that gives you a second
to do a quick little sketch. What I liked about this scene is all the orange and red
colors of the foliage. I was there in April, but
that's autumn in New Zealand, and I just couldn't get
over the fact that I was looking at fall color in April. I always wanted to capture
that whenever I could. Here again, some little
squiggles for the water and I've just got that sketched in
and I'm good to go now. This last one I'm going to do is a sheep at the farm
where we had lunch. The thing about doing
something like this is that probably you're going to see more than
one sheep, right? Like there were a bunch of sheep wandering around and
they'd all come up to us because they're very well trained and they know that maybe they can get a little treat. So they walk right up to people. You can start sketching one sheep and then
if it wanders away, pick it back up
with another one. You don't have to have
one stand perfectly still for you for 2 minutes
for you to get this in. You can just look at
a bunch of them and get a general idea
of their shape. That's what I'm doing
here. They've got a little top knot on top that seems to span this
area between the two ears. And I'm just going to make
some little curly lines. I remember where that is. Then their eyes are way up
on the side of their head, very much in line
with their ears. I think maybe that one eye is a little too big,
but that's okay. Again, we're just trying to just capture the idea that
there's a sheep here. And then the long face, like the nose is about
halfway down the body. Just looking at
those proportions, even if there's a bunch
of sheep walking around, you can figure out
like, oh, ice. This is the rule of drawing sheep is that they've
got these long noses. You get the side of
the nose in there. Then maybe some darker
areas just where there's a little bit of a
shadow in the coat. Or I don't think we're supposed
to call it fur, are we? But anyway, there wool coat, we can just suggest that in the picture you
can only see one leg. But I want to go ahead and give this 12 legs, which is
what it should have. I'll just get that
in. Maybe just darken up some of these
lines a little bit, but that's really all I
need to do for this sheep. Very quick, you can see
I love some space here. I like to leave a
little space to write something. It doesn't
have to be much. You might just want to put
the date and where you were. There might be other things you want to remember about the day. Maybe you want to
remember what you had for lunch or what the
name of the sheep is, or what the name
of that bridge is. It would have been helpful if I had remembered the
name of that bridge, I would have happily
put that in, but I forgot that anyway. And little details you want to write down,
you can do that now. You can also come
back later with this. Obviously, if you want
to use a different color or use a pen or do
something different, that's fine, but it's
just a little bit of extra space to make whatever
notes you want to make. I'm going to get that in.
That's all I'm going to do for now until we're ready to
move on to water color.
5. Landscape watercolor: All right, so now we're going
to get into water color. This is exactly how I do
it when I'm out and about. I've got my tiny little
portable watercolor palette that clips right on
to the sketch book. Just one pin. This
watercolor brush pen, very easy to use. Good for these real small
little sketches like this. This water happens to be a
very bright turquoise color. It just naturally is because of the minerals in the
water, in the rocks. I'm using that color every time. What I'm doing here, as you
can see as I'm going through, and I'm just going to paint
all three of them at once. Now, you might want to
paint these one at a time. Depending on where you are
and how much time you have. You can come back and
do all these later If you have a general idea of
what everything looks like. You really don't need to do it all at once.
That's what I'm doing. This is naples yellow
and I'm mixing a little purple in it because purple contains
both red and blue. When you mix red and blue and yellow together,
you get a gray. I'm just looking for some different grays
for the cliff side, for the rocky faces
of these slopes. I'm adding a little
blue in it to push it more towards
a bluer gray. This does not have
to be perfect. It doesn't matter so much
exactly what you get in here, but it's just a
nice neutral color. I like Naples yellow
all by itself. It's a great color for
buildings and pavement, and sand at the beach
and all kinds of things. But it's also nice to mix these other very light
colored neutrals. You can get a lot
of nice effects. I'm using that, just putting it into some of these areas
where I see these slopes. The other nice thing about doing three of these at once is that you put that color down and
you let it dry everywhere. And then you go in
and do another one, a little more Naples, Yellow for the mountain off in
the distance there. Then there's some
other beachy areas, it's crushed gravel or sand. Again, doesn't have
to be an exact match. But obviously you look at that and you get a general
sense of like, okay, I'm looking at a sandy
area next to the water. That's p***ty,
that's good enough. I'm going to get a
little more color in that hill off in the distance. I think this is all looking pretty good times things
need just a second to dry, but fortunately, I do also
have to come in and clean off this tiny little palette so I can move into another color. That's okay. I'm going
to take just a second clean my palette and then I'm going to look at
some of these greens. Now it just so happens that
I don't at the moment, have a sap green on my palette. If I did, I'd be using that. Instead, I'm going
to take ultramarine. I can mix a little
yellow into it. See what I think of that?
Also, some of this new gamboge mixed with ultramarine
will give me a very olive green color. I can get a pretty dark color, but also much more in the olive green instead
of bright green. That's about what I
think I want here. I'm going to work on this little slope that's just covered in trees
for the moment. I'm just going to put down
that one wash of color. If that's all I had
time to do, it's fine. You look at that and you
completely understand that that's a hillside
with trees, right? Good enough, no matter what. But I will try to come
back in and do some more, little details on it. A little bit more
texture if I have time. But this is all about
doing something quick. Getting something down
is really the goal. I'm coming back into these
areas where I had made some little squiggly marks
to suggest the trees, and I'm just layering
on top of that with some of these dark greens. Fortunately, the small
brush comes to a point. I can actually get
something that feels a little bit like
these lines, but it's fine. I can just cover up
the lines I've already put down and they'll
still show through a bit. That's really what
I had in mind. I'm keep going through here and work in just enough green
to suggest what this is. The hillsides that are partly covered in
vegetation, partly not. That's really about all
that I need for that to be. I get that in there. I did say that I would
maybe come back, I'm going to get a little
bit on the hillside up here. Some lighter blues, bluish green greens tend to go a little blue as they
head off into the distance. I just pick up a slightly, slightly bluer green
is just about all I need right there as the
boat in the picture, you can see that it's yellow, but I think it won't
show up very well. I'm just going to make
the boat blue instead. I feel like a lot
of boats are blue. That's believable, and I think it'll just read
a little bit better. So feel free to change things, make it more interesting, make it your own. That's
totally fine. Okay, so I'm cleaning off
my palette once again, and I'm going to work on bringing some of the
other colors in here. So this red, this is
where it's useful to have a brush that comes
to a really fine point. It's not quite as
fine as you know, I might like to get all of
these little tiny details, but at a glance you
can tell that you're looking at a bridge. Right?
And that's the goal. You could also do this with a marker or a colored pencil or something like
that if you had it. But I'm going to do
all of this with one, with one tool, just to
see what that looks like. Now, I was so excited about this fall foliage on
this one hillside. I'm just mixing some orange
and red colors together, just dropping that in. I don't need for this to exactly represent what's going on
over there on the hillside. And in fact, I don't
really want to fill in the mixture that you see
of greens and yellows, oranges and reds too much. I think it's just overwhelming. Like I think it's enough to
just drop down some colors in a few places and maybe
connect it a little bit. Maybe smear some of that
together just a bit. But basically you're
just trying to give the basic sense that there was fall color even
though it was April. That's p***ty other places where I might just
want to drop a bit in. I'm not liking how white
that Cliffside is. I'm going to go in
and fix that a bit. I'm also going to dip back
into my ultramarine and a little bit of new gamboge, a little bit of yellow. Maybe even grab some of that reddish orange to
just get a dark green, as dark as possible. Again here you could
use like if you had Prussian blue,
you could use that. Or if you had a good
dark sap green. And I'm just going to suggest these trees a little bit
more than what I drew. This is definitely extra. But I have the time. I was trying to do all of this in a very short
amount of time, but there's time in here
to go ahead and do that, but definitely that's
not required. Okay. Now onto this sheep. Now this I want to
keep very simple, but I'll just mix some of this light spring green and some yellow together to get more
or less the sense of grass. This is a very distinctive color that you see all
over New Zealand. Of course, the grass that
the sheep love so much, I'm just changing the color up as I move it around just to suggest shadows or sunlight moving or something, but
you don't have to do that. Like it could just be one
solid light green color and that would be totally fine. Anyway, we drop a little
bit of color in there, I definitely want to get the
pink in the sheep's ears. I think that that's a really distinctive that brings
the little animal to life. I love that looks great. Then I really don't
need a ton of color. Like I could just
leave it like this. It would be fine
to just leave it, but I'll go ahead and
take some naples yellow. Definitely the darker
areas where I made some pencil lines just to
suggest the shadows that fall. Then once that's in, get it down the side of
the face on either side. I can just with a damp brush that doesn't
have any paint on it, just work it in very lightly
to the rest of the animal. That's although I'm realizing I should have also put in
a little bit of sky color. A lot of times with a
little thumbnail like this, I won't bother with the sky, but I know a lot of people
are going to want to. Let me just show you
what I would do. Like I'm just taking
a tiny bit of cobalt and just dropping it in, making a few brushstrokes
and putting in a blue sky even though
the sky was cloudy. If I want to do clouds, I'm going to make a little
bit more of a purple mixture. And I might add some red or orange or yellow to
it, to gray it down. Now I've pushed it a little
bit too close to brown. If you're mixing your own gray, you're going to go back
and forth with this a bit, add a bit more blue to it. Maybe you have
something like pains gray on your palette already, which is great for clouds. Really just a mixture of everything that's
on your palette. Weill make clouds. I'm just dropping a
few drops of that in. And there you go. I
think we're done.
6. Cityscape pencil sketch: Okay, So, let's go ahead and do some
actual urban sketching. We're going to do a
few different views of buildings in Auckland. I was there to meet up
with the urban sketchers. In fact, this first
image is when a bunch of us were gathered
together on a chilly, rainy afternoon to do one last session of
drawing together. And I'm not going to try to
get this entire picture in, I'm just going to do one detail which is the top of this tower. And you notice I
started at the top of the tower and I'm going
to work my way down. I don't honestly know how
far I'm going to get. So I'm just going to
keep drawing until I get to the bottom
of this little box and that's what
it's going to be. Now, anytime you're
doing buildings, you're thinking about
perspective at least somewhat. And if you find
that chal***ging, if you haven't
really had a chance to learn perspective very well
yet, don't worry about it. You could always just
do building facades and another little details that don't really require you to
think too much about that. But it's quite simple, it's
a very easy thing to learn. Definitely don't be
intimidated by it. But for the sake of these
little thumbnail sketches, you want to draw something that you feel comfortable drawing, that you know you can pull off. In this case, I'm just doing the top of this tower
and I'm just going one level at a time and
looking at what's there, what all the features of it are. There's a clock face, different little
things going on, different little details,
windows and stuff. I'm also not trying to be
real specific and get in the exact right number of everything you'll
notice on all of these. I'm not counting windows, I'm not trying to
be that precise. I'm just trying to capture an impression of what I've seen. I've worked my way
down to just about as far as I can get on
this little tower. But I think that looks
pretty cool actually, I'm going to do some little
light colored lines just to suggest that there's
stone or brick work there. Then this is where
the tower ends. There's this structure that sits right atop the
entrance to the building. I don't need to get
all of that in, but I'm just going to do
a little bit of it here. That looks pretty good, maybe. See if this is always
where you're like, oh, I have another second, let me see what else I can do. Maybe I can darken in some of these windows for
the clock face. I can go ahead and show
what time it is and make some little marks around the edges just to make it clear
that that's what this is. That those are clocks
darken up some of the shadow areas underneath some of these little features. Any little details like that. If you have time, you can always work in and if you don't
have time, you're fine. Okay. That's it. That's
all we're going to do. For that one, we'll
add some color, but for now, that's all
we're going to do now. This next one is the
Auckland Sky Line. If you go to
Auckland, you have to get out on the
water because it's, this is a city that loves its waterfront and there's such a wonderful sailing
tradition there. Definitely get out on
a boat if you can. This is the drawing that you
could actually do on a boat. It's only going to take
a couple of minutes. The sky line isn't
going anywhere, even if the boats moving, which it obviously will be, the sky line is fixed. Again, we're not trying to get an exact replica
of the sky line. It's okay if not every
building matches perfectly. You're just trying
to catch a quick impression of what you see. Now in this case, I'm not thinking too
much about proportion, but I do feel like the towers got to bust out of
the top of the frame there, which is a fun thing to do. If you're going to make
a box to draw inside, you're free to bust out of
the box anytime you want. That seemed to make sense for the proportions that I
had established here already with the
height of the trees. I thought, well, I'm going to need to go a lot
higher than that. Again, I'm not trying to meticulously copy
every single building, I'm just looking at what these clusters of
buildings look like, maybe getting some
sense of windows. When you're this far away, sometimes the windows
just look like vertical lines or horizontal
lines and that's fine. Sometimes a pattern of windows will just be one dark
stripe and that's okay. Just get as much as you can. I'm looking for any
little things also like cranes or antennas on tops of roofs are always
interesting to draw. But mostly the idea is just
keep your pencil moving, keep your eyes on the sky line, and just try to
capture some of it. Now one thing, even though
this is an overcast day, generally when you're looking
at buildings like this, one side is going to be darker, it's going to be in shadow, and the other side is
going to be in light. Even with this very dull, we don't have a really
strong light source. You do still see that
as I'm drawing these. I'm trying to be
mindful of making these feel three dimensional by making one side of them
darker than the other. That's an easy little
trick that you can do even when you don't
have a great light source. I'm just going to
continue along here. If you're drawing along with me, yours might look quite
different from mine, but you're getting the
general impression of what's happening
on the sky line. And that's really all
we're trying to do. I really only got
the middle of it. There's lower buildings
as you get out more further away from the
city center, but that's okay. I think this is a
good place to start. Get some of these
little cranes in sign that the city
under construction, something's always being built. I want to put those things in. Any other little details? I'm in that stage
now where it's like, oh, I think I can keep going
for another 30 seconds. What else can I do? I'm going to color in the trees
in the foreground. Obviously, I'm planning on
painting those as well, but that'll just help remind
me that they're trees. I think that's pretty good. The last one I'll do, I think I'm going to
make this one a square. It fits right there. That's where I'll put
it, this beautiful. This is the fairy building
down by the waterfront. It's a gorgeous building. As soon as we got to town, I said every urban
sketcher who's here for the symposium is going to
want to draw this building. And sure enough, I think
it got drawn over and over again because it's so
full of interesting detail. But when you're doing
something that's small, you're not going to get
a lot of that detail in. Right. You're just
trying to capture it. I'm starting out quite lightly in pencil because I actually want to make sure that I've left enough room and I can
actually fit this thing in. I'm just trying to
get that cube shape. It's not a cube, it's
more rectangular. But anyway, trying
to make sure that I've got room to
get that shape in, but then to also
get the tower in, which is obviously
an important part of recognizing this building. Once again, I think I'm going
to jump over my border, my line that I
drew a little bit, but that's totally fine.
That's good enough. I think with that, I'll go ahead and
start drawing with a darker line and really just get in there with some
of these details. I don't want to do all the
vegetation that's around. I don't want to do
every little light pole and everything because
this is way too small. This drawing, it's
only two or 3 " tall. And I'm trying to do these
very quickly because again, the whole idea is we're
going to be moving along very soon and you've only
got a second to capture it. Anything I can get within
just a few minutes, that's probably all I'm
going to be able to do. My idea with this is if you're out with
friends and family, you stop for an ice
cream for a minute. Or maybe somebody goes into a little shop to
look at souvenirs. And you say, I'm just
going to stay out here and draw this building real quick. I'll meet you when you're done. Well, they're going to spend at least 5 minutes
in the shop, right? You've actually got time to get some quick
little drawing in. That's all I'm
looking to do here. I'm just capturing the bare minimum
details that I can get. I see there's a couple levels
above the main building, and I want to, I want to
capture all of those. And I'm going to start
to draw in some of these windows and the
columns in the doors. But I'm not trying to reproduce
every single thing I see. This is what I mean
when I say like, you don't need to be
counting windows. If you're counting windows, you're probably
going to get totally lost and you're
going to run out of time just giving a sense of like this is a
grand old building, It's got a bunch of windows, it's got columns, it's got
all this stuff going on. That's about all you're
really going to be able to pull off in
the time you've got. I'm just, I'm
looking at archways. I'm looking at whatever
little architectural details can actually read at this tiny, tiny level that we're at. That's looking pretty good. I need to put a roof
on this building. There are these windows that are right underneath
the roof line, and I want to be sure to
include those. I like them. I like that bright hit
of blue from the glass. I want to be able
to include that. I'm just drawing these in these little windows so that I don't get lost and
just forget where they are. There's the roof line going back then This dark yellow trim also travels around the
side of the building. And I can suggest, again, I'm just suggesting
archways and columns. But I'm not being super precise about it and I'm not
getting real caught up in really even thinking about perspective
in much detail. I need to get
generally the sense of that we're looking at this
building from the side, but I don't need to get
too caught up in that. Then I want to make
sure that I get this tower right
because I think it's such a distinctive feature and these are the things that
are so much fun to draw. This is a building that I
would definitely come back do at a larger size later. But it's cool to just capture it very quickly like this also. This is a great little
study for a larger version. If you have already done
a little thumbnail of it, then you've figured out
some of the issues. And you could actually just use the blank page right next
to this one to go ahead and take on a much
larger version of it after you've done
this little thumbnail. You can think of
these also as like little practice sessions for
doing bigger drawings later. But if this is all
you managed to get to the, that's great too. I'm just darkening up
some of the features, making sure I'm using a
good bold line that'll be really visible Again, I've reached that stage
right where it's like, oh, I think I still
have another minute. Like nobody's coming
out and telling me it's time to move on
yet what else can I do? I could put a little shading in the bottoms of these trees. Trees are generally darker on
bottom and lighter on top. I could do that, but I think
that's really about it. This is all I'm going
to do for pencil and then I'll come back in
and do some water color. And I think this time
also some colored pencil. But once again, I've left a
little space you can write whatever you want to say about these buildings or about what you did that day
or where you are. You can invite your friends
to write something in that space or your family or whoever you're
traveling with. It doesn't have to
necessarily just be you. You might have a little sticker or something you want a glue in. Like a little collage
element would be cool too. But I'm just going to put
something basic in here. And there we go, there's our pencil thumbnails.
7. Cityscape watercolor: Just for a little variety. This time we're going to
use some colored pencils. I just have a few here. And normally if I'm traveling, I'm not going to carry more
than a dozen with me for sure because I
don't want to carry a lot of art supplies around. I'll show you how that
works in a minute. But we're going to
start with watercolor. And I'm just mixing up a
couple of different blues and greens and putting a little orange in
to gray it down. And I'm just getting
in a few brush strokes for the water. This is going to be a
very light application of water color because
I am planning to come in on top of it
with colored pencil. I'm not necessarily going
to color everything in with water color and do as
thorough a job as I would. Otherwise I'm just going
to keep this really quick. Also, I need it to dry really fast so that I can
draw on top of it. Because colored pencils work best if your paper is
totally, totally dry. If you want to do colored
pencil on top of watercolor, definitely you need
time for it to dry. I'm keeping this very
light very quick. Some green for the trees
that are in the foreground. Then I just want to
mix bluish gray. They all these buildings
on the skyline, they're pretty
monochromatic really. I don't need to get a bunch of different building
colors in here. Even if it was the type of skyline where there were a
lot of different colors, like sometimes
modern skyscrapers will have a greenish
cast to them, or maybe there's
old brick buildings mixed in or whatever. It could be quite a much
more diverse skyline than this one happens to
be in terms of color. But even in those situations, I usually want to keep
the color palette really simple because
you're just trying to show this one united image
of the city skyline. I'm dropping in these
dark, bluish grays. This is a great time to use something like a pains
gray if you have it. Or even something
like a shadow violet would work great here. Or you can do what I did, which is you can just take a blue, like ultramarine, and mix a
bunch of other stuff into it. Mix in a little orange, a little yellow, a little
red, a little purple. Just keep going until
you get a color that works for what
you're trying to do. Thing with these
buildings is that there's usually a dark side
and a light side. Just from where the light is. It's good to capture that. But again, the whole
idea here is to just be very quick and
easy and move right on. Okay, cleaning off my
little tiny palette. And we will move right
along to the next thing. I'm going to get into
Naples yellow again, I'm going to mix a tiny
bit of purple into it. And also just a little bit of whatever's left on my palette. Just to get a little bit gray or more brown version
of this color, some artists will really
just use like dirty water, like their paintbrush
water will just be this random mixture of
colors and that's enough. But all I want here is a
light yellowish brown. If you had something like a
yellow ochre on your palette, that would be great too. For this, I'm just dropping
that on top of this tower, basically, more or
less everywhere. The only other
thing I want to get on the tower is
that the top of it, that dome, is that
greenish vertegreelor. I'm going to take some cobalt teal and mix it with
some phylo green and try to just get that that
color is very recognizable. A light cool green color that we all are used
to seeing on building. I want to get that you can't see much of what's going on
with the flag on top. So I'm just dropping a color in just to have something there. That's really all I'm going to do for the moment with that. Because again, I'm
thinking about the fact that I'm
going to come in with colored pencil when you're trying to decide what to do in watercolor and what to
do in colored pencil, it just comes down to which colored pencils
do you have with you? Like, I don't have one
that would have given me that bright,
greenish blue color. Obviously, I need to
do paint with that. If there's a color that's the majority of a building like this one has a
lot of yellow on it. I'm using that naples yellow quite a bit here and really covering most
of the building. Then for the reddish color, I'll do that with colored pencil because that is a color that
I happen to have with me. It's always, it's a little
bit just up to you, but also it just depends
on what you've got. I want some color on the ground just so it's
obvious that it's ground. It's a sunny day. I
tend to exaggerate. The sense of yellow
sunlight hitting the pavement again with the naples yellow and a
little bit of new gamboge. It seems like a lot of yellow. But I know that I'm going
to be coming back and drawing on top of it
with colored pencils. So that's going to take
some of that away. The other thing I like to do, I have a couple of green
colored pencils with me, but what I like
to do is just get a light green color down on the trees and then do
the rest with my pencil. I'm just going to dab in a very light yellowish green to suggest the side of the tree that's being
hit with the light. And then I'll do more
with a darker color. Okay. I've gone through, I've done pretty much everything
that I need to do here. I think I will put a little
bit of sky into this one. You can always just
leave the sky blank. You definitely don't have
to fill everything in. A lot of times I do that, I don't really bother
putting in a sky. But I'll go ahead here.
That's just a bit. I just use a little
bit of cobalt blue and also the cobalt teal. I'm again, more just for
demonstration purposes, but it's totally optional. I want to mix up a
bluish, purplish gray. I'm also just using a couple of different
blues and dipping into a little bit of orange
and yellow to make a gray. I want this to be
very blotchy looking because it's a
cloudy, overcast day. And I'm suggesting those clouds and I also want to remind you, you don't have to
make the sky match the actual scene if you don't feel like making it
look like an overcast day. If you want it to
be a sunny day, be my guest and just
put in some blue sky. Okay, I'm moving over to
this tower because it's dry and I'm just coming
in with a gray pencil. I usually do take a medium gray with me for one
of my colored pencils. And you might think, well,
why bother with that? I mean, it's like
you can hardly tell the difference between that and a regular pencil. That's true. But my regular
pencil that I use is a mechanical pencil and
it's a pretty fine line. I can get thicker lines here. It's hard to see on camera, but you really can see
the difference between a gray and a darker pencil. Lead. Definitely. You could just do this with pencil
if you like as well. I'm just darkening in some of the undersides where
little shadows are cast. Just trying to
increase the values generally make the darks a little darker so the
lights will stand out. But you could come in here and just color in a
light shadow color. You can do that with
water color as well. Just a little stripe of a
gray color on one side. But it's something you can also do with
pencil. All right. So one other thing
I'm realizing I forgot was some of
that sky color. I want to go into these
windows, You know, people tend to want to paint windows blue, but
often they're not. They're often dark because of the shadows and just the way the light
hits the building. But in this case,
some of them actually are basically the same
color as the sky. I went and added that in. While I'm waiting
for that to dry, I'm once again just coming in with the
gray and looking at these buildings again and seeing are there any more
details I can add? Are there any areas where I
want something to be darker? What makes a drawing
interesting is always value. It's just the difference between the darkest darks and
the lightest lights. And it's that contrast that
really draws us in any time. You can exaggerate
that a little bit. It'll make for a more powerful
and impactful drawing. Definitely thinking
about is one side of this lighter and the
other side is darker. Can I really emphasize that? I'm really just going in here and messing around with that. This all depends, again, on how much time you have. It's not really necessary
to do any of this. These are all just
little accents, but we're not spending a huge amount of
time coloring these. We have the time. I'm going to go ahead and
take my very dark green and just darken up some of these trees that are
in the foreground. We don't see a lot of
detail with these, but why not just go ahead and play around with
that a little bit. Give it a little
bit more texture. I think that looks good now for this building, we're
going to come back. Building is this
terra cotta color. That's actually, I would say has a little more pink in
it than the pencil I have. It's it's almost a maroon, burgundy color, I think. But the pencil I have is more
like a very dark orange. It's actually, the color is
actually called terra cotta. What I want to point
out here is you don't need to have the
exact right color. Like this is obviously a color that looks like
a brick building, right? If you are traveling
with colored pencils, just remember you don't
need every single pencil for every possible color
like is close enough. This will read as
the building it is. I'm just going through
and I'm leaving the yellow where I think
I need to leave it. I'm just using colored
pencil to color in some of the areas that are better
off or that are terra cotta. I'm not trying to get every single detail in this building. That would be crazy. It's
a tiny little drawing. It's all of gosh 3 ", Maybe just going
through here real quick and adding some
little scribbly lines and little spots of color
and little bits of texture. That's really all
you need to do. There is some of this color on the bottom tier
of the clock tower. I want to be sure I get that. Then I also have a yellow ochre. This is a really
good colored pencil to always have because it
shows up in everything, right? It shows up in botanical
and landscape subjects, but also in buildings. And you can even use
it drawing people. I think it's just a really
good color to have. And I'm just going
to go through and emphasize some of the darker, deeper yellows here and there. Thinking of it as a shadow color for the yellower parts
of the building. Just working it in wherever
I see a place to do that. That's really about
all I need to do. Firm that up. Then
with the trees, I've got a dark green. I'm thinking of
this as these trees as having a shadow
side and a light side. I could just leave it like this. I like the contrast between the very light green
that I put down a watercolor and the darker
green that I did with pencil. I'm just going to
come in just to show you b***d between the two. I'm letting a little bit of
that watercolor show through, but mostly I'm coming in with another colored
pencil there. I can even use that terra
cotta to do some tree trunks. It probably those tree trunks are really browner than that. But again, it works. It reads, maybe make some
little shadows with the gray. That's definitely one
of the things it's so great for just color in a few of the windows or other
little areas that I think are actually really
dark or in shadow. Just get some of that
in. This is really it. Here's a page spread of our little quick
architectural tour.
8. Botanical Garden pencil sketch: Let's try this
thumbnail approach with some botanical subjects. This is from a day
I spent wandering around the Wellington
Botanical Garden. It's a gorgeous garden. There's lots of wonderful trails and paths to walk around, but you end up in a
conservatory where there's many more interesting
things to look at and definitely many more
interesting things to draw. I think the thing
about something like plants is that there's
so much to see, right? You go to a botanical garden and there's just such a huge variety of like flowers and leaves
and different shapes. This is where I think an
approach like this can be especially
helpful because you can do these bigger scenes that give a sense of what
the whole thing looks like. But then also you can zoom
up real close and just look at a flower or
a leaf or something. For this first one, I'm taking in more
of the entire scene. But I'm definitely not trying to draw everything in the scene because it's way too much for a tiny little
thumbnail like this. I know that. I just
want to get in a few of the larger trees that
are in the foreground. And a sense that there's a mountain off in
the background, but we don't have to
do too much with that. I need this path to be inviting, but it also has to go somewhere. I think what I'm going to do is I'm going to
change it a little bit from what I see in the photo and really just more obviously suggest a path that's going
off like behind that tree. I don't have to deal with figuring out what
the path leads. I can just change that and have it be something that goes away
off in the distance. Now, there's a lot of interesting plants that are lower to the ground here
that I would like to get in, but I'm actually
pulling elements from elsewhere in the picture. I'm not trying to copy
exactly what I see. These, what I'm doing here now. I actually see over to the right underneath
that big tree. But I'm moving them
over here to the left. Now I'm thinking, well, I do
need a little something over here and I actually see some
smaller plants on the left, but I like on the right, I switch these
around a little bit, really, I'm just trying
to fill in space, make sure I have something
in the foreground that complements what's
in that middle range and what's in the background. I'm just going to draw in the interesting shape
of the leaves here. But knowing that I'm going to also use colored
pencil with this one, I'm already having
the back of my mind that I can do more with
colored pencil here. I'm not going to need to do it all with the regular pencil, but that's an interesting
shape and I like that. Then I've also got
a couple of trees here also in this
middle distance. I just want to shade in the sun is coming from
well above obviously, But off to the left I want
to have some shading over to the right just to show the
light hitting these trees. And it helps gives
them some form. There's two trees, one in
front and one in back. And I decided to go ahead
and depict it like that, even though that's a little bit tricky for something this small. But anyway, that's
what we've got, Just a very quick
little scene now. The rest of these are all going to be in the conservatory. For this one, I decided
that rather than crop the photo that you're only
looking at the lily pads. I wanted to go
ahead and show you the entire picture of the
pond inside the conservatory. You can get a sense of how you can be looking
at all this stuff, but you don't have to
draw all that stuff. You can zoom in and
just draw some of it. Also, I'm not looking to copy the exact configuration of
these leaves and flowers. I'm looking at
everything I see in the pond and I'm
pulling some in. I'm not going to
put the flowers in the exact place that you
see them in the picture, and I'm not going to arrange the leaves in the exact
way that you see them. I'm just using
those as reference. I'm recording my observations in this rectangle
that I've drawn. That's really all
you need to do. Don't be too hung up on making an exact
replica of what you see. I can see that some are
larger, some are smaller. There's more space in between, some of them than others. I can definitely have them going only halfway in the frame. Here, like I'm using this rectangle as
like a picture frame, I can have things
that are cropped off and not entirely
within the frame. And it gives you this sense
of a viewfinder in the sense that there's something more to this and I've only
drawn part of it. I would say this is one of those situations where just
get as much in as you can. Erasers are for part of drawing. Definitely, if you're
not happy with something, feel free to erase. That's the whole reason
we're doing this in pencil, is so that we can rethink everything and restate lines and do whatever
we need to do. So that's totally fine. Some of these little flowers
are actually elevated. They're sticking up
out of the water. I'll try to get a little
bit of a sense of that. Yeah, just following my eye and giving recording some little
observations about this. It's helpful with leaves. Most leaves have some
veins that are visible. If you can see them, it can be helpful
to draw those in. It just gives a little
clue that this is a plant we're looking
at as opposed to whatever else it might be. The patterns of veins
in a leaf are something that are very particular
to the type of plant. It's a good way of making more close observations of
what you're looking at. Now we'll move along and do whatever else looks interesting from inside
the conservatory. I guess this is love
lies, bleeding. I'm pretty sure
that's what it is. But anyway, we'll
draw some of this. But again, this is
really complex. Like if you look at
this photograph, you're like, wow,
there's a lot here. We have a lot of leaves, stems, stuff in the background,
stuff in the foreground, These long hanging flowers. And there's a bunch
of them, there's easily a dozen of them. Not drawing everything, right? I'm just going to simplify
and I'm like, okay, I definitely want to get the stem and I want
to get a few leaves, but I don't need a ton of them. Then the real star of the
show here, of course, is these big pink flowers, which I'm just going
to very loosely draw. I can see that it's
got an uneven edge to it and there's a lot
of different ways I could have drawn that I didn't have to do this wiggly line. I could have done a bunch of
really short little dashes. I could have made little
lines all the way across. How you decide to very quickly depict something like this is very much just part of your, your innate style, like just your inherent
way of doing things. It's totally fine to
just make it your own remember too,
that he, again, you can have them cropped out, you can have them
going off the edge of the little box that you drew. Now I'll just do this
interesting foliage, and this one is easy to
draw and tricky to color, more to come when it's
time to color this one. But also here, I'm
not looking to get everything that you
see in this photograph. I'm looking at all the different leaves that I see here and I'm just putting an
arrangement of them together. This is another one of
those things where you can go right outside the
box if you want to. I think it's actually fun to color outside the
lines like that. If you want to have it busting out of the box you've
drawn, then feel free. Of course you don't have to
put these in boxes either. You can just have them
floating on the page. I just like the look of this, that's why I do it that way. But really, there's
not a lot that we have to do in this one in
terms of the drawing. It's mostly going to be about
the color here, probably. That's enough. That's it. This is very quick. This is
definitely just 10 minutes worth of quick little thumbnails and we got four of them in. Once again, I left some space to write something
to make notes. If you have a glue stick with
you when you're traveling, you could glue in your
admission tickets to the garden or put a stamp there or a sticker or any little collage thing or just any notes
you want to make. This is a space to do it. That's really all we need
to do for this page. I think as long as I'm here, I'm going to kind of say a little bit more about
what happened in the day. I could also be
doing this with pen. I could bring a
color in to do this, like do it in a colored pencil or a marker or
something like that. For simplicity's sake, I'm just doing everything in
pencil right now. But you could also
do more involved, very fancy lettering right
here if you've got the time. This is of course how
to get this done in like 10 minutes worth of drawing. And
you've filled a page. So I'm going to keep
this really simple, but feel free, feel free to add your own ideas
here for sure. Okay, let's move on and see
how we can add some color.
9. Botanical Garden Watercolor: Okay. So the way I'm starting
this is I'm just dropping in a light greenish,
yellow color, really. Just a mixture of my yellow and spring green
everywhere I see it. If you're painting
along with me, then I'm putting
this in the trees, I'm putting it on the lily pads. Then I'll also just use the same color over
here for these flowers. Now, this might not be the exact green that I was seeing
in real life, but again, I think it's a good
idea to get in the habit if you're going to
color these later anyway, then do it from memory. But also do it with the idea that you want to unified
color scheme, right? It's even if the colors might have been slightly
different in these scenes, it's nice to have some unity across all
of your thumbnails. Now, this foliage, it's a
little bit of an exception. It's tricky to paint
without a picture. I'll bring the picture
back in just a minute, but I'm going to put down a
base layer of some yellow. Then for some of them, I'm going to put a base
layer of some pink. This is just like
quin acrononeink. The reason for this
is that there's like a speckled pattern
on these leaves. I want to be able to come in
on top and do the pattern. This layer is really just about what's going to go underneath the
rest of the pattern. I'm just dropping that down really quick does not
have to be very fancy. Once again, keeping with
this idea of just using the same colors and having some repetition
across different, your different little boxes or your different
little thumbnails. I'm going to use that same
pink here for these flowers, even if it was a
slightly different pink in real life, it's fine. I'm just going to keep
going with it, honestly. I like the way it looks, just these two colors together, like lime green and the pink. It would be fun to see how
far I could take that, just in terms of like
putting that everywhere. But anyway, let's keep moving. I mixed up a little Quinacrnone, magenta here for the lily pond. I want these flowers to
all be the same color. In real life, there were a
bunch of different colors. But for simplicity, and especially when you're
working so small like this, I think it makes sense to have them all be the same color. All I have to do is just
drop that in real quick. I'll give that some time to dry before I come back
and do much more. Now, I'm just mixing
up a sky color with some teal and cobalt blue or palo blue,
whatever you have. I'm just dropping in a
little bit of a sky color then working in some greens, mixing this into a light green. Show the hillside
off in the distance. Obviously, there's not
going to be any detail in terms of trees or
whatever on that hillside. It's just going to be like this green shape off in the distance. I just drop that
in really quick. Then while I'm thinking
about this thumbnail, I'm going to take some naples yellow and just do the path a good generic color
that suggests sand or gravel or just
sunlight hitting a path. I'll drop that color
into the tree trunks as well to suggest that sunlight
is hitting the tree trunks. And I can come in later and add a darker side to those
trunks too, if I want to. I want to mix up a slightly different green for the grass, a little bit more
spring green and a bit of blue, ultramarine. And some of that light yellow. That's all I really need
right there. That's fine. It's more than enough. I'll come in later and add some
darker colors to that, but that looks pretty good. Now, I'm going to clear. When you're using such a
tiny palette as this one, you have to clean it off a lot. But I'm going to clean
off that palette now. I'm going to get into
some ultramarine and some palo green and palo turquoise because I want to put in some water into
the pond first. I thought about just
leaving it because I think it's pretty obvious
that it's a lily pond anyway. But I think I'll go
ahead and drop it in. This is meant to
be really simple. I'm not going to try to suggest any reflections in the water or variations in
the color of it. I think this is the thing where you just drop in some
color and you know that people are going to look at
it and understand that we are seeing water lilies
floating in a pond. Obviously, I think
that's p***ty there. All right, we've got that. Now I've brought
back the picture. You can see this is something I'm going to do in
colored pencil. The leaves that are green have these orange speckles on them. The veins seem orange. Then these light green. I've got a lighter, brighter green colored pencil and I'm drawing in
some big circles and some big stripes to remind myself that I want
to keep those parts yellow. That's where I want to let
the yellow show through. I'm just going in and coloring around those
little circles that I drew. This is obviously very
scribbly and very fast. As you can see, I'm just like
moving right along here. It reads, it has that modeled
look of these leaves. I'll just keep too, I like doing this stuff. If you've got like a pattern, I like doing this stuff in colored pencil or marker
because you can just get a little more precise but also be fast for these quick
little things. It's nice. Now I'm looking at
some of the darker leaves. These are tricky. I'm really just experimenting, honestly. This isn't something that
I practiced ahead of time. You're getting to see me
work it out in real time. The way I do when I'm out and
about with my sketch book. I'm letting the
pink show through, but I'm trying some
dark blue on top. Just because that color, it's like, it's almost black. But it's like, is
it a blue black, is it a maroon black?
What is it exactly? With this one, again, just continuing to
experiment here, I'm dropping in some more
red marks and coming in with a little bit
of a different blue. This one actually has a
slight bit of green in it. You really don't
notice the difference. But I just wanted to experiment and try a few different things. These are for the darker
leaves that are in shadow, but some of them are quite
bright in this picture. Let me try yet another thing. This is a fluorescent
pink colored pencil. Then I'm going to come in
with a maroon color on top, just going around the areas
I've already drawn like that. It's always, if you can find an excuse to use
a fluorescent color, it's always fun to do in a sketchbook because it makes
everything pop so much. This is cool because it's a
good opportunity to use that. I want there to be
lots of these bright, fluorescent pink speckles then I'm still using the maroon or burgundy or like in a lizard. And crimson,
something like that. Some of we colored pencil, I like the way those three look. I mean they're different
but they're cool. Now, I'm taking a dark
green colored pencil and I'm just coming in and
darkening up a few areas. This is, it's also a lime
green or an olive green, but just a little darker
than the paint I put down. This is not really necessary, but you can go around
and draw in some of the veins on the leaves or actually color in some of
the leaves if you want. Just just to give things a little bit more texture and a little bit more character. That's all just a factor of how much time you've got and also what art supplies
you brought with you. Sometimes I just
don't always have the right colors with me to make something like this work. But I think I can do a
little bit with this. I'm just going over my
pencil marks a bit. Adding in some of
the slightly darker, an olive color in
just a few places. Thought I would try the
fluorescent out a bit. It doesn't actually
do that much. It doesn't show up very much. I'm not going to keep
going with that. It's not very good for layering
on top of other things. For the tree trunks here, I want to add a darker
brown, obviously, then a darker green for the more shadowy
areas of the tree. Just a mixture of a lighter green where the
lights hitting it and then a darker green where it's more in shadow or just the darker
part of the tree. In this case, I
actually have two trees and one's in front of the other. It's hard to tell in
such a small drawing, but I drew them the
way I saw them. I'll go ahead and
keep that then. I think the only other
thing I'm going to do here, this is more of a turquoise. And I'm just drawing in some more spiky foliage
here and there. And then maybe I'll
get that maroon back and see about
making some of these more of a reddish violet color just to suggest some
of that foliage. But that's really
pretty much it. I think we've got our day at the botanical
garden all done.
10. Food & Drink pencil sketch: A couple of reasons why I like to draw food
when I'm traveling. One is that everybody's
sitting down around a table. So usually you've got just a minute to do a
quick little sketch. Another reason is that
food always reminds us of the culture and the things that are
special about a place. I think it can be really cool
to just like do a page of all the food you ate on
a single day on a trip. Now, it can be a
little intimidating. I know sometimes to work out the shapes of coffee cups
and stuff like that. For this first one, I'm going to demonstrate the more
technical way of doing this. I teach a class just on
drawing food and drink. You can get a lot more
of this information, but this is the technical
way of doing it, where you do a line
down the center. You can keep things straight, and then you do some
lines across and just outline your circle
before you draw it. You can be a little
bit more careful. Normally, I would be doing
this very, very light, but I'm using a
darker pencil mark so you can actually
see it on camera. Because usually I would do that so light that you can
hardly even see it. And then I would
draw over it once I had a better sense of
where everything goes. But I left this one dark enough that it's hard to
just erase it back. I'm going to just put the
spoon in here as well. But now I'll go ahead and
make the final lines, draw it in a more final way. You can certainly do this where you make yourself a little grid and really think about the perspective and
try to get it right. You'll notice that even
taking this little bit of extra time to
think about this, for one thing, the drawing
is still a little wonky. I'm just trying to capture the basic idea of
a cup and saucer. This is not meant to be a real academic or
technical drawing, but also it still only
takes a couple of minutes. Even if you slow down and
really try to think about it, It's okay to do that
if you want to. I'm going to do the little
pattern on the coffee. Just draw that in with pencil. Okay, let's move on. The next thing I'm
going to draw, I actually don't have a
reference photo for you, so there's not going to be a
little picture that pops up. But if you're in New Zealand, you're bound to eat a
lot of savory pies. They have them everywhere,
it's a great snack. I ate them for breakfast, I ate them for lunch,
I ate them for dinner, I ate them in between. I'm just going to very
loosely sketch in one of these little pies that usually
have a savory filling, either meat or vegetable. It's just a very common thing, I'll suggest it setting
on a little plate, but that's really
all I'm going to do. You're getting a sense of
how quick these things are and really simple to
draw now for this one, just to have some variety, rather than just draw a plate with a thing sitting
on it like I have been. I'm going to put a little
bit of scenery in. I'll draw some trees
off in the distance, maybe exaggerate the
sense of those trees, a little bit of the grassy area. Then I'm going to get
in this picnic table and try to convey the sense of having it look like I'm
sitting at the table. Which of course, I was having the lines of the table going
off into the distance. I'm just thinking a little
bit about perspective here and trying to get that
exactly right then. To do this. To do
this glass of beer, you're going to see that I'm
just going to do this in a very like freehand way, right? Sure. It's a little bit wobbly, but I think it very much conveys the sense of having
a beer in the outdoors, which is all we're
trying to do here. Always be sure you draw the
liquid inside the glass. I think that helps get the
message across. Let's see. Also, if you're
visiting New Zealand, you're definitely going to
eat a lot of cheese because they make all kinds of
wonderful cheese there. I'll just get a
close up this time. That's the other
thing is you don't even have to draw
the whole thing. Right? I'm not going to draw
an entire cheese platter. I'm not going to
get everything in. There's a piece of
bread here that's just coming out from the corner. And I'm just going to show
a little bit of that. I'm not going to do
the whole thing. I think that's
always part of this is having pulled back views and having real close up views
and getting that sort of mixture of the two
in can be really great. That's all I'm doing here Also, I just really want to emphasize like you can do this
while you're eating. Like this is happening
so quick that it's not like everyone has to
sit there and not touch their food for 30 minutes
while you're doing this. This is something that you can definitely do as you're sitting around a
table with everybody. Now, burger and fries. These things, I just
want to emphasize that it can be tricky figuring out the angle like we're looking at this burger from an angle. Yes, it's round, but
we're not seeing it exactly round because we're looking at
it from the side. I'm really trying to draw
what I see and not what's in my mind what a
burger looks like. Just suggest the texture
on top of the bun there. Then for the fries,
I'm really going to draw a big pile of sticks. I think we can get the
idea across pretty well with just this and
a little bit of color. It's already quite clear that
this is a burger and fries. Right. I'll just get these in. That looks pretty good. I'm
not even going to bother with plate or table or any of that. I
think that's p***ty. Then for the last one, let's say in the evening, you
go out with some friends, you have some cocktails. I'm not going to draw them
exactly as you see them here. I'm going to line them up in a row and do
them one at a time. Try to imagine like your friends are actually drinking
their cocktail. They're not going
to sit there while their ice is melting
for you to draw it. But they're going to be picking them up and setting
them down on the table. Picking them up and
setting them down again. You've got some time to observe them and get these shapes in. You can see that
a lot of times I start with the top of the
glass and I draw that little oval at the
top to suggest the opening of the glass
and just work my way down. These shapes can feel tricky and frustrating when you are doing
them for the first time. And really practicing and
drawing a whole bunch of them till it gets really
comfortable is the way to do it. But also, don't worry if
they get a little weird. I can already tell that this
one is a little lop sided. It's actually very lopsided, but that's okay, it fits with
the rest of the drawing. And the whole idea is that
you're doing this super fast, and don't worry
about it, it's fine. I very deliberately wanted to do these quickly and just let the mistakes stay on
the page because I think that's the
spirit of all of this. Okay, one more
little tumbler here. I always try to just
draw in the ice cubes, just as little
squares, little cubes. And of course, if
there's any garnish you want to get that into, it helps make it look
like a cocktail. I'm even going to add a straw to this one, even
though there isn't one. Just to make it different
from the other one, I'll just suggest
the curve of a table here as if they're all
lined up on a table. Really? That's all we're going
to do in terms of drawing, you have a bunch of little
drawings that show what your culinary adventures
were for the day. As always, I left some room
to write, this is the thing, especially for food, I
think it can be really fun to make a note of like
the name of the restaurant. Because I guarantee you that six months or
a year from now, you're going to be
sitting around with some friends and they're
going to ask you for a recommendation about where to go when they
go to New Zealand. Take some time, make
whatever notes you need to make here about what
you ate, where you ate it. Sometimes you even want to jot down like kind of a recipe, like you want to remember, this happens all the time
with cocktails, right? You have a drink and you really like it and
you're like, oh, I need to know what's in this drink so I can
order it again. And so that's the kind of stuff that you can make notes of here. I try to leave some space in between each box this time to write a little bit
about each food item. That's something
else to think about as you're planning these pages. I generally don't think too much about where these
boxes are going to go. I just start and fit them all together and figure
it'll work out somehow. But it can be a good idea when you're doing something like food to
leave a little space. Because probably you are
going to want to make these little notes and
have a little bit more of a memory of everything
that you saw here. I'm writing very original
captions like burger, but, but go ahead and
put in whatever kind of notes you want to
do here. Cocktails. Obviously, I didn't leave
myself a ton of room here, but I can just
editorialize a little bit. Cheese, of course be you're
going to go to New Zealand, You're pretty much required
to enjoy some of their beer. Okay, let's do some color now.
11. Food & Drink Watercolor: All right, now we're going
to add some color to these. Once again, I'm
not going to bring the images back for this because my assumption is that
you're working from life, doing the drawings and
adding color later, and really relying on
your memory for that. Honestly, this is so simple
that in some ways it doesn't really matter if you know the exact
colors of things. Like in this case, I'm going to pretend
that we're traveling with three markers and
some water colors. I'm taking this blue and
I'm just seeing like, where could I drop
this blue marker in just to have a little variety instead of just water color? We'll play around
with markers a bit. Just going to go look
at all the pictures at once and see if any
of these drawings, if there's a place for the blue, like this coffee cup was
actually a little bit greener. But I did it in blue. I'll
just drop that in for the sky. It's not the exact
right sky color, but it looks like sky. Then I have the golden,
orange, yellow color. Definitely, it
works for the beer. I could put it into a couple of these cocktail glasses or
even just the garnishes, the bit of citrus or whatever. Just dropping this in as
a little bit of spot art, wherever I think it works. I'll just go ahead and make
this drink that color. It doesn't matter exactly
what color the drink was, but I definitely buy that as a drink color.
That's pretty good. Even this pink, magenta color, I could do this cocktail. It's close enough
to the color of the cocktail that I
can drop that in. It's probably really about all
I could use that for that. Maybe I'll just
go ahead and make this champagne the same color. Because I'm liking the way these drinks look with
just like a minimal, a little bit of color on
them. I think they're cool. Okay. Now we'll go
to water color. We've done what we can do
with those three markers. That's always the
thing with traveling. Like if you're
traveling with markers, you only have the ones
you have with you. You might not have
every single color. But that's the great
thing about watercolor is that you can mix anything
you possibly might need. We'll do the green of the
hills off in the distance. It's a little bit lights, maybe I should have brought
in a little bit darker color, but this is fine then a yellowish greenish color for the grass that's more
in the foreground. In every case, I
would be looking for other opportunities to use that color because
I have it mixed up. In this case, there just isn't anywhere else where I
really need to use it then A yellowish color
for just the sandy area, just the ground that
the picnic tables are sitting on, I think that's fine. I'm going to bring a little
bit of orange in as long as I have that new gamboge
color on my palette. And I'll do an orangey
yellow drink right there. That's one place I
can use that color. This is all about looking
for opportunities, like what else can
I drop in there? And then cleaning off this
little palette in between. And just moving on
to the next thing, we've gotten a lot of
the brighter colors in, but now I'm going to dip back
into this Naples yellow, which is so useful
for so many things. It's great for like
pastries or bread. It's a good base color
for stuff like that. I actually use Naples yellow. If I'm doing food, I'm definitely
going to reach for it. Now I need more of a brown. Since I don't have a
brown on my palette, I'm just taking naples
yellow and mixing some orange into it and
a little bit of blue. And just seeing what
color brown I get, I can keep going back and forth with the
orange and the blue. In this case, I'm using the
cobalt blue just to see what brown I get out of that for some of these other
places where I need it. You can see that this is
really just a process of playing with these colors
and going back and forth. And sometimes it pushes
a little too far towards orange and other times it's a little too far towards, more of a bluish gray. But this looks about
right for the coffee. I don't want to
spend forever mixing up this color, just
dropping that in. Everyone's going to understand
that that's coffee. It's totally fine. I
think that covers it. I can make this pie a
little bit browner, maybe just to suggest that
it's just come out of the oven and there's some areas of it. They are a little
bit darker as you would have with any baked good. Now I want to get more
of a more earthy, yellowish orange color
that I can push a bit into that brown so that I can get just a little
bit more of a brown color. I'll do that with the burger and then there's this
other piece of bread. I can just work in some
color to the bread. Maybe drop in a little more
naples yellow in there. Again, this should all be
very quick and very simple. If you did have colors
on your palette, like rosen, or a burnt umber, or a transparent red earth, the yellow ochre, then you'd
be mixing them from those. I just happened to have a
palette of very bright colors. I thought it would
be interesting to just show you how
I would mix them. Also, it's about working with
what you've got with you. And this just happened to
be what was in my palette. I thought that would
make some sense. I mixed up a little
bit of a darker gray. I can get that spoon in there. Again, this is just all
about thinking about. All right, what can I
do with what I already have on my palette
before I wipe that off? Taking that naples
yellow again and just mixing a little bit of the brown into it to do
the french fries. This does not have to
be very complicated. That is p***ty that looks like what it's
supposed to look like. Now I'm dipping into
the ultramarine, which is my darkest blue, and really one of my darkest
colors on the palette. If I take some orange, it pushes towards
a really dramatic, dark, very dark brown. I can keep pushing this even further by bringing
in some more blue, even some dark
turquoise or green, so that I get a neutral color, maybe a little red in there, a little bit of dark green. I get a neutral color
that's very close to black. It's pretty dramatic. I'm just going to keep
experimenting with it until I think I have the right dark color
for this burger. Like I just need a
very dark brown again. If I'd had something like
burnt sienna on my palette, I would have just used that. But I don't happen to
have that this time. I'm just going to take this
very dark brown that I mixed up and do a little bit of
the burger and the bread. Then I'll come back
into the Naples yellow. Now I've got this good mix of very neutral browns Go in
there that I can dip into. And dip into that
mixture that I've already made, I get a brown. It's a little bit
of a lighter brown, but it's good for this wood. I'm going to come over here
and just do the picnic table. This is when I say
like I'm not bringing the pictures back for
us to have references. We all know roughly what
color a picnic table is. Truly, you can do this
using your own memory and just using
your own knowledge of what the world looks like, you will totally
get close enough. It's absolutely fine. I think this is all looking
pretty good actually. I'm going to mix a
little bit more blue. You can see that I just have this nice overall gray
color that's come from so many colors on this palette that I get just
another darker color. It's similar to
the picnic table. I just brought a little
bit more blue into it. I'll make this table that
the drinks are sitting on, a color just to look like something and look a little different
from the others. That looks pretty
good. There's not really a lot more
that I can do here, but I'm going to go ahead. I'm mostly wiping off
this palette by now. As you can imagine,
my water is dirty. The palettes dirty. As I just go to clean
that a little bit, I end up with this light
grayish color that I could use to put some little
cache shadows around things. Just to give it a little
bit of a sense of depth. You have a sense of these things are
sitting on something. The little cache shadow
gives that sense. That's definitely optional. You don't have to do
that. But I'm just looking for a little things I
can touch up at this point. I'll come back over that burger B just a bit and then I'm going to drop
in a little bit of red for a tomato and
a little bit of green that could be like lettuce
or pickles or something. I think I've got a tiny bit of room where I can drop that in. I really think this is just
about all I need to do. So hopefully you
see from this that this can be really
quick and easy and fun, and you end up with
a illustrated diary of what you ate all day.
12. Final thoughts: Okay. That's it. I hope
you've made lots of thumbnails and that
you're ready to go out and try this
on your next trip, whether it's a trip
to New Zealand or just to the park
down the street. I hope this has shown you
that thumbnails are more than just a way to work out your ideas for a
larger painting, although they're great for that. But they're also a way to tell a story through a series
of little snapshots. Even if you're at
the beach looking at basically the same
scenery all around you, doing several little
thumbnails makes for a really dynamic
and interesting page. A few takeaways that I
want you to think about. First of all, don't spend a lot of time deciding
what to draw. The good news about
this method is you're going to do a bunch
of little drawings. Just jump right in there, draw whatever's in front of you. Also, try to do a mixture of close ups and
pulled back scenes, like if you're looking at
a beautiful waterfalls, look down at the ferns
growing around your feet. And maybe give us a close
up of those ferns too. Then remember to leave
some space to write, Whether you want to
write little captions or do some fancy lettering
or just make notes. This adds to the memories you're making in
your sketchbook. Also, feel free to take
a glue stick along, work in some collage,
ticket stubs, map stickers, stamps,
travel brochures, even beer labels that
you pull off a bottle. Those are great ways to fill a sketchbook and add to those
little thumbnail drawings. Remember, you can always
paint your thumbnails later. Take a snapshot if you need
help remembering the colors. But honestly, I think from
memory, give it a try. Feel free to try this approach with different art supplies and
see what you like. I love doing thumbnails
with markers and colored pencil can be really
great too. Just mix it up. The important thing is to choose lightweight art
supplies that you'll be happy to carry with you no matter how long you'll
be out walking. That's always my test. Am I truly comfortable
carrying this all day? Because if I find
myself hesitating, it means my bag is too heavy. That shouldn't even
be a question. Okay. Well, I think that's it. Thanks so much for joining me. I teach a lot of other classes, so take a look at those. Feel free to post a review, questions, comments. I would
love to hear from you. You can also come
find me on Instagram. I send out a news letter
that's filled with advice for artists
and I have a website. I'm easy to find. I would
love to stay in touch. So I hope to hear from
you. Thanks so much.
 Amy Stewart, Writer & artist