Transcripts
1. Introduction: Mm. Hello, everyone. My name is Elin an
artist and art educator. I have been doing
watercolor painting for years and studying teaching
in the past three years. Now I'm a top teacher
on skill share and an art instructor at the local
schools and art centers. In this class, you will be
learning the whole process of how I transform
my mini paintings. Into holiday ornaments,
including how to sketch by using whatever
items you have at home, how to create coherence among five paintings by using
the same color palette, how to create
different effects by using a variety of
techniques and media, how to paint pine
trees, pine needles, snow mountains, snow, and the reflechions
on the ornaments. This class is for everyone of all skill levels who not only just starts
watercolor journey, but has worked with
watercolor for a while. I will guide you step
by step in real time, so you can follow along easily. Plus, each project will take
only 20 minutes or less. So you can create in your
busy schedule as well. I can not wait to
show you all of them. So let's grab our
surprise and join me for this fun and
exciting class.
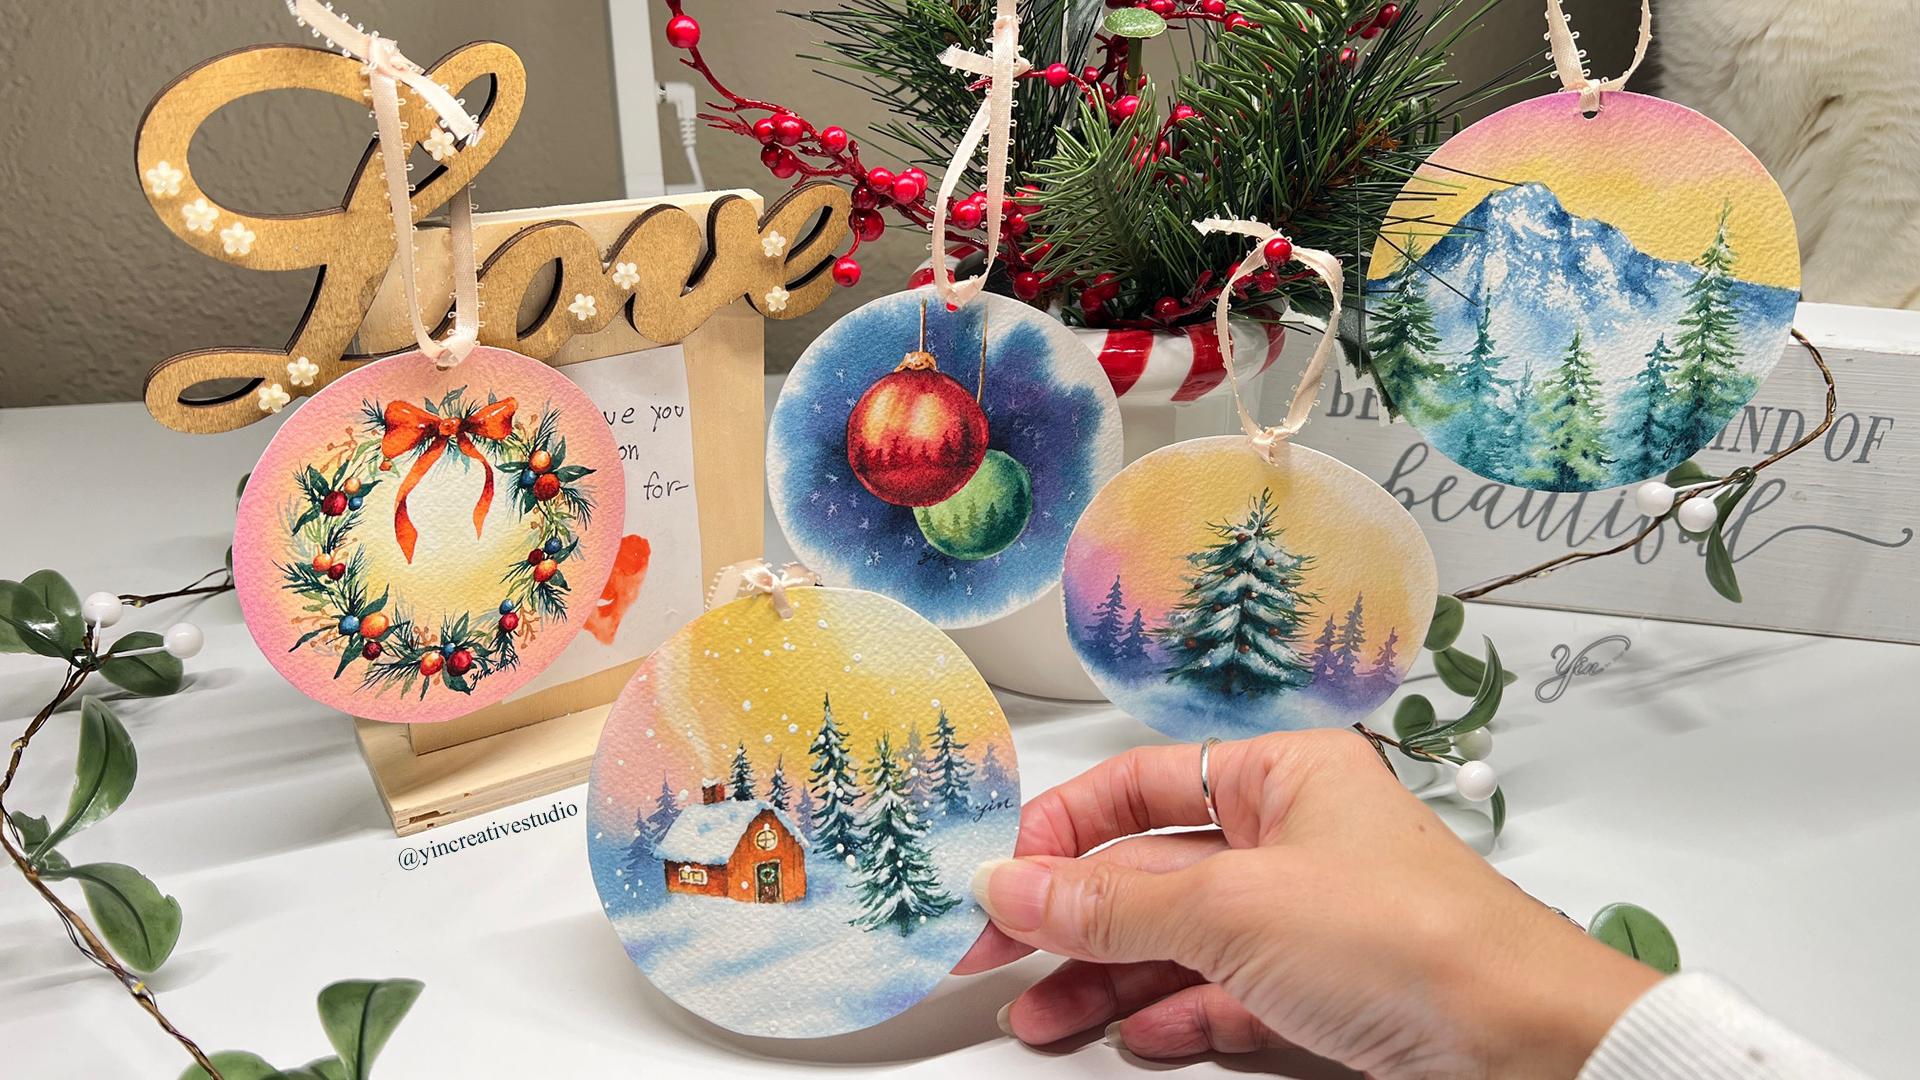
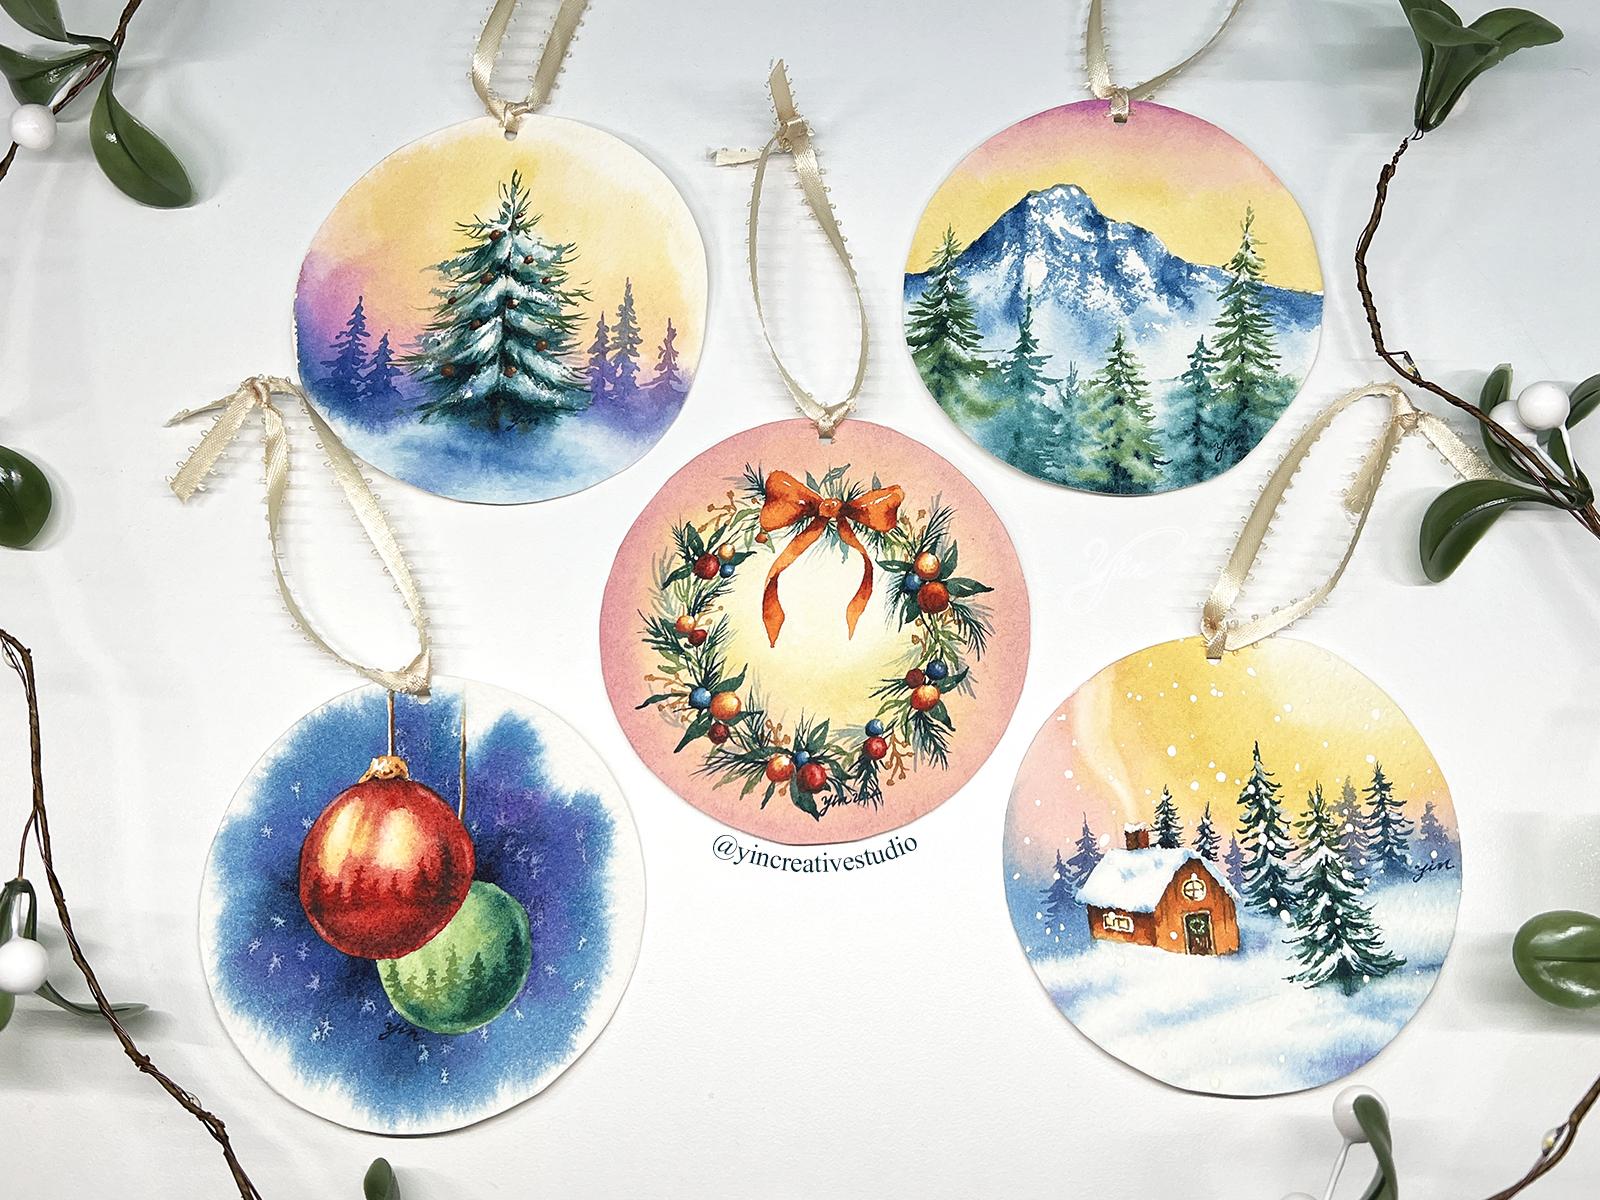
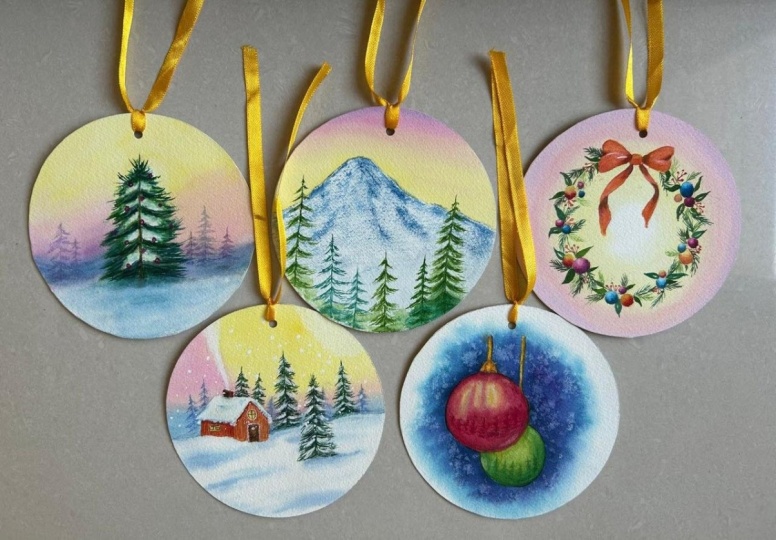
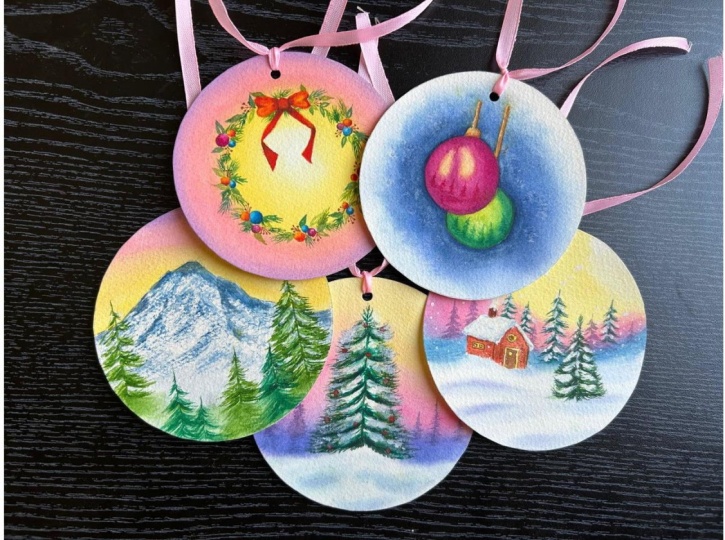
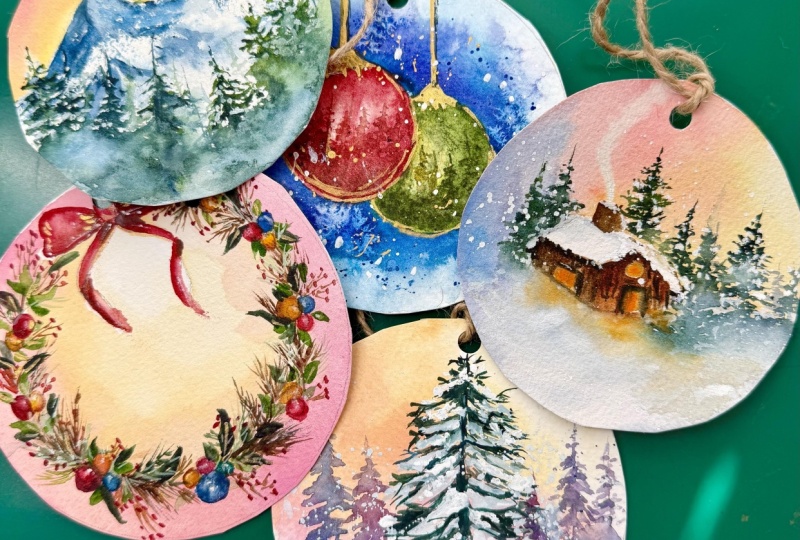
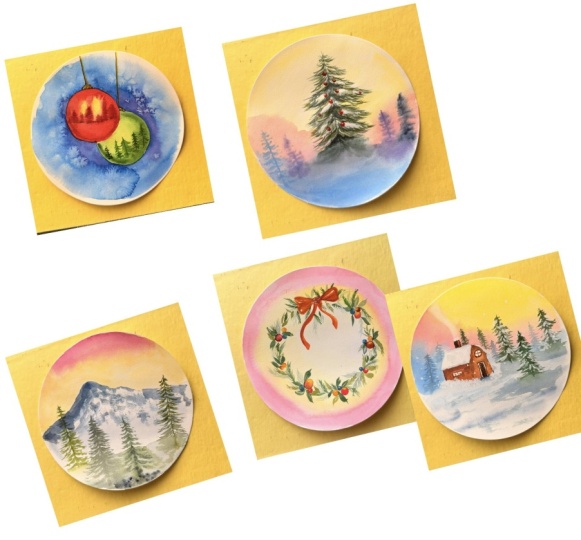
2. Class Project: Adding personal touch to
your holiday decorations. Welcome and welcome
back to my class. In this class, you will be
making unique ornaments with watercolor paintings
of Christmas tree, snow mountains, wreath, snow
Village, and ornaments. I will guide you step by step of how to create these
beautiful ornaments, including our
surprise, like we need for this project, how to sketch. How to apply flu masking to certain areas
of your paintings, how to use the same set of colors to create
coherent paintings, how to use different
watercolor techniques such as dry and dry, wet on dry, wet on wet, lifting of paint and spattering to achieve
a variety of effects. How to create snow effects
by using whitewash and salt. How to flatten your
paper after painting. How to transform your mini
paintings into ornaments. After this class,
you will be able to create these beautiful,
unique ornaments, but also apply
these techniques to other projects for
special occasions, such as birthdays
and anniversaries. I'm so excited to show you
all if you are already, let's dive right in.
3. Art Supplies: Or surprise like we need
for this class, first, I use two edge pencil and the
regular eraser to sketch. For the paper, I use arch, copress, 140 pumps, 100% cotton. The size is ten by 14. So I can fit in five of my
mini paintings in there. So it's up to you you can
choose bigger paper or smaller. It all depends on what you want. Next, let's talk
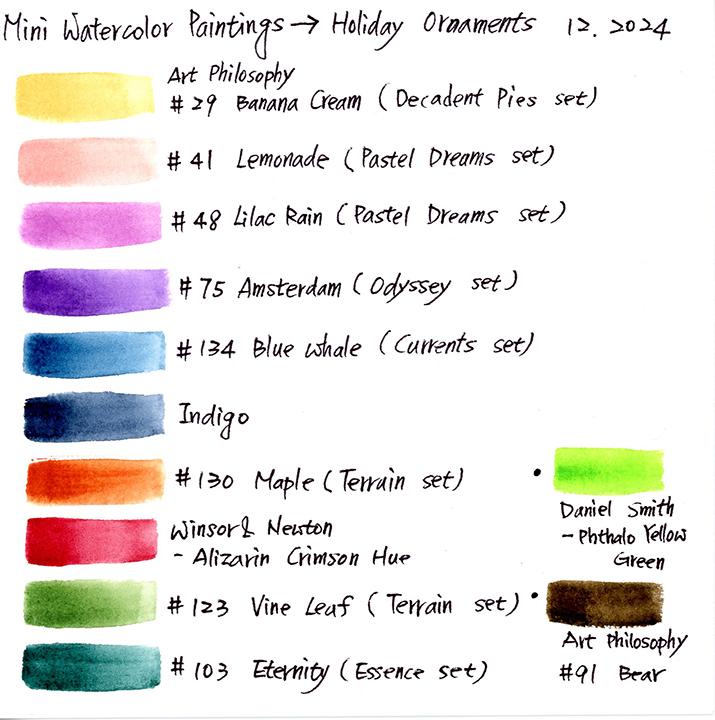
about the paints. So I have our philosophy brain. So as you know you might know, I use this brand a lot. But if you don't have it,
don't worry about it. I have made this color chart. I save in resource section.
You can download it. So you can find any colors that similar to whatever
you have at home, then you can paint along. Also, we have a whitewash. Later on, we're going to
use it for snow effect. Also, these two colors I
choose from different brands. So you can find all the paints
information on this chart. Next, I will have
the ceramic pale. Sometimes one or two depends on how many colors I
will use later on. And next is brushes. Before I to brushes, I'm going to put the rack here, so my brushes will
stay and not moving. So for the brushes,
first of all, I will use the quil size four. Usually, I use this one to wet the paper to do the
wet and wet effect. So you will see me
use it sometime. And the next one
is quil size one. I really like it because
it really pointed and it can absorb
water pretty well. Next, I have a whole
bunch of wrong washes. I can I have a size from two, four, six and eight. And also, I have a
different brand, which this one is
from Princeton, and the previous one is
either from a silver brush or the Skimoni art brushes. And the last two round brushes, size six and eight. And finally, I have
two flat brushes. One is zero, one is two. So mainly I use them
to leave off pins. You will see me how
to use them later on. Now let's move to mexicin flu. I use Wisn and Newton brand and also use residue eraser to erase mexican fluid later on. For me, I like to use different separate small
palette just for mexican fluid, so I will not mess
up with my paint. And for mexican fluid part, I also need to use liquid soap. So you will see me how
to use liquid soap when we go to the
mexican section. Also for the water jar, I also have one big
and one small one, small one just for my skin flu so you can wash your
brush right away. And then the bigger one
just for regular pints. Then we will have salt, which is No usually I use it. But this time, I use salt
to create the snow effect. So I will show you how I use it. And finally, when we
finish the painting, we're going to
make the ornament. So for making ornament,
we will ribbon. You can pick any color you like. We will knee a pair of scissors. Finally, we will need
to use the paper punch. So the size I use is one eighth. So that's small enough to
fit in my mini paintings. So that's all our surprise
that we need for this class.
4. Sketch: Let's sketch. In this lesson, we will use arch
watercolor paper, copress 140 pound, 100% cotton. The size is ten by 14 ". Then we need a two edge
pencil and eraser to sketch. Then we need a
compass or a mark. If you don't have
a compass at home, you can just grab the
mark on the cup or any item that can help
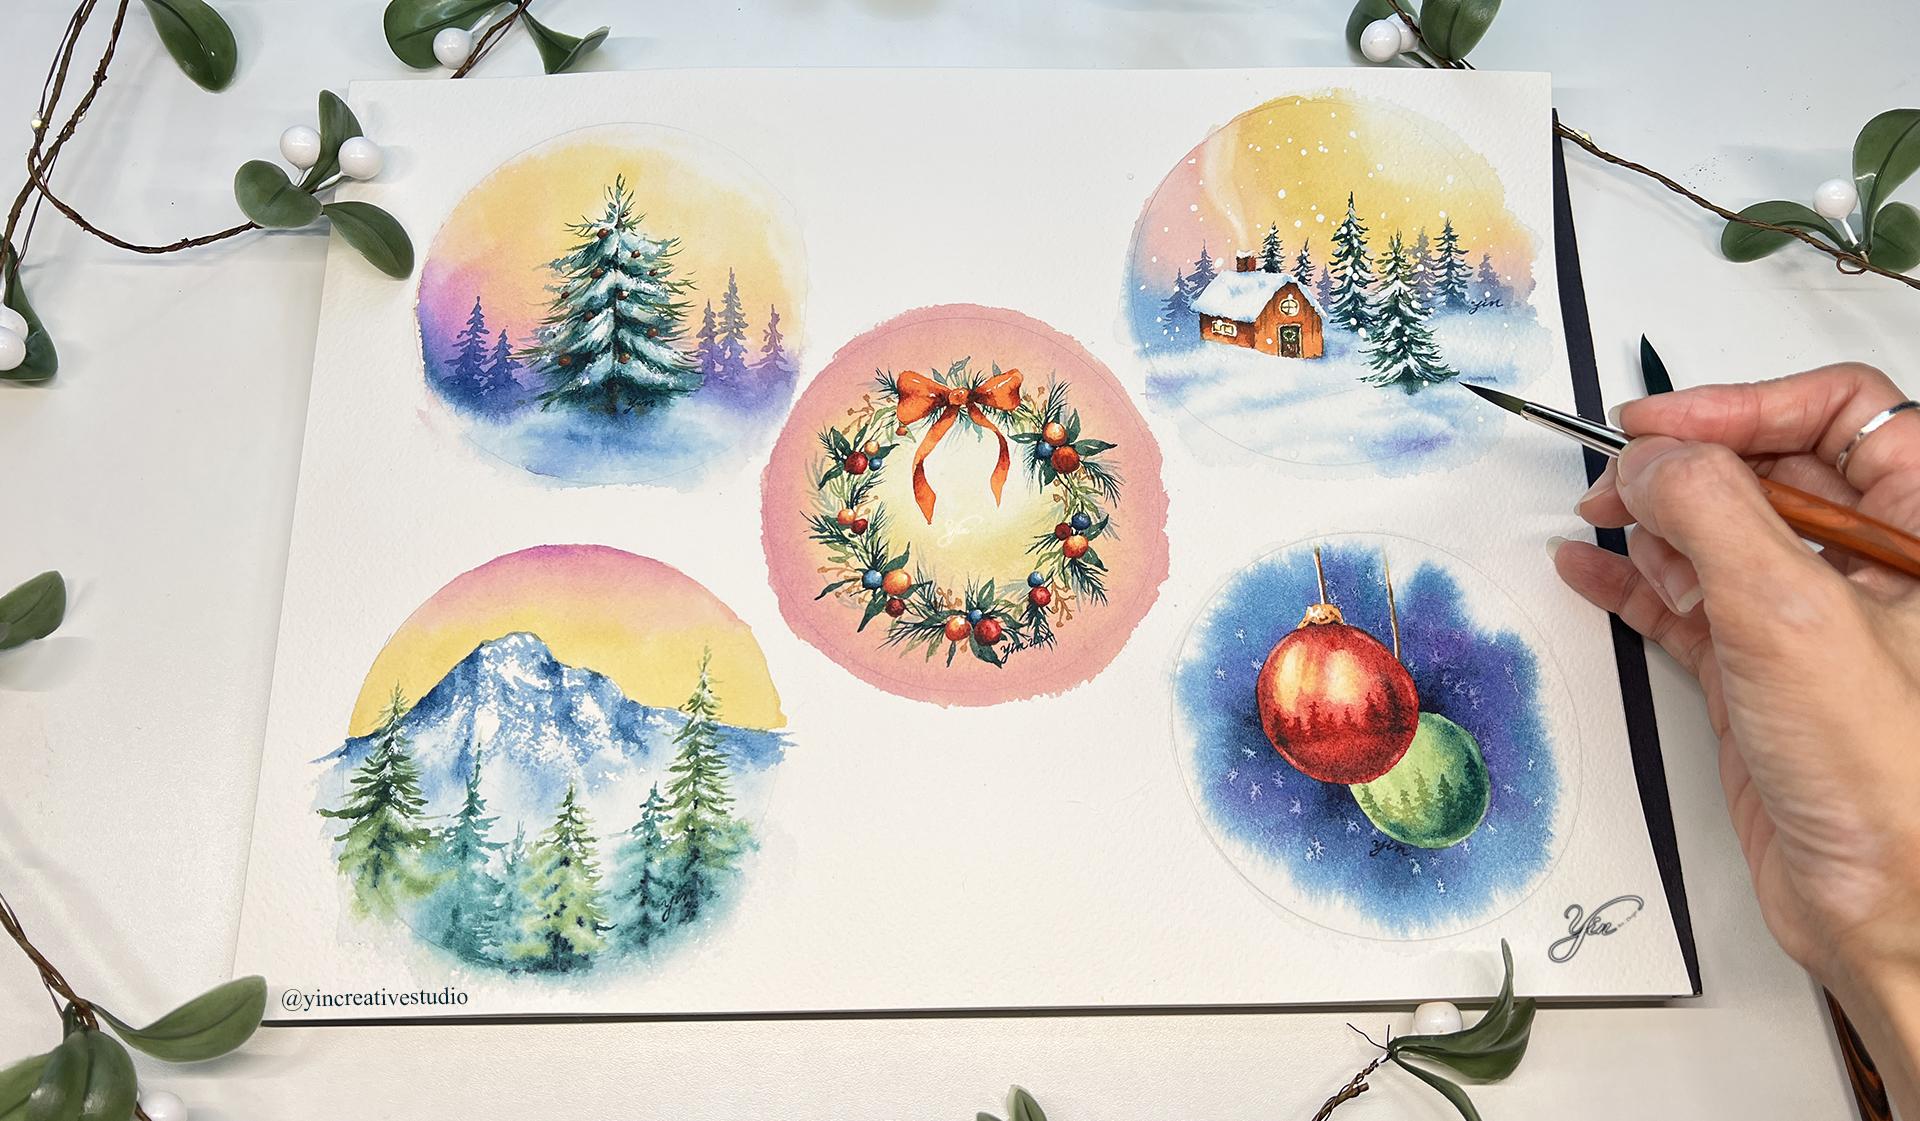
you create circles. Then based on the
size of circles, you can decide where to put
your five mini paintings. After drawing five circles, let's sketch the first painting, which is Christmas trees. I will put the main Christmas
tree in the middle. Then we add the ground, which is snow going to be. As for the Bgrond tree, I'm not going to sketch. I will just use color
to create a Bground. So I will show you when we
get to the painting part. When you sketch Christmas tree, just make sure each leaf not
going to the same direction, some of them going down, some of them going up, so you can make this
tree more interesting. Now we just finish the first
sketch of Christmas tree. Let's move to the next
one, which is wreath. I'm going to put bow in
the middle on the top. And from there, you can decide where your wreath
is going to be. Make sure you have
enough space between wreath and the edge of paper. So when you cut out the paper, you are not going to
cut out your painting. Then we're going to decorate the wreath with different
groups of ornaments. Try to make each group looks different with different
numbers of ornaments, or maybe the sizes
are different. So just make them
or look different. As for the details of leaves, pine needles, you
can pray by ear. So when you start painting, you can base on your colours. You can arrange
them differently. And since it's mini painting, so you don't have to worry about too much about the details. So just be free, design your own wreath. Now we just finish
the second sketch. Let's move to the next one, which is snow Mountains. First, let's decide where you
want to put your mountain. Just make sure you have
enough space between the top of mountain
and the edge of paper. The same reason you had
to make sure you have enough space for you to
punch a hole later on. When you sketch pine trees, try to avoid sketch each
tree at the same height. Some are taller,
some are shorter. So this way, your trees
will look more natural. One more thing to avoid is not to let the top of your
tree touch the edge, which is outline
of your mountains. So your trees either go
above the mountain or under. So this way, your layout
will be more smooth. I think now we just
finish the third sketch. Let's move to the next one. The fourth painting is
Christmas ornament. So we need two sizes of
circles. So same thing. If you don't have a complex, use whatever items
you can find at home. So we need one
bigger, one smaller. So let's put the bigger one in the front a
little bit higher, higher than the center. Then we put a small one behind, which is a little bit
lower than the first one, a little bit to right. So this way, the layout
looks more interesting. And you can add the string a little bit details on the top. I think, this sketch is done. Let's move to the next one, which is our last painting. The last sketch is
about Snow Village. First, let's design where
you want to put your house. I would like to put
my house on the left, not in the center, a little
bit lower than center. Then I'm going to put two
main pine trees on the right. The one in the front
as foreground. The second one a little
bit behind the house. This way, you can create
illusion of space. Then you add some
pine trees behind a tree behind the house, a little bit further down, you can create different
horizontal line here on the right. That's another way you can
create depth of your painting. No. Oh, wait. I forgot to add the
chime of the house. So let's finish
the chime sketch. Yeah, right? I think
now the sketch is done. They all look good. Let's
move to the next lesson.
5. Masking Fluid: Et's apply maskin flu to certain
areas of your paintings. Here we need liquid
soap, maskin flu. Try to get rid of
tra glue right away. Here we use wrong
brush size too. So the steps are dip your
brush into water first, then dip your brush
slowly into liquid soap, finally, dip into maskin flu. For the wreath, we only cover ornaments and
the ribbon areas. Remember to wash your brush
right after you finish, so your brush will be
ready for the next use. Now let's switch to
round brush size one for the small,
more delicate area. Next, let's cover
Christmas ornaments, both front and back,
including the strings. Finally, let's cover the
house of Snow Village. Again, wash your brush
right after you are done. Now I think we just finish
applying mexican flu. So let's get to the next lesson.
6. Painting Christmas Trees Part 1: Let's paint mini
Christmas trees. First, let's cover the
areas of other paintings. I don't want any pains to add to other paintings
by accident. Next, let's apply
water to paper, except for the ground and the center of the
main Christmas tree. Make sure you apply
enough water so we can create soft background by
using wet on wet technique. For the background,
I'm going to use banana ping and lemonade first. I use quo size four
brush with water only to bring both
colours better together. I added more banana
cream and lemonade. Then I add lilac ran to the
bottom of the bacon. H. I go back to banana cream to
make the transition softer. I apply water to make
the edges softer. I also apply more water to the
snow area than the button. Now let's paint the
ground with blue wheel. H Use lacran in Amsterdam for the transition. The edge is too rough, so I use water to
make it softer. Now apply more water to the edge and carry some blue
down to the snow area. Add a blue wheel to create snow ground by using
wet and wet technique. Let's apply more brood
to the darker areas, including where the tree dropped touch the
ground and shadows. Since the paper is still damp, let's use flat brush two to leave pins in order to
reshape the Christmas tree. Now let's paint the main tree. Use queer size one brush
with internity color to center the tree truck
and create the leaves. When you create pine tree, remember to hold your
brushes straight up and move your brush
in different directions, including going up,
down and sideway. This way, you can create more
nature look of pine tree. Next, let's use raw brush size two with ne leaf color to create lighter
areas of pine tree. Let's use bare coder to create
tree truck and branches. So edges of pine
tree are too rough, so I use frat brush size
zero to soften the edges. Remember, we only need a
little bit water on the brush. Also, clean your brush when there is too much
paint on the brush. Now let's paint snow
on the pine tree. The key to creating
snow is making soft and smooth transitions
between snow and pine trees. That's why I apply water first, and then blue will color. Having a queer size four
brush with water to wet paper whenever your paper
is not damp enough. Use internty color again
to create darker areas. Also add blue wheel to the darkest areas
near the tree truck. Use quel site for brush with water to soften the
edges and carry some blue wheel to
the darker areas of snow under the
shadows of pine tree. Now let's use round
brush size two with vinee leaf color to
add more pie needles. Use internity color to create another layer
of pine needles. Adding different
layers of pine needles can make the pine tree
look more realistic. Now the main Christmas
tree is done. Let's move to the next lesson.
7. Painting Christmas Trees Part 2: Now, let's create the pine
trees in the background. I mix colours of Bur
wil and Amsterdam. I'm going to just
paint silhouette of pine trees to create
illusion of space here. Down the bottom, I use
quell sets for brush with water to bring the color
into the background. I paint a second pine tree a little bit taller
than the first one. Now let's add more
Amsterdam color to another pine tree on
the right hand side. Remember to avoid painting
trees with the same heights. Same here. I use
quercie for brush with water to bring the color
into the background. Add more water to dilute
color for the father trees. For the fries tree, I mix banana cream, lilac rain, blue wheel,
and Amsterdam colors. Now we just finished painting the trees
in the background. Now let's emphasize
the darkest areas of pine trees by
using two colors. First one is indigo with bear. The second color is
internity with blue wheel. Always wet the area like you
are going to paint first. Remember to add more layers of e pine needles can create the
depth of the tree as well. Here I use wrong
brushes size four to create the details
of pine needles. Finally, let's use
color one to really emphasize the darkest areas
of this Christmas tree. I use quill site for
brushing with water, just a little bit water to
smooth any rough edges. Now this main Christmas
tree is done, let's paint snow gram. Well the paper and
apply blue wheel to it. If the pain is
breathing too much, you can carry pain
to the snow area. For the shadows, I add more aster than
other two blue wel. Whenever your paper
is not damp enough, just reapply water to it. Now let's apply the
second layer of blue wheel with Amsterdam
to the shadows. Add the blue wheel again
to the darkest areas. Now let's leave of
pain to create snow. Remember to get rid of extra
pigments on the brush often. Also, you can
soften the edges of snow by lifting
off pain as well. Next, let's add some ornaments
on this Christmas tree. I use maple colour
to create ornaments. You can praise your
ornaments anywhere you want. Just feel free to add
more if you prefer. Next, I use a lasery
crimson color with a little bit of indigo for the
darker areas of ornaments, which are the bottom
of ornaments. Finally, I use lemon
yellow and white quash to create a highlight
of each ornament. I apply lemon yellow squash
to the ornaments first. Use the flat brush size
two to soften the edges. Finally, add a whitewash
for the final touch. Less ns part is to create
a froufhness of snow. Here I use white gosh
to achieve that effect. Remember, that there's not
too much water on your brush. Squeeze extra water
into a paper towel. Brush white gosh on
the top of snow areas. Repeat the same steps until you are happy
with the result. Now we just complete this
Christmas tree painting. Let's go to the next project.
8. Painting Snow Mountains: Let's paint snow mountains. First, let's wear
the sky area only. Then we use colored banana
cream for the first layer. Next, we use lemonade
to make gradiation. You can always use banana cream to make the
transition more smooth. Finally, let's use color lilac on the very top of the sky. Go back to the lemonade to
smooth the transition as well. Now the sky is down
before it's dry, let's leave off some pain to create the snow on
top of the tree. Now let's pin snow mountain
by using dry dry technique. If you are not sure
how much water you should apply
to this technique, you can always practice
on another paper first. When you feel comfortable, just come back and you
can finish this area. For this technique, you let a tip of brush touch
the paper first. Once you touch the paper, push the brush down more. In the meantime, move your
brush in a zi zag way. Then you can create the darker side by
adding more layers. Now the top of snow
mountain is done. Let's create the rest of the
mountain with foggy effect. First, let's apply water to the middle part of
the snow mountain. Add darker blue
to certain areas. Then apply water to the rest area all the
way to the button. Add brew wheel to
the very button. Finally, let's add indigo to emphasize the darkest
areas of snow mountain. Use brew wheel to brand the
indigo batter on dry paper. Now we have just complete
painting snow mountains. Let's create an
evergreen forest. First, let's apply water
to the bottom area. Next, let's use round
brush size four with the color of nee leaf
to create pine tree. B then use quel brush size one with internity color for the darker areas
of this pine tree. Continue using the same brush and colour to create
a tree next to it. After that, let's use a wrong brush size
two with the colors of internity and indigo for the darkest areas of pine tree. Use internity color to
bring the darker color better to reduce the
strong contrast. Now the first two
trees are done. However, I want to add more
details to the pine trees, including extending the top of the first pine tree and creating snow on the trees by
lifting off pain. Sometimes you might need
to lift off paints a few times before achieving
the effects like you want. So just be patient and
enjoy the process. Now let's create the
darkest areas of these pine trees by using the colors of
internity with indigo. Let's continue creating the rest of the pine trees. Same steps. First, use a round
brush size four with the color of wine leaf
to create the pine tree. Next, use internity color
for the darker areas. Finally, use internity with indigo colors for
the darkest parts. You can always come back
to add more details by using wrong brushy size
two with vinee leaf color. Use quill brush size one to
define the pine tree more. Now creates no effects
by lifting off paint. Now let's repeat
the same steps and create last group of pine trees. Step one, use wrong
brush size four with vinee leaf color to create
the top part of pine tree. Here I switch to wrong
brushes size two with nee leaf color to create a
fine lines of pine needles. Remember to avoid the
same heights of trees, I stand the top of pine tree
on the right hand side. Step two use quel
brush size one with internty color to create the
darker parts of pine tree. Step three, use
the same brush and the color to create a less
pine tree in the background. Remember to create
each pine tree a little bit different
from each other by creating the pine needles in different directions and how
dense the pine needles are. After painting all the trees, let's do the final
touch by using the colors of internity
with indigo for the darkest areas and the lifting of pain
for snow effects. Finally, let's use whitewash to
emphasize snow on the trees. Please feel free to add
more snow if you prefer. Now we have just completed the painting
of snow mountains. Let's move to the next lesson.
9. Painting Wreath Part 1: Let's pain wreath. First, apply water. Make sure that you cover
the whole area well. To pop out the red ribbon, I leave the central area later. That's why I leave
the central area unpainted and apply banana
cream color around it. Next, apply lemonade
colour around it. You can use either
quill brush size four with water or
the previous color, which is banana cream to bring
colours better together. Finally, add the lilac
ren color to the edge. Use the previous color lemonade to make color transition better. Now let's wait for
the background completely dry before
painting the wreath. Let's start with
white leaf color to build the wreath
frame with leaves. You can use mine as reference or you can
create your own pattern. You can arrange all elements
anyway that you like. Here, I just show you different elements that you
can apply to your wreath. You can find a reference in projects and resource section. I usually testing our colours on another paper before painting
on the final project. Here, I mix maple colour with a little bit of bare
for the berries. Add them around wreath. Feel free to add
more if you prefer. Now I'm going to
use two colors to create bigger and darker leaves. The first color is internity with leaf for the lighter one. The second color
is internity with a little bit indigo
for the darker areas. Use the first color to create the shapes
of leaves and then use the second color to the areas that are next
to the bow ornaments. Now let's repeat the same
steps to create more leaves. Try to create different
shapes, different layers, with a variety of sizes to
avoid the repetitive pattern. Next, let's dilute the
Blue wheel color to create pie needles in the back to
add the depth of your wreath. Now use internity color to add pine needles in the front to create the thickness of this. When you paint pine needles, make sure that you have the
right amount of water for your paint to create a
sharp and clean lines. Don't push your brush too hard. Only use the tip
of your brush to create thin lines
for pine needles. No. So Finally, let's use integral color
for the darkest areas of wreath next to or close
to the bow ornaments. You can also use indigo color to create more pine needles
to fill in the open areas. I add some leaves here to make the wreath
look more complete. You can always check if there are any areas that
you want to fix. Now the wreath looks good. Let's remove the maskin
fluid and move to the next lesson for painting
Christmas boll ornaments.
10. Painting Wreath Part 2: Let's create Christmas
bow ornaments. We are going to
create three groups of bow ornaments based
on different colors. The first group is
using banana cream, maple, and lazary crimson. First, use banana cream
color for the base. Leave the highlight unpainted, but use a little bit water
to carry color to it. Make it very smooth. Add maple as the second layer. Finally, apply a lasery crimson to create the darkest area. Let's repeat the same steps to paint a second bow ornament. Use flat brush size two to
bring colours smoother. Let's repeat the same step for other bow ornaments
in this group. You can make any
circle look better by applying a lasery crimson color. It's time you can fix
any imperfect shape. Now this bow looks
rounder, which is better. You can choose whichever bow ornaments for
this color group, or you can use mi as reference. Now the first color
group is done, let's paint the second
group of bow ornaments. First, apply a lasery
crimson to create the base. Leave the highlight unpainted, but use fred brush size too with a little bit of water
to carry color to it. Add indigo to create a shadow. Create a highlight
by lifting off pain. In the meantime, you can
reshape the circle if needed. Let's repeat the same steps
to paint other red ornaments. B For a realistic look, creating core shadow and
highlight is the key. Now the second group is done, let's paint the rest of the ball ornaments with blue
wheel with indigo color. First, use Blue wheel
color for the base, but leave the
highlight unpainted. Add another layer of blue
wheel for the darker area. We can also add a
little bit of indigo to emphasize the darkest area
which is core shadow. Same thing here, let's
repeat the same steps to complete the rest
of the bow ornaments. First, use blue wheel
color for the base, add indigo for the core shadow, lifting of pin for highlight. As you can see here, I used lilac ring color
for bow ornament. However, after painting it, I did not see the harmony
among these colors. That's why now I cover it
with blue wheel color. Now it's time to
paint the ribbon. Use maple colour for the base by applying
wet on dry technique. I leave the numb unpainted so I can kill shop
lines around it. Apply a lasery crimson color to the darker areas while the base still damp enough for
the wet and wet effect. Let's go back to using wet on dry technique for
the rest of ribbon. Same thing here, add
a lasery crimson for the darker area when
the paint is still damp. Then use a lasery crimson with indigo color for
the darkest areas. A Now we just create a three dimensional look. Finally, paint the nut with maple colour for
the base and add a little bit of a lasery
crimson for the folding areas. Now we have just completed the painting of
Christmas wreath. Let's move to the next lesson.
11. Painting Snow Village Part 1: Let's paint snow village. First, apply water to the sky
and the forest area only. Next, use banana cream as
the first color for the sky. The line source is from
the top right corner. Then use lemonade color as
the second color for the sky. Always use the previous
color banana cream to make the color
transition smoother. Sometimes you use
quel brush size four with some water to
soften the edges. Now use blue quel color
for the bottom of forest. Again, use previous color, which is lemonade to make
a color transition better. When the paint is still wet, let's use quel brush
size four with water to carry blue wheel color
to the snow ground. This way we can create
the froffness of snow. Another thing that we can do when the paint is still wet is left it off to create a smoke
effect from the chimney. Now let's create pine trees in the background by using blue
wheel with Amsterdam color. When you create pine
tree silhouette, try to hold your brush
straight up and then move your brush side by side and up and down all at the
same time very quickly. Let your brush move freely. For the bottom of trees, use a dilute blue wheel color to create smooth solid
transition to the growth. Use the same steps to create
other trees in the distance. Now let's use internity
color to create trees that are closer to us. Try to paint each pine
tree in different forms, so they look more organic. Also, remember the height of each pine tree should
be a little bit different, so they are not on
the same level. Add indigo color to
the darker areas, including the central and
the bottom areas of trees. Let's continue creating
trees for the middle ground. Creating different
layers of trees can bring depth
to your painting. Same here, use a little
bit Blue wheel cutter to make a smooth transition between the tree and the ground. Use indigo coder to create the
darker areas of pine tree. Now let's paint snow ground. First, apply water. Next, use a Blue wheel cutter
to define the darker areas. Use quel brush size four
to soften the edges. Use blue wheel with Amsterdin color to
emphasize the darker areas. The best way to create
a fluffiness of snow is to use wet
and wet technique. Use blue wheel
again to emphasize the shadows of the house and
the main tree in the front. Now use quel brush set
four with a little bit of blue wheel color to create a shadow of the main
pine tree in the front. Now the snow ground is done, let's paint the main pine trees. Use wrong brushes size six with internity color to create
the form of pine tree. When you paint pine needles, remember to create them
in different directions. Also, leave some areas
unpainted as snow. Use indigo color for
the darker areas, such as the tree truck and
the bottom of the tree. Use whitewash to create snow. After that, use
indigo color again to emphasize the shadows under
pine needles or snow. So Use oil brush size four with water to
soften the transition. Let's paint the last pine tree. Use wrong brushes size six with vinee leaf color to
create the form. This time, I made these pine needles go up to
be different from others. Then add internity color
for the darker parts. Same here. I leave some areas unpainted to indicate
some snow areas. Use leaf color for the tips of pine needles for
the lighter areas. Then use internity
with indigo color for the darker areas to create
three dimensional look. Soften the transition by using quel brush
size with water. Use white gouache to
create snow on the tree. Add more integral
color to emphasize the darkest areas
after creating snow. Use internity color to create pine needles texture
around snow. Use nee leaf color to add more details on the top
of this main pine tree. Now I add more white squash with less water to make
snow really pop up. I also create some snow on the trees in
the middle ground. You don't have to add too much, just a little bit here there. Now we have just completed the first part
of snow village painting. Let's paint the house
in the next lesson.
12. Painting Snow Village Part 2: Let's paint the house. First, let's remove maskin fluid by using a residue eraser. Next, apply water
to the roof only. Use round brush size A with blue wheel color to create
the volume of snow. Adding the second layer
of bro wheel to create the shadow of the chimney and make the bottom
of roof darker. Use quel brushes size four with water to soften any harsh edges. Now we just finish the
roof covered by snow. Now let's paint the windows
with banana cream colour. Don't fill in the whole windows. Instead, use quel
brush size four to carry banana cream to
the unpainted areas. This way, it looks like the line shining
through from inside. For this house, I use
wet and dry technique, so I can control how much
water to apply bitter. Most of the colors in the
background are cool colors. So I use maple color, which is warm color to keep
a balance of this painting. Always use quill brush size with water to soften any rough edges. Use bare color to create shadows
of the roof and windows. Use the previous color, which is maple to make
color transition smoother. Or another sign of wall, I apply dilute maple
color as the base. M. Then add more maple color to define the wall. Use quel brush size
for with water, not too much water to make the
color transition smoother. Same here, add bare color for the darker areas
like under the roof. Add more bare color
to the darkest areas, especially the shadows
of the roof on the wall. Paint the door with bare colour. Oh add a wreath on the door by using
lemon yellow green, and the vinee leaf color
for the darker areas. The lemon yellow
colour can really pop up from a small tiny wreath. Use bare colour to
create door frame, window frames, and the
wooden texture on the walls. For the window frames, I add banana cream color to
create the lighter areas. It's a small area, but those details can really make Europe painting
look more realistic. Use banana cream color
to paint the door frame. So tone it down. Use the maple with bare colour to paint the darker
side of the chimney. Use maple color for
the lighter side. Use bare cloter for
the darkest areas, which is under snow. Finally, use whitewash to create a fluffiness of snow on
the top of the chimy. Finally, let's
create snowflakes by splattering whitewash
to the whole painting. The tip for this
technique is to have the right amount of water
with whitewash to splatter. Also, splattering whitewash in different
angles directions. The closer and the
harder you splatter, the more and the bigger
white dust will be. You can also create some
white dust by hand if needed. So just give it a
try and have fun. Now we have just finished the
painting of Snow Village, which means we have finished all of the
five mini paintings. Let's move to the next lesson, how to transform your
paintings to ornaments.
13. Painting Ornaments Part 1: Let's plan ornaments.
For the background, we need the colors of Blue
wheel, Amsterdam, and indigo. First, apply water
to your paper. We have applied flu masking to ornaments area already
in Lesson five. If you haven't done so, you can pause here and
go back to Lesson five. Use round brush size eight with blue wheel color to create a
first layer of background. I don't want to cover
the whole circle. Instead, I want to show the organic look of
wet and wet effects. Next, I add Amsterdam color to the top right corner
as the second layer of Bground then use
round brush size four with indigo to add the darkest areas
behind ornaments. Use Amsterdam cor to make
the color transition better. Finally, add indigo to the
areas behind ornaments. Now let's spray some salt
to create snow effects. It's a small painting, so don't use too much salt. Each so will turn out bigger
than its original size. In order to get a better result, you have to spray so when
the papers still wet enough. After the background is dry, let's remove my skin fluid
by using a residue eraser. Get rid of extra glue on paper by using a
clean dry brush. For the first ornament, we need three colors. The first one is banana
cream with maple. The second color
is lazary crimson. The third color is lazary
crimson with indigo. First, apply water to
the front ornament only. Next, use banana cream with maple color to create the base. Leave the highlight
area unpainted. Then apply a lasery
crimson color to the button in the
top of the ornament. Carry some lazarin crimson
color into the middle area, but not fully cover the
highlight in the base. Carefully reshape the circle. Sometimes I can reshape the circle better by
rotating my paper. So if you want, you can try. Add more lasery crescent to
the edge right under the cap, the edges and the two
third area of ornament. Use a lasery crimson with
indigal color to create a shadow of the cap and
core shadow of ornament. Use a lasery crimson to make the colour
transition smoother. Use dilute banana
cream with maple color to soften the strong
contrast if you see any. Let's create a
tree refreshing on the ornament by using a
lasery crimson color. Keep in mind that
the horizon line on a sphere is always curved. Use a lasery crimson with indigo color to create trees
in the core shadow area. Dilute the color a little
bit for the horizontal area. Soften the edge with oil brush size for with
a little bit water. Now let's paint the cap and the string by using banana
cream with maple colour. Leave the highlight
area unpainted. Next, use the color of maple with bare to create
darker areas. Use a flat brush size two
to soften the highlight. Use maple with bare colour to
add the details of the cap. Finally, let's add more indigo
to the shadow of the cap and the trees in
the core shadow area. Now the first ornament is done, let's paint another one
in the next lesson.
14. Painting Ornaments Part 2: For the second ornament, we use the coors ine leaf internity and
internity with indigo. First, apply water
to the inside of the second ornament
only and avoid reactivating the pins
of the first ornament. Use wrong brush size six with wine leaf cor to
create the base. Use internity color to
create core shadow. After removing my skin fluid, I found out that the
shape of a sphere is off. I will show you
later how I fix it. Leave of pain to
create the highlight. Add another layer of
internity color to make the core shadow
darker if needed. Use internity with indigo to
emphasize the darkest area. Use banana cream with maple
colour to paint the string. Leave the highlight unpainted. Add bear colour for
the darker area. Leave of paint to smooth
the highlight if needed. Oh add more bear to emphasize the darker area. You can repeat steps until you
are happy with the result. Now let's create the tree refreshing by using
he leaf color. Each tree should be curved
with different hides, so they look more organic. For the tree refreshing
in the highlight area, let's add banana fling
other to make it lighter. Add internity color to
create darker trees. Add internity with
integral color to the trees in the
core shadow area. Let's create refracted
light by lifting off paint. Try to get rid of paint each
time after lifting off. A Now, the second ornament is done. Let me show you how to fix the imperfect shape of a sphere. First, use a flat brush size
too with a little bit of water to soften the edge and carry internity color
to the white area. In the meantime, reactivate
paints in the background. Now apply water to this area. Just a little bit, not too much. Then apply blue wheel
with Amsterdam father. Use quel size four
quel brush size four to soften the edges. Let's reshape the ornament
by lifting of paint. You can repeat the same steps
until you like the result. Now we have completed the
painting of ornaments. Before transforming all your
paintings into ornaments, let's sign your name
on each of them. All of the paintings
have been done, so we can move to
the next lesson.
15. Transforming: In this lesson, we need
a pair of scissors, a paper punch with round one eighth inch hole and ribbons with the
size of three 16th inch. I choose this champagne gold
color for my ornaments. First, let's double confirm if the hole is suitable for
your paper ornament. Next, let's cut out
mini paintings. I like to cut out each
painting separately. This way, I can control
where my scissors go and will not cut out other
paintings by accident. Plus, it's easier for me
to cut around a circle. Now we just have the
first painting cut out. It's not as flat as I want to. Let's cut out the rest
of paintings first, and then I will show you
how to flatten them. Now we have cut out
these mini paintings. Here is how we can flatten them. First, find a heavy
book at home. Then press each
painting on one page. Finally, cover the painting with a clean sheet of print paper. This way, you can
protect your paintings from the potential ink
marks from the book. H. Now we have all five paintings
inserted in this book. To make sure they can
be flattened properly, I add another heavy
book on top of it. It would be better if you
can leave them overnight. If not, you should wait at least 2 hours for
them to be flattened. It's time to take
the paintings out. It looks pretty good. So let's take other
paintings out now. H Now it's time to transform your
paintings to ornaments. Make sure that you
have a scissors, paper punch, and
the ribbons ready. First, let's measure where we should punch a hole
in your painting. Based on this painting, the perfect place for a hole is right above the Christmas tree. You can visualize the
position of the hole on the paper by looking at
the dt on the paper punch. You can also turn around and check the hole position
from the button. Double check before
you punch it. Now the hole is done, let's grab the ribbon. Fold the ribbon in half, so it's easier to go
through the hole. You can decide how long
the ribbon should be. Once you decide, let's
tight a knob first. So the painting is not
moving around when you hanging on Christmas
tree or other places. Now we just transform the
first painting to an ornament. Let's repeat the
same steps and turn the rest of the paintings
into ornaments. Step one, punch a hole. Make sure the hole is not too
close to the edge of paper. Double check, triple
check, just in case. For the ribbon, I majoring all at the same time so it
can save you some time. Step two, fold the ribbon in half and go
through the whole. Step three, tie a knob. Make sure both ends
of ribbons are even. We have just completed
transforming all our paintings into beautiful and
personalized ornaments.
16. Final Thoughts: Congratulations on
completing this class. I hope all the lessons
will help you create beautiful and special
holiday ornaments for either yourself
or your loved ones. I'm looking forward to
seeing your creation and decorations by adopting the
techniques from this class. Please go to the
discussion session to start a conversation, share your paintings, or
ask me any questions. Also, you can go to
the review session to let me know what you have
learned from this class. If there's anything that
you want me to cover in the next class or any comments. I will be so happy
to hear from you. I also can be reached
at in creative art on Intagram and in creative
studio on YouTube Channel, where I share both
my painting process and the life experience
with you regularly. Again, thank you so
much for joining me. I hope to see you all
soon in my next class until then happy holidays
and happy painting.