Transcripts
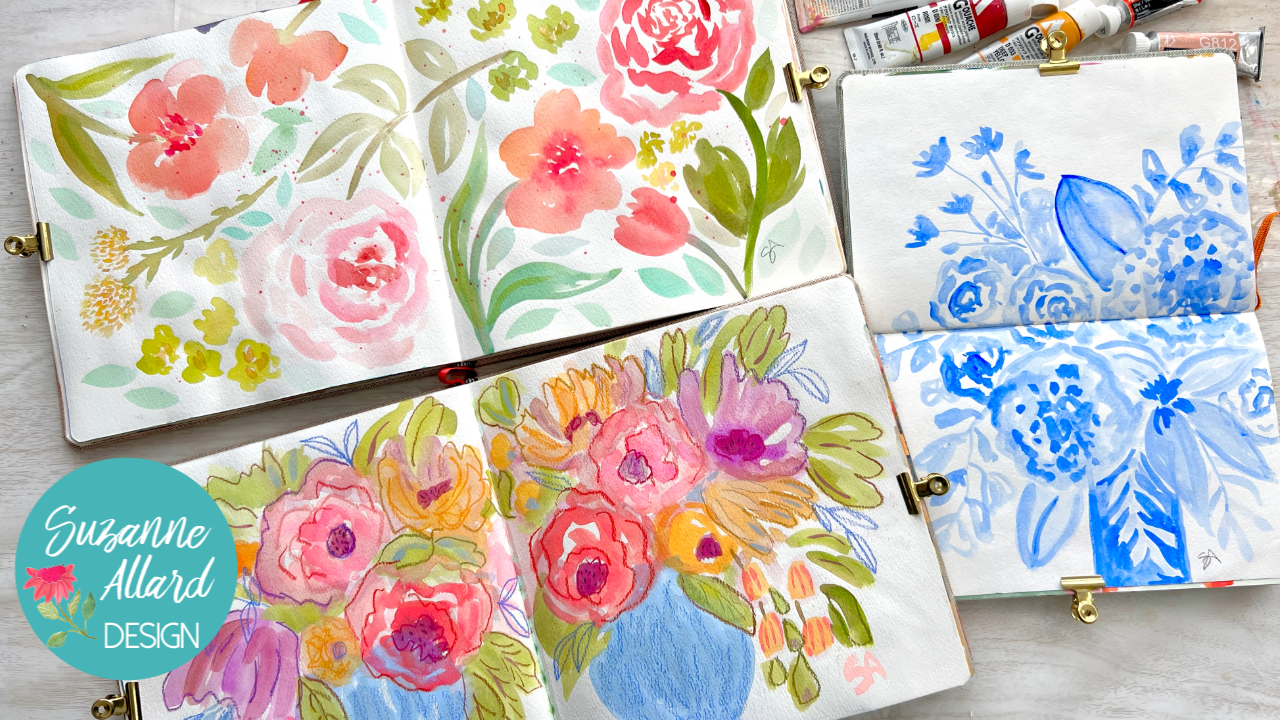
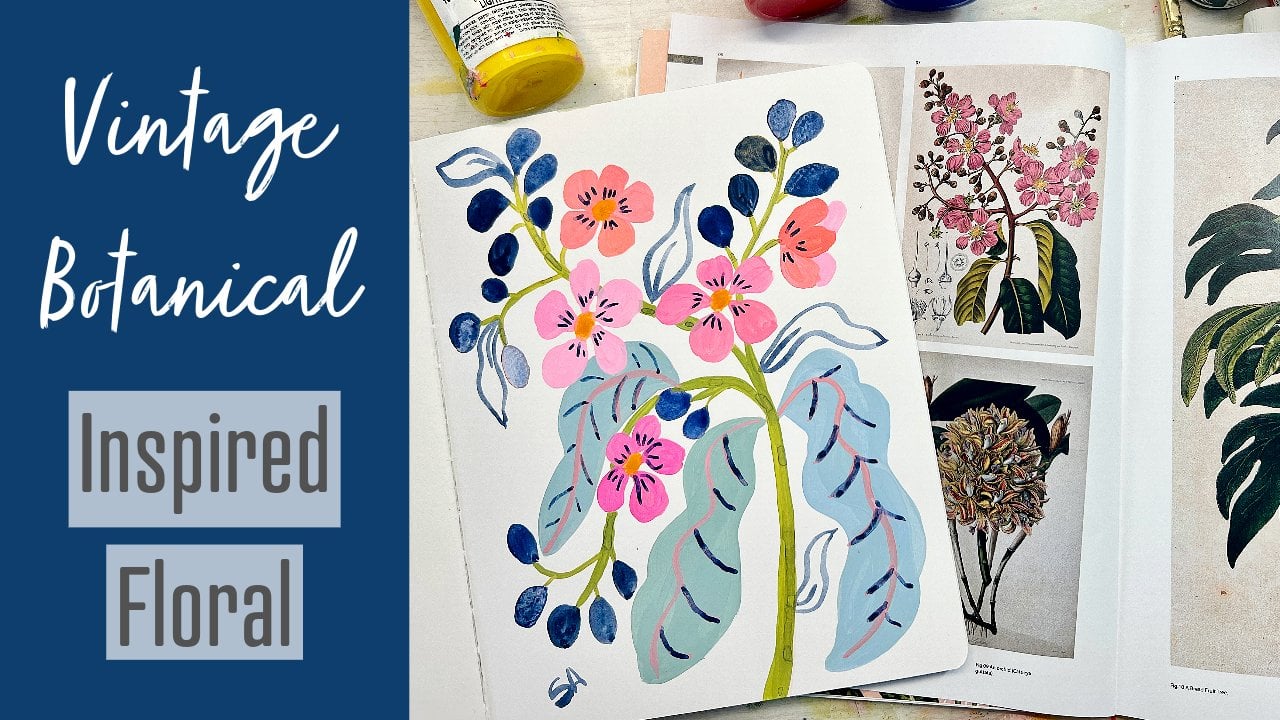
1. Three Delicious Floral Spreads Intro: I've got a fun class for you. I called it three
delicious floral spreads. I do tend to use the word delicious and yummy when talking about paintings because that's
just how they feel to me. What we're going to do is use the sketchbook in three ways. There's so many great ways
to use a sketch book, but we're going to do
three different types of floral spreads. Mix it up. We'll have one
that's just one color, and then one that I
call it tossed flowers. And then I'm calling
it blue vase, twins. Where we do a similar vase, but then we use
the paint colors. We got out to try two
slightly different types of book pays and we end
up with a nice pair. I guess they're not identical twins, they're
fraternal twins. Anyway, this is a lot of fun, this class in exploring florals and fresh florals
with an emphasis on some white space and lightness and calm but still colorful. I hope you'll join me. Hi, I'm Suzanne Allard
and I am myself, taught artist who didn't start painting till I was about 52. I did created things but I didn't really believe
I could be an artist. I'm really glad I got
tired of telling myself that story and just pushed
through and started painting. I learned in online
classes just like this. And now I license my
work on products. I sell originals and
prints in my shop. And I teach, I love
teaching as much as I love painting,
I teach online. And I think it's at this
point something like 40,000 students in 30
countries. I don't know. It's so humbling and wonderful and joyful for me to be able to share the belief I have
that we can all create. Every time someone says to
me, oh, I wish I could. I don't think I can,
I have to push back. Because I just think that that's just about some belief
systems that aren't accurate. Anyway, I hope you join me in this three delicious
floral spreads. This is probably number two in a series of floral
classes that I've got coming out just to celebrate the many beautiful ways we can create flowers.
See you in class.
2. Supplies 1: All right. Well, if you've
taken my closet before, you know that I
love to just show you all a variety of things, but that I always want
you to know that. I am not saying you need to buy all this. That
you need to get. Just I don't want it to be overwhelming because
you could do these florals with just one of the types of
paint I'm showing you, of course, And one of one
or two of the brushes. And just keep things really
simple and one sketchbook. But I would just like to show you all these things
so that you can say, oh, I like that, I want that. I like this, why there's a
lot of variety in the class, but I never want it to overwhelm anyone or have them think, oh my gosh, I have to get three Sketchbooks and
three types of pain. Okay, that's my big disclaimer. Don't let anything keep
you from creating. All right, let's start with some of the
references that I use. I have a few floral books that
are my absolute favorite. I will put links
to those and notes about all of this in the
class supplies and download. Make sure you look
at that as well. One of my favorite references is this flower color guide book. It's small, it's handy. And what's fantastic is that the flowers are all with
a white background. You can easily, and they're just photographed
beautifully, You can very easily see flowers. And just like look at that, that right there is
inspiring me because I like meandering
buds and flowers. It's organized by color, may not use it by color. If I say I'm in the mood
to paint something pink, then I can go into the pinks. But of course when
you're painting, you can make anything
any color you want. I more use it as a reference for if I really want to paint a naculus there and there's a bunch of different
colored Rnaculus in here. Look at those poppies. Okay, I can spend this whole video looking at
this book. You Get the Idea. Flower Color Guide.
Flower Recipe Book is another one that I
like for similar reasons. It's a book that shows how
to put together bouquets. Like a recipe, like in cooking, there's pretty bouquet
pictures that are inspiring and we can lift from. But also it has these spreads
like this where it'll toss the flowers out like
a table here, there. This just helps you really
closely see and say, I might pick the way that that is curved and
the way those buds, that sort of thing.
That's that one. All right, yeah,
I love my books. I also use my own photos as
reference in this class, which I will share with you, of course, for palette paper, really, I have not found a palette paper
that didn't work. You do not need to spend
a lot of money on it. I've gotten a cheaper brand at a store called
Michael's here in the US, and it worked just fine. This is a brand new
one. But what's nice about the Strathmore, if you care, and not that
it's really expensive, is that it's
attached to the pad. You can just use this piece of paper and then throw it away. I tend to just have a piece of paper next to me
when I'm working. You can use other things
for a palette though. You can use a glass
cutting table that I started out using paper plates as
long as they were waxed. That worked basically
any non porous surface. Because otherwise
if the paper plates that are not don't have
a wax covering on them, then it just paint
just soaks right in. The other thing, palette
wise, I want to show you, because I use it in a
couple of the paintings, is this quash, airtight palette, which people get
very interested in. And I did a Youtube video on how I fill it and how it works. But briefly it has
these vessels. I have kept these colors in here now for
probably two months. A couple of them I see here are starting to
dry a little bit. I just use a pet like this
or a slitle spray bottle. I get all of these
supplies by the way, if you do want any of them. I have links to them on my on my website and
my Amazon links. I also use these little
make up spritzers, do it that way, but the point
is that it's air tight. If I seal it and I don't do
anything with it for a week, it does really well. I will say that the paints stay better longer
if I use distilled water. This is actually
distilled water in here. Yeah, I've learned
that one the hard way. Otherwise, you go get your paints out and
there's mold in them. We don't need moldy
paints. All right. Let's talk brush again.
Use what you have. I'll say what I say in
every supply video, which is when it
comes to supplies, you don't need to get
the most expensive. But please don't
get the cheapest, the bottom of the barrel. Because whether it's
paper brushes or paint, you're going to be disappointed. I would rather you get
less of a decent quality. And I just mean
like student grade, you don't have to go out and get the most expensive arches. Watercolor paper,
real sable brushes, not just stay away from
the cheapest brush wise. Let's talk about that first. This is my Suzanne all designed, It's a set of ten brushes
that we release twice a year. If you want to get on the
waiting list for those, just go to my website under supplies and you'll
see it there, a link to it and you can get on the waiting list.
They're synthetic. I just picked all
the shapes and sizes that I use a lot in my classes. Don't feel like you
need to get those. The other two brands
that I really like are the **** Black brand and
the Princeton Velvet Touch. But I will say
there's also silvers, a great brand. They're
all synthetic. Don't use really much real
animal hair in my brushes. Just a solid, at least student
grade synthetic brushes. All you need sizes, I use a variety in the class. It's amazing how handy and
versatile a filbert brush is. That's the one with
the shape like this. This is a size seven, you
could use a 468 around. Obviously those are the
go to thicker is often better for florals as long as you have something
for the details when you want to do
the smaller stuff. And that's what this
little guy, number four, then flats are really nice
to have to sometimes, depending on what I use this
number four flat a lot. Those are brushes, pencils, sometimes I use
them for details. I don't think I used any of these metallic gold
pens in this class, but I often just sketch
with water down paint. But sometimes I'll sketch with a light colored colored pencil, either a prisma color or a water soluble pencil
that's not water soluble. But the nice thing about the
super coolor you can use, the cons to the brand is it's Swiss and whether it's the
pencil or the crayons, they make ones that dissolve
in water as your painting. That just marks dissolve
in the paint and go away. All right, let's talk sketch
books I used and have tested some that are a good
price and a good quality. I wanted watercolor paper for
this class because we were doing those kind of
style of florals. I did. I do have a mole skin
watercolor sketchbook. I don't like the shape of it. I like square and I like this
portrait shape for this, clove this little sketch book. This is the handbook. It's made by speed ball, but what I like about it
is the nice lemon cover. I also like that you
can choose to get it in either 90 pound or
140 pound paper, that just refers to the
thickness of the paper. I always talk about using at least 140 pound paper when you're doing your artwork that you're going to put
on the wall or sell. But in a sketch book it
can get really thick. I love the option that
this handbook gives you. Ordering it with 95 pound paper. I think it is just a little
bit lighter but plenty thick for a sketchbook.
I love that one. Comes with a little,
I'll come with a little string and then
this is really nice. Before unit you've
painted it, it's dry, but you can see this
sketchbook is half full and there are some flattening
that needs to take place. What I'll do is take this out
and then bind it like that, and then put heavy
books on it overnight. These little clips, by
the way, are great. I got those on Amazon. I think I have a link
to them and my list. This is one of the
florals we'll paint. I like this. The next two
are the Artisa brand. I have not loved or been
impressed with their paints, but these sketchbooks I think, are really good
quality for the money. This is a nice size, the paper is good quality. Nice linen cover. It looks, honestly, doesn't it, like
they imitate in handbook? Actually, I think they did. Now I see the little
pocket in the back. Yeah, very similar strap. Similar linen cover. Anyway, it nicely
bound, it lays flat. I do use the clips when, because I've got paint on these and it helps train
the spread to open it. But this is the eight and a quarter
by eight and a quarter, and I use this quite
a bit in class, mostly that then this is the larger one
that is new to me. I've been experimenting with
different things with it, but I use it class as
well and it's like eight something by
11 and something. Same brand arts. All right,
that's sketch books.
3. Supplies 2: All right, let's talk, Pat, I've got some paints out here. I try not to confuse you
because it can be confusing. I have acrylic,
which I did use was surprising success in
the toss florals module. It's all acrylic. It's amazing. It's in the arts sketchbook, I think if you use good
paper and a paint that flow, which the nova color
acrylics flow, we almost indistinguishable
from watercolor. When you work with them, you can see some small differences. But anyway, the nova color paint is a paint that you have to
buy via mail order. I have a bundle with them, a Suzanne Allard artist bundle. They're in California. They're a really nice
artist grade paint at a student grade price
if you live in the US, because the shipping
overseas makes it too expensive for US people. If you don't already
have acrylic, you might like that. You
might also like the. I encourage you to
use what you have now before you start
adding. Listen to me. I have so many types of paint. I don't even want you to see what's on the rest
of this table. Okay, acrylic here, I just want to help because this gets confusing for people who
aren't familiar with. It was confusing to me. The acre acrylic
paint and combined. This is regular. The original type of
really was used in France. Think of at least 200 now. It's more than that years ago. It used to be used to do those
beautiful wall papers and interior design patterns and it's just opaque and
scans really well. It's just beautiful. It's the first paint
that I started with. I don't know why most
people don't start with, but somehow I did and
fell in love with it. Then I discovered has all those properties
that nice finish, high intensity pigment,
but it has acrylic in it. When it dries, you can't
disturb the layers. And there's nothing
good or bad about that. It's just knowing depending on what you want to achieve with a particular surface and what your goal is
for that painting. But you'll see in the class, I use these three interchangeably. I will say that. Remember that this is
the only one of these three that can be
reconstituted with water. The regular guash, these two, once they dry, they are stuck. I've got a palette that
I got into the moment. And I'm mixing, throw some gash in there and some
macro wash and acrylic. And now I've got to
clean this palette. That can't just be rinsed out. That's why I like
the palette paper. Anyway, I use all
three of these. They are interchangeable. Don't worry about mixing them. You'll learn what does, what you experiment with them. Now, color wise,
for the most part, you can make your colors or
use the colors you've got. I will point out some
colors that are my go to colors that are harder to make. More challenging, I always
have a turqwise on hand then Opera Pink is what called in the gash world
and watercolor world, but it's basically
a fluorescent. I think it's richer than
a fluorescent acrylic, but it's a very bright pink
and I use it rarely straight, but it mixes and
makes everything pop in the pink and
red and yellow family. All right, let's
talk about brand. We talked about the acrylics. My two favorite acrylic
brands are a whole in that's these two Turner
I guess goes that way. Then my favorite gash brands are get some Turner because
I like that one too. Well, let me get you in. It's called Turner Design. I think it's the first
pain I started out with, I think it is. These are my favorite
brands of regular gas. Turner. Also the Ah, then Win, which also
makes an acrylic wash. Even though these don't
look like the packaging, then Linds or Newton
Designers is lovely, these are a little
more expensive. Turn is really a great paint
at a good price point. If you're starting and you've
never tried Guash or Aqua, don't feel like you have
to do anything more than these to have some success. All right. We did
the sketchbooks. And by the way, if you want
to paint these paintings on paper nine by 12 paper
or eight by ten paper, 11 by 14, feel free. I just love what sketch books do for you mentally
and creatively. I, when I open up a sketchbook, it feels like it's inviting. The pressure to produce
a painting is gone. I also like the whole
spread part of it. You'll see in this class, we'll do some paintings that are across both
sheets in the spread. Then we'll do another
painting where we turn to the book and
paint it this way. And then some where we just
do one side of the spread. But it's almost like
when I do one side, the other side is
beckoning to me to do something that complements
the one I already did. Some people just use one side and leave the other side
blank, which is fine too. I just have found that
sketch books for me really help my heart blossom. And that's because I think
the fear is lessened, the approachability
is increased. It's just so much
more, I don't know. They're like my friends sketch books call to me and say, hey, that's why I don't
even want to count how many because then I try the little ones and the big ones in this paper and that paper. But anyway, you paint
on whatever you want. I'm just glad you're here. So let's get started.
4. Tossed Flowers 1: Okay, let's do some really
loose tossed flowers and we'll just take them across the page, across the spread. Similar to this, I cut one out because I
used it in a collage, but we know the fresh with white
space coming through them and pops of color. Then for inspiration, this
is one of my favorite books. I'll put it in the supply list. The flower recipe book, just because the pictures really a book about the recipe
to put together a bouquet. But I like these pages where they lay everything
out flat and photograph it. Just right there is some
great shape inspiration and some flower inspiration. Maybe we'll start
with that page, then for each bouquet,
they do the similar thing. Pretty, just a variety of photographs that give you that clean
background to work with. Those are the beautiful Protea, there's some other pretty
ones to work with. Maybe we'll do that to the pony. Everybody loves ponies. Okay. So I'm going to use acrylic because I wanted to make
sure you knew the designs. These paintings can
be done with acrylic, not just quash or aqua. As long as you have that
nice watercolor paper, you didn't get that, that
absorbing that it'll do now. It won't absorb as
much or spread or bloom the way water
color watercolor paint. There's a couple
of tricks you can do just to add more water. Then the other thing
is that I have found in the last few months is something called flow aid, which already mixed up, it comes in a bottle. And then you mix it with the concentrate and you
get a lot out of it. But I'll show you
with and without it. Just so you can see, it just
adds to the viscosity of the paint and makes
it flow. Flow aid. Use a big brush, this
is our number eight. Or you could use even
something larger, ten, even larger if you have it. Because we're going to big
fat shape floral shapes. When I look at paint inspiration
like this in the book, I'm not necessarily
looking to copy it. Well, I'm definitely not
looking to copy it exactly, but I'm also not necessarily
looking at one flower. I might look at a couple
different ones and decide just look and then see
what my hand wants to do. On the paper, I'm mixing some Florence magenta with
some cadmium red light. And since I'm going
to really have this water down and the white, the lighter colors will just be with more water down paint, I can really put a lot
of water on my brush. I almost drip down there. I'm going to start
with maybe something that's more gathered in the
middle like a rose or pony. Most flowers are, there's
smaller bits in the middle. And then as it goes
out, they get larger, which means I'm just going
to push down a little more and add more water. Some flowers are lighter in the center and some flowers
are darker in the center. You can take it either way. They're also completely
different colors. Sometimes I'm just pushing down in intentionally, not going to make this a
perfectly round shape. As I went out, I pushed
harder and added more water. Let's see what we want
to use for her stem. You're going to grab
a bit of yellow. Let's use this blue green. I'll show you how you
can tone it down. So that it's bright. I love bright green, but I don't want it
quite that bright. So I'm just going to dab
of red sons it right down and I'm going to bring
that stem just kind of still pretty green. I'm going to bring
some really loose leaves, lots of water. So you can see the
acrylic is not moving as much as the water color, but it's still really
water color looking. Especially if I
were to say take, even put more water in my
brush and get really subtle. So, so I like doing that sometimes on the
flower too. Let me show you. Let's just make another
flower really light colored. Let's see, maybe this
one came this way. We're going to toss, maybe we'll make this one another
large one here. Going that way, I've barely
got any color in this brush. Super water down. I'm just going to make a
center in here now that bloomed a little bit and I
have not added any flow aid. We can make that one side of that of this floral, so pale. Want to make sure I'm
not getting too round, so I'll go out this way. Yeah, that's really pretty. Then we'll tone down the stem
and you take it this way. I've watered down
the stem color too, because it won't go
with the flower. If it's really bold here, we can do maybe a little
more structured leaf. This big brush makes
such a nice leaves. I'm just doing two
brush strokes and letting the white in between be like the
vein of the flower. This is something that
you can practice and just do pages of them. So relaxing, I can come back through here if tries is losing a
bit of intensity, just dab a little
color in that center. Maybe just a little more
color here so it shows up. Okay, let's try a
different kind of four. We talked about the peony. Maybe we could do some
small peonies because I like to mix up in these
tossed flower compositions. I like to mix up
little ones with big ones and we've already
got two pretty big ones. Maybe just switch to
the filbert brush. Just add a bit of yellow to our water down
mixture here and go a little bit different
color, an orangey play. Let's do thinking about which
way I want this time to go. Let's see here.
5. Tossed Flowers 2: Let me make a stem
Going out that way, that means a flower
with the center there. Sometimes it helps me to mark the center and just
making big peony leaves, which this filbert is great for. Try to put your brush down and one or two
strokes and leave it. It's so hard I know
to not go fussing back in there like I just did. You'll re reward it
and then rinse out. Your brush is really watery
and just do some bits on the outside here that are
to just add interest. That was a little too
much water there, but they'll add just
a little bit of something on the outside and then our stem can go this way, and a pretty, our color has changed just
a little bit each time by what we're mixing with. I'm grabbing some
of the pink into this green and I'm going
to make a nice long, it's a little more
yellow than I wanted. Okay, bring this color
back up in here. I like when the stem
bleeds with the flower, that's pretty pony. All right. I still have my filbert, so I'm going to
rinse the green out and do another panting maybe that's just on its side here, have a little more yellow. I just want a little color
variation and could do one that's coming off the side here. I'm just touching.
I'm really just, when you're painting really
lightly like this, I almost, I'm thinking of
touching the paint down rather than a stroke. It's just a different feel. I'm thinking that could
be on its side and we have a stem going like that. We'll see more of the green. Get that to bleed in
nicely with that, I think it'd be nice to
do another pan maybe. Right? Let's see, we have
a stem going this way, this way, and this way. The let's see, this way. Yeah, I think coming down here, we're up there, this way.
Okay, let's do that. Sometimes the brain cylinders
are not all firing, so I'm going to
try not to be too. If you look at this
pony for example, these petals are not a uniform. I'm going to just make
myself not be too uniform on the style of this
one and not too circular. That would mean probably
bringing this out further, something like that. And leaving a large
center where I can put some intense
magenta yumminess. Let's actually get it so
intense that it's straight from the yes, that's bleeding. This nova color
does look at that. That is so pretty making you want to do it over here
before it's completely dry. You'll get different
effects by when you add a layer on top of a watery look
like this. Which is fun. So pretty even do now I was going to
say a bit of Well I will we'll just a little
bit here in the flower, we'll bring a stem down. Way. Let's take that stem just a little more in the
turquoise direction. That turquoise, let me wash. Getting a lot of that out with the paper towel, Too much water. That's why it's always handy
to have a paper towel. All right. Let me do a test. See if Yeah, that's
what I'm going for. You can see it might turn
out to be a cool effect, but by mucking with
that stroke so much it got a little overworked. And come up here and
do something that moves the all turquoise on it. Actually, it's
looking really pretty with that edge being pink. I love to make my leaves
like ballerina arms. I wasn't even a ballerina. I don't know why I
like that reference, but they just feel
that way to me. Okay? I like to work in odd numbers. I have three ponies, I only have two roses. I can fix that easily
by just doing like a rose bud, you know, doesn't even need to
really be a big deal. I can just be right a semi open, but there we haven't done. Oh, look at that
splattered there. That's fun. Afterwards, I can take a brush and that's
how you deal with that. If that happens, just take
your brush and make latter. Anyone will think
it was intentional? I really like you see these little I don't know
what they are, they little clusters
but I like the color. These are pretty too. Let's do some of those little clusters. I think a filber brush is
going to be good for that. I'm going to make
a very limy green. We can even take our little
practice sheet and practice. A cluster cluster is
going to be about holding your brush
really loosely and dancing it on the paper. Here, there I am talking about. Dance again. There's
just super light. You can see that I'm barely not gripping this very much at all. I want to make them
different sizes, different variations
of the color. A little bit brighter,
maybe less bright. And I'll put some of
those over here too. These have more water in them. Odd number 53. You can do anything
you want like that. And then I might just grab
some of this color and drop it in here so that it's, it's one of my favorite colors. I just think it
brings so much life.
6. Tossed Flowers 3 : Okay, so we have a bit of
empty space by the way. If you didn't like
that when it blotted, you could blot it up
with paper towel. But I'm going to
let it be and we'll splatter at the end.
I'll show you that. Let's see. Anything else? My, I've got so many flowers
in my imagination from just looking at
them all the time. These little dark
things are so sweet. Cosmos. Pretty. I don't want to do anything dark in this
though. These are pretty. I've done these before, Radia. They're actually. Let
me show you how those. We do one in my greeting now, do we do one of my
greeting card class? I'm not sure. Maybe not. Okay. So we're going to make yellow in a
variety of shades, orangey yellow, even
some greeny yellow, which we already have here. And then just make dots. Let's see, where
do I want to put? Let's put some of these here. I'm going to turn this and we'll make the stems
Come down here. You can see why I have paint. You look at the little
amount of paint I've used. I use the tiniest bit
From each of these, you could paint probably 50 sketchbooks full with one
jar of acrylic paint. I don't think I'll need
any more of these than I already have on the
paper. I'll put that away. I'm thinking of a
couple of these and then the stems coming this way. All I'm going to do is
make these clusters. I've got the yellow on, on my brush. This
is my round four. I'm just going to vary
these in shape and size. And then I'm going to
grab the more greeny yellow and make other clusters. And I'm putting them randomly, but also facing upward. I am trying to not hit the same one twice even
though I don't mind. And I like if they bleed, then I'm adding more and
water and other colors. Remember that the red and
the pink will tone it down. So if you want a bit
of a deeper orange, I want to make this one larger. I don't want them
perfectly round. The ones in the picture are actually a variety
of round shapes. I guess I do want
some more yellow. I want some real great yellow. And a bit of these spots Now I'm just adding a little
more yellow in on top of my other dabs. Just intensify the center
a little bit more. Okay, And I'm going to
make a super pale stem. Bring it down here,
it's too pale. So now that I've
made that wet mark, I can just drop in the color. Sometimes it's easier than trying to make the same stroke. Look at the texture we get. That's cool. Okay,
bring this guy over. Just adding a bit of
interest to the stem, making it different thicknesses and we can have little bitty. Sort of leaf things randomly cry. Let that dry. While I have this orangey color, I'm going to come in and put some of those little clusters
that were in the center. Now that these are dry there, I mean, you could leave
them the way they were. They're pretty, but I'm just
adding a little bit of, okay, I'm looking
at the whole thing. I'm looking for color right now. What I'm noticing is this is really light and lots
of yellow green here. And I feel like I want a
little bit more of that here. All I really need to
do is add some more of a couple more of
these little things, and now I'm doing
it with a round. So they're just a little
different. A little smaller. Whoops. I grab some orange,
not that it matters. There's other speck
of something else. Okay. We could make one
a little more orange. All right. Now, I think, I just feel like I want
some random leaves. I might do those in a really
pale turquoise color. I'm going to take the larger, again, one we started with here, she is the tiniest bit
because we've seen how intense these paints
are, water way down. And I don't want to straight out the bottle'm going to
ad a little bit of green and maybe a little bit of orange to tone it
down a little bit. There we go. Okay. I think I'm just going to make
these and varying some of them really pale throughout, some of them more green, some of them more turquoise, different sizes. This is of course, optional. You could leave it
the way it was. I liked it that
way too, can help. This little painting didn't have a problem with
hanging together. But if you ever are
doing a painting and it's just you feel like
nothing's tying it together, Doing a little bit of something
like this throughout, it can really help that some of them I'm making really watered down just a
hint of something. Okay, now let's do
this bladder that I think I need a little
more red over here that will help that it's one of those things that
you've just taken a risk. You are just taking a risk. There is a way to practice it. You can take a sheet like this and here
I'll show you. Practice your bladder. So we've put a lot of water
on this and lots of color. I just tapped it, that'll
help us say, okay, that's about the
size of the dot I want or you can do fill it back up and do more like that with your hand and get a little
bit bigger dots. Probably a zillion ways
to get a spladder. The one I typically use is
the tapping that will make things go in a little
bit of a more control. It just depends
on what you want, and I just want a hint
of it, so let's try it. Some of you are
probably saying, no, don't, don't do it. Let me water down
more. Okay, here goes. What do you think? Okay. I like it. It's
they're starting to spread because they
were too tiny before. Okay. Yeah. I like those. More bold, so scary. Right? Not really. She is done. Isn't that fun? Tossed flowers? I like to imagine
when I'm creating these that we took flowers we just to them and they laid
out in a pleasing way. These make for great
patterns as well. All right, I hope you
enjoyed the tossed flowers.
7. One Color Beauty: Okay, for this one color beauty, I'm using a bouquet that I
made at my mother's house. I'll include that
reference photo. It had a blue vase. And other than that,
I changed a lot. I don't really like
painting sunflowers, and it had a sunflower in it. I improvised, but this is a
really great exercise to do. Just take one color. I love blue. This is an ultramarine blue. And with white, I've
got my sketch book. I guess it would
be horizontally. I'm going to do a sketch of the bouquet on the
whole, spread this way. There's so fun ways to work in a sketch book.
This is just one of them. Oh yeah. I'm realizing that just in case I
go over the edge, I want to put one of
those protector sheets, and I just use palette
paper for that, which is what I've
got my paint on here. I'm starting with the
outline of a blue vase. The sketch is done
with the paint brush. You can do it with
pencil before, but it's a sketch book. If it doesn't turn out who
cares, you learn something. I'm keeping the paint
pretty watered down. You can see how I if you're
quick enough before it dries, you can erase parts. I wanted to erase that a little bit of the vase that came there. I often start like this
with one large bouquet. I mean one large bloom. To anchor the bouquet, try to make your blooms large. I have included what
I end up making in the class downloads
so that you can take this sketch and you could trace it onto your sketch book
or paper if you wanted to practice it with carbon paper or hold it up to a window
on a piece of paper. I'm number four round here. It's Windsor Newton Cotman
brand that I use sometimes. I'm just thinking
about since we're only using one color technically, we're making many
variations of that color. By just how much water we add. You just have to be a
little more conscious of making sure you're
doing a variety of intensities of paint color. Of course, you can go back over and darken things as well. I end up doing something
on the vase here that I don't know that I
had done before that I really ended up liking. This makes my point that I make about working
in a sketch book, giving yourself the
freedom to play. You may do something and only like one or
two things in it, but then you can take
those one or two things and develop them somewhere
else on another page. I'm just looking
at the reference, but I'm also looking at the painting itself and thinking about what it needs for balance. I do like to have
123 or so large, large blooms and
then smaller ones, and then some leaves dabbing in some of the more
intense ultramarine. I do have some white
mixed in there. Just to give me a
little variation with water color, there is no, we just let the white and
just means you use paint. But since this is gas and I like to have
the white in case I want to make a more
of a pastel color like I'm doing right there. Maybe I just want a little
variation technically. Maybe we're using two colors
if we count the white. Just making a large leaf
that comes off that. These are Zenias in
the reference photo, but I ended up making them
more like a hydranga. My mother is an
amazing gardener. She has she's 84 now and has just this half acre botanical
garden practically. And when I call her,
she's breathless. See Mom, you're in the
garden, aren't you? Yes. I'm just doing
some pruning. You know pruning, she's
a little obsessive. Now, I'm coming through
with a little bit darker. Everything's still pretty wet depending on how long
you let things dry. The colors will behave differently when you
go in and layer. If you want them to bleed, then dab them in when they're wet. When your first layer is wet, if you want it to sort, be separated as another layer, then, um, wait till
it dries a bit. I picked up, I got a
little bit too much blue on that one and then
just removed it, removes some of it, but
it's still pretty intense. This is also great
for value study. Value, meaning the lightness or darkness of parts
of your painting. Because you quickly realize you've got to have
lights and darks, otherwise you can't
see anything really boring and nothing that if you ever are
painting something, you just think, oh, it's blah. Check for values, make sure
you have enough lights and darks. You don't need a lot. You don't need ten ranges of color from
darkest to lightest. Some artists work to do use only three or four and
really simplify the range. A medium, a dark, and light. Now this is what I did
in the vase that I really liked, the lighter. And that cutting out creates some really interesting shapes I think I'm really
liking at this point. And believe me, it doesn't
always turn out this way. I've sketched a lot of bouquets and they
come out lopsided. Or just the way I put
the flowers didn't work and all kinds of things. Even now, even though
I've been doing this for several years now, if I don't plan well enough for where things
are going to be, sometimes ended
up where I've got two big blooms
that are almost at the same eye level and they almost the same size and they look like eyeballs
staring at you. And I'm like, no, okay. Then you learn, don't
line everything up. But at this point, I'm really liking the structure
of this bouquet. The size of the
blooms, the variety, the way the one
color is forcing me to play with texture and value. This is when I
decided to make them into hydranga looking things. I'm deciding now where
to build on from here. I do like my
bouquets meandering, not in a funeral bunch, that's what I call those
tight round bouquets that are bunched in a ball. No, Let the flowers
and the plants, and the leaves you move. I think I'm trying to
make that stem thinner. I went too fast
and it got thick, but it really doesn't matter.
That's how you erase. You wet and dab with
a clean paper towel. Then if you want to redo it, let it dry before
you try to redo it. I'm thinking about
where I want to go now. It's interesting the way it is, but it needs something
toward the top. One of my favorite floral
designers, Kiana Underwood. You can find her Instagram. She goes by tulipinaact. She's got one of my
favorite books that I use for reference a lot,
color me floral. But I love her bouquets and her arrangements
because they spill. They are not traditional at all. Cascade often in the middle. At the top, there's not, they're fingers that just go out but it somehow works
And at least for me, you know, personal preference, I like her work and she's definitely influenced
the way I paint florals, little sort of daisy flowers, pulling the high up. All this is done with
one brush and one color. The great exercise to do when traveling me racing. Again, I'm looking around at this point thinking about to have enough variation
of lights and darks. A lot of times we
think we have to make something look like the thing. But we know that this is a bouquet and that
these are flowers. Like, what I'm doing here is there was too much
empty space there. I'm just creating the
background suggestion of another flower back there. You don't have to give it
a lot of detail because our brain knows that's a
flower or a leaf or something. Somehow it's part
of the bouquet. Especially something in
the background like that, feeling like that front leaf
needs a little more detail. I'm taking a last look, deciding that I want it to have some movement
up in that corner, I'm doing the same loose leaves that are in the
lower left corner. Those ended up being so easy
to make and just sort of I let my hand do what it wanted and I really liked
how they turned out a tiny amount of pain, isn't it that I used? Give me a little more
definition there. Just picking out some areas
that need just maybe a little more to make them
more noticeable. I love to little dots. I'm done basically, but fussing. This is where you want to
be careful not to overwork. And I've decided that I am done. I hope you try this
exercise, one color.
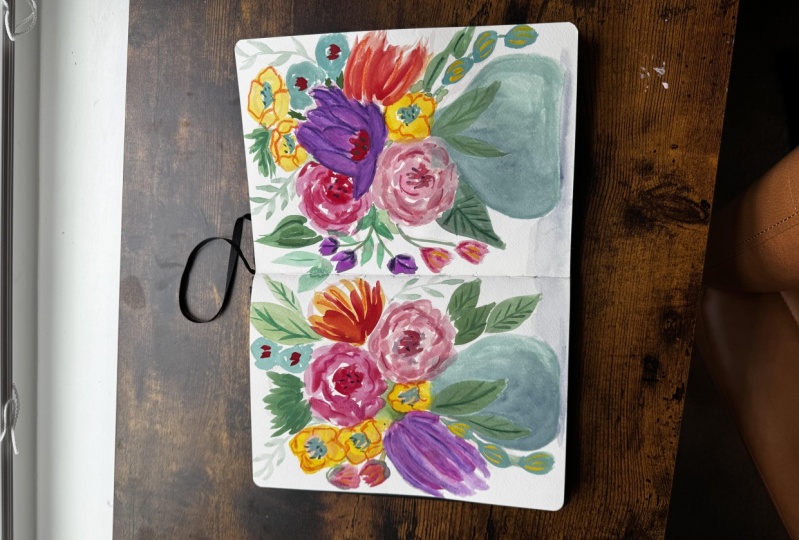
8. Blue Vase Twins 1: Okay, here are the colors
that we're going to use on these blue base twins. They're all regular guash. We've got most of
them from hole bin. You can see the color
numbers on there. You do not need to get
these exact colors. I just wanted to
show them to you. Basically, if you
have a few pinks, yellow, that blue
is really pretty. The 861, you'll see,
I use it on the vase. And then of course,
the opera pink is in the well used
Windsor Newton Tube. There some colors I
grabbed out of my drawer. Pinks, reds, greens. And here's our inspiration. Let's get started and take a look at the inspiration and see
what we want to do. I also used a
variety of brushes. These are the Suzanne
Allard design brushes that I put out a
couple times a year. You can sign up for the
waiting list on my website, size four round and
size four flat. Then I think the fill
bird is a size seven. This is a little picture in the book that I'll include
in class downloads. I love this floral
arrangement book. It gives me, it's not
that I follow it, obviously, you'll see I don't
really follow it at all. I don't know, Sometimes I
follow it more than others. But it just helps me to
have something there as a reference point here. I'm loosely taking the
number four flat brush and that pretty blue, I don't use many colors
out of the tube. I really just don't like to. But it looks like
I did that here. I usually add a little something
just to make it my own. I'm trying to intentionally be loose and flowing
with these vases. I haven't even really
thought about the shape, just making it up as I go. You can certainly I think the reference gave
me a place to start, but then I ended up changing it and I changed it some more. You are the creator
of your vessel. I'm like a potter. We don't
have to actually make this thing in. What
are they called? Oh, then it's going to come to me later
in the oven that they put pots in a kiln. Goodness gracious. We can
make any shape we want. We don't have to worry about actually making a
three D version of it. I like my vases to
be a imperfect, perfectly like, a
little bit wonky. You'll see me play with it
several times because it might start to look too perfect and then it starts
to look too wonky. You just keep playing with it. That's the beauty of gas. It's opaque. Water color means it can be
reconstituted with water. Even if that bit that I have on the palette paper
dries for days, I can come back, add some water,
and use it again. I recommend doing
that. If you're painting something with guash, if you're not sure
you're done with it, save your palette with
the colors on it, getting some white
out and some yellow. This is a warm yellow. Yellows generally come
in either like a warm, it's usually called a cadmium. And then a cool yellow, which is often
referred to as a lemon yellow or light yellow.
That's a magenta. I love having a magenta on hand. Whenever you mix
white with a color, it will cool it down. White is a cool color. If you want to keep some warmth, then you'll want to
add a bit of yellow. I don't really have
a color palette planned out for this one. I just grabbed tubes that
I wanted to start from. Definitely keeping
this painting softer. More pastels. I did
have that in mind. Now I'm taking the brush and just very
loosely holding it, sketching out some flowers. I wanted to make these bouquets. Twins, but not identical
twins, fraternal twins. I wanted them to
have similar bits. This is a great way to work because you've
got the paints out, you've got the two sides
of the sketchbook. You can try different
shapes on different sides. If they end up being
something you like. You've got a pair of
prints that you can scan, clean up in Photoshop
if you so desire. And turn into prints. I'm really looking at flowers. I have that reference photo, but I'm not really
pulling much from it. I'm just thinking at this
point of blocking in shapes that are flowery. I am thinking of balance
putting enough in the flower arrangement
to make it interesting and the placement of it to be in various places
around the arrangement, not all bunched together. I do like my arrangements
cascading off. Now I'm grabbing the large
number seven Filbert, which is another one of
my favorite brushes, especially for florals,
Just staying loose. That paper towel
keeps coming back. It's so funny. I've made
a move, color to sketch. You can sketch and
really any color, even if you did a
fluorescent pink, then you'll have
bits of it showing through, which can
be really fun. This painting, my plan is
to be a little softer. I'm using a soft color to sketch with varying my sketches
on the types of flowers, the structure of them,
the size of them, the way they're pointing. You'll see I dab in my centers, which helps me think about
which way is that flow. I think of them as faces. Which way will that
face be looking? Because you don't
want a bouquet, where all the faces are
staring straight at you. You won't see a flower
arrangement like that. Anyway, now I'm using the side
of the brush, the filbert. When I've got a bit
of color in one, pop it over on the other and go back and
forth in this way. I find that working
intuitively like this, maybe put some music on. Or if you're like me, for some reason the music can't have words.
It distracts me. So I can have music
that's instrumental, or I can have a podcast. I know that makes no sense. Because the podcast has
words. I can't explain it. I think I did read about it. It has to do with the
different parts of the brain. But here I'm playing
with the vase again. I don't want to
overwork it though. I want that texture. I like that the vase
on the left has some bits of white left in it. At this point, I'm
standing back and I'm liking the overall
structure of each of these. I'm just looking at
it now thinking, do I want, what
else do I want to put in these before I start
adding leaves and things? But I'm just looking
for, overall, how does it feel?
Feel well balanced. Now I'm thinking I'm
ready to add some green. I took that beautiful
whole in G 842. I'm just letting that
mix in with my lavender, which is giving me a really
lovely, softened green. That's the thing about
harmonizing with colors. If you make sure you have a
bit of one of the colors, say in this case that magenta
and all your other colors, then colors will harmonize you just the way
you would get mud. And you'll find out quickly if it happens there's a little
mud there happening. But in my case, I usually have so many bright colors that I need a little bit of neutral. The way that mud gets created is by combining
colors that are across from each other on the color wheel, meaning
complimentary colors. You'll learn after
just experimenting that when you mix those
two, you'll get mud. You either get it
by design or not. Now this is a really fun
way to make loose leaves. You see how getting
some paint and letting the brush do the work
and the paint and creating some really
lovely texture with the paper and variation in
the color in the water there. I just grab some darker green. I think it's a permanent
green usually, I don't use many greens. I make them, but I think
before I knew how to do that, I bought too many greens. I don't really buy
greens anymore, except for a lime green. A nice strong lime
green I will buy because it's easier
than making it. Same thing here with the leaves. I'm looking to balance
dancing around both sides. Looking for that sense of it doesn't have
to be exactly even. I don't need to have
the same number of leaves on one
side as the other. But overall, each boquet
needs to feel balanced. Just dabbing in green with white yellow making
more of a lime there. I love coming in with a lime green and doing
some high lights. It just makes everything
pop and brings life. The layers to me are where
things really come to life. I was thinking about, where do I want that flower looking? I don't want them to
look straight on. All right, so we're
going to wash our brush and come back to this
in the next video.
9. Blue Vase Twins 2: All right, now I'm getting out the scarlet just for a bit of a, any red, I'll do a
warm red, basically. A red, not a magenta, or maybe that's
called vermillion. Vermillion's a warm red. I just want a bit,
you see how the tiny amount of paint I
use for these paintings. I have my basic structure. At this point now I'm thinking about what other
colors do I want to introduce? I'm testing out a warm red and getting it where
I want to get it. I think I felt like
it was a little bit B. I'm adding a little
bit of that pink. See what we can get with that. I still think it's B. Anytime something's blow
in the red or pink, family pull out the opera
pink and you don't need much. I do have a new of God forbid, I would actually run
out, look at that. The tiniest spec makes
that color beautiful. It's a miracle color. I'm ever stranded
on a desert island. I need my opera pink. I've decided these
are going to be by. They're there. Those really David Austin roses. Those are luscious, or maybe
they're just a big fat pony. But there's something
big and delicious full. I'm loosely using the edge, I'm still using that big size seven Filbert grabbing a
little more opera pink. Thinking about where else
do I want this color there. I went for the straight opera pink just to get a little
bit different shade of pink. But, you know, I
talk about using the sketchbook in this
way to learn things. I think one of the
things I learned on this one is I really
liked that sketch color. I used this because it gave an instant
depth to the blooms. I blotted that back out. I think it was just, it was just I wanted to
lighten it and see if I want to go back in with
some more intense. I need more opera pink. Very relaxing way to work because you're just playing
and see how I'm dabbing. I don't even like to
call it brush strokes. With this kind of painting, I feel like it's
more like dancing on the paper with some
color on a brush. I don't wash my
brush very often for the reason I was telling you I like the colors that it makes. As long as like for example, the reason that yellow gold is, is because there was a bit of the pink and opera
pink in my brush. But I know that going in
and just by experience, you could put a color
wheel, print one out. Or if you've signed up for
my free color mixing class on my website at San Lr.com there's a
color wheel in that. Just have one on hand,
right in front of you. So that if you're about to mix colors, you can say, oh no, that's going to make mud if it's a cross on the color wheel. Other than that, I like to keep a bit of the last
color in my brush. Generally just wash it when
I'm making a real departure, or I'm not getting the
intensity of a color I want or it's going too muddy. The other thing about bouquets
is that we all tend to, for some reason, I've
learned this over time, make the blooms too small. That's why these are
really generous, and some of them are on both
sides the size of the vase. Especially if you're
looking at a big peony or a full flower, they're going to
be big like that. They draw your eye in. You do want a variety of blooms, little ones and big ones, But don't be afraid
to make a couple, 23 large blooms to
grab your eyes. Now I'm taking that magenta and that's why I
love this Filbert. Look at the lines I
can make with it by just using the top edge of it. I think that magenta
in the green is making a really nice accent detail
depth to those leaves. That yellow is a
really pretty yellow. That warm yellow, it's
thebaine eight to one, it's called Yabuki yellow. Japanese yellow holbein has a magillion colors of
gas, Maybe not that many. But they have these
lovely sets that I've been playing with by season, Spring, They're all 12 colors. I have them in my
Amazon supply list because once in a while, Amazon really marks them down. They do spring, summer,
winter and fall. But I don't know. I like to pick out
my own colors. So there's a few colors
within each set that I like. But I would design a set that
was not quite like theirs. They didn't ask me though, you're better off maybe just getting the individual
colors that you like? I am obsessed with that blue. It's also got a funny name. The G861, it's called. Okay. Wurenagusa or Mayo Soots. Blue. Yost blue. I don't know what mayo soots is. Maybe I'll have to Google it. I'm just coming through to make a bit more
texture in the face. I just added some white to the green to see if
there are any places that I wanted to layer, do another layer on the leaves. Now I'm just looking around
saying again, for balance, what needs to be
done, What's missing, What's bugging me, What do
I like like I really like, on the left side, those
two golden blooms, that sprig that comes
out to the left. I love that. And
on the right side, the one that drops
off to the right. I like that, I like
the big blooms. Getting my test
paper to see if I've got the thing about the opera. Pink is you have to
be, it's very intense. Here I am toning it down because straight out of
the tube, it is intense. I use it to mix with
things to liven them up. But it doesn't photograph well. Straight out fluorescence
really don't. I'm just bringing some of that. It's not just in the flowers. I like to take a color and move it so that the eye doesn't get stuck anywhere.
You can do this for yourself. You'd literally look
at the painting and try to notice
where your eye goes. Your eye will do it way before you can figure out
what it's doing. It's more of a matter of tested
out by look away and then look at it and observe what your eye is
doing, where it goes. Does it get stuck anywhere? I think I fix this later. But on the Bocan on the right as I'm doing the recording
on this, there it is. I think I'm going
to work on it now. Getting stuck on that white
space to the right in there, it feels like the bouquet on the left side is
perfectly balanced, but the one on the right
needs something there. I've never done this
before. I thought, why not put a flower
between the two? They are sisters. They can share one flower. That's how I decided
to fix that. What was bugging me mostly
on the bouquet on the right, I felt like it needed it. So now they're co
joined bouquets. At this point, you know, I'm in the final stretches, I'm just playing and thinking about what I might
do layer wise. So here I made a really,
really pale yellow, basically an off white and just doing a little
bit of highlighting. And then even though it
wouldn't white as that looks, it felt way too light to me. But the beauty of gas, even if I left it there till
tomorrow to see how it dried, if I wanted to take it out, I could or paint over
it or wet it And dates, the highlighting can be a little frustrating
because you'll think that's perfect and then it dries and you
can barely see it. Sometimes I a, if it's
a little too intense, that'll reduce the intensity. That's just practice. Now, I'm taking a paint color, which I like to do and signing them might as well do that
while I've got the paint out. Then the signature is done
in them with the same color. It's part of the painting. We'll let this dry and
see if we want to add some more details
after it's dry.
10. Blue Vase Twins 3 Details: Okay, these have dried
and I'm happy with them. I don't really need
to do anything. And you made a
personal preference. But I feel like I
wanted to come in with just a little bit
of colored pencil, maybe add a little
bit of detail. My favorite dark is an
indigo or navy blue. I thought I'd take this pencil. This is a Fabstel. But I also use prisma
color variety of brands. Just the better brands
so that they show up. I just thought it
would add you needed a little something if
you have a scanner, sometimes what I'll
do is scan something before I add the
details just in case I ended up liking it
better beforehand then I can still have it
made into something, a print or a product. What else? You could also use
the neo color crams. More oil, Pasto. That may be enough. Let's see. I've also got a I guess
is the orchid color. I don't know if I want to
do anything with that. Let's see, it's kind of interesting. The texture of the
watercolor paper is kind of making the pencil
have a really nice texture. Okay. And then I also pulled out, I don't know if I'll use these, but I just grab
some other colors that work, you
know, in the same. I'm not looking to add a lot more color or
different colors. I don't want to do that, taking its exact match, sometimes taking the same or
a similar shade on top of, but this is too close. See if I have anything that's
a little bit different. Let's see, here I have a
soft gray and another blue. This is maybe going
to be too dark. Yeah, I don't think
I was thinking about doing a pattern along there,
but I don't think I do. That was a prisma color, so it probably won't come
up with the water. It's okay. I can always paint over it. The gray might be interesting. Now you know what I
think I want to do. I think I want to use paint
and do some little marks. But first, I'm just going to take see the squash had dried. But I saved my palette paper. Actually, I use this color
in another painting. So I can come back in here
and just make some texture. We'll see how much
of that shows up. I like those light
marks that were left, so I'm not going to do
anything with that this way. You get just a little variation. Okay. I don't want to
do anything else. Sometimes I usually
like to bring in the vase color somewhere
else in the bouquet. Even if it's just really subtly, I think I'm
going to do that. I can actually do that with
the pencil. Let's try Bells. Let's see what we like better. Yeah, I can see that,
but you probably can't. I just think it brings the composition
together a little bit. If there's just a bit of
the vase color in the. Okay, I like that. Where do I want another one? Maybe just a half one
coming out of there? Be a bit of this in here. And what about you? These are like sisters arguing
about who's prettier. Well, that's good.
Yeah, I like them. They're twins. Fraternal
twins, Not identical.
11. Three Delicious Floral Spreads Wrap Up: Hi. I hope you enjoyed
these floral spreads. We did the blue based twins, which I don't know,
they're just fun. You can go in and add details
with cran or pastel or pen, maybe some texture play. Then it allows you to just
see what you liked about each one and take those same colors and materials that you
have out and play. That's what I love about that. We also did tossed flowers very light and fresh and just
reminds me of a spring day. Maybe went to the flower
market and tossed them down. Very light touch, very
quick, very pretty. Then study on one color. You could do this in
so many other colors and really makes
for a nice decor. And let's say when you have a certain color theme in a room and you want
like in a powder room, I actually have this pumpkin painted powder room in
the house that we bought. It's a yellowy, orangey color, which I thought I would repaint. But I'm actually
starting to like it. It might be fun to do with a lot of white space
like this in that color, or maybe a darker version of
that color to put in there. Anyway, I hope you
enjoyed and play. As far as fixative
people ask me sometimes what I would fix these
with. It really depends. If they're straight,
watery color like this, I just leave them alone. If I have a few more
things on them, like maybe some
ink or some cram, I might use the Rl, unworkable fixative,
or spectra fix, which is my favorite for odor. But it can make things run. That's why with regular
quash water color, I don't really use it. I use it more with
acrylic anyway, It depends on what
you're using it for. What's your application? If
it's just in your sketchbook, then you don't
need any fixative. If you're going to put it,
frame it and it might, some light might get on it, then you might want
to use a spray matt. Fixative or varnish. Liquid text makes
a good brand too. Anyway, I hope I've shown
you some fun ways to explore in your sketchbook and you
join me in the next class. I have dozens. At this point, florals, abstracts, landscapes
are coming. Don't forget to follow me either on Instagram or
Facebook or both. I do sometimes time lapses or I share a
little tidbits process. I also have an e mail newsletter that you can access
on my website at Suzanne.com I have also
supply lists on there, which I've built out two lists, one is Amazon and one is Blick. You can see all my
favorite supplies. Everything from setting up
the studio to art supplies, to my favorite frames, all kinds of things like that. Lots of resources on my website. Just keep creating. Just promise yourself that that you're going
to keep creating.
 Suzanne Allard, Landscape, Floral, Abstract Painting Teacher