Transcripts
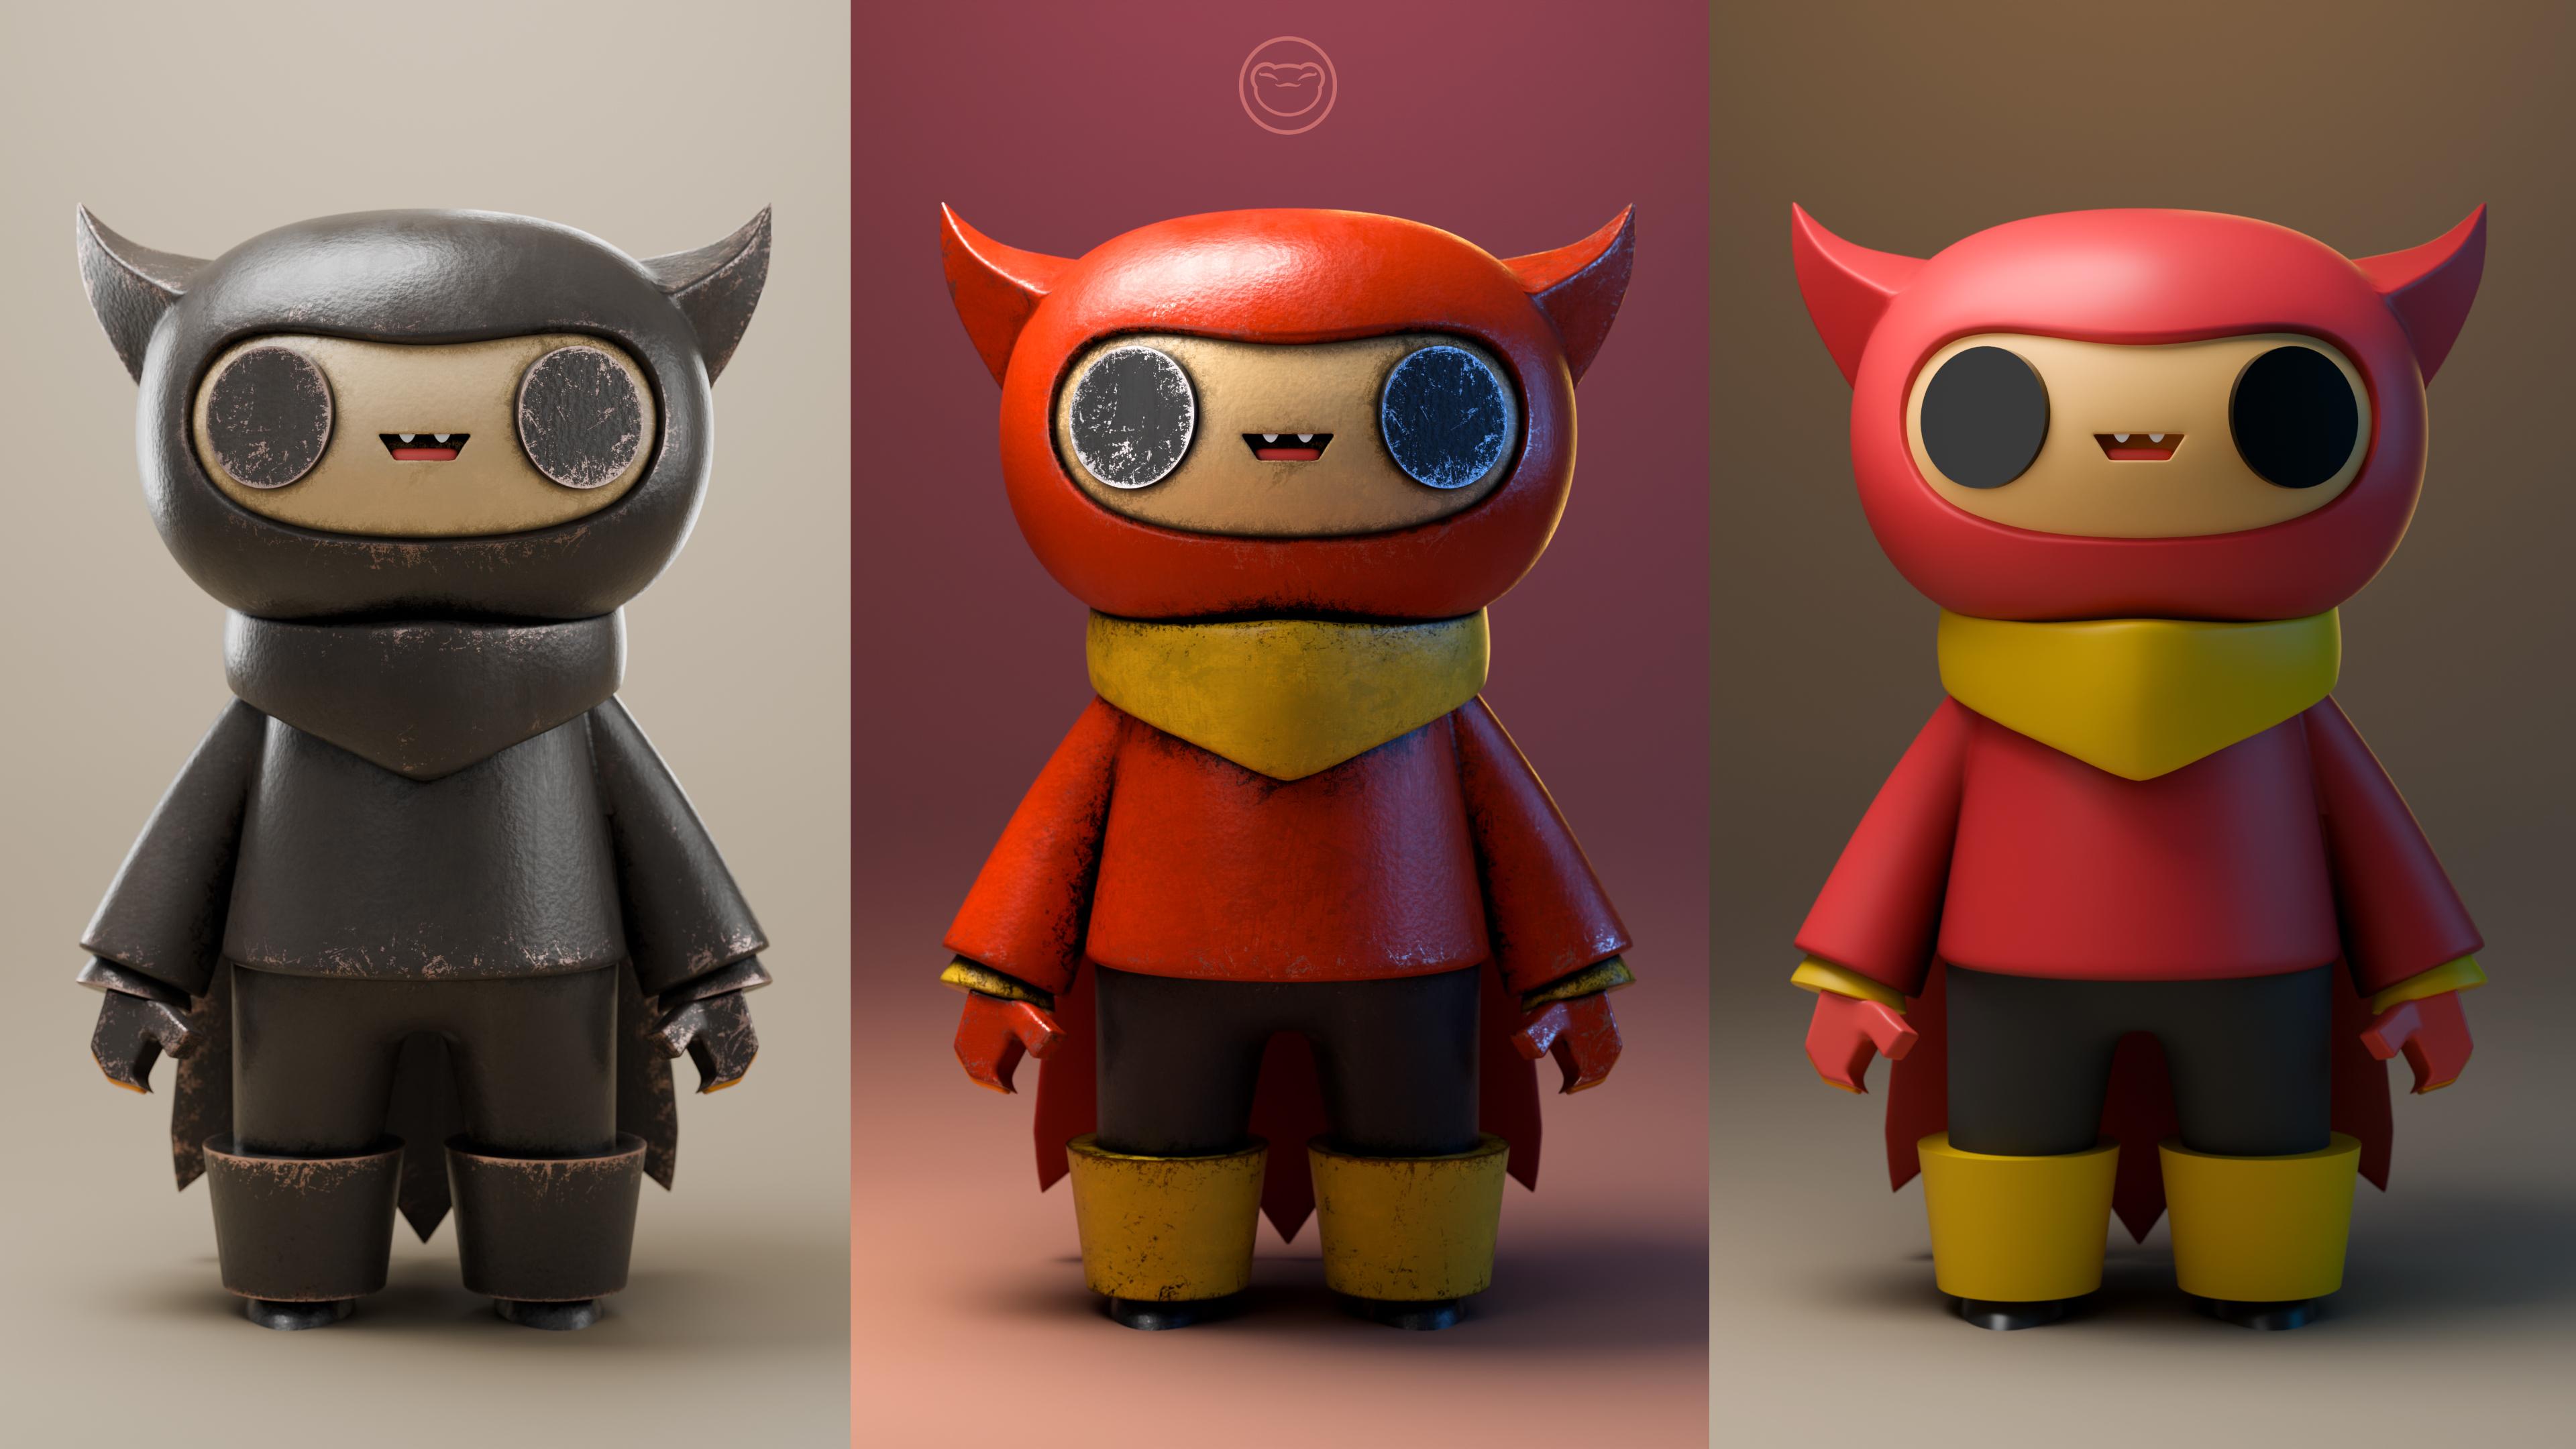
1. Red Dynamo: Intro! : Can guarantee you've never
done a tutorial where you do the whole sculpt top to
bottom and nomad sculpt. Then crossover to
blender for lighting, materials, and cycles rendering. And if you don't
know what cycles rendering is, to your butt. I'm a drug pre Dave
digital artist and content creator
with a love for pancakes and creating beautiful three D
illustrations and animations. I'm obsessed with making my
art the best that it can be, so I knew eventually
I'd have to dive into the can of worms
that is blender. Did he just say what
I thought he said? So, we're gonna do a
full sculpt in Nomad, which is iPad, Samsung
tablet, mobile device. Then I'm gonna walk
you through the steps, exporting it to blender,
which is on your computer. So you will need a
computer for this class, and you will need
a computer that's capable of running blender. So my recommendation is
to download Blender to computer now to make sure you
can get it up and running. This class is perfect if
you're a new three D sculptor and you're looking to bring your renders to the next level. Now, you can just do
the Nomad tutorial. Oh. You can continue
on working in blender. I know you don't want to do it. I know blender is terrifying, but everyone has to take
that first step eventually. So let this be your first step. Where's the blender? Keep drawing, keep sculpting. I look forward to
seeing you in class. Nothing more would
I teach you today. Sure.
2. Class Project: So, welcome to the
class project. Now, this is a two tiered class project because
you can just do one. So the first part of
the class project is creating the sculpt in nomad. Of course, you can bring any
sculpt over into blender. We're going to create the
whole thing in nomad, and then I'm going
to walk you through each step. Bringing
it over into blender. The ultimate A plus is creating not only
the nomad sculpt, but then also rendering
it out in blender. Of course, I'm going to walk you through every single step. This class is a
long time coming, and I've been wanting to do a blender tutorial
for a long time, but I really had
to get a handle on what I'm doing in a way
that I can explain it. So hopefully you'll get it. So I'm going to explain it
just the way I do with nomad. You're not going to be
able to see my hands, and it's going to be tough. But I know you can do it.
But that's pretty much it. Like, I always say, you can make this your
own. Have fun with it. But I think this is
an essential part in your production value, which is just the way
that your sculpts look, the way that you present them. This is the next level. So
I'm glad you're here with me, and I'm excited to get started making
tutorials for blender. I think cycles rendering
is going to blow you away. Alright, so I think
that's about it. Let's jump into the next
video getting started.
3. Getting Started: All right, let's get started. There's a few things that I
do before I start any sculpt. First, I change from It PBR to MTCAP I'll explain
exactly what that is. So now, this is
our three D mesh. This is our only three D
object in our physical space. Right now it's just a sphere, but it's pretty big,
let's just delete it. Press the scene menu, delete, add, and we can go
ahead and name. This is just the
autosave and let's put I don't know what I'm going to name it
yet. I'll probably change it. Okay, so now let's add let's just go back from
the very beginning. We'll press here the
scene menu, add a sphere. That's how you add a
shape or a primitive. So when you hit Add, you see
how it says primitives here. They're just simple shapes.
There's some other things. We'll get to those later. So now our three D object is a sphere. Why did I delete it
and add a new one? This one is much smaller and we didn't need one that
was such a big size sphere. Also, I wanted to let you
know about validating. When you see up
here this validate, all that is is
once you validate, then it's officially
part of the project, and then you get all the tools. Right now, you see my
tools are grade out. If I were to validate, you
can use all the tools. We might do some
things before we validate as we move forward. Tap undo, redo with three
fingers, undo two fingers. This is the Snap cube. So you might see me
sometimes when I'm sculpting and things are
a little bit off center. I might just tap here, front, that's how you know
you'll be looking at the front of the sculpt. Also, where I started
this rant was Mt cap. White is a bit hard to see. It's a bit hard to sculpt
with, and it's a bit bright. Let's tap this little sun right here and let's change
from lit PBR to Mt cap. I think this is much
more like clay. It's a three D object, but
I like to call it clay. Momoame Clay, Amohol Clay. There's a few things
also when I'm going through, I've voxel remesh. It's okay that you don't know
exactly what that is now, but there's a shortcut right here and there's also the grid. There's a shortcut and the grid. Those are the shortcuts. And if you don't
have those there, you can just tap right here. And you have your add shortcuts. Here you can add and remove
shortcuts from this panel. So if you want to have
it just like mine, just tap the voxel rems, and if you don't have
grid for some reason, you can tap the grid there. The next thing that you
might be wondering is why my sphere is smooth
and yours is not. If that's the
situation and yours is more pixelated, here's
how you fix that. So we can go to this
little menu here, the materials, and this is the only thing that we
have up here, a sphere. So if you go down here, you see smooth shading. Smooth shading just
makes it appear smooth. It actually looks like this. If I turn it off, that's
what it actually looks like. I prefer to have
smooth shading on. My smooth shading
is on by default. If I go back here to the
materials and I go down, you can see that my smooth
shading for Auto is on. So if yours is different and
you want to change that, again, just go, I
think it's here. I might be the wrong one. Oh, no, I was the wrong one. So you go to this little COG here and you see
the smooth shading. If I tap that, automatically,
it will be off. If that's checked, then
automatically it's on. Okay. As we have the grid behind. We're going to get rid of that. In a second, let's just set up our little stage, our floor, our character will have
something to stand on and let's tap our scene. Add and we'll add a box. Now we have this box. Let's use the Gizmo. The Gizmo is like
the controller. That's how you control
all your three D objects. As you move this around, you see that there is a green
arrow, red arrow, blue arrow, spheres, rings, and a big orange ring. Will the spheres stretch the arrows move it in
whatever direction. The rings rotate it, and the orange ring makes
it bigger and smaller. There's some other
things, but I don't really use them at all. If you want to get real crazy, you can just take
the middle and just move it around Wie Nilly, but I only use that
in some situations. Okay, so let me make sure I undo so I'm right in the middle. Okay, perfect. What we're going to do is make
a stage with this. I'm going to take the
orange ring. It's a little bit hard to see, make
it a little bit bigger. I'm going to hit front,
and then I'm going to take this green sphere and just
shrink it until about there. And I'm going to put it right on the edge so that the top of the rectangle or the top of the square is right on the
bottom of the red line. Also, I have smooth shading on, so my square looks weird. I'm going to turn it off
just for this shape. So I'm going to tap here. You see it has the box. It has whatever
you have selected. That's what the name is here. I'm going to go down to smooth shading and
I'll just turn it off and you'll see that
the box is now sharp. Also, anytime you add something, it's always good to go to
your scene and label it. Tap these three dots.
Name, and we'll just name this floor and not sure what
we use this sphere for. We'll probably use
it for the head. Let's go to the sphere,
tap here, name, head. Now we don't need
the grid anymore, so let's turn the grid off there and now that's much nicer. Also, I didn't mention that
my background is purple. If you want a different color
background, just tap here, and then you can change
it by tapping here, you can put it any
color that you want. I prefer a darker color. The other thing
that we can do in this menu is we can
add a reference image. Make sure that your image
is on your device if you're using a tablet or an iPad. I'm using an iPad Pro, just
tap here, tap the image, Import, for me, I have it in my photos and just tap
the reference, add. And okay, so let's close this. And now we see that our
little character is here. Yours might be somewhere else. If you need to move it,
just hit Transform, and then you can move it around. You notice everything
else is blacked out. I think that's a
pretty good spot. Once you have it placed,
tap with one finger, and then you're back
to sculpting mode. So let's save. Okay. Perfect. So
like I mentioned, anytime you bring in a
primitive or a simple shape, like, for example, this sphere, let's move it up a little bit. Whoops. Let's move
it up a little bit. Let's go ahead and validate it. Now our sphere is validated, you'll notice that in our scene, now the validated part is white. Anything that's unvalidated
is going to be orange. We can go ahead and
validate this as well. Okay, now both of our
shapes are validated, and I think we're ready to get started blocking
out our character. In the next video, we'll begin blocking out our
little red character here.
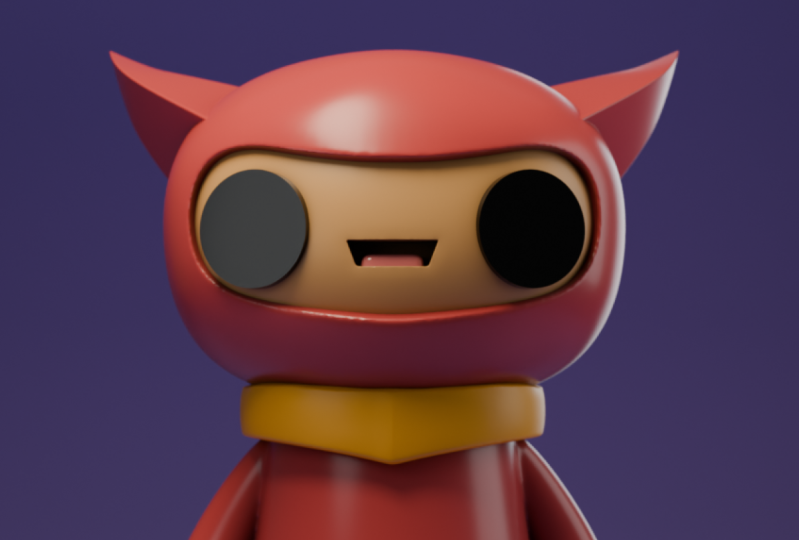
4. Helmet & Horns: Alright, so I made
it a little smaller. I'm going to tap on the
sphere so I can move it up. And this is going
to be the head. So you can see the head
is a little bit squashed, so we can do that easily
with this green node. Probably around there. So it looks like even
though it's squashed, it's not exactly like narrow
the same amount as this. So let's actually
start using our tools. Let's use the move tool. So your tools are right here. And let's use the move tool. Yours might be somewhere
else, actually. But the move tool and
let's make the radius, which is how big the
tool is going to be, let's start at 2:50. Was that 250? 250. What
I want to do is move this part up and maybe even move this part a little bit outwards
to kind get this shape. You notice that it's
happening on both sides and that's because we have
symmetry enabled. That's a big help. Just maneuver these until they look
like this shape. And I think this
looks pretty good. I'm going to make
it a little bit smaller here so that I can push up the bottom
because it looks like the bottom is a
little bit flatter. So I'll just kind of push
up the bottom a little bit. I'm just going to turn it
to make sure that it looked good from these other angles. So I'm looking at
it from the top, and I don't think I want it
to kind of narrow out here. So I'm going to do the same
thing with the move tool. I'll make it a
little bit bigger, and I'll just adjust
the shape a little bit. So I'm just gonna pull
that part outwards. I think that looks a little
bit more what I would imagine this kind of helmet thing to look. I think
that looks pretty good. Maybe I'll stretch
it out a little bit. You can use your gizmo
and then you can just pull. I think that looks good. Okay, so I think that's
pretty good for the head. What we need to do now
is we need to hollow it out so you can see
this nice area here. We're going to hollow
out this shape. So let's go ahead and take
the head and clone it. So we have head one.
Let's rename it. Tap these three dots, name, and let's just call this head X. Anything I put an X with, I'm going to cut it and you'll see what I
mean in a moment. So we have head and
then we have head X. So now go to the bottom
and you see Xray. Let's tap Xray. So now we're using head x. I'm going to go ahead
and hide this so I don't accidentally choose a tool so I can lay my
hand on the screen. So I'm going to use
this bigger orange ring to make this a
little bit smaller. And you see how we can see
inside that other sphere. So we just want to
make it a little bit smaller, maybe around there. I think that looks pretty good. I think that's perfect. Come to think of it,
we actually don't have to cut this other sphere. The only thing that
we need to cut is the part where his face
is showing beneath it. I think this is a great start. Let's hit Xray again
and now we have the helmet and we have the yellow part
that's kind of inset. That's perfect. So the
next thing we want to do is maybe carve
out this shape here. Let's add a cylinder. We'll tap here at our scene. Add a cylinder. Let's move the cylinder up. I'm going to name this
cylinder cylinder X. Since we're not going
to cut this anymore, let's name the head, head A, and head X,
we'll change that to B. Head B. A is the bigger one, B is the internal smaller one. B is going to be yellow. Okay, so cylinder X. Let's use our gizmo.
We'll move it up and then we'll move with
the blue arrow towards us. And now let's go over here
and you see this snap with the angle symbol.
We'll tap that. So it should be at 90 degrees. If not, you can tap on
it and change it to 90, and we're just
going to rotate it 90 degrees with the red ring. It should only move 90 degrees. Perfect. So now let's go back
to this option, and we just want to take this orange node at the
front end and widen it. Let's take the back ring
and make it smaller. We can move it in
a little bit too. The reason why we're making this smaller is because you
notice on the rim, it's not just a straight cut. It's almost beveled so
that if this is wide, then it's going
to bevel outwards and it should match
up with that. I think that looks pretty
good. Let's validate. And once this shape is
validated, let's hit symmetry. This should automatically
change to vertex. Let's take this red arrow and just pull it away
from each other. Now let's shrink the whole thing and let's move it with the green arrow back into the head. You can see where
I'm going with this. We're going to use this
to carve out this shape. That looks too big, obviously. I can make it smaller with
the larger orange ring. I'm thinking maybe
something like that. Maybe a little bit smaller. We can pull it out
a little bit too. But you have to
use your judgment, and it looks like
it's not wide enough, so I'm going to
use this red arrow again and make it wider. Let's voxel remesh the shape. What that does is just
going to recalculate it and make it a
good solid piece. That method we use by using symmetry and
pulling them apart, sometimes the shape
can get a bit weird. So when I do things like that, I like to voxel remsh. Let's go here, voxel, and we can remsh Let's slide
this up to about 1:50 or so. We'll do 160 and hit remesh. Sometimes you'll see
me go like this. I'll swipe up on the shortcut.
It's the same thing. So we'll just go to 160, remesh, and now the
shape is remsh. So let's use the move tool, and let's just pull
down the middle of this just to make it a
little bit straighter. I think that looks pretty good. You can also take the smooth tool and just
kind of smooth out this cylinder just to keep that bottom cut
and nice and smooth. Okay? You don't want any,
like, lines or you don't want you just want it to be straight across,
it looks like. I might even take move and
just push it up a little bit. The top, the top actually
looks like it dips, so let's push that
in a little bit. We'll make the move tool
a little bit bigger, and we make it bigger and smaller because we want it to be very smooth transition.
I think that looks good. You can try this a couple
of times if you want. I like the look of that. Let's see if I have to edit it. We make sure that we're
on this cylinder X. And then tap on the head as
well, so we're in our scene. Cylinder X, head, and
then we want to hit the little I on cylinder
and it should turn off. If that doesn't turn off, hit advanced and uncheck
sync visibility. So now that your head still has the little eyeball
and this is hidden, you can hit Boolean Boolean, and it's going to carve
that out of the circle. So now you can see what your shape might need.
It might need some work. You can take move on this head,
even though it says mesh, and you can actually
move it around and shape it a little bit
better if you need to. You can actually you can make the move in small
and you can pull it down from the inside if you want to make sure
that outer layer is showing. It's the same thing
if I go to Xray C, I'm pulling it down
from the inside. But I think that
looks pretty good. I'll slide this out. I want the bottom a little bit
straighter, more straight. I think that looks pretty good. So now we'll turn X ray off. And now we have this sphere, so I'm just gonna take move, and I'm just going to adjust it so that that rim is
even all the way around. Perfect. It looks good. Okay, so it's a little craggy
messed up around the edges. That's okay. Let's go
ahead and voxel remesh it. Make sure that you're on mesh, and let's rename
this name, head A. Now let's go down
and voxel remesh it. I'm going to pull
this up, and I'm going to do it at 2:50. So that got them
pretty straight. Let's take the smooth
tool and let's just smooth this out. Let's add on his
little horns here. Let's take the tube tool path, and we don't need snap. For the tube tool,
you just want to tap, pull down, and then let go. We can tap this green node here and we can go ahead
and slide this one up to where it would be, I
think that looks pretty good. We need to put a curve in it, so let's just tap in the middle and we can put that
little curve in it. It looks like it's actually
more horizontal on the head, so let's make sure
we do it that way. Although you can do it
however you want, really. I think that looks pretty good. I think I'm going to tilt mine. I'm going to use the gizmo, and I'm just gonna move
it back and maybe, let's take it off of snap so
I can kind of just twist. And twist it, I want to
pointing towards the back a little bit, a little flavor. I think that looks good.
Now let's go back to the tube by pressing this
little squiggly right there, and let's work
these radius radii. We'll tap once for now, and now we have oranges, two orange little nodes, so we can take the bottom
one and make it wide, and we can pull it
more into the head. This one we can shrink. Make this a little bit wider. Now let's hit profile. Okay, so here we have profile. Now, we have to figure out what we think this looks like if we think it's three or if
we think it's four, if it's like two sides, the front and the back, or
if it's just a triangle. So let's go to the
profile options here. Let's say we wanted a triangle, we can just bring
these together, and then you have a triangle. You can take twist
and you can twist it Whoops. Something like that. Maybe it has three. I think that looks pretty
good, actually. I think that looks pretty good. Make the bottom a little bit
wider and then take a look. I think that looks good. So the character is
sort of like this. So you have to take into account that we're going to
look at it from the front, but you can also angle it
so that you're getting a better idea of what
it's going to look like. You can always take the
gizmo again and you can make some small adjustments
to its position as well. We'll just take that orange ring and move it
right around there. I think. I think
that looks perfect. So let's go back to
our tube options. So we like where this is, so we can go ahead and make this sharp by bringing it
all the way together. And then we can just tap mirror, and now we have it
on the other side, and we're good to go.
5. Shape Blocking : So now let's make a cylinder
here for his neck cuff. So let's tap our scene, add cylinder, excuse my throat. And let's tap on the
cylinder and move it up. And let's rename it collar. So let's go ahead
and use the gizmo. It looks a little hidden
there, but it's there. Let's move it up
and we'll shrink it with the green node,
something like that. Maybe we'll make it a
little bit smaller. I want to make it a
little bit higher. I think what we're
going to do when we make this shape eventually is we'll trim it because it looks like
it's bigger in the front, but we'll deal with
that when we get to it. Let's move it up to where it's probably around
where it's going to go, and I think that looks
pretty good for now. So now let's add another
cylinder for the body. We can just tap our scene
tap here and clone. Let's make this body. Let's go to the
cylinder options here. Well, actually, we
can just move it down with our gizmo so we
don't get confused. We can make it a little bit
smaller than the collar. Let's see, it looks like it's just a little bit
smaller than the collar. We can go back to these options and then we can pull this
down with the green. You have to gauge how far it is. It looks like it's a little bit shorter than the head
as far as length. I think that looks
pretty good and it's wider at the bottom. We'll use this orange node
to make it a bit wider. Maybe I'll make this a
little bit less wide. We have a little
room for his arms. Okay, I think that
looks pretty good. Let's move everything up.
Remember this is our floor. I'm just going to make
this a little bit smaller. Floor is on the bottom. I'm just going to select everything and just
move it up some. I'm going to turn
the grid on just to make sure that whoops. You have to be careful sometimes when you're
moving things. I just want to make sure that everything remains straight. Okay. Because if you notice
when I grabbed everything, this is off center, sometimes that can
be a little tricky, so I just needed to
keep an eye on it, but it looks like
everything is fine. I probably should have
brought it up higher. Let's bring it up
higher. Let's bring it up to that line. Perfect. I'm going to turn the
grid back off and now we can jump to the legs
which are more cylinders. Let's take the
body and clone it, and let's name this legs. So we'll use the Gizmo. We'll move this down and it
looks like it's the opposite. So it's a little bit
bigger on the top, so we can go back to these cylinder options and we can make this a little
bit more leggish. It looks like something
like that. It's not super tapered,
just a little bit. We can go ahead and mirror them just so we can see how it looks. We've hit mirror, which
means we have to go to the Gizmo let's make it smaller
and move them separately. Pretend this is
the only one here. The other one is just so
we can get the size right. I'm going to make it smaller it looks like it should have a little bit to the
edge of the body. So that looks good.
Now I'm going to go back to the cylinder options
and just kind of make it. We'll make these a little bit longer. I think that looks good. And we'll have to
tilt them as well. It looks like they're tilted. So if we press the gizmo, they look like they should
be kind of like this. And the bottom part is okay, even though
we'retilting it because this cylinder is
going to be straight, so that should look fine. Okay, so I'm going to move
them over a little bit more and I think I'm going to bring them
down a little bit more, stretch them out like this. We have this hissital
pelvic region as well. I think I'm just going
to use a box for that. Let's add a box and let's
get it out of that mirror. Let's name the mirror legs. Let's name the
box, legs, middle. We can go ahead and
validate the box. Now we're on Gizmo,
we can move this up, shrink we'll just put it up. It looks like it's
something like that. I'm going to stretch it
with this blue node. Something like this.
Actually, you know what? I just thought of something
smarter, let's do it. Instead of this box,
let's delete it. Let's add another cylinder. Just long press it
and let's bring it up right underneath the legs and let's relabel it legs. Mid. Although we're using a cylinder, there's something really cool that you can do with a cylinder, you can turn it into a box, but you can still adjust
it like a cylinder. Now let's tap these
three little dots and let's change the
division X to four. Now it looks like a
weird shaded box. So we'll go here
to the material, and we'll turn smooth
the shading off. Let's go to Gizmo. Snap. Instead of 90, let's just put in 45. And then let's rotate it
to the left 45 degrees. That looks good. So I'm going to turn snap off. So now let's raise
it up, shrink it. Let's take a look at Xray so we can just kind
of see where it is. So we'll sort of
shrink it like that. Actually, it looks
a bit shorter. Maybe around there. We can turn X ray off. Now, we do want him to have
a little bit of a backside, and I just want to pull
it back and forth. But you see how the gizmo
makes it difficult. So let's just hit pivot. Let's turn snap back on. The snap is still 45 degrees. But since we hit pivot,
it's only going to affect the pivot or the
gizmo, excuse me. Let's rotate it this way
and then hit pivot again. We can hit Snap again as well. Now I can use this blue
node to stretch it out. And we can take these
options and we can open up the front or we can just make it a better
shape, closer shape. I think that looks pretty good. I think I want to take these
and make them a little bit wider at the top. Yeah, I think that looks good. So those shapes
are looking nice. So I might also add
another shape in the back, but I'm not exactly sure yet. Well, we can add Let's
add another box. Let's use the gizmo. We'll move it up. Shrink back. We'll shrink it this way.
And let's just kind of put it across like his
little backside. Let's make it
round, so we'll tap these three dots post
subdivision two division X, we can just put it down to
three is good, I think. We'll go ahead and validate it, and then maybe we can pull it, stretch it a little
bit, we'll come back to that a little bit
more later and fix that up. We'll add add another
cylinder Gizmo and it's going to start to get
easier the more you do it. You can see how characters, you'll just get
faster and faster once you get a
hang of the tools. We'll move it up over up and looks like it's
already in a mirror. Let's take it out and just label it leg, cuffs. Okay. So this looks pretty good as far as the space from the SM. I think that looks
good. So now we just go back to these settings and
we'll just taper the bottom. Maybe we'll make this
a little bit wider. Now we can go ahead
and mirror it. We can give it its own mirror. Let's make sure we name the
actual mirror leg cuffs. Because eventually
we're going to flatten that down and it's going to take the name of the
mirror. It's always good What is this too? These are the horns.
It's always good to take the red name, figure out what it is,
and just rename it. Let's make sure we save. Now there's two more cylinders. We can use the cuffs. We can take the whole
thing and clone it, and then just rename that clone. Feet. Now we're going to tap
on the actual leg cuffs. Let's just rename those two
so we don't get confused. You want to be on
the yellow part in order to adjust the feet. We'll bring it down and it
looks like it's the opposite. Again, I'm going to
tap the options. We'll bring these up. Maybe the whole things
are a little smaller, his feet look like
they're very small. We'll just make those small. Let's throw on the arms. Do I want to use a
tube for the arms? Oh, let's use another
tube. We'll go to path. We don't need snap. We'll start right at the armpit and
we'll bring it down. Looks like his hand is
going to be mid leg. I'm going to stop there so the hand looks like
it'll probably be mid. Let's make the tubes. Like to view and
make sure that make sure everything is
still symmetrical. We can go ahead and add
another node here to give a little bit of a
arch in the arm. It looks like let's hit radius, looks like this end might
be a little bit bigger. Let's go ahead and
take this tube. First, let's move it
out of the mirror. As always, let's rename it arm. Then let's clone it, and let's
rename the clone arm cuff. Now we're on arm cuff. We can go ahead and just bring
these into each other to delete them and then
we'll bring this down. Now we just need to make this
smaller and bring it out. Probably should have brought it out first, but that's okay. This is just the cuff. We
can make it bigger actually. As long as we're making
this side smaller. Actually, I want to
put a little bend in that as well, so we'll
add another one. The other thing is for this arm, I want to bend it
back a little bit. Even though it doesn't
really show it here, I think I want to
take the arm and the arm cuff and I'll
just use the gizmo and just move them back I
think that looks pretty good. I want to take this cuff
and then just adjust it to the changes from the
other part of the arm. I think that looks perfect. Now if we want, we
can go ahead and give a mirror and we can give
the arm cuff a mirror. We just go add mirror. Let's go ahead and add
two more cylinders. Let's turn it a little bit. Gizmo, these we can
bring up forward. Snap. Let's change
it back to 90. Or we could have just
rotated it twice, but we rotate it forward. Big orange ring shrink. These are obviously going to
be the eyes and then we'll just shrink it up like this and move it
back into the head. We'll give it its own
mirror and then separate. Let's make sure it's not
already in a mirror. It is. Let's take this out. Let's
take this mirror out, and then we can
connect them back up. Okay, so into the face down. Skin him up a little bit, and then we can rotate. Let's take snap off. So then we can rotate, and we'll have to adjust
them a little bit later, so we have some
room for the mouth. So let's go ahead and
take everything and move it down closer to this, and then we can give
it a quick save. Just go to select everything
except for the floor. Move it down some. So
let's go ahead and save.
6. Toy Hands: Okay, so to make the hands, I think we need to
make the shape of the palm and kind of
just go from there. So let's add Box. So we'll take the gizmo, and let's just move it over. Like so. Whoops. Keep
accidentally turning it around. I'm gonna hit solo. But I want
to be able to see the box. Where's the box? Tap on the box and then hit
solo. There we go. Okay, I'm gonna turn
smooth shading off, so I'm gonna go to materials. Whoops, and then turn
smooth shading Okay, so first, I'm going to make
it a little bit thinner. And again, this is
going to be the top of the back of the
palm right here. This will be the inner side and the thumb will be
somewhere around here. But for now, we're just going
to look at it front on. So I'm going to
trim this thing up. So first, let's go ahead and validate this shape.
Let's take trim. And we need to forget
about the thumb for now and just make
this little opening. Let's take the polygon tool. Let's start around here and we'll just make
something like that. Now we need to make a third one, just tap somewhere else,
and we'll make a third one. Let's tap these dots and
let's add another node. Now you can kind of feel, hopefully you can kind
of get where I'm headed. Let's first make this
little indentation here. So something like that. I'm going to add another
one just to make sure that everything
we're going to cut is going to be white. We'll
do something like that. It gets a little wider there. Actually, and we're not going
to worry about the thumb, we're just going to
do the palm section. So this line is going
down and then it's like, bam, bam. That's
actually pretty good. That's actually pretty good. Let's trim this by just
hitting this green. Beautiful. Now that's trimmed. Next, we just need to
trim the back of this. I think we can use the
line tool and just trim the back in like that. Perfect. I don't know why that is
a little ugly back there. I'm not sure what
happened to that, but I think it's fine, actually. For the thumb, I think I
want to use the tube tool. Let's use path. Let's just make a path to where the
thumb would go. Then we'll tap the green.
Let's bring this out, so it's more in a
thumbish type area. We'll bring that right into
his little palm section. Let's make the
whole thing bigger and let's make it
square by using the profile so it
can better already. We can go ahead and twist it, so we'll tap twist and
we just twist it one of these ways so that
it's nice and level. Okay, that's starting
to look thummy. Okay, I think that looks good. So let's see if we
can use the Gizmo. Gibmo doesn't really like
it's helping us out too much. Let's see if we put this
to 45 and hit pivot. Let's see if we can
rotate the pivot. It's still a little bit
off, unfortunately. I guess I mean, I guess we can we can just
eyeball it like that, but it's not always
the best thing to do, but I think we'll survive. All right, so I'm going
to open this up a little bit and just move it down just so it's
a little bit thicker. And let's turn
smooth shading off. That looks good. Let's give it a little
bit more subdivisions and linear subdivisions.
Let's do two and two. Just give it a little more
strength. I think that's good. Let's go ahead and
validate this. The only thing
that we need to do now is give it
another little trim. I'm just going to turn
it so it's on its side. And I'm going to take
the polygon tool again. What is our printer doing? Our printer is
just freaking out. So I'm going to go like that. I'm going to do a new
one, make them all black, and I'm going to make
this nice curve. So I'm going to make this round. Like so. So I'm thinking something
like that will work. Let's just trim it
and see how it looks. You think it looks great. Yeah, I think that looks good. I like it. So now I
just want to take this, and I'm just going
to move this with the move tool sew
more into the palm. I'm kind of going to join
these up a little bit. And we're going to
smooth all this out. So actually, I don't mind that it's a little rough and ready. That's fine. I think that looks good.
The only problem is, it looks like it's
a little high. So I'm just going
to take the gizmo and I'm going to use that pivot because I want to move it
straight down this way, so I'm going to use pivot, rotate it until that arrow is pointed the way
I want to move it, and then I'm just going
to move it straight down. I think that looks good. Maybe
I'll move it out a little bit more. But I think
that looks good. I'll just take rectangle, and I'll trim the rest
of this little palm. I think that's poefect. I'm going to hit left
and I want to do this little piece
in the middle here. I'm going to take this box, which is the hand, clone Gizmo. We'll move it out and then we'll just
shrink it like this. Maybe we'll stretch it a little bit and
then move it down. Maybe we won't stretch it. Maybe we'll stretch it this way. I think that looks good. I'll just take trim, and I think I just
want to trim it here. Maybe I'll bring it in
and then just stretch it. I think that works. Now we have that interesting
middle piece as well. Now all these things
we're going to vax remesh together and it's
going to be a lot softer. It shouldn't be a little sharp, but it'll be a lot softer. Let's do these two pieces. Let's figure out which one
of these two pieces are. We have this box,
we have this tube. Those are the hands.
Let's go ahead and voxel remesh them at 200. Remesh, boom. Good. Now that we've done that,
we can smooth them out. Nice. And then we can take
the other piece. We can voxel remash that. It doesn't need to be that
much, maybe around 160 or so, and we can smooth
this out as well. Okay, I think that's good. I might even make this
a little bit thicker. If I wanted to come
all the way down, no, I guess that's not
gonna work, will it? I'd have to, like, stretch
it maybe first and then do it and then bring it down. It's still a bit tricky
to get perfectly right. There's got to be a
way though, right? Okay, let's think about this. If I want to do what
I'm trying to do, I need this part to
be as long as that. If I want that part to
be as long as that, I need to do select mask, rectangle, and I just need
to pull this part down. Select mask and then clear. I'm just going to trim off
all that stuff in the middle. I don't need any of that.
All I need is the outside. So I'll just vax
remash this around 150 or so and then I'll
smooth it out again. I think that's good. Okay, let's solo unsolo. And let's take these
boxes, and we'll shrink. And we'll get them
close to where the hand is. That looks good. I tried this three
different ways, and this looks the best. So you might have to
take some time on it. Don't think that you have
to rush and get it quickly. It takes time to kind of
figure out the nuances and how to make things really look the way
they should look. So they never feel
like you have to rush when you're
doing this stuff. Fortunately, it's like sometimes things just take a
while to get right. And you can see I'm just kind
of squashing it and pulling it and pushing it until it's exactly the
way that I want it. So I'll just connect these
up and then just take the box and add a mirror
for the other hand. But I think that
looks pretty good. Let's look at the pose again. Yeah, I think that
looks pretty good.
7. Red Cape: Okay, so now let's do the cape. Let's add a box. Let's move it up out of that mirror and
let's label it cape. Cape A or Cape A, apparently. So I'm going to take my
gizmo and just move it up so it's up out of the way. So we'll turn it on its side. We'll make it a little
bit thinner like that. We can make it a
little bit bigger. Obviously, we want
it to be behind him. So around there is good. Maybe a little bit longer. Let's turn smooth shading off. So we'll go to materials,
smooth shading off. Let's make it a little
thinner. Something like that. Now let's take Kp
A and clone it, and this is going to be try. We'll just name that try. Actually, let's delete that. Let's add a new box and
let's name that one try. Okay, now we're on the new box. Let's bring that up.
Let's do Snap 45. Let's turn this left 45 degrees, then we have a nice triangle. Make it a little bit thinner, but thicker than the cape. Material smooth shading
off. That's good. That's looking perfect.
We can validate Gizmo. Bake. Remember, we're baking the position of it
in the triangle, then we have to reset the gizmo by going
pivot center pivot. It'd be nice if we can
actually solo these two. Let's take cape and
try and hit solo. Let's tap on the try and
we'll just bring that down. I'm going to stretch it
a little bit this way, like so, and I'm
going to shrink it. Let's move it up.
I think that'll be good. Just like that. Okay, so now we have try. Let's add a mirror. Now it has its own mirror, let's tap on try and actually, do we want to have one
in the middle or do we want to whoops I accidentally
clicked off of the cape. Let me select the
cape and then hit it. Right now, these are mirrored. These three. Now if I tap here, and just so you're aware
what happened was, if you're in solo, you have to have whatever you want
selected, including the mirror. So if something goes away, just select all three of these, and then you have
to tap on the one that you want with your finger, with the stylus, not
with the Apple pencil. Right now, this is going to be the middle
part of the cape. So we're going to
bring it up and we're going to trim in
there like that. That's looking good, but we
want to make this more round. Let's take this and validate. And let's take move and let's
make it more cape like. We'll pull this down, we'll pull this side up a bit, like that. We can pull this together. You can make that
smaller if you want, if you want it to be a
little bit more round. Think about this is
the shape that you want the cape to be pretty much. I think that's good. Maybe you can always stretch
it out a little bit too. But I think that's pretty good. I might trim off the
top a little bit. You can just take
trim and a rectangle and you can trim
off a little bit. I'm going go back to these Gizmo and we can just clone these. I accidentally hit
something else. Now we can just clone. I'll move it over. I actually want to tilt
them a little bit. I'm going to hit Snap so
that Snap is no more. Then I'm going to tilt
it and move it up. I think it helps actually if you can see the negative space. Hopefully this makes
sense. What I'm doing. I'm literally just
thinking about the middle of the cape
or the ends of the cape. I'm going to separate
these a little bit more and maybe
move them down. Now this is longer, and I'm going to clone these and I'm going to rotate
them a little bit. You see how these
should be triangles. I have to figure out how to best get them
to be triangles. That works. I just need
to move them down a bit. Now I have to do the
same thing with these. There we go. You want to
shape shape like that. I think that looks
pretty good. All right. I think what will
work best is if we take the cape, move it down, and just shrink it
so it's kind of even so that this line is going to seamlessly
go up the cape. I'm going to spread it out
until it's right at that edge. I think that's good and
then I'm going to spread it down so that you don't see it and I
might have to do it again, just line it up. But I
think that's perfect. Our cape is going
to look like that. Now what we'll do is
take all of these tries. The mirror and all
the tries validate. I'm going to rename it try. Now we just need to vaxl
remesh this together. I'm going to vox remesh it
high so it's nice and crisp. I'm going to vax
remesh around 300 so that everything
stays nice and crisp. I'll take the cape. This I'm going to vax remesh as well, probably around the same. So I'll remesh it really high. Now I can take them both. I can hide the tran boolean. So let me have a
pretty cool cape. I'm going to take or we can probably just stretch
it with the gizmo. You can stretch it some
and I might take smooth. You can either take smooth
and try to smooth this out or you can take trim with the polygon tool and you can try to if you really want
to get a nice edge, you can try to do
something like this. I'll add a node in the middle. See how you can try to trim this so that it's a
little more rounded. I don't know if it'll work. But sometimes you just have to, you know, let's say we want a trim like this and then maybe we
can just trim that. I should have been symmetrical
on the other side as well. So let's just hit view. Now it's a little more
like a cape. I like it. Let's unsolo. Let's take the
gizmo and just shrink it. We'll move it back into
position a little bit, shrink it a little bit more,
flatten it a little bit. That looks good. It's
essentially something like this. I'm not sure how we're going to put it together, but it's
something like that. I think that looks great. Of course, you can experiment, make different kinds of capes. But essentially, I like
how that turned out. All right. Let's save.
8. Pushing & Pulling: So let's start with the feet. So I'm just gonna turn
him so he's facing left, and we'll use move. We'll make it fairly small and make sure you have
the feet selected. And I can see here that
we need to validate. And once we're validated,
we should be all good. Let's just check our feet here. So our foot is in a mirror. So when we work on 1 ft, it'll happen on the other side. So let's just pull
this up a little bit. I think that's
probably pretty good. So I'm just gonna use
move and make sure that the foot is on the
ground plane her box. So I think that
looks pretty good. I'm gonna bring the
inside in a little bit, so it's a little
bit more foot like. Yeah, I think that's
good. And of course, you can always go
through and just check, make sure that you
like the size. If you wanted to
make them smaller, you can make them
a little smaller. But I think that's
pretty good. So I'm gonna go ahead and trim
the bottom of the feet. That's one reason I
want to make sure that they are on the ground plane. I'm going to go ahead and kind of adjust these a
little bit more. And then I'm going to use trim and rectangle to just
trim the bottoms. Okay, good. I'm gonna go ahead and box or remash them probably around 150 for now. You can give them
a little smooth. Now, when you smooth them, you may have to kind of stretch them out a little bit if they kind
of come up from the floor. It's a little pet peeve of mine when the feet are
not touching the floor. So I always just kind
of adjust them a little bit to make sure that
they're nice and flat. You can use Xray too to make sure you don't
push them down too far. Okay, that's pretty good. If TD prints
something like this, it'll still be flat
on the bottom. Okay, and as for the collar, let's go ahead and validate, turn smooth shading off. So tap material and then
turn smooth shading off. And in my head, the back comes up a little bit. We see that the front comes
down, so let's take move. And of course, you can kind of design this however you like. I'm making sure
symmetry is on so that both sides are affected. So I just want to move the
back of this up a little bit. And then I also want to
bring this front down. But I don't necessarily want to bring the top down as well. Obviously, I just want to
spread it out like so. And I think I want to trim
a straight line down here, sort of cutting it sharply. So I'm gonna use trim line. And let's see how it looks. So I'm thinking
of making a line. Now, we want everything in the white it's going to be cut. So I'm thinking
something like this. Let's see how it
looks. It looks good. I'm gonna go ahead and turn
smooth shading back on. And I'm gonna Vox
willll remish it. So let's ox we'll
remish it like 175. I'm gonna give it a nice smooth I want to try to get the
crease in the middle. Let's use crease and make
sure you have it on invert. Let's see if we can get
this crease in the middle. Let's go to symmetry
and hit Show line. So that'll give us the cheat
code to where the middle is. It's always easier for me to make a straight
line in a diagonal. Now I'm just going to actually, the smarter thing to do would
be to turn off symmetry and just try to get this inverted crease
right up the middle. Okay. I'm going to
turn this off for now. So I'll uncheck show line. Okay, I think that
looks pretty good. We can actually take
pinch, as well. Woo. Let's turn symmetry
back on for pinch. Let's pinch these edges. Nice. Pinch the top as well. And one thing we can
do to make this a little stronger is
voxel remash it. So I'm gonna box remash
it again at 175. I'll take smooth,
and I'm just going to lightly smooth this. Nice. Okay, so the only thing that's
a bit different to me is the head is a bit
further down on this. But I think we can go ahead and adjust this and maybe
move this down. So I'll take the gizmo
and move that down. And then I want to take the head and everything connected to it. But unfortunately, I was a dum dum and didn't
label everything. So let me go ahead
and label these. We'll take this mirror
and label this hands. The head I'm going
to put up top. Where are the horns?
Horns are here. We'll move those up. The horns are above the head
and we need the eyes. We'll bring those up. And
we'll name the mir eyes. This mesh is the cape. So I'm gonna go through
and label everything because it'll make it
easier moving forward. Let's save. We're happy with
the horns, we'll go ahead and validate them. And we'll validate the mirror. Now the horns are validated. Head B, head A, horns, eyes. I think we can validate
the eyes as well. Let's go ahead and just validate these. We'll take all of these. I'm going to take
all the head, go to Gizmo and I'm just
going to bake it. Okay. And the reason
I'm baking it is so now all of these are going to be in the center, where
they should be. Apparently, this
isn't. So let's see. Let's see if we do
pivot, center pivot. If we go all of these
and do center pivot. So it was I was just showing the last location
that the gizmo was, but it was actually
in the right spot. Once we did pivot center pivot, everything should be centered. So it was just
trying to trick us. So we'll select all the head
and just move that down. A bit. Maybe there. I think that's good. I think I want to I might
want to adjust this. Now, you can do this if
you feel it's necessary. I think I want to
adjust the head slash helmet piece to maybe come down a little bit.
Let's see how it looks. Maybe in the front. I feel like it doesn't want to
come down in the front. There we go. Push that side back up. Maybe bring this down. I think the back
looks pretty good. This I can also take a
move really big and just move this collar point in a bit. I think that's good. And part of me wants
to use flatten. This is just a little extra. Part of me wants
to use flatten and just kind of flatten this
out for some reason. I'll solo it so nothing
else gets in the way, and then I'll just
flatten out this edge. Sometimes I just do
things that just feel right for no reason. I'm gonna take move,
and I'm also gonna move this part out a bit and maybe move
the bottom part in. I want to make this
a little sharper, so I'm just going to use move and just kind of sharpen
that up a little bit. Push that part up. Noise. Make sure you don't have
any gaps like this. I'm going to move this just a little bit so that gap
so there's no gap there. And Okay, good. I'm
gonna save this. And now for the mouth. So we just need to figure out how we want to actually
shape the mouth. And since I'm on this
arm, let's go ahead and validate the arm. Let's validate the
cuffs. They look good. I think everything else I think everything
that's validated, we can validate the legs. Validate that. These cuffs. I think everything else is
good. Yeah, we're good. So next, we'll
just come back and figure out what we want
to do with the mouth.
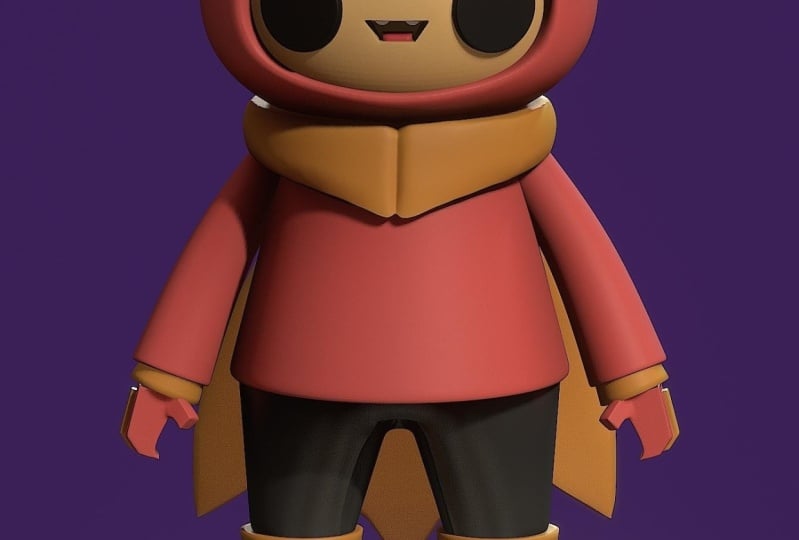
9. Mouth & Buns: Okay, so let's give
him a food mouth. He's going to get
hungry. I think I want to do a boolean for this. And also, don't forget that to adjust this part of the head, just use mask quite big
so it's nice and smooth. Just remember to kind
of adjust so that the so that there's still that
equal rim around the edge. I kind of want I kind of want to bring a nice flatten
around that, too. We might
flatten that later. We'll see. And these looks like they popped out a
little bit, and that's okay. Oh, did I bring them
together? I did. If that ever happens, if you
bring something together, and then you decide
you don't want it together, super easy. Just take you know what? I usually trim, and then I work on one and
then mirror it, but there's an
easier way to do it. You can actually take the gizmo, so we're on the eyes,
and they're one piece. But what we can do
is instead of group, we can just take vertex. And I believe I
believe we can, no. Am I wrong? No, maybe maybe
we do symmetry as well. Am I I'm not crazy. I knew it. So vertex and symmetry. Now, let's do pivot, center the pivot points in
the middle, though. That's the only problem. We can take pivot and move it over. Let's move it over
to this I. Alright? And then we'll
uncheck the pivot. So then we should have
control over this I. Yes. So that's a huge help for us. Let's bend it this way
a little bit, too. So that's a huge help for us. We might have to come back
and edit these eyes later. So just remember, if
you have two things, now they're still on the
opposite side of the world. So that's kind of why that
works because remember, there's local symmetry, but then there's just like
the project symmetry. So just remember
vertex and symmetry, and you can still
adjust the mirrors, even if they're just one piece. Okay, let's go back to Auto. Let's figure out the mouth. Let's add a cylinder for now. And let's just try to
I'm going to try to stick to that shape
because once I start trying to be a gunslinger and I'm just
kind of going off on my own, then you know, I start then I start really losing the plot when I'm trying to, like,
make a tutorial. Alright, so we just made
this cylinder small, and I just moved it in front of the face so you can kind
of see what I'm doing. So let's go ahead and make
this into a square again. So we tap these three dots and we bring the division X to four. So the division X is four, and we can turn
smooth shading off. So just go to the material,
which is that sphere, and then turn smooth
shading off. There it is. And let's rotate it. So
let's do Snap and 45, we'll rotate it
once, 45. Perfect. So now I don't think we can bake it yet because
we can't bake because we haven't validated and we
don't want to validate it yet because we want to be able to use these cylinder tools. So I'm going to make the top bigger and then I'm going to make the
whole thing smaller. To me, that's what
it feels like. It feels like that
shape right there. I don't know why I'm
being so dramatic. But I think that looks good.
I think that looks good. I think it's time to validate. And I think it's time
to take Gizmo and bake. Now, remember before the
same thing happened. The Gizmo still shows the previous the previous
what's the word? Orientation. But let's
do pivot, center, pivot. Now we're looking good. So now we can use this piece. Let's just name it mouth X. Now we can use it to cut out we can do a Boolean cut
out of the face. Let's move it into the face. Let's go back to front and let's shrink it down
because it's pretty small. Maybe something like
that. It's actually a little bit smaller. Maybe
something like that. It doesn't have to be exact, so it can be however
small you want it to be. So smooth shading on, and then we'll take this shape, smooth shading on auto. It looks crazy, but
let's see what happens. Boolean, Boolean.
Still looks crazy. Okay. The mouth is only
eight vertices, so that's very, very small. Let's take the mouth and just give it some more resolution. So let's voxel re mesh it. And we're gonna
get rid of it, so I'm going to just do 200. I'm going to take
this, and let's voxel remish this as well at 200. Okay, we got a little bit of gritting going on, which
I'll just smooth out. First, so now we have the
head yellow and the mouth X, and we'll hit the little
eyeball for the mouth X. Again, if you have any issues, you can go down here and tap advanced and uncheck
sync visibility. So remember, once we have two items selected and one with the eyeball hidden,
we can use Boolean. So Boolean, Boolean, and there we have
that perfect mouth. Okay, so let's add his
little tongue in there. So this is now the head yellow. And then we can add
a little tongue. So we'll just add a almost
want a little square tongue. I kind of want a
square tongue, right? I feel like a square
tongue would be better. I don't think I've ever
used a square tongue. Feel like it feels
like it fits better. And sometimes I just like to
do things out of the box. I'm going to bring the
resolution down on this, so I'll tap here and we'll do our post subdivision to two and bring the
division X down. I'm going to make this bigger so you can see what's happening. Actually, I'll solo
it and we'll bring division X down just so it's a little bit
of a softer cube. Maybe at three.
I'll validate that. Yeah, I feel like
that's exactly what. What I wanted. I like it. And next we can just
start box will re messing things
together and just kind of making him whole and linking up the different parts
that are the same color. So let's just do a quick save. I think he looks good.
So the first thing is just kind of
solidifying these pieces. So I'm going to validate this I can't believe I
didn't validate that. I must have forgot.
I want to make sure that the sizes are
a little bit high, so I'm going to be
subdividing most of these. Tap on the body first,
make sure it's validated. We'll tap here, subdivide twice. I think twice as good.
We'll take the arms. Make sure that's validated. I'm validating the mirror. Now we hit we have the arms, and let's go ahead and tap
the pyramid multi res, and we'll subdivide
it twice as fine. Now we need this, which
is the body and the arms. Let's just put them together. I'm going to actually nestle them just so I know
where they are. So we have the legs,
the legs in the box. That's right. We
have this part too. Okay, the box can come out because that's
one single piece. Let's take the
legs and validate. Perfect. We'll take the box. Well, that's separate
from this box. Legs mid will bring up to where the legs are and the legs
let's do Multis subdivide. Legs mid Let's see. Let's vax well
remish that first. So we're going to
vox remish 200. Now these two I'm
going to connect. Connect all these pieces. And then his little bum, which we really
won't see that much. But let's make it a
little bit longer. Let's subdivide it like we did the other ones. That
should be fine. And we'll connect these
two. These are all the body Arms. Okay. That was
a little silly of me. Let's put the box, the legs mid, the legs. All these parts are
going to be black, so let's take these and let's
vax re mesh these together. One important thing
is the front, we want to be solid solid
is not the right word. We want it to be
straight across. So I'm going to take
these legs, use move, and I'm just going to kind of
move them so that they're a little bit more flush
with this piece. Okay. That looks pretty good. So we'll take all of these now and just vox or
remesh them together. I'm gonna do around 200. Perfect. So now we'll just take smooth. You can smooth this out. Smooth
out his little backside. I guess I probably
could have trimmed a little bit of that off, huh? I want to take move and take
this and move it forward. Just so it sort of
is a little bit more in line with the shirt. I think we can
just take flatten. Let's solo this part.
Let's just take flatten. And let's just kind of
give him a little bit of a a little bit of
something like that. So it's not so it's
not so egregious. Okay. So just a nice little flatten, I think we'll work wonders and then we'll just
smooth it out. I think that should be good. Let's hit solo, and
that's much better. I'm going to take the
back part of this with move and I'm just
going to push it in. So it sort mimics kind like
the curb of our backs. I think that's good.
You can even take this. If it's still feeling
a little too much, you can pull it up a bit.
I think that's good. I think that's nice. I think the under part is okay. I don't think we'll really
see underneath there. So I think that's
fine. Let's take these pieces and
let's validate them. Arm cuffs, we can Let's
add a little bit more. Let's go to the arm cuff. Oh, we validated the
arm cuffs, didn't we? So let's just validate
the whole mirror. Arm cuff, feces, we
can validate hands. So we have this separate
piece for the hands. Let's give that its own mirror that's gonna be its own color. So let's just name this hands, accent, something like that. And then we have hands,
and we'll validate. Perfect. Okay, let's save.
10. Dynamo Detailing: Alright, we're doing
well. We're pretty close. So if you're like me and you're worried about this line here, which I think looks pretty cool. Let's actually, it kind of
looks like it comes down. Let's use crease invert. Let's make a crease here. Straight across, and maybe even here from the leg.
It's kind of cool. You can do something
like that or again, we can take pinch and
we can pinch across. So you can pinch
straight across. I don't think we can
I'm not sure if we can kind of get a pinch. Oh, yeah, we can. So we get a little bit
of a pinch there. So that's nice. I'm gonna go ahead and voxel
remash this piece again. I'm gonna do it
higher at like 250. I really want to try
to lock that in. And I want to take smooth
and I want to smooth above try not to really mess with that
beautiful crease we made, but I still want it
to look very smooth. Nice. I like that. I
think that worked. This also bothers me that
you can see the underside. So I'm just gonna
tilt it a little bit, make sure I'm not
carving through the back. And what
do I mean by that? Let me hit solo. I don't want to carve
like this if I take trim, because if I try to
carve it straight, it's going to carve
the whole back. But if I do like this, then
it's only going to carve that underp which is bugging me. We'll
look at it like this. We'll take trim line. I'll put it down a
little bit more. We'll take our line and we'll just trim right
down. There we go. So let's see how that looks. It looks a little
sharper, I think. Some little vax will
remiss it again, probably do around 250. It's a bit high, but I
want to make sure that I'm locking these shapes in. We'll do a little
bit of a smooth. I think that it looks good. Nice. It looks like the
top needs to be pinched, so just keep an eye
out for, um, you know, some areas that you
might have to go back over with pinch or
something like that. I'm constantly Oop. I'm constantly making sure that everything looks the way
that I want it to look. Sometimes it just takes
forever, unfortunately. Okay, everything looks good. I feel like I want
to move this up a little bit back here. I'm trying to make sure
to show you, like, all the little details that
I do. Oh, you know what? This back looks a
bit weird to me. So I'm actually gonna
move it forward. I'm gonna move the top
out and this forward. Okay, that makes a little
bit more sense to me. I'm gonna push down.
In the middle, I need to make the
move smaller so I can kind of push
down in the middle. Okay, I'll smooth it little
bit. That looks nice. I'm gonna clean up
this edge with pinch. Think that looks nice. Let me solo it. This
looks really lumpy here. I don't I'm not a huge
fan of that, though. Let me try to smooth
all this out in here. It looks a little lumpy, so
I'm gonna use clay and I'm just gonna kind of clay over it a little
bit and smooth it. Okay, that looks a bit better. I'll take move and kind
of move this up, as well. Those little details really,
really, really matter. Um, I'm always trying to pay attention to
those little details. Even things like I want this to look Okay. Looks good. I'm
gonna vox remish it again and then kind of smooth
out because I just touched. I just kind of made some edits, so I'm going to smooth that out. Maybe I'll take pinch. Just kind of pinch the middle
again a little bit. Okay. Okay, that looks good. This
was a really difficult piece. But that's how, you know,
sometimes it takes those really difficult pieces kind
of to really get it. I also don't like
how this separates. So I'm going to use clay. I'm going to add some clay here to kind of bridge
it a little bit, and then I'm just
going to smooth it. Okay, I think that looks better. So let's save. Alright, cool. I'm pretty happy with this. Oh, we need to ox
remiss these together. So let's take the
body and the arms, and let's just vox
remiss them together. Oh, we can do 250. Oh, but do we want to? That's where it gets tricky. We could always try
booleaning them together. If we take both of
them and hit boolean, then we just get, that's
a little bit better. It's a nicer cut. I'll smooth out up here, but it's still a
nicer cut, I think. It's a nicer cut down here or a nicer
joining, I should say. Body. Everything else is good. These are black. Okay,
we have the leg cuffs. They look good. I
think I want to join them with the arm cuffs. Let's see if we can subdivide
them. They're a little low. So let's subdivide them. Arm cuff leg cuffs. And let's just join those
and just call them cuffs. The box is the legs. Okay. Everything's
looking fantastic, so we need to join the
head and the horns. They're both very high,
so I'm going to save. Make sure you save before you do very heavy voxel remshing. Let's remash this at 300
and just see how it looks. I might do it a little higher. I might try it at 4:50, see if we can keep those lines straight. They're
pretty straight. Let's check out the
horns beforehand. They're very small.
So let's subdivide. This is high. Now the
horns are much higher. Let's turn smooth shading off. And now let's see
what happens if we take these two and
put them together. So with vox remshp that
was the wrong one. We want to take head horns and horns and vox remish around 450, and let's just take a look C. Okay. I think that looks good. Turn symmetry on because
now this is symmetrical. We can smooth smooth
out these horns a bit. I think they look great. If you want to, you can
use flatten or pinch. Maybe pinch is the move here. Take pinch and pinch this edge. I think pinch is the move. Just gives you more of
that crispness back. Merry crispness. I'm I'm gonna have
to figure out a way to name a video that on YouTube. Merry crispness. Maybe maybe ways to paint
really well defined things. Okay, this good. The arms are together. The cuffs
are together. Okay, so now for this I put it down angle it. I think that's good. I'm going
to take drag and I'm going to drag the two
ends into the cuff. Maybe move is better. We want
it to be nice and smooth, so move is probably better. So we'll push it in and then
we'll also pull push, pull. We really want to get
these sides in and do something like that.
Make move really big, maybe push this
out in the middle. Okay, I think that looks good. Will you smooth a
little bit on this? Kind of smooth it out. Okay, that looks good. Okay. And I want to check
out all this is. Let's turn smooth shading on just to see what
it looks like. It looks okay. It
looks better off. Part of me wants to add
some details back here. You know, I'm always
adding details. Let's add a cylinder and
just make them really small. We'll use a snap, turn them this way and kind of make them
like they're like, little connectors or something. Let's use mirror. So I don't
know, let's see if it works. Just kind of rotate them
so that they look like they're kind of connected. Kind of keep them sort of
level with the collar. I think I like that.
I think I like it. So I'll validate them
and call it cape. Let's validate both of these. I'm just gonna Let's
two pivot center pivot. Okay, that's good. Cape Uh, connects. Okay, save. Cat me think of anything
else cool I want to do? Remember, you can do whatever
you want with this guy. So, um, have fun a little bit and experiment before we hop to the next video. I really like fins,
so I want to put a fin on the back of his helmet. So let's go to the horns, which is now the helmet. Let's make it the
helmet. I can't believe I spelled it like
that, like the designer. We'll add. What do
I want to use here? Let's use a cylinder. Let's use Gizmo.
I'll bring it up. We'll do snap so I can
turn it on its side. Okay, we'll squash it. Shrink it. I'll
shrink it this way. I'm thinking
something like this. I think that's what I want. I'm going to validate it
because I think it looks good. Then I'll just use move and figure out exactly
how I want it to look. In my head, it was kind of long. Yeah, a bit like that. But it had a harder
fall off on the bottom, so I'm going to push this up, maybe even pull it down. Yeah, I think something
like that is what I had in mind. Okay, that looks good. I like that. It just
adds a little something, you know, a little flavor. All about the flavor. Okay, so let's add this to the helmet. Let's just call this helmet. Finn. Nice.
11. LitPBR & Lighting: Okay, and I am going to add two little cylinders for teeth. I just
wanted to warn you. So let's find this add cylinder. And this will be the same
thing that we always do. I'm just going to bring
it up, bring it forward. Snap turn it this
way, Shrinky ink. Okay pull it together, shrink it a little bit more. So it's tooth size. Tefi sized. We'll go like this,
mirror, pull it apart. And I think that's
all I want to do. Just add a little bit a
little bit of a tooth. Part of me does want to
make it a little sharper. No, I can't lie about that. Let's just validate it. Let's take drag, and let's
just see if I want to give him little some little fangs. Et's make sure that
they're moved up. And I think those are keepers for me, so I'm gonna keep them. And I'm going to go ahead and validate these and
call them fangs. Okay. Good. So now let's finally go
ahead and light them. It looks so good.
I'm very excited. I don't know what this
thing is there for. Sometimes it just pops
up out of nowhere. Oh, there's another thing we
can do too to make painting. I forgot this step. Let's take the pieces that are going to
be the same color. So the helmet, what is the box? The box is the tongue. So we want the helmet, the body. Let's just go ahead and
join these for now. Those are going to
be the same color. Helmet fin, Cape. I don't think anything else is going to
be the same color. What else is the same color? The body. This will be the
same color as the hands. So we'll join that. Oh,
the fin helmet fin, and the Oh, no. Uh oh. Problem. The
problem is that the body. Okay, so it's okay when
they're joined together. The helmet fin and
the hand accent. I'm gonna join those. Those
can be the same color. The hands, I can't join
with the body though, because the hands the
smooth shading is off, so I need to keep that off. I can put them up here
next to the helmet. Cape neck I think the cape connects can be
we'll keep it separate. We can color them. We can
color them separately. Let's change it from Mat
cap back to lit PBR. You have to do that in order
to color it, and light it. So Mt cap back to it PBR. And we'll just set a
base tone for now. So I'm going to use you
want to use some sort of let's select everything. We'll tap here, we want to use some sort
of neutral color. I kind of use a
terra cotta color, and we'll just paint all. I like the darker one. So
we'll paint all. Looks great. We'll go to our light, turn environment off.
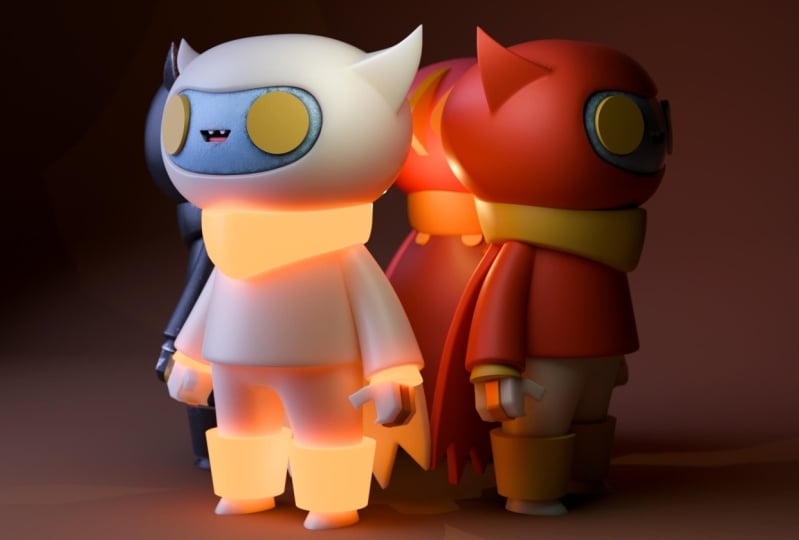
Look at that grate. That looks so good. I have to export this. Okay, so let's now
add our first light. So we add light, put
the light to two. And let's hit a line. So the light is we can
control it with the Gizmo. We'll move it over and up this white arrow is where
the light is pointing, and it's pointing in the
perfect spot right now. Okay, so this lighting
is looking good. Let's go to our lights, and let's rename it key. This will be our key light. All right, so let's clone the key light and
we'll name this edge. This will be our edge
lighting. Let's hide this. Let's take this
and move it over. So now we have our
cloned edge lighting. I'm just going to bring
it down to about here. And now we can rotate this. Oh let's take it off of snap
so we can rotate it freely. So we want to rotate it so the light is coming from behind. Let's take it off of
a line so that way we can rotate it in the orientation
of this white arrow. So we'll use the red ring and the green ring because we
want just a nice sharp edge. That's perfect. So let's
bring this to five. So we're bringing the
power of the light up, as well. Maybe even ten. Let's just go crazy. Okay. So now we need to
make an R two and a D two, two more lights. We can actually use the
first light. Let's clone it. Oh, then it goes
right underneath. No, I have to continue the
way that I always do it. Let's clone this one
and make it R two. And let's go back to a line, and let's just bring this
light back straight over. This is going to
be the secondary light pointing to this side. So we just need to take the
green ring and rotate it. It's really bright,
as you can see. So we can put that
down to maybe two. We can still see it. Let's
make it. Let's make it cool. So we'll change the
color to a bluish color. Look a lot. And now we
can take the edge light. Oh no, we'll take
R two. We'll clone it, and we'll name this D two. We'll make the light white. We'll change it from a
sunlight to a spotlight. Let's move it over. Now, this matters where we put the light. So we'll bring it up.
Let's turn a line off. Okay? And now we'll rotate it. And let's put it kind of here, but let's back it up so
it's a little higher. Yeah, something like that,
I think, looks good. Maybe we'll make it a little warm. We'll do
something like that. And maybe we'll make the other
light a little warm, too. So let's go back,
go to our Edge. We'll go to Edge and make that
a little warmer, as well. Perfect. So let's save. So that will be saved. I'm
actually gonna save it again, so I'm gonna do Save as. New. Red Rascal two is fine. So then I can continue
with this new one. Okay, so let's turn on post process, so we
get a good look. And you can take a
look at my settings. Everything looks
pretty good so far. Might do bloom, so you can get a little bit of a shin
there. Looks very pretty. Okay, so that looks great. Now let's go to the light again and let's bring
in our environment. So we'll tap here. Of course, we're using my
custom environment. If you don't have
this, just tap here, Import, photos, make sure
that it's on your device, find it, and then you
just add it here. And then you'll be
using the same invite. And this is in downloads
and resources. Might be a little bright.
I'm gonna turn this down so that we still get a
nice shadow on the left side. Okay, maybe 0.85 or so. I think that looks great.
So we'll save this. And now let's, let's go
ahead and color this guy. Once we color him,
we'll be good to go. I'll show you how
to do a turn table, and he's pretty much good to go. All right, so this is red. And we'll just make
this really simple. You want to use this line or this sphere with a
line through it. We'll make that red.
And let's do this. I'm going to open
this to this side so I don't block what I'm doing. Okay, so let's check
this out in red. I think I like this muted red. So we'll do paint all.
And this is f7595. A. If you want to use
these exact colors, but you don't have to.
Is anything else red? Oh, the hands are also red. And now, these parts are yellow. I don't know why I
didn't join those. So the collar and the cuffs, let's see if I can join them, and everything still
looks good, yep. Oh, and the head yellow. I'll color that separately. So now let's find
our yellow color. Okay, nice bright yellow. That's looking good. We'll
use the same for the head. Although the head looks
a little bit lighter. That looks a little
bit more accurate. So we'll keep it
like that for now. These are black. Okay. That's good. Little tei fis I could get them. These little fangs. Let's let's go ahead and let's do pivot center pivot just
to get that up there. And then, we can't bake,
so I guess it's fine. So let's make those white
and then the tongue. The tongue let's
actually just use this. What I just did was, if you use the paint, this
is the eyedropper, you just use that and you can drag over any color you want, and it will capture that color. Then we go back into it, paint, and now the
tongue is painted. These can be the same
color as the eyes. Again, I'll just use the
eyedropper, tap here. Now we're still
selected on the pants, then we'll just paint all. Look a little they look a little uh Maybe I want to lighten
them a little bit. I like that kind of charcoal
look. So let's go with that. That looks a bit
better. The feces. Let's do pivot
center pivot. Okay? They look a little bit darker and a little bit more glossy, so I'm going to turn
the roughness down. And then paint. And then the only thing we
forgot is this. So I'm gonna go back into paint, use my eyedropper, and then grab this part and go
ahead and paint that. It looks fantastic.
That looks good. So did we save a Oh, we did save a view. So here's the view. I
think it looks good. Let's open it up a
little bit more. This looks a little bit
more accurate. Is our view. Although we can probably
put it in perspective as well. That looks pretty cool. So I'm going to go ahead and go to this little image and
get rid of the reference, and I'm going to update this by pressing this
little arrow pointing down. This will update our view. So that's one. Let's try one
with it on Orthographic. So let's just add view,
and we'll name this two. And I really like
the front view, which is what we lit for. So we'll put it here, and
we'll save that view, as well. So the little camera ad view, and we'll just name
this three front. Okay, perfect. So the only thing left is, let's do a nice turn
table for this rascal. Oh, wait a minute. I got so many lights back here, I didn't color
these or the cape. The cape, I feel
like should be red, but maybe a darker
red. I don't know why. And these I think I may want
maybe they should be Black. Maybe they should be this color. Oh, no, let's make them yellow. Let's make them the
same yellow as this. Now, let's just paint all. Perfect. Oh, I love that profile, too. Profiles so pretty. But I think I want
to fix the lights. So the only light that won't
get fixed is this light. But I think I want to fix. So let's go to the lights if I can remember where
it is. So we'll go here. Let's go into the key. Let's go into the
settings and attachment. I think we want camera. Edge, camera, R two camera. This is the only one that
we can't map to the camera. I'll hit a line
and we'll move it. I don't think I
can move this two. Let's see if I can reset it. Move it straight
up. We'll rotate it and point it straight down. Let's move it up a little bit. And we'll point it
right over his head. So that makes it
kind of interesting. So let's go back
to the front view. It looks good. So I
changed the color of the background just so it was something that
really made the red. Pop, pop. And I also change the RT light to a similar
color to the background, and I change the edge light to a similar color
to the background. It kind of ties your
character in when the lights can kind of feel like they're coming from the
surrounding area. So just a nice little
little touch that I made. I can probably make R two
even a bit more saturated. But I think that
looks pretty good. So now at export, just go to your folder, go
down to render. If you want to render it
with the background color, then just go ahead and
leave both of these unchecked and you can hit full screen or whatever
size that you want. If you want it just to
be a clear background and just the character, then you just go ahead and
hit transparent background. But I'm going to turn
that off because I want to do it with
the background. And then you just hit
down here Export PNG. And this will cycle through
whatever you have set in your post processing,
the number at the top. Minus at 3:50, so it
exports at 3:50 samples, which is just I
think 300 is good. Probably 200 to 350 is fine. I'll just export. I'll use Airdrop to send this
to my computer. Tap with four fingers to
have everything go away. Let's check on our post process, make sure everything is on. Beautiful. Tap
with four fingers. Oh, let's save. Tap with four fingers, tap the nomad icon. Tap with four fingers, tap the Okay, tap
the nomad icon. Sometimes I have brain farts. And if you're on an iPad, I'm going to scroll down from
the top corner here record, and then go back here and
make sure it's on zero, zero, zero, and then
hit Turn table. And that's a good size. So I'll leave it there. It's a super awesome character. I'm really happy with it. I hope that you guys had fun
and you learned a lot. Making characters
like this and trying to having to problem solve
is the only way that you'll learn to create really cool characters and
learn to be efficient. You just have to try to run
into all the problems that you're going to have
really that's all art is, is just a series of problem
solving and being able to solve them as
efficiently as you can and as quickly as you can.
12. Blender Prep! : So let's bring this
character over into blender. This will give you
really amazing renders. So the first thing that we
want to do is make sure that we don't have any layers, which we didn't work
with in this tutorial. But if you're
making a character, you want to make sure
that you flatten all of the layers on
any of the pieces. But we didn't work with
layers with this one, so don't worry too
much about that. So let's go into our scene. We don't need the floor. So we can delete that. We don't need the cameras, so
let's delete that. And we don't need the lights. So I'm going to tap on all
the lights and delete. So all we need is
just the raw figure. So let's go ahead and
bring our grid back. It's a little hard to
see. So I'm going to go to here and just bring this
color down so it's darker. I'll make sure I hit front. Okay, so now we should
see this red line, and you can see that he's right he's perfectly lined
up with this red line. So that'll be great. When we
export it over to blender, it'll be right where
he's supposed to be. So we can turn the grid off. So the next thing we want
to do is make sure that everything is baked in its spot. So what that means is when
we send it over to blender, the origin of each of these
pieces, like, for example, let's say, the
head and the body, the origin will be right
there in the middle. So that's what we want. So let's say I go to these
cuffs and everything. The origin is in
the very middle. You check here,
you can't bake it. If we go to the eyes,
and we check here. See, the eyes is
off to one side. I'm gonna go pivot center
pivot, and then bake. So each of these pieces, see how the gizmo
is kind of off. I'm going to go pivot, center, pivot, and then bake. Okay, but it looks
like it's good. So I probably
didn't need to bake because I should have did
pivot, center pivot first. If we look at the
legs, pivot, center. It. We can bake that. Then we have the cuffs,
we have the feet. Everything looks good.
Pivot center pivot. Let's just check out. The helmet is good. Hands. This is the yellow head. Let's make sure pivot
center pivot, bake that. Fangs looks good,
pivot center pivot, tongue, pivot center pivot,
and we'll bake that. And I think that's
all of our pieces. So nothing else we
should need to bake. Oh, let's right the cape. Pivot, center pivot.
And we'll bake that. Cape connects. Hands accent. Pivot center pivot. Oh,
that's interesting. That's very interesting. What solo that?
Oh, with the thin. The fin. That's very interesting. I'm going to go ahead
and separate this, let's tap here and separate. We have the fin,
and then we have these two hands. I'm
going to join together. And bake. I'm gonna unsolo. And this will be the fin.
So all of these together, I'm going to join again. And you can just join in
with the hands accent. Let's delete this and just Okay, so now everything is
good, so we'll bake that. Legs is great. Cuffs are great, and feces are great. Okay, so everything is in
its proper optimal position. So the next thing we want to
do is just go to our folder, and we don't have
to save it because we can save it in nomad when
it's all lit up and pretty. So we go down to export GLTF and then we'll export
this to your computer. Blender you use on a PC or Mac. So make sure you have blender downloaded and we'll
just export it to whatever computer that
you're going to use Blender. And blender's free, but you probably should
know that by now. So I'll export this
to my computer. Okay, perfect. So then we're good to go. I'm gonna discard the autosave and just um I was just too new, get it set up for whatever the
next thing I'm gonna make.
13. Welcome to Blender!: Alright, so welcome to Blender. And let me start out by saying
Blender is a very complex, and there's so much
depth to blender. It's gonna take you a while to really wrap your
mind around it. You're gonna have to
watch a ton of tutorials. But I'm gonna try
my best to make it as simple and painless as I can. You won't be able to
see my hands like nomad because it's
mouse and keyboard. Okay, so once again, I'm using a PC so if you're using a MAC, then you're gonna have
to substitute some of the key strokes because Macs and PCs are a
little bit different. So they're a little bit different and
you're going to have to figure out those
small differences. And sometimes they
will take a moment. So try not to get frustrated. I had to learn it on a mac when all of the
tutorials are on a PC, so I had to figure that
out, so it can happen. But if you really if you really get into
blender, eventually, you want to get a PC, it'll be easier to work and easier to follow along with tutorials and
things like that. So once you open blender, you're going to have a
little splash screen, and once you say, Okay, exit out of that, then you will have this screen
with your default cube. Alright, so if you have your
mouse to move it around, you hold down the mouse button. And then you can move
everything around. If you're on a mac
with a track pad, I believe you just do
this with two fingers, and then you can move
around the screen. And you'll easily be able to figure out how to
zoom in and out. With the mouse, you just
use the scroll wheel. So we're seeing this red line. This is the same red line that
we used when we export it. So this is the one where our
character is standing on it, and that's why he's
standing on this red line. Then we know that
it'll be level. So the first thing
we want to do is go up to file, excuse me, go up to Edit and
preferences. And add ons. So go to search add ons
and search Node Wrangler. And we might not use
the node wrangler here, but every tutorial that you look up is going to use
the node Wrangler. So you might as you'll
just get it now. So node wrangler, and
you can make a check. And I believe the
settings will autosave. Once you make a change, it'll just save that setting. But you might want to
double check that, but I'm pretty sure
that's default. Also, if you are using a PC, one key piece of information that would
have helped me a lot, or even if you're using a MAC, you want to go down to system and you want to make sure that you're using
the cores or the GPU. So Macs have the metal, so you want to be using that. So just go to
whatever the setting is that's using the GPU cores. I'm going to be
using the optics. I'm using a GFce. This is what's in MPC, so that's what
I'm going to use. But you have to
go here and check this or else it
might use the CPU, which is really, really slow. So make sure that you do that. So we can close out of
the settings for now. Oh, there's one more
thing that I want you to do for the settings if
you're using a MAC, especially if you're
using a laptop, then you have to go into input and then go
into let's see. So for your keyboard, you
want to do emulate Numpad. So that's if you
have, like, a laptop. Like with my Mac laptop, I don't have a separate the
numbers aren't separate. The numbers are on the top row. So that's useful. Actually, even on my PC, the numbers are also
on the top row. I don't have a keyboard where the numbers are
off to the right, so I have to do emulate Numpad. And I think that's it for now, so we'll close out of that. The next thing is so we'll start over here
with this little camera. Blender has two different
render engines. There's EV, which is kind of a more cartoony,
like, less realistic. But if you press
the scroll down, then you have cycles, which is going to be more realistic. I'm just gonna put mine to cycles because I
always work in cycles. Also, I'm going to
change the device from CPU to GPU compute. Again, this just will point to your GPU
instead of your CPU. CPU is always in most cases, really slow. And let's see. I'm going to go
down here to okay, everything else here is good. So now I'm going to go down to this little output and
just check it out. This is, like, your size of your canvas and things like
that. Let me go back up. So again, make sure you go
to your render options, which is this
little camera here. Make sure that the device
is set to GPU compute. Also, you want to go
down to here DNOis. So this is the render settings,
and this is the viewport. The viewport is what we see
while working in Blender. The render is what we'll
see when we export it. So you want to make
sure that the Denis, and then you put Hughes GPU. So just make sure that all
these options are at GPU. And also, let's change the
viewport Max samples to 200. If you have a slower computer, you can put that number lower. For MAX samples for now, just put it to 200. And again, if you have
a really fast computer, you can go up. Like I might do 1,000. If you have a slower computer, you might have to go down to
50 or something like that. This is the samples that
we will export with. And you'll notice that
I don't change mine, and it's only because I missed that the first time I recorded. So I had to go back
and make sure I made this change so that when you're going
through this tutorial, your computer isn't
trying to sample 1,000 samples for the viewport. Let's just go to Render
and set the MAX samples to let's just do 200 for
now. That should be good. Everything else you
can keep the same. Okay, let me just go down here, make sure there's nothing
that I'm forgetting. Think everything is good. But this bar over here,
this is pretty much all your tools that we're gonna be using for
all different things. Okay, especially this one. This is the materials one. We're going to use
that a lot. You can see here this is the material. This is the material that's on our default cube. You
can rename it here. Let's just rename it cube. I actually like to use
blender in the animation tab. So if you go to animation, it should give you these
two windows like this, which I think is great. So this window is showing
the camera settings. This window is just showing, like what we were seeing
on the other screen. So if we go back out to layout, if I wanted to do
the same thing, if I wanted to open up another
screen, you can do that. You just go up to the
corner to where you see this little these
four little lines, and then you just tap
and spring it over. And this is how
you open a window. Now, this is something that's really confusing because it's really easy to accidentally
open up multiple windows, and Blender doesn't have an easy way to close
those windows. It's a fantastic application, but there's certain
really simple things that it just makes
very difficult. And this is one of
them. So in order to close the window,
so for example, I have this one open, and I can drag this one over this
one. You see the arrow. The only reason I
can do it is because this window is the
same size as that one. So, for example, if I
open a new window here, then I'm not able to do that. I'm not able to open
the whole thing. The only thing I can do is make a whole new
big window here. So I know that gets
really confusing, but I wanted to show you
this because that was one of the most annoying things that happened when
I opened blender. I was following a tutorial
and opened a window, and then you just wind up
opening 1 million windows. So let's just go back to blank. I'm gonna go to this one, and then I'm just
gonna go up because they're the same size,
and that's fine. But for practice, let's
open up a new window. So we'll just open
this up like this. So now on this side, let's say we wanted to make this what the camera is
actually seeing. So this is the camera,
and it's off center. As you can see, they kind
of have it off the center. This is a light. But if we want to see what
the camera sees, then we just press zero. So I'm on this side, and I press zero, this
is what our camera sees. If I was on this side and I press zero, it's the same thing, but I'm just going
to move it around to go back out of that view. Okay, so let's say we wanted to move the camera to the center. So let's say we want
to move the camera right here so that it's
looking like dead center. So when you press the camera, there's these
controls over here. So let's say we take this one, which is the transform tool, so then you see your gizmo. Obviously, these are kind of just all these are kind
of all wrapped up in one, scale, rotation, and, you
know, up down left right. So I'm just gonna use this one So we need to move
it over. So this is very similar to nomad, and you can see it's
moving in the camera. You can see what
the camera seem. So let's go over here to
this little arrow here, and we'll bring out,
like, the locations. So this is the location,
this is the rotation. So these are all the
numbers of all this stuff. Blender is full of math. It's full of numbers.
And eventually, you just kind of have
to get used to it. So obviously, you can
move things around, but you can also move them here. So, for example, I'm
moving left and right, and you see that
number changing. So let's just say I put this
to zero and press Enter. So now it is exactly
on the center thing. Even though the camera's
pointed the wrong way, it's on that center line. So let's say we
want to look at it straight on like
we were in Nomad. Let's press the number one. So this is a shortcut, so now we're looking
at it straight on. But we need to rotate it. So I'm I'm just going
to move around, go back to the camera.
We need to rotate it. So let's find the
rotation we need. So this blue ring, tap on that and
you can rotate it. So now you see which one
is handling the rotation. So if we put this to zero, you can see it's pointing
directly forward now. So that's pretty good.
Et's bring it down. We'll rotate it up a little bit. Now we're in a pretty good spot. We can back it up a little bit. And we have a pretty good
pretty good point of view. Let's say we want to make
this box into a backdrop. So we want to make a
backdrop for this character. So I'm going to tap S, and then I'm just going
to move the mouse around. So S will scale things. So I'm going to make
it around this big. I'm gonna hit one so I can
just have a good view of it, and then I'm gonna move it up to around the bottom of that line. Okay, that's pretty good. So now I want to use this box
to make a backdrop to make, like a photography backdrop. So one cool thing about
blender that you can't do in nomad is you can control
all of these edges. So if you go up
here to the right, to the top right, and
it's the same thing here, right now, we're looking
at the solid view. So if we go here, this
is the wire frame. So now we're just
seeing the edges. This is the material,
which you can't really see anything now because
we don't have any materials or anything up. And this is this is the actual shaded shape, but
it doesn't look good now. So let's just go back to We can actually go back
to the solid mode, so just go back over here. To this white sphere. Let's go back to the solid mode. We want to select this edge. So on your keyboard, hit tab. So now we're in edit mode. So edit mode is different
because in edit mode, if you look up here,
right in the middle, you'll see edit mode, and you'll see this one is vertices. So this is like each point. This controls the edges, and this controls the faces. So just like it
sounds, the faces is just like the faces
that are showing. The edges are like these
edges that connect them, and the vertices is
each little point. So let's say I want
these two vertices, I'm going to press Shift, so I can select two
of them at a time. And now you'll see that these
two vertices are selected. And I could go to here, and if I wanted to move these,
I can move them around. I could press S and resize them to make different
shapes and such. Okay, so let's make
a simple backdrop. So we have our cube
here. Here's our camera. You can press one
on the number pad, and you can see that it's
lined up with the red line, so that'll be our floor. Okay, so let's tab. We're still in edit mode. And let's go to vertices. So this is the
first option here. And we just want to
select the vertices. So let's just tap off of it so that the whole
thing isn't selected. And you can select one. Now I'm going to hit Shift, and then I'm going to
select this one, these two. So now we have
these two vertices. So these two vertices are
connected to this edge. They're connected to this edge. Obviously, the
edge going across. They're also connected to
this face and this face. So let's just hit X. And then you can put vertices. So then it just makes
this shape here. So we like this, but if you look in
the camera settings, it's not really hitting
the left and right side. So there's a few
things we can do. We can either bring the camera forward or we can make
this a bit bigger. So let's leave the
camera alone for now. Let's hit tab. So we
should be in object mode. And then we'll tap
the background. And then let's stretch it with
this little red box here. So we're just going to
stretch it until it fits. So I think that's perfect. Now we also want
to bring this edge up more because you
can see in our camera the bottom is not
completely to the edge. So let's go back into Edit
mode, so we'll hit tab. And you're gonna
wind up doing that a lot going back and forth, edit mode and object mode. So here in edit mode,
we'll select the edge. And then we'll select
the physical edge. And now we can just
use this tool to just move it with the arrow
so we can move it. So now let's tab back into Edit mode. We should be on edge. So we'll grab this edge. So we grab the middle and we're using bevel here on the left. And now we take this little yellow knob and we can pull it. So we'll give it a
nice bevel like this. I kind of want to bevel it until the bottom is right
around there. So now we just have this
plane that's beveled. This little window
should pop up. As long as you haven't
clicked anything, if you did just just undo hit Bevel again
and go through it, because for some reason, if
you click on somewhere else, this window goes away and then you can't get
it back again. It's really annoying.
So for segments, that's how we'll get
the curve in it. We're going to add segments, and then it's going to round
that straight plane out. So let's just press right. And let's do we'll
do eight segments. But another issue is, you can see here that it's very it's coming forward
a bit too much. So we can take the
shape right here. It says 0.5. And you
can adjust the shape. Let's move it to the
right and you can adjust it so that it's a little more the bottom
surface is a little bit flatter and this back
isn't coming forward so much. So I think that's pretty good. I'm just going to tap
anywhere off of our backdrop, and I'm going to
go ahead back into Edit mode, so I'm
going to hit tab. And then I'm going to right
click and then Shade Smooth. And on the Mc, I
think right click is clicking with two fingers. Then I'm going to
hit Shade Smooth. And now we have this
smooth backdrop that you can see in this angle. You can play with the
other numbers, too. Like, there's other views that it will go to
that it will snap to. And as you go up the line, you'll kind of
notice what they do. So let's go over here to the
top right to this sphere. You can see the
rendered settings. And there's also a shortcut. So you can hit Z as
in zebra or Zebra, as some people say,
so you can hit Z, and you'll see rendered
solid material wireframe. We were in rendered. I mean, we were in solid, excuse me. If you hit Z, wireframe,
hit Z, rendered. So now we're looking
at the rendered view. Which is perfect. So let's tap one. Let's tap one. And then
let's bring in our sculpt. Let's just get right
down to business. So go to your file and hit Save. And one other important
thing if blender crashes on you because Blender
does crash often. So if Blender crashes
on you, open back up. You can just open up a new like, where it has the default cube, open up blender again, and then just go to recover
and then go to AutoSave. And then you'll see you
can look at the time, whatever the last autosave is, that'll be the closest
to your project. So it's pretty good about that. I think it saves
every 2 minutes. So if it ever
crashes, just open up a new a new project file, recover, and then autosave. Anyway, so let's
go back to file. Let's go down to Import. And then let's go
over and down to GLTF. And we'll click that. And now we have
to find our file, which I'm not sure
where I put it. I might have put
it in GLB files. So I sent this from my
iPad to my computer. And do I not see
it here? I don't. So you just have to bring
it to your computer. Okay, let me figure
out where this is, and then we will be right back.
14. Import into Blender: Okay, so I went back into
it actually is here. I think it's actually
in this folder. But let's just start again because I know
that can be confusing. So I'm going to go
into File, Import, GLTF and GLB files, and then I just have
to find Red dynamo. So I'm going to tap Red dynamo. Remember, this is the GLB that I exported right from Nomadsculpt, and then we're going
to hit Import GLTF. Okay, there we are. You can see that he is level with
the floor, which is great. And the size is
actually pretty good. I'm being honest,
the size is great. So we're just gonna leave
the size as is And usually, the first thing that I do is I'll right click and
I'll hit Shade Smooth. Now, the only tricky thing is, I think some of the items, some of the parts, we
didn't use smooth shading. So if something is if something has used
smooth shading and nomad, then you can smooth
shade it in blender. But if something is
shaded flat and nomad, so no smooth shading, then you don't want to use
shades smooth and blender. So, for example, if I
hit smooth shading, everything looks good so far. I guess I guess I smooth
shaded everything. Yeah, everything
looks pretty good, so I must have used
smooth shading on everything. So just
be aware of that. If you bring something over
and it's flat and nomad, like, there's no smooth shading, you want to be
careful in blender. So we'll keep it at that. So over here on the
right, you can see, these are all of the objects
that we just imported. What I like to do is go
all the way up here to the top right to this
little collection tab, so I'll tap that, and it
makes a new collection. And I'm just gonna
double click on it and call it red dynamo. Okay, so red dynamo. And now I'm just gonna
tap on the first one, shift, tap on all of them, and then drag them
into Red dynamo. So now I know exactly where
they are just makes it easier to have them
bundled together. Okay, so let's back
up a little bit. And usually, let's switch these. So if we want to make this one solid and
this one rendered, remember, we can just put our cursor on the
one side. It's Z. This one, I'm going
to go to solid. And this one, it's Z, and I'm going to go to rendered. So now we can see
what our camera sees. And now this one we
can kind of move around and do what
we need to do. So right now there's
only one light. It's right here. Okay,
so this is our light. And, of course, anytime
you click the camera here, this option is going to
change into camera settings. And the only one
that will probably use is the focal length, so you can adjust the
focal length. Like so. And then also, I like
to use depth of field. So if you tap that, you
can adjust the depth of field to make the background
blurry, things like that. But I'm going to
leave it off for now until we get to that point. So back up to the light, you have four lights here, so you can adjust
them as you need. I like to use area lights. So let's tap area. It's super bright. And I'm just gonna use these
controls over here. And for now, we're just
going to bring it over. I'm gonna put it on the
opposite side of him. So, literally, same as nomad, I'm just gonna move this around. See that orange beam. That's where the
light is pointing. I'm going to use this green ring to swing it around this way. Okay, so let's adjust
the shape of this light. So it's an area light. You
can barely see it right now. So we're in our light settings, and let's just bring this up. To one. Let's bring this up too. So now you can see it a
little bit better here, and now you can adjust
it as you need. So let's say we just
want to make it wider, you can just adjust it that way. It's very bright. So
let's turn the power. We'll tap on the power
and let's make it 400. Okay, that's a
little bit better. So now just adjust your light so that it can be sort
of coming down A little bit more
on him like this. So here's a few things that
are going to help with that. So right now you can see
the Gizmo is not really, like, lined up with
how the light is. So in order to get the
Gizmo to be on the same to correlate with
the light, go up here. So instead of default,
just go to local. And that should be make
it a little bit easier. So now I'm just going
to kind of move in this direction, and I'm
going to rotate it. I'm going to make it
a little bit shorter, and then I'll use this red
arrow to bring it over, and I'll use this green ring to kind of put it a little
bit more on him. So, something like that. Let's make it a
little bit more down. You can see the shadow
will be affected by this. So I think that's pretty good. Move the light back some.
So now let's get him all in frame because
we can see that's a big issue is that he's
kind of at a frame. So let's back up
here, tap our camera. And now, let's adjust
the camera to him. So we can move this up a bit. And remember if I wanted
to move it straight up, I'd have to go to
Global, and then you can move it straight up,
straight back and forth. But we'll stick
to local for now. So now I'm just gonna
lift it up and you can see it in our
little frame there. So you can just adjust it until it's what feels good to you. I think I like that. I might
bring it a little bit more forward. I think
that looks good. Maybe down a little bit. You could even get fancy
and do something like this. I think that's
good for now. I'm gonna try to
adjust the light so that we can kind of
get all the shadow in. So I'm gonna try to
adjust the light. Oh, okay, so it looks like
it's not really going to matter how I point it. Let's see if I physically
move the light, then it'll physically
move the shadow. Okay, I think that
looks pretty good. Okay. Alright, I like
that. I'm gonna make it a little bit less bright, so I'm gonna go here to
the light settings here, I'm gonna put this
on 200 instead. Okay? That looks a
little bit better. So obviously, lighting, if you
go up to your lights here, you can turn this off, and you
can still see your object, which means that there's some
ambient light in the scene. So this controls
the ambient light. So right here, this is
like the seen world. I kind of looks like it kind of looks like the same
icon as the materials. You'll probably get it
confused just like I do. But right here, just
look for world. So there's the color, which obviously you can
adjust the color. And you can adjust
how strong it is. So, for example,
you can put it down to zero, and it should be black. There's no ambient
light in the scene. You can turn on your light
and see how that looks. You'll notice there's
two of these. This is your viewport. So this is what we're
seeing now, the viewport. The second one is
the actual render. So if you have this
on but not this, say for this light, it's going to render out
looking like this. What I like to think
about at first, anything that you do
here, just do for both. Don't leave one or the other, because then it'll be confusing. So just click them both if you're going to take
something away or add something. Okay, so we have one light
here. So let's go up. Let's actually add a folder of just lights or a collection. So we'll go up
here to the right. We'll tap, and we
can bring this up. And let's just name this Lights. Okay, we'll take this light. We'll move it up into
that collection. Okay? Now let's add a new light. So let's hit Shift A. And again, you must
have your cursor here on one of the screens. So Shift A. And then let's go down to Light you don't have
to hold down Shift. Once you hit Shift A,
this menu will pop up. You don't have to hold it
down. We'll go to light, and let's add
another area light. Okay, so now let's just
use these directions, and we'll move it
up. I will be here. And let's point it towards him. So let's just make sure that that orange beam
is pointing towards him. And sometimes things
might disappear. That happens a lot in blender. So if you go up here and you
have to check these things. So right up here, I'm not sure what
the name of this is. Let's see. Show overlays. If you tap that, then everything
will kind of disappear. The cameras and things
like that might disappear. So just remember if the
camera ever disappears, it might just be show overlays. And again, if you wind
up hitting something, let's say you're on
this and you wind up hitting something,
and let's see. You could toggle the local view. So that's if you accidentally
hit this, like, slash. So if this ever happens,
and you're like, Where did everything
go, just go to View. And you can go down
to Local View, and you can either
toggle Local view or you can go to view
and then hit frame A. That will also that should
also bring everything back. But those two things drove
me crazy in the beginning, so just remember,
earmark those things. Okay, so let's play
with this other light. Let's bring it down.
Oh, that looks good. So now let's hover over the actual light size and
looks like it's a square. So let's go into the
light settings here. And let's change it from
square to rectangle. And let's just stretch it out. That looks good. And let's
make it instead of ten, let's do 30. Okay. And seeing the bottom here, I don't really like
that too much. So I think I'm going to
make it a little shorter and move it up with
this red arrow, I'll just move it
up a little bit. And maybe I'll move
it back, so it's not so much in the shadow. So I'll move it back, and I'll
make it a little thinner. Here we go. I think
that looks interesting. Maybe I'll make it a
little fatter. I like it. I like it when it's a
little more soft hitting here. Okay, that looks good. And for this one, this
one might look better as a circular light. So we'll just go into
the light settings for that light and change this
from rectangle to ellipse. Okay, nice. And also, let's go back into
the world settings. And I just want to put this
up to maybe like five. Okay, so here's nothing,
but I want to bring it up. I don't think I want
to bring it up to one. I think I want to
bring it up to, like, five, six or seven. I'll leave it on I'll leave
it on 50.5, excuse me, 0.5. I think that looks
good. Okay, so we can probably I
think he looks great. So we have two lights here. Let's duplicate
this light and put another light maybe
somewhere else. So right now I'm on this screen. I'm just going to hit
Shift D. So hit Shift D. So now it's duplicated. You can move your mouse around and you can
see the other light. Of course, you can
also press Z X or Y if you want to move it in
very specific directions. So maybe where do
we want to put it? Sometimes these look great. I'm just gonna move it manually. Sometimes these look great with a nice rim light or edge light so you can
put the light behind. And then you can
rotate it to get a nice edge light on
one side or the other. Maybe on this side.
That looks pretty good. I'm gonna make the
light a little thinner. It looks great. So there's a nice
edge light there. So that looks that
looks really nice. And let's say, Well, just like we do in nomad, let's go up here
and rename these. So I'm gonna rename
this light by double clicking and just
calling it dgeight. Edge light, right,
it's on our right, so that'll make it easier. This light, let's
just name this key. This is the first light that we put that's over his left side. And this one, let's
just make two. So that's on our right. It's just shining
from his right side. So another thing that
I like to do is, let's add another light. So Shift A. We're
already on lights. Let's add another area light. And let's just shine
it on the backdrop. So let's move it up. Shine
it towards the backdrop. We'll go into our
light settings here, change it from square to
let's do to rectangle. So then we can kind of make
it a little bit bigger. Okay, let's figure out
where we want to move it. Okay, so we'll put
it there for now, but it's acting a bit funny because we don't have
proper material on this. So this is a great time
to work on the materials. So we have our light set up. Let's now work on the materials, which is the surface of
all of these objects.
15. Blender Materials: Okay, so as far as materials go, materials are the surface of any of these objects,
even the background. And I just want to
note that over here, you'll see I have Blender kit. Blender kit is a free add on
that you can add to blender. So just go to blenderkit.com and you can download
Blender Kit, but it will show you the steps to enable Blender kit,
and it will show up. Right here. And what
that allows you to do is just use different materials. You can go to categories
that allow you to use different materials
for your sculpts. So my advice would just be to go download it now so
that you'll have it. Yeah, maybe I'll show you
a few of these later. But for now, we're
just going to stick to the regular materials. So let's tap on the helmet so you can see that the
helmet is selected. Whoops. I'm using
the wrong keyboard. So you can see that the
helmet is selected. And right now, let's go to the materials tab,
which is right here. So if we tap on
the materials tab, you see it says material zero. So let's tap on there, and let's name it Dynamo reed. Okay, so now we have Dynamo red and we have all of
these options here. So right now, we can't
change the color of it. That would be the base color. And that's because we brought
over the color from no MD. Of course, we can
change the color, and I'll show you a
little bit of that. So I'm gonna go
down to the bottom and you can sort of lift
this up a little bit. And you'll see this
sort of again, I'm using the animation tab,
so that's why that's there. If you are using something
else, like, Oh, no, I'm in layout.
This is animation. But if you don't have
another window here, you can you can do
like we were doing before and just Okay,
well, we can do that. You can drag up and just make a new a new window. But
I'm gonna get rid of this. I'm going to take this one, make it the same size
as the other one, and then I'm going to drag this over just to make it
one long thing here. So Blender has
what's called nodes. Nodes are probably one of
the most confusing concepts. But if we're in the bottom here and you
see this little option, if you tap that, you have
all these other options. So let's just go down
to Shader Editor. So if we tap Shader
Editor, these are nodes. I'm going to try to keep
this as simple as I can. So right now, this
color attribute, this has come from nomad. This is what's telling the
base color that this is red. So this is coming from nomad. The principled BSDF that's
just your base color. So that's what this
is. Material output. This is the material
that we're seeing. So right now this is red. This is the material output. And the way nodes work is this information goes
to this information, goes to this information. So I'm not that well
versed in nodes, but you can have a ton of
these things over here, and they all go into there
and you can make it look like cloth or leather or wood. There's tons of different
things you can do in blender. We're not going to
get that deep into. But if you wanted to
change the color, let's say if you want to
make this a different color. There's a few ways
you can do it. You can just take this, just
hit X, and now it's white, and now you can
change the color here and you can change the
color here, so that's, like, unlocked, and you can
adjust the color. Okay. I'm going to hit Control Z because I like the
red that it was. Principal BDSF is the same
as these options here. And we'll just go from right, this menu here because that was easier for me
when I started. So metallic obviously will make things more
metallic looking. Roughness obviously makes things more rough or less rough. And I think we'll just
worry about those for now. I'll make it a
little more rough, just what kind of
looks like plastic. And then you have subsurface, which we also have on nomad. If you want to work
with the subsurface, you would just use the
weight and the scale. So just bring the weight
up and the scale up. And you can see it's already
kind of getting clear. So we have the eyes. I'm going to go right over
here and change material five to black eyes. Okay. And now I think I want to
make these a bit shinier. Well, we still can't see them. The light's probably
not in the right spot. So you can adjust
it to make them as rough or as
glossy as you want. I think I'll leave
mine around there. The legs are a bit glossy. I'll change this to legs. And let's make them
a little more rough. So we'll bring that up. It's about there.
That looks good. And this yellow, I think I'm going to make this
a bit more rough. Okay, let's turn them around
and take a look at the cape. Actually, I'll do
it on this screen. So we'll tap on the cape. I'll rename it cape. And the reason why it's good to rename these
things is you can press this little button
here next to your material. If you tap that, then these are all the materials
in the project. So if you wanted to
use the dynamo well, it's actually kind of confusing
because, for example, dynamo red is what
we set the helmet, but you can see this
is still black here. And that's because we didn't
change the color in blender. The color is coming from nomad. So that's that's why
it's still black. Since we're talking about
it, let's take the cape And let's go ahead and hit X on here. So we'll get rid of that. Now we can adjust the color. So we press the white, and now we can make it I think we had it like a
darker something like this, but a little bit darker, so I'll make this a
little bit darker. I want to make it
a bit more rough. Okay, I think that looks good. So now when I go here, you
can see that the cape is actually red because we
adjusted it here in blender. I think that looks good.
Okay, so now we have these. Maybe I'll put the metalness
up on these for fun, and I'll put the roughness
up a little bit. And these can be cape buttons. Okay. Now his little shoes, which are separate,
maybe I'll make them a little glossy,
a little glossier. Like the reference, the
hands, I'll rename them. And maybe we want to make
them a little more rough. I think everything else. Well, this is the hands accent. And maybe we want to adjust that to be like the buttons are. So let's press this, and
we'll do cape buttons. So it's not gonna
change the color, but it'll change the metalness
to match the cape buttons, cause I think that's the
only thing that we changed. Okay, so the face we'll
just call this yellow face. And, of course, you can
do this at your end pace. I'm going a little quickly. But once you get the hang
up changing one material, then you can just
pause and go through and change all the materials
to whatever you'd like. I think I want to make the
face a bit more rough. That's good. We'll go to
the teeth. There we go. And we'll make the teeth glossy, and the tongue will
make a little rough, and we'll leave that as is. And I'll just name this
yellow cuffs. Okay. So now I'm gonna hit
zero again to go to our camera view and
we can see what we have. So I think
that looks great. Let's also press the background because we also need to
give that a material. So we just want
to make sure that we're in the material tab. Or you could also
go down here and just hit a new material.
It's the same. So we hit new. You can see
that the nodes pop up. And let's make the base color. I think white is good.
Let's up the roughness. And the reason I rough
bring the roughness up is so our lights and stuff won't really have
a glare off of it, but you can
experiment with that, bringing it all the way
down to have a nice glare. And, of course, if you wanted to adjust the color,
you can do that. I think we made a kind
of an aquamarine color. So we can do
something like this. And again, one of the
notes that I gave you in No MD let's zoom out of it here. This light is the edge light. So this light is coming
from back there, and you can see, now that
we change the background, probably what I would do is
adjust where this light is because I don't like how it's a harsh light
coming from the back. So there's things like that that you should pay attention to. And also, I don't know if I'm going to keep the
background this color. But like I did in Nomad, I might change this light by hitting the color
while on this light, I would hit the color
and kind of match it. Uh, 'cause that
kind of will bring everything a little
bit more together. But I think that looks
good. I like it. One thing that I like to do. So in nomad, if you've taken
any of my classes, you know, I have the eye glare that I
always use for my sculpts. So if I want to have
a glare in this one, I'll have to move the
light to the correct spot, which Let's see
that didn't work. Multiple importance. Let's go to these eyes and
kind of figure out why this isn't I'm not seeing
too much of a glare. So let's do this. If I really
want to glare on this, let's hit Shift A. Let's add a let's
add a point light. And let's put it in
front of the face. Oops. Okay, let's go
back to the point light. We'll put it over here. So
now we can kind of see it. Okay. I just had to make
sure I was still in cycles. And another quick note, if
you want to have a light, but you don't want it
to have a reflection, you can hit multiple
importances. And we're actually
seeing the light. That actually wasn't
the reflection. Let's hit area. And let's increase the
size of the area light. Let's make it a rectangle, let's increase the size. Well, I can kind
of see it there. There we go. I can
kind of see it there. So now we can see a bit of
a glare on the on the eye. Let's change the color. We'll change it to this,
maybe kind of match that. So that's a bit more
interesting, I think. So if you have other eyes, especially eyes
that are spherical, you can experiment with
bringing lights in front, bring the different
shaped lights, and you'll get that
shape in here. I'm just going to
show you an example. I'm going to hit Shift A,
and I'm going to add a mesh. I'll add a UV sphere. I'll move it up and forward. You don't have to do
this. I just want to show you. I'll press S. I'll make it small. I'll right click and
hit Shade Smooth. I'll go over to
the material tab. I'll add a material. I'll tap the color, and then I'll drag this down to black. And I'll drag the
roughness down to zero. And this should show you
how I get those lights on, like a pupil or an eye. So now you can see you
can have a better, you know, view of what this is actually doing on a sphere. But since the eyes are
flat, it kind of looks like, it doesn't look as That's good. So I just wanted to show
you what it would look like on an actual sphere. So I'm going to hit X to delete because we do
not need that sphere. This is the original key light, which I think I want
to bring this down. Let's see what it
looks like at 100. So I'm using this bigger
key light up here, and I'm using this
light data here. And then I tap the power, and I'm just gonna put 100. See what that looks
like. That looks nice. I think that looks
good. Maybe we'll split the difference and do 150. Okay. And let's see if I actually do want
this. I like it. But maybe just a
little bit less. So I'm on this point light now, and I'll just bring it down to, like, three or so. I like what it's doing, but I just don't want that much of it. And, of course, you
can experiment. Maybe you want to
make the helmet so you tap on the helmet. Maybe you want to
make that glossy. That's kind of cool,
too. So please feel free to experiment. That's how you
have the best fun. The most fun by experimenting. Okay, this is coming out
really cool. I like it so far. I just don't know if I want the blue background or if I just want the regular
white background. Let's click here and let's
bring this back to white. So I've clicked on
the background. I'm in the materials tab, and I want to adjust the light. I think I kind of
like this beige. It just feels a bit
more natural to me. I like that beige. I think the feet are a little
bit too glossy, so I'm going to make them
a little bit more rough. On the feet, I'm going
to take this light. And I'm going to turn it into change the color
so it's a little cooler. Or maybe I'll just
make it white. I'll turn the saturation down on this color,
so it's just white. And maybe I'll take this one. And there's another
option that you can do with the light, the spread. If we tap that and
change it to 90, then it's not gonna be
so bright on the side. It's gonna be more
focused in the middle. So, the fact that it's more
focused in the middle, you have to turn it down,
turn the power down. So I'm gonna put it to 50. And I think that looks
that looks a bit better. Yeah, that looks nice. You kind of move it around, make sure you have it in a
place that you like it. That looks good. I'm also going to
adjust the world. You go back to the world,
and maybe you want to make it brighter to see
if you like it better. See if we put it on one,
what it looks like. Still looks good. So I'm
pretty happy with this. I think I want to
change this yellow. It looks a little
bit too mustardy. So I'm gonna go back
into the materials. And we'll change the
color attribute to RGB, and then we can adjust that RGB to whatever color we want. Don't forget to bring
this all the way up. Oh, I think something like
that looks a bit better. I'll make it a little oranger. I think I like that. I
think that looks good. Okay, so I'm pretty
happy with what we have. The only the only other
thing I want to do is, I feel like his face isn't
quite bright enough. So I'm going to change this
light to a point light. And I'm going to physically move the light in front of his face. I'm just going to
go ahead and change from local to global, so that'll just make
it easier for me to move it in front of his face. And now I'll go over
to the light settings, and the radius, I'm
gonna raise that up. See that orange ring. I'm
gonna raise the radius up. I'll put this at ten. Okay, I'm gonna go a
little bit higher. Little bit here. Okay, I think that looks good. So now I just think he's
a little bit brighter, and I really like the
way that that looks. Let's go to our edge light, and let's change it from blue, so I'm in this back light here. Let's change it
from blue to like. Maybe a warmer color,
something like this. Okay, I think that looks good. I'm gonna check the
position of it. And remember, since I don't want this to be so harsh down here, I'm going to change
the spread to 60. See how this is much softer? I think that looks better. We
also have this back light. So let's tap this light. Remember before when we
were dealing with it, we hadn't set the material
yet. So let's pack it up. Let's put it up a bit higher. I kind of want it just on
the top with a backdrop. Yeah, now I can see
it a bit better. I'll make it a
little bit smaller. You could even move it back and see what it
looks like if some of it catches his helmet. Whoops. Rotate. I think it looks nicer on the back wall. Let's change it. Let's
change this color over here on the right to maybe
something a little bit warmer. Okay, I think that
looks pretty good. Okay, so now it's always good to go through
the lights and just make sure that they
actually look good. So right now this looks
a little bit too bright. So I'm going to bring
this down to ten. And I think the reason it's
too bright is because, remember, we changed the spread, and
I'm gonna open it up. That'll make it a
little softer, as well. The bigger a light is, then, like the softer an area light, the bigger it is, the
softer it will be. So I'm going to take
this down to five. Okay, I think that looks good. I think this looks really good. So I think that we learned
a lot about lights. We learned a lot
about materials. I think in the next video, I just want to show you
some tricks with a node. Now, we'll keep it really
simple with the node, and I'm going to show
you some other materials using Blender kit. And maybe I'll show you how to use emissions as
well with blender, because I think those wind up looking really nice in Blender. So great job for now. Let's finish Up Strong
in the next video. I'll show you a few things
and then we'll export render. Our render.
16. Finishing Touches: Okay, so I was playing
around with this file, and I'm just going to show
you this with the nodes. So let me just X these. So I chose the red, and I deleted by pressing X, the color, the attribute
that was there. So now we just have
the regular color. So the cool thing
about nodes is, for example, if you're in the
node window, hit Shift A. Okay, so let's go to input, and let's go to RGB. So RGB is just colors. So if we plug this in
to the base color, then we can control the color. So I put it all the way up and
maybe we'll put it to red, something like that. Make
this a little bigger. Okay, and we'll put
it to this red color. So, I like to add things
like ambient occlusion. So let's press Shift A. Okay, input ambient occlusion. So now, once we click on that, we have this little node
that we can plug in here. So I just dropped it. I clicked
it in between these two, and this color connected here, this color connected here. So now we have some
ambient occlusion. And if you look at the distance, so if you look at the bottom, the bottom of the chin
and near the arms, that's where the ambient
occlusion comes into play. If I go to distance, and then increase the distance. So that's going to add a
little bit more shadows to it, the ambient shadows. So this is something
that I like to do for all of my materials,
even the floor. So if we take the floor,
so for the background, we already have this color here. Let's see if we can just plug in an ambient occlusion node. Shift A, input,
ambient occlusion. Then we just tap here
before I connect them, and I'm going to match this
color. So I'll click here. I'll click on the eyedropper, and then I'll grab this color. So let's try it now. Okay? The colors are the same. So now let's try distance. So you can see the shadow
getting a bit darker there. So this just enhances
your ambient color. So you can choose to do that with some of the
other materials. Maybe I'll do it to
this material here. So we have the color node. So this is for the
face. Shift A, let's see if we can input the ambient occlusion
right here. Perfect. So we can hit distance, and then we can see that shade coming in there on the face. It's these types
of little things, these little details that
really make it fantastic. So another thing I want to
show you is blender kit. So if you have Blender kit and you figured out how to load it, you can tap, let's say, the yellow, and Blender
kit is right here. You should have a
little search bar here. Let's turn the
little eyeball on. So right now we're in models. We need to go to materials. And then in materials,
you have all of this. I'm just going to put
in the search yellow. Okay? So we put yellow. So now we have these
yellow elements. So let's say this one, the yellow pebbled leather. So we'll click on that,
and that changes to this, which doesn't look
that exciting. So I'm gonna choose
a different one. This looks kind of interesting. Quilted leather yellow.
So as you can see, you can find some really
interesting things. This is a great way to use Blender kit that has tons and tons and
tons of these things, so it can really be
helpful to make some interesting to use some interesting textures
on your sculpts, and they have tons of them here. I'm just going to hit Control Z until we get back to regular. Okay, so just to reiterate, you download Blender
kit from its website. And then I think once
you have the zip file, I believe all you have to do
is go into Edit preferences, add ons and then find
Blender kit and check it. It will show up here.
And once you tap that, you can use materials and just make sure to
open up the categories. And for search
filters, I usually go, if you want to use the
models or something, just make sure you
go free first. So it'll show the
free ones first. But the materials,
they're all free. So the next thing I
wanted to show you was how to make something
emit light. So let's take these yellow bits, and let's say we want to
make them glow yellow. So we want to go to the
materials tab over here. Go down to emissions. So we have the color, and
then we have the strength. So we're gonna have
to match the color. So let's tap there. We
don't have to match it, but we can just make it yellow. And then we have the strength. So then you keep going,
and you see it glowing. Now, obviously, the
lighter it gets, the whiter it gets. So you might have to
adjust this and make this as dark as you can. It's a little tricky to get a yellow blowing too brightly. If you really want
it to look yellow, then you just can't
make it so bright, 'cause then it starts
to turn white. So something like that. And, of course, if you're
gonna do a glow, you have to adjust the lights so it will be a little
bit more visible. Okay, so that's emission. So you just tap on it, and
in the materials editor, just come down to emissions, and you have to adjust
the color and the amount. One of my absolute
favorite textures is to do some sort of edgeware. So in blender kit, I can go to materials. Let's go up to the top bar
here and type Edgeware. Oops. And make sure you
toggle this little eye. So then you have
all these little edgewares which are great. Let's try this one. And then you see you have
that really great texture and edgeware. We can go to this one. Maybe we'll try the yellow
out and get the dirty black. You can do the same
thing with the eyes. So it just looks completely different in a matter
of a few clicks. So as you may have
noticed just now, my framing was off, so I
have to start back here. So the next thing I
wanted to show you was the camera settings. So let's zoom out and
go to our camera. And I wanted to show you
how to set the FSTop. So if you want the background
to be blurry and you only want your character
to be in focus. So you want to go
to your camera? Camera settings here,
and then depth of field. So the main thing is, you want to adjust your
focal distance, your focus distance to be so you want your focus
distance to be the eyes, the teeth are kind
of on the same, but usually you want
to focus on the eye. So you want the eyes to be very, very clear and in focus. So that's your focus distance. You can, of course,
set the eyedropper, and then you can
set the eyedropper to something that
you want, as well. But I find that it doesn't
always work that well. So what I like to do is not use the object and just set it by eye with
the focus distance. So then you go down to F Stop. And the lower the FSTop is. So, for example, if
it's at F Stop three, it's at two, the eyes
are still in focus, but then the horns
are out of focus. So that's a very
shallow depth of field because this layer where the eyes are is the only
layer that's in focus, but once it gets far
enough to the horns, then it still puts
them out of focus. And the higher you go, the
more we'll become in focus. So if we go up to 1.5, the horns are more in focus. If you go up more, then more
behind him will be in focus. So I'm going to
put this to maybe, like, I think eight is fine. Okay, so that's all I wanted to show you
with depth of field. It's always good to kind of use that to
make it look a little bit more like photography makes it look a little
bit more realistic. Okay, so let's now
export this character. So first, we want to go up
here to the render settings. So we're over here
on the right side. We'll just make sure
that it's in cycles. In the samples you
want to be around 200. This is just the viewport. So this is just what
you're seeing now. This is another thing
that you can adjust. If your computer is
really struggling, if you hear the fans when you're just moving stuff around, you can set this a
little bit lower. You can set it to,
like, 50 or something. Again, this is just
what shows up here. These are your viewports,
and that's that. If you go down to render, this is the render settings. So these samples really matter. You can set yours to
about 200 or 300. The higher you go,
the better quality, but the longer it
will take to sample those frames. I'm
going to put mine to Um, I'm gonna do 1,000, but I would recommend going
like 200 to begin with. You can see how long that takes, depending on your computer. Also, you want to make sure
when you go down to Denois, you want to make sure
that you have US GPU. Okay, and that's pretty much it. The only other thing
if you go here, your size is probably
1920 by 1080. If you want to raise the size, I have a four K size, so you just tap here, and then you can go up
to the four K size, 21 60 P. That's what I have. 21 60 P by 38 40. And it'll actually keep this
same frame because it's the same it's the same size square. It's just the resolution
is just higher. So it's just much, much bigger. But we're
going to keep it here. And then you just go up here
to the render settings. And then you can
render your image. So I have mine in such a large format that
it renders in sections. So it's going to do
this first section. It's going to do 1,000
samples of the first section, 1,000 samples of
the second section, and then section 1,000 samples of this small
section on top. Again, I would recommend
going like 200 samples until you see how fast or how long
your computer will take. Okay. And now we have rendered
or clean rendered image. So I'm going to save image, save and I'm going to set this one to B. I actually did these before,
but now I'm re recording. So I'm going to I'm
going to do this B, and then maybe a baby A. Okay, and we'll save image. And that's how you
save your sculpts. We can go ahead and hit this X to get out of the render view. And again, one of the
really fun things to do is adjust your lighting,
adjust your backdrop. Let's say I set the
backdrop back to white. Let's save this. I'm gonna set the backdrop back to white. I'll go to the
lighting settings. Okay, that one's white. This one I'll set to white. I'll just turn the
saturation down. So you can just go to all
your lights and reset them, bring the saturation down. By bringing the saturation down, it just takes all
the color out of it. Go to this front light. Okay? We need to change
the color of this. Thought we changed
it, but I guess not. Let's take the saturation out. Nice. Don't forget there's this world here, so
we can go to world. You can put this on
one we can maybe raise this up a little bit to make
it brighter Smre like that. We'll add a little bit of
brightness to this key light. So we'll go back to
the key settings, 100. And of course, I'm
just doing this to show you how you can, you know, adjust and kind of play around with your sculpt. I'll put this on 50. I should be pretty bright. Nice. Let's make the
background a little bit brighter by adjusting
this back light. We'll put it to 50
to start off with. And maybe we'll move it back. I'm seeing that. Oh,
well, there we go. We'll make it a
little bit bigger, and then we'll make it
a little bit brighter. Let's go like 300. Maybe that's a
little too bright. We'll set the color
of the background to, like, a grayish. Okay, so now we have a much
brighter scene, which I like. Okay, so here's just
a bright version. I'll render this
version as well. So go to Render, Render Image. And it still looks
dark back there. I'm gonna minimize
it and double check. Ooh, see, this is what I did. I didn't have this
light selected. So but I could tell that the lighting was
different than what I set. So that's what I was saying.
You really have to pay attention to what
you're rendering. We can go to the
render tab here, and this will pop up our render, which is still rendering.
I just finished. I'm going to go back
to the layout tab. I'm going to make
sure this is on, and I'm going to take
this light, Shift D, and then I'll press
X to move it on that constrained and I'll just brighten up this side of
him as well, why not? I'll bring it a little
bit further over and maybe I'll turn it a
little more towards him. Get it a little brighter. So now I'll render this. Oh, and one last thing I have to mention if you're ever
trying to work with nodes, and they just disappear and you're like, Where
are my nodes at? Go to view frame A,
and they will pop up. It's one of the most
annoying things ever. But anyway, as you can see, I really like just playing with the lights and
adjusting the lights. But as you can see, you can
have a lot of fun with this, and it keeps me up
late many a times, just kind of adjusting the lights and playing
with the lights and having a lot of fun with
bringing my sculpts over. So that's essentially
how you do it. There's a ton more
that I can show you. There's a ton more that
you can do on Blender. But for now, I think this is a great beginning spot that's already a
lot. I understand. I understand that
it's confusing. But it's just the
way that blender is. There's just too much to
really get a hold on. You really just have to work as often as you can in blender, and you'll slowly get
ahold of everything. But, yeah, save this project, experiment with things, bring your other nomad sculpts in. That's the only way to
learn, but trust me, it's well worth it because
these renders are amazing. I'm going to try to do some
more shorter tutorials with things on blender, little bite size pieces, but I think this
is good for now. Congratulations on finally
jumping into Blender. Oh
17. Outro! : I just want to I just
want to say, like, you should know if you got
through this class and you've never worked
in Blender before, it is an accomplishment. Blender is a nightmare. There's so much you can do,
but it's really a nightmare. And the reason I wanted to
do this class is because everything was for an
intermediate blender user. For us nomad people, and I consider myself
a nomad person, if you're coming from nomad, you don't know anything
about Blender. You don't know anything about
using a mouse and keyboard. It's just a different animal because I want to be that bridge that I didn't have
when I was trying to go from nomad to lender. Now, the sky's the
limit with Blender. You can do animation,
CGI, things like that. There's a lot that you
can do with Blender, but it's gonna take
some time to learn. I'm still learning it myself, but I'm really excited to start this next chapter of being able to incorporate lender tutorials
with nomad tutorials. Please tell me about
your experience with this class and with
working in Blender, because I really want
to know where you struggled and what I
could have done better. So in the next one,
I can do better. Upload your renders,
both nomad and Blender to projects
and resources. I can't wait to
see your projects. You sure to rate and
review this class. That means so much to me. If you rate and review, I
really, really appreciate it. Of course, you can
let me know what you want to see more of, what
you want to see less of, and just let me know what
you think about this format and about combining
nomad sculpt in lender. Also, if you're on social media, if you post this, I'd
love for you to tag me. There's a much different
way of sculpting and modeling in Blender that
just doesn't exist for Noma. I'm still getting a handle
on all of that, too, so make sure you check out my YouTube because I'm gonna be posting some videos all the things I've
learned in Blender. So more of this kind of stuff. I'm gonna be posting
usually probably little little tidbits of things
that I learn in Blender, because I think that's the
easiest way to go about it, 'cause there's just
so much in blender. But I think that's all
I got for this one. I look forward to seeing
your class projects. Keep drawing, keep sculpting. I look forward to seeing
you the next video.
 Dave Reed, 2D & 3D Illustrator - Brooklyn, NY