Transcripts
1. Nomad Sculpt Beginner Tutorial : Go. Okay, so for today's
beginner tutorial, we're just going to
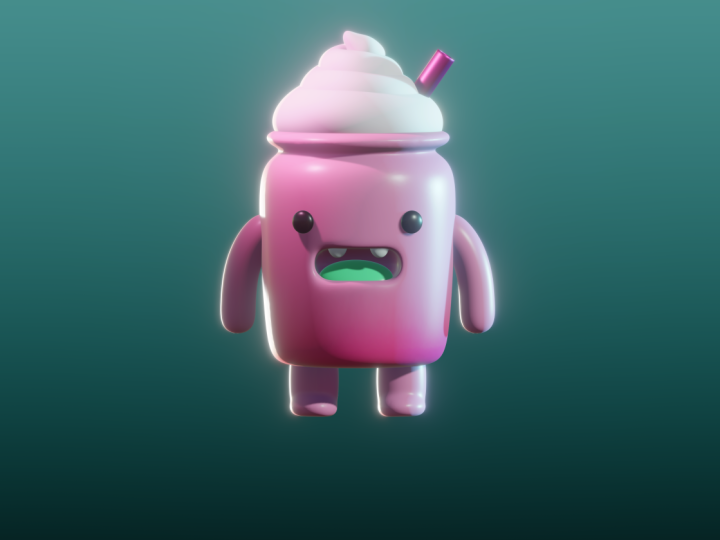
create this really cute, fun kawaii jar with
some whipped cream. And a lot of the tools and
techniques you'll use today, you'll be able to use them in all your sculpts moving forward. That's why I like
making these more simple, small characters, so you can get all the benefits, and then you can
take them and use them for whatever
you want to sculpt. So we'll start out using
the late tool for the body. It's a really fun
tool and really simple once you kind
of know the basics, we're going to make some
arms using the tube tool. The tube tool is one of the strongest tools
that Nomad has. I use it in all of my sculpts. We'll use cylinders
for the legs. We're going to learn
voxel remeshing. We'll also use the tube tool to make the whipped cream on. And then we'll move on to
simple and effective lighting to really make the
character pop. Then we can move on to
things like materials. So that's how you
get that nice soft, glossy, toy like feel. Lastly, we'll walk
through exporting our three D model so
you can render it, share it, or even
three D printed. By the end of this
class, not only will you have your own version
of this character, but you'll have a
solid understanding of the essential tools and
workflow and Nomad sculpt. And once you start having
fun and experimenting, trust me, it's all over. Keep drawing, keep sculpting, and I look forward
to seeing you in class here on Skillshare.
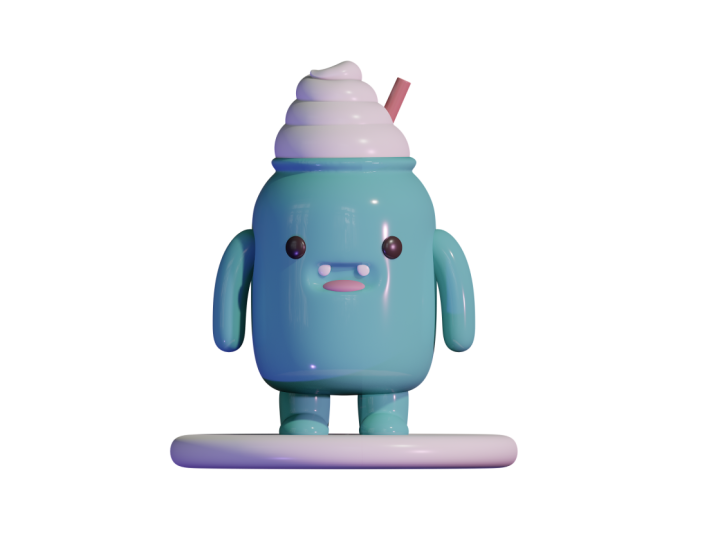
2. Class Project: For this class project,
we're going to create a cute koi jar character using the tools and
workflow from the lessons. You can follow
along step by step or feel free to adjust
things along the way. Change the colors,
tweak the shapes, or add your own little
details to make it yours. The goal is to get
comfortable building in three D while creating
something fun and simple. Once you're done, feel free to share your work in
the class gallery. I can't wait to
see what you make. Let's move on to the next
video getting started.
3. Gettign Started: Jar: All right, let's get started. So the first thing we want to do is make sure we're in
orthographic view. So just tap this little camera and make sure you're
in orthographic. Next, let's get
rid of this grid. So if you have a grid up, just tap the little icon down here and get rid
of that ugly grid. So now let's change from white. We're just going
to use a MT cap. So just tap this
little sun, Mt cap. And you can tap here. You
can use any of these. I usually use one of these two. I'll stick with PXG clay. I just think this
looks better than sculpting in something
that's pure white. Next, let's import
our reference image. We just want to tap
this little photo here, tap reference image,
tap the image, import minus in my photos, and we're just going
to import this here, tap the check, and
then it imports. Now you see it here. If you need to change it
or move it around, all you have to do is go
back to where it was, hit transform, use two fingers. You can move it around. And
once you have it placed, just tap with one finger to
go back to sculpting mode. So what we want to do now
is save our progress. You may have seen a pop up asking you to save your project. So let's just go to this
little folder here, and here we have save.
So let's just save. So let's go ahead and
delete this sphere. Let's just tap the scene menu. Here's our sphere here
and let's just delete it. What we're going to
do is add a lathe. We'll tap the lathe tool over here and you'll see a line
show up in the middle. Let's just tap this little
picture, transform. Then I'm just going to
take two fingers and drag the image right in the middle. I think that looks pretty good. The line is going right
down the middle of the image, tap with one finger. Okay, so we're using
the lathe tool. We're using curve here. We're going to start
at the bottom in the middle and then we're
just going to draw. We're going to trace
the outer line. We're going to come here
and you see a little lip, so we're just going to
make a little lip like that, and then we're
going to go here, and then we're
actually going to come around and then go back down and then back over
to the orange line. And then we have our jar
that we need to fix up. I'm going to go
back to the picture tap transform and
I'm just going to replace this back where
it was. Tap once. So now we have our jar
and I'm actually not sure why it is tilted like that. B. Let's see. Reset. Okay, that's better. I'm not sure why it got
tilted like that, but if that happens, just tap here and tap reset, and then it should
straighten up. It's okay that it's not in
the middle of the line, but yeah, I'm not
sure what that was. But anyway, now let's tap the Gizmo and let's
tap pivot auto pivot. Down here, you'll
see the lathe tools. So what we need to do is
just make it match this. But for example, the bottom, I'm just going to
take these nodes and straighten them
out a little bit. Then if you want the end
to be see how it curves, you can always pull these
nodes a little closer together to get the edge
a little bit better. And to make the lip,
you might have to add some nodes here to get
it nice and round. If you need a little
more resolution, see how you can see
that it's squared off. You can go to these
little three dots and just do postavision. If you put it up to one, S zero, you can see that it's a little more low resolution
and it looks more squared. And then as you go
up, it adds more. But this number goes up as well. So I think just ticking to
one should be pretty good. I think I want the
lip a little thinner. So I'm just going
to bring these all a little closer together. Yep. For straight lines
going down like this, sometimes it's
better to drag these towards each other
and get rid of one because you don't such you don't need all
of these in between. They're just going to
ruin the straight line. So I'm going to bring these into each other to delete them. Okay, I think
that's pretty good. And that's pretty much it. You don't have to
go crazy with it. The lathe is a really fun tool. Once you get something
that you like, you can go ahead
and hit Validate. Next up will be arms and legs.
4. Arms & Legs: So next we'll add
the arms and legs. For the arms, we'll
use the tube tool. We just want to go
to our tools here, tube tool, and let's do path. The arms start about right here. I would say that's
about right here, just tap on the screen and
then drag down to about here, and then tap this
little green sphere. Let's add another node here, so just tap on the white line. Now we can sort of
adjust the arm. So we'll bring this part in
and you'll notice that it won't go inside the
jar, so just tap SNAP. Then it should go
right in and we'll use this little orange node to
make it a little bit bigger. We want to make
this bottom round. Let's go down here and
uncheck constant density, tap the three dots, post
subdivision to two, and let's bring
these down to four. Of course, you can
always just tap. Okay I'm actually
going to bump this up to three. I think that
looks pretty good. It looks like we need
to make it a little bigger and bring that
in a little bit more. I think that looks
good. Once you get your arm to
where you like it, you can just tap mirror. For now, we'll just
leave it because you might want to adjust
it a little bit later. Let's go ahead and
do a quick save. For the legs, we're
going to tap our scene, add, and we're just
going to use cylinders. So let's tap this little gizmo
right here. We'll shrink. We'll move it down. You can use the large
orange ring to shrink again. We'll tap mirror. We'll tap this little gizmo
again and then we'll move these and that will
give us our legs. You can tap this little
cylinder to get back to the cylinder options and
we can just stretch it out and then move the
whole thing down. I think that works pretty well. I just want the
cylinders to be nice and soft and round
on the bottom. I think what we'll do
is just validate them. We'll go to this
little beaker icon and then we'll just hit smooth. We'll just drag smooth then we want to drag inflate to make them a
little bit bigger. I think that looks pretty good. And if you really want
to add some feet to it, what I would do is add a sphere. Let's drag this
out of the mirror. So this mirror is the legs. This quad sphere is
the one we just added. So you can actually
use your gizmo, and then you can shrink this
sphere and then move it to the legs and then just
mirror it at the end. Or that could just be me. Maybe flatten it a little bit. And you can go ahead and
validate and then I might use move to then just make this a little more
flush with the leg. Then I have something like that. Then I will just go to the
tools and just use trim, and you can use rectangle. All you would need to do is draw a rectangle like this and then that bottom part will
be trimmed like that. I think I want it to be
in a little bit more. If we go back to our scene, let's go ahead and
name things so that we're not confused. Let's just do a quick
save and let's name this. The lathe is the body. This mirror, this is the leg. Let's name the mirror, we'll tap these three dots. Let's name that legs. This cylinder, essentially,
this red is a mirror. This cylinder, which is the leg is nestled under this mirror. That's why you're
seeing two of them. If I was to drag this out,
you would just see one leg. If I put it in, it's two legs. This is the foot. If
I rename this foot, make sure you're on
the foot, add mirror. So now we can go ahead
and tap on both of those, validate, both of
these, validate, yes. Now we have both our
legs and both our feet. We can select them both, and then we can voxel remesh I'm going to swipe up from here. Just in case you
don't see this little shortcut down here
for voxel remesh, you can put the shortcut there by going to these three lines, shortcuts and then
adding the voxel remesh. See? But this is the same thing. If you don't want
to do any of those, you can go up here to Voxel and it's the
exact same thing. If I swipe up, you'll
see the numbers match. We'll just go to 150
and then hit remesh. We can use the smooth tool and we can just smooth this out. Then there's this
cute little legs. Let's do a quick save. Now let's add some
spheres for the eyes. We'll go to our
scene, add sphere. I'm going to name this eyes, and we can tap mirror. Let's go to our Gizmo and firstly, let's just
make it small. We'll move it forward up. I can shrink. Okay. And then we'll slide it to the left. And now we just need to make
it flush with the body. Yeah, I think that's good.
Alright, let's save. Next up, we'll work
on the whipped cream.
5. Whipped Cream: Let's work on the
whipped cream on top. This is going to be a
simplified version. First, let's go into our scene and just hide all of these. Then we'll add tube. I'm just going to long press
and move it to the top. I'm going to tap home just so it kind of shrinks it a bit, and I'm going to turn on a grid. So first, we're going to tap these three dots and put
post subdivision to three. Okay? So then we're
going to tap spiral, and we're going to
set the twist angle, so we're going to twist one, two, three, and then four. So 3.5 rows. So now we're going to go back
to radius and tap it once. So you'll see the little
two orange things on the top and bottom.
We'll make this smaller. I think that looks great.
Let's turn the grid off. I don't like looking at it. Now let's go into the three dots here and let's just bring
the division X down. Probably into 30.9, I think
is okay. Let's validate. Now let's go into the move tool. Let's turn symmetry off and we don't need it
to be really big. Here, I'm just going to stretch this make it a
little bit bigger. So I'm just gonna stretch
that out a little bit. You can just adjust it until it's however you
want it to look. I think I just want a little bit of something like that.
I think that looks good. And if you're showing a
little bit of gabs here, you can always go into
this little beaker and you can inflate
it a little bit, and it'll kind of hide those. Alright let's save. So let's go back into our scene, and we'll bring everything back. The tube, let's rename. With cream, and I
think it's huge. So I'm gonna shrink
it, move it up. Okay, it is very, very big, that's okay. Let's shrink it a
little bit more. And we want to do
something like that. You could even give it a
little tilt if you want. Now I'm going to try smooth. Now, smooth it might not work as well as
I want it to work. It looks like it's working okay. I'm just using the
smooth tool to push back some of that mesh. You could also do clay with sub. That will actually just
take away that takes away. That's what the sub is. You
can do it that way as well. That might be a little faster. Okay. And then I'll just
go and smooth that. Okay, so I smoothed
most of it away. I think that looks pretty good. No. So I might take the move
tool and just kind of drag this edge a little bit in there. Looks good. Okay, I think that looks great. Okay, I'm gonna make
it a little smaller. Ah, I think that looks great. I think I'm happy with that. Perfect. So now I'm
just going to safe. Next up, we'll
work on the mouth. Mm.
6. Mouth : Okay, so for the mouth, we're going to use a sphere. Let's go to our scene
menu, add quad sphere. We can tap this little
gizmo here and let's just shrink this with the
larger orange ring. I'm going to move
it forward. So it looks like the mouth
is just about here. I'm going to make it a little
smaller. Maybe about there. Let's go ahead and validate. What we want to do now
is use select mask, rectangle, and we want to turn symmetry off
by tapping there. If you look at my sphere, you can see this red line, and that's going to
help us set the mask. Just make a rectangle and
we'll just use that line as our guide and then tap Gizmo and then
we're just going to use the red arrow to
just stretch this out. I think that's pretty good. Yeah, I'll do it
right about there. I'm going to go back to
select Mask and do clear. Now we want to go
back to our Gizmo and do pivot, auto pivot. Then let's go up to
this little box icon and do move origin. That's going to move it to
the center of our project. Now when I bring it up, we know that it's
directly in the center. We can move it up. I'm just
going to make this smaller. I think that looks pretty good. So now we just want to look at one side of this
object and we want to do the same thing with select mask and we want
to make a rectangle. Like this, but I just realized, it did go all the way
through, which is great. If yours doesn't go
all the way through, you might have to go to this option and you
might have to uncheck this because if you have this checked, I'll
just show you. If this is checked, then
it might look like this. See, it didn't go through
to the other side. Again, that's in the select
mask options up here. It's this little option and I'm just going
to uncheck this. I'm going to clear
everything and then I'm just going
to make a rectangle. Like that. We'll use the gizmo, and we're just going
to use the arrow to stretch this out forward. And then we're going to use
this little blue sphere to just make that flat. So now I'm going to go
ahead and go back to select mask and just
clear the mask. Let's do a quick save. What we need to do
is take this piece. We'll use the gizmo and
move it into the mouth. If we hit Xray, we can see that it's a good distance in there. I probably doesn't
need to be that deep. So maybe something like that. Turn X ray off. You just
want to make sure that you have some space in front
of the jar as well. The first thing that we
need to do is go to scene. We need to take let's
just call this mouth X. Let's clone it, and let's rename this mouth B, we'll
just call it B. Mouth B, let's just hit this
little eyeball to hide it. Mouth X. All we're going to do
is use the trim tool, Lasso and let's hit Xray. All we need to do is trim
this little outer portion. C, we have the outside and then we have this
space where it's crossing through the jar and
then we have the back part. We just need to use
the lasso and just trim everything
that's in the front. You know what would
actually be cleaner? We can turn symmetry
back on and then just do the same thing because then it'll just clone
it either side. Not that it really
makes a difference, but it feels better for me. We'll turn Xray off so we shouldn't be able to see
it, which is perfect. The next thing that we need
to do is we need to make that back part and this
jar one piece. Now we need to fuse the back part of the
mouth and this jar. We'll go to our scene. We
want to tap the mouth X and the body and let's just
voxel remesh this around 200. Okay, so now they're officially one single piece in the body. And we might need
to add a taurus. I don't really like
the details up here. So what I'm going to do is
go to the scene, add Taurus. I'm going to shrink it with this green node and then just
move it up with the gizmo. Shrink it. I want it to pretty much
match the other one. So here, it's a
little bit bigger. Let's do this. We can go back to
the tours options and we can just use this
to make it a little bit bigger and then back to the Gizmo to move it up and maybe shrink
it a little bit. Maybe even stretch
it a little bit. Why not? I think that
looks pretty good. Okay, so we're just going to
leave that there for now. Going back to this, let's go to our scene and
let's unhide Mouth B. If you tap on Mouth B, let's just make it a little bit smaller and then move it
forward just a pinch. So I'm going to make it a little smaller and then move it
forward just a little bit. Now what we can
do is we can take Mouth B and body, we
select both of those. Hit the little I on Mouth B. If this doesn't work for you, if you find that it won't just let you tap that I, this
is what's happening. You need to go to advanced
and you need to uncheck sync visibility because
when you have it checked, it's going to do this. Just make sure you
go to advanced and uncheck sync visibility. Tap that eyeball, tap
Boolean and Boolean. So now you have the body with that clean mouth and you can see that it
has the depth as well. Okay, let's do a quick save. Okay, so now let's
voxel remesh this. So let's voxel remesh. It can be the same at 200. So vox will remsh that, and then let's use this little
beaker to smooth this out. Perfect. Oh, no. Okay, so I'm just going to show you what
happened with mine. So if you see holes, the reason that happens is because when we did the boolean, there wasn't enough space
around the bottom of the top. So that's an easy fixed. I'm just going to undo
it, go back to mouth B. So all I need to do
is just shrink it, or I can just make the
whole thing a little bit smaller and make sure
I shrink it like that. So now I just do the same thing. Body, eyeball, boolean, boolean, voxel remesh it again,
and then smooth. Much better, and then we don't have any of those
spaces in the bottom. Next up, we'll
work on the teeth, tongue, and the straw.
7. Teeth & Tongue & Straw: Okay, so the body is 230 K. It's a very high
resolution for this jar, which is fairly simple. So if you don't have
quadri measure, just go here and miscellaneous, and then you can decimate. So I'll turn the wireframe
on so you can see the resolution is going to lower the more
that you decimate. So once, twice. Okay. And if you
turn wireframe on, you can see that it
doesn't look that bad. But the more you do it, It's not too bad. So 7,000 is pretty
good, I would say. And if you have quad remeasure, you can use quad remeasure. Let's just do half half. And you can see it gives you a cleaner flow of the vertices and faces
and things like that. That looks pretty good. I
think I'll leave it there. So as for this part, I'm going to go ahead and
tap the three dots for the Taurus and just put
the division X down. I'll bring it down to 20. And now the Taurus and the body, I'm just going to join together, and they're both
going to be the body. So I'm going to do a quick save. So teeth and tongue, we can keep pretty simple. We'll go to scene,
add a quad sphere. You want to make sure that
it's not in this mirror. So I'm going to take this quad
sphere and just put it on top and I'll rename that teeth. We'll just shrink this
to about tooth size. We'll hit mirror with that little gizmo and then
we'll move them over. Right into the pie hole. Now we can just adjust
them how we want. I'm going to flatten them
with this little sphere here. One thing I like to do is put the teeth with the
curve of the mouth. I'm just going to use
this to rotate them. They just make more
sense like that to me. I'm going to take
these and I like it, so I'm just going to validate. This is teeth Then we'll
add another quad sphere, we'll name this tongue. We'll hit our gizmo. Shrink. We can just flatten. If
you want it to be a little bit sort of I don't know how to
make this make sense, but I'll show you. You can take select mask with rectangle and you
can select the top. Then you can always pull
this down straight. We'll go back to select
mask and just clear it. Basically all I did
was make it more like a cylinder and I think that
actually looks better. Then I'm just going to
take the little beaker and smooth that. I like that more
cylindrical look. But are. Using a sphere just simplifies
it a little bit, I think. There you go. So you got a
nice cute tongue in there. I just use MV to flatten
it a little bit. Alright, so let's
do a quick save. So let's do a little straw. So we'll just add a cylinder
and we'll just shrink it maybe right around there. It doesn't have to be long. Okay, so now it's just a matter of placing it exactly
where we want. So let's just take the gizmo. Then, of course, you can
adjust the size as needed. Another thing
that's really cool, you can just hit a whole and then then you'll
have a hollow straw. I'm just going to
adjust the width of that, make it a little thicker. That's good. It's the
resolution is really high, so I'm going to take that down. I'm going to tap the
three dots and just bring this division
X level down. I mean, that's
better. It's still a bit high, but I
think that's fine. I'm going to hit
another quick save. Once you're happy with the eyes, you can go ahead and validate. I'm just going to
name the mirror eyes so I don't have to do
it after I validate. Select these, validate.
These are the arms. Do the same thing,
name the mirror. That way when you select
them both, validate arms. Cylinder is the straw, so make sure you
name everything. And you can validate. And that's where you
definitely want to save again once you do
all that stuff. Let's set this up
for the next video. So let's go to this little sun, we'll change from MT cap to PBR, so it should be all white. And then when we come
back to the next video, we'll first paint
this a neutral color and then we'll add lights, and then we'll finish off with some nice
rendering. Alright? Great job so far. I'll see
you in the next video. Next up, we'll work on the lighting and the
post processing.
8. Lighting & Post Process: Okay, so let's make
everything a neutral color. That will make it
easier to set up our lights. So
we'll go to scene. We'll select everything. We'll go down here to this
little rounded cube, tap that. Then let's find a neutral color. I usually like to do an
orange, grayish to orange. Roughness should
be about halfway. I have some presets. I usually use this
terracotta type color. So this color is E 19357. So I'm just going
to do paint all, so everything should
be painted that color. So next, we want to go to the ittle sun and we want to
turn off the environment. If you don't have
this environment, you can download it in
the class downloads. This is my own
custom environment, but we want to turn that off for now. We want to add a light. This is where you add all of your lights. You
add one light here. Let's tap this little pencil
and just name this key. This is the main light that's
lighting your character. So let's tap these three dots and we'll change
attachment to camera. All this does is it keeps
the cameras in place. So when we do a turn table
and this is spinning, the lights don't spin with it, the lights just stay in place and only the character spins. That's why I change
it to camera. Okay, so let's go
back to that light. If you can't see
them, go back here. If you can't see them, there's
a little icons thing here. So they don't show up, for example, now you
can see the icon. I always hit a line because if I want to just move it straight over
this way and up, this does not make that easy, so just hit a line and then
move it here and here. This is a directional light, and the reason I'm moving it
here is literally because the light looks like
it's coming from this direction. See
this little arrow. For directional
lights, the only thing that matters is this arrow. I could put this anywhere on the screen and it won't
change the light. It doesn't matter. All that matters is the way that
this arrow is pointing. If I rotate it, then
it's going to change. That's the first light,
that's the key light. Let's put the intensity to 2.5. All right, nice. Now we'll go back to our
sun. We have one light set. We're just going to copy and we're going to change
this one to edge. This is going to be an
edge light or rim light. We can just move this over down over a little bit
more and we want to rotate it so that
only the edge of the light is showing on
the rim of the character. That looks pretty good. I'm going to put the intensity
to five maybe for fun, we'll just make this
light a bit warm. Okay, so that looks pretty good. Let's take edge and clone it, and let's rename this 12. So this light, I like
to bring over here. I'm going to put
this back down to, let's just say two,
so this intensity. And I'm just going to rotate
this so that we're getting a little bit on the
side of this character. So maybe something like this. We can change the temperature. Maybe we'll just
do something blue. Okay, so we'll do
something like that. Let's do a quick
save, for funzies. And now we have space for one more light and Nomad,
so we can clone this. I like to name this one
D two. I'm such a nerd. Okay, so now this light, I'm just gonna put
this back to white. Oh, you know what,
Lynn Just for fun, let's try a different
type of light. So here's our lights here. So if you tap, it's just going to go to a
different kind of light. So let's go to Spotlight. You can also just go here. Oh, wait, this is R
two. I meant D two. That's okay. Whatever light this is that's pointing nowhere. So you can do the
same thing here and you can just change it.
Where do you change it? You can change it up here. So we're just going
to use spotlight, and that works just
like a spotlight. So now when you
move it, wherever this cone is, that's
where the light is. Oops. That's where
the light is shining. Sometimes it's hard
to find the arrows. So you can play around
with this light. It's pretty cool, actually. I don't use spotlights that
much because I usually do pretty generic lighting when
I'm lighting my characters, but it is pretty fun. There we go. Okay,
so let's just save. Now we set up our lights.
Let's go ahead and tap the sun again and turn
back on the environment. But it's very
bright. You see how you can't even see
the lights anymore. That's why we turn this off
to make the lights because you want to be able to see them fully and see
what they're doing. When we turn this on, just
turn down the exposure. Here is nothing. But we don't want it to
be completely black. We want to have
some ambient light. So that's why we do
something like this. So I think that looks great. So let's turn on post process. So let's tap this
little shutter icon, turn the render resolution up. We'll tap post process. And I'm just going to
put it to my setting, and then you can copy if you want, but you don't
really have to. So here's my saved
post process settings. They tend to change
with each sculpt, so keep that in mind. This color, for now, I'm just going to
match the color of character just because
I think it looks nice. So now the shadows have a
little bit of an orange glow. Okay? So, of course,
you can adjust these as you want, and
just experiment. So they'll change how dark the different areas
and things are. So really fun to
play around with, but that's what really
makes it look realistic, gives it a nice cool look. Depth of field. You can play around with all of
these as you want, chromatic aberration,
fun stuff there. But this is essentially
my settings. Okay, so now that
we have that done, also, if you're having problems, if your device is
starting to slow down, you can turn post process. You can turn post process off,
and then you can color it. I'm going to leave mine
on because mine seems to be okay when I have
post process on. So in the next video, we're
just going to add some color. Then we'll do some
renders and a turn table, and that will be that.
Great job so far. I will see you in
the next video. Next up will be
coloring and rendering.
9. Color & Rendering: Okay, so let's add some color. So the first thing you
want to do, let's select the jar or the body, and we'll go to this little
rounded circle down here. We can go up to reddish. Let me swing this over here
if we want to try to match, but you don't really
have to match. I mean, you can do
whatever you want. Really? I think
that's a good match. So this roughness, the higher
it is, the more rough, the less reflections and
things you will see. But then the more you go down, the more reflections
and things you'll see. So I think I want to do I
don't think I want it just glossy like that because that minimizes the
reflections sometimes. So I like to just add a little bit of roughness so it looks a little
bit more real. Then just hit pain all. Just as a note, remember, you don't want to
be in a mat cap. Otherwise, your paint
will look weird. I won't look right.
Remember to be on it PBR. If you want to paint
something over this or if you want a two tone, just go here and add a layer. You base right now is pink. You can make this layer pink by just hitting pain all.
Now this layer is pink. Layers are really great way to add flexibility to whatever
you're trying to create. If we add this and add, how do you actually
spell turquoise? Let's say we wanted to add
an element of turquoise. You could do something really
cool like select mask. Let's rectangle here. Let's blur it up a little bit. Then let's change this
color to turquoise. Okay. We'll paint that. Then you can clear the mask, and now you have two colors that you can adjust if you
want, you can do less. So if you tap on the paint,
there's an eyedropper. So you can tap on the eyedropper and then you can
grab the color here, and it'll set this back to whatever color
you just grabbed. So now for the arms, we can do paint, for
the legs, paint. For this, maybe we'll
just do a white. Maybe a little more rough. Be you can experiment with that. This, I feel like I want it
to be a nice gold color, so we'll go something like this, and then we'll turn
up the metalness, so that just makes
it more metallic. So we'll do something like that. Nice gold straw. Teeth
we'll just go with white. Well, we can turn
the metalness down. We'll turn the roughness down. Tongue, we can go pink, but I think I'm
going to do, like, a nice light purple
and move this, maybe a little roughness. Paint that and the
eyes we'll just go with black with a little gloss. All right. I love it. If
you want to experiment with some different environments,
you can do that. So here's the one
that we're using. This is no environment.
Here's with the environment,
you can rotate it. You can tap and you can use some of these default
environments. So just other fun
things that you can do, but I always use my
own environment. Okay. Well, I'm just going to double check that
post process is on. It looks good. I think I want it to be a little bit brighter, so I'm just going to raise the exposure of the environment. I like that. Now, if you want
to change the background, you can just tap here and
you can change your color, see there's gradient color. So you would just
tap this and you can make it a nice
light background. Maybe we'll add
some orange to it. A little bit. Since I did this, I'm actually going to I'm going to change D two to
match the background. I'm going to tap this in the lights and I'm just
going to do an orange color. Oops I might bring up the
intensity a little bit. I might do the same with this. So sometimes it's
nice to just make the lights match
the environment. Okay, I think
that's pretty good. I want it to be a little bit more lighter on the left side, so I'm just adjusting the
environment rotation. I think that looks good.
I think that looks great. I'm going to hit a quick save. Now to do a turn
table and a render. Let's turn the reference
image off first. All you want to do is go
to this little folder. You want to go to render. If you want no background, if you just want it
transparent, just tap this. This obviously shows
the interface, if you want to print that. When we render, you're going to see a bunch of numbers
and it's going to count. And once it gets
to the end number, that's when you're going
to see the render. This is what controls
that number. I usually keep mine at 3:50. Seems fine. Okay, so back
here, we'll just do screen. I'm going to do a transparent
background Export PNG. Okay, beautiful. So now I can save this. All right, so we
have a nice render. So now for the turn table, all we want to do is tap
this little Nomad icon, and then right here, these are my settings, you can
match them if you like. And then we'll
just tap turntable and then we have
a nice turntable. I want to make it a
little bit bigger. I just noticed
that when it turns around, the lighting
is different. So that means, let me go to my lights and make sure that these are
affixed to the camera. I don't think you can do
it for the spotlight. I don't think that
moves. I thought I had already set them to
camera, but I don't know. I guess things happen.
So let's try that again. So we'll go here, and
then we'll do turn table. I think this looks much better. So I record this turn table? Alright, thanks so
much for joining me. That's going to wrap
things up for this class. But please make sure to post your projects to
the class gallery. I'd love to see what you create, especially differences
and details and little things that
really make it your own. But, of course, if you just
follow it along step by step, I'm more than happy
to see that, too. So another thing
that I've been doing lately is making
YouTube videos where I go over all the class
projects. It's all in fun. It's not a critique. It's just an opportunity for
everyone to see what you guys are up to and how you're progressing.
Nomad Sculpt. So another thing
that I've been doing a lot lately is making YouTube videos where I go
over the class projects. It's not a critique. It's
not really a review. It's just to celebrate
my students and all the class
projects so everyone can see what you guys are up to. So make sure you put your
social media if you want, so I can give you a proper shout out and check out the
rest of your work. Of course, if you
post on Instagram, I love to share your
work to my stories, instagram.com slash
DRUG FredaV Dave. My YouTube is also
drug Fredave Dave, so that's tube dot,
youtube.com slash DRUG Dave. And last but not least, if
you enjoyed this class, if you had fun, please
rate and review. That's what keeps
me going. I really appreciate it in advance. So remember a moment ago when
you saw my Blender edits. If you're interested
in learning Blender, I actually have two Blender beginner tutorials
here on Skillshare. One is just a complete
crash course and Blender, and the other one is just simple animating with key frames. But I think Blender has a lot so if you're
interested in that, check out those premium classes here on Skillshare as well. Okay, that's all I got. Keep drawing, keep sculpting. I hope to see you in the next
class here on Skillshare. So here's our time. It's our time down here. If.
 Dave Reed, 2D & 3D Illustrator - Brooklyn, NY