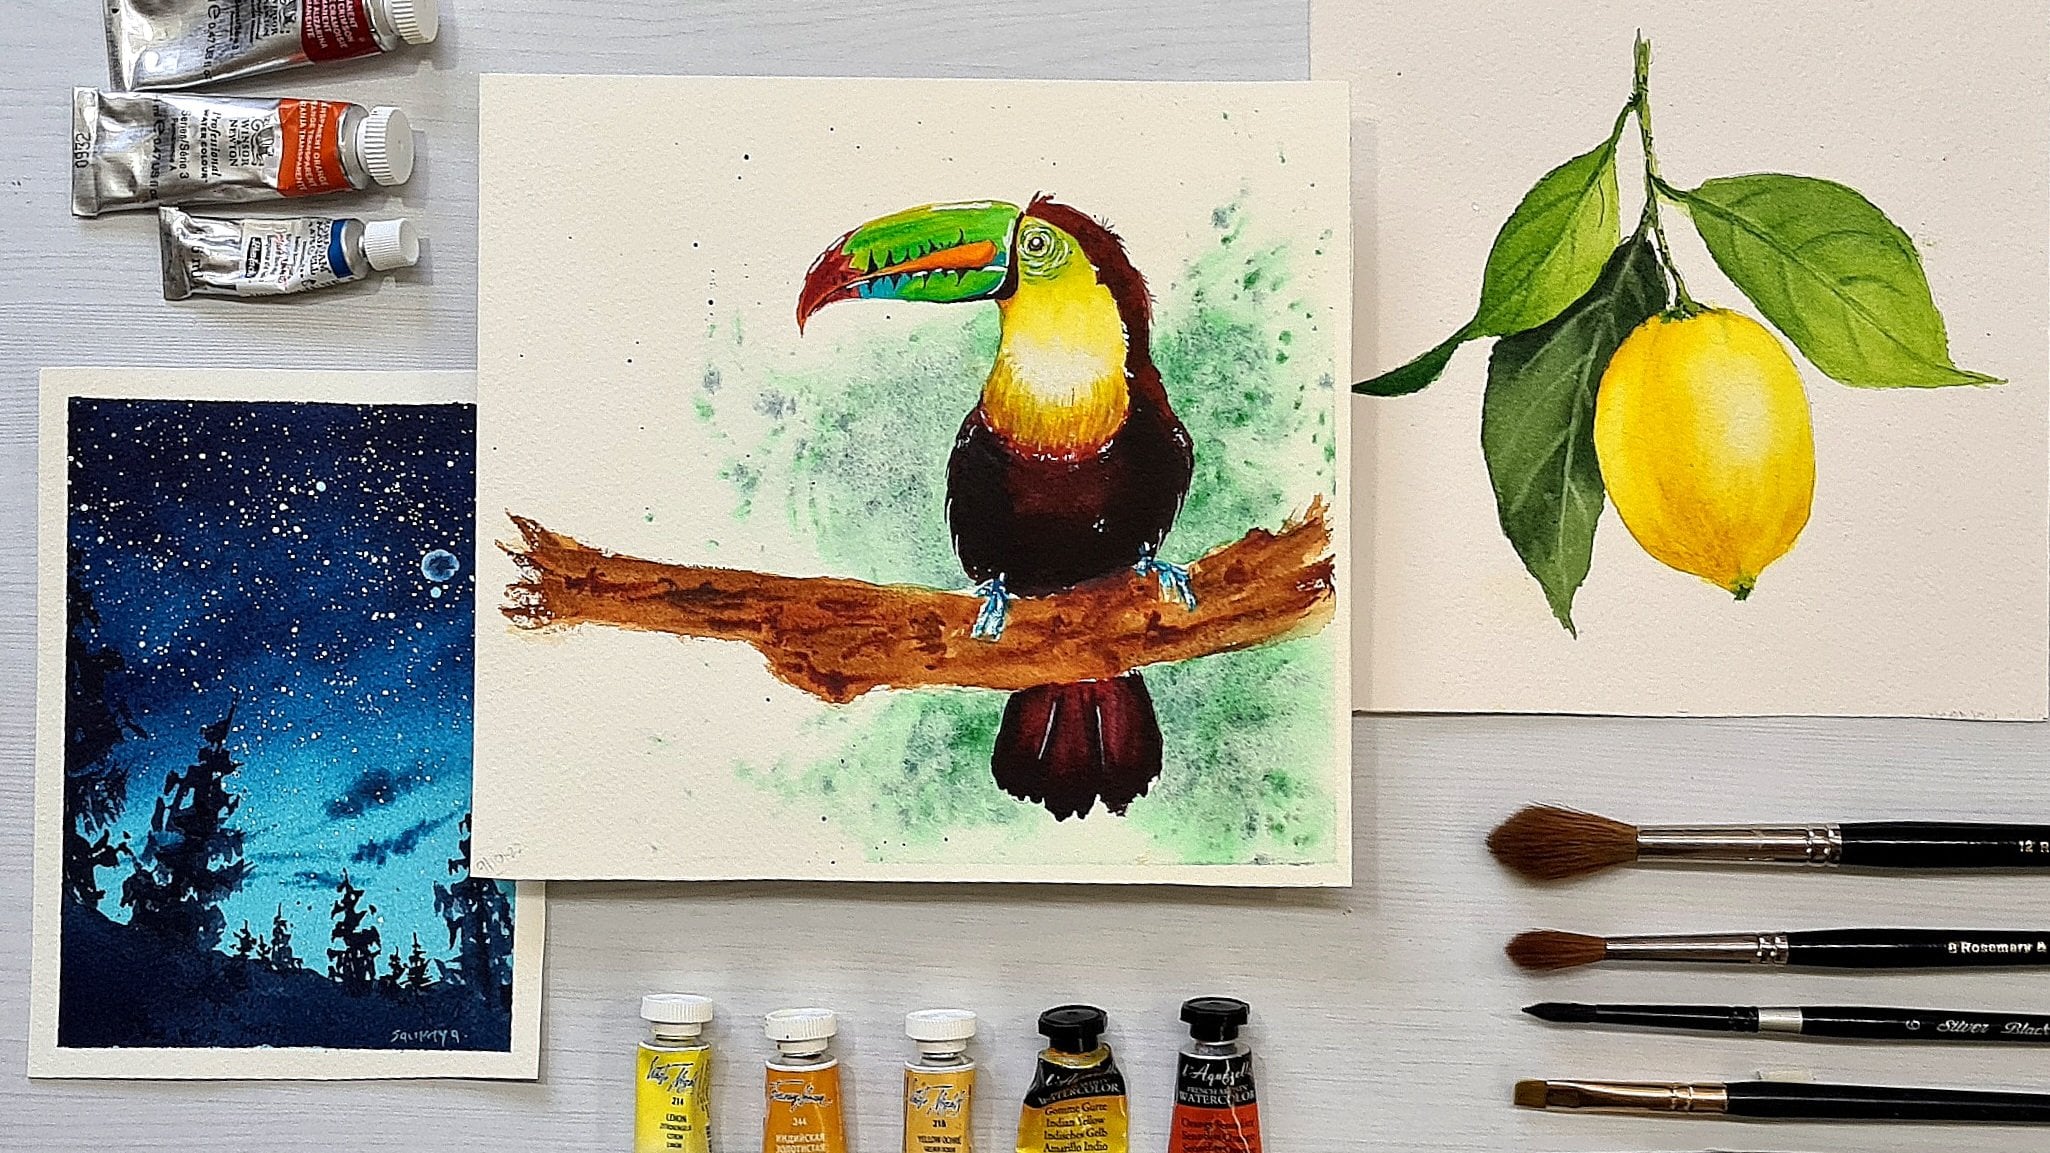
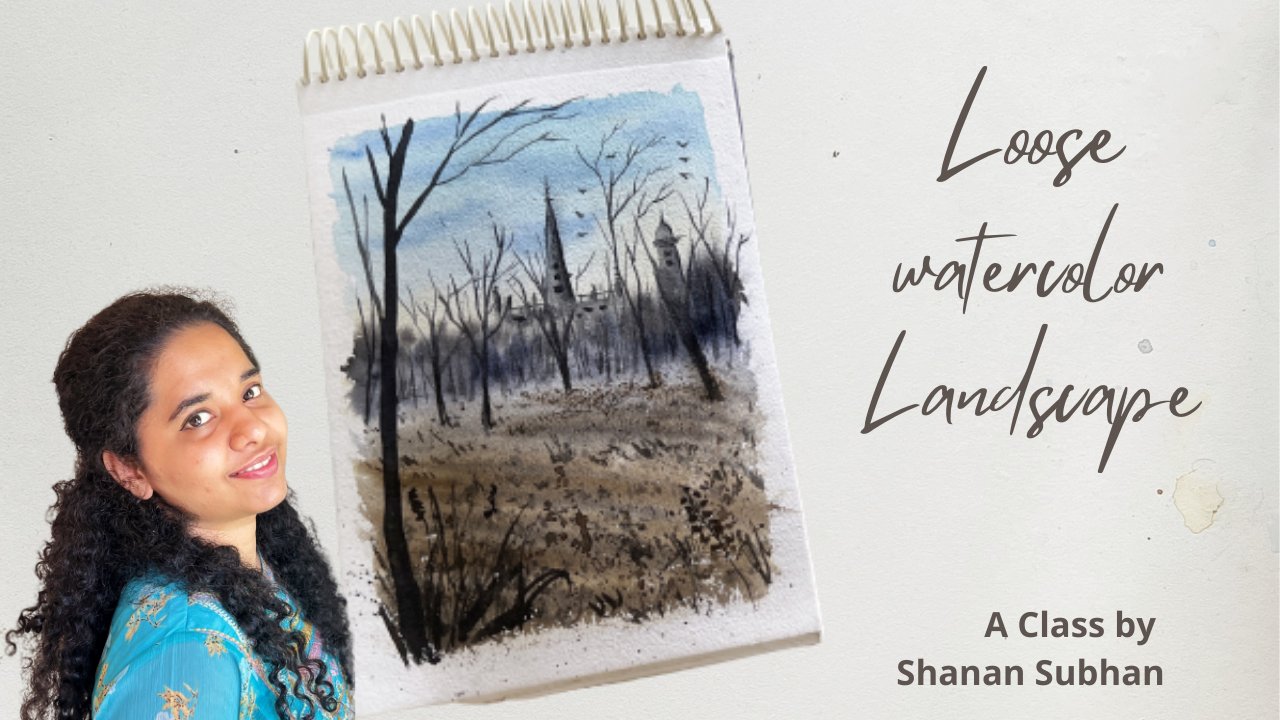
Transcripts
1. Introduction: You are looking for
a more intuitive and instinctive approach
to watercolors. Come join me in this class where we'll dive into
the world of painting, enabling your creativity to flow naturally using the
magic of splatters. Hi, my name is Sml. Cota. I'm a watercolor
artist from India. I'm greatly inspired by nature, especially the
fluidity of water. Watching the colors blend and flow on paper fascinates me. The thing I love most about watercolors is how
versatile they are. They can be used for
strict, detailed, and realistic
painting, while also allowing for a more loose
and fluid approach. In this class, we'll focus on creating expressive forms
with the help of splatters. The splattering
technique can be used in various aspects of a painting
to paint backgrounds, depict atmospheric effects
like Fogan's Nist. To add visual interest
to our paintings, and the list just goes on. Throughout the
class, we'll learn how to paint using the
wet on wet technique. Use expressive brush strokes, simplify complex subjects
into basic forms and shapes and interest by allowing the natural
flow of water. This class is perfect
for beginners or anyone who's interested in exploring a more expressive
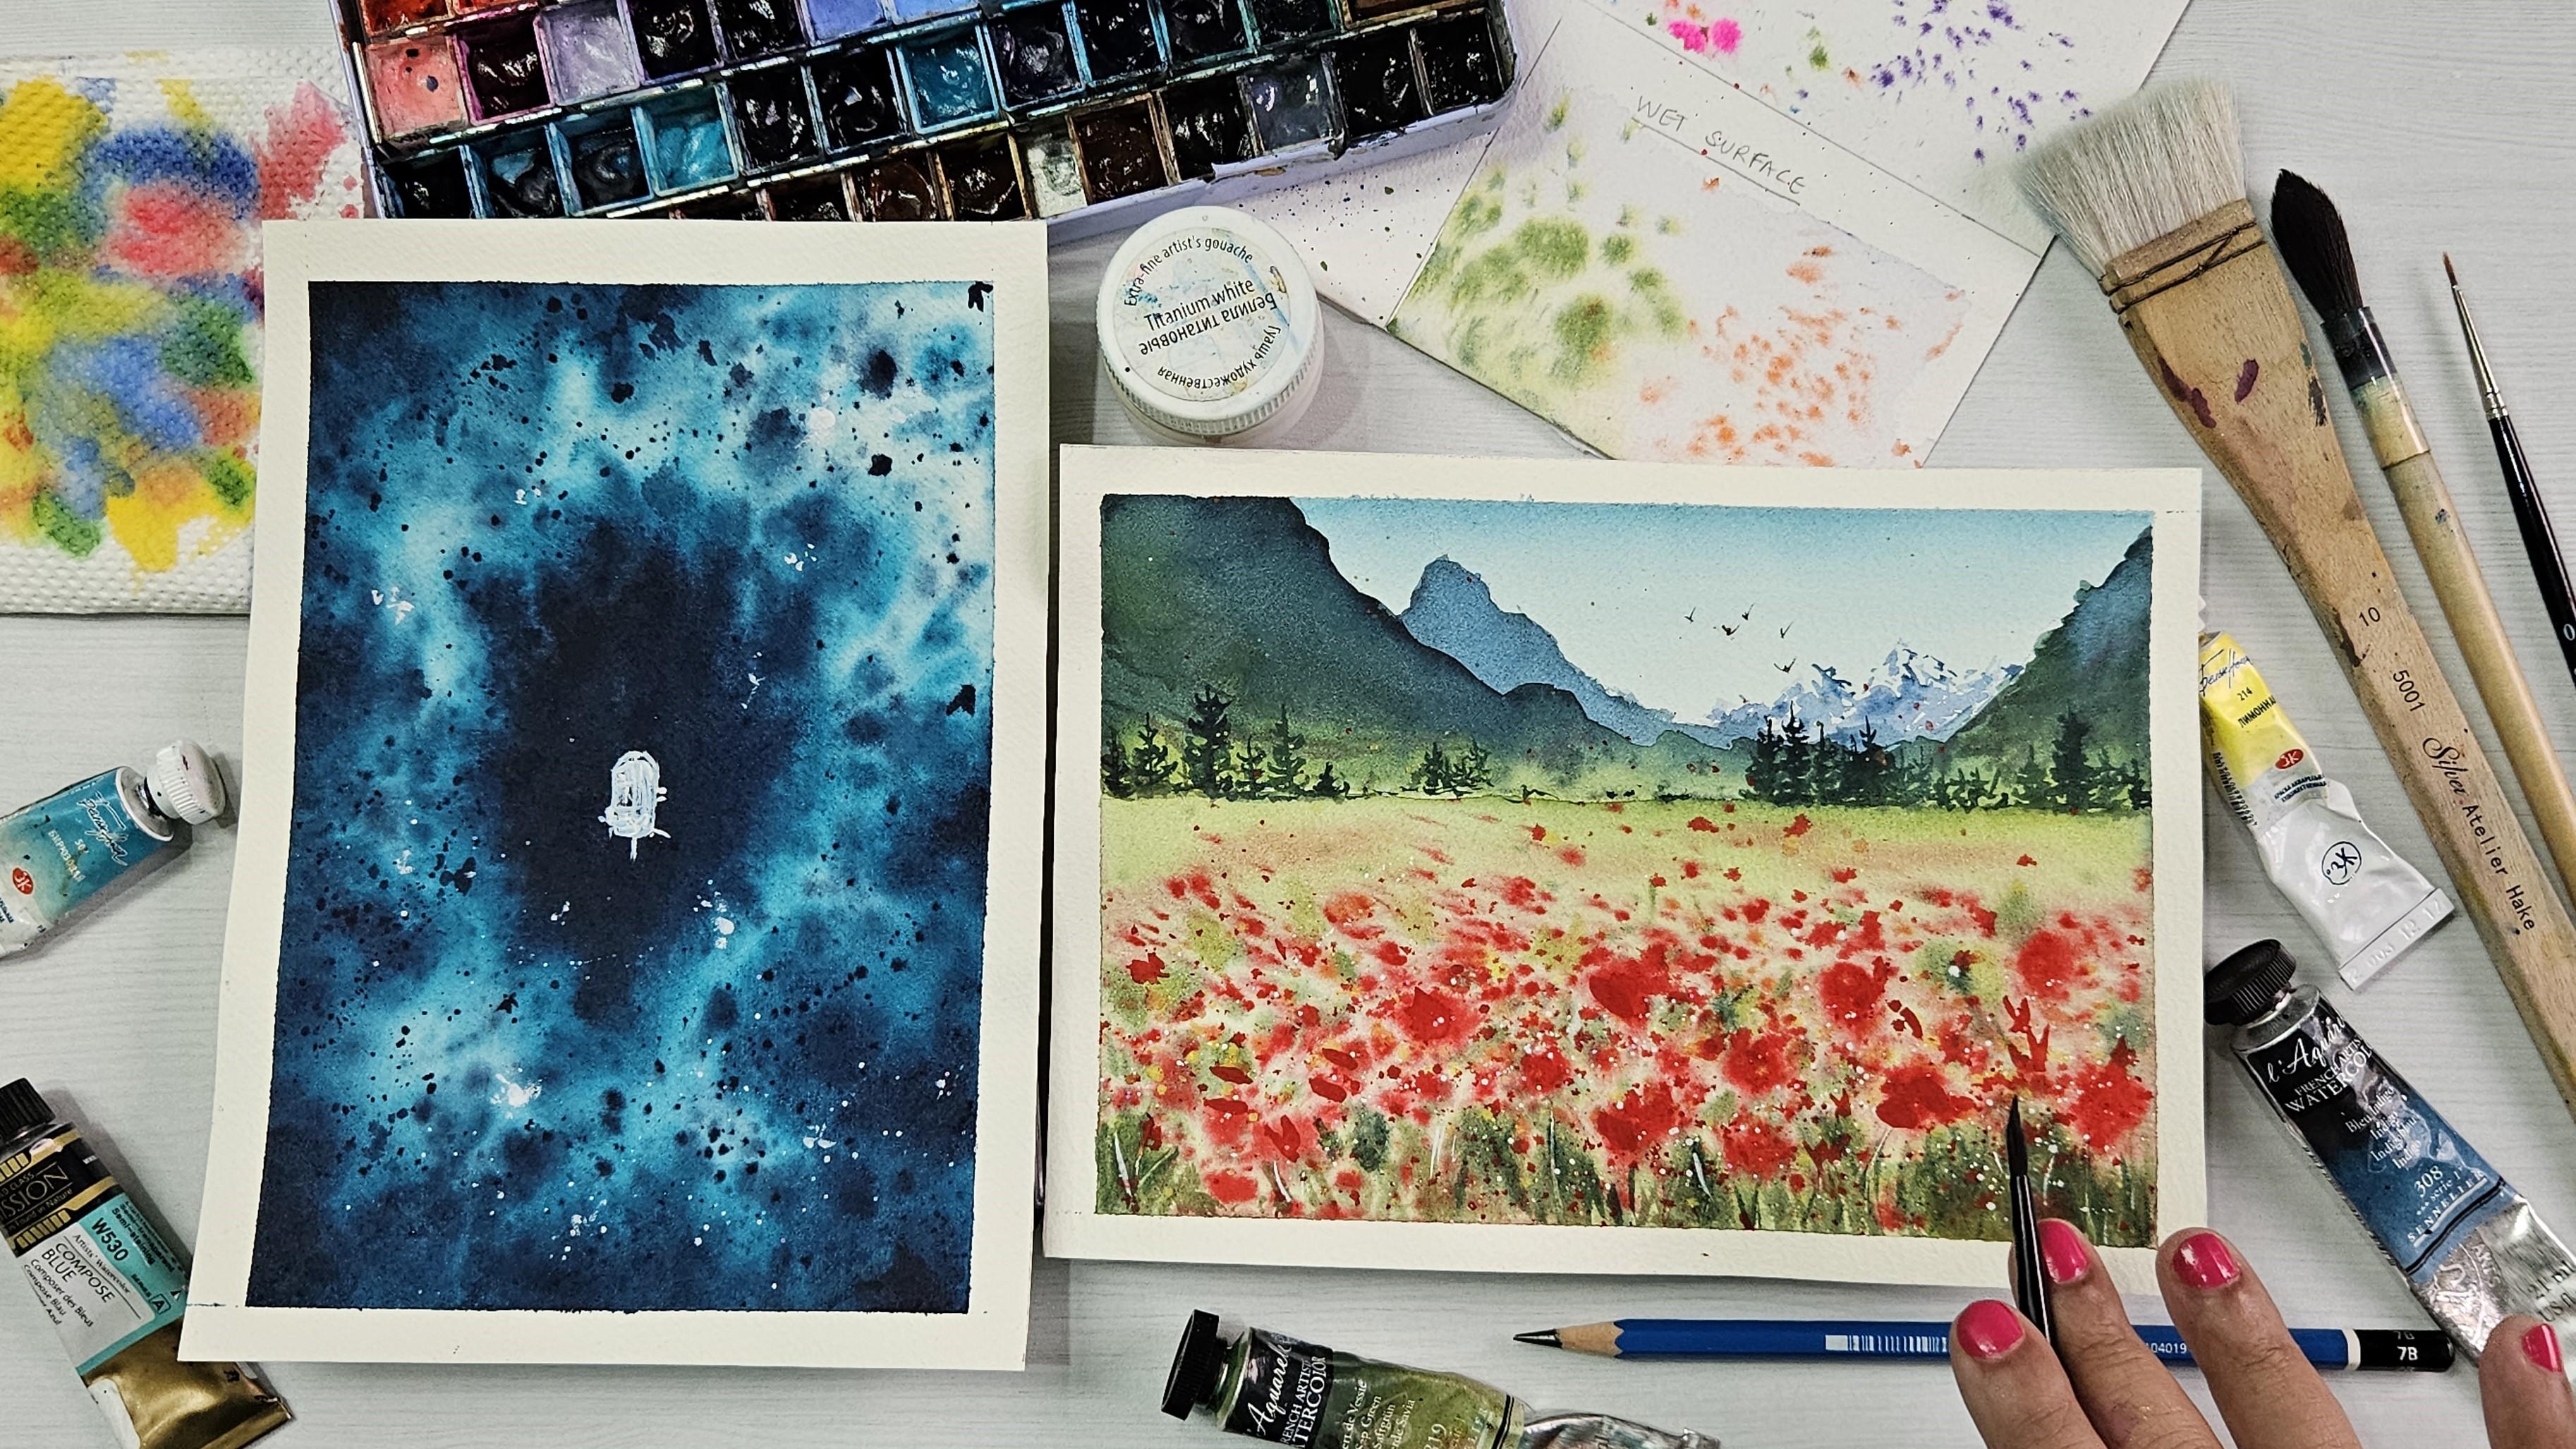
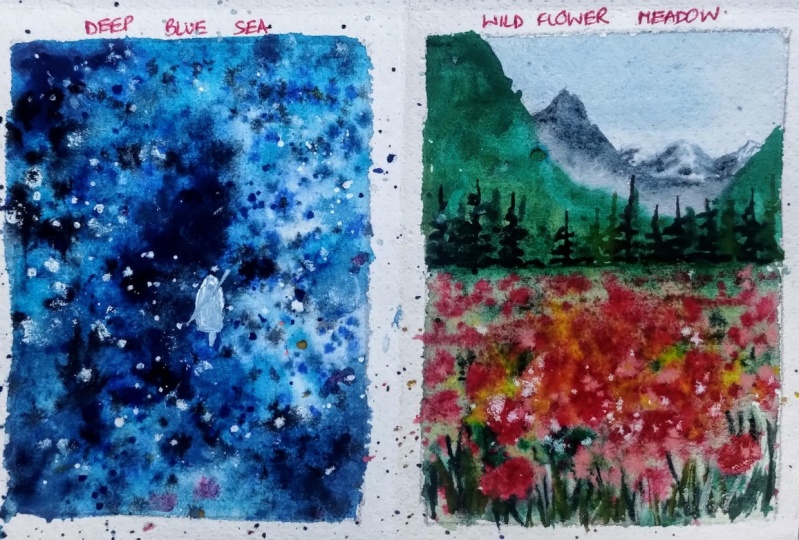
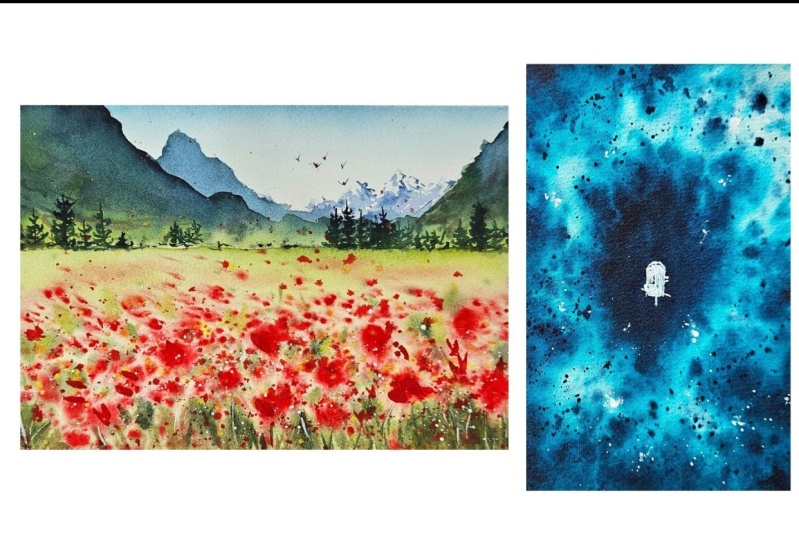
painting style. For the class project, I have chosen two distinct
landscape subjects. The first project is a
deep blue ocean scape, and the second one, a
meadow of wild flowers. Through these different
landscape subjects, you'll develop confidence in
painting with spontaneity, bringing a sense of freedom, creative expression, and energy
to your future artworks. Are you excited? I know I am. Quickly grab your brushes
and let's get started.
2. Your Class Project: I have chosen two class projects which are very diverse subjects. They will demonstrate
the versatility of the splattering technique
in different contexts. For the first class project, we will be painting a
deep blue ocean scape. In the project, we'll
use platters to depict the different
levels of the ocean floor. By varying the intensity and
the color of the platters, we will be able
to create a sense of dimension in our artwork. For the second class project, we will be painting a
meadow of wild flowers. The splatters will represent a vibrant scattering of petals and the movement of wind
through the flowers. At the same time,
we will be painting a well composed landscape
and see just how much the splattering
technique adds value and visual interest
to the overall painting. This class is perfect
for beginners, as through these
projects you'll gain confidence in
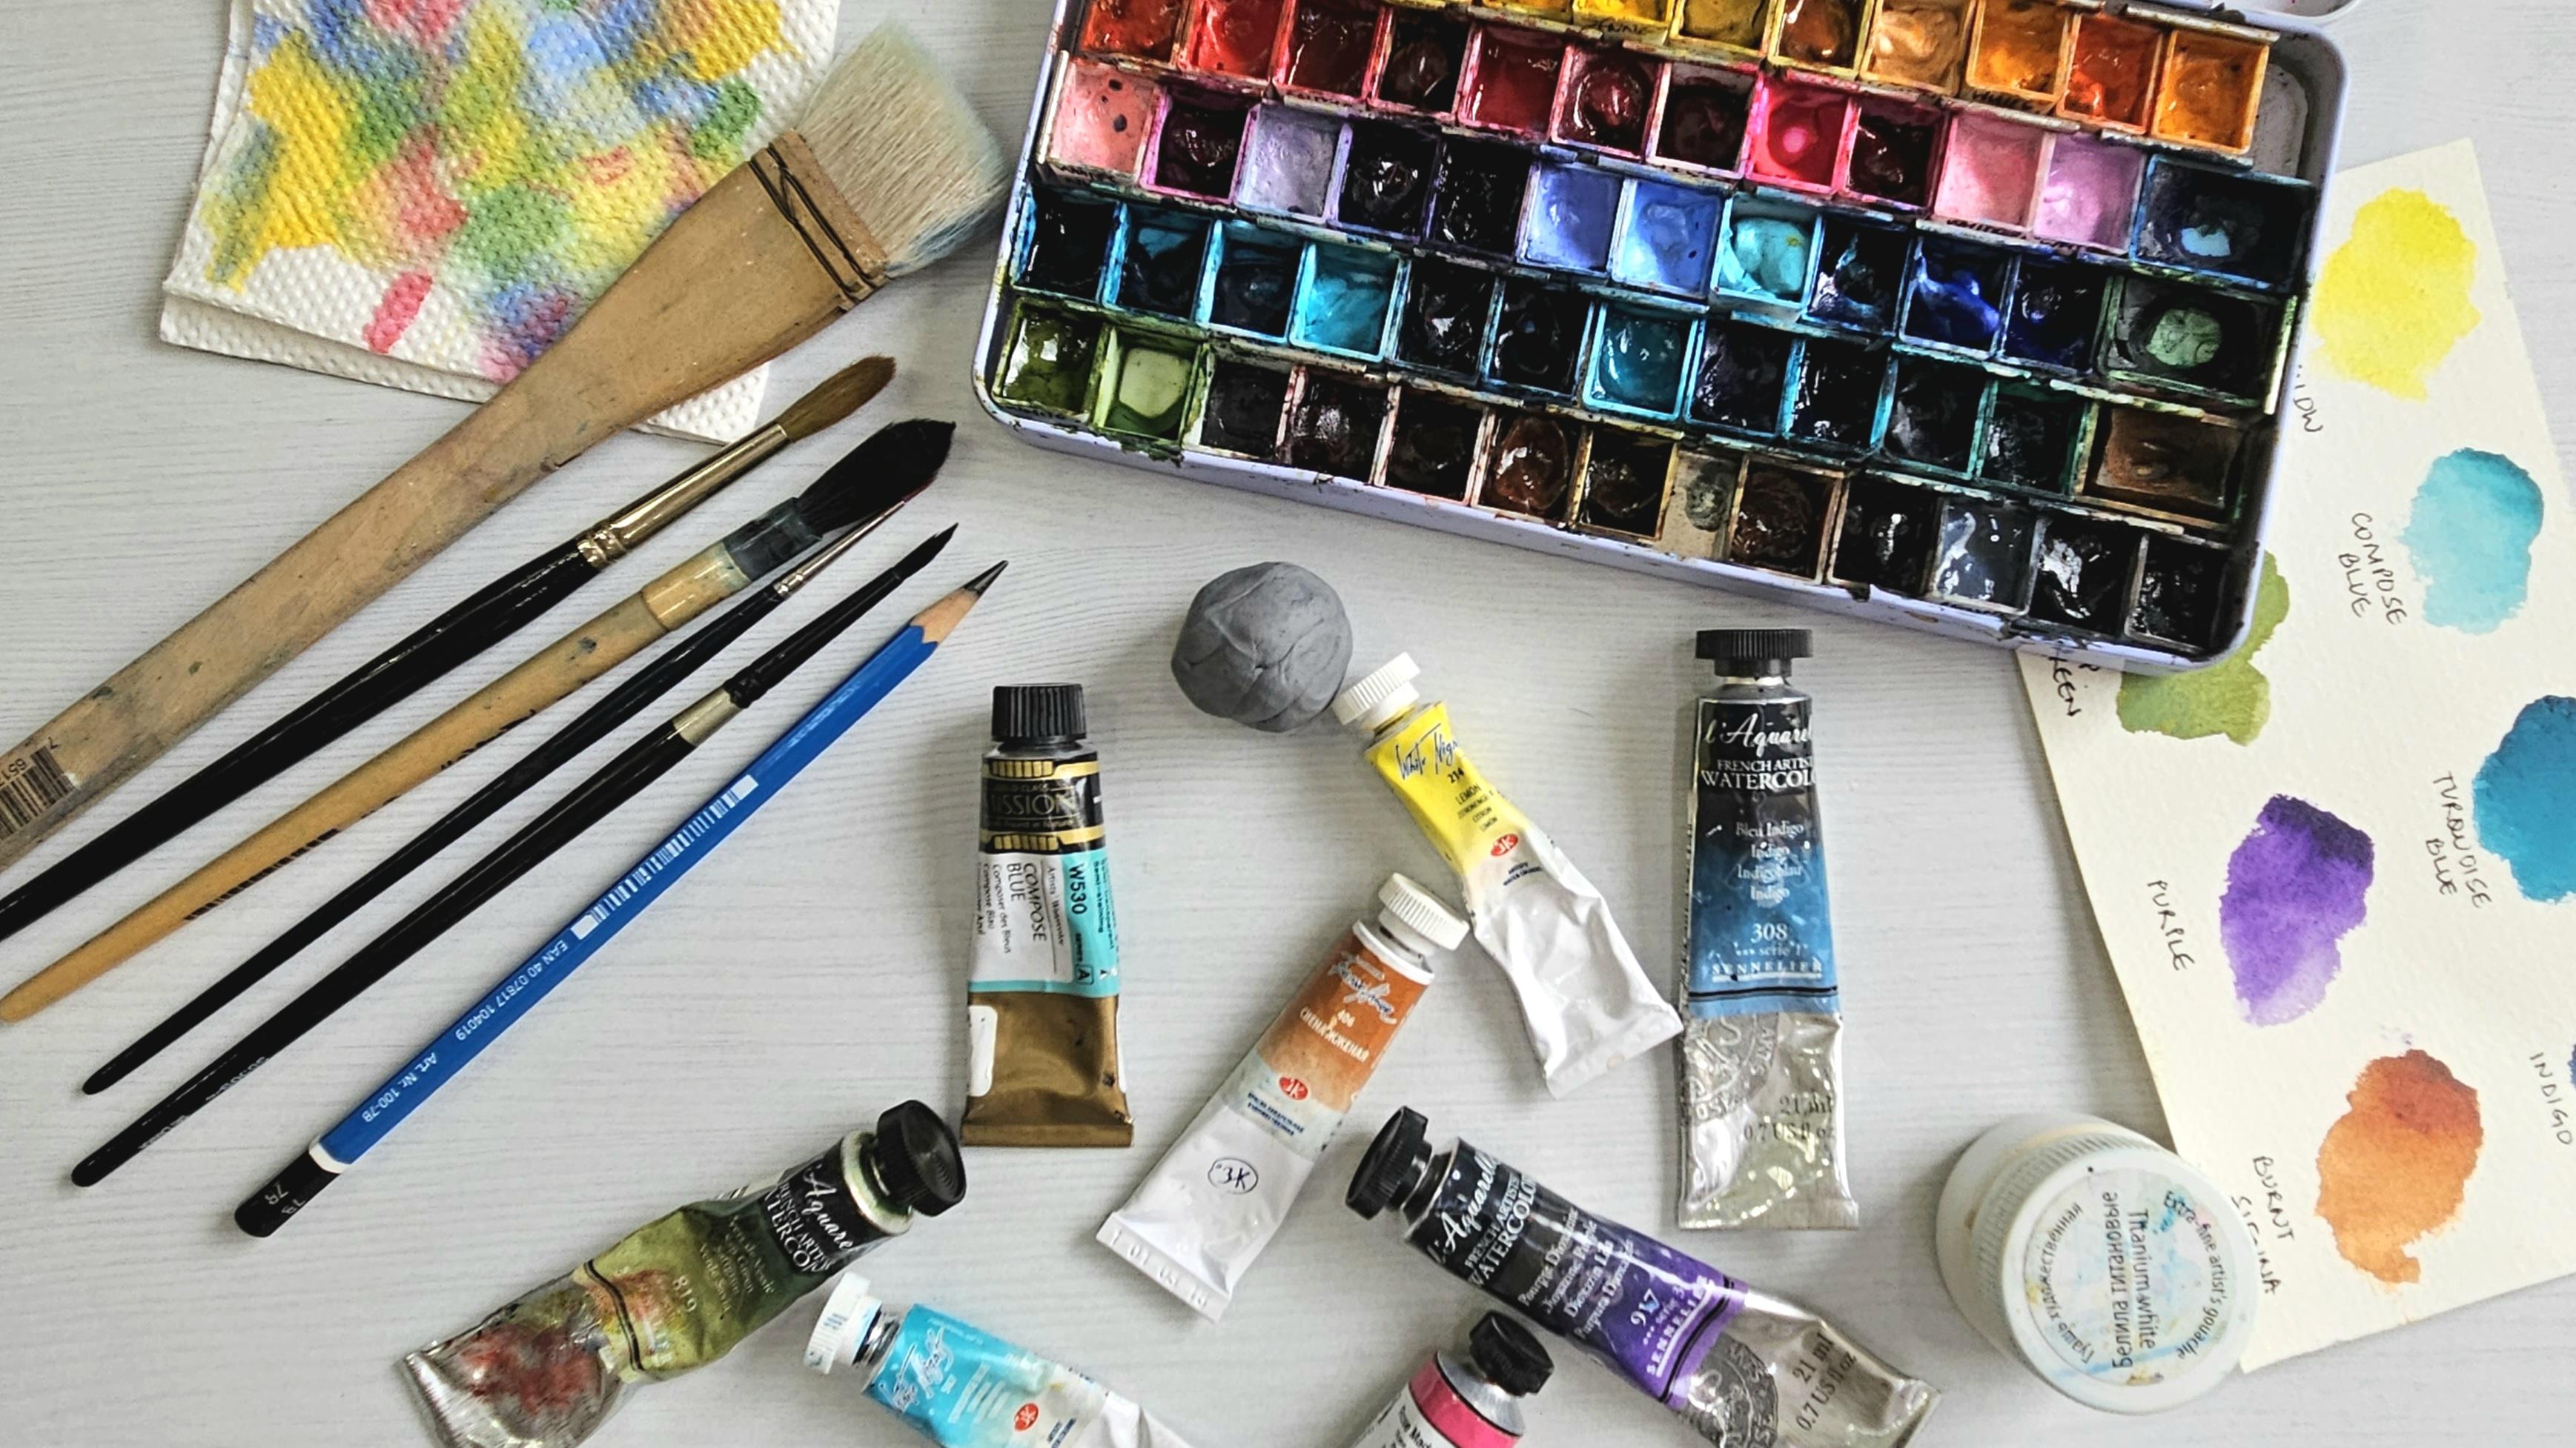
incorporating splatters in all your artworks. Let's first go over the materials we will be
using during this project. For the paper, I'll be using 100% cotton watercolor paper, which is at least
300 SM and weight. I'll be using one
sheet of this block. I'll divide the sheet into two halfs and 12 into
two smaller papers. We'll use the small papers for painting our class project. And 12 of the sheet for
practicing splattering technique. Let's come onto the colors now. We'll be using
professional artists, create watercolors
for this class. They can be either
tube or pan form. I have squeezed my tube paints
into pans In this palette, the colors which we
will be using in our projects is lemon
yellow, compose, blue, turquoise, blue, indigo, rose, madder, sap, green,
purple, and burn sienna. In addition to these colors, we would be using white quash for painting our highlights. Let's talk about the brushes
Now I'll be using a large, fluffy flat brush for
wetting our paper. You can use any large
brush that you have. The two main brushes
that I'll be using are a mob brush and
a medium round brush. I'll also be using a small brush for
painting the details. The other materials which
we will be using are a hard board to fix
our paper on a pencil, a needed eraser, masking tape, two jars of clean water, paper towels, and a hair dryer or heat gun to dry my paper. Although this is optional, you can always let
your painting air dry. You can find a detailed list of materials required.
The resources section. My suggestion to you
would be to remember that creativity is a journey and that there are no right
or wrong answers in art. Embrace the process
of exploration and experimentation while
giving yourself permission to make
mistakes along the way. Relax, have fun and trust in
your unique artistic voice. Remember to post your projects
in the project gallery. I'll be very happy to provide feedback before we
start painting, let's first practice the
flattering technique.
3. Practice: Splattering Technique: The splattering technique
involves applying paint to a surface by flicking or dripping it onto
the desired area. It creates random and
unpredictable patterns, resulting in dynamic
and textured effects. It can be achieved using various tools like
paint brushes, toothbrushes, or
even your fingers. It allows us to introduce spontaneity and a sense of controlled chaos
to add paintings. The splattering technique
can be of two types, wet on dry splattering and
wet on wet splattering. The wet on dry
splattering involves splattering wet paint
onto a dry surface. Let me demonstrate this for you. And holding my brush
horizontally and parallel above, and then flicking
it with my finger. You can also use another
brush to flick it. You can see that this creates random splatters of
different sizes. This technique creates
distinct and control splatters with well defined edges. It is commonly used
for depicting foliage, stars in the night sky, or detailed textures
in various subjects. The second kind is the
wet on wet splattering. It involves splattering wet
paint onto a wet surface. Let me demonstrate it for you. I'll first weather area with clean water using
this red color. Let's make some splatters. First with the finger
and then with the brush. You get different kinds of splatters when you're
using different tools. Let me show you this technique
with a different color, taking pink on my brush
and splatter away. This technique
results in softer, diffused splatters with
less defined edges. It creates more organic and
unpredictable patterns. It is often used to suggest
natural elements like clouds, water reflections,
and abstract effects. We can also paint
backgrounds with this. There can be several factors which affect the
size of splatters. The first is the amount
of water on our brush. The more water we
have on our brush, the larger the
splatters will be. Let me demonstrate this for you. I'll first demonstrate on a dry surface and then
on the wet one here, I have lots of
water on my brush, and I'm splattering
blue paint now. Taking off the excess moisture
and water from my brush, I'll pick some blue
and splatter again. Let me switch to another color to
demonstrate this better. I'm taking some
orange on my brush, taking off the excess
moisture on it, and then making some splatters. You can see the difference. The one with more
water is larger. I'll demonstrate the same
effect on a wet surface. I'm wetting my paper
with clean water. These are the splatters
which have more water, and these are the ones when my brush has
less water on it. Again, you can see
how the amount of water on the brush impacts
the size of the splatter. The next factor is
the size of the tool. A larger brush will
create larger splatters, while a smaller brush will
create smaller splatters. Let me demonstrate taking the large brush and
making bigger splatters, switching to my small brush. Now again, the difference in the size
of splatters is quite clear. Now repeating this
process on a wet surface, I'll first use my large
brush to make the splatters, switching to my small brush. Now again, we can clearly see
the difference in the size. Now that you're comfortable with the splattering technique, let's move on to painting our very first class
project, The Blue Sea.
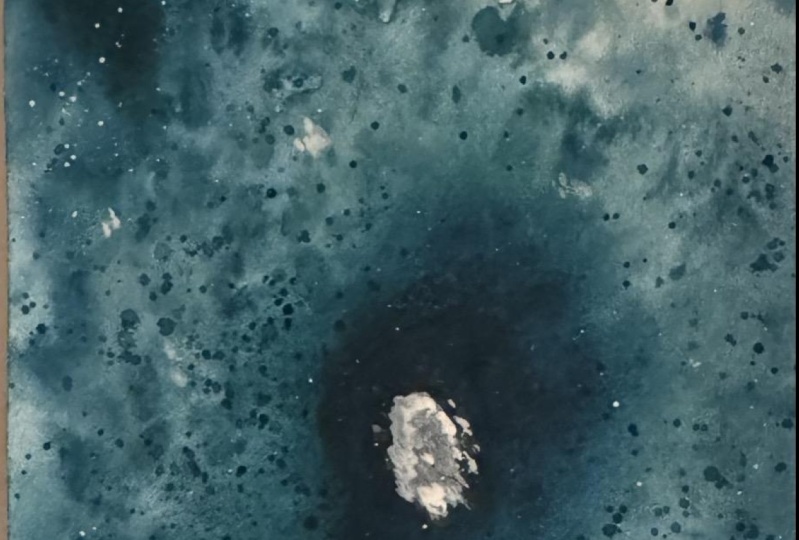
4. Deep Blue Sea: Splatters: For our Deep Blue A project, we will use the
splattering technique to portray the different levels and depths of the ocean floor. The lighter splatters will represent the shallow
areas with sunlight, while the denser and
darker splatters will simulate the mysterious
depths of the ocean. Through the strategic
layering of splatters, we can capture the movement
and the interplay of light in shadows bringing
the deep blue sea to life. On our paper, let's first
study the reference image to identify the areas which have light and the areas which
are deep in the shadow. We can see that this area here is quite deep where
the ship is sailing. While this part has
a lot of light, we'll use the white of the paper to depict
this brightness. When we observe more carefully, we'll notice many layers of the color starting
very light here, then tad bit darker
here in this area. The intensity of the color keeps increasing as we get
closer to the center. Let's get started.
Let's start by securing the paper onto a sturdy
surface using masking tape. Now we're going to
start by roughly marking out the dense
and deep areas. Taking the large brush, we'll wet the entire
paper evenly, ensuring that there
are no dry spots. Now let's prepare
a diluted mix of compose blue lots of water
and very little paint. We'll use this for
the first layer, beginning with the dense mass, then adding color to the
random areas around it. Remember, keep the
white areas intact. They'll give the painting
a lovely glow later on. Add another layer of the same mix to slightly
increase the intensity. Don't cover everything from the first layer and keep
those white avias untouched. Now I'm going to clean
my brush and get rid of any excess water
on my paper towel. With the slightly damp brush, I lift some color off where the paint has bled
into what should be white. Moving on to the next leer mix. In some turquoish
blue add water. And because our
paper is still damp, the color will only be slightly darker than
the previous layer. Apply this mix to the dense
areas and randomly around it. Remembering to preserve
the lighter tones, time for some splatters. Switch to a smaller brush for better control
over the size. Load up your brush
and go for it. I'm not really liking
the size of the platter. Let's switch to our mop
brush and try again. I feel there isn't
enough moisture on my brush as I'm still
getting smaller splatters, I want the platters in the
lighter color to be larger, just adding more
water to the mix. And let's try again. I'm still getting
smaller splatters. I'll add some more water
and then try again. Now that's so much better. Keep changing the angles of the brush to control the
direction of the splatters, randomly, placing some
dots here and there. Now for the next layer, I'm mixing turquoise,
blue, and water. Apply this color, just like we did for the
previous layers. Remember to keep those
lighter shades intact. They are crucial for adding
dimension to the painting. Add some more
pigment and water to the mix and then splatter, add indigo to the mix and make more Splatters also lay in the color in the dense area here and there
in the surrounding areas. Pay special attention to my brush strokes and also the way that I'm
holding my brush, I'm cleaning my brush. And with this clean water, I'll make some water splatters. My paper is still quite wet. If you feel yours
is getting dry, stop dry the whole paper off
and then rewet it again. Next, take more turquoish, blue and indico, but less water. This time make some
splatters with this mix. Notice how the color is darker
since we use less water. Now make a mix of only
in Deco and water. Use this to paint another layer using the same mix. Make darker splatters. I'm cleaning my brush and I'll splatter some clean
water onto the painting. It adds an interesting touch and it helps restore
the lighter areas. But be cautious, don't go overboard always off the
excess water on a paper towel. If you're not feeling confident, use a smaller brush to
make these platters. I'm cleaning my brush again
and now with this damp brush, I'll gently lift some color off. I'll make some more
splatters with indigo. Yeah, that's it. Let your
paper dry completely. I'll sum the next
lesson where we'll add the final details and finish
painting our first project.
5. Deep Blue Sea: Details: Let's continue
painting our project. Make sure your painting is completely dry
before we move on. Now, let's re wet it
with a large soft brush. Just a light touch to avoid messing with the
colors underneath. Once the paper is evenly dam, grab a highly saturated
mix of indigo. Remember we're talking
very little water and lots of paint here. Start dabbing this rich
mix onto the paper. It's like an instant depth and contrast boost for
your painting. Now using that same
intense indigo, let's throw in some
splatters here and there. But be super careful not to overshadow
the lighter colors. I'm taking my mob to make
some larger splatters. I'm randomly placing some
dots here and there. That's it for now. Let
the paper dry completely. Once the paper is, it's
time to paint the ship. I'll be painting it
with this white quash. I'll paint it using
my number zero brush. I'll roughly make an
outline of the ship leaving some dark spots
for that realistic touch. Also throw in some
dots here and there, adding some more dots to
create some highlights. Let's add some tiny splatters. Now notice how they're small. We're just aiming for
those subtle highlights. Now, let your paper
dry completely, and that's it, we're done. Time to peel off the tape. There you have it.
Our first project, wasn't it so much fun
to paint with platters. Let's now move on to our
second class project, where we'll see
how to incorporate the platters in a
landscape painting, making it more interesting
and loose. See you there.
6. Wildflower Meadow: First Layer: For our second project, we'll be painting a
meadow of wild flowers. Through this
project, we'll paint a whole landscape
with mountains, trees, fields, and flowers. We'll use platters to
paint the flowers in the foreground and add looseness interest
to our painting. You can find the reference image of this painting in
the resources section. Let's start sketching first. We'll start by
attaching our paper to a hard surface first
using a masking tape. Press it gently to ensure
that there are no air gaps. Once the paper is attached,
let's start sketching. We'll begin by placing
the horizon line just above the center of the
paper, which is here. I'm drawing the rough
shape of the mountains. Now we'll first draw the
mountain closest to us. And then the distant ranges for the range farthest to us. I won't be sketching it out
since it's going to be very light and we have to use some white of the paper
to depict the snow. Our sketching stops here. We won't even be sketching
the flower field, as we will be painting it very loosely with the
help of splatters. With the sketching
part done now, I'll first paint
the sky For that, I'll use my big brush to
wet the entire paper. Now taking my mop brush, I'll take some compost blue. You can use any
live blue that you have and just a
little bit of indigo, dab off the excess
meisture from the brush. Pick some paint up and
lay it on the paper. Clean your brush and
drag the paint down. Take some more indigo
and darken the mix. Take a little bit
of compost blue. I am now preparing a very
saturated mix of the colors. Just to deepen the top
half of the paper, I mean the top half of the sky. Dragging the paint down, you can now pick up your
boat and tilt it like so. It will allow the colors
to blend more naturally. We are done painting the sky, let your paper dry completely. And I'll see in the
next lesson where we'll paint the mountains and the
trees in the background.
7. Wildflower Meadow: Mountains: My paper is completely dry. Now let's begin painting
the distant mountain range. We'll start with the
mountains farthest from us, they have a bit of snow on them. We'll use the white of the
paper to show the snow. To paint the mountain, I'll be using my number brush and prepare a diluted
mix of indigo. Very little paint
and lots of water. I'm also preparing a diluted
mix of indigo and purple. These are the two
colors which we will be using to paint the
range farthest from us. We'll start painting
the mountains like so, leaving some part of the paper
white to depict the snow. We'll keep alternating
between these two colors. Now, taking a darker indigo, dabbing off the
excess on my paper, I'll add some darker
shadows here and there to add some
depth to the mountain. We are done Now, while the
first range is trying, we'll prepare the colors
for the next range. Taking in Deco, which is
already on my palette, and a little bit of
sap green to prepare a darker green more in Deco. The farther the things
are away from us, the less saturated
they seem to be. Hence, we'll be using very diluted colors to
paint the mountains. Using the whole body of the
brush lay in the color. We will soften the edge
using clean water. Also drop in some
blue here and there. Quickly dry off your painting. I'm using a head dryer
to dry off mine. Now let's begin painting the mountain range
closest to us. For that, I'll be
using a blue green, a dark green, and light green for the base
just above the horizon. Let's first prepare
the Dark green, Lego and Sap Green. I'm adding a bit of yellow to the Sap Green to paint the
area just above the horizon. Taking this light green, I'll place this color just
above the horizon line. Taking dark green, I'll start adding the color
taking dark blue, I mean dark blue green
for the area on the top. Similarly, we'll
paint this area here, dark blue in the top and
green here and there. I want to soften this line here. I'll take my mob, I'll take off the
excess moisture. And just. Swipe over the area here. See we've soften the edges now. Now when the area is
slightly becoming dryer, I'll take some burn sienna, makes a little bit of purple in it to get a very dark brown. Now taking off the excess
moisture from my brush, I'll paint some textures
on the mountain. So just use the
tip of your brush now let's add some trees
here on the horizon. For that, I'm taking
my smallest brush, that is a number zero
synthetic brush. And mixing in some sap green
with the blue on my palette. We can also take
some purple on it. I'm just placing
random dots here and there to show
the distant trees. Now I'm preparing a
mix of indigo and team painting some trees here and there, deepening the color
with more indigo. Now, taking only sap, green will prepare
a lighter mix. That's it. Let your
paper dry completely. And I'll see you in
the next lesson, where we'll paint with flatters.
8. Wildflower Meadow: Splatters: Let's begin painting
a flower field. For that, I'll prepare a mix
of green and yellow sap, green and lemon yellow. Now, we'll paint the
field with this color. Leave some white areas
here for our flowers. Clean your brush and
soften the edges. Now with my number four brush, I'll pick some red
and dilute it a bit. I'm going to use this mix
to paint flowers from us. They won't have any shape. I'm just painting thin lines, like using just the
tip of my brush. Yes, that's it. Now, I'll take some
more pigment on my brush that is equal
parts of paint and water. Now, holding my brush horizontally and
parallelly above my paper, I'll flick it to
create platters. Seems like my brush does
not have moisture on it, so I'll just dip it in water. Take some more paint and splash splatters far from us would be smaller. As they come nearer to us, they'll become bigger in size. I'm dropping in some paint
to create bigger blobs, mixing in some lemon yellow
to create a bright orange. Next, I'm tailing my brush. I'm picking up some green
and again splatters some large splatters. Now we're using the green to depict the leaves
and the grass. Now, while the
area is still wet, I'll draw in some stems using very quick strokes with the paint
already on my brush. We're painting this
while surface is wet, using the wet on wet technique. By using the wet
on wet technique, we're avoiding harsh
edges of the stems. Now lexin some indigo
to get a dark green. I'm mixing in the indigo
already on my palette, so we have a darker green. Now, add some orange to the green to create a brown. Taking some lemon
yellow and sap green, my paper is still wet. It's starting to dry now. Now mixing in darker
green with more indigo. These different uses of green makes us paint
and illusion of depth with clean water. I'll just flick some to
create some interest. These clean water splatters separates the pigments on paper, creating some
interesting textures. Now I'll take some yellow
and splatter this as well. Now using the back of my brush, I'll scrape some lines to create the white
light highlight. Now for the final part, I'll take some white quash, wet my brush, and again
create some splatters. I'll also draw in some
lines in the foreground. Now I'll take this orange mix and splatter some paint
on a dry surface. I'm now beating this
process with red. Don't worry about
this splatter here. What I'll do is
I'll paint a bird. If you don't have any
splatter on your sky, you can just let it
be taking black. I'll just quickly
paint some bird. I'll take some red and
add dots here and there. That's it. We're done painting, so let's peel the tape off. There you have it. Your
second class project.
9. Conclusion: Yeah, we finished painting
both our projects. I hope you enjoyed
painting with Splatters. Wasn't it so wonderful
to just let go, letting your creativity flow, and allowing watercolors to
work their magic on paper. Throughout the class, we learn
the fundamental techniques of loose painting and embracing
the beauty of simplicity. We also discovered the
art of splattering, which adds so much interest
in energy in our artwork. But this class was not
just about the techniques, it was about letting
go of perfectionism. Learning to trust our
instincts and enjoying the happy accidents that bring a unique character
to our paintings. I strongly urge you to keep practicing the skills which
are used in the class. Don't be afraid to push
yourself and try new things. If you have any questions, you can ask them on the
discussion page of this class. Please upload your projects
in the project gallery. It will help me to look at
them and give feedback. I would really appreciate it if you could leave a
review for this class. I would love to hear what
you thought about it. Feel free to reach out to me at Smad Creates on Instagram. I'm so excited to see
what you've created. Really, looking forward to seeing all your
projects and paintings. Keep painting. Keep exploring. Keep nurturing your
love for watercolors. I hope you enjoy this
class. Happy painting.
 Saumya Lakhotia, Watercolor Artist