Transcripts
1. About this Class: a Relaxing Watercolor Adventure: Hi, I'm Elizabeth and
Italian watercolor. I believe that anyone can paint. And this talent is overrated. What really counts
is daily practice. I like to sketch every day, but I don't always
have the time. So what do they do? Adjust one to relax
and weakness. I do some direct painting,
which is static. It is painting
directly on paper. A corner without define
your sketch in pencils or it's found its relaxing. It's easy to do that you
need to learn some skills. In these class. You will learn all
the necessary skills. Sif for direct painting. Draw directly with
paint, fix mistakes. Adjust your drawing
along the way. Achieve colour variation
for added interests. Place, shadows and light
for realism and roundness. Glaze several layers to
achieve depth and use a limited palette for a
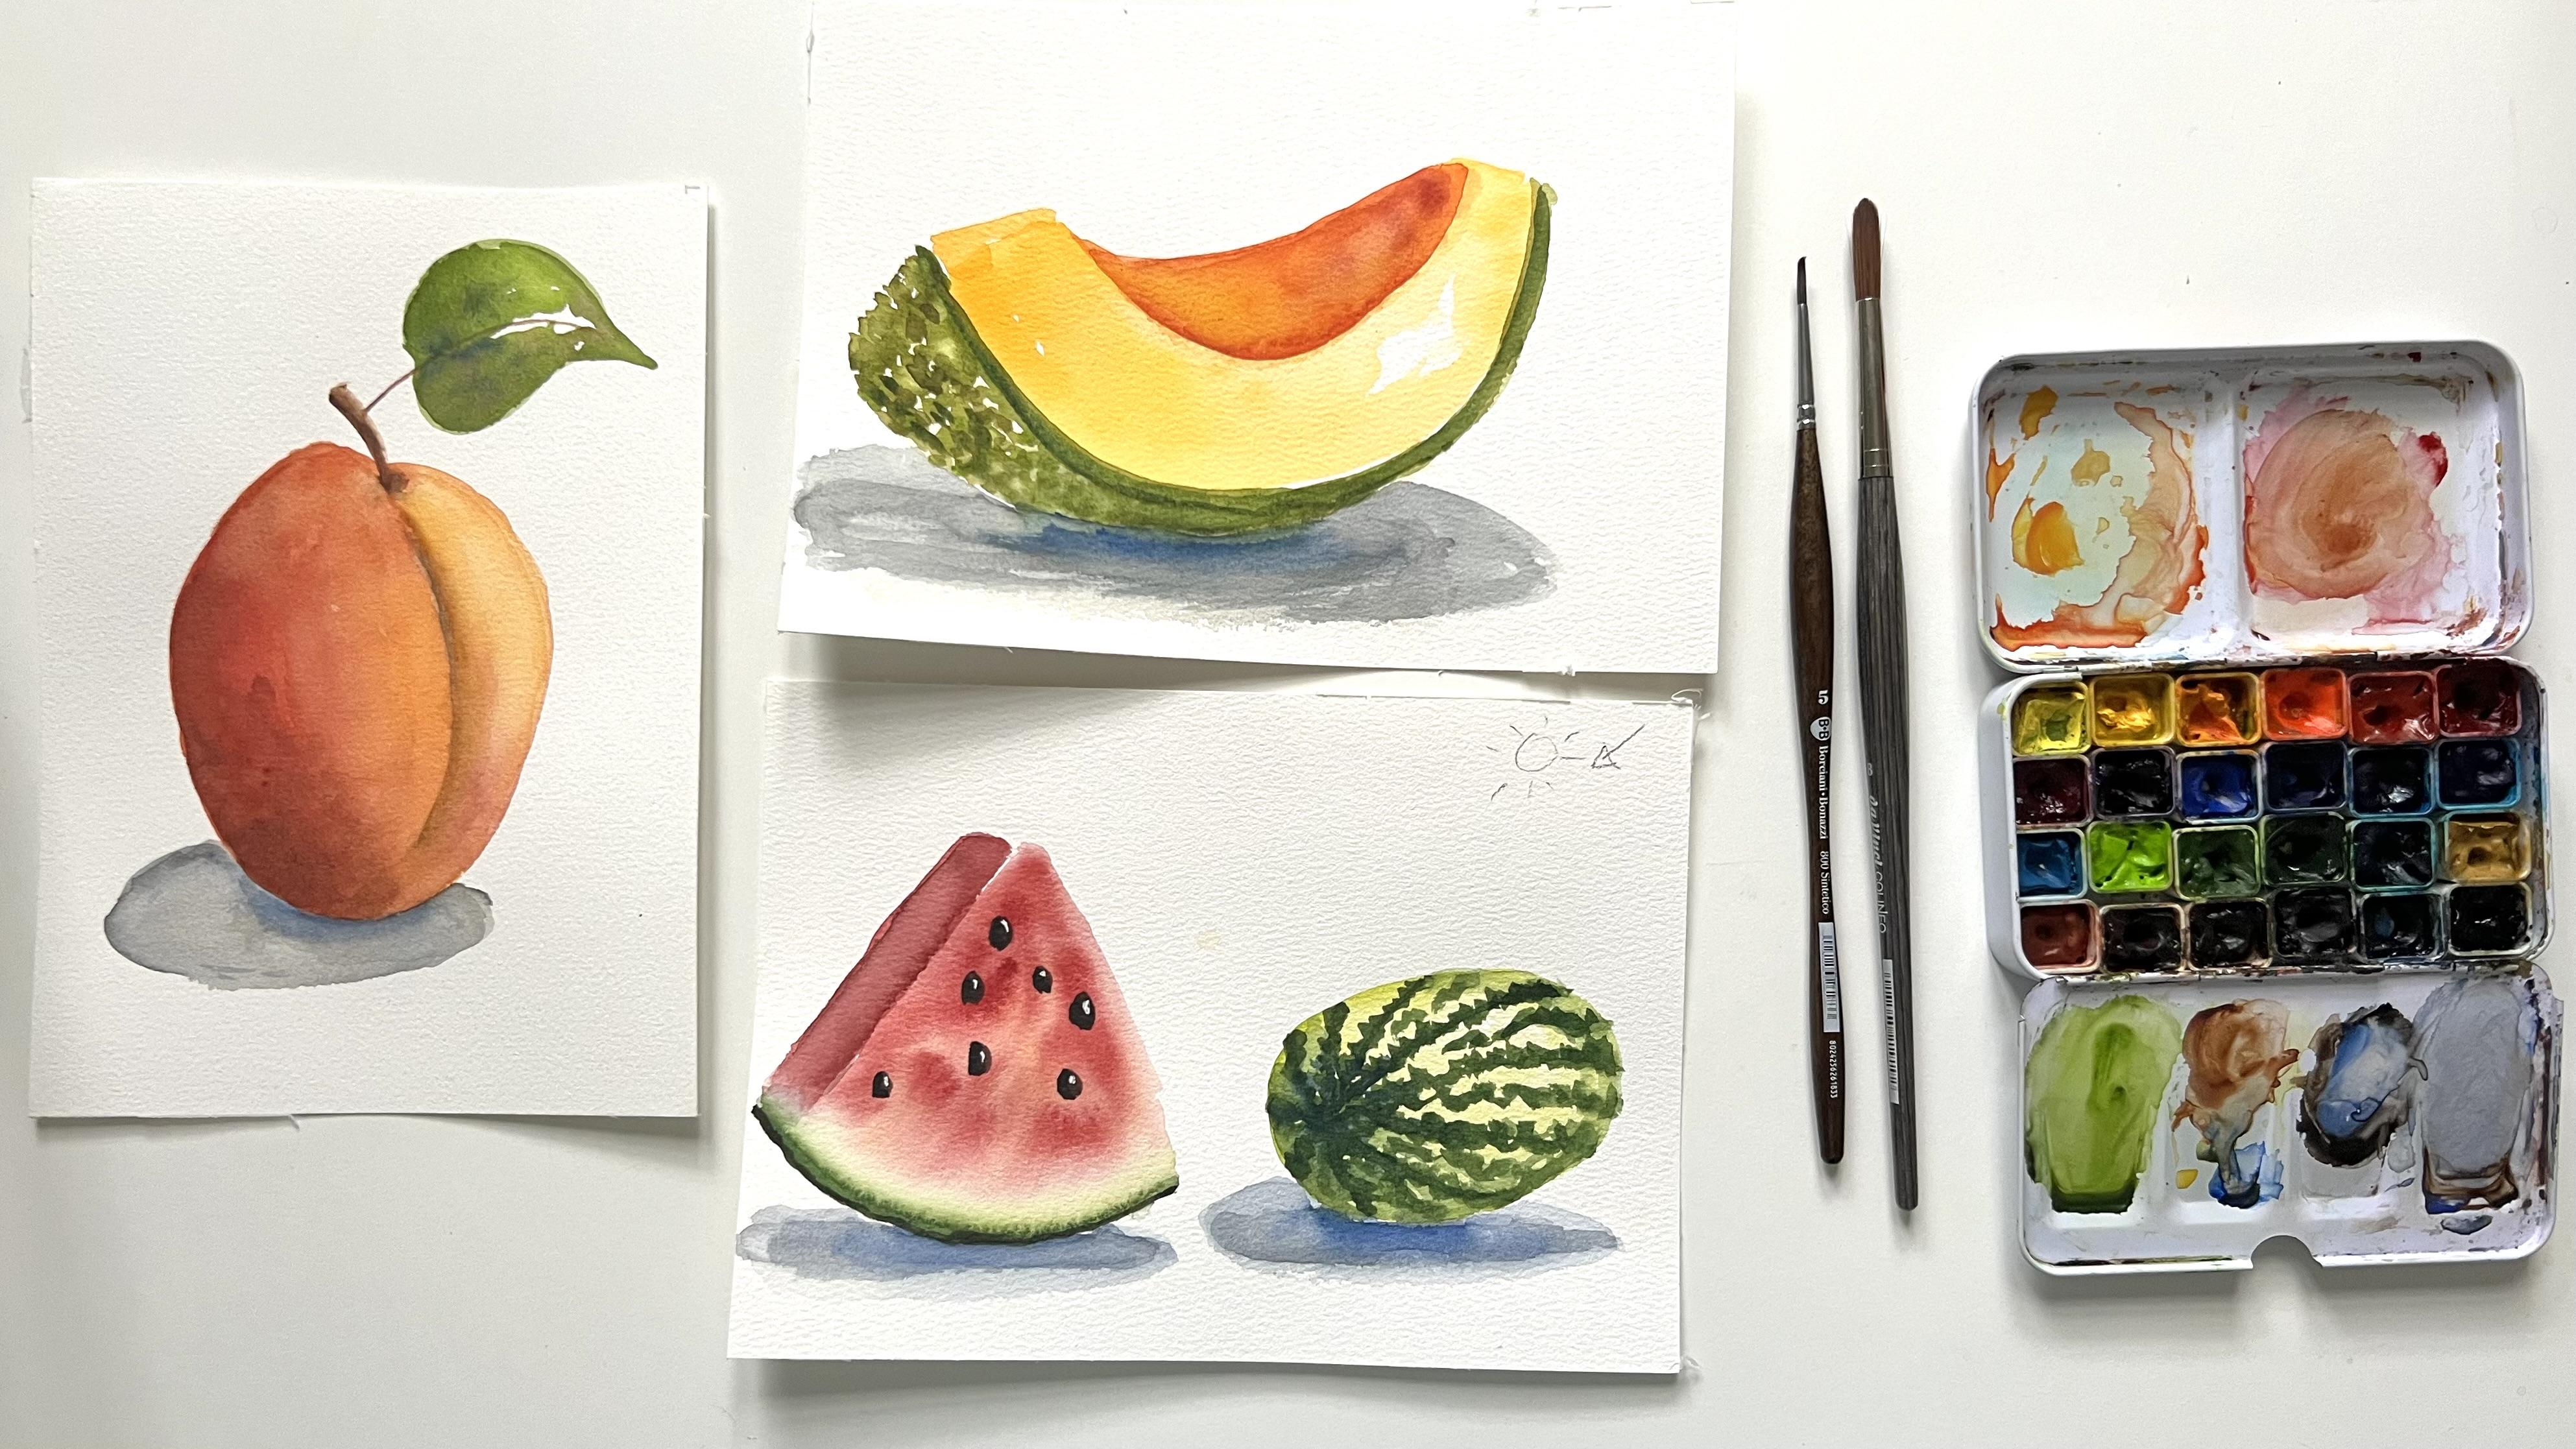
more unified resolved. In this class today, we have painting directly
on paper, some fans, Summer Fruit and Africa, watermelon, and a Canteloupe. You can pay them
all on one sheet of paper or on different sheets. These class is meant
for beginners to intermediate because it's easy but it requires some painting. So will tell you waiting for ragged supplies and join me in these adventure
without further ado. I'll see you for my next lesson.
2. Supplies for this Class: For this class, so you're supplies would be
really minimum. You need some good
watercolor paper. I suggest you to use cotton paper if you can about cellulose
will also be fine. The important thing,
really important is that your paper
is for Watercolor. Theses on paper
100% and it's Cold. Press in means that it
has a Fine texture to it, which, which I prefer, makes it easier to work with. The color is a good paper, is the most important, I think, piece of
supply which you need. Watercolor paper, 300 GSM
grams per square meter. Cotton is better, but not
necessarily it's optional. Then I have used a basic
set of Watercolors. We will be using yellows, reds, Blue, different Greens. Some Yellow Ochre fairly tall, and some Burnt
Sienna and sunblock. So any basic set you have, we probably have this colors. I'm not using any fancy colors in this class because I want it. Then you can follow this class with any basic supplies
that you have. You just need a few
colors to follow. I'm not saying which
colors you use. If you have a warm and cold, Yellow, warm and cold, read different Greens,
some ultramarine blue, some Burnt Sienna,
some Yellow Ochre, sunblock are some Payne's gray. We'd be fine. So you can follow along
with any paint you have. I'm using brushes one
larger, N1, finer. And they are round synthetic
brushes for the column. Then if you have it,
that's not optional. You can use the for highlights. I'm using one lesson. It's always nice to have a
white gel pen when you paint watercolors because it helps with highlights and corrections. So I always have one on my desk. And I suggest you to buy one and keep it because you
will be using very much. And we're also using
one in this class. And then of course you will
be needing some water. I use two jars like this. One, I keep clean water and the other one I
rinse my dirty brushes. One is for dirty water and
one always with clean water. I find very, very useful to have a heating tool like
this or a hairdryer, because whichever
color you need, a drying time between different
layers and you can speed up by the process with the
hairdryer or a heating tool. Then you will also need a
cloth or some kitchen paper. That's solved for supplies. I think it's quite easy and anyone can have these
supplies at home.
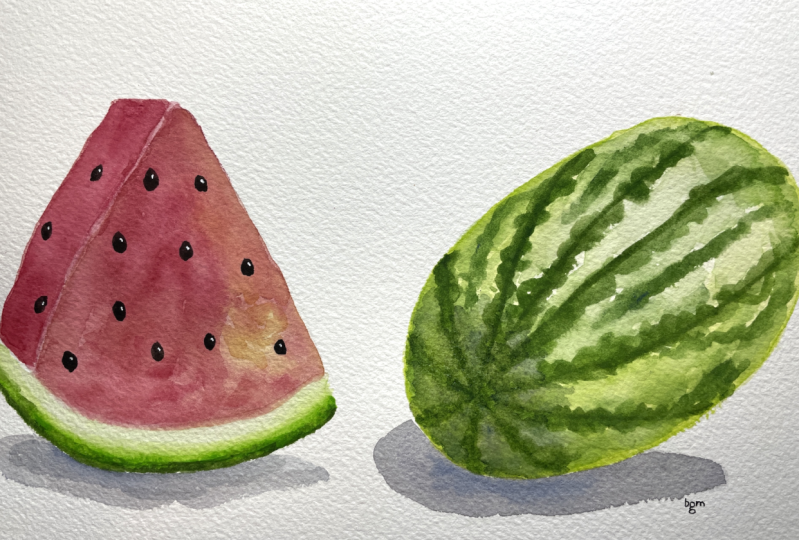
3. Watermelon 1st Layer: The first fruit we will
paint is very easy. One, a Watermelon, and we will
be using some red warmer, add maybe some Alizarin crimson. If you have the cadmium
red or vermilion and some warmer yellow,
indian yellow. Or if you have cadmium yellow, it is not important that
you have a specific color, but that you use the color variety and
use different values. So use what you
have, a colder red, a warmer red spiral grad, and Indian yellow
or cadmium yellow. So we start by mixing
some of these colors. We prepare them. Then with clean water, we draw a triangle like this. Just clean water doesn't
have to be very precise. We can still adjust it later. And I'll take some of these warm red and I dropped some dots, some yellow here and there will also Summer
leads in crimson. Here. Must be a straight line. So now that we can
see the triangle, we can still fix it
in the, adjust it. Just you drop some color so that you get a nice
color variety. Some Yellow also. They also leave some spaces
wide, lift some color. And I also my brush like this. I've just dried on a
paper towel and I lived. Then. I'll take some darker color
like alizarin crimson. And I will draw the
side of the slice. It's in shadow because the light source is from the
right-hand side. Like this. If you can, you
don't touch here. But if you can leave some white space
like here is better. So you don't bleed colors. And also, It's nice to
distinguish the face, the front of the
watermelon slice and decide, now what you do. You take some light green, this is May green or any
light green that you have. Or you can also take some sap green and mix it with the
lemon yellow, for instance. And collect this curve below. And then with clean water, you just blend it. And you also blend this
path and to almost touch. And now you lift. With your clean brush side. You must adjust with more
color here, the side. You can also now more color if you think you
don't have enough. And Yellow. And do it, do what he has to do. Now you take a
darker green, light, sap green for instance,
or hookers green. Or you take some
region in your mix it with your May green. And here, the Qin can always clean it with your brush. Lift some color here. Okay? This once again, you can sweep your brush
like this alone. So we dropped, added
to increase on here. Now we let the watercolor
do what he has to do. On this side, we will
draw a whole watermelon. Course. They don't belong
to the same fruit because this is slice. And here we will
draw a whole fruit. And I take some lemon yellow and then mix it
with some light green. Like this, light green. And I will draw a
novel like this. Going upwards like this. Then. So easy to direct paint. And then we color the inside. And we can also drop
some darker green here because it
will be in shadow. So like this, this side we can drop some darker green
and we let this dry. Of course, you can
use a hairdryer or a heating tool to speed up the process and I will do it
4. Watermelon 2nd Layer: I always try to verify if
it is dry with texture with the back of our finger
because if we touch with the finger print, you can ruin your paint. If you touch it like
this, you don't. And if it is cold, it is still wet. If it isn't called its try. Okay, this is drier than this. So we start from here. The first thing we do, we add black to our
Alizarin crimson. Because CCS, the side in shadow. And we would like this drop shadow like this. Remember to soften these. You just dry it can do
just lift some color. Now we can add the seeds. The seeds, we take black. But we add a touch
of burnt sienna. So it's not pitch black. And I take a smaller brush
and I will add my seats. Black and burnt like this. And they tried to
put them randomly. This shape with a drop. We'll see them in
not just numbers, because odd numbers
are more interesting. Here, put another
one, just randomly. Seven. Okay. Here. I put
some more Alizarin crimson. I need to make a
straight line here. Because this is in
shadow and didn't need to reinforce the
difference between the two. Soften this. Okay. Now I can
add some more dark green. So I take some darker
green and I add some of my black here and try to draw very dark green. Now I take hookers green. So my dark green, if you don't have hookers green, you can take sap green and add some ultramarine blue or
some black, some purple. Just play with colors until you learn find the
color that you like. I put a dot here for the center. I need I need a brush
with a pointed tip. I take my darker green
here and I draw some lines that will simulate how
round this fruit is. Straight lines for the moments like these light rays towards. Okay. So now you need to draw the
irregular striped. Typical of a watermelon. My hookers green,
you can add some black to your neutral tint, to your sap green. You can also add some blue
and maybe burnt umber. Here, there is too much space, so I will just filling
with more stripes These can be slightly darker because prospective and keeps
around. When it's selected. We'll let this dry and
we'll come back to this. Now we can reinforce the
roundness of these seats, putting some more black here. And I will just draw a line on the left-hand side which
is away from light, because light is from here. If you feel unsecure, you can always draw an arrow
with your light source. So you always know which
direction is coming. The delight from here,
black, black, black. So it gives a roundness
to the left below. Below. This. Also hear some
black on this side. And now we add shadow. For shadow, we
create a gray with the burnt sienna and
ultramarine blue. More blue must be blueish. So you add some blue. You can create a lot
of shallow because we will be using a lot
of this column. What should it down? And you put a stripe here below. And also you can put
a little shadow here. And you just blend it. Because these will be in shadow. You also put some shadow here. Remember that light
is from here. So I will be like this. Now you've take some blue, ultramarine blue
and add some blue, just the point of contact between the fluid and
the ground here too. And then you just
pull it Something
5. Watermelon Last Touches: Now, I made sure that
everything is dry. I use my hairdryer if needed, and then need to add some
shadow on this part of the fruit and better
define the stripes. So first of all, I better define this tribe. So yeah. And you take some
water down of these same green and you just add
some darker green here. Very carefully, you
don't have to blur the stripes like this. Below. And on the left-hand side, shadow. You see that when it dries, water color becomes
much, much lighter. I need a bold shadow to
make the object pop. It's my gray that I create
with Blue and Burnt Sienna. And if I can also add some ultramarine blue
on the suicide of these Watermelon to darken this Treitz where
they are in shadow. Careful not to make it bleed
over the wet to green, but you use a thick paint, it will not bleed on
water dam play paint. This. And then we slowly soften these edges. Okay. The last step, can these
watermelon is to add the highlights on the seat
with the white gel pen. On this side. Towards light small
duct within enough. And the end we have
painting that directly, watermelon slice and
the whole fruit. Let's go to the
next fruit factor before we go, one last touch. You see I have. Further you define the shadow, which is very important, I think to define the
shadow below the fruit. And it helps to really make
the objects pop the shadows. Very, very important. Shadows and light contrast is very helpful
to give roundness three dimensions and
paint a simplified, yet been gobbled up
6. Cantaloupe: My second fruit is Canteloupe. We continue using
our Indian yellow, which is a very warm yellow, almost an orangey
yellow in quantity. We will also use some cadmium
yellow somewhere here. Watch or down. We'll always have
time to reinforce it. The basic shape is one-liner, But then a crescent like these. That goes slightly
higher than the face. Then it goes down here, which is and then we fill it. Can also, if we remember, can also leave some whitespace. We can also adjust it now, make it slightly thicker. Some whitespace here, I can
put some cadmium yellow, so I have some color variety. I leave some white
here for highlights. If I don't like the shape, I can always adjust it later. I soften is. And we also add some more Indian yellow
here, for instance. And now we let these dry. We can speed up the process with the heating tool or hairdryer. Now I take this same
yellow and I darken it. Some red like this, so that we have a
more intense orange. And I draw a line that
from here goes up to here. And I think that
I think and also sliding these to
make it more arched. And I feel it. It's very
easy as you've seen. Okay. I have used my heating towards
to speed up the process, of course, to better
define it later. Now we need to paint the skin, the skin of the Canteloupe. They need some very pale yellow. You have it, some Naples
yellow for instance. For I don't have it. So we'll take some
cadmium yellow, a really watch for
loop down here. And I need to really
water it down. Very pale yellow here. And we'll be going somehow on the left
and then thes. And then here we have our very paid yet. Okay. Like this. Once again, we make everything try. My camera unfortunately
did not record the second part of the
skin of the Canteloupe, so I have to record it now on
a different piece of paper. We have our very pale
yellow and we need to mix an olive green with some sap green and some Yellow
Ochre. Like this And what we do, we
draw some dots. Don't hide the Yellow, do not high the yellow
remember to show the yellow. These also near the edge. They are more close
together here. And here we have the side skin. Like these dots. These line goes up here. The shape of a crescent. And here we have, our adults. Don't hide the
Yellow completely. I want to adjust the
shape of this watermelon because I think it's a bit
bizarre the perspective. So I adjust it and
I can still do it even if it is in direct
painting to look like this. And I face now some yellow, indian yellow here. Don't touch the green beads. Okay, nicer now the shape. And now we better define also the inside here, even darker. So we can leave too
handsome color. The light is hitting
the Canteloupe here. Pat dry, brush your chest. And you can also add some
Alizarin crimson here. You can take some yellow that you lift. You can lift some paint
if you find that. You like it more variegated. Okay? And you can also
put some more here. So define the skin. This is the last step and we need to add shadow. And I take my gray, I cannot some of these brown. I always use the
colors that I have on my mixing space. Under draw. A line. Touches here,
slightly below here. Someone. And I add some blue to intensify the
coldness of the shadow. Softening. I like to intensify the blue. Otherwise, if you
don't have shadows, this will fly and it's not nice. Okay? Here also we can
add some shadow. I take the same shadow. And how we added here, I can add some darker
green here because it's in shadow this side,
especially below Some darker green, I some Blue. And I will talk this. Okay. Here you can
slightly soften this. In water. You cannot some cadmium yellow
here me Yellow is opaque, so we add some yellow
accent here towards light. Blend it with the elites,
anything in here, so that you have a colour
variation in the inside of your of your Canteloupe. Add some darker green just here. Okay. We let this dry. We briefly dry with the
hairdryer in right heating tool. Further define my shallow. Okay. Can always slightly adjust. If you don't like it. But don't overwork it. Here must be slightly dark. I think that we have to
put more shadow him. Yeah. Okay. Yeah. Okay. I get more believable. So this side, It's
likely more blue here. Okay. Let's finish. Just we let these dry
and we go to our third, which is the most difficult. It's BBVA. We choose
7. Apricot: Apricot is slightly
more difficult, but I promise it
will still be easy. We draw one apricot in
the middle and maybe I can put it in a
portrait direction. I will start with some
very light orange, yellow, yellow, cadmium yellow. Make it like a very light
orange or a warm yellow. I use what I had in the palette. And I would draw an oval here. Like this. You, here, you have
a nova round here. Correct? The shape. You can watch some
reference images. And then here also
be the same color. Just draw more
elongated the apricot. Otherwise, it looks
like a peach. I'm going do the peach with the same method.
You just feel it. If some white here so you see the face. Anymore. I don't have the space to give exactly the
shape of an apricot. Now we can darken this side
and we take our warmer red and we drop some
color here, right? Apricot. We can also drop
some color here. Maybe we can even take
some Alizarin crimson. And on this edge, we can just drop some color. Allison crimson here
to mix in here, I mix the yellow with this
color and I get this orange. And we assigned correct. This, you see, goes down. Can always fix my drawing. This even more like this. Aren't. Take my Indian
yellow, my warm yellow. Like this. Colour variation is very important in
this type of drawing. Otherwise it's just childish. And here I took some
Yellow Drop it. I think I will insist here with some Alizarin crimson
and some yellow. I want it darker here. As long as easy swear
to you can work it, then you must stop. Just dry your brush and
you draw this line. But there is a separation between the two halves
of the apricot. Now, you need, we
need to let this dry. But here my scope, slightly app and
heroes, so like this. And also we can take some Burnt
Sienna, quite, quite dry. And we draw this
separation here. Okay. Because it's slightly wet and I will be just the hint. Like this. Okay. No, I couldn't hear. It must go slightly higher
than straight in here. Slightly higher enhance
trait like this. Separation. Now we try
with our heating tool. Okay, now it's dry. We don't like something. We can fix it. Yeah. With water or paint. I don't want any hard edge here. So we got some yellow here. Just to have my
beautiful color variety. And I will not touch this be the exception of this side
because it gives roundness. Slightly, slightly
darker side like this. Okay. Now we need
to paint our leaf. Here. You take the smaller brush and I will draw with
Burnt Sienna. Quite sick. It wasn't dry. Should await it.
But don't worry. It was bleeding. But it's not important. Just stop it with our brush. Goes behind. Maybe we can try a little. And again, should hide
behind this curve like this. And this side, you do it
with Yellow Ochre like this. And this side Ochre so that this part would
be in shadow here, always with your Burnt Sienna. I have little stem
going like this. And around the stem, you can draw with sap
green, simple sap green. You can draw your leaf
to see shapes here. And then you'll go
towards the end, here. And here with a nice curve. Inside, you can use
some light green. And then you can use some
sap green can leave some white somewhere like this. And you can also drop some blue. Maybe hand here. Some Burnt Sienna, I swear. My tick, some darker green. Remember this will be in shadow and also maybe the
tip of the leaf Can be. So I would be quite organic because you have
some colour variation. Just use some colors that you
have used in the apricot. So take your Burnt Sienna
centroids this line. And now the shadow. You take the usual mix of
burnt sienna and Blue. And you draw an oval
behind your apricot. Blue near the apricot. Just pulling this gray blend to this curve. You can also add
some extra dark on this side of the apricot. And that will take my Alizarin
crimson and some Burnt Sienna like this and
give some warm red here. Don't be scared because
they're watercolor. Gets much lighter. Once. Once try and you can
soften this edge. Clean brush. You just raise your brush and slightly drive
on a paper towel. And more color here, just almost Burnt Sienna here. Because here we have shadow. To give depth to your
fruit and add interest. Soften. Like this. I like to have dark shadows, makes the object much
more interesting. Here. This angle would be the one morning Shonda.
Our Burnt Sienna. I from soften these cyst because it's wet and I
can still work on it. So slightly more Burnt
Sienna. Just started. So dot some Alizarin crimson. So a will naturally, some colour variation. Natural way. The last I can take a
thinner brush and we my with my burnt sienna here. For my stem. We let this dry. We can speed up the process with the heating tool or hairdryer. Now once dry, you can see
if you need something else. The only adjustment
that I would like to do will have to soft
and likely these entry. And I will use some
pain to do so. And I will rainforest is separation and I will
use some shadow color. Yeah. Pretty likely. You dry your brush and you add some warm yellow because you have a
curve in this direction. So this pump would be
the most the lightest. Yeah. We don't want
any white stripe here. Just play with colors,
alternate the colors. So you have this slowly
colour variation. We don't want any one. Yeah, because it's
shallow that is coming this way from behind. The apricot can reinforce this small area. And I think I don't want
to touch it any longer and we let it dry once again. Okay. Of course you can go
on, you can stop, but do not overwork it. Just enjoy the pleasure
of direct painting
8. Wrap Up: Congratulations,
you have finished your class and you have
faded the Canteloupe, the apricot, and I bet it
wasn't difficult at all. I would be delighted if you
upload your projects either Gallery because it helps other students to
discover the class. You to understand what kind
of results they can achieve. And also you can
get my feedback, my specific feedback
on your project. Also, it would be
very important for me if you put the lethal
if you for this class, your project on Instagram, and you can tag me and you will find me on the
elisabetta, that Food. My name in that way, republics to project
in my stories. Thanks a lot for having
join me in this class. And I see you in minutes. Thank you. Ciao. Ciao
 Elisabetta Furcht, Anyone can paint!